MT3620 Grove Breakout


Azure Sphere MT3620 Development Kit and MT3620 Mini Dev Board are both enabled by Microsoft Azure Sphere technology, MT3620 Grove breakout is an expansion breakout board designed for the brand new MT3620 Mini Dev Board. MT3620 Grove breakout enable users to quickly apply sensors modules -SeeedStudio Groves into rapid prototyping application which is built based on MT3620 Mini Dev Board.
Since Azure Sphere SDK has not yet supported ADC on MT3620, this breakout serves as an interface between MT3620 I2C port and external ADC, which provide a way to read the analog data from analog port. Besides the analog port , this breakout has UART,SPI,I2C,GPIO ports.

Features
- 12-bit ADC, I2C-compatible serial interface
- 8 Grove connectors
- 2 x UART
- 2 x I2C
- 2 x Analog
- 2 x Digtal(4 GPIO)
Hardware Overview
Interface

① Extention Header 1: 24 pins, please refer to board pin map for the detail pin defination.
② Analog: 2 Grove Analog ports, the input signal voltage must less than 3.3v.

- ③ I2C: 2 Grove I2C ports, the I2C port shares the same pin with UART1, so you only can choose I2C or UART1 at one time.

- ④ UART: 2 Grove UART ports, the I2C port shares the same pin as UART1, so you only can choose I2C or UART1 at one time. The SPI0 port shares the same pin with UART0,so you only can choose SPI0 or UART0 at one time.

- ⑤ Digital: 4 digital GPIO ports, the working voltage is 3.3v.

- ⑥ Extention Header 2: It is duplication of Extention Header 1. You can solder wires to header. There are 2 pins not connecting with Extention Header 1. Pin1 of J5 is connected to 3.3v directly and Pin6 of J5 is not connected.

- ⑦ SPI: The SPI0 port shares the same pin with UART0,so you only can choose SPI0 or UART0 at one time.

- ⑧ AD7992BRMZ-1: MT3620 Mini Dev Board supports SPI, UART, I2C, Digital functions, but does not support the ADC function. So the MT3620 Grove Breakout includes AD7992 chip, which is a 12-bit, low power, successive approximation ADC with an I2C-compatible interface. Then connect to I2C interface of MT3620 Mini Dev Board.

- ⑨ I2C Address Select: As is logic Input. Address select input that selects one of three I2C addresses for the AD7992, If it is connect to GND, the I2C address is 0x23. If it is connected to 3.3v, the I2C address is 0x24.
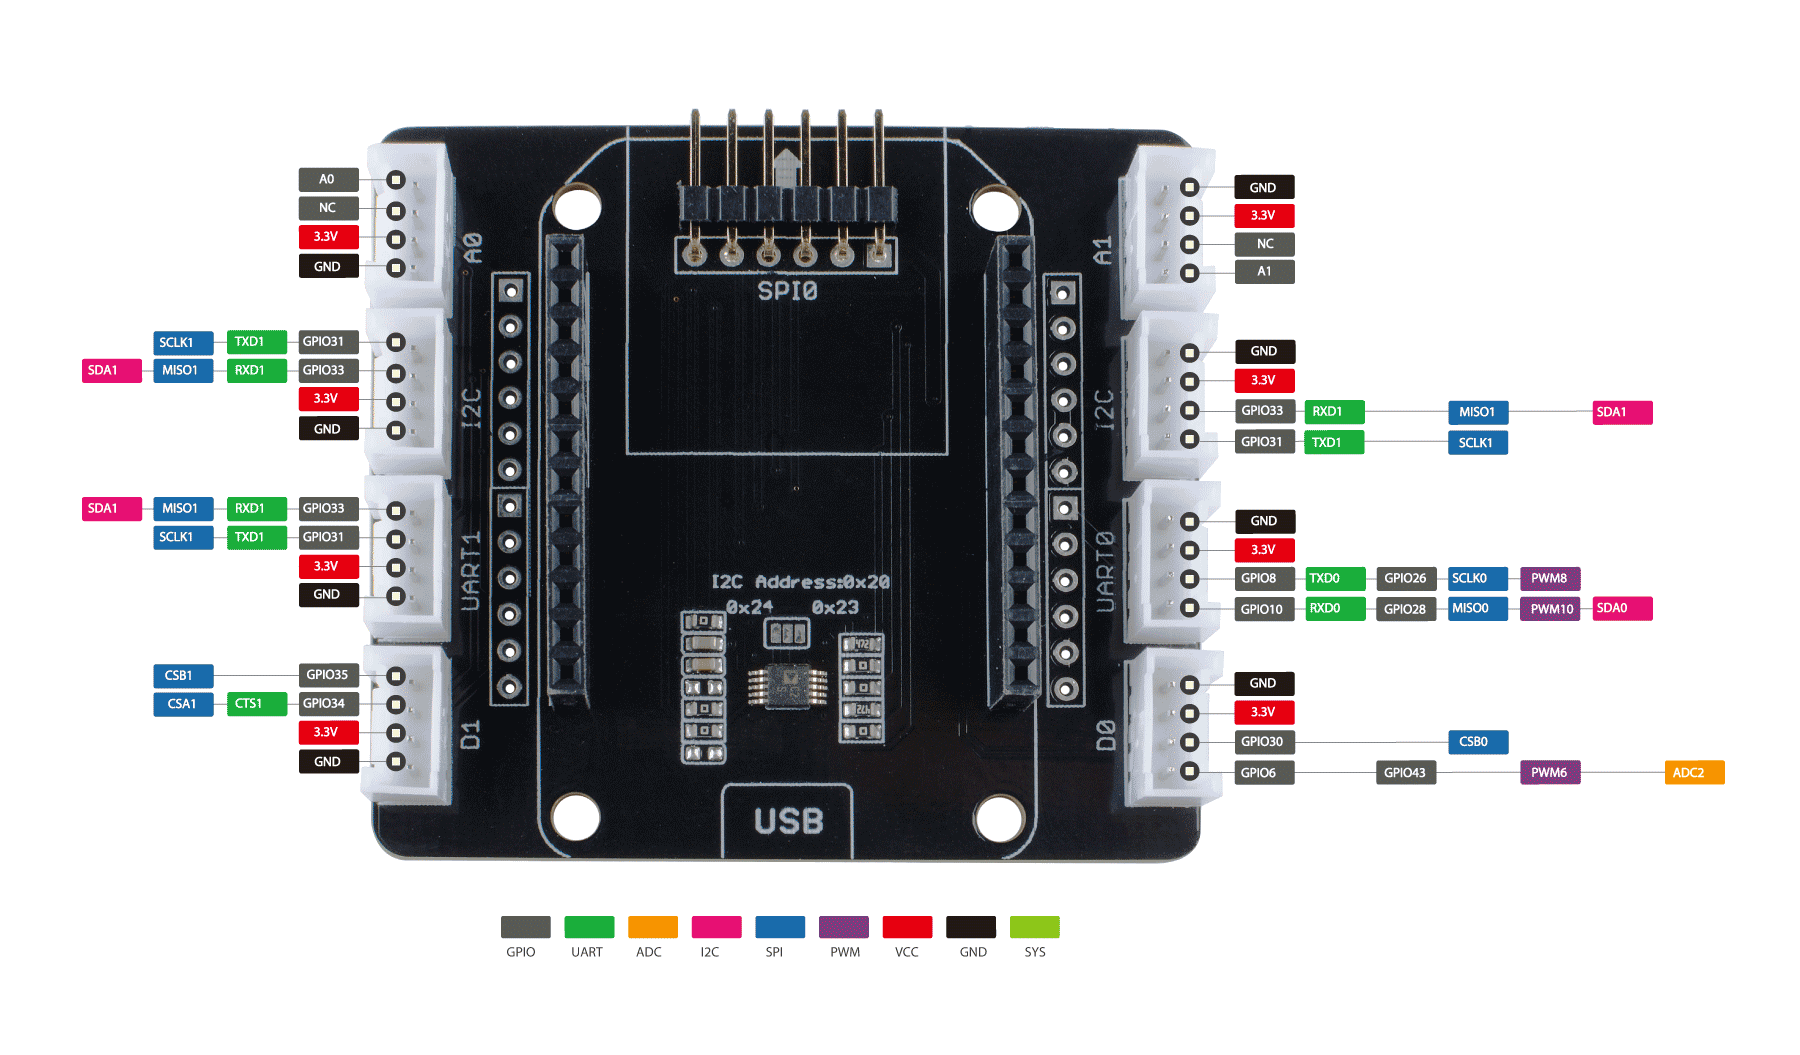
Board Pinmap
Board Dimensions
L: 57mm W: 52mm H: 10mm
Applications
- Home/Building/Facilities
- Automation
- Security
- Equipment Management
- Utilities
- Public Safety
To understand how Azure Sphere works in a real-world setting, consider Contoso, Ltds cenario.
Install Azure Sphere
If you have MT3620 Mini Dev Board that has not yet been used, complete these steps first to get up and running.
MT3620 Mini Dev Board Demos
We build there demoes which combine MT3620 Mini Dev Board and Seeed Grove system.
Demo#1: MT3620 Mini Dev Board performs as an MCU, which connects with Grove-Button and USB to TTL adapter. Then you connect MT3620 Mini Dev Board and the USB to TTL adapter to PC usb ports. After you downloading the code, press Grove-Button and enter "Hello World!" from USB to TTL adapter, you can receive "Hello World!" from Visual Studio Output window.
Demo#2: MT3620 Mini Dev Board performs as an MCU, which connects with Grove-Light Sensor and USB to Grove-Rotary Sensor. Then you connect MT3620 Mini Dev Board to PC usb ports. After you downloading the code, you move your hand on top of the Grove-Light Sensor or rotate the Grove-Rotary Sensor, you can see analog outputs for both sensors from Visual Studio Output window.
Demo#3: MT3620 Mini Dev Board performs as an MCU, which connects with Grove - OLED Display 1.12". Then you connect MT3620 Mini Dev Board to PC usb ports. After you downloading the code, you press Grove-Button and enter "Hello World!" from USB to TTL adapter, you can receive "Hello World!" from Visual Studio Output window.
Demo#1 Digital and UART
Part List
| MT3620 Mini Dev Board | MT3620 Grove Breakout | Grove - Button | USB To Uart 5V&3V3 |
|---|---|---|---|
 |  |  |  |
| Get One Now | Get One Now | Get One Now | Get One Now |
Hardware Connection

Please make sure the plug the MT3620 Mini Dev Board into MT3620 Grove Breakout in the correct way. There is USB silk screen on the MT3620 Grove Breakout and make sure it at the same side as USB port of MT3620 Mini Dev Board.
- Step 1. Connect Grove-Button to D1 of MT3620 Grove Breakout.
- Step 2. Connect USB To Uart adapter to UART0 of MT3620 Grove Breakout through Grove-Cable.
- Step 3. Plug MT3620 Grove Breakout to MT3620 Mini Dev Board.
- Step 4. Connect MT3620 Mini Dev Board and the USB to TTL adapter to PC usb ports.
Please make sure the voltage switch on USB to TTL adapter is turned to 5v. You connect the RX of the USB to ttl adapter to TX of MT3620 Grove Breakout, the TX of the USB to ttl adapter to RX of MT3620 Grove Breakout and GND as well. Do not connect the 5V.
Software
- Step 1. Download Azure Sphere Demo
- Step 2. Open the Samples\UART0 under Azure_Sphere_Demo
- Step 3. Double click UART0.sln
- Step 4. Right-Click the project name of your application, select Properties > C/C++ > General > Additional Include Directories
- Step 5. Click the down arraw > Edit... > New Line icons, modify the path of UART0, click Select Folder > OK > OK
- Step 6. Go to the application project Right-Click References > Add References, select Projets, click the check box of UART0, then click OK
- Step 7. Right-Click the project name of your application, select General > Target API Set, click the check box and set as 1+Beta1902 if you use the Visual Studio Community version and please skip this step if you use the Enterprise version.
- Step 8. Click the Remote GDB Debugger.
- Step 9. Open the COM monitor tool and select USB to TTL adapter serial port
- Step 10, Press the Grove-Button and send "Hello World!" from COM monitor tool.
- Step 11, You can see the below message from Visual Studio output window.
UART received 12 bytes: 'Hello World!'.
UART received 2 bytes: '
'.
UART received 12 bytes: 'Hello World!'.
UART received 2 bytes: '
'.
UART received 12 bytes: 'Hello World!'.
UART received 2 bytes: '
Demo#2 Analog
Part List
| MT3620 Mini Dev Board | MT3620 Grove Breakout | Grove-Light Sensor | Grove - Rotary Angle Sensor |
|---|---|---|---|
| |  |  |
| Get One Now | Get One Now | Get One Now | Get One Now |
Hardware Connection

Please make sure the plug the MT3620 Mini Dev Board into MT3620 Grove Breakout in the correct way. There is USB silk screen on the MT3620 Grove Breakout and make sure it at the same side as USB port of MT3620 Mini Dev Board.
- Step 1. Connect Grove-Rotary Angle Sensor to A0 of MT3620 Grove Breakout.
- Step 2. Connect Grove-Light Sensor to A1 of MT3620 Grove Breakout.
- Step 3. Plug MT3620 Grove Breakout to MT3620 Mini Dev Board.
- Step 4. Connect MT3620 Mini Dev Board to PC usb port.
Software
- Step 1. Download Azure Sphere Demo
- Step 2. Open the Samples\AD7991_I2C under Azure_Sphere_Demo
- Step 3. Double click AD7991_I2C.sln
- Step 4. Right-Click the project name of your application, select Properties > C/C++ > General > Additional Include Directories
- Step 5. Click the down arraw > Edit... > New Line icons, modify the path of AD7991_I2C, click Select Folder > OK > OK
- Step 6. Go to the application project Right-Click References > Add References, select Projets, click the check box of AD7991_I2C, then click OK
- Step 7. Right-Click the project name of your application, select General > Target API Set, click the check box and set as 1+Beta1902 if you use the Visual Studio Community version and please skip this step if you use the Enterprise version.
- Step 8. Click the Remote GDB Debugger, you move your hand on top of the Grove-Light Sensor or rotate the Grove-Rotary Angle Sensor, you can see analog outputs for both sensors from Visual Studio Output window.
A0: 192 A1: 2646
A0: 162 A1: 2644
A0: 1489 A1: 2647
A0: 621 A1: 2644
A0: 227 A1: 2648
A0: 33 A1: 2644
A0: 0 A1: 2647
A0: 0 A1: 2647
A0: 0 A1: 2647
A0: 0 A1: 2644
A0: 373 A1: 2643
A0: 885 A1: 2646
A0: 1717 A1: 2647
A0: 2057 A1: 2647
Demo#3 I2C
Part List
| MT3620 Mini Dev Board | MT3620 Grove Breakout | Grove-OLED Display 1.12'' V2 |
|---|---|---|
| |  |
| Get One Now | Get One Now | Get One Now |
Hardware Connection

Please make sure the plug the MT3620 Mini Dev Board into MT3620 Grove Breakout in the correct way. There is USB silk screen on the MT3620 Grove Breakout and make sure it at the same side as USB port of MT3620 Mini Dev Board.
- Step 1. Connect Grove-OLED Display 1.12'' V2 to I2C of MT3620 Grove Breakout.
- Step 2. Plug MT3620 Grove Breakout to MT3620 Mini Dev Board.
- Step 3. Connect MT3620 Mini Dev Board to PC usb port.
Software
- Step 1. Download Azure Sphere Demo
- Step 2. Open the Samples\SeeedOLED_I2C under Azure_Sphere_Demo
- Step 3. Double click SeeedOLED_I2C.sln
- Step 4. Right-Click the project name of your application, select Properties > C/C++ > General > Additional Include Directories
- Step 5. Click the down arraw > Edit... > New Line icons, modify the path of SeeedOLED_I2C, click Select Folder > OK > OK
- Step 6. Go to the application project Right-Click References > Add References, select Projets, click the check box of SeeedOLED_I2C, then click OK
- Step 7. Right-Click the project name of your application, select General > Target API Set, click the check box and set as 1+Beta1902 if you use the Visual Studio Community version and please skip this step if you use the Enterprise version.
- Step 8. Click the Remote GDB Debugger, you will see the info display on oled.
Remote debugging from host 192.168.35.1
Seeed oled 96*96 demo.
Schematic Online Viewer
Resource
- [Product] Welcome to Azure Sphere
- [Library] Azure Sphere Demo Library
- [Eagle] MT3620 Grove Breakout Schematic
- [PDF] MT3620 Grove Breakout Schematic
- [DataSheet] WF-M620 RSC1 datasheet
- [DataSheet] AD7992 datasheet
Tech Support & Product Discussion
Thank you for choosing our products! We are here to provide you with different support to ensure that your experience with our products is as smooth as possible. We offer several communication channels to cater to different preferences and needs.