Grove - 按钮
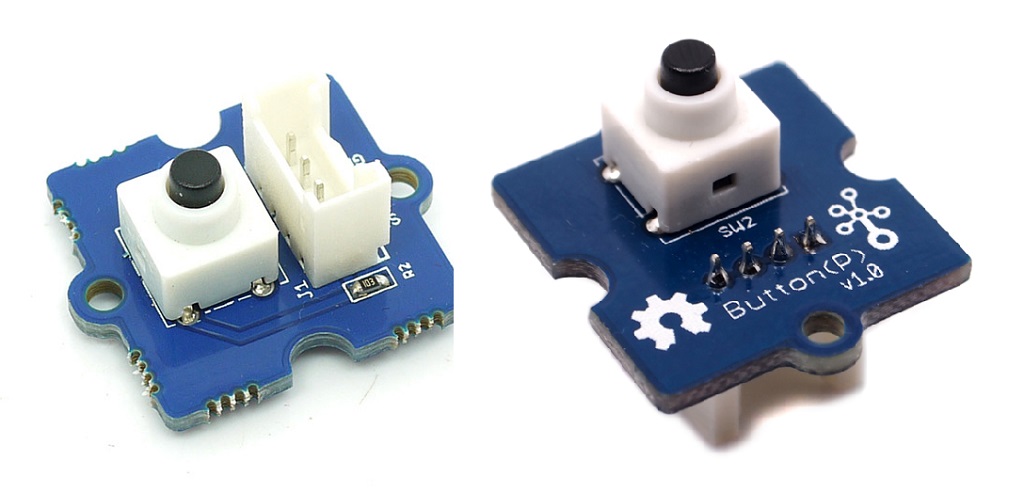
Grove - 按钮是一个瞬时按键开关。它包含一个独立的“瞬时开/关”按钮。“瞬时”意味着按钮在释放后会自动弹回。按下按钮时输出高电平信号,释放时输出低电平信号。丝印层上的 Sig 表示信号,而 NC 表示完全未使用。此按钮有两个版本,如图片所示。唯一的区别是 Grove 插座的方向。

版本
| 产品版本 | 变化 | 发布日期 |
|---|---|---|
| Grove-按钮 | 初始版本 | 2010年11月25日 |
特性
- 易于使用的瞬时开/关按钮
- 使用标准4针 Grove 电缆
有关 Grove 模块的更多详细信息,请参考 Grove 系统
规格
| 参数 | 值/范围 |
|---|---|
| 工作电压 | 3.3/5V |
| 电气寿命 | 200,000次循环 |
| 操作力 | 100 ± 50gf |
| 工作温度 | -25℃ 至 +70℃ |
| 尺寸 | 20mmX20mm |
支持的平台
| Arduino | Raspberry Pi | |||
|---|---|---|---|---|
上述提到的支持平台仅表示模块的软件或理论兼容性。在大多数情况下,我们仅为 Arduino 平台提供软件库或代码示例。不可能为所有可能的 MCU 平台提供软件库或演示代码。因此,用户需要自行编写软件库。
入门指南
使用 Arduino
硬件
- 第一步:准备以下物品:
| Seeeduino V4.2 | Base Shield | Grove - Button |
|---|---|---|
 |  |  |
| 立即购买 | 立即购买 | 立即购买 |
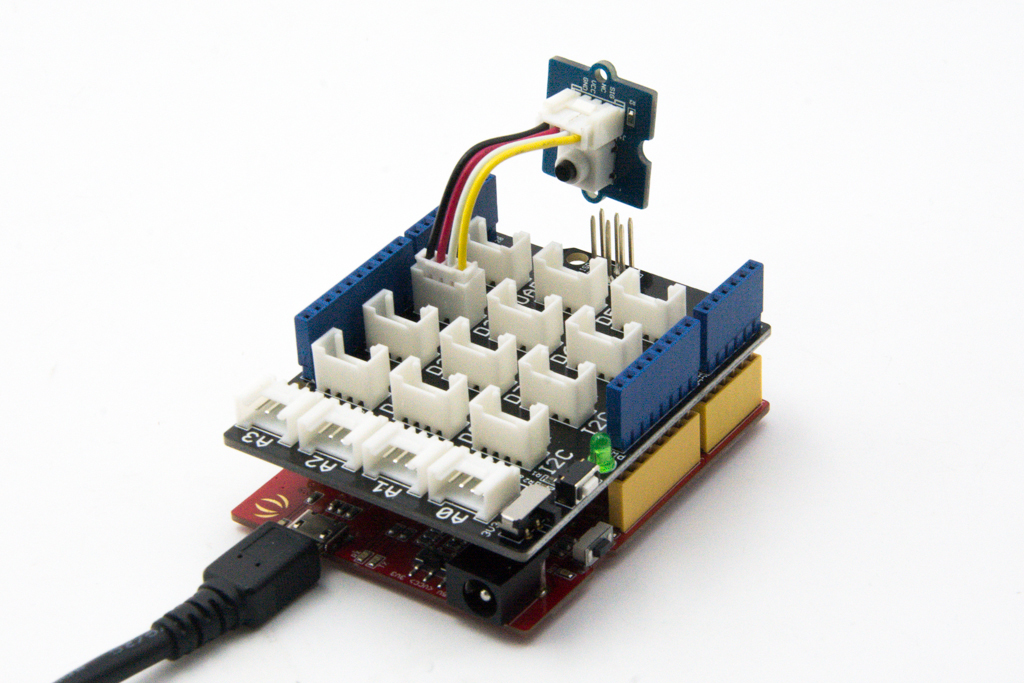
- 第二步:将 Grove-Button 连接到 Grove-Base Shield 的 D2 端口。
- 第三步:将 Grove - Base Shield 插入 Seeeduino。
- 第四步:通过 USB 数据线将 Seeeduino 连接到电脑。
如果没有 Grove Base Shield,也可以直接将 Grove-Button 按如下方式连接到 Seeeduino。
| Seeeduino | Grove-Button |
|---|---|
| 5V | 红色 |
| GND | 黑色 |
| 未连接 | 白色 |
| D2 | 黄色 |
软件
- 第一步:将以下代码复制到 Arduino IDE 并上传。
const int buttonPin = 2;     // 按钮引脚编号
const int ledPin =  13;      // LED 引脚编号

// 变量将会改变:
int buttonState = 0;         // 用于读取按钮状态的变量

void setup() {
    // 初始化 LED 引脚为输出:
    pinMode(ledPin, OUTPUT);
    // 初始化按钮引脚为输入:
    pinMode(buttonPin, INPUT);
}

void loop(){
    // 读取按钮的状态值:
    buttonState = digitalRead(buttonPin);

    // 检查按钮是否被按下。
    // 如果按下,buttonState 为 HIGH:
    if (buttonState == HIGH) {
        // 打开 LED:
        digitalWrite(ledPin, HIGH);
    }
    else {
        // 关闭 LED:
        digitalWrite(ledPin, LOW);
    }
}
- 第二步:可以看到板载 Pin13 的 LED 灯随着按钮按下和释放而亮灭。
使用 Codecraft
硬件
第一步:将 Grove - Button 连接到 Base Shield 的 D2 端口。
第二步:将 Base Shield 插入 Seeeduino/Arduino。
第三步:通过 USB 数据线将 Seeeduino/Arduino 连接到电脑。
软件
第一步:打开 Codecraft,添加 Arduino 支持,并将主程序拖到工作区。
如果这是您第一次使用 Codecraft,请参阅 Codecraft 使用 Arduino 指南。
第二步:按照下图拖动模块或打开页面底部提供的 cdc 文件。
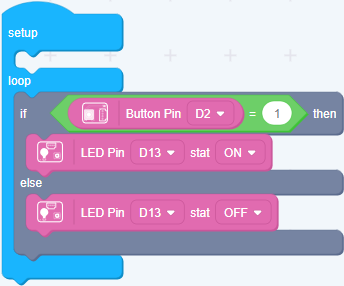
将程序上传到 Arduino/Seeeduino。
tipsuccess 当代码上传完成后,按下按钮时,Arduino/Seeeduino 板上的 LED 灯会亮起。
使用 Raspberry Pi (配备 Grove Base Hat for Raspberry Pi)
硬件
- 第一步:准备以下物品:
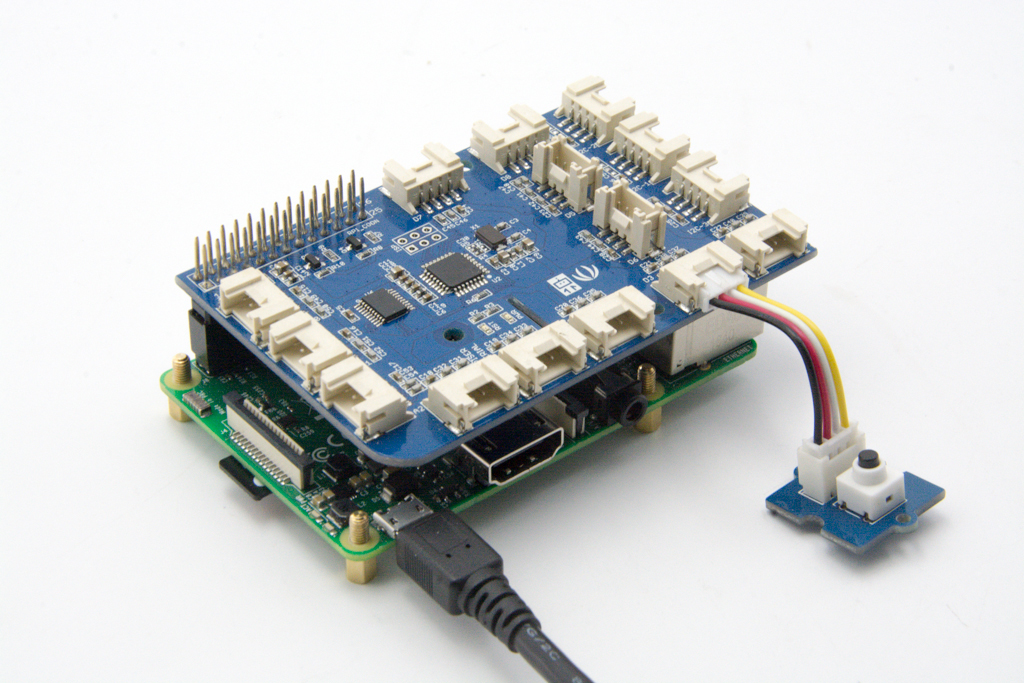
| Raspberry Pi | Grove Base Hat for RasPi | Grove - Button |
|---|---|---|
 |  | |
| 立即购买 | 立即购买 | 立即购买 |
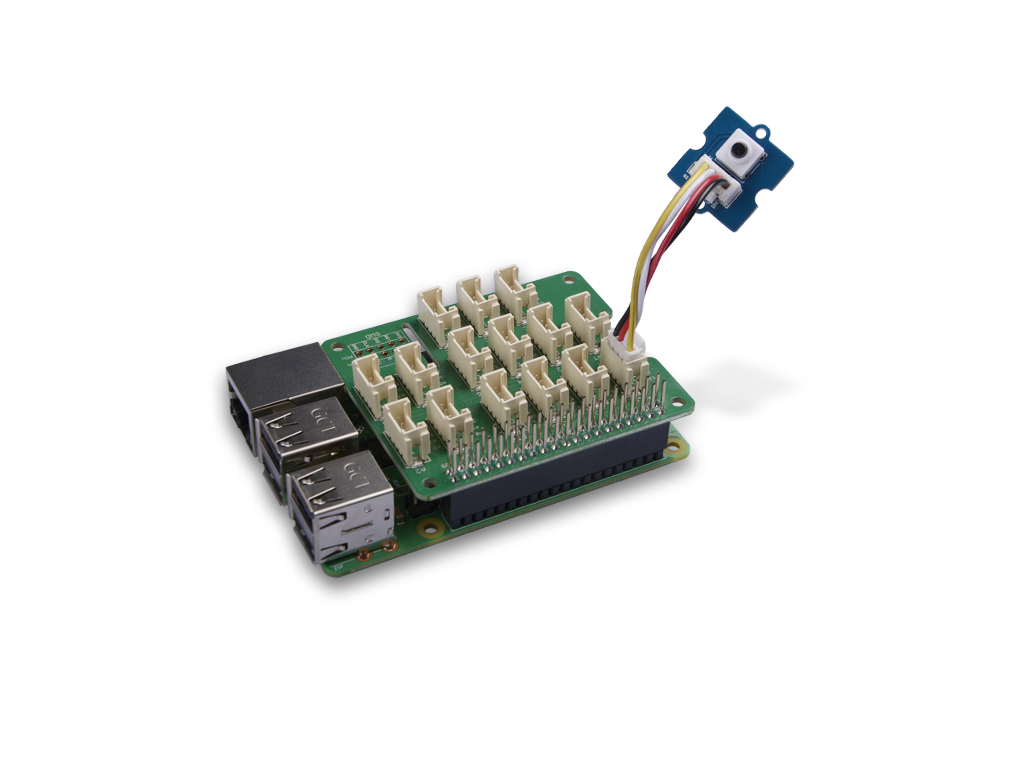
- 第二步:将 Grove Base Hat 插入 Raspberry Pi。
- 第三步:将 Grove - Button 连接到 Base Hat 的 PWM 端口(端口 12)。
- 第四步:通过 USB 数据线将 Raspberry Pi 连接到电脑。
软件
如果您使用的是 Raspberry Pi 且系统版本为 Raspberrypi OS >= Bullseye,您必须仅使用 Python3 执行以下命令。
- 第一步:按照 软件设置指南 配置开发环境。
- 第二步:通过克隆 grove.py 库下载源文件。
cd ~
git clone https://github.com/Seeed-Studio/grove.py
- 第三步:执行以下命令运行代码。
cd grove.py/grove
python3 grove_button.py 12
如果您将红色 LED 连接到 Base Hat 的其他端口,而不是执行 python grove_led.py 12,您应该运行以下命令:
python3 grove_button.py portnumber
以下是 grove_button.py 的代码:
import time
from grove.button import Button
from grove.factory import Factory


class GroveButton(object):
    def __init__(self, pin):
        # 高电平 = 按下
        self.__btn = Factory.getButton("GPIO-HIGH", pin)
        self.__last_time = time.time()
        self.__on_press = None
        self.__on_release = None
        self.__btn.on_event(self, GroveButton.__handle_event)

    @property
    def on_press(self):
        return self.__on_press

    @on_press.setter
    def on_press(self, callback):
        if not callable(callback):
            return
        self.__on_press = callback

    @property
    def on_release(self):
        return self.__on_release

    @on_release.setter
    def on_release(self, callback):
        if not callable(callback):
            return
        self.__on_release = callback

    def __handle_event(self, evt):
        dt, self.__last_time = evt["time"] - self.__last_time, evt["time"]
        # print("事件索引:{} 事件:{} 按下:{}".format(evt["index"], evt["code"], evt["pressed"]))
        if evt["code"] == Button.EV_LEVEL_CHANGED:
            if evt["pressed"]:
                if callable(self.__on_press):
                    self.__on_press(dt)
            else:
                if callable(self.__on_release):
                    self.__on_release(dt)


Grove = GroveButton

def main():
    from grove.helper import SlotHelper
    sh = SlotHelper(SlotHelper.GPIO)
    pin = sh.argv2pin()

    button = GroveButton(pin)

    def on_press(t):
        print('按钮被按下')
    def on_release(t):
        print("按钮被释放,按下时间为 {0} 秒".format(round(t,6)))

    button.on_press = on_press
    button.on_release = on_release

    while True:
        time.sleep(1)


if __name__ == '__main__':
    main()
如果一切正常,您将能够看到以下结果:
pi@raspberrypi:~/grove.py/grove $ python3 grove_button.py 12
Hat Name = 'Grove Base Hat RPi'
Button is pressed
Button is pressed
Button is pressed
Button is pressed
Button is pressed
Button is pressed
Button is released, pressed for 0.002685 seconds
Button is pressed
Button is released, pressed for 0.219019 seconds
Button is pressed
Button is released, pressed for 0.001372 seconds
Button is pressed
Button is pressed
Button is released, pressed for 0.043143 seconds
Button is pressed
Button is released, pressed for 1.083292 seconds
^CTraceback (most recent call last):
  File "grove_button.py", line 103, in <module>
    main()
  File "grove_button.py", line 99, in main
    time.sleep(1)
KeyboardInterrupt
您可以按下 ctrl+c 来退出此程序。
使用 Raspberry Pi(配合 GrovePi_Plus)
硬件
- 第一步:准备以下物品:
| 树莓派 | GrovePi_Plus | Grove - 按钮 |
|---|---|---|
|  | |
| 立即购买 | 立即购买 | 立即购买 |
- 第二步:将 GrovePi_Plus 插入树莓派。
- 第三步:将 Grove-按钮连接到 GrovePi_Plus 的 D3 端口。
- 第四步:通过 USB 数据线将树莓派连接到电脑。
软件
如果您使用的是 Raspberry Pi 且 Raspberrypi OS >= Bullseye,您必须仅使用 Python3 执行此命令。
- 第一步:按照 设置软件 配置开发环境。
- 第二步:克隆 Github 仓库。
cd ~
git clone https://github.com/DexterInd/GrovePi.git
- 第三步:执行以下命令。
cd ~/GrovePi/Software/Python
python3 grove_button.py
以下是 grove_button.py 的代码。
import time
import grovepi

# 将 Grove 按钮连接到数字端口 D3
# SIG,NC,VCC,GND
button = 3

grovepi.pinMode(button,"INPUT")

while True:
    try:
        print(grovepi.digitalRead(button))
        time.sleep(.5)

    except IOError:
        print ("Error")
- 第四步:我们将看到按钮的开关状态。
pi@raspberrypi:~/GrovePi/Software/Python $ python3 grove_button.py
0
1
1
1
1
0
0
在线原理图查看器
资源
-
[Eagle&PDF] Grove-Button Eagle 文件
-
[更多阅读] 木质激光枪
-
[Codecraft] CDC 文件

受到《守望先锋》的启发,我们最近制作了一款非常酷的木质激光枪玩具来娱乐!
木质激光枪和枪靶都基于一个名为 Seeeduino Lotus 的 Arduino 板。激光枪上的激光发射器被控制以发射激光脉冲来“激活”枪靶。而枪靶上有三个光传感器,用于检测激光脉冲。看起来很简单,对吧?如果您对我们的项目感兴趣,请为自己或您的孩子制作一个!作为圣诞礼物,花一天时间 DIY 是非常值得的。
项目
Grove - 按钮与 LED 串灯介绍:初学者示例 - 我敢打赌初学者完成项目后会微笑 - 发我一张自拍吧!
使用 Grove 按钮控制 Grove LED:如何连接和使用 Grove 按钮来控制 Grove LED 插座套件。
按钮和 LED Grove 模块:
技术支持与产品讨论
感谢您选择我们的产品!我们为您提供多种支持,以确保您使用我们的产品时体验顺畅。我们提供多个沟通渠道,以满足不同的偏好和需求。