LoRa Node with AIoTs GPS on Wio Terminal
Introduction
The AIoTs GPS & state tester is basic on Wio Terminal Chassis-LoRa-E5 and GNSS to develop. It compares with the traditional IoTs has more conciseness and intelligence. The traditional one basically just receives some data then does a command action regardless of the data whether is correct. And yet the AIoTs using neural network algorithm is able to filter the useless data to get the correct ones.
In this project, it will be used a built-in 3 axis accelerometer sensor and the neural network algorithm to build up an intelligent recognition system. Based on the movement of Wio Terminal, it can show you its state in real-time. Generally, the example project here included three trained states which are Stop(WT idle state), Turn(rolling-over WT device), and Wave(take WT to wave your hand). It is encouraged that you go to Edge Impulse website to add more training action.
Features
- The LoRa device can display the DevEui, APPEui and Appkey on the first page.
- Neural network algorithm correct data
- High accurately detect Wio Terminal state
- Display longitude, latitude and satellites number.
- Display the device and TTN connection status.
Getting started
Hardware
Hardware Required
In this demo you will need the devices listed as below:
Hardware Connect
It is connected to a computer through the Type-C cable.
Machine Learning with Wio Terminal
Here we gonna show you how to use Wio Terminal to train a Machine Learning model and use it. The project is based on the Arduino platform which means Arduino IDE and various Arduino libraries are required. If this is your first time using the Wio terminal, we recommend a guide to quickly Get Started with Wio Terminal.
Download and install it in your Arduino library:
Edge Impulse Training Started
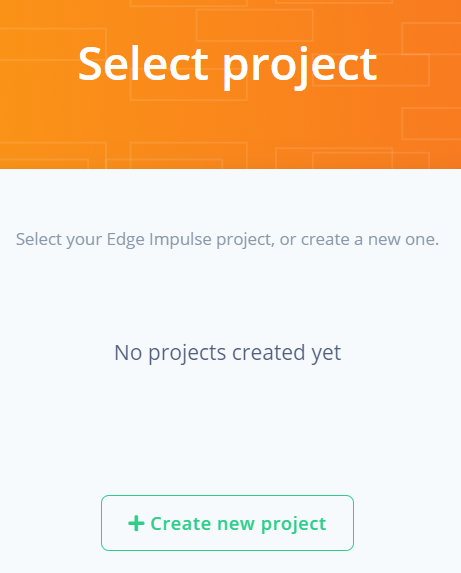
First, you need to have your own Edge Impulse account and then create a project.
- Step 1. Open the Edge Impulse website, and then register an account.

- Step 2. Create a new project.

Website Connecting with Wio Terminal
- Step 3. Download the firmware wio-terminal-ei-1.4.0.uf2 for the preparation of connect.
Like Get Started with Wio Terminal guidelines suggested:
Double dropping down the Wio Terminal (already connect to your PC ) left bottom, you will see a driver(like Arduino (F:) below) popup on the computer. Then you can draw the wio-terminal-ei-1.4.0.uf2 firmware to the driver. And when you saw the driver disappear, it means the firmware has been programmed. Now you can go to the website to connect Wio Terminal.

- Step 4. Once the firmware is set up, click
connect using WebUSBto connect the Wio Terminal to the website.

When Device, Label and Sensor like below show up, it means the connection is done and the data acquisition can be activated.

Data Acquisition
Now you can collect data on Edge Impulse.
-
Step 5. Enter
Label,Sample length (ms.)and clickStart samplingLabelmeans the categories you want to classify.Sample lengthmeans the time during your sampling.
You may want to choose different Sensor or Frequency as well to see what happens.

It is highly recommended that samples the data more than 10 times.

Machine Learning Model Generating
Once the data has been collected, you can use it to train your ML model.
- Step 6. After sampling the data, click
create impulseto process the data.

The processing block and learning block here we selected are the same as the website recommended. We on the other hand highly suggest you choose others to see what difference it can be made. Once blocks were set up, click Save Impulse to store the impulse.

- Step 7. Move to the
Spectral featurespage, and then to the bottom clickSave parameters, it will move automatically to theGenerate featureside.

Here is the Generate feature side, it can help translate your data to the features needed in Machine Learning.

Click Generate feature and the result should show up on the right:

- Step 8. Move to the
NN Classifierpage to use your features training a Machine Learning model. To the bottom of the page, clickStart training.

Training output is on the right of the page, When you see the output, it means the model has been generated.

Machine Learning Model Deployment
Now you can deploy your Machine Learning model to your Wio Terminal.
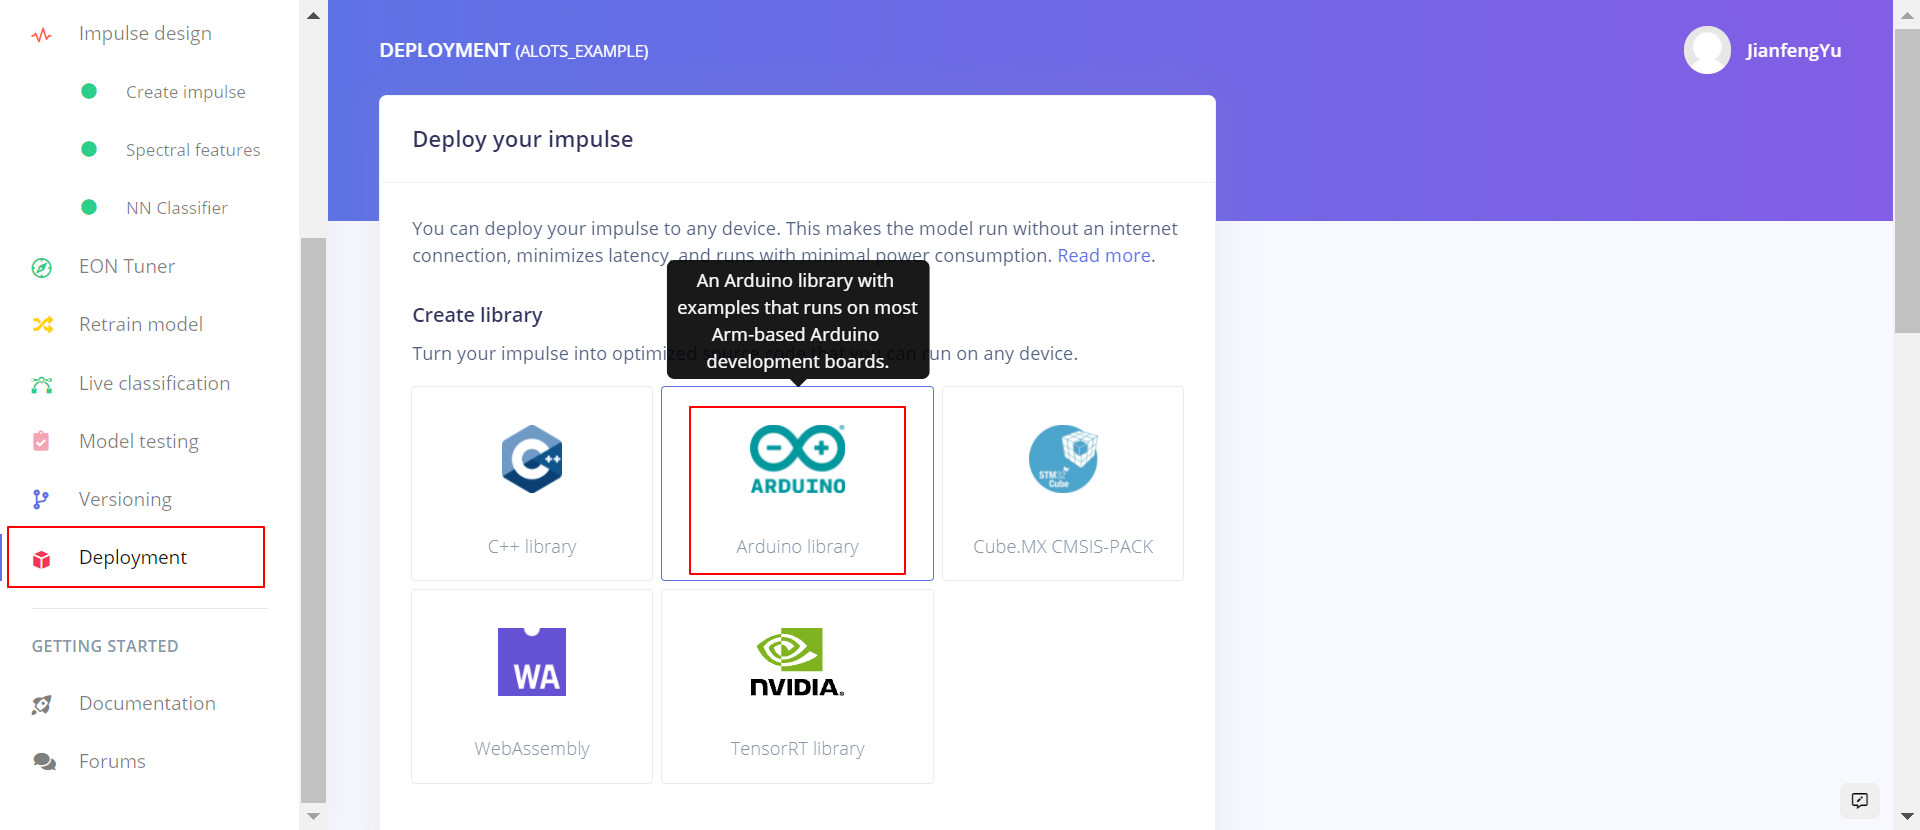
- Step 9. Select and click the
Deploymentcolumn on the left.

Then choose Arduino Library, to the bottom select build to create the library needed in your Arduino. It will automatically download a zip file that includes the third-party library.

The name of the wanted library is about the name of the project which means whatever the name you have written to the project on step 2 will be shown here. It can help you find the correct file that you need.

- Step 10. Download the code file from Github and open it with Arduino IDE. Change the third-party library of your own like above and then run the code.

Because of the difference among the global area, the code in the file should be changed a little:

If you connected 'America server', then there are no worries about the example code, but other places should be set up as shown below('CN_470_510' means in China the value should be the range from 470 to 510):

Finally, the result should be something like:

If you want to know more about the Edge Impulse or there is something that is still unclear, please go to Wio Terminal Edge Impulse Getting Started to get more information.
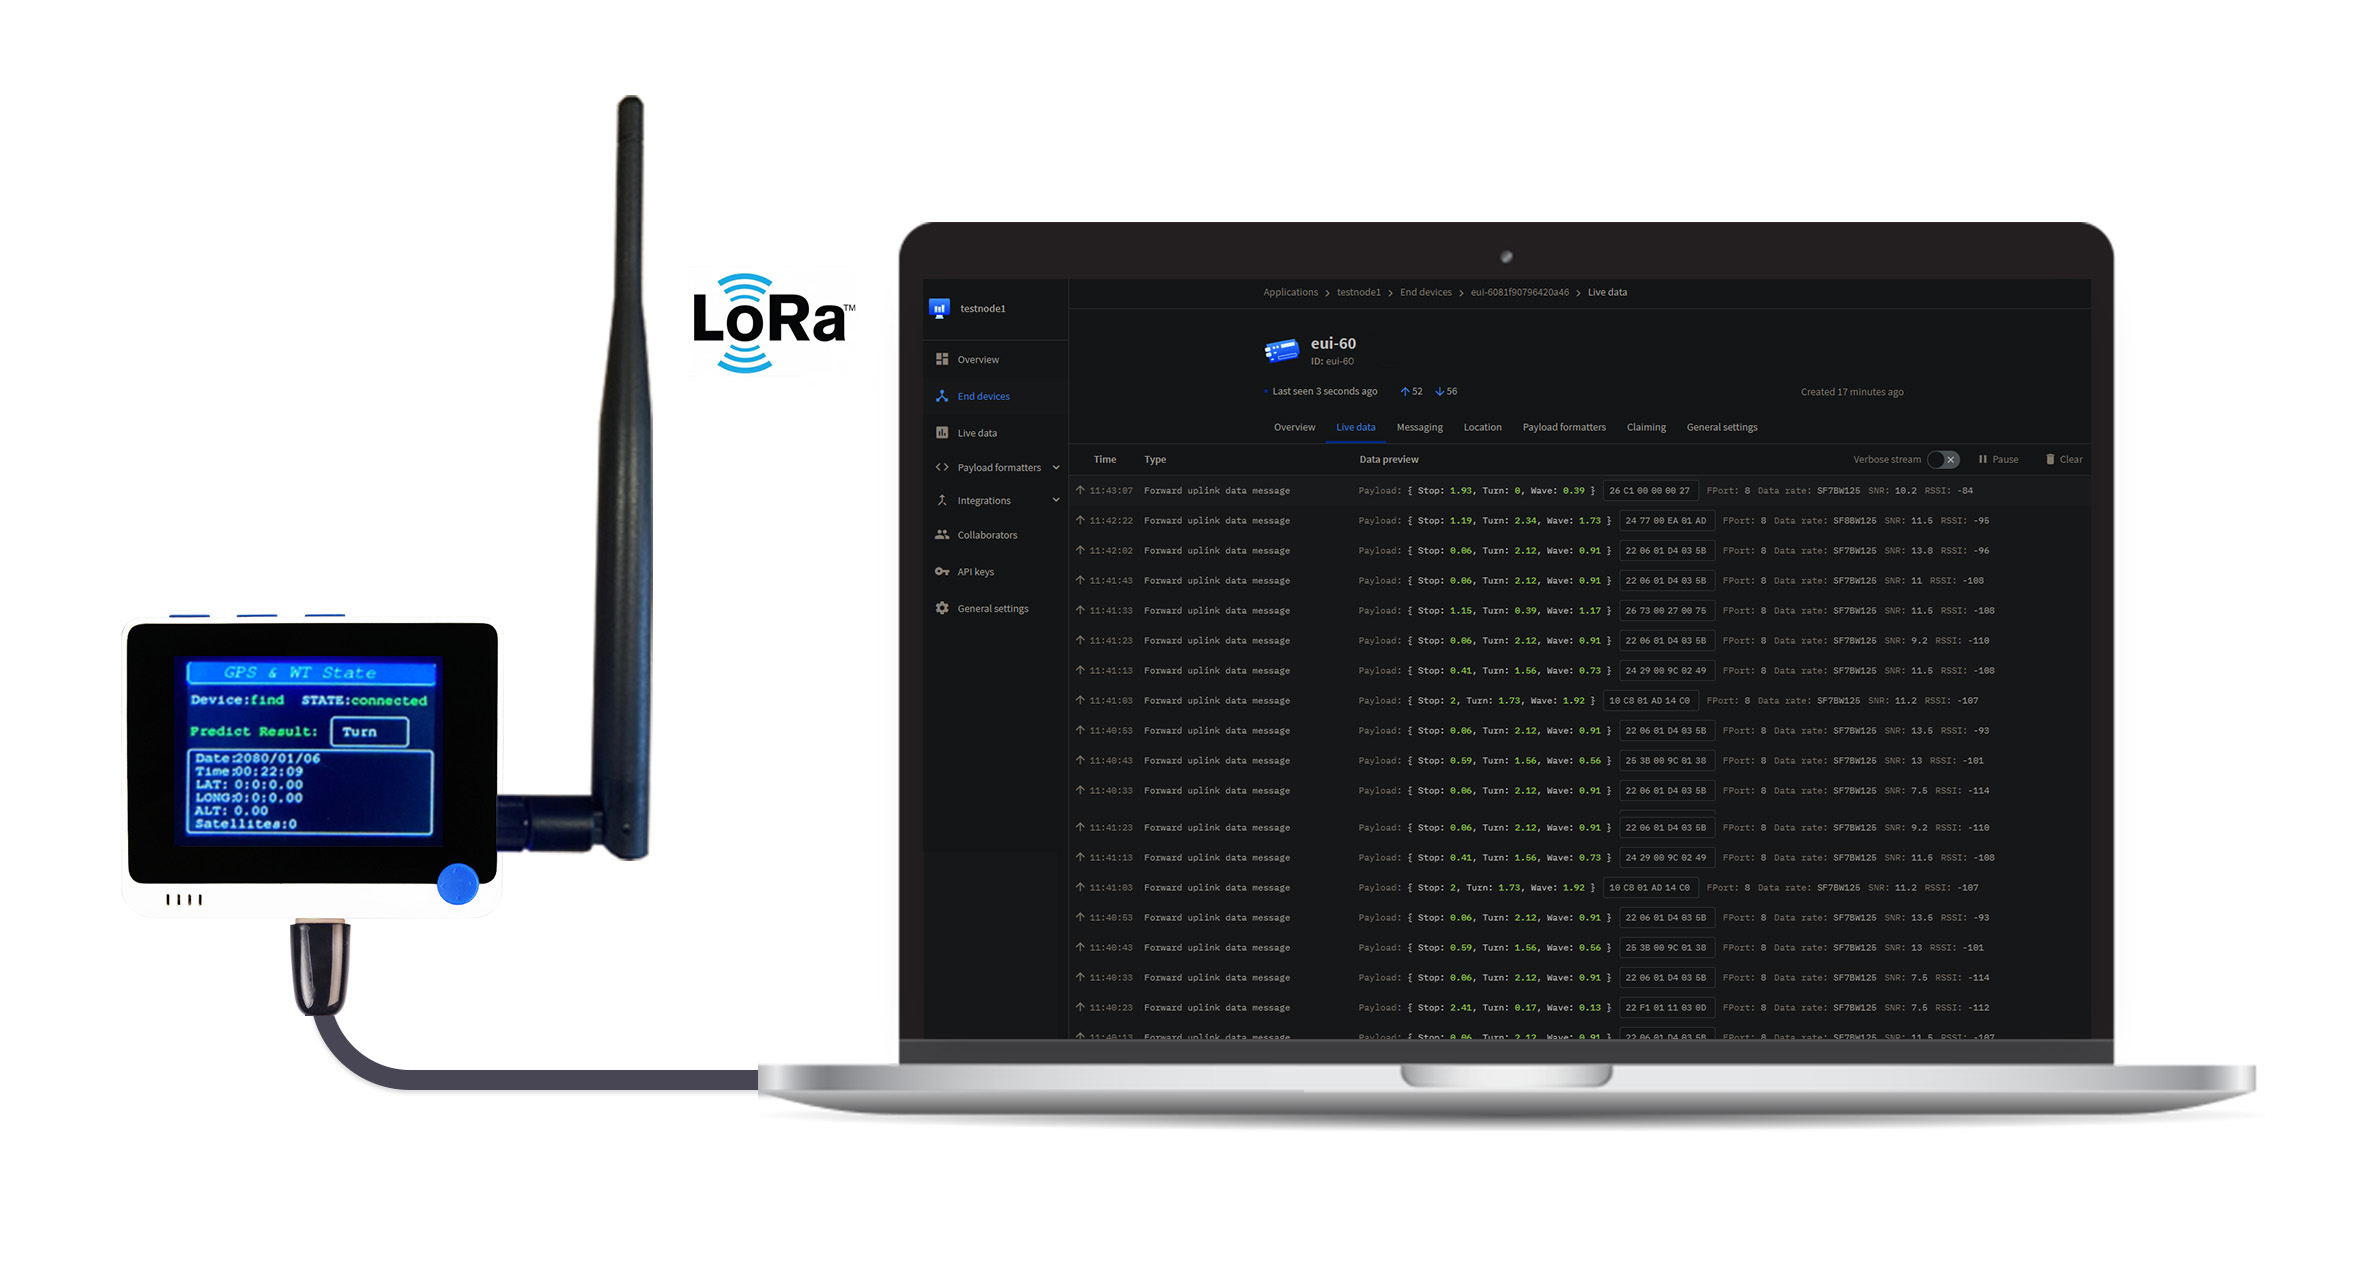
Displaying Data on TheThingsNetwork through LoRa
After we trained a Machine Learning model and collected data, it will be more fun if we can transport our data to the clouds. In this project, we will be able to display the data on TheThingsNetwork platform(cloud) through LoRa.
Hardware Required
- Gateway
You need to set up a gateway first, allowing you can connect Wio Terminal and TTN(TheThingsNetwork) cloud.
TheThingsNetwork Displaying Data Started
Step 1 Load into TTN website and create your account, then click go to gateways for setting up the device.

Step 2 Click Add gateway on the Gateways page.

Add your own gateway information:
- Owner (your name)
- Gateway ID (depend on the gateway)
- Gateway EUI(depend on the gateway, sometimes same as gateway ID)
- Gateway name(your choice)

Frequence plan in LoRaWAN options is depended on your place lived in. Before Add gateway, you may find a page that includes some clusters. The choice of Frequence Plan and cluster should be the same which means you should pick the area you find nearest to your place.


Step 3 Once the gateway is set up, you can now add your Wio Terminal node connecting with it on the Applications page. Click Add application:

Fill in these information by your will:
- Owner
- Application ID
- Application name

Step 4 Once you created an application, you can see on the bottom to the right there is an Add end device that can help you add Wio Terminal device.

- Select
BrandasSelect Sense CAP - chose
ModelasLoRa-E5 - Hardware Ver and Firmware Ver are set up by default
- Profile(Region) is according to your location(same region as
Frequncy plan) - Frequency plan is the same as your choice in Step 2
- AppEUI, DevEUI, and AppKey are unique in different LoRa-E5 devices. You can find them easily by programming a firmware Gateway_Tester.uf2 into your device. Like tutorial in Edge Impulse, programming a firmware you just simply drag the uf2 file to the drive after you pull down the Wio Terminal left button.

- End Device ID will be automatically prefilled after you input the DevEUI.

Step 5 After you connected the device, there is Payload formatters selection and you need to add some code for decoding data(Choosing Formatter type as 'Javascript'):

function Decoder(bytes, port) {

  var decoded = {};
  if (port === 8) {
    decoded.Stop   = bytes[1];
    decoded.Turn   = bytes[3];
    decoded.Wave   = bytes[5];
  }

  return decoded;
}
Step 6 Finally, go to the gateway, then click Live data. You may see the results:
