How to use Arduino Boards as DAPLink Device
What is DAPLink
Arm Mbed DAPLink is an open source software project that programs and debugs application software running on Arm Cortex CPUs. DAPLink is often referred to as interface firmware and runs on an auxiliary MCU connected to the SWD or JTAG port of the application MCU. This configuration is available on almost all development boards. It creates a bridge between your development computer and the CPU debug access port.
Please also visit DAPLink for more information.
DAPLink For Arduino Boards
Now, we have developed the DAPLink firmware running on your Arduino Boards(SAMD Series) such as Wio Terminal and Seeeduino Xiao so that you can upload and debug development boards that support DAPLink in a most cost-effective way!
Features
- Debug and Flash Arm Cortex CPUs
- Provides a virtual serial port, eliminating the need for a usb to serial port
- Drag and drop to upload firmware(coming soon)
Supported Boards
It supports all the SAMD boards by Seeed:
- Wio Terminal
- Seeeduino XIAO
- Seeeduino Zero Series:
- Seeeduino LoRaWAN
Please make sure you have installed the latest ArduinoSAMD board library for Seeed (>=1.8.1) for this to work!
Get Started
1. Installing the DAPLink Arduino Libraries
-
Visit the Seeed_Arduino_DAPLink repositories and download the entire repo to your local drive.
-
Now, the Seeed_Arduino_DAPLink library can be installed to the Arduino IDE. Open the Arduino IDE, and click
sketch->Include Library->Add .ZIP Library, and choose theSeeed_Arduino_DAPLinkfile that you've have just downloaded.

2. Installing the Adafruit_TinyUSB_Arduino Library
-
Visit the Adafruit_TinyUSB_Arduino repositories and download the entire repo to your local drive.
-
Now, the Adafruit_TinyUSB_Arduino library can be installed to the Arduino IDE. Open the Arduino IDE, and click
sketch->Include Library->Add .ZIP Library, and choose theAdafruit_TinyUSB_Arduinofile that you've have just downloaded.
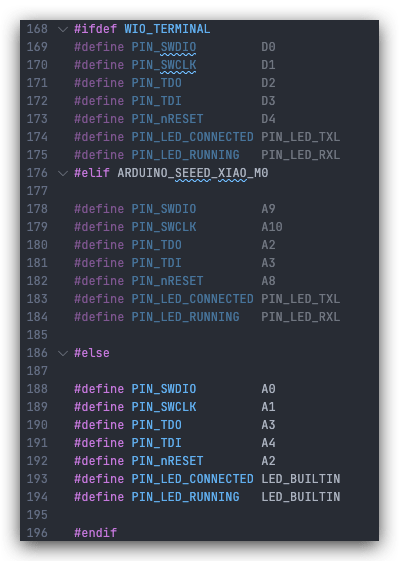
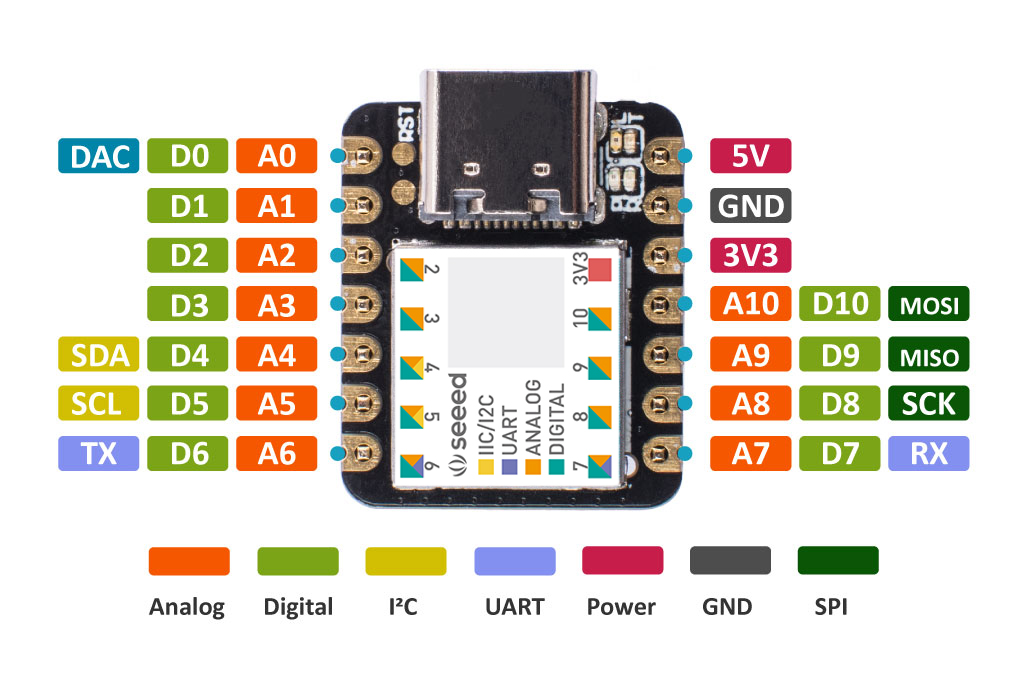
Customizing Pin Definitions
If you are using Wio Terminal or Seeeduino Xiao, you may skip this section and just use the default definitions.
- The pins definitions for DAPLink is defined in
DAP_config.hunderSeeed_Arduino_DAPLink/src, reference the followings:
Upload to Arduino Boards
Open the simple_daplink.ino under Seeed_Arduino_DAPLink/example using Arduino IDE. Under Tools -> USB Stack and choose TinyUSB.

Compile and upload the code!
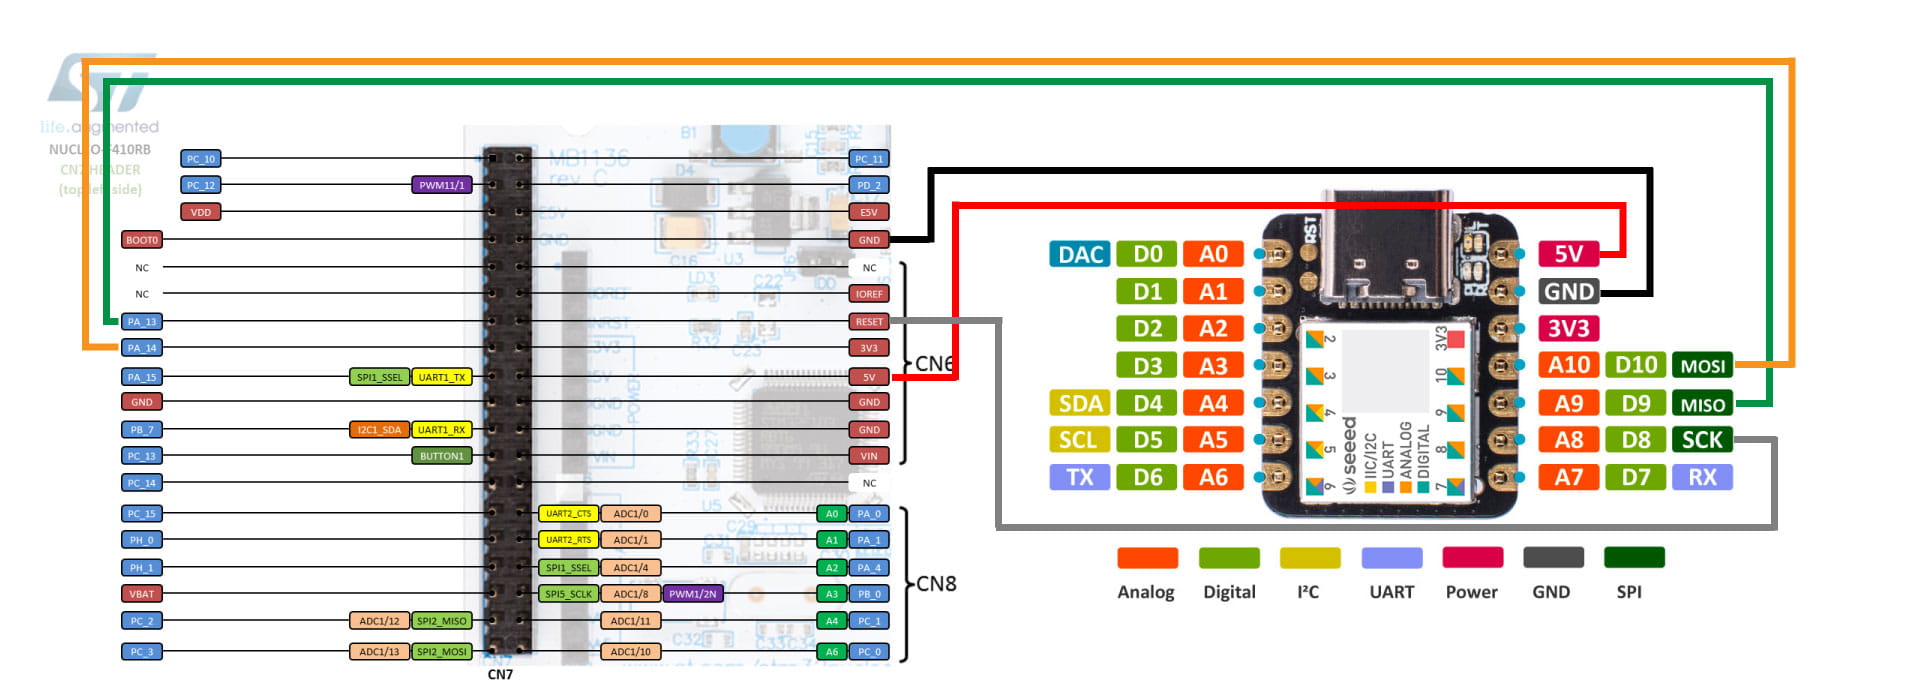
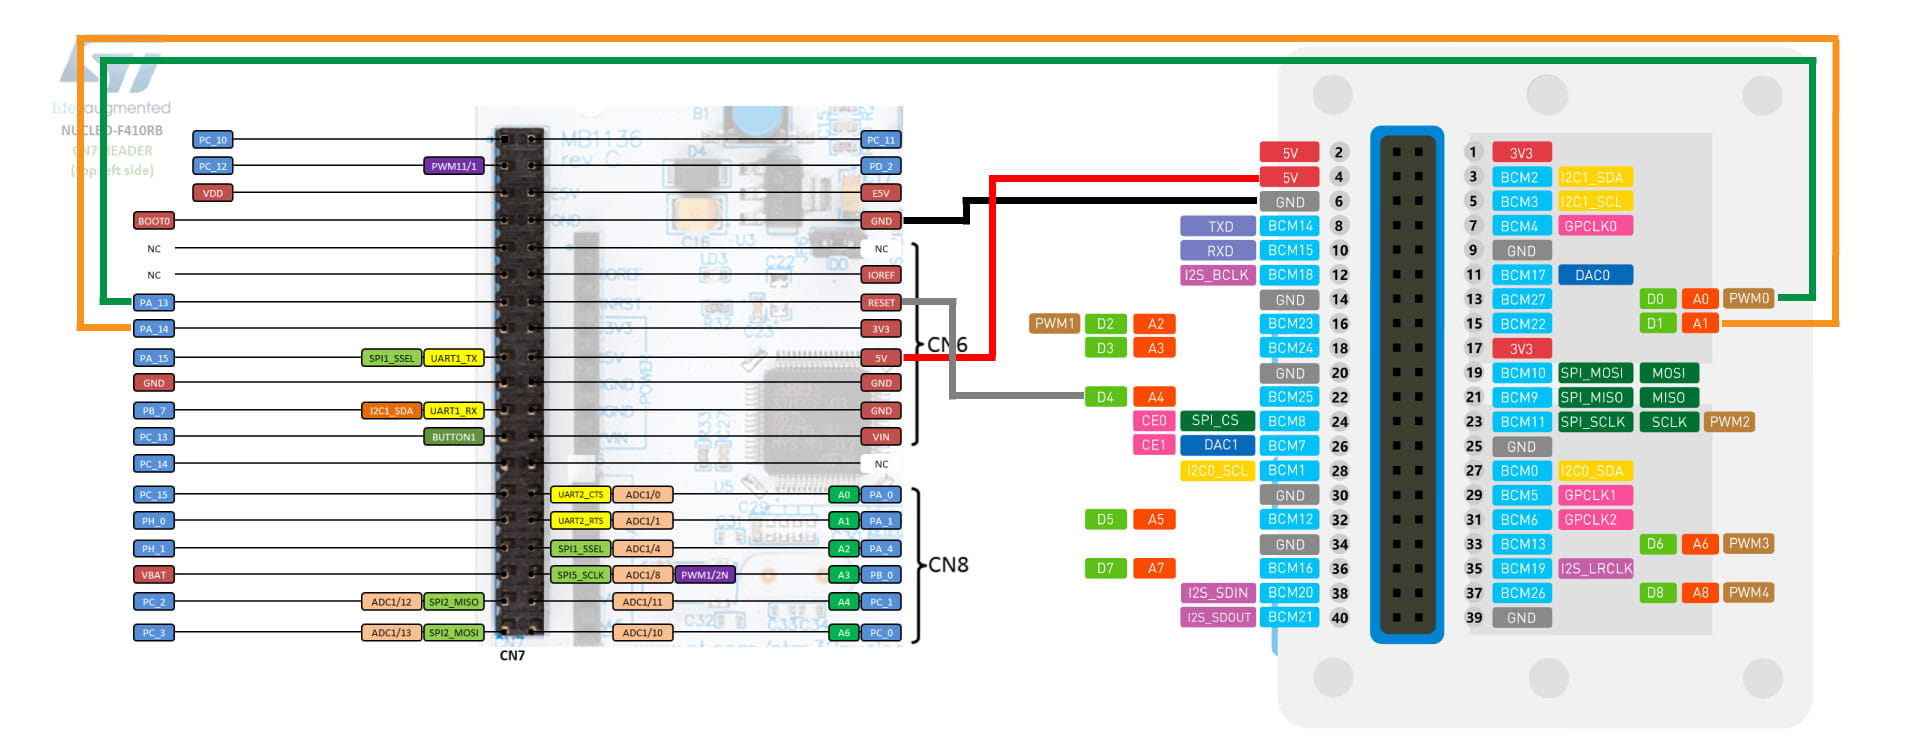
Hardware Connection Example
In this wiki, we have used the STM32F410RB development board as connection example:
If you have changed pinout definitions, please connect according to your own defines.
- Seeeduino Xiao Connection Example
- Wio Terminal Connection Example
Debug and Flash Example for IDEs
Our Arduino board now becomes our DAPLink device for uploading for MCUs! Let's have some examples for different IDEs for reference.
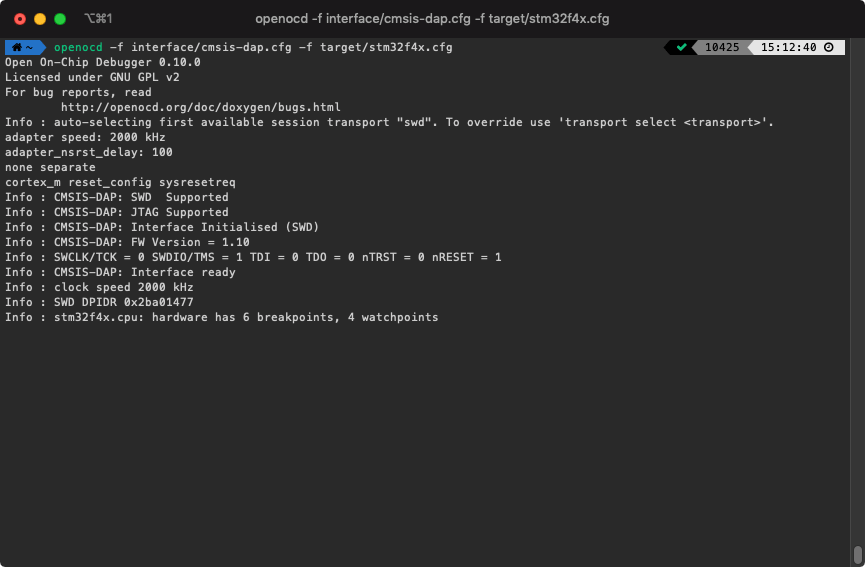
Debugging with OpenOCD
-
Connect the Arduino DAPLink to target Development according to the connection above, and to your PC.
-
Make sure you have installed OpenOCD.
-
Open Terminal and run the following:
Change to your device target according to your development board, you may check the official document for reference.
openocd -f interface/cmsis-dap.cfg -f target/stm32f4x.cfg
- Under your development board project build path, run the gcc, which looks something like below:
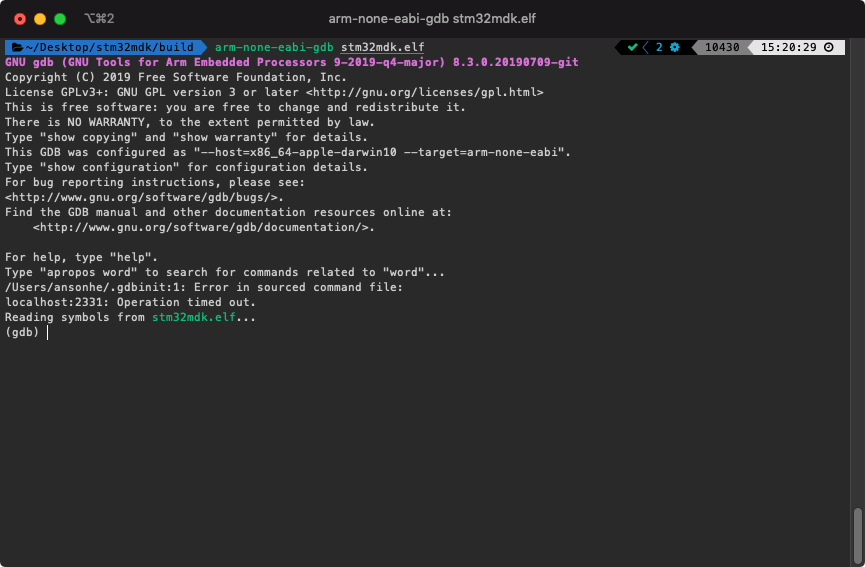
- under gdb, connect to local host by running the following:
target remote 127.0.0.1:3333
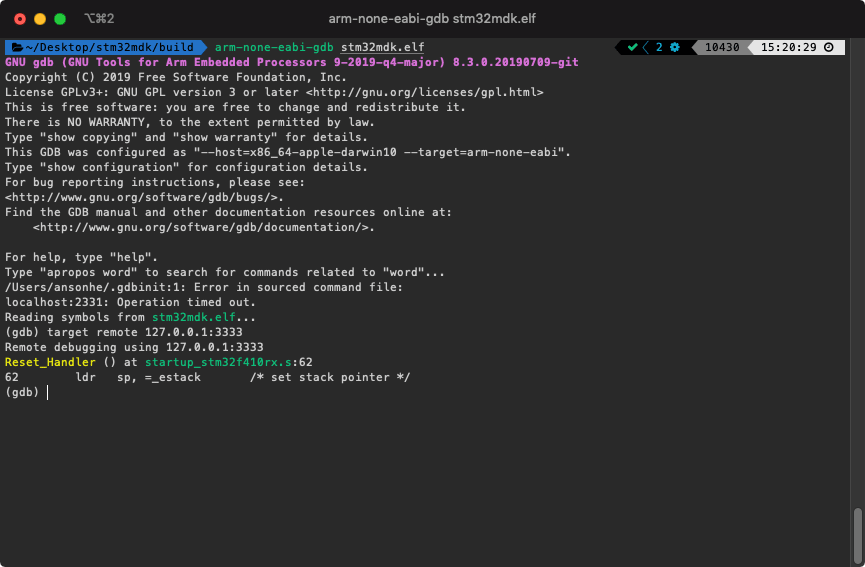
- Now the development board is connected, you may start to debug or upload!
Run load to upload to development board:
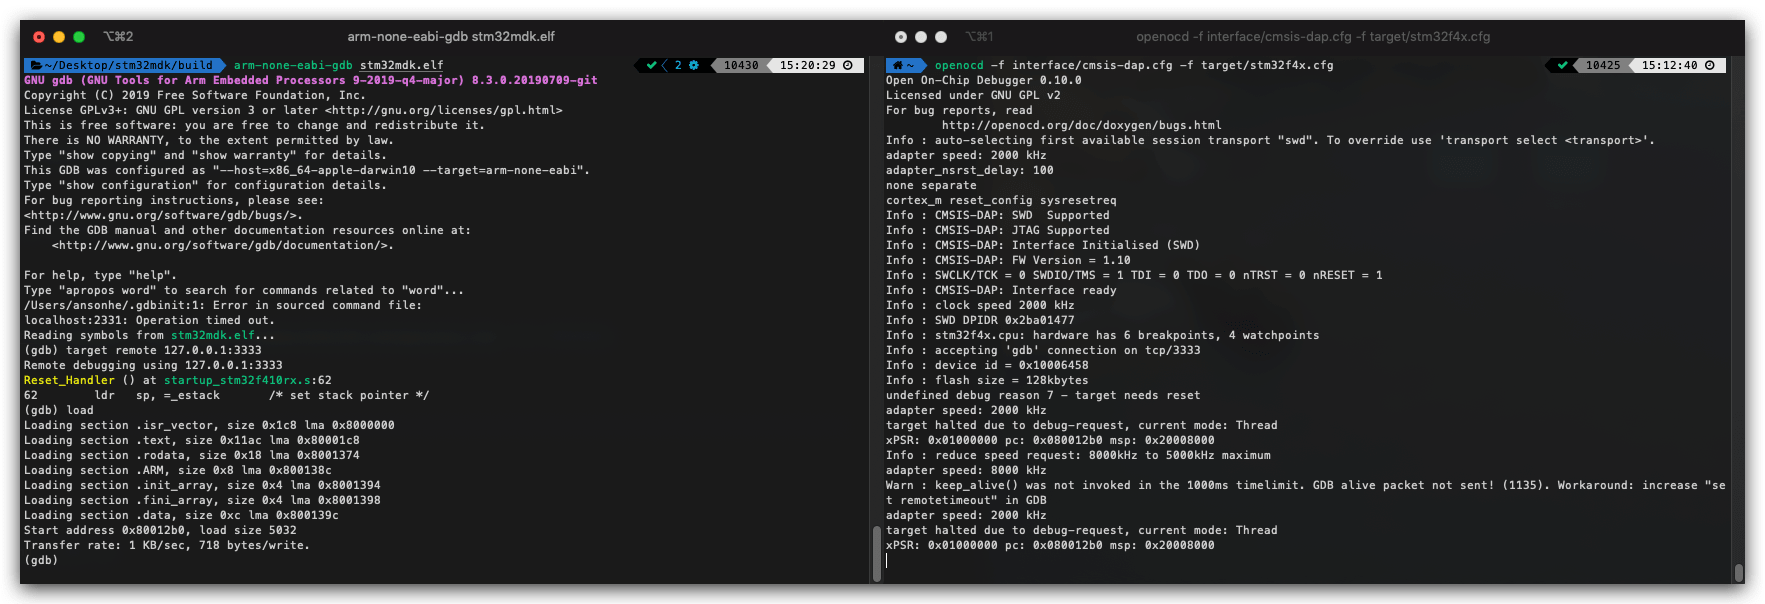
Some useful commands for GDB:
continue/contctrl+cnextbreakinfo breakcleardeletelist
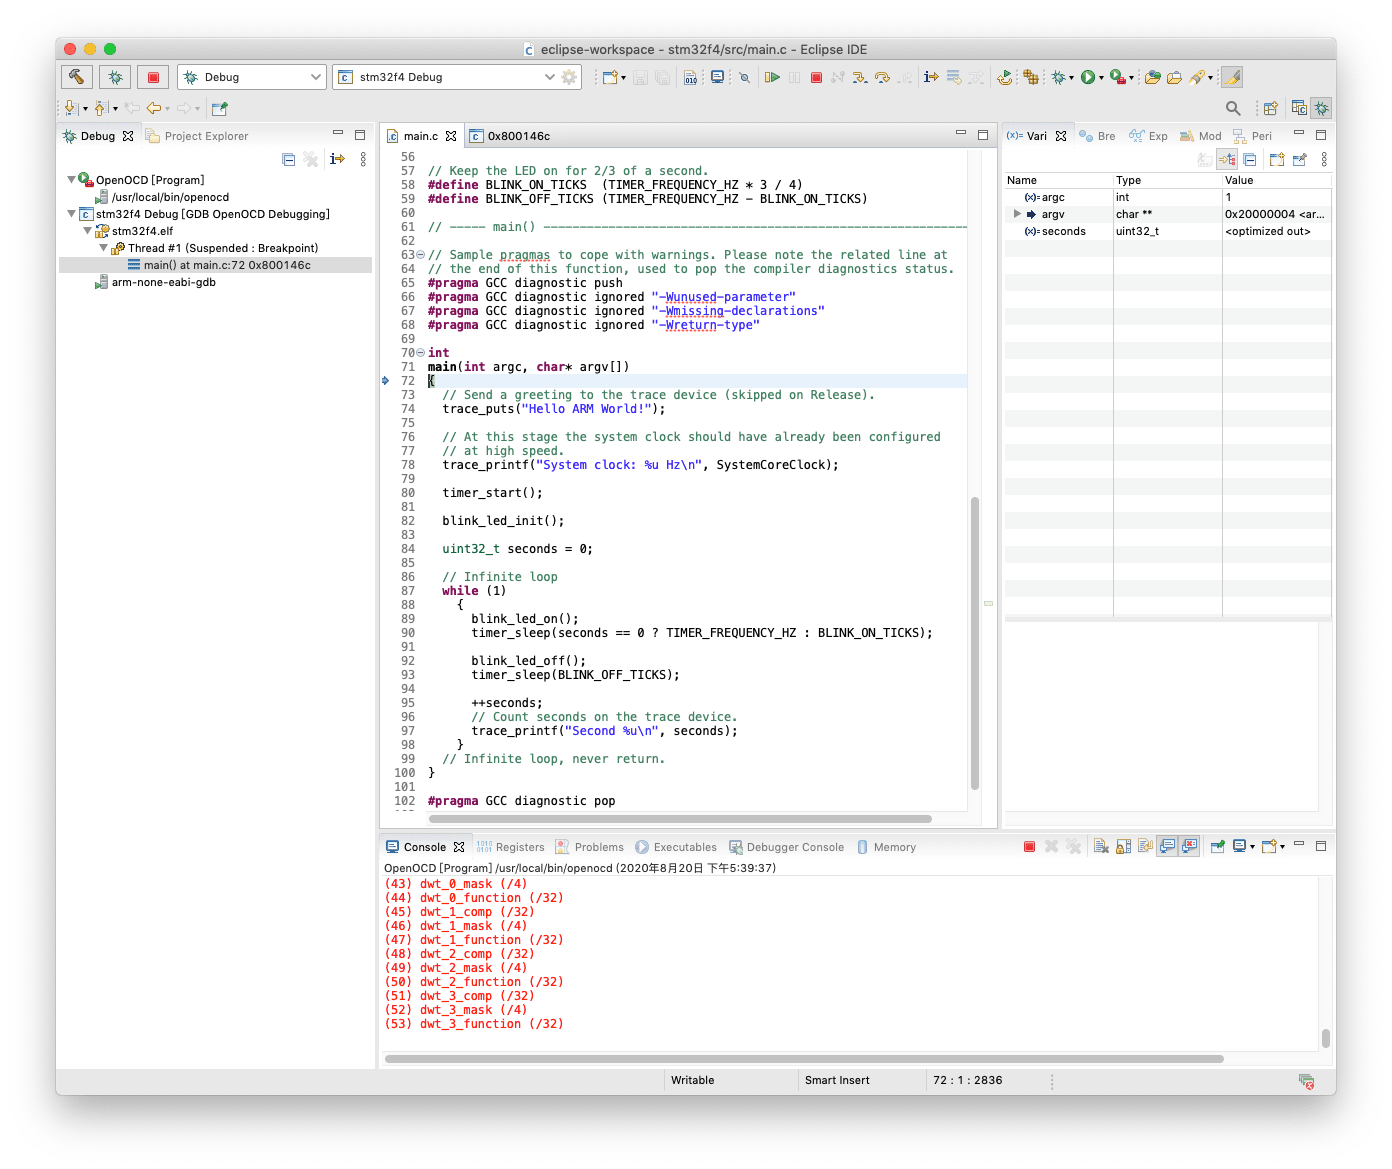
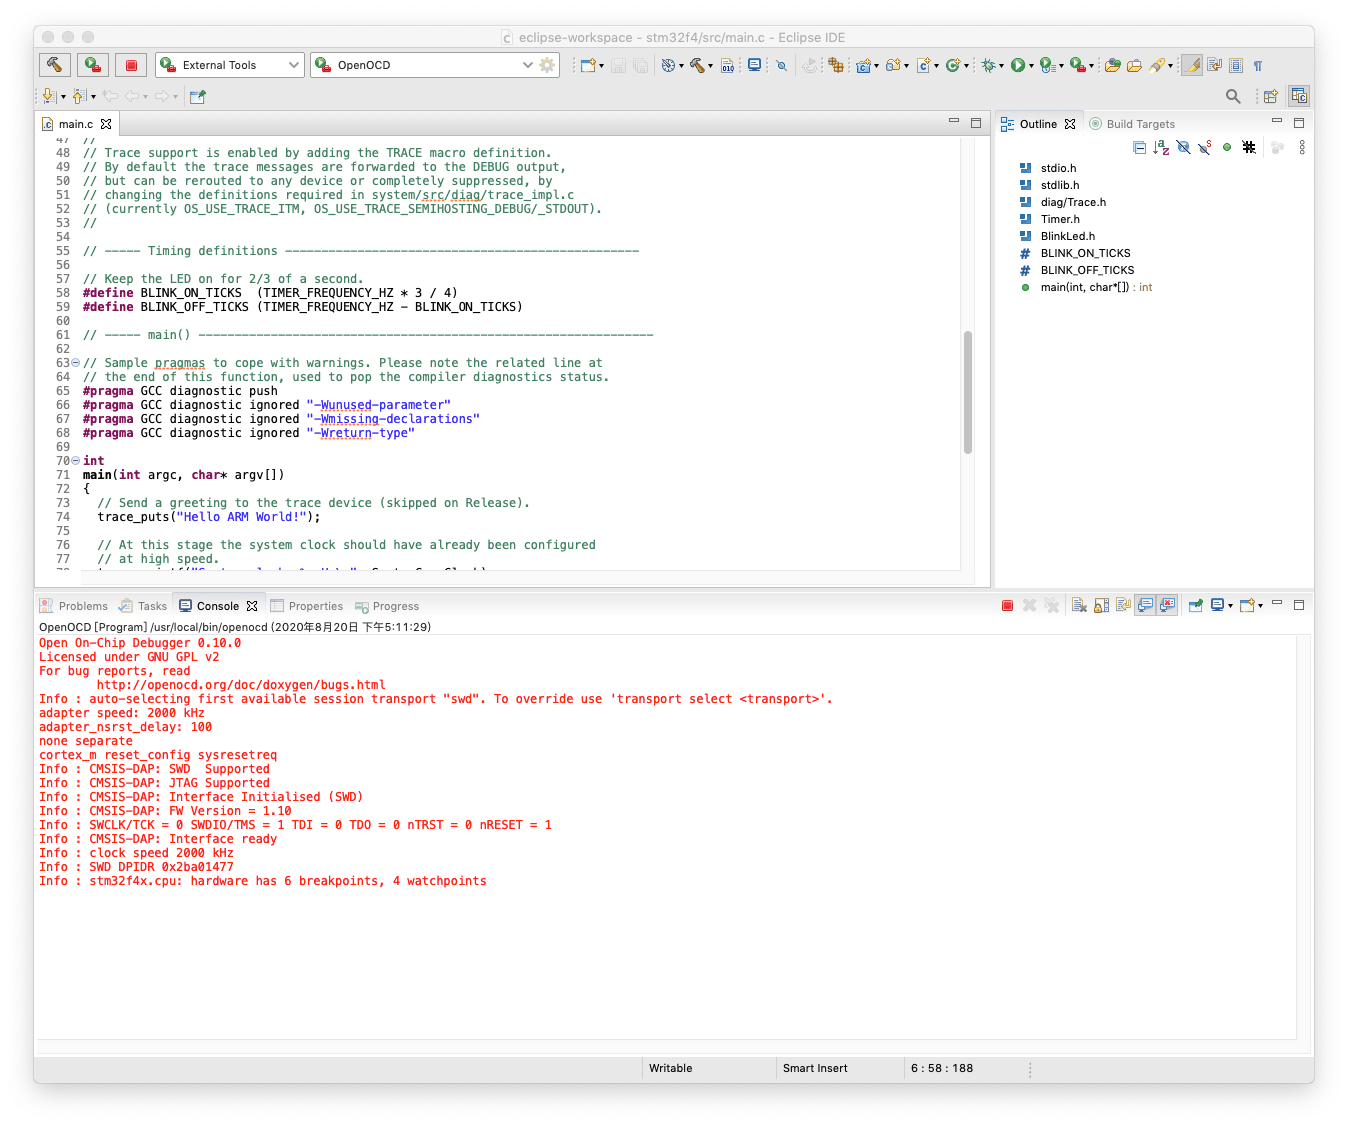
Debugging with Eclipse
For Eclipse, it's very similar to the OpenOCD as it can use the OpenOCD as backend.
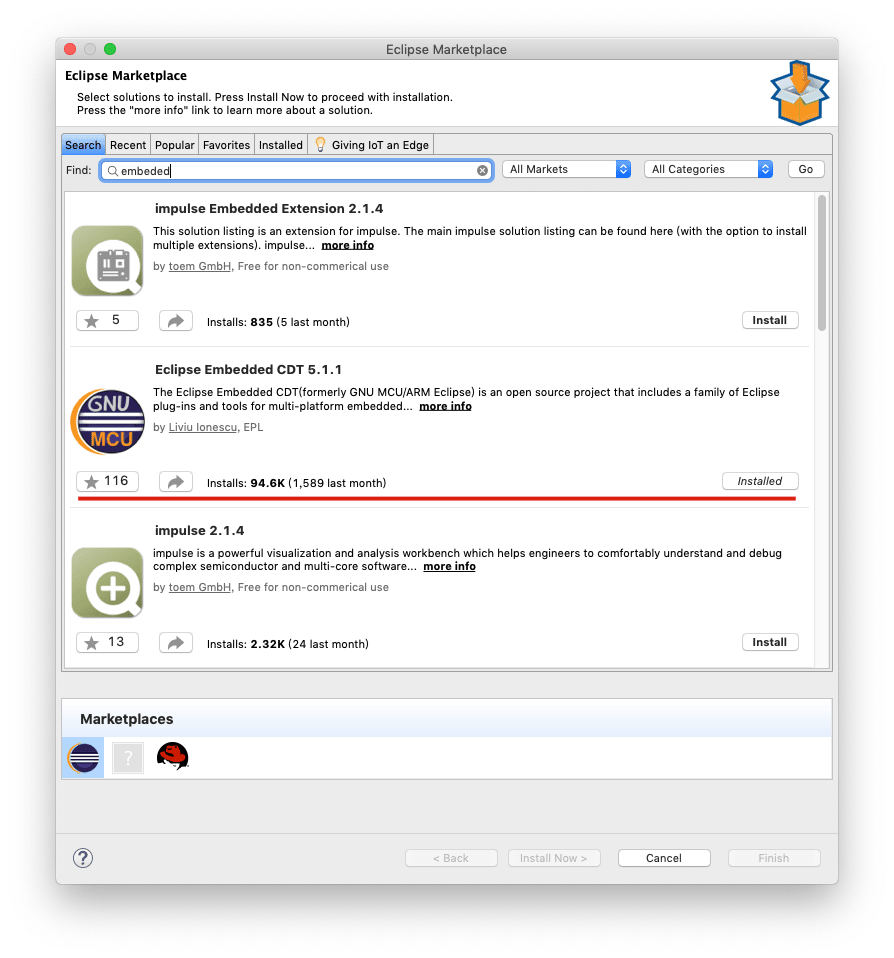
- Navigate to Help -> Eclipse Marketplace, search and download Eclipse Embedded CDT:
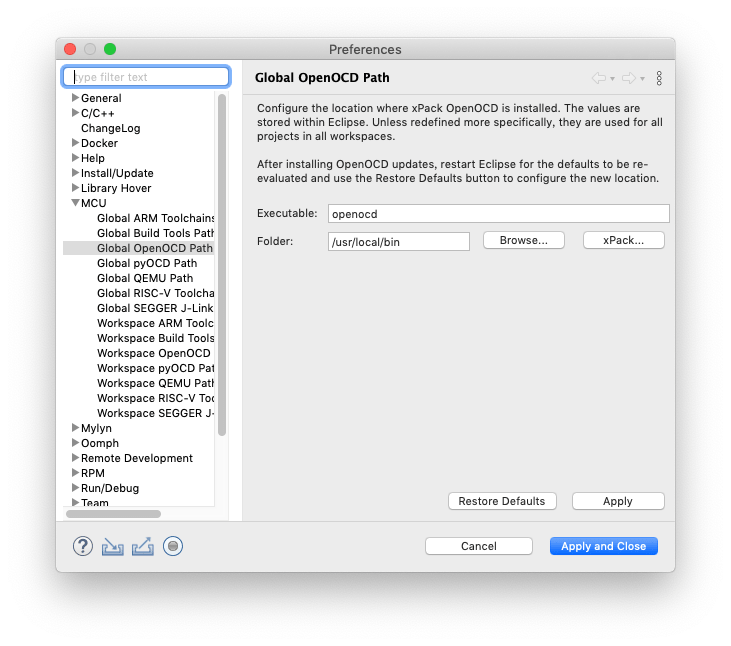
- Navigate to Window -> Preference -> MCU -> Global OpenOCD Path and fill in your OpenOCD path as follow:
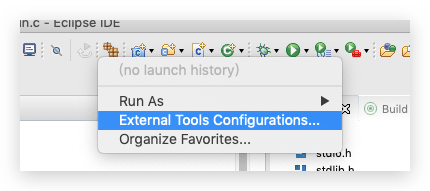
- Build your project. Under Run Last Tool, click on External Tools Configurations:
- Copy the following settings, please change to your path (also your target board).
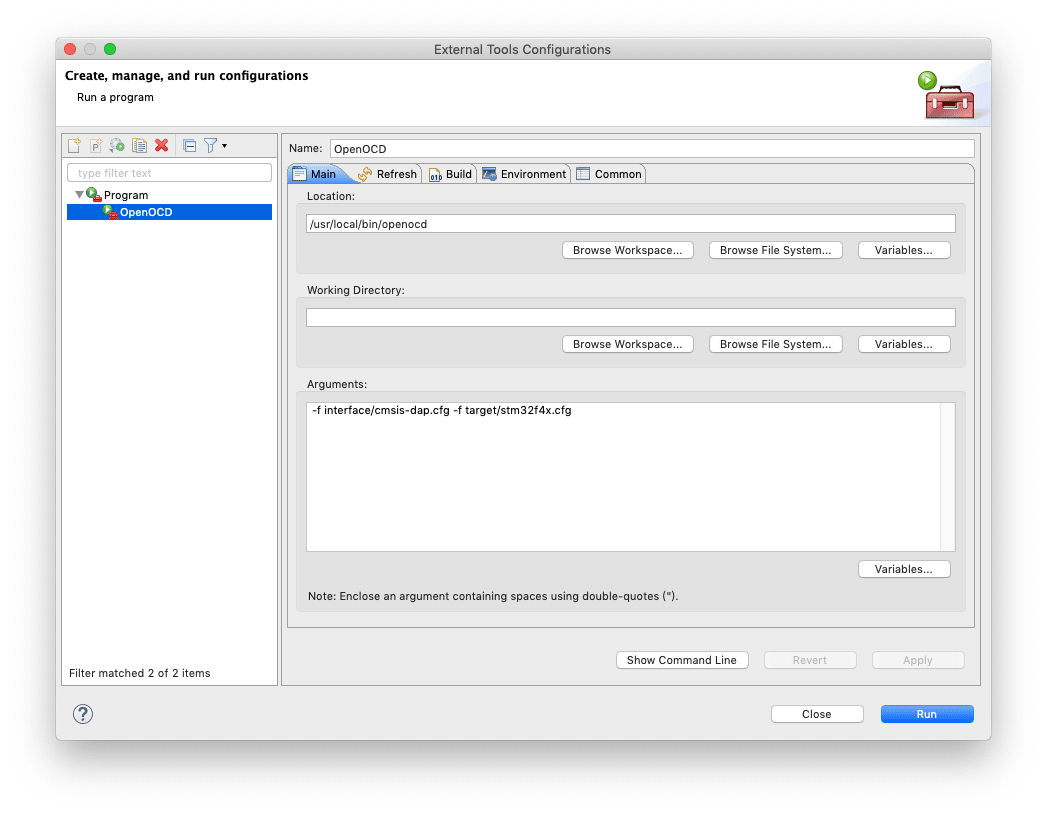
If it goes well, it should look something like this:
- Under Debug, click Debug Configurations, select Debugger section, and fill in your gcc path:
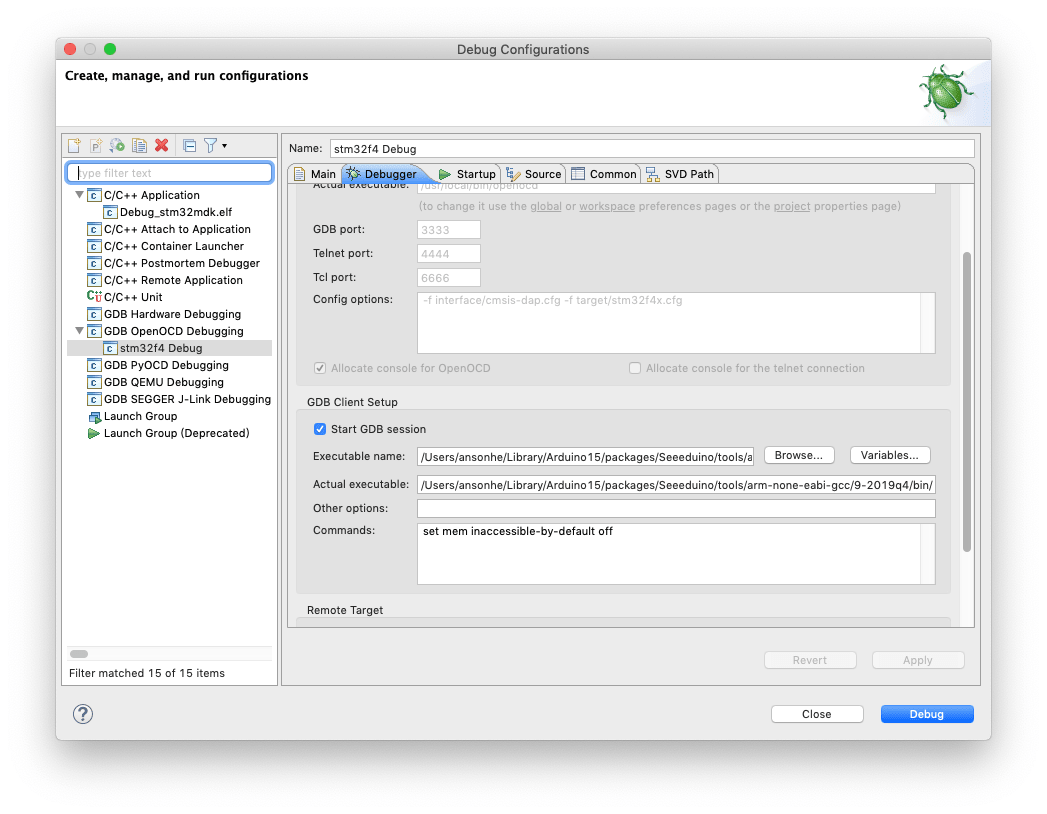
Now it's all good and ready to debug!
More reference, please check here.
Debugging with Keil
- Connect the Arduino DAPLink to target Development according to the connection above and to your PC.
To use our Arduino DAPLink in Keil, check the following:
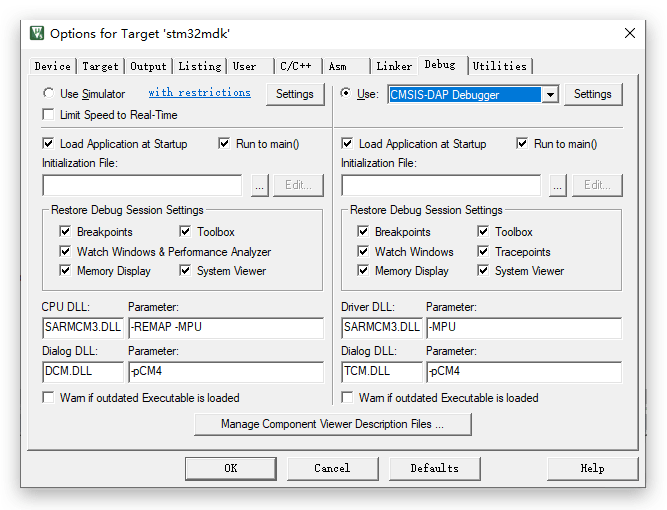
- Open your project with Keil, click on the Options for target.
You should see a window just like below. Make sure the device matches with your device. Navigate to Debug section and select CMSIS-DAP Debugger.
- Click on the settings next to the CMSIS-DAP Debugger.
- Choose Seeed CMSIS-DAP(our Arduino board) and you should see that it's connected.
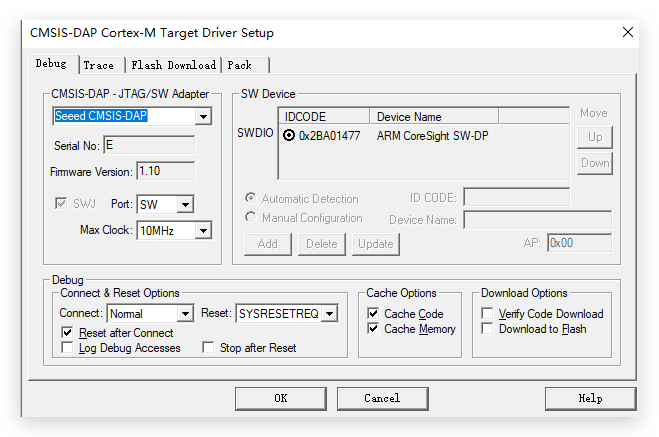
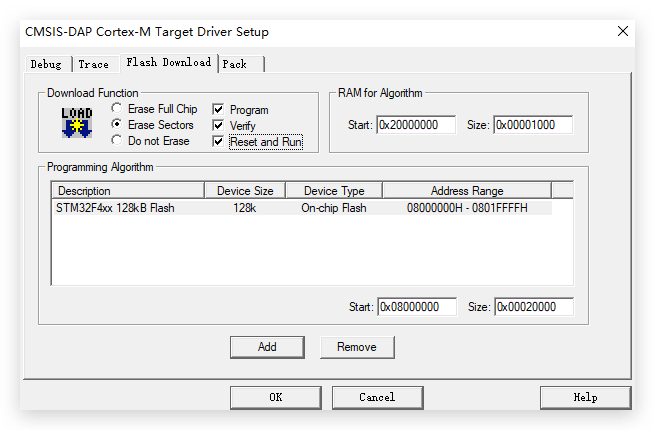
- You may also want to navigate to the Flash Download section to make sure it's the right device and Click OK.
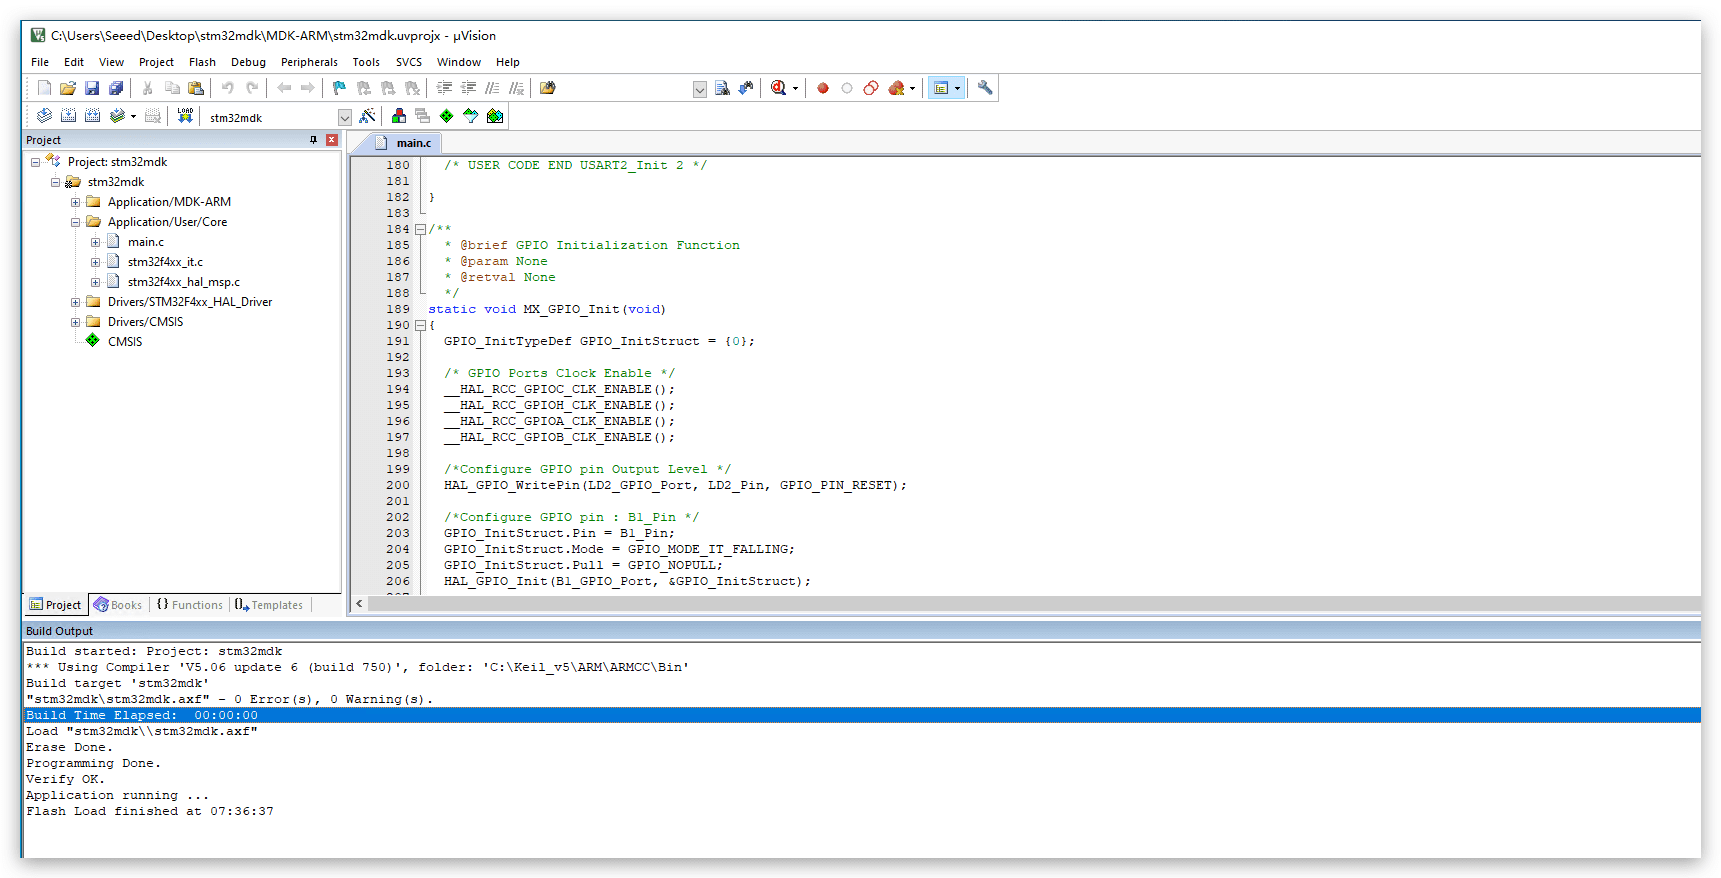
- Click on Build and Flash!
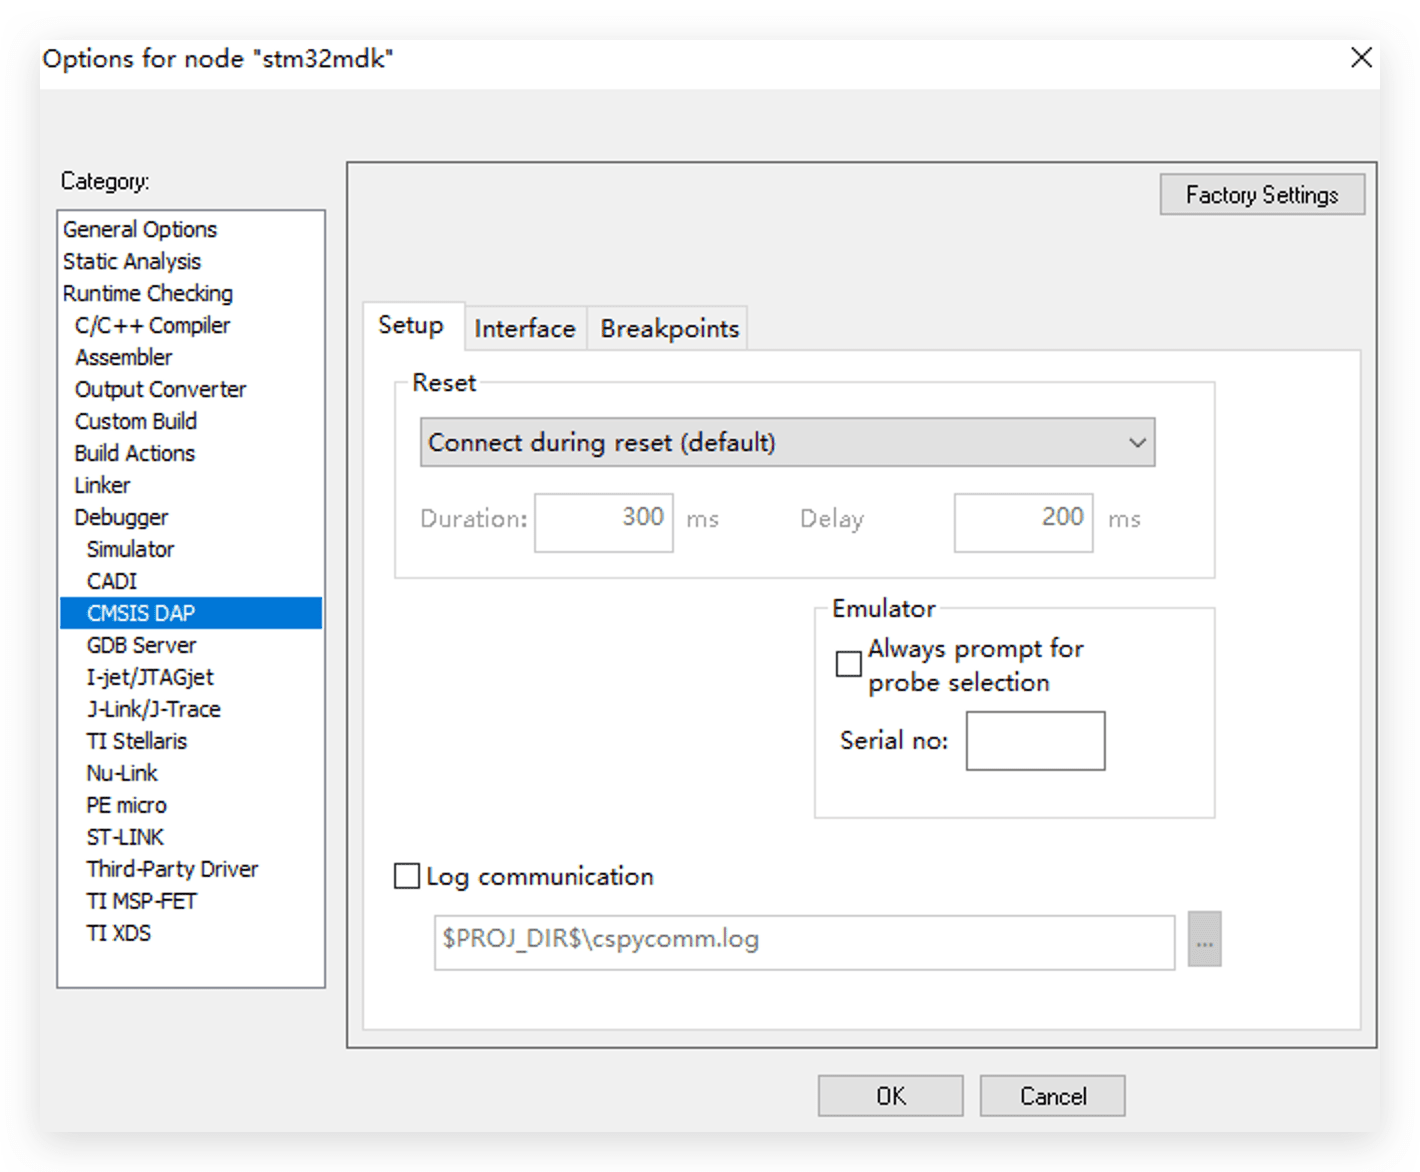
Debugging with IAR Embedded Workbench
-
Connect the Arduino DAPLink to target Development according to the connection above and to your PC.
-
Open your project, and navigate to Project -> Options. In the Options menu, select Debugger:
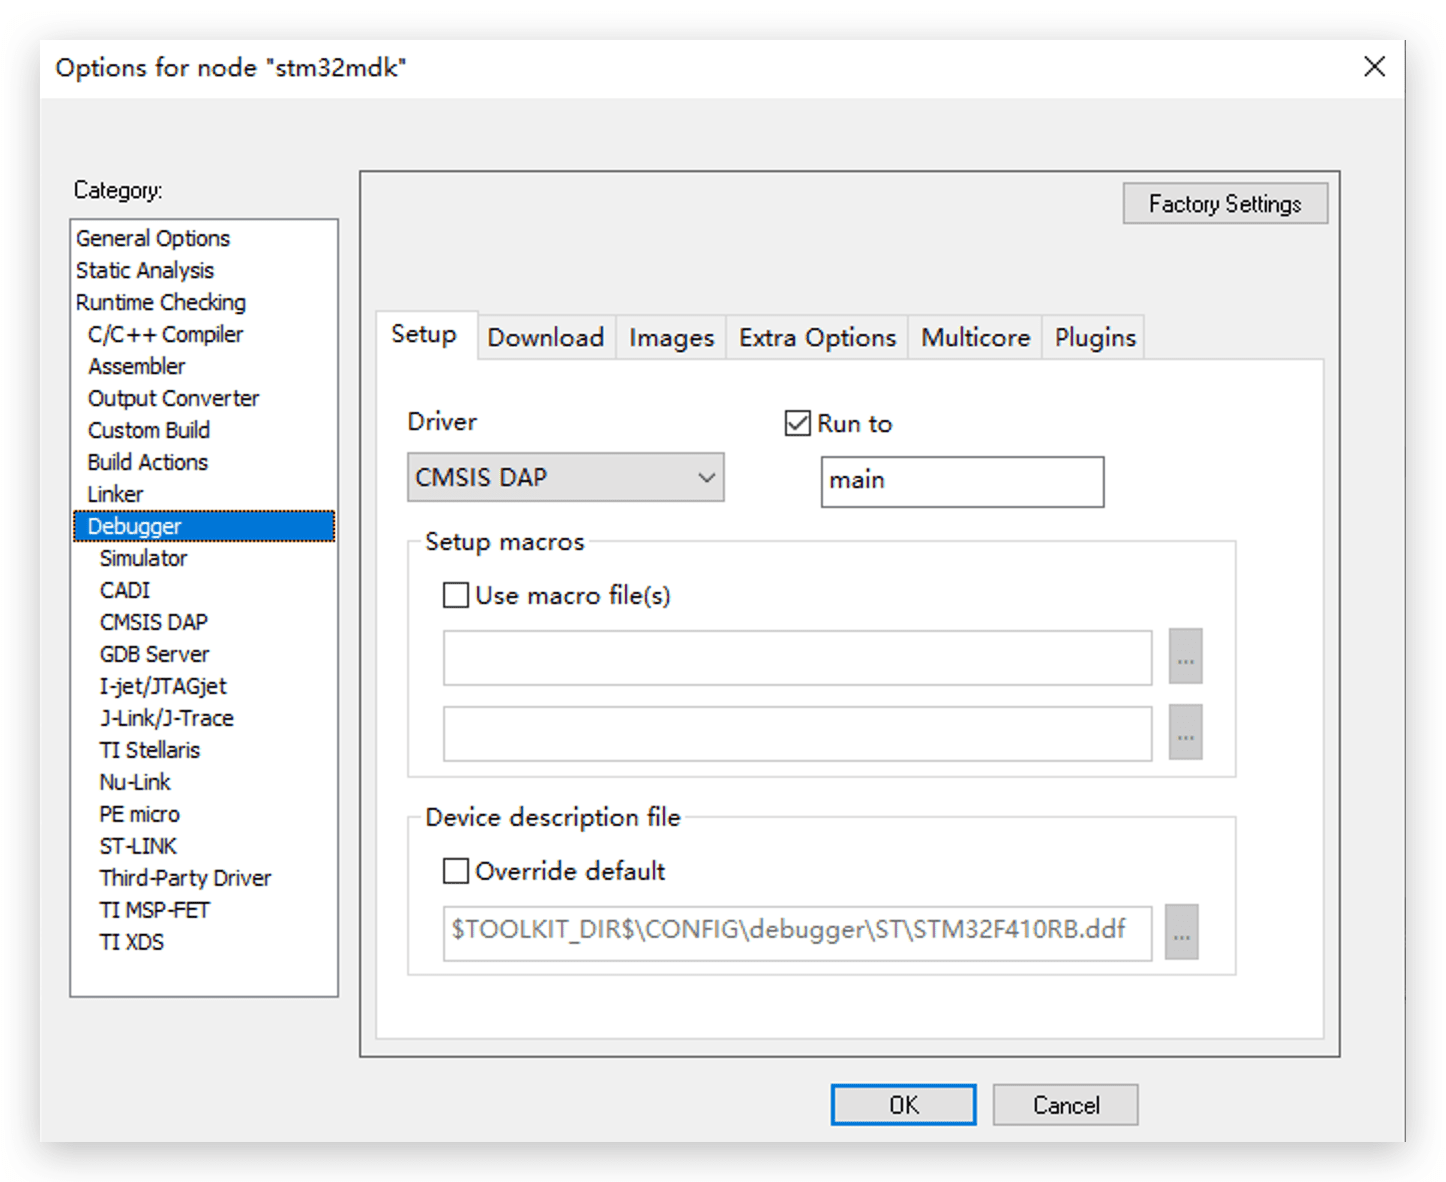
- In the Setup tab, select CMSIS DAP from the Driver drop-down menu.
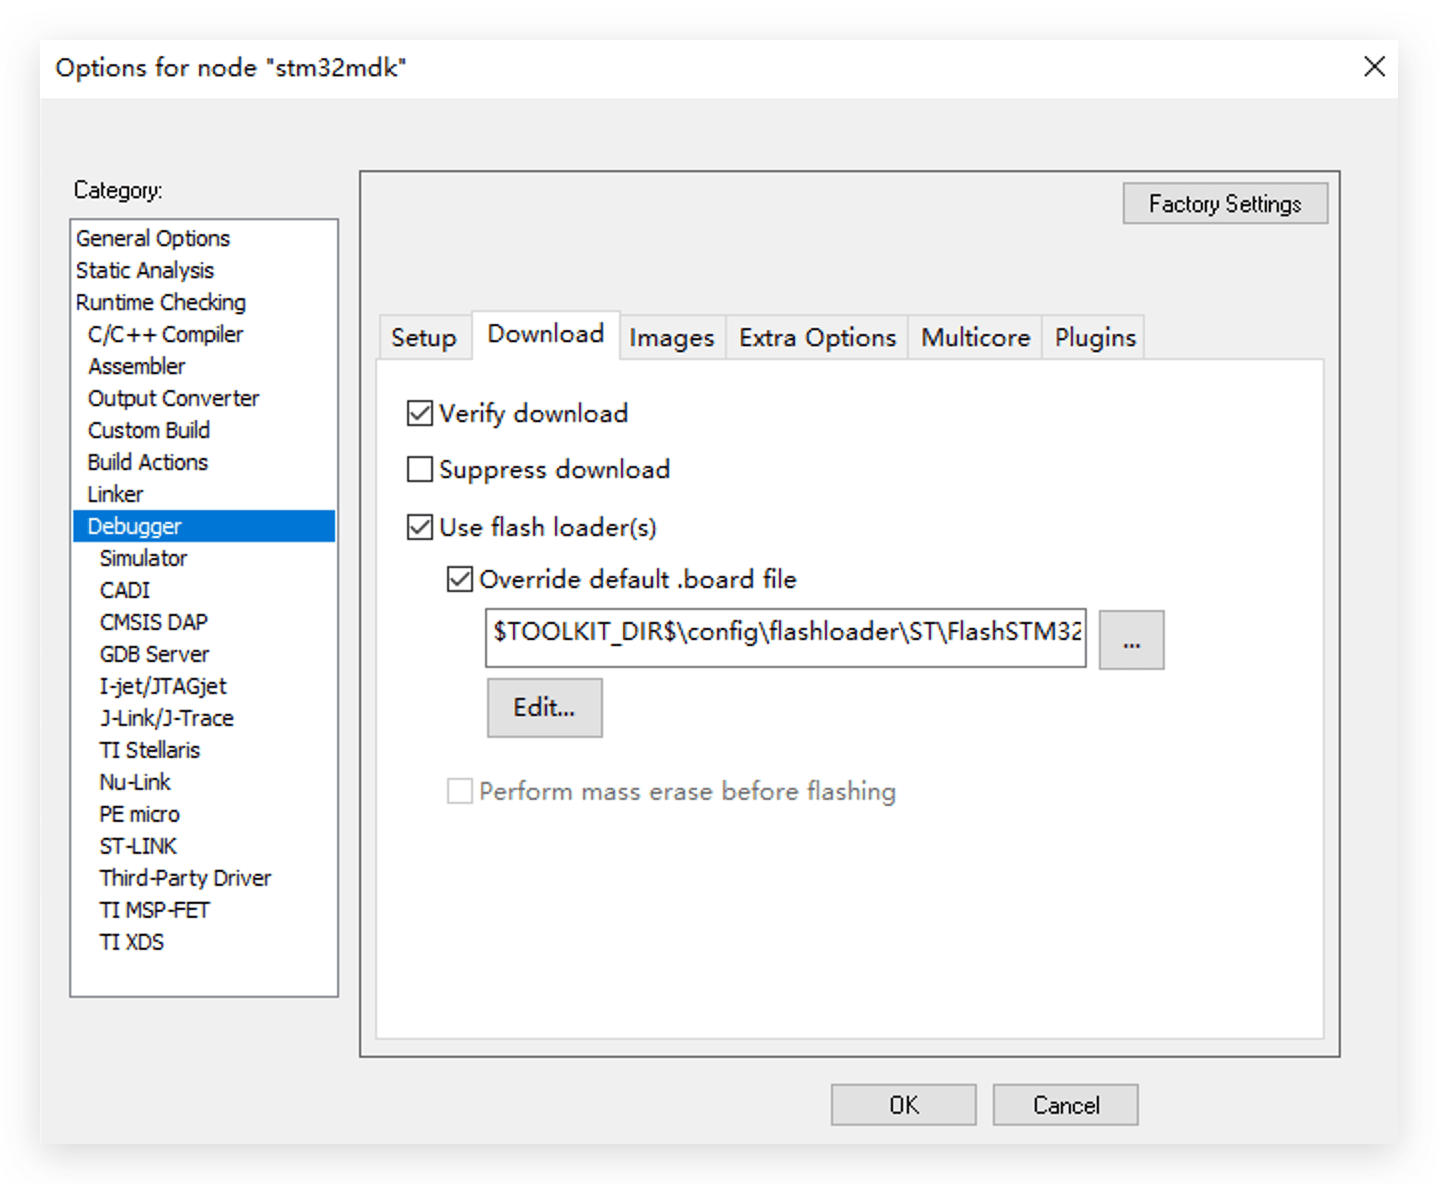
- In the Download tab, check Verify download and Use flash loader(s)
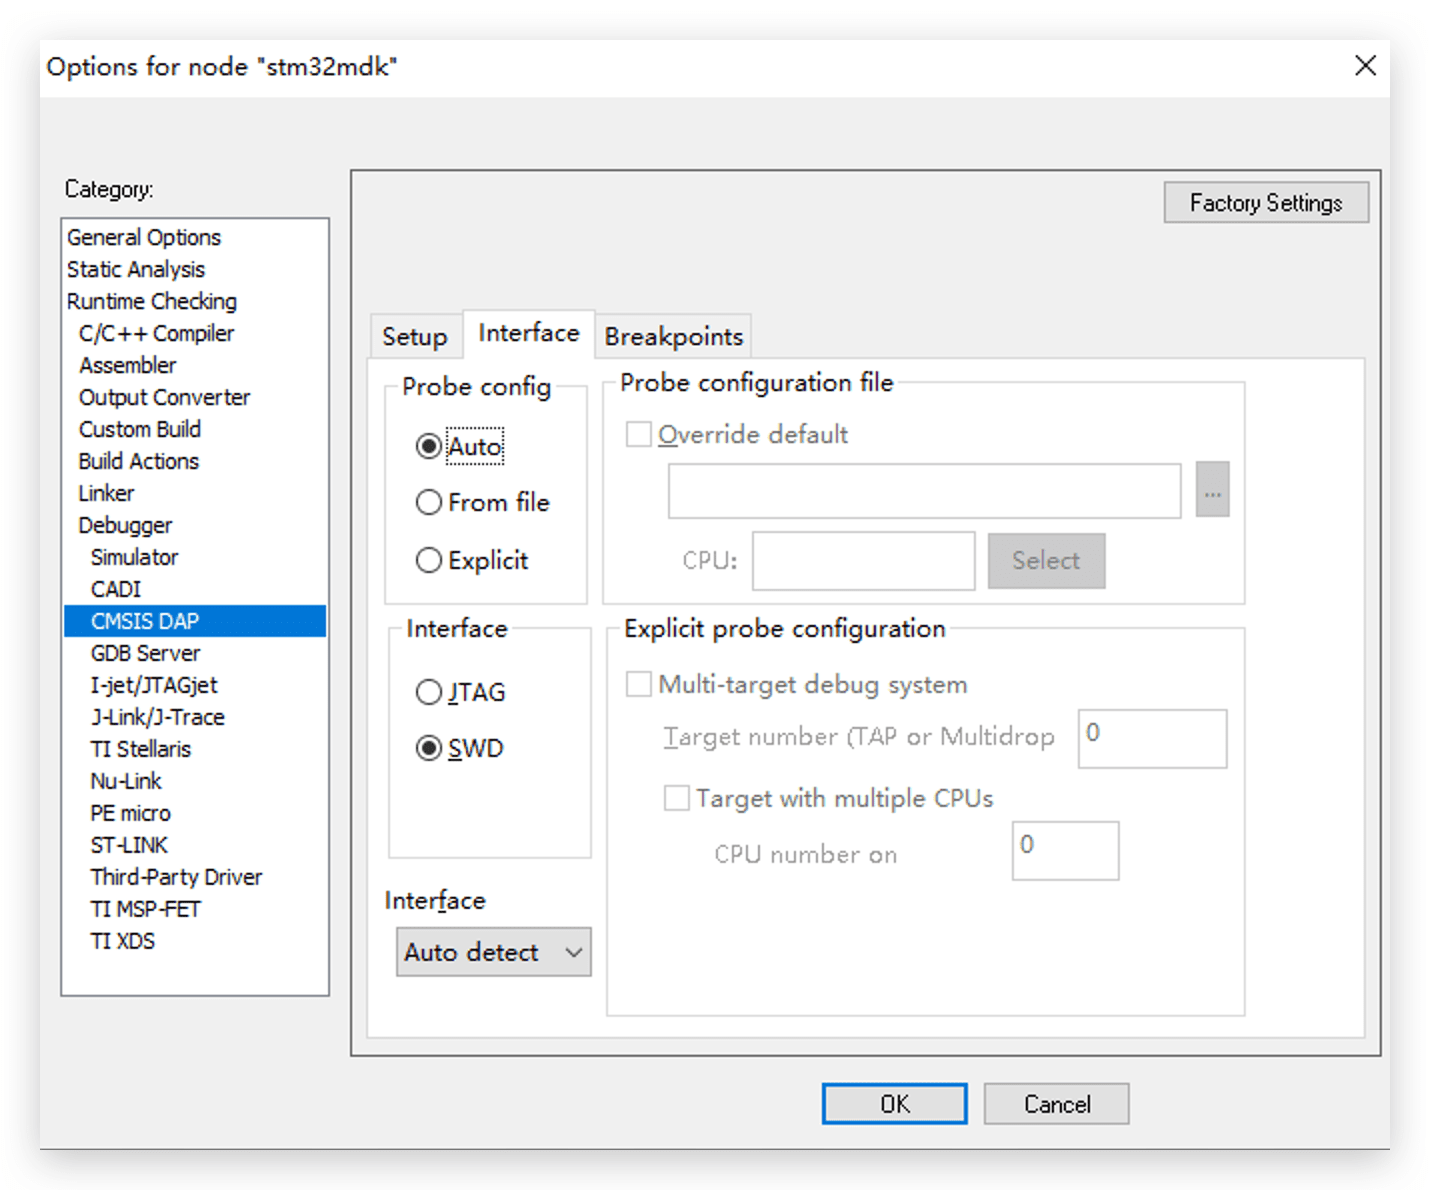
- Select CMSIS DAP from the menu on the left, select the Interface tab and configure the SWD protocol.
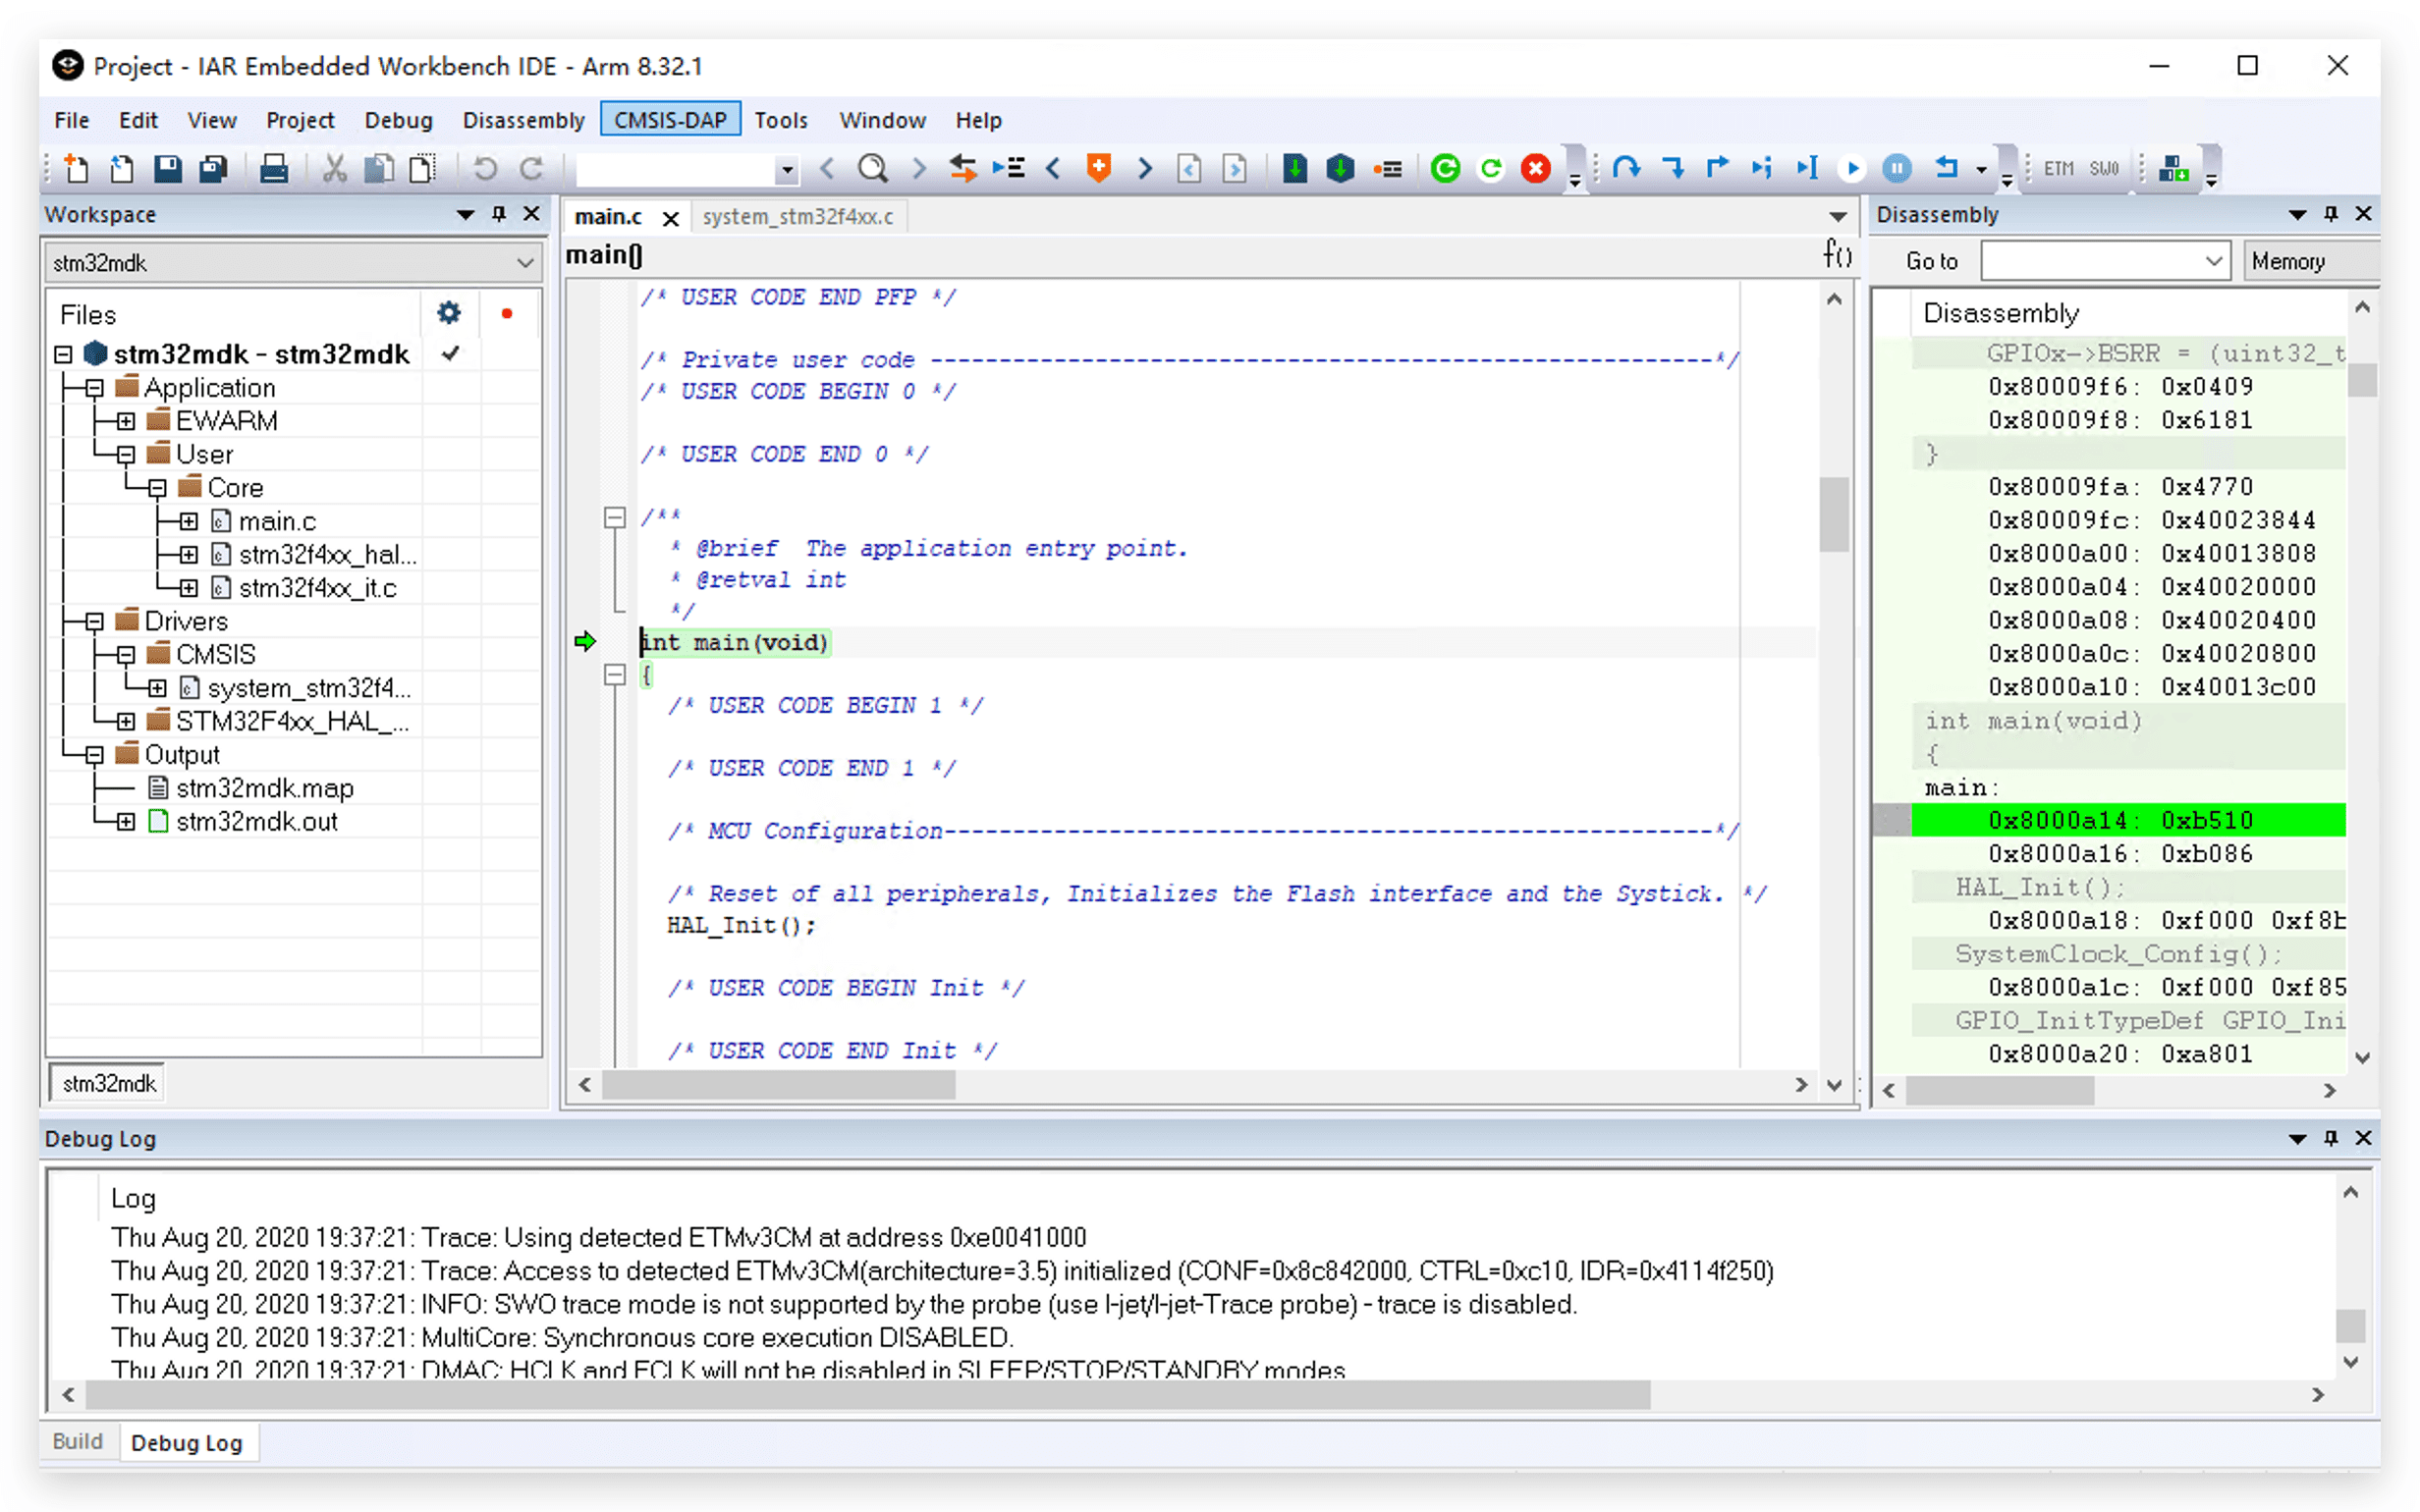
- Click OK, and you can click Download and Debug!
Serial Usage
To make life easier, we also implemented a USB to Serial function to the Arduino Sketch which saves you the need of additional hardware!
- By default, it is defined as
Serial1and it's the Hardware Serial pins. For example, it's pin 6 and 7 for Seeeduino XIAO.
You may define your own Serial in the Arduino Sketch.
Reference usage, check here.
Resources
Tech Support & Product Discussion
Thank you for choosing our products! We are here to provide you with different support to ensure that your experience with our products is as smooth as possible. We offer several communication channels to cater to different preferences and needs.