Develop in Microsoft Azure IoT Central
Add a Rule to Send an Email
Rules in IoT Central serve as a customizable response tool that trigger on actively monitored events from connected devices. For example, in this demo, we can set IoT Central to send an email when the light intensity level is below 50.
-
STEP 1: Click on Rules from the left navigation menu in Azure IoT Central.
-
STEP 2: Click on +New or Create a rule
-
STEP 3: Enter a name for the rule
-
STEP 4: Under Device template, select Seeed Wio Terminal

- STEP 5: Under Conditions, turn on time aggregation and select a time window of your choosing. Here we will set it as 5 minutes
Note: Every xx minutes, the rule evaluates once on the last xx minutes of data
-
STEP 6: Under Telemetry, select the telemetry of your chossing. Here we will set it as Light intensity
-
STEP 7: Under Aggregation, select Average. This will take the average value during the set time window before
-
STEP 8: Under Operator, select a condition of your choosing. Here we will use is less than condition
-
STEP 9: Under Value, type a value. Here we will type 50

-
STEP 10: Under Actions, click on Email
-
STEP 11: Type a Display name, To address and Note for the email

Note: Please note that the email address here should be added to this Azure IoT Central Application and also have signed-in at lease once.
- Navigate to
Administration > Users,click Assign user, fill in the Email, assign a Role and click Save

-
STEP 12: Click on Done
-
STEP 13: Finally, click Save
Now we have successfully created a rule to send an email
Control Hardware from Microsoft Azure IoT Central
You can not only view the telemetry data on Azure IoT Central, but also use it to control hardware as well. In this demo, we will be able to control the built-in buzzer on the Wio Terminal and specify a time duration in which the buzzer will beep
-
STEP 1: Click on the Command tab
-
STEP 2: Enter a value inside the column under Duration
Note: values are in milliseconds unit. ex: 1000 = 1000ms = 1s
- STEP 3: When you click Run, you will be able to hear a beeping sound from the buzzer for the time duration specified above

How to Add Other Sensors?
You can add any sensor to the Wio Terminal and send telemetry data from the connected sensor to Azure IoT Central. We will connect a Grove - Temperature & Humidity Sensor (DHT11) to the Wio Terminal and send temperature and humidity data to Azure IoT Central to visualize on dashboards!
Microsoft Visual Studio Code Set Up
Download, Install and Configure Visual Studio Code
If we want to add more sensors to the Wio Terminal in order to send telemetry data to Azure IoT Central, we cannot easily use the .uf2 file as we did before. Because the codes are already compiled inside that .uf2 file. So, if we want to add more codes to the demo, we need to use an IDE called Microsoft Visual Studio Code, add the necessary codes and finally upload them to the Wio Terminal.
So now, let's move on to installing Microsoft Visual Studio Code on the computer
- STEP 1: Visit code.visualstudio.com and click Download
Note: Choose the installer according to your operating system
-
STEP 2: Go through the installation wizard and complete the installation
-
STEP 3: Open Visual Studio Code
-
STEP 4: Click on Extensions from the left navigation menu and type platformIO in the search box

- STEP 5: Click install

Code for the Demo on Visual Studio Code
-
STEP 1: Visit this link to find the available releases inside the SeeedJP/wioterminal-aziot-example repo
-
STEP 2: Navigate to the Latest release and under Assets, click on Source code (zip). This will download the source code as a .zip file
-
STEP 3: Extract the .zip file
-
STEP 4: Go back to Visual Studio Code and navigate to
File > Open Folder... -
STEP 5: Choose the folder that we extracted before and click Select Folder
-
STEP 6: Navigate to
wioterminal-aziot-example-0.10 > include > config.hfrom the left navigation menu -
STEP 7: Once config.h is open, look for "dtmi:seeedkk:wioterminal:wioterminal_aziot_example;5" and change it to "dtmi:local:wioterminal_aziot_example;5"
Note: dtmi:local:wioterminal_aziot_example;5 is the Model ID
-
STEP 8: Navigate to
wioterminal-aziot-example-0.10 > seeedkk-wioterminal-wioterminal_aziot_example.jsonfrom the left navigation menu -
STEP 9: Once seeedkk-wioterminal-wioterminal_aziot_example.json is open, look for "dtmi:seeedkk:wioterminal:wioterminal_aziot_example;5" and change it to "dtmi:local:wioterminal_aziot_example;5" as well
Note: seeedkk-wioterminal-wioterminal_aziot_example.json is the DTDL model that we have mentioned before
Currently the model is defined for acceleration, light intensity and button count data. We will go ahead to add temperature and humidity to this DTDL model.
- STEP 10: Add the following codes below "contents": [:
  "contents": [
    {
      "@type": [
        "Telemetry",
        "Temperature"
      ],
      "name": "temp",
      "unit": "degreeCelsius",
      "displayName": {
        "en": "Temperature (C)",
        "ja": "温度"
      },
      "schema": "integer"
    },
    {
      "@type": "Telemetry",
      "name": "humi",
      "displayName": {
        "en": "Humidity (%RH)",
        "ja": "湿度"
      },
      "schema": "integer"
    },
Note: Here, name is what we will use to identify specific telemetry data later in the codes, unit is the unit corresponding to the data, displayName is the name which displays on Azure IoT Central ("en" for English/ "ja" for Japanese) and schema is the data type
-
STEP 11: Navigate to
wioterminal-aziot-example-0.10 > platformio.inifrom the left navigation menu -
STEP 12: Once platformio.ini is open, under lib_deps, add https://github.com/Seeed-Studio/Grove_Temperature_And_Humidity_Sensor
lib_deps =
    https://github.com/Seeed-Studio/Grove_Temperature_And_Humidity_Sensor
Note: This is the library for Grove - Temperature and Humidity Sensor (DHT11)
-
STEP 13: Navigate to
wioterminal-aziot-example-0.10 > src > main.cppfrom the left navigation menu -
STEP 14: Once main.cpp is open, add the DHT11 library after the line #include "CliMode.h"
#include "CliMode.h"
#include "DHT.h"
- STEP 15: Add the DHT11 definitions and the initializations after the line LIS3DHTR AccelSensor;
LIS3DHTR<TwoWire> AccelSensor;

#define DHTPIN 0 //Define signal pin of DHT sensor
// #define DHTPIN PIN_WIRE_SCL //Use I2C port as Digital Port */
#define DHTTYPE DHT11 //Define DHT sensor type
DHT dht(DHTPIN, DHTTYPE); //Initializing DHT sensor
Note: The DHT11 sensor can be connected to both the Grove Ports on the Wio Terminal. If Digital Port is used, pin can be defined as 0 and if I2C port is used, pin can be defined as PIN_WIRE_SCL. The port diagram will be shown later in this document
- STEP 16: Add the following codes under the SendTelemetry() function to parse the json file along with the telemetry data
static az_result SendTelemetry()
{
    float accelX;
    float accelY;
    float accelZ;
    AccelSensor.getAcceleration(&accelX, &accelY, &accelZ);

    int light;
    light = analogRead(WIO_LIGHT) * 100 / 1023;

    int temp; //assign variable to store temperature
    int humi; //assign variable to store humidity
    temp = dht.readTemperature(); //read temperature
    humi = dht.readHumidity(); //read humidity

    char telemetry_topic[128];
    if (az_result_failed(az_iot_hub_client_telemetry_get_publish_topic(&HubClient, NULL, telemetry_topic, sizeof(telemetry_topic), NULL)))
    {
        Log("Failed az_iot_hub_client_telemetry_get_publish_topic" DLM);
        return AZ_ERROR_NOT_SUPPORTED;
    }

    az_json_writer json_builder;
    char telemetry_payload[200];
    AZ_RETURN_IF_FAILED(az_json_writer_init(&json_builder, AZ_SPAN_FROM_BUFFER(telemetry_payload), NULL));
    AZ_RETURN_IF_FAILED(az_json_writer_append_begin_object(&json_builder));
    AZ_RETURN_IF_FAILED(az_json_writer_append_property_name(&json_builder, AZ_SPAN_LITERAL_FROM_STR("temp")));
    AZ_RETURN_IF_FAILED(az_json_writer_append_int32(&json_builder, temp));
    AZ_RETURN_IF_FAILED(az_json_writer_append_property_name(&json_builder, AZ_SPAN_LITERAL_FROM_STR("humi")));
    AZ_RETURN_IF_FAILED(az_json_writer_append_int32(&json_builder, humi));
- STEP 17: Add the following codes after the line ntp.begin, in order to start the DHT11 sensor
dht.begin(); //start DHT sensor
Now we have completed all the codes for this demo.
- STEP 18: Click PlatformIO icon from the left navigation menu and click Build

If you see the following message, you have successfully compiled the code:
================================== [SUCCESS] Took 30.56 seconds ==================================
Microsoft Azure IoT Central Set Up
Now we need to create a custom device template so that the data from the Wio Terminal can be visualized on Azure IoT Central Dashboard
Creating a New Device Template
-
STEP 1: Visit Azure IoT Central and click
Device templatesfrom the left navigation menu -
STEP 2: Click + New, click IoT device and click Next:Customize
-
STEP 3: Type a name inside Device template name box and click Next:Review
-
STEP 4: Click Create
Importing a Custom Device Model
-
STEP 1: Click Import a model
-
STEP 2: Navigate to the wioterminal-aziot-example-0.10 folder that we used before, find seeedkk-wioterminal-wioterminal_aziot_example.json file and click on it
-
STEP 3: Click Open
-
STEP 4: Click Views from the left menu and click Generate default views
-
STEP 5: Click Generate default dashboard view(s)
-
STEP 6: Navigate to Overview from the left menu and customize the dashboard according to your preference.
Note: We have previously mentioned in this document, how to customize the dashboard
- STEP 7: Follow the below configuration
| Tile Name | Tile Size | Tile Visualization |
|---|---|---|
| Light Intensity | 2 x 2 | Line chart |
| Light Intensity | 1 x 1 | Last Known Value |
| Temperature (C), Humidity (%RH) | 2 x 2 | Line chart |
| Temperature (C) | 1 x 1 | Last Known Value |
| Humidity (%RH) | 1 x 1 | Last Known Value |
| Left button | 1 x 1 | KPI |
| Middle button | 1 x 1 | KPI |
| Right button | 1 x 1 | KPI |

- STEP 8: Click Save and Publish
Wio Terminal Set Up
Hardware Set Up
- Connect the Grove - Temperature and Humidity Sensor (DHT11) to Grove Digital Port on the Wio Terminal

Software Set Up
Upload Code to Wio Terminal
Now we need to upload the code to the Wio Terminal to send the telemetry data to Azure IoT Central
- STEP 1: Go back to VS Code, click PlatformIO icon and click Upload

Wi-Fi and Azure IoT Configuration
Next, let's move on to configuring Wi-Fi and Azure IoT connection just like we did before
- STEP 1: Hold down on the 3 buttons and turn ON the Wio Terminal to enter the configuration mode

-
STEP 2: Open a serial console application such as PUTTY
-
STEP 3: Type the correct serial COM Port, set 9600 as the baud rate and enter the Wio Terminal

- STEP 4: Press ENTER on the keyboard and type help in the serial terminal to view the configuration usage
Note: Now we don't need to enter WiFi SSID and password because they are already saved from the previous configuration
-
STEP 5: Set connection information of Azure IoT by visiting the previously created application on Azure IoT Central
-
STEP 6: Navigate to
Administration > Device Connectionfrom the left navigation menu, and copy the ID scope into notepad -
STEP 7: Click on SAS-IoT-Devices and copy the primary key into notepad
-
STEP 8: Visit previously opened serial terminal and type set_az_iotc
your_ID_scopeyour_primary_keyyour_device_name
Note: Make sure to add a single space between each field and you can decide on a device name of your choice.
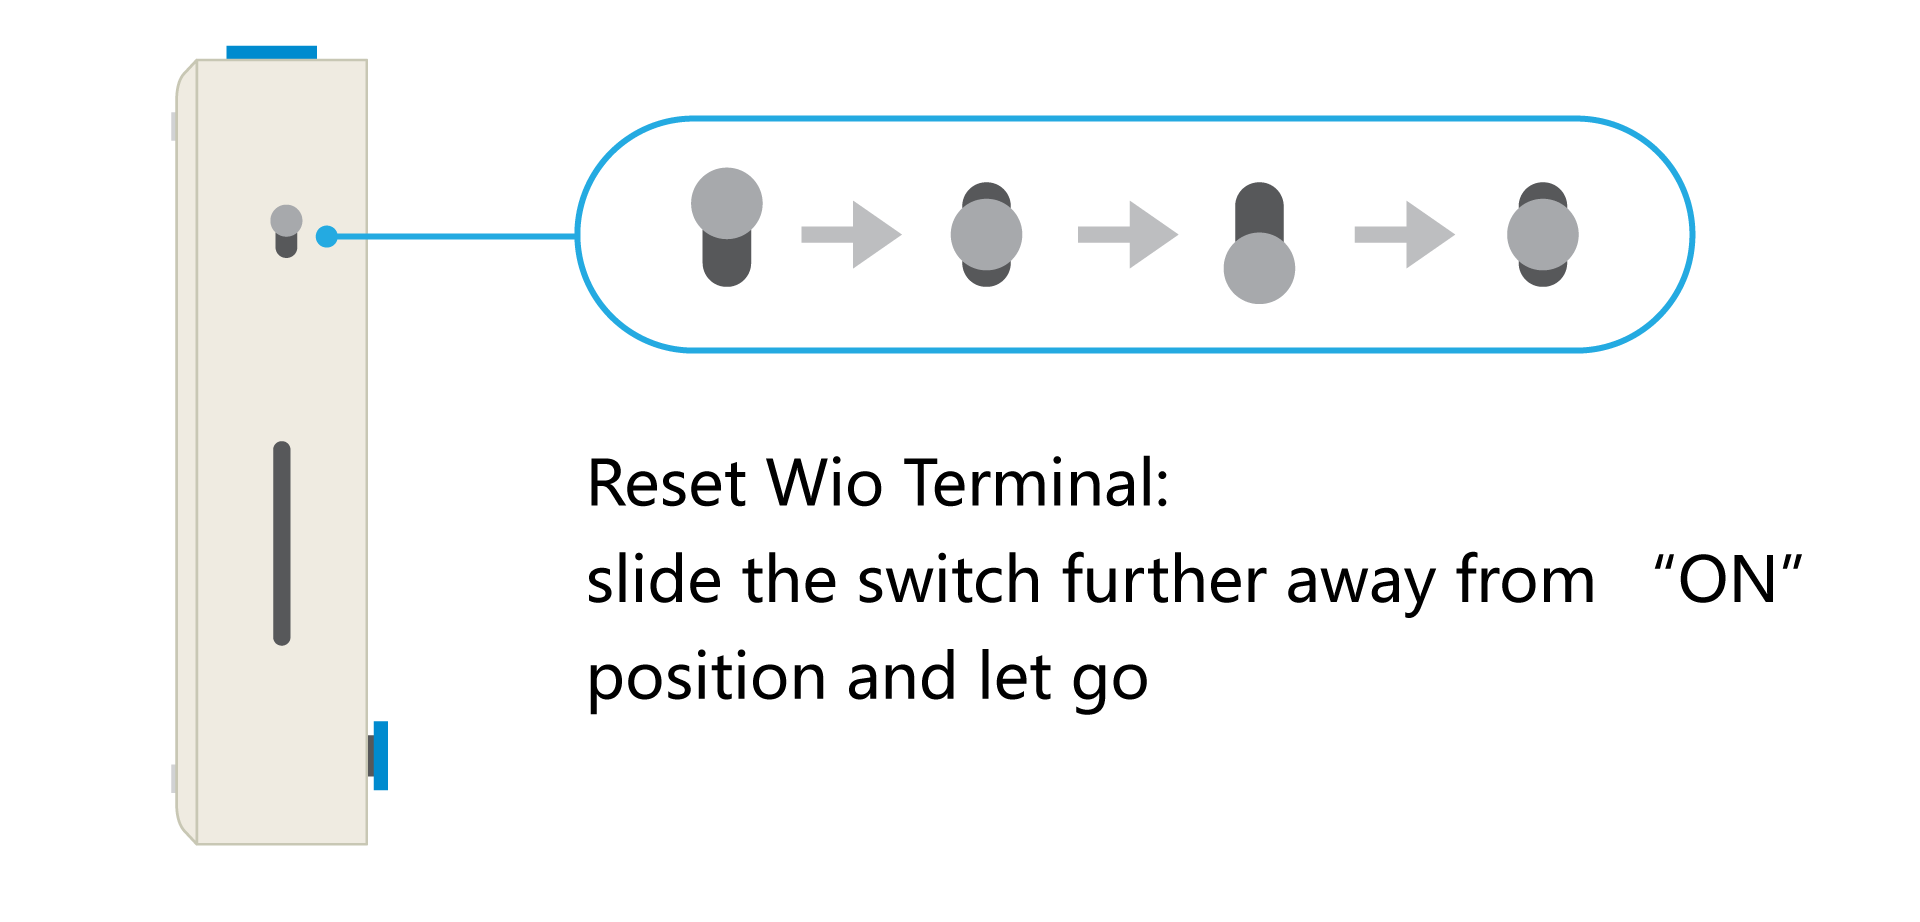
- STEP 9: Reset the Wio Terminal by sliding down the switch further away from the ON position and releasing
Now you will be able to see the Wio Terminal LCD displaying that it's connecting to Wi-Fi and then Azure IoT Hub. After that, it will show the telemetry data being sent to Azure IoT Central.
Visualize on Azure IoT Central
Go back to Azure IoT Central and from the left navigation menu, click Devices, click on your Device name

Now you will be able to visualize all the sensor data from the Wio Terminal on Microsoft Azure IoT Central Dashboard!