Download Arduino and install Arduino driver

Download the Arduino Environment
Now Arduino IDE is available for Window, Mac OS X and Linux.Please click the button below to download.
 ](https://www.arduino.cc/en/Main/Software)
We recommend using the latest version of the Arduino DIE.
Setup the Arduino IDE
For Window and Mac OS X
Download the corresponding software,and click the setup.exe,then follow the instruction will be OK.
For Linux
Please go to
Connect Seeeduino to PC
Connect the Seeeduino board to your computer using the USB cable. The green power LED (labeled PWR) should go on.
Install the driver
Installing drivers for the Seeeduino with window7
-
Plug in your board and wait for Windows to begin its driver installation process. After a few moments, the process will fail.
-
Open the Device Manager by right clicking “My computer” and selecting control panel.
-
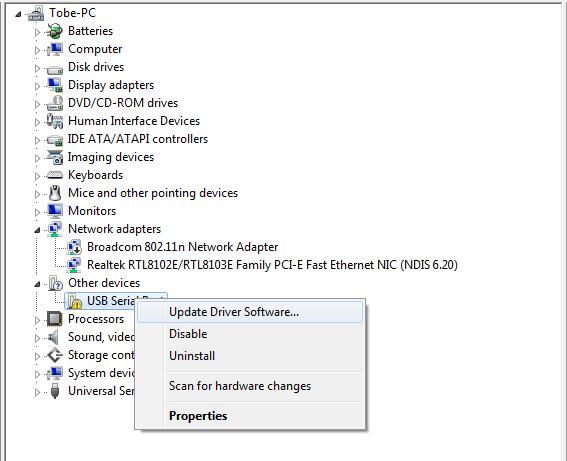
Look under Ports (COM & LPT). You should see an open port named "USB Serial Port" Right click on the "USB Serial Port" and choose the "Update Driver Software" option.
- Next, choose the "Browse my computer for Driver software" option.

- Finally, select the driver file named "FTDI USB Drivers", located in the "Drivers" folder of the Arduino Software download.

- The below dialog boxes automatically appears if you have installed driver successfully.

- You can check that the drivers have been installed by opening the Windows Device Manager. Look for a "USB Serial Port" in the Ports section.

- You can also see the serial port in Arduino environment.

Installing drivers for the Seeeduino with window8
You should save these files which you are editing before installing driver with window8,because there will several power off during operating.
-
Press “Windows Key” +”R”
-
Enter shutdown.exe /r /o /f /t 00
-
Click the "OK" button.
-
System will restart to a "Choose an option" screen
-
Select "Troubleshoot" from "Choose an option" screen
-
Select "Advanced options" from "Troubleshoot" screen
-
Select "Windows Startup Settings" from "Advanced options" screen
-
Click "Restart" button
-
System will restart to "Advanced Boot Options" screen
-
Select "Disable Driver Signature Enforcement"
-
Once the system starts, you can install the Arduino drivers as same as Windows
Installing drivers for the Seeeduino with Mac OS
-
Enter page: https://www.ftdichip.com.
-
Download Driver for the Mac OS X version, named 2.2.18 (32bit)

- Open the driver file which you just download, and double click FTDIUSBSerialDriver_10_4_10_5_10_6_10_7.mpkg

- After double click, you will see an installer window.

- Click “Continue”.

- You can see the below dialog boxes if you have installed driver successfully.

- Test it with Seeeduino

add
Install the Driver
First of all, you need to:
-
Get a Micro-USB cable
- You need a Micro-USB cable first; the data cable of an Android Phone will do fine. If you can't find one, you can buy one here.
-
Connect the board
- The Seeeduino V4.2 automatically draw power from either the USB connection to the computer or an external power supply. Connect the Arduino board to your computer using the USB cable. The green power LED (labelled PWR) should go on.
For Windows
This drive is available for Windows XP, Windows Vista, Windows 7, Windows 8/8.1 and Windows 10.

- Plug in your board and wait for Windows to begin its driver installation process. After a few moments, the process will fail, despite best efforts.
- Click on the Start Menu, and open up the Control Panel.
- While in the Control Panel, navigate to System and Security. Next, click on System. Once the System window is up, open the Device Manager.
- Look under Ports (COM & LPT). You should find an open port named "Seeeduino v4.2". If there is no COM & LPT section, look under "Other Devices" for "Unknown Device".
- Right click on the "Seeeduino v4.2" port and choose the "Update Driver Software" option.
- Next, choose the "Browse my computer for Driver software" option.
- Finally, navigate to and select the driver file named "seeed_usb_serial.inf"
- Windows will finish up the driver installation from there.
For Mac OSX
You don't need to install any drivers.
For Linux
Getting Started on Linux
For using on Linux, please go to Installing Arduino on Linux
You don't need to install any drivers.
First of all, you need to Install an Arduino Software.
Q1. What's the difference between Arduino UNO and Seeeduino v4.2
Seeeduino v4.2 is fully compatible with Arduino UNO. The mainly difference list below:
- Use a micro USB to power and program the board
- 3 on-board Grove connector
- 3.3/5V system power switch
- DCDC circuit instead of LDO, more efficiency
- Others circuit improve
Q2. I can't upload my sketch to Seeeduino v4.2
Please check,
- If the Power LED on
- If you choose the right Port and Board (Seeeduino v4.2)
- Close and reopen Arduino IDE and try again
Q3. Where can I find technical support if I have some other issue
You can post a question to Seeed Forum .
Tech Support & Product Discussion
Thank you for choosing our products! We are here to provide you with different support to ensure that your experience with our products is as smooth as possible. We offer several communication channels to cater to different preferences and needs.