XIAO ePaper Display Board(ESP32-S3) - EE04 ePaper Display Work with ESPHome
What is ESPHome?
ESPHome is an open-source firmware framework that simplifies the process of creating custom firmware for popular WiFi-enabled microcontrollers. With ESPHome, you can:
- Create custom smart home devices using simple YAML configuration files
- Integrate seamlessly with Home Assistant for a unified smart home experience
- Control and monitor your devices through multiple interfaces (web, API, MQTT)
- Automate your home with powerful on-device automations
- Update your devices wirelessly “Over The Air” (OTA) updates without physical access
Getting Started
Hardware Overview
| XIAO ePaper Display Board(ESP32-S3) - EE04 | Home Assistant Green |
|---|---|
 |  |
Home Assistant Green is the easiest and most privacy-focused way to automate your home. It offers an effortless setup and allows you to control all the smart devices with just one system, where all the data is stored locally by default. This board benefits from the thriving Home Assistant ecosystem and it will be improved every month by open source.
We have also written how to install Home Assistant for some of Seeed Studio products, please refer to them.
- Getting Started with Home Assistant on ODYSSEY-X86
- Getting Started with Home Assistant on LinkStar H68K/reRouter CM4
If you are not using a Seeed Studio product, you can also check and learn how to install Home Assistant for other products on the official Home Assistant website.
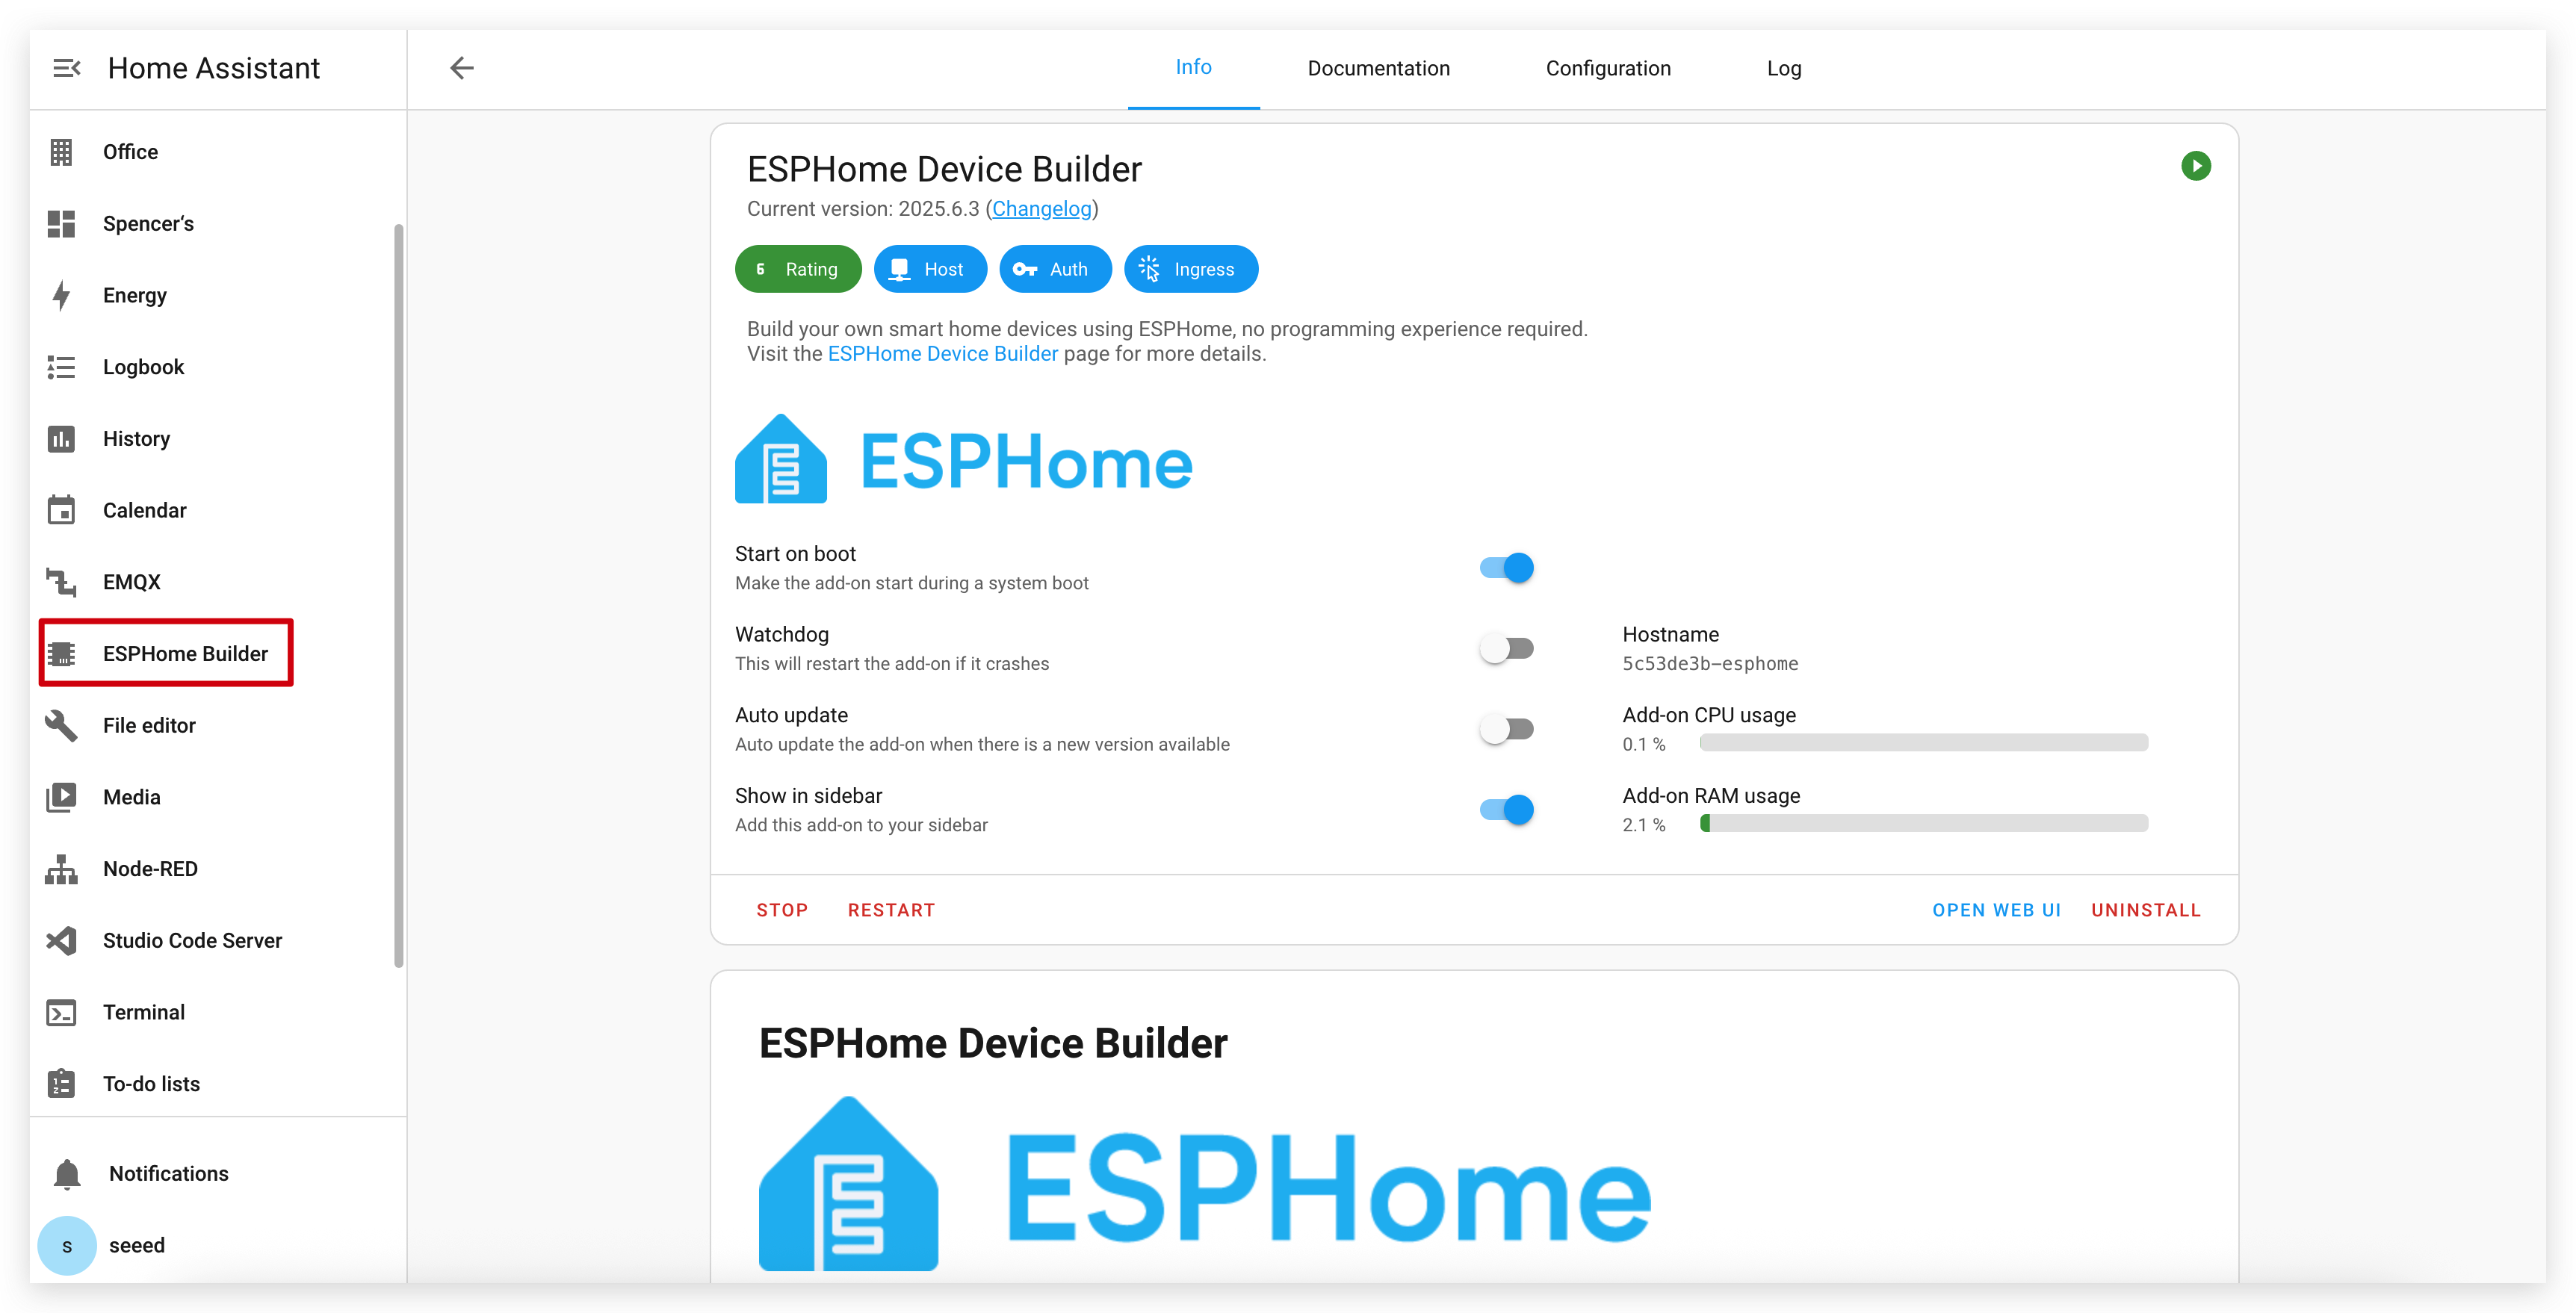
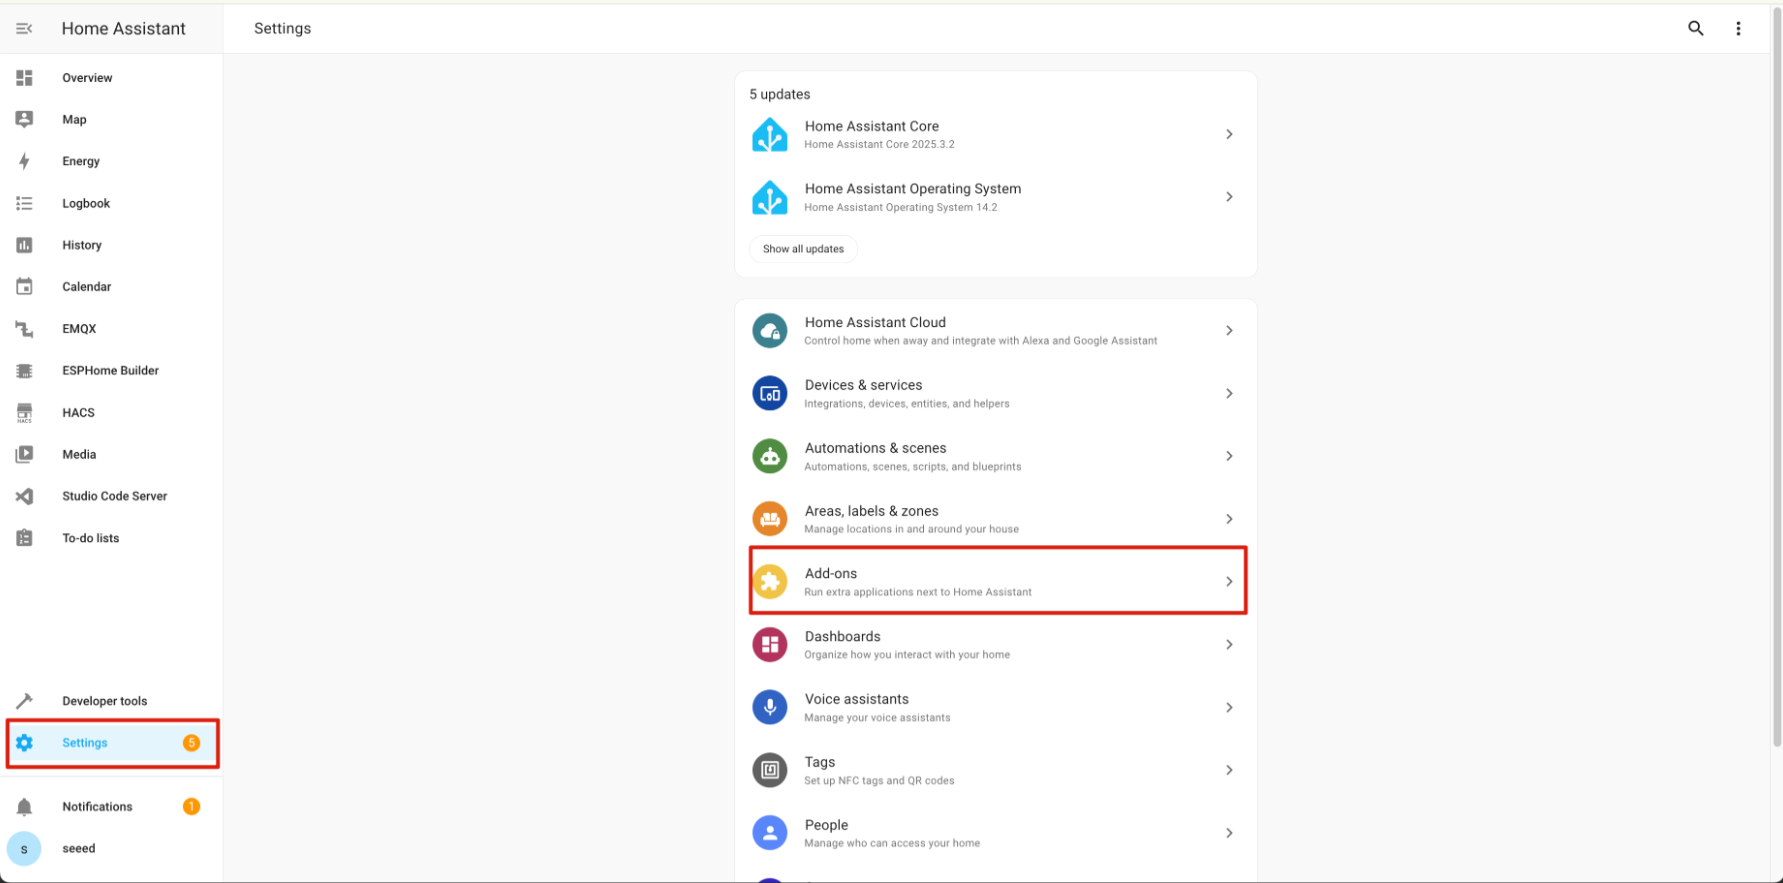
Step 1. Install ESPHome
Go to Settings -> Add-ons -> ADD-ON STORE

Enter the search term ESPHome.
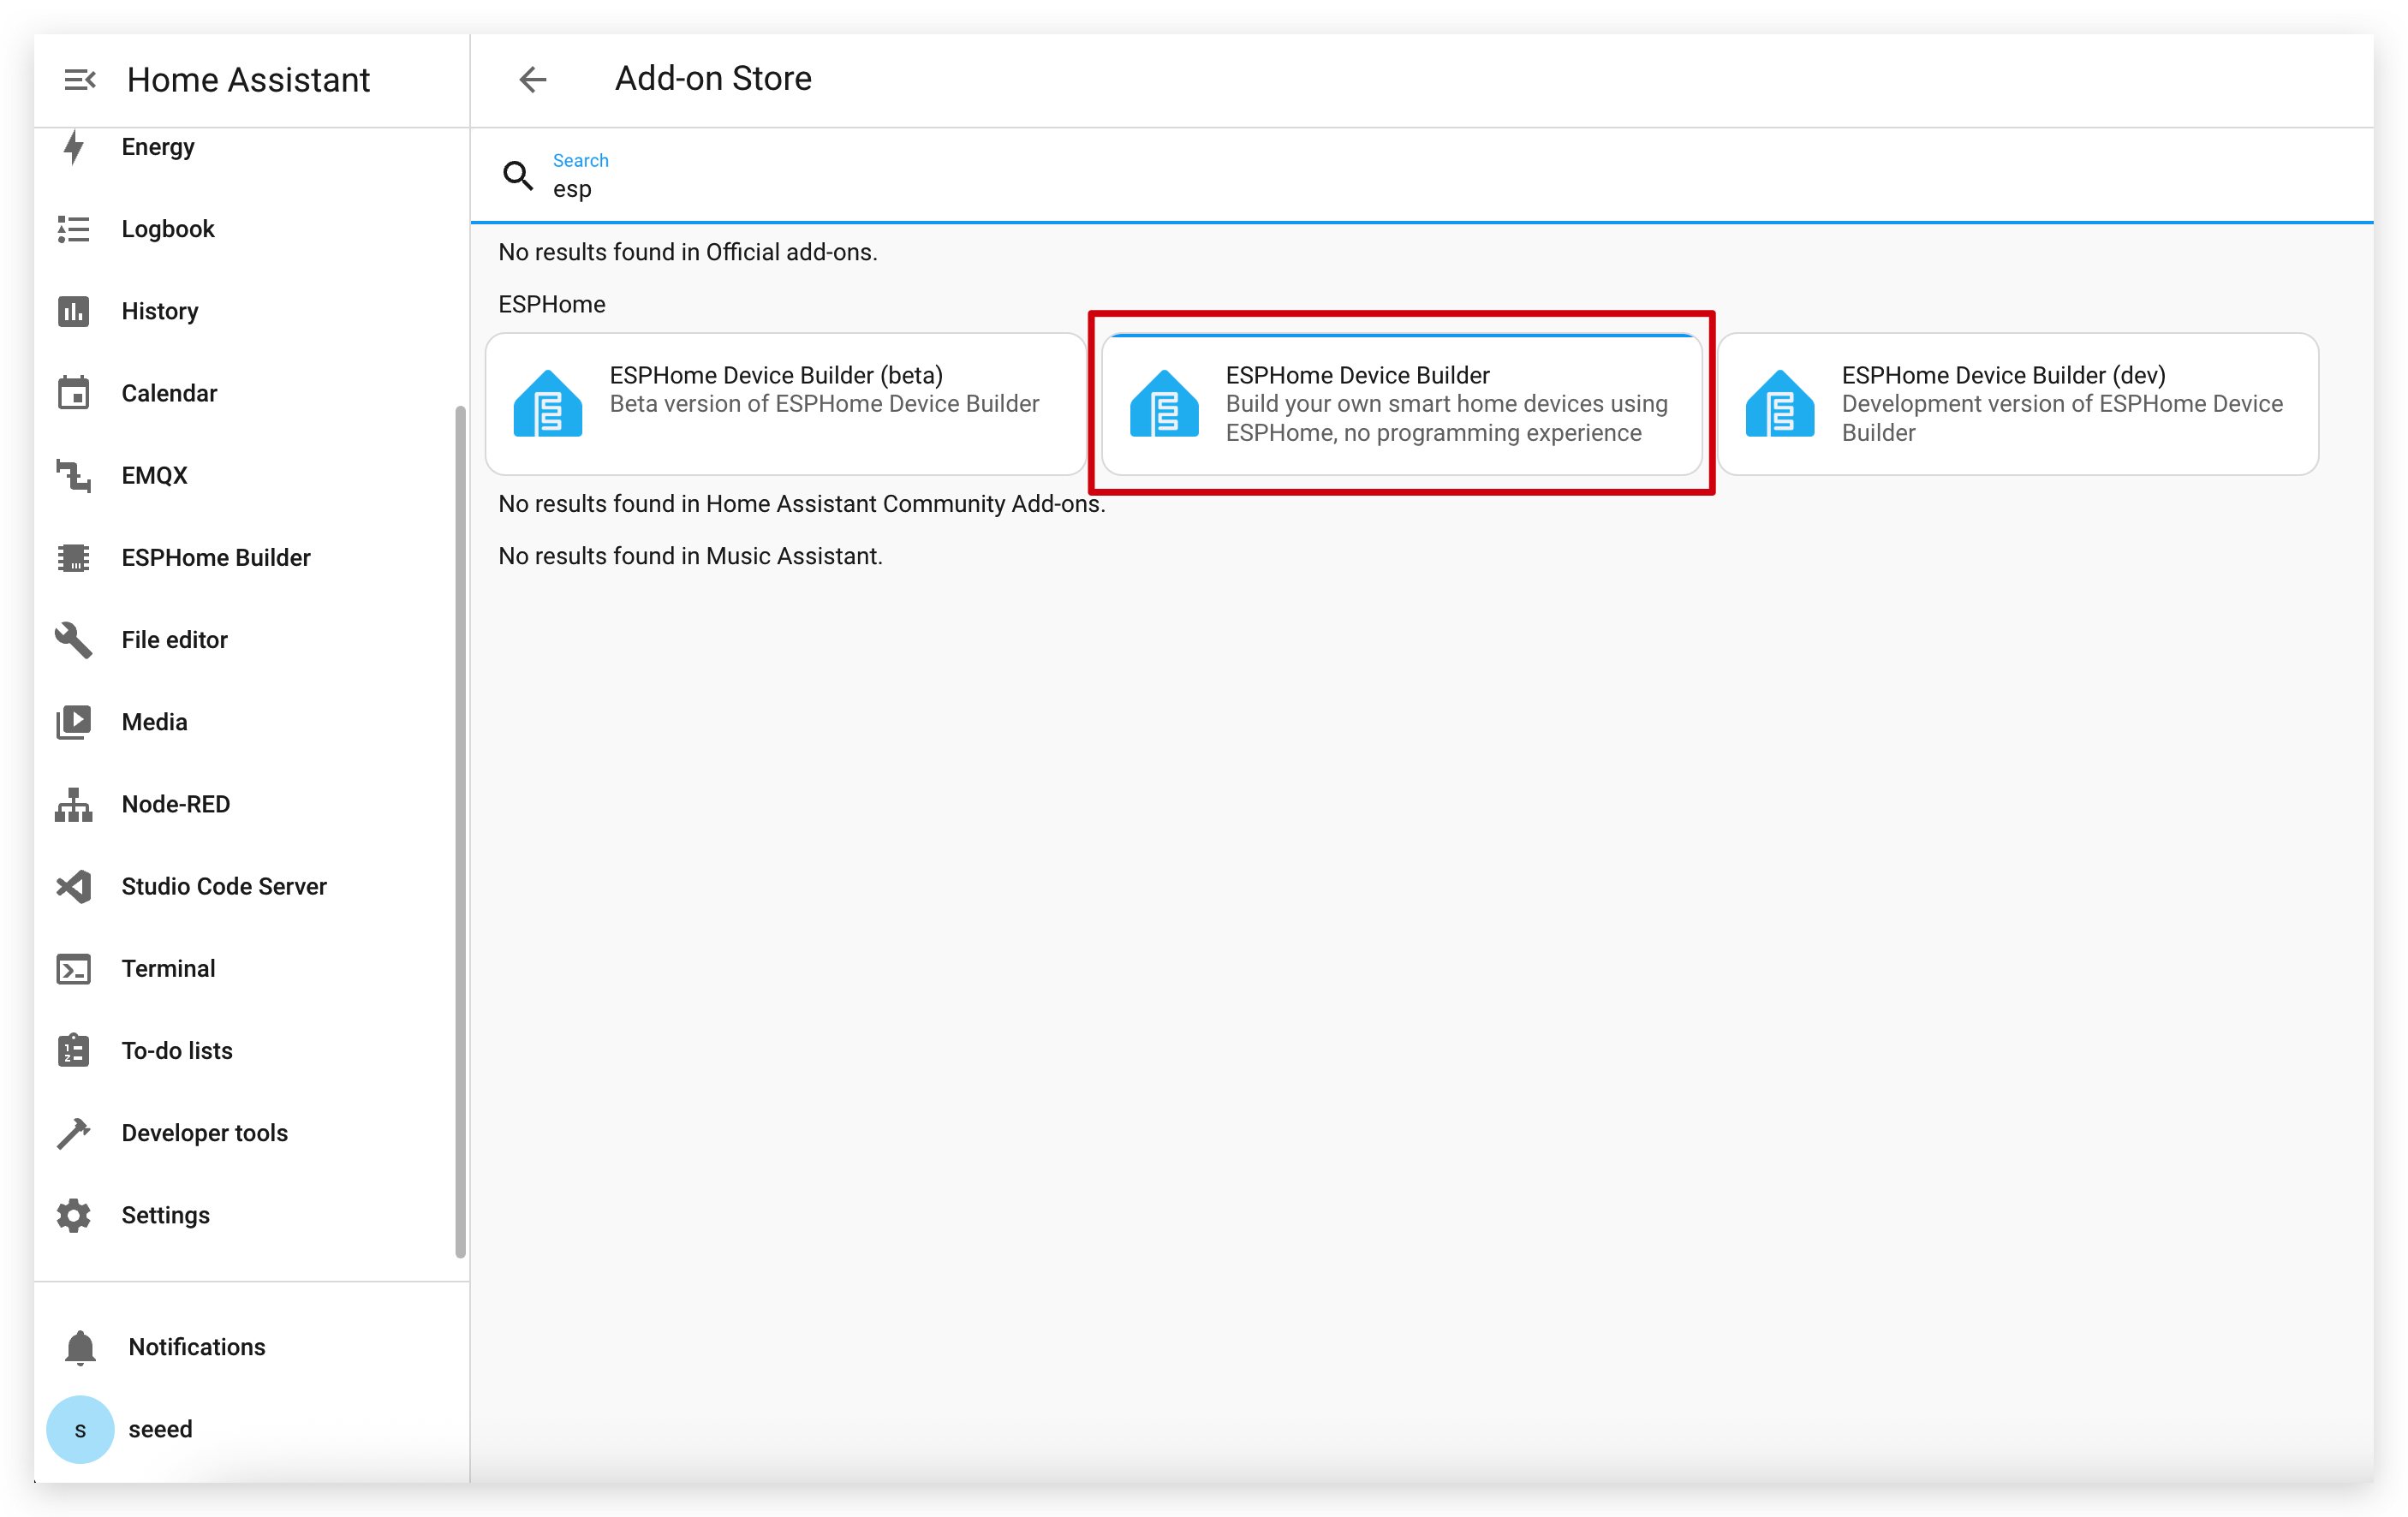
Click on INSTALL and START.
If you can't find ESPHome in the add-on store, make sure you're using a Home Assistant installation that supports add-ons (like Home Assistant OS or supervised installations). For other installation types (like Home Assistant Container), you may need to run the ESPHome Device Builder independently using Docker. See the official ESPHome documentation for more details.
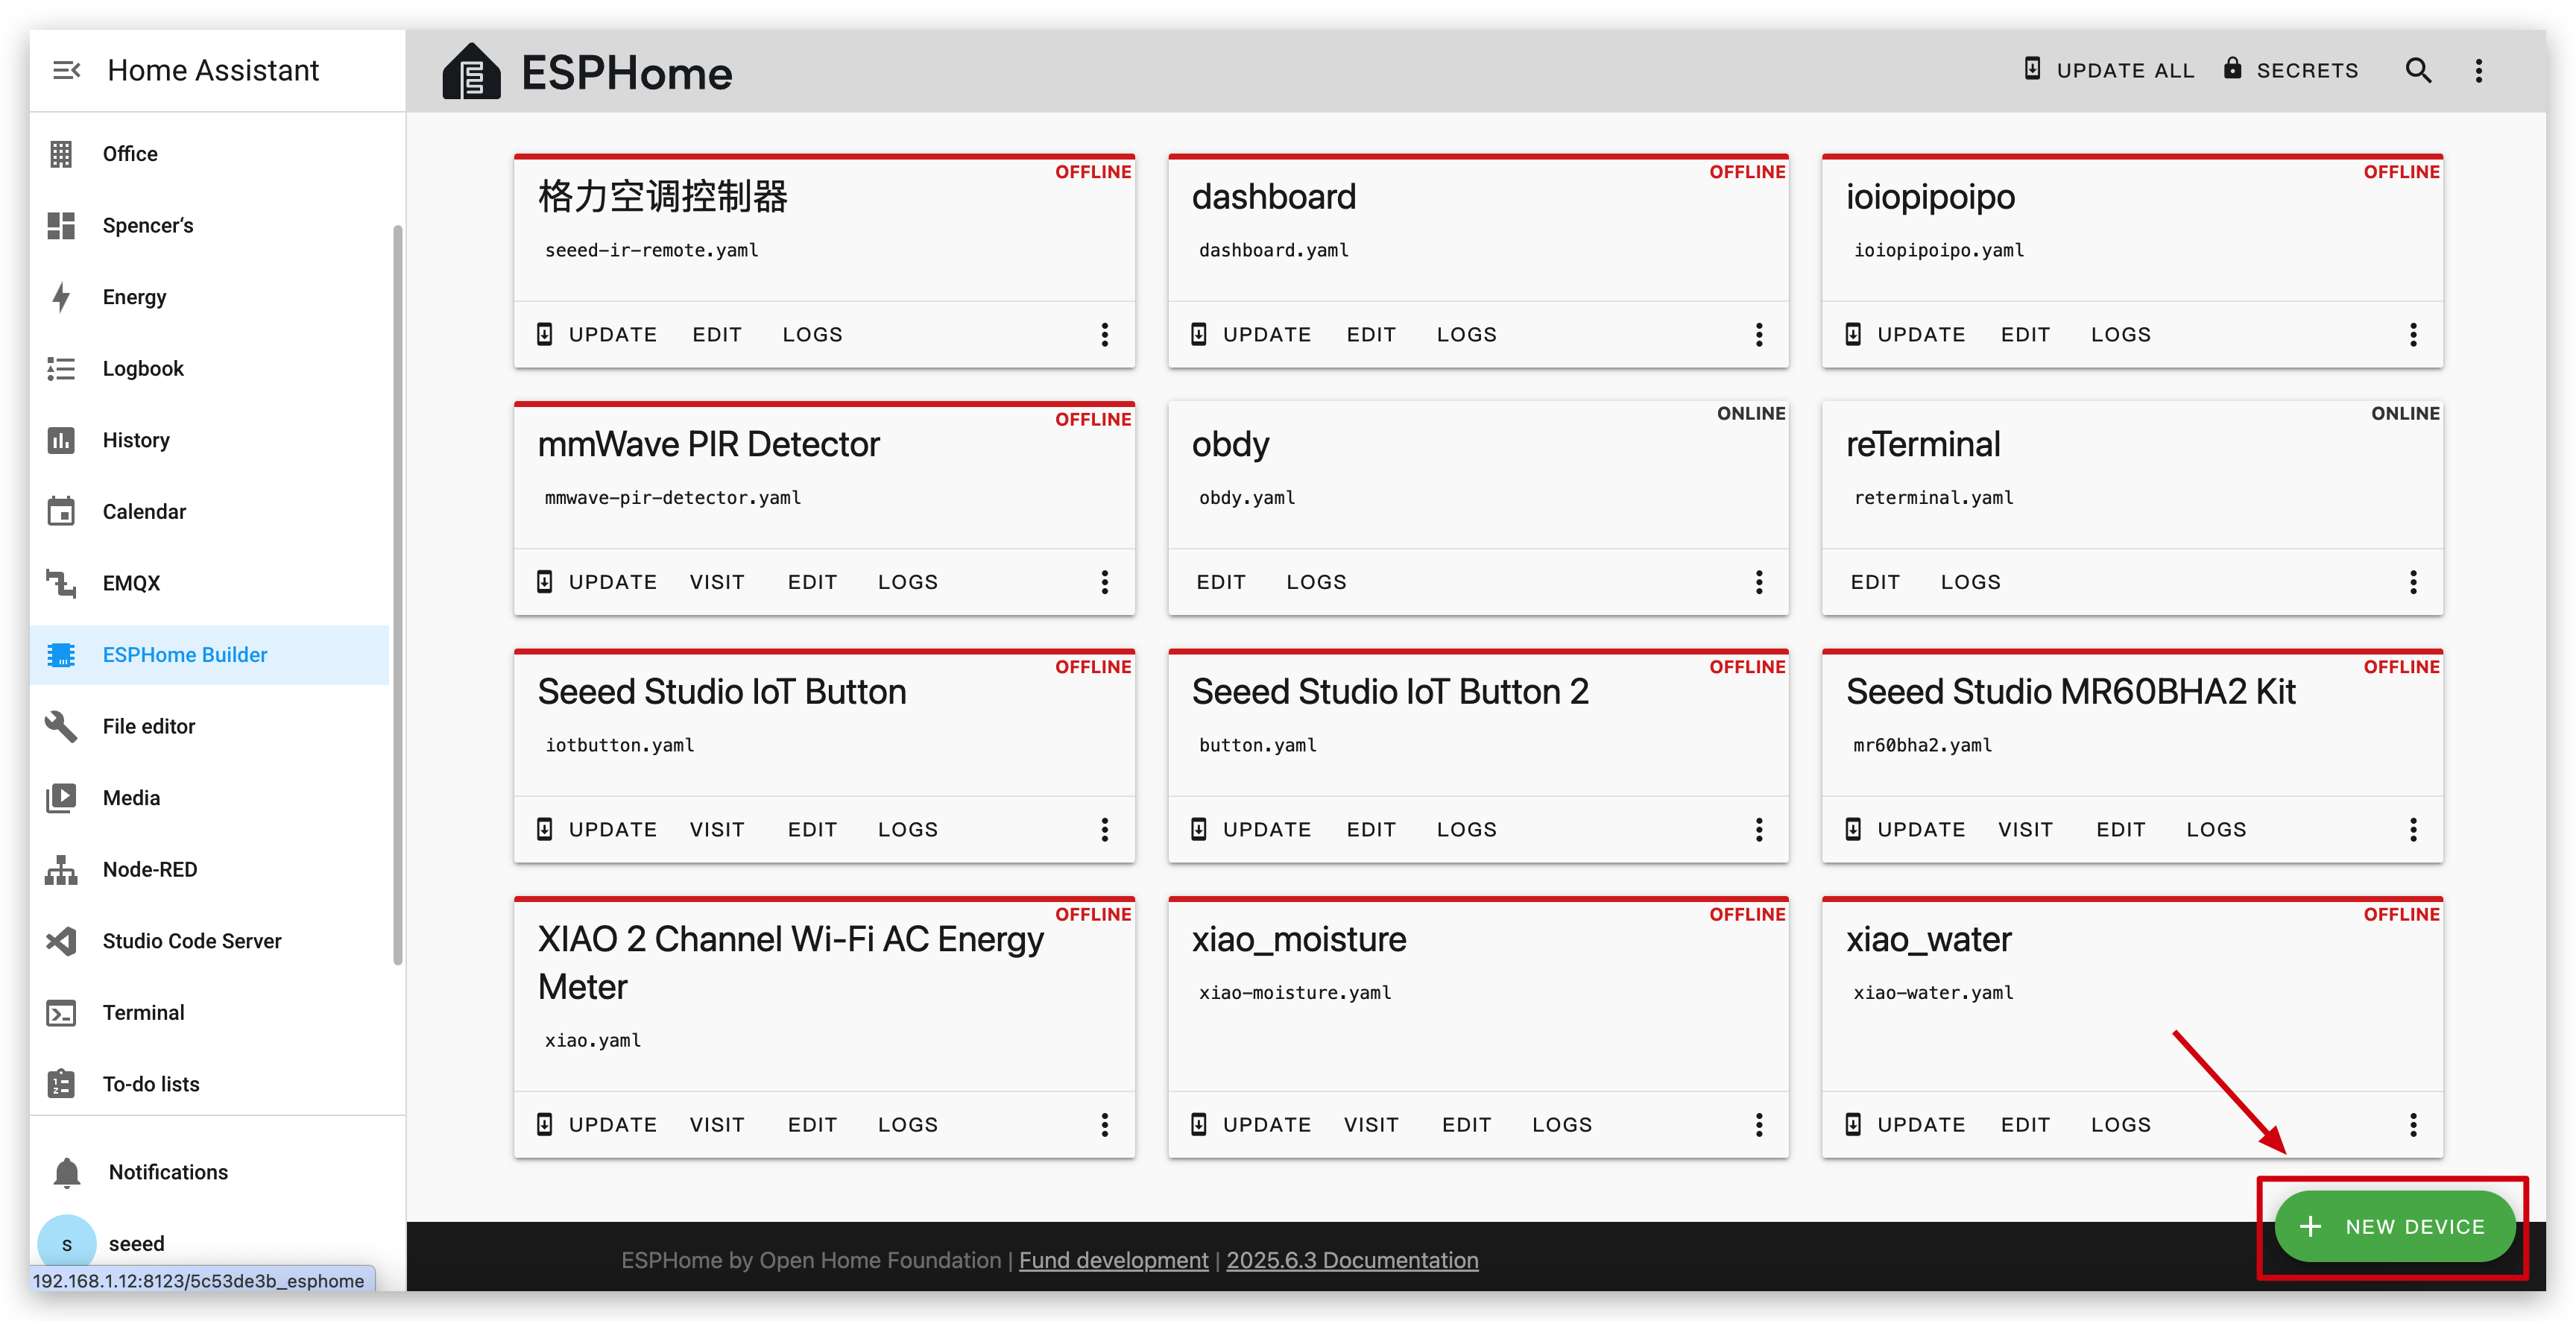
Step 2. Add a new device
Go to ESPHome and click on NEW DEVICE.
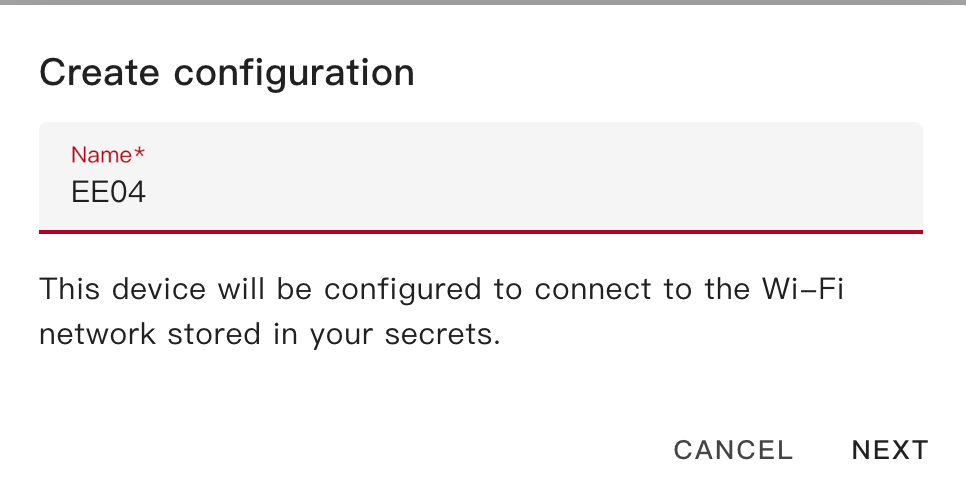
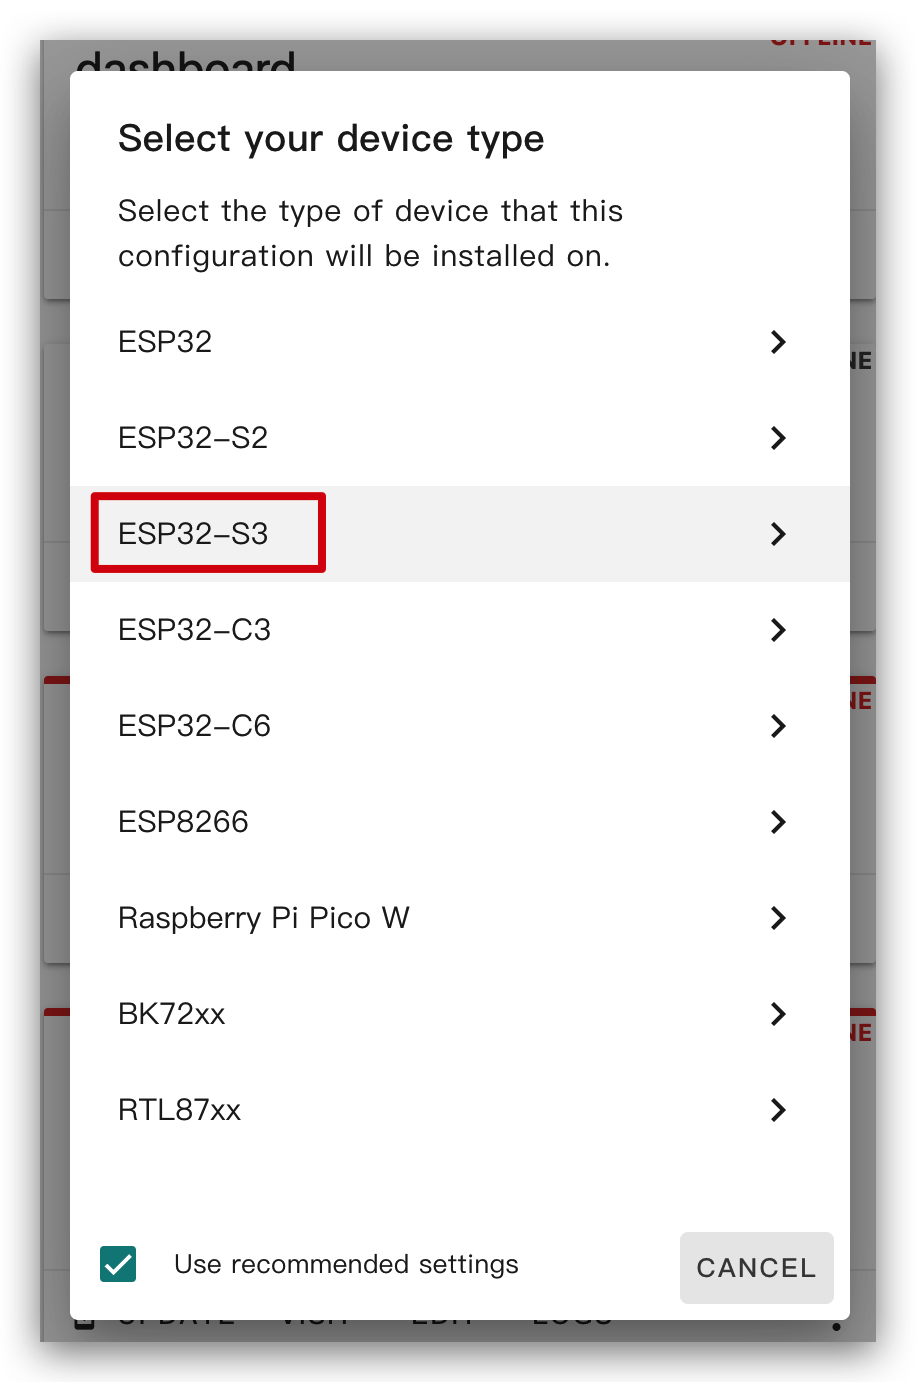
Give the XIAO ePaper Display Board(ESP32-S3) - EE04 a name you like and select ESP32-S3 for chip type, then click on SKIP.
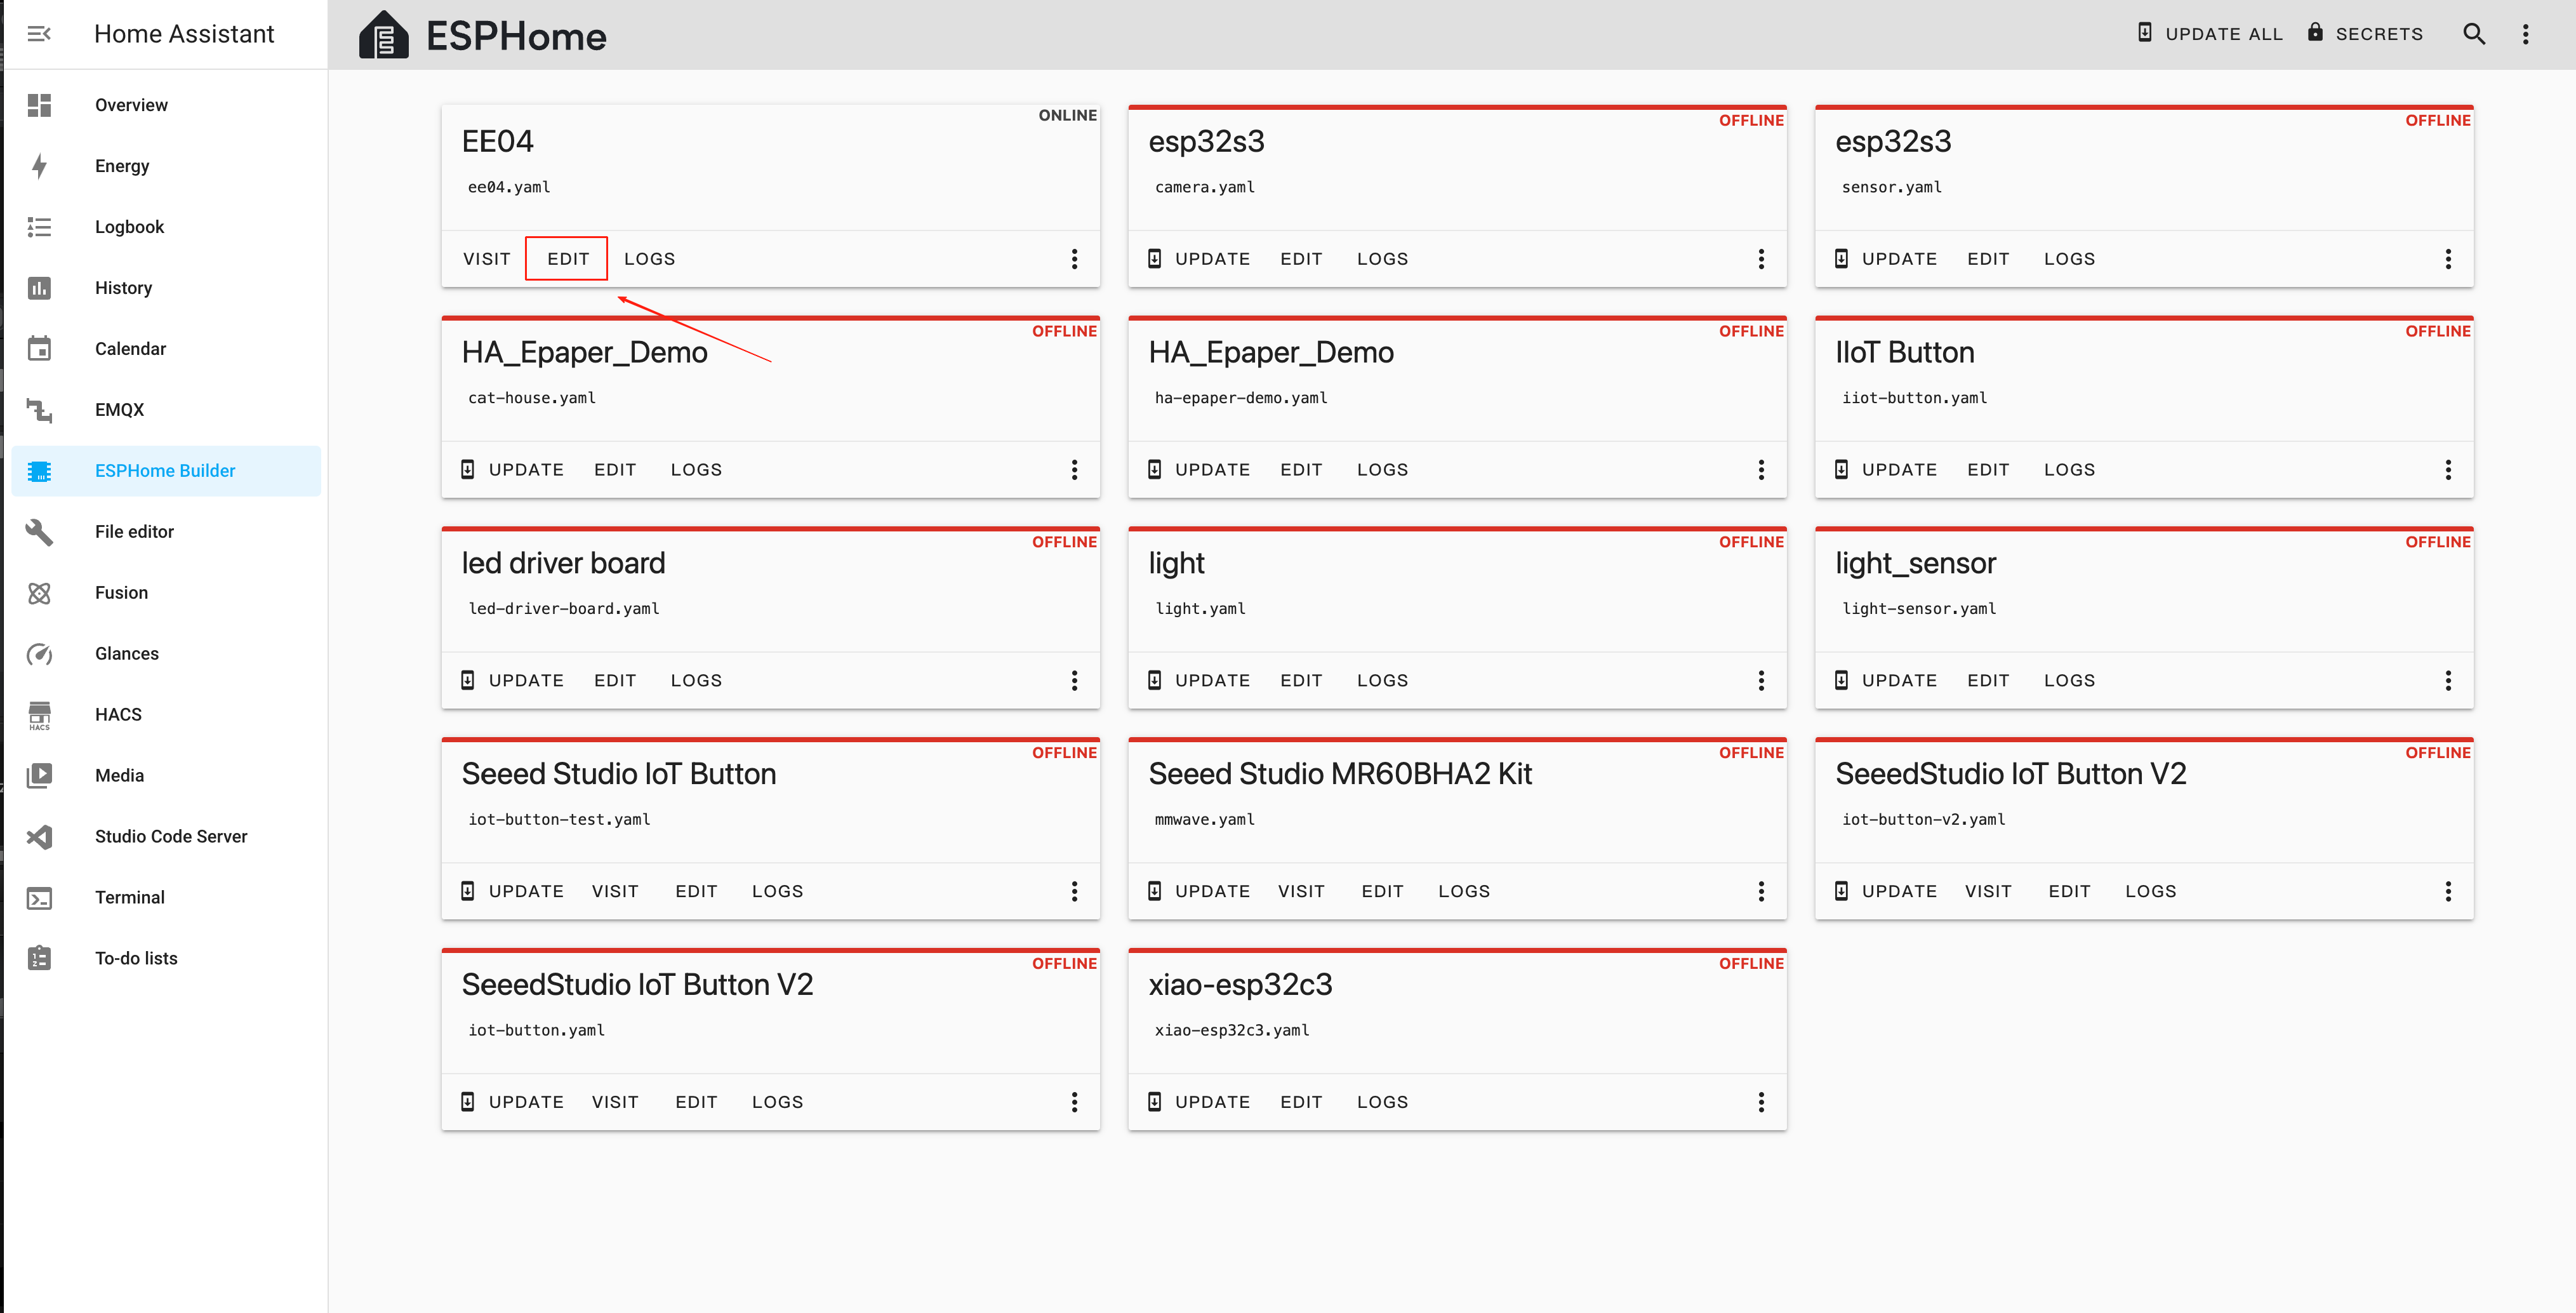
After you create a new device, click EDIT.
Step 3. Install firmware
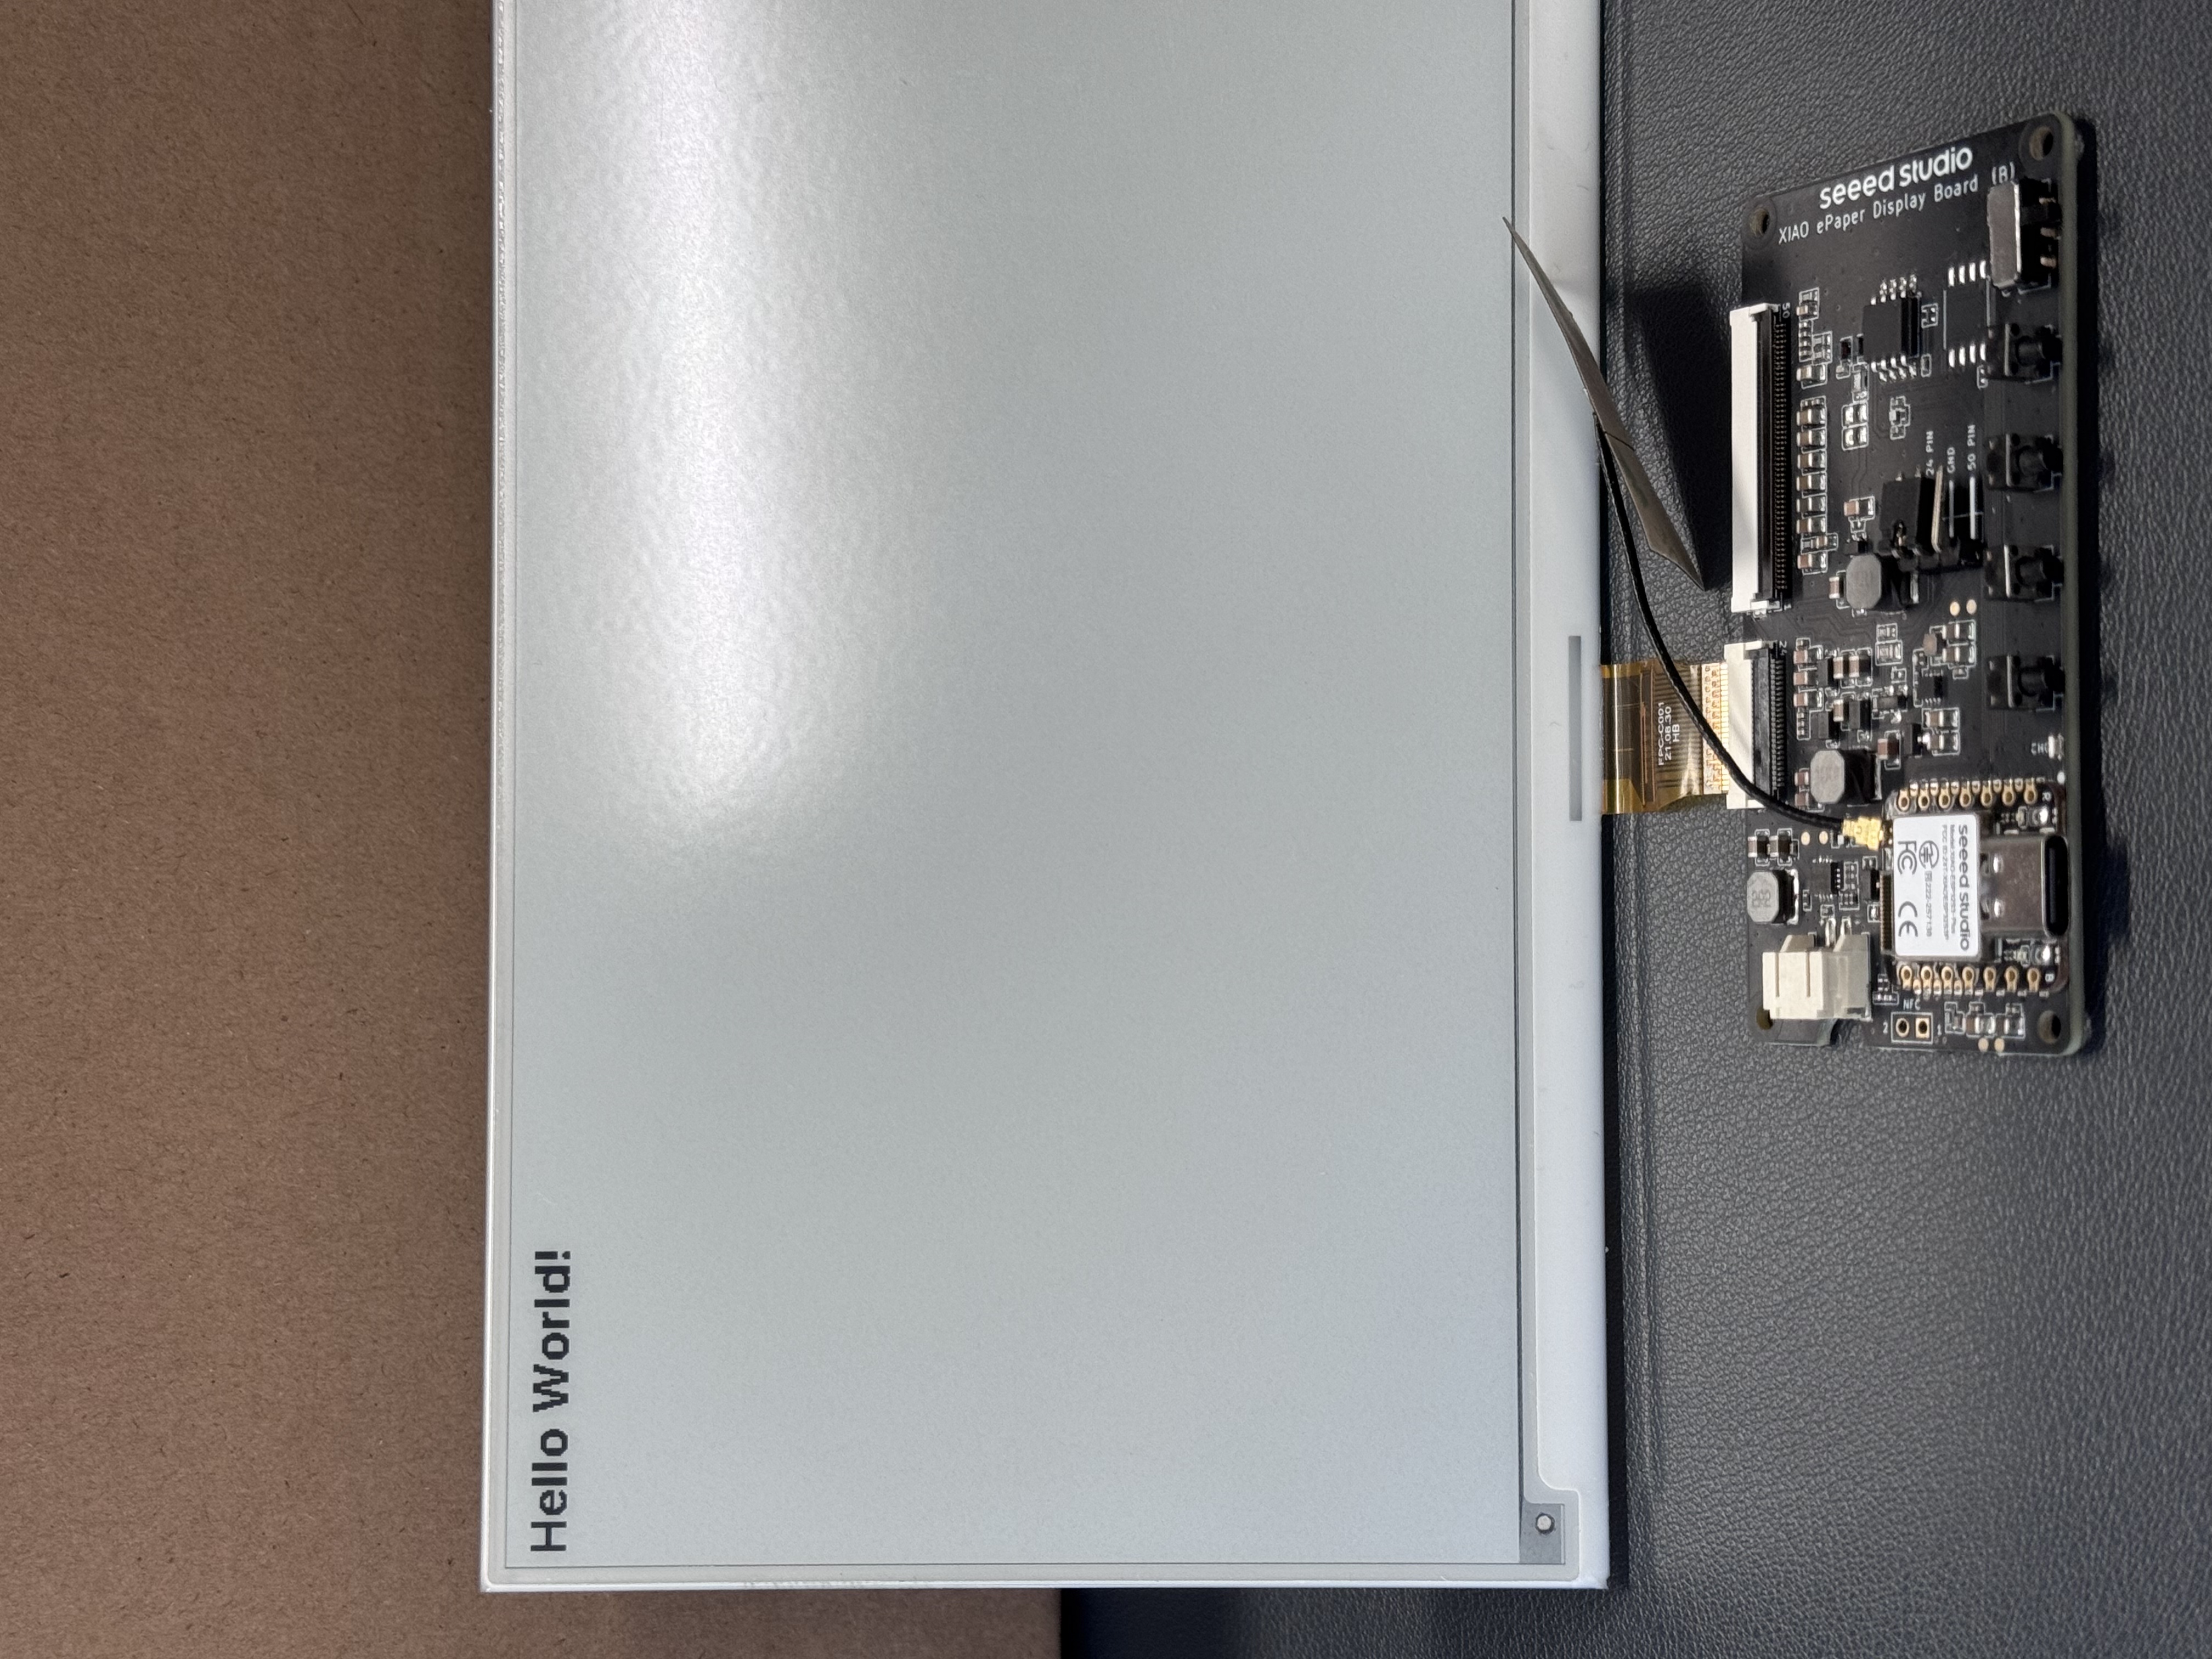
This is a basic example and will show "Hello World!" on the display.
The main purpose is to show you different ways to install firmware to the device.
You can use this example by copying the code below and pasting it after the captive_portal code line in your YAML file.
- Since the following routine requires fonts before downloading the firmware, please click this link to complete the configuration.
ssid:,password:Here you need to add the network name and password.- The Quadruple Color 2.13 and Quadruple Color 2.9 use external libraries, so the
boardnames used in ESPHome differ.
The following are 24-pin connector screen types:
- 1.54 Inch Monochrome Color
- 2.13 Inch Monochrome Color
- 2.13 Inch Quadruple Color
- 2.9 Inch Monochrome Color
- 2.9 Inch Quadruple Color
- 4.2 Inch Monochrome Color
- 5.83 Inc Monochrome Color
- 7.5 Inch Monochrome Color
esphome:
  name: ee04
  friendly_name: EE04

esp32:
  board: esp32-s3-devkitc-1
  framework:
    type: esp-idf

# Enable logging
logger:

# Enable Home Assistant API
api:
  encryption:
    key: "b0AIbJ+kbeMayi1PgSGXtiD1yQCapUBF4A/7v7btys0="

ota:
  - platform: esphome
    password: "5d7cca6f4b3f38aba559ab0d6aaf5926"

wifi:
  ssid:
  password:

  # Enable fallback hotspot (captive portal) in case wifi connection fails
  ap:
    ssid: "Ee04 Fallback Hotspot"
    password: "zxPMBtCEWonm"

# define font to display words
font:
  - file: "gfonts://Inter@700"
    id: myFont
    size: 24

captive_portal:

# define SPI interface
spi:
  clk_pin: GPIO7
  mosi_pin: GPIO9

display:
  - platform: waveshare_epaper
    id: epaper_display
    model: 1.54inv2
    cs_pin: GPIO44
    dc_pin: GPIO10
    busy_pin: GPIO4
    reset_pin:  GPIO38
    rotation: 0
    update_interval: 300s
    lambda: |-
      it.print(0, 0, id(myFont), "Hello World!");
esphome:
  name: ee04
  friendly_name: EE04

esp32:
  board: esp32-s3-devkitc-1
  framework:
    type: esp-idf

# Enable logging
logger:

# Enable Home Assistant API
api:
  encryption:
    key: "b0AIbJ+kbeMayi1PgSGXtiD1yQCapUBF4A/7v7btys0="

ota:
  - platform: esphome
    password: "5d7cca6f4b3f38aba559ab0d6aaf5926"

wifi:
  ssid:
  password:

  # Enable fallback hotspot (captive portal) in case wifi connection fails
  ap:
    ssid: "Ee04 Fallback Hotspot"
    password: "zxPMBtCEWonm"

# define font to display words
font:
  - file: "gfonts://Inter@700"
    id: myFont
    size: 24

captive_portal:

# define SPI interface
spi:
  clk_pin: GPIO7
  mosi_pin: GPIO9

display:
  - platform: waveshare_epaper
    id: epaper_display
    model: 2.13inv2 #More models you can refer to here: https://esphome.io/components/display/waveshare_epaper/
    cs_pin: GPIO44
    dc_pin: GPIO10
    busy_pin: GPIO4
    reset_pin:  GPIO38
    rotation: 0
    update_interval: 300s
    lambda: |-
      it.print(0, 0, id(myFont), "Hello World!");
esphome:
  name: ee04
  friendly_name: EE04
  libraries:
    - SPI


esp32:
  board: esp32-s3-devkitc-1
  framework:
    type: arduino


# Enable logging
logger:

# Enable Home Assistant API
api:
  encryption:
    key: "eg2Jyse0gE146lJ2mVaqAnwteb4U2GJ7d1sZc2BOOsc="

ota:
  - platform: esphome
    password: "e2f184b95aac832509885f676abf5b73"

wifi:
  ssid:
  password:

  # Enable fallback hotspot (captive portal) in case wifi connection fails
  ap:
    ssid: "ESPHome_Epaper"
    password: "123456789"

external_components:
  - source: github://xcjk-tofuture/esphome@dev
    components: [ waveshare_epaper ]

font:
  - file: "gfonts://Inter@700"
    id: font1
    size: 24

captive_portal:

spi:
  clk_pin: GPIO7
  mosi_pin: GPIO9

display:
  - platform: waveshare_epaper
    id: my_display
    model: gdey0213f51
    cs_pin: GPIO44
    dc_pin: GPIO10
    busy_pin: GPIO4
    reset_pin:  GPIO38
    rotation: 90
    update_interval: 30s
    full_update_every: 1
    lambda: |-
      const auto BLACK   = Color(0,   0,   0,   0);
      const auto RED     = Color(255, 0,   0,   0);
      const auto YELLOW  = Color(255, 255, 0,   0);
      const auto WHITE   = Color(255, 255, 255, 0);

      it.fill(YELLOW);
      it.print(0, 0, id(font1), BLACK, "Hello World in BLACK!");
      it.print(0, 30, id(font1), RED, "Hello World in RED!");
      it.print(0, 60, id(font1), YELLOW, "Hello World in YELLOW!");
esphome:
  name: ee04
  friendly_name: EE04

esp32:
  board: esp32-s3-devkitc-1
  framework:
    type: esp-idf

# Enable logging
logger:

# Enable Home Assistant API
api:
  encryption:
    key: "b0AIbJ+kbeMayi1PgSGXtiD1yQCapUBF4A/7v7btys0="

ota:
  - platform: esphome
    password: "5d7cca6f4b3f38aba559ab0d6aaf5926"

wifi:
  ssid:
  password:

  # Enable fallback hotspot (captive portal) in case wifi connection fails
  ap:
    ssid: "Ee04 Fallback Hotspot"
    password: "zxPMBtCEWonm"

# define font to display words
font:
  - file: "gfonts://Inter@700"
    id: myFont
    size: 24

captive_portal:

# define SPI interface
spi:
  clk_pin: GPIO7
  mosi_pin: GPIO9

display:
  - platform: waveshare_epaper
    id: epaper_display
    model: 2.90inv2
    cs_pin: GPIO44
    dc_pin: GPIO10
    busy_pin: GPIO4
    reset_pin:  GPIO38
    rotation: 0
    update_interval: 300s
    lambda: |-
      it.print(0, 0, id(myFont), "Hello World!");
esphome:
  name: ee04
  friendly_name: EE04
  libraries:
    - SPI


esp32:
  board: esp32-s3-devkitc-1
  framework:
    type: arduino


# Enable logging
logger:

# Enable Home Assistant API
api:
  encryption:
    key: "eg2Jyse0gE146lJ2mVaqAnwteb4U2GJ7d1sZc2BOOsc="

ota:
  - platform: esphome
    password: "e2f184b95aac832509885f676abf5b73"

wifi:
  ssid:
  password:

  # Enable fallback hotspot (captive portal) in case wifi connection fails
  ap:
    ssid: "ESPHome_Epaper"
    password: "123456789"

external_components:
  - source: github://xcjk-tofuture/esphome@dev
    components: [ waveshare_epaper ]


# external_components:
#   - source:
#       type: local
#       path: components_epaper
#     components : [waveshare_epaper]

font:
  - file: "gfonts://Inter@700"
    id: font1
    size: 24

captive_portal:

spi:
  clk_pin: GPIO7
  mosi_pin: GPIO9
display:
  - platform: waveshare_epaper
    id: my_display
    model: gdey029f51h
    cs_pin: GPIO44
    dc_pin: GPIO10
    busy_pin: GPIO4
    reset_pin:  GPIO38
    rotation: 90
    update_interval: 30s
    full_update_every: 1
    lambda: |-
      const auto BLACK   = Color(0,   0,   0,   0);
      const auto RED     = Color(255, 0,   0,   0);
      const auto YELLOW  = Color(255, 255, 0,   0);
      const auto WHITE   = Color(255, 255, 255, 0);

      it.print(0, 0, id(font1), BLACK, "Hello World in BLACK!");
      it.print(0, 30, id(font1), RED, "Hello World in RED!");
      it.print(0, 60, id(font1), YELLOW, "Hello World in YELLOW!");
      ESP_LOGD("epaper", "reflash......");
esphome:
  name: ee04
  friendly_name: EE04

esp32:
  board: esp32-s3-devkitc-1
  framework:
    type: esp-idf

# Enable logging
logger:

# Enable Home Assistant API
api:
  encryption:
    key: "b0AIbJ+kbeMayi1PgSGXtiD1yQCapUBF4A/7v7btys0="

ota:
  - platform: esphome
    password: "5d7cca6f4b3f38aba559ab0d6aaf5926"

wifi:
  ssid:
  password:

  # Enable fallback hotspot (captive portal) in case wifi connection fails
  ap:
    ssid: "Ee04 Fallback Hotspot"
    password: "zxPMBtCEWonm"


# define font to display words
font:
  - file: "gfonts://Inter@700"
    id: myFont
    size: 24

captive_portal:

# define SPI interface
spi:
  clk_pin: GPIO7
  mosi_pin: GPIO9

display:
  - platform: waveshare_epaper
    id: epaper_display
    model: gdey042t81
    cs_pin: GPIO44
    dc_pin: GPIO10
    busy_pin: GPIO4
    reset_pin:  GPIO38
    rotation: 0
    update_interval: 300s
    lambda: |-
      it.print(0, 0, id(myFont), "Hello World!");
esphome:
  name: ee04
  friendly_name: EE04

esp32:
  board: esp32-s3-devkitc-1
  framework:
    type: esp-idf

# Enable logging
logger:

# Enable Home Assistant API
api:
  encryption:
    key: "b0AIbJ+kbeMayi1PgSGXtiD1yQCapUBF4A/7v7btys0="

ota:
  - platform: esphome
    password: "5d7cca6f4b3f38aba559ab0d6aaf5926"

wifi:
  ssid:
  password:

  # Enable fallback hotspot (captive portal) in case wifi connection fails
  ap:
    ssid: "Ee04 Fallback Hotspot"
    password: "zxPMBtCEWonm"

# define font to display words
font:
  - file: "gfonts://Inter@700"
    id: myFont
    size: 24

captive_portal:

# define SPI interface
spi:
  clk_pin: GPIO7
  mosi_pin: GPIO9

display:
  - platform: waveshare_epaper
    id: epaper_display
    model: gdey0583t81
    cs_pin: GPIO44
    dc_pin: GPIO10
    busy_pin: GPIO4
    reset_pin:  GPIO38
    rotation: 0
    update_interval: 300s
    lambda: |-
      it.print(0, 0, id(myFont), "Hello World!");
esphome:
  name: ee04
  friendly_name: EE04

esp32:
  board: esp32-s3-devkitc-1
  framework:
    type: esp-idf

# Enable logging
logger:

# Enable Home Assistant API
api:
  encryption:
    key: "b0AIbJ+kbeMayi1PgSGXtiD1yQCapUBF4A/7v7btys0="

ota:
  - platform: esphome
    password: "5d7cca6f4b3f38aba559ab0d6aaf5926"

wifi:
  ssid:
  password:

  # Enable fallback hotspot (captive portal) in case wifi connection fails
  ap:
    ssid: "Ee04 Fallback Hotspot"
    password: "zxPMBtCEWonm"

# define font to display words
font:
  - file: "gfonts://Inter@700"
    id: myFont
    size: 24

captive_portal:

# define SPI interface
spi:
  clk_pin: GPIO7
  mosi_pin: GPIO9

display:
  - platform: waveshare_epaper
    id: epaper_display
    model: 7.50inv2
    cs_pin: GPIO44
    dc_pin: GPIO10
    busy_pin: GPIO4
    reset_pin:  GPIO38
    rotation: 0
    update_interval: 300s
    lambda: |-
      it.print(0, 0, id(myFont), "Hello World!");
The following are 50-pin connector screen types:
- 7.3 Inch spectra™ 6
esphome:
  name: ee04
  friendly_name: EE04

esp32:
  board: esp32-s3-devkitc-1
  framework:
    type: esp-idf

# Enable logging
logger:

# Enable Home Assistant API
api:
  encryption:
    key: "b0AIbJ+kbeMayi1PgSGXtiD1yQCapUBF4A/7v7btys0="

ota:
  - platform: esphome
    password: "5d7cca6f4b3f38aba559ab0d6aaf5926"

wifi:
  ssid:
  password:

  # Enable fallback hotspot (captive portal) in case wifi connection fails
  ap:
    ssid: "Ee04 Fallback Hotspot"
    password: "zxPMBtCEWonm"

font:
  - file: "gfonts://Inter@700"
    id: font1
    size: 24

captive_portal:

external_components:
  - source:
      type: git
      url: https://github.com/esphome/esphome/
      ref: 2025.10.5
    components: [ epaper_spi, display ]

spi:
  clk_pin: GPIO7
  mosi_pin: GPIO9

display:
  - platform: epaper_spi
    id: my_display
    model: 7.3in-Spectra-E6
    cs_pin: GPIO44
    dc_pin:
      number: GPIO10
      inverted: false
    busy_pin:
      number: GPIO4
      inverted: true
    reset_pin:  GPIO38
    rotation: 0
    update_interval: 30s
    lambda: |-
      const auto BLACK   = Color(0,   0,   0,   0);
      const auto RED     = Color(255, 0,   0,   0);
      const auto BLUE     = Color(0, 0,   255,   0);
      const auto GREEN     = Color(0, 255,   0,   0);
      const auto YELLOW  = Color(255, 255, 0,   0);
      const auto WHITE   = Color(255, 255, 255, 0);

      it.fill(WHITE);
      it.print(0, 0, id(font1), BLACK, "Hello World in BLACK!");
      it.print(0, 30, id(font1), RED, "Hello World in RED!");
      it.print(0, 60, id(font1), YELLOW, "Hello World in YELLOW!");
      it.print(0, 90, id(font1), GREEN, "Hello World in GREEN!");
      it.print(0, 120, id(font1), BLUE, "Hello World in BLUE!");
Click INSTALL to install the code to the device and you will see the following image.

- Install through browser
- Install through host
- Install through Wi-Fi
If your Home Assistant Host (Raspberry PI/Green/Yellow etc.) is far away from you, we recommend using this method. You can install it with the computer you have on hand.
First, you need to click Manual download to download the compiled firmware.

Open this website where we will upload the firmware to the ePaper panel.

Go back to ESPHome to download the firmware.

Select Factory format.

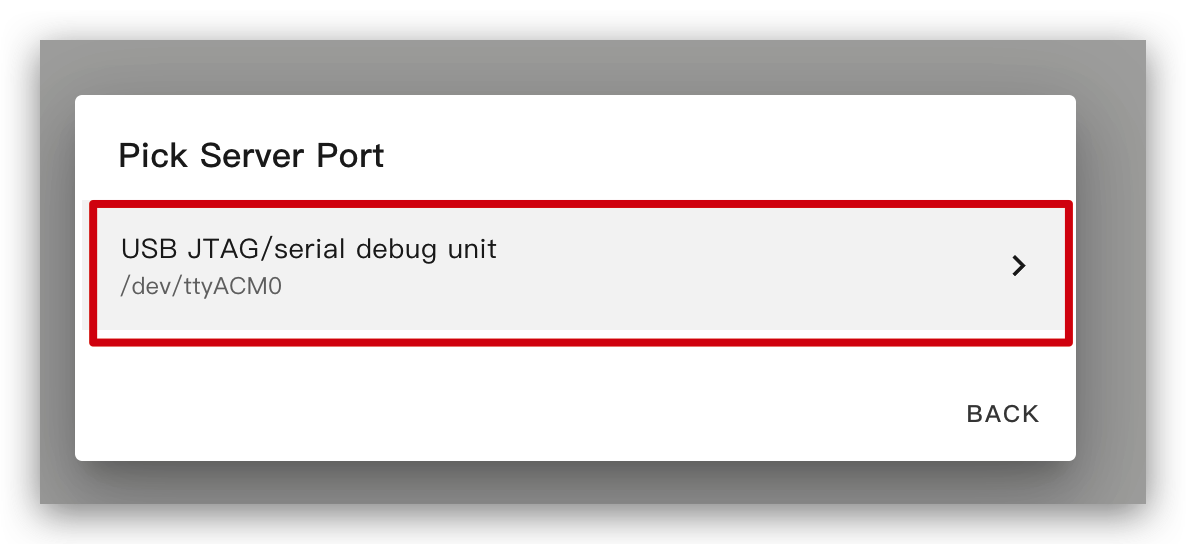
Use USB cable to connect the ePaper panel to your computer and click CONNECT.

Select usbmodemxxx(Windows is COMxxx) and click connect.

Click INSTALL and select the firmware you just downloaded.

Wait a moment and you will see 'Hello world!' on the display ~
If your Home Assistant Host (Raspberry PI/Green/Yellow etc.) is nearby, we recommend using this method as it is simpler.
Before you install the code to the device, you need to use USB cable to connect this device to your Raspberry Pi or HA Green(Yellow) etc which is running Home Assistant.
Click the options following the image to install the code to the device.

Wait a moment and you will see the feedback like the following image. It means the code is running successfully.
This is the simplest way, but on the premise that when installing the program for the first time, you should first upload the program to the ePaper Panel using the method on the left. After that, you can upload it via wifi. Also, make sure your YAML configuration includes properly configured ota and api sections with valid encryption keys for this method to work.
In this way, you don't need to connect the ePaper panel to anything, just make sure it is online.
Click the option and then the firmware will be installed to ePaper penal automatically.

Basic for drawing in ESPHome
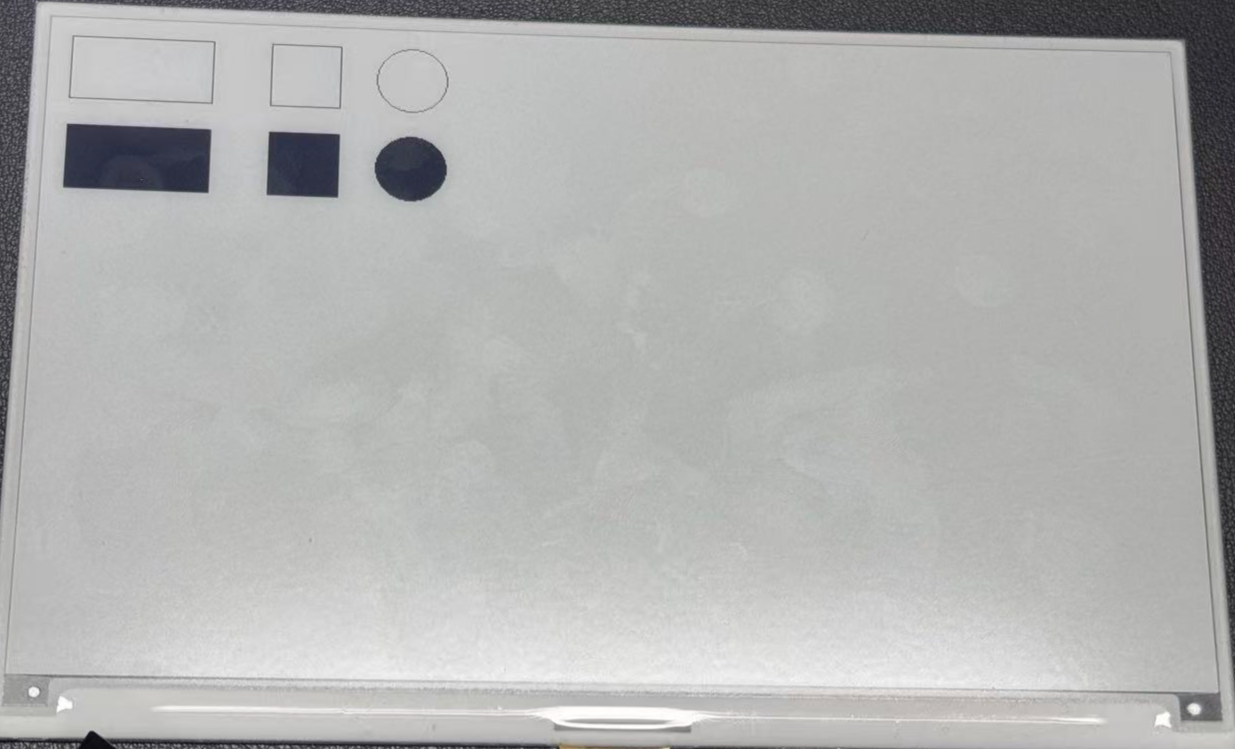
Drawing Simple Graphics
This example YAML code configures the SPI interface and the XIAO ePaper Display Board(ESP32-S3) - EE04 for an ESPHome project. The lambda section contains drawing commands that render simple shapes on the screen:
- Two rectangles (one at position (10, 10) with size 100x50, and another at (150, 10) with size 50x50)
- One circle at (250, 35) with a radius of 25
- Two filled rectangles (at (10, 80) and (150, 80))
- One filled circle at (250, 105) with a radius of 25
You can use this example by copying the code below and pasting it after the captive_portal code line in your YAML file.
- 1.54 Inch Monochrome Color
- 2.13 Inch Quadruple Color
- 2.13 Inch Monochrome Color
- 2.9 Inch Quadruple Color
- 2.9 Inch Monochrome Color
- 4.2 Inch Monochrome Color
- 5.83 Inch Monochrome Color
- 7.5 Inch Monochrome Color
esphome:
  name: ee04
  friendly_name: EE04

esp32:
  board: esp32-s3-devkitc-1
  framework:
    type: esp-idf

# Enable logging
logger:

# Enable Home Assistant API
api:
  encryption:
    key: "b0AIbJ+kbeMayi1PgSGXtiD1yQCapUBF4A/7v7btys0="

ota:
  - platform: esphome
    password: "5d7cca6f4b3f38aba559ab0d6aaf5926"

wifi:
  ssid:
  password:

  # Enable fallback hotspot (captive portal) in case wifi connection fails
  ap:
    ssid: "Ee04 Fallback Hotspot"
    password: "zxPMBtCEWonm"

captive_portal:

spi:
  clk_pin: GPIO7
  mosi_pin: GPIO9

display:
  - platform: waveshare_epaper
    id: epaper_display
    model: 1.54inv2
    cs_pin: GPIO44
    dc_pin: GPIO10
    busy_pin: GPIO4
    reset_pin:  GPIO38
    rotation: 0
    update_interval: 300s
    lambda: |-
      it.rectangle(10, 10, 100, 50);
      it.rectangle(150, 10, 50, 50);
      it.circle(250, 35, 25);
      it.filled_rectangle(10, 80, 100, 50);
      it.filled_rectangle(150, 80, 50, 50);
      it.filled_circle(250, 105, 25);
esphome:
  name: ee04
  friendly_name: EE04
  libraries:
    - SPI


esp32:
  board: esp32-s3-devkitc-1
  framework:
    type: arduino


# Enable logging
logger:

# Enable Home Assistant API
api:
  encryption:
    key: "eg2Jyse0gE146lJ2mVaqAnwteb4U2GJ7d1sZc2BOOsc="

ota:
  - platform: esphome
    password: "e2f184b95aac832509885f676abf5b73"

wifi:
  ssid:
  password:

  # Enable fallback hotspot (captive portal) in case wifi connection fails
  ap:
    ssid: "ESPHome_Epaper"
    password: "123456789"

external_components:
  - source: github://xcjk-tofuture/esphome@dev
    components: [ waveshare_epaper ]

font:
  - file: "gfonts://Inter@700"
    id: font1
    size: 24

captive_portal:

spi:
  clk_pin: GPIO7
  mosi_pin: GPIO9

display:
  - platform: waveshare_epaper
    id: my_display
    model: gdey0213f51
    cs_pin: GPIO44
    dc_pin: GPIO10
    busy_pin: GPIO4
    reset_pin:  GPIO38
    rotation: 90
    update_interval: 30s
    full_update_every: 1
    lambda: |-
      const auto BLACK   = Color(0,   0,   0,   0);
      const auto RED     = Color(255, 0,   0,   0);
      const auto YELLOW  = Color(255, 255, 0,   0);
      const auto WHITE   = Color(255, 255, 255, 0);

      it.rectangle(10, 10, 100, 50,YELLOW);
      it.rectangle(150, 10, 50, 50,YELLOW);
      it.circle(250, 35, 25,YELLOW);
      it.filled_rectangle(10, 80, 100, 50,YELLOW);
      it.filled_rectangle(150, 80, 50, 50,YELLOW);
      it.filled_circle(250, 105, 25,YELLOW);
esphome:
  name: ee04
  friendly_name: EE04

esp32:
  board: esp32-s3-devkitc-1
  framework:
    type: esp-idf

# Enable logging
logger:

# Enable Home Assistant API
api:
  encryption:
    key: "b0AIbJ+kbeMayi1PgSGXtiD1yQCapUBF4A/7v7btys0="

ota:
  - platform: esphome
    password: "5d7cca6f4b3f38aba559ab0d6aaf5926"

wifi:
  ssid:
  password:

  # Enable fallback hotspot (captive portal) in case wifi connection fails
  ap:
    ssid: "Ee04 Fallback Hotspot"
    password: "zxPMBtCEWonm"

captive_portal:

spi:
  clk_pin: GPIO7
  mosi_pin: GPIO9

display:
  - platform: waveshare_epaper
    id: epaper_display
    model: 2.13inv2 #More models you can refer to here: https://esphome.io/components/display/waveshare_epaper/
    cs_pin: GPIO44
    dc_pin: GPIO10
    busy_pin: GPIO4
    reset_pin:  GPIO38
    rotation: 0
    update_interval: 300s
    lambda: |-
      it.rectangle(10, 10, 100, 50);
      it.rectangle(150, 10, 50, 50);
      it.circle(250, 35, 25);
      it.filled_rectangle(10, 80, 100, 50);
      it.filled_rectangle(150, 80, 50, 50);
      it.filled_circle(250, 105, 25);
esphome:
  name: ee04
  friendly_name: EE04
  libraries:
    - SPI


esp32:
  board: esp32-s3-devkitc-1
  framework:
    type: arduino


# Enable logging
logger:

# Enable Home Assistant API
api:
  encryption:
    key: "eg2Jyse0gE146lJ2mVaqAnwteb4U2GJ7d1sZc2BOOsc="

ota:
  - platform: esphome
    password: "e2f184b95aac832509885f676abf5b73"

wifi:
  ssid:
  password:

  # Enable fallback hotspot (captive portal) in case wifi connection fails
  ap:
    ssid: "ESPHome_Epaper"
    password: "123456789"

external_components:
  - source: github://xcjk-tofuture/esphome@dev
    components: [ waveshare_epaper ]

captive_portal:

spi:
  clk_pin: GPIO7
  mosi_pin: GPIO9

display:
  - platform: waveshare_epaper
    id: my_display
    model: gdey029f51h
    cs_pin: GPIO44
    dc_pin: GPIO10
    busy_pin: GPIO4
    reset_pin:  GPIO38
    rotation: 90
    update_interval: 30s
    full_update_every: 1
    lambda: |-
      const auto BLACK   = Color(0,   0,   0,   0);
      const auto RED     = Color(255, 0,   0,   0);
      const auto YELLOW  = Color(255, 255, 0,   0);
      const auto WHITE   = Color(255, 255, 255, 0);

      it.rectangle(10, 10, 100, 50,YELLOW);
      it.rectangle(150, 10, 50, 50,YELLOW);
      it.circle(250, 35, 25,YELLOW);
      it.filled_rectangle(10, 80, 100, 50,YELLOW);
      it.filled_rectangle(150, 80, 50, 50,YELLOW);
      it.filled_circle(250, 105, 25,YELLOW);
esphome:
  name: ee04
  friendly_name: EE04

esp32:
  board: esp32-s3-devkitc-1
  framework:
    type: esp-idf

# Enable logging
logger:

# Enable Home Assistant API
api:
  encryption:
    key: "b0AIbJ+kbeMayi1PgSGXtiD1yQCapUBF4A/7v7btys0="

ota:
  - platform: esphome
    password: "5d7cca6f4b3f38aba559ab0d6aaf5926"

wifi:
  ssid:
  password:

  # Enable fallback hotspot (captive portal) in case wifi connection fails
  ap:
    ssid: "Ee04 Fallback Hotspot"
    password: "zxPMBtCEWonm"

captive_portal:

spi:
  clk_pin: GPIO7
  mosi_pin: GPIO9

display:
  - platform: waveshare_epaper
    id: epaper_display
    model: 2.90inv2
    cs_pin: GPIO44
    dc_pin: GPIO10
    busy_pin: GPIO4
    reset_pin:  GPIO38
    rotation: 0
    update_interval: 300s
    lambda: |-
      it.rectangle(10, 10, 100, 50);
      it.rectangle(150, 10, 50, 50);
      it.circle(250, 35, 25);
      it.filled_rectangle(10, 80, 100, 50);
      it.filled_rectangle(150, 80, 50, 50);
      it.filled_circle(250, 105, 25);
esphome:
  name: ee04
  friendly_name: EE04

esp32:
  board: esp32-s3-devkitc-1
  framework:
    type: esp-idf

# Enable logging
logger:

# Enable Home Assistant API
api:
  encryption:
    key: "b0AIbJ+kbeMayi1PgSGXtiD1yQCapUBF4A/7v7btys0="

ota:
  - platform: esphome
    password: "5d7cca6f4b3f38aba559ab0d6aaf5926"

wifi:
  ssid:
  password:

  # Enable fallback hotspot (captive portal) in case wifi connection fails
  ap:
    ssid: "Ee04 Fallback Hotspot"
    password: "zxPMBtCEWonm"

captive_portal:

spi:
  clk_pin: GPIO7
  mosi_pin: GPIO9

display:
  - platform: waveshare_epaper
    id: epaper_display
    model: gdey042t81
    cs_pin: GPIO44
    dc_pin: GPIO10
    busy_pin: GPIO4
    reset_pin:  GPIO38
    rotation: 0
    update_interval: 300s
    lambda: |-
      it.rectangle(10, 10, 100, 50);
      it.rectangle(150, 10, 50, 50);
      it.circle(250, 35, 25);
      it.filled_rectangle(10, 80, 100, 50);
      it.filled_rectangle(150, 80, 50, 50);
      it.filled_circle(250, 105, 25);
esphome:
  name: ee04
  friendly_name: EE04

esp32:
  board: esp32-s3-devkitc-1
  framework:
    type: esp-idf

# Enable logging
logger:

# Enable Home Assistant API
api:
  encryption:
    key: "b0AIbJ+kbeMayi1PgSGXtiD1yQCapUBF4A/7v7btys0="

ota:
  - platform: esphome
    password: "5d7cca6f4b3f38aba559ab0d6aaf5926"

wifi:
  ssid:
  password:

  # Enable fallback hotspot (captive portal) in case wifi connection fails
  ap:
    ssid: "Ee04 Fallback Hotspot"
    password: "zxPMBtCEWonm"

captive_portal:

spi:
  clk_pin: GPIO7
  mosi_pin: GPIO9

display:
  - platform: waveshare_epaper
    id: epaper_display
    model: gdey0583t81
    cs_pin: GPIO44
    dc_pin: GPIO10
    busy_pin: GPIO4
    reset_pin:  GPIO38
    rotation: 0
    update_interval: 300s
    lambda: |-
      it.rectangle(10, 10, 100, 50);
      it.rectangle(150, 10, 50, 50);
      it.circle(250, 35, 25);
      it.filled_rectangle(10, 80, 100, 50);
      it.filled_rectangle(150, 80, 50, 50);
      it.filled_circle(250, 105, 25);
esphome:
  name: ee04
  friendly_name: EE04

esp32:
  board: esp32-s3-devkitc-1
  framework:
    type: esp-idf

# Enable logging
logger:

# Enable Home Assistant API
api:
  encryption:
    key: "b0AIbJ+kbeMayi1PgSGXtiD1yQCapUBF4A/7v7btys0="

ota:
  - platform: esphome
    password: "5d7cca6f4b3f38aba559ab0d6aaf5926"

wifi:
  ssid:
  password:

  # Enable fallback hotspot (captive portal) in case wifi connection fails
  ap:
    ssid: "Ee04 Fallback Hotspot"
    password: "zxPMBtCEWonm"

captive_portal:

spi:
  clk_pin: GPIO7
  mosi_pin: GPIO9

display:
  - platform: waveshare_epaper
    id: epaper_display
    model: 7.50inv2
    cs_pin: GPIO44
    dc_pin: GPIO10
    busy_pin: GPIO4
    reset_pin:  GPIO38
    rotation: 0
    update_interval: 300s
    lambda: |-
      it.rectangle(10, 10, 100, 50);
      it.rectangle(150, 10, 50, 50);
      it.circle(250, 35, 25);
      it.filled_rectangle(10, 80, 100, 50);
      it.filled_rectangle(150, 80, 50, 50);
      it.filled_circle(250, 105, 25);
- 7.3 Inch spectra™ 6
esphome:
  name: ee04
  friendly_name: EE04

esp32:
  board: esp32-s3-devkitc-1
  framework:
    type: esp-idf

# Enable logging
logger:

# Enable Home Assistant API
api:
  encryption:
    key: "b0AIbJ+kbeMayi1PgSGXtiD1yQCapUBF4A/7v7btys0="

ota:
  - platform: esphome
    password: "5d7cca6f4b3f38aba559ab0d6aaf5926"

wifi:
  ssid:
  password:

  # Enable fallback hotspot (captive portal) in case wifi connection fails
  ap:
    ssid: "Ee04 Fallback Hotspot"
    password: "zxPMBtCEWonm"

captive_portal:

external_components:
  - source:
      type: git
      url: https://github.com/esphome/esphome/
      ref: 2025.10.5
    components: [ epaper_spi, display ]

spi:
  clk_pin: GPIO7
  mosi_pin: GPIO9

display:
  - platform: epaper_spi
    id: my_display
    model: 7.3in-Spectra-E6
    cs_pin: GPIO44
    dc_pin:
      number: GPIO10
      inverted: false
    busy_pin:
      number: GPIO4
      inverted: true
    reset_pin:  GPIO38
    rotation: 0
    update_interval: 30s
    lambda: |-
      const auto BLACK   = Color(0,   0,   0,   0);
      const auto RED     = Color(255, 0,   0,   0);
      const auto BLUE     = Color(0, 0,   255,   0);
      const auto GREEN     = Color(0, 255,   0,   0);
      const auto YELLOW  = Color(255, 255, 0,   0);
      const auto WHITE   = Color(255, 255, 255, 0);

      it.rectangle(10, 10, 100, 50,BLACK);
      it.rectangle(150, 10, 50, 50,RED);
      it.circle(250, 35, 25,BLUE);
      it.filled_rectangle(10, 80, 100, 50,GREEN);
      it.filled_rectangle(150, 80, 50, 50,YELLOW);
      it.filled_circle(250, 105, 25,WHITE);
When you see the feedback like the following image, it means the code is running successfully.
Due to space constraints, we will not elaborate too much on the drawing methods and principles of other patterns, if necessary, the reader is recommended to read ESPHome in this part of the detailed examples.
Drawing TrueType fonts
This example demonstrates how to display custom icons on your XIAO ePaper Display Board(ESP32-S3) - EE04 using TrueType fonts. Material Design Icons provide a wide range of scalable symbols perfect for ePaper displays.
Installing Required Tools
Step 1. First, we need to install the Studio Code Server add-on to manage files. Navigate to the Home Assistant Add-ons store, search for Studio Code Server and click on it.
Step 2. Click on INSTALL and wait for the installation to complete. Once installed, click START to launch the editor.

Setting Up Icon Fonts
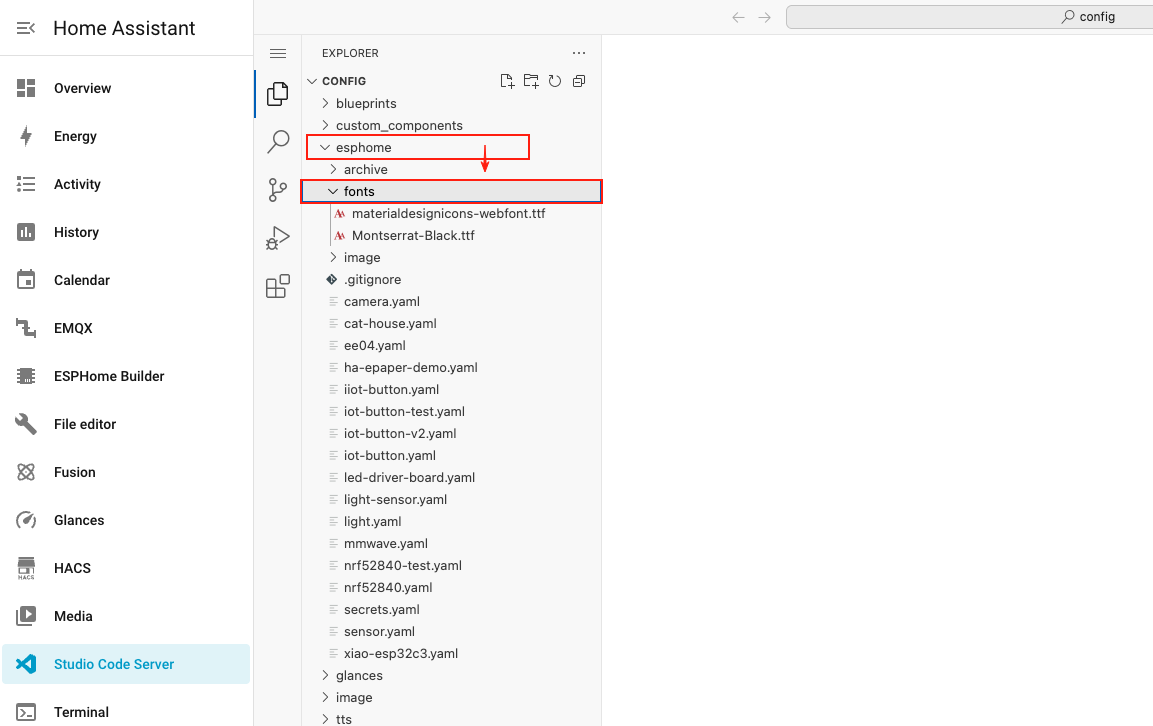
Step 3. Create a new folder called fonts in your ESPHome configuration directory. This folder will store the TrueType font files needed for displaying icons.
Step 4. Download the Material Design Icons font file by clicking the button below and extract the contents.
Step 5. Upload the downloaded font file (materialdesignicons-webfont.ttf) to the fonts folder you created earlier.

Configuring ESPHome for Icons
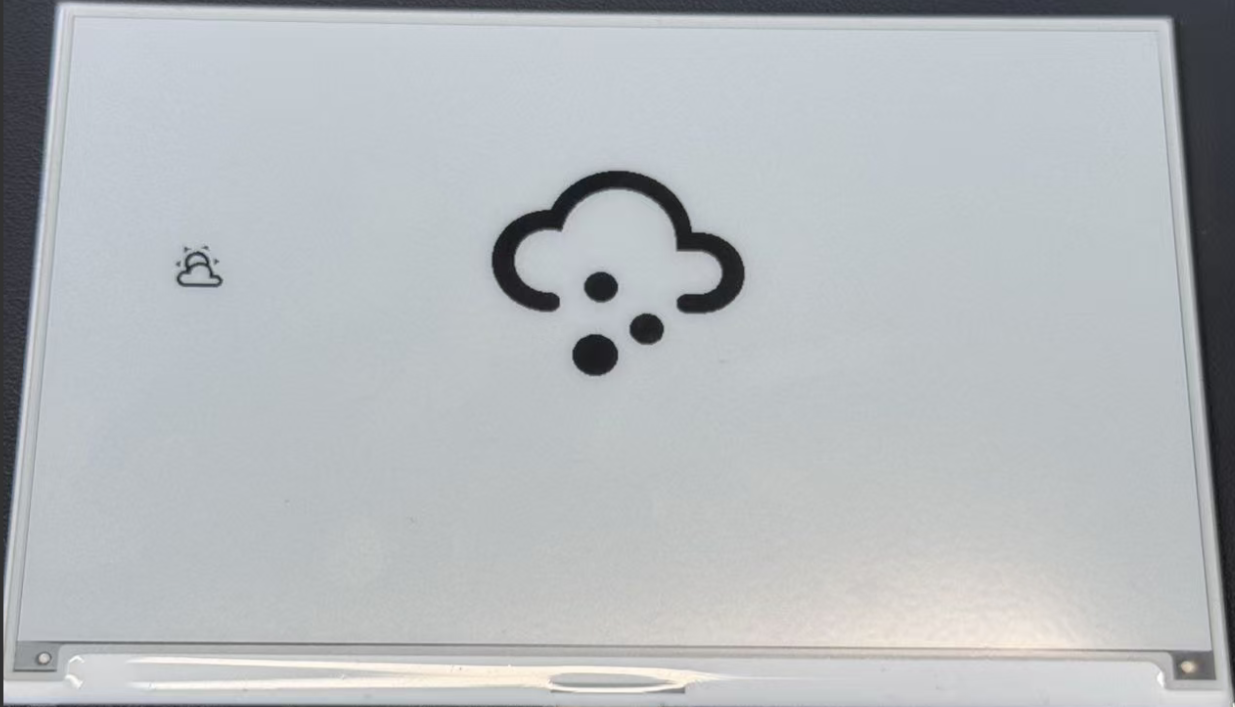
Step 6. Add the following code to your ESPHome configuration file after the captive_portal section. This code defines two font sizes for icons and configures the display to show weather icons.
- 1.54 Inch Monochrome Color
- 2.13 Inch Quadruple Color
- 2.13 Inch Monochrome Color
- 2.9 Inch Quadruple Color
- 2.9 Inch Monochrome Color
- 4.2 Inch Monochrome Color
- 5.83 Inch Monochrome Color
- 7.5 Inch Monochrome Color
esphome:
  name: ee04
  friendly_name: EE04

esp32:
  board: esp32-s3-devkitc-1
  framework:
    type: esp-idf

# Enable logging
logger:

# Enable Home Assistant API
api:
  encryption:
    key: "b0AIbJ+kbeMayi1PgSGXtiD1yQCapUBF4A/7v7btys0="

ota:
  - platform: esphome
    password: "5d7cca6f4b3f38aba559ab0d6aaf5926"

wifi:
  ssid:
  password:

  # Enable fallback hotspot (captive portal) in case wifi connection fails
  ap:
    ssid: "Ee04 Fallback Hotspot"
    password: "zxPMBtCEWonm"

captive_portal:

# define font to display words
font:
  - file: 'fonts/materialdesignicons-webfont.ttf'  # Path to the font file
    id: font_mdi_large
    size: 200        # Large icon size
    glyphs: &mdi-weather-glyphs
      - "\U000F0595" # weather-cloudy icon
      - "\U000F0592" # weather-hail icon
  - file: 'fonts/materialdesignicons-webfont.ttf'
    id: font_mdi_medium   # Medium icon size
    size: 40
    glyphs: *mdi-weather-glyphs

# define SPI interface
spi:
  clk_pin: GPIO7
  mosi_pin: GPIO9

display:
  - platform: waveshare_epaper
    id: epaper_display
    model: 1.54inv2
    cs_pin: GPIO44
    dc_pin: GPIO10
    reset_pin:
      number: GPIO38
      inverted: false
    busy_pin:
      number: GPIO4
      inverted: true
    update_interval: 300s
    lambda: |-
      it.printf(100, 200, id(font_mdi_medium), TextAlign::CENTER, "\U000F0595");
      it.printf(400, 200, id(font_mdi_large), TextAlign::CENTER, "\U000F0592");
esphome:
  name: ee04
  friendly_name: EE04
  libraries:
    - SPI


esp32:
  board: esp32-s3-devkitc-1
  framework:
    type: arduino


# Enable logging
logger:

# Enable Home Assistant API
api:
  encryption:
    key: "eg2Jyse0gE146lJ2mVaqAnwteb4U2GJ7d1sZc2BOOsc="

ota:
  - platform: esphome
    password: "e2f184b95aac832509885f676abf5b73"

wifi:
  ssid:
  password:

  # Enable fallback hotspot (captive portal) in case wifi connection fails
  ap:
    ssid: "ESPHome_Epaper"
    password: "123456789"

external_components:
  - source: github://xcjk-tofuture/esphome@dev
    components: [ waveshare_epaper ]


# define font to display words
font:
  - file: 'fonts/materialdesignicons-webfont.ttf'  # Path to the font file
    id: font_mdi_large
    size: 200        # Large icon size
    glyphs: &mdi-weather-glyphs
      - "\U000F0595" # weather-cloudy icon
      - "\U000F0592" # weather-hail icon
  - file: 'fonts/materialdesignicons-webfont.ttf'
    id: font_mdi_medium   # Medium icon size
    size: 40
    glyphs: *mdi-weather-glyphs

captive_portal:

spi:
  clk_pin: GPIO7
  mosi_pin: GPIO9

display:
  - platform: waveshare_epaper
    id: my_display
    model: gdey0213f51
    cs_pin: GPIO44
    dc_pin: GPIO10
    busy_pin: GPIO4
    reset_pin:  GPIO38
    rotation: 90
    update_interval: 30s
    full_update_every: 1
    lambda: |-
      it.printf(100, 200, id(font_mdi_medium), TextAlign::CENTER, "\U000F0595");
      it.printf(400, 200, id(font_mdi_large), TextAlign::CENTER, "\U000F0592");
esphome:
  name: ee04
  friendly_name: EE04

esp32:
  board: esp32-s3-devkitc-1
  framework:
    type: esp-idf

# Enable logging
logger:

# Enable Home Assistant API
api:
  encryption:
    key: "b0AIbJ+kbeMayi1PgSGXtiD1yQCapUBF4A/7v7btys0="

ota:
  - platform: esphome
    password: "5d7cca6f4b3f38aba559ab0d6aaf5926"

wifi:
  ssid:
  password:

  # Enable fallback hotspot (captive portal) in case wifi connection fails
  ap:
    ssid: "Ee04 Fallback Hotspot"
    password: "zxPMBtCEWonm"

captive_portal:

# define font to display words
font:
  - file: 'fonts/materialdesignicons-webfont.ttf'  # Path to the font file
    id: font_mdi_large
    size: 200        # Large icon size
    glyphs: &mdi-weather-glyphs
      - "\U000F0595" # weather-cloudy icon
      - "\U000F0592" # weather-hail icon
  - file: 'fonts/materialdesignicons-webfont.ttf'
    id: font_mdi_medium   # Medium icon size
    size: 40
    glyphs: *mdi-weather-glyphs

# define SPI interface
spi:
  clk_pin: GPIO7
  mosi_pin: GPIO9

display:
  - platform: waveshare_epaper
    id: epaper_display
    model: 2.13inv2 #More models you can refer to here: https://esphome.io/components/display/waveshare_epaper/
    cs_pin: GPIO44
    dc_pin: GPIO10
    reset_pin:
      number: GPIO38
      inverted: false
    busy_pin:
      number: GPIO4
      inverted: true
    update_interval: 300s
    lambda: |-
      it.printf(100, 200, id(font_mdi_medium), TextAlign::CENTER, "\U000F0595");
      it.printf(400, 200, id(font_mdi_large), TextAlign::CENTER, "\U000F0592");
esphome:
  name: ee04
  friendly_name: EE04
  libraries:
    - SPI


esp32:
  board: esp32-s3-devkitc-1
  framework:
    type: arduino


# Enable logging
logger:

# Enable Home Assistant API
api:
  encryption:
    key: "eg2Jyse0gE146lJ2mVaqAnwteb4U2GJ7d1sZc2BOOsc="

ota:
  - platform: esphome
    password: "e2f184b95aac832509885f676abf5b73"

wifi:
  ssid:
  password:

  # Enable fallback hotspot (captive portal) in case wifi connection fails
  ap:
    ssid: "ESPHome_Epaper"
    password: "123456789"

external_components:
  - source: github://xcjk-tofuture/esphome@dev
    components: [ waveshare_epaper ]


# external_components:
#   - source:
#       type: local
#       path: components_epaper
#     components : [waveshare_epaper]


captive_portal:

# define font to display words
font:
  - file: 'fonts/materialdesignicons-webfont.ttf'  # Path to the font file
    id: font_mdi_large
    size: 200        # Large icon size
    glyphs: &mdi-weather-glyphs
      - "\U000F0595" # weather-cloudy icon
      - "\U000F0592" # weather-hail icon
  - file: 'fonts/materialdesignicons-webfont.ttf'
    id: font_mdi_medium   # Medium icon size
    size: 40
    glyphs: *mdi-weather-glyphs

spi:
  clk_pin: GPIO7
  mosi_pin: GPIO9
display:
  - platform: waveshare_epaper
    id: my_display
    model: gdey029f51h
    cs_pin: GPIO44
    dc_pin: GPIO10
    busy_pin: GPIO4
    reset_pin:  GPIO38
    rotation: 90
    update_interval: 30s
    full_update_every: 1
    lambda: |-
      it.printf(100, 200, id(font_mdi_medium), TextAlign::CENTER, "\U000F0595");
      it.printf(400, 200, id(font_mdi_large), TextAlign::CENTER, "\U000F0592");
esphome:
  name: ee04
  friendly_name: EE04

esp32:
  board: esp32-s3-devkitc-1
  framework:
    type: esp-idf

# Enable logging
logger:

# Enable Home Assistant API
api:
  encryption:
    key: "b0AIbJ+kbeMayi1PgSGXtiD1yQCapUBF4A/7v7btys0="

ota:
  - platform: esphome
    password: "5d7cca6f4b3f38aba559ab0d6aaf5926"

wifi:
  ssid:
  password:

  # Enable fallback hotspot (captive portal) in case wifi connection fails
  ap:
    ssid: "Ee04 Fallback Hotspot"
    password: "zxPMBtCEWonm"

captive_portal:

# define font to display words
font:
  - file: 'fonts/materialdesignicons-webfont.ttf'  # Path to the font file
    id: font_mdi_large
    size: 200        # Large icon size
    glyphs: &mdi-weather-glyphs
      - "\U000F0595" # weather-cloudy icon
      - "\U000F0592" # weather-hail icon
  - file: 'fonts/materialdesignicons-webfont.ttf'
    id: font_mdi_medium   # Medium icon size
    size: 40
    glyphs: *mdi-weather-glyphs

# define SPI interface
spi:
  clk_pin: GPIO7
  mosi_pin: GPIO9

display:
  - platform: waveshare_epaper
    id: epaper_display
    model: 2.90inv2
    cs_pin: GPIO44
    dc_pin: GPIO10
    reset_pin:
      number: GPIO38
      inverted: false
    busy_pin:
      number: GPIO4
      inverted: true
    update_interval: 300s
    lambda: |-
      it.printf(100, 200, id(font_mdi_medium), TextAlign::CENTER, "\U000F0595");
      it.printf(400, 200, id(font_mdi_large), TextAlign::CENTER, "\U000F0592");
esphome:
  name: ee04
  friendly_name: EE04

esp32:
  board: esp32-s3-devkitc-1
  framework:
    type: esp-idf

# Enable logging
logger:

# Enable Home Assistant API
api:
  encryption:
    key: "b0AIbJ+kbeMayi1PgSGXtiD1yQCapUBF4A/7v7btys0="

ota:
  - platform: esphome
    password: "5d7cca6f4b3f38aba559ab0d6aaf5926"

wifi:
  ssid:
  password:

  # Enable fallback hotspot (captive portal) in case wifi connection fails
  ap:
    ssid: "Ee04 Fallback Hotspot"
    password: "zxPMBtCEWonm"

captive_portal:

# define font to display words
font:
  - file: 'fonts/materialdesignicons-webfont.ttf'  # Path to the font file
    id: font_mdi_large
    size: 200        # Large icon size
    glyphs: &mdi-weather-glyphs
      - "\U000F0595" # weather-cloudy icon
      - "\U000F0592" # weather-hail icon
  - file: 'fonts/materialdesignicons-webfont.ttf'
    id: font_mdi_medium   # Medium icon size
    size: 40
    glyphs: *mdi-weather-glyphs

# define SPI interface
spi:
  clk_pin: GPIO7
  mosi_pin: GPIO9

display:
  - platform: waveshare_epaper
    id: epaper_display
    model: gdey042t81
    cs_pin: GPIO44
    dc_pin: GPIO10
    reset_pin:
      number: GPIO38
      inverted: false
    busy_pin:
      number: GPIO4
      inverted: true
    update_interval: 300s
    lambda: |-
      it.printf(100, 200, id(font_mdi_medium), TextAlign::CENTER, "\U000F0595");
      it.printf(400, 200, id(font_mdi_large), TextAlign::CENTER, "\U000F0592");
esphome:
  name: ee04
  friendly_name: EE04

esp32:
  board: esp32-s3-devkitc-1
  framework:
    type: esp-idf

# Enable logging
logger:

# Enable Home Assistant API
api:
  encryption:
    key: "b0AIbJ+kbeMayi1PgSGXtiD1yQCapUBF4A/7v7btys0="

ota:
  - platform: esphome
    password: "5d7cca6f4b3f38aba559ab0d6aaf5926"

wifi:
  ssid:
  password:

  # Enable fallback hotspot (captive portal) in case wifi connection fails
  ap:
    ssid: "Ee04 Fallback Hotspot"
    password: "zxPMBtCEWonm"

captive_portal:

# define font to display words
font:
  - file: 'fonts/materialdesignicons-webfont.ttf'  # Path to the font file
    id: font_mdi_large
    size: 200        # Large icon size
    glyphs: &mdi-weather-glyphs
      - "\U000F0595" # weather-cloudy icon
      - "\U000F0592" # weather-hail icon
  - file: 'fonts/materialdesignicons-webfont.ttf'
    id: font_mdi_medium   # Medium icon size
    size: 40
    glyphs: *mdi-weather-glyphs

# define SPI interface
spi:
  clk_pin: GPIO7
  mosi_pin: GPIO9

display:
  - platform: waveshare_epaper
    id: epaper_display
    model: gdey0583t81
    cs_pin: GPIO44
    dc_pin: GPIO10
    reset_pin:
      number: GPIO38
      inverted: false
    busy_pin:
      number: GPIO4
      inverted: true
    update_interval: 300s
    lambda: |-
      it.printf(100, 200, id(font_mdi_medium), TextAlign::CENTER, "\U000F0595");
      it.printf(400, 200, id(font_mdi_large), TextAlign::CENTER, "\U000F0592");
esphome:
  name: ee04
  friendly_name: EE04

esp32:
  board: esp32-s3-devkitc-1
  framework:
    type: esp-idf

# Enable logging
logger:

# Enable Home Assistant API
api:
  encryption:
    key: "b0AIbJ+kbeMayi1PgSGXtiD1yQCapUBF4A/7v7btys0="

ota:
  - platform: esphome
    password: "5d7cca6f4b3f38aba559ab0d6aaf5926"

wifi:
  ssid:
  password:

  # Enable fallback hotspot (captive portal) in case wifi connection fails
  ap:
    ssid: "Ee04 Fallback Hotspot"
    password: "zxPMBtCEWonm"

captive_portal:

# define font to display words
font:
  - file: 'fonts/materialdesignicons-webfont.ttf'  # Path to the font file
    id: font_mdi_large
    size: 200        # Large icon size
    glyphs: &mdi-weather-glyphs
      - "\U000F0595" # weather-cloudy icon
      - "\U000F0592" # weather-hail icon
  - file: 'fonts/materialdesignicons-webfont.ttf'
    id: font_mdi_medium   # Medium icon size
    size: 40
    glyphs: *mdi-weather-glyphs

# define SPI interface
spi:
  clk_pin: GPIO7
  mosi_pin: GPIO9

display:
  - platform: waveshare_epaper
    id: epaper_display
    model: 7.50inv2
    cs_pin: GPIO44
    dc_pin: GPIO10
    reset_pin:
      number: GPIO38
      inverted: false
    busy_pin:
      number: GPIO4
      inverted: true
    update_interval: 300s
    lambda: |-
      it.printf(100, 200, id(font_mdi_medium), TextAlign::CENTER, "\U000F0595");
      it.printf(400, 200, id(font_mdi_large), TextAlign::CENTER, "\U000F0592");
- 7.3 Inch spectra™ 6
esphome:
  name: ee04
  friendly_name: EE04

esp32:
  board: esp32-s3-devkitc-1
  framework:
    type: esp-idf

# Enable logging
logger:

# Enable Home Assistant API
api:
  encryption:
    key: "b0AIbJ+kbeMayi1PgSGXtiD1yQCapUBF4A/7v7btys0="

ota:
  - platform: esphome
    password: "5d7cca6f4b3f38aba559ab0d6aaf5926"

wifi:
  ssid:
  password:

  # Enable fallback hotspot (captive portal) in case wifi connection fails
  ap:
    ssid: "Ee04 Fallback Hotspot"
    password: "zxPMBtCEWonm"

captive_portal:

external_components:
  - source:
      type: git
      url: https://github.com/esphome/esphome/
      ref: 2025.10.5
    components: [ epaper_spi, display ]

# define font to display words
font:
  - file: 'fonts/materialdesignicons-webfont.ttf'  # Path to the font file
    id: font_mdi_large
    size: 200        # Large icon size
    glyphs: &mdi-weather-glyphs
      - "\U000F0595" # weather-cloudy icon
      - "\U000F0592" # weather-hail icon
  - file: 'fonts/materialdesignicons-webfont.ttf'
    id: font_mdi_medium   # Medium icon size
    size: 40
    glyphs: *mdi-weather-glyphs

# define SPI interface
spi:
  clk_pin: GPIO7
  mosi_pin: GPIO9

display:
  - platform: epaper_spi
    id: my_display
    model: 7.3in-Spectra-E6
    cs_pin: GPIO44
    dc_pin:
      number: GPIO10
      inverted: false
    busy_pin:
      number: GPIO4
      inverted: true
    reset_pin:  GPIO38
    rotation: 0
    update_interval: 30s
    lambda: |-
      it.printf(100, 200, id(font_mdi_medium), TextAlign::CENTER, "\U000F0595");
      it.printf(400, 200, id(font_mdi_large), TextAlign::CENTER, "\U000F0592");
-
The
glyphssection defines which icons to load from the font file. Loading only the icons you need saves memory on your device. -
The program may take 2~3 minutes from the completion of burning to the final display.
Step 7. Save your configuration and upload it to your XIAO ePaper Display Board(ESP32-S3) - EE04. When you see feedback like the following image, it means the code is running successfully.
Customizing with Different Icons
The Material Design Icons library contains thousands of icons you can use in your projects. Here's how to find and use different icons:
Step 1. Visit the Material Design Icons website by clicking the button below.
Step 2. Search for an icon you want to use in your project. You can browse by category or use the search function.

Step 3. When you find an icon you like, click on it to view its details. Look for the Unicode value, which will be in the format F0595.
Step 4. Add the Unicode value to your ESPHome configuration by:
- Adding it to the
glyphslist in your font configuration - Updating the display code to use the new icon
For example, to use a new icon with Unicode F0123:
glyphs:
  - "\U000F0595" # weather-cloudy icon
  - "\U000F0592" # weather-hail icon
  - "\U000F0123" # your new icon
And in the display lambda:
lambda: |-
  it.printf(100, 200, id(font_mdi_medium), TextAlign::CENTER, "\U000F0123");
Step 5. Save your updated configuration and upload it to your device to see the new icon.
For weather dashboards, consider using icons like F0590 (sunny), F0591 (partly cloudy), F0593 (rainy), and F059E (windy).
By combining these icons with the weather data from Home Assistant that we set up earlier, you can create a dynamic weather display that shows the current conditions using appropriate icons.
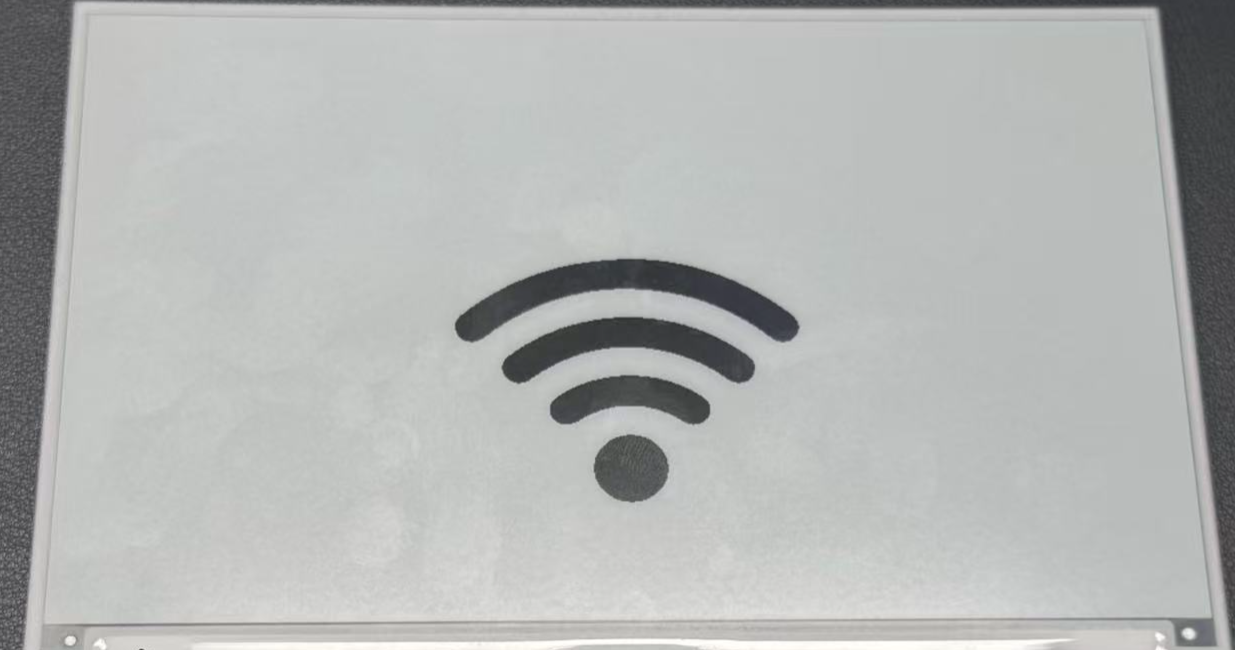
Displaying Custom Images
This example demonstrates how to display custom images on your XIAO ePaper Display Board(ESP32-S3) - EE04. You can use this feature to show logos, icons, or any graphics that enhance your dashboard experience.
Preparation
Step 1. Ensure you have the Studio Code Server add-on installed in Home Assistant. If you haven't installed it yet, follow the instructions from the previous example.
Step 2. Create a new folder called image in your ESPHome configuration directory. This folder will store the image files you want to display.
config/
└── esphome/
    ├── your_device.yaml
    └── image/         <- Create this folder
Adding Images
Step 3. Download a sample image to test the functionality. You can use the WiFi icon provided below or use your own image.
Step 4. Upload the downloaded image to the image folder you created earlier using the Studio Code Server file manager.

For best results on ePaper displays, use high-contrast images with clear black and white areas. JPG and PNG formats are both supported.
Configuring ESPHome for Image Display
Step 5. Add the following code to your ESPHome configuration file after the captive_portal section. This code defines the image resource and configures the display to show it.
- 1.54 Inch Monochrome Color
- 2.13 Inch Monochrome Color
- 2.13 Inch Quadruple Color
- 2.9 Inch Quadruple Color
- 2.9 Inch Monochrome Color
- 4.2 Inch Monochrome Color
- 5.83 Inch Monochrome Color
- 7.5 Inch Monochrome Color
esphome:
  name: ee04
  friendly_name: EE04

esp32:
  board: esp32-s3-devkitc-1
  framework:
    type: esp-idf

# Enable logging
logger:

# Enable Home Assistant API
api:
  encryption:
    key: "b0AIbJ+kbeMayi1PgSGXtiD1yQCapUBF4A/7v7btys0="

ota:
  - platform: esphome
    password: "5d7cca6f4b3f38aba559ab0d6aaf5926"

wifi:
  ssid:
  password:

  # Enable fallback hotspot (captive portal) in case wifi connection fails
  ap:
    ssid: "Ee04 Fallback Hotspot"
    password: "zxPMBtCEWonm"

captive_portal:

image:
  - file: /config/esphome/image/wifi.jpg    # Path to your image file (JPG or PNG)
    id: myImage
    type: BINARY                            # Binary mode works best for e-paper
    resize: 800x480                         # Resize to match display resolution
    invert_alpha: true                      # Invert colors if needed

spi:
  clk_pin: GPIO7
  mosi_pin: GPIO9

display:
  - platform: waveshare_epaper
    id: epaper_display
    model: 1.54inv2
    cs_pin: GPIO44
    dc_pin: GPIO10
    reset_pin:
      number: GPIO38
      inverted: false
    busy_pin:
      number: GPIO4
      inverted: true
    update_interval: 300s
    lambda: |-
      it.image(0, 0, id(myImage));          # Display image at position (0,0)
esphome:
  name: ee04
  friendly_name: EE04

esp32:
  board: esp32-s3-devkitc-1
  framework:
    type: esp-idf

# Enable logging
logger:

# Enable Home Assistant API
api:
  encryption:
    key: "b0AIbJ+kbeMayi1PgSGXtiD1yQCapUBF4A/7v7btys0="

ota:
  - platform: esphome
    password: "5d7cca6f4b3f38aba559ab0d6aaf5926"

wifi:
  ssid:
  password:

  # Enable fallback hotspot (captive portal) in case wifi connection fails
  ap:
    ssid: "Ee04 Fallback Hotspot"
    password: "zxPMBtCEWonm"

captive_portal:

image:
  - file: /config/esphome/image/wifi.jpg    # Path to your image file (JPG or PNG)
    id: myImage
    type: BINARY                            # Binary mode works best for e-paper
    resize: 800x480                         # Resize to match display resolution
    invert_alpha: true                      # Invert colors if needed

spi:
  clk_pin: GPIO7
  mosi_pin: GPIO9

display:
  - platform: waveshare_epaper
    id: epaper_display
    model: 2.13inv2 #More models you can refer to here: https://esphome.io/components/display/waveshare_epaper/
    cs_pin: GPIO44
    dc_pin: GPIO10
    reset_pin:
      number: GPIO38
      inverted: false
    busy_pin:
      number: GPIO4
      inverted: true
    update_interval: 300s
    lambda: |-
      it.image(0, 0, id(myImage));          # Display image at position (0,0)
esphome:
  name: ee04
  friendly_name: EE04
  libraries:
    - SPI


esp32:
  board: esp32-s3-devkitc-1
  framework:
    type: arduino


# Enable logging
logger:

# Enable Home Assistant API
api:
  encryption:
    key: "eg2Jyse0gE146lJ2mVaqAnwteb4U2GJ7d1sZc2BOOsc="

ota:
  - platform: esphome
    password: "e2f184b95aac832509885f676abf5b73"

wifi:
  ssid:
  password:

  # Enable fallback hotspot (captive portal) in case wifi connection fails
  ap:
    ssid: "ESPHome_Epaper"
    password: "123456789"

external_components:
  - source: github://xcjk-tofuture/esphome@dev
    components: [ waveshare_epaper ]


image:
  - file: /config/esphome/image/wifi.jpg    # Path to your image file (JPG or PNG)
    id: myImage
    type: BINARY                            # Binary mode works best for e-paper
    resize: 800x480                         # Resize to match display resolution
    invert_alpha: true                      # Invert colors if needed

captive_portal:

spi:
  clk_pin: GPIO7
  mosi_pin: GPIO9

display:
  - platform: waveshare_epaper
    id: my_display
    model: gdey0213f51
    cs_pin: GPIO44
    dc_pin: GPIO10
    busy_pin: GPIO4
    reset_pin:  GPIO38
    rotation: 90
    update_interval: 30s
    full_update_every: 1
    lambda: |-
      it.image(0, 0, id(myImage));          # Display image at position (0,0)
esphome:
  name: ee04
  friendly_name: EE04
  libraries:
    - SPI


esp32:
  board: esp32-s3-devkitc-1
  framework:
    type: arduino


# Enable logging
logger:

# Enable Home Assistant API
api:
  encryption:
    key: "eg2Jyse0gE146lJ2mVaqAnwteb4U2GJ7d1sZc2BOOsc="

ota:
  - platform: esphome
    password: "e2f184b95aac832509885f676abf5b73"

wifi:
  ssid:
  password:

  # Enable fallback hotspot (captive portal) in case wifi connection fails
  ap:
    ssid: "ESPHome_Epaper"
    password: "123456789"

external_components:
  - source: github://xcjk-tofuture/esphome@dev
    components: [ waveshare_epaper ]

captive_portal:

image:
  - file: /config/esphome/image/wifi.jpg    # Path to your image file (JPG or PNG)
    id: myImage
    type: BINARY                            # Binary mode works best for e-paper
    resize: 800x480                         # Resize to match display resolution
    invert_alpha: true                      # Invert colors if needed

spi:
  clk_pin: GPIO7
  mosi_pin: GPIO9
display:
  - platform: waveshare_epaper
    id: my_display
    model: gdey029f51h
    cs_pin: GPIO44
    dc_pin: GPIO10
    busy_pin: GPIO4
    reset_pin:  GPIO38
    rotation: 90
    update_interval: 30s
    full_update_every: 1
    lambda: |-
      it.image(0, 0, id(myImage));          # Display image at position (0,0)
esphome:
  name: ee04
  friendly_name: EE04

esp32:
  board: esp32-s3-devkitc-1
  framework:
    type: esp-idf

# Enable logging
logger:

# Enable Home Assistant API
api:
  encryption:
    key: "b0AIbJ+kbeMayi1PgSGXtiD1yQCapUBF4A/7v7btys0="

ota:
  - platform: esphome
    password: "5d7cca6f4b3f38aba559ab0d6aaf5926"

wifi:
  ssid:
  password:

  # Enable fallback hotspot (captive portal) in case wifi connection fails
  ap:
    ssid: "Ee04 Fallback Hotspot"
    password: "zxPMBtCEWonm"

captive_portal:

image:
  - file: /config/esphome/image/wifi.jpg    # Path to your image file (JPG or PNG)
    id: myImage
    type: BINARY                            # Binary mode works best for e-paper
    resize: 800x480                         # Resize to match display resolution
    invert_alpha: true                      # Invert colors if needed

spi:
  clk_pin: GPIO7
  mosi_pin: GPIO9

display:
  - platform: waveshare_epaper
    id: epaper_display
    model: 2.90inv2
    cs_pin: GPIO44
    dc_pin: GPIO10
    reset_pin:
      number: GPIO38
      inverted: false
    busy_pin:
      number: GPIO4
      inverted: true
    update_interval: 300s
    lambda: |-
      it.image(0, 0, id(myImage));          # Display image at position (0,0)
esphome:
  name: ee04
  friendly_name: EE04

esp32:
  board: esp32-s3-devkitc-1
  framework:
    type: esp-idf

# Enable logging
logger:

# Enable Home Assistant API
api:
  encryption:
    key: "b0AIbJ+kbeMayi1PgSGXtiD1yQCapUBF4A/7v7btys0="

ota:
  - platform: esphome
    password: "5d7cca6f4b3f38aba559ab0d6aaf5926"

wifi:
  ssid:
  password:

  # Enable fallback hotspot (captive portal) in case wifi connection fails
  ap:
    ssid: "Ee04 Fallback Hotspot"
    password: "zxPMBtCEWonm"

captive_portal:

image:
  - file: /config/esphome/image/wifi.jpg    # Path to your image file (JPG or PNG)
    id: myImage
    type: BINARY                            # Binary mode works best for e-paper
    resize: 800x480                         # Resize to match display resolution
    invert_alpha: true                      # Invert colors if needed

spi:
  clk_pin: GPIO7
  mosi_pin: GPIO9

display:
  - platform: waveshare_epaper
    id: epaper_display
    model: gdey042t81
    cs_pin: GPIO44
    dc_pin: GPIO10
    reset_pin:
      number: GPIO38
      inverted: false
    busy_pin:
      number: GPIO4
      inverted: true
    update_interval: 300s
    lambda: |-
      it.image(0, 0, id(myImage));          # Display image at position (0,0)
esphome:
  name: ee04
  friendly_name: EE04

esp32:
  board: esp32-s3-devkitc-1
  framework:
    type: esp-idf

# Enable logging
logger:

# Enable Home Assistant API
api:
  encryption:
    key: "b0AIbJ+kbeMayi1PgSGXtiD1yQCapUBF4A/7v7btys0="

ota:
  - platform: esphome
    password: "5d7cca6f4b3f38aba559ab0d6aaf5926"

wifi:
  ssid:
  password:

  # Enable fallback hotspot (captive portal) in case wifi connection fails
  ap:
    ssid: "Ee04 Fallback Hotspot"
    password: "zxPMBtCEWonm"

captive_portal:

image:
  - file: /config/esphome/image/wifi.jpg    # Path to your image file (JPG or PNG)
    id: myImage
    type: BINARY                            # Binary mode works best for e-paper
    resize: 800x480                         # Resize to match display resolution
    invert_alpha: true                      # Invert colors if needed

spi:
  clk_pin: GPIO7
  mosi_pin: GPIO9

display:
  - platform: waveshare_epaper
    id: epaper_display
    model: gdey0583t81
    cs_pin: GPIO44
    dc_pin: GPIO10
    reset_pin:
      number: GPIO38
      inverted: false
    busy_pin:
      number: GPIO4
      inverted: true
    update_interval: 300s
    lambda: |-
      it.image(0, 0, id(myImage));          # Display image at position (0,0)
esphome:
  name: ee04
  friendly_name: EE04

esp32:
  board: esp32-s3-devkitc-1
  framework:
    type: esp-idf

# Enable logging
logger:

# Enable Home Assistant API
api:
  encryption:
    key: "b0AIbJ+kbeMayi1PgSGXtiD1yQCapUBF4A/7v7btys0="

ota:
  - platform: esphome
    password: "5d7cca6f4b3f38aba559ab0d6aaf5926"

wifi:
  ssid:
  password:

  # Enable fallback hotspot (captive portal) in case wifi connection fails
  ap:
    ssid: "Ee04 Fallback Hotspot"
    password: "zxPMBtCEWonm"

captive_portal:

image:
  - file: /config/esphome/image/wifi.jpg    # Path to your image file (JPG or PNG)
    id: myImage
    type: BINARY                            # Binary mode works best for e-paper
    resize: 800x480                         # Resize to match display resolution
    invert_alpha: true                      # Invert colors if needed

spi:
  clk_pin: GPIO7
  mosi_pin: GPIO9

display:
  - platform: waveshare_epaper
    id: epaper_display
    model: 7.50inv2
    cs_pin: GPIO44
    dc_pin: GPIO10
    reset_pin:
      number: GPIO38
      inverted: false
    busy_pin:
      number: GPIO4
      inverted: true
    update_interval: 300s
    lambda: |-
      it.image(0, 0, id(myImage));          # Display image at position (0,0)
- 7.3 Inch spectra™ 6
esphome:
  name: ee04
  friendly_name: EE04

esp32:
  board: esp32-s3-devkitc-1
  framework:
    type: esp-idf

# Enable logging
logger:

# Enable Home Assistant API
api:
  encryption:
    key: "b0AIbJ+kbeMayi1PgSGXtiD1yQCapUBF4A/7v7btys0="

ota:
  - platform: esphome
    password: "5d7cca6f4b3f38aba559ab0d6aaf5926"

wifi:
  ssid:
  password:

  # Enable fallback hotspot (captive portal) in case wifi connection fails
  ap:
    ssid: "Ee04 Fallback Hotspot"
    password: "zxPMBtCEWonm"

captive_portal:

external_components:
  - source:
      type: git
      url: https://github.com/esphome/esphome/
      ref: 2025.10.5
    components: [ epaper_spi, display ]

image:
  - file: /config/esphome/image/wifi.jpg    # Path to your image file (JPG or PNG)
    id: myImage
    type: BINARY                            # Binary mode works best for e-paper
    resize: 800x480                         # Resize to match display resolution
    invert_alpha: true                      # Invert colors if needed

spi:
  clk_pin: GPIO7
  mosi_pin: GPIO9

display:
  - platform: epaper_spi
    id: my_display
    model: 7.3in-Spectra-E6
    cs_pin: GPIO44
    dc_pin:
      number: GPIO10
      inverted: false
    busy_pin:
      number: GPIO4
      inverted: true
    reset_pin:  GPIO38
    rotation: 0
    update_interval: 30s
    lambda: |-
      it.image(0, 0, id(myImage));          # Display image at position (0,0)
Step 6. Save your configuration and upload it to your XIAO ePaper Display Board(ESP32-S3) - EE04. When the update completes, your ePaper display will show the image.
Advanced Image Techniques
You can enhance your image display with these additional techniques:
Positioning Images
To position your image at specific coordinates on the screen:
lambda: |-
  // Display image at position (100,50)
  it.image(100, 50, id(myImage));
Combining Images with Text
You can display both images and text on the same screen:
lambda: |-
  // Display image
  it.image(0, 0, id(myImage));

  // Add text below or beside the image
  it.printf(400, 400, id(myFont), TextAlign::CENTER, "WiFi Connected");
Using Multiple Images
To display multiple images on the same screen, define each image in your configuration:
image:
  - file: /config/esphome/image/wifi.jpg
    id: wifiImage
    type: BINARY
    resize: 200x200

  - file: /config/esphome/image/temperature.png
    id: tempImage
    type: BINARY
    resize: 200x200

# In the display lambda:
lambda: |-
  it.image(50, 50, id(wifiImage));
  it.image(300, 50, id(tempImage));
Remember that ePaper displays have limited refresh rates. The update_interval: 300s setting means your display will refresh only every 5 minutes. Adjust this value according to your needs, but be aware that frequent refreshes can reduce the lifespan of ePaper displays.
By combining images with text and other display elements covered in previous examples, you can create rich, informative dashboards on your XIAO ePaper Display Board(ESP32-S3) - EE04.
Reference & Resources
Tech Support & Product Discussion
Thank you for choosing our products! We are here to provide you with different support to ensure that your experience with our products is as smooth as possible. We offer several communication channels to cater to different preferences and needs.