Edge Box RPi 200 Getting Started with Node Red
Introduction
Node-RED is a versatile programming tool designed to connect hardware devices, APIs, and online services seamlessly. Its browser-based flow editor simplifies the process of wiring together different components using a variety of nodes from the palette. With a lightweight runtime built on Node.js, it efficiently utilizes the Raspberry Pi and other low-cost hardware, making it perfect for edge network applications.
Getting Start
Before you start this project, you may need to prepare your hardware and software in advance as described here.
Hardware Preparation
| Edge Box RPi 200 |
|---|
 |
Software Preparation
Edge Box-200 comes to your hand pre installed raspberry pi OS. If you are booting this device first time please read our Getting Started Wiki
Install Node Red on Edge box
- Step 01: SSH to Edgebox
Please open PowerShell if you using windows or open Terminal APP if you are using program and then type ssh
{USERNAME}@{EDGEBOX_IP_ADDRESS}. As example
Then please enter the password for the {USER} of the Operating System you have setup on your Edge Box.
- Step 02: Install Node-RED
The Node-RED team has prepared us with a All-IN-ONE script, which you could just enter the following command into the EdgeBox native Terminal APP (via VNC viewer) or in the SSH Shell from the step above.
bash <(curl -sL https://raw.githubusercontent.com/node-red/linux-installers/master/deb/update-nodejs-and-nodered)
At the end of the installation, there will be a couple of questions asked by the prompt, and you need to answer them.

- Step 03: Setup Node-Red After the installation with the All-IN-ONE script is complete, you can use follow commands accordingly:
Use node-red-start to start Node-RED
Use node-red-stop to stop Node-RED
Use node-red-start to start Node-RED again
Use node-red-log to view the recent log output
Use sudo systemctl enable nodered.serviceto autostart Node-RED at every boot
Use sudo systemctl disable nodered.serviceto disable autostart on boot
- Step 04: Access Node-RED editor
Now please open your favorite Web Browser and enter the url described as below:
-
Option 1: Use
http://127.0.0.1:1880, if the web browser is running locally on your Edgebox via VNC. -
Option 2: Use
http://{EdgeBox_IP_ADDRESS}:1880, if the web browser is running remotely on a host computer, please replace the{EdgeBox_IP_ADDRESS}with the ip address of EdgeBox.
Getting familiar with Node-RED
Now you should see the similar result as the image below:

Node-RED editor Overview
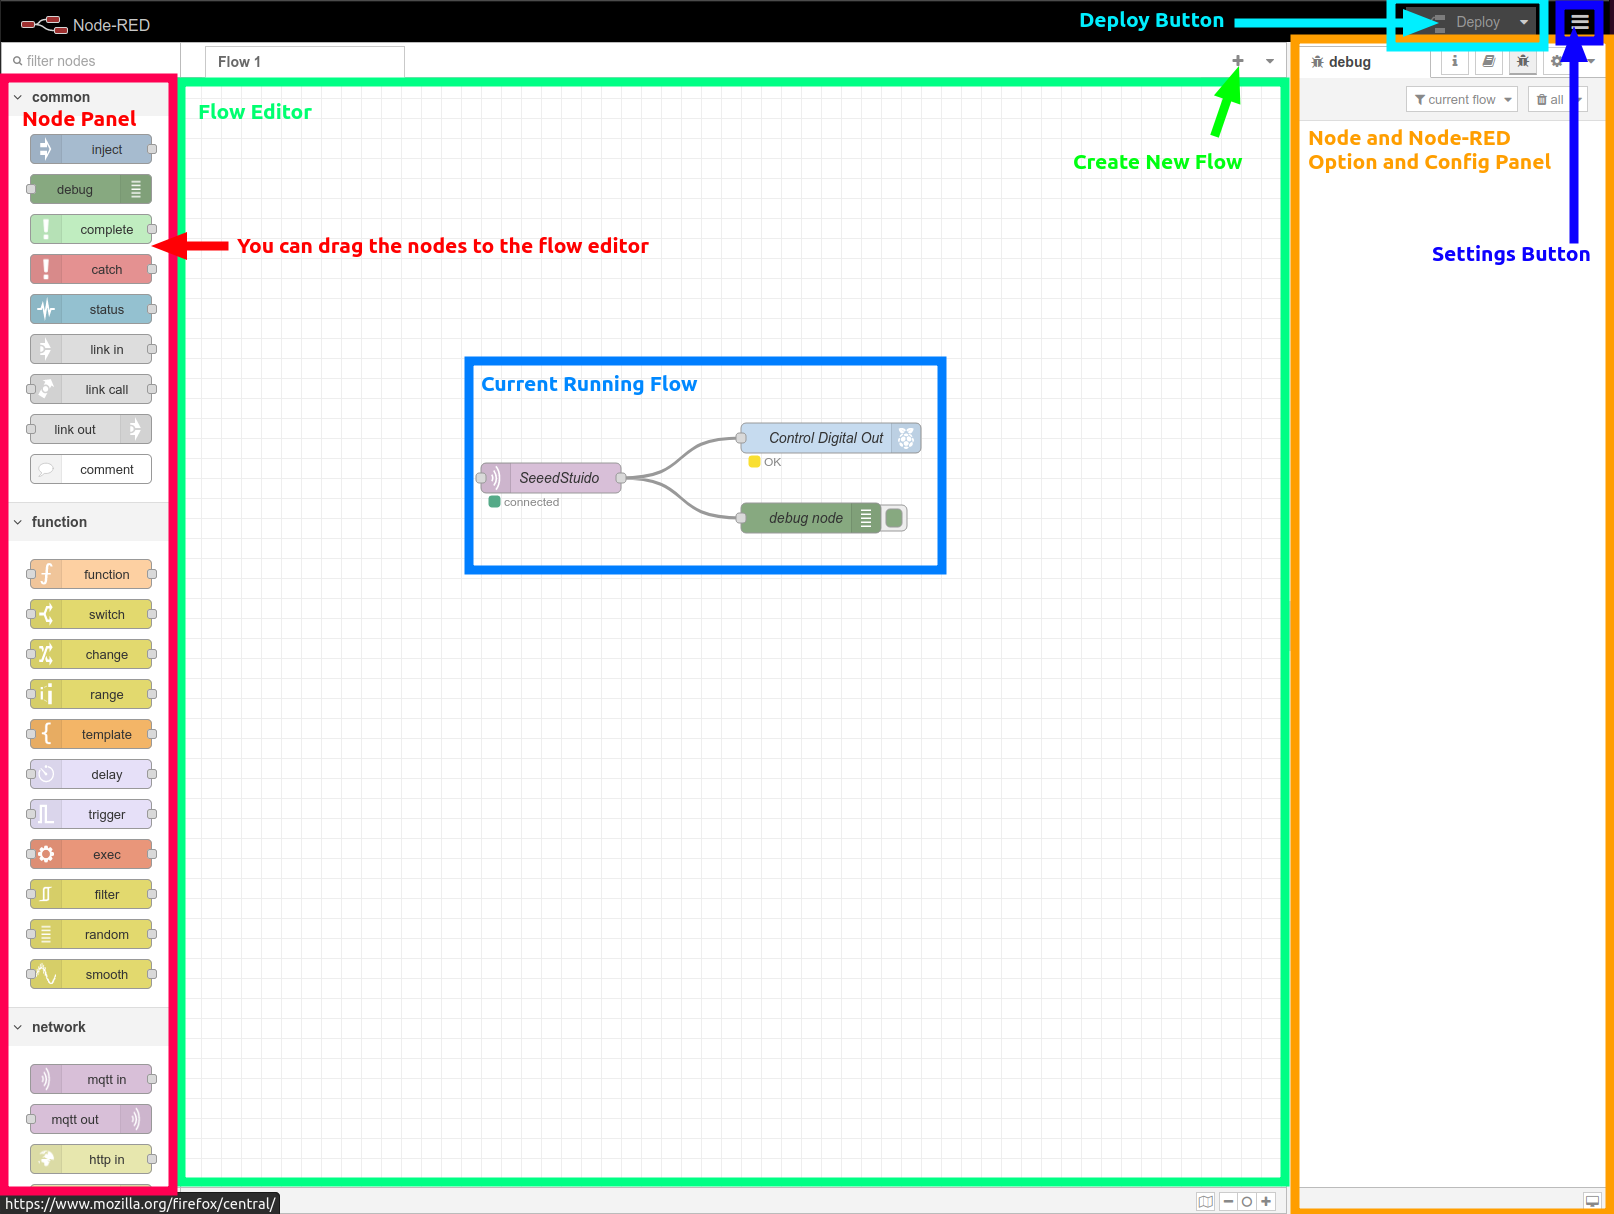
- Node Panel: The area where users can browse and select nodes from a palette to add to their flows.
- Flow Editor: The workspace where users visually connect nodes together to create their flows.
- Config Panel: The section where users can configure the properties and settings of selected nodes.
- Settings Button: Allows users to access and adjust various settings and preferences for the Node-RED editor.
- Deploy Button: Enables users to deploy their flows to the Node-RED runtime, making them active and operational.
Install Nodes
There are a couple of options: one is using command lines, and the next one is using the Node-RED editor. Here, I will explain the simplest method, which is using the Node-RED editor.
-
Step 1: Click the Settings button with three dash icon located at the right corner and then select the Manage palette
-
Step 2: At the palette tab click Install tab
-
Step 3: Search for the node in the node search bar and Click install button to install
-
Step 4: click on Install button from the dropdown warning window to confirm install
-
Step 5: Wait for the installation to complete and you should see the install button changed to installed.
-
Step 6: you should see the installed nodes in the side bar.

Tech Support & Product Discussion
Thank you for choosing our products! We are here to provide you with different support to ensure that your experience with our products is as smooth as possible. We offer several communication channels to cater to different preferences and needs.