Edge Box RPi 200 with Node Red and MQTT
Introduction
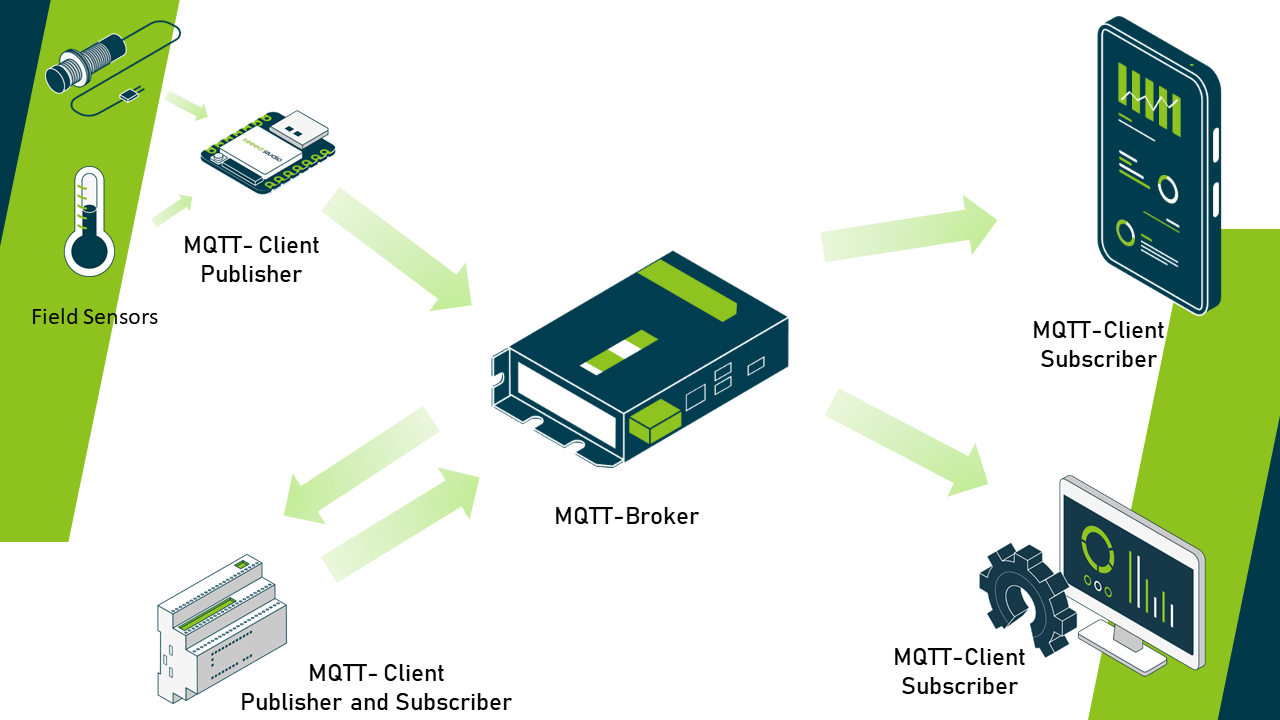
MQTT (Message Queuing Telemetry Transport) is a lightweight messaging protocol ideal for IoT (Internet of Things) applications due to its efficiency and low bandwidth requirements. It facilitates communication between devices in a publish-subscribe model, allowing for real-time data exchange over unreliable networks. With Node-RED, integrating MQTT enables seamless connectivity between edge devices and central servers or other devices, fostering efficient data transmission and processing. EdgeBox Edge Controller, by supporting MQTT natively, eliminates the need for additional hardware gateways by allowing the installation of an MQTT broker directly on the EdgeBox itself. This reduces complexity, minimizes latency, and enhances reliability, as data can be processed and acted upon at the edge without relying on external intermediaries, thus optimizing IoT system architecture.
Getting Start
Before you start this project, you may need to prepare your hardware and software in advance as described here.
Hardware Preparation
| Edge Box RPi 200 |
|---|
 |
Software Preparation
Edge Box-200 comes to your hand pre installed raspberry pi OS. If you are booting this device first time please read our Getting Started Wiki. We have prepared a Getting started Guide on Node-RED. It is recommended that you review this guide before proceeding to the wiki.
Setup EdgeBox as MQTT Broker
- Step 01 : SSH or VNC to EdgeBox RPi 200 and Update Raspberry Pi OS:
sudo apt update
- Step 02 : Then, install Mosquitto on it. To do so, open the terminal and execute this command:
sudo apt-get install mosquitto
- Step 03 :Next, install the Mosquitto command-line client by executing the following command in the terminal:
sudo apt-get install mosquitto-clients -y
- Step 04 : Once the MQTT broker installation is complete, adjustments to its configuration files are necessary. The default configuration file can be found at
/etc/mosquitto/mosquitto.conf. To access and modify this file, use the nano editor by executing the following command in the terminal:
sudo nano /etc/mosquitto/mosquitto.conf
In the configuration file, we’ll disable the default configuration settings with this line:
include_dir /etc/mosquitto/conf.d
to
#include_dir /etc/mosquitto/conf.d
Next, we'll enforce a policy disallowing anonymous users from connecting to the broker by adding the line:
allow_anonymous false
To store passwords securely, we'll specify a file location by adding:
password_file /etc/mosquitto/pwfile
Then, to set the listening port to 1883, we'll add:
listener 1883
Save the modifications by pressing Ctrl+S and exit the editor with Ctrl+X.

- Step 05 : To establish usernames and passwords, granting access to MQTT clients, or resetting existing passwords, utilize the following command in the terminal:
sudo mosquitto_passwd -c /etc/mosquitto/pwfile <username>
After generating a username and password, reboot Edgebox
sudo reboot
You can initiate the Mosquitto broker by entering the following command in the terminal:
sudo systemctl start mosquitto
sudo systemctl status mosquitto To verify whether the Mosquitto broker is running
sudo systemctl stop mosquitto To halt the Mosquitto broker
sudo systemctl restart mosquitto For restarting the Mosquitto broker
sudo systemctl enable mosquitto To ensure that the Mosquitto broker initializes upon system boot
Test Connection
- Step 01 : Open a new SSH session or terminal and run the following command to subscribe to a topic
mosquitto_sub -h localhost -t test -u <USER> -P <PASSWORD>
- Step 02 : In another SSH session or terminal, run the following command to publish a message to the same topic. Make sure to enter User name and Password accordingly.
mosquitto_pub -h localhost -t test -m "Hello, world!" -u <USER> -P <PASSWORD>
You should see the message "Hello, world!" appear in the first SSH session window where you ran the mosquitto_sub command. Make sure to enter User name and Password accordingly.
Edit Flows
MQTT in Node
The MQTT-in node subscribes to MQTT topics and receives messages from the broker. When a message is published to one of its subscribed topics, the MQTT-in node activates and forwards the received message to the subsequent nodes in the flow for further processing.
-
Step 01 Drag and drop an MQTT-in node from the Node-RED palette onto the canvas.
-
Step 02 Double-click the MQTT-in node to open its configuration dialog.
-
Step 03 In the configuration dialog, configure the following fields:
-
Server: Ensure the broker details are pre-populated. If not, click the pencil icon to add the broker's IP address, username, and password.
-
Action: Select whether to subscribe to a single topic or use a dynamic subscription. For a dynamic subscription, extract the desired MQTT topic from the message payload using a function node or other processing nodes. Here, we'll subscribe to a single topic.
-
Topic: Enter the MQTT topic you want to subscribe to.
-
QoS: Choose the desired Quality of Service (QoS) level for message delivery (0, 1, or 2).
-
Name: Optionally, assign a meaningful name to your node.
-
-
Step 04 Click Done to save the configuration.


MQTT-out Node
The MQTT-out node (MQTT output) is used to publish messages to MQTT topics. You can configure the topic and the payload of the message to be published, which can be either static or dynamically generated based on data from other nodes in the flow.
-
Step 01 Drag and drop an MQTT-out node from the Node-RED palette onto the canvas.
-
Step 02 Double-click the MQTT-out node to open its configuration dialog.
-
Step 03 In the configuration dialog, click the pencil icon next to the Server field to create a new broker configuration.
-
Step 04 Edit the MQTT broker settings by adding the broker’s address in the server field, port, and any authentication credentials if required (e.g., username and password).
-
Step 05 Click Done to save the broker settings.
-
Step 06 In the configuration dialog, configure the following fields:
-
Topic: Enter the MQTT topic to which you want to publish messages.
-
QoS: Choose the desired Quality of Service (QoS) level for message delivery (0, 1, or 2).
-
Retain: Choose whether to retain the published message on the broker (true or false).
-
Name: Optionally, assign a meaningful name to your node.
-

- Step 07 Click Done to save the configuration.
We use the inject node to inject the message at a certain interval, and we also use the debug node to inspect the published message.

You can view this graphical representation below to understand how to connect and configure the MQTT-in, MQTT-out, debug, and inject nodes.
Tech Support & Product Discussion
Thank you for choosing our products! We are here to provide you with different support to ensure that your experience with our products is as smooth as possible. We offer several communication channels to cater to different preferences and needs.