Develop with Ubidots
Ubidots is a systems integrators, IoT Entrepreneurs and OEMs effortlessly self-construct Internet of Things (IoT) applications and connected services with Ubidots’ data collection, analysis, and visualization tools. In the planning of the kit, we choose Ubidots platform as an alternative without LoRaWAN®, you can use the WiFi function that comes with Wio Terminal to get the data presentation in Ubidots dashboard with the sensor data you need through MQTT protocol.
In this chapter we will show you how to send data from sensors to Ubidots by means of Arduino programming.
Preliminary Preparation
Connection
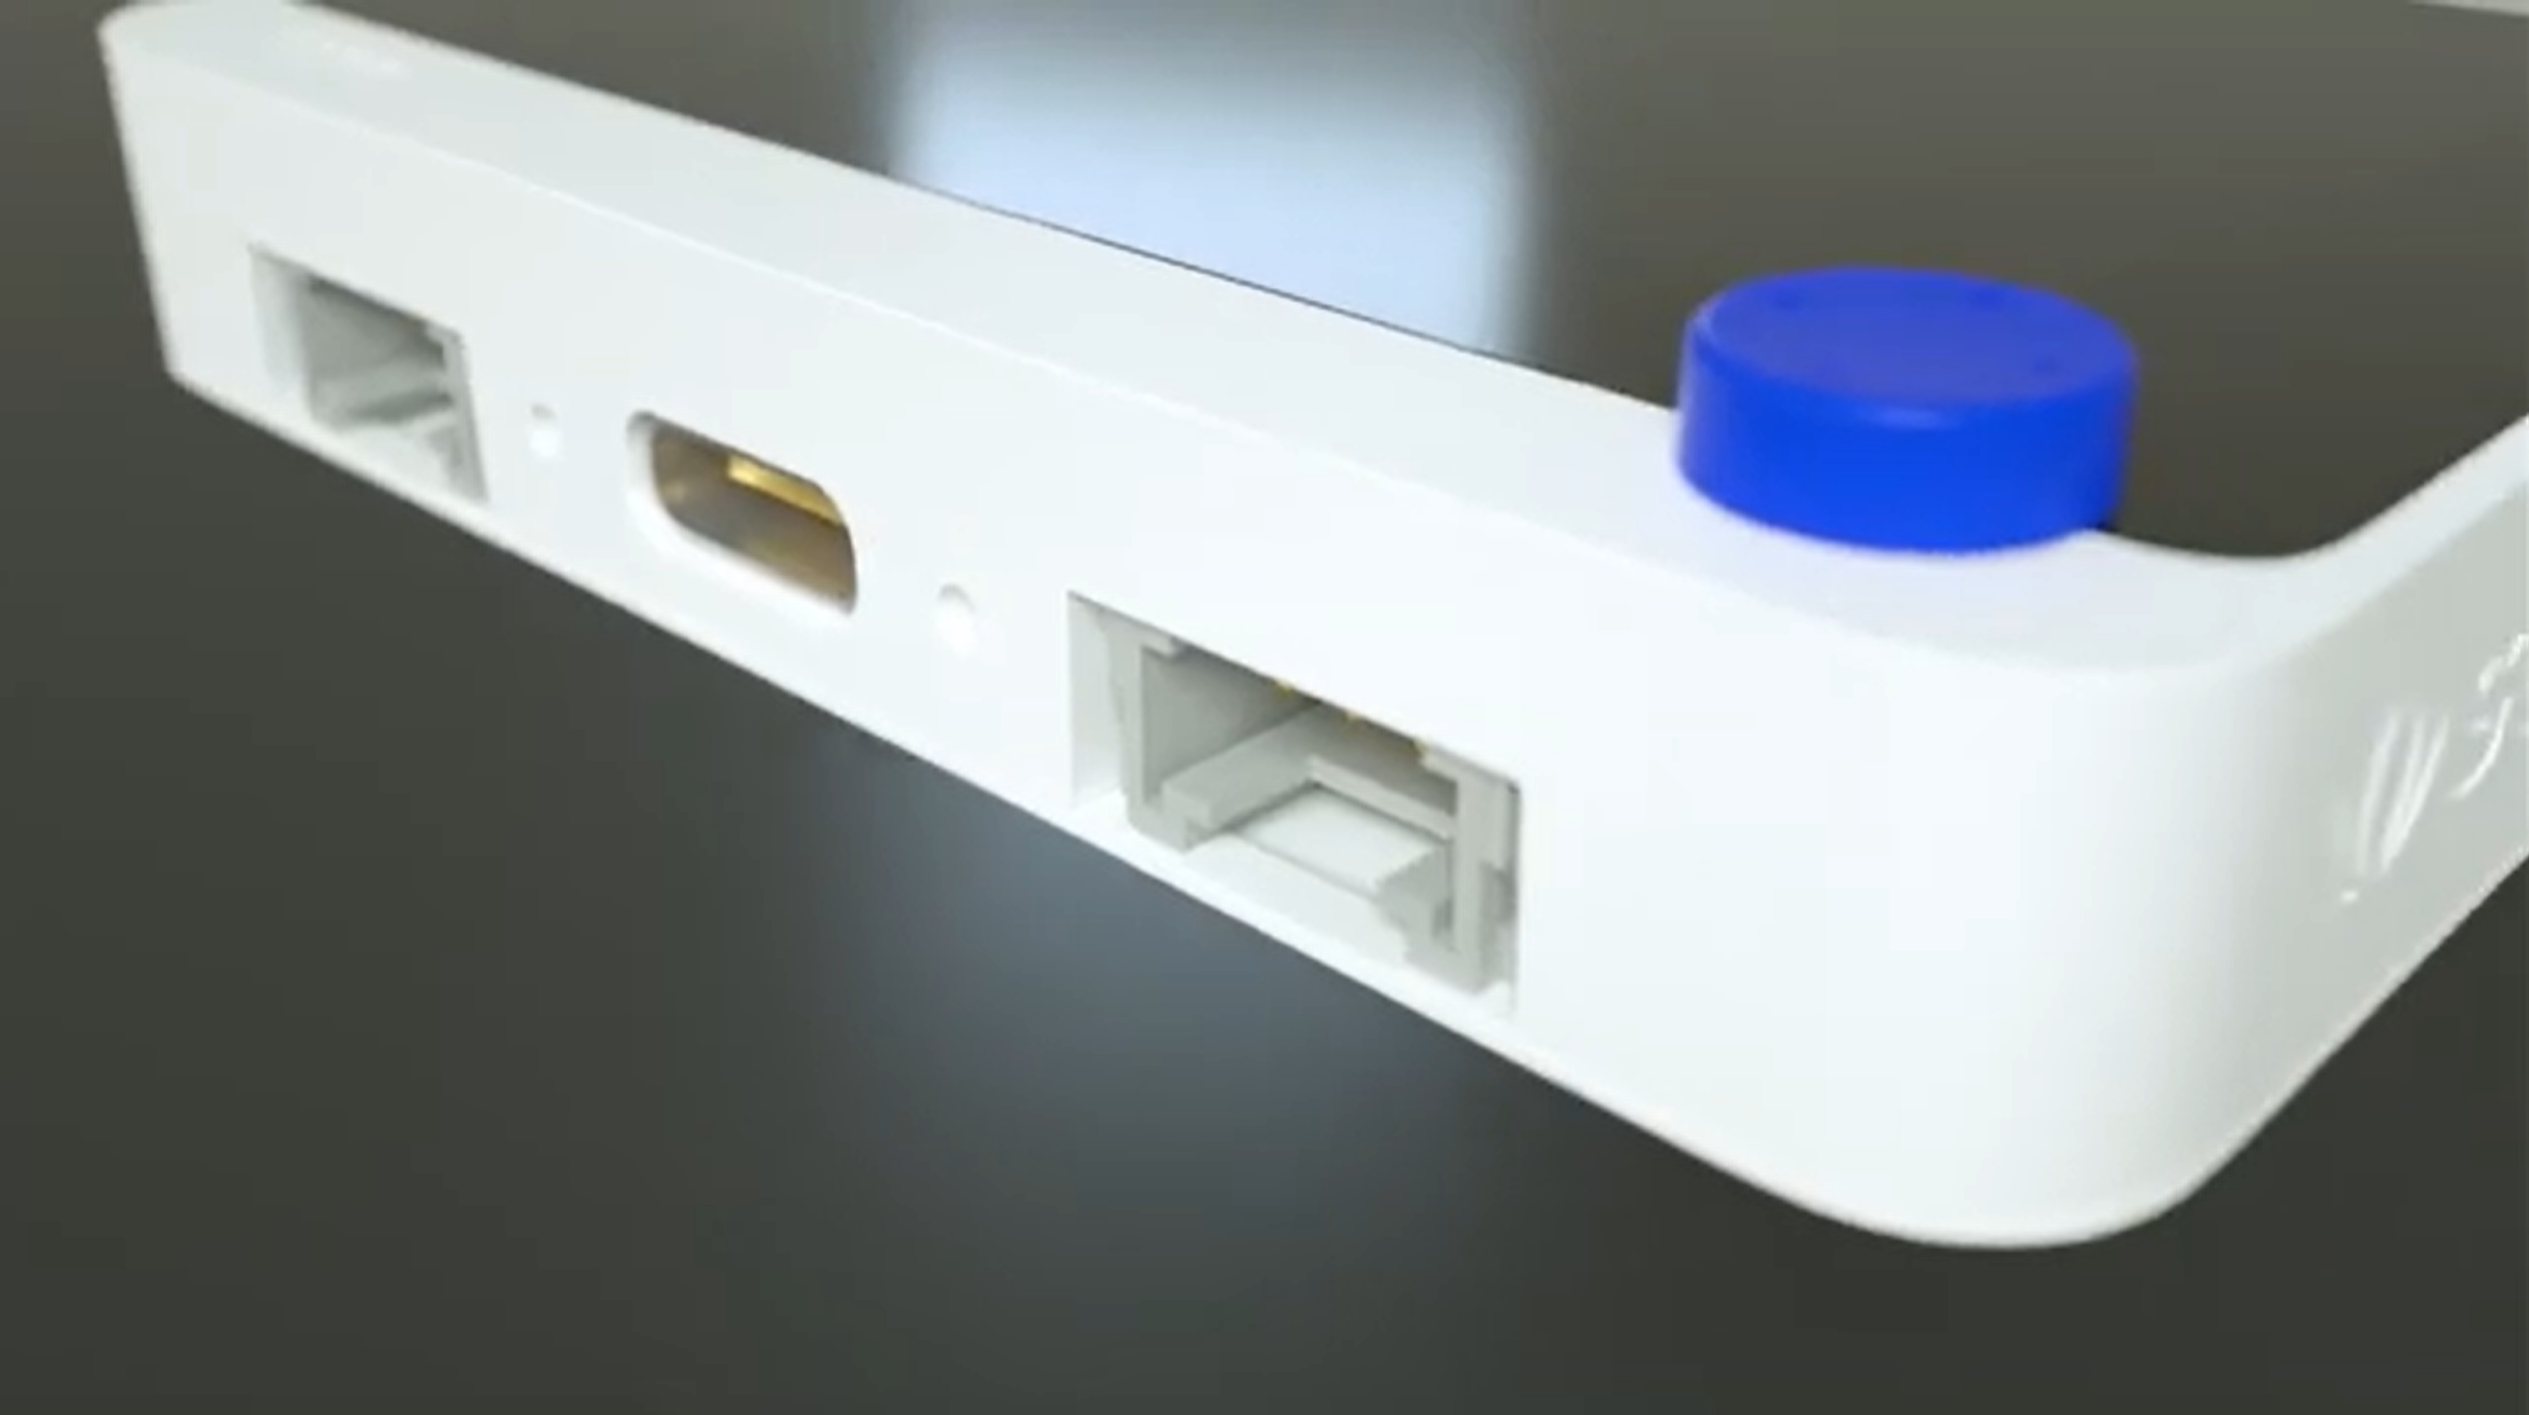
The sensors inside the SeseCAP - K1100 Kit can all be connected to the Grove connector under the Wio Terminal via the Grove cable. The following table describes the location of the Grove connector to which each sensor is connected.
| Sensor Type | Communication Protocol | Connected Grove Interface |
|---|---|---|
| Grove Temp&Humi Sensor (SHT40) | I2C | Wio Terminal left Grove interface |
| Grove VOC and eCO2 Gas Sensor (SGP30) | I2C | Wio Terminal left Grove interface |
| Grove Vision AI Module | I2C | Wio Terminal left Grove interface |
| Grove Soil Moisture Sensor | ADC | Wio Terminal right Grove interface |
Software preparation
Step 1. You need to Install an Arduino Software.

Step 2. Launch the Arduino application.
Step 3. Add Wio Terminal to the Arduino IDE.
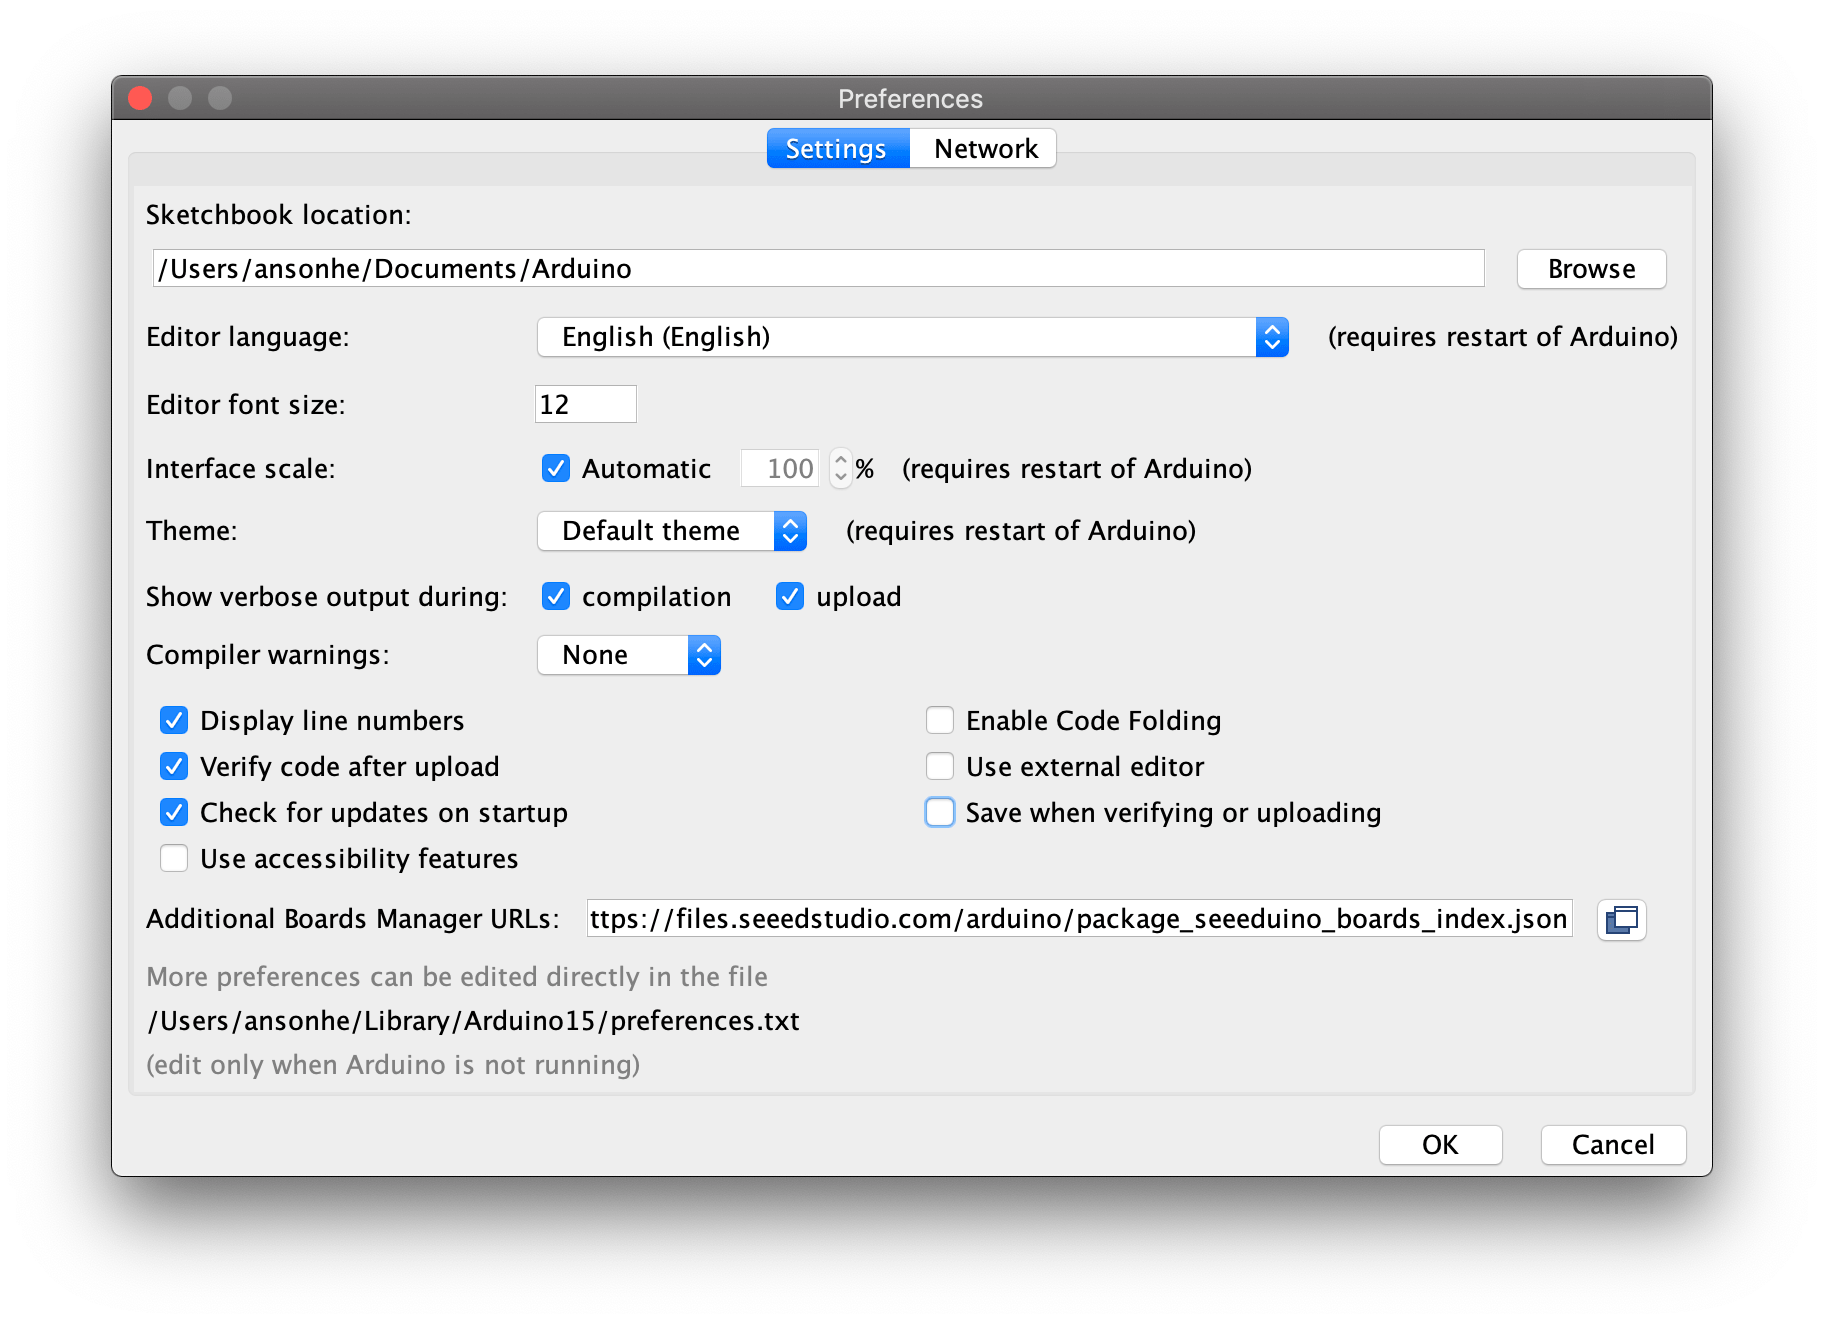
Open your Arduino IDE, click on File > Preferences, and copy below url to Additional Boards Manager URLs:
https://files.seeedstudio.com/arduino/package_seeeduino_boards_index.json
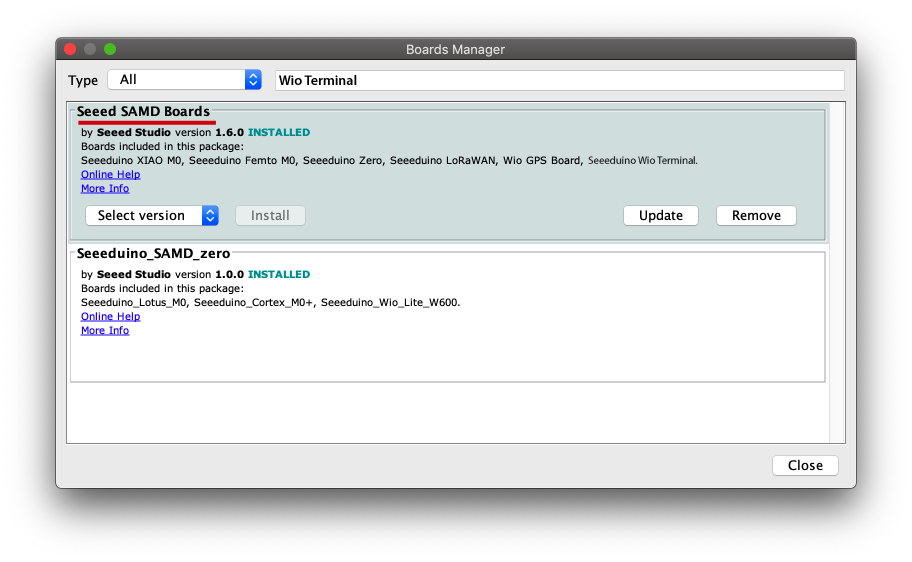
Click on Tools > Board > Board Manager and Search Wio Terminal in the Boards Manager.
Step 4. Select your board and port
You'll need to select the entry in the Tools > Board menu that corresponds to your Arduino. Selecting the Wio Terminal.
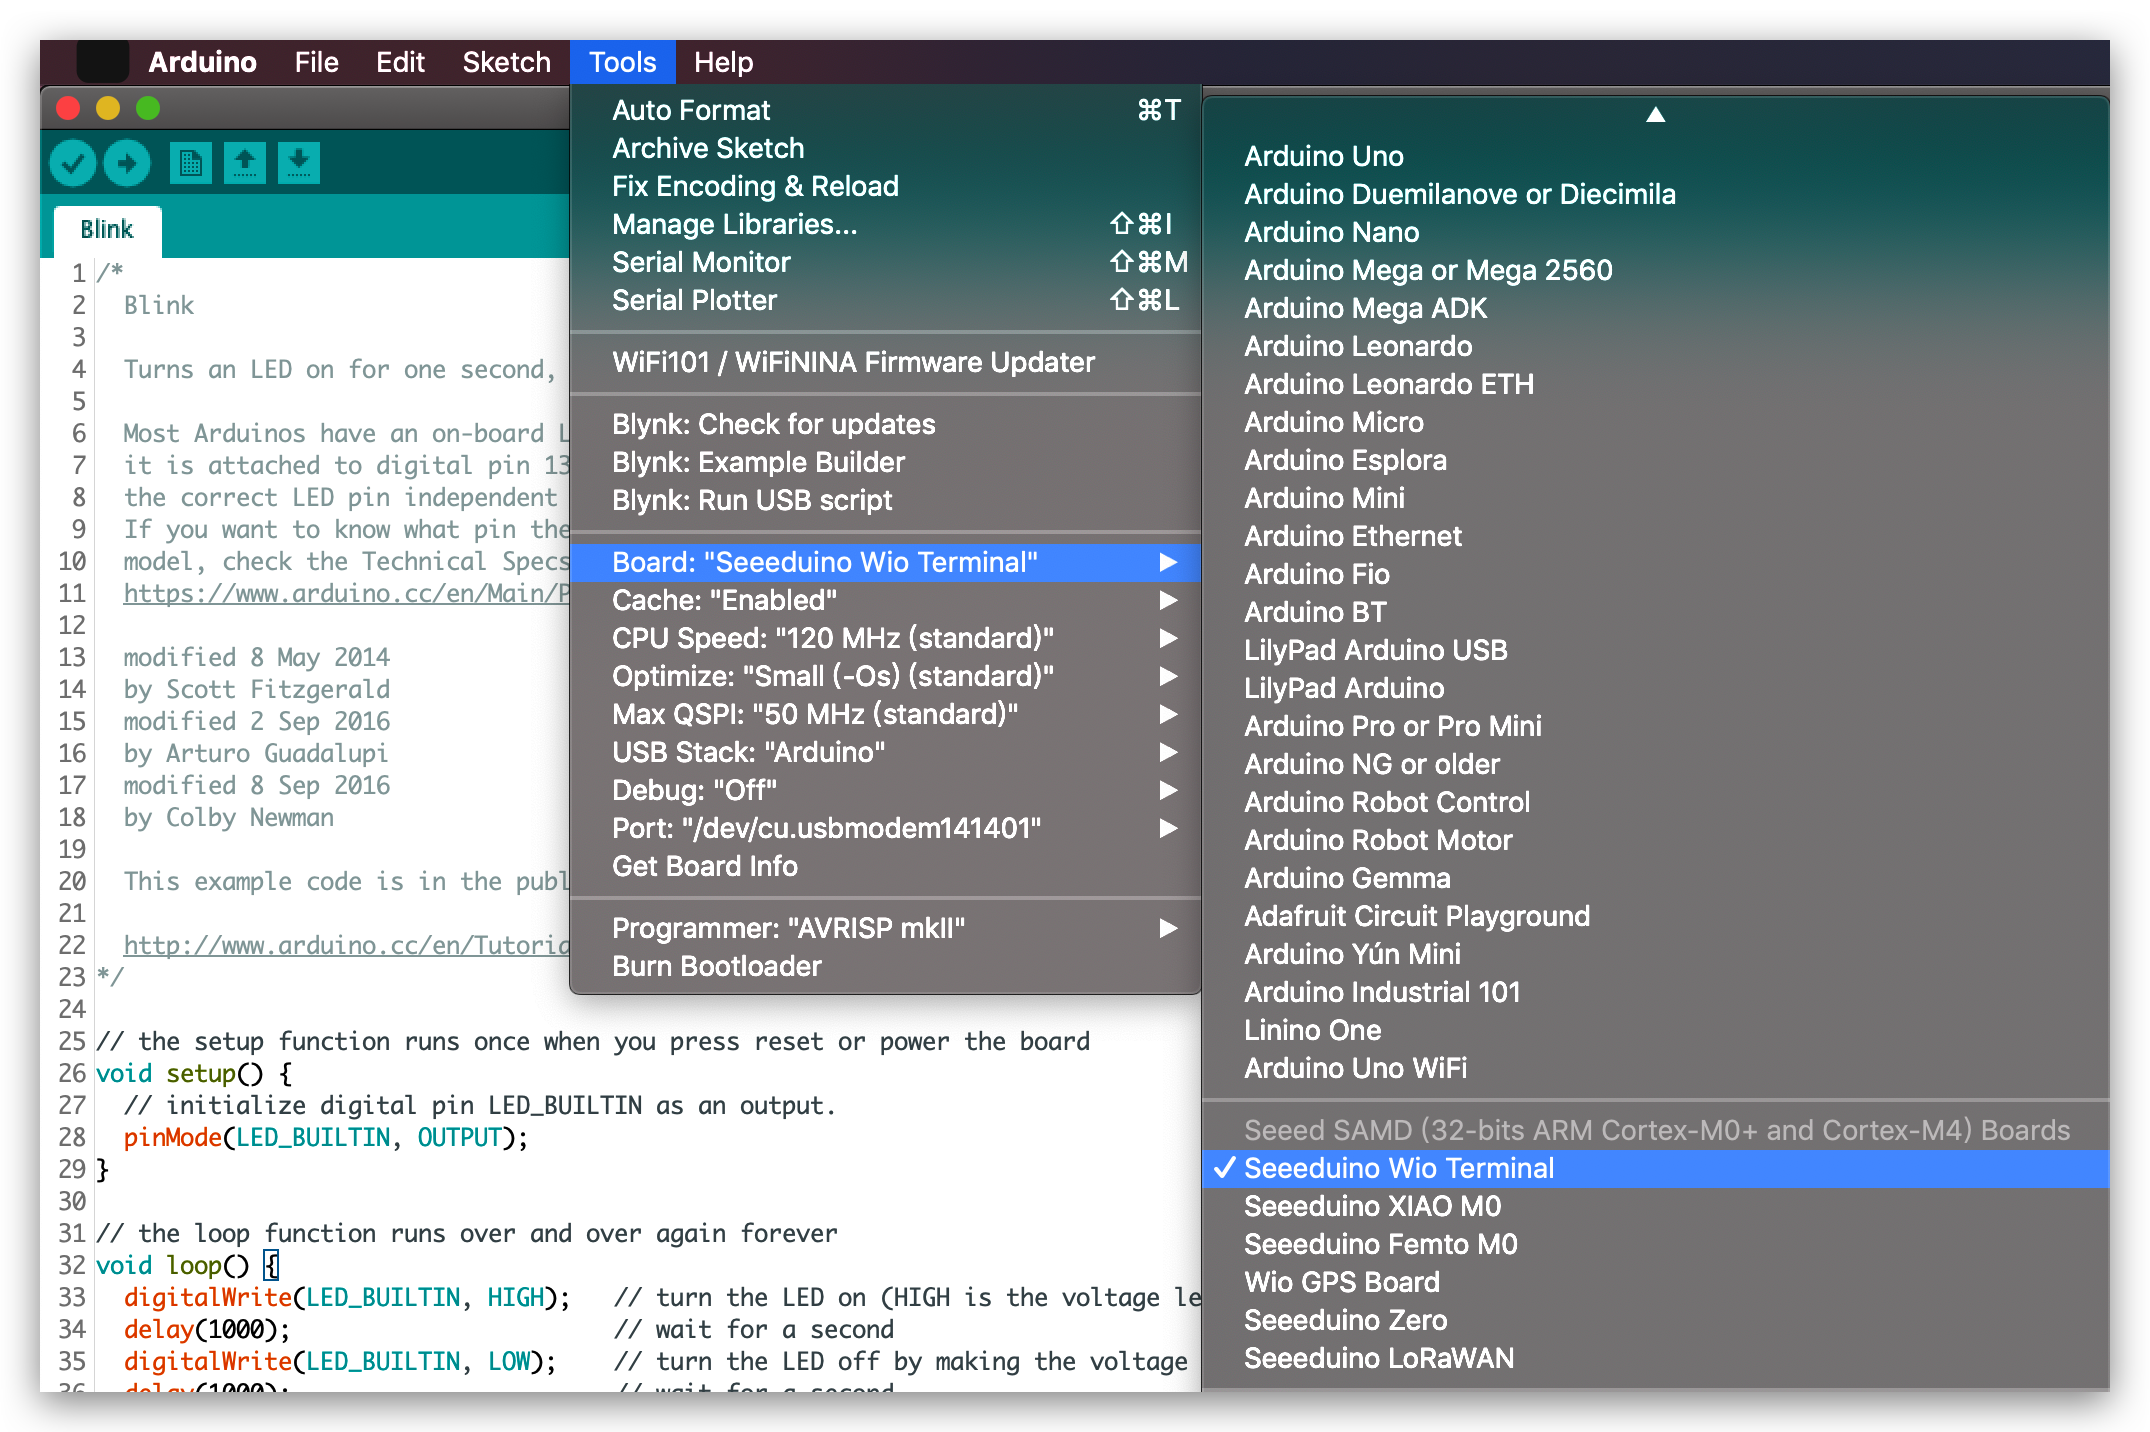
Select the serial device of the Wio Terminal board from the Tools -> Port menu. This is likely to be COM3 or higher (COM1 and COM2 are usually reserved for hardware serial ports). To find out, you can disconnect your Wio Terminal board and re-open the menu; the entry that disappears should be the Arduino board. Reconnect the board and select that serial port.
For Mac User, it will be something like /dev/cu.usbmodem141401.
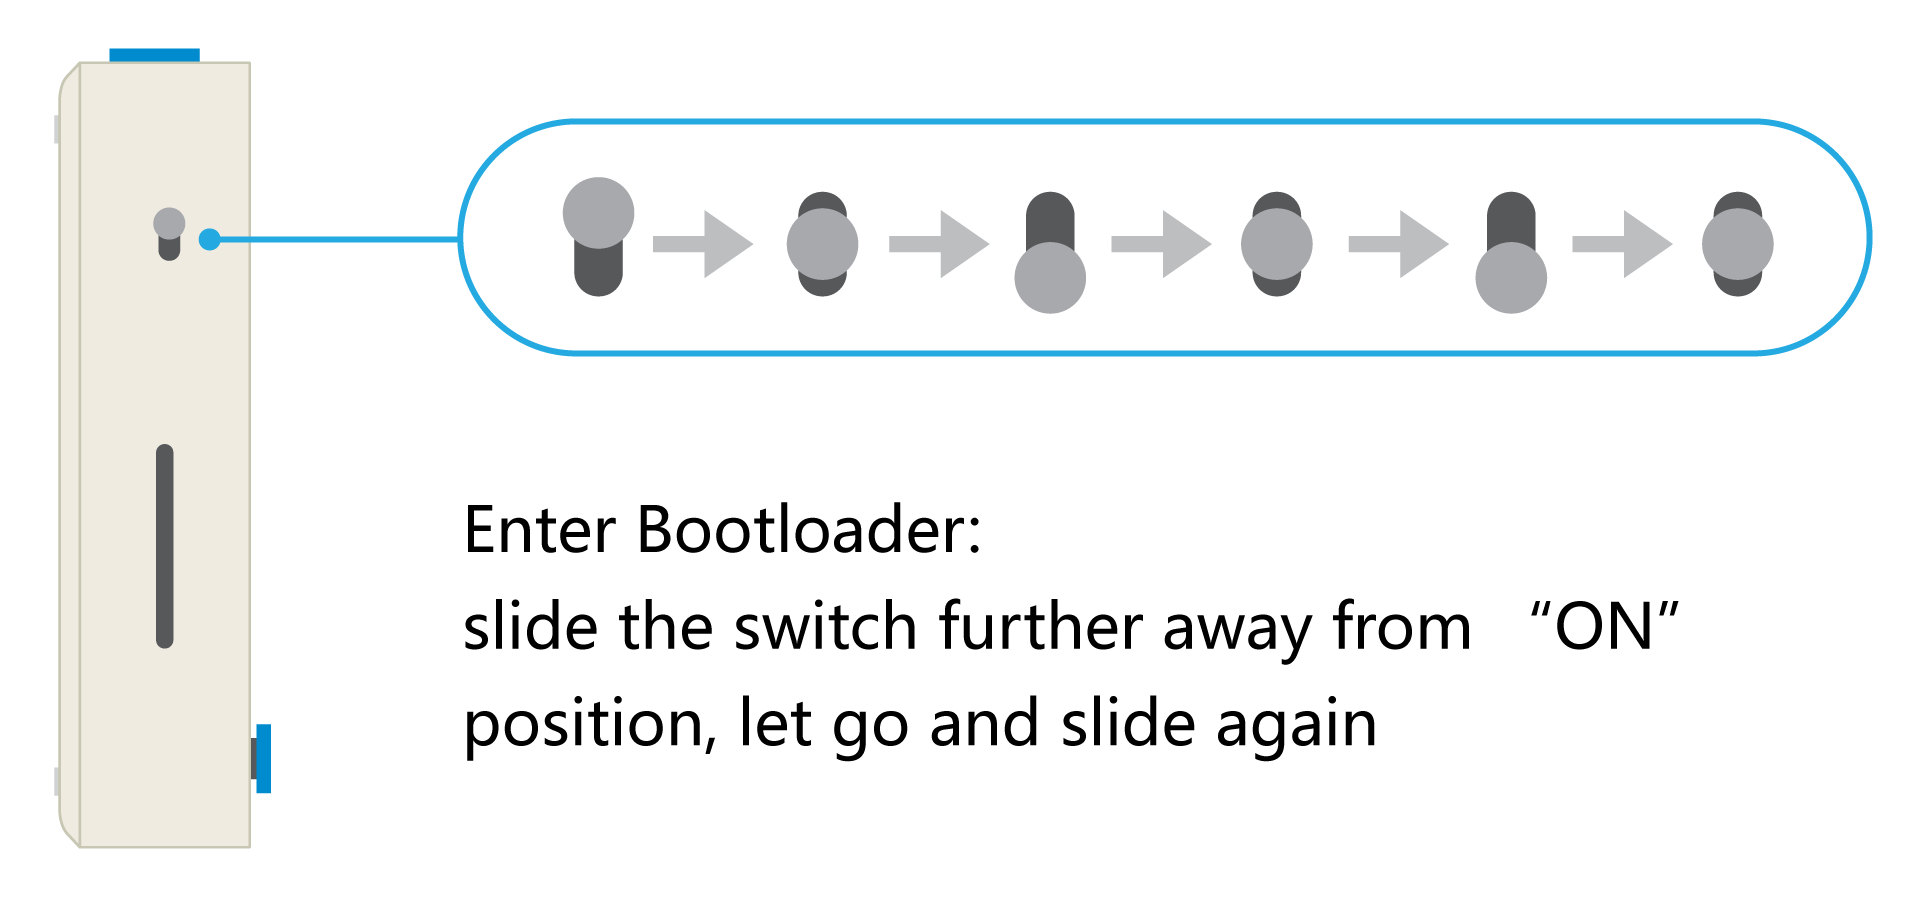
If you are not able to upload the sketch, mostly it's because Arduino IDE was not able to put Wio Terminal to bootloader mode. (Because MCU was halted or your program handling USB) Workaround is putting your Wio Terminal to bootloader mode manually.
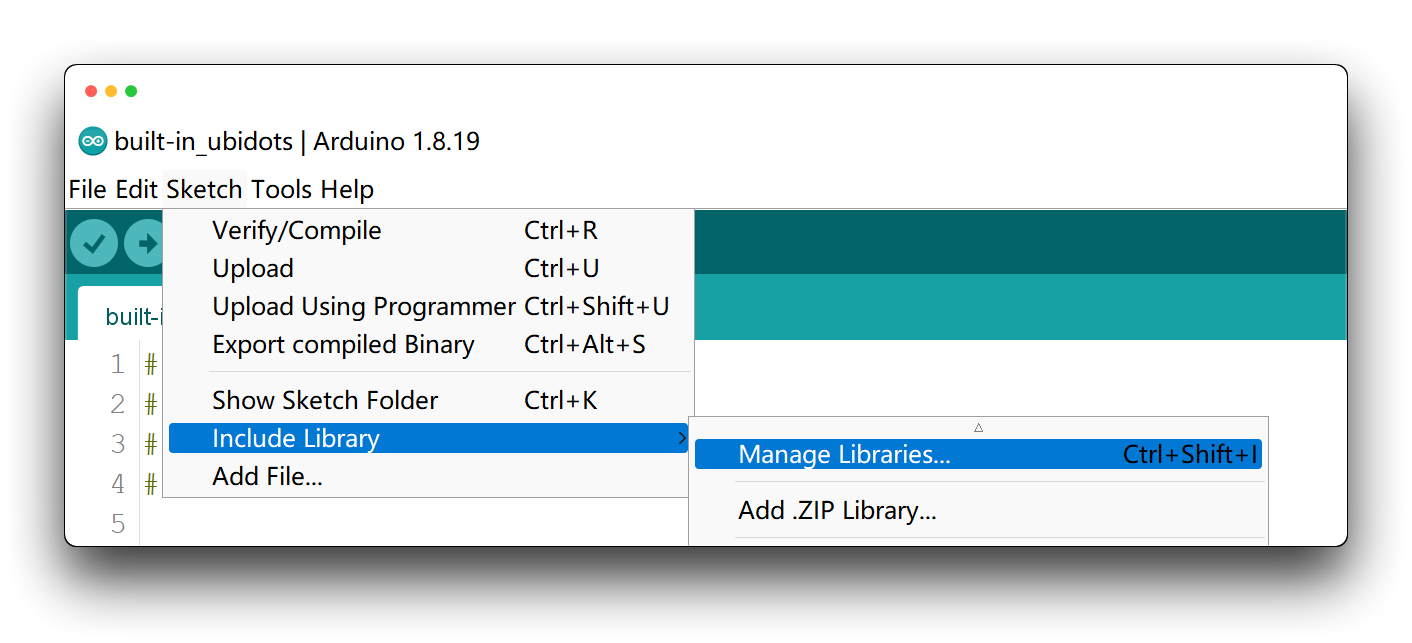
Step 5. Install the library required for the sensor of your choice
| Sensor Type | Link 1 | Link 2 |
|---|---|---|
| Wio Terminal IMU Sensor | Download | - |
| Grove Temp&Humi Sensor (SHT40) | Download | Download |
| Grove VOC and eCO2 Gas Sensor (SGP30) | Download | - |
| Grove Vision AI Module | Download | - |
Sensors not listed in the table above indicate that a separate library download is not required.
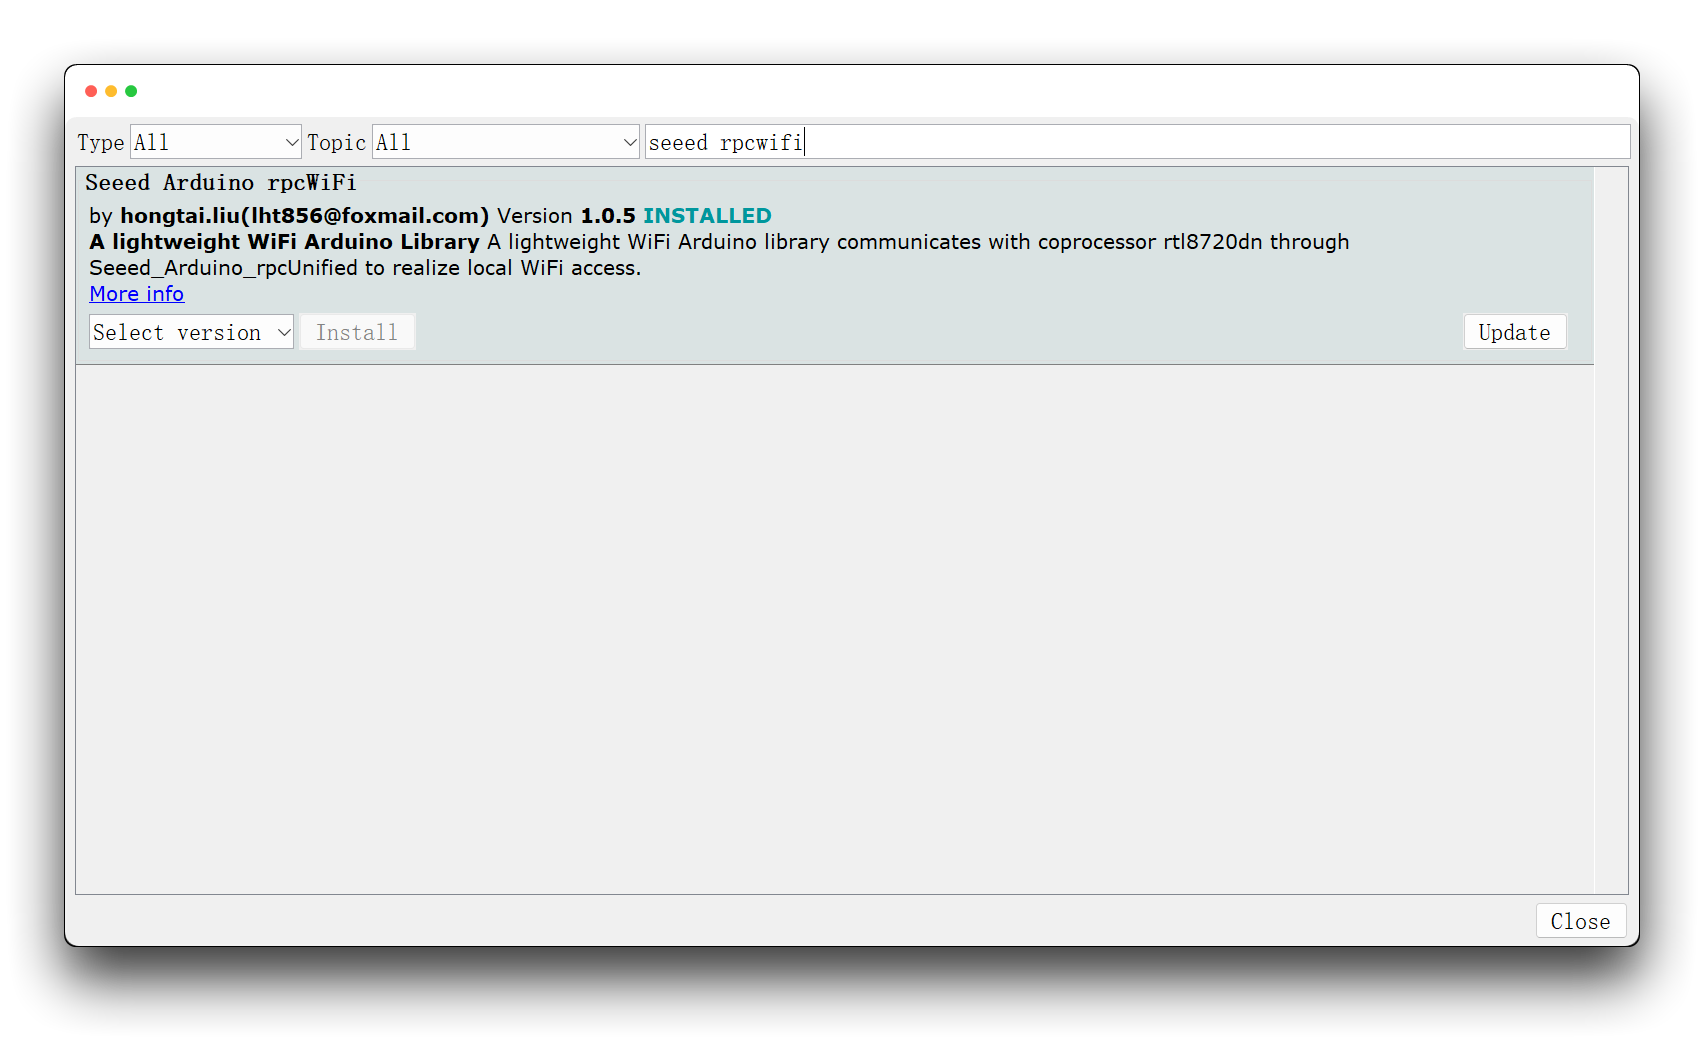
Step 6. Needed Libraries for Wi-Fi
We need the following libraries to get started with Wi-Fi on the Wio Terminal. You can search for these libraries by typing the library name in the search box of Arduino Library Manager.
- Seeed_Arduino_rpcWiFi - search for
seeed rpcwifi
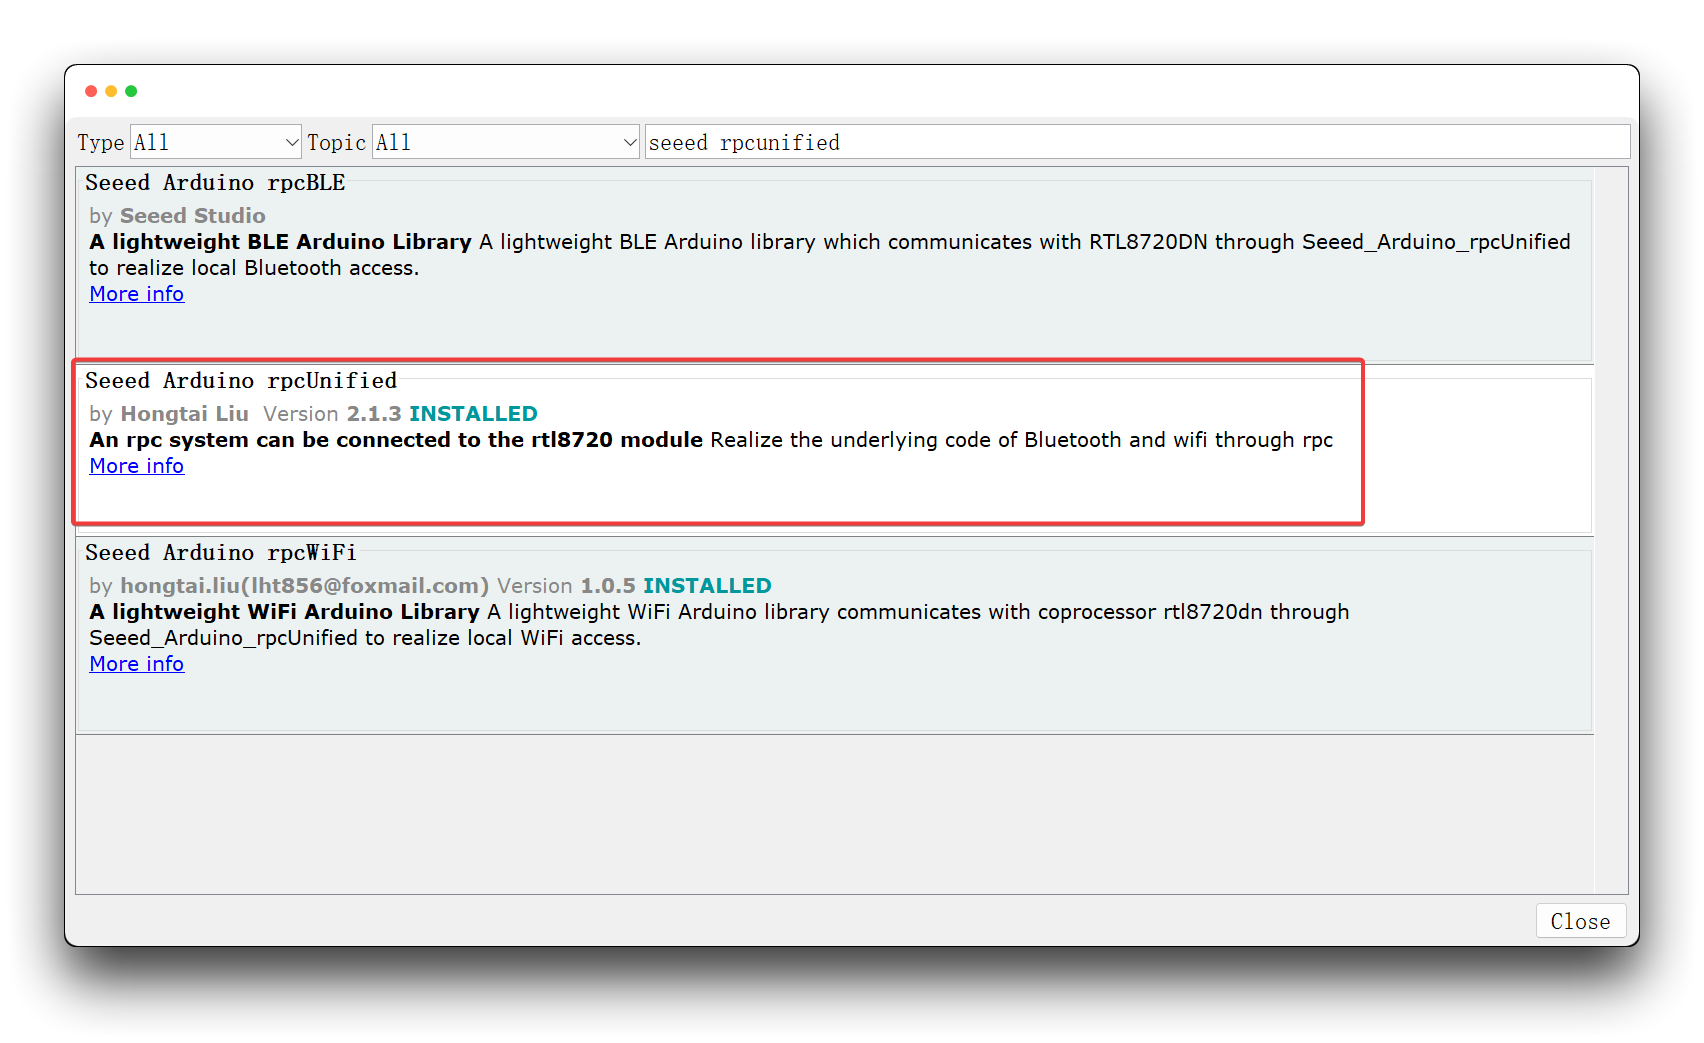
- Seeed_Arduino_rpcUnified - search for
seeed rpcunified
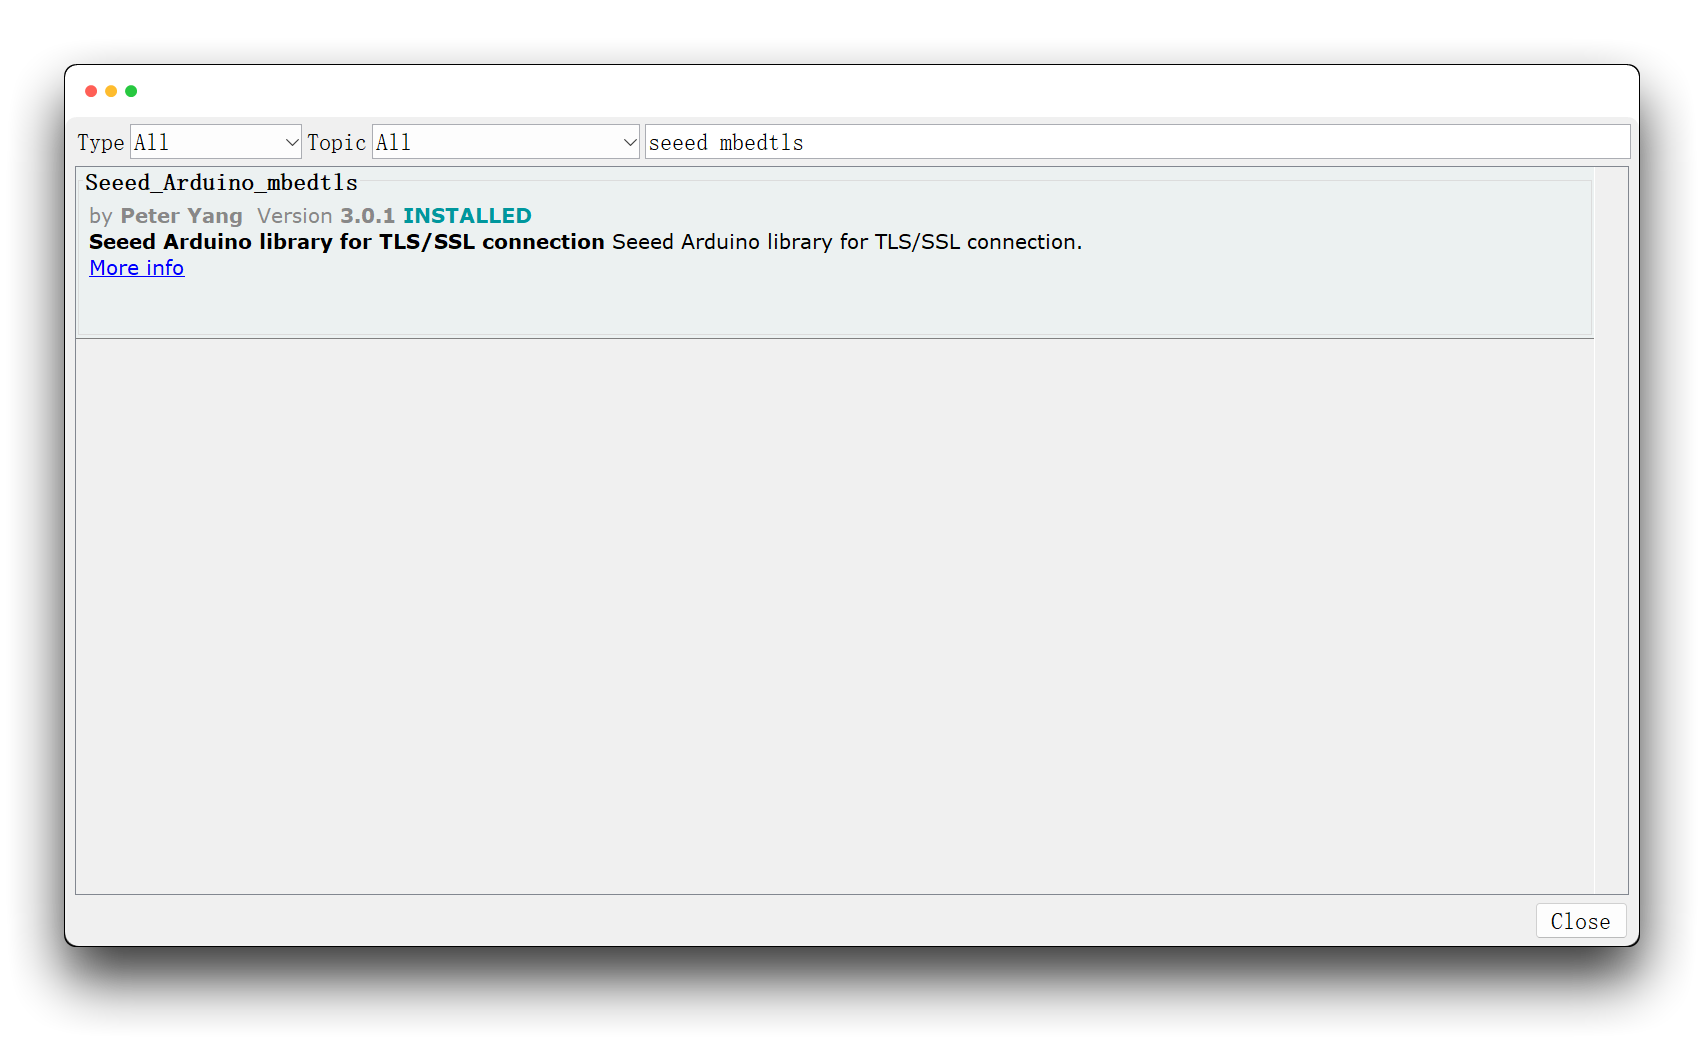
- Seeed_Arduino_mbedtls - search for
seeed mbedtls
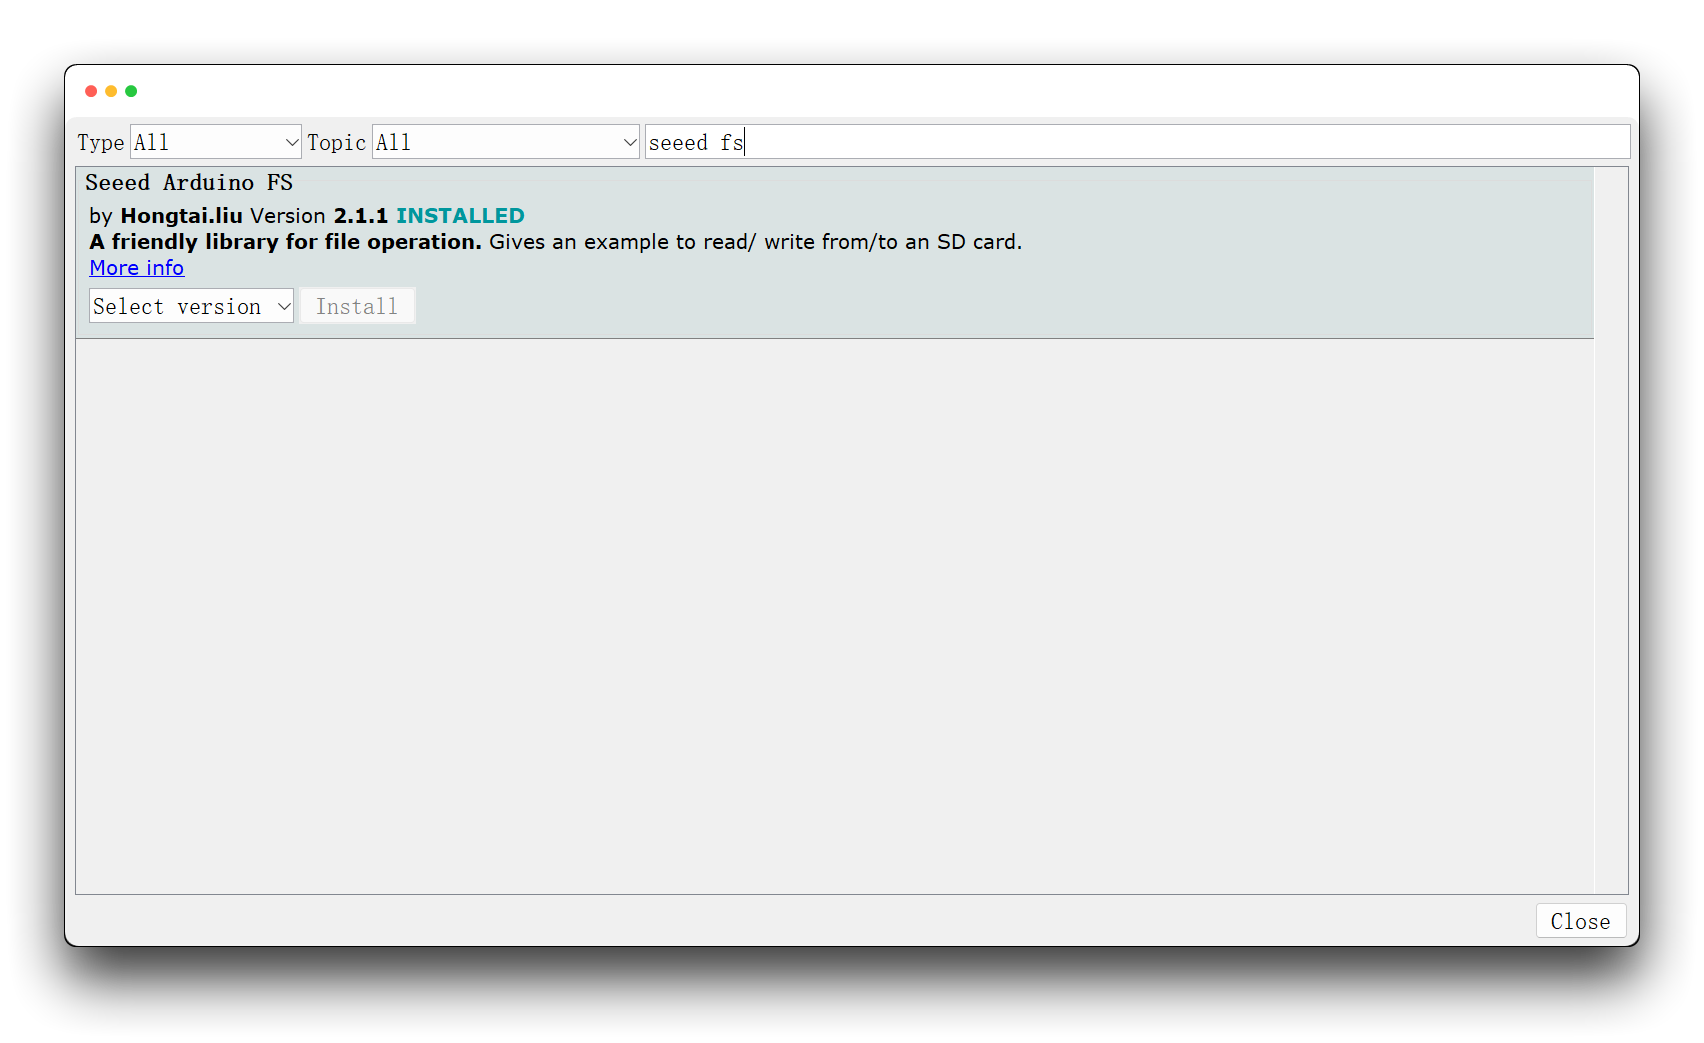
- Seeed_Arduino_FS - search for
seeed fs
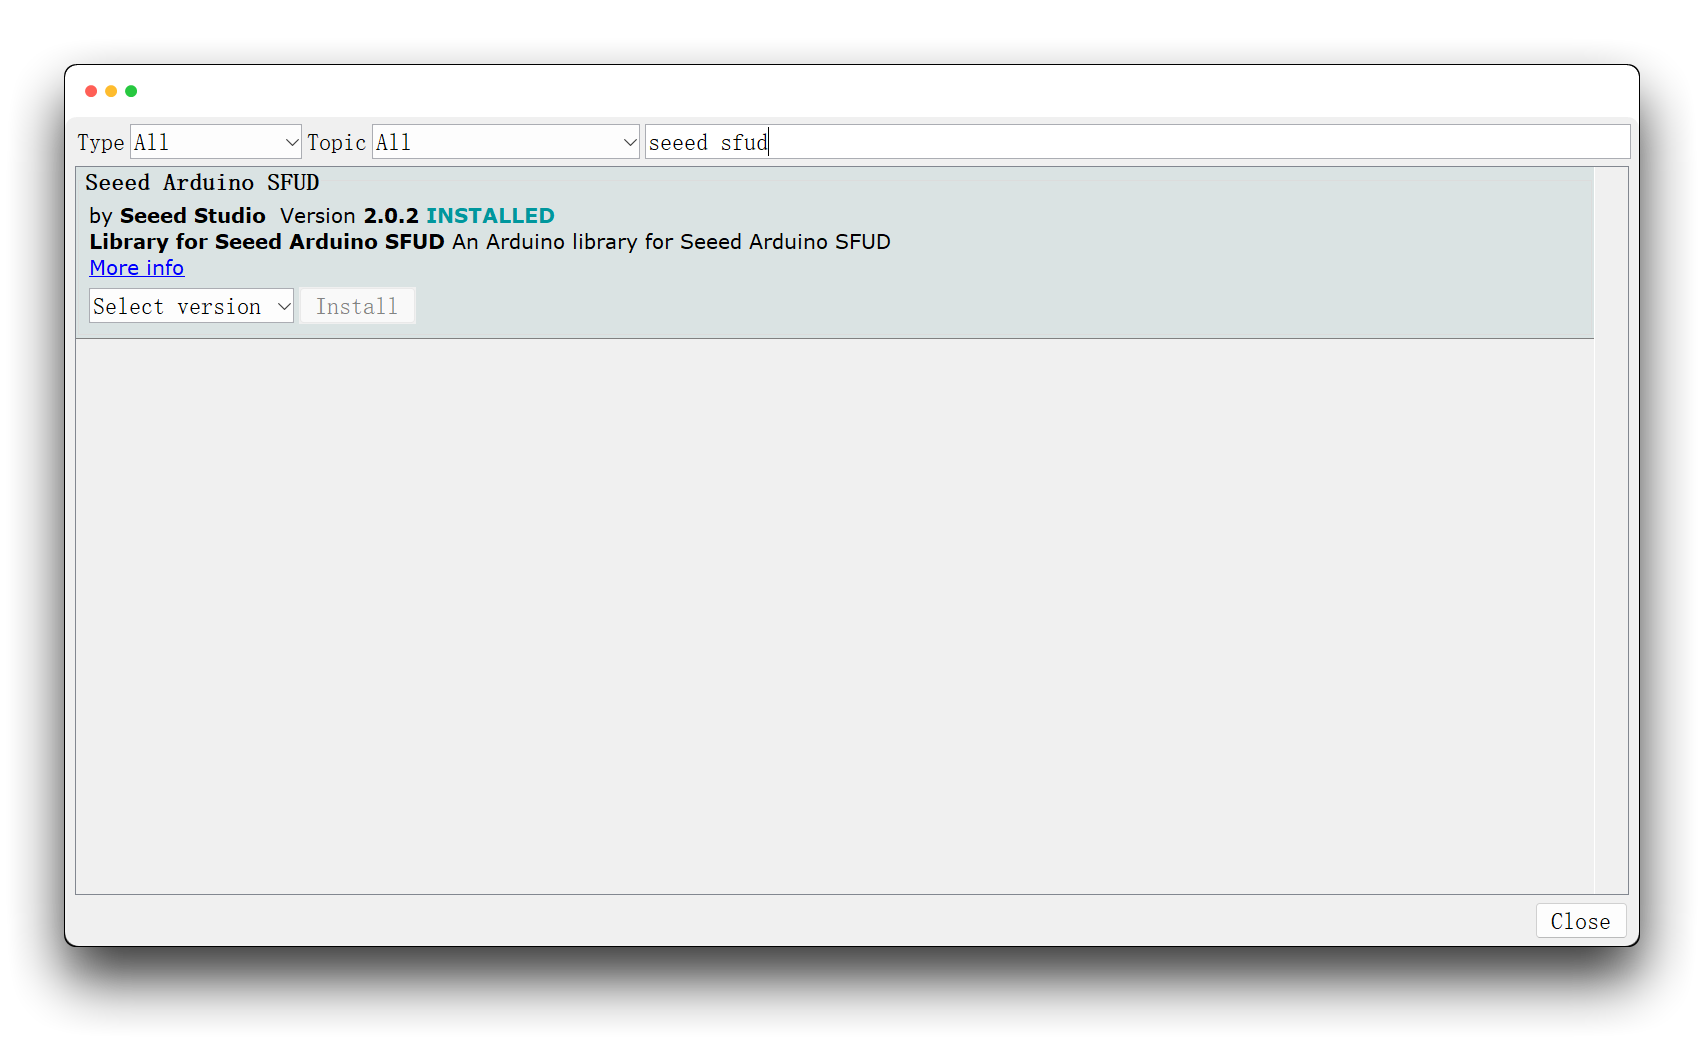
- Seeed_Arduino_SFUD - search for
seeed sfud
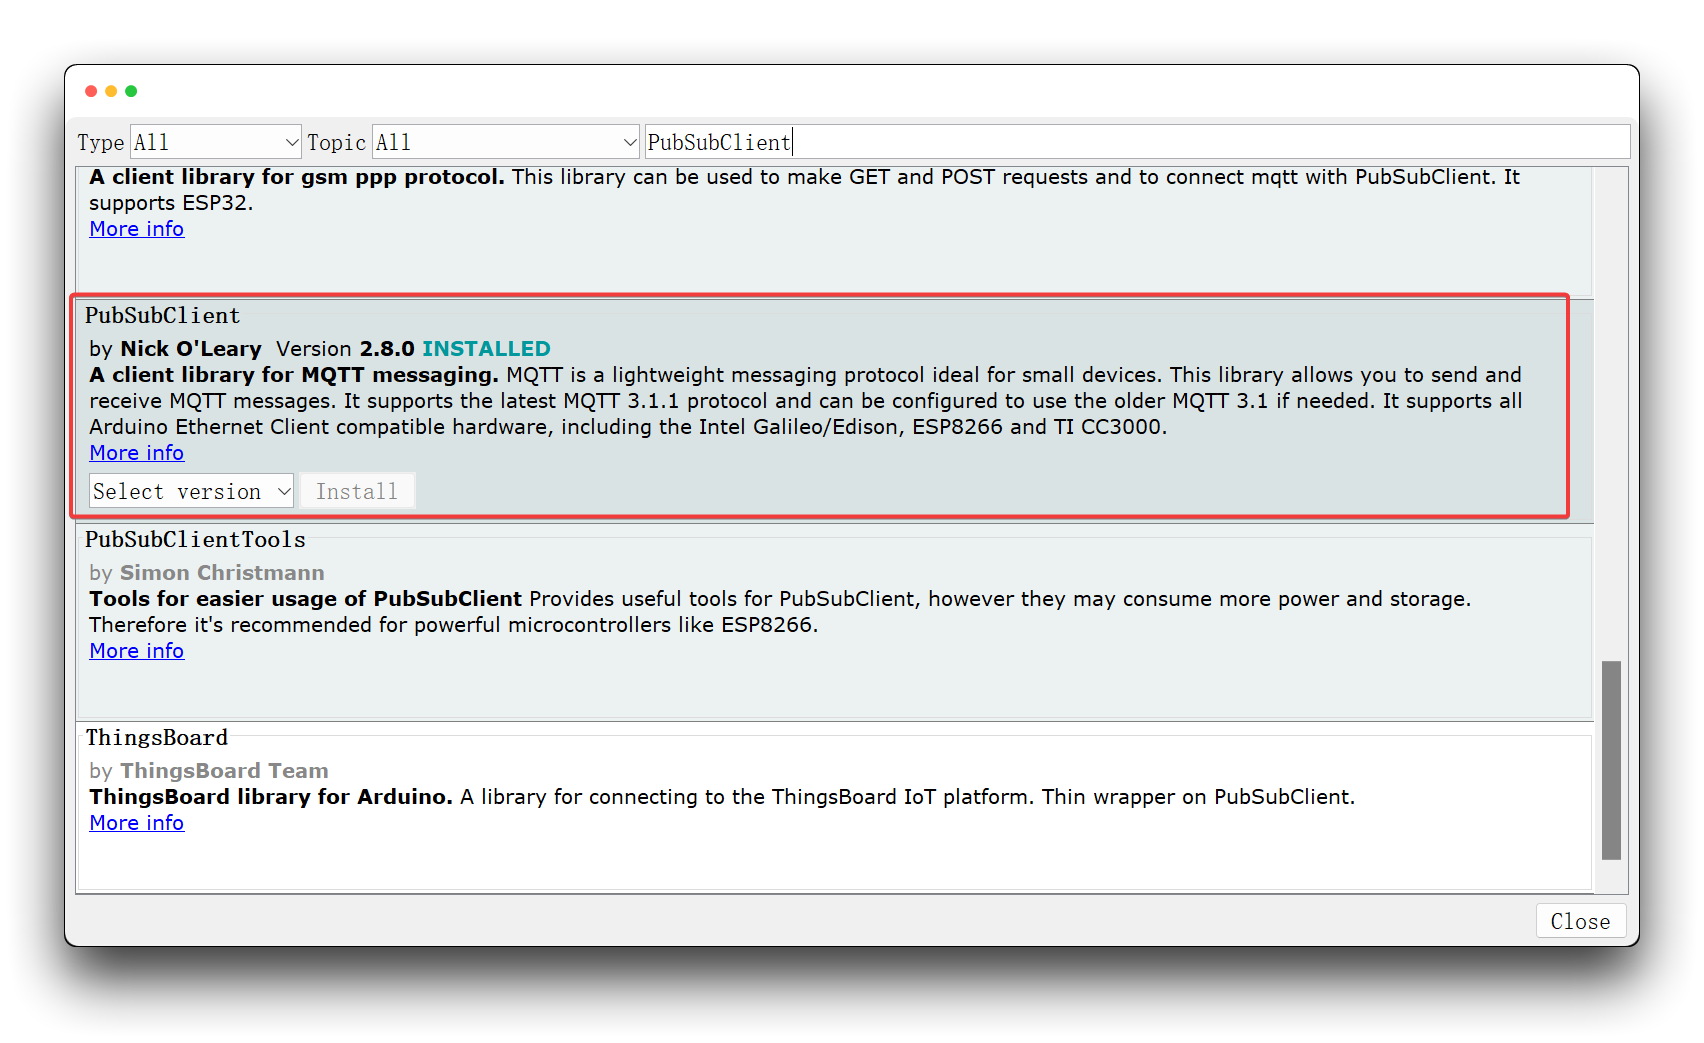
- PubSubClinet - search for
PubSubClient
Operation Steps
Step 1. Register and login to Ubidots
If this is your first time using Ubidots, please go to the Ubidots website and register an account of your own.
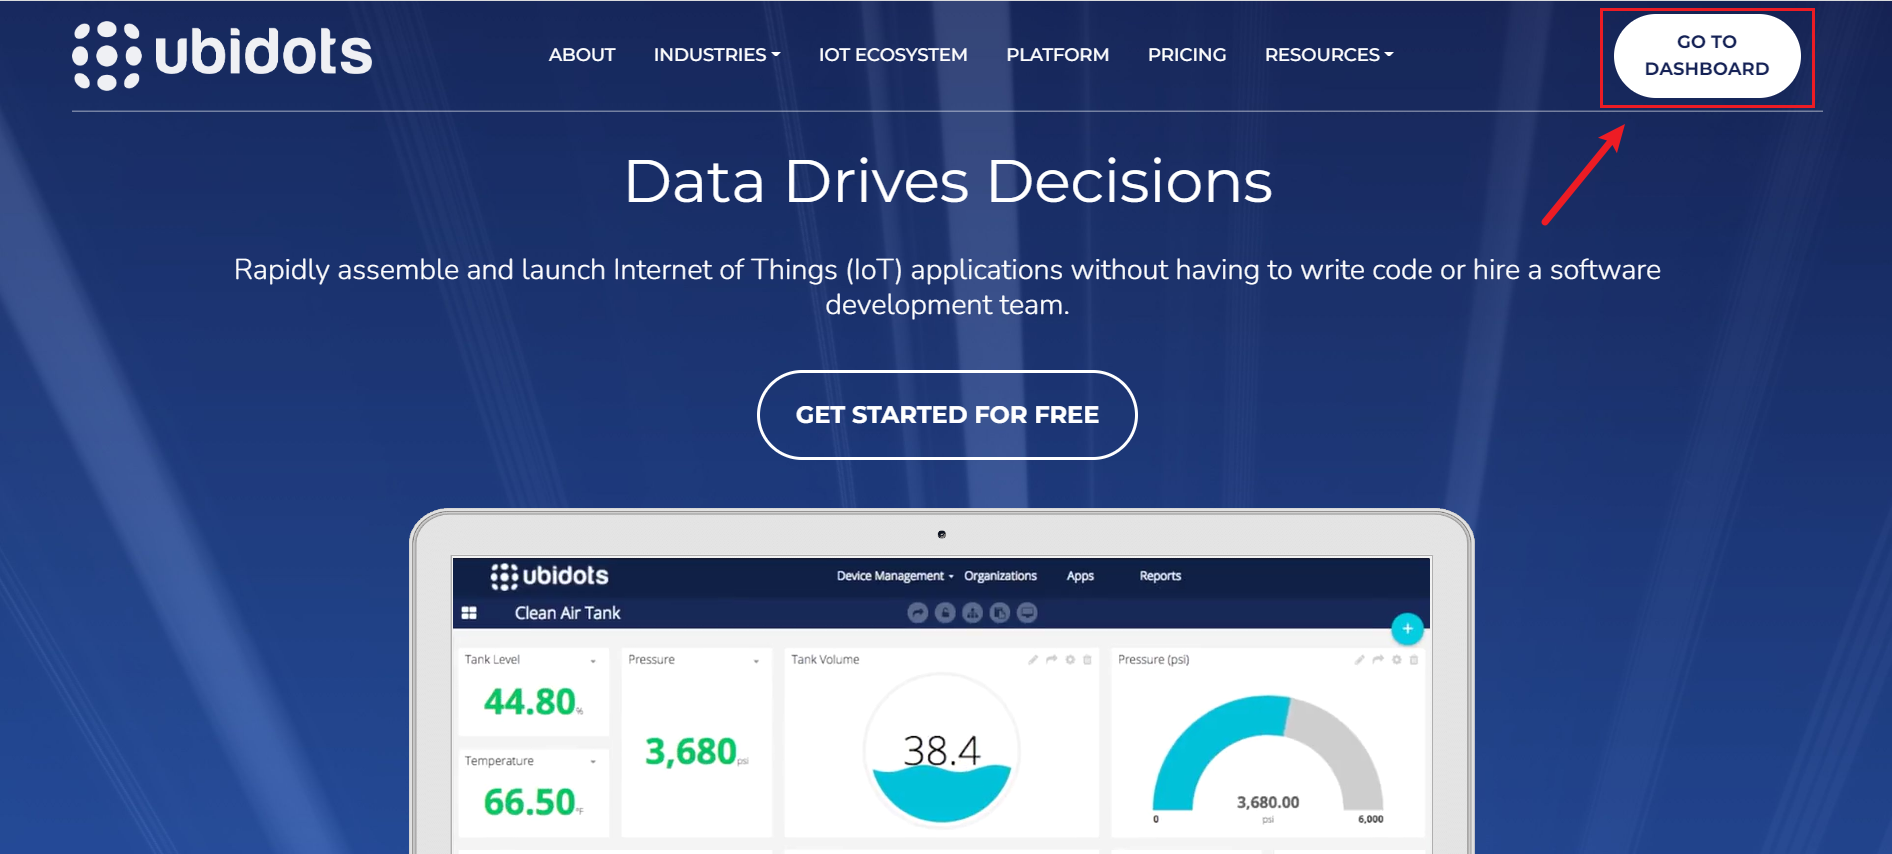
Once you have registered, please login to Ubidots using your registered account.
Step 2. Assign your unique Ubidots TOKEN
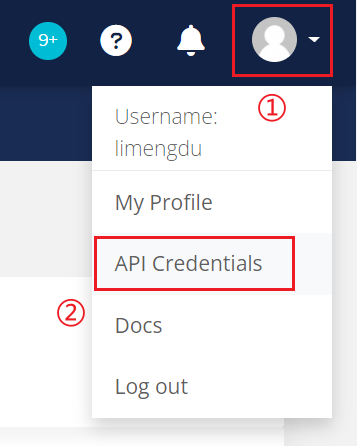
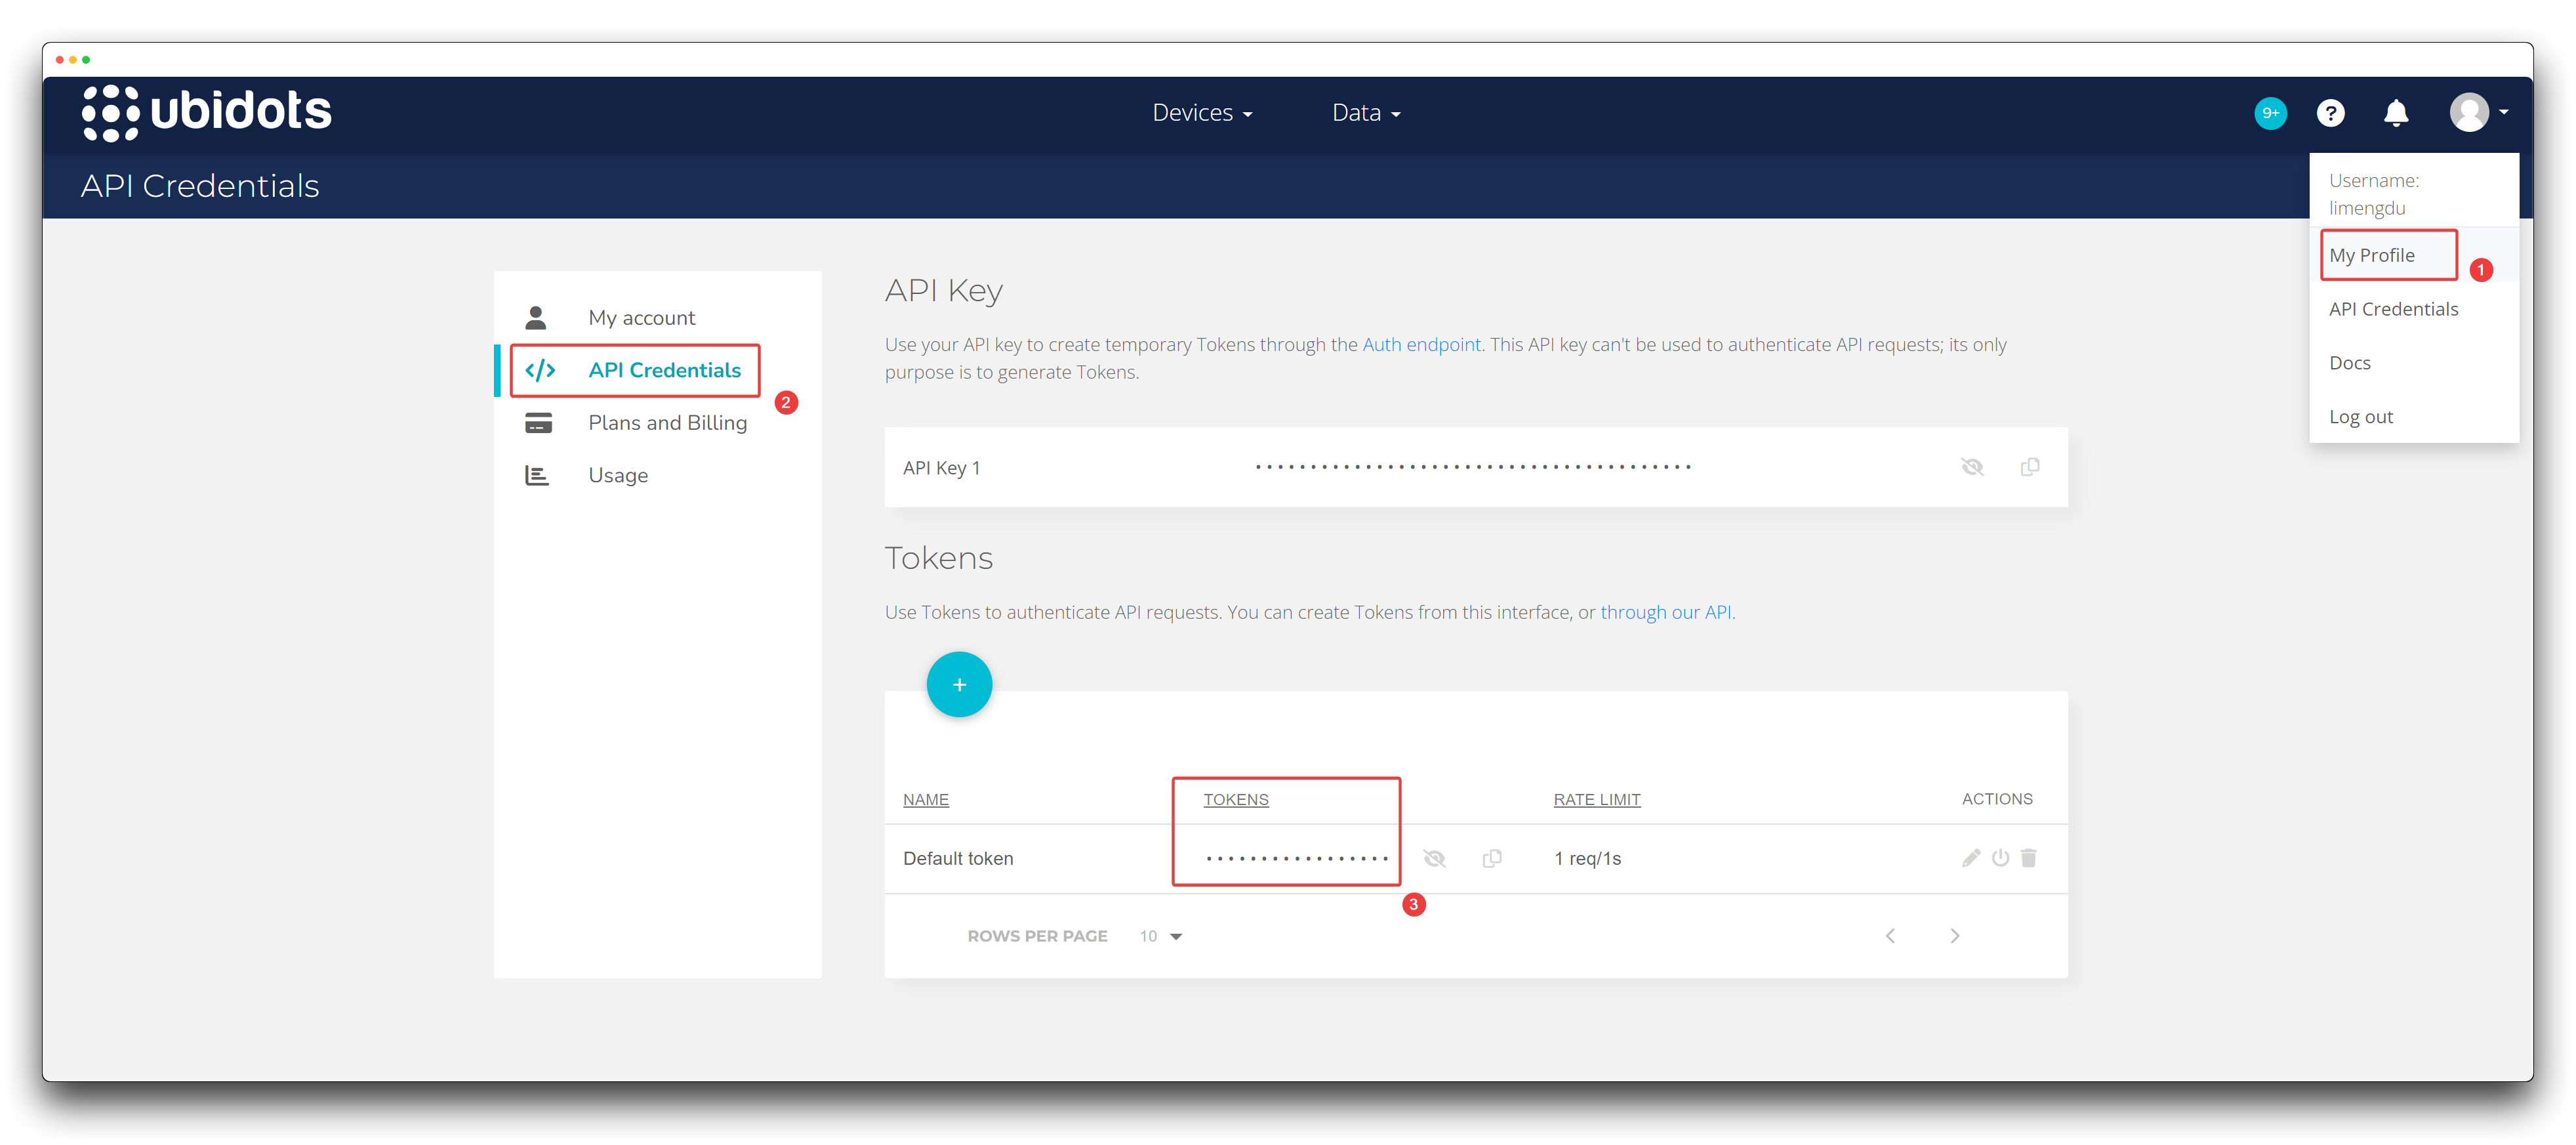
Every request to Ubidots requires a TOKEN. The easiest way to get yours is clicking on “API Credentials” from the user dropdown.
Go to you user dropdown and click on API credentials:
Tokens: Temporary and revocable keys to be used in your API requests. Please save the TOKEN for now, we will use it later.
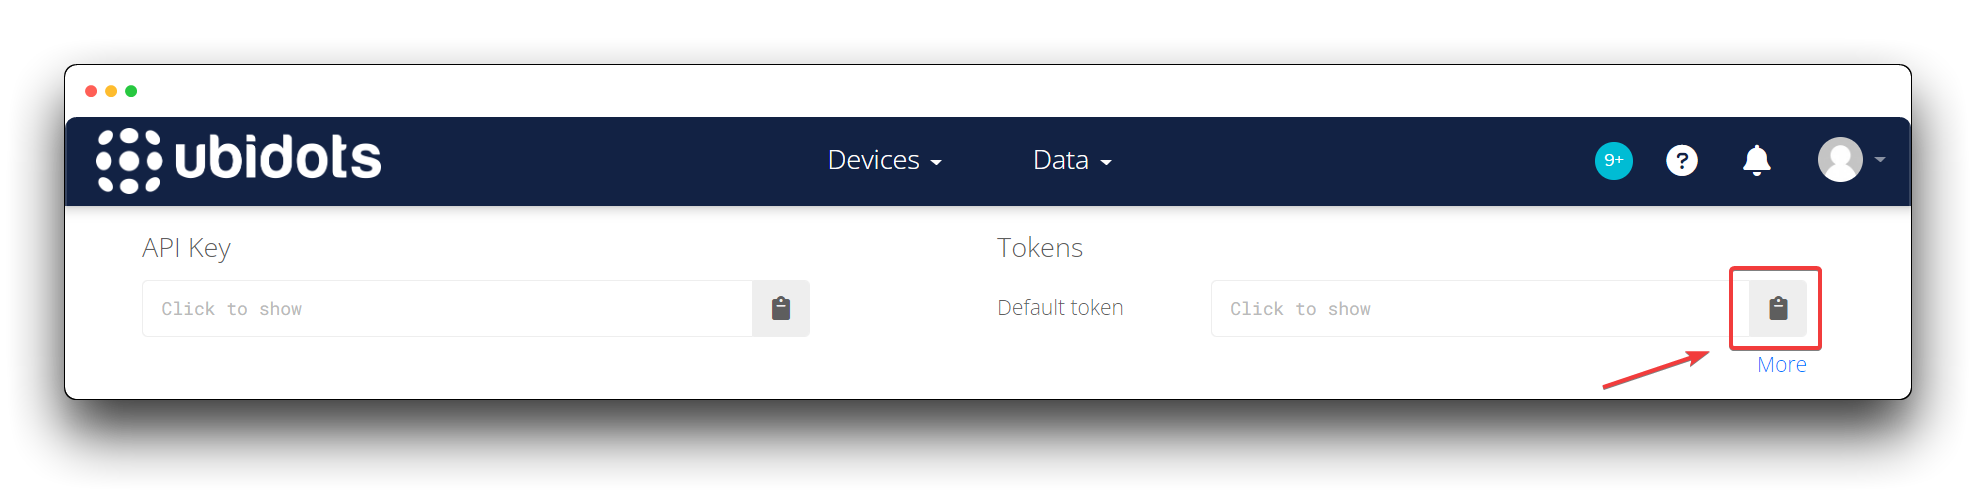
All API calls only accept your TOKEN. Don’t try to use your API Key, it won’t work! You can also access all of your Ubidots API Keys section of the My Profile settings in your User Dropdown. Select My Profile –> API Credentials to review the list of API TOKENS relating to your specific Ubidots Account.
Step 3. Be prepared with the necessary information
To establish an MQTT connection, we will need to prepare the following information in advance.
- WiFi SSID
- Fill in the WiFi SSID to which Wio Terminal can connect. Wio Terminal will search for WiFi within its surroundings and try to connect to it.
- Password for WiFi SSID
- Fill in the password for the WiFi SSID to which Wio Terminal can connect.
- Ubidots TOKEN
- This is the TOKEN generated in step 2.
- Variable label
- This is the name of the sensor value provided by the user to Ubidots. Ubidots are matched to different data based on this name provided by the user. If the Variable label don’t exist before the first dot is sent, Ubidots will create them automatically.
- Device label
- This is the name of the device and the name of the device provided by the user will be used by Ubidots to identify the device. If the Device label don’t exist before the first dot is sent, Ubidots will create them automatically.
- MQTT client name
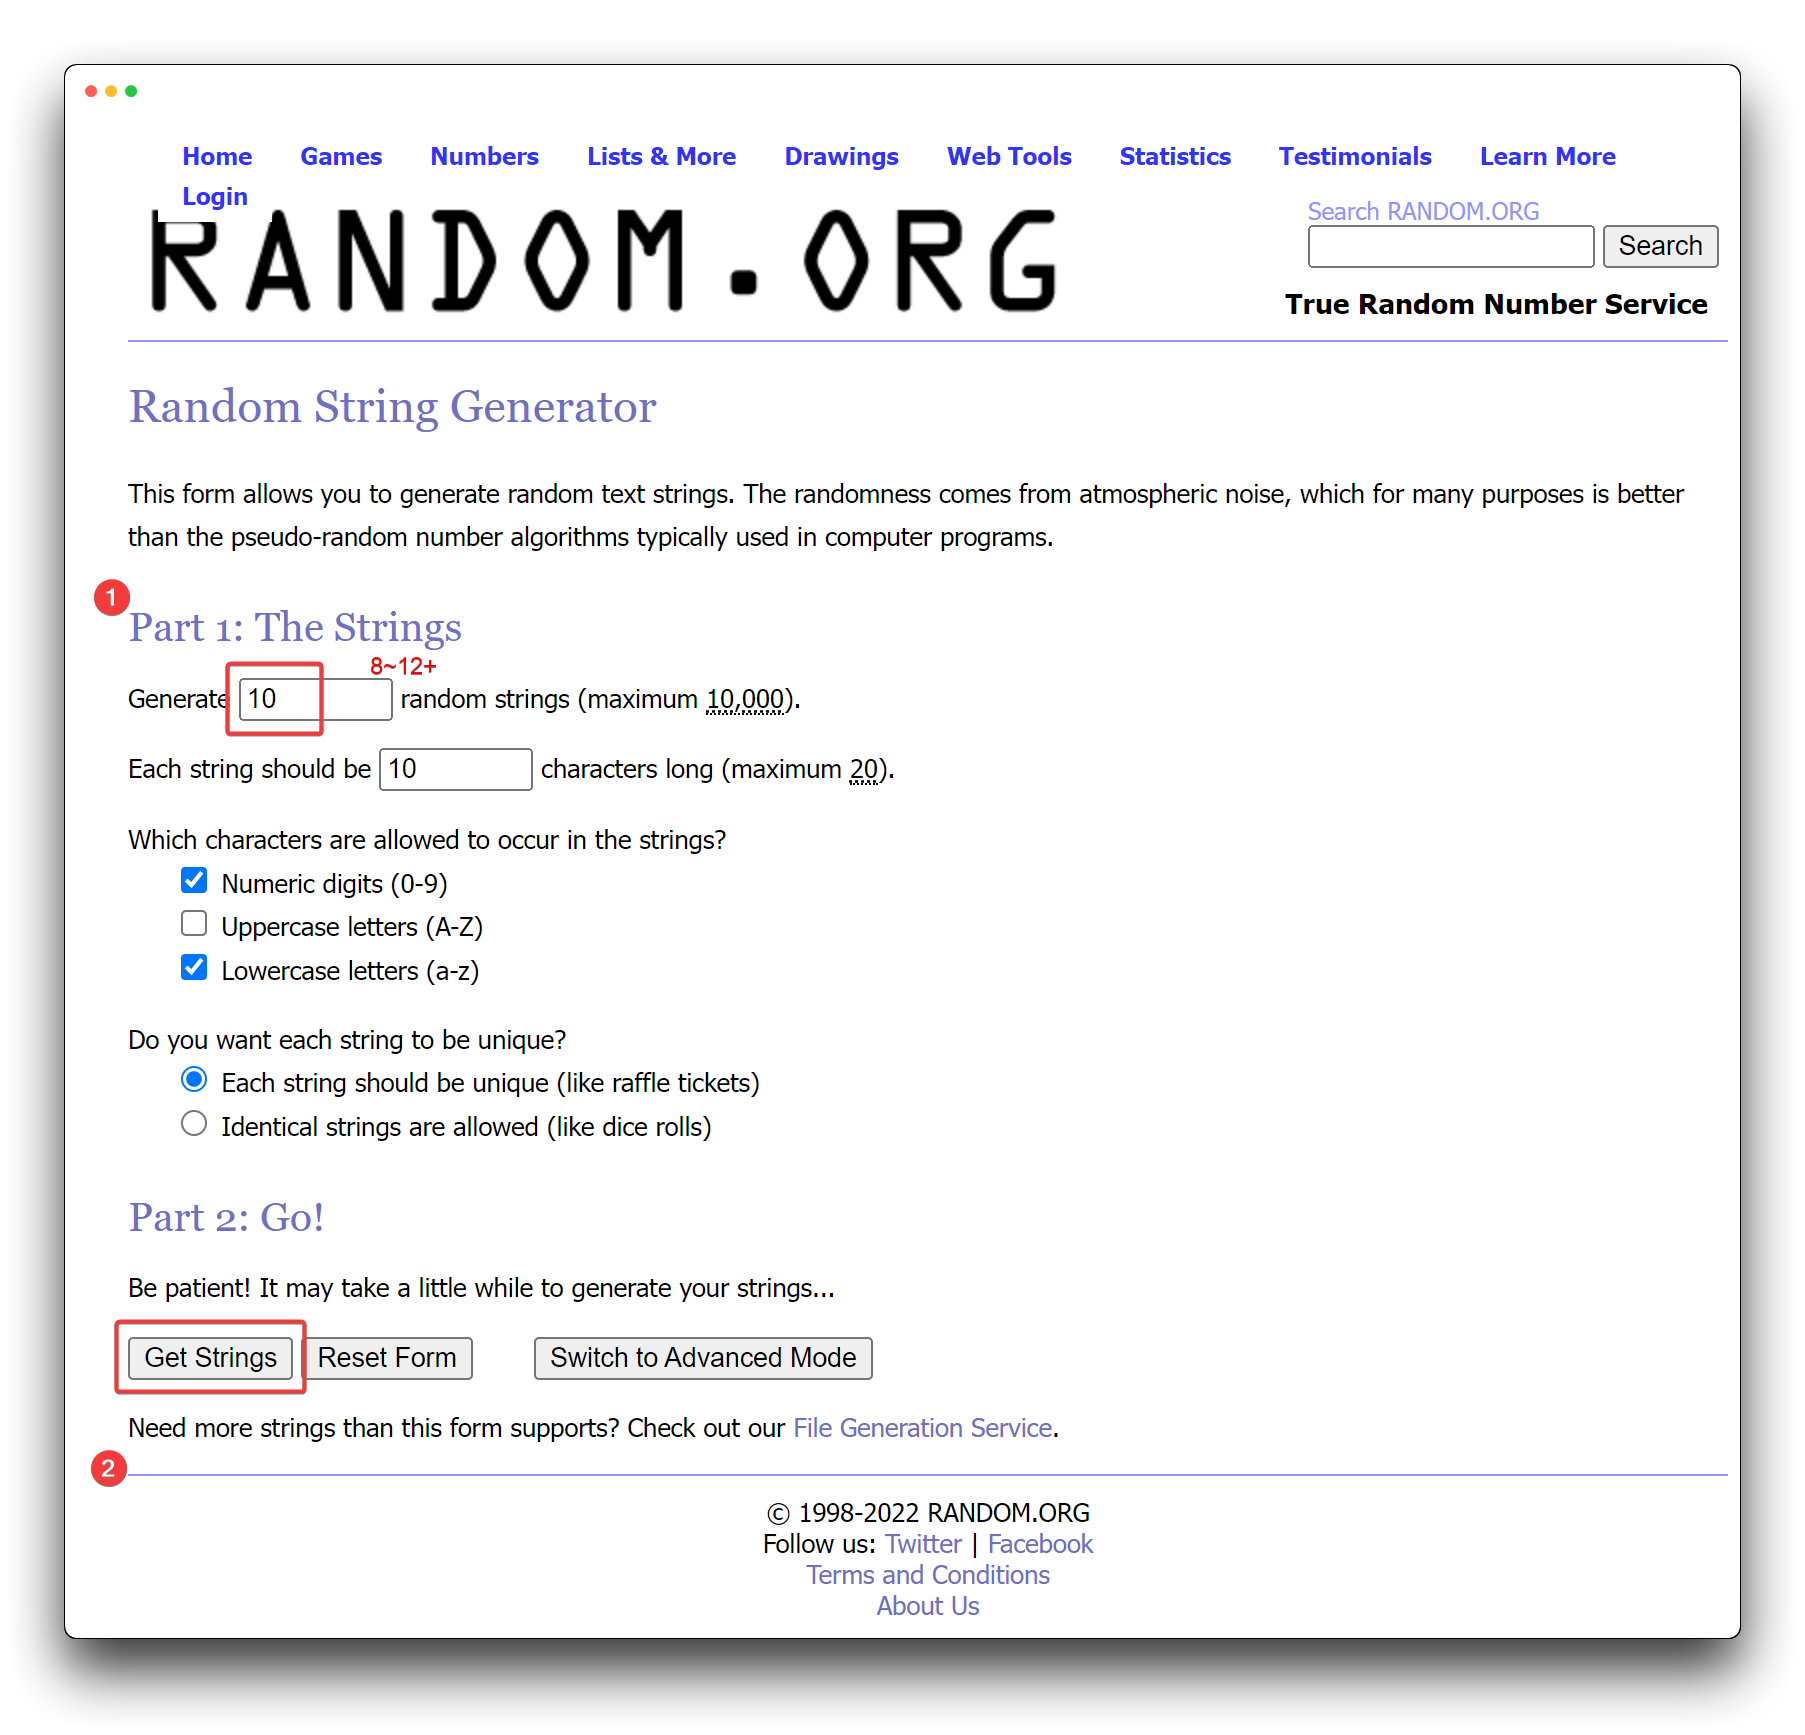
- This is special because it is the ID with which your device will be identified by the broker so it MUST be unique. If your device tries to connect with the same ID that has already been taken by another device, the connection will be refused. Please create your own all alphanumeric 8-12+ character MQTT client name and input into the code accordingly. Need some help creating a unique MQTT client name, check out this random ascii builder, or simply use the MAC address of your device as every MAC address is globally unique.
At the beginning of the program below, we will define for these requirements at the top of the code, please fill in your own information as appropriate.
//examples
#define WIFISSID "<YOUR-WIFISSD>" // Put your WifiSSID here
#define PASSWORD "<YOUR-WIFI-PASSWORD" // Put your wifi password here
#define TOKEN "<YOUR-UBIDOTS-TOKEN>" // Put your Ubidots' TOKEN
#define VARIABLE_LABEL "light" // Assign the variable label
#define DEVICE_LABEL "wio-terminal" // Assign the device label
#define MQTT_CLIENT_NAME "r6y1ax7mq8" // MQTT client Name
Send built-in sensors Data to Ubidots
If you want to send detection data from the Wio Terminal's built-in sensors to Ubidots, paste the complete code below into the Arduino and upload it to the Wio Terminal.
#include <PubSubClient.h>
#include <rpcWiFi.h>
#include <TFT_eSPI.h>
#include"LIS3DHTR.h"

LIS3DHTR<TwoWire> lis;

//Required Information
#define WIFISSID "<YOUR-WIFISSD>" // Put your WifiSSID here
#define PASSWORD "<YOUR-WIFI-PASSWORD" // Put your wifi password here
#define TOKEN "<YOUR-UBIDOTS-TOKEN>" // Put your Ubidots' TOKEN
#define VARIABLE_LABEL1 "light" // Assign the variable label
#define VARIABLE_LABEL2 "IMUx"
#define VARIABLE_LABEL3 "IMUy"
#define VARIABLE_LABEL4 "IMUz"
#define VARIABLE_LABEL5 "sound"
#define DEVICE_LABEL "wio-terminal" // Assign the device label
#define MQTT_CLIENT_NAME "r6y1ax7mq8" // MQTT client Name

const long interval = 100;
unsigned long previousMillis = 0;

TFT_eSPI tft;

char mqttBroker[] = "industrial.api.ubidots.com";

WiFiClient wifiClient;
PubSubClient client(wifiClient);

//sensor values
static int lightValue = 0;
static float imuxValue = 0;
static float imuyValue = 0;
static float imuzValue = 0;
static int soundValue = 0;

// Space to store values to send
static char str_light[6];
static char str_imux[6];
static char str_imuy[6];
static char str_imuz[6];
static char str_sound[6];
char payload[700];
char topic[150];

void callback(char* topic, byte* payload, unsigned int length){
  Serial.print("Message arrived [");
  Serial.print(topic);
  Serial.print("] ");
  for (int i=0;i<length;i++) {
    Serial.print((char)payload[i]);
  }
}

void reconnect() {
  // Loop until we're reconnected
  while (!client.connected()) {
    Serial.println("Attempting MQTT connection...");

  // Attempt to connect
  if (client.connect(MQTT_CLIENT_NAME, TOKEN,"")) {
    Serial.println("connected");
  }
  else {
    Serial.print("failed, rc=");
    Serial.print(client.state());
    Serial.println(" try again in 2 seconds");
    // Wait 2 seconds before retrying
    delay(2000);
    }
  }
}

//Reading built-in sensor values
void read_builtin()
{
  lightValue = analogRead(WIO_LIGHT);
  Serial.print("Light = ");
  Serial.println(lightValue);

  imuxValue = lis.getAccelerationX();
  Serial.print("IMU_x = ");
  Serial.println(imuxValue);
  imuyValue = lis.getAccelerationY();
  Serial.print("IMU_y = ");
  Serial.println(imuyValue);
  imuzValue = lis.getAccelerationZ();
  Serial.print("IMU_z = ");
  Serial.println(imuzValue);

  soundValue = analogRead(WIO_MIC);
  Serial.print("Sound = ");
  Serial.println(soundValue);
}

//Sending data to Ubidots
void send_data()
{
  dtostrf(lightValue, 4, 0, str_light);
  dtostrf(imuxValue, 4, 3, str_imux);
  dtostrf(imuyValue, 4, 3, str_imuy);
  dtostrf(imuzValue, 4, 3, str_imuz);
  dtostrf(soundValue, 4, 0, str_sound);

  if (!client.connected()) {
    reconnect();
  }

  // Builds the topic
  sprintf(topic, "%s", ""); // Cleans the topic content
  sprintf(topic, "%s%s", "/v2.0/devices/", DEVICE_LABEL);

  //Builds the payload
  sprintf(payload, "%s", ""); // Cleans the payload
  sprintf(payload, "{\"%s\":", VARIABLE_LABEL1); // Adds the variable label
  sprintf(payload, "%s%s", payload, str_light); // Adds the value
  sprintf(payload, "%s}", payload); // Closes the dictionary brackets
  client.publish(topic, payload);
  delay(500);

  sprintf(payload, "%s", ""); // Cleans the payload
  sprintf(payload, "{\"%s\":", VARIABLE_LABEL2); // Adds the variable label
  sprintf(payload, "%s%s", payload, str_imux); // Adds the value
  sprintf(payload, "%s}", payload); // Closes the dictionary brackets
  client.publish(topic, payload);
  delay(500);

  sprintf(payload, "%s", ""); // Cleans the payload
  sprintf(payload, "{\"%s\":", VARIABLE_LABEL3); // Adds the variable label
  sprintf(payload, "%s%s", payload, str_imuy); // Adds the value
  sprintf(payload, "%s}", payload); // Closes the dictionary brackets
  client.publish(topic, payload);
  delay(500);

  sprintf(payload, "%s", ""); // Cleans the payload
  sprintf(payload, "{\"%s\":", VARIABLE_LABEL4); // Adds the variable label
  sprintf(payload, "%s%s", payload, str_imuz); // Adds the value
  sprintf(payload, "%s}", payload); // Closes the dictionary brackets
  client.publish(topic, payload);
  delay(500);

  sprintf(payload, "%s", ""); // Cleans the payload
  sprintf(payload, "{\"%s\":", VARIABLE_LABEL5); // Adds the variable label
  sprintf(payload, "%s%s", payload, str_sound); // Adds the value
  sprintf(payload, "%s}", payload); // Closes the dictionary brackets
  client.publish(topic, payload);
  delay(500);

  client.loop();
}

void setup() {
  Serial.begin(115200);
  lis.begin(Wire1);
  pinMode(WIO_MIC, INPUT);
  pinMode(WIO_LIGHT, INPUT);

  tft.begin();
  tft.setRotation(3);
  tft.setTextSize(2);
  tft.fillScreen(TFT_BLACK);

  lis.setOutputDataRate(LIS3DHTR_DATARATE_25HZ); //Data output rate
  lis.setFullScaleRange(LIS3DHTR_RANGE_2G);

//  while(!Serial);

  // Set WiFi to station mode and disconnect from an AP if it was previously connected
  WiFi.mode(WIFI_STA);
  WiFi.disconnect();

  tft.drawString("Connecting to WiFi...",20,120);
  WiFi.begin(WIFISSID, PASSWORD);

  while (WiFi.status() != WL_CONNECTED) {
    delay(500);
    WiFi.begin(WIFISSID, PASSWORD);
  }

  tft.fillScreen(TFT_BLACK);
  tft.drawString("Connected to the WiFi",20,120);

  delay(1000);
  client.setServer(mqttBroker, 1883);
  client.setCallback(callback);

}

void loop() {
  read_builtin();   //Reading buile-in sensor values
  send_data();   //Sending data to Ubidots
  delay(5000);
}
Send Grove Soil Moisture Sensor Data to Ubidots
If you want to send Grove Soil Moisture Sensor data to Ubidots, paste the complete code below into the Arduino and upload it to the Wio Terminal.
#include <PubSubClient.h>
#include <rpcWiFi.h>
#include <TFT_eSPI.h>

//Required Information
#define WIFISSID "<YOUR-WIFISSD>" // Put your WifiSSID here
#define PASSWORD "<YOUR-WIFI-PASSWORD" // Put your wifi password here
#define TOKEN "<YOUR-UBIDOTS-TOKEN>" // Put your Ubidots' TOKEN
#define VARIABLE_LABEL "light" // Assign the variable label
#define DEVICE_LABEL "wio-terminal" // Assign the device label
#define MQTT_CLIENT_NAME "r6y1ax7mq8" // MQTT client Name

const long interval = 100;
unsigned long previousMillis = 0;

TFT_eSPI tft;

char mqttBroker[] = "industrial.api.ubidots.com";

WiFiClient wifiClient;
PubSubClient client(wifiClient);

//Soil moisture pins and sensor values
int sensorPin = A0;
static int soilValue = 0;

// Space to store values to send
char str_soil[6];
char payload[700];
char topic[150];

void callback(char* topic, byte* payload, unsigned int length){
  Serial.print("Message arrived [");
  Serial.print(topic);
  Serial.print("] ");
  for (int i=0;i<length;i++) {
    Serial.print((char)payload[i]);
  }
}

void reconnect() {
  // Loop until we're reconnected
  while (!client.connected()) {
    Serial.println("Attempting MQTT connection...");

  // Attempt to connect
  if (client.connect(MQTT_CLIENT_NAME, TOKEN,"")) {
    Serial.println("connected");
  }
  else {
    Serial.print("failed, rc=");
    Serial.print(client.state());
    Serial.println(" try again in 2 seconds");
    // Wait 2 seconds before retrying
    delay(2000);
    }
  }
}

//Reading soil moisture sensor values
void read_soil()
{
  soilValue = analogRead(sensorPin);
  Serial.print("Moisture = ");
  Serial.println(soilValue);
}

//Sending data to Ubidots
void send_data()
{
  dtostrf(soilValue, 4, 0, str_soil);

  if (!client.connected()) {
    reconnect();
  }

  // Builds the topic
  sprintf(topic, "%s", ""); // Cleans the topic content
  sprintf(topic, "%s%s", "/v2.0/devices/", DEVICE_LABEL);

  //Builds the payload
  sprintf(payload, "%s", ""); // Cleans the payload
  sprintf(payload, "{\"%s\":", VARIABLE_LABEL); // Adds the variable label
  sprintf(payload, "%s%s", payload, str_soil); // Adds the value
  sprintf(payload, "%s}", payload); // Closes the dictionary brackets

  client.publish(topic, payload);
  delay(500);

  client.loop();
}


void setup() {
  Serial.begin(115200);

  tft.begin();
  tft.setRotation(3);
  tft.setTextSize(2);
  tft.fillScreen(TFT_BLACK);

  // Set WiFi to station mode and disconnect from an AP if it was previously connected
  WiFi.mode(WIFI_STA);
  WiFi.disconnect();

  tft.drawString("Connecting to WiFi...",20,120);
  WiFi.begin(WIFISSID, PASSWORD);

  while (WiFi.status() != WL_CONNECTED) {
    delay(500);
    WiFi.begin(WIFISSID, PASSWORD);
  }

  tft.fillScreen(TFT_BLACK);
  tft.drawString("Connected to the WiFi",20,120);

  delay(1000);
  client.setServer(mqttBroker, 1883);
  client.setCallback(callback);
}

void loop() {
  read_soil();   //Reading soil moisture sensor values
  send_data();   //Sending data to Ubidots
  delay(5000);
}
Send Grove VOC and eCO2 Gas Sensor Data to Ubidots
If you want to send Grove VOC and eCO2 Gas Sensor data to Ubidots, paste the complete code below into the Arduino and upload it to the Wio Terminal.
#include <PubSubClient.h>
#include <rpcWiFi.h>
#include <TFT_eSPI.h>
#include "sensirion_common.h"
#include "sgp30.h"

#define WIFISSID "<YOUR-WIFISSD>" // Put your WifiSSID here
#define PASSWORD "<YOUR-WIFI-PASSWORD" // Put your wifi password here
#define TOKEN "<YOUR-UBIDOTS-TOKEN>" // Put your Ubidots' TOKEN
#define VARIABLE_LABEL1 "voc" // Assign the variable label
#define VARIABLE_LABEL2 "co2"
#define DEVICE_LABEL "wio-terminal" // Assign the device label
#define MQTT_CLIENT_NAME "r6y1ax7mq8" // MQTT client Name

const long interval = 100;
unsigned long previousMillis = 0;

char mqttBroker[] = "industrial.api.ubidots.com";

WiFiClient wifiClient;
PubSubClient client(wifiClient);

TFT_eSPI tft = TFT_eSPI();

static unsigned short int VOC = 0;
static unsigned short int CO2 = 0;

// Space to store values to send
char str_voc[6];
char str_co2[6];
char payload[700];
char topic[150];

void callback(char* topic, byte* payload, unsigned int length){
  Serial.print("Message arrived [");
  Serial.print(topic);
  Serial.print("] ");
  for (int i=0;i<length;i++) {
    Serial.print((char)payload[i]);
  }
}

void reconnect() {
  // Loop until we're reconnected
  while (!client.connected()) {
    Serial.println("Attempting MQTT connection...");

  // Attempt to connect
  if (client.connect(MQTT_CLIENT_NAME, TOKEN,"")) {
    Serial.println("connected");
  }
  else {
    Serial.print("failed, rc=");
    Serial.print(client.state());
    Serial.println(" try again in 2 seconds");
    // Wait 2 seconds before retrying
    delay(2000);
    }
  }
}

void read_sgp30()
{
  s16 err = 0;
  sgp_measure_iaq_blocking_read(&VOC, &CO2);
  if (err == STATUS_OK) {
      Serial.print("tVOC  Concentration:");
      Serial.print(VOC);
      Serial.println("ppb");

      Serial.print("CO2eq Concentration:");
      Serial.print(CO2);
      Serial.println("ppm");
  } else {
      Serial.println("error reading IAQ values\n");
  }
}

void send_data()
{
  dtostrf(VOC, 4, 0, str_voc);
  dtostrf(CO2, 4, 0, str_co2);

  if (!client.connected()) {
    reconnect();
  }

  // Builds the topic
  sprintf(topic, "%s", ""); // Cleans the topic content
  sprintf(topic, "%s%s", "/v2.0/devices/", DEVICE_LABEL);

  //Builds the payload
  sprintf(payload, "%s", ""); // Cleans the payload
  sprintf(payload, "{\"%s\":", VARIABLE_LABEL1); // Adds the variable label
  sprintf(payload, "%s%s", payload, str_voc); // Adds the value
  sprintf(payload, "%s}", payload); // Closes the dictionary brackets
  client.publish(topic, payload);
  Serial.println(payload);
  delay(500);

  sprintf(payload, "%s", ""); // Cleans the payload
  sprintf(payload, "{\"%s\":", VARIABLE_LABEL2); // Adds the variable label
  sprintf(payload, "%s%s", payload, str_co2); // Adds the value
  sprintf(payload, "%s}", payload); // Closes the dictionary brackets
  client.publish(topic, payload);
  Serial.println(payload);
  delay(500);

  client.loop();
}

void setup() {
  Serial.begin(115200);
  while (sgp_probe() != STATUS_OK) {
      Serial.println("SGP failed");
  }
  sgp_set_absolute_humidity(13000);
  sgp_iaq_init();

  tft.begin();
  tft.setRotation(3);
  tft.setTextSize(2);
  tft.fillScreen(TFT_BLACK);

//  while(!Serial);

  // Set WiFi to station mode and disconnect from an AP if it was previously connected
  WiFi.mode(WIFI_STA);
  WiFi.disconnect();

  tft.drawString("Connecting to WiFi...",20,120);
  WiFi.begin(WIFISSID, PASSWORD);

  while (WiFi.status() != WL_CONNECTED) {
    delay(500);
    WiFi.begin(WIFISSID, PASSWORD);
  }

  tft.fillScreen(TFT_BLACK);
  tft.drawString("Connected to the WiFi",20,120);

  delay(1000);
  client.setServer(mqttBroker, 1883);
  client.setCallback(callback);
}

void loop() {
  read_sgp30();    //Reading sgp30 sensor values
  send_data();     //Sending data to Ubidots
  delay(5000);
}
Send Grove Temp&Humi Sensor Data to Ubidots
If you want to send Grove Temp&Humi Sensor data to Ubidots, paste the complete code below into the Arduino and upload it to the Wio Terminal.
#include <PubSubClient.h>
#include <rpcWiFi.h>
#include <TFT_eSPI.h>
#include <SensirionI2CSht4x.h>
#include <Wire.h>

#define WIFISSID "<YOUR-WIFISSD>" // Put your WifiSSID here
#define PASSWORD "<YOUR-WIFI-PASSWORD" // Put your wifi password here
#define TOKEN "<YOUR-UBIDOTS-TOKEN>" // Put your Ubidots' TOKEN
#define VARIABLE_LABEL1 "temperature" // Assign the variable label
#define VARIABLE_LABEL2 "humidity"
#define DEVICE_LABEL "wio-terminal" // Assign the device label
#define MQTT_CLIENT_NAME "r6y1ax7mq8" // MQTT client Name

const long interval = 100;
unsigned long previousMillis = 0;

char mqttBroker[] = "industrial.api.ubidots.com";

WiFiClient wifiClient;
PubSubClient client(wifiClient);

TFT_eSPI tft = TFT_eSPI();
SensirionI2CSht4x sht4x;

static float temp = 0;
static float humi = 0;

// Space to store values to send
char str_temp[6];
char str_humi[6];
char payload[700];
char topic[150];

void callback(char* topic, byte* payload, unsigned int length){
  Serial.print("Message arrived [");
  Serial.print(topic);
  Serial.print("] ");
  for (int i=0;i<length;i++) {
    Serial.print((char)payload[i]);
  }
}

void reconnect() {
  // Loop until we're reconnected
  while (!client.connected()) {
    Serial.println("Attempting MQTT connection...");

  // Attempt to connect
  if (client.connect(MQTT_CLIENT_NAME, TOKEN,"")) {
    Serial.println("connected");
  }
  else {
    Serial.print("failed, rc=");
    Serial.print(client.state());
    Serial.println(" try again in 2 seconds");
    // Wait 2 seconds before retrying
    delay(2000);
    }
  }
}

void read_sht40()
{
  uint16_t error;
  char errorMessage[256];
  error = sht4x.measureHighPrecision(temp, humi);
  if (error) {
      Serial.print("Error trying to execute measureHighPrecision(): ");
      errorToString(error, errorMessage, 256);
      Serial.println(errorMessage);
  } else {
      Serial.print("Temperature:");
      Serial.print(temp);
      Serial.print("\t");
      Serial.print("Humidity:");
      Serial.println(humi);
  }
}

void send_data()
{
  dtostrf(temp, 4, 2, str_temp);
  dtostrf(humi, 4, 2, str_humi);

  if (!client.connected()) {
    reconnect();
  }

  // Builds the topic
  sprintf(topic, "%s", ""); // Cleans the topic content
  sprintf(topic, "%s%s", "/v2.0/devices/", DEVICE_LABEL);

  //Builds the payload
  sprintf(payload, "%s", ""); // Cleans the payload
  sprintf(payload, "{\"%s\":", VARIABLE_LABEL1); // Adds the variable label
  sprintf(payload, "%s%s", payload, str_temp); // Adds the value
  sprintf(payload, "%s}", payload); // Closes the dictionary brackets
  client.publish(topic, payload);
  delay(500);

  sprintf(payload, "%s", ""); // Cleans the payload
  sprintf(payload, "{\"%s\":", VARIABLE_LABEL2); // Adds the variable label
  sprintf(payload, "%s%s", payload, str_humi); // Adds the value
  sprintf(payload, "%s}", payload); // Closes the dictionary brackets
  client.publish(topic, payload);
  delay(500);

  client.loop();
}

void setup() {
  Serial.begin(115200);
  Wire.begin();
  sht4x.begin(Wire);

  tft.begin();
  tft.setRotation(3);
  tft.setTextSize(2);
  tft.fillScreen(TFT_BLACK);

//  while(!Serial);

  // Set WiFi to station mode and disconnect from an AP if it was previously connected
  WiFi.mode(WIFI_STA);
  WiFi.disconnect();

  tft.drawString("Connecting to WiFi...",20,120);
  WiFi.begin(WIFISSID, PASSWORD);

  while (WiFi.status() != WL_CONNECTED) {
    delay(500);
    WiFi.begin(WIFISSID, PASSWORD);
  }

  tft.fillScreen(TFT_BLACK);
  tft.drawString("Connected to the WiFi",20,120);

  delay(1000);
  client.setServer(mqttBroker, 1883);
  client.setCallback(callback);
}

void loop() {
  read_sht40();    //Reading sht40 sensor values
  send_data();     //Sending data to Ubidots
  delay(5000);
}
Send Grove Vision Ai Module Data to Ubidots
If you want to send Grove Vision Ai Module data to Ubidots, paste the complete code below into the Arduino and upload it to the Wio Terminal.
#include <PubSubClient.h>
#include <rpcWiFi.h>
#include <TFT_eSPI.h>
#include"LIS3DHTR.h"
#include "Seeed_Arduino_GroveAI.h"

//Required Information
#define WIFISSID "<YOUR-WIFISSD>" // Put your WifiSSID here
#define PASSWORD "<YOUR-WIFI-PASSWORD" // Put your wifi password here
#define TOKEN "<YOUR-UBIDOTS-TOKEN>" // Put your Ubidots' TOKEN
#define VARIABLE_LABEL1 "num" // Assign the variable label
#define VARIABLE_LABEL2 "confidence"
#define DEVICE_LABEL "wio-terminal" // Assign the device label
#define MQTT_CLIENT_NAME "r6y1ax7mq8" // MQTT client Name

const long interval = 100;
unsigned long previousMillis = 0;

char mqttBroker[] = "industrial.api.ubidots.com";

WiFiClient wifiClient;
PubSubClient client(wifiClient);

GroveAI ai(Wire);
uint8_t state = 0;
TFT_eSPI tft = TFT_eSPI();

static int num = 0;
static int conf = 0;

// Space to store values to send
char str_num[6];
char str_conf[6];
char payload[700];
char topic[150];

void callback(char* topic, byte* payload, unsigned int length){
  Serial.print("Message arrived [");
  Serial.print(topic);
  Serial.print("] ");
  for (int i=0;i<length;i++) {
    Serial.print((char)payload[i]);
  }
}

void reconnect() {
  // Loop until we're reconnected
  while (!client.connected()) {
    Serial.println("Attempting MQTT connection...");

  // Attempt to connect
  if (client.connect(MQTT_CLIENT_NAME, TOKEN,"")) {
    Serial.println("connected");
  }
  else {
    Serial.print("failed, rc=");
    Serial.print(client.state());
    Serial.println(" try again in 2 seconds");
    // Wait 2 seconds before retrying
    delay(2000);
    }
  }
}

//Vision AI init
void VisionAI_Init()
{
  Serial.println("begin");
  if (ai.begin(ALGO_OBJECT_DETECTION, MODEL_EXT_INDEX_1)) // Object detection and pre-trained model 1
  {
    state = 1;
  }
  else
  {
    Serial.println("Algo begin failed.");
  }
}

//Read VisionAI values: number of characters recognized, confidence level for each person
void read_VisionAI()
{
  if (state == 1)
  {
    uint32_t tick = millis();
    if (ai.invoke()) // begin invoke
    {
      while (1) // wait for invoking finished
      {
        CMD_STATE_T ret = ai.state();
        if (ret == CMD_STATE_IDLE)
        {
          break;
        }
        delay(20);
      }
      uint8_t len = ai.get_result_len(); // receive how many people detect
      if(len)
      {
         Serial.print("Number of people: ");

         num = len;
         Serial.println(num);

         object_detection_t data;       //get data
         for (int i = 0; i < len; i++)
         {
            ai.get_result(i, (uint8_t*)&data, sizeof(object_detection_t)); //get result
            Serial.print("confidence:");

            conf = data.confidence;
            Serial.println(conf);
          }
      }
     else
     {
       Serial.println("No identification");
       num = 0;
       conf = 0;
     }
   }
    else
    {
      Serial.println("Invoke Failed.");
      num = 0;
      conf = 0;
      delay(1000);
    }
  }
}

void send_data()
{
  dtostrf(num, 4, 0, str_num);
  dtostrf(conf, 4, 0, str_conf);

  if (!client.connected()) {
    reconnect();
  }

  // Builds the topic
  sprintf(topic, "%s", ""); // Cleans the topic content
  sprintf(topic, "%s%s", "/v2.0/devices/", DEVICE_LABEL);

  //Builds the payload
  sprintf(payload, "%s", ""); // Cleans the payload
  sprintf(payload, "{\"%s\":", VARIABLE_LABEL1); // Adds the variable label
  sprintf(payload, "%s%s", payload, str_num); // Adds the value
  sprintf(payload, "%s}", payload); // Closes the dictionary brackets
  client.publish(topic, payload);
  delay(500);

  sprintf(payload, "%s", ""); // Cleans the payload
  sprintf(payload, "{\"%s\":", VARIABLE_LABEL2); // Adds the variable label
  sprintf(payload, "%s%s", payload, str_conf); // Adds the value
  sprintf(payload, "%s}", payload); // Closes the dictionary brackets
  client.publish(topic, payload);
  delay(500);

  client.loop();
}

void setup() {
  Serial.begin(115200);
  Wire.begin();

  tft.begin();
  tft.setRotation(3);
  tft.setTextSize(2);
  tft.fillScreen(TFT_BLACK);
  VisionAI_Init();

  // Set WiFi to station mode and disconnect from an AP if it was previously connected
  WiFi.mode(WIFI_STA);
  WiFi.disconnect();

  tft.drawString("Connecting to WiFi...",20,120);
  WiFi.begin(WIFISSID, PASSWORD);

  while (WiFi.status() != WL_CONNECTED) {
    delay(500);
    WiFi.begin(WIFISSID, PASSWORD);
  }

  tft.fillScreen(TFT_BLACK);
  tft.drawString("Connected to the WiFi",20,120);

  delay(1000);
  client.setServer(mqttBroker, 1883);
  client.setCallback(callback);
}

void loop() {
  read_VisionAI(); //Reading visionai sensor values
  send_data();     //Sending data to Ubidots
  delay(5000);
}
Ubidots Panels
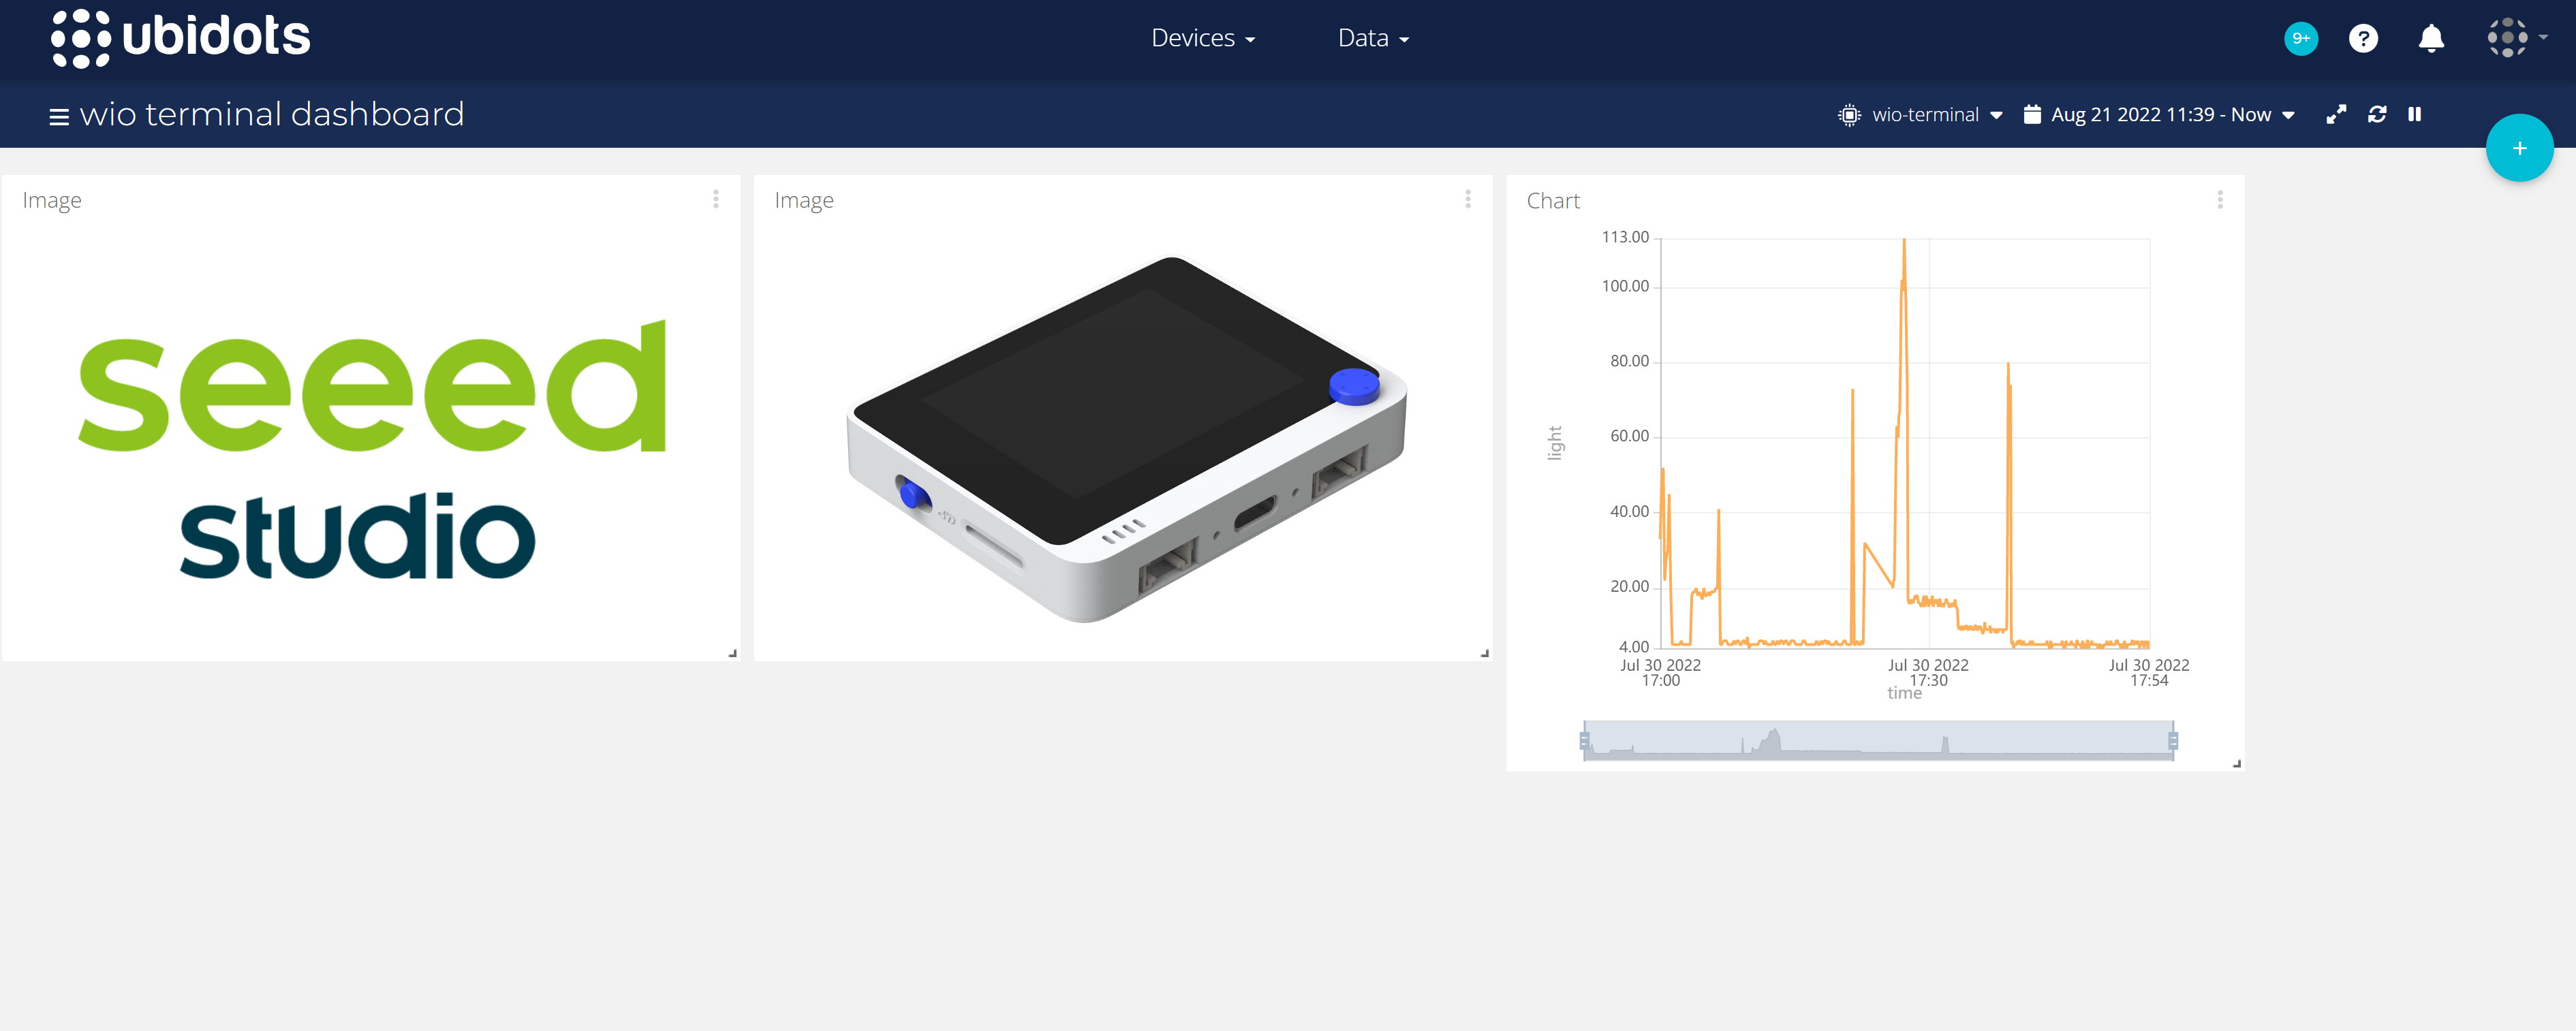
Once the code has been uploaded, we can prepare to set up the dashboard to see how the data has been uploaded.
Ubidots has a very simple interface and if you want to view information about your device, you can select Devices right at the top of the dashboard.
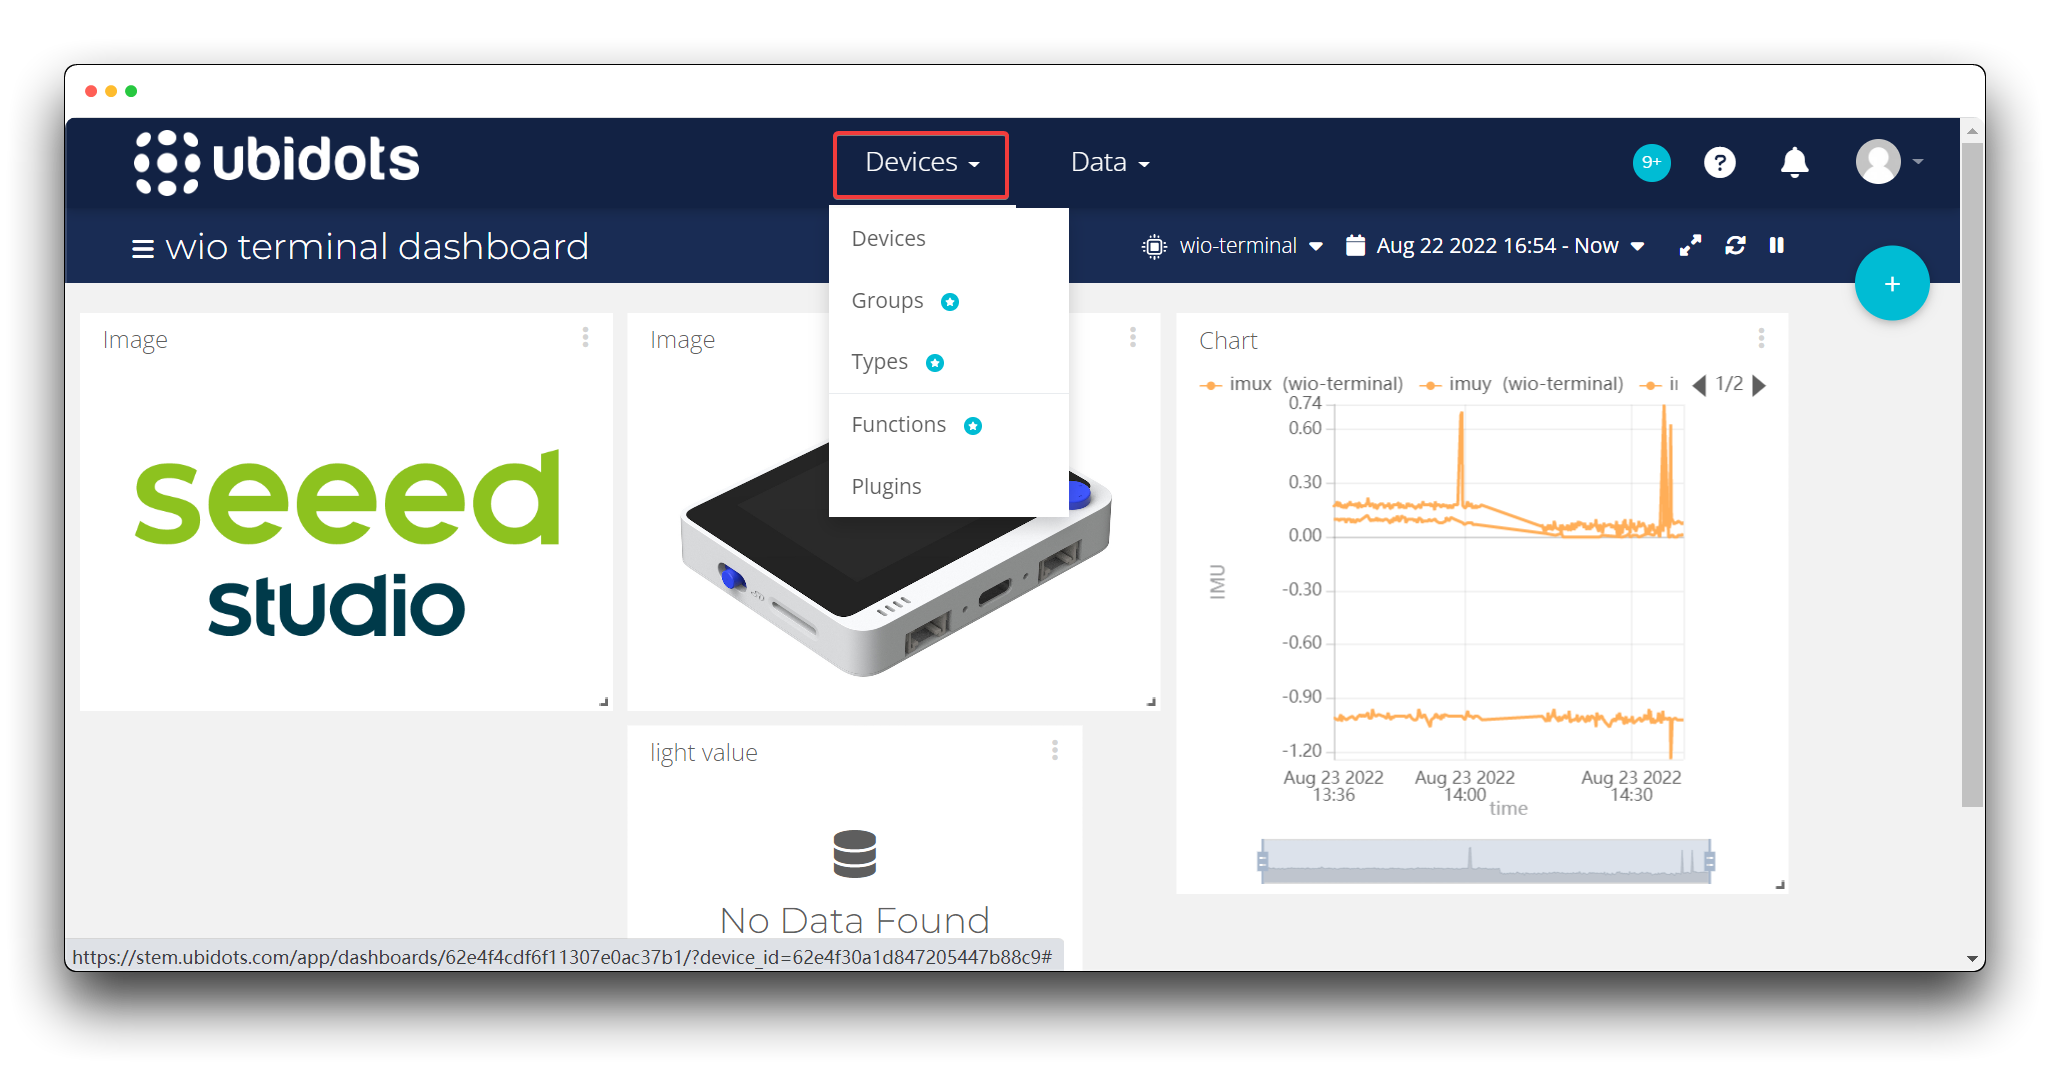
Click on your device name here to be able to see all the history tabs. This is determined by the VARIABLE_LABEL in the code.
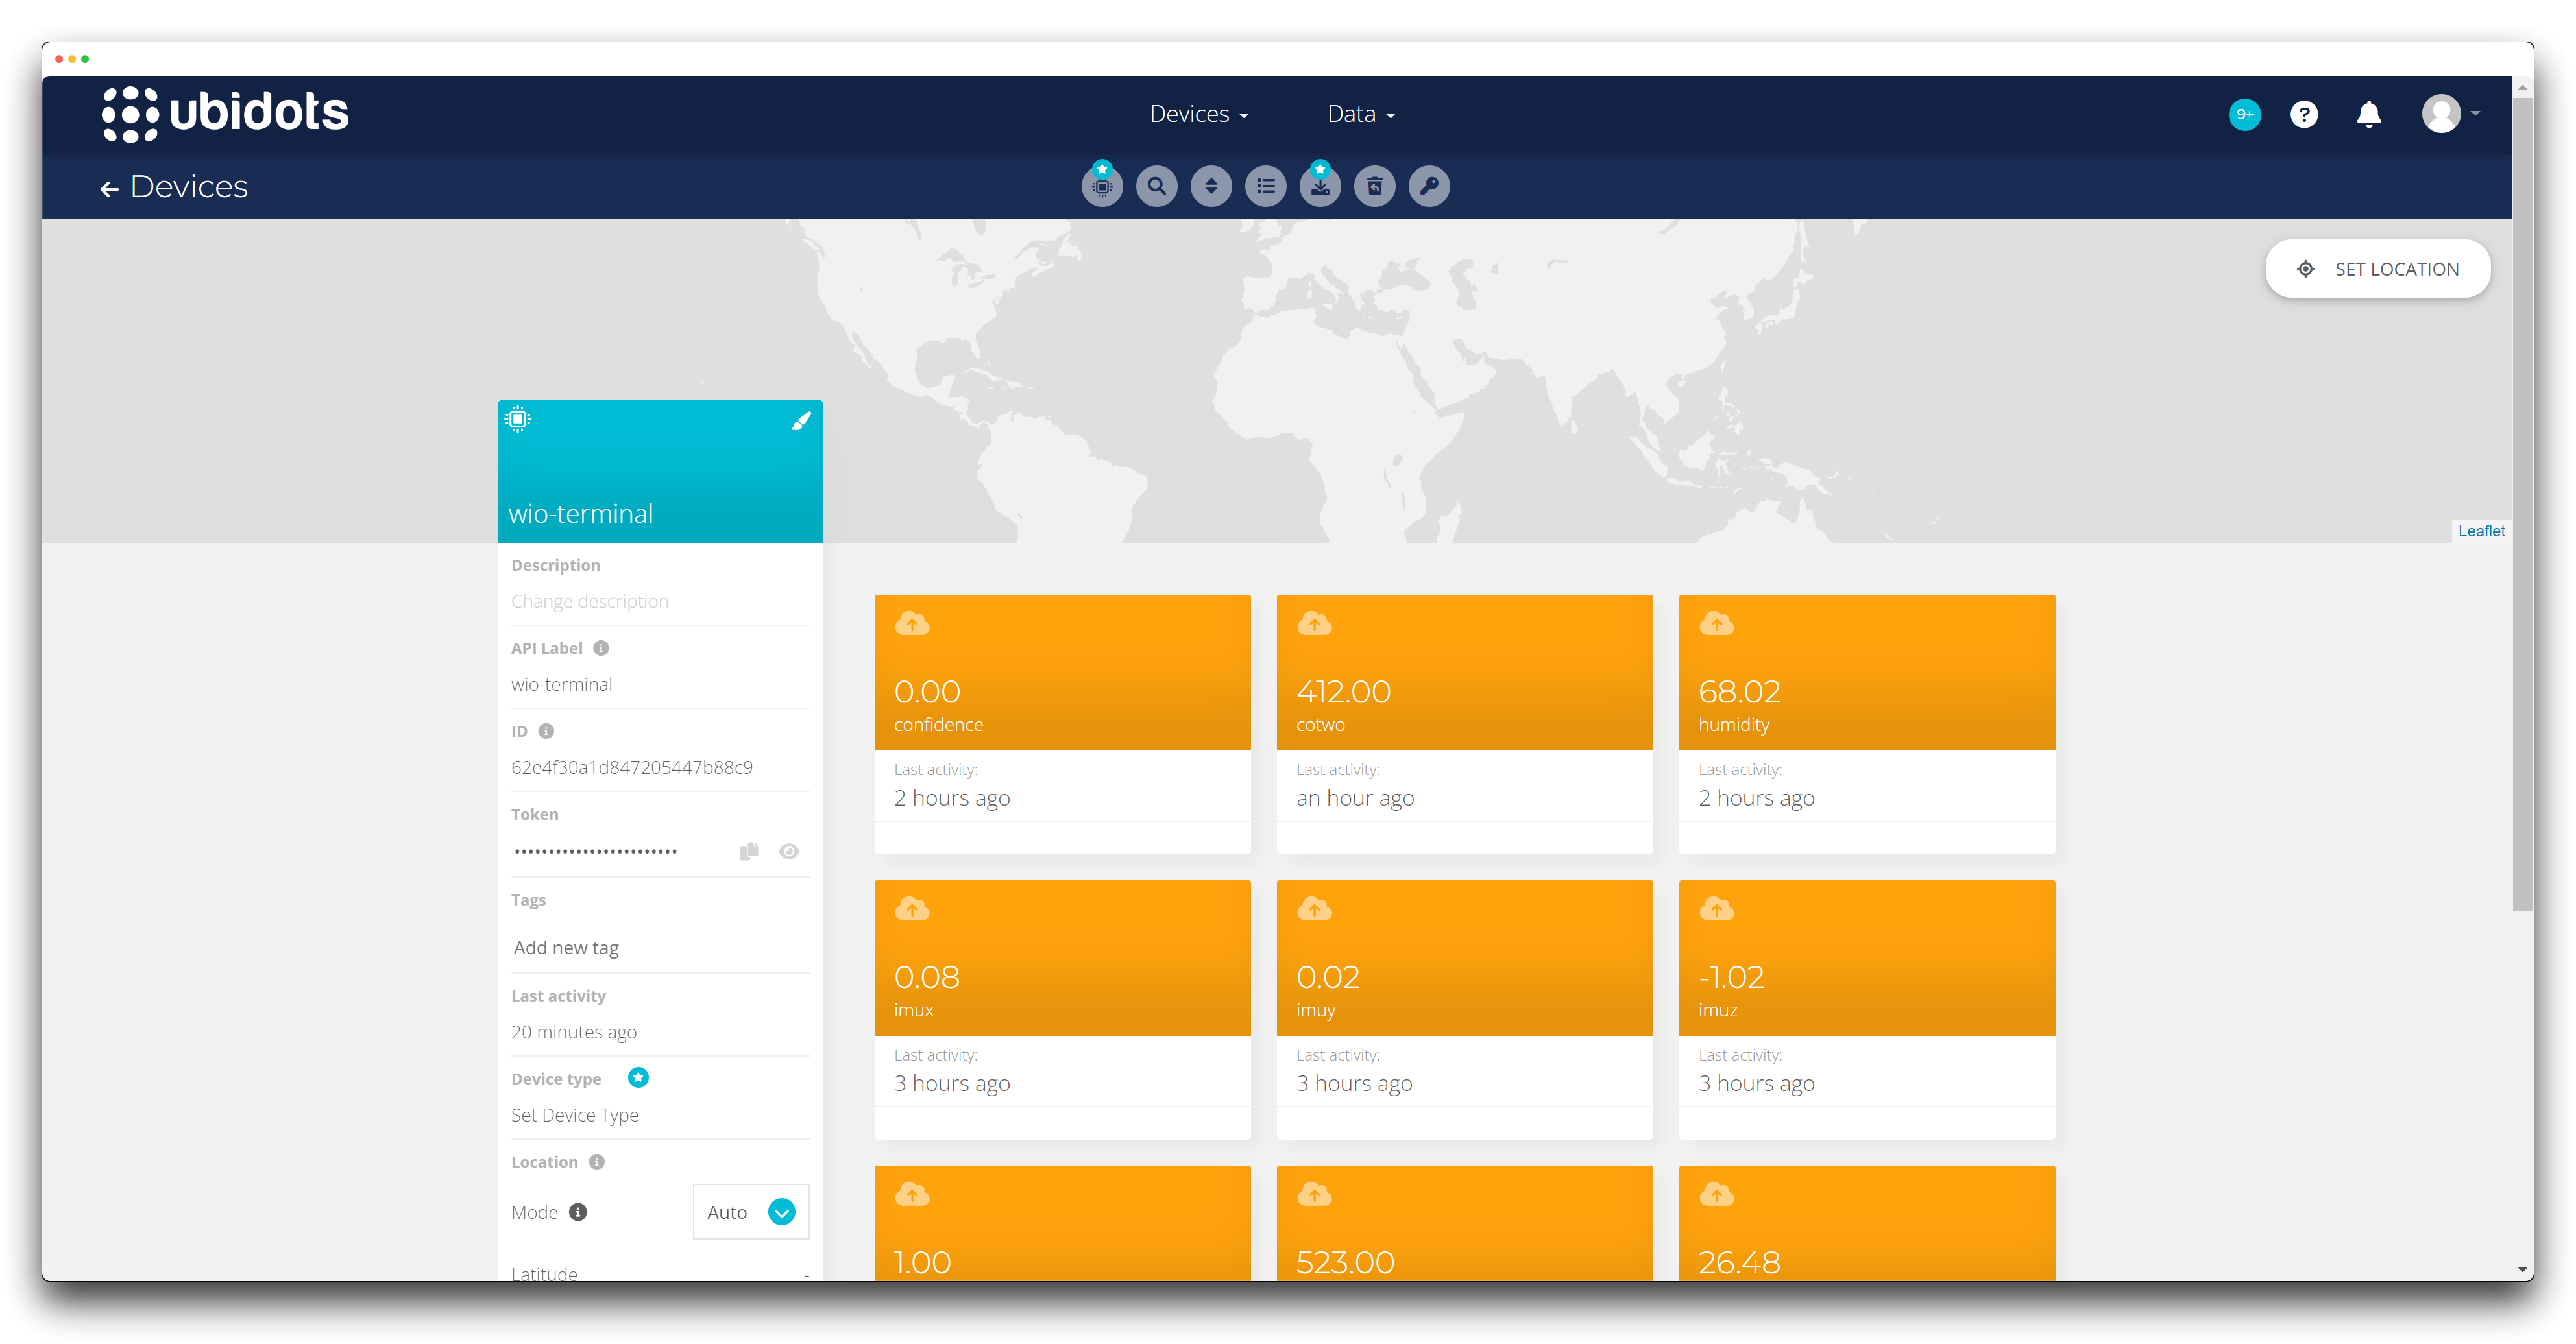
The free version of Ubidots only supports the creation of one TOKEN and ten labels. Once you have more than ten labels, the labels you have uploaded as well as the data will be discarded.
If you want to see the data information of your device, you can select Data.
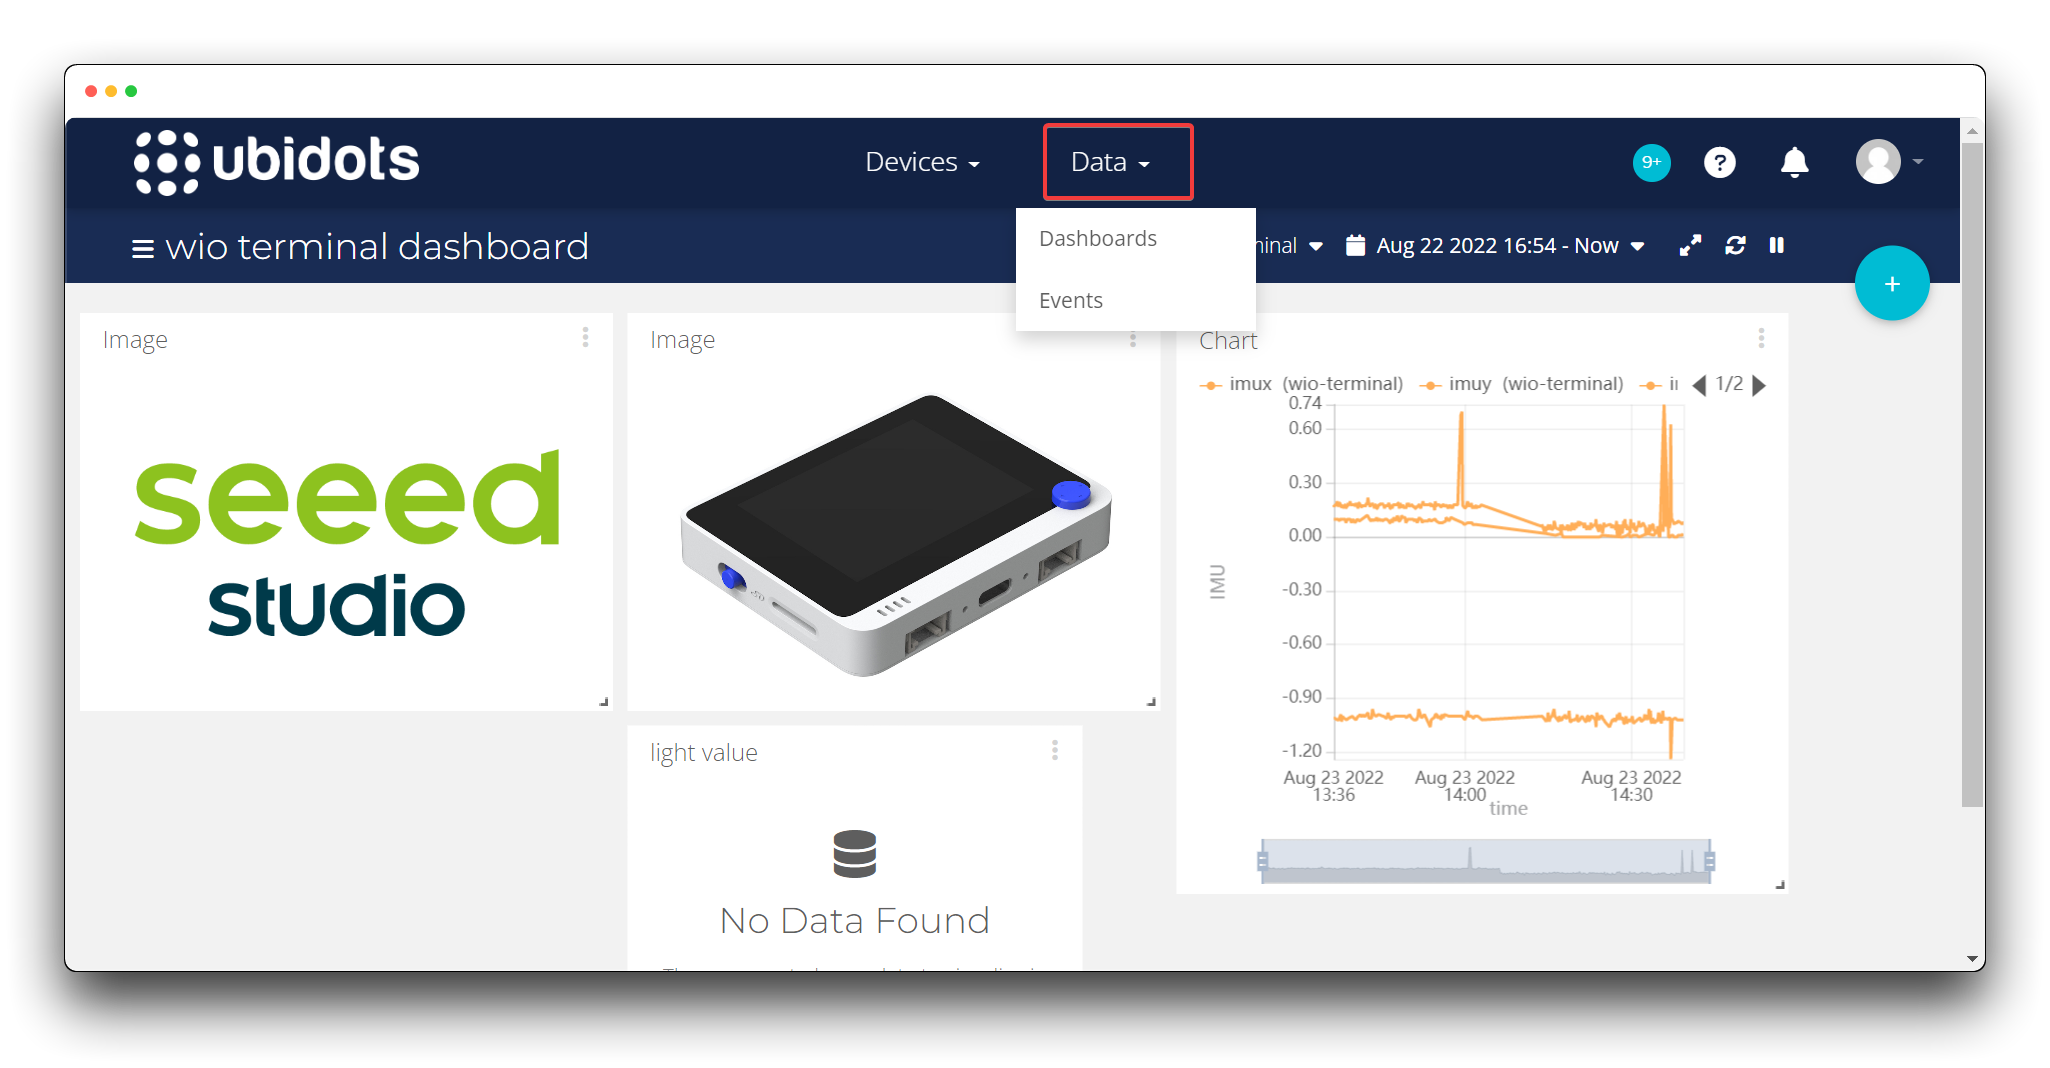
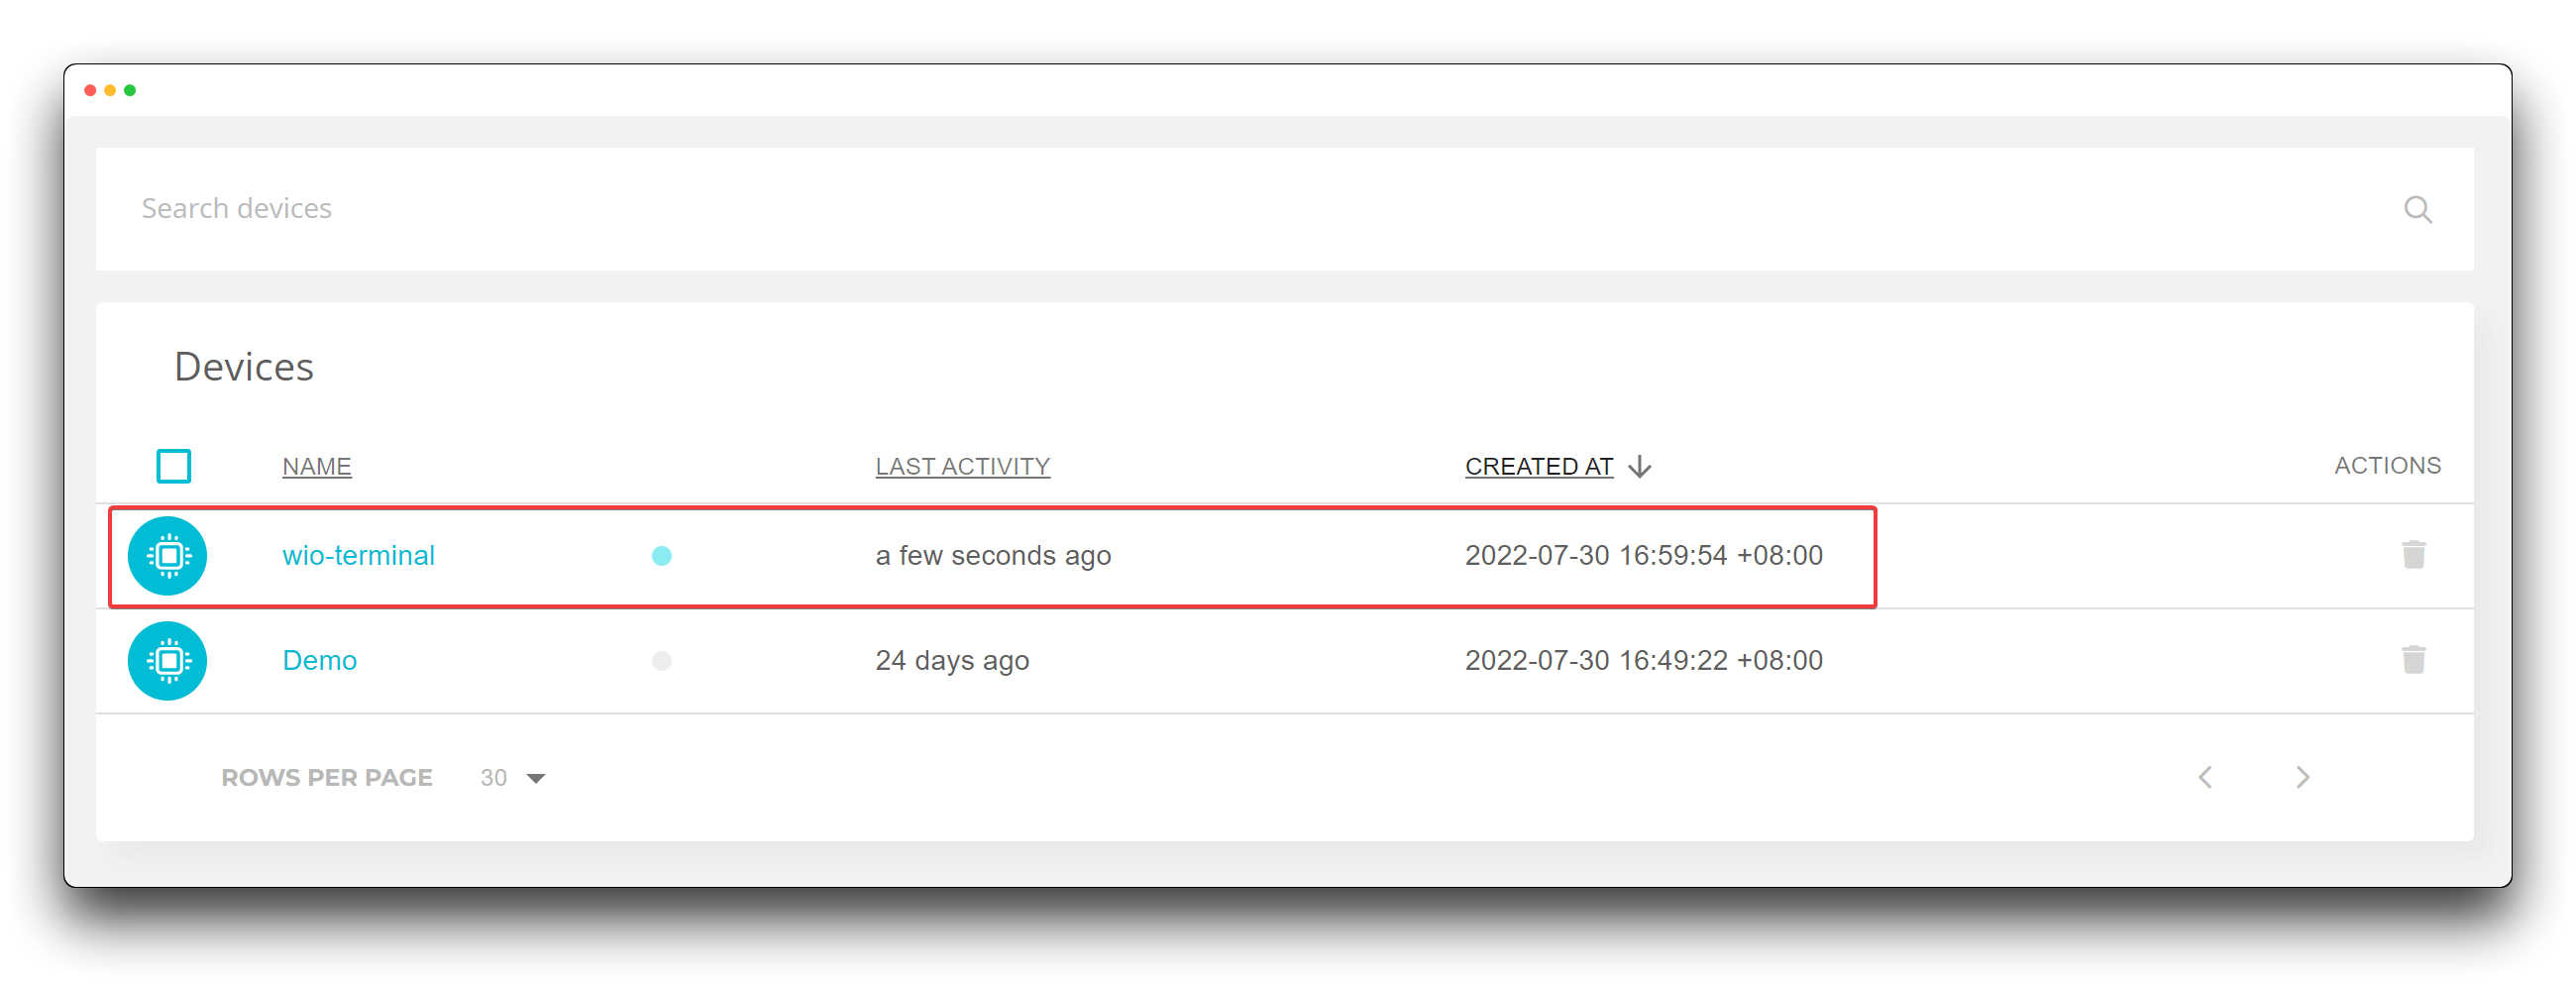
You can also select a different dashboard screen in the top left corner of the main page. By default to start with, Ubidots will automatically create a dashboard for you called Demo Dashboard. Once the Wio Terminal is networked and sending data, you will be able to see a dashboard called wio terminal dashboard. This is defined in the code under DEVICE_LABEL.

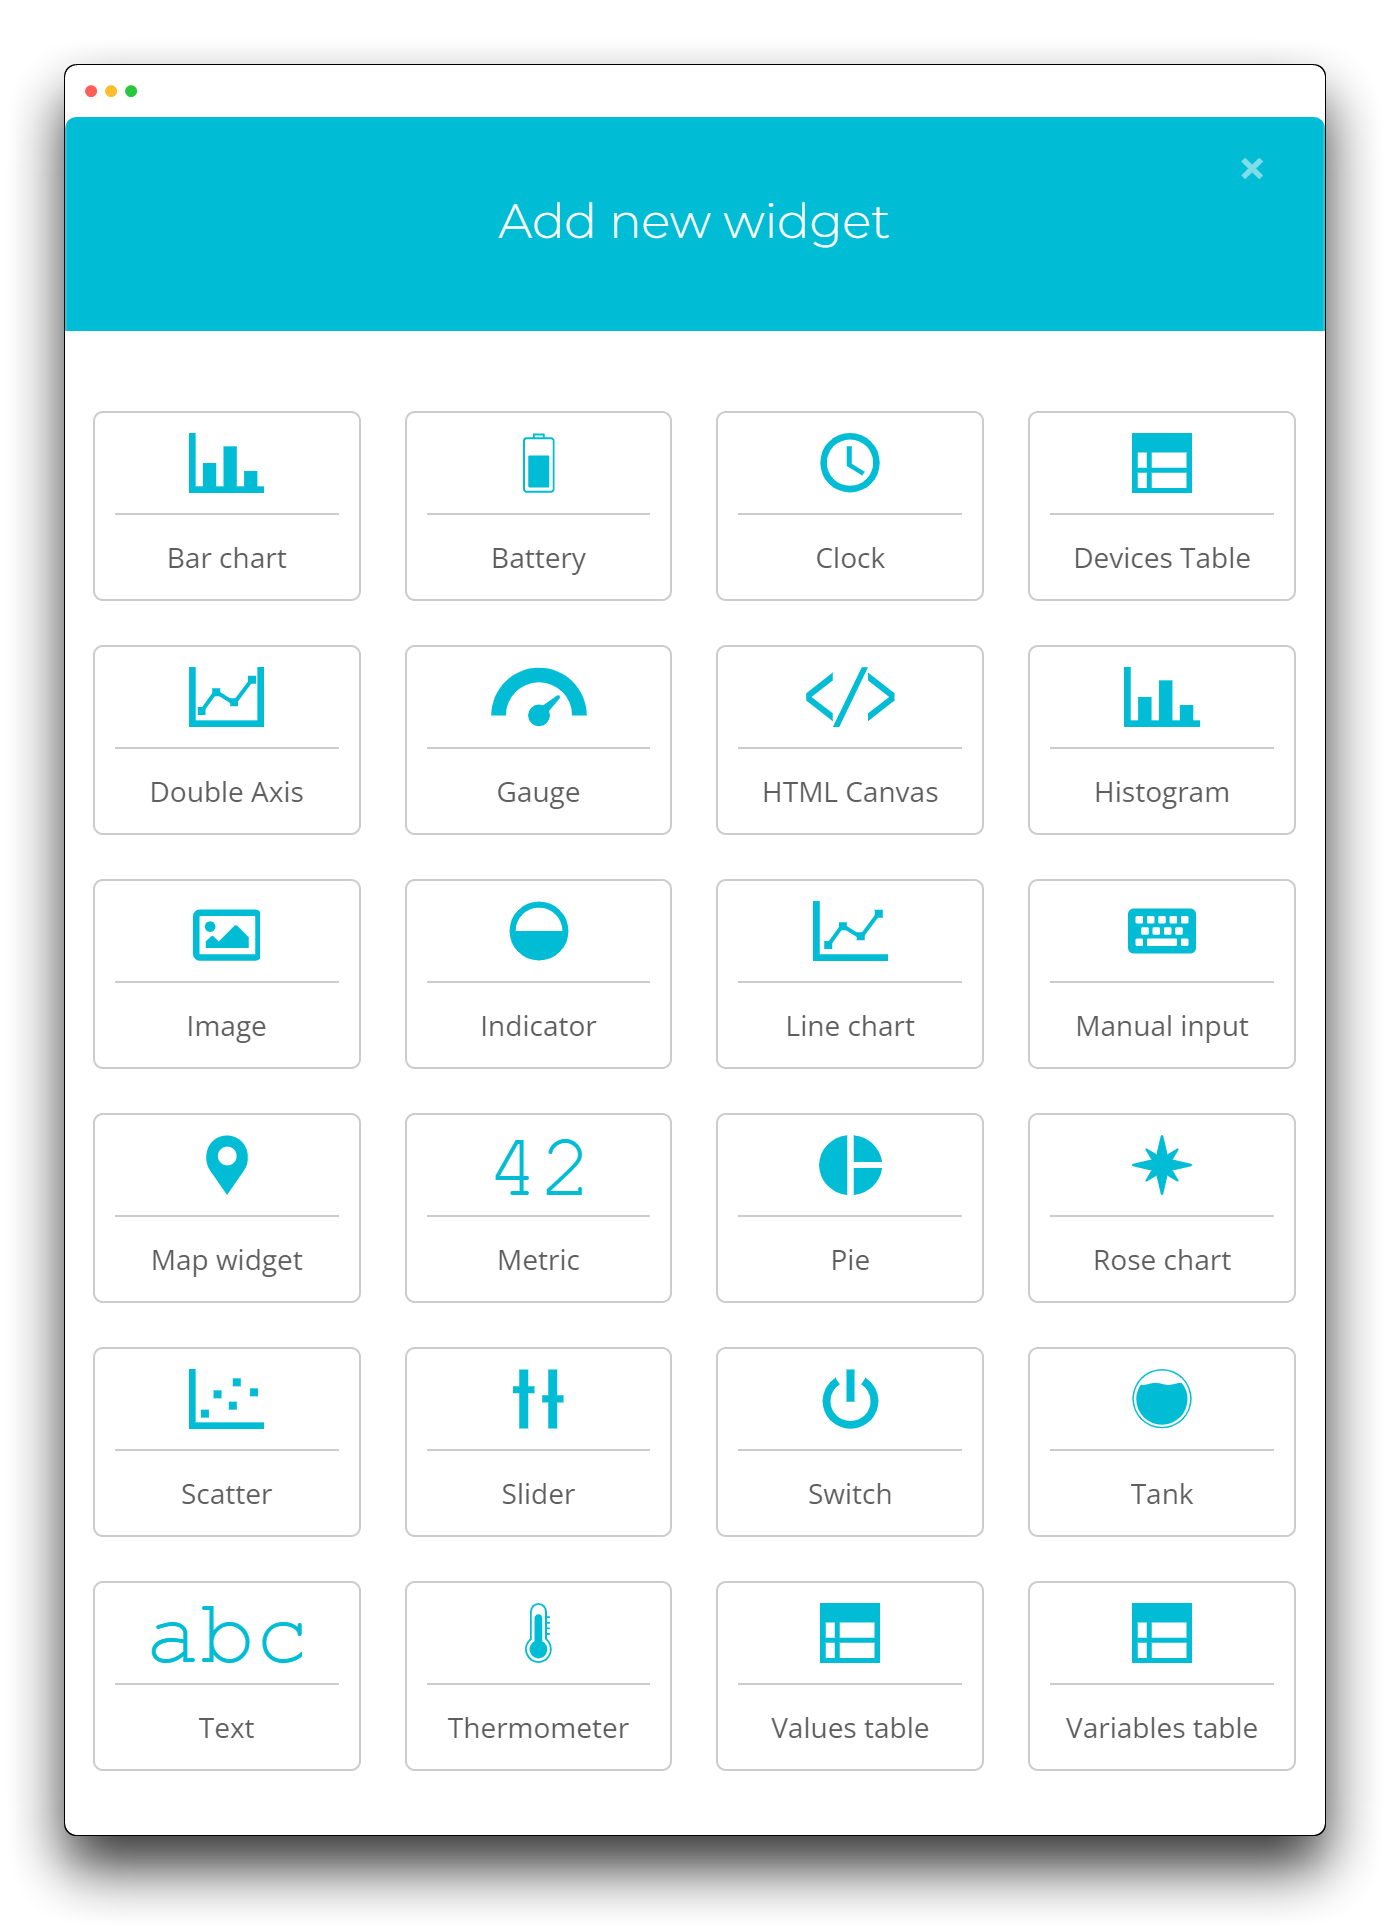
You can add different panels under the current dashboard, which requires you to click on the + sign in the top right corner.

Below is a list of the panels supported by Ubidots.
Let's take the example of creating a line chart table. If you want to draw a line chart of IMU sensor values, then you need to create three labels and the names of the labels need to match the VARIABLE_LABEL in your code, then just leave everything to Ubidots and it will be generated automatically for you.
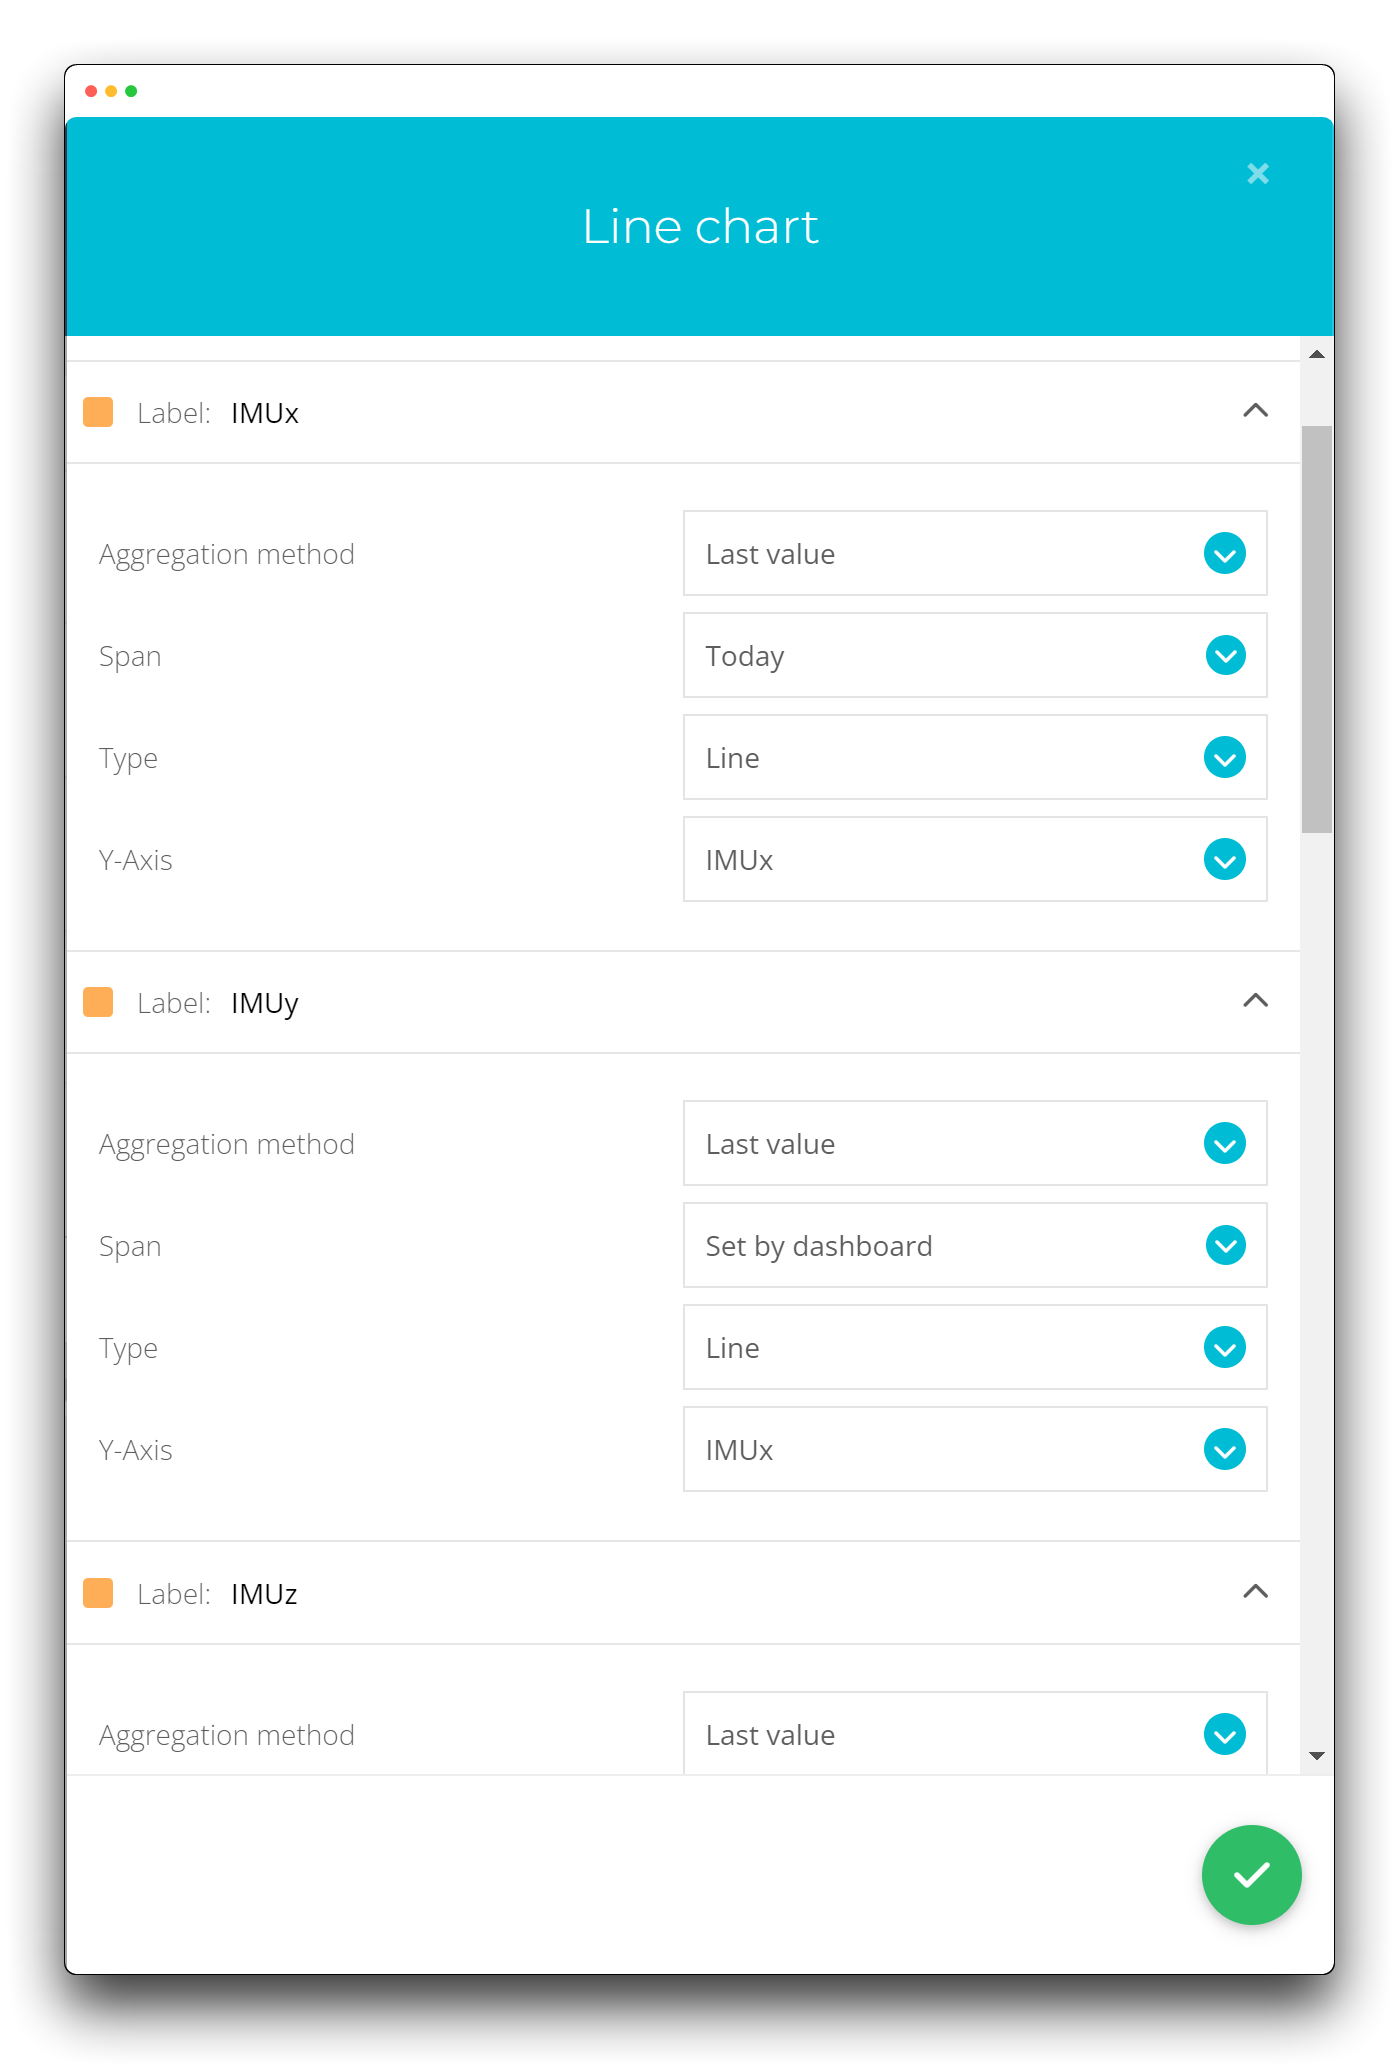
Ubidots also has very powerful customisation features, such as whether to display values, the name of the Y-axis and how much data to display, all of which you can play with freely.
Resources
For all the codes used in this tutorial please click on the icon to access them.
Tech Support & Product Discussion
Thank you for choosing our products! We are here to provide you with different support to ensure that your experience with our products is as smooth as possible. We offer several communication channels to cater to different preferences and needs.
Statement
- The LoRa® Mark is a trademark of Semtech Corporation or its subsidiaries.
- LoRaWAN® is a mark used under license from the LoRa Alliance®.