Grove - Capacitive Fingerprint Scanner/Sensor
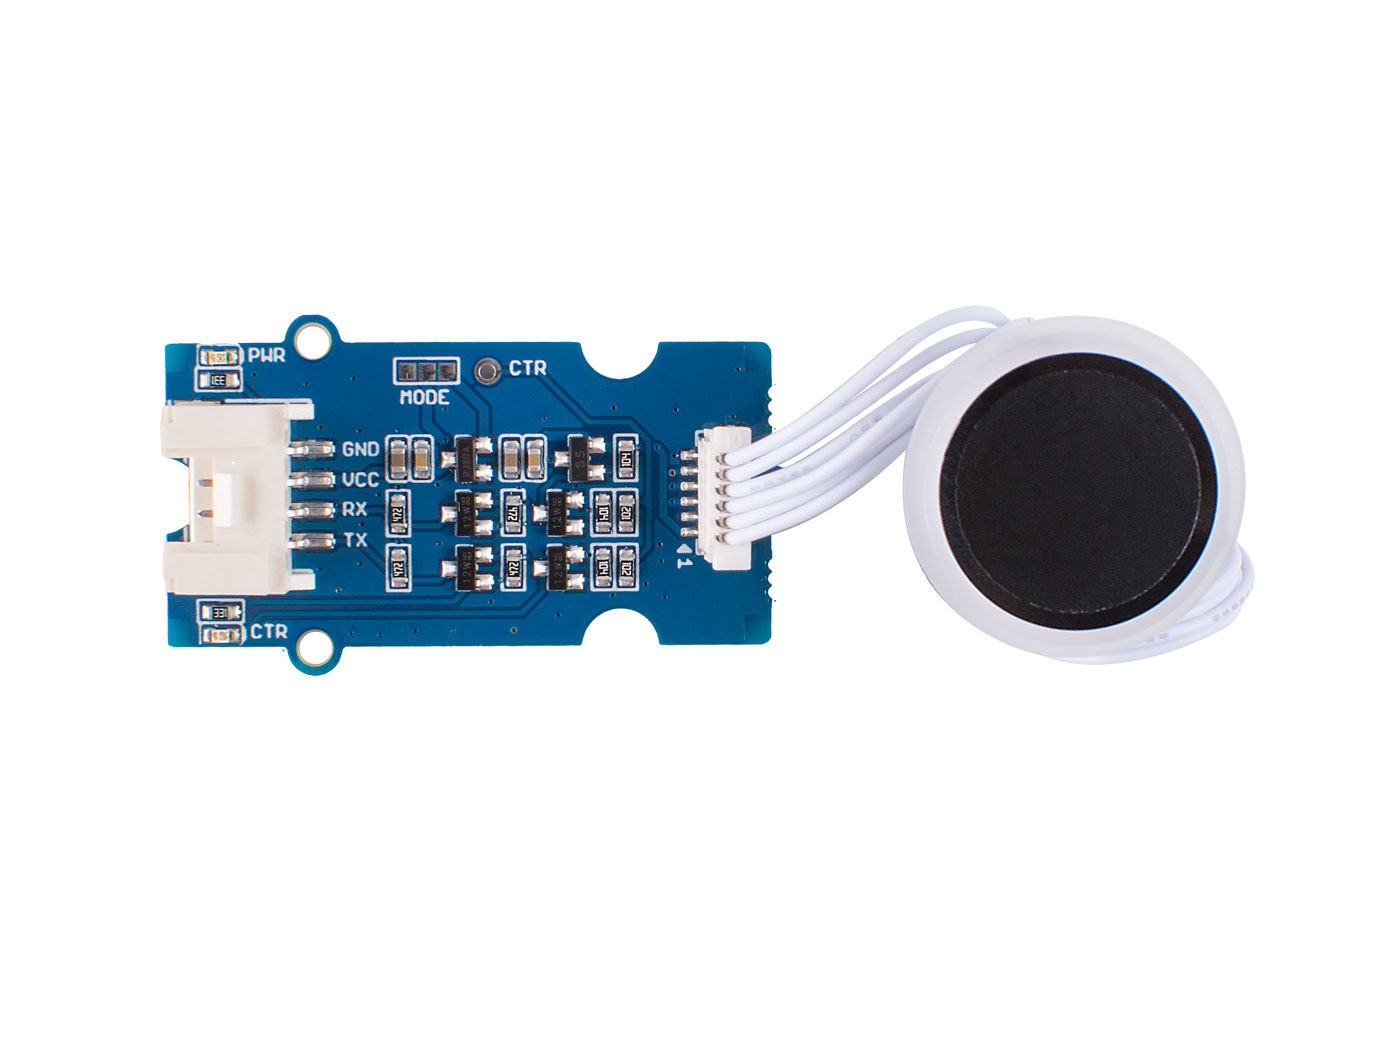
The Grove - Capacitive Fingerprint Scanner / Sensor is based on the KCT203 Semiconductor fingerprint recognition module, including a high-performance MCU, a vertical RF push-type fingerprint sensor, and a touch sensing device. This module features many advantages such as small size, small fingerprint template, low power consumption, high reliability, fast fingerprint recognition, etc. In addition, it is worth mentioning that there is a lovely RGB light around this module to indicate whether the fingerprint recognition is successful.
The system is equipped with a high-performance fingerprint algorithm, and the self-learning function is remarkable. After each successful fingerprint recognition, the latest challenge feature values can be integrated into the fingerprint database to continuously improve the fingerprint features, making the experience better.
We add the power level shift circuit on the Grove Driver board so that this module can work with both 3.3V and 5V systems. And with the help of the Grove UART connector and the Arduino library we offered, you can build your own Arduino fingerprint sensor/scanner easily.
We have already released the Grove optical fingerprint sensor, this time we bring you the Grove - Capacitive Fingerprint Scanner / Sensor. So what's the difference? Well, let's show you the merits and demerits of both sensors so that you can choose the best one to meet your needs.
| Product | Advantage | Disadvantage |
|---|---|---|
| Grove - Capacitive Fingerprint Scanner / Sensor | Can identify biological characteristics, only identify living body, high safety, small size, low power consumption, high accuracy | Poor abrasion resistance, easily susceptible to sweat, stains, finger wear, etc. |
| Grove - Optical Fingerprint Sensor | Strong abrasion resistance, good environmental adaptability, and good stability | Large size, high power consumption, and relatively low accuracy, can't identify the living body, low security |

Features
- Built-in 2KByte storage: support up to 100 fingerprints
- Powerful self-learning function: the more you use, the more accurate the recognition
- Selectable security level
- Small size, low power consumption,10uA for standby mode
The new sensors have updated internal algorithms to improve the accuracy of recognition, but the libraries and codes used have not changed.
Applications
- Fingerprint lock devices: door locks, safes, steering wheel locks, padlocks, gun locks, etc.
- Fingerprint sign-in, access control system
Specification
| Parameter | Value |
|---|---|
| CPU | GD32 |
| Fingerprint Template Storage | Max. 100 |
| Connector | Grove UART |
| Sensor Resolution | 508 DPI |
| Sensor Pixel | 160*160 |
| False Rejection Rate | <1% |
| False Acceptance Rate | <0.005% |
| Match Response Time(1:N Mode) | <350ms |
| Match Response Time(1:1 Mode) | <7ms |
| Sensor Size | Φ14.9mm |
| Frame Size | Φ19mm |
| Power Consumption | Full speed: ≤40 mA; Sleep: ≤12uA |
| Operating Voltage | 3.3V/5V |
| Operating Temperature | -20~70℃ |
| ESD Protection | Non-contact 15KV, contact 8KV |
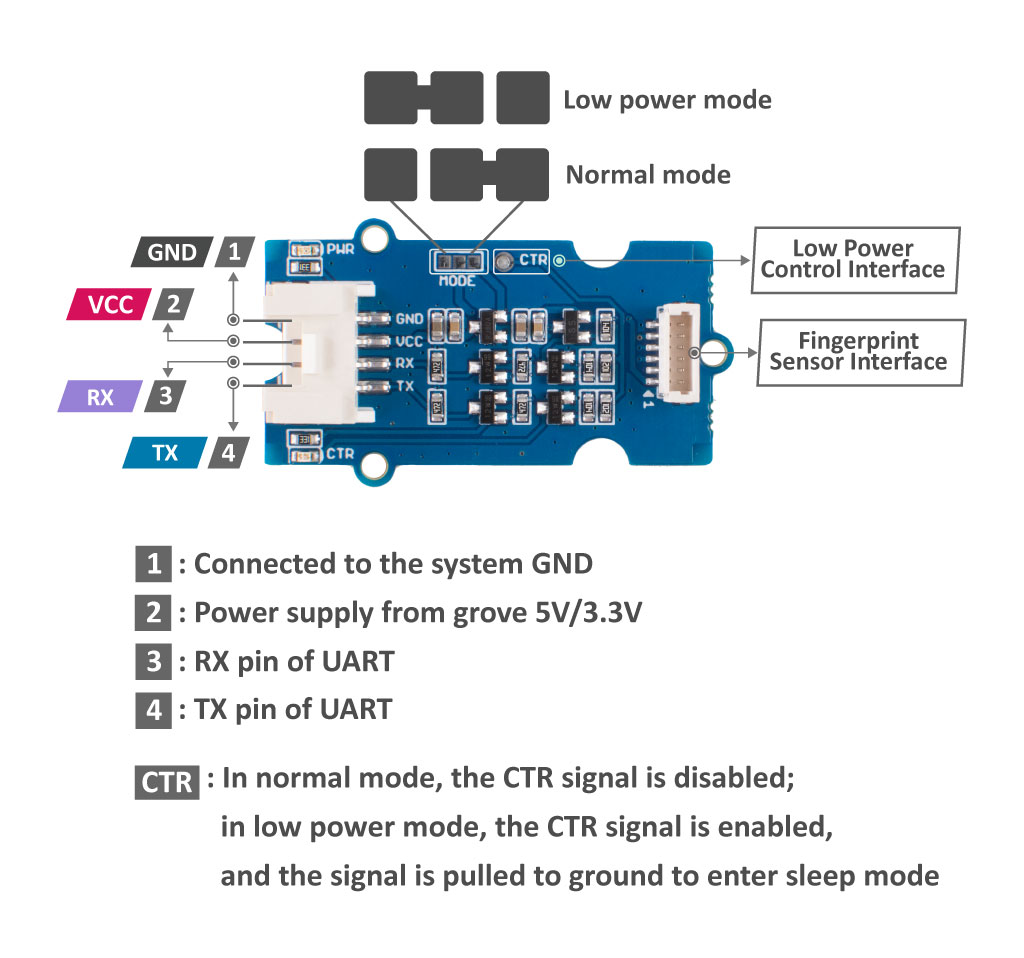
Pin Out
Platforms Supported
| Arduino | Raspberry Pi | |||
|---|---|---|---|---|
The platforms mentioned above as supported is/are an indication of the module's software or theoritical compatibility. We only provide software library or code examples for Arduino platform in most cases. It is not possible to provide software library / demo code for all possible MCU platforms. Hence, users have to write their own software library.
Getting Started
Play With Arduino
Hardware
| Seeeduino V4.2 | Base Shield | Grove - Capacitive Fingerprint Scanner/Sensor |
|---|---|---|
 |  |  |
| Get One Now | Get One Now | Get One Now |
1 Please plug the USB cable gently, otherwise you may damage the port. Please use the USB cable with 4 wires inside, the 2 wires cable can't transfer data. If you are not sure about the wire you have, you can click here to buy
2 Each Grove module comes with a Grove cable when you buy. In case you lose the Grove cable, you can click here to buy.
-
Step 1. Connect Grove - Capacitive Fingerprint Scanner/Sensor to port D2 of Grove-Base Shield.
-
Step 2. Plug Grove - Base Shield into Seeeduino.
-
Step 3. Connect Seeeduino to PC via a USB cable.
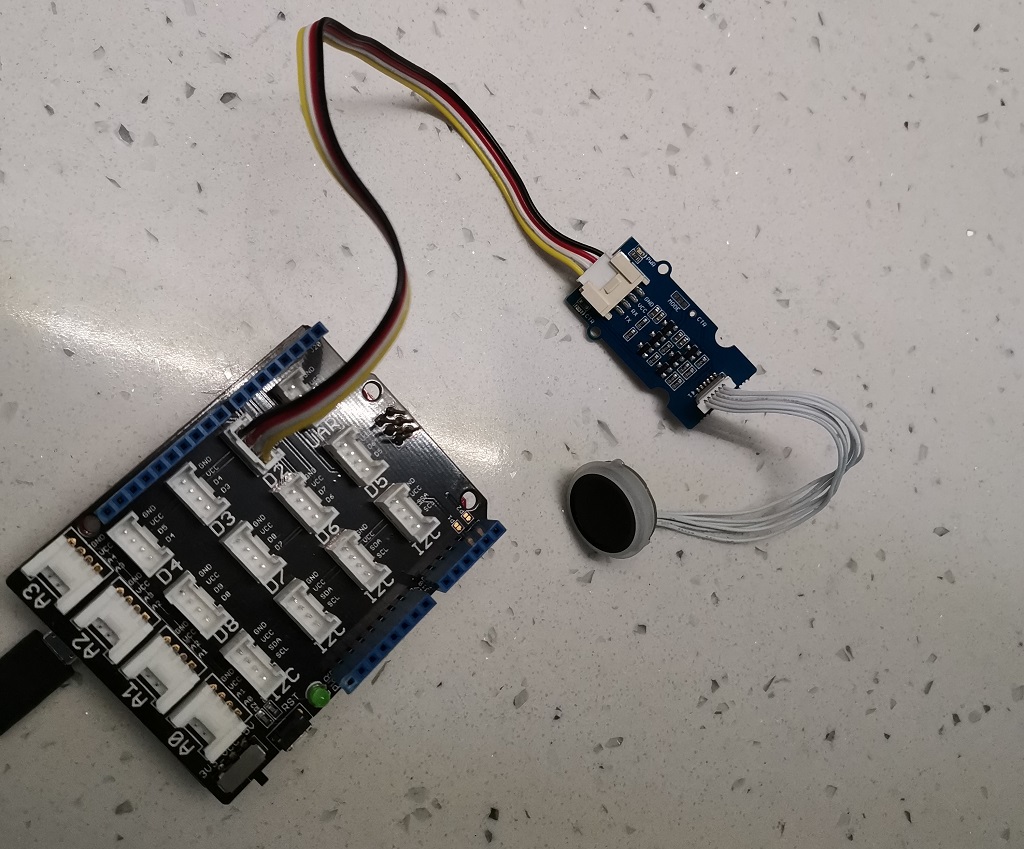
If we don't have Grove Base Shield, We also can directly connect this module to Seeeduino as below.
| Seeeduino | Grove Cable | Grove - Capacitive Fingerprint Scanner/Sensor |
|---|---|---|
| GND | Black | GND |
| 5V or 3.3V | Red | VCC |
| D3 | White | RX |
| D2 | Yellow | TX |
Software
If this is the first time you work with Arduino, we strongly recommend you to see Getting Started with Arduino before the start.
-
Step 1. Download the Seeed_Arduino_KCT202 Library from Github.
-
Step 2. Refer to How to install library to install library for Arduino.
-
Step 3. Restart the Arduino IDE. Open the example, you can open it in the following three ways:
- Open it directly in the Arduino IDE via the path: File --> Examples --> Seeed_Arduino_KCT202 --> full_process.

- Or, you can just click the icon
 in upper right corner of the code block to copy the following code into a new sketch in the Arduino IDE.
/*

    Copyright (c) 2019 Seeed Technology Co., Ltd.
    Website    : www.seeed.cc
    Author     : downey
    Create Time: Jun 2019
    Change Log :

    The MIT License (MIT)

    Permission is hereby granted, free of charge, to any person obtaining a copy
    of this software and associated documentation files (the "Software"), to deal
    in the Software without restriction, including without limitation the rights
    to use, copy, modify, merge, publish, distribute, sublicense, and/or sell
    copies of the Software, and to permit persons to whom the Software is
    furnished to do so, subject to the following conditions:

    The above copyright notice and this permission notice shall be included in
    all copies or substantial portions of the Software.

    THE SOFTWARE IS PROVIDED "AS IS", WITHOUT WARRANTY OF ANY KIND, EXPRESS OR
    IMPLIED, INCLUDING BUT NOT LIMITED TO THE WARRANTIES OF MERCHANTABILITY,
    FITNESS FOR A PARTICULAR PURPOSE AND NONINFRINGEMENT. IN NO EVENT SHALL THE
    AUTHORS OR COPYRIGHT HOLDERS BE LIABLE FOR ANY CLAIM, DAMAGES OR OTHER
    LIABILITY, WHETHER IN AN ACTION OF CONTRACT, TORT OR OTHERWISE, ARISING FROM,
    OUT OF OR IN CONNECTION WITH THE SOFTWARE OR THE USE OR OTHER DEALINGS IN
    THE SOFTWARE.
*/
#include "ATSerial.h"
#include "Protocol.h"
#include "KCT202.h"


#if defined(ARDUINO_ARCH_AVR)
    #define debug  Serial
    SoftwareSerial uart(2, 3);
    FingerPrint_KCT202<SoftwareSerial, HardwareSerial> kct202;
#elif defined(ARDUINO_ARCH_SAM)
    #define debug  SerialUSB
    #define uart Serial
    FingerPrint_KCT202<Uart, Serial_> kct202;
#elif defined(ARDUINO_ARCH_SAMD)
    #define debug  SerialUSB
    #define uart Serial1
    FingerPrint_KCT202<Uart, Serial_> kct202;
#else
    #define debug  Serial
    SoftwareSerial uart(2, 3);
    FingerPrint_KCT202<SoftwareSerial, HardwareSerial> kct202;
#endif


Protocol_oprt oprt;
uint8_t err_code = 0;
uint8_t param[10];
uint32_t param_len;

void setup(void) {
    debug.begin(115200);
    kct202.begin(uart, debug);
}

uint16_t finger_num;
void loop() {
    //The first param is the finger-print ID to check.
    //if set 0xffff,indicates that search for all the finger-print templates and try to match.
    kct202.autoVerifyFingerPrint(CHECK_ALL_FINGER_TEMP,
                                 LED_OFF_AFTER_GET_GRAGH | PRETREATMENT_GRAGH | NOT_RET_FOR_EVERY_STEP);
    debug.println(" ");
    debug.println("Please put your finger on the touchpad.");
    debug.println("To verify your finger print.");
    debug.println(" ");
    debug.println(" ");
    debug.println(" ");

    if (0 == kct202.getVerifyResponAndparse(finger_num)) {
        debug.println("Verify ok!");
        debug.print("Your finger temp id = ");
        debug.println(finger_num, HEX);
    }
    delay(2000);
}
The library file may be updated. This code may not be applicable to the updated library file, so we recommend that you use the first way.
-
Step 4. Upload the demo. If you do not know how to upload the code, please check How to upload code.
-
Step 5. Open the Serial Monitor of Arduino IDE by click Tool-> Serial Monitor. Or tap the ++ctrl+shift+m++ key at the same time. Set the baud rate to 115200.
-
Step 6. Please put your finger on the touchpad.
If every thing goes well, when you open the Serial Monitor, it may show as below:
Usage:
    Please put your finger on the touchpad
    Repeat for 4 times or pressed continuously


Uart<=== : EF.1.FF.FF.FF.FF.7.0.5.0.0.0.0.C.

***********************************************************
Please put your finger on the touchpad
***********************************************************
Uart<=== : EF.1.FF.FF.FF.FF.7.0.5.0.1.1.0.E.

***********************************************************
Please put your finger on the touchpad
***********************************************************
Uart<=== : EF.1.FF.FF.FF.FF.7.0.5.0.2.1.0.F.

***********************************************************
Please put your finger on the touchpad
***********************************************************
Uart<=== : EF.1.FF.FF.FF.FF.7.0.5.0.1.2.0.F.

***********************************************************
Please put your finger on the touchpad
***********************************************************
Uart<=== : EF.1.FF.FF.FF.FF.7.0.5.0.2.2.0.10.

***********************************************************
Please put your finger on the touchpad
***********************************************************
Uart<=== : EF.1.FF.FF.FF.FF.7.0.5.0.1.3.0.10.

***********************************************************
Please put your finger on the touchpad
***********************************************************
Uart<=== : EF.1.FF.FF.FF.FF.7.0.5.0.2.3.0.11.

***********************************************************
Please put your finger on the touchpad
***********************************************************
Uart<=== : EF.1.FF.FF.FF.FF.7.0.5.0.1.4.0.11.

***********************************************************
Please put your finger on the touchpad
***********************************************************
Uart<=== : EF.1.FF.FF.FF.FF.7.0.5.0.2.4.0.12.EF.1.FF.FF.FF.FF.7.0.5.0.4.F0.1.0.EF.1.FF.FF.FF.FF.7.0.5.0.5.F1.1.2.EF.1.FF.FF.FF.FF.7.0.5.0.6.F2.1.4.

Register ok!
Uart===> : EF.1.FF.FF.FF.FF.1.0.8.32.0.FF.FF.0.7.2.40.


Please put your finger on the touchpad.
To verify your finger print.


Uart<=== : EF.1.FF.FF.FF.FF.7.0.8.0.0.0.0.0.0.0.F.

Uart<=== : EF.1.FF.FF.FF.FF.7.0.8.0.1.0.0.0.0.0.10.

Uart<=== : EF.1.FF.FF.FF.FF.7.0.8.0.5.0.1.0.64.0.79.

Verify ok!
Your finger temp id = 1
Uart===> : EF.1.FF.FF.FF.FF.1.0.3.D.0.11.

Uart<=== : EF.1.FF.FF.FF.FF.7.0.3.0.0.A.

Operation succed.
Delete ok!
Schematic Online Viewer
Resources
Tech Support & Product Discussion
Thank you for choosing our products! We are here to provide you with different support to ensure that your experience with our products is as smooth as possible. We offer several communication channels to cater to different preferences and needs.