Grove - I2C UV Sensor (VEML6070)

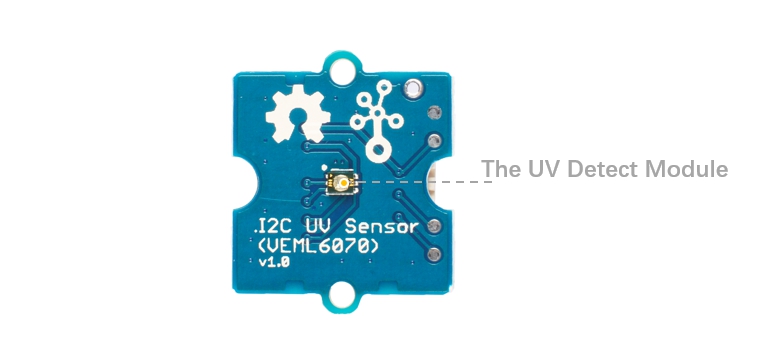
The Grove - I2C UV Sensor(VEML6070) is an advanced ultraviolet (UV) light sensor with I2C protocol interface. Ultraviolet (UV) is electromagnetic radiation with a wavelength from 10 nm to 400 nm, shorter than that of visible light but longer than X-rays, this sensor detects 320-410nm light most effectively, and will converts solar UV light intensity to digital data.
This module is based on VEML6070, which has linear sensitivity to solar UV light and is easily adjusted by an external resistor.
What's more the active acknowledge (ACK) feature with threshold windows setting allows the UV sensor to send out a UVI alert message. Under a strong solar UVI condition, the smart ACK signal can be easily implemented by the software programming.
Features
- Excellent performance of UV radiation measurement under long time solar UV exposure
- Excellent UV sensitivity and linearity
- Excellent temperature compensation
- High dynamic detection resolution
- Support acknowledge feature (ACK)
Specification
| Item | Value |
|---|---|
| Operating Voltage | 3.3V / 5V |
| Range of spectral sensitivity | 320 ~ 410 nm |
| Peak Sensitivity | 355 nm |
| UVA Sensitivity | 5 μW/cm2/step(typical) |
| Interface | I2C |
| I2C Address | 0x38(Data LSB) / 0x39(Data MSB) |
Actually, this sensor has 3 I2C address, each address
Typical applications
- Solar UV indicator
- Cosmetic / outdoor sport handheld product
- Consumer products
Hardware Overview
Pin Out


Platforms Supported
| Arduino | Raspberry Pi | |||
|---|---|---|---|---|
 |  |  |  |  |
The platforms mentioned above as supported is/are an indication of the module's software or theoritical compatibility. We only provide software library or code examples for Arduino platform in most cases. It is not possible to provide software library / demo code for all possible MCU platforms. Hence, users have to write their own software library.
Getting Started
Play With Arduino
Hardware
Materials required
| Seeeduino V4.2 | Base Shield | Grove - I2C UV Sensor (VEML6070) |
|---|---|---|
 |  |  |
| Get One Now | Get One Now | Get One Now |
1 Please plug the USB cable gently, otherwise you may damage the port. Please use the USB cable with 4 wires inside, the 2 wires cable can't transfer data. If you are not sure about the wire you have, you can click here to buy
2 Each Grove module comes with a Grove cable when you buy. In case you lose the Grove cable, you can click here to buy.
-
Step 1. Connect the Grove - I2C UV Sensor (VEML6070) to port I2C of Grove-Base Shield.
-
Step 2. Plug Grove - Base Shield into Seeeduino.
-
Step 3. Connect Seeeduino to PC via a USB cable.

If we don't have Grove Base Shield, We also can directly connect this module to Seeeduino as below.
| Seeeduino | Grove Cable | Grove - I2C UV Sensor (VEML6070) |
|---|---|---|
| GND | Black | GND |
| 5V or 3.3V | Red | VCC |
| SDA | White | SDA |
| SCL | Yellow | SCL |
Software
If this is the first time you work with Arduino, we strongly recommend you to see Getting Started with Arduino before the start.
-
Step 1. Download the Seeed_VEML6070 Library from Github.
-
Step 2. Refer to How to install library to install library for Arduino.
-
Step 3. Restart the Arduino IDE. Open the example, you can open it in the following three ways:
- Open it directly in the Arduino IDE via the path: File --> Examples --> Seeed_VEML6070 --> INT_mode.

- Open it in your computer by click the INT_mode.ino which you can find in the folder XXXX\Arduino\libraries\Seeed_VEML6070-master\examples\INT_mode, XXXX is the location you installed the Arduino IDE.

- Or, you can just click the icon
 in upper right corner of the code block to copy the following code into a new sketch in the Arduino IDE.
#include "Seeed_VEML6070.h"


/*SAMD core*/
#ifdef ARDUINO_SAMD_VARIANT_COMPLIANCE
  #define SERIAL SerialUSB
#else
  #define SERIAL Serial
#endif

VEML6070 sensor;

char *UV_str[]={"low level","moderate level","high_level","very high","extreme"};

err_t read_UV()
{
    err_t ret=NO_ERROR;
    u16 step;
    sensor.wait_for_ready();
    CHECK_RESULT(ret,sensor.read_step(step));
    SERIAL.print("UV step = ");
    SERIAL.println(step);
    RISK_LEVEL level=sensor.convert_to_risk_level(step);
    SERIAL.print("UV level is ");
    SERIAL.println(UV_str[level]);
    SERIAL.println(" ");
    SERIAL.println(" ");
    SERIAL.println(" ");
    return ret;
}


void setup()
{
    SERIAL.begin(115200);
    delay(10);
    SERIAL.println("serial start!!");
    delay(1000);
    if(sensor.init())
    {
      SERIAL.println("init failed!!!");
    }
    /*threshold is 145 steps*/
    /*enable*/
    sensor.set_interrupt(INT_145_STEP,ENABLE);
}


void loop()
{
    if(read_UV())
    {
      SERIAL.print("read UV sensor failed!!");
    }
    //sensor.enable();
    //sensor.disable();
    delay(1000);
}
There are 2 demos in the library:
basic_demo.ino
This example can get the UV index and UV level from the serial.polling for data.
INT_mode.ino
here is a INT pad on the sensor module which connect to ACK pin of VEML6070. You can set UV threshold by 102 steps or 145 steps(only two choises).The INT pin outputs low when the UV value beyond limit.You can attach INT pin to a interrupt pin of host,To improve the efficiency of program operation.
The library file may be updated. This code may not be applicable to the updated library file, so we recommend that you use the first two methods.
-
Step 4. Upload the demo. If you do not know how to upload the code, please check How to upload code.
-
Step 5. Open the Serial Monitor of Arduino IDE by click Tool-> Serial Monitor. Or tap the ++ctrl+shift+m++ key at the same time. Set the baud rate to 115200.
If every thing goes well, when you use UV light to illuminate this module, you will see information like:
4serial start!!
cmd reg=32
UV step = 20
UV level is low level


UV step = 125
UV level is low level


UV step = 511
UV level is low level
Alert Function
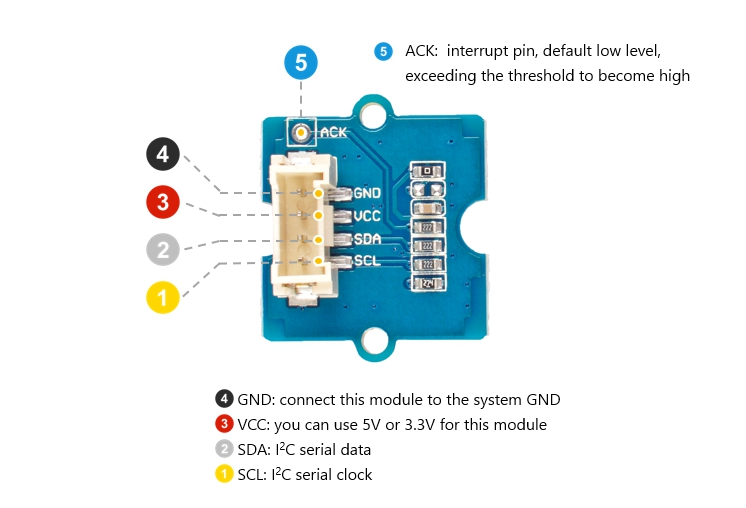
As we can see in the hardware Overview part, there is a ACK pin for user to work as a interrupt signal. The good news is that there are two threshold 102 step and 145 step to choose, the bad one is that you can not set your own number, only 102 and 145 are valid. The ACK pin default output low, once the UV value exceed the threshold you setted, the ACK pin output High. Let's come back to the example code INT_mode.ino.
Line 46, the default setting of threshold is 145, if you want to use the 102, you should just change the code as below:
sensor.set_interrupt(INT_145_STEP,ENABLE); //change this line
sensor.set_interrupt(INT_102_STEP,ENABLE); // modified
Play With Raspberry Pi (With Grove Base Hat for Raspberry Pi)
Hardware
- Step 1. Things used in this project:
| Raspberry pi | Grove Base Hat for RasPi | Grove - I2C UV Sensor (VEML6070) |
|---|---|---|
 |  |  |
| Get ONE Now | Get ONE Now | Get ONE Now |
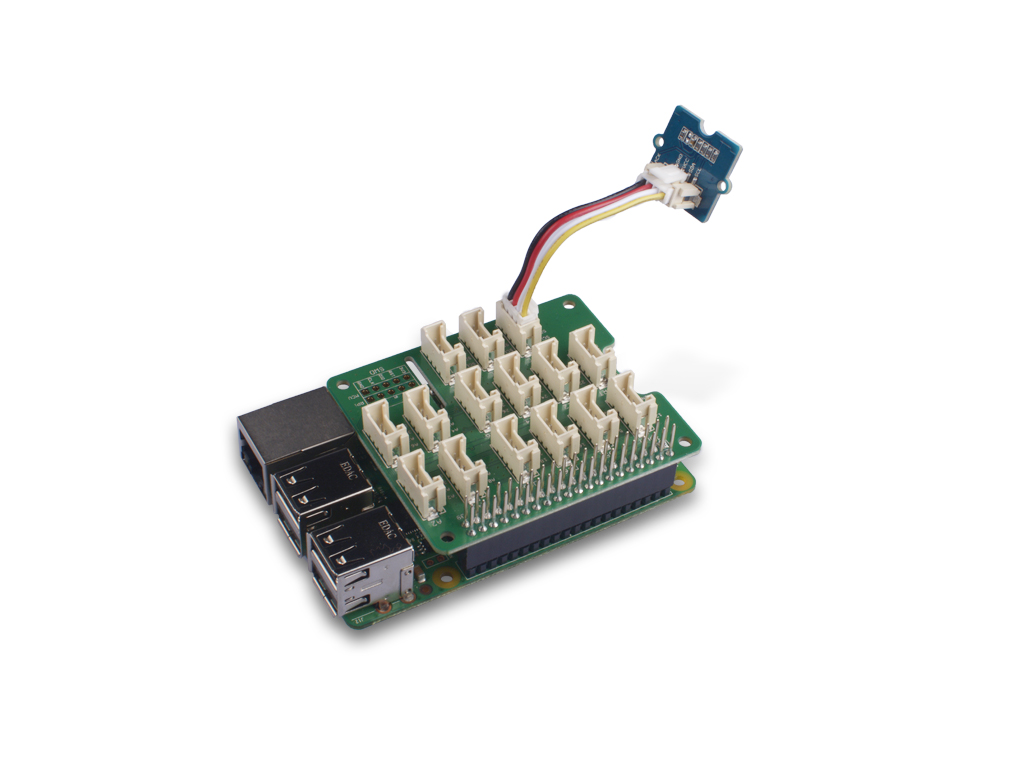
- Step 2. Plug the Grove Base Hat into Raspberry.
- Step 3. Connect the Grove - I2C UV Sensor (VEML6070) to I2C port of the Base Hat.
- Step 4. Connect the Raspberry Pi to PC through USB cable.

Software
- Step 1. Follow Setting Software to configure the development environment install the grove.py to your raspberry pi.
- Step 2. Excute below commands to run the code.
# virutalenv for Python3
virtualenv -p python3 env
source env/bin/activate
#enter commmand
grove_uv_sensor
Following is the grove_uv_sensor.py code.
from __future__ import print_function
from grove.i2c import Bus
import time


# I2C address of the device
VEML6070_DEFAULT_ADDRESS				= 0x38

# VEML6070 Command Set
VEML6070_CMD_ACK_DISABLE				= 0x00 # Acknowledge Disable
VEML6070_CMD_ACK_ENABLE					= 0x20 # Acknowledge Enable
VEML6070_CMD_ACK_THD_102				= 0x00 # Acknowledge threshold 102 Steps
VEML6070_CMD_ACK_THD_145				= 0x10 # Acknowledge threshold 145 Steps
VEML6070_CMD_IT_1_2T					= 0x00 # Integration time = 1/2T
VEML6070_CMD_IT_1T						= 0x04 # Integration time = 1T
VEML6070_CMD_IT_2T						= 0x08 # Integration time = 2T
VEML6070_CMD_IT_4T						= 0x0C # Integration time = 4T
VEML6070_CMD_RESERVED					= 0x02 # Reserved, Set to 1
VEML6070_CMD_SD_DISABLE					= 0x00 # Shut-down Disable
VEML6070_CMD_SD_ENABLE					= 0x01 # Shut-down Enable
VEML6070_CMD_READ_LSB					= 0x38 # Read LSB of the data
VEML6070_CMD_READ_MSB					= 0x39 # Read MSB of the data

class VEML6070():
	def __init__(self, address = VEML6070_DEFAULT_ADDRESS):
		self._addr = address
		self._bus  = Bus()
		self.write_command()

	def write_command(self):
		"""Select the UV light command from the given provided values"""
		COMMAND_CONFIG = (VEML6070_CMD_ACK_DISABLE | VEML6070_CMD_IT_1_2T | VEML6070_CMD_SD_DISABLE | VEML6070_CMD_RESERVED)
		self._bus.write_byte(VEML6070_DEFAULT_ADDRESS, COMMAND_CONFIG)

	def read_uvlight(self):
		"""Read data back VEML6070_CMD_READ_MSB(0x73) and VEML6070_CMD_READ_LSB(0x71), uvlight MSB, uvlight LSB"""
		data0 = self._bus.read_byte(VEML6070_CMD_READ_MSB)
		data1 = self._bus.read_byte(VEML6070_CMD_READ_LSB)

		# Convert the data
		uvlight = data0 * 256 + data1

		return {'u' : uvlight}


def main():

	veml6070 = VEML6070()

	## Exit handlers ##
	# This function stops python from printing a stacktrace when you hit control-C
	def SIGINTHandler(signum, frame):
		raise SystemExit

	# This function lets you run code on exit, including functions from abpdrrt005pg2a5
	def exitHandler():
		print("Exiting")
		sys.exit(0)

	while True:
		light = veml6070.read_uvlight()
		print("UV Value: {0}".format(light['u']))
		print(" *********************************** ")
		time.sleep(1)

if __name__ == '__main__':
	main()
If everything goes well, you will be able to see the following result
(env)pi@raspberrypi:~ grove_uv_sensor
UV Value: 0
UV Value: 0
UV Value: 0
UV Value: 0
^CExiting
You can quit this program by simply press ctrl+c.
Schematic Online Viewer
Resources
-
[Zip] Seeed VEML6070 Library
-
[PDF] Datasheet VEML6070
Project
This is the introduction Video of this product, simple demos, you can have a try.
Tech Support & Product Discussion
Thank you for choosing our products! We are here to provide you with different support to ensure that your experience with our products is as smooth as possible. We offer several communication channels to cater to different preferences and needs.
