Grove - Infrared Temperature Sensor Array(AMG8833)
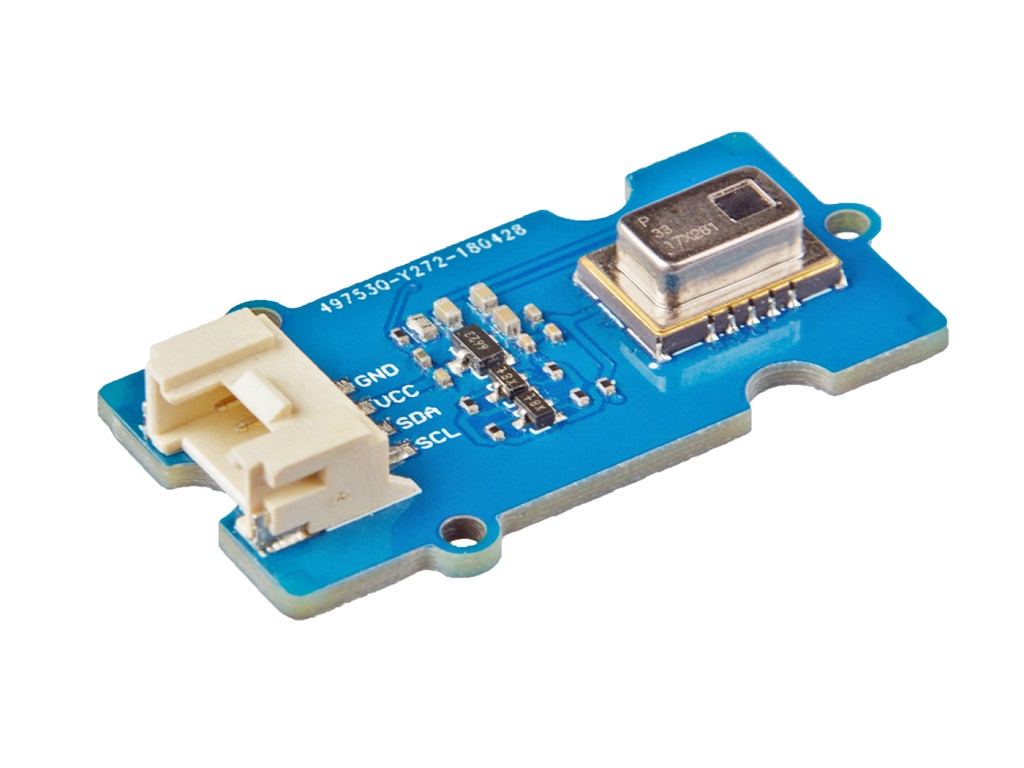
The Grove - Infrared Temperature Sensor Array (AMG8833) is a high precision infrared array sensor which based on advanced MEMS technology. It can support temperature detection of two-dimensional area: 8 × 8 (64 pixels) and maximum 7 meters detection distance.
We provide both Arduino and Raspberry Pi demo for this sensor. It will be a perfect module to make your own thermal camera.

Features
- Temperature detection of two-dimensional area: 8 × 8 (64 pixels)
- I2C output (capability of temperature value output)
- High precision
- Long detection distance
Specification
| Item | Value |
|---|---|
| Operating Voltage | 3.3V / 5V |
| Temperature range of measuring object | 0 °C to 80 °C +32 °F to +176 °F |
| Operating temperature range | 0 °C to 80 °C +32 °F to +176 °F |
| Storage temperature range | −20 °C to 80 °C –4 °F to +176 °F |
| Temperature accuracy | Typical ±2.5 °C ±4.5 °F |
| Viewing angle | Typical 60 ° |
| Optical axis gap | Within Typical ±5.6 ° |
| Number of pixel | 64 (Vertical 8 × Horizontal 8 Matrix) |
| External interface | I2C |
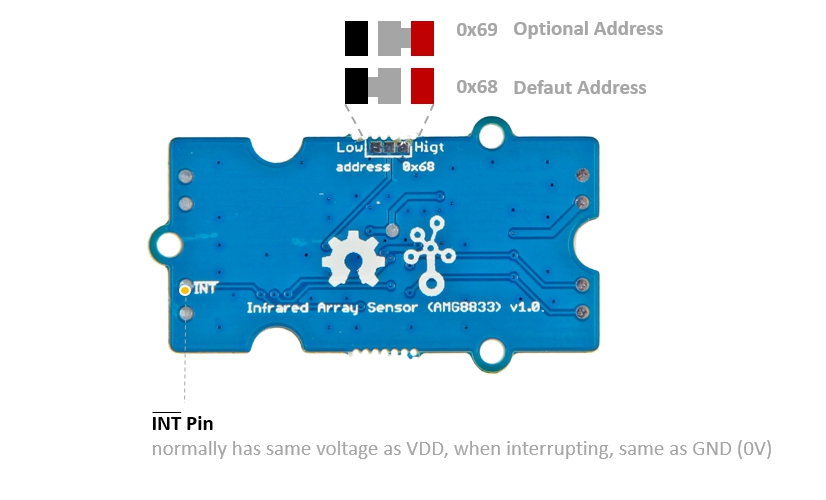
| I2C Address | 0x68(default) \ 0x69(optional) |
Typical Applications
- High function home appliances (microwaves and air-conditioners)
- Energy saving at office (air-conditioning/lighting control)
- Digital signage
- Automatic doors/elevators
Hardware Overview
Pin Out

Schemaitc
Power
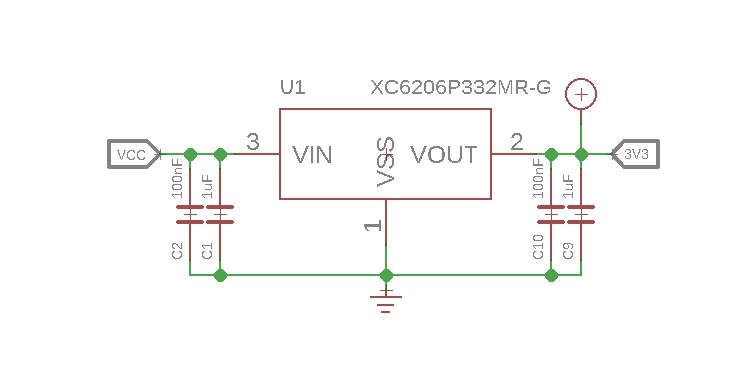
The typical voltage of AMG8833 is 3.3V, so we use the XC6206P33 chip to provide a stable 3.3V. The input of XC6206P33 ranges from 1.8V to 6.0V, so you can use this module with your Arduino both in 3.3V and 5V.
Bi-directional level shifter circuit
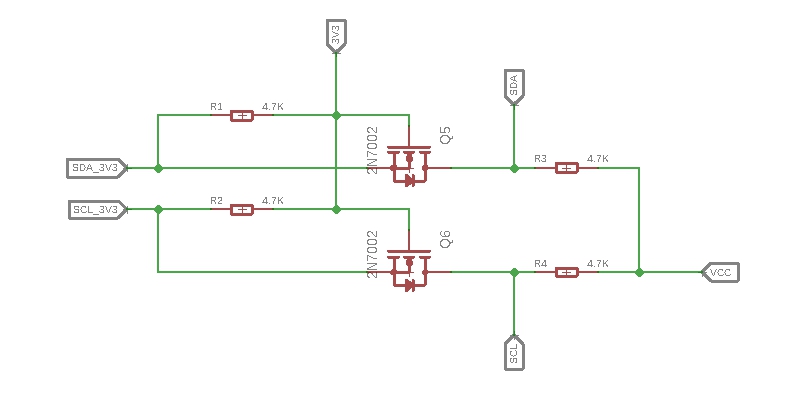
This is a typical Bi-directional level shifter circuit to connect two different voltage section of an I2C bus. The I2C bus of this sensor use 3.3V, if the I2C bus of the Arduino use 5V, this circuit will be needed. In the schematic above, Q6 and Q5 are N-Channel MOSFET 2N7002A, which act as a bidirectional switch. In order to better understand this part, you can refer to the AN10441
Platforms Supported
| Arduino | Raspberry Pi | |||
|---|---|---|---|---|
The platforms mentioned above as supported is/are an indication of the module's software or theoritical compatibility. We only provide software library or code examples for Arduino platform in most cases. It is not possible to provide software library / demo code for all possible MCU platforms. Hence, users have to write their own software library.
Getting Started
Play With Arduino
Hardware
Materials required
| Seeeduino V4.2 | Base Shield | Infrared Temperature Sensor Array | 2.8 TFT Touch Shield V2.0 |
|---|---|---|---|
 |  |  |  |
| Get One Now | Get One Now | Get One Now | Get One Now |
1 Please plug the USB cable gently, otherwise you may damage the port. Please use the USB cable with 4 wires inside, the 2 wires cable can't transfer data. If you are not sure about the wire you have, you can click here to buy
2 Each Grove module comes with a Grove cable when you buy. In case you lose the Grove cable, you can click here to buy.
-
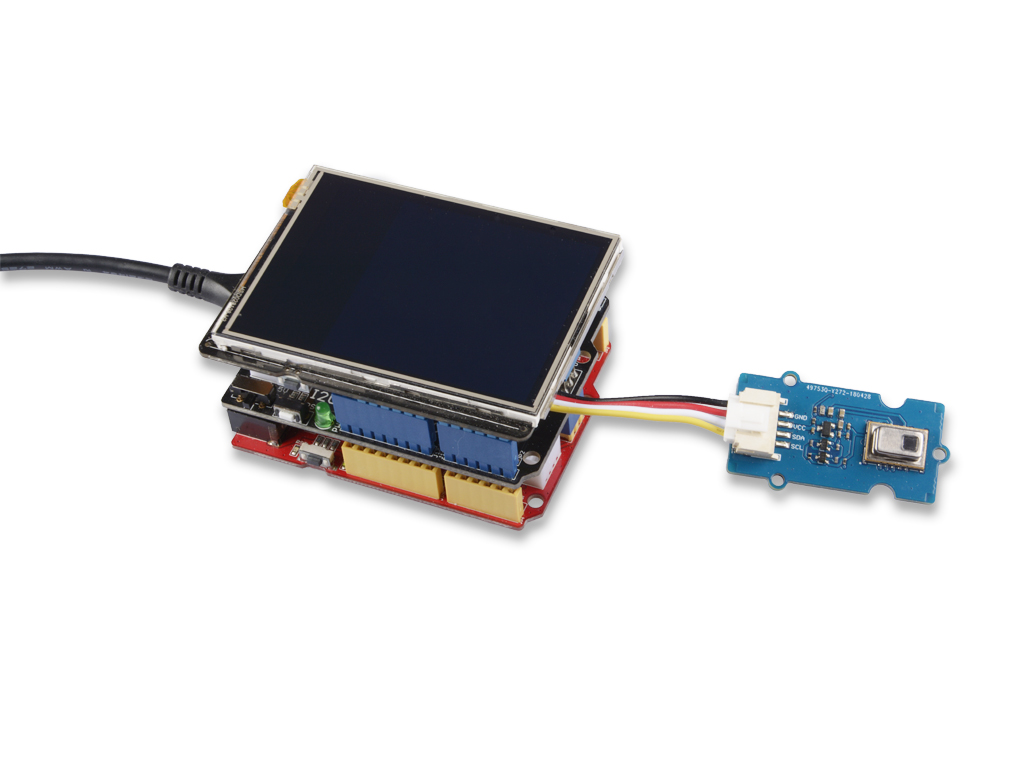
Step 1. Connect the Grove - Infrared Temperature Sensor Array (AMG8833) to port I2C of Grove-Base Shield.
-
Step 2. Plug Grove - Base Shield into Seeeduino.
-
Step 3. Plug 2.8 TFT Touch Shield V2.0 into the Grove - Base Shield.
-
Step 4. Connect Seeeduino to PC via a USB cable.
If we don't have Grove Base Shield, We also can directly connect this module to Seeeduino as below.
| Seeeduino | Grove Cable | Grove - Infrared Temperature Sensor Array (AMG8833) |
|---|---|---|
| GND | Black | GND |
| 5V or 3.3V | Red | VCC |
| SDA | White | SDA |
| SCL | Yellow | SCL |
Software
If this is the first time you work with Arduino, we strongly recommend you to see Getting Started with Arduino before the start.
-
Step 1. Download the Seeed_AMG8833 Library from Github.
-
Step 2. Refer to How to install library to install library for Arduino.
-
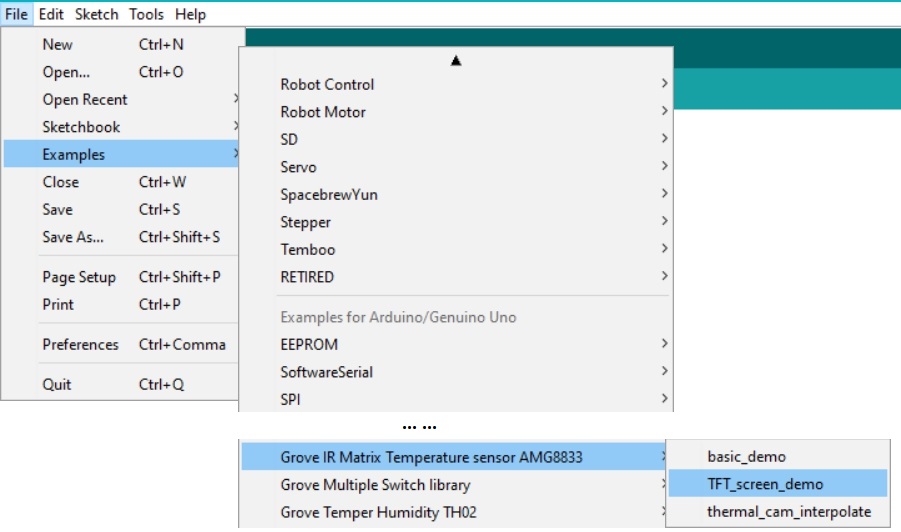
Step 3. Restart the Arduino IDE. Open the example, you can open it in the following three ways:
- Open it directly in the Arduino IDE via the path: File --> Examples --> Grove IR Matrix Temperature sensor AMG8833 --> TFT_screen_demo.
- Open it in your computer by click the TFT_screen_demo.ino which you can find in the folder XXXXArduino\libraries\Seeed_AMG8833-master\examples\TFT_screen_demo, XXXX is the location you installed the Arduino IDE.

- Or, you can just click the icon
 in upper right corner of the code block to copy the following code into a new sketch in the Arduino IDE.
#include <stdint.h>
#include <TFTv2.h>
#include <SPI.h>

#include "Seeed_AMG8833_driver.h"


AMG8833 sensor;

#define TFT_PIXELS_NUM   30

void parse_int_status(u8* status)
{
    u8 val=0;
    for(u32 i=0;i<8;i++)
    {
        if(status[i])
        {
            for(u32 j=0;j<8;j++)
            {
                if(status[i]&((1<<j)))
                {
                    Serial.print("pixel ");
                    Serial.print(8*i+j+1);
                    Serial.println("interrupt is generated!!!");
                }
            }
        }
    }
}

void print_status(u8* status)
{
    for(u32 i=0;i<8;i++)
    {
        Serial.print(status[i],HEX);
        Serial.print("  ");

    }
    Serial.println("  ");
}


void setup()
{
    Serial.begin(115200);
    sensor.init();
    TFT_BL_ON;
    /*2.8 TFT screen. url:https://www.seeedstudio.com/2.8-TFT-Touch-Shield-V2.0-p-1286.html*/
    Tft.TFTinit();
}


void loop()
{
    u8 val=0;
    float pixels_temp[PIXEL_NUM]={0};
    u16 color[PIXEL_NUM]={0};
    /*Read temperature*/
    sensor.read_pixel_temperature(pixels_temp);
    /*Different temperature correspond to different color.*/
    for(u32 i=0;i<PIXEL_NUM;i++)
    {
        if(pixels_temp[i]<29)
        {
            color[i]=BLUE;
        }
        else if((pixels_temp[i]>=29)&&(pixels_temp[i]<30))
        {
            color[i]=GREEN;
        }
        else if((pixels_temp[i]>=30)&&(pixels_temp[i]<31))
        {
            color[i]=YELLOW;
        }
        else if((pixels_temp[i]>=31)&&(pixels_temp[i]<33))
        {
            color[i]=0xfd00;
        }
        else
        {
            color[i]=RED;
        }
    }
    /*Use a TFT screen to display.*/
    for(u32 i=0;i<PIXEL_NUM;i++)
    {
        Tft.fillScreen(TFT_PIXELS_NUM*(i%8),TFT_PIXELS_NUM*(i%8+1),TFT_PIXELS_NUM*(8-i/8),TFT_PIXELS_NUM*(7-i/8),color[i]);
    }
}
The library file may be updated. This code may not be applicable to the updated library file, so we recommend that you use the first two methods.
- Step 4. Upload the demo. If you do not know how to upload the code, please check How to upload code.
If every thing goes well, you will see the TFT screen shows the temperature map.
Play with Raspberry
If this is the first time you play with a raspberry pi, please refer to the Get start with a raspberry Pi.
Hardware
Materials required
| Raspberry Pi | Grove Base Hat for Raspberry Pi | Infrared Temperature Sensor Array | 5 inch 800x480 Capacitive TouchScreen |
|---|---|---|---|
 |  | |  |
| Get One Now | Get One Now | Get One Now | Get One Now |
If you do not have a Pi-Screen you can use the PC monitor, or you can use the VNC Viewer to display the result remotely.
-
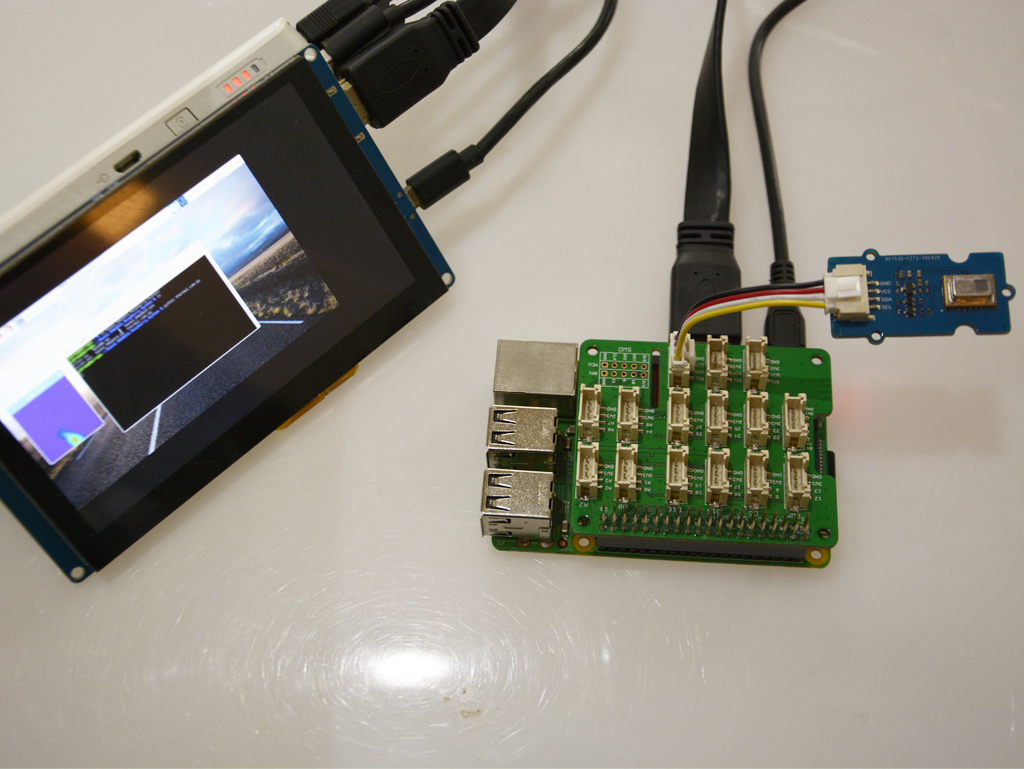
Step 1. Connect the Grove - Infrared Temperature Sensor Array (AMG8833) to port I2C of Grove Base Hat for Raspberry Pi.
-
Step 2. Plug Grove Base Hat for Raspberry Pi into Raspberry Pi.
-
Step 3. Connect the 5 inch 800x480 Capacitive TouchScreen with the Raspberry Pi via the HDMI cable.
-
Step 4. Connect Raspberry Pi to PC via a micro-USB cable, power the 5 inch 800x480 Capacitive TouchScreen via another micro-USB cable.
Software
- Step 1. Open the I2C interface for your raspberry pi. You can open a terminal and tap the following command.
sudo raspi-config
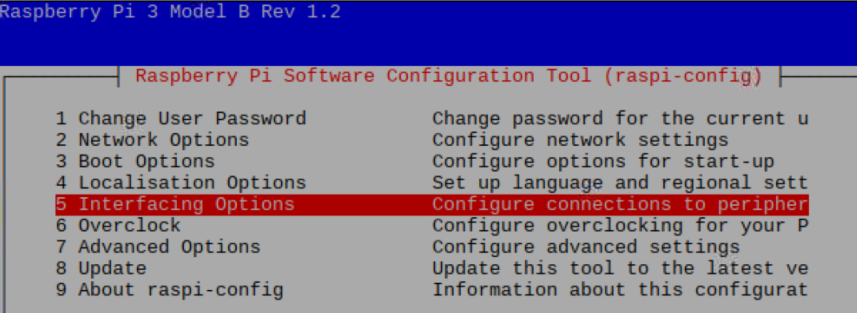
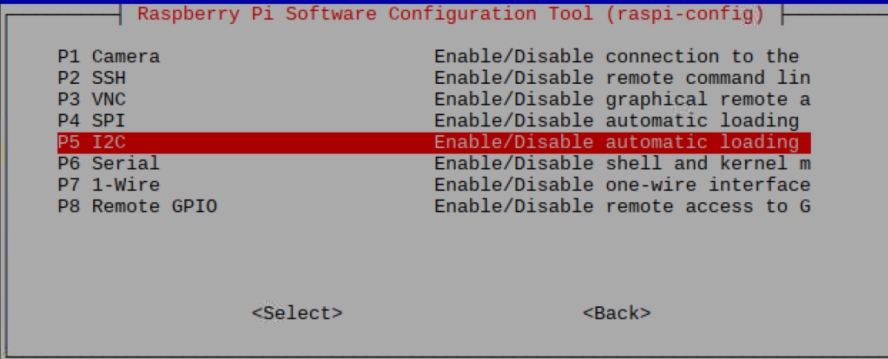
- Step 2. When you see the picture above, choose Interfacing Options, then choose I2C to enable the I2C interface.
- Step 3. When you finish, you can use the following command to check.
sudo i2cdetect -y 1
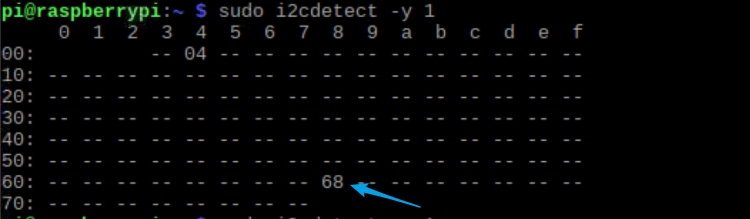
You can see the I2C address, which means the raspberry has detected the sensor. If not, please do step1~3 again. Ok, let's move on.
- Step 4. Tap the following commands in the terminal to install related dependencies.
sudo apt-get update
sudo apt-get install -y build-essential python-pip python-dev python-smbus git
sudo apt-get install -y python-scipy python-pygame
sudo pip install colour
- Step 5. Download the Seeed AMG8833 Python Library.
git clone https://github.com/Seeed-Studio/Seeed_AMG8833_Raspberry_Python.git
- Step 6. Go into the AMG8833 folder, and run the demo.
pi@raspberrypi:~ $ cd Seeed_AMG8833_Raspberry_Python/
pi@raspberrypi:~/Seeed_AMG8833_Raspberry_Python $ ls
driver.py   README.md         Seeed_AMG8833.pyc
driver.pyc  Seeed_AMG8833.py  thermal_cam.py
pi@raspberrypi:~/Seeed_AMG8833_Raspberry_Python $ python thermal_cam.py
If everthing goes well, you will see.

Schematic Online Viewer
Resources
-
[Zip] Grove - Infrared Temperature Sensor Array (AMG8833) Eagle Files
-
[PDF] AMG8833 DATASHEET
-
[PDF] XC6206 DATASHEET
Project
This is the introduction Video of this product, simple demos, you can have a try.
Tech Support & Product Discussion
Upgradable to Industrial Sensors
With the SenseCAP S2110 controller and S2100 data logger, you can easily turn the Grove into a LoRaWAN® sensor. Seeed not only helps you with prototyping but also offers you the possibility to expand your project with the SenseCAP series of robust industrial sensors.
The IP66 housing, Bluetooth configuration, compatibility with the global LoRaWAN® network, built-in 19 Ah battery, and powerful support from APP make the SenseCAP S210x the best choice for industrial applications. The series includes sensors for soil moisture, air temperature and humidity, light intensity, CO2, EC, and an 8-in-1 weather station. Try the latest SenseCAP S210x for your next successful industrial project.
