Grove Shield for XIAO with battery management chip

Overview
Seeed Studio Grove Base for XIAO is a plug-and-play Grove extension board for Seeed Studio XIAO. With the on-board battery management chip and battery bonding pad, you could easily power your Seeed Studio XIAO with lithium battery and recharge it. 8 Grove connectors onboard includes two Grove I2C and one UART. It acts as a bridge for Seeed Studio XIAO and Seeed's Grove system. Flash SPI bonding pad allows you add Flash to Seeed Studio XIAO to expand its memory space, providing Seeed Studio XIAO with more possibilities.
With the on-board battery management chip and battery bonding pad, you could easily power your Seeed Studio XIAO with lithium 3.7V battery and recharge it, making your projects, especially wearables ones, more flexible and in portable. You could even break the board through the onboard PCB stamp holds according to your actual needs of the project (only 25*39mm in dimension after break-off), making it smaller than smaller and the weight would be reduced from 13g to 10g as well!
As an extension board, the Seeed Studio Grove Base for XIAO also pulls all 14 pinout from Seeed Studio XIAO, and its on-board power switch and charging status indicator light makes it more user-friendly. The Shield even reserves the SPI-Flash bonding pad for an advanced developer who may need to add Flash to Seeed Studio XIAO to expand its memory space, providing Seeed Studio XIAO with more possibilities.
As Seeed Studio XIAO form factor, all Seeed Studio XIAO boards support both Grove Shield for XIAO and Seeed Studio XIAO Expansion board. There is a slight difference between the pins and refer to the Pinout it is easy to manage.
This product does not include a Seeed Studio XIAO board, please click here if you need one.
Hardware Overview
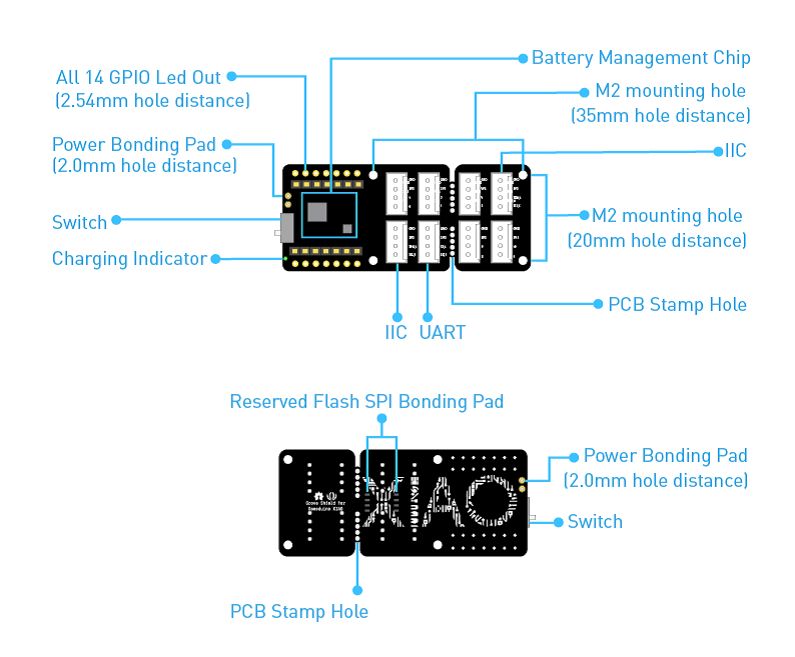
Pinout description

Feature
- On-board Lithium Battery Charging and Management Function
- Grove connectors ( Grove IIC x 2, Grove UART x 1 ), all 14 GPIO led out
- Compact and Breakable Design
- Flash SPI Bonding Pad Reserved
- On-board Power Switch and Charging Status Indicator Light
Specification
| Item | Value |
|---|---|
| Operating voltage | 3.3V / 3.7V Lithium Battery |
| Load Capacity | 800mA |
| Charging current | 400mA (Max) |
| Operating Temperature | - 40°C to 85°C |
| Storage Temperature | -55°C to 150°C |
| Grove Interface | I2C 2 / UART 1 |
Applications
- Wearable devices
- Rapid prototyping
- Grove modules testing
- Projects require small size
Platform Supported
| Arduino | Raspberry Pi |
|---|---|
|
|
Getting Started
Materials Required
| Seeed Studio Seeed Studio XIAO | Grove-Doppler-Radar | Seeed Studio Grove Base for XIAO |
|---|---|---|
|
|
|
| Get ONE Now | Get ONE Now | Get ONE Now |


External headers-pin description for Grove-Doppler Radar

| Pin number | Signal name | Pin description |
|---|---|---|
| 1 | DIV_OUT | Frequency divider output from the BGT24LTR11 |
| 2 | GND | Ground |
| 3 | VCC_5V_EXT | External+5.0V input power supply pin(maximum=5.5V) |
| 4 | VTUNE | VCO frequency tuning voltage |
| 5 | IFQ_HG | BGT24LTR11 Q-channel-analog signal output-second gain stage |
| 6 | IFI_HG | BGT24LTR11 I-channel-analog signal output-second gain stage |
| 7 | PWM_OUT | External user-configurable GPIO with CCU4 |
| 8 | OUT1 | External GPIO pin (user configurable) |
| 9 | OUT2 | External GPIO pin (user configurable) |
Hardware Connection

Please plug the USB cable, Doppler Radar Interface into Seeed Studio XIAO expansion board Interface gently, otherwise you may damage the port.
-
Step 1. Plug Doppler Radar into Seeed Studio XIAO expansion board with a Grove Cable.
-
Step 2. Connect Seeed Studio XIAO to PC via a USB cable.
-
Step 3. Download the code, please refer to the software part.
-
Step 4. Run the code and the outcome will display on the screen of Serial Monitor in your Arduino IDE .
Software
If this is the first time you work with Arduino, we strongly recommend you to see Getting Started with Arduino before the start.
-
Step 1. Download the Demo code.
-
Step 2. Copy the whole Seeed_Arduino_DopplerRadar file and paste it into your Arduino IDE library file.
-
Step 3. Open the BGT24LTR11_DETECTION_TARGET file with your Arduino IDE.
-
Step 4. Upload the demo. If you do not know how to upload the code, please check How to upload code.
Software Code
#include "GBT24LTR11.h"

#ifdef __AVR__
    #include <SoftwareSerial.h>
    SoftwareSerial SSerial(2, 3); // RX, TX
    #define COMSerial SSerial
    #define ShowSerial Serial

    GBT24LTR11<SoftwareSerial> GBT;
#endif

#ifdef ARDUINO_SAMD_VARIANT_COMPLIANCE
    #define COMSerial Serial1
    #define ShowSerial SerialUSB

    GBT24LTR11<Uart> GBT;
#endif

#ifdef ARDUINO_ARCH_STM32F4
    #define COMSerial Serial
    #define ShowSerial SerialUSB

    GBT24LTR11<HardwareSerial> GBT;
#endif

void setup() {
    // put your setup code here, to run once:
    ShowSerial.begin(9600);
    COMSerial.begin(115200);
    GBT.init(COMSerial);
    while (!ShowSerial)
        ;
    while (!COMSerial)
        ;
    /*
        MODE 0 -->detection target mode
        MODE 1 -->I/Q ADC mode
    */
    while (!GBT.setMode(0))
        ;
}

void loop() {
    // put your main code here, to run repeatedly:
    uint16_t state = 0;
    ShowSerial.print("target speed:");
    ShowSerial.println(GBT.getSpeed());
    state = GBT.getTargetState();
    //2 --> target approach
    //1 --> target leave
    //0 --> Not Found target
    if (state == 2) {
        ShowSerial.println("target approach");
    } else if (state == 1) {
        ShowSerial.println("target leave");
    }
    delay(200);
}
If everything goes well, you can go to Serial Monitor to see an outcome as following:

And if there's an object approaching the radar or passing by, the outcome will alter as below:

The minimum speed accuracy that the sensor is capable of detecting is 52cm/s, which equals to 0.52m/s, 3.6km/h and 2.23mph. Additionally, the results returned by function getSpeed() are multiples of 52cm/s and are absolute values accordingly.
Schematic Online Viewer
Resources
- [ZIP] Attachment of Seeed Studio Grove Base for XIAO
- [ZIP] Demo Code library
- [PDF] Grove DopplerRadar (BGT24LTR11) Radar module communication protocol v1.1.pdf
- [PDF] ETA 3410 Datasheet
Project
Tech Support & Product Discussion
Thank you for choosing our products! We are here to provide you with different support to ensure that your experience with our products is as smooth as possible. We offer several communication channels to cater to different preferences and needs.