Grove - Temperature Humidity Pressure Gas Sensor(BME680)
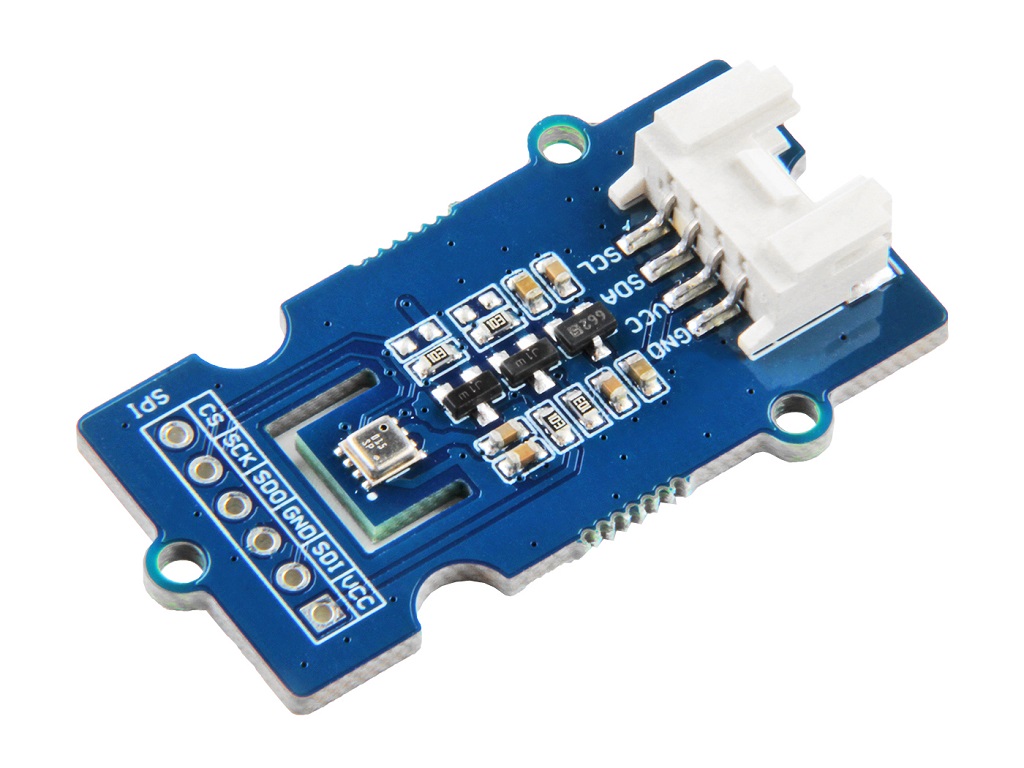
The Grove-Temperature&Humidity&Pressure&Gas Sensor(BME680) is a multiple function sensor which can measure temperature, pressure, humidity and gas at the same time. It is based on the BME680 module and you can use this sensor in your GPS, IoT devices or other device which needs those four parameters.
The 'gas' means air quality which is mainly affected by the VOCs (volatile organic compounds) gas. At this time Augest 8,2018, this module do not support gas mearsue for some Arduino board. It is only available for the Arduino board with the large memory arduino platform like ATMEGA2560. If you use other arduino platform, like: arduino uno, seeedunio v4.2... the gas value you get is not accurate.
Upgradable to Industrial Sensors
With the SenseCAP S2110 controller and S2100 data logger, you can easily turn the Grove into a LoRaWAN® sensor. Seeed not only helps you with prototyping but also offers you the possibility to expand your project with the SenseCAP series of robust industrial sensors.
SenseCAP S210x series industrial sensors provide an out-of-box experience for environmental sensing. Please refer to the S2101 Wireless Temperature and Humidity Sensor with higher performance and robustness for air quality monitoring. The series includes sensors for soil moisture, air temperature and humidity, light intensity, CO2, EC, and an 8-in-1 weather station. Try the latest SenseCAP S210x for your next successful industrial project.
| SenseCAP Industrial Sensor |
 |
| S2101 Air Temp & Humidity |
Features
-
4-in-1 for multiple measurement
-
low consumption
-
Wide measurement range
-
Optional output:
Individual humidity, pressure and gas sensors can be independently enabled/diabled
Specification
| Item | Value |
|---|---|
| Working voltage | 3.3V/5V |
| Operating range | -40~+85℃; 0-100% r.H.; 300-1100hPa |
| Digital interface | I2C(up to 3.4MHZ)/ SPI(3 and 4 wire, up to 10MHz) |
| I2C address | 0x76(default)/ 0x77(optional) |
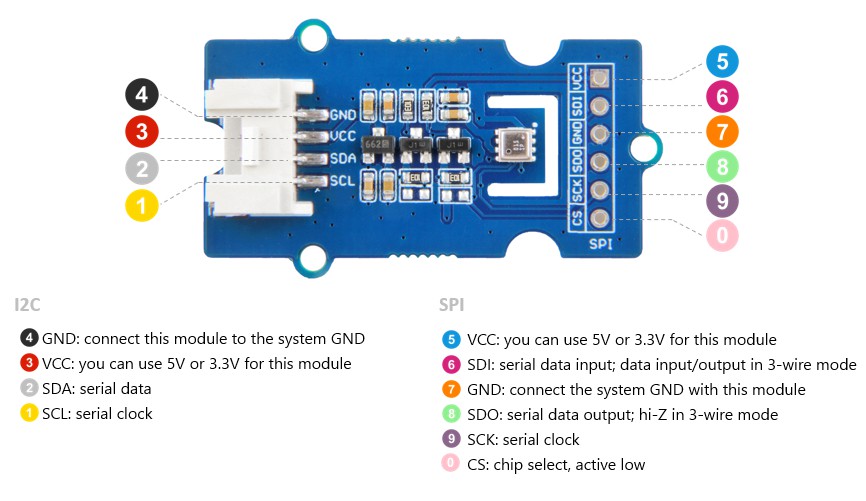
Hardware Overview
Pin Map
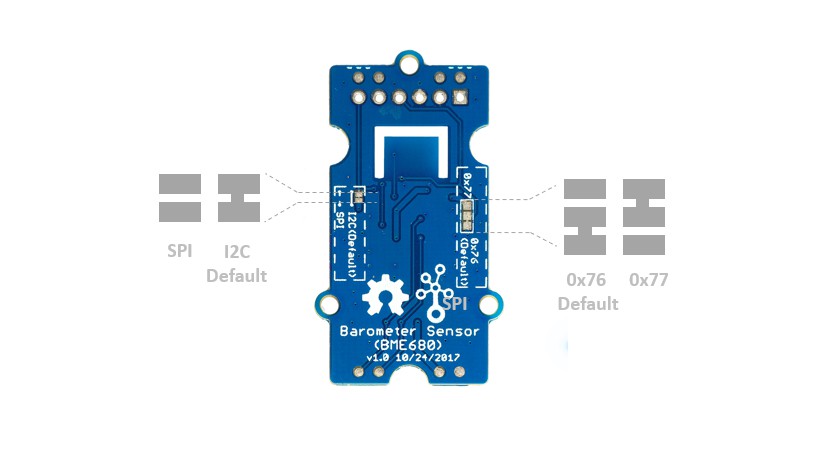
If you want to change the default settings, you may need to cut the pad and solder by yourself, please follow the picture above and please be careful when you use knife or soldering iron.
Platforms Supported
| Arduino | Raspberry Pi | ESP-IDF |
|---|---|---|
|
|
|

The platforms mentioned above as supported is/are an indication of the module's software or theoritical compatibility. We only provide software library or code examples for Arduino platform in most cases. It is not possible to provide software library / demo code for all possible MCU platforms. Hence, users have to write their own software library.
Getting Started
Play With Arduino
Hardware
Materials required
| Seeeduino V4.2 | Base Shield | Grove-BME680 |
|---|---|---|
 |  |  |
| Get One Now | Get One Now | Get One Now |
1 Please plug the USB cable gently, otherwise you may damage the port. Please use the USB cable with 4 wires inside, the 2 wires cable can't transfer data. If you are not sure about the wire you have, you can click here to buy
2 Each Grove module comes with a Grove cable when you buy. In case you lose the Grove cable, you can click here to buy.
-
Step 1. Connect the Grove-Temperature&Humidity&Pressure&Gas Sensor(BME680) to port I2C of Grove-Base Shield.
-
Step 2. Plug Grove - Base Shield into Seeeduino.
-
Step 3. Connect Seeeduino to PC via a USB cable.
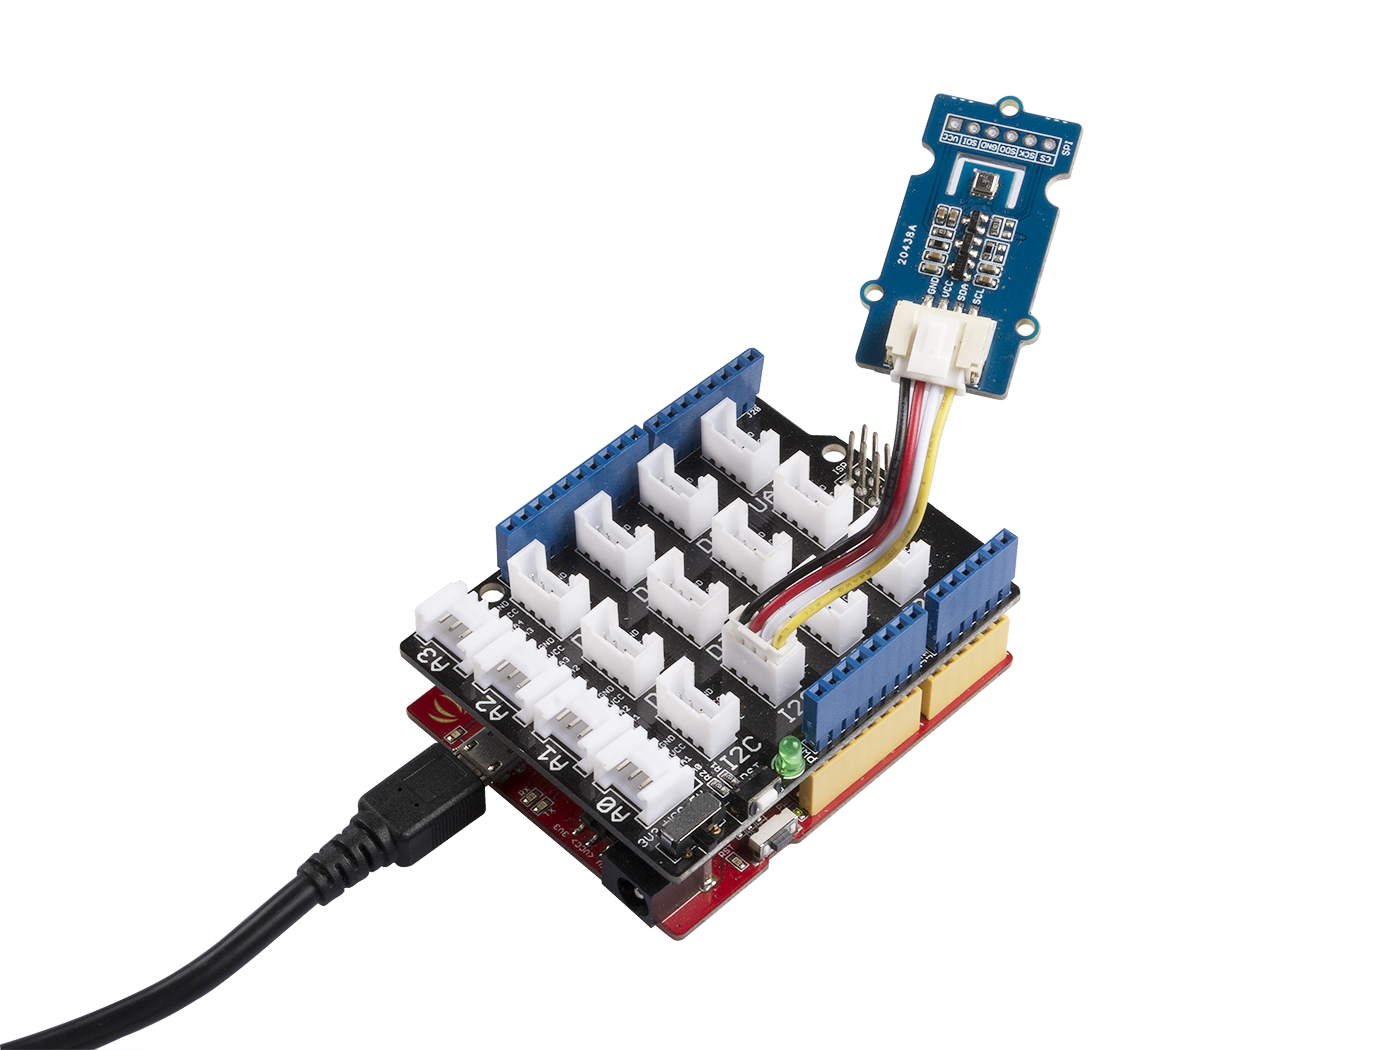
If we don't have Grove Base Shield, We also can directly connect this module to Seeeduino as below.
| Seeeduino | Grove-BME680 |
|---|---|
| 5V | Red |
| GND | Black |
| SDA | White |
| SCL | Yellow |
Software
If this is the first time you work with Arduino, we strongly recommend you to see Getting Started with Arduino before the start.
-
Step 1. Download the Grove BME680 Library from Github.
-
Step 2. Refer to How to install library to install library for Arduino.
-
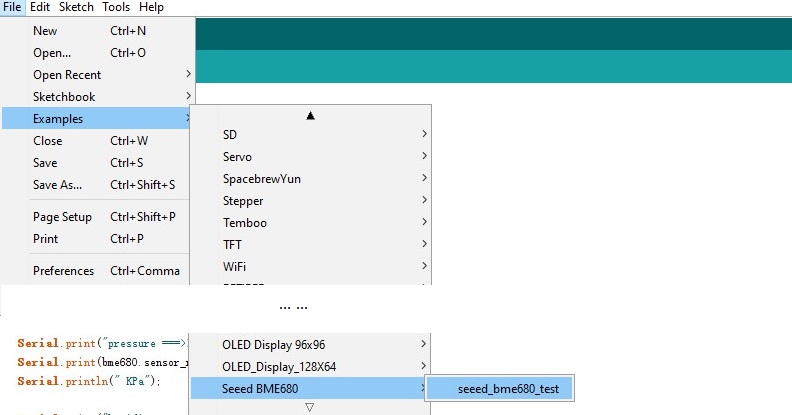
Step 3. Restart the Arduino IDE. Open “BME680” example via the path: File --> Examples --> Seeed BME680 --> seeed_bme680_test.
-
Step 4. Upload the demo. If you do not know how to upload the code, please check How to upload code.
-
Step 5. Open the Serial Monitor of Arduino IDE by click Tool-> Serial Monitor. Or tap the ++ctrl+shift+m++ key at the same time. if every thing goes well, you will get the result.
The result should be like:
Serial start!!!
temperature ===>> 27.14 C
pressure ===>> 94.51 KPa
humidity ===>> 65.76 %
gas ===>> 101.51 Kohms


temperature ===>> 27.15 C
pressure ===>> 94.51 KPa
humidity ===>> 65.76 %
gas ===>> 101.64 Kohms


temperature ===>> 27.14 C
pressure ===>> 94.51 KPa
humidity ===>> 65.77 %
gas ===>> 101.64 Kohms


temperature ===>> 27.15 C
pressure ===>> 94.51 KPa
humidity ===>> 65.80 %
gas ===>> 101.76 Kohms
1 - To get the stable and accurate value, you need to let the arduino run the code for about 2 hours. The result is much more reliable then.
2 - For the gas part, it's a variable resistance which reflect the value of the VOC gas, so the unit is Kohms.
3 - If you want to get a reliable result for gas part, please use Arduino Mega and check here
Play With ESP-IDF
Hardware
Materials required
| Seeed Studio XIAO ESP32C3 | Seeed Studio Grove Base for XIAO | Grove BME680 Environmental Sensor |
|---|---|---|
 |  | |
1 Please plug the USB cable gently, otherwise you may damage the port. Please use the USB cable with 4 wires inside, the 2 wires cable can't transfer data. If you are not sure about the wire you have, you can click here to buy
2 Each Grove module comes with a Grove cable when you buy. In case you lose the Grove cable, you can click here to buy.
- Step 1. Connect the Grove-Temperature&Humidity&Pressure&Gas Sensor(BME680) to the Grove Base for XIAO using the Grove cable.

- Step 2. Connect XIAO ESP32C3 to PC via a USB cable.
Software
If this is the first time you work with ESP-IDF, we strongly recommend you to see Getting Started with ESP-IDF before the start.
-
Step 1. Install ESP-IDF following the official guide.
-
Step 2. Create a new project using ESP-IDF template.
-
Step 3. Clone the BME680 component repository:
cd <your_project>/components
git clone --recursive https://github.com/Priyanshu0901/grove_bme680.git
- Step 4. Configure the I2C pins in your project's
sdkconfigfile or using menuconfig:
idf.py menuconfig
Navigate to Component config -> BME680 Sensor Configuration and set:
-
I2C SDA Pin: 6
-
I2C SCL Pin: 7
-
Step 5. Copy the example code from the component's
examplesdirectory to your project'smaindirectory. -
Step 6. Build and flash the project:
idf.py build
idf.py -p /dev/ttyUSB0 flash monitor
The output should be similar to:
I (251) main_task: Started on CPU0
I (251) main_task: Calling app_main()
I (251) BME680_EXAMPLE: BME680 sensor example started
I (261) BME680_EXAMPLE: Initializing BME680 sensor...
I (261) BME680_IF: I2C interface initialized with address: 0x76
I (271) BME680_IF: BME680 interface initialized successfully
I (281) BME680: BME680 configured successfully
I (281) BME680: BME680 initialized successfully
I (281) BME680_EXAMPLE: BME680 initialized, waiting for sensor to stabilize...
I (1291) BME680_EXAMPLE: Performing first sensor reading...
I (1411) BME680_EXAMPLE: First sensor reading successful on attempt 1
I (1411) BME680_EXAMPLE: Sensor Data:
I (1411) BME680_EXAMPLE:   Temperature: 30.46 °C
I (1411) BME680_EXAMPLE:   Pressure: 910.34 hPa
I (1411) BME680_EXAMPLE:   Humidity: 51.17 %
I (1421) BME680_EXAMPLE:   Gas Resistance: 12561.98 kOhm
I (1421) BME680_EXAMPLE:   Gas Valid: Yes
I (1431) BME680_EXAMPLE:   Data Valid: Yes
I (1561) BME680_EXAMPLE: Sensor Data:
I (1561) BME680_EXAMPLE:   Temperature: 30.50 °C
I (1561) BME680_EXAMPLE:   Pressure: 910.33 hPa
I (1561) BME680_EXAMPLE:   Humidity: 51.20 %
I (1561) BME680_EXAMPLE:   Gas Resistance: 136.83 kOhm
I (1571) BME680_EXAMPLE:   Gas Valid: Yes
I (1571) BME680_EXAMPLE:   Data Valid: Yes
I (3691) BME680_EXAMPLE: Sensor Data:
I (3691) BME680_EXAMPLE:   Temperature: 30.50 °C
I (3691) BME680_EXAMPLE:   Pressure: 910.33 hPa
I (3691) BME680_EXAMPLE:   Humidity: 51.04 %
I (3691) BME680_EXAMPLE:   Gas Resistance: 96.77 kOhm
I (3701) BME680_EXAMPLE:   Gas Valid: Yes
I (3701) BME680_EXAMPLE:   Data Valid: Yes
- The example code includes error handling and recovery mechanisms for sensor read failures.
- The sensor requires some time to stabilize after initialization, so the first few readings might not be accurate.
- The gas resistance value is in kOhms and represents the air quality.
- The sensor supports both I2C and SPI interfaces, but the example uses I2C by default.
- Make sure to use the correct I2C pins (GPIO6 for SDA and GPIO7 for SCL) when using with XIAO ESP32C3.
Schematic Online Viewer
Resources
- [Zip] Grove-BME680 Eagle file
- [Library] Seeed BME680 Library
- [PDF] Datasheet of BME680
Project
This is the introduction Video of this product, simple demos, you can have a try.
Tech Support & Product Discussion
Thank you for choosing our products! We are here to provide you with different support to ensure that your experience with our products is as smooth as possible. We offer several communication channels to cater to different preferences and needs.