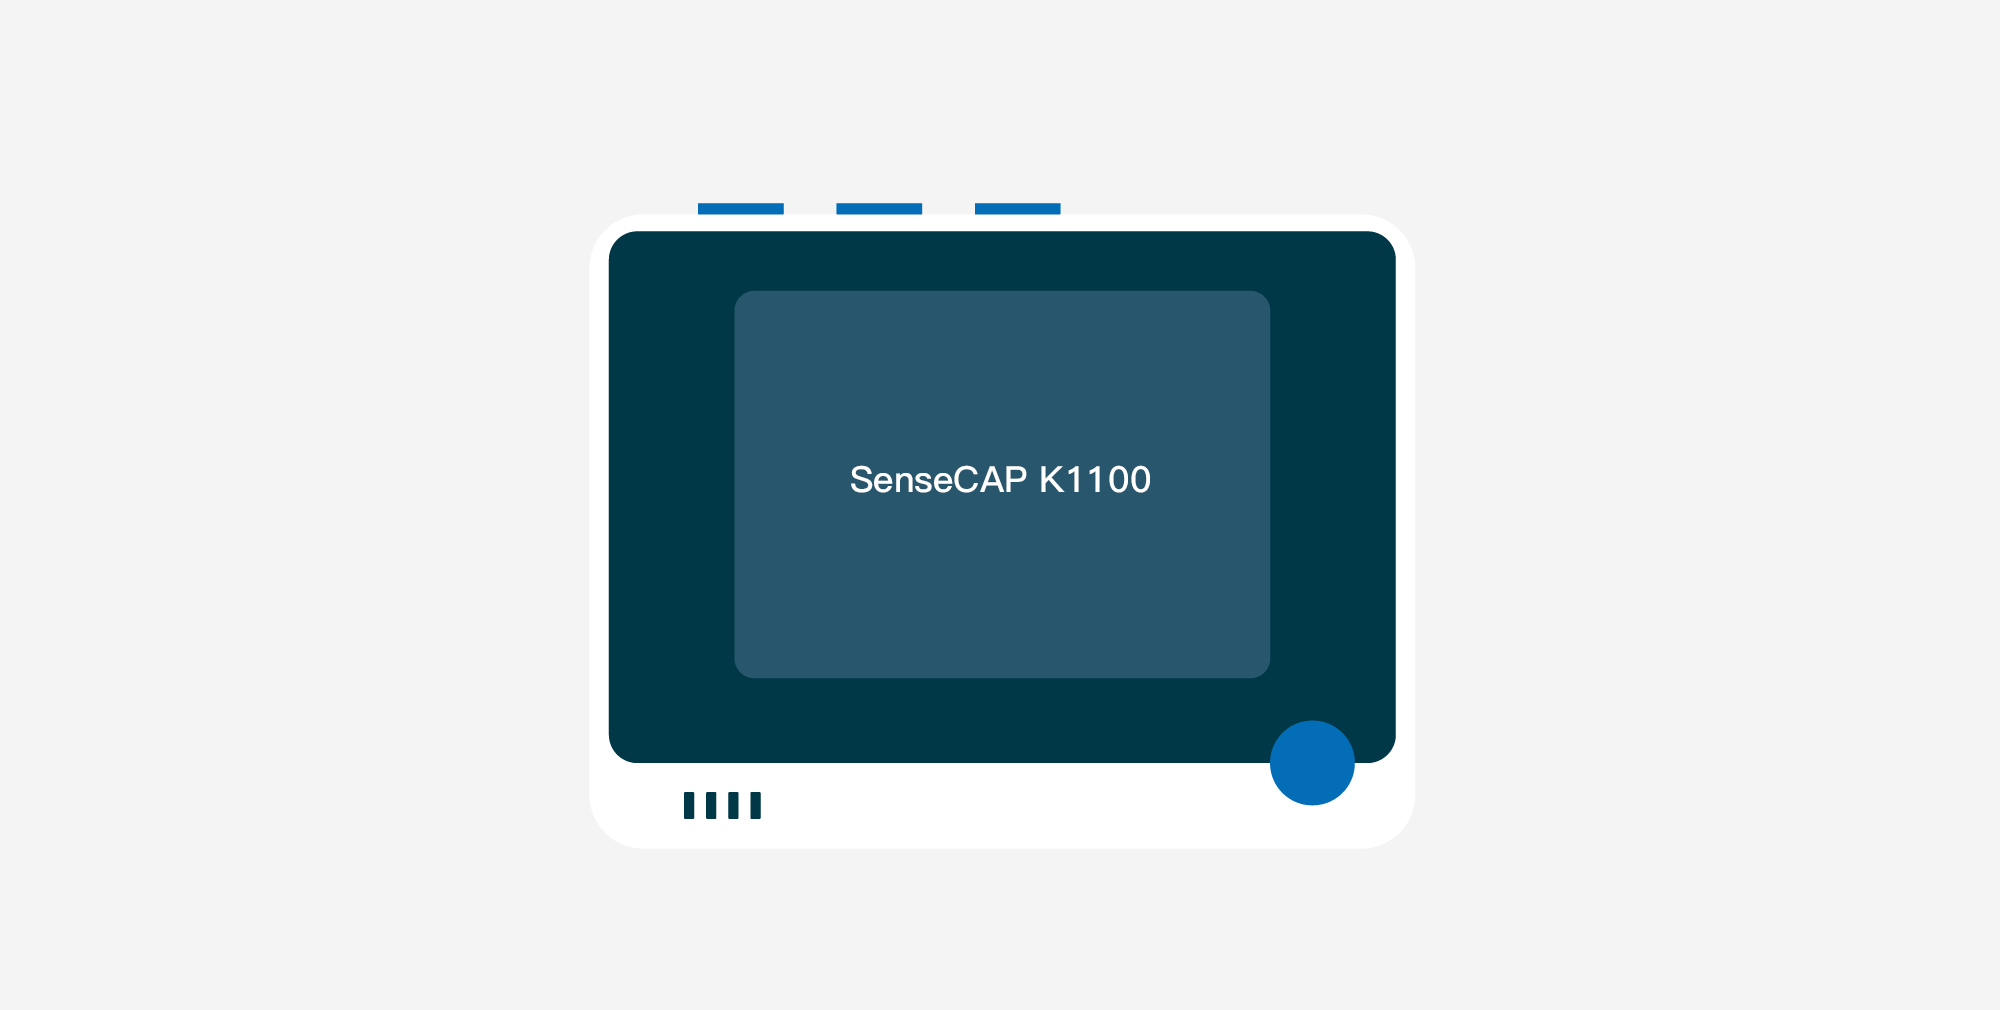
Quick Start with SenseCAP K1100 - The Sensor Prototype Kit
Introduction
SenseCAP K1100 - The Sensor Prototype Kit represents Seeed Studio concentrating the essence of LoRa® communication on technology and edge intelligence products, for the easiest deploying and mastering of LoRa® and IoT applications.
.jpg)
We are proud to bring you SenseCraft, which allows our users to experience a better way to send data to the cloud in the shortest possible time and with very little hands-on cost.
This is only possible with the help of our completely in-house designed SenseCAP platform. SenseCAP provides an easy-to-use cloud platform. Users can scan the QR code with the SenseCAP Mate App to bind the device with its respective account to manage the devices, in the LoRaWAN® network coverage environment and check Sensor Node data on the SenseCAP Portal. SenseCAP Portal provides API for users to further develop based on the data on the Portal.
If you don't have LoRaWAN® coverage around you for the time being, don't worry, you can switch freely between WiFi and LoRa®, and you can also transfer data to Ubidots/Microsoft Azure IoT Central for further data processing via WiFi.
We can't wait to share our current project progress with you, and we welcome all users to experience our project!
Upgradable to Industrial Sensors
With the SenseCAP S2110 controller and S2100 data logger, you can easily turn the Grove into a LoRaWAN® sensor. Seeed not only helps you with prototyping but also offers you the possibility to expand your project with the SenseCAP series of robust industrial sensors.
The IP66 housing, Bluetooth configuration, compatibility with the global LoRaWAN® network, built-in 19 Ah battery, and powerful support from APP make the SenseCAP S210x the best choice for industrial applications. The series includes sensors for soil moisture, air temperature and humidity, light intensity, CO2, EC, and an 8-in-1 weather station. Try the latest SenseCAP S210x for your next successful industrial project.


Overview
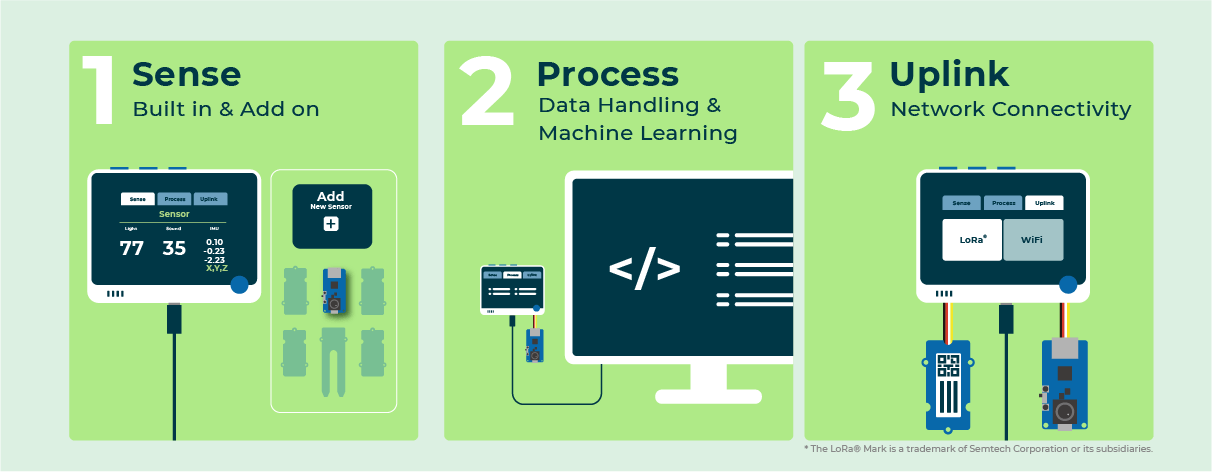
With IoT functionality as one of the features of the SenseCAP K1100 kit, it is necessary to take a look at the logic of its implementation before we start.
To summarise, we offer two paths for our users to experience IoT, one is LoRa® and the other is WiFi.
If you want to use LoRa®, then you will need to prepare a suitable LoRa® gateway in advance and connect the data to the SenseCAP platform by using a Grove Wio E5 module, connected to a LoRaWAN®.
If you want to use WiFi, then you need to have stable WiFi network coverage in your environment. Simply enter your WiFi and password in the profile, along with information such as the key provided by the IoT platform, to achieve an exceptional IoT experience.
Preliminary Preparation
Before you begin, we strongly recommend that you upgrade to the latest version of SenseCraft to ensure the most stable experience.
You can download and update the latest version in our SenseCraft distribution by clicking on the icon below.
Of course, you can also download the latest .uf2 file directly by clicking here.
| SenseCraft-v0.2-20220907.uf2 | Download |
After downloading SenseCraft to your local disk, please follow the instructions below to flash it into Wio Terminal.
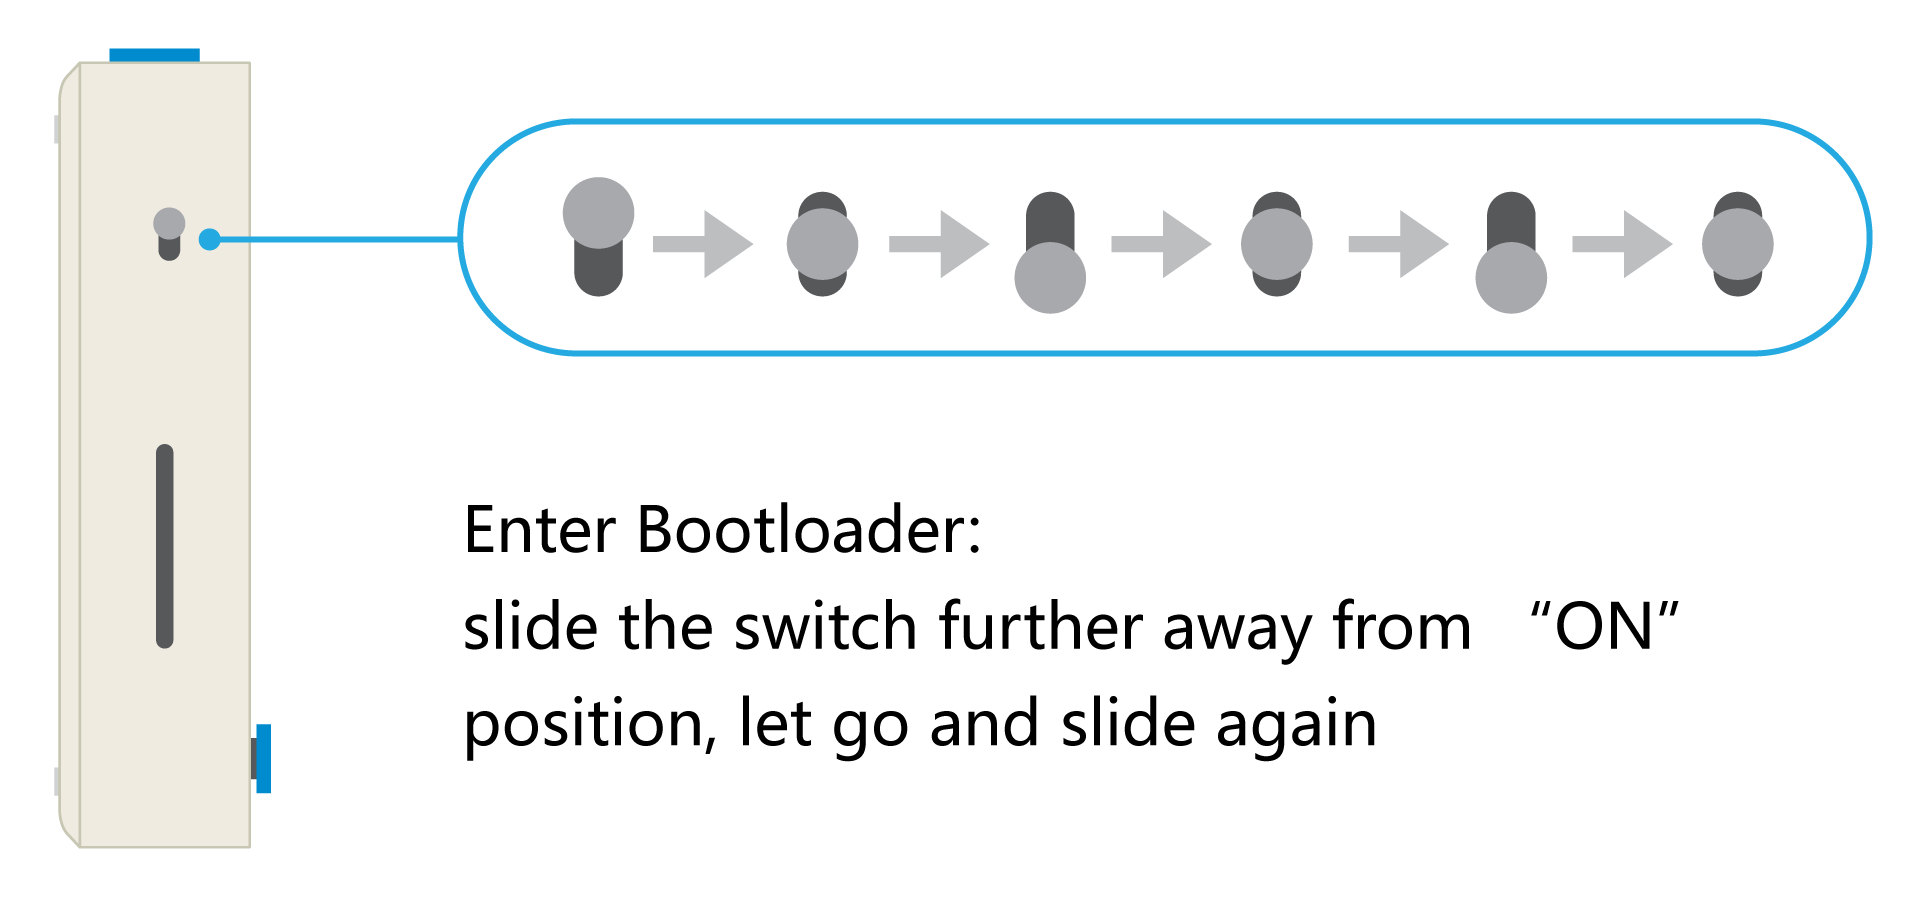
Connect the Wio Terminal to PC and turn in ON, Enter Bootloader Mode by sliding down the power switch further away from "ON" position, release, slide again and release.
Once Wio Terminal is in the Bootloader mode, the blue LED will start to breathe in a way that is different from blinking.
Open File Explorer on your PC and you will see a new external drive, named Arduino, drag the previously downloaded .uf2 file into this Arduino drive.
Once the SenseCraft flash is complete, the external memory named Arduino will automatically pop up and the SenseCraft program will start working.
Navigate the UI using buttons
Before you get into learning the operating interface, you need to get used to the Button logic we have designed for Wio Terminal. In this way, you will be able to select and operate pages very smoothly according to the fixed Button logic.
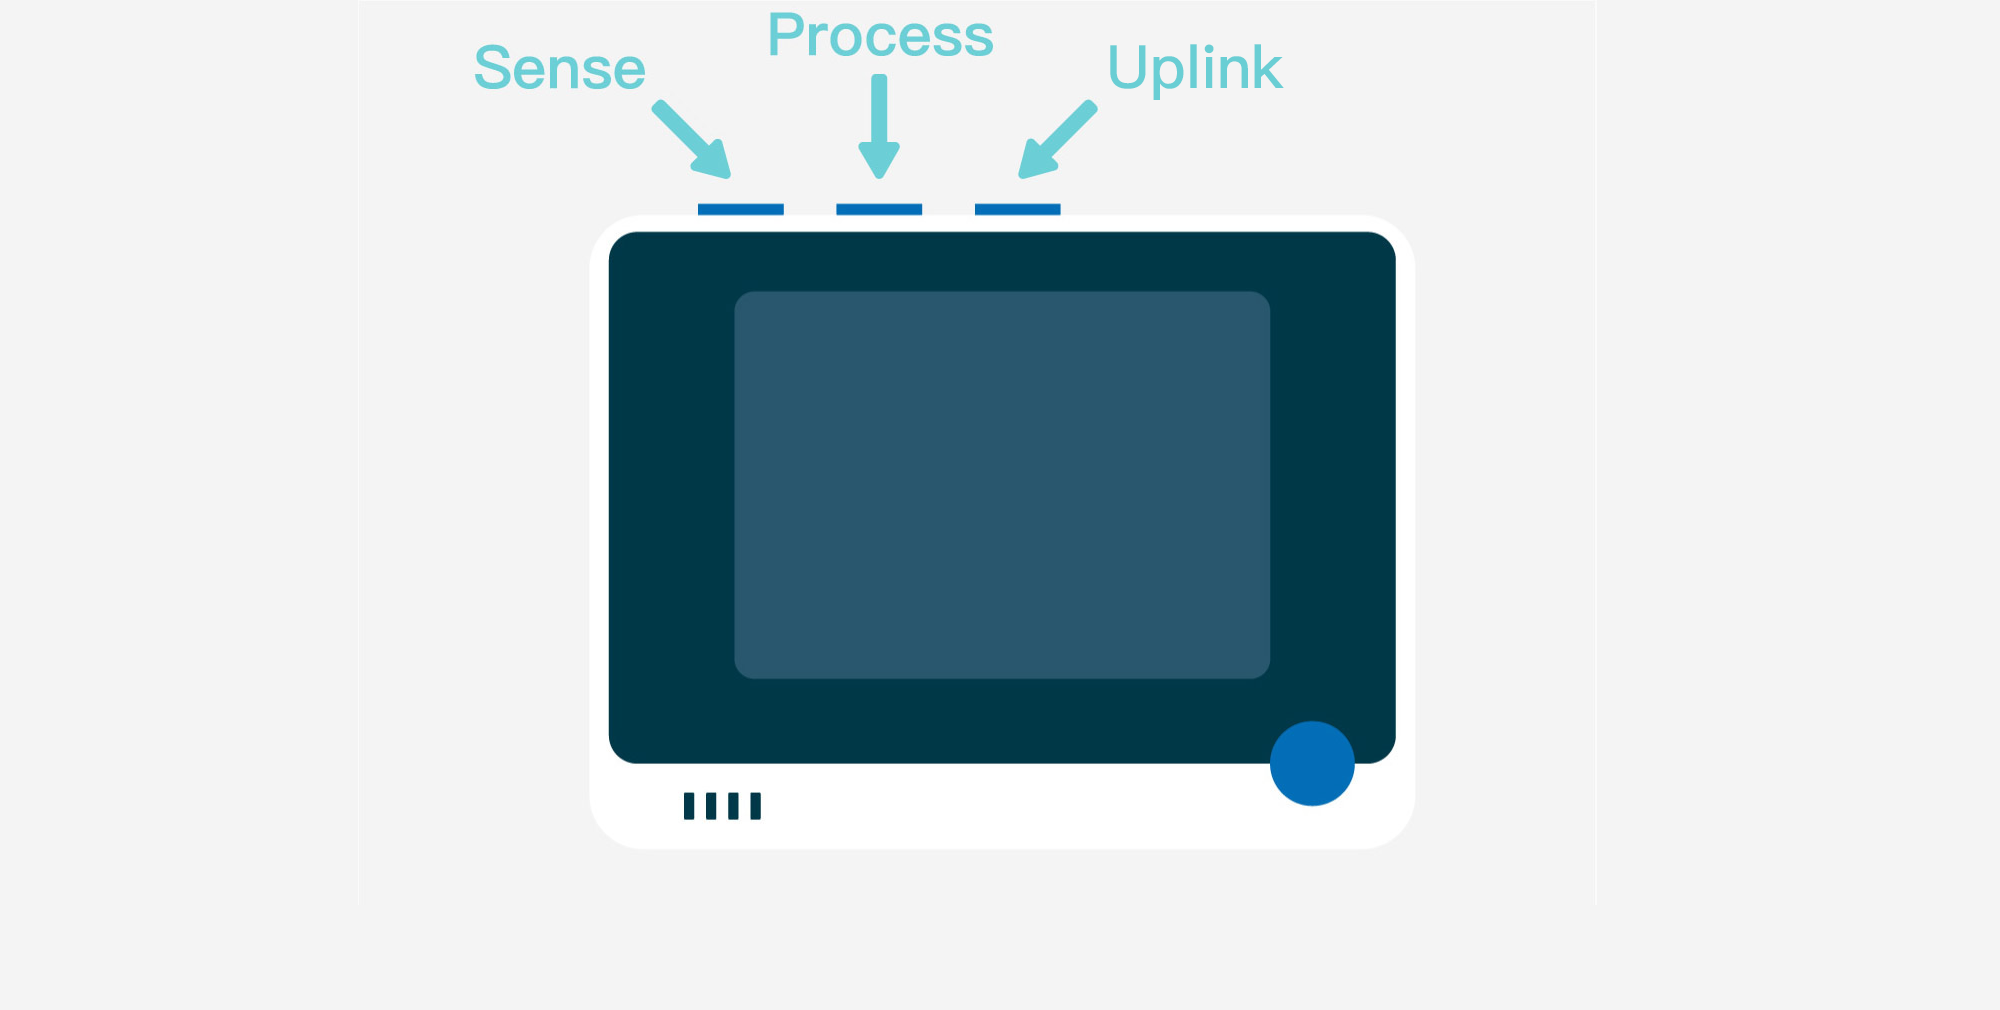
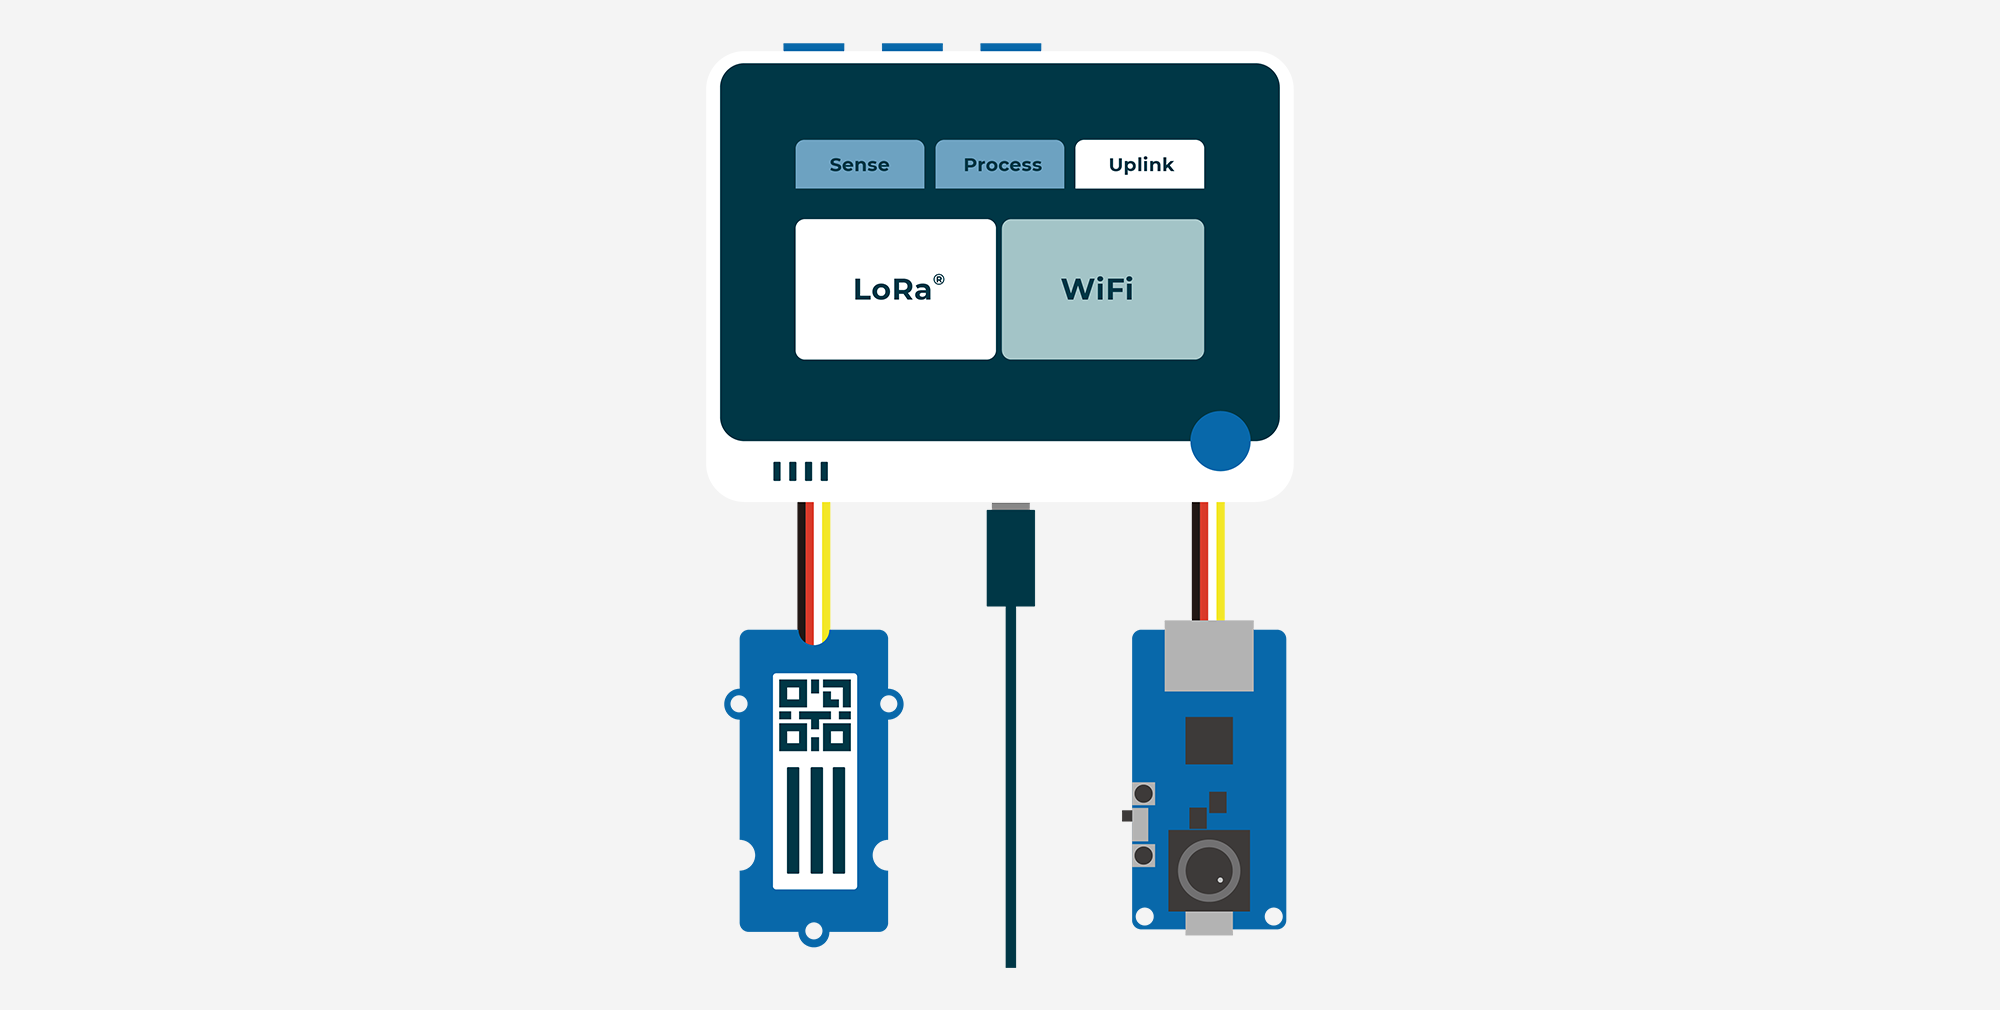
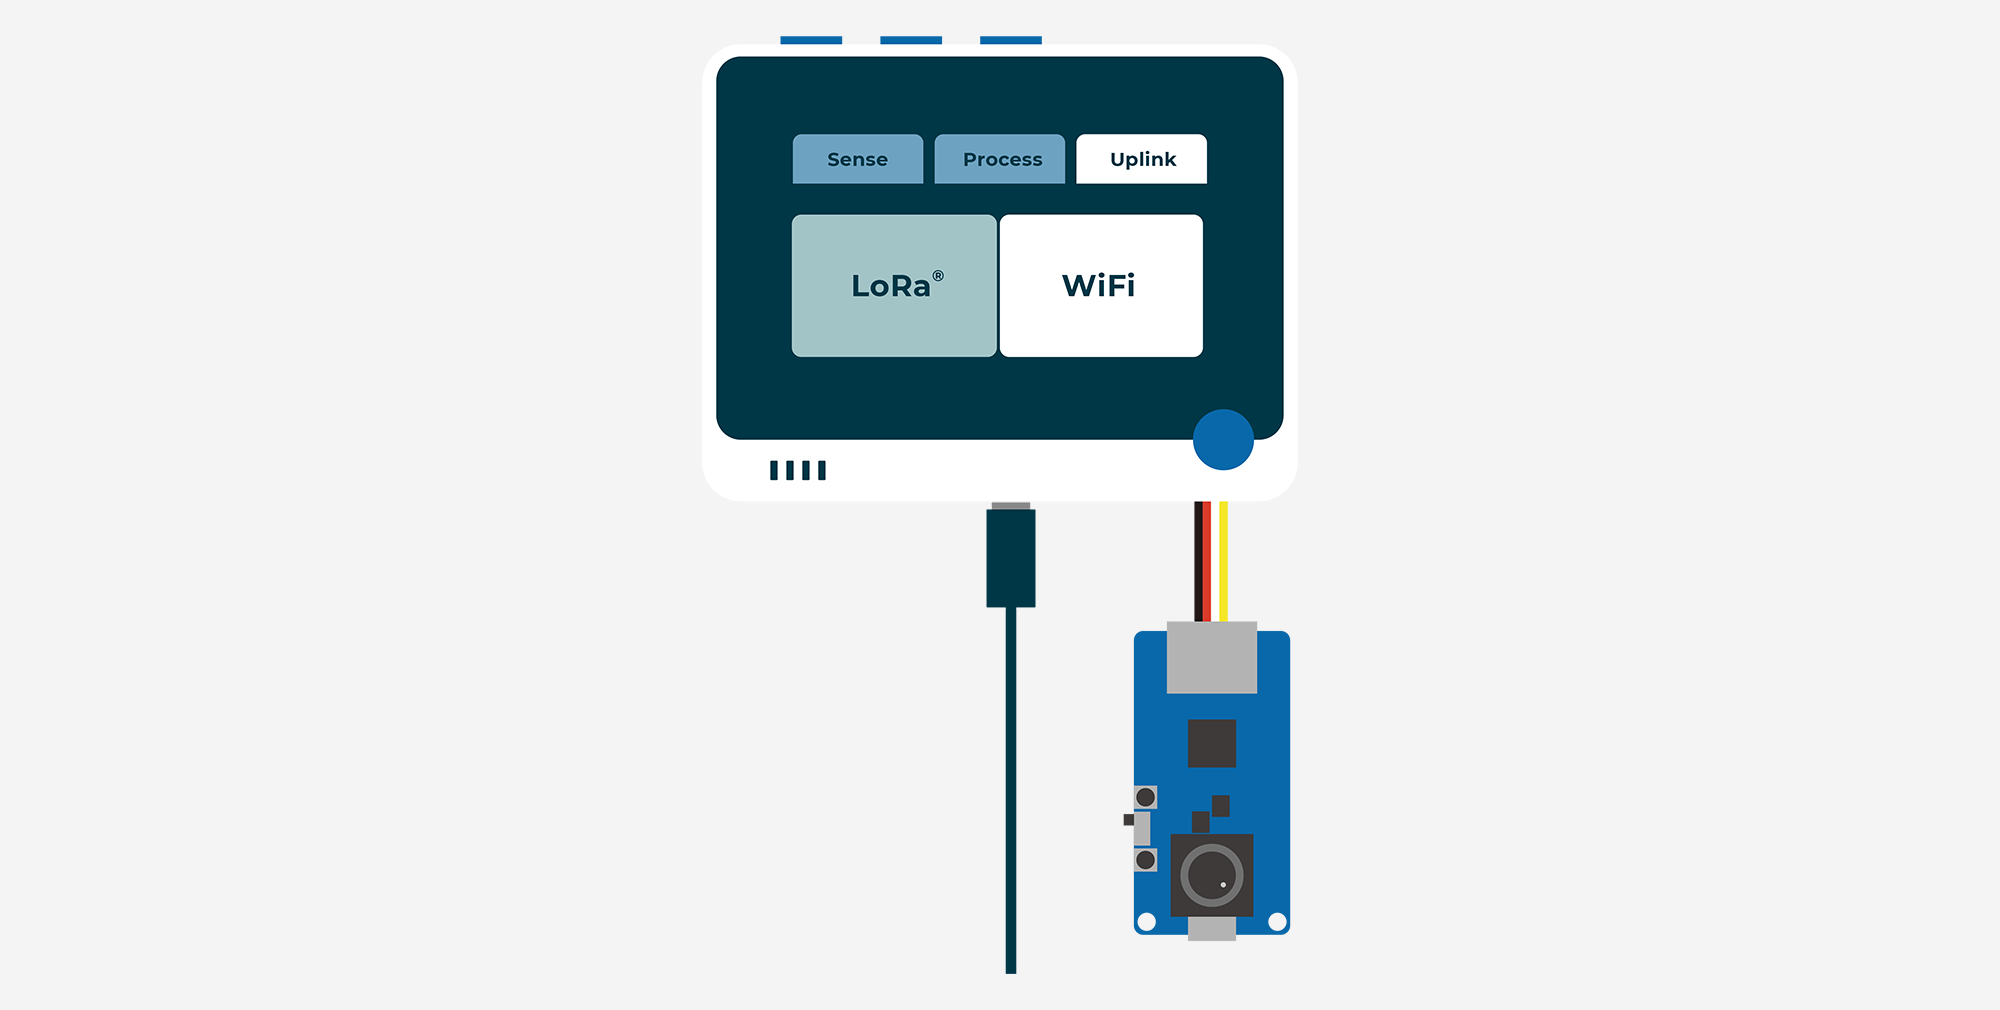
First are the three buttons located above the Wio Terminal. They correspond to the display screens of the three main functions. They are Sense, Process and Uplink respectively.
No matter where you are, when you press the three buttons at the top, you will be able to go back to these three screens.
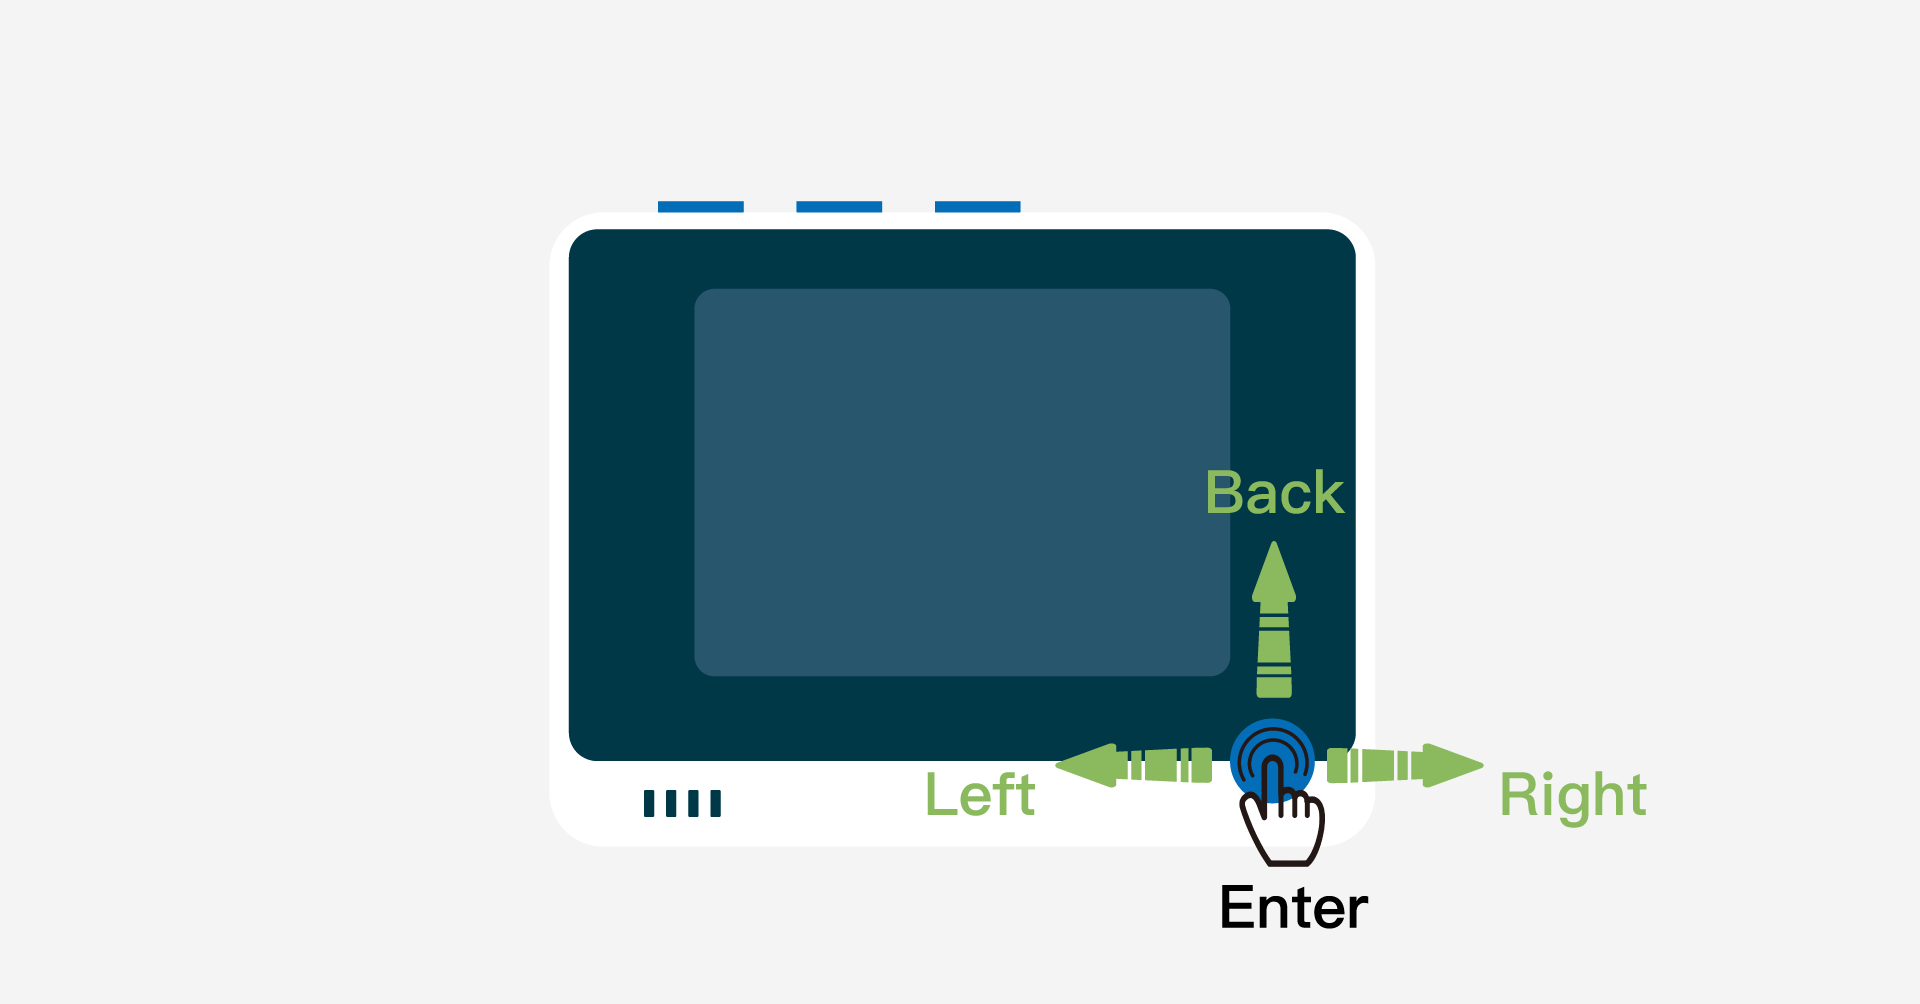
Then there is the five-way directional button located at the bottom right of Wio Terminal, which allows you to perform the following operations:
- Left/ Right: Scroll through pages/ menus left and right
- Middle: Make a selection
- Up: Go back to the previous page
When a green box appears on the page, it indicates that the content is in the selected state.
Page Logic
As mentioned above, we have prepared three pages for SenseCraft, representing the three main functional modules of SenseCraft, namely Sense, Process and Uplink.
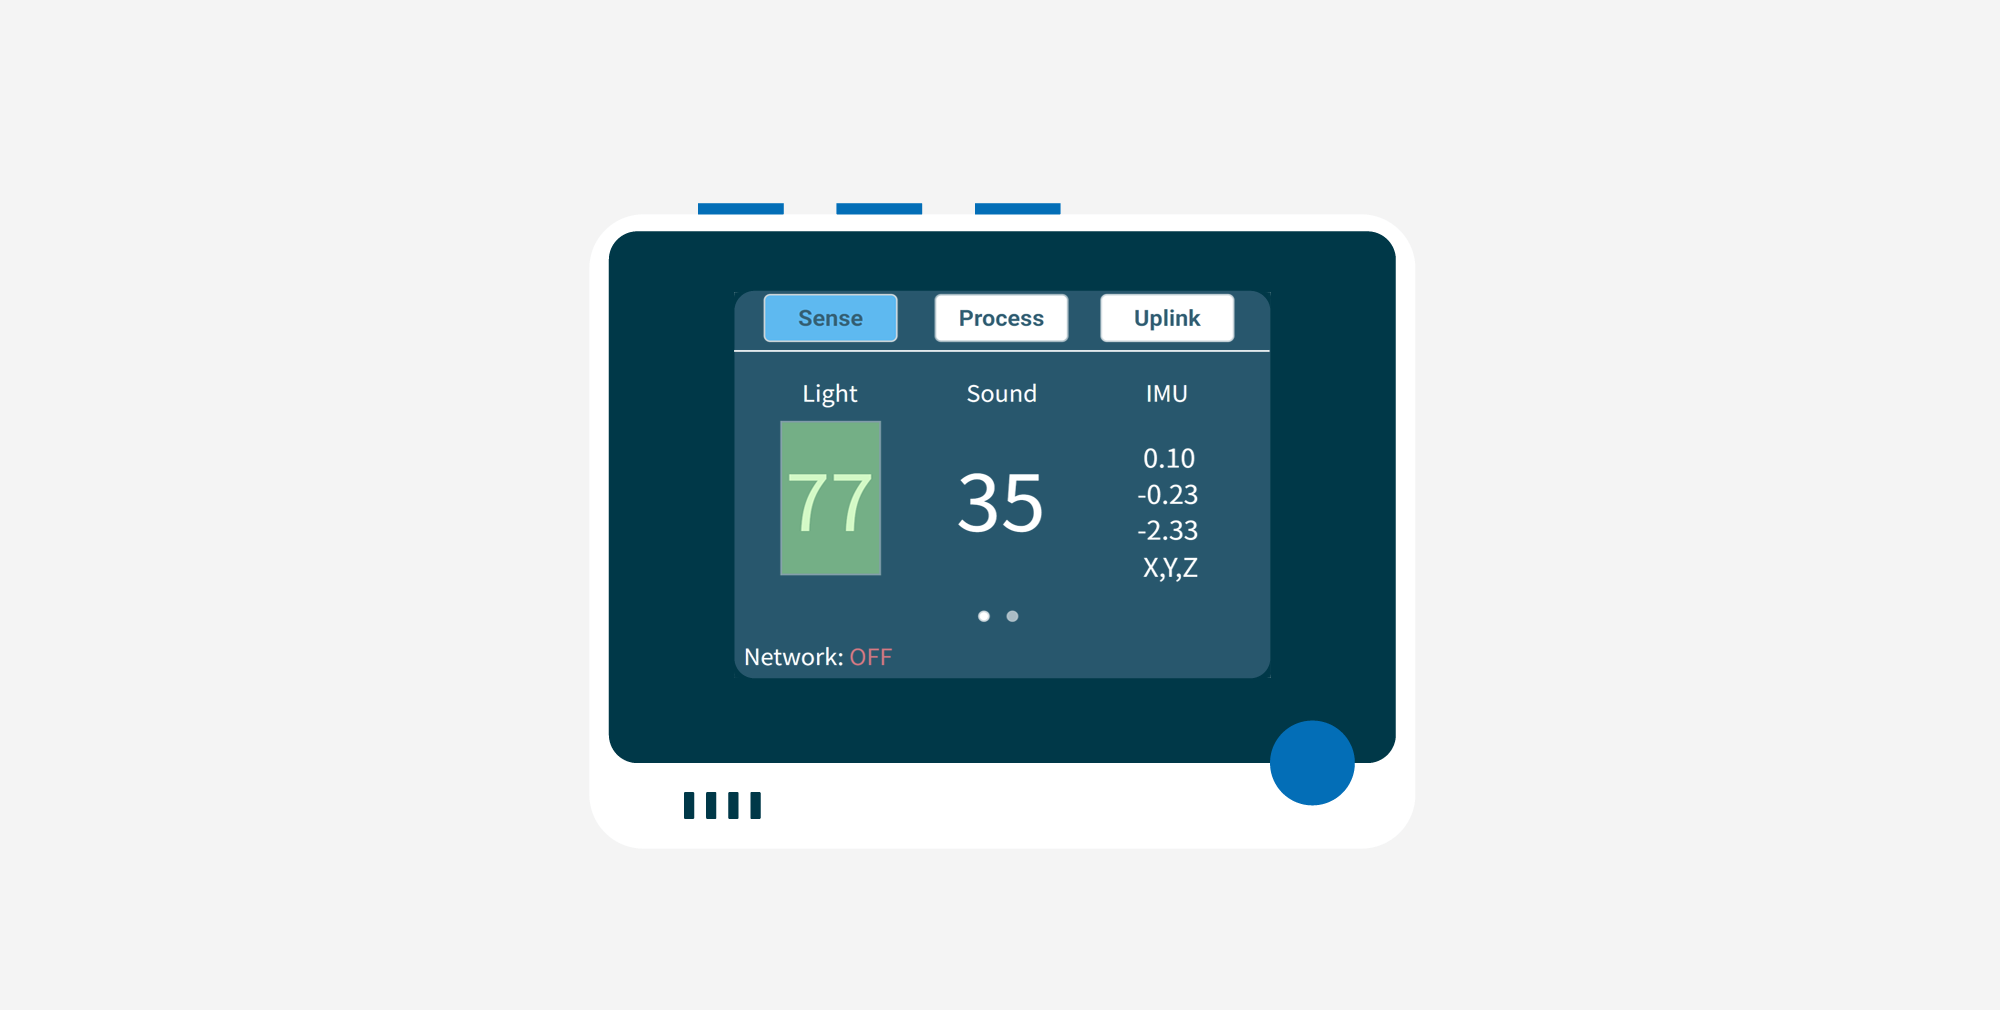
Sense
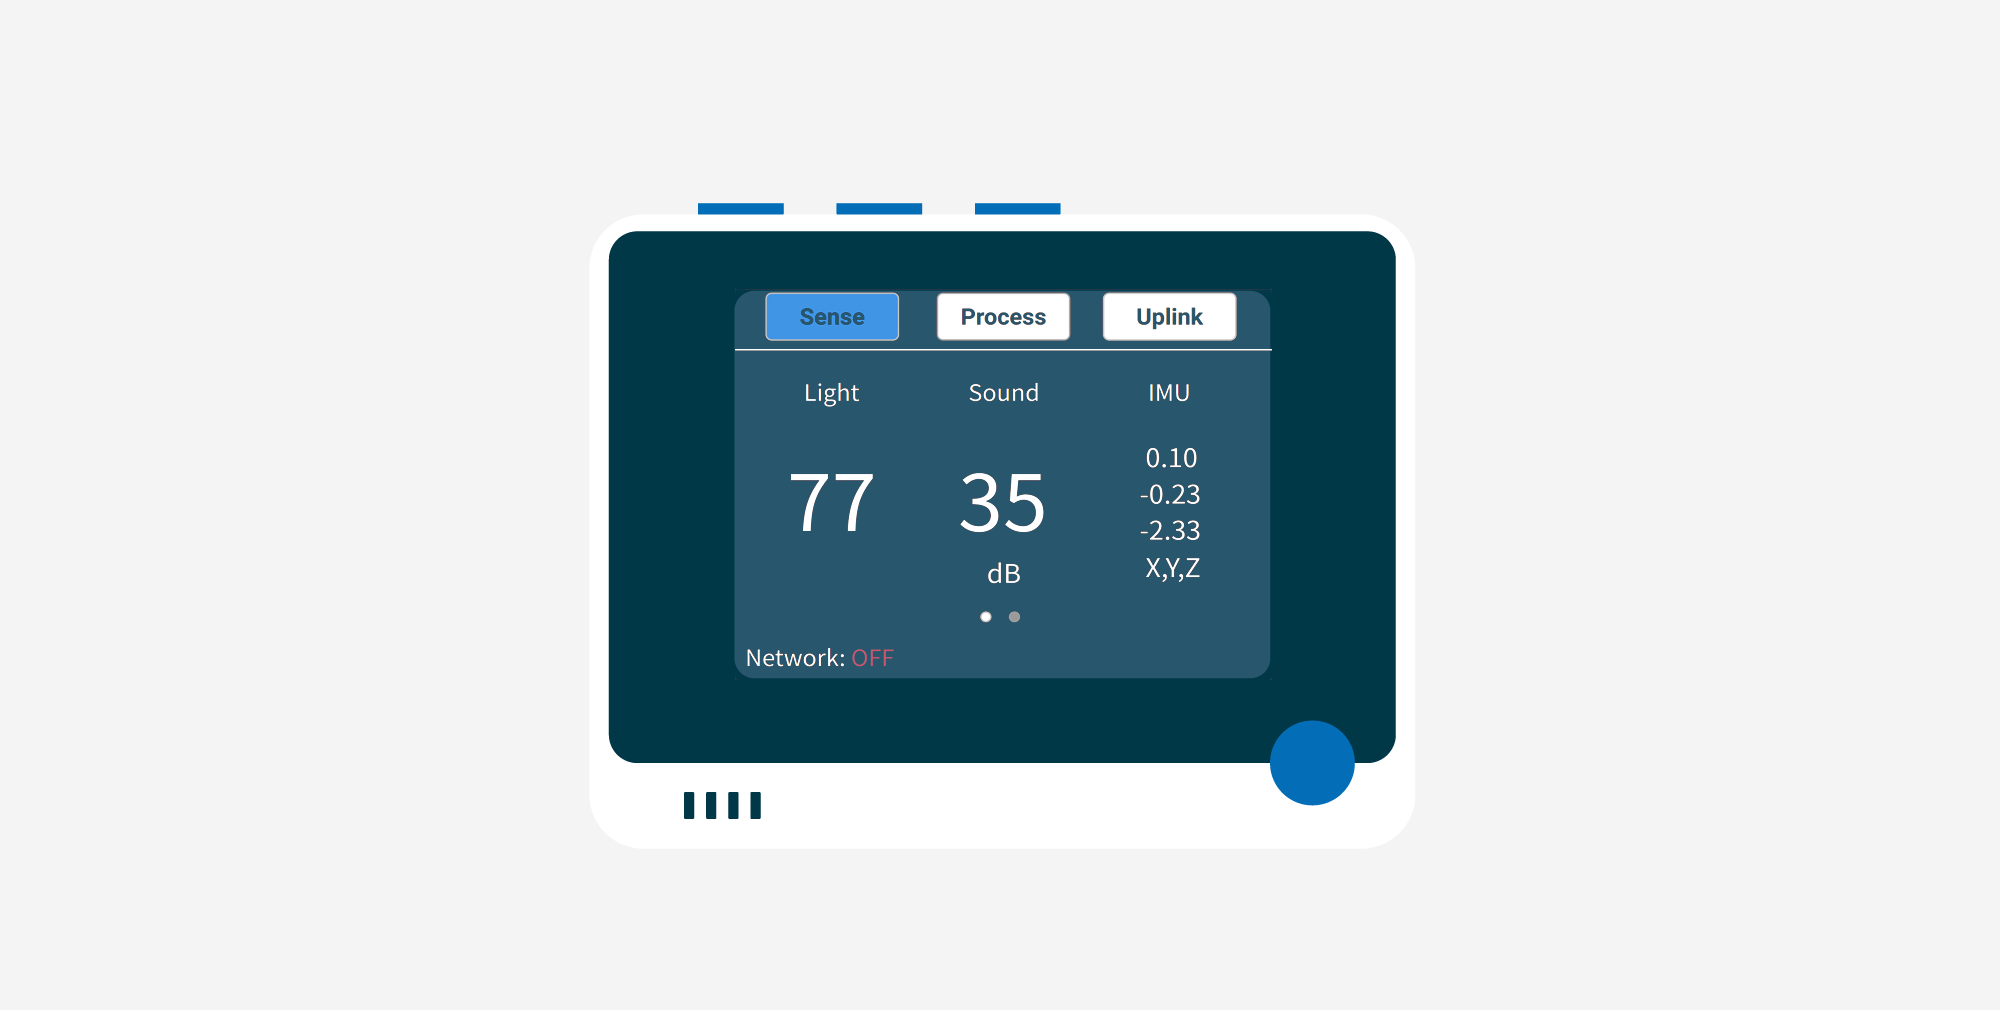
The main function of the Sense page is the sensor data display. You can observe the working status and sensor values of the built-in sensors in Wio Terminal from the Sense page.
Of course, if you try to connect the Grove sensors in the kit to the Grove connector on the right side of the Wio Terminal, you will find that the Wio Terminal will automatically detect the type of sensors and read their values.
Process
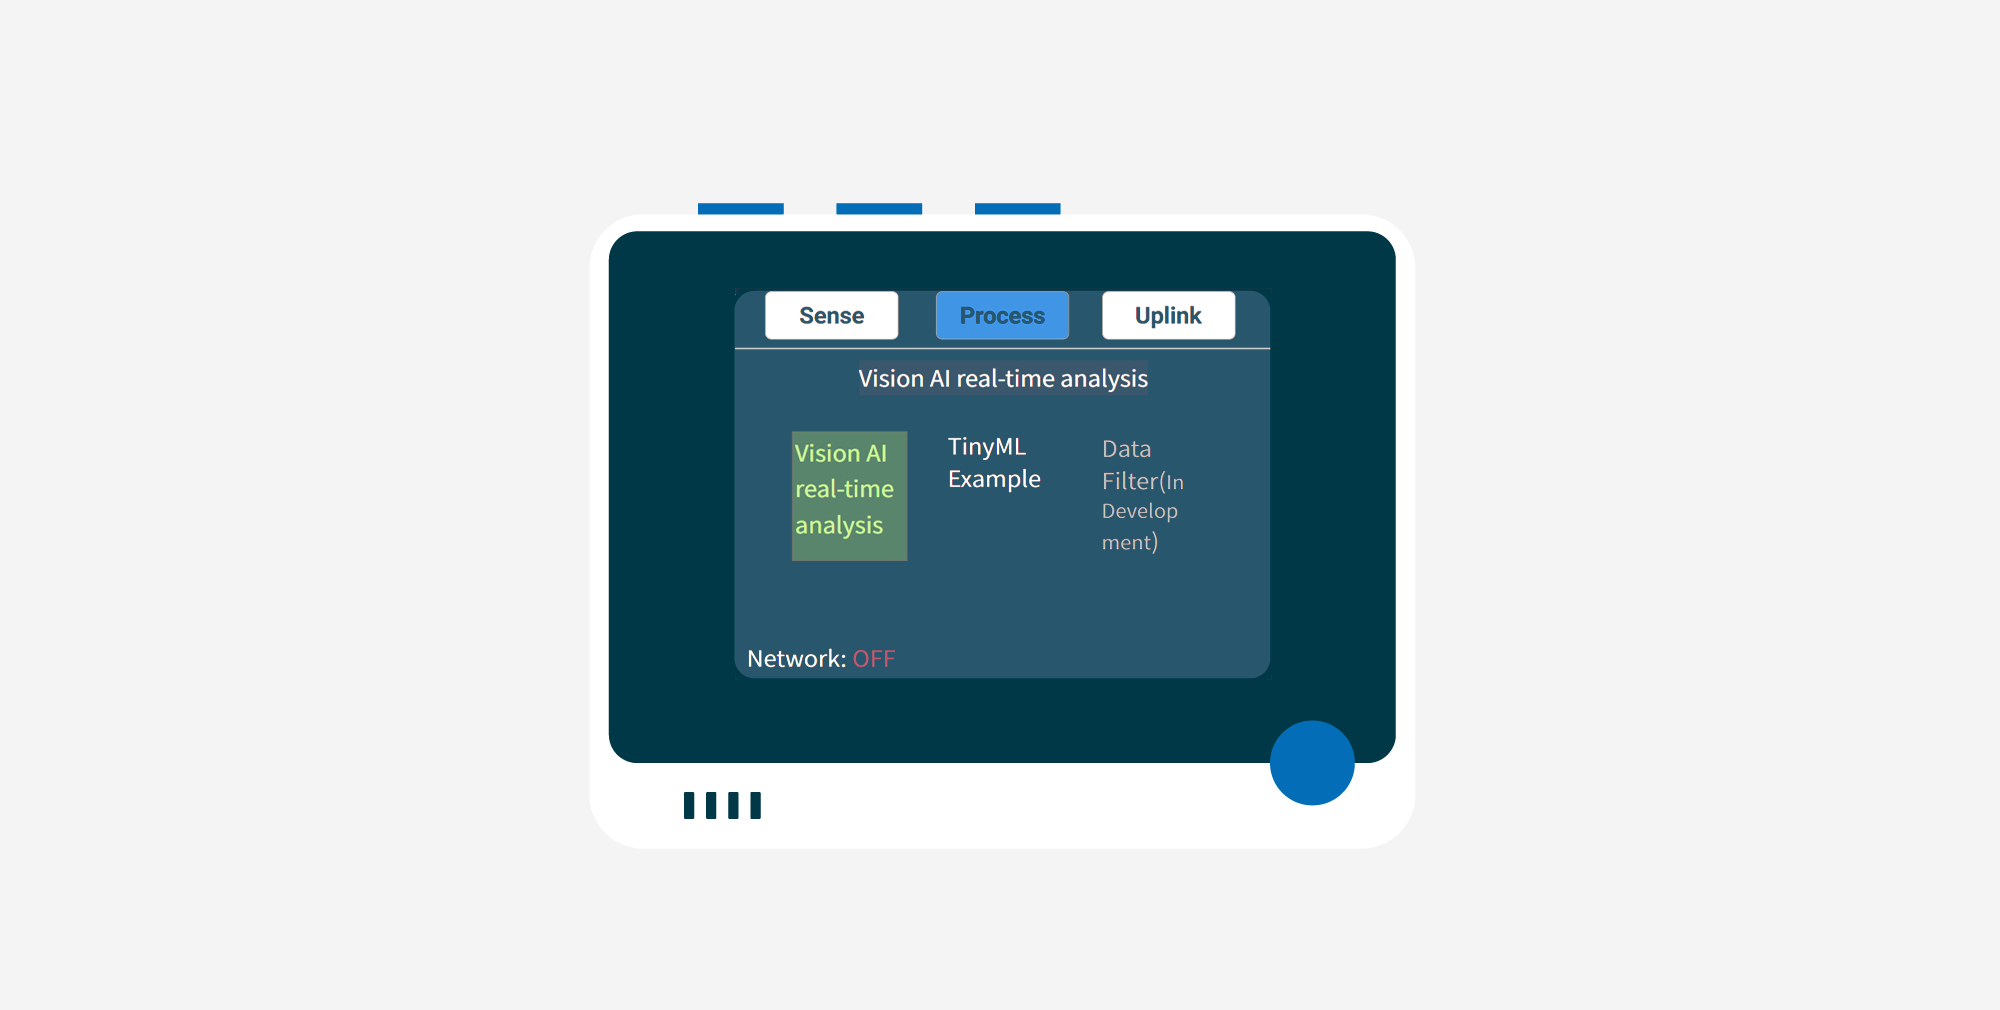
The main function of the Process page is to show the process of data processing. We have currently developed log output for this page for the recognition and model processing of the Grove Vision AI module.
In the future, we will give Wio Terminal more powerful data filtering and processing capabilities for this page.
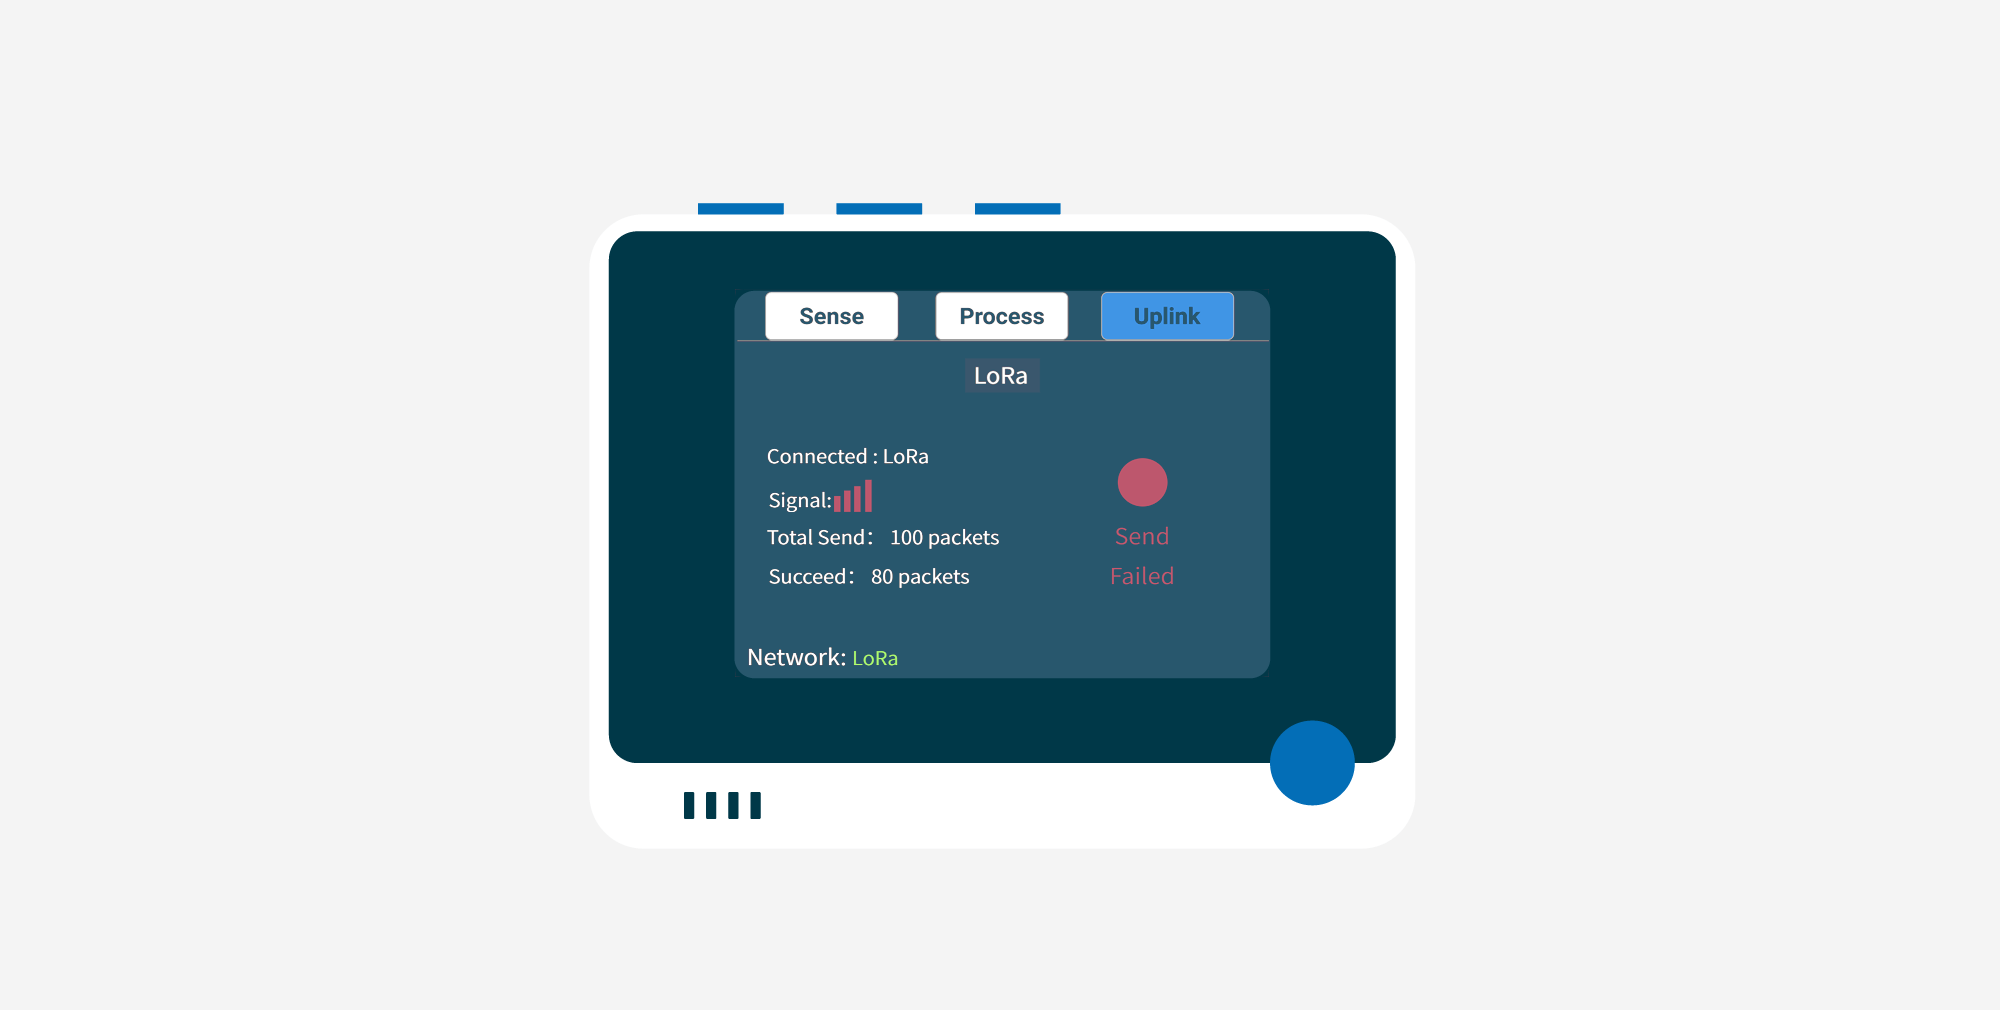
Uplink
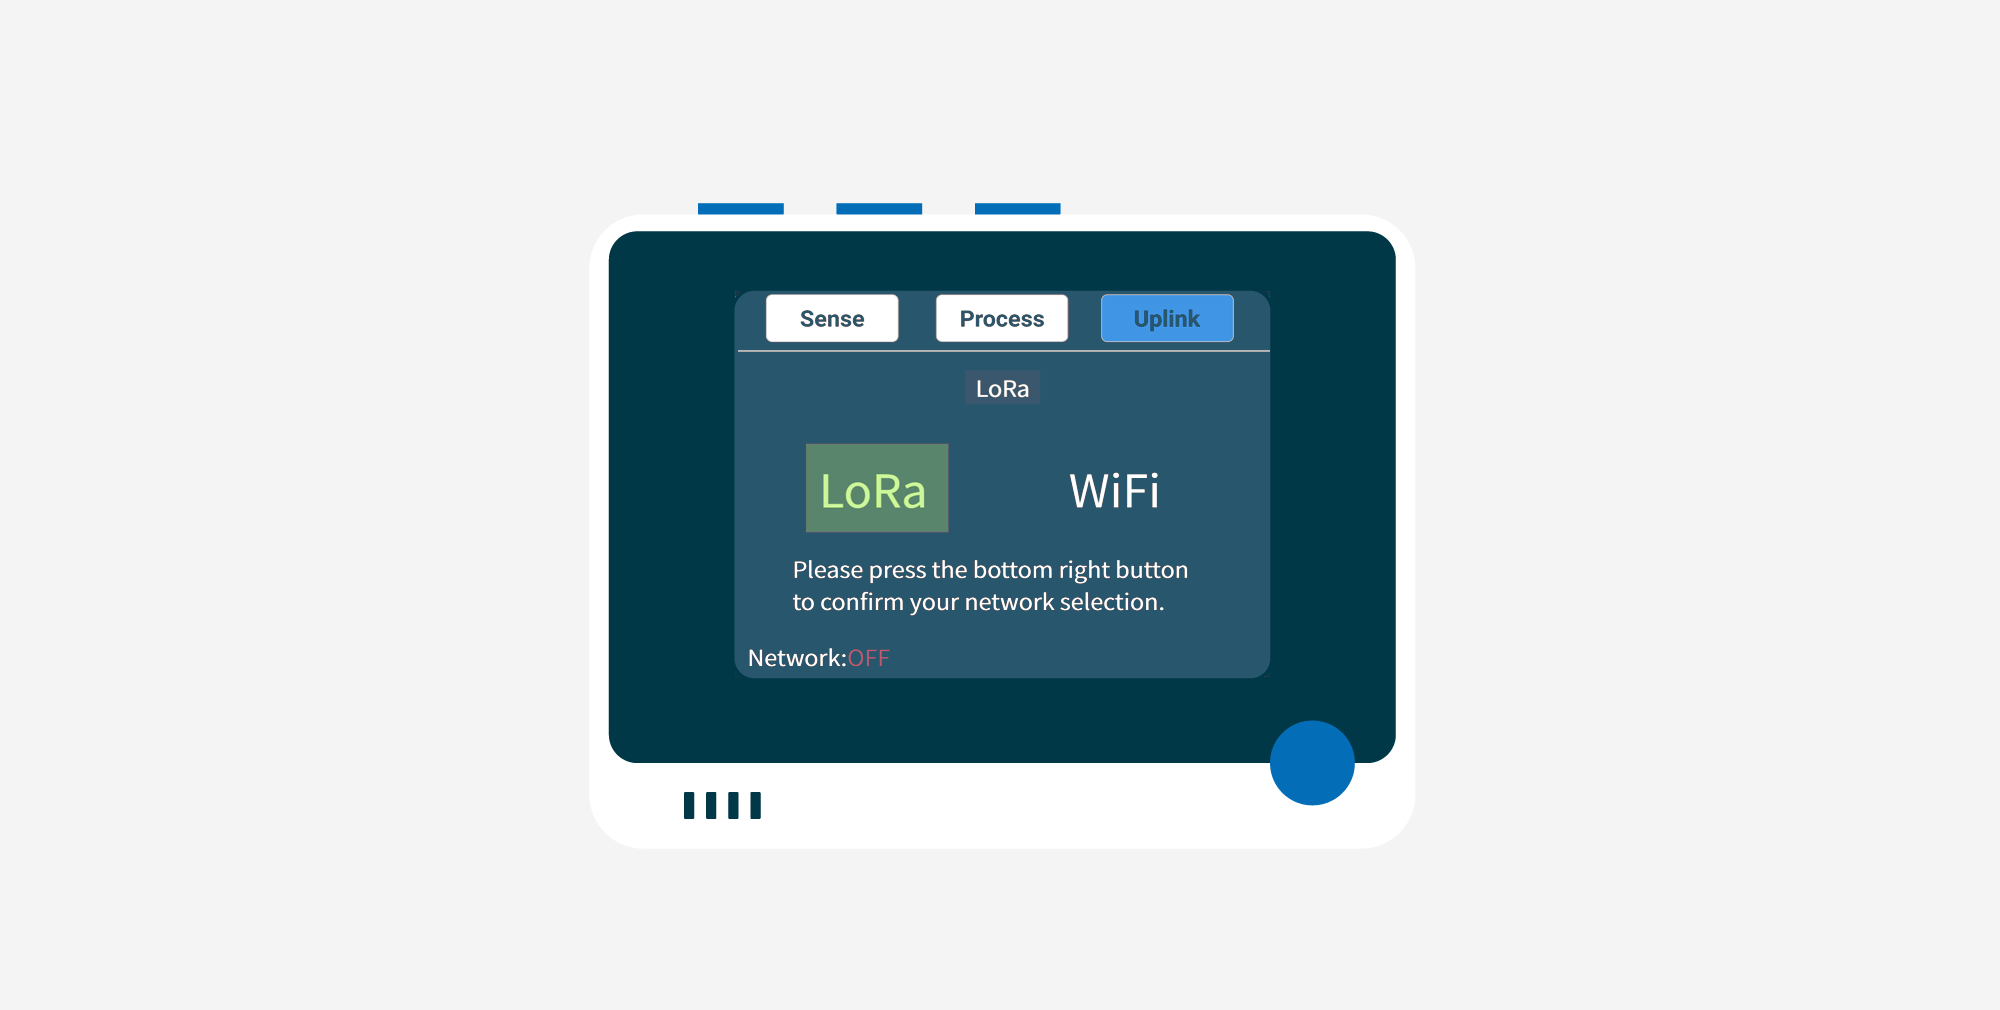
The main function of the Uplink page is to upload data to the cloud. Users can configure which IoT method you want to use, LoRa® or WiFi, on this page.
Here, you can freely configure your exclusive IoT features, freely switch between different networks and platforms, and create its value for this set of devices.
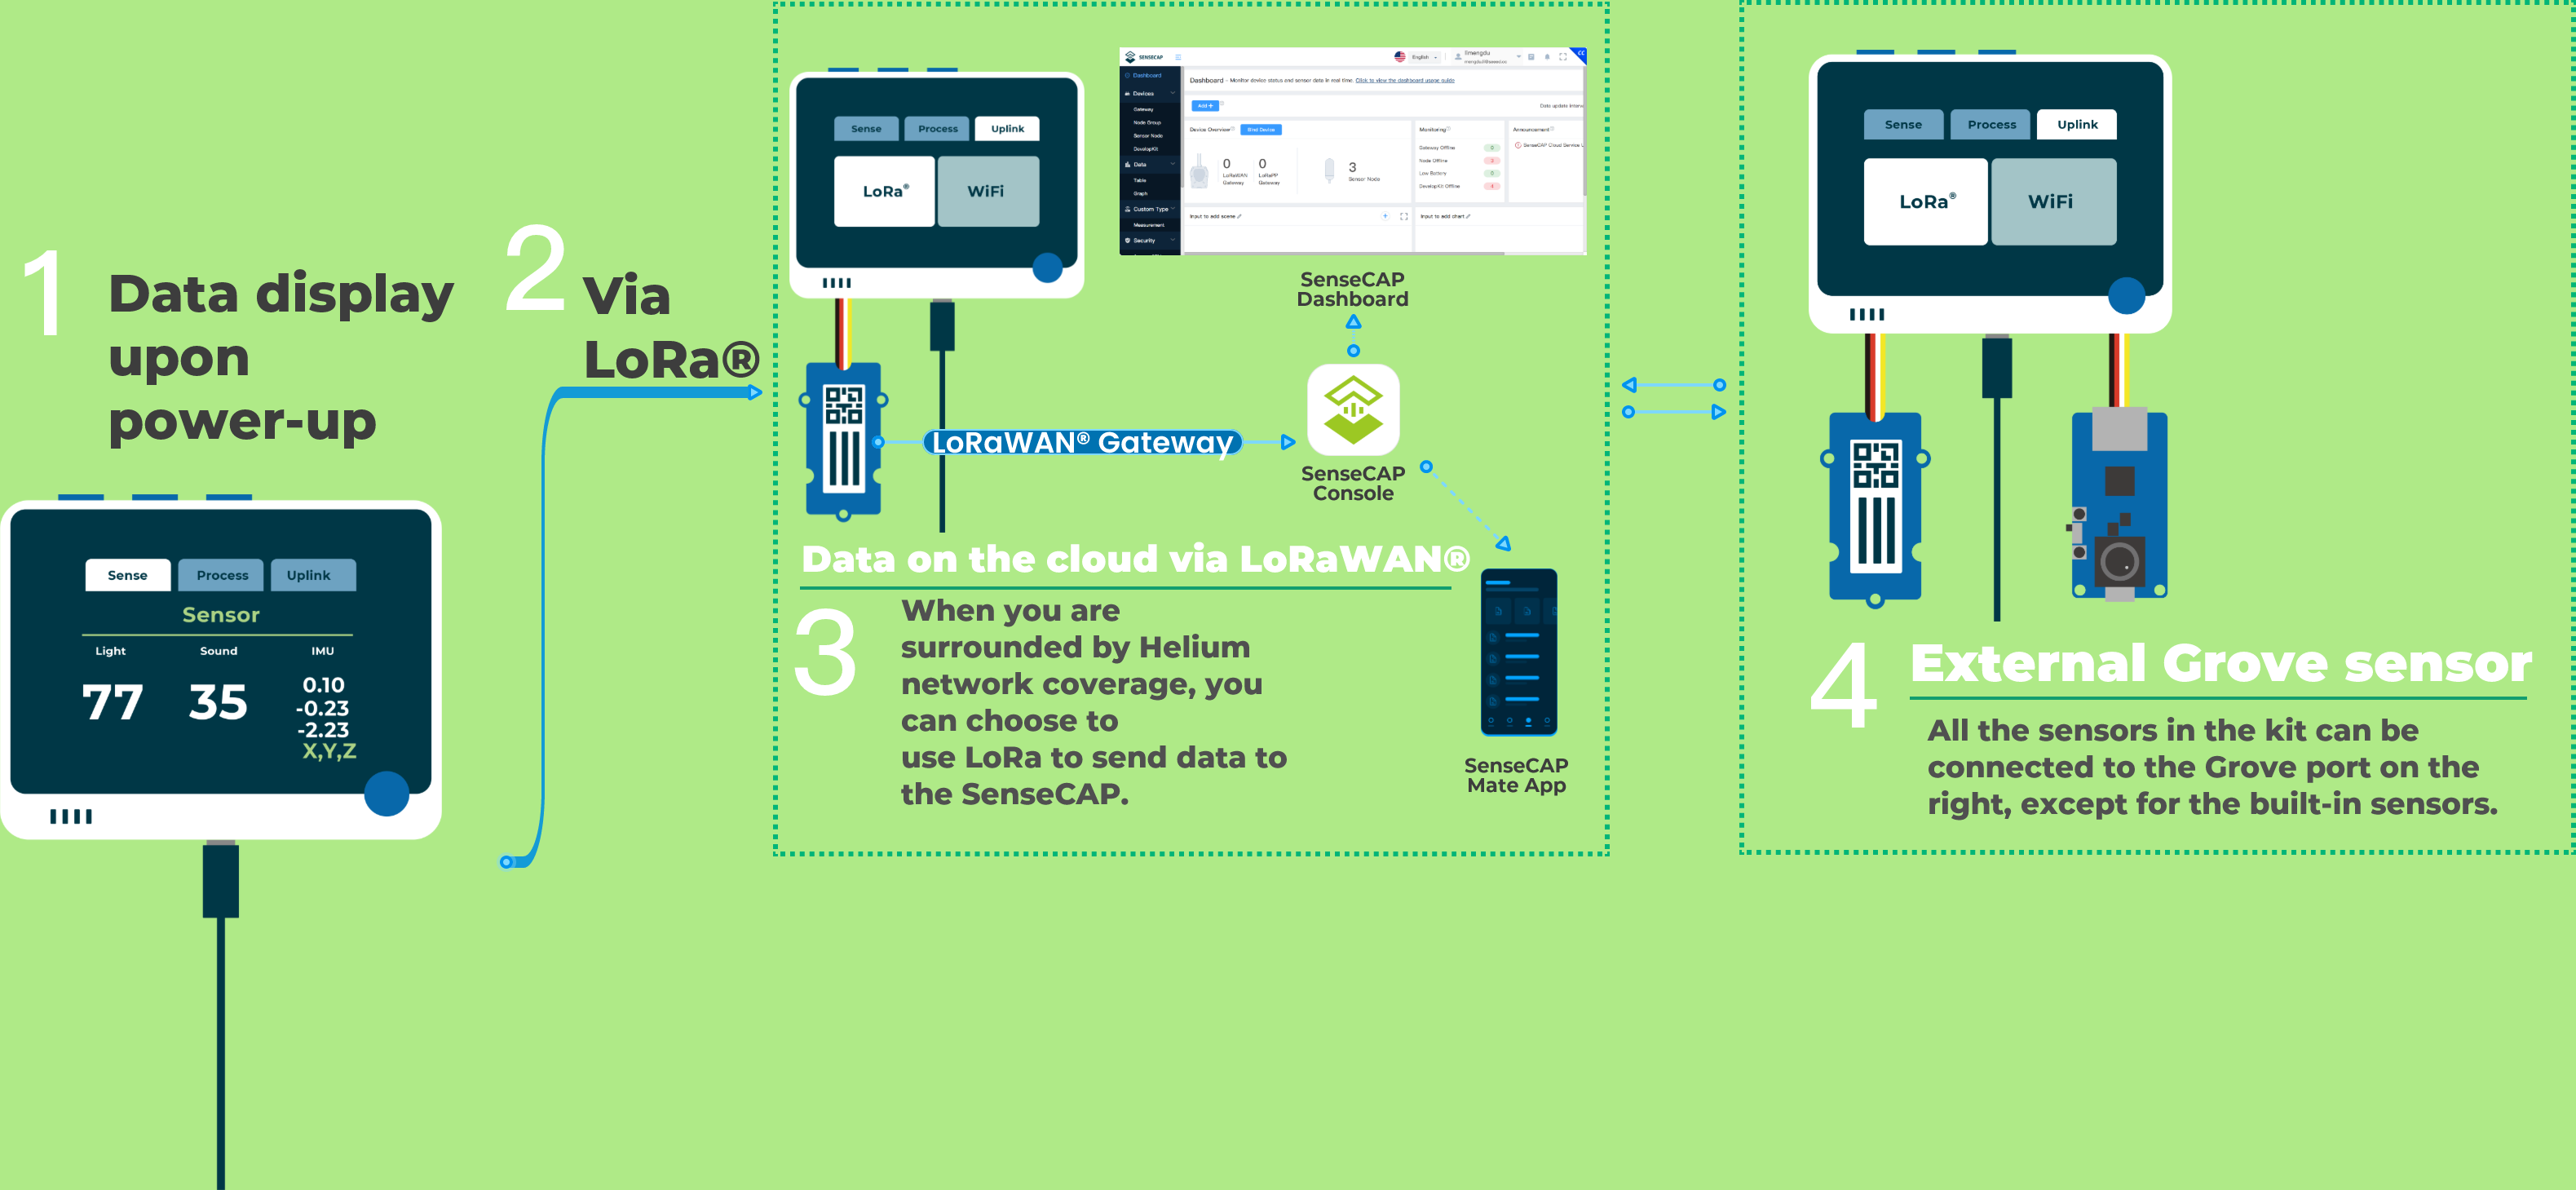
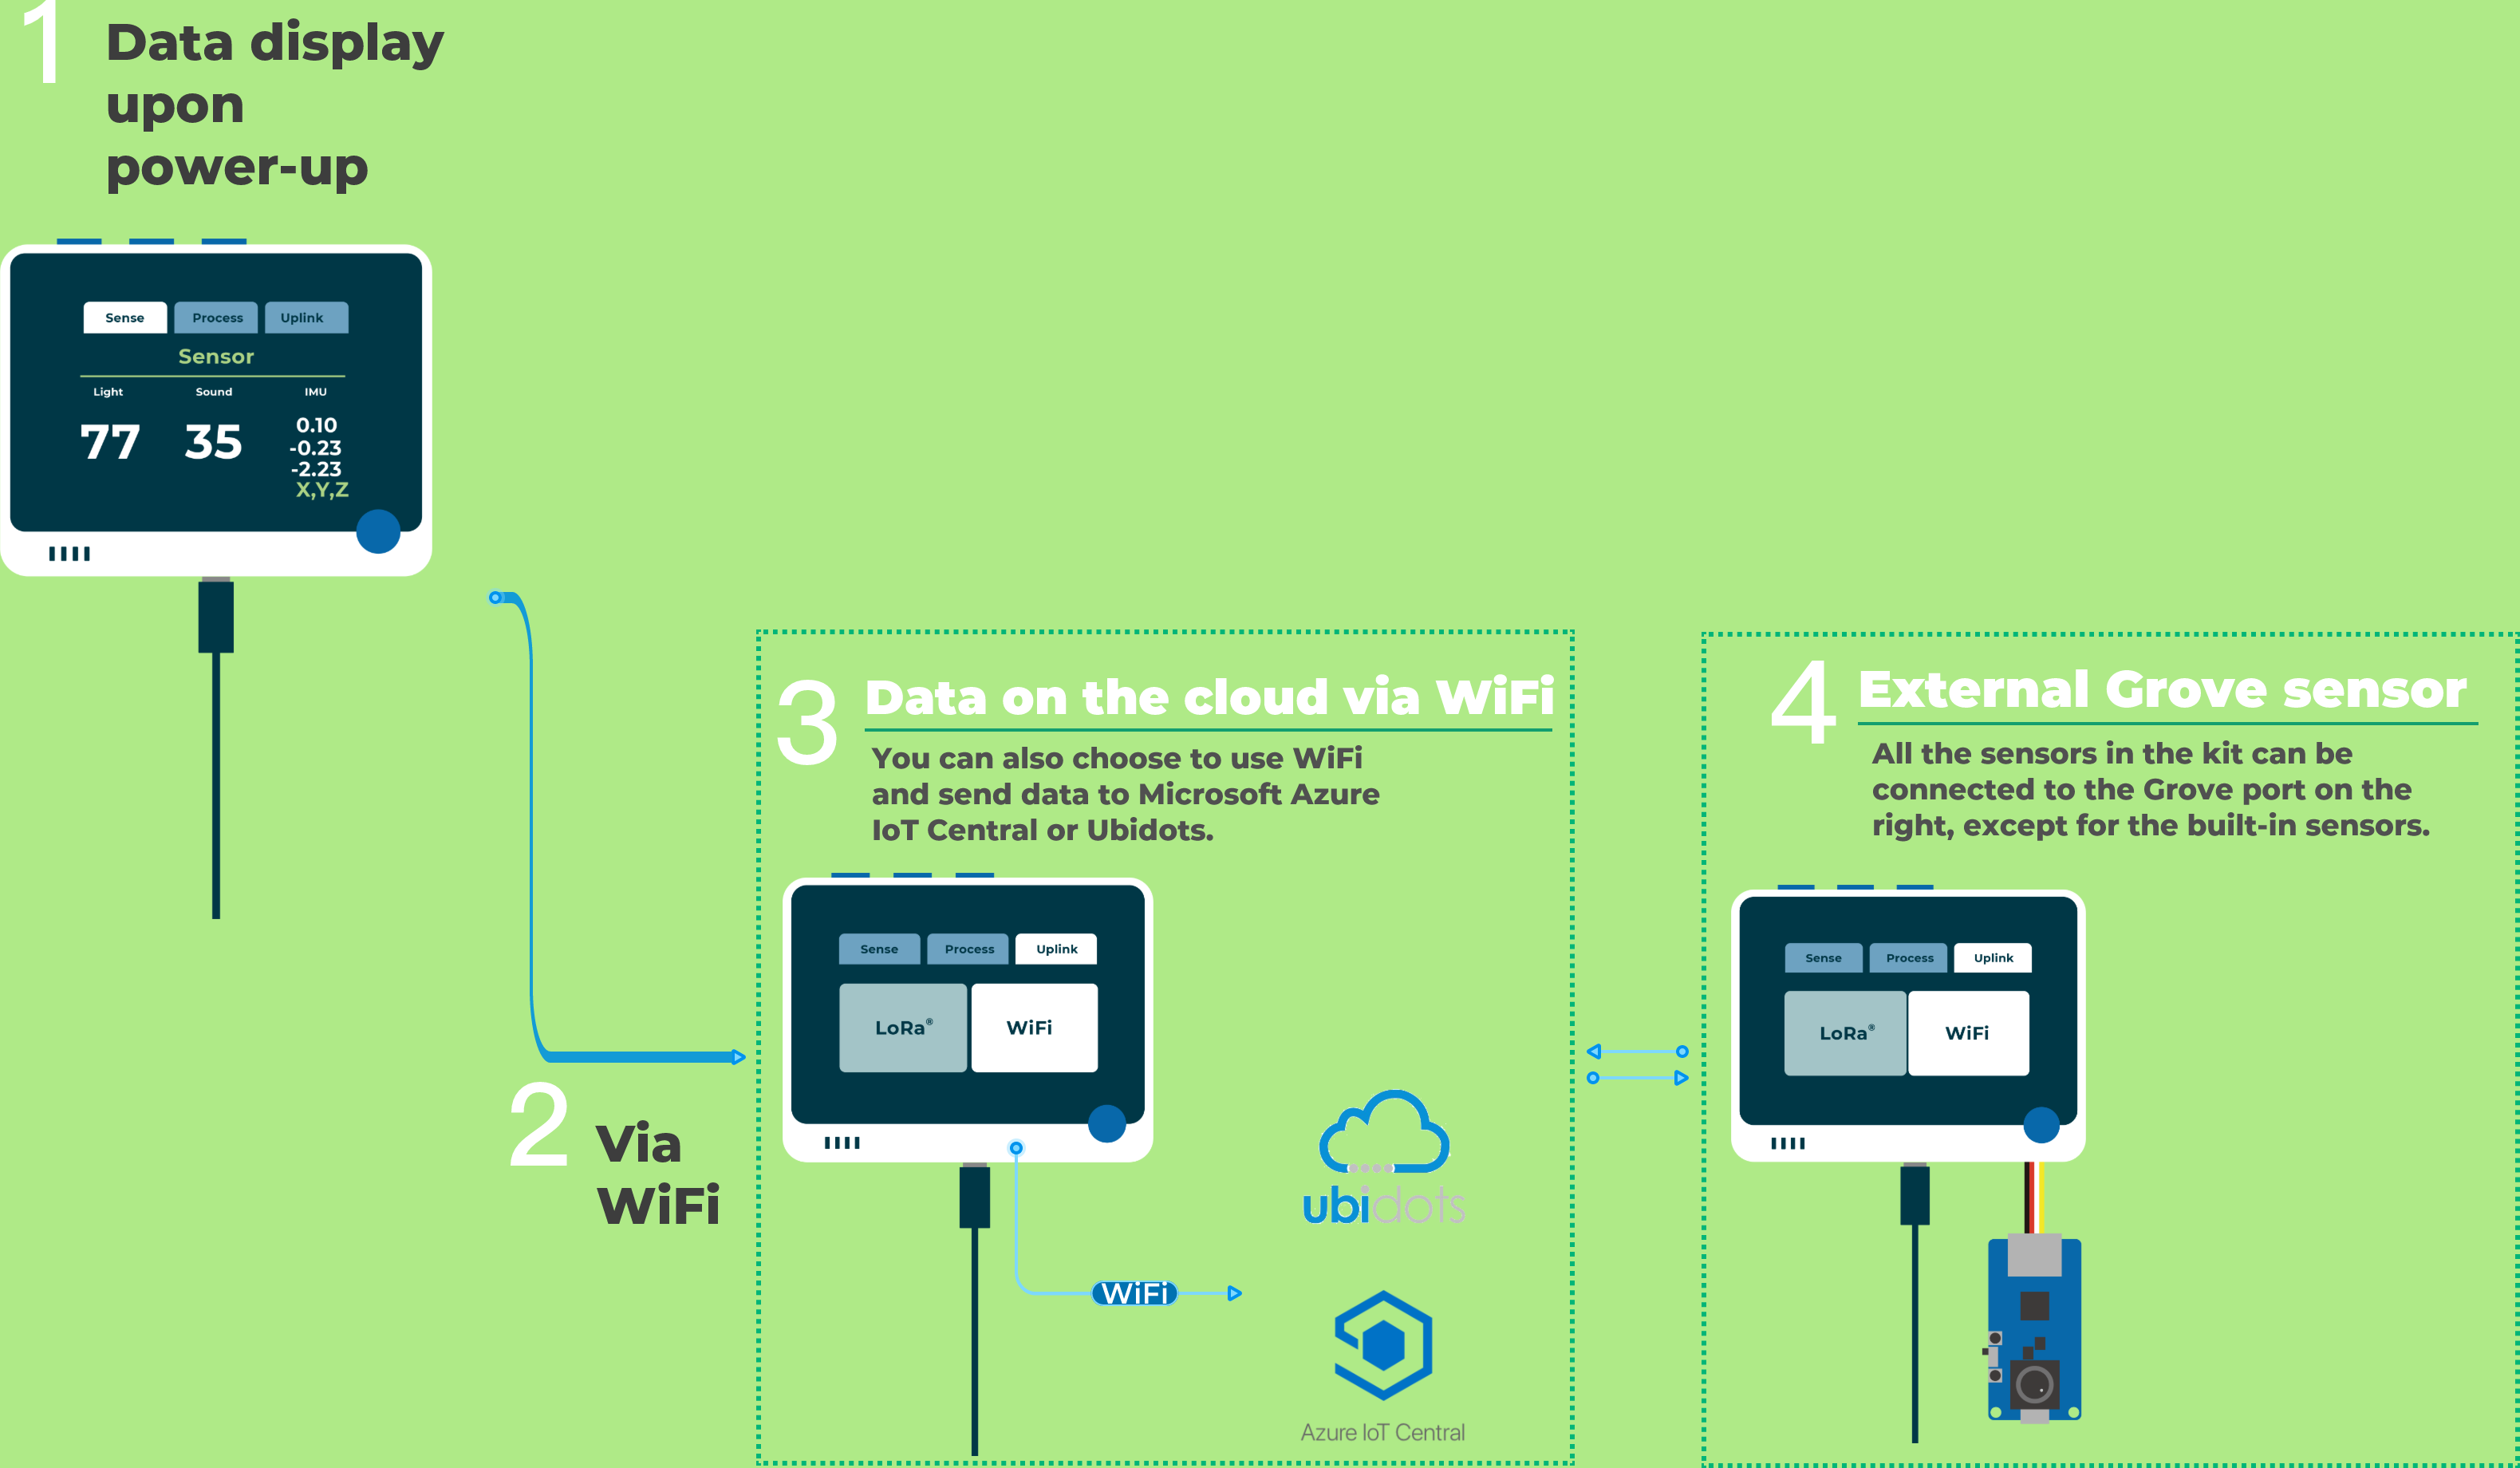
Display of data from built-in sensors
After you flash SenseCraft to Wio Terminal and power it up, wait a few seconds and you will be able to see the values of the built-in sensors directly on the Sense page.
Wio Terminal has three built-in sensors: a light sensor, a sound loudness sensor, and a three-axis sensor.
At this moment you do not need to do anything, the value of the built-in sensor will automatically refresh once per second, you can very naturally observe the current environment of light, loudness and three-axis data.
Send sensor data to SenseCAP via LoRa®
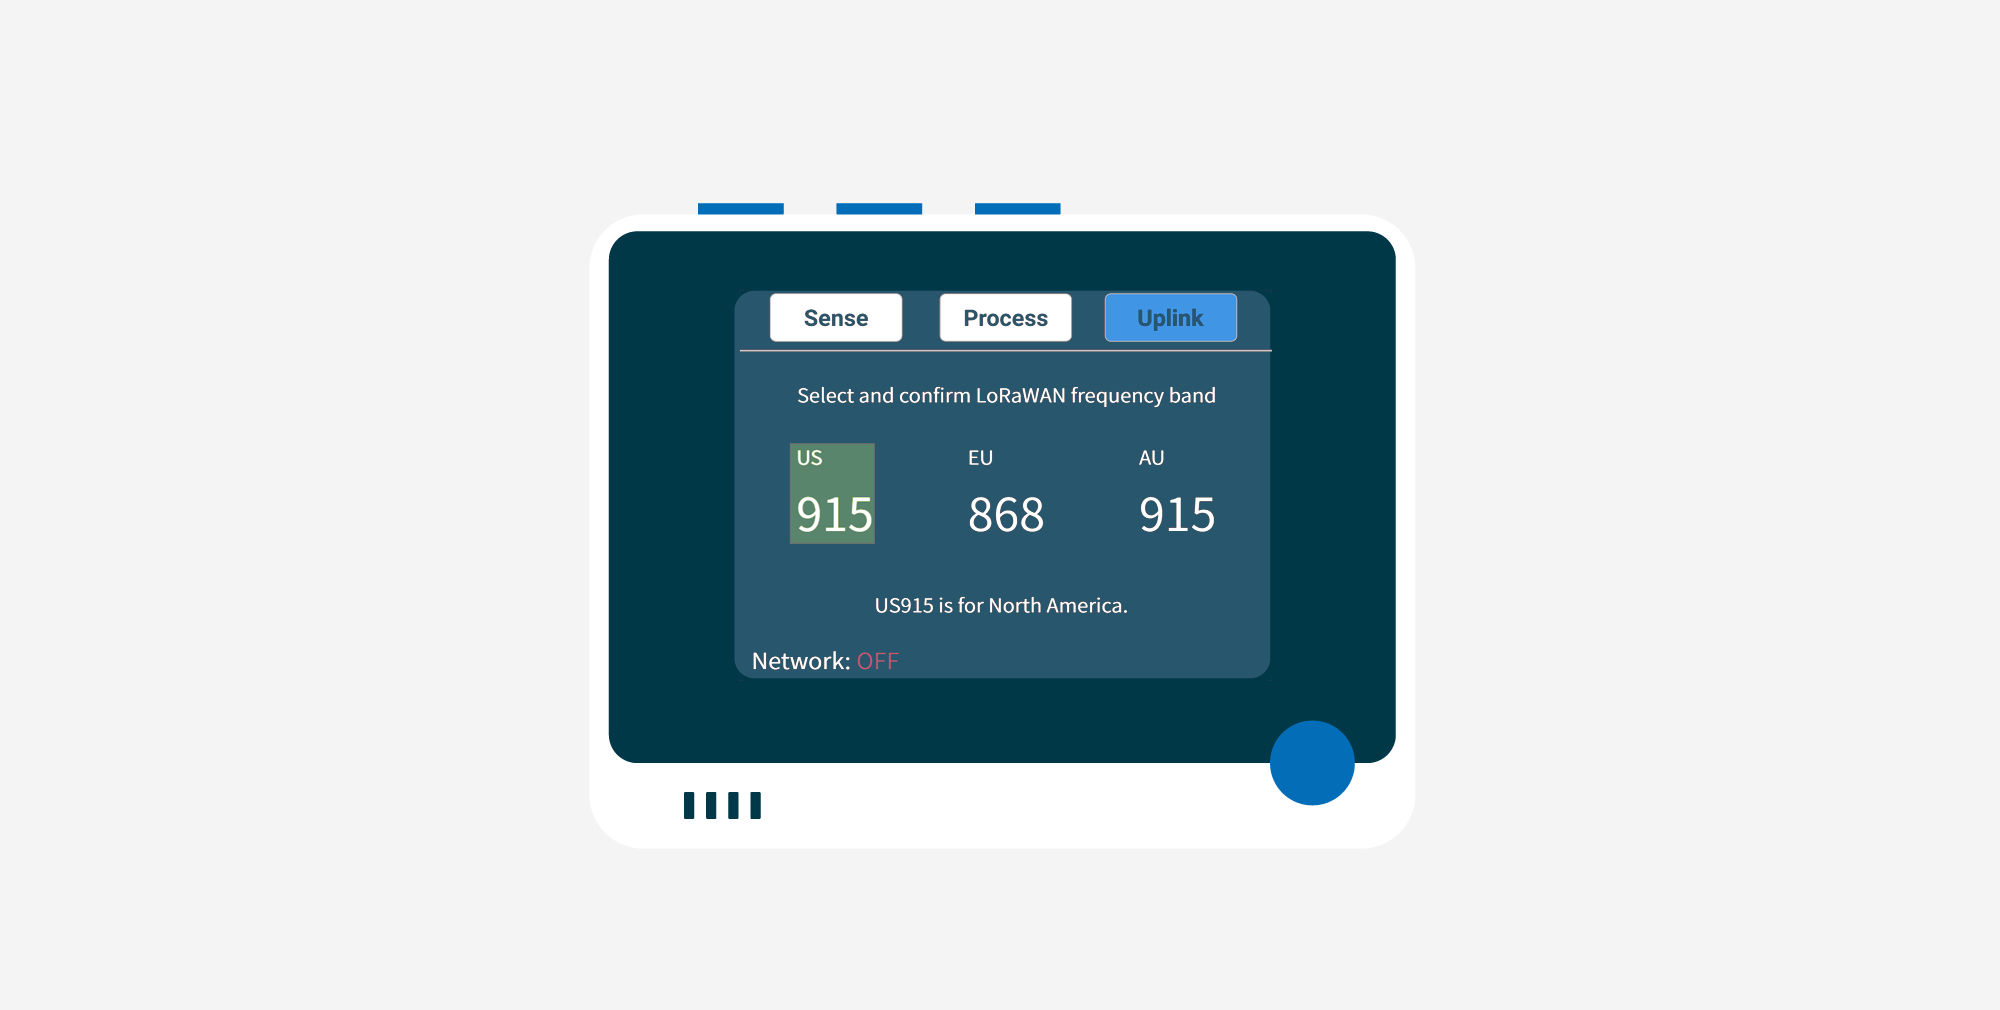
Step 1. Press the rightmost top button to enter the Network tab.
You will notice that LoRa® is already highlighted.
Step 2. Middle press to select LoRa® and connect Grove-Wio E5 to the Grove connector on the left side.
Step 3. Scroll through the LoRaWAN® frequency bands displayed on the screen and select the frequency band according to your region.
Now it will prompt you to bind the Wio-E5 with the SenseCAP platform.
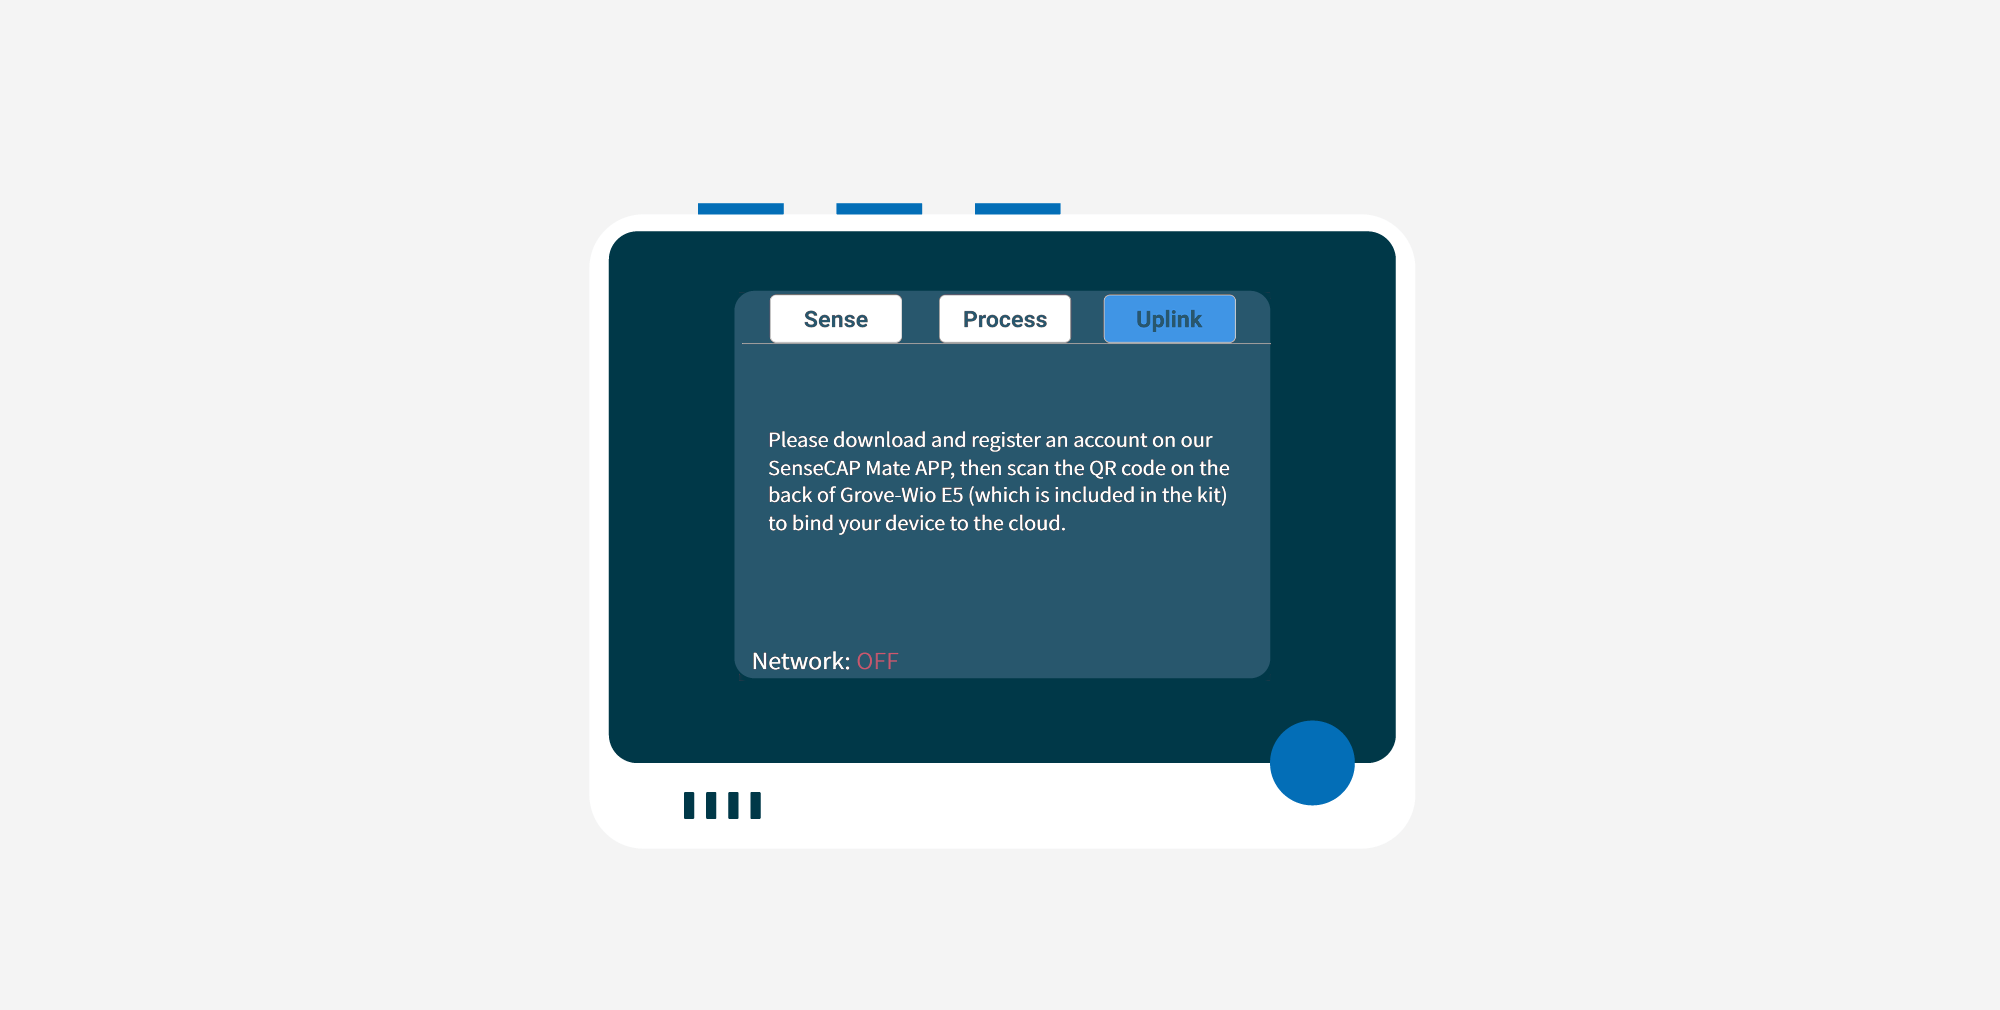
We offer two ways to bind your device in the SenseCAP platform.
- Option 1. Bind the device on the mobile APP
If you want to use your cell phone to scan and bind your device, or view some of the sensor data remotely. Then please download SenseCAP Mate APP by yourself according to the following link.
- SenseCAP Mate APP for iOS on App Store
- SenseCAP Mate APP for Android on the Google Play Store

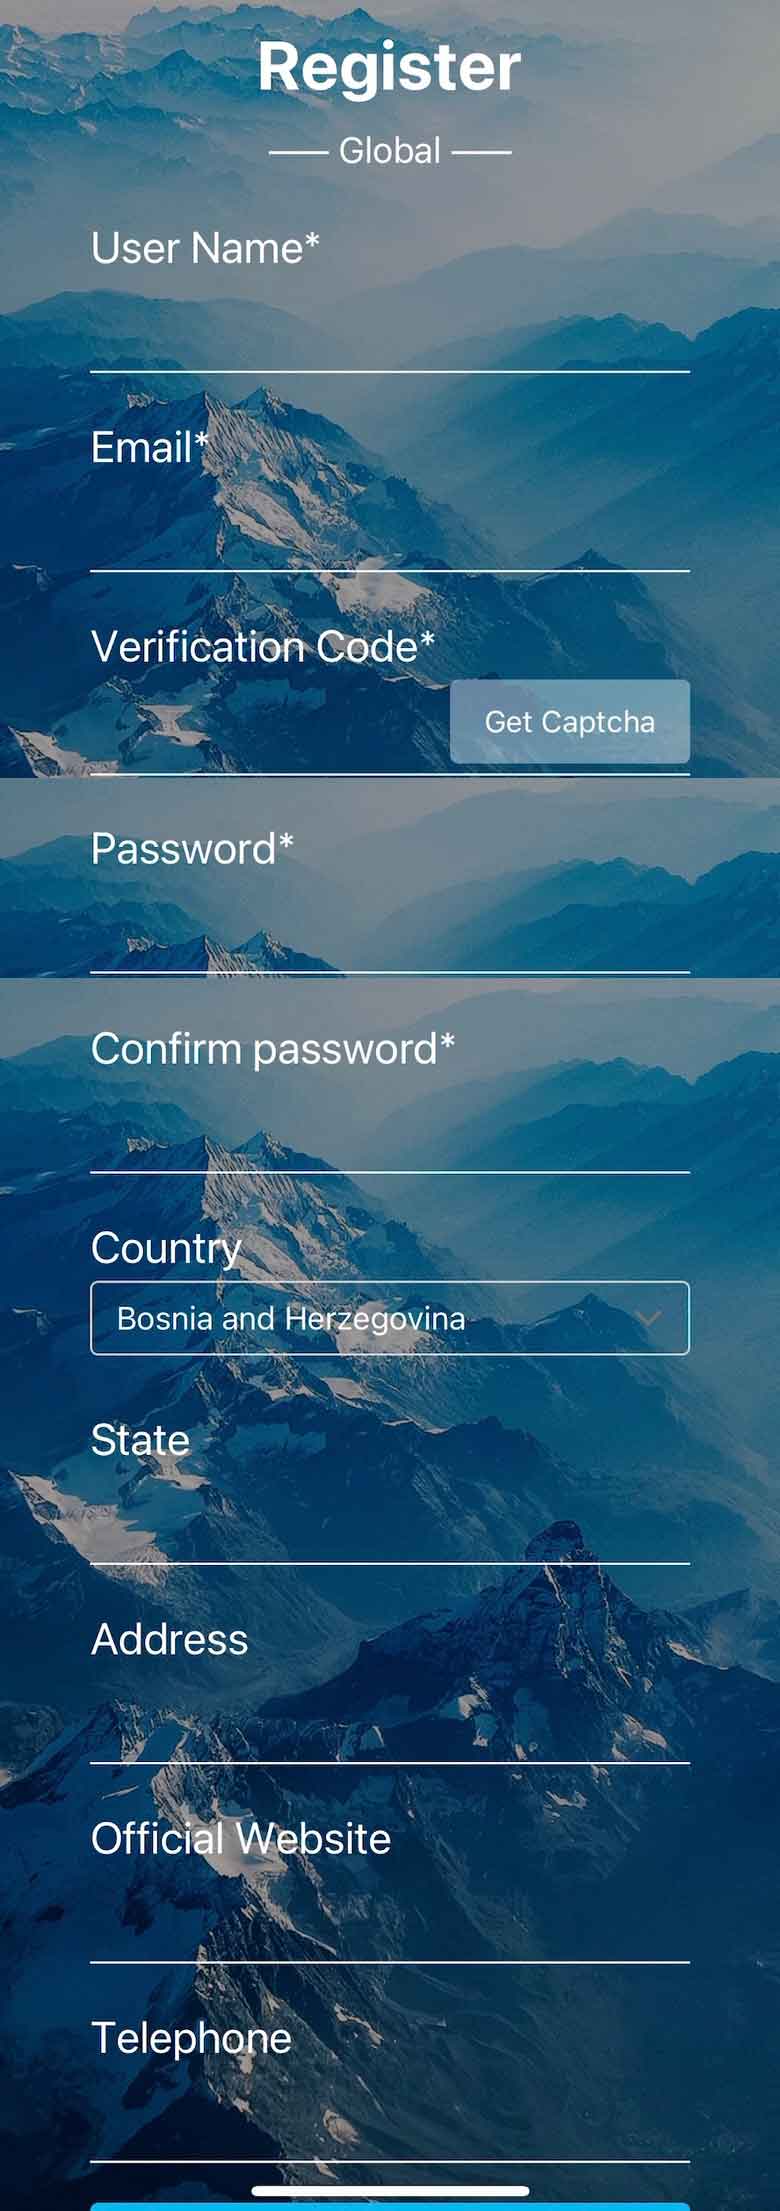
Open the SenseCAP Mate APP after downloading the corresponding version of the APP according to all the mobile systems you use. if it is your first time to use the SenseCAP platform, please register an account first.

Please select the Global version when registering.
In the page of registration information filling, the fields with are required fields, and those without can be filled in optionally. Click the Register button after everything is completed.
Then please use the account you just registered to log into the APP.
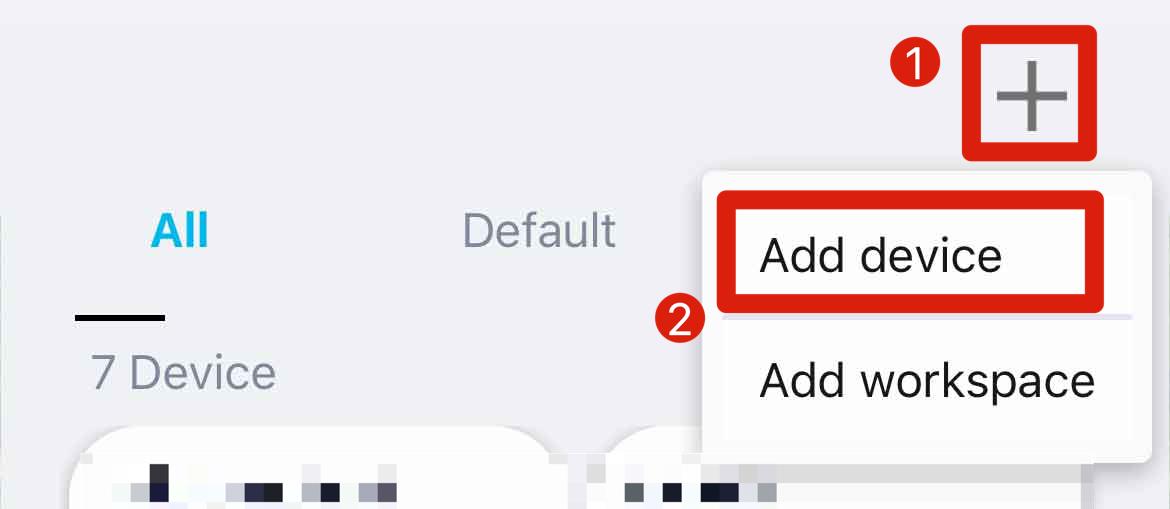
Select Device directory at the bottom of the main interface, where you can see the information of all the SenseCAP devices you have bound.
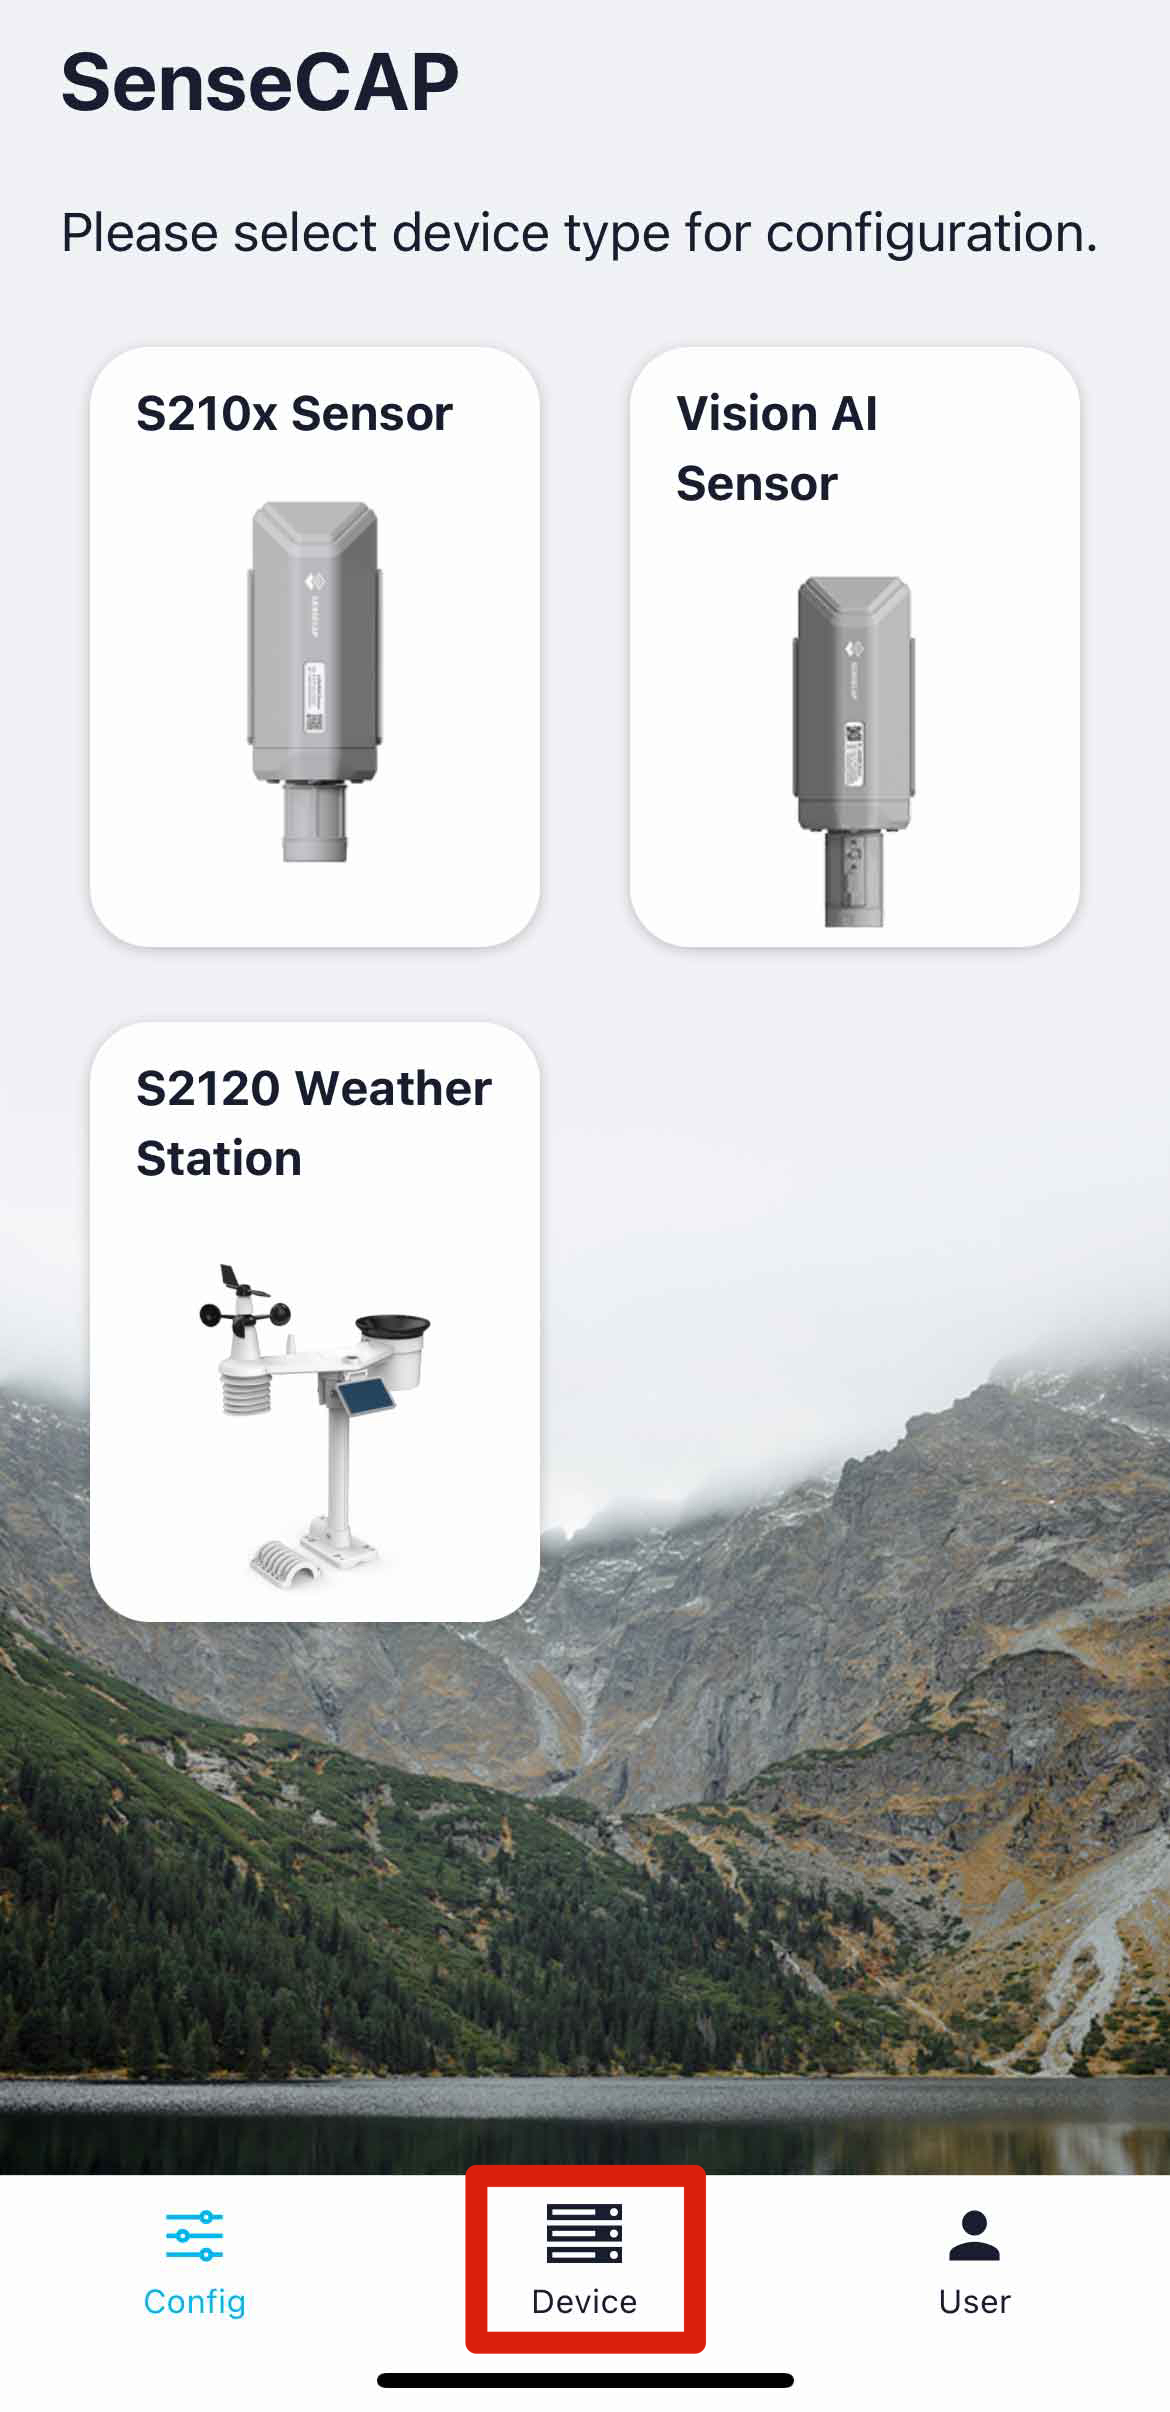
Click the + in the upper right corner and select Add device to bind the Grove - Wio-E5.
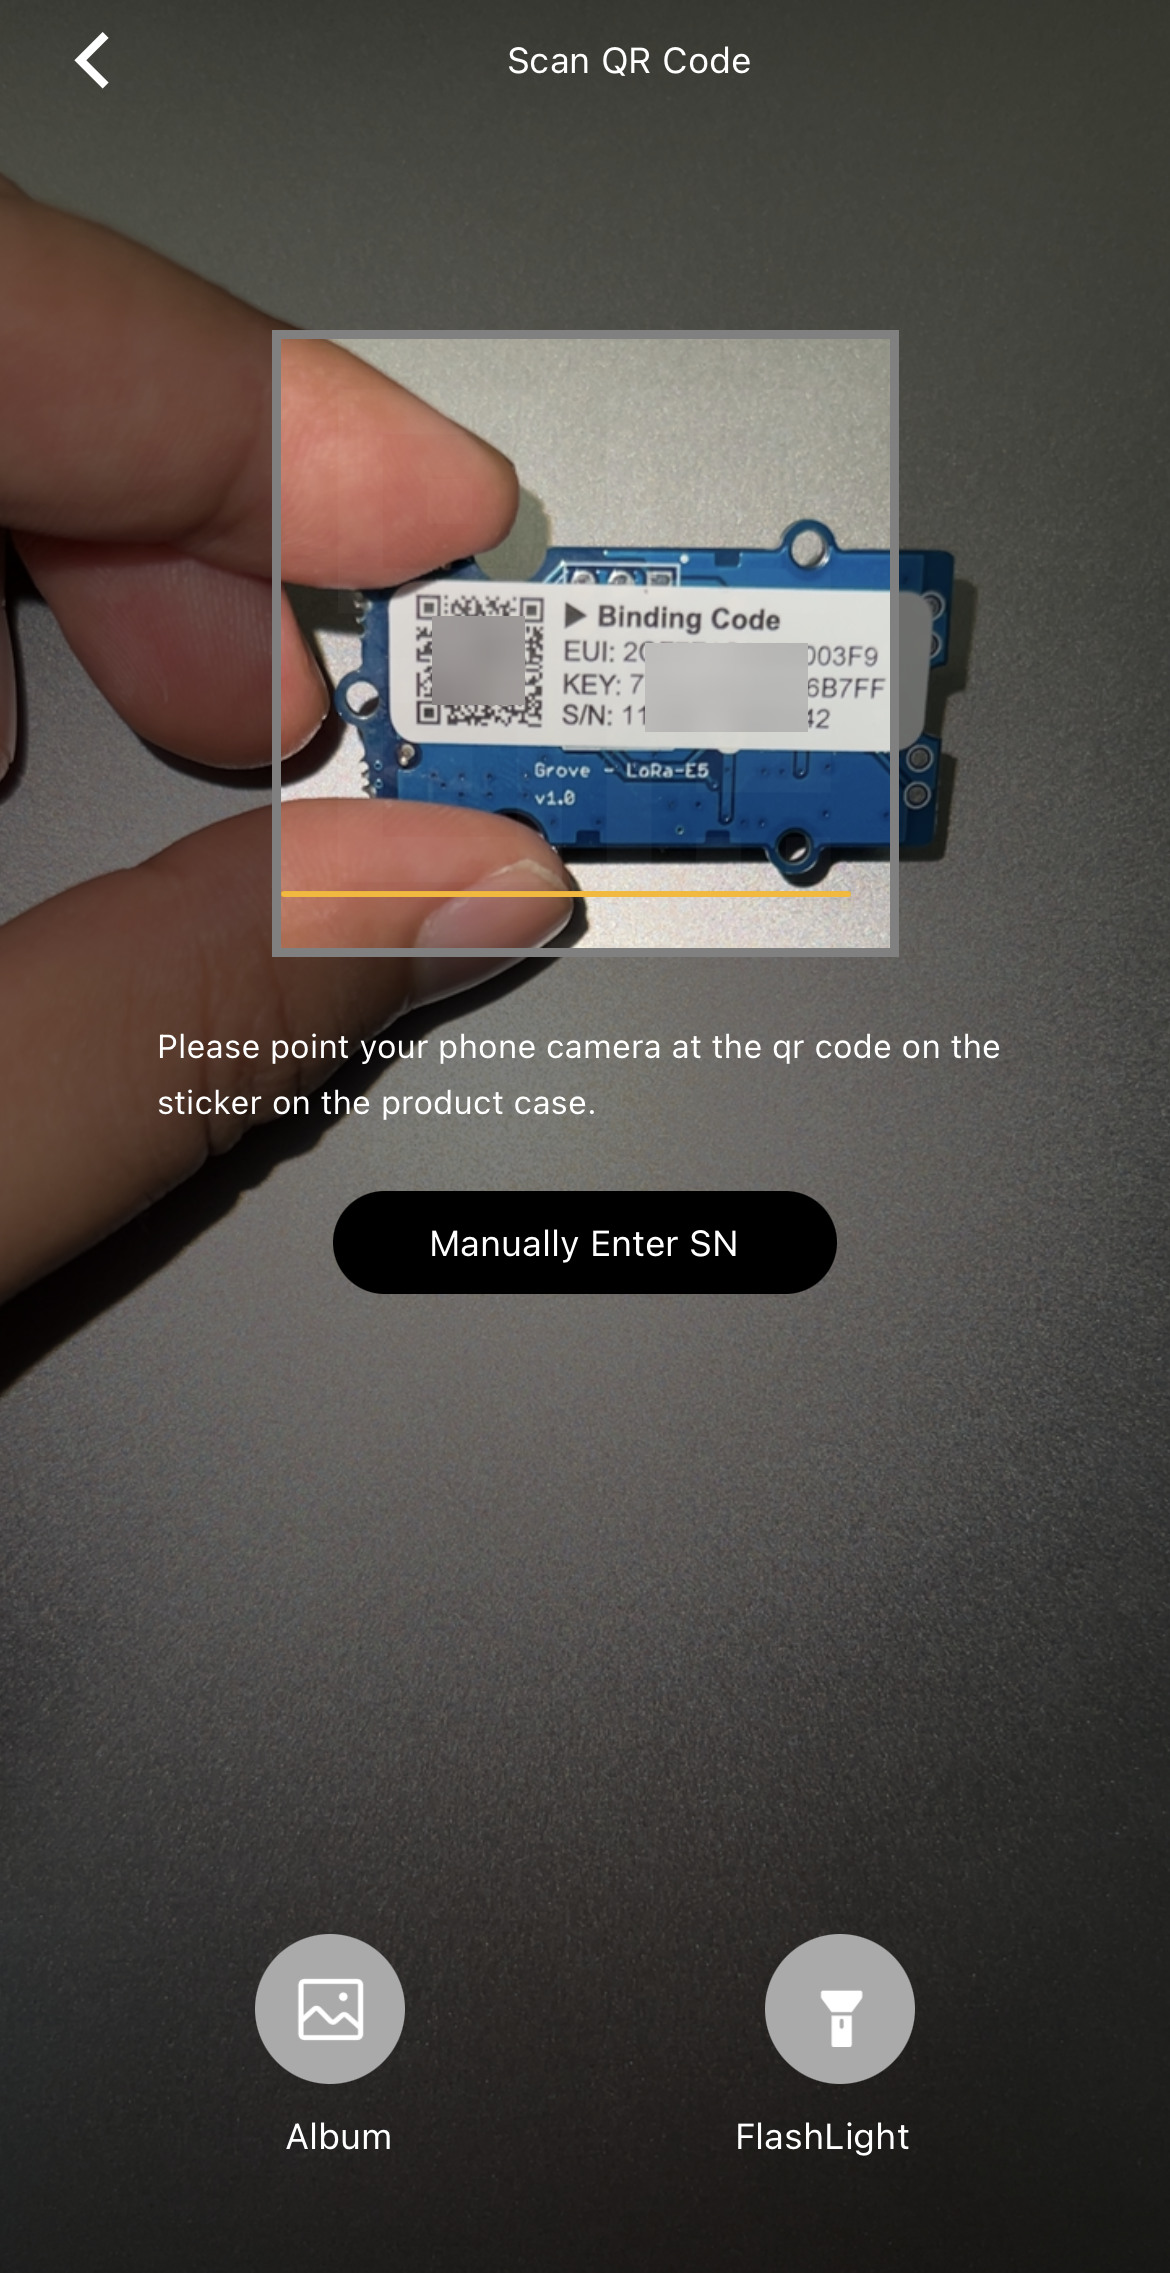
Align the box in the center of the camera with the QR code on the back of the Grove - Wio-E5 to scan the code to bind your kit. Please note that the QR code on the front of the Wio E5 should not be scanned.
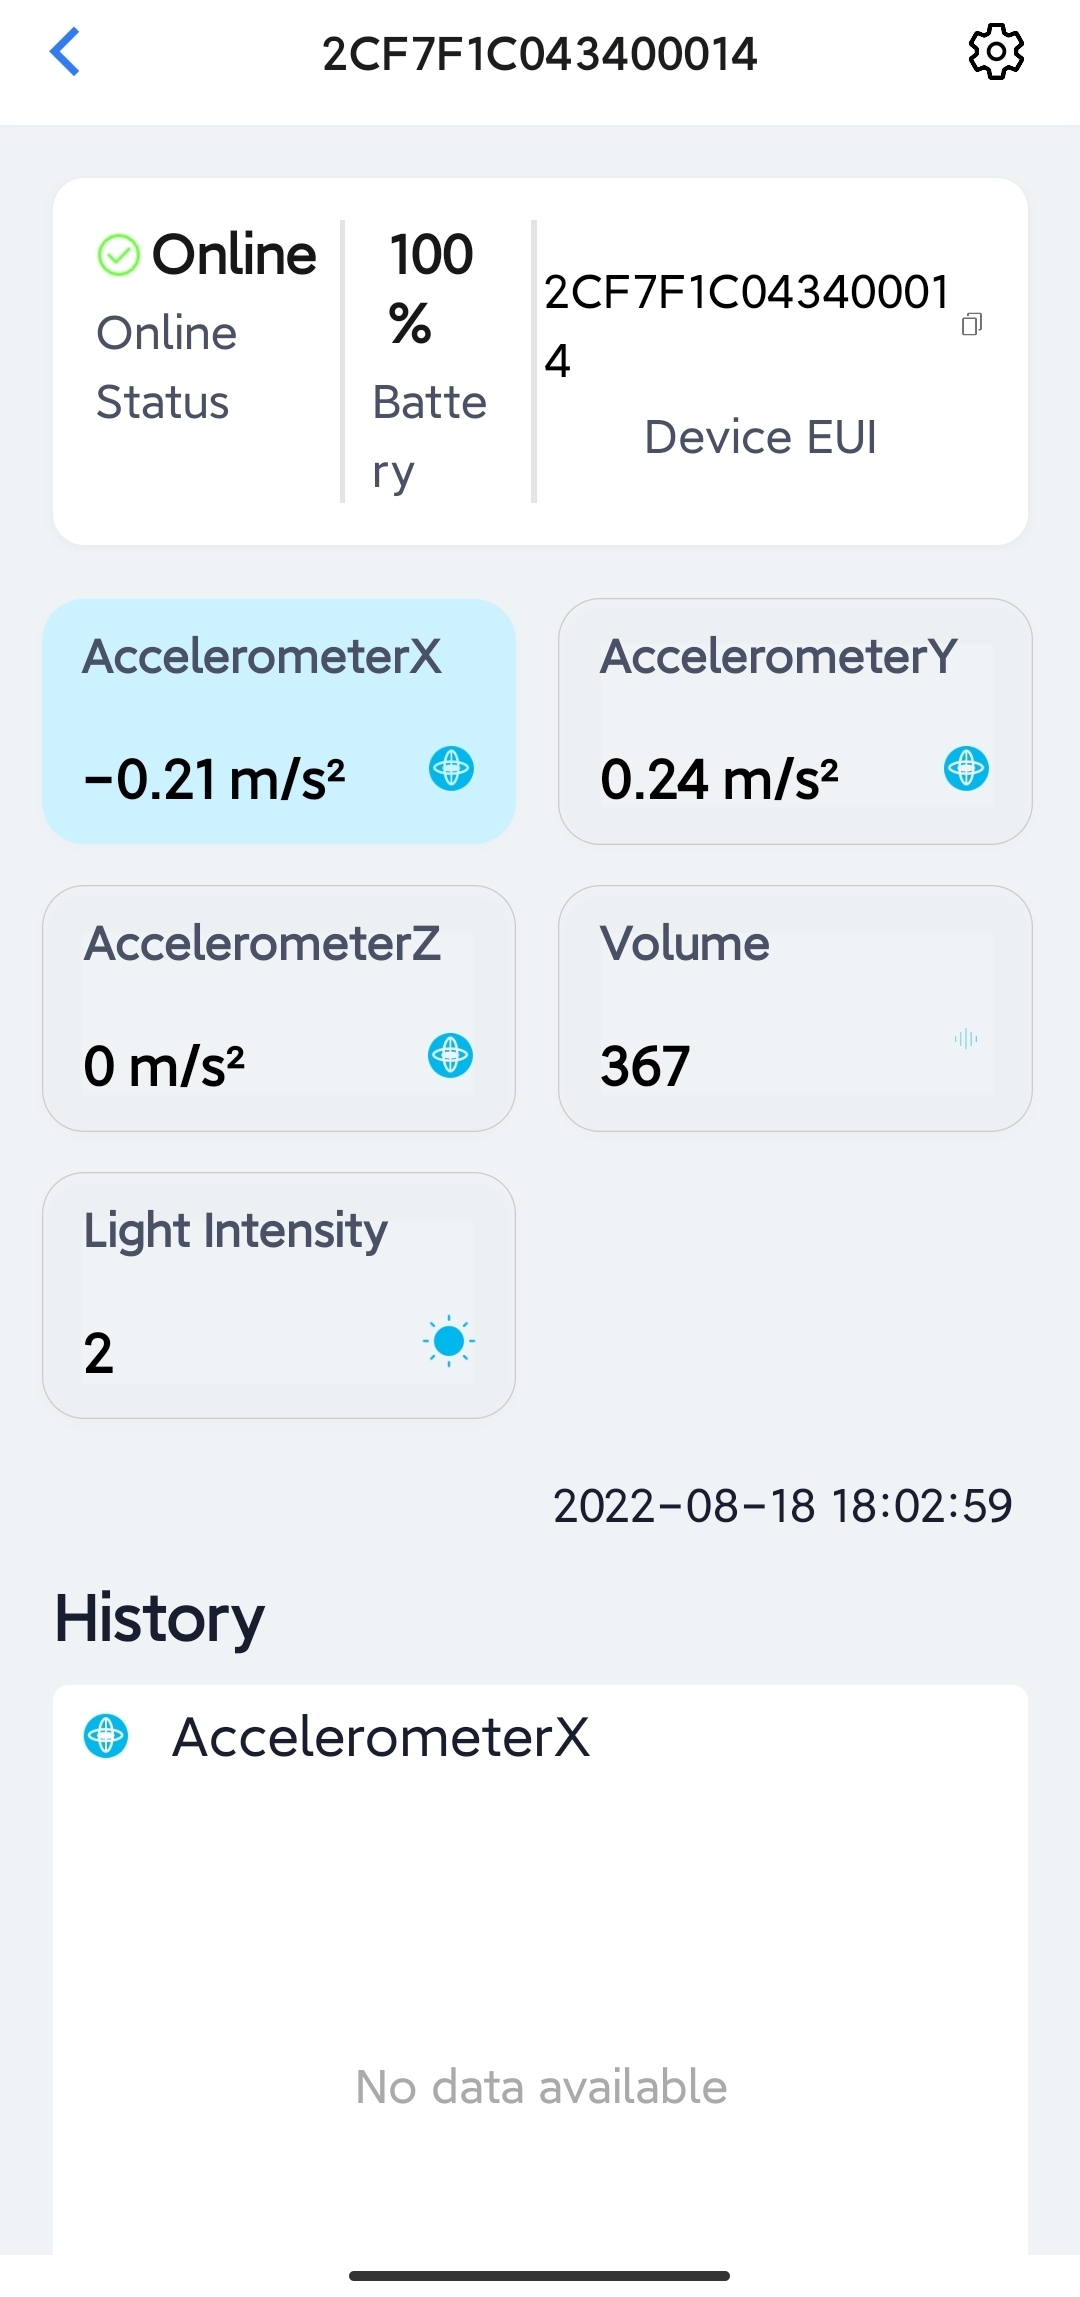
After successful binding using the SenseCAP Mate App, you will see the sensor data displayed on the app.
The SenseCAP Mate App will not automatically refresh the data information, you will need to manually scroll down on the sensor page to refresh the data. If you do not see new data for more than 10 minutes, you can try restarting the Wio Terminal by toggling down the side button once.
- Option 2. Bind the device on the SenseCAP web platform
Please use your browser to open the SenseCAP Console. If this is your first time using our platform, please register an account first.
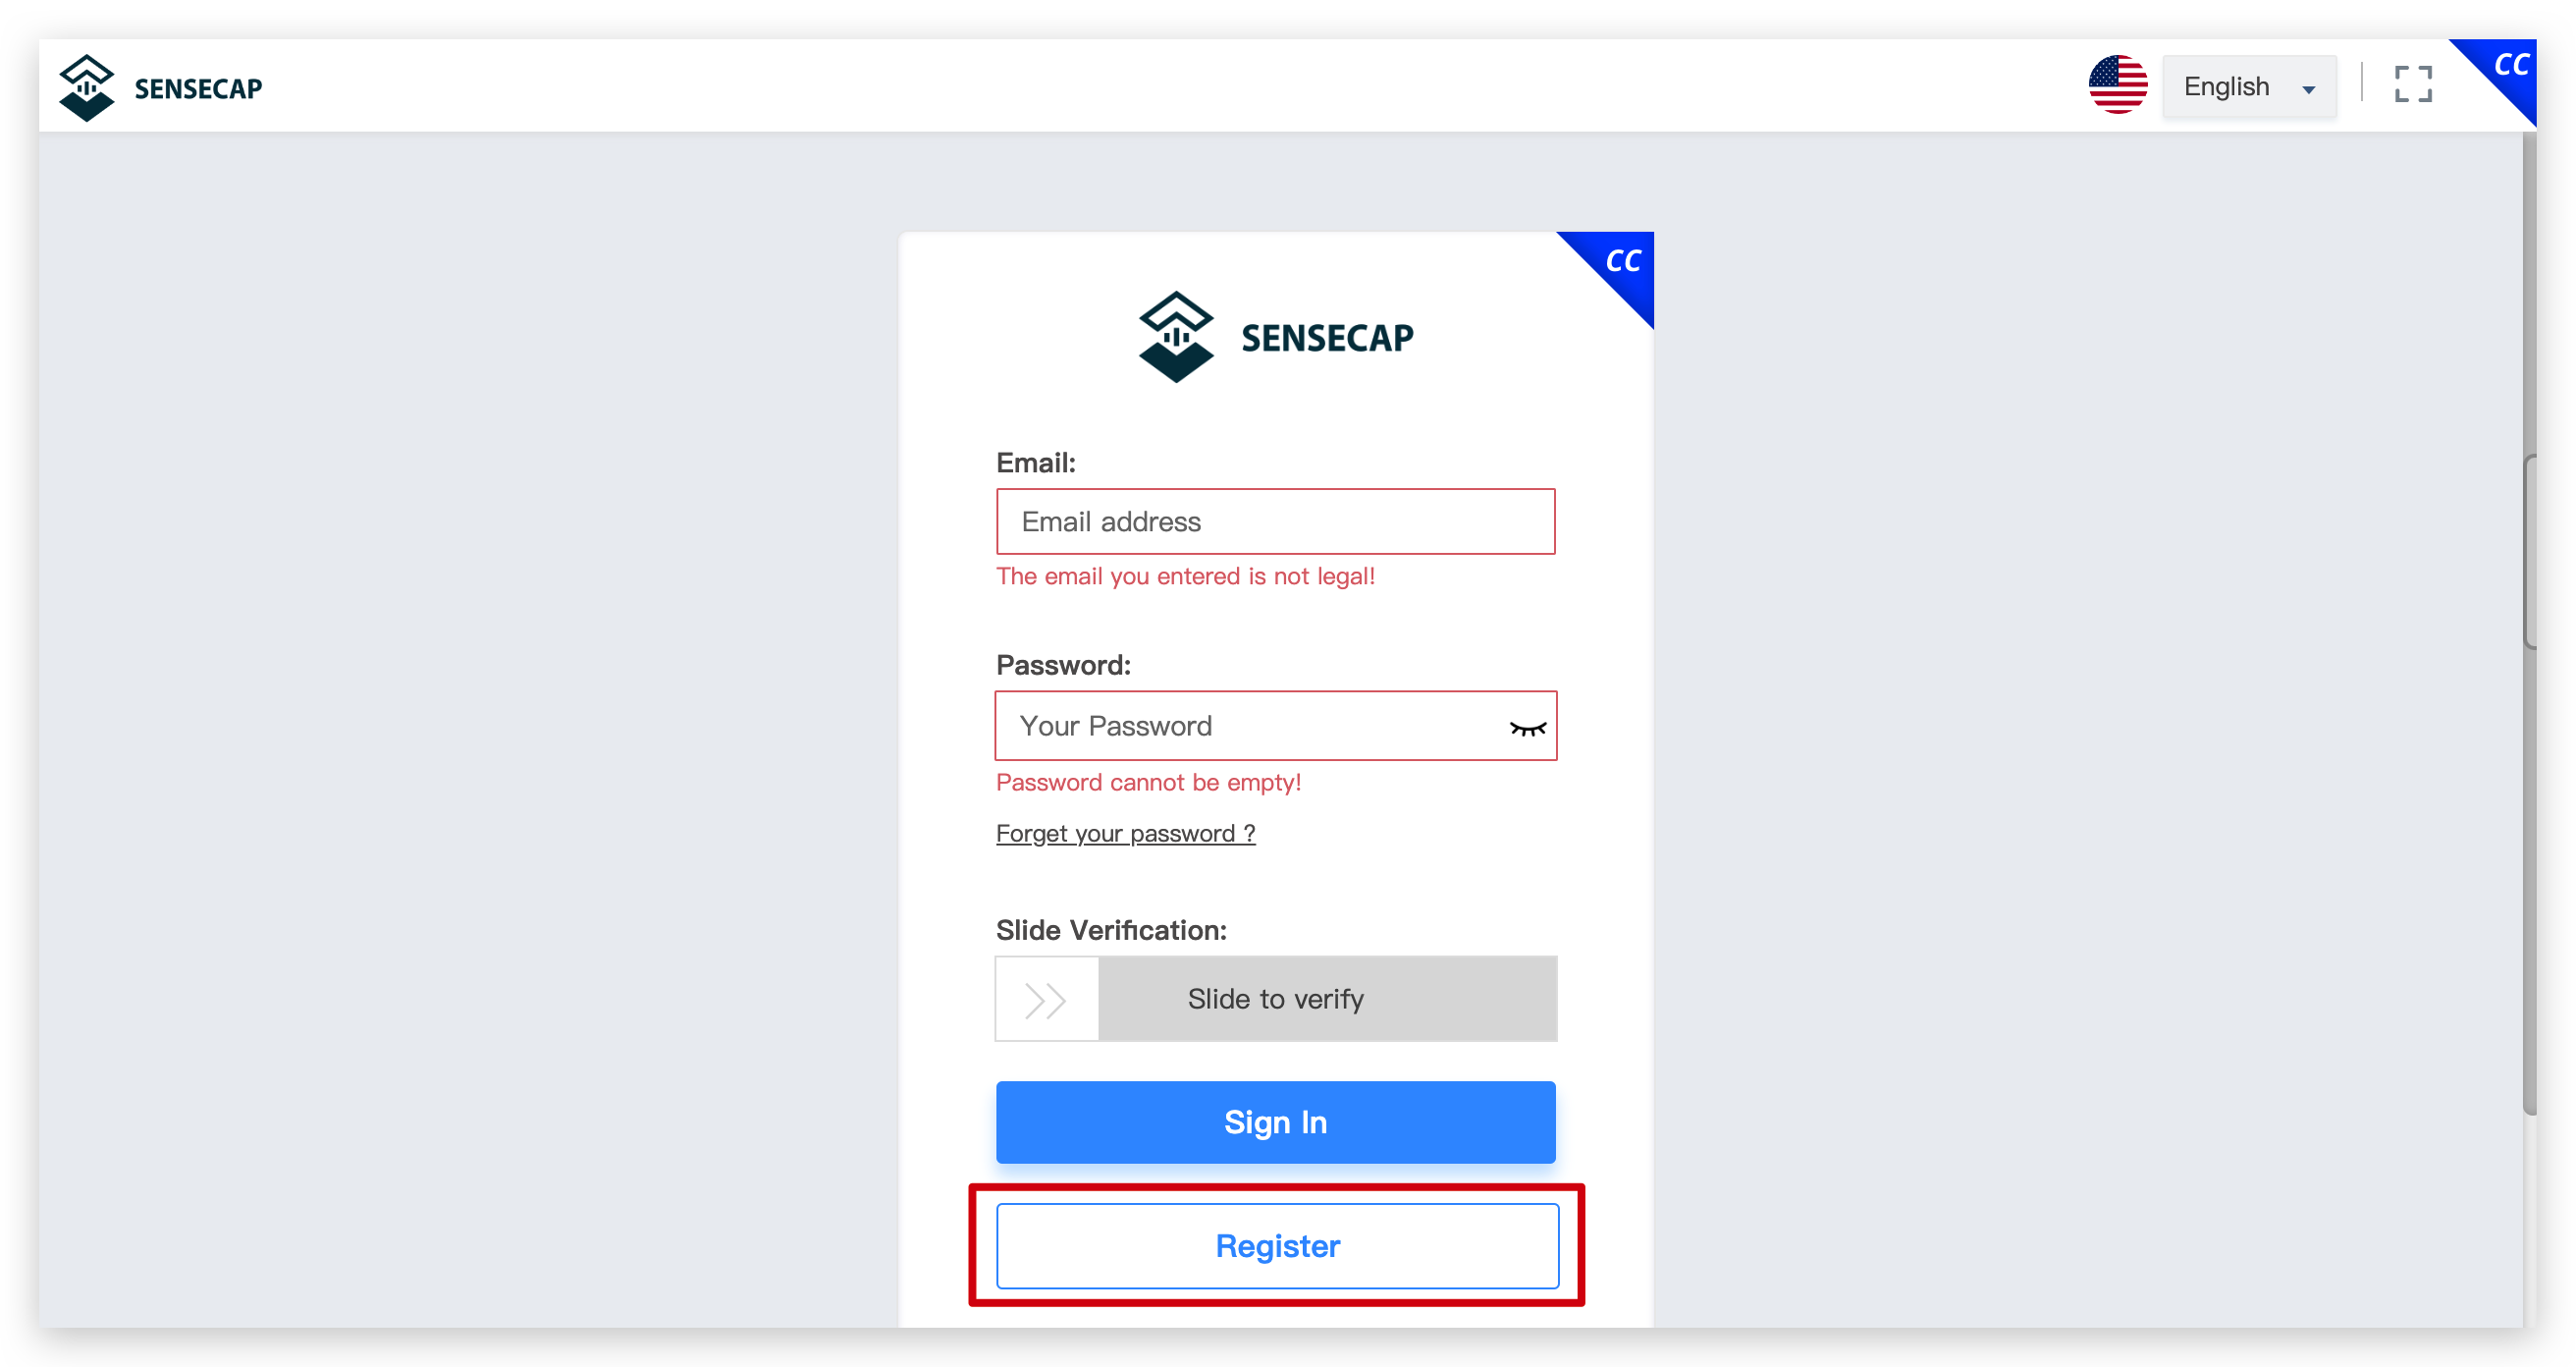
Then log in to the SenseCAP console using the account you just registered.
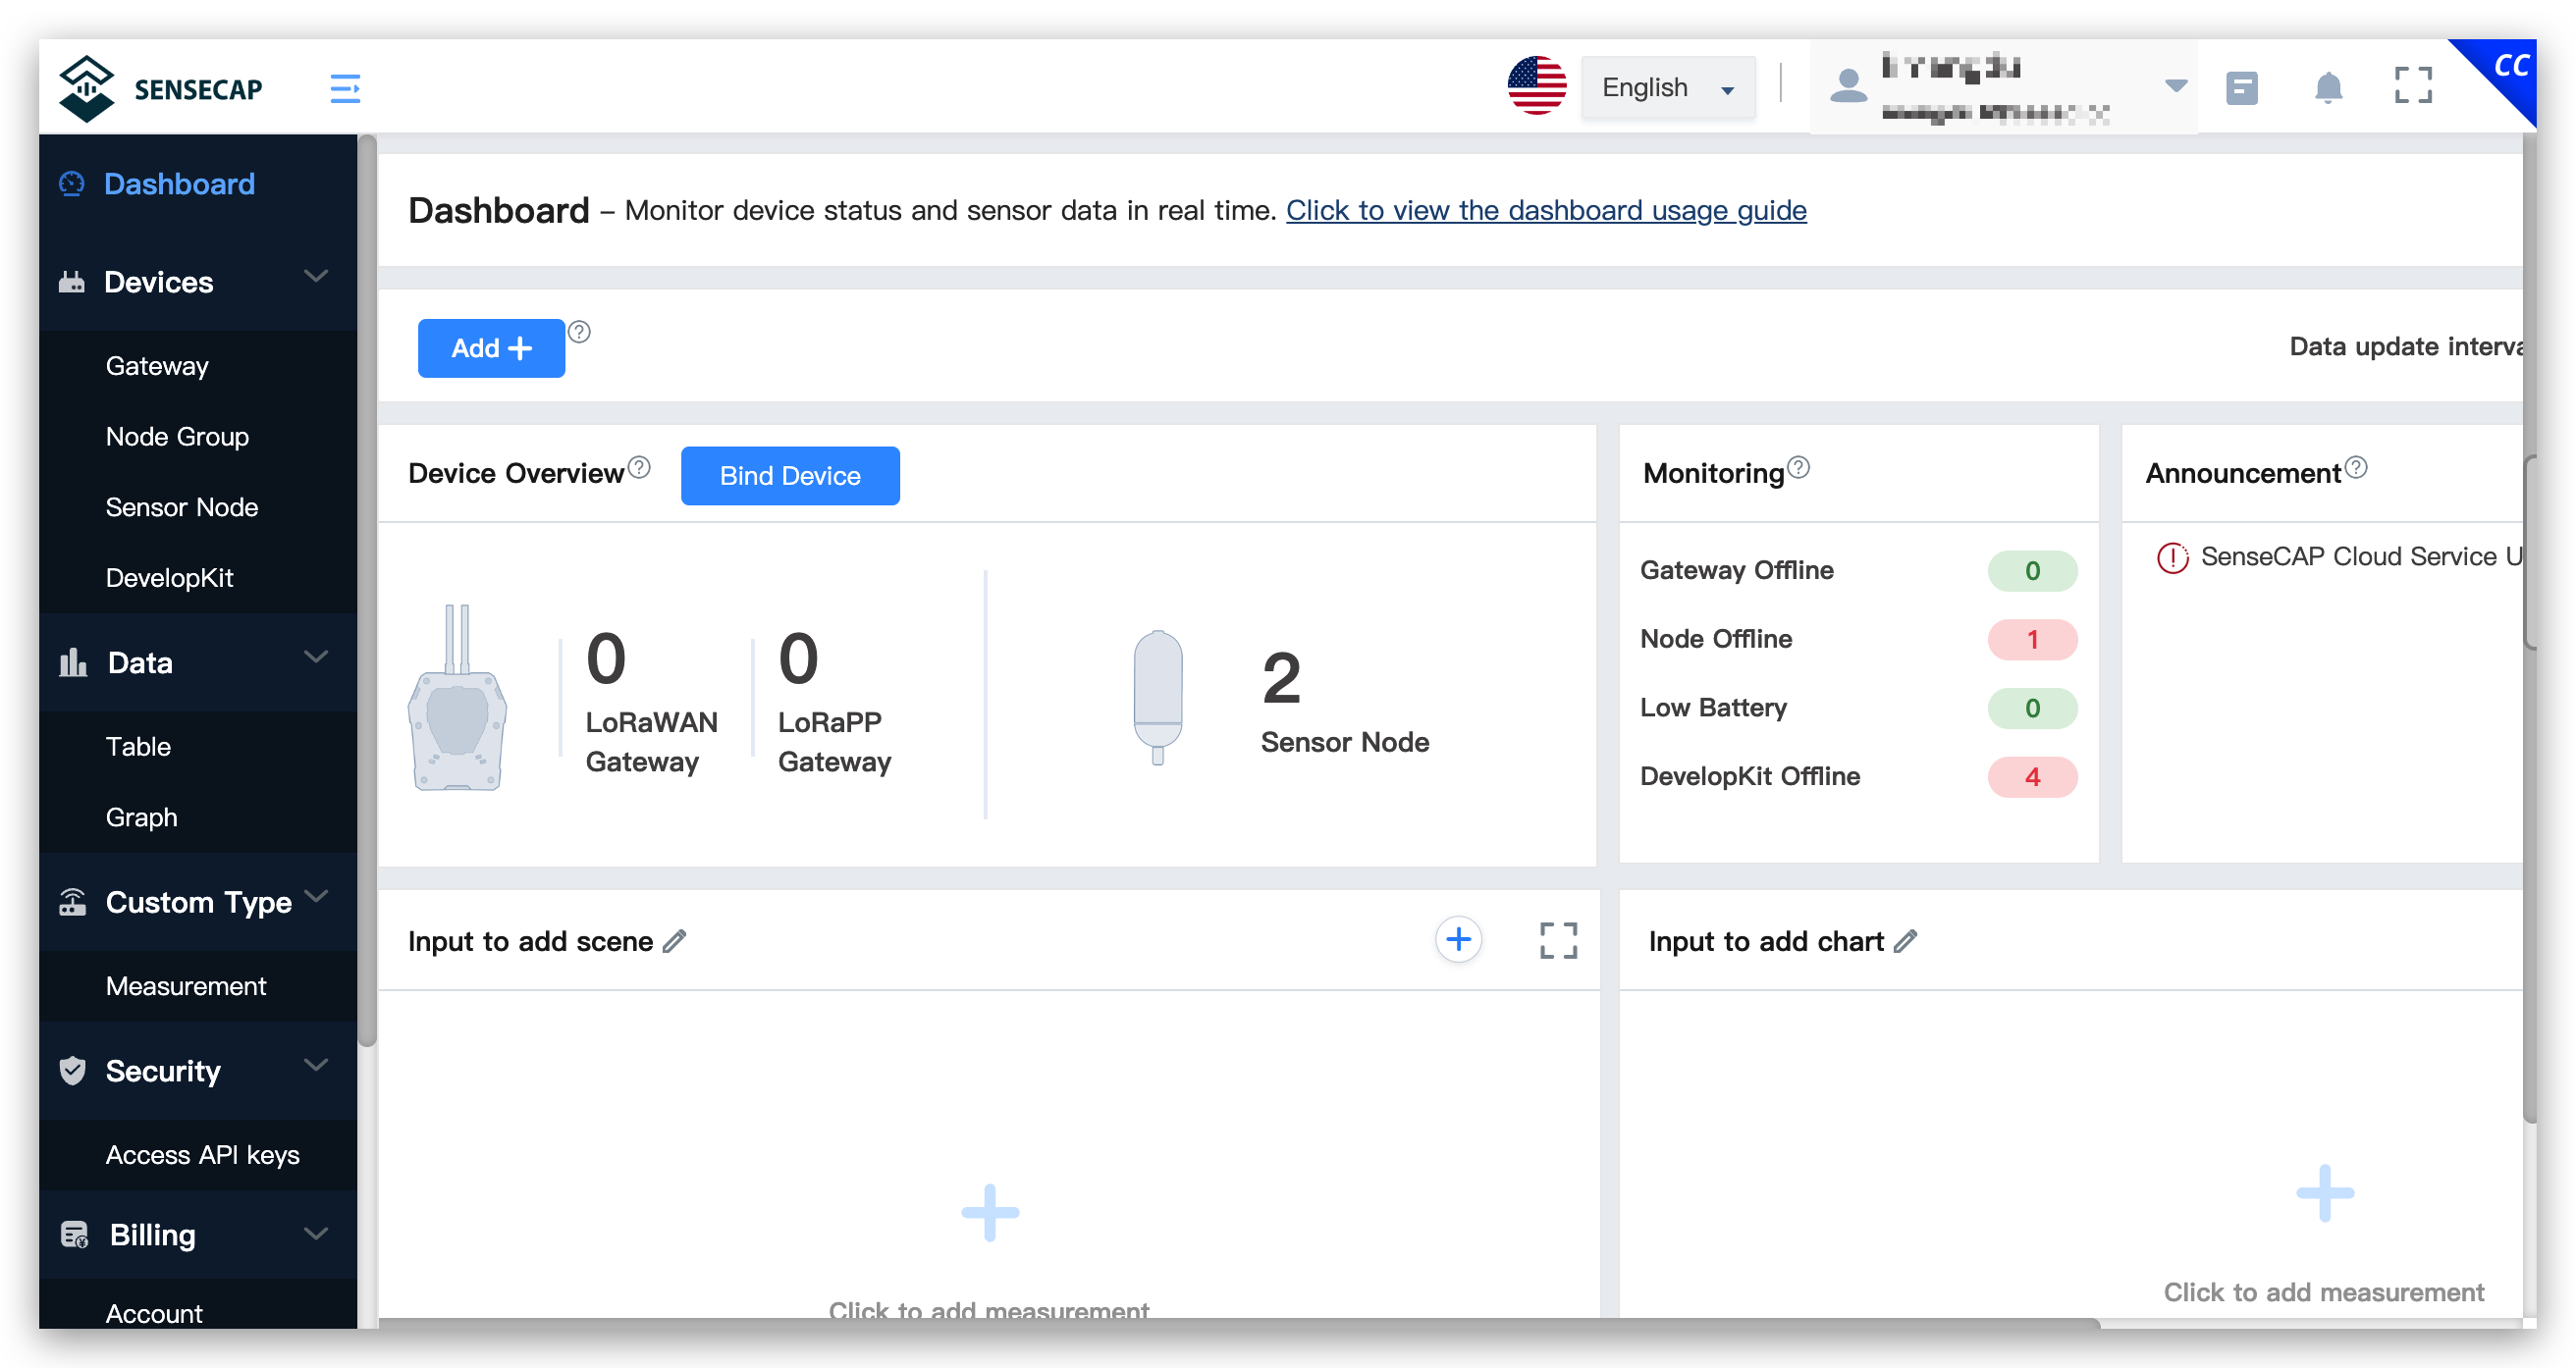
Select the Dashboard screen and click Bind Device.

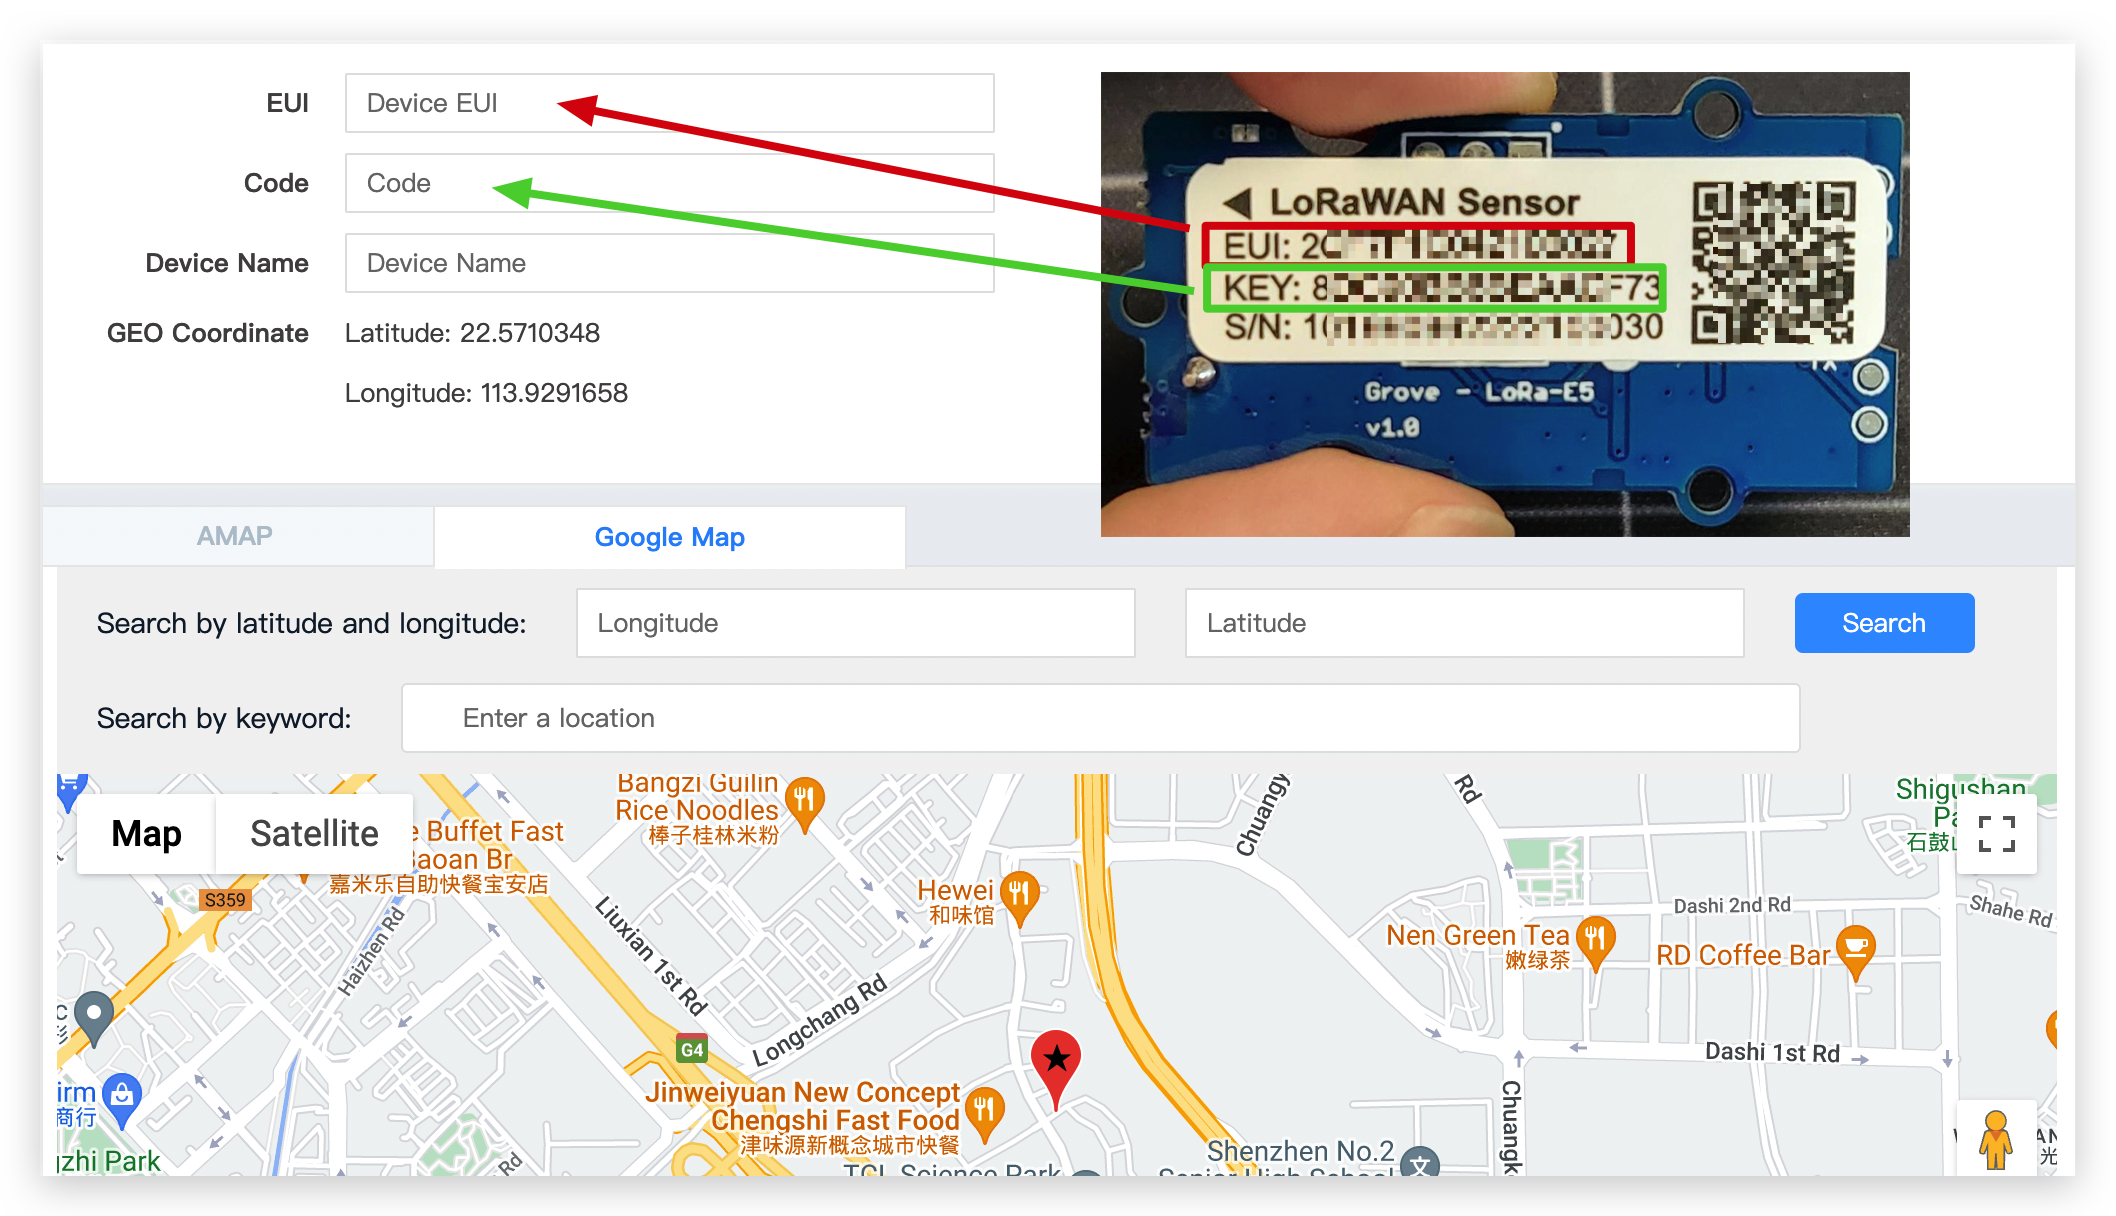
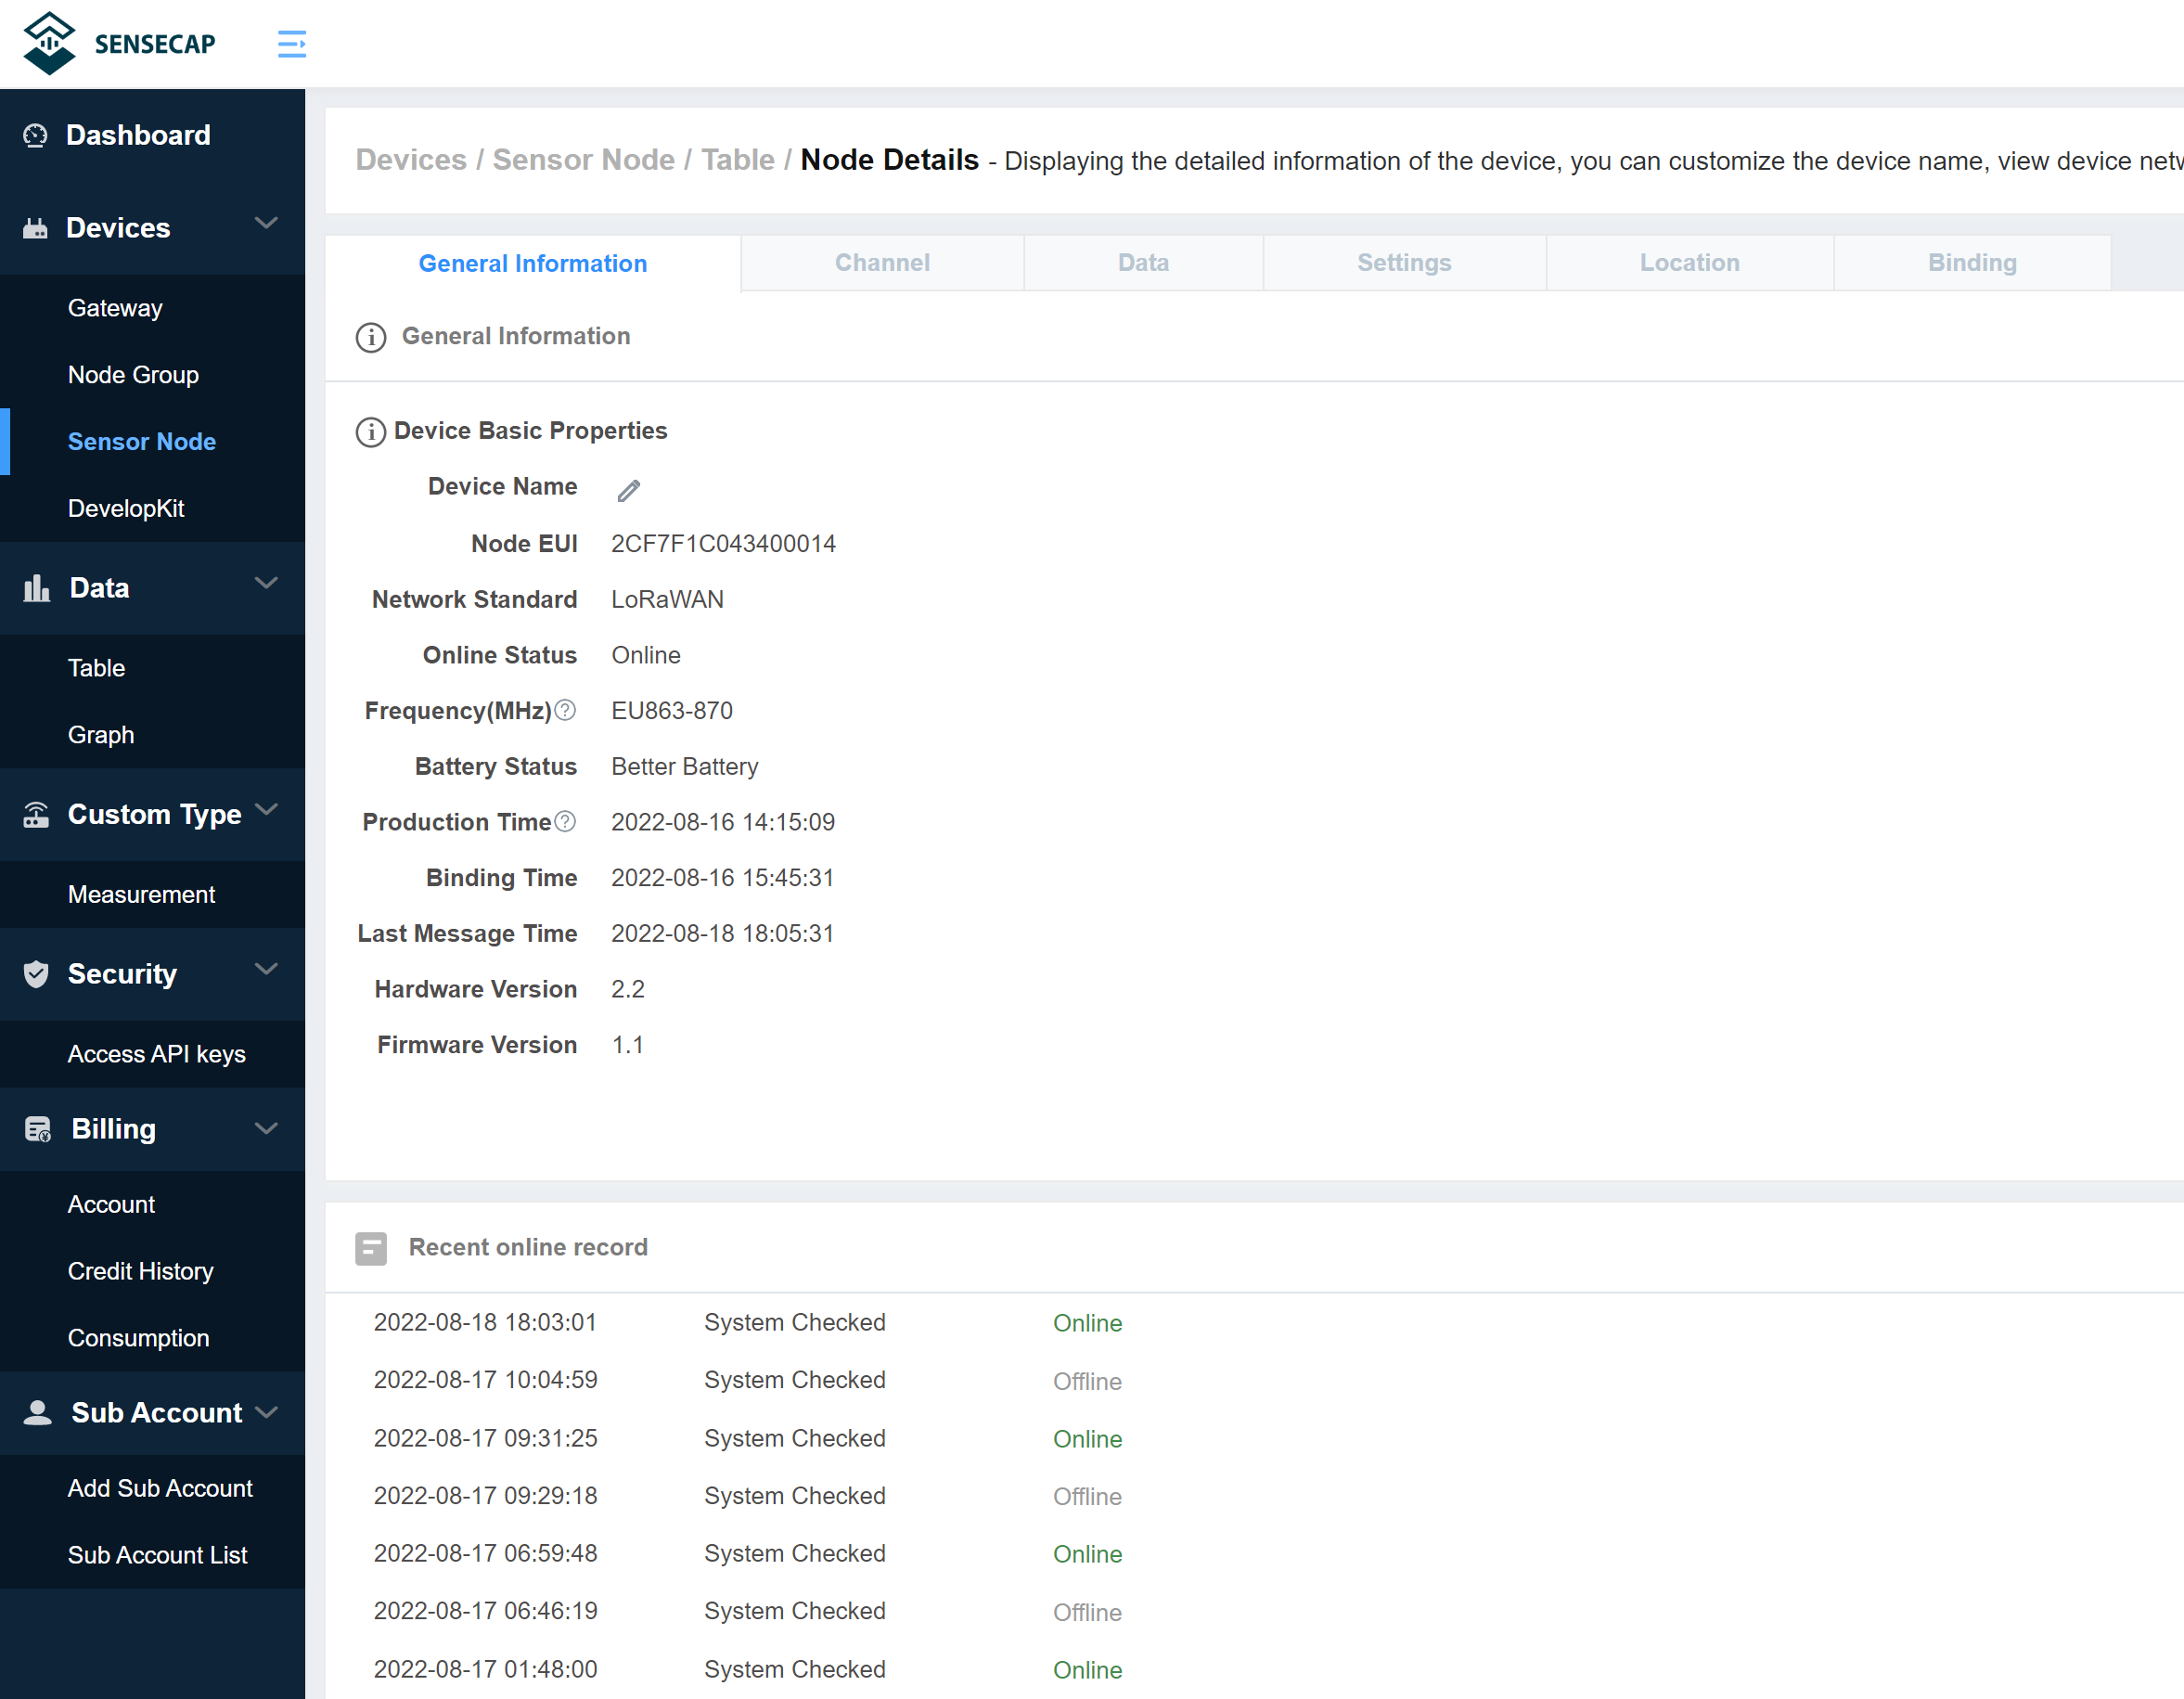
Then on the next page you will need to fill in the EUI, Code/KEY and Device Name, and you can even set the location for the device. (Grove - Wio-E5 does not have a location function)
Some of the required information can be found on the sticker on the back of the Grove - Wio-E5. Please fill in the device name as you need it.
After filling out the above content, click the Confirm button below to complete the device binding.
After successful binding using the web platform you will see the sensor data displayed on the platform.
SenseCAP on the web also does not have automatic data refresh and you will need to refresh your browser to see the latest data.
Once you have selected the band, you will need to wait a little while for the Grove Wio E5 to finish initialising.
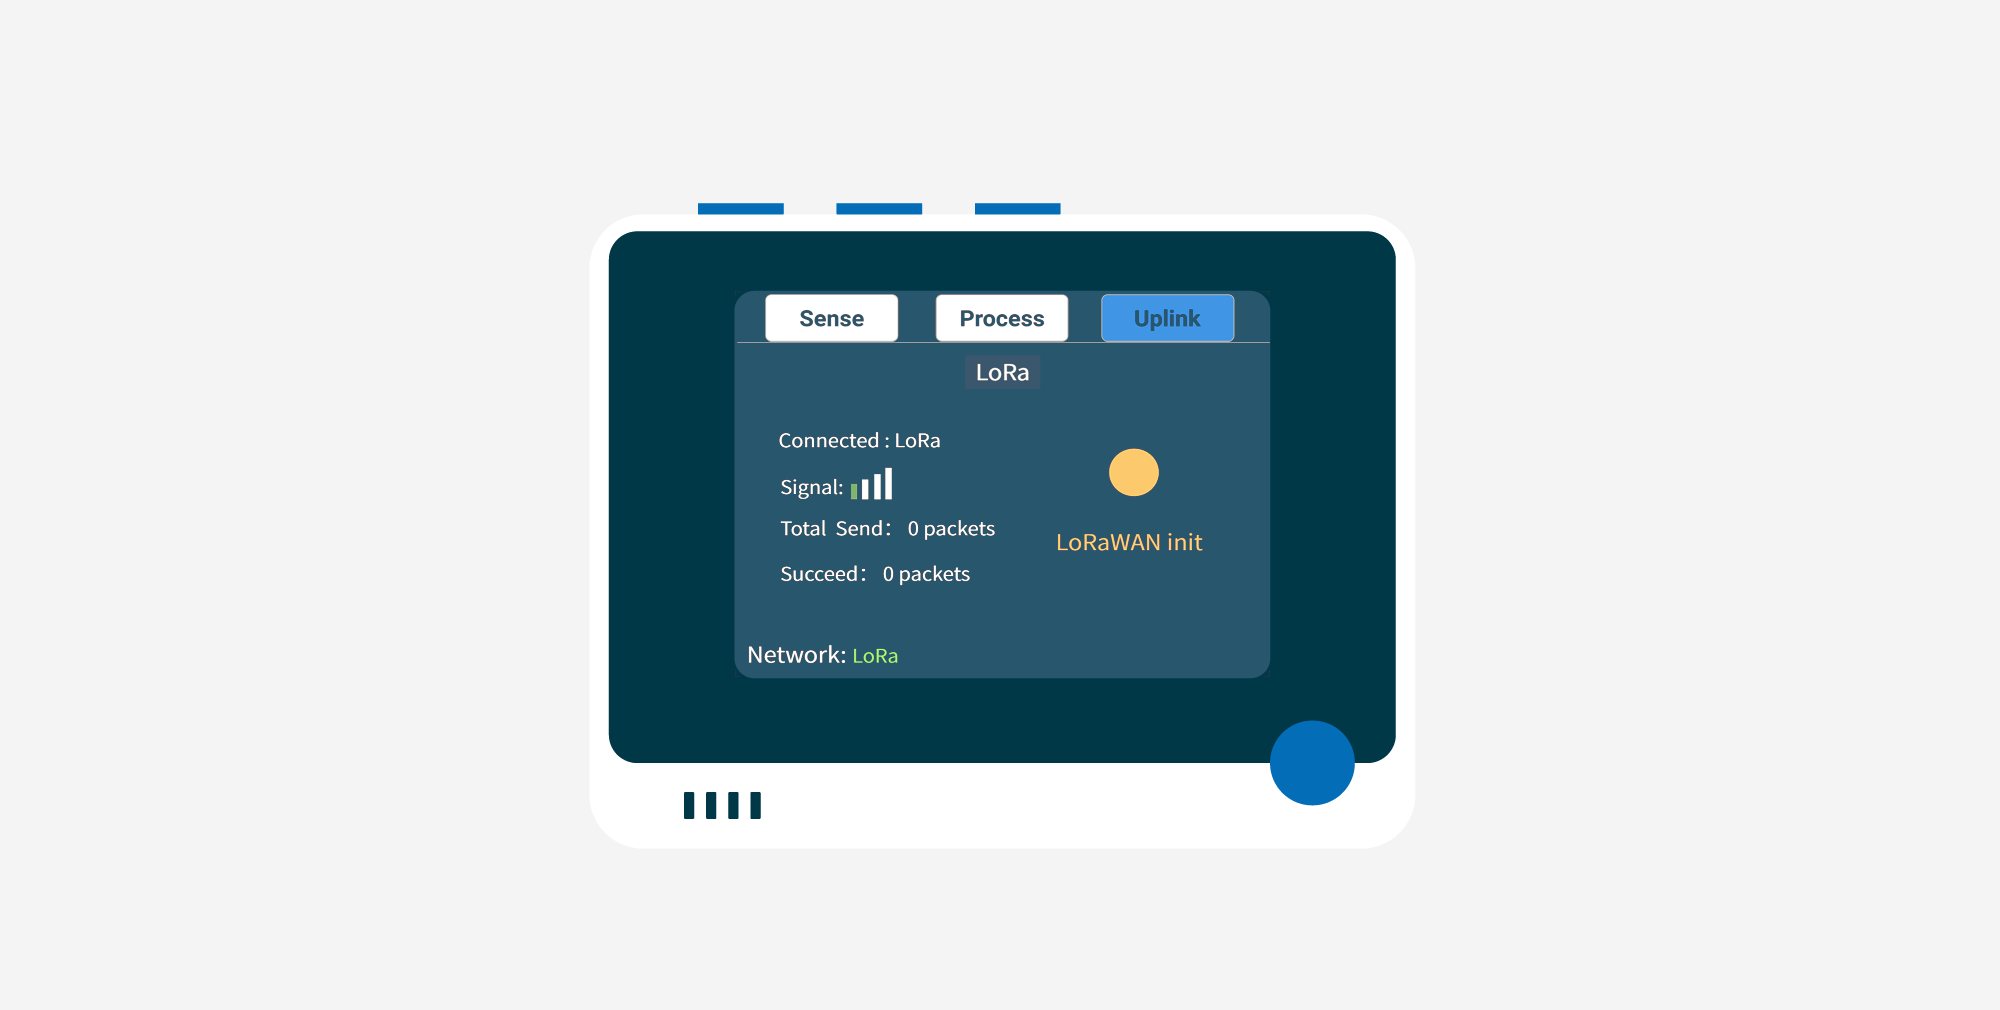
If the LoRaWAN® connection to SenseCAP platform is successful, you will see the following.

If you are not connected to the Grove Wio E5 or if the LoRaWAN® is disconnected in the middle of the process, it will show a transmission failure.
Send sensor data to Microsoft Azure IoT Central via WiFi
Here the device will use WiFi communication to send the sensor data to the cloud. Microsoft Azure IoT Central will be used to visualize the data coming from the sensors connected to Wio Terminal via WiFi!
For reasons of space, please skip to this link for the introduction to this part of the chapter.
Send sensor data to Ubidots via WiFi
Here the device will use WiFi communication to send the sensor data to the cloud. Ubidots platform will be used to visualize the data coming from the sensors connected to Wio Terminal via WiFi!
Step 1. Register and login to Ubidots
If this is your first time using Ubidots, please go to the Ubidots website and register an account of your own.
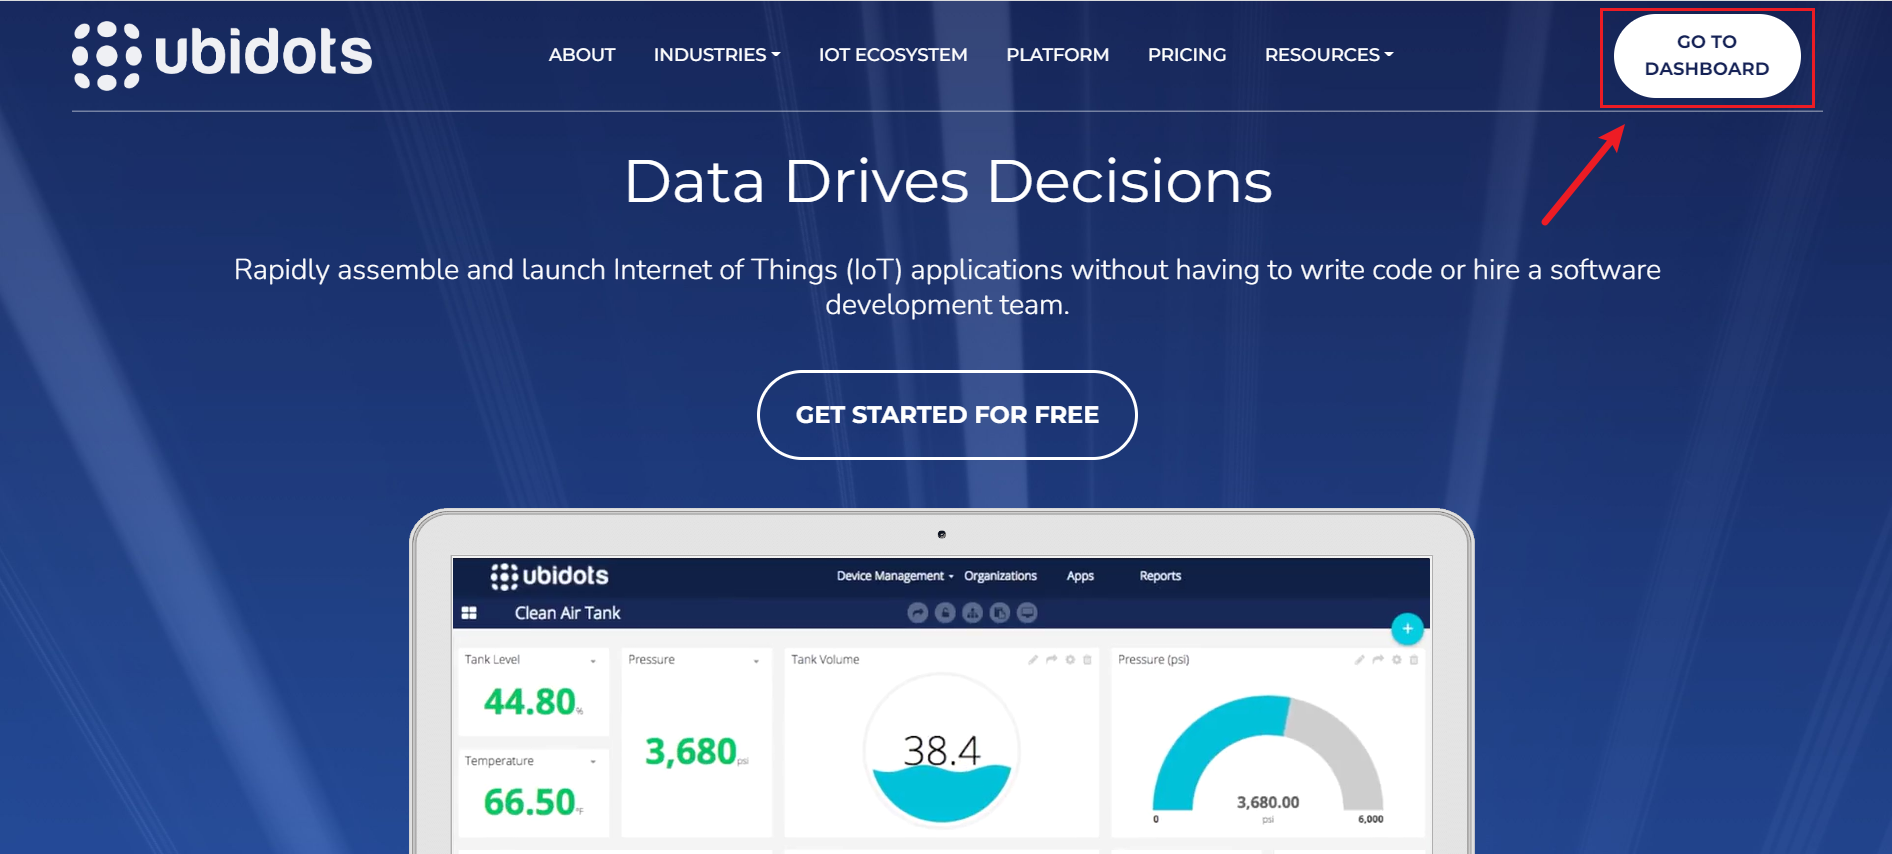
Once you have registered, please login to Ubidots using your registered account.
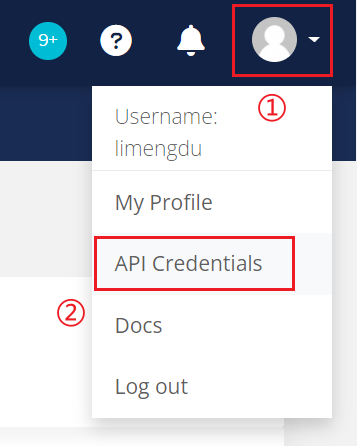
Step 2. Assign your unique Ubidots TOKEN
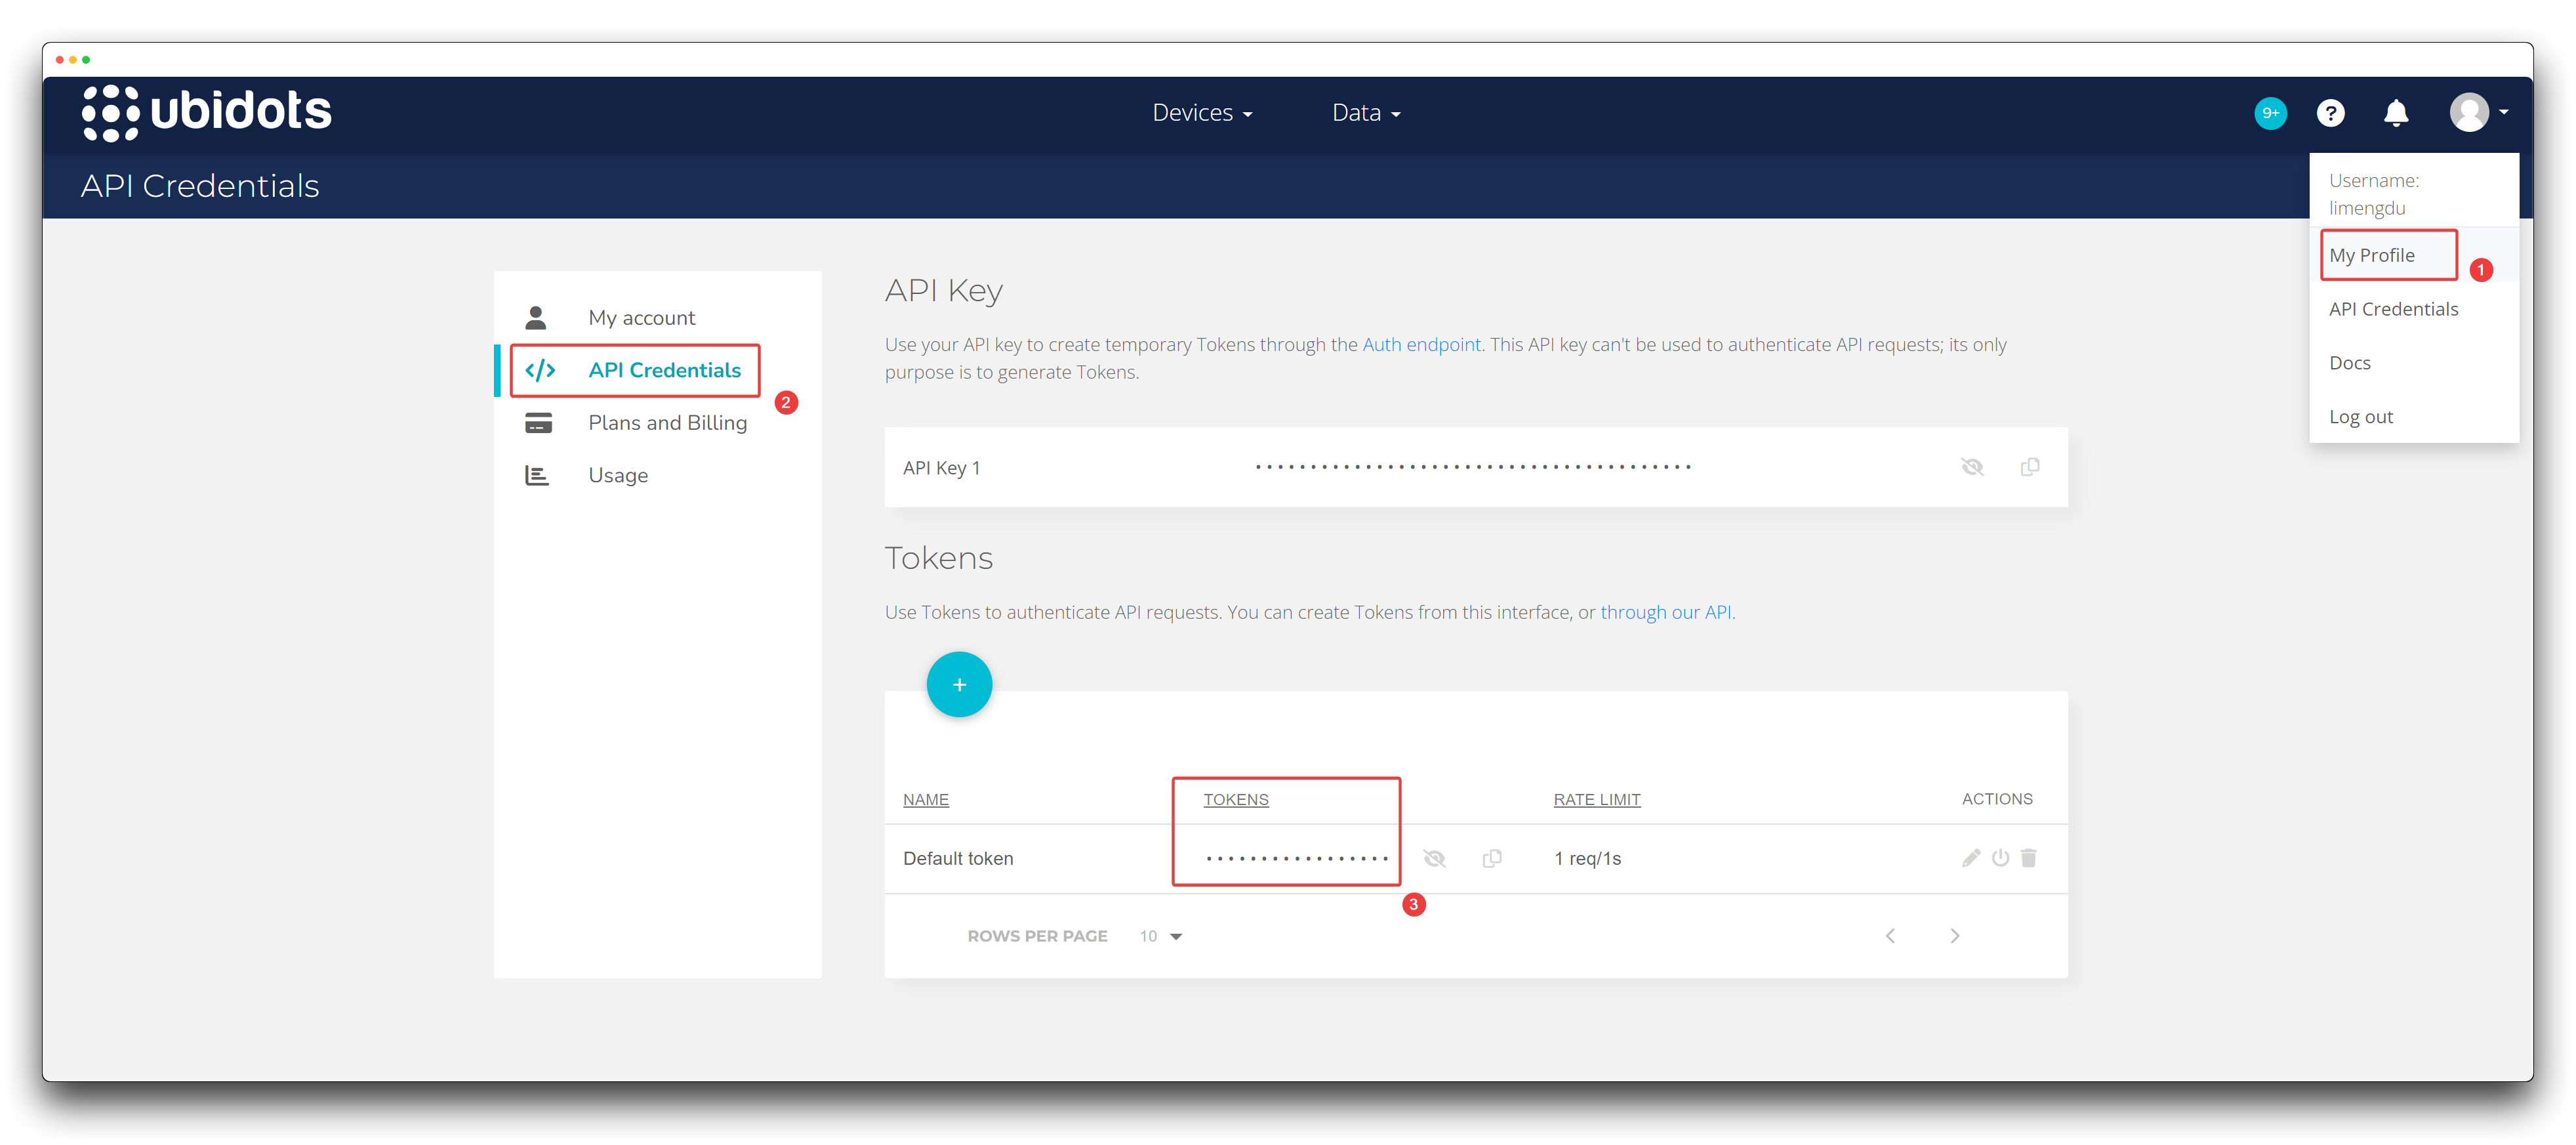
Every request to Ubidots requires a TOKEN. The easiest way to get yours is clicking on API Credentials from the user dropdown.
Go to you user dropdown and click on API credentials:
Tokens: Temporary and revocable keys to be used in your API requests. Please save the TOKEN for now, we will use it later.
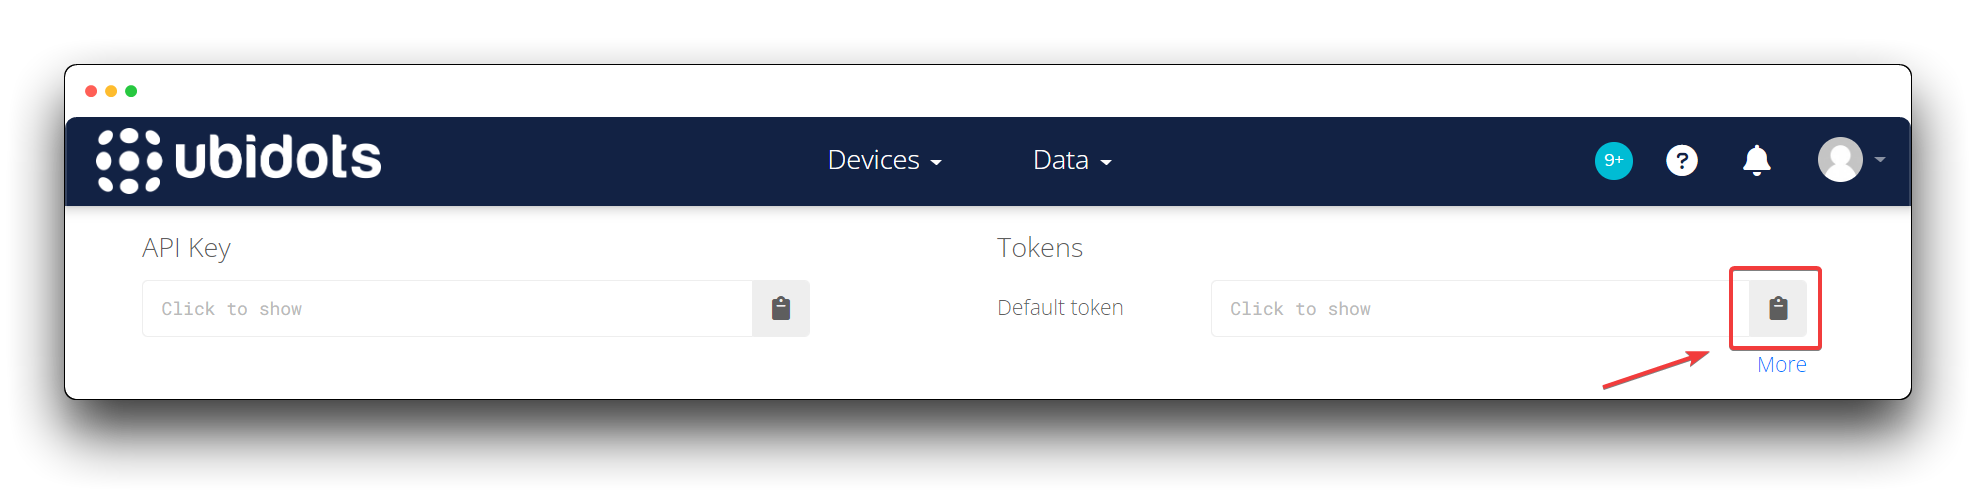
All API calls only accept your TOKEN. Don’t try to use your API Key, it won’t work! You can also access all of your Ubidots API Keys section of the My Profile settings in your User Dropdown. Select My Profile –> API Credentials to review the list of API TOKENS relating to your specific Ubidots Account.
Step 3. Be prepared with the necessary information
To establish an MQTT connection, we will need to prepare the following information in advance.
- WiFi Name
- Fill in the WiFi Name to which Wio Terminal can connect. Wio Terminal will search for WiFi within its surroundings and try to connect to it.
- Password for WiFi
- Fill in the password for the WiFi to which Wio Terminal can connect.
- MQTT client name
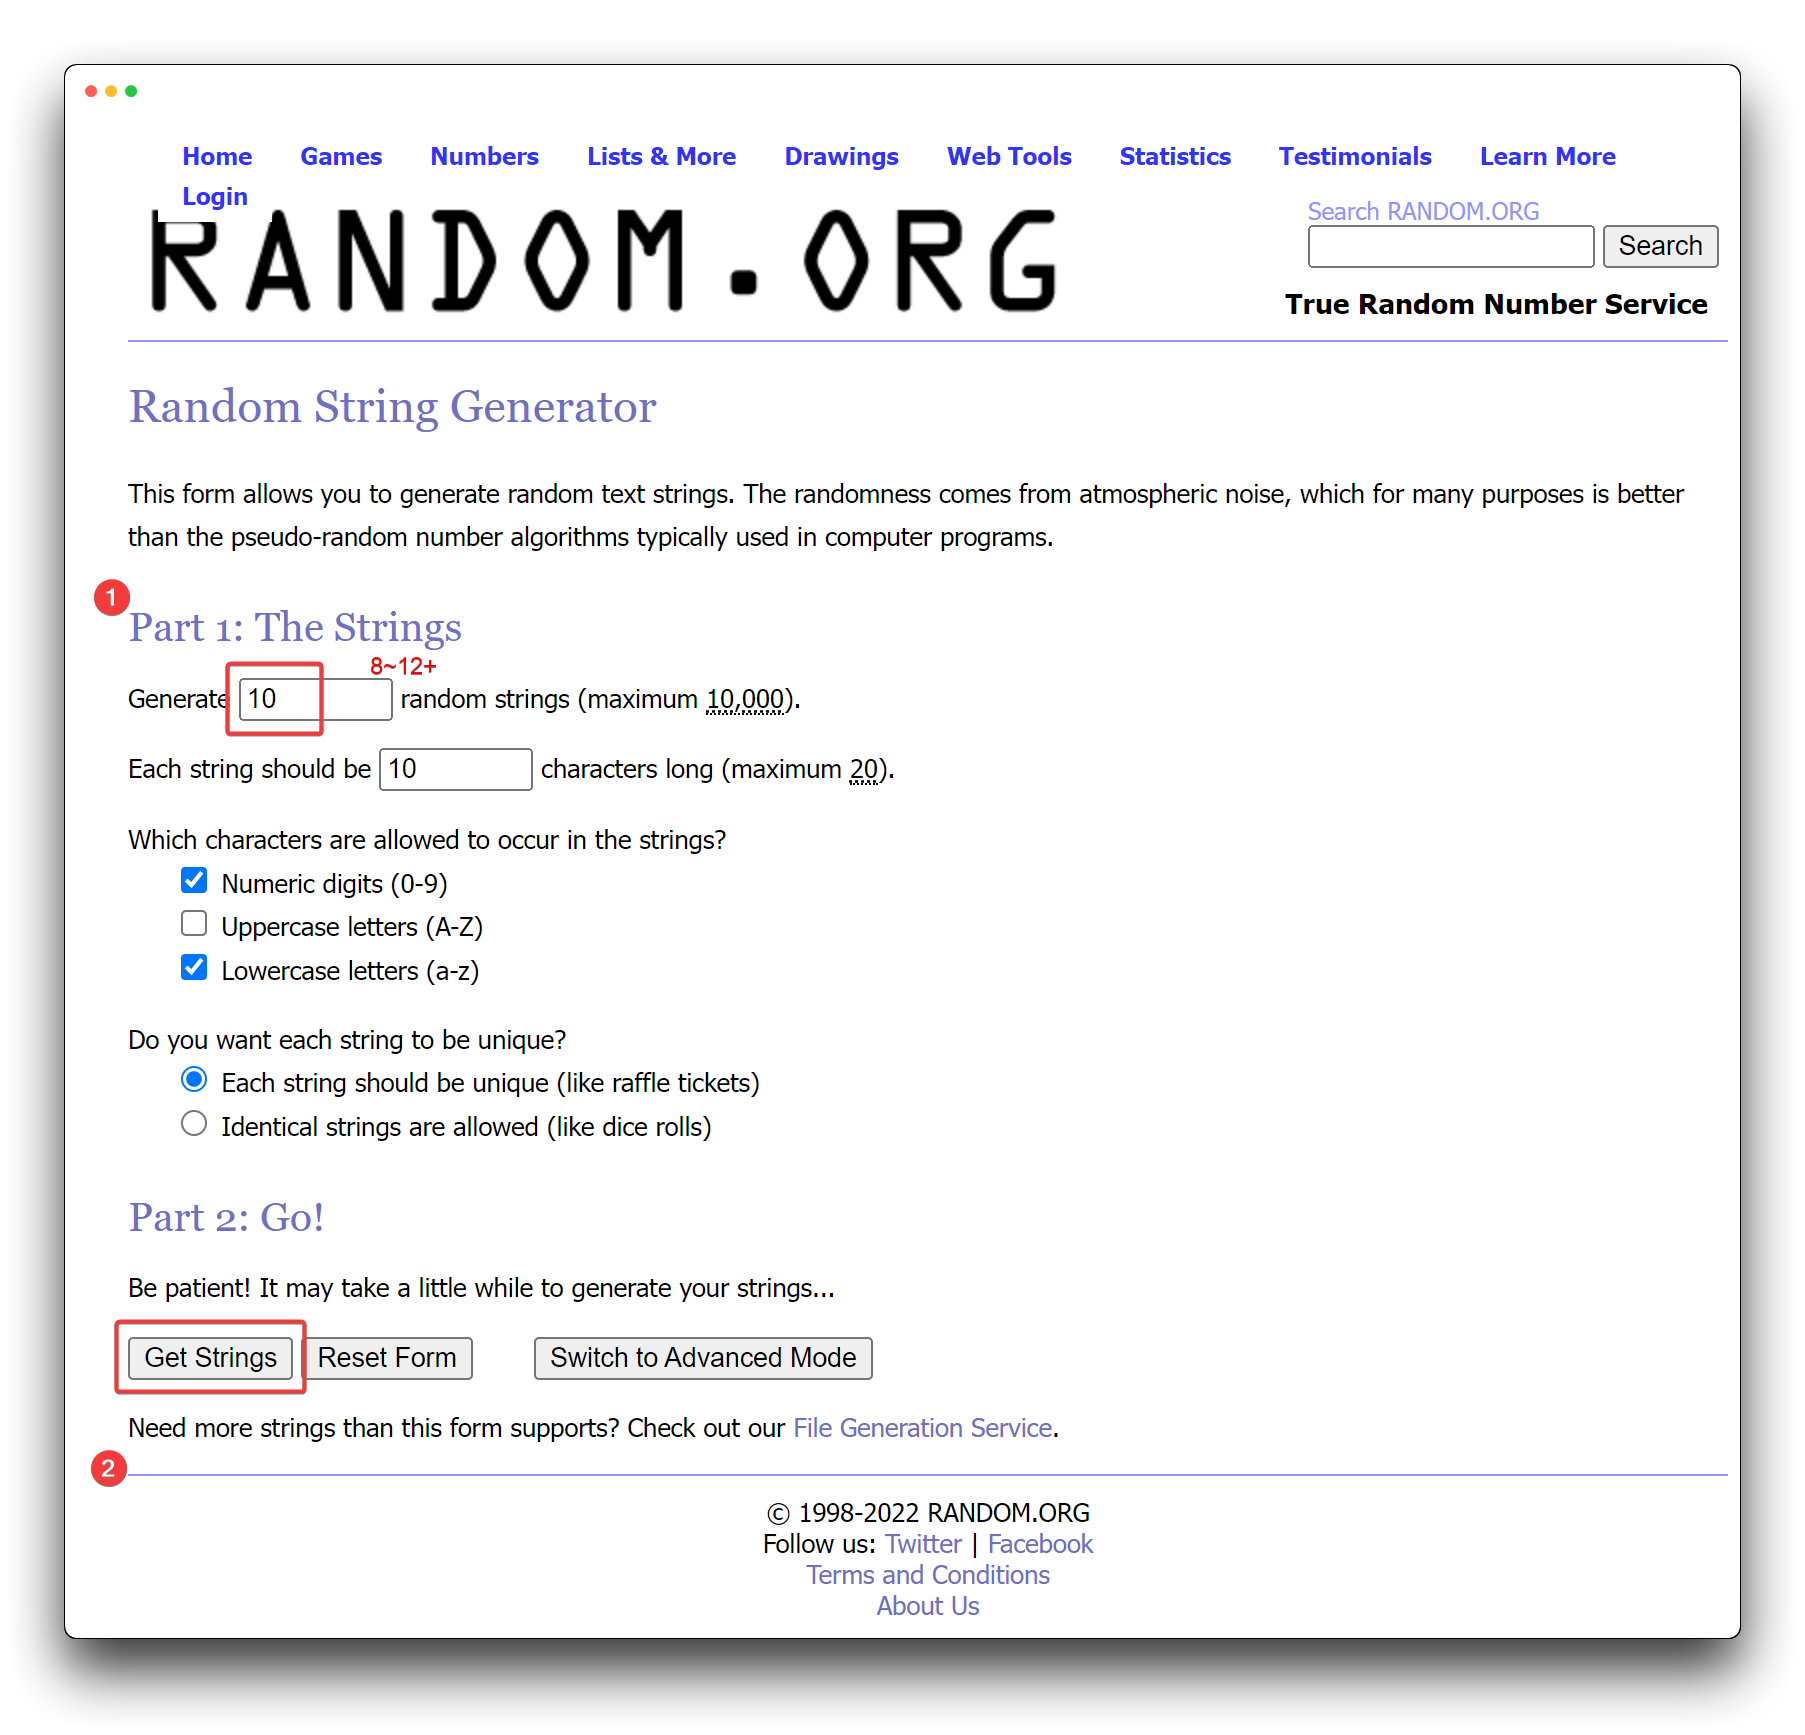
- This is special because it is the ID with which your device will be identified by the broker so it MUST be unique. If your device tries to connect with the same ID that has already been taken by another device, the connection will be refused. Please create your own all alphanumeric 8-12+ character MQTT client name and input into the code accordingly. Need some help creating a unique MQTT client name, check out this random ascii builder, or simply use the MAC address of your device as every MAC address is globally unique.
- Ubidots TOKEN
- This is the TOKEN generated in step 2.
- Device label
- This is the name of the device and the name of the device provided by the user will be used by Ubidots to identify the device. If the Device label don’t exist before the first dot is sent, Ubidots will create them automatically.
Please have the above ready as we will use them in the next step.
Step 4. Confige config.txt.
When we use the SenseCraft, an external drivers appears as soon as the Wio Terminal is connected to the computer.
This means that the USB stick appears when the Wio Terminal is connected to the computer, without the need to toggle the side button twice extra!
Normally there is a file called config.txt on the external drivers, so open it.
It holds the necessary information about the network connection, which we can modify to achieve automatic configuration at power-up. The contents of the config.txt file are in the following format.
SSID=WiFi_Name
PASSWORD=WiFi_Password
MQTT_CLIENT_NAME=Topic
TOKEN=Default_Token
DEVICE_LABEL=Device_Name
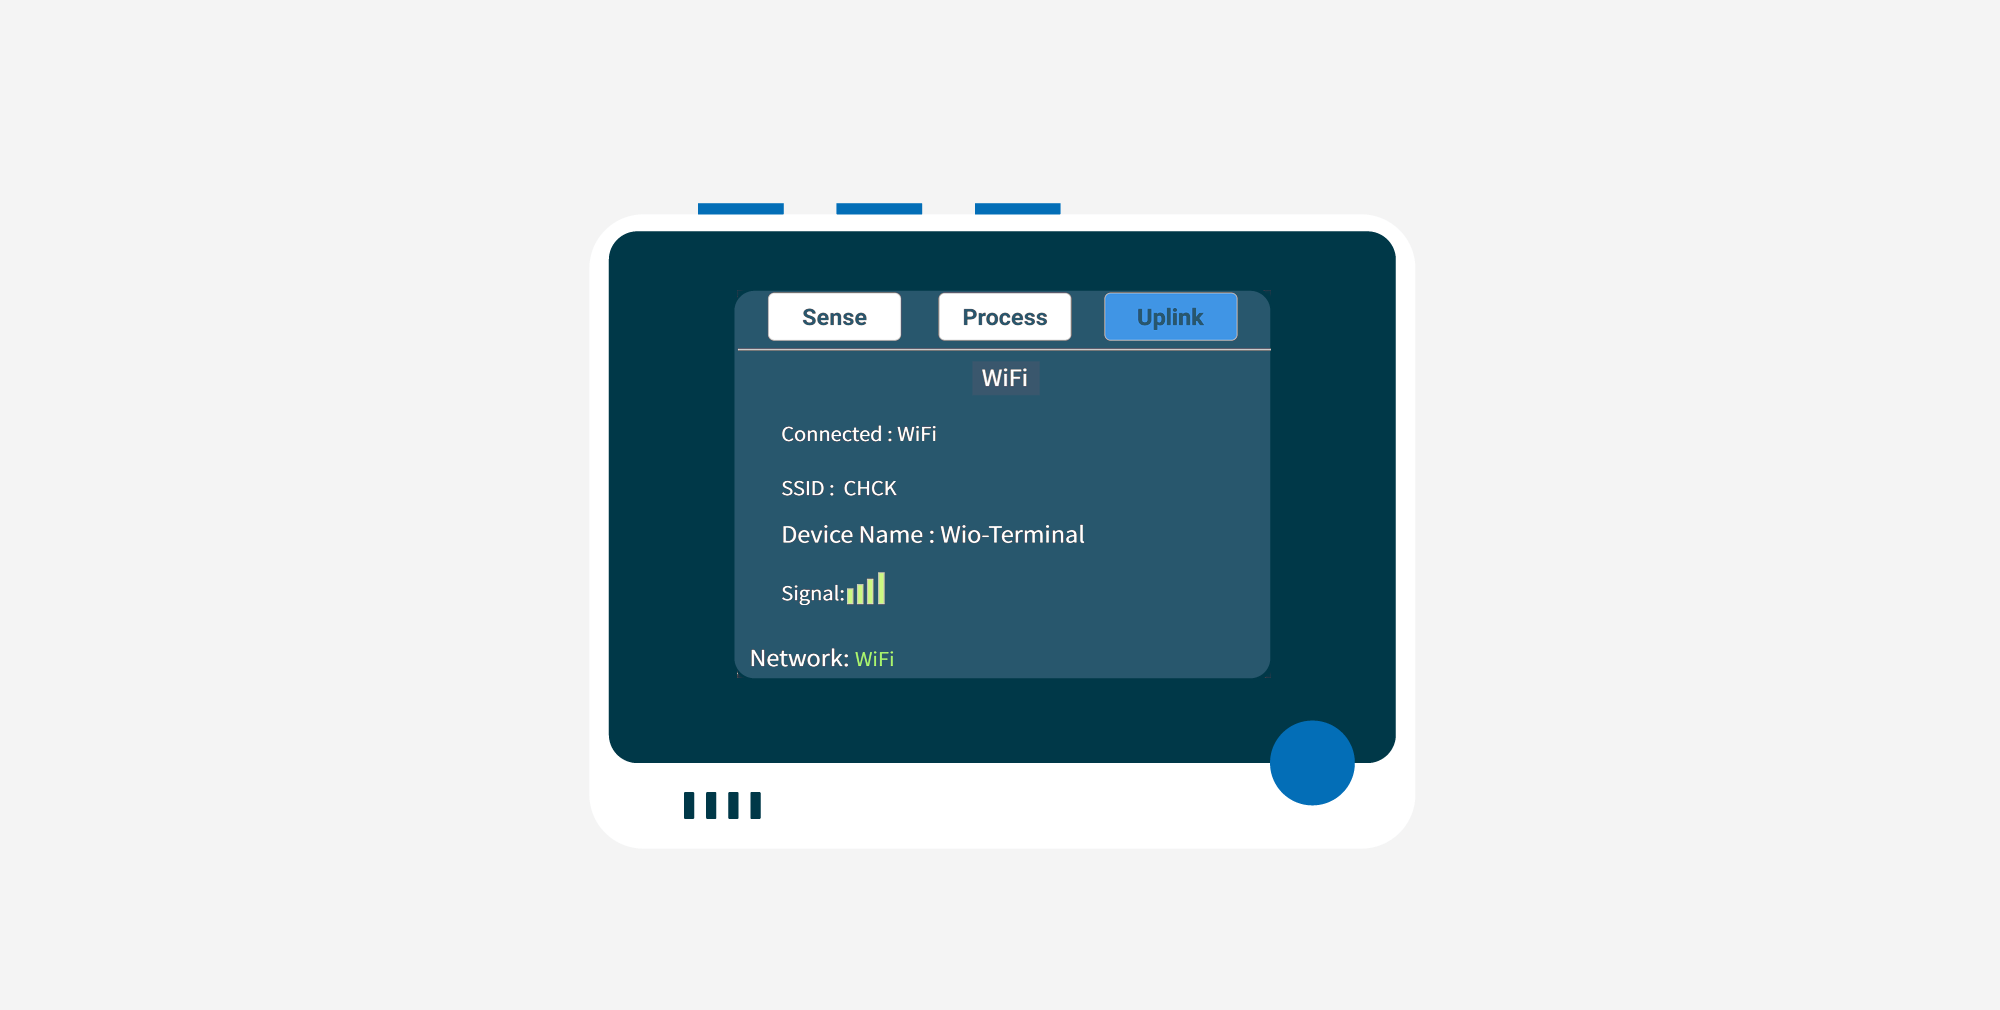
Please fill in the required fields above, corresponding to the information we obtained in step 3. Once completed, the contents of your config.txt file should look similar to the example below.
SSID=CHCK
PASSWORD=123456
MQTT_CLIENT_NAME=al49mw880j
TOKEN=BBFF-xxxxxxxxxxxxxxxxxxxxxxxxxxxxxxx
DEVICE_LABEL=Wio-Terminal
Once you have made your changes, save the config.txt file and restart Wio Terminal by flicking the side button down once.
Step 5. Enter Network tab and select WiFi.
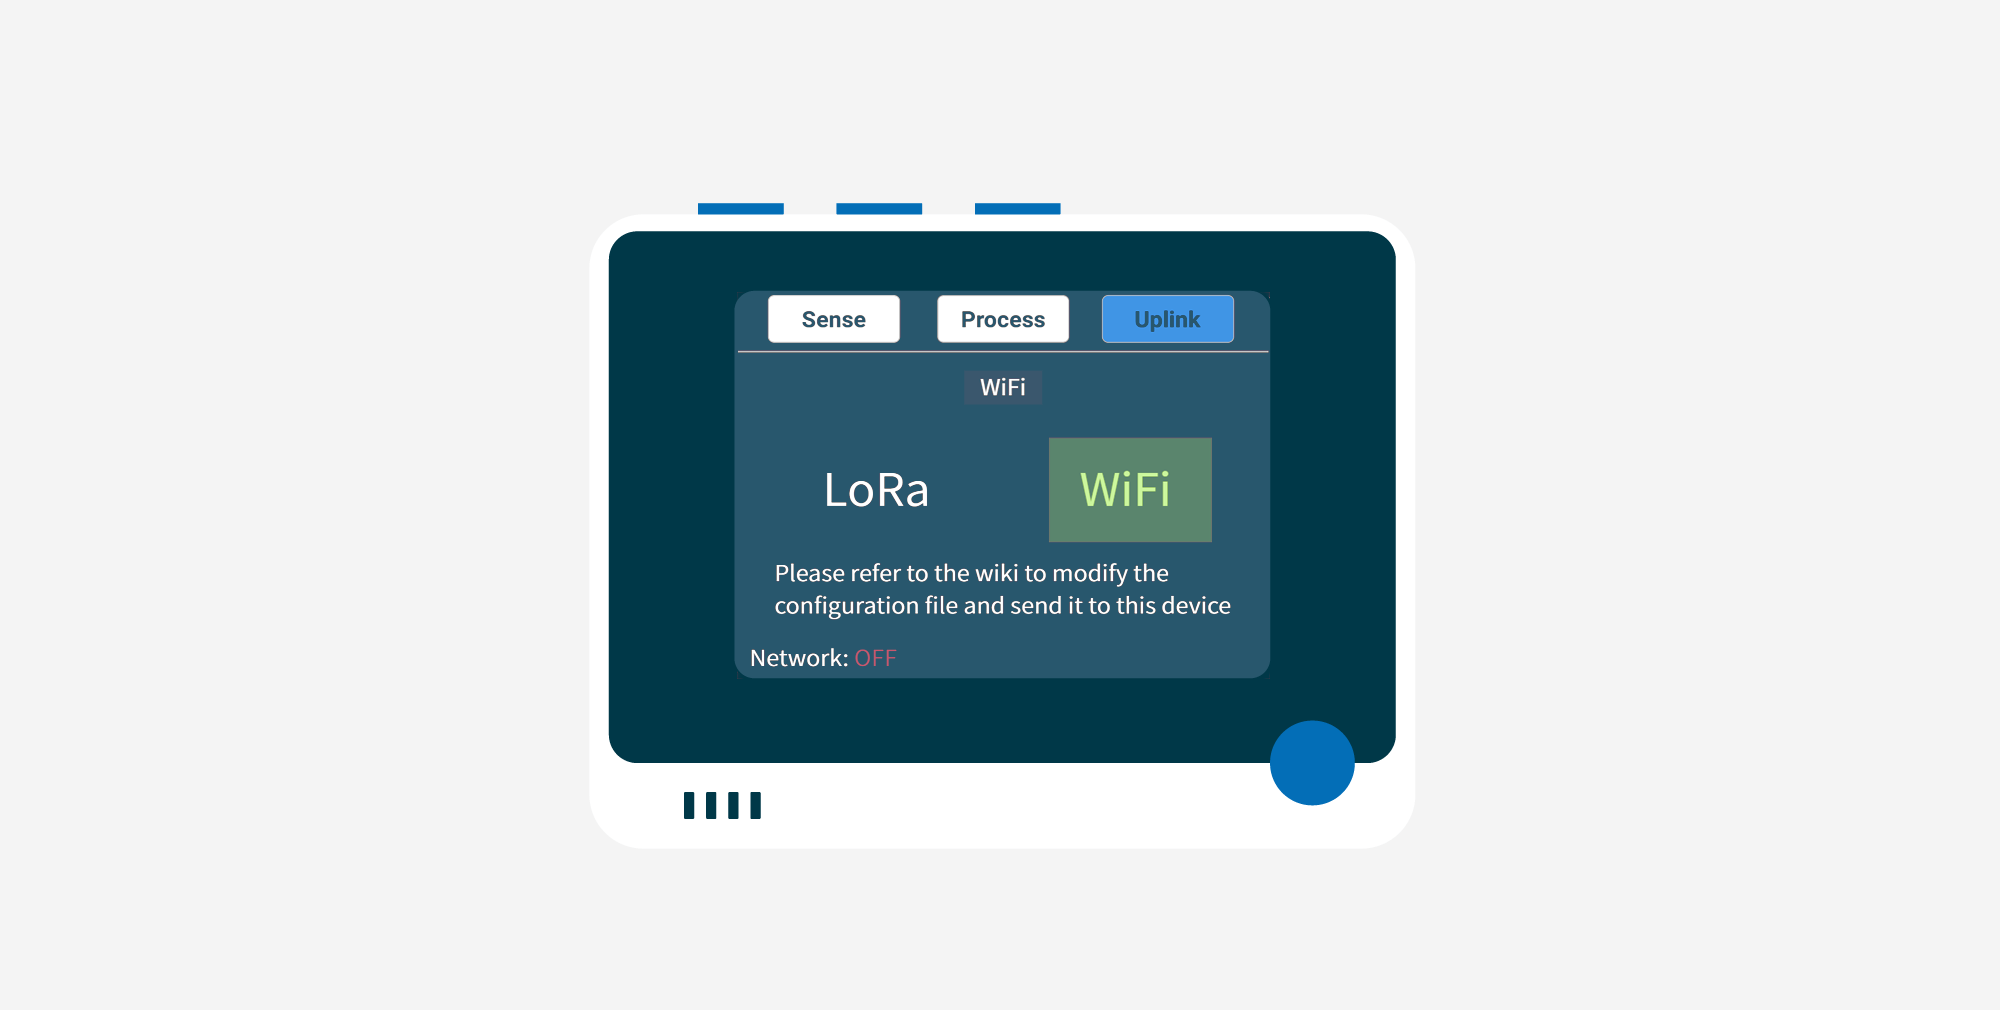
Now it will wait for the configuration to load.
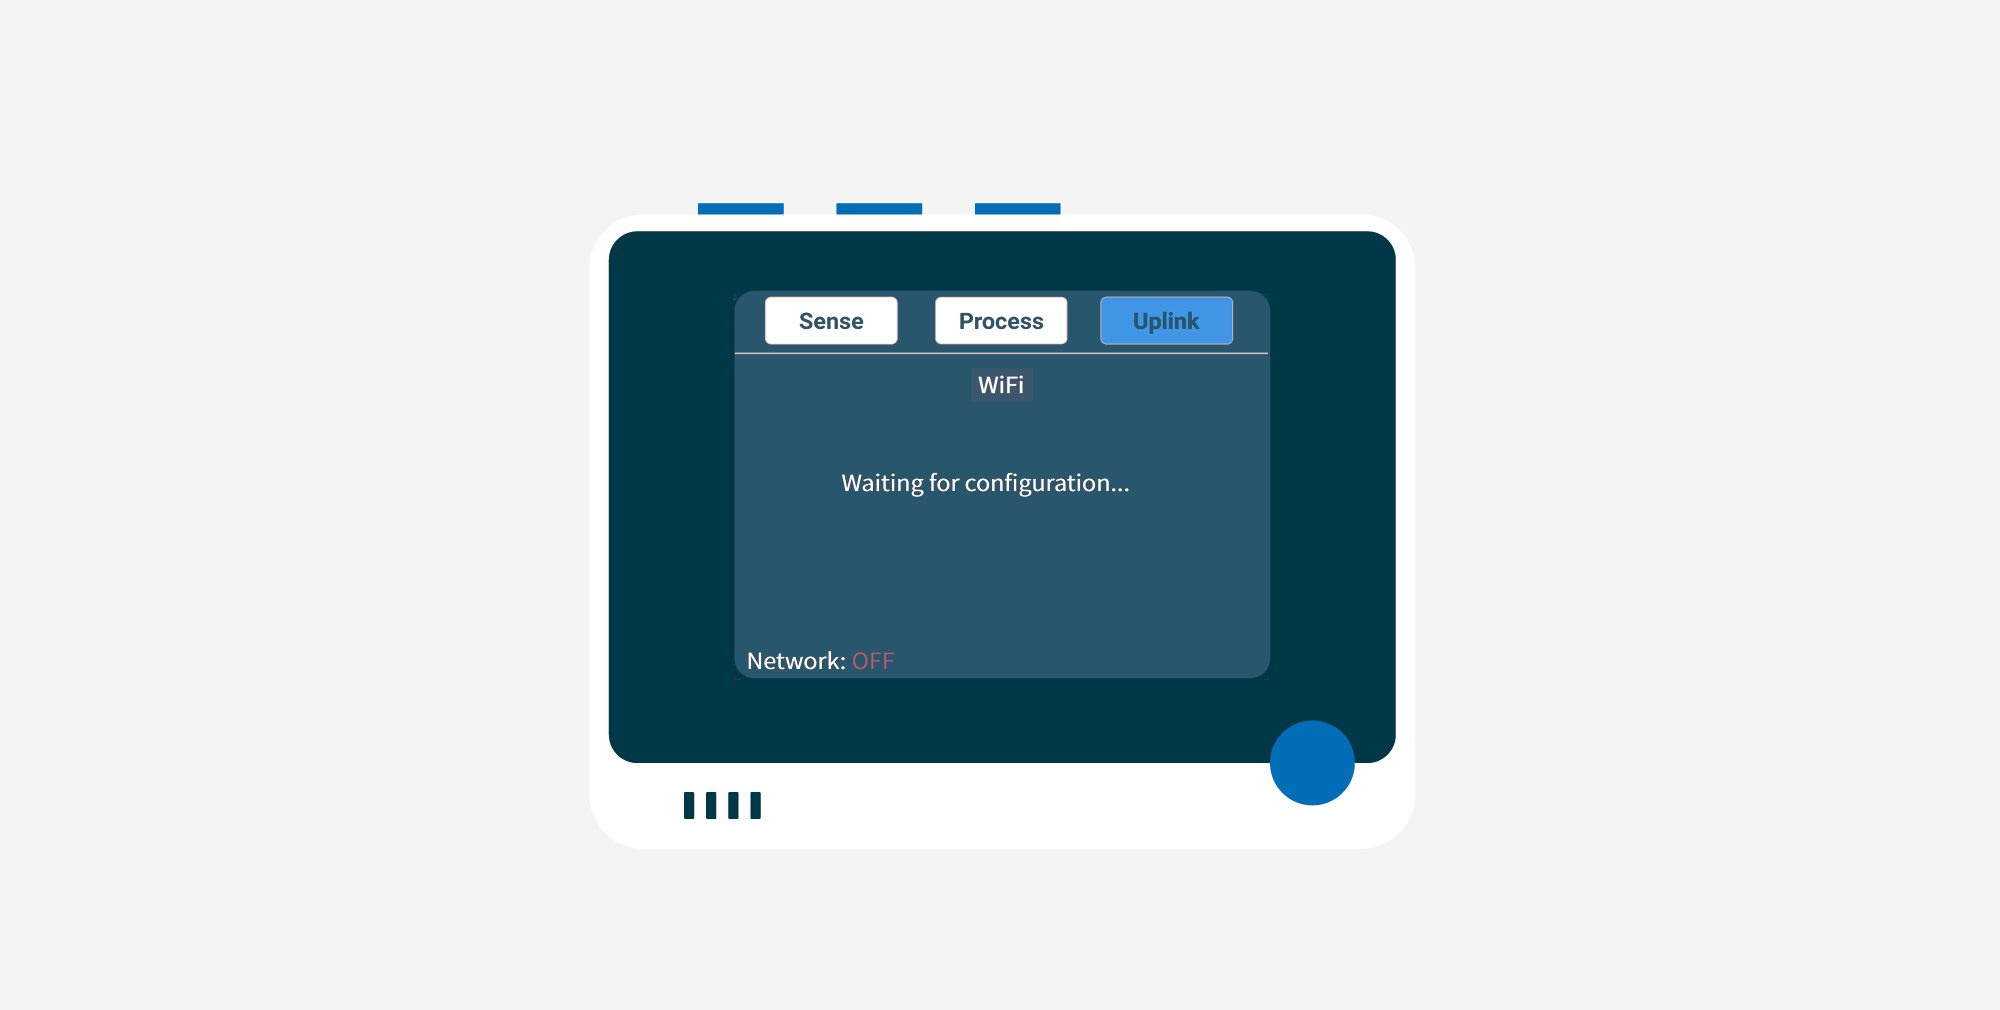
Once the loaded WiFi configuration is picked up, it will first connect with the WiFi network and then with the Ubidots platform. If the connection with Ubidots is successful, it will display the following.
Step 6. View data in Ubidots
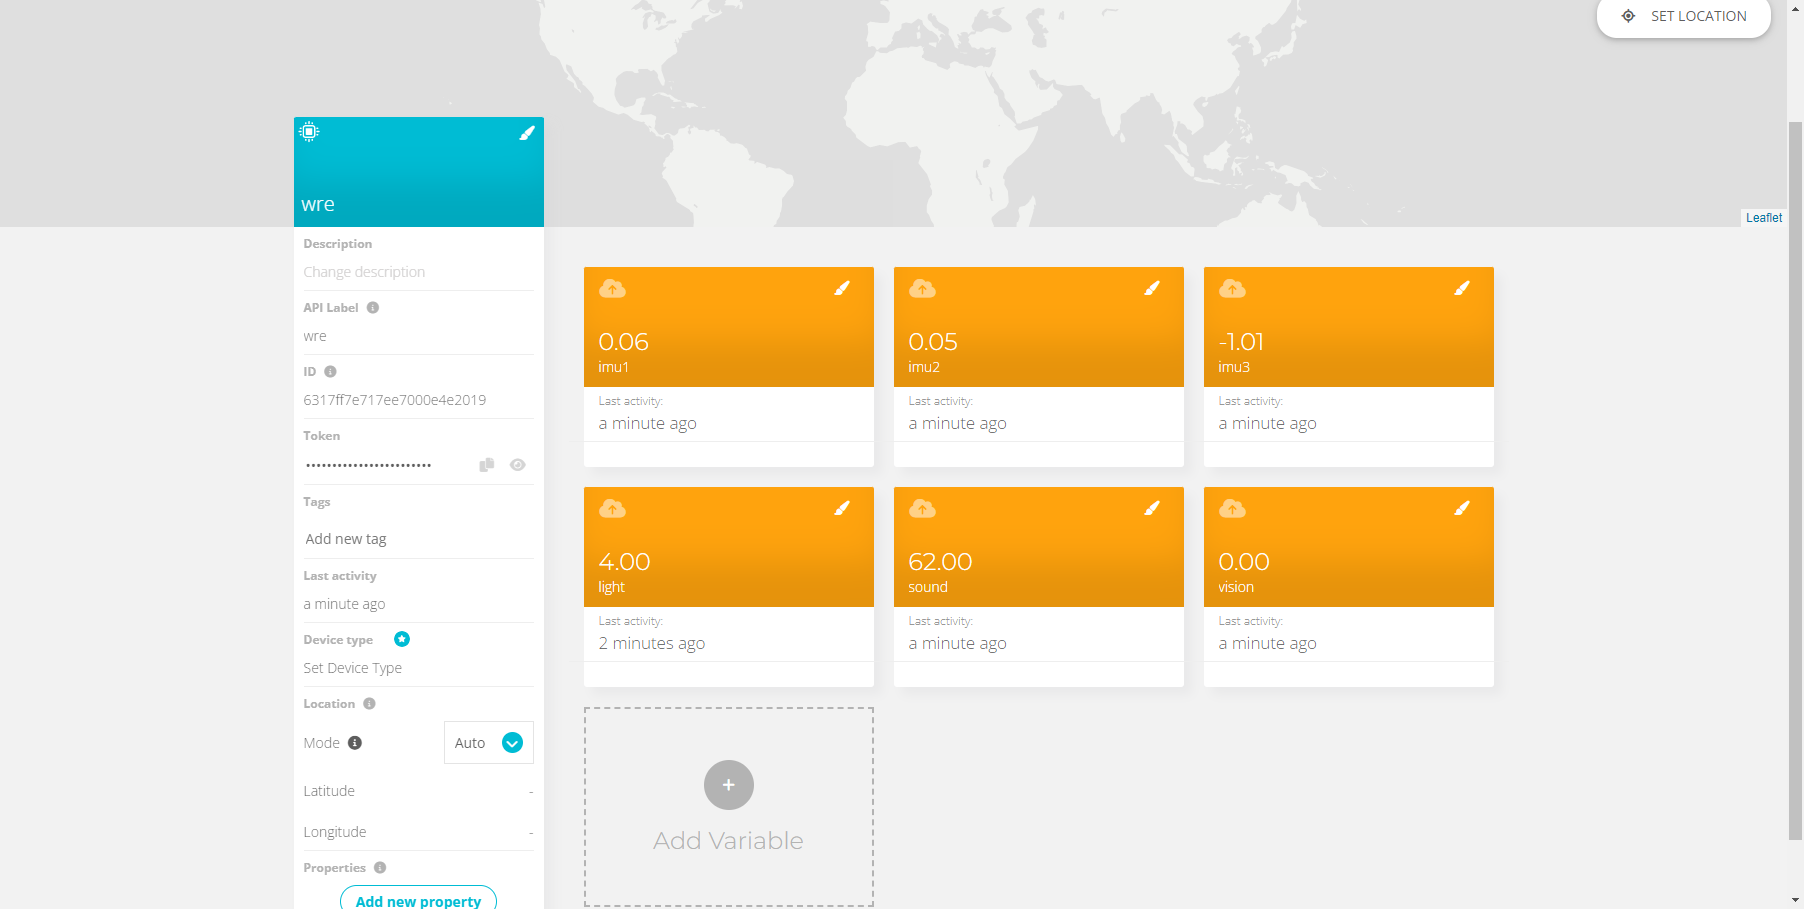
Once the data has been successfully sent to Ubidots, you will be able to view the data information in your Ubidots device.
Ubidots has a very simple interface and if you want to view information about your device, you can select Devices right at the top of the dashboard.
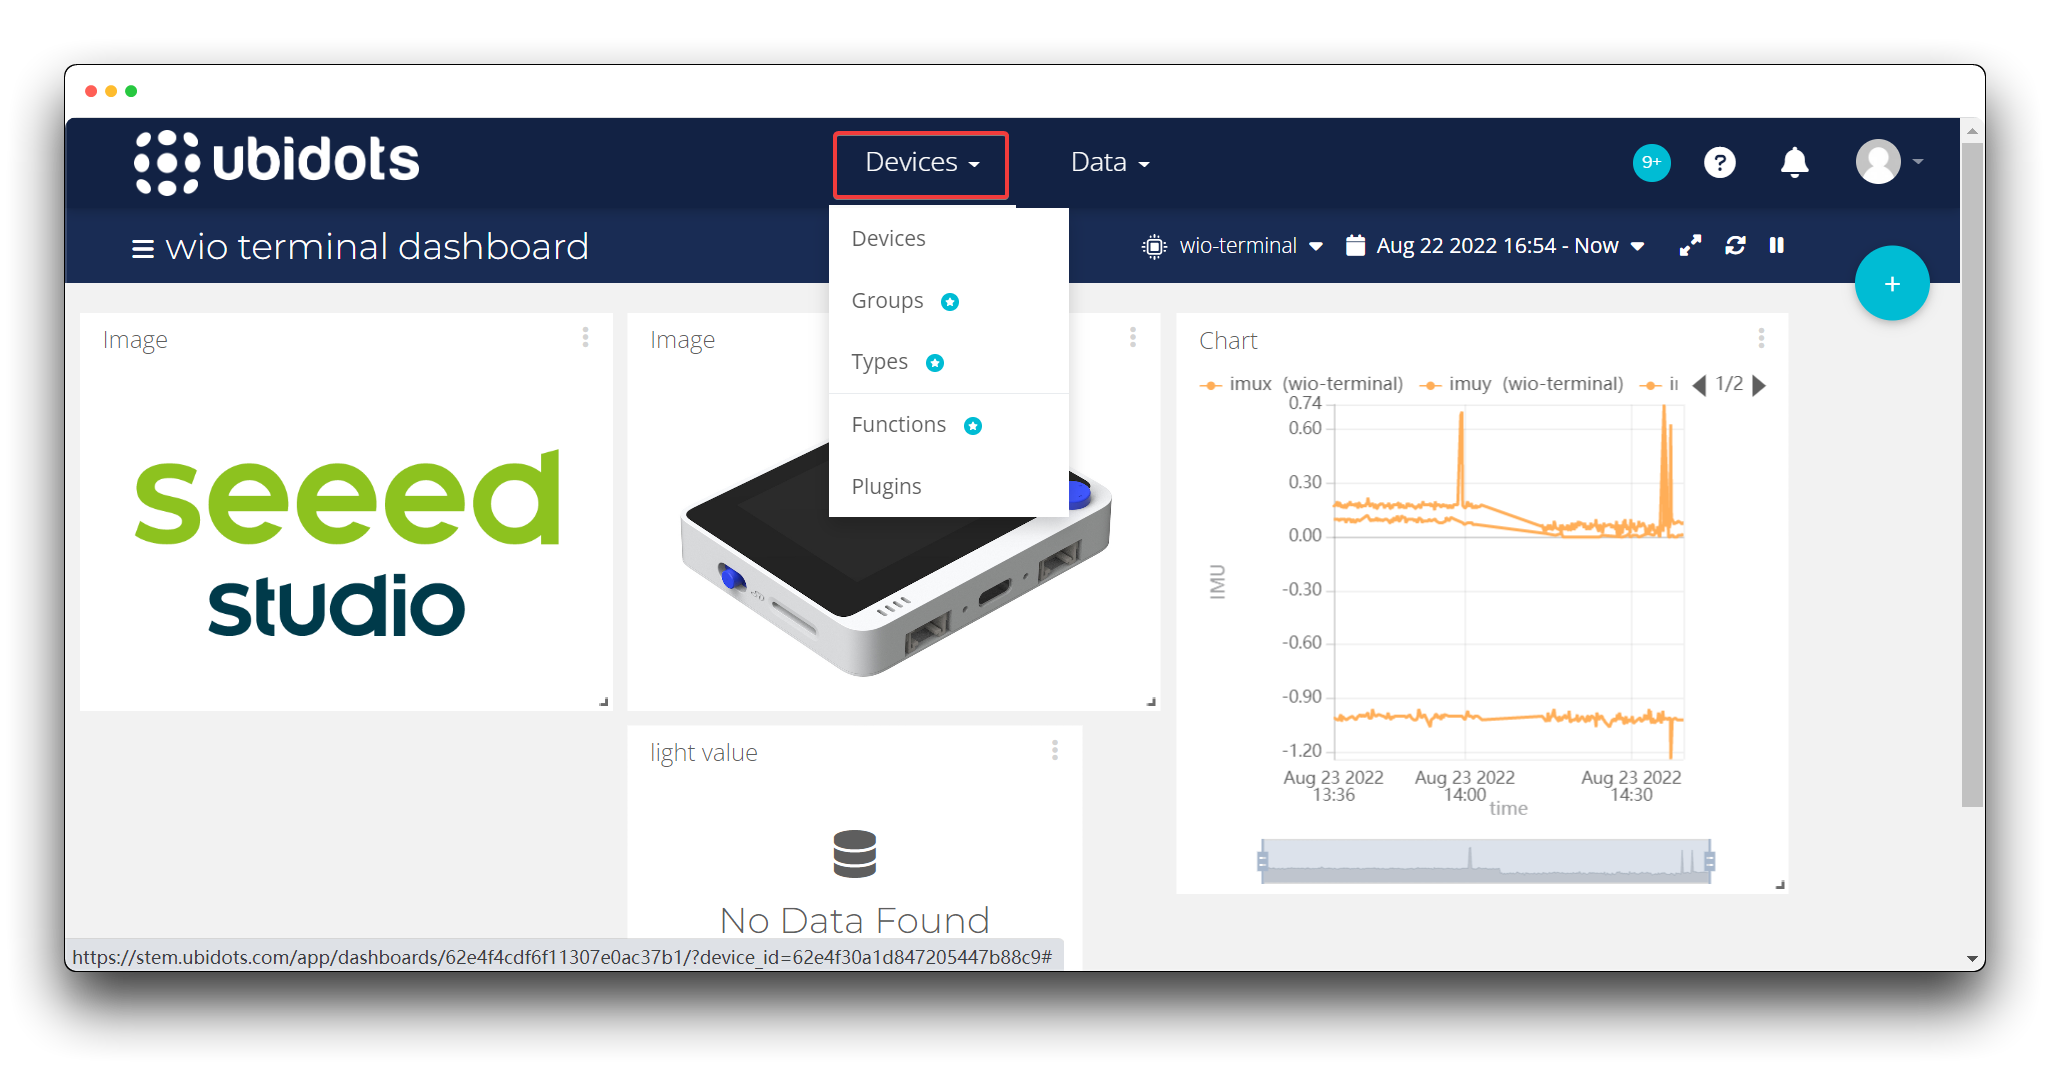
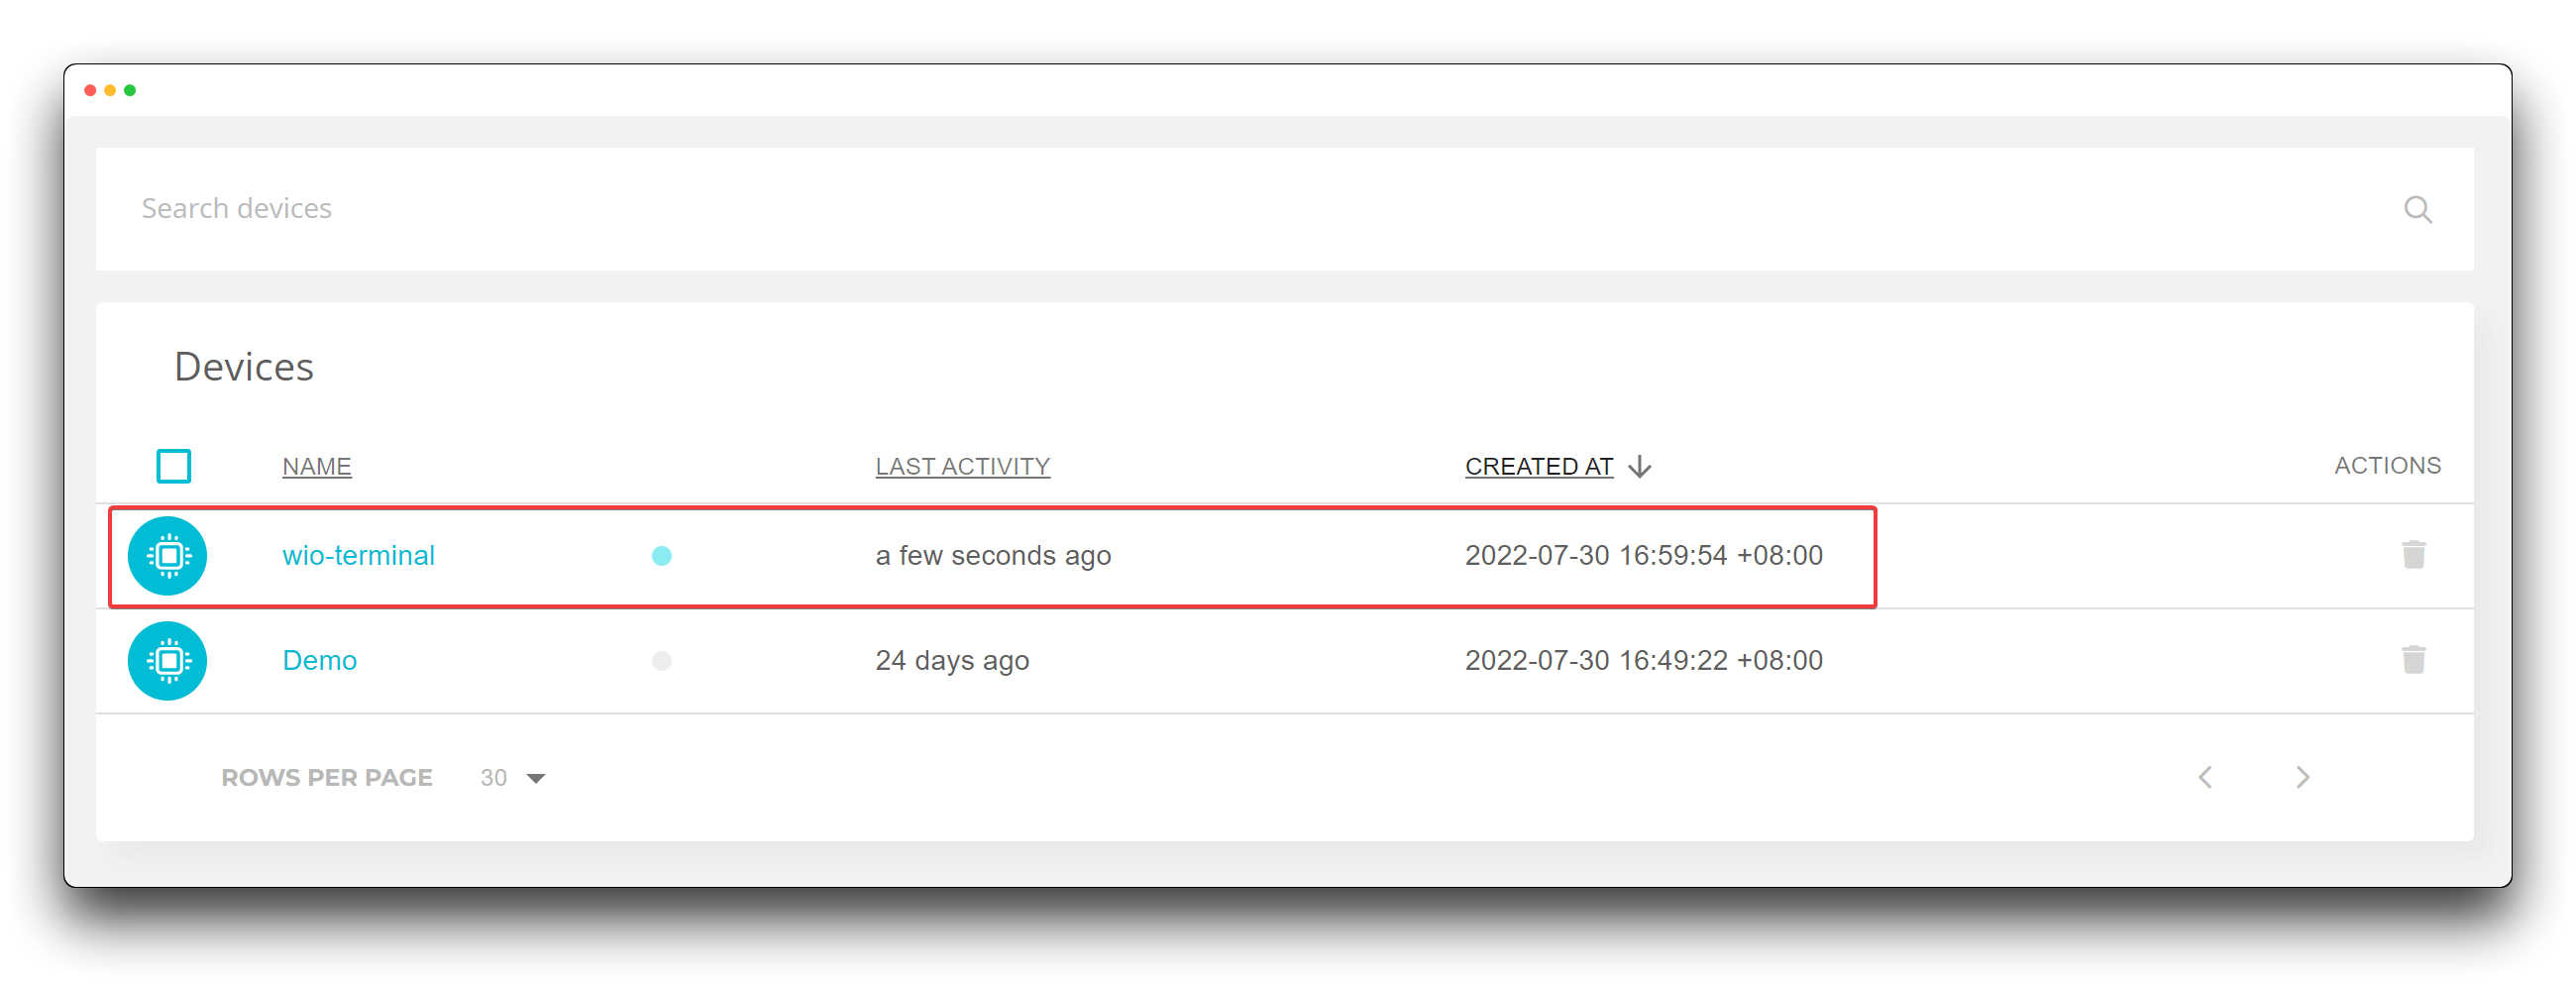
Click on your device name here to be able to see all the history tabs.
The free version of Ubidots only supports the creation of one TOKEN and ten labels. Once you have more than ten labels, the labels you have uploaded as well as the data will be discarded.
If you would like to use Ubidots for further independent development, please refer to our further tutorials on Ubidots.
Connect the other Grove sensors in the kit
In addition to the built-in sensors, the possibilities of SenseCraft are endless. The Grove sensor in the kit is also allowed to access the Wio Terminal and is automatically recognised.
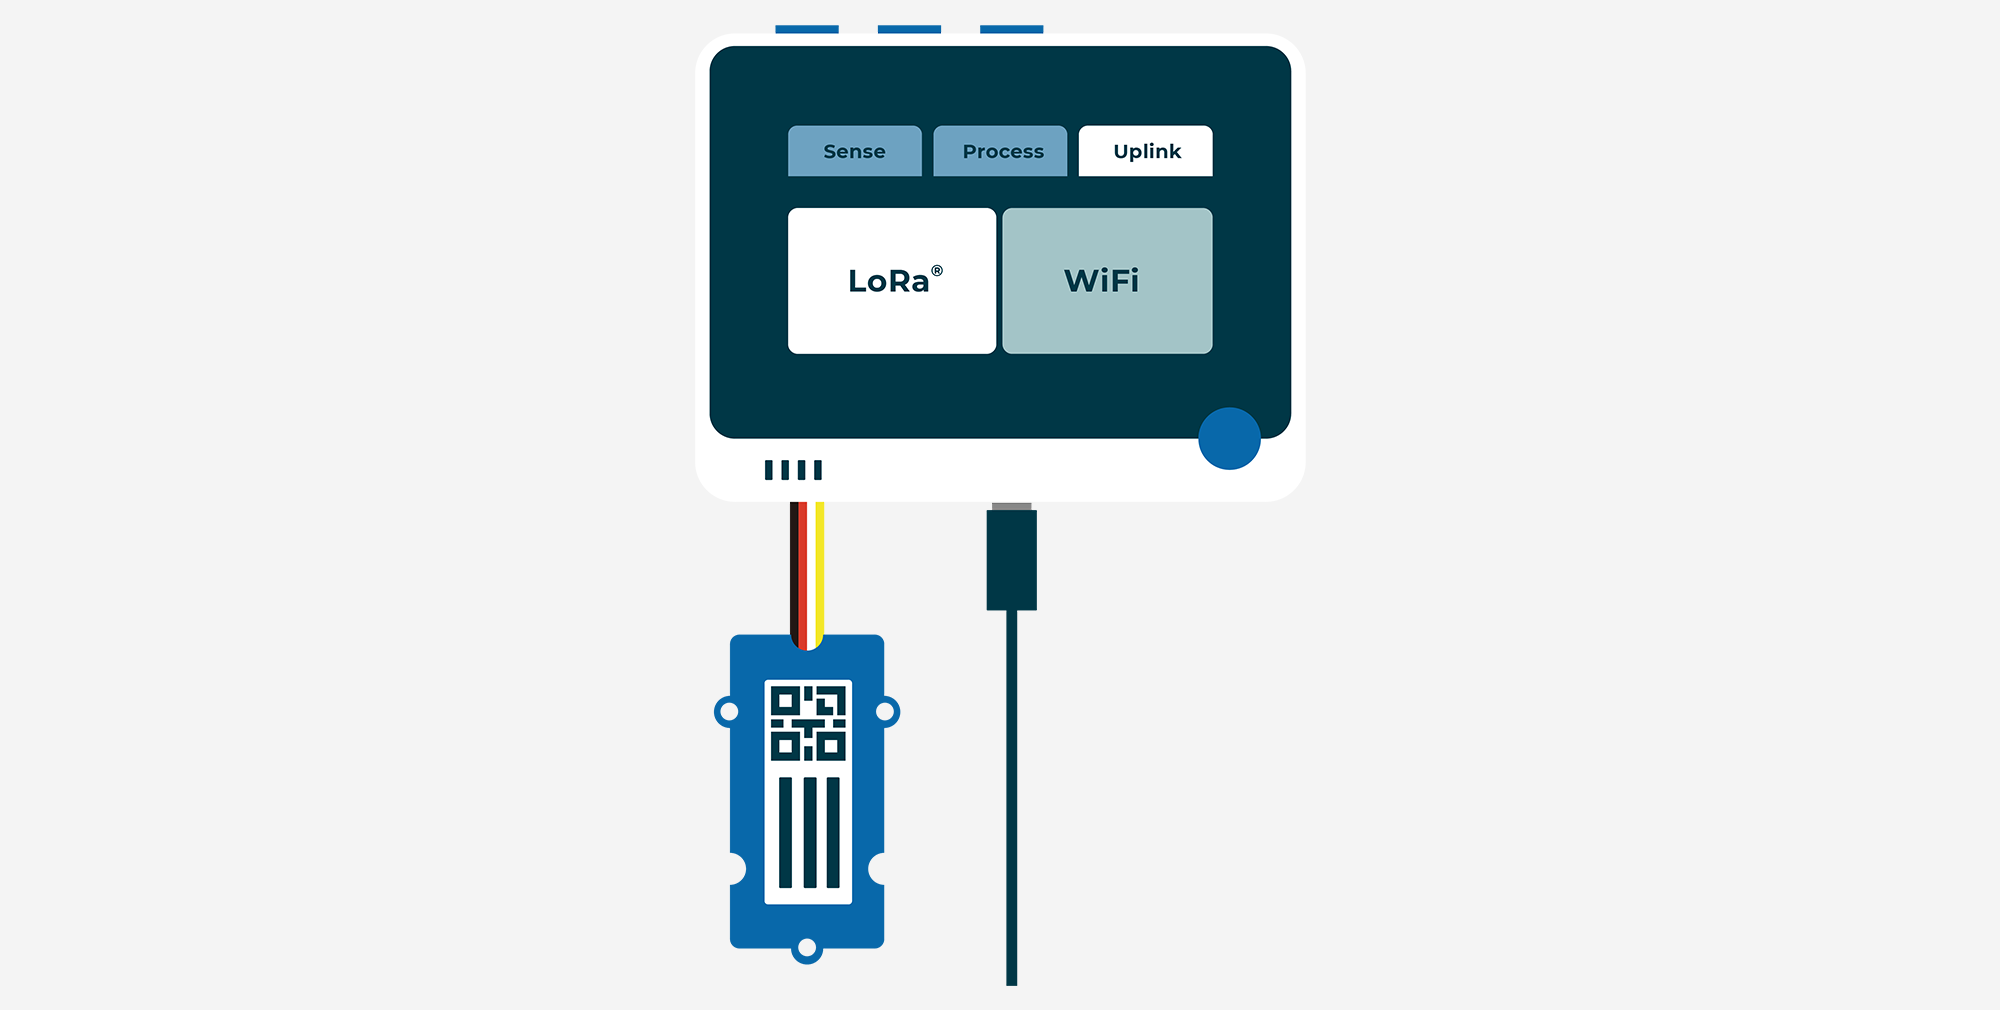
Plug a Grove sensor into Wio Terminal
In the current version of SenseCraft we only support the simultaneous connection of one sensor for use. (except for the Grove Wio E5)
When connecting, you can use the Grove cable provided in the kit to connect one of the sensors you want to use to the Grove connector on the bottom right of the Wio Terminal.

The diagram above shows the Grove Vision AI as an example, indicating how the sensors in the kit are connected. Of course, the same applies to other sensors. (except for the Grove Wio E5)
Do not connect the Grove sensor in the kit to the Grove connector on the left side of the Wio Terminal. The Grove connector on the left is currently designed for the connection of the Grove Wio E5.
View Grove sensor values
Once you have connected the Grove sensor you will be able to view the Grove sensor values in the Sense page.
You just need to press the right arrow button under the Sense page until the value of the external sensor appears. Usually, the value of the external sensor will be after the IMU sensor.

Uploading data from Grove sensors to the cloud
The detection of the sensor by SenseCraft is fully automatic, so we don't need the user to do anything extra. Of course, this all includes the uploading of data after the newly inserted Grove sensor.
- Similarly, if you want to send data from your Grove sensors over LoRaWAN®, you just need to connect your Grove Wio E5 on the left side at the same time.
Then, follow the steps in Send sensor data to SenseCAP via LoRa®.
- If you want to send data out via WiFi, then you do not need to connect anything else, please continue to refer to the contents of Send sensor data to Ubidots via WiFi for action.
Advanced Play
We have designed a number of very interesting and advanced ways to play with SenseCraft, and you can get a quick overview and use these features with this section.
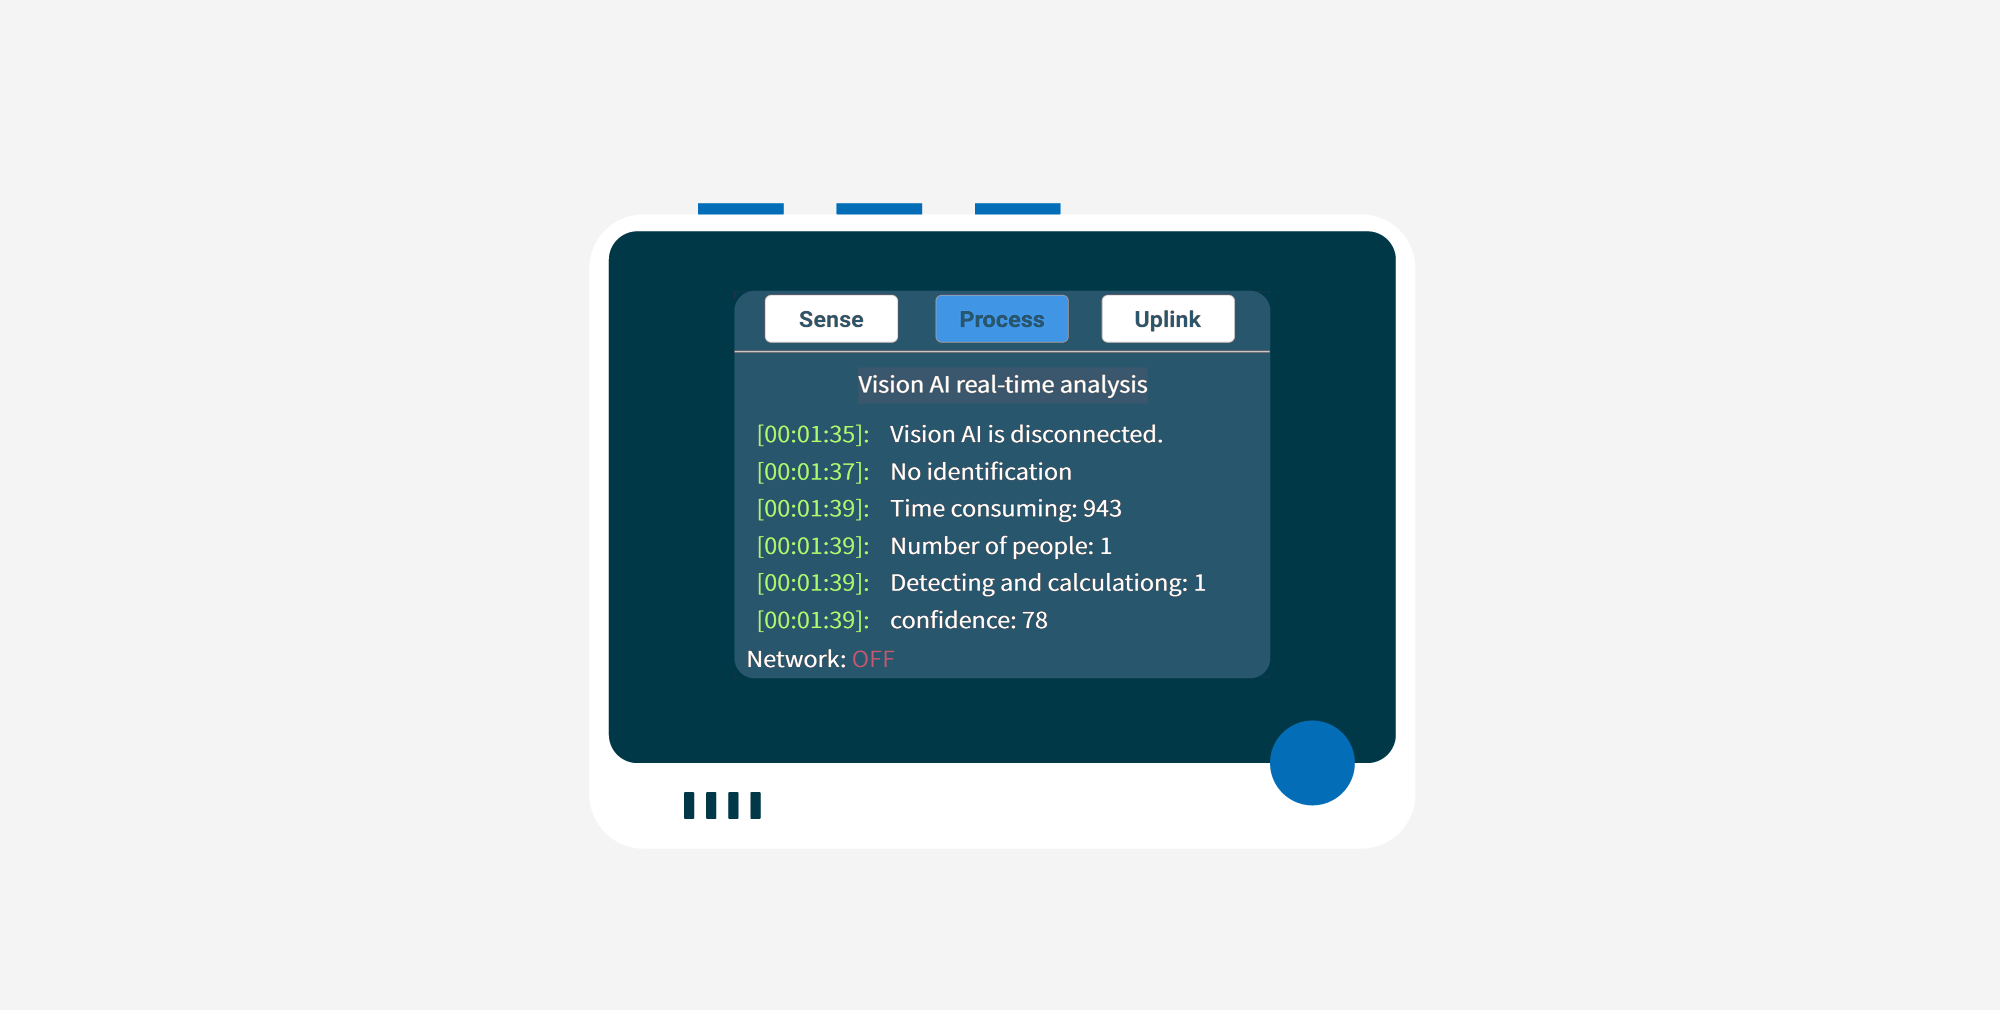
Vision AI real-time analysis
This is a feature designed for Grove Vision AI. Users can observe the running log of Vision AI under this interface, which is convenient for users to observe the recognition of Vision AI in real time, adjust the camera screen, etc.
Step 1. Connect the Grove Vision AI
Please connect your Grove Vision AI to the Grove connector on the right side of the Wio Terminal.
Step 2. Access the Vision AI real-time analysis interface
Please click on the second button above the Wio Terminal to access the Process screen.
The default selection under the Process screen is Vision AI real-time analysis, at which point we simply middle press on the 5-way button to enter.
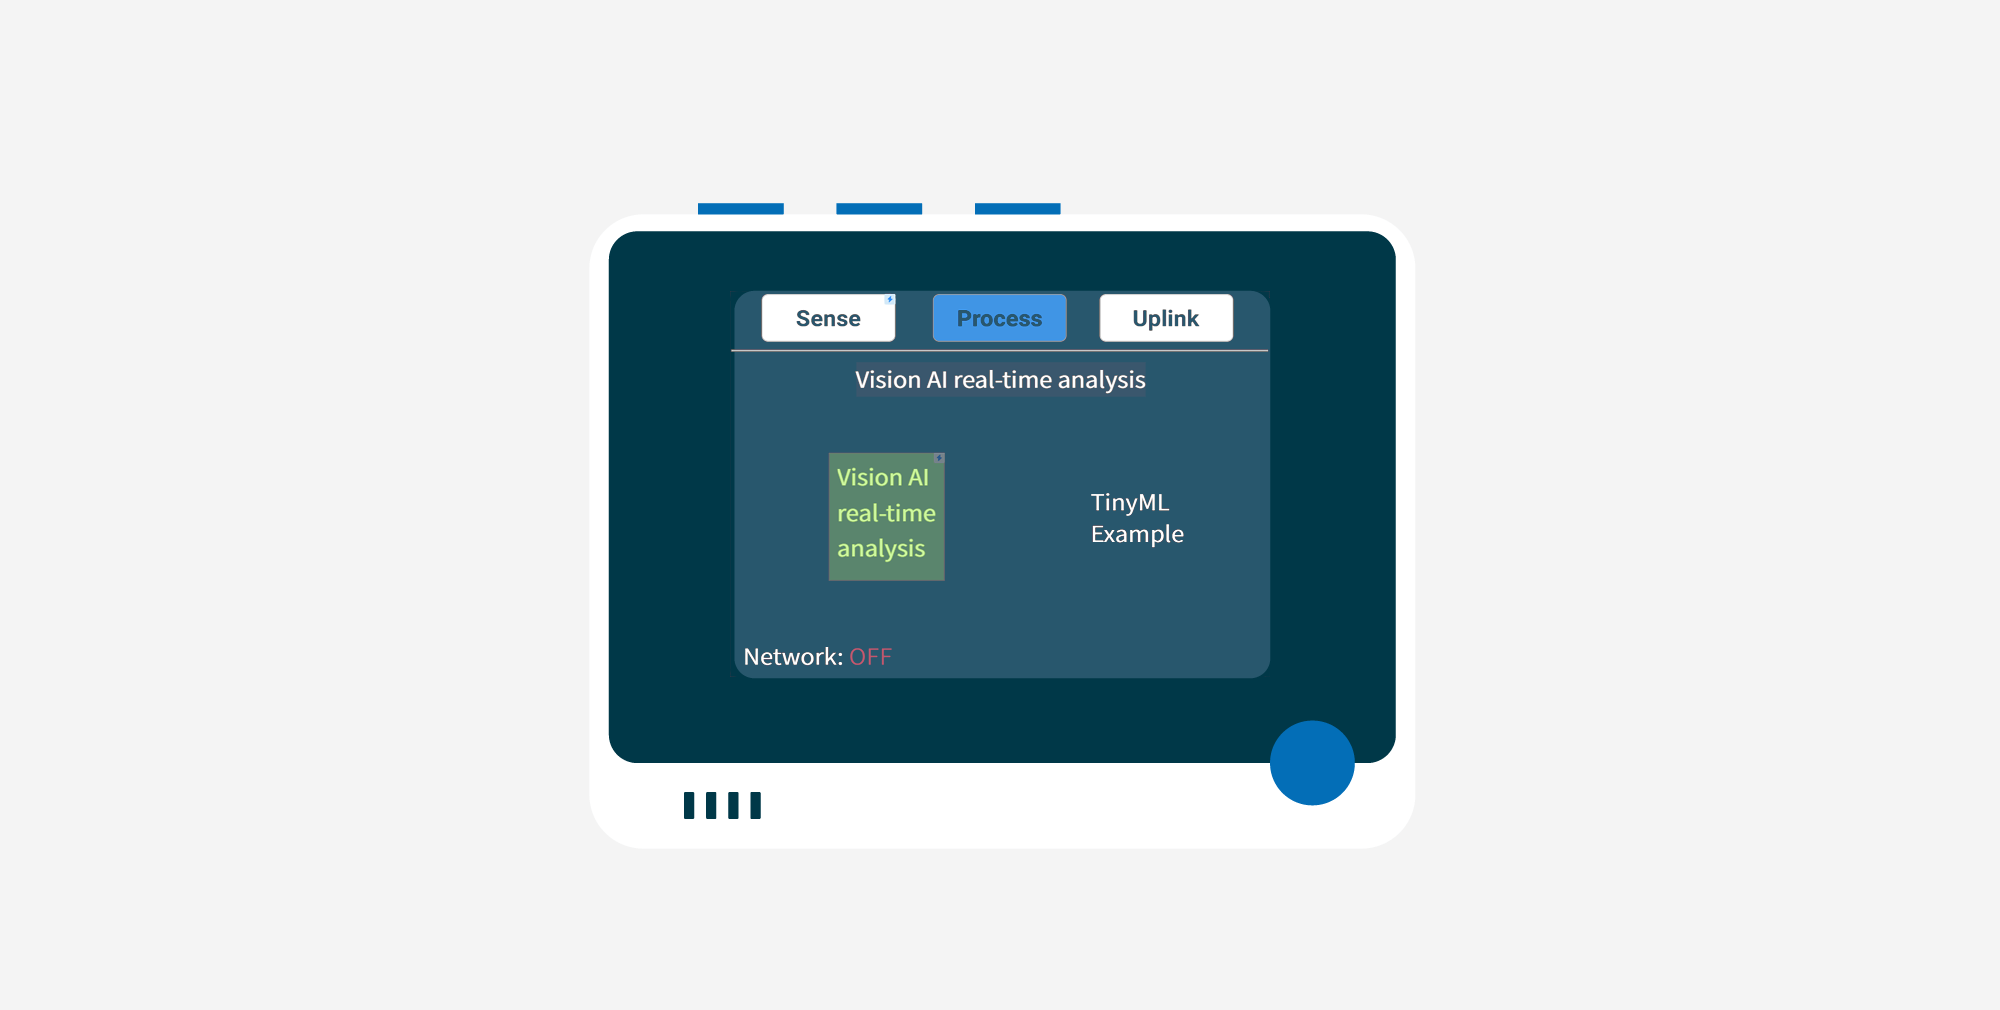
Then you will be able to see Vision AI log on this page.
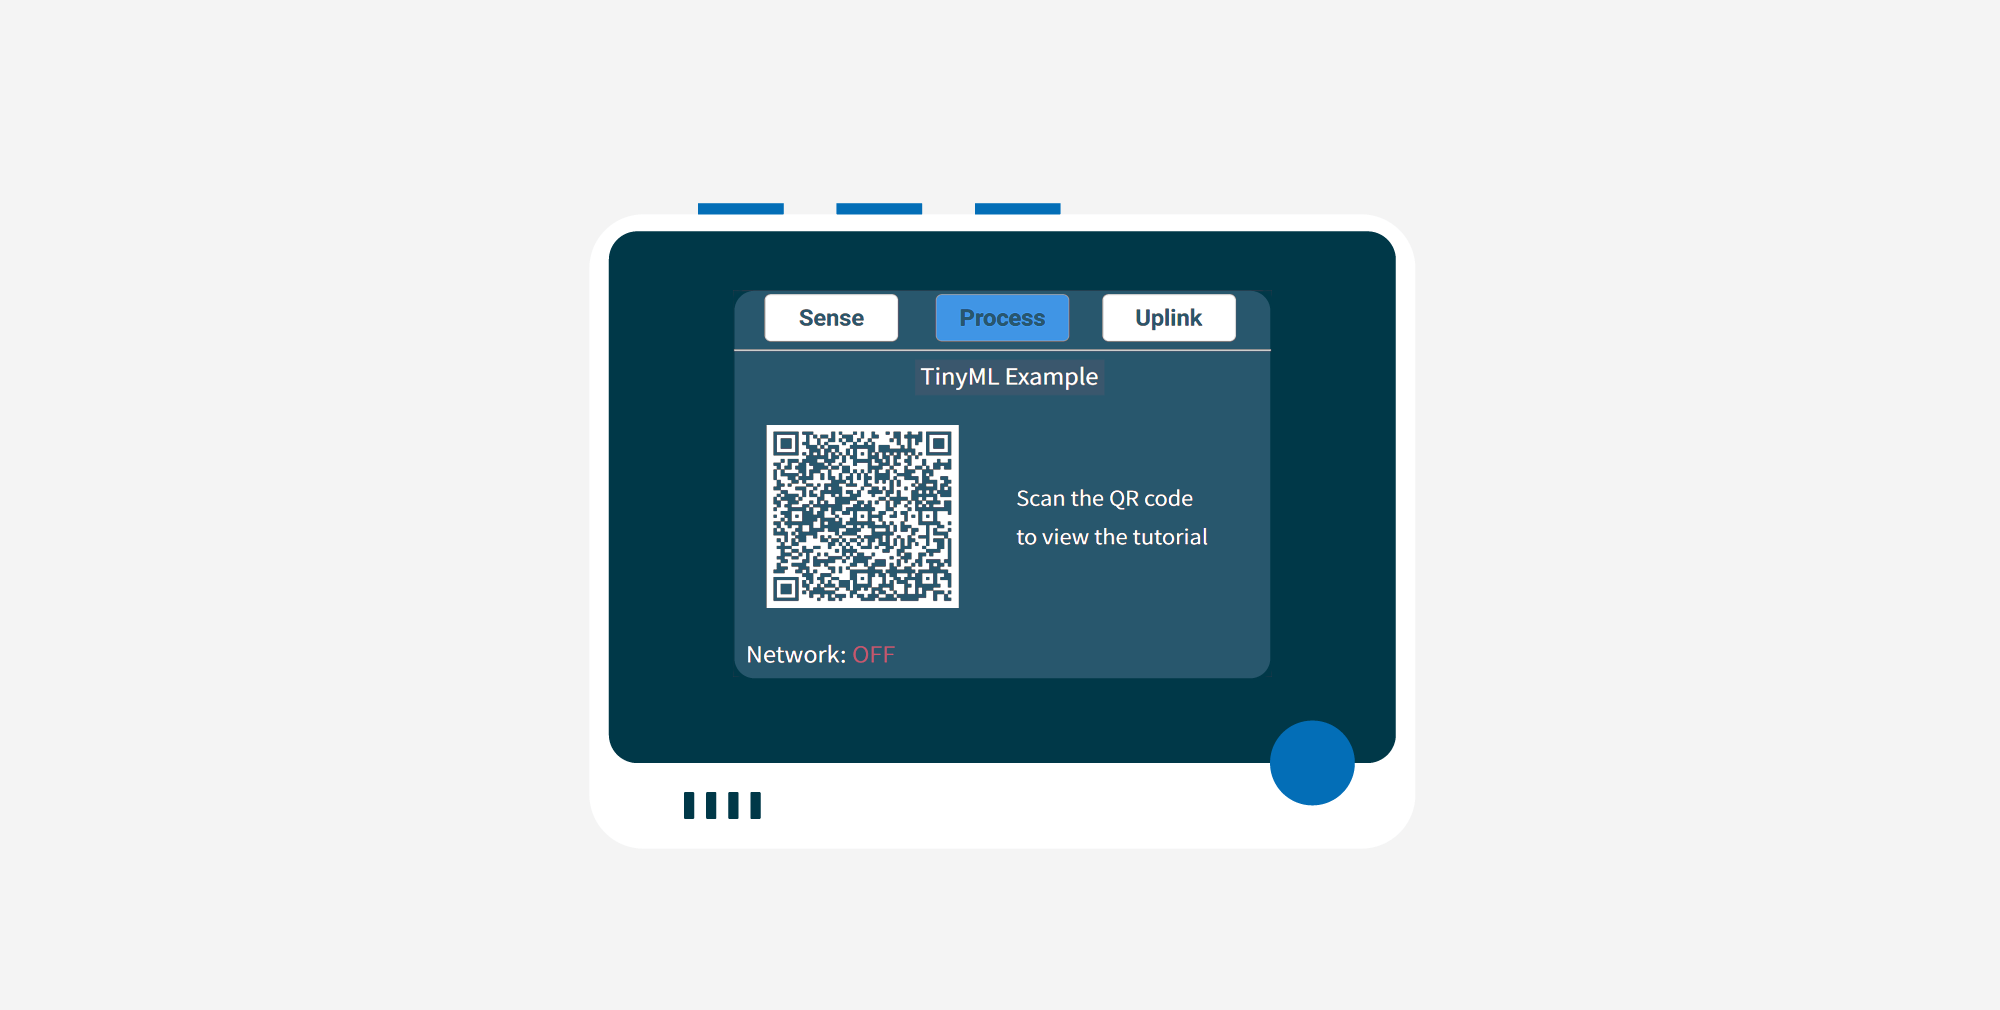
TinyML Example
This is a feature designed for Wio Terminal in embedded machine learning. Under this page, users can scan into the TinyML series of courses we have prepared to experience the powerful machine learning capabilities of Wio Terminal & Vision AI.
Step 1. Please click on the second button above the Wio Terminal to access the Process screen.
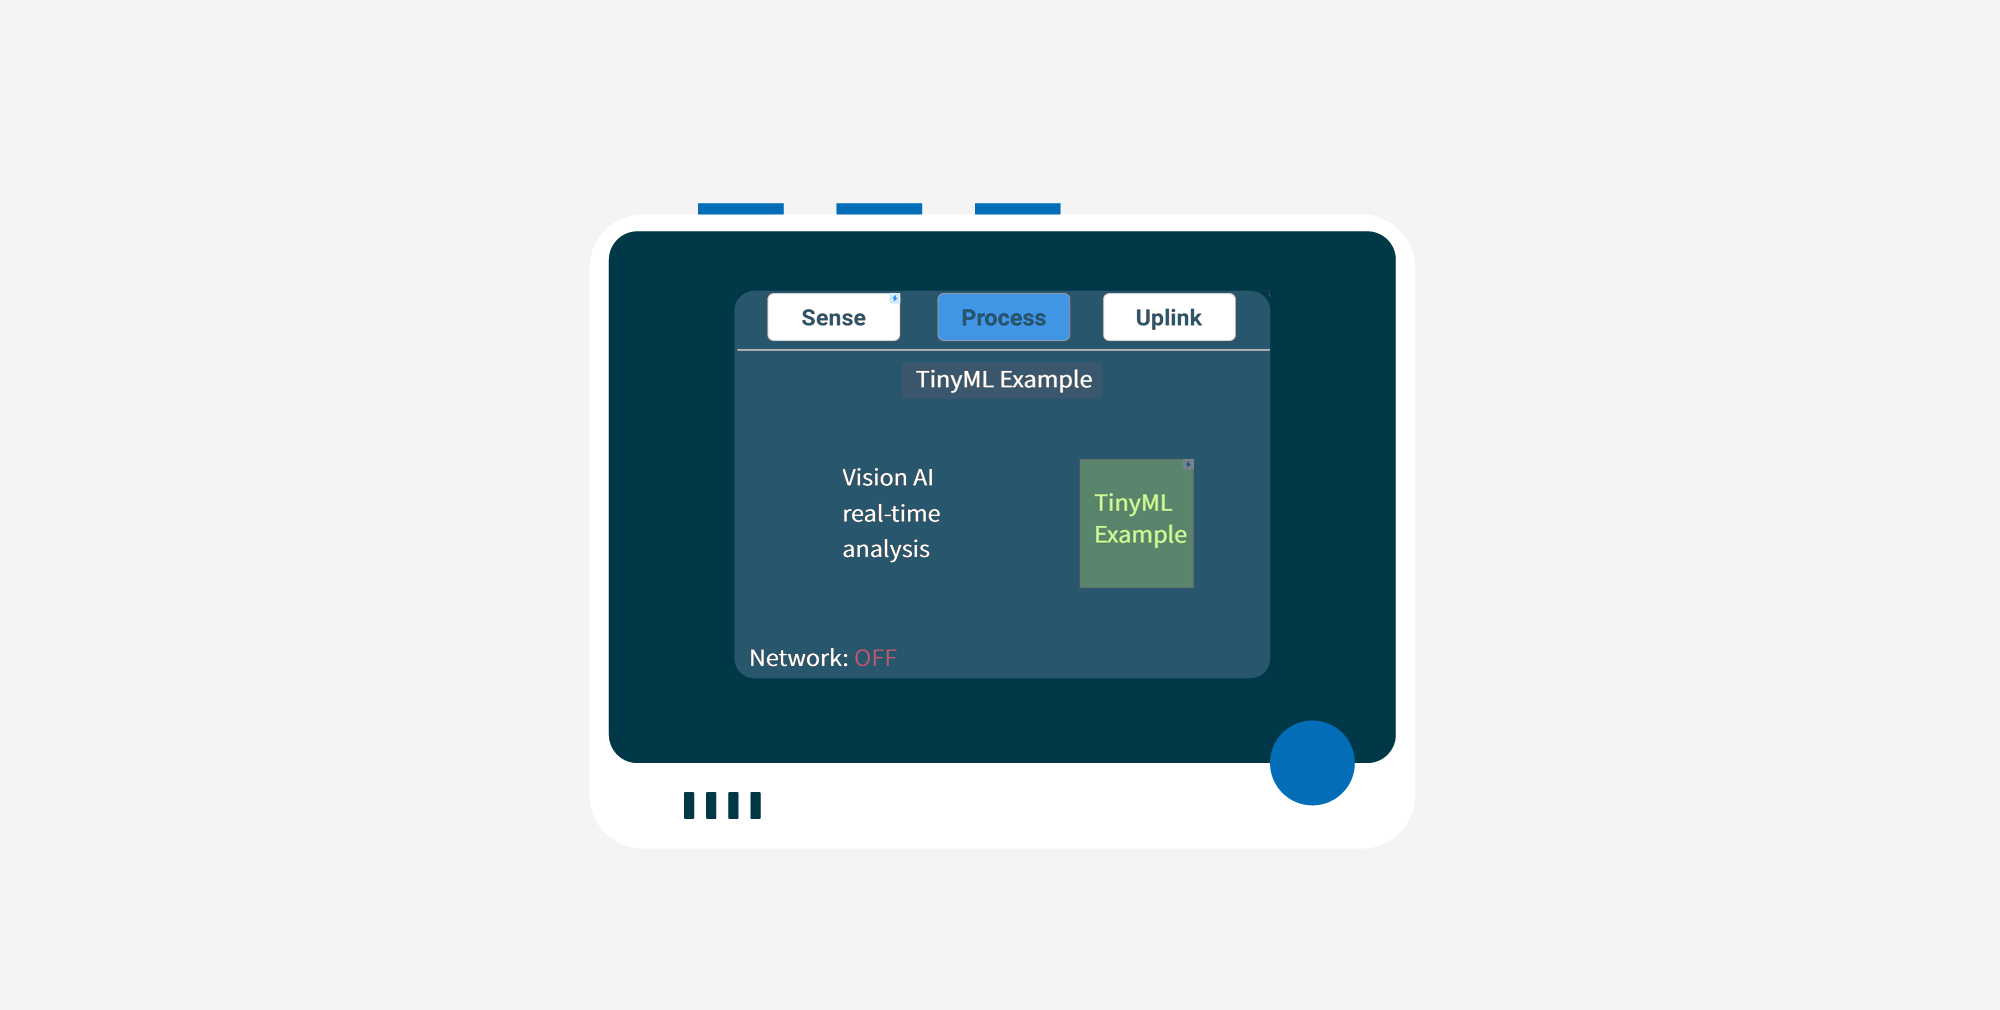
Step 2. Access the TinyML Example interface
Press the right arrow of the five-way button to select TinyML Example. Simply middle press on the 5-way button to enter.
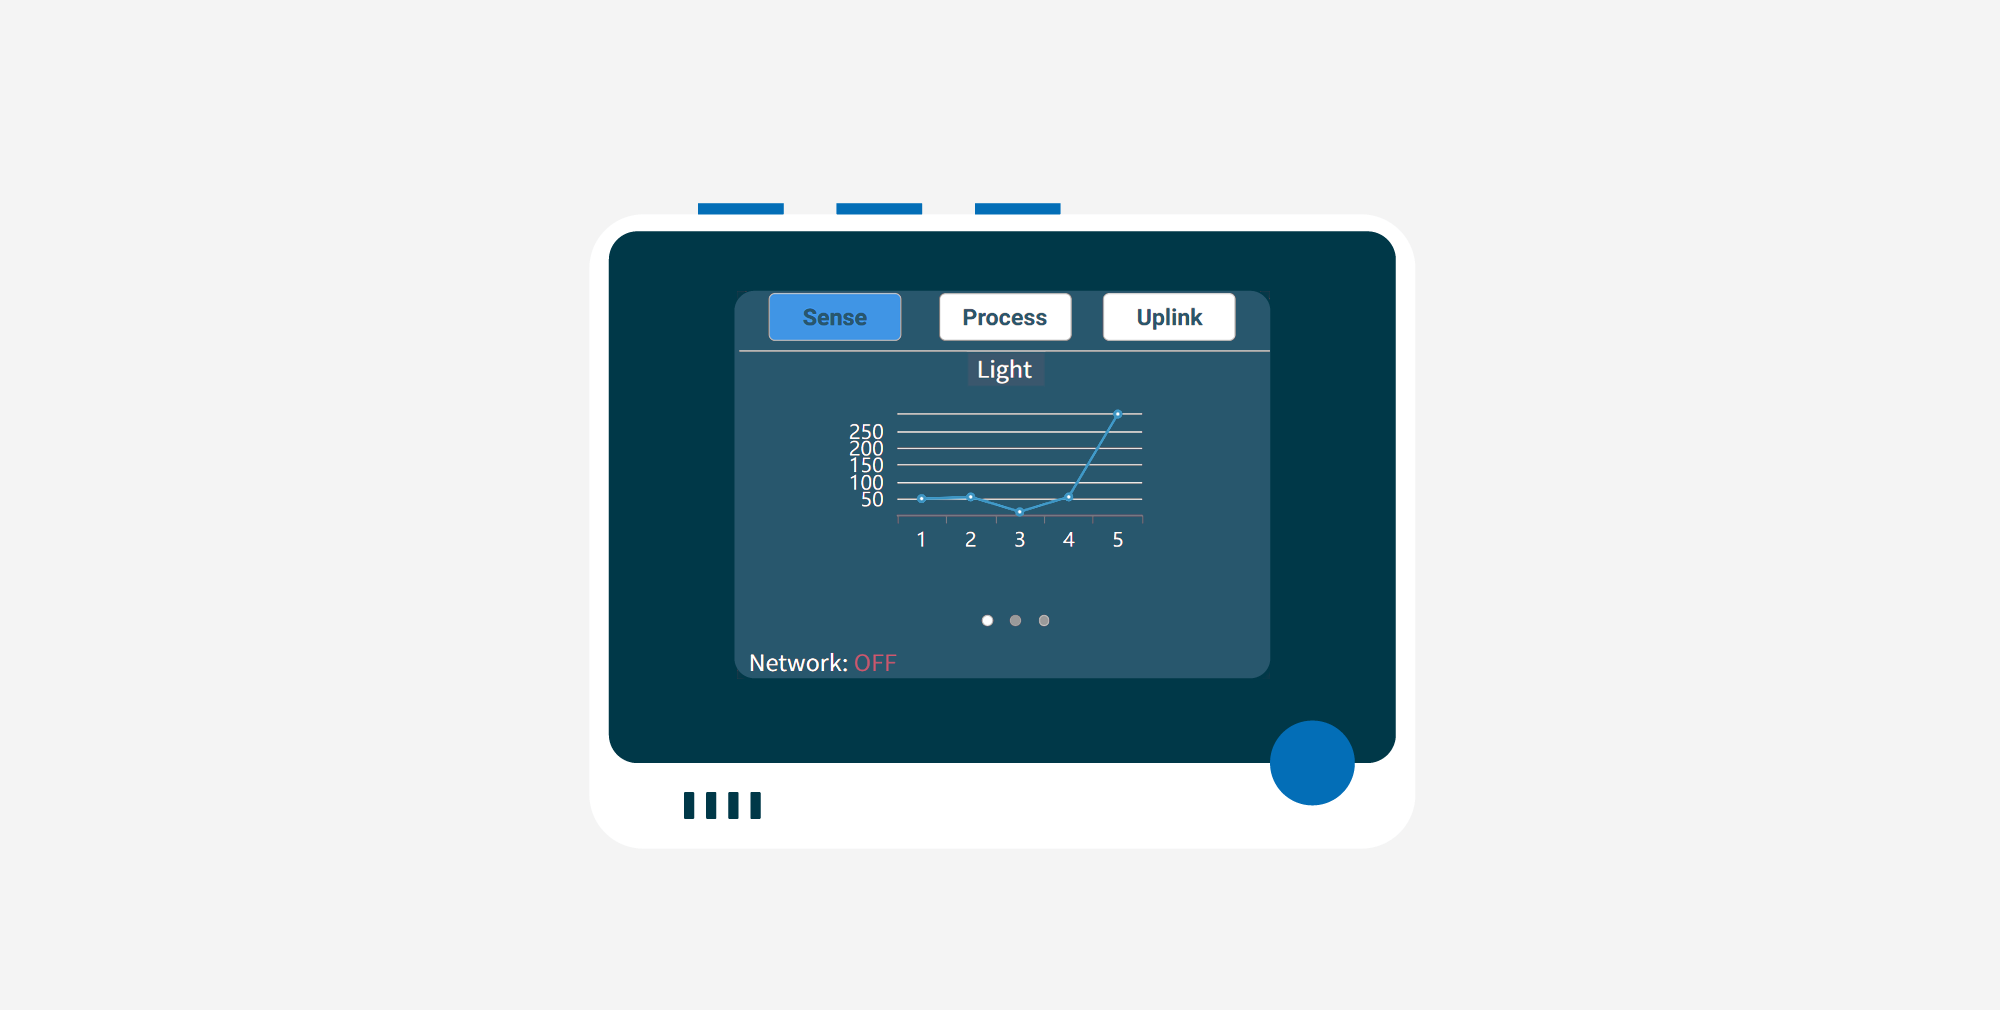
Graph Visualization
We have provided the Wio Terminal with a line graph display so that you can observe how the data changes in the values of each sensor.
Take the example of a line graph of light values.
Since the Light column is already highlighted, middle press on the 5-way button to enter graph visualization mode for the data from the light sensor.
Save to TF Card
Considering that users may have the need to save offline to an TF card and only require subsequent data filtering or analysis, we have also designed the Wio Terminal with the ability to save data to a TF card.
When in graph visualization mode as described before, middle press again to view this page.
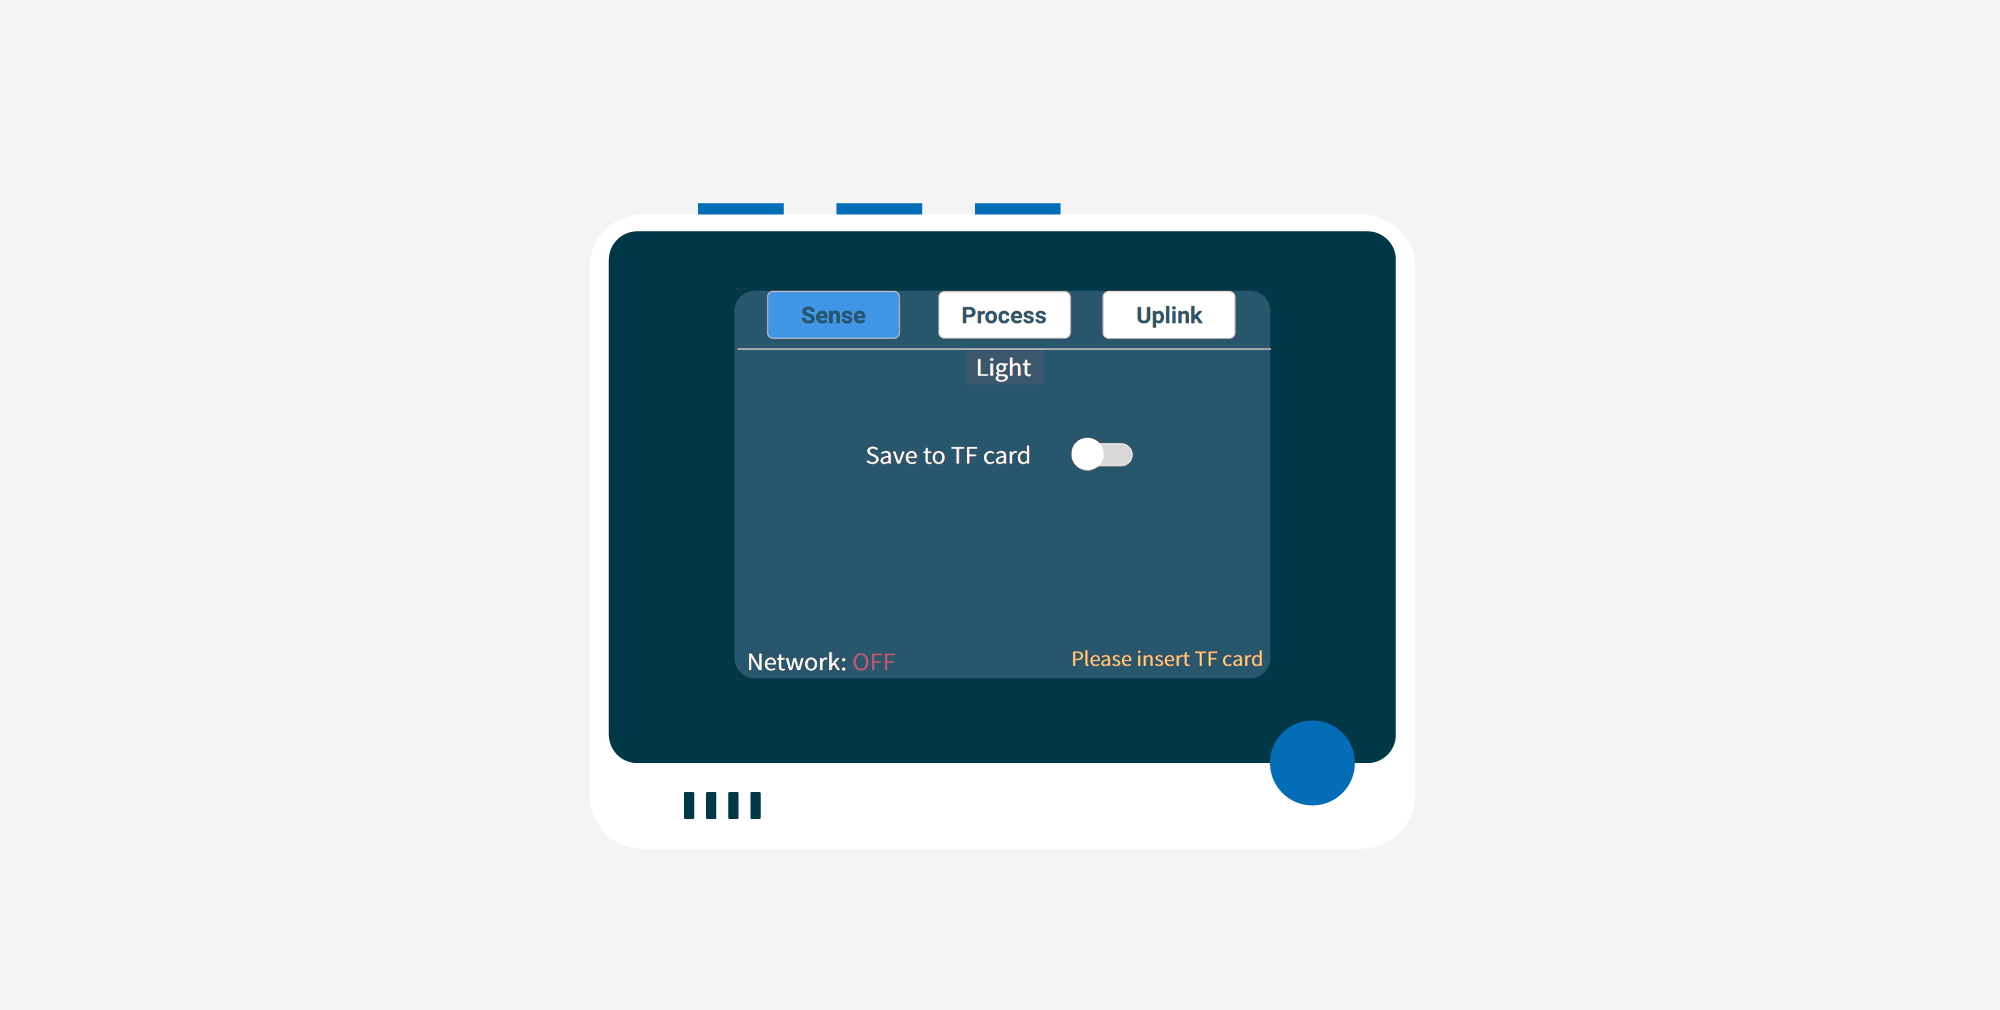
This is where the data from the sensor can be saved to an TF card. First insert an TF card to the Wio Terminal.
After that, press the middle button to select Save to TF card and it will show the message Saving has been started. Once this message dissappears, the saving is finished and it will save the data as a .csv file.
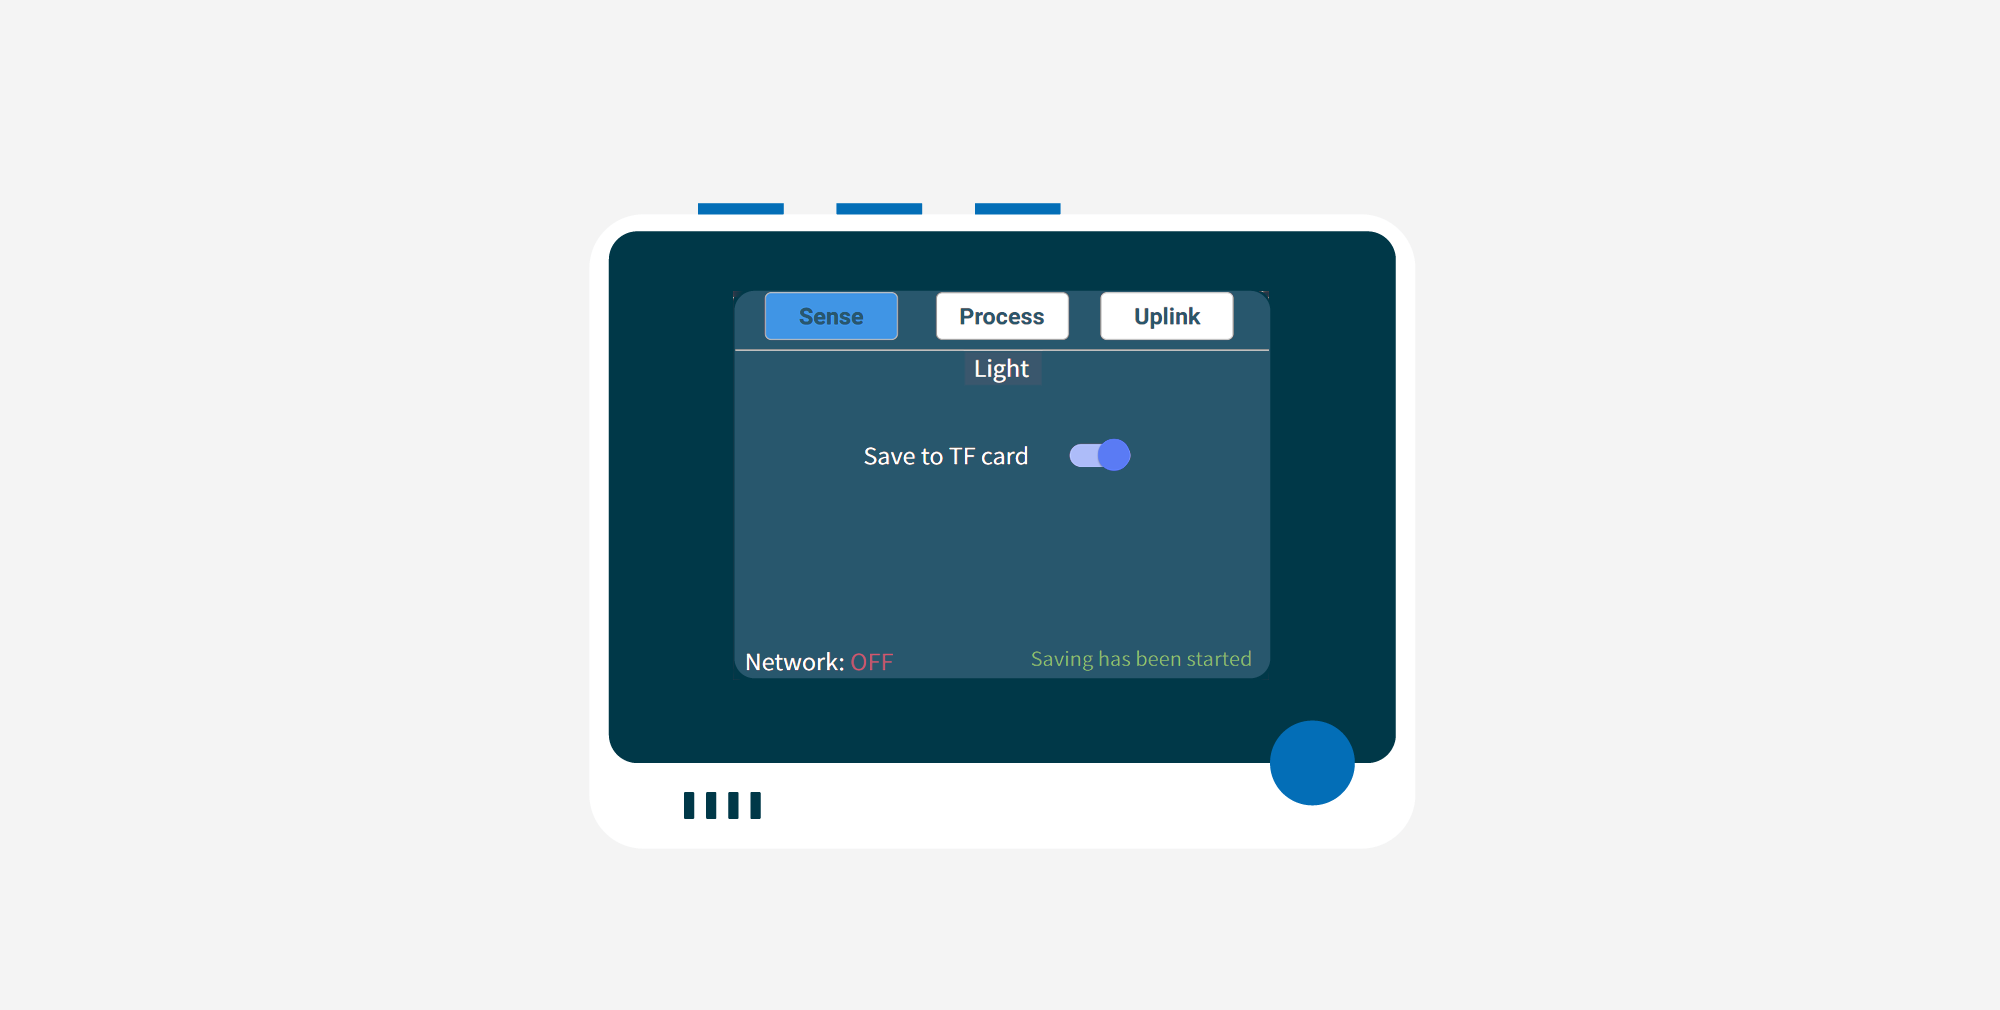
If the storage on the TF card is full, it will notify as follows.

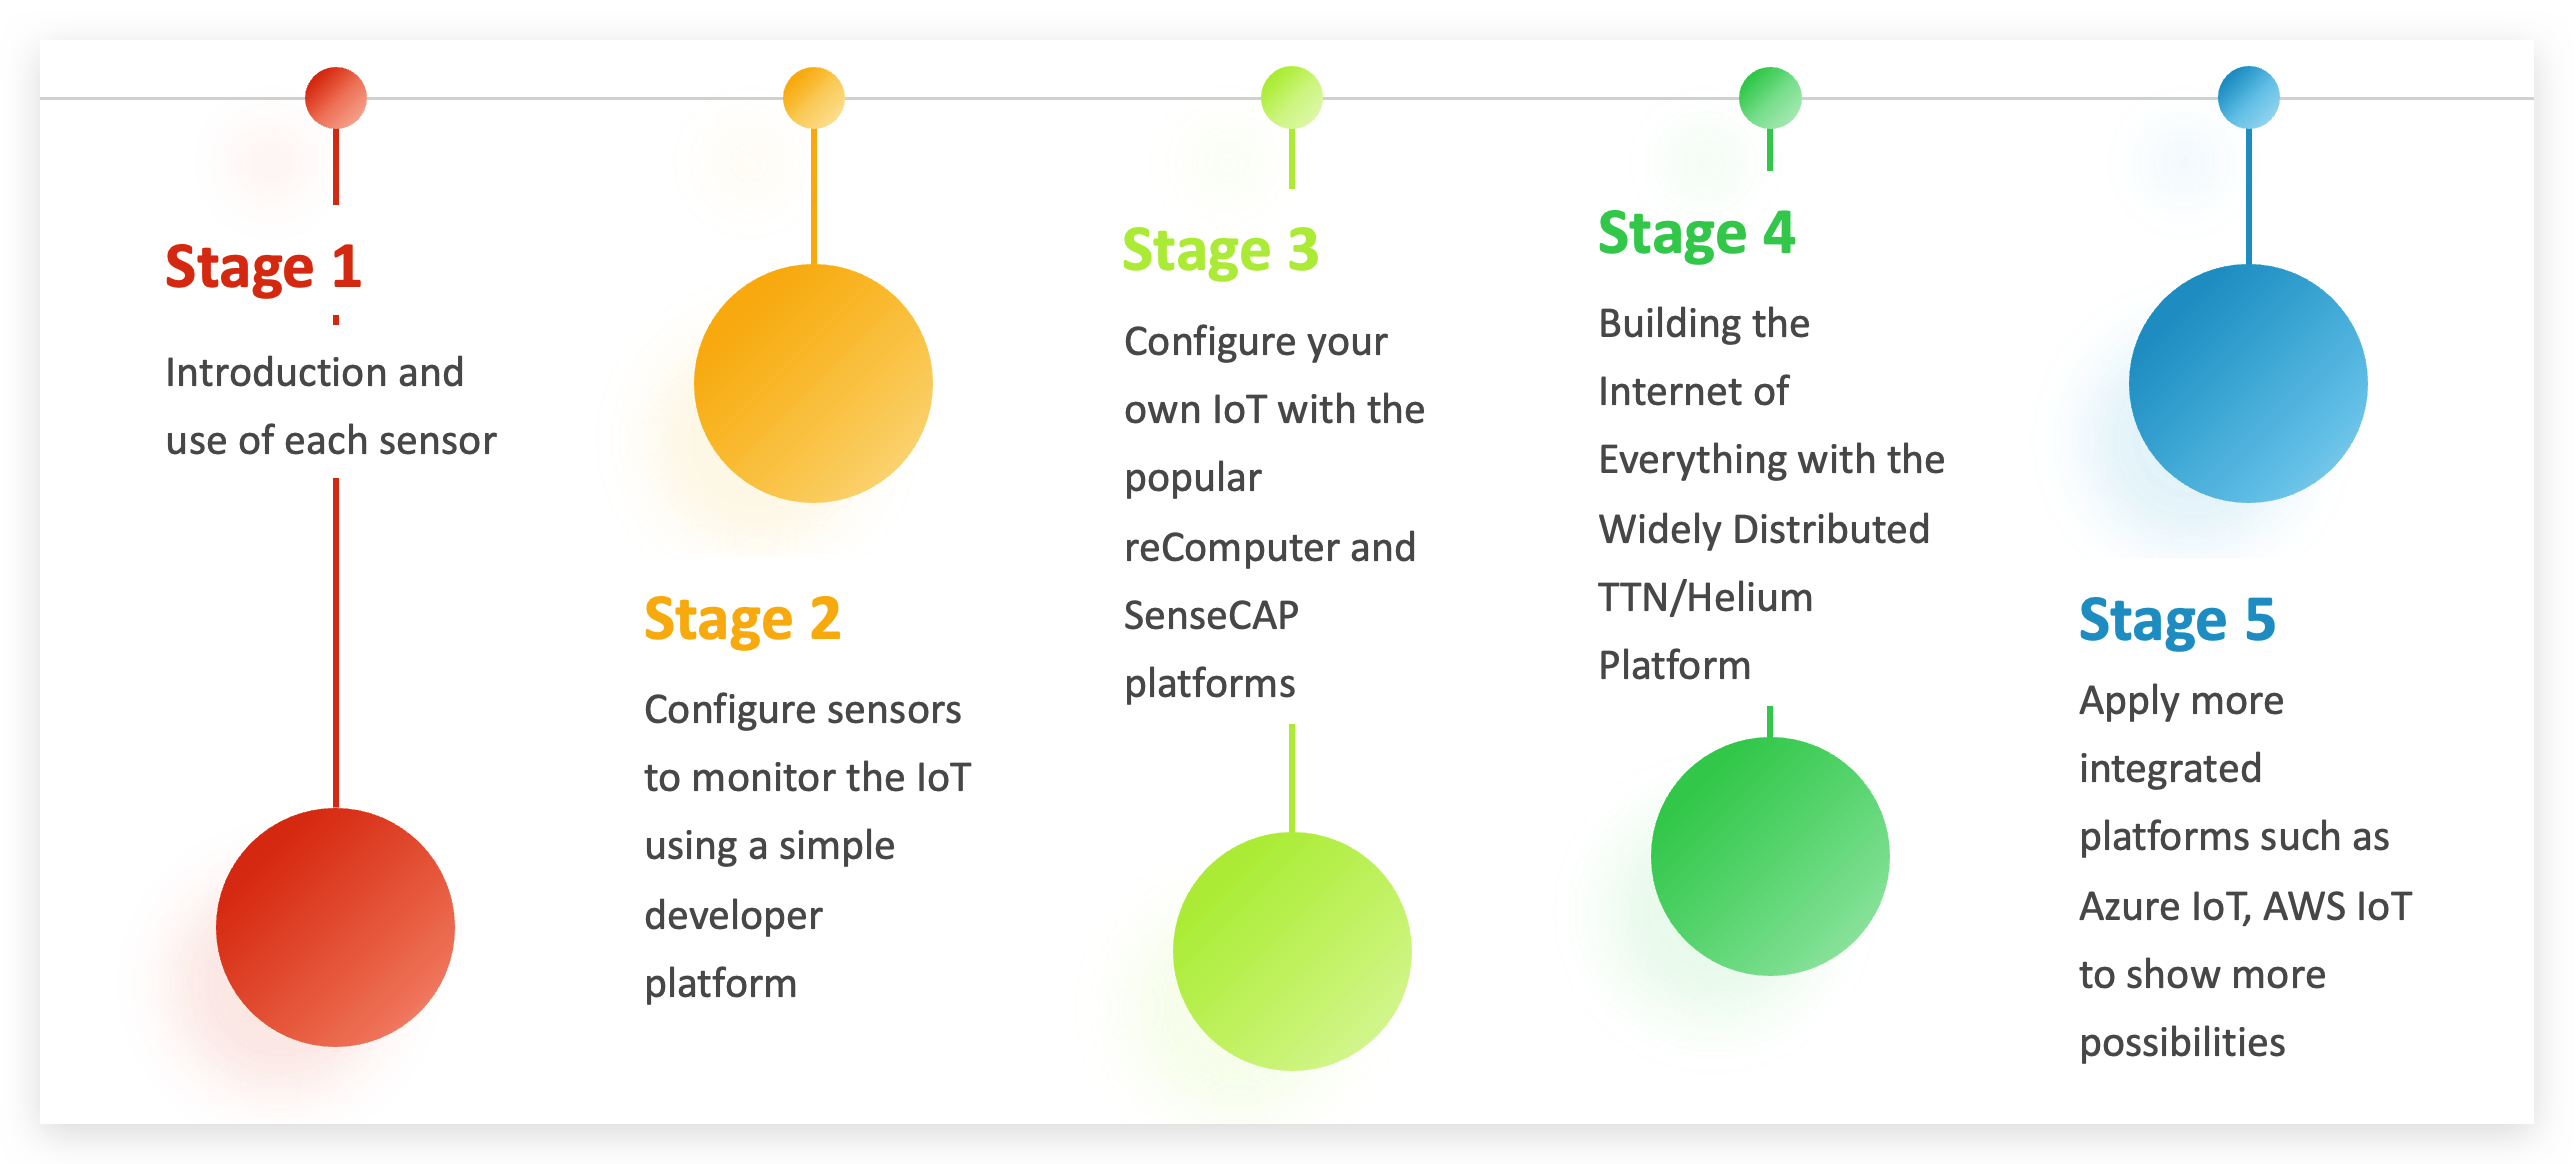
What can I do next?
Congratulations on successfully complete the steps listed in this quick starter guide, we just observed the data transferred from sensor device into SenseCAP Console / Ubidots view in least amount of time!
Next, if you want to dive further into sensor programming as well as LoRaWAN®, cloud platforms and more, continue with our SenseCAP - The Sensor Prototype Kit Overview.
Resources
- [GitHub]Seeed_Arduino_K1100 Source Code
Troubleshooting
Q1: Why does the data content from the SenseCAP platform differ from the data displayed in the Wio Terminal?
A: Because the data is read every five minutes and then sent out within three minutes. So the sensor value obtained may be the value read once in some five-minute interval with some delay. Whereas the data from Wio Terminal is in real time, which may lead to inconsistencies between the two.
Q2: Why can't I connect to LoRaWAN®?
A: If you always can't connect to LoRaWAN®, please make sure that there is a strong enough signal and stable Helium network coverage within the surrounding environment. We recommend that you have a Helium gateway of your own to experience the full process. The Grove - Wio-E5 is only a prototype, so its antenna strength is not comparable to that of a large LoRa® device. Moreover, this may also be related to the instability of the Helium network, which has been partially unresponsive since July 2022, and for which we can only wait for the official fix of Helium.
Q3: Why is it that sometimes some sensor data in a set of content does not appear on SenseCAP?
A: It could be that Grove - Wio-E5 is experiencing packet loss. In general, packet loss is a normal situation and does not need to be overly concerned. If there is a very severe packet loss, you can try to restart Wio Terminal. If you have very high requirements for real-time data and stability, you may want to check out the industrial-grade SenseCAP series devices.
Q4: I did not purchase the kit for K1101, can I use the firmware to experience this routine?
A: If you are not a customer who purchased this kit, you may not be able to experience full access to SenseCAP. The Grove - Wio-E5 in the kit is a special edition, and products purchased separately do not have access to SenseCAP.
Q5: If I use another program, can I recover the firmware?
A: You can burn this firmware for the Wio Terminal at any time, and in theory you can always use this routine as long as it does not destroy the original firmware of the Grove - Wio-E5. The method to burn the firmware is as follows. Slide the switch twice very quickly, as followed:
At this point a disk called Arduino will appear on your computer, just copy the firmware (.uf2 file) to this disk. Once the firmware is installed, the disk will be automatically ejected and the Wio Terminal will reboot into the Setup Band interface.
Q6: If I change the Dev EUI, App EUI, App Key of Grove - Wio-E5, is there a way to retrieve it?
A: We have opened up the enquiry interface to our users, so that when you have changed the information on the three codes to suit your project, you can also access them at any time with the sticker information on the back of the Grove - Wio-E5.
https://sensecap.seeed.cc/makerapi/device/view_device_info?nodeEui=<your_eui>&deviceCode=<your_code>
Please use the EUI and Code information marked on the back of the Grove - Wio-E5 to fill in the corresponding position on the above website to find out the corresponding three codes for your device by opening the website in your browser.
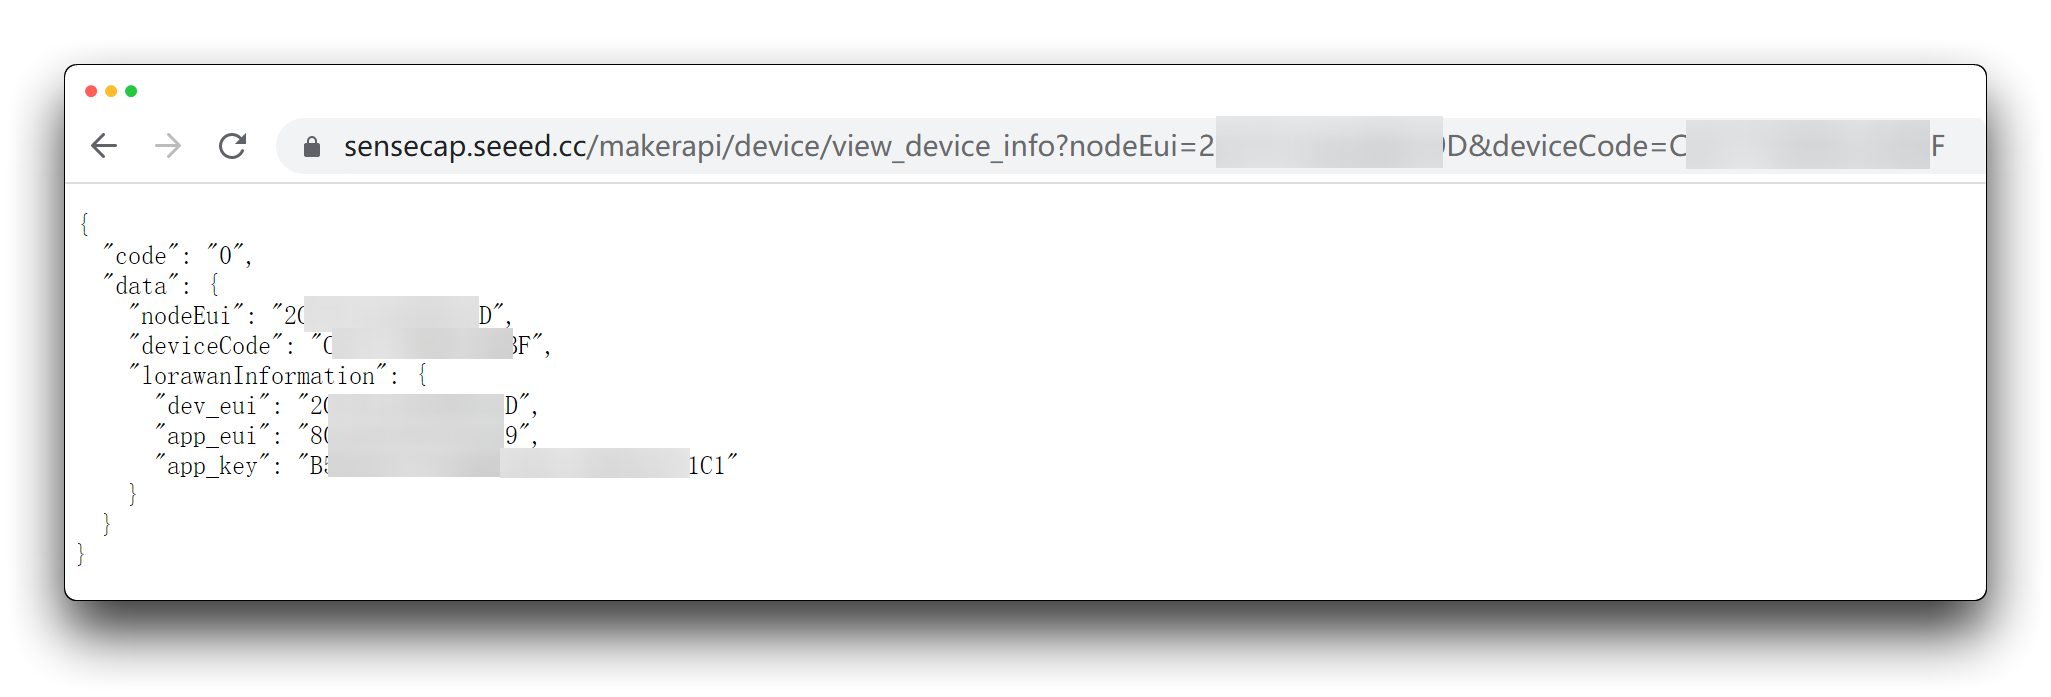
Please take good care of the three codes, any loss caused by the loss of the codes will be the responsibility of the user.
Q7: Is it possible to use SenseCAP's DevEUI, AppEUI and AppKey on other platforms? For example Helium or TTN?
A: The answer to this is no. SenseCAP's triple code cannot be used to bind to other platforms, otherwise there is a high risk of data anomalies on different platforms.
Tech Support & Product Discussion
Thank you for choosing our products! We are here to provide you with different support to ensure that your experience with our products is as smooth as possible. We offer several communication channels to cater to different preferences and needs.
Statement
- The LoRa® Mark is a trademark of Semtech Corporation or its subsidiaries.
- LoRaWAN® is a mark used under license from the LoRa Alliance®.