Connecting SenseCAP to Azure IoT Central via Node-RED
SenseCAP K1100 - The Sensor Prototype Kit represents Seeed Studio concentrating the essence of LoRa® communication on technology and edge intelligence products, for the easiest deploying and mastering of LoRa® and IoT applications.
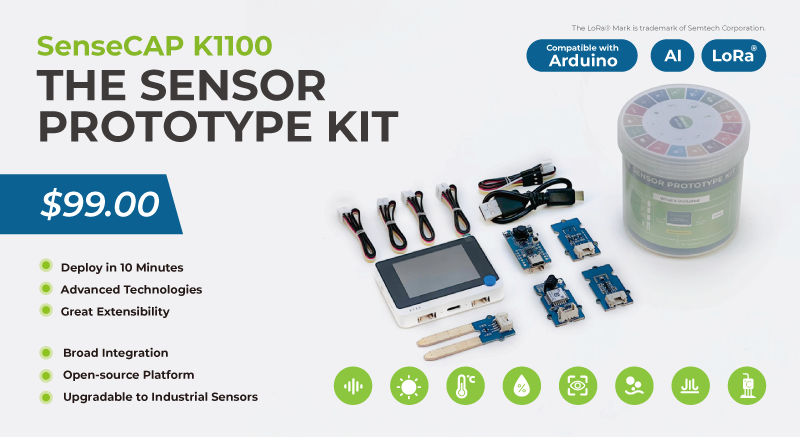

Upgradable to Industrial Sensors
With the SenseCAP S2110 controller and S2100 data logger, you can easily turn the Grove into a LoRaWAN® sensor. Seeed not only helps you with prototyping but also offers you the possibility to expand your project with the SenseCAP series of robust industrial sensors.
The IP66 housing, Bluetooth configuration, compatibility with the global LoRaWAN® network, built-in 19 Ah battery, and powerful support from APP make the SenseCAP S210x the best choice for industrial applications. The series includes sensors for soil moisture, air temperature and humidity, light intensity, CO2, EC, and an 8-in-1 weather station. Try the latest SenseCAP S210x for your next successful industrial project.


Microsoft Azure IoT
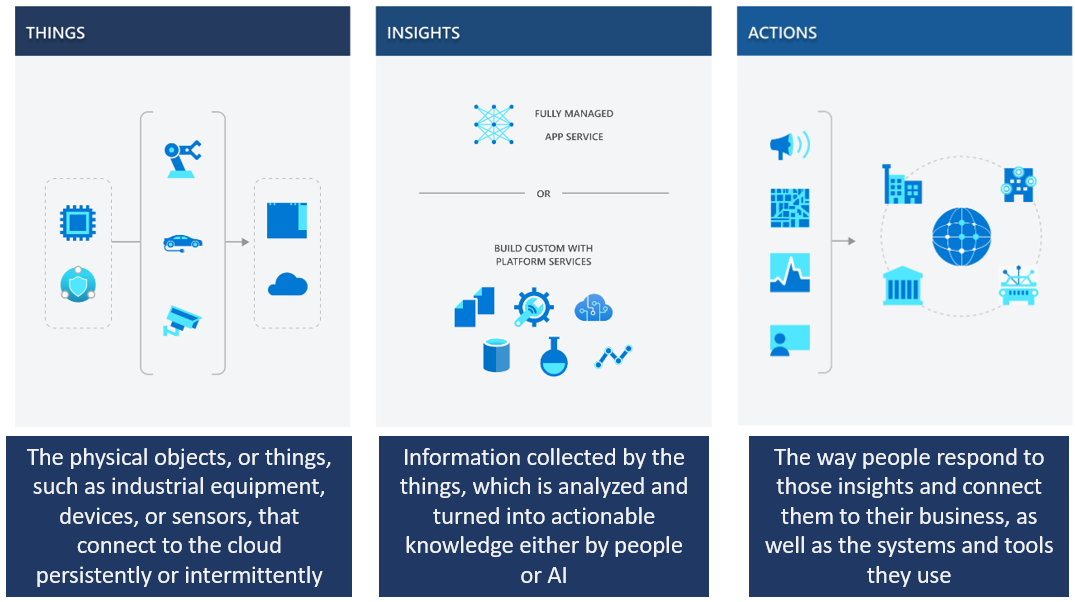
Microsoft Azure IoT is a collection of Microsoft-managed cloud services that connect, monitor, and control billions of IoT assets. It includes security and operating systems for devices and equipment, along with data and analytics that help businesses to build, deploy and manage IoT applications.
Microsoft Azure IoT Central
Microsoft Azure IoT Central is a fully managed global IoT SaaS (software as a service) solution that makes it easy to connect, monitor and manage your IoT assets at scale. It is highly secure, scales with your business as it grows, ensures that your investments are repeatable and integrates with your existing business apps. It also bridges the gap between your business applications and IoT data. Finally it offers centralized management to reconfigure and update your devices.
The content of this chapter will continue to use the Node-RED introduced earlier and facilitate the management of the K1100 kit in Microsoft Azure IoT Central through the use of Node-RED.
If you haven't installed or don't know what Node-RED is, please refer to Node-RED & SenseCAP Tutorials.
Install the SenseCraft
SenseCraft is an open source software platform to build smart sensors with no-code. It delivers a complete out-of-the-box solution to sense the real-world, process data and send the data to the cloud in the easiest and fastest way possible with no coding experience at all! It is now compatible with Wio Terminal.
By using the SenseCraft, we can transfer sensor values from the K1100 kit directly to the SenseCAP platform without programming. This is, of course, achieved via LoRaWAN®.
If you want to access Azure IoT Central via WiFi (MQTT), please refer to this Wiki.
Step 1. Download the firmware to your computer
Under the Latest release, click on SenseCraft-vx.x.uf2 to download the .uf2 file.
Step 2. Upload the firmware to Wio Terminal
Connect the Wio Terminal to PC and turn in ON, Enter Bootloader Mode by sliding down the power switch further away from "ON" position, release, slide again and release.
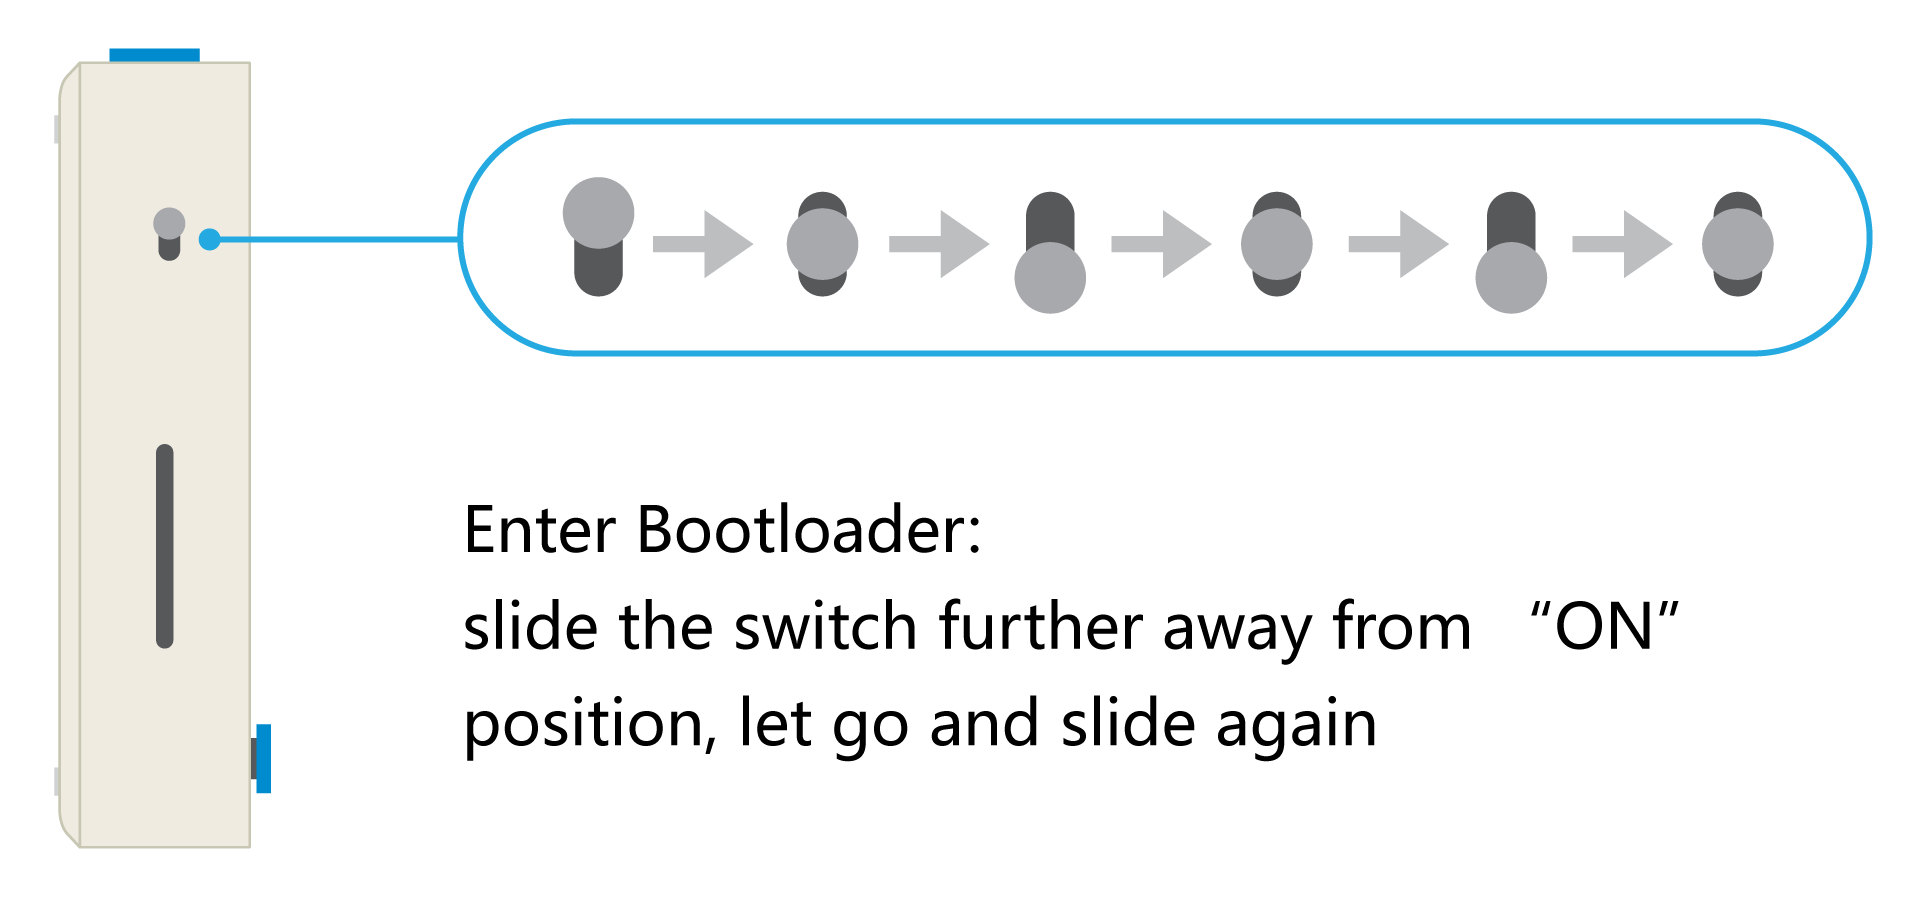
Once Wio Terminal is in the Bootloader mode, the blue LED will start to breathe in a way that is different from blinking.
Open File Explorer on your PC and you will see a new external drive, named Arduino, drag the previously downloaded .uf2 file into this Arduino drive.
Now we have successfully uploaded the SenseCraft into the Wio Terminal.
Create MQTT Node
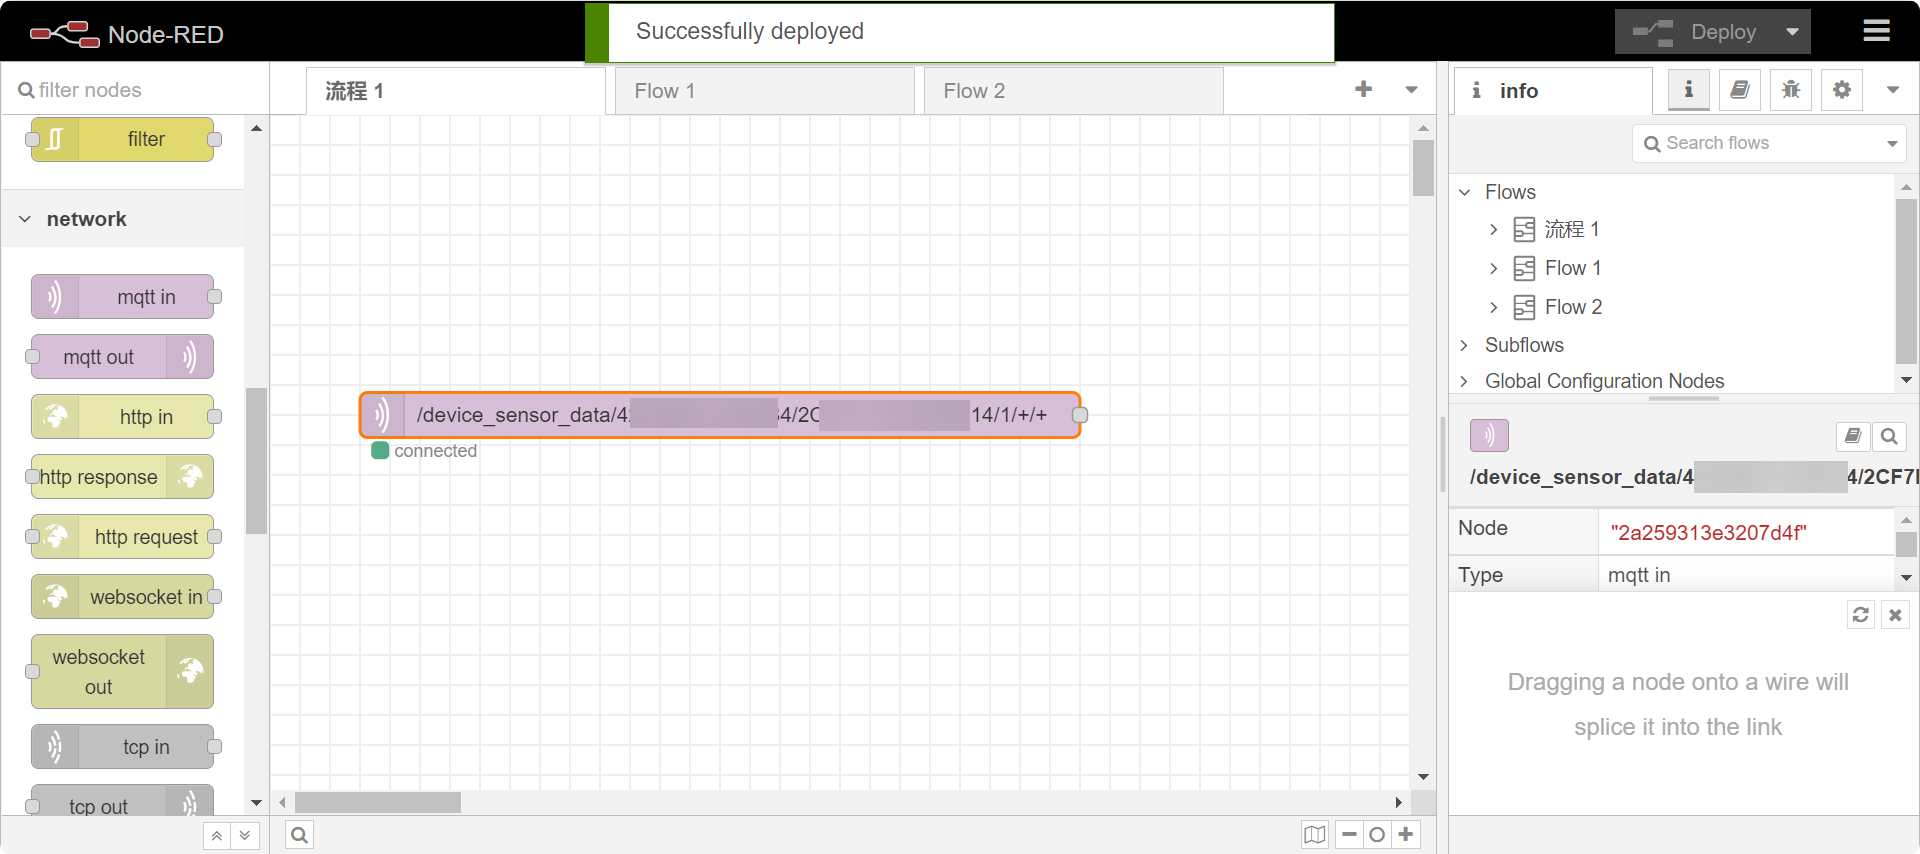
Step 1. Start Node-RED
Start Node-RED by typing the command node-red in the terminal and open a browser and enter the address http://localhost:1880 in the address bar to access the editor of Node-RED.
Step 2. Create MQTT Node
We use Network -> mqtt in node and configure mqtt in the format of the SenseCAP API as requested in the previous tutorial.
-
Server: openstream.api.sensecap.seeed.cc
-
Port: 1883
-
Protocol: MQTT V3.1.1
-
Client ID: The format is
org-<Organization ID>-<Random ID>-
<Orgnization ID>Your organization ID. We have obtained it in the Get the SenseCAP API. -
<Random ID>uses your own randomly generated numbers or lowercase letters.
-
-
Topic Format:
/device_sensor_data/<OrgID>/<DeviceEUI>/<Channel>/<Reserved>/<MeasurementID>
| OrgID | Your organization ID. We have obtained it in the Get the SenseCAP API. |
| DevEUI | Unique identification of sensor devices. This information can be found on the sticker on the back of the Grove - Wio E5, as well as in the SenseCAP console device. |
| Channel | A physical interface on the device to which the sensor is connected. For the K1100 kit, the default value here is 1. |
| Reserved | Reserved Fields. |
| MeasurementID | Measured value ID. This ID can be found in the Measurement IDs section of the SenseCAP documentation |
Step 3. Validate MQTT nodes
Once configured, please click the Deploy button in the top right corner to check if the configuration was successful. If it is filled in correctly, then the word Connected will be displayed.
Configure Microsoft Azure IoT Central
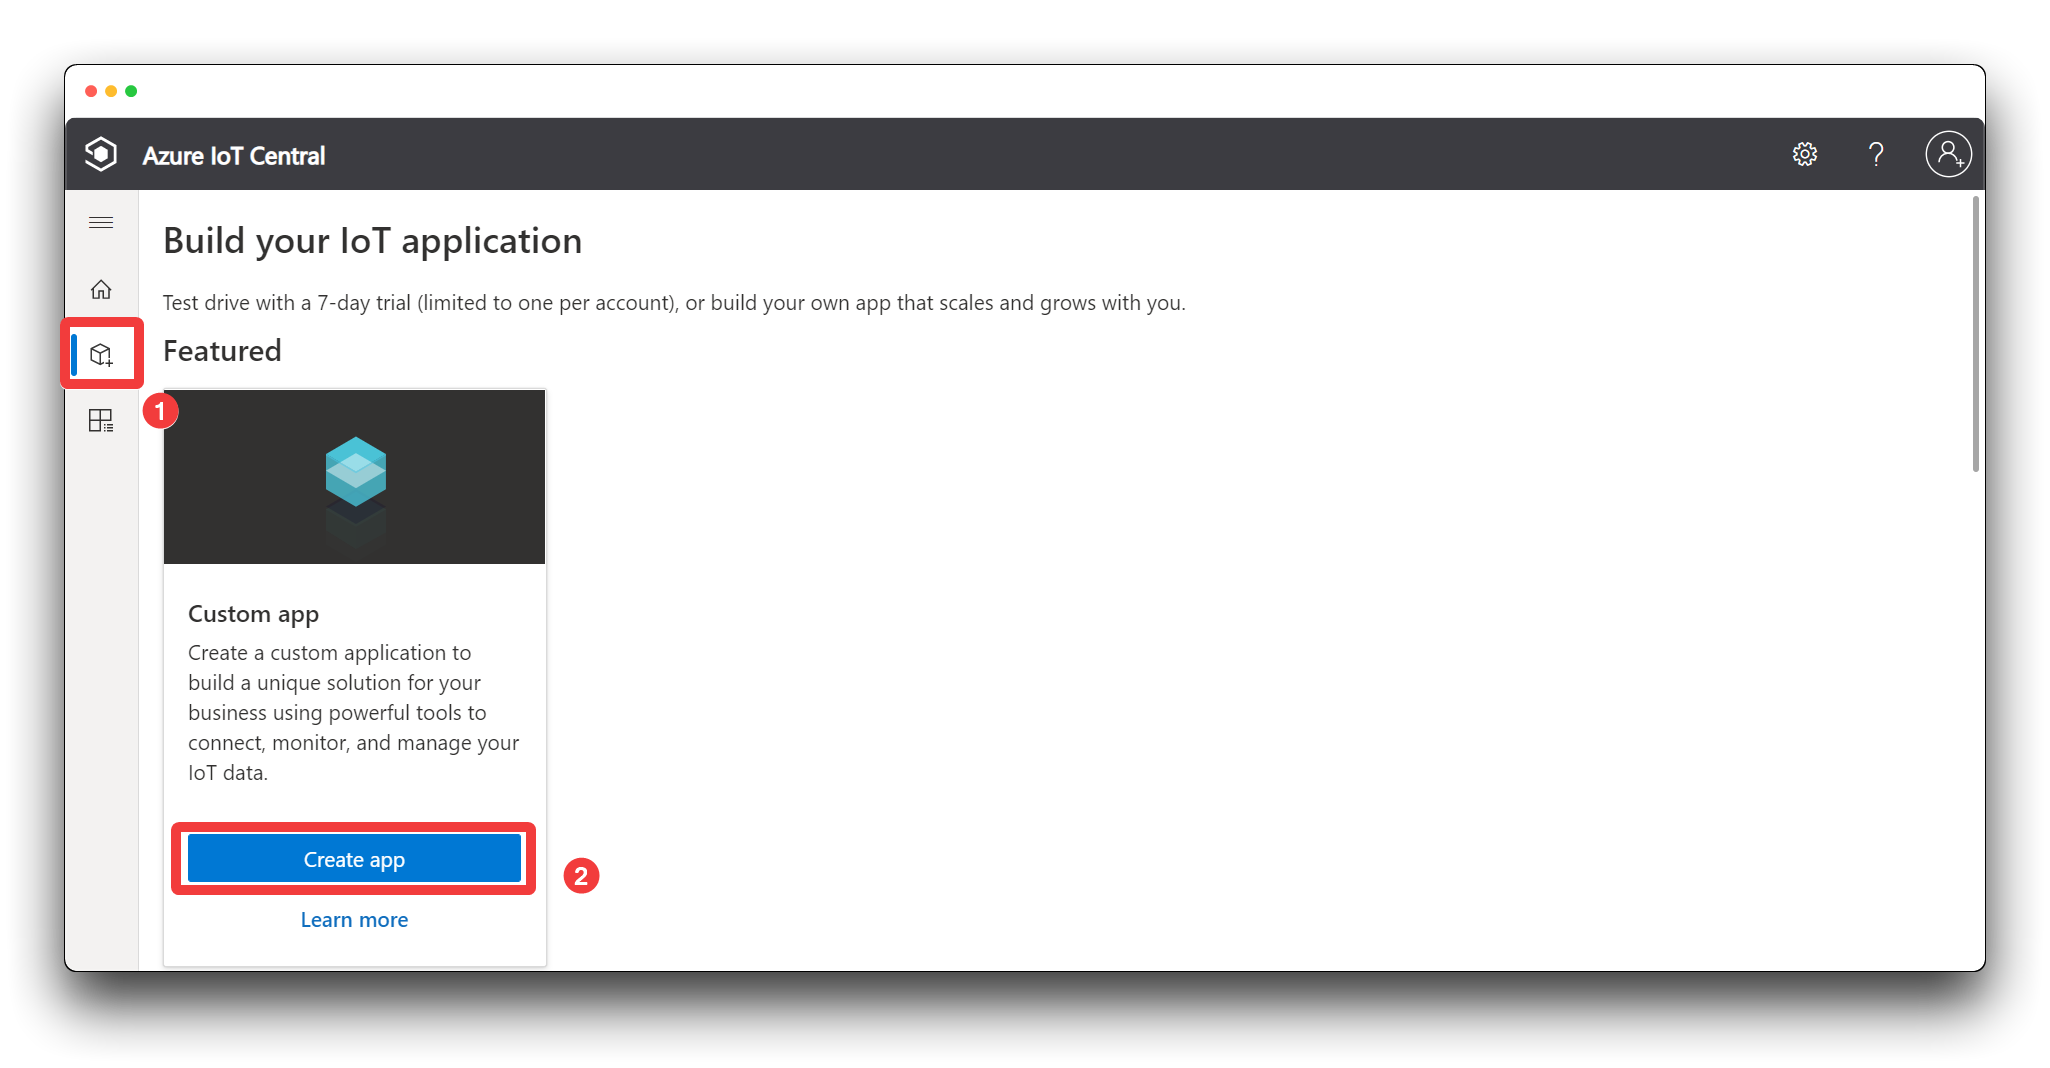
Step 1. Log in to Azure IoT Central.
Please go to the official Azure IoT Central website, click Build from the navigation menu on the left, and click Custom apps.
If you are not already logged into Azure IoT Central, you will be asked to complete a registration/login at this point.
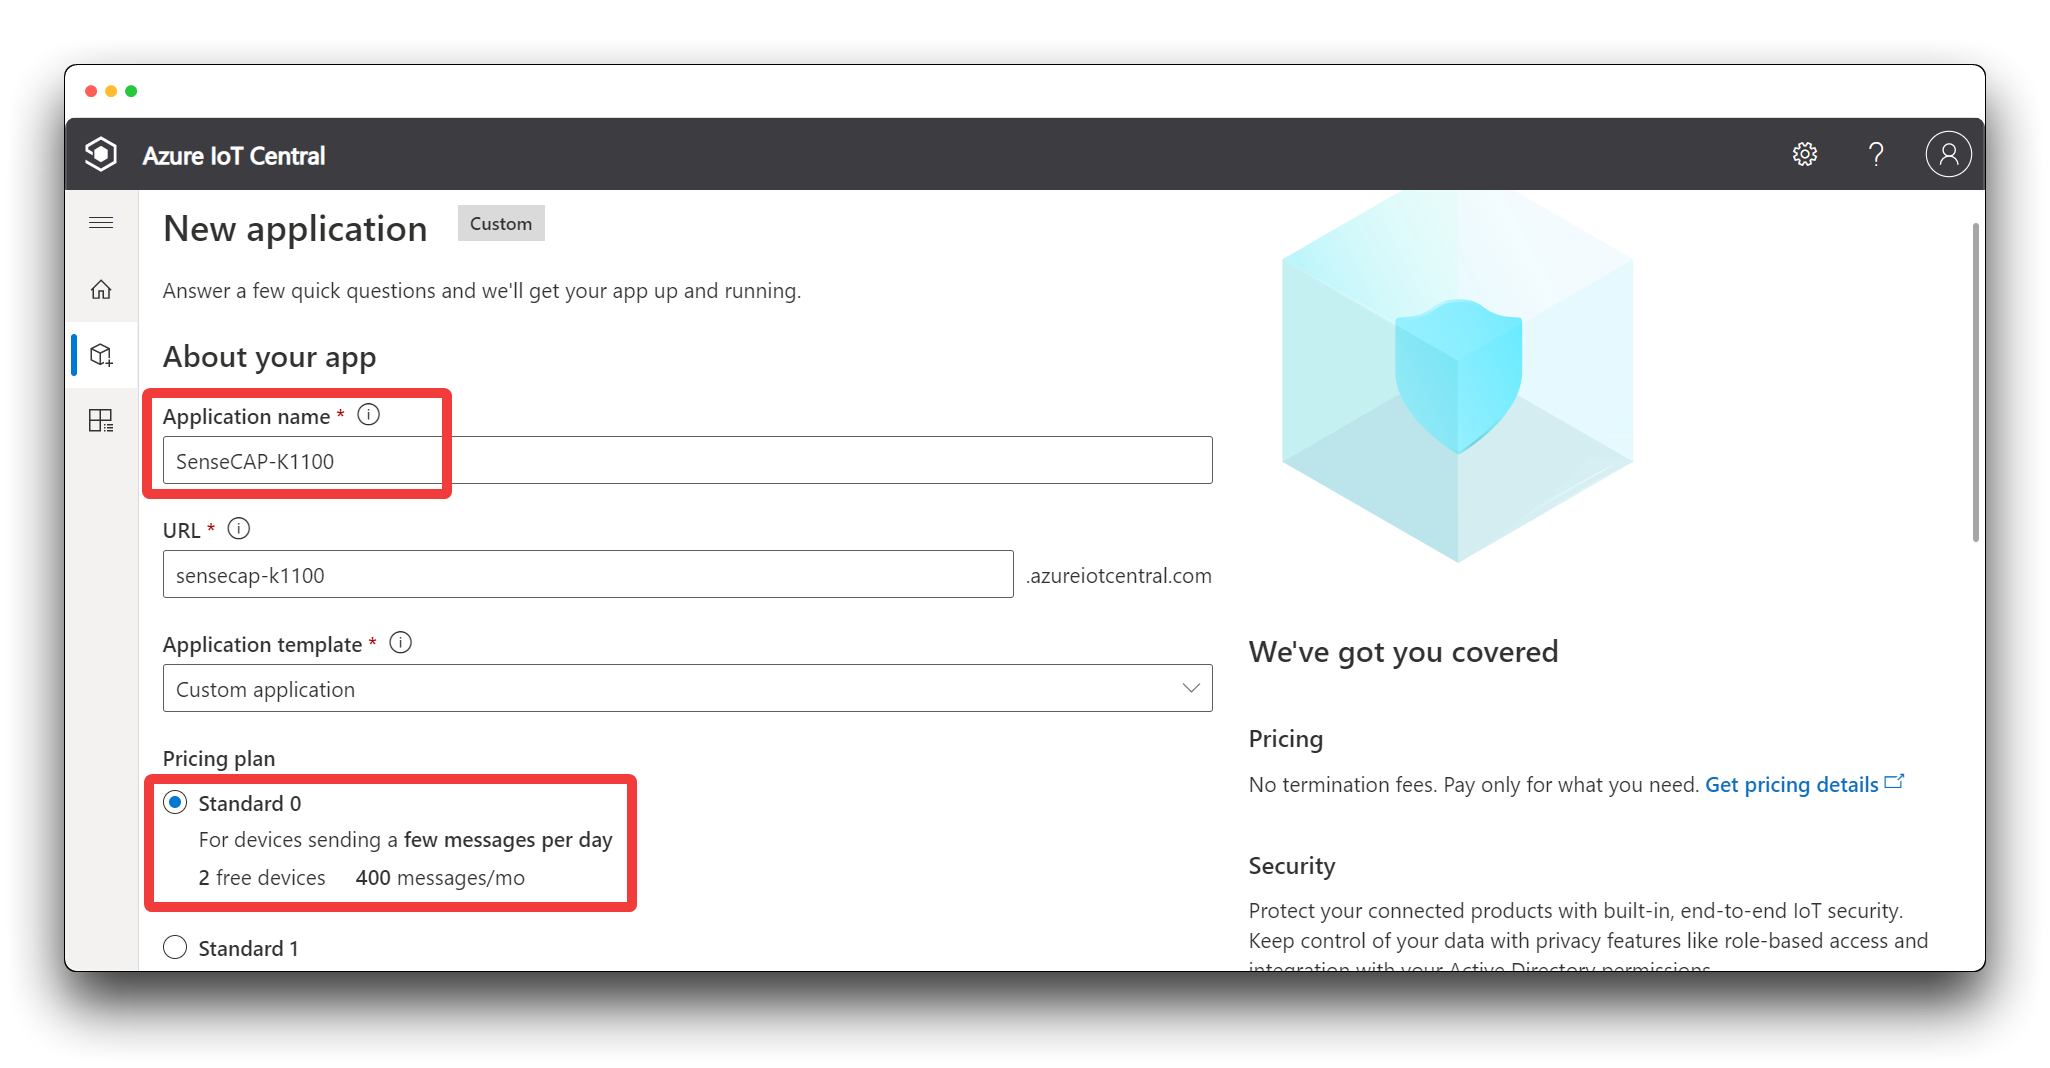
Step 2. Fill in Application name and choose Standard 0 under the Pricing plan. Application URL will be created automatically when you fill in application name. In this example, we will accomplish this task at minimal cost.
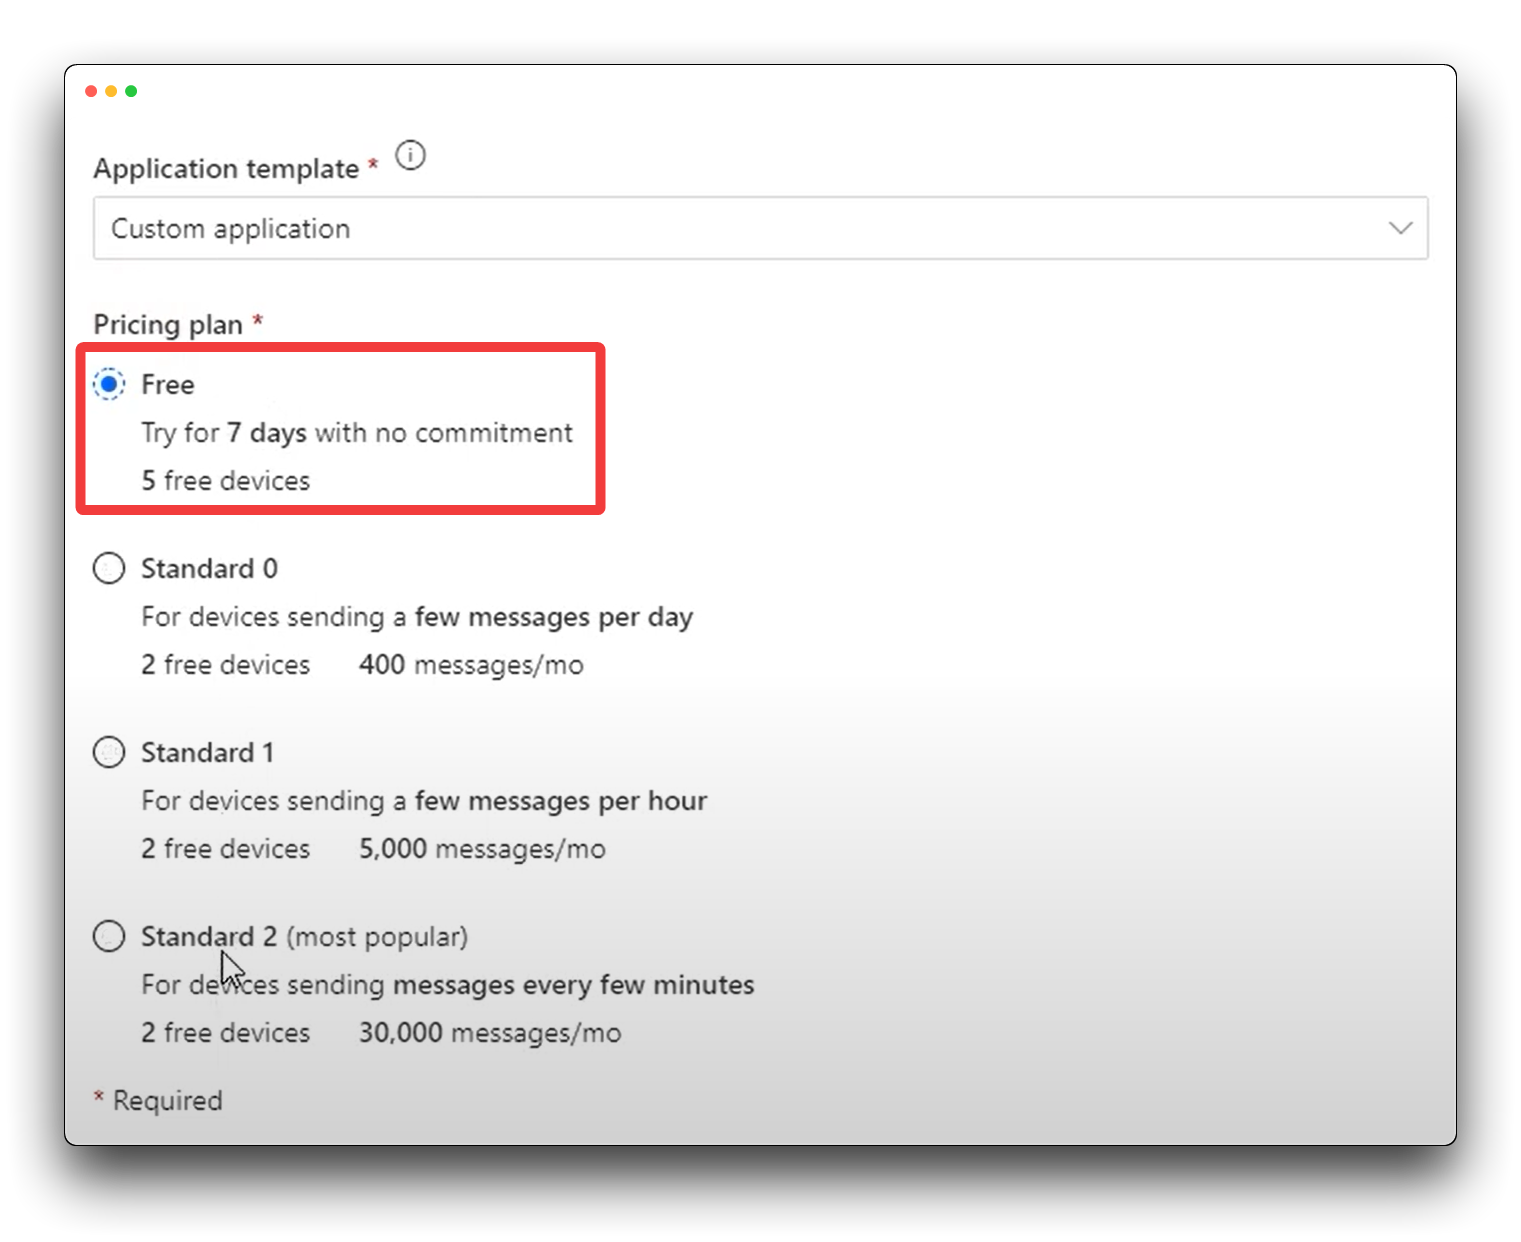
If you are a new user of Azure IoT Central, we recommend that you select Free as this will not consume your fees.
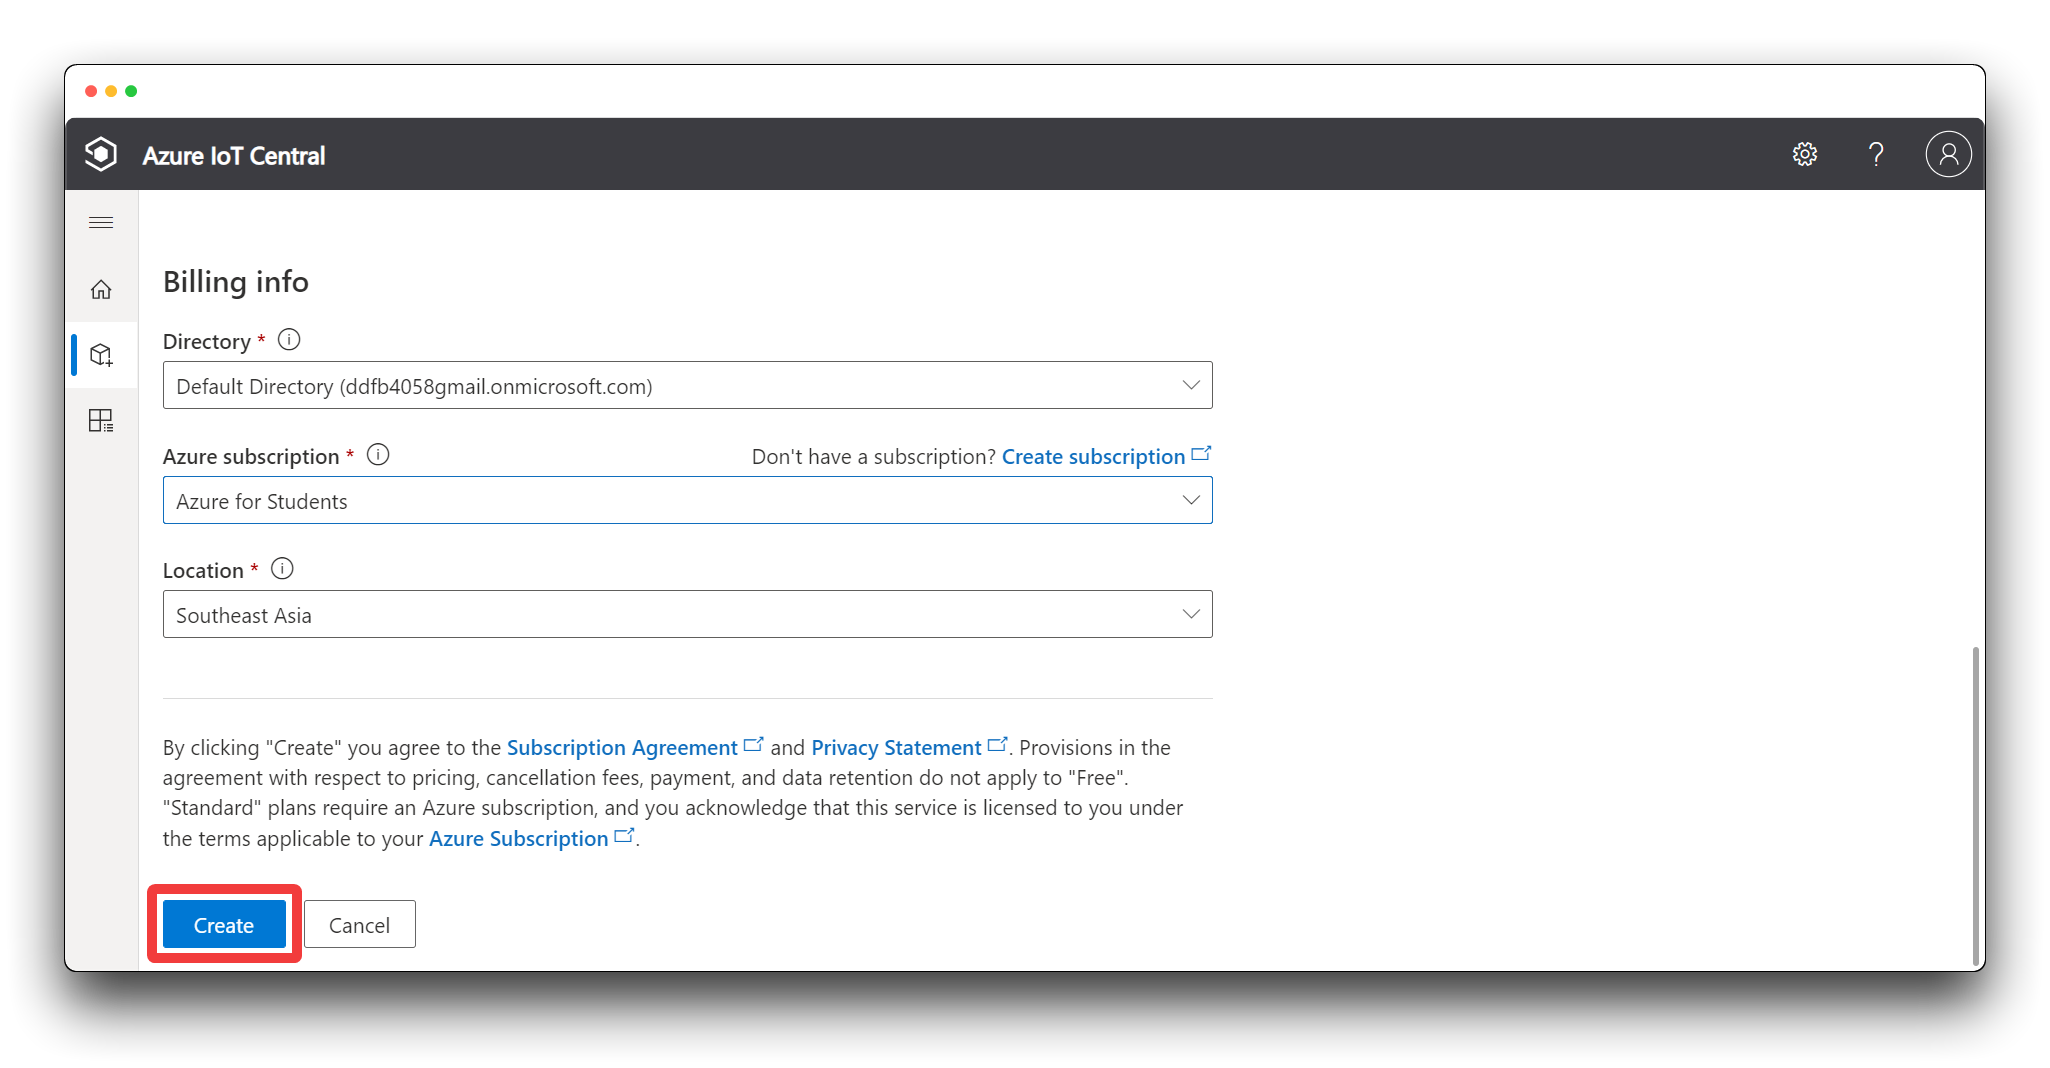
Step 3. Click Create to create the new application. Now you have successfully set up Azure IoT Central!
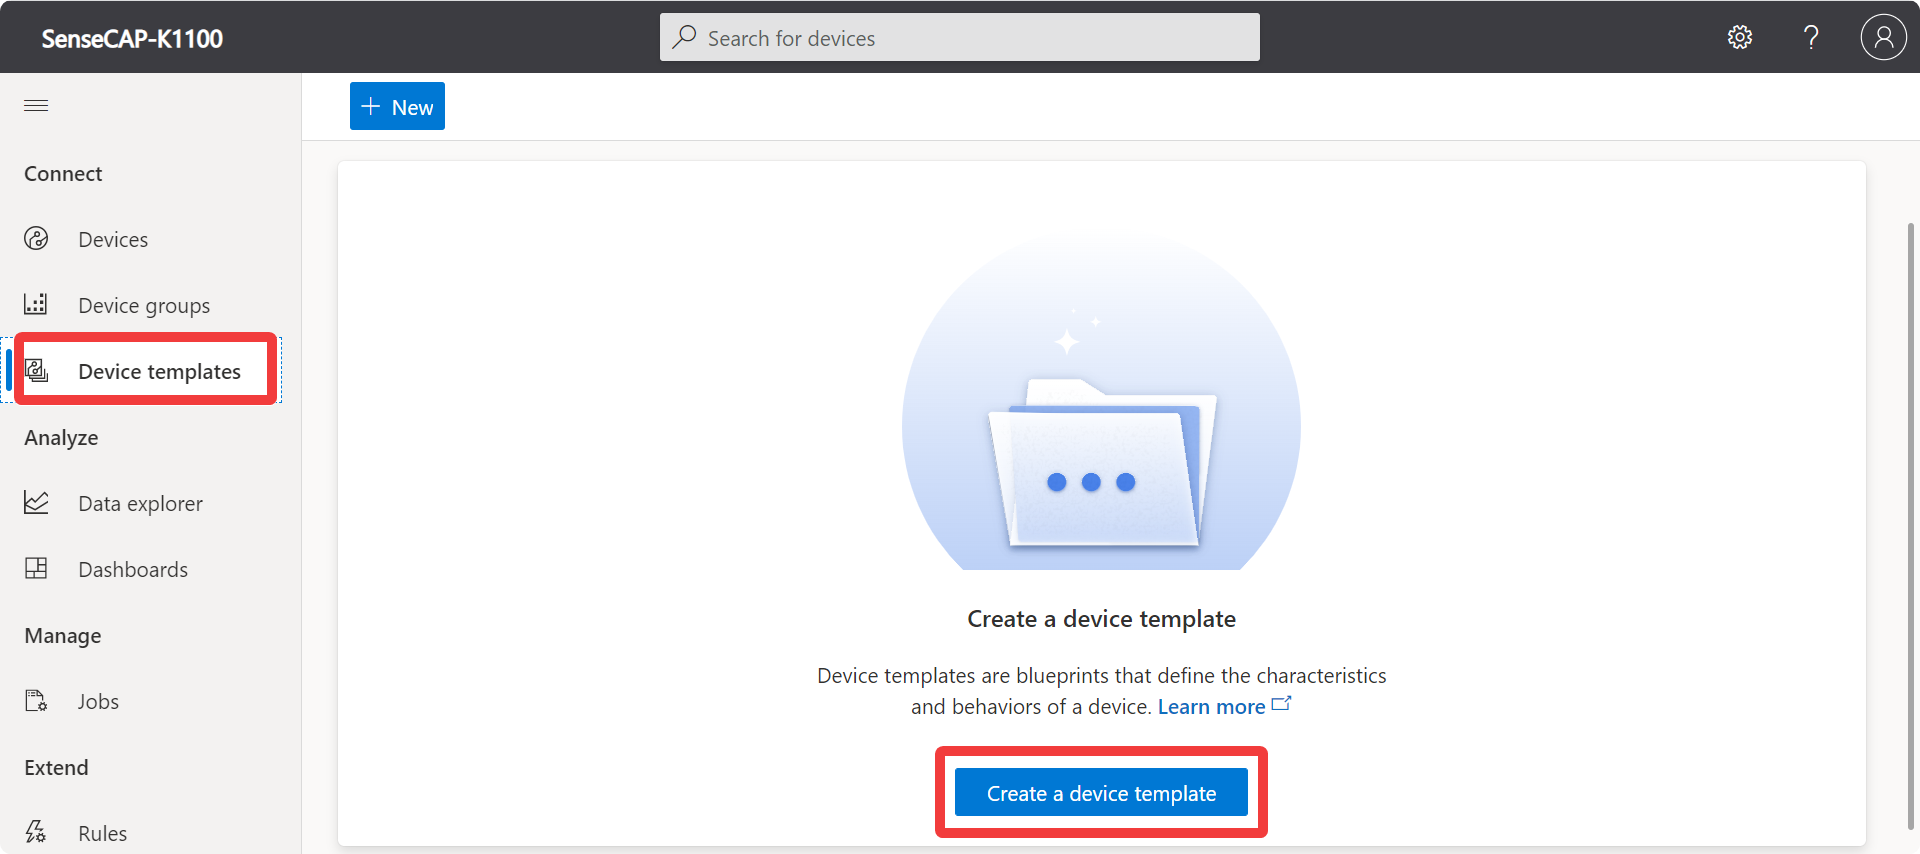
Step 4. Create a Device template
Please create a new device template by clicking on Device templates in the left-hand menu bar.
Please select Wio Terminal as our template.
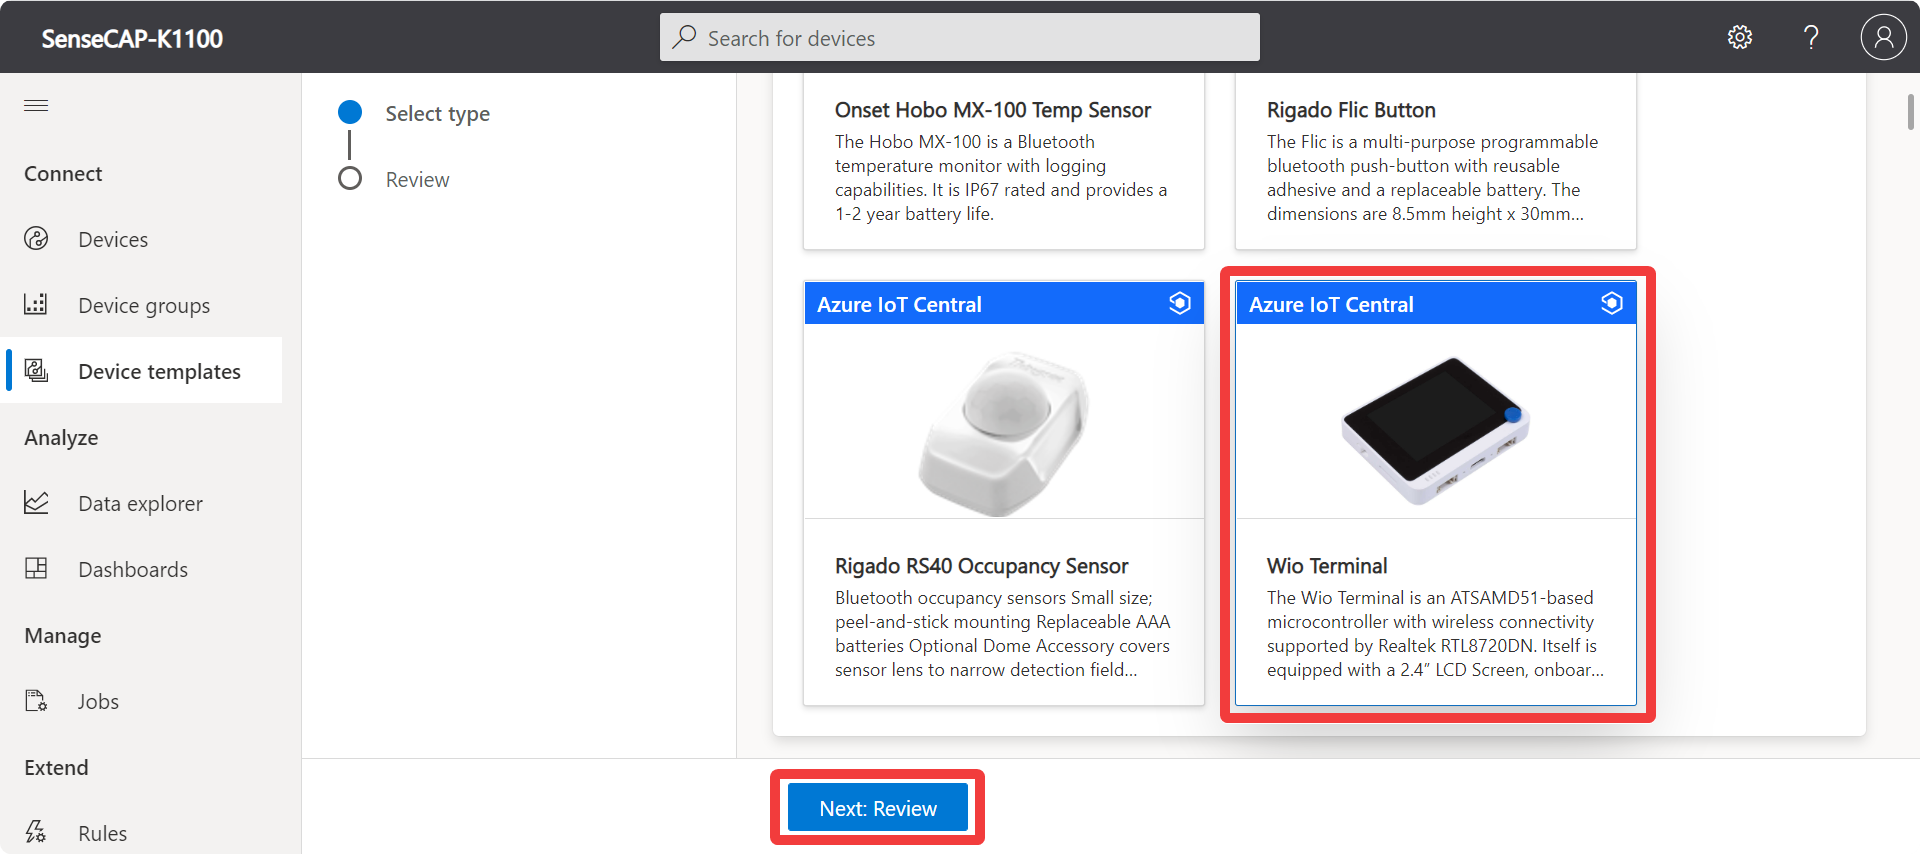
Then just click on Create.
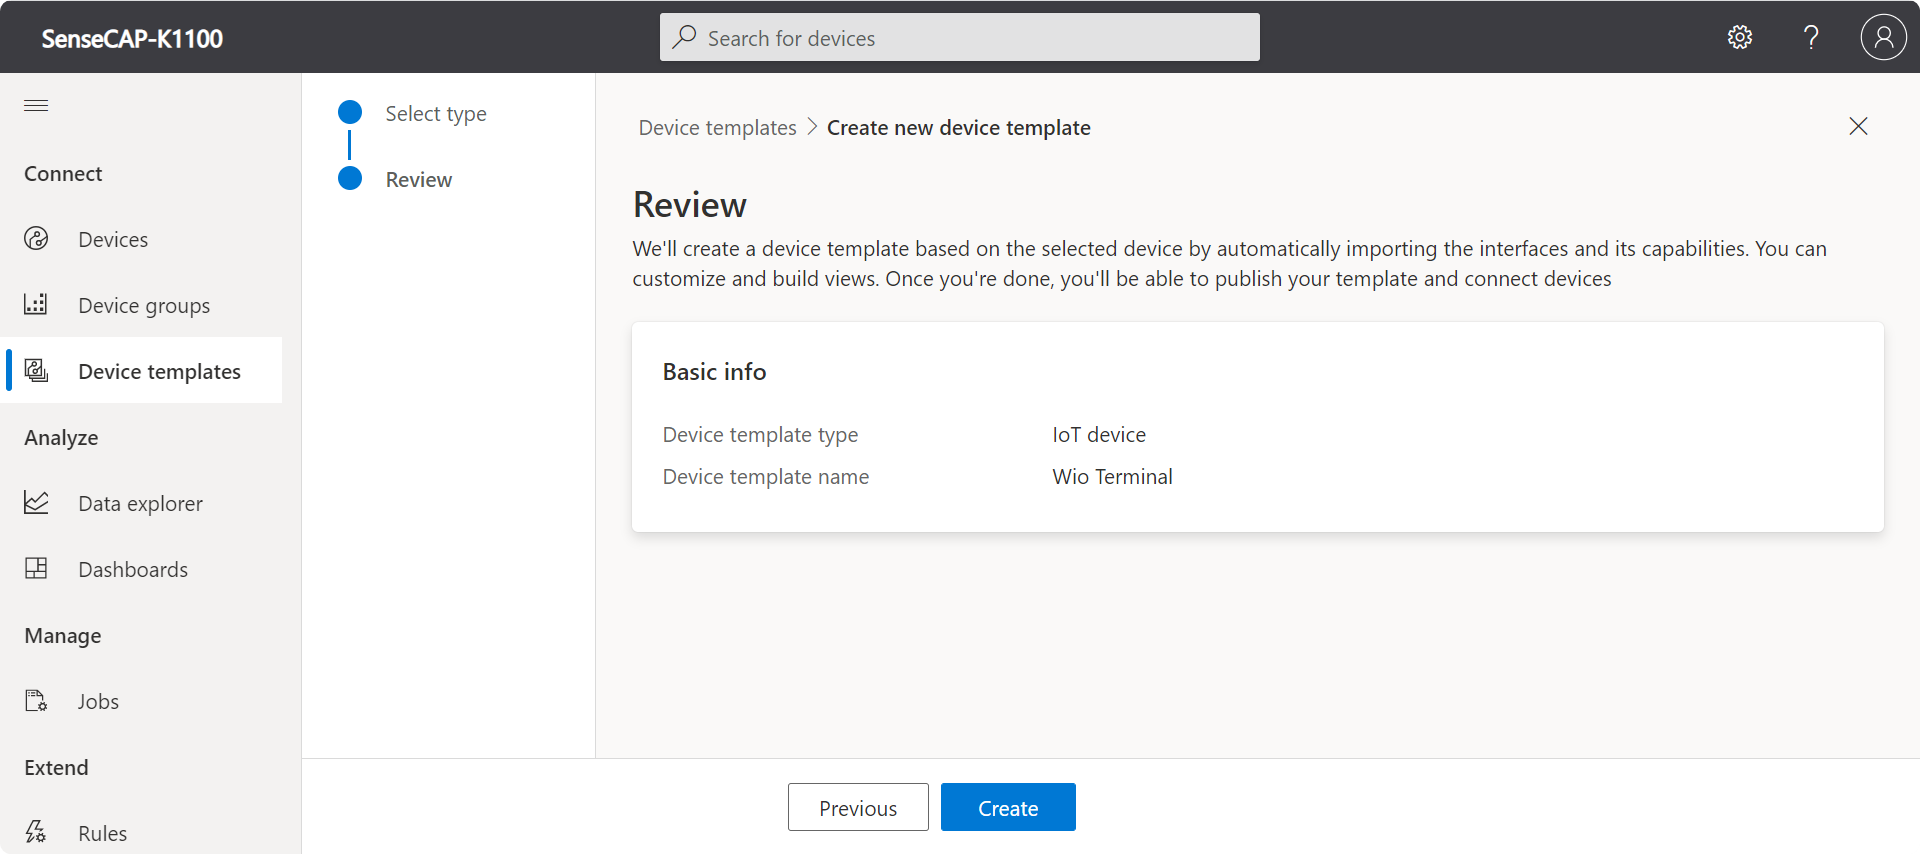
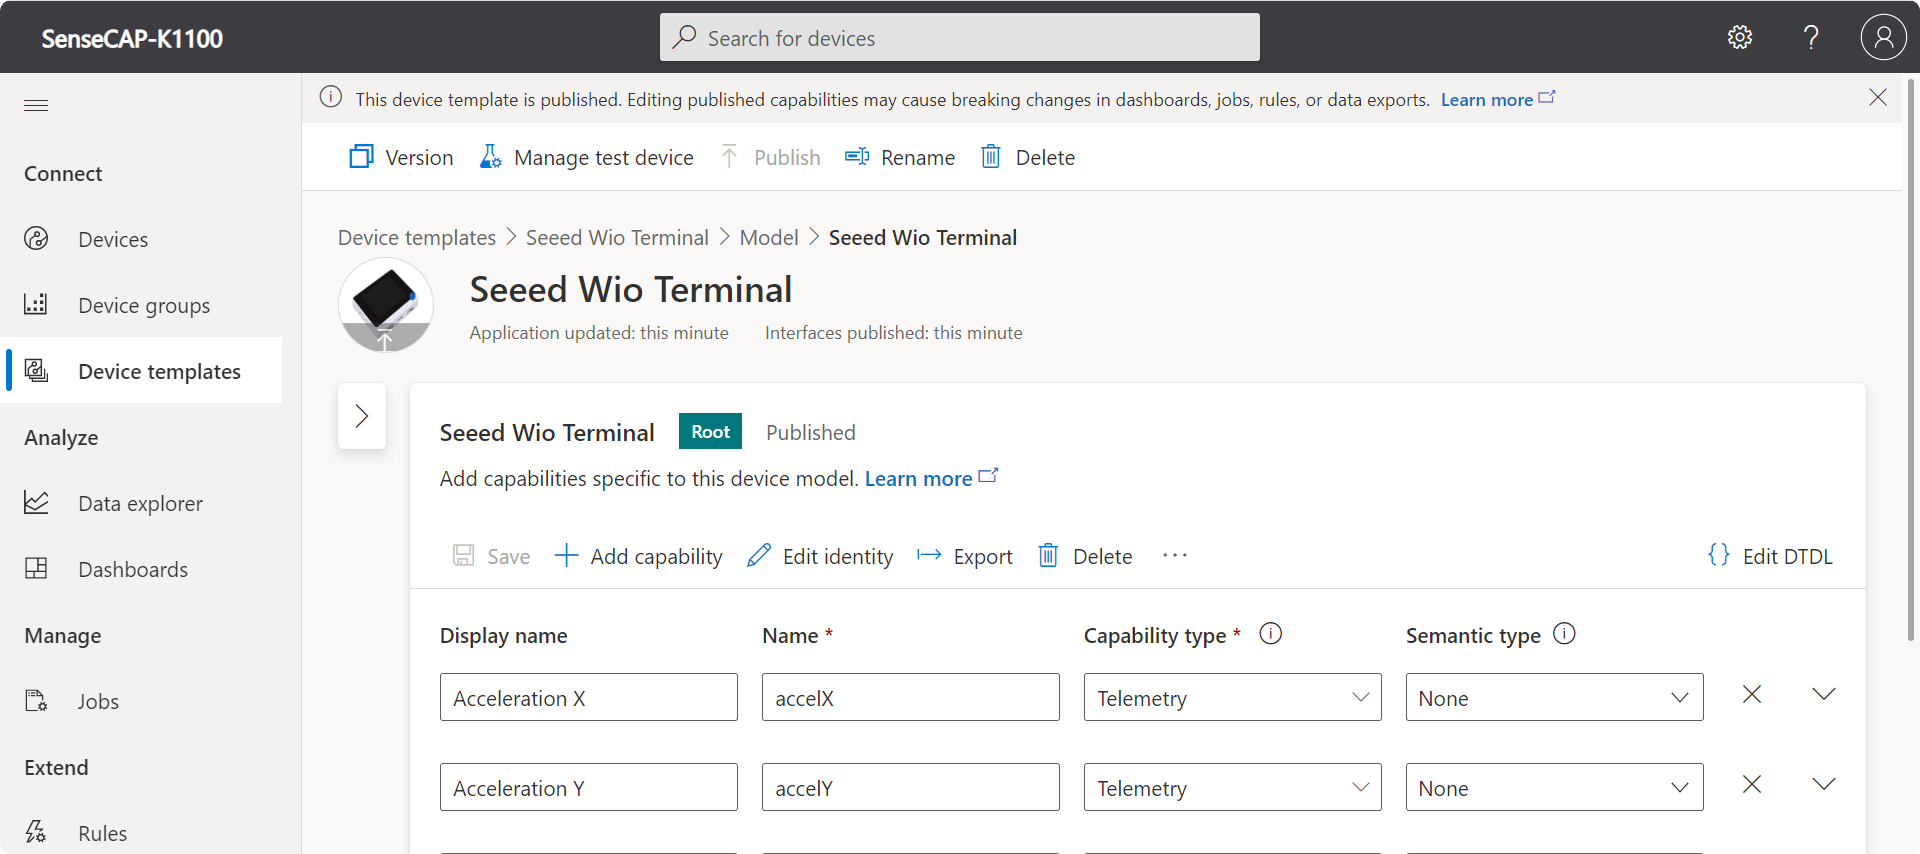
Then, a ready-made template is created.
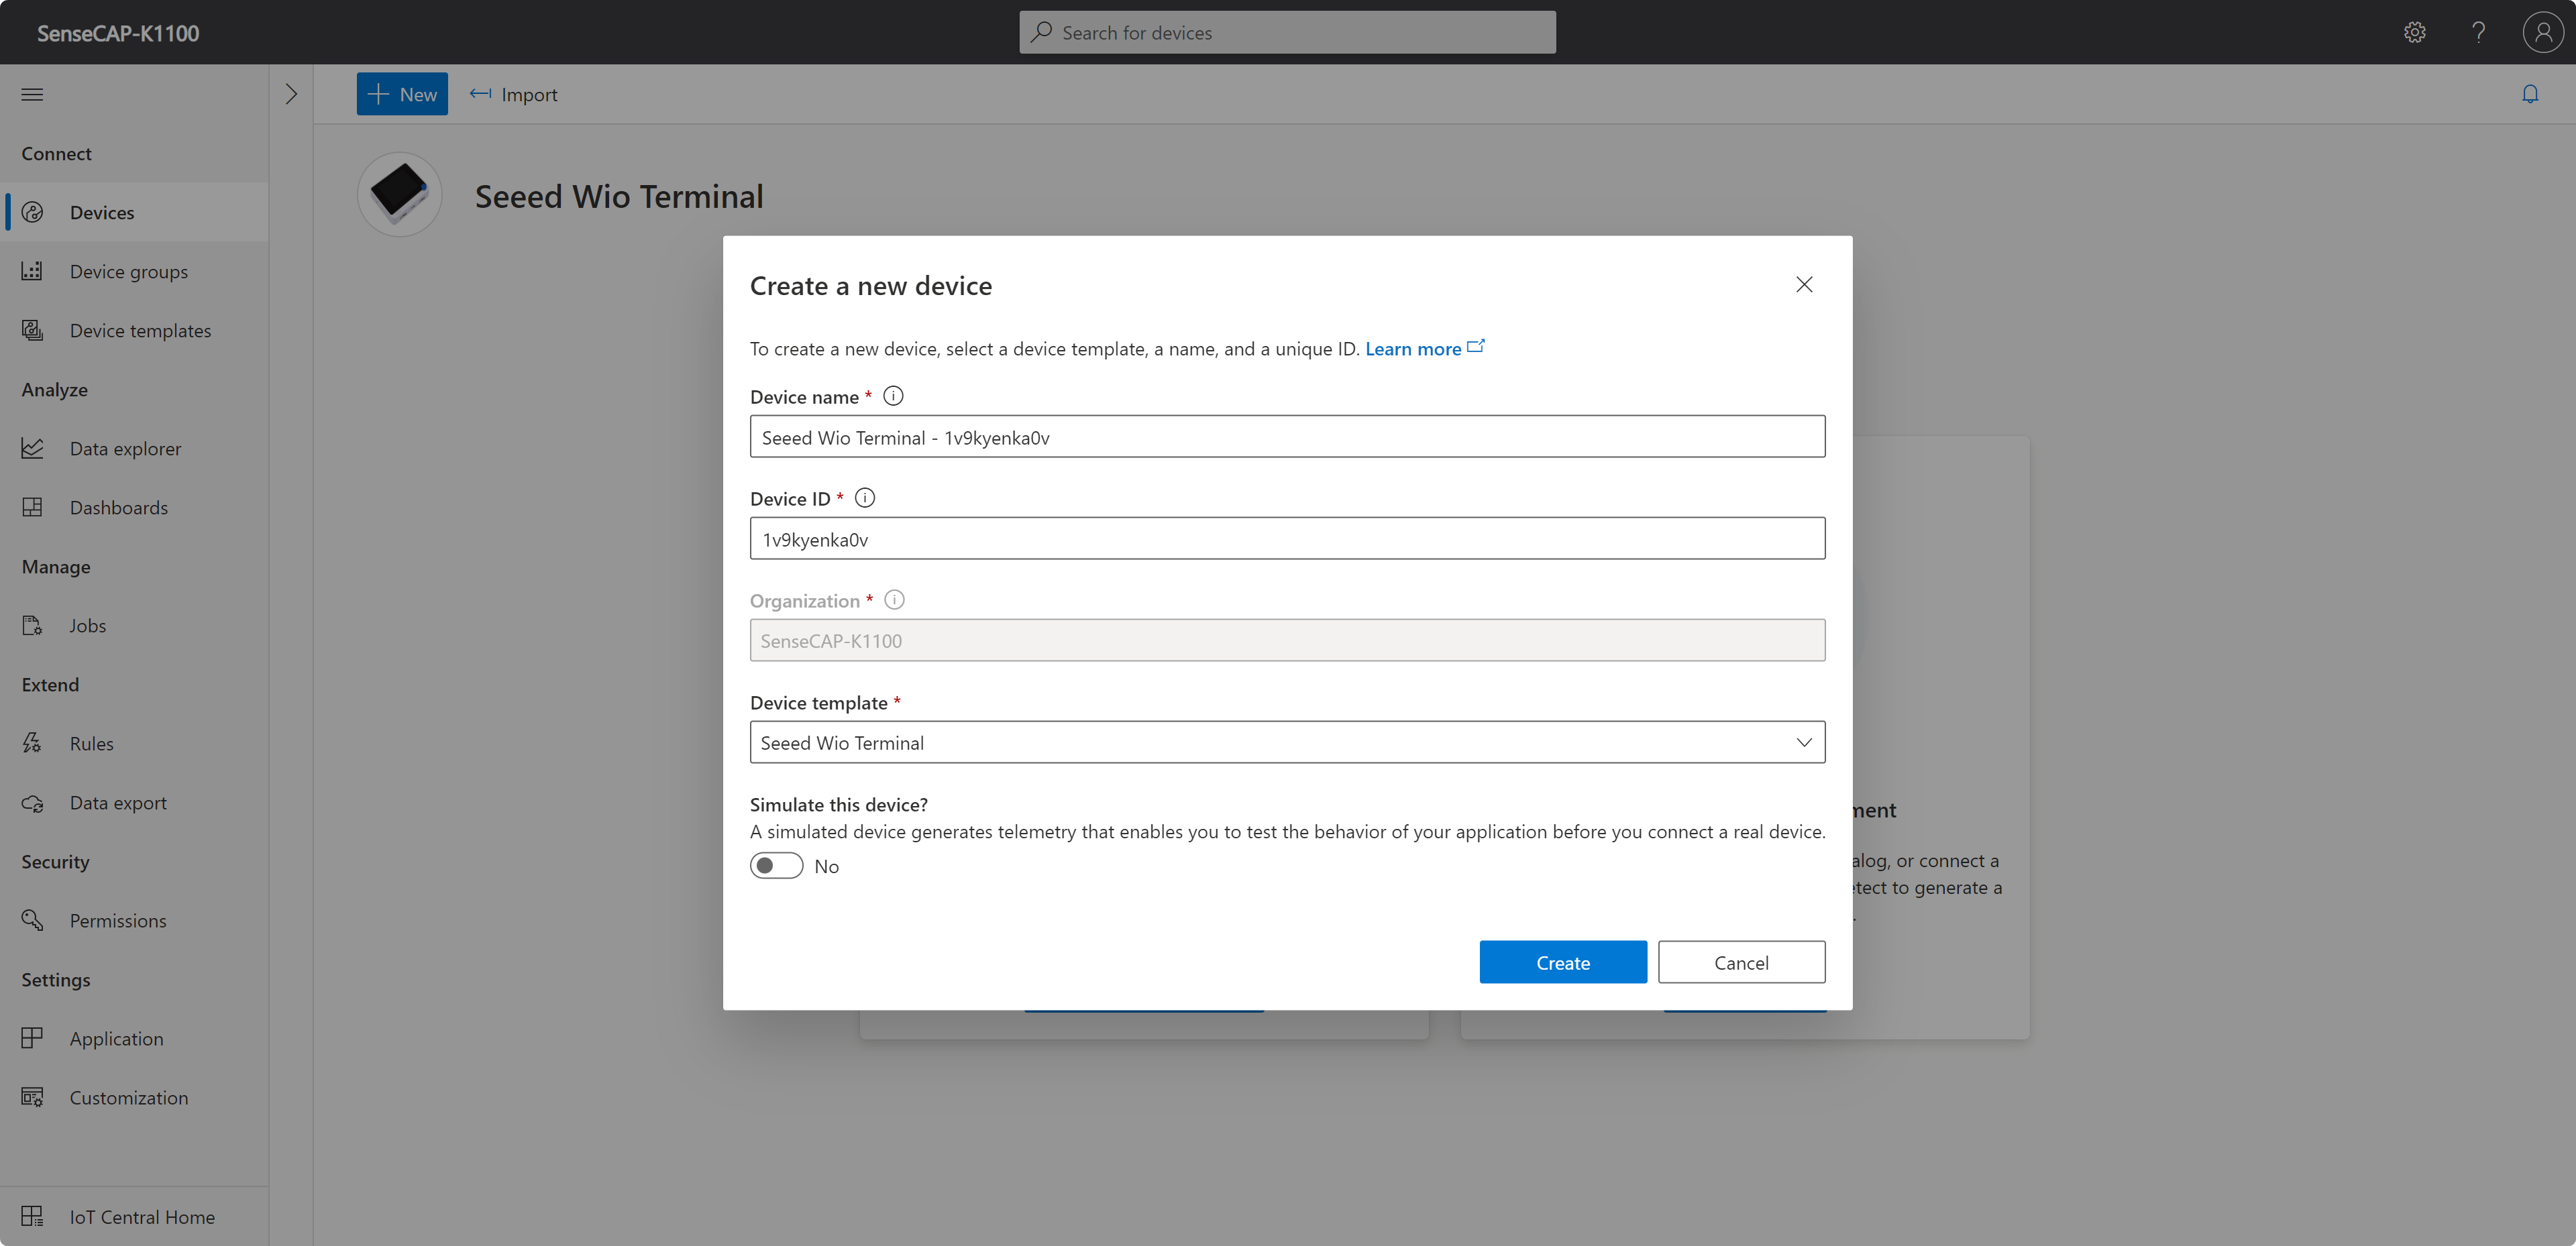
Step 5. Create a Device
Click on Devices -> Seeed Wio Terminal under the left menu bar.
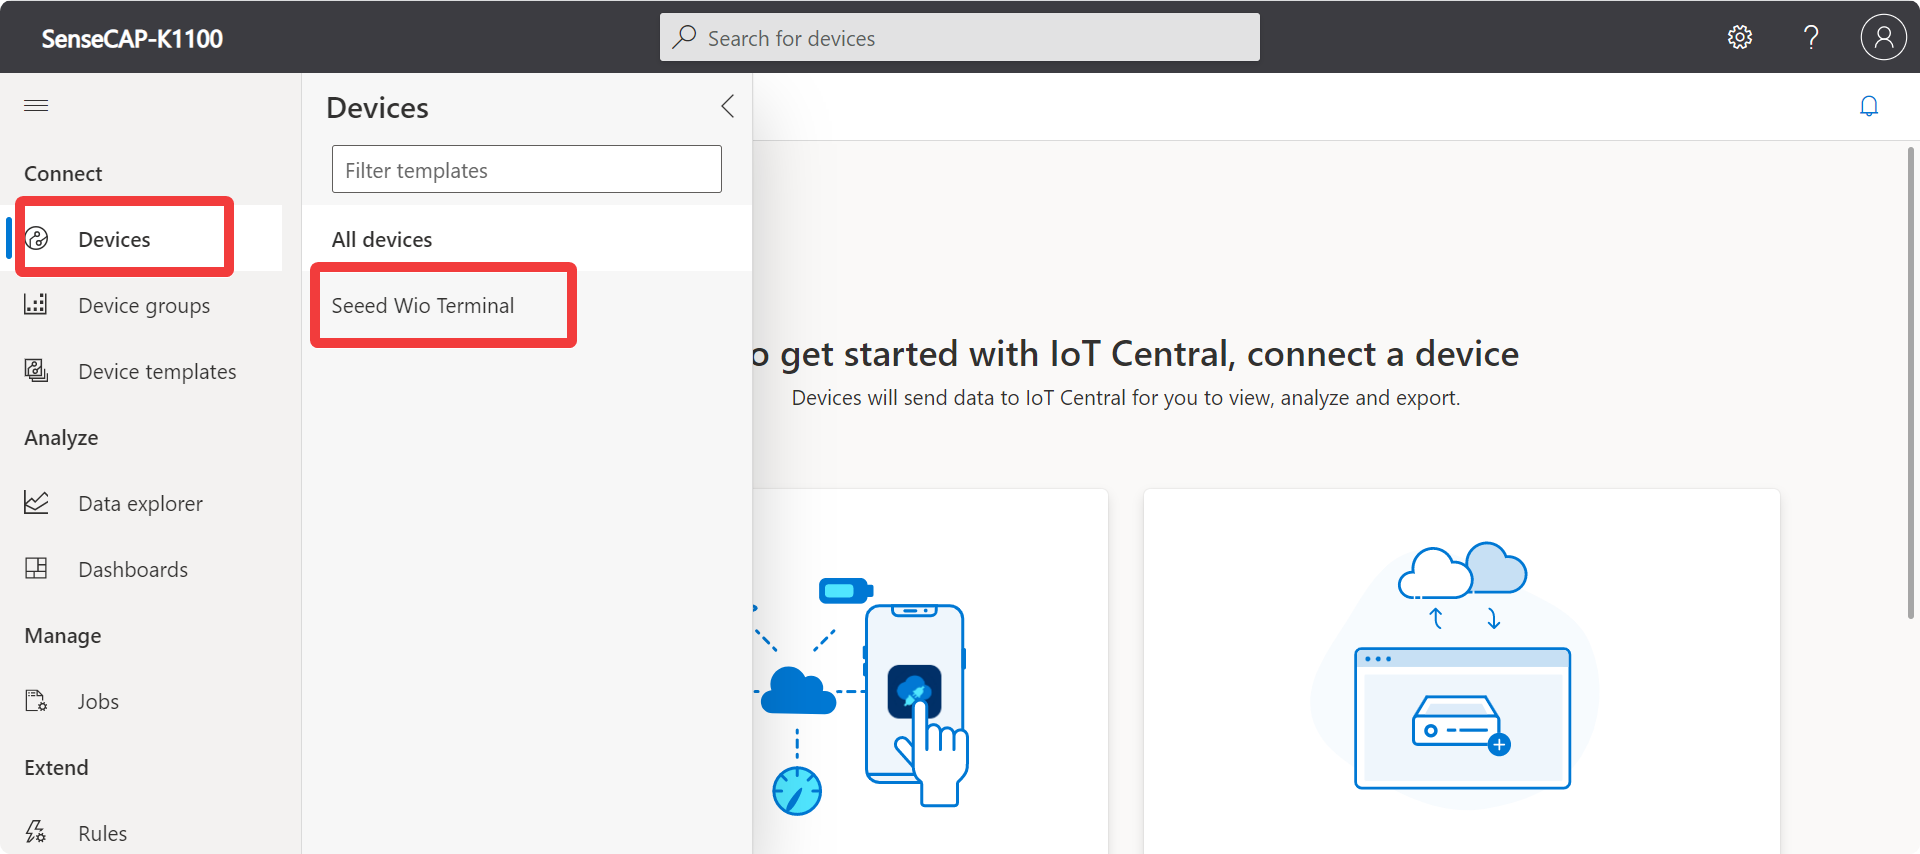
Click on New.

Click on the Create button to complete the creation of the device.
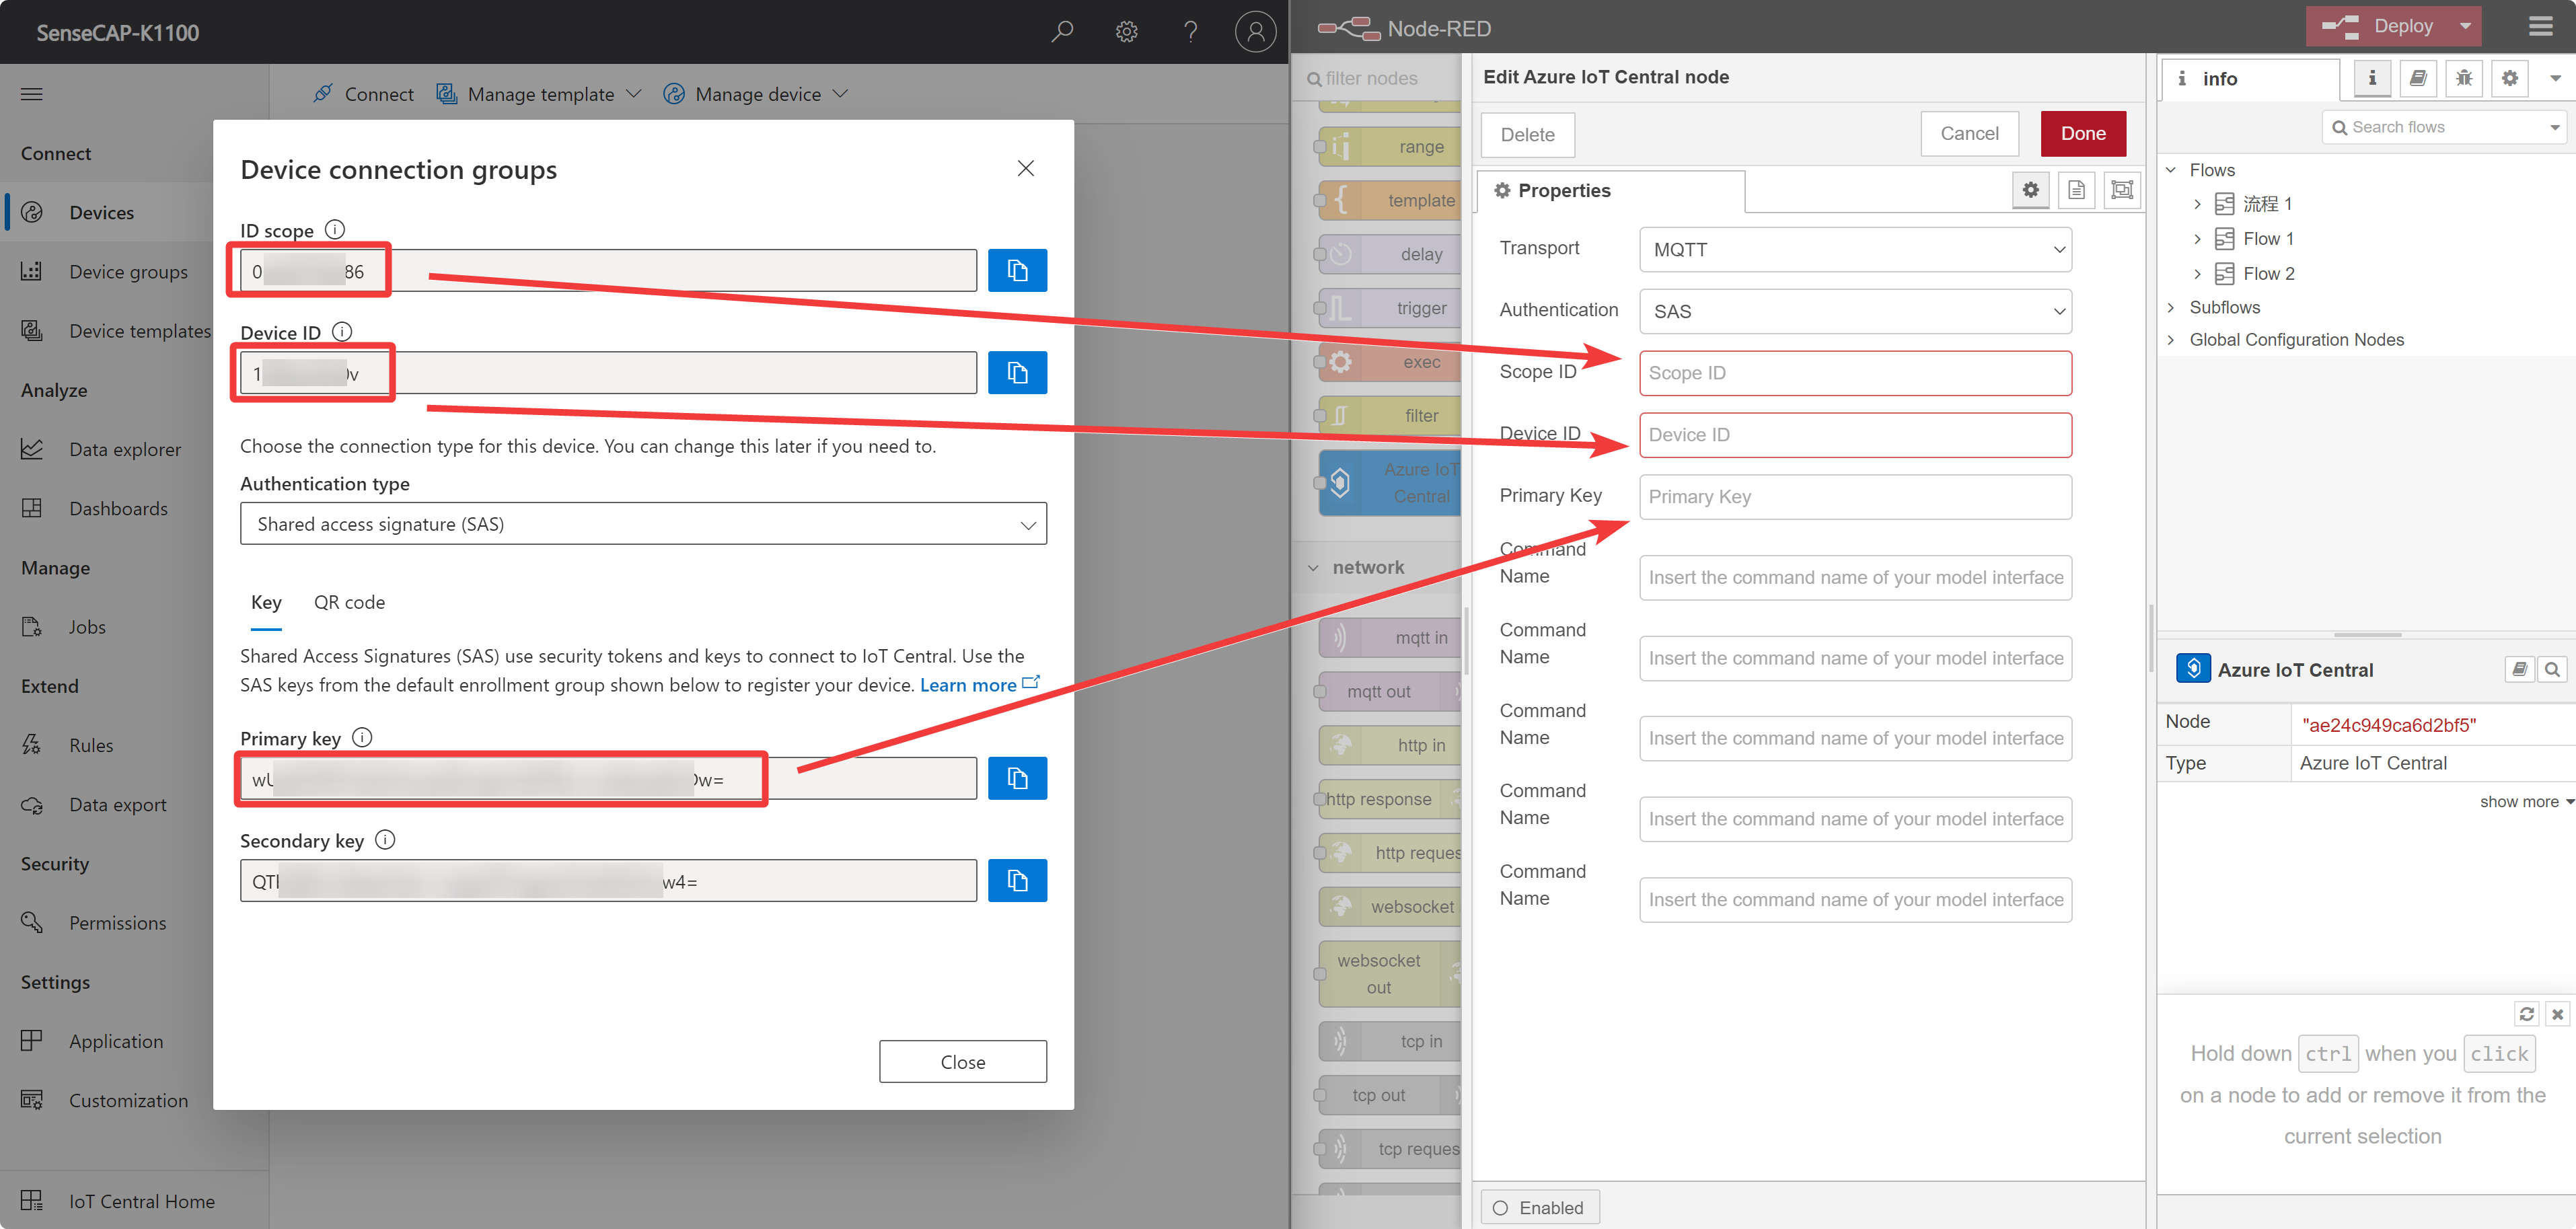
Once you have created the device, you will see the device we have just created under Device, please tap into the device and click on the Connect button in the top left corner.
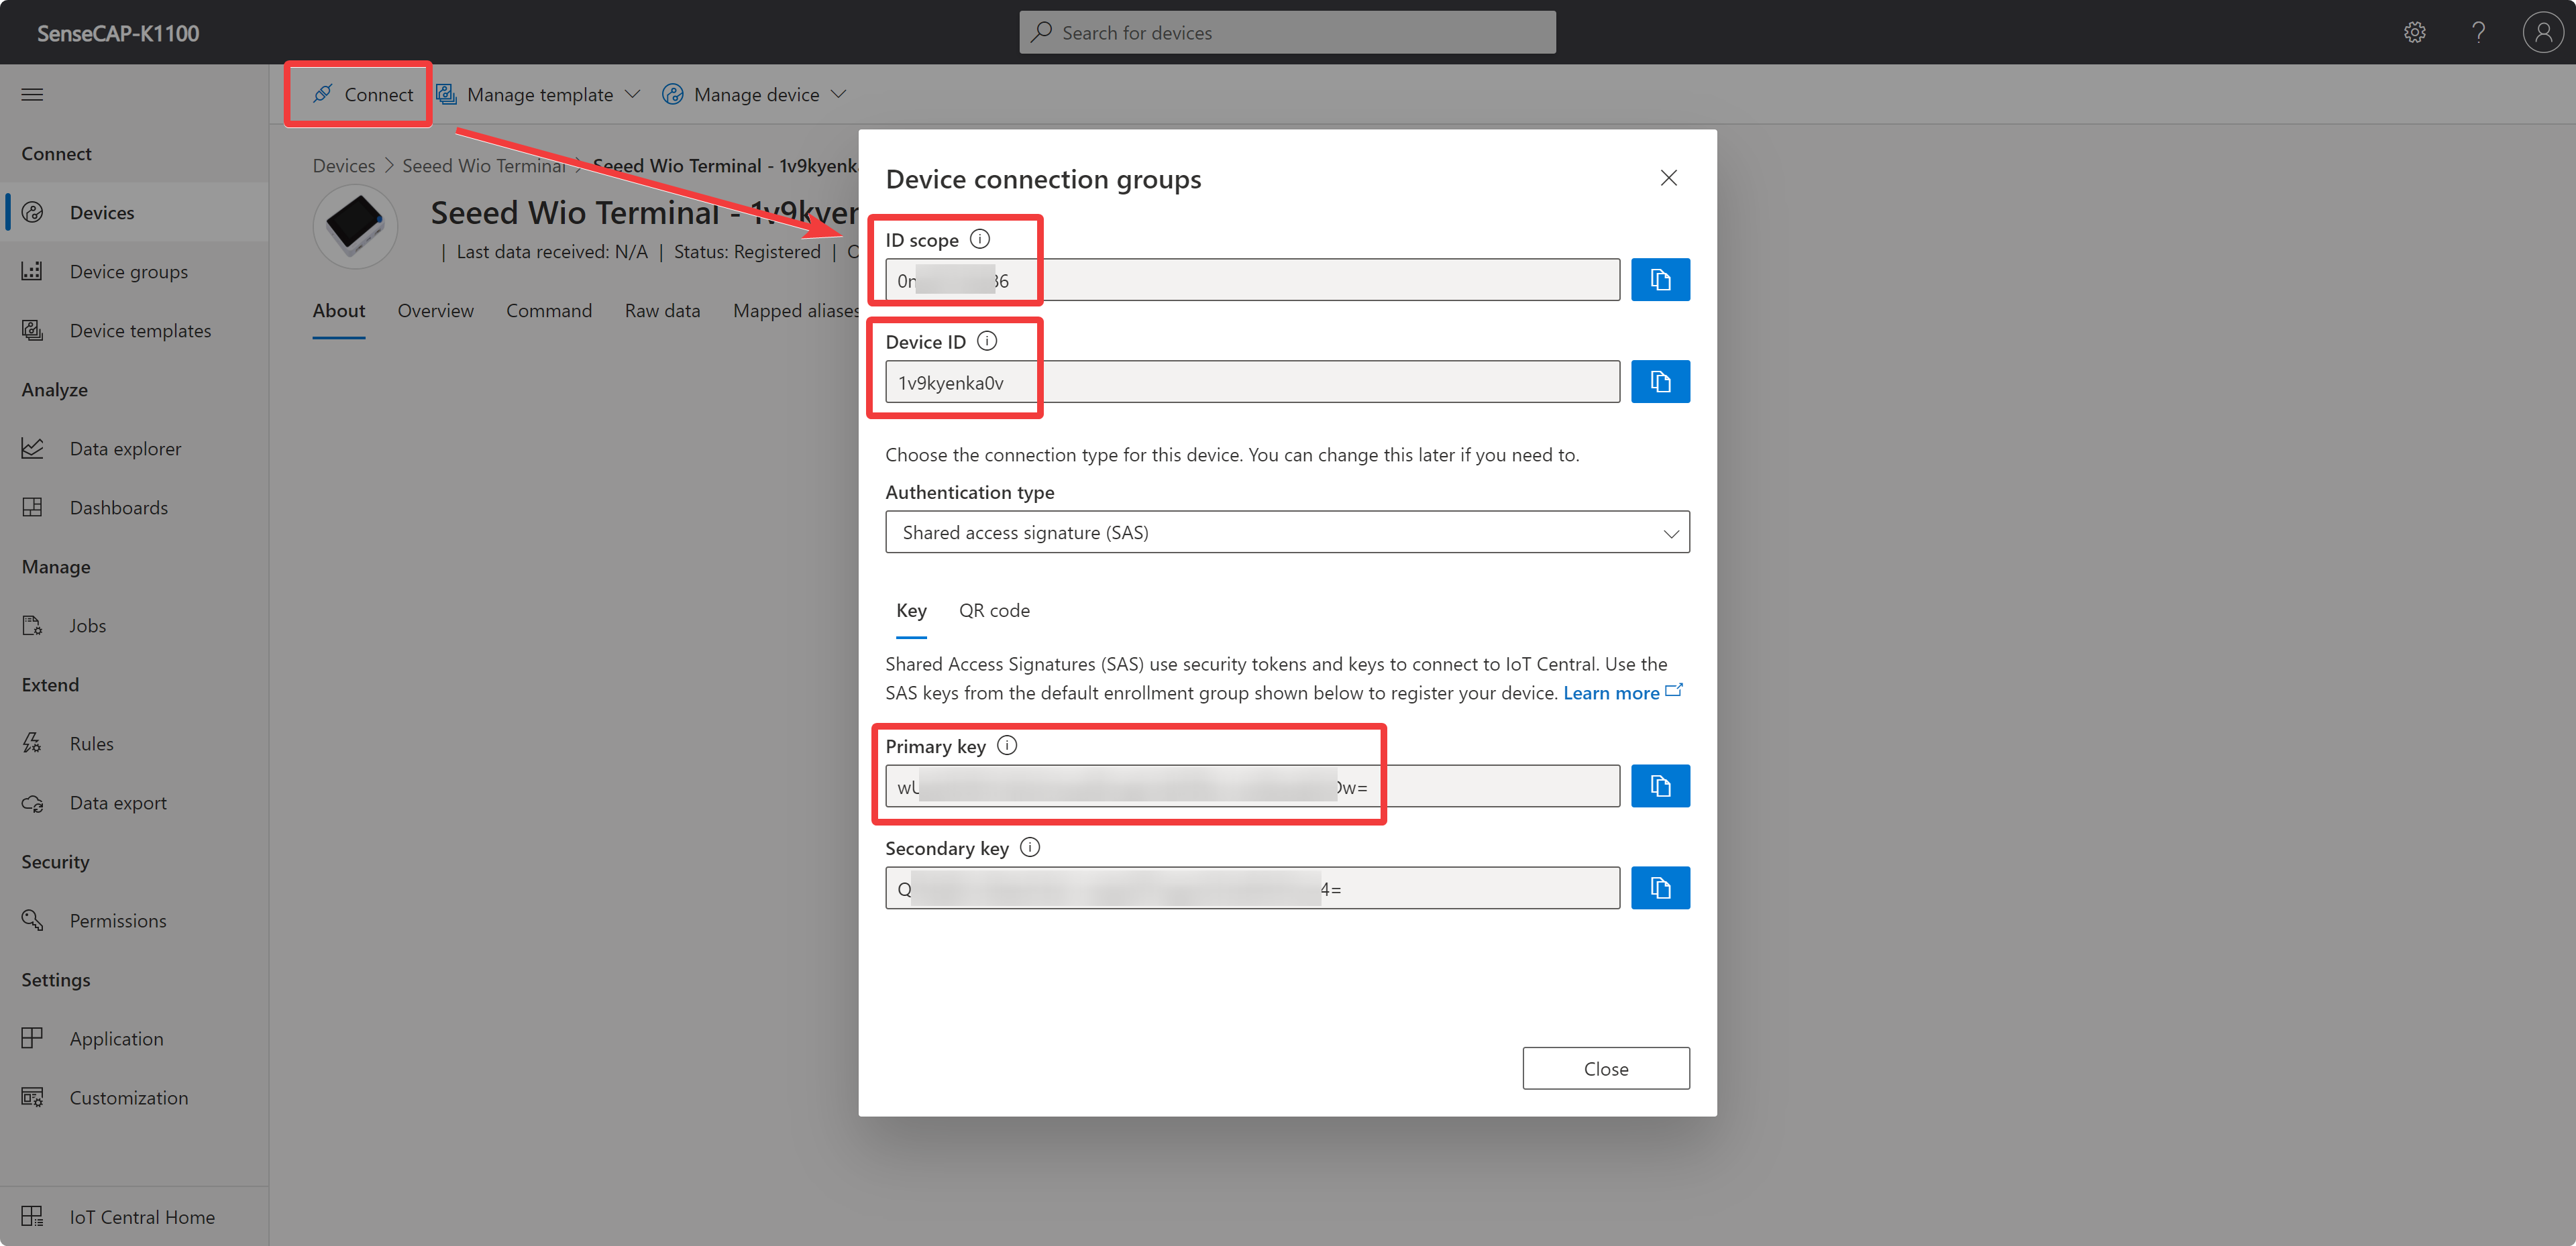
Here we need the information there.
ID scope
Device ID
Primary key
Please make a note of this information, which we will use in the next steps.
Configure Node-RED
Step 1. Download Azure IoT Paletts
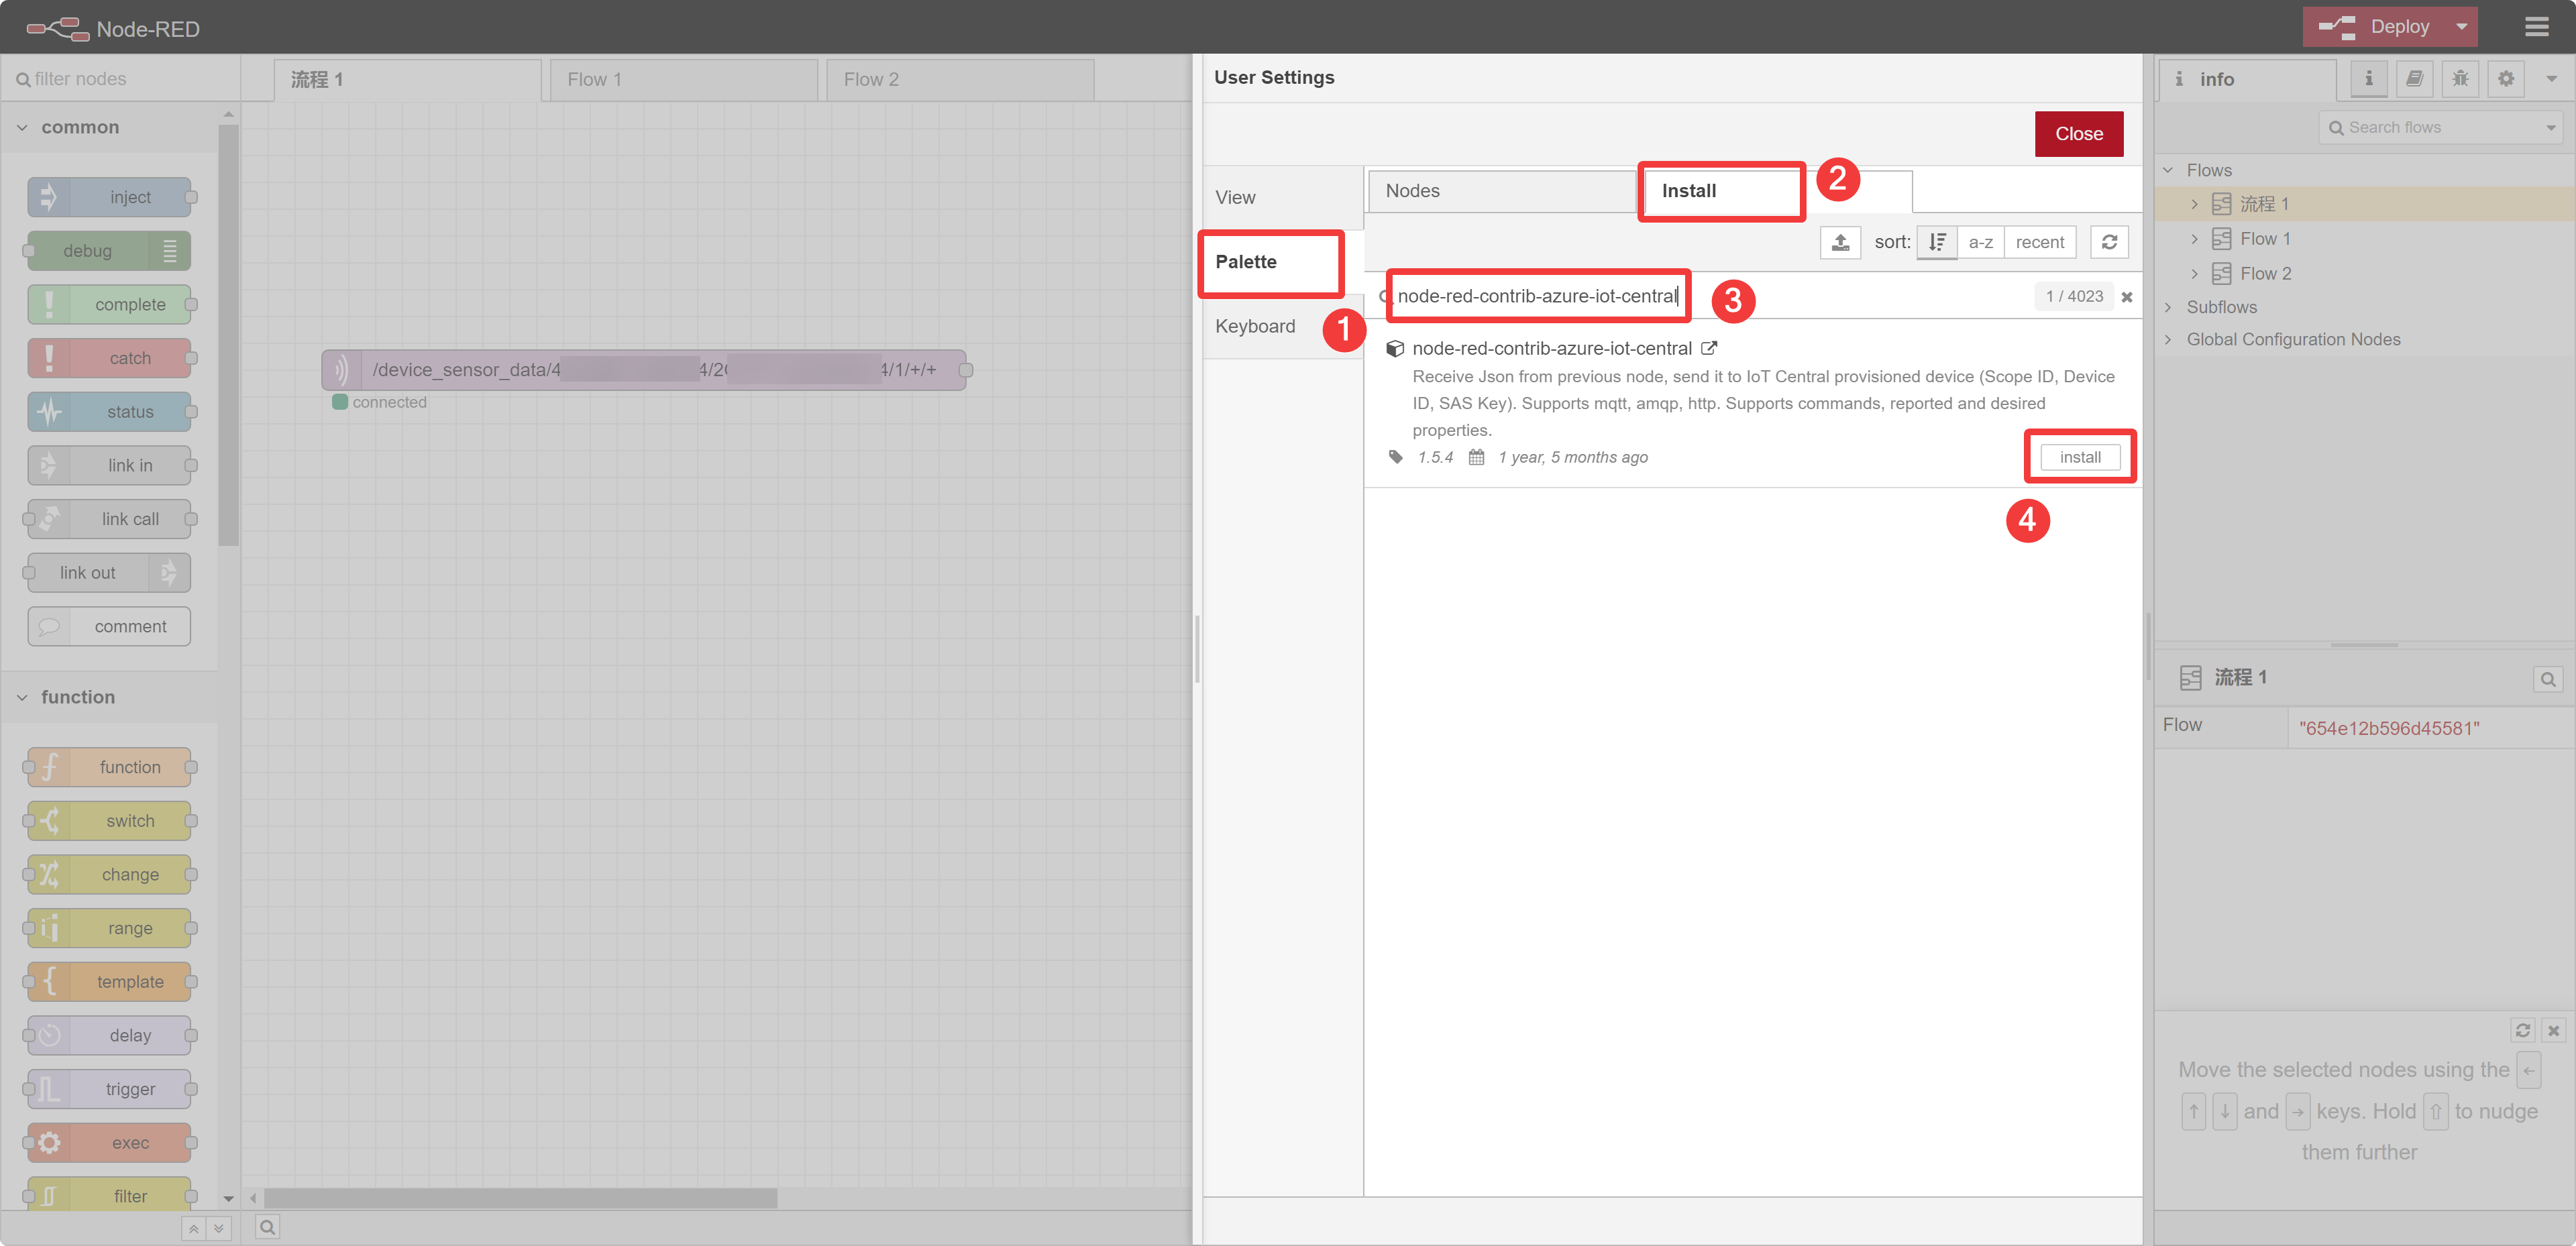
Click on the upper-right menu bar and select Settings.
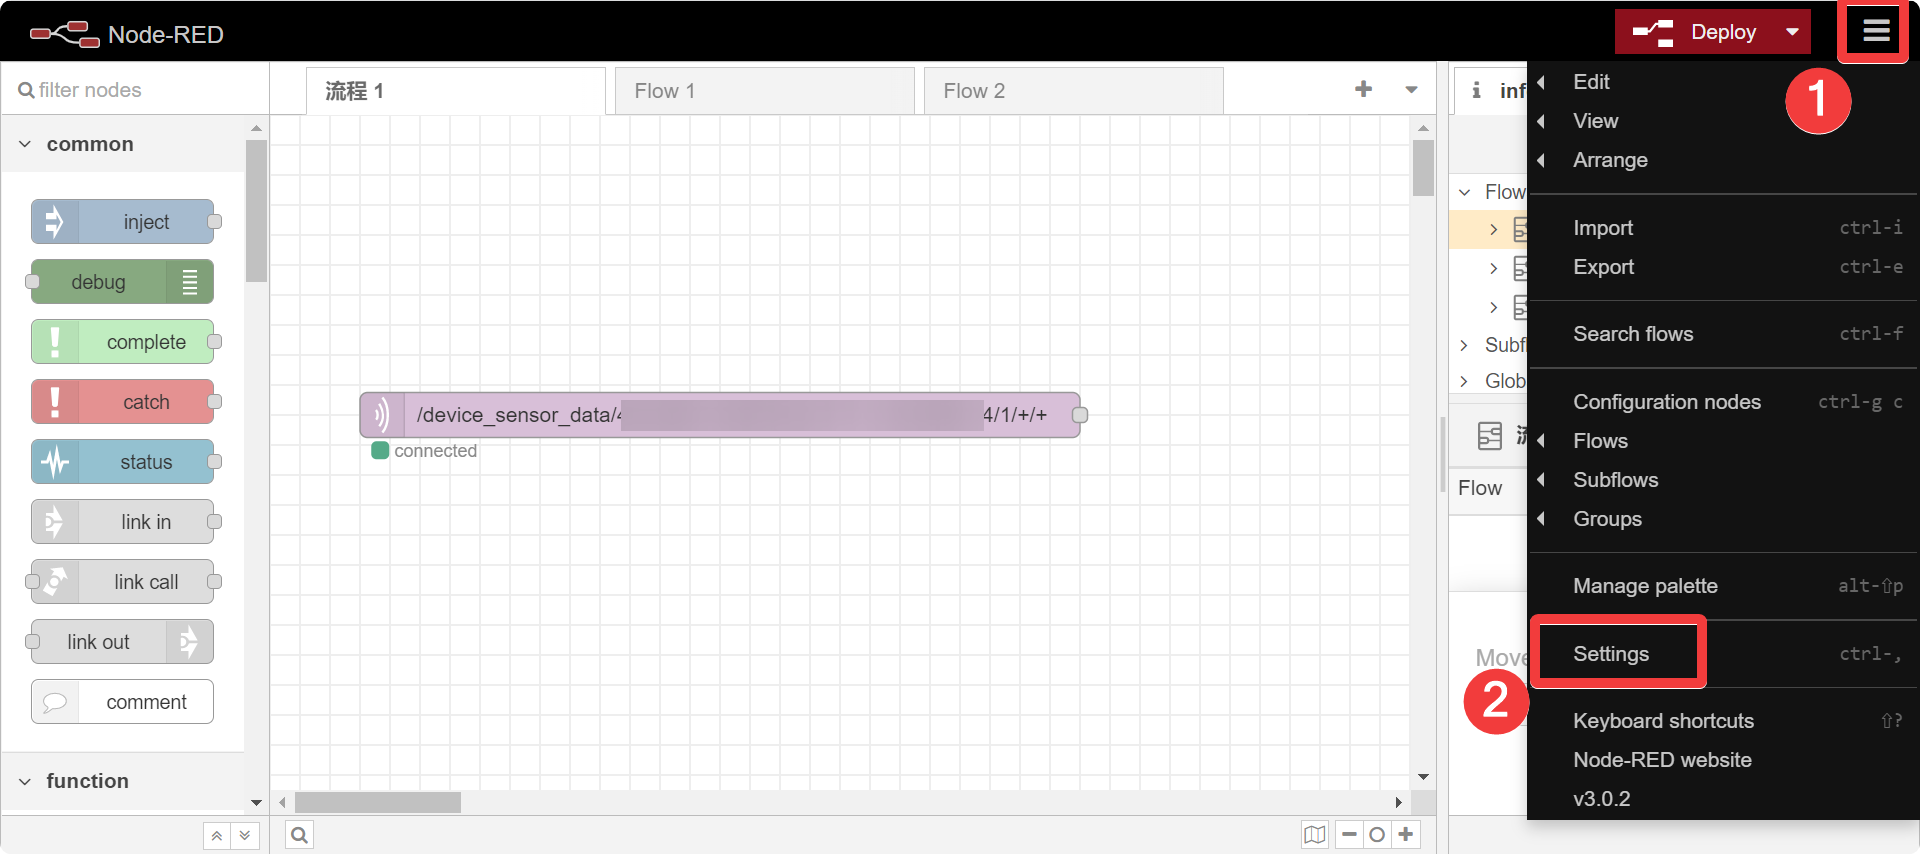
Search and install node-red-contrib-azure-iot-central in the Paletts -> Install.
Step 2. Configure the Azure Iot Central node
Drag out the Azure Iot Central node from the function bar on the left, double-click it to enter the configuration page, then click the edit button to edit Azure Iot Central node.
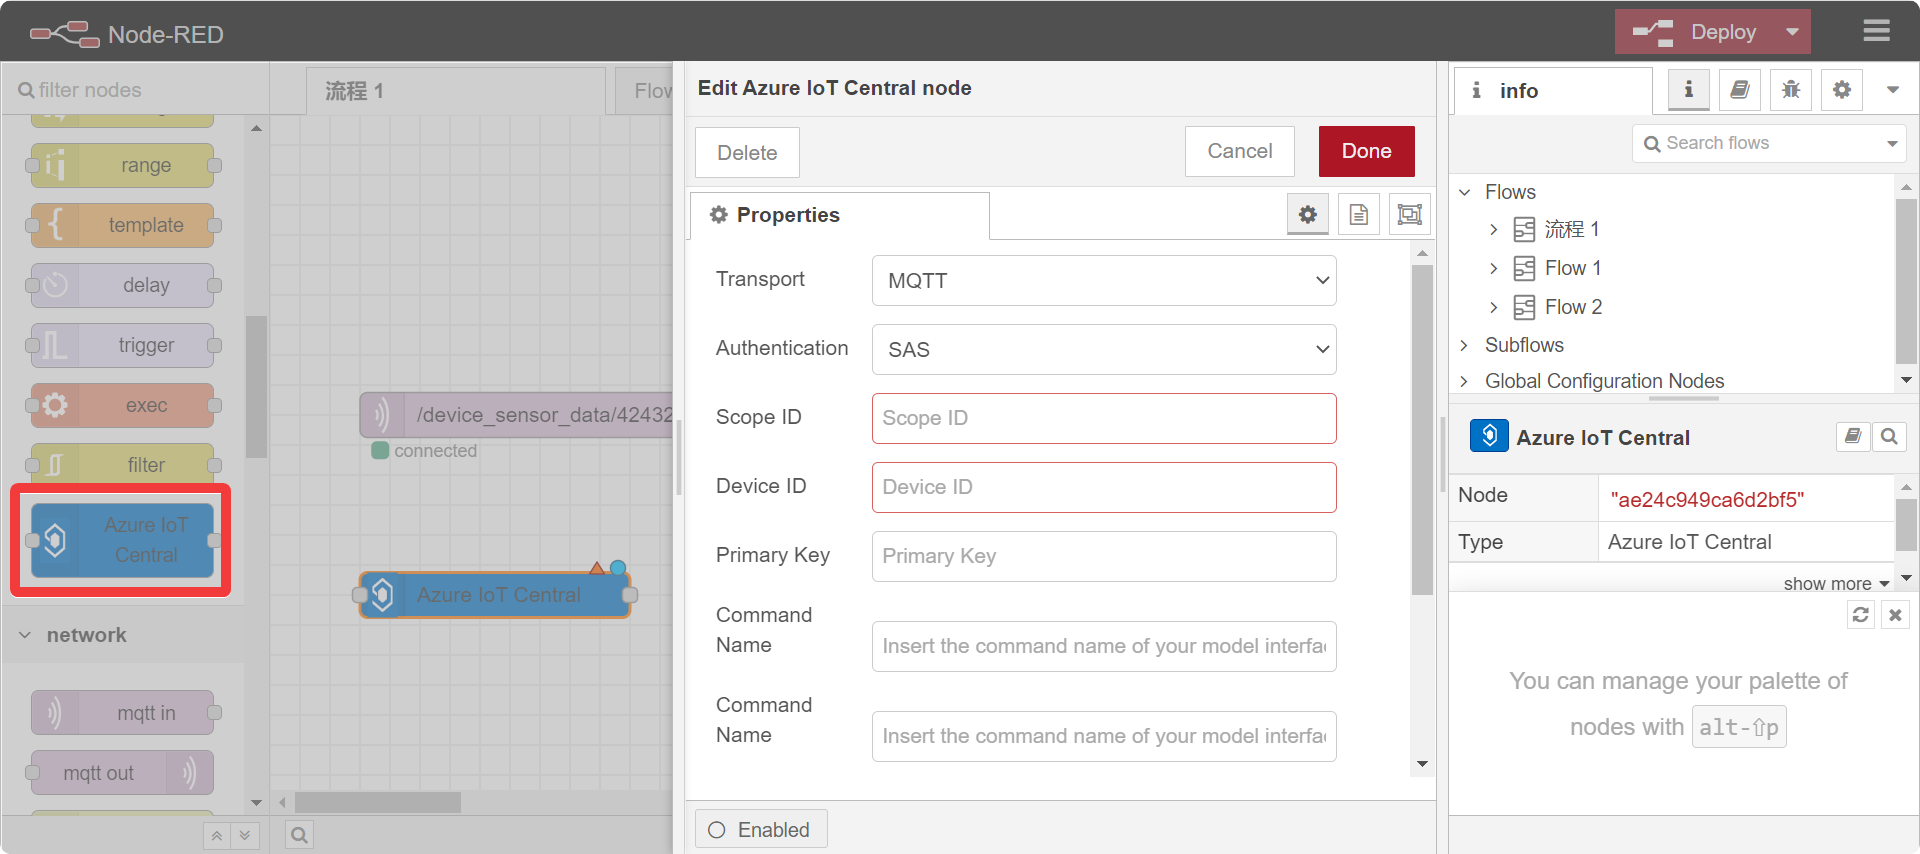
The configuration is required to be filled out as follows:
- Transport: MQTT
- Authentication: SAS
- Scope ID
- Device ID
- Primary Key
The last three are exactly what we get in Configure Microsoft Azure IoT Central.
Step 3. Configure the function node
Data reporting to Azure Iot Central needs to follow a specific data format, so it's necessary to add a function node to process the data format.
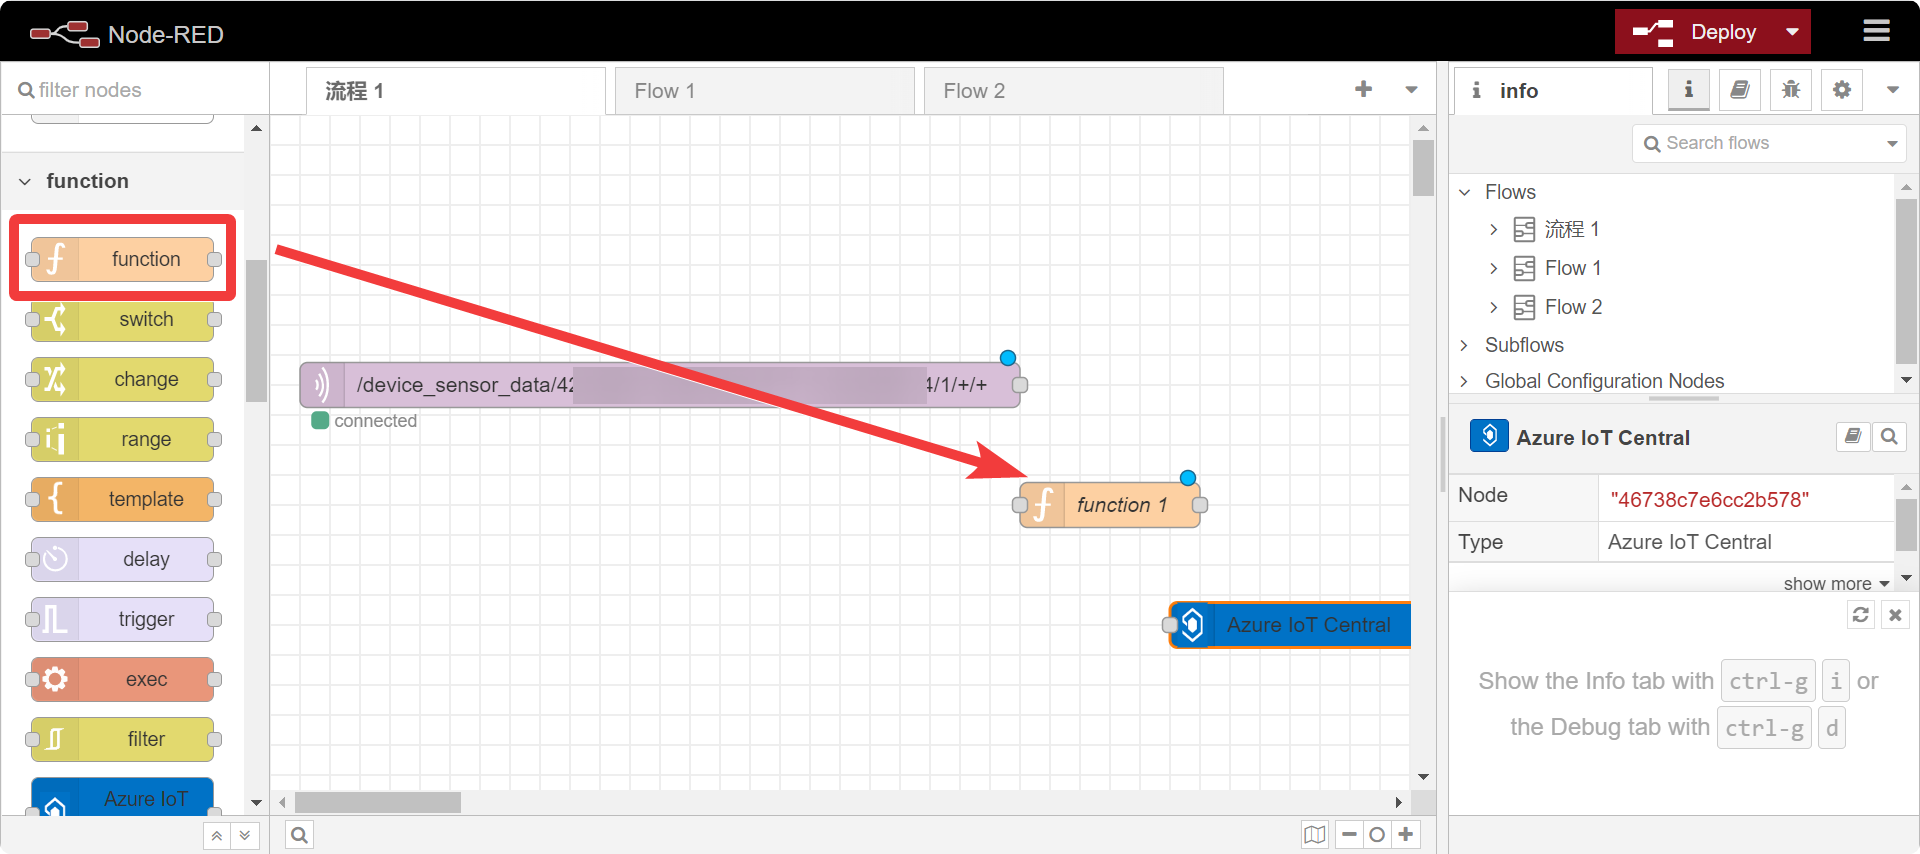
Drag out the function node from the function bar on the left, double-click it to enter the edit page, then copy the code to On Message.
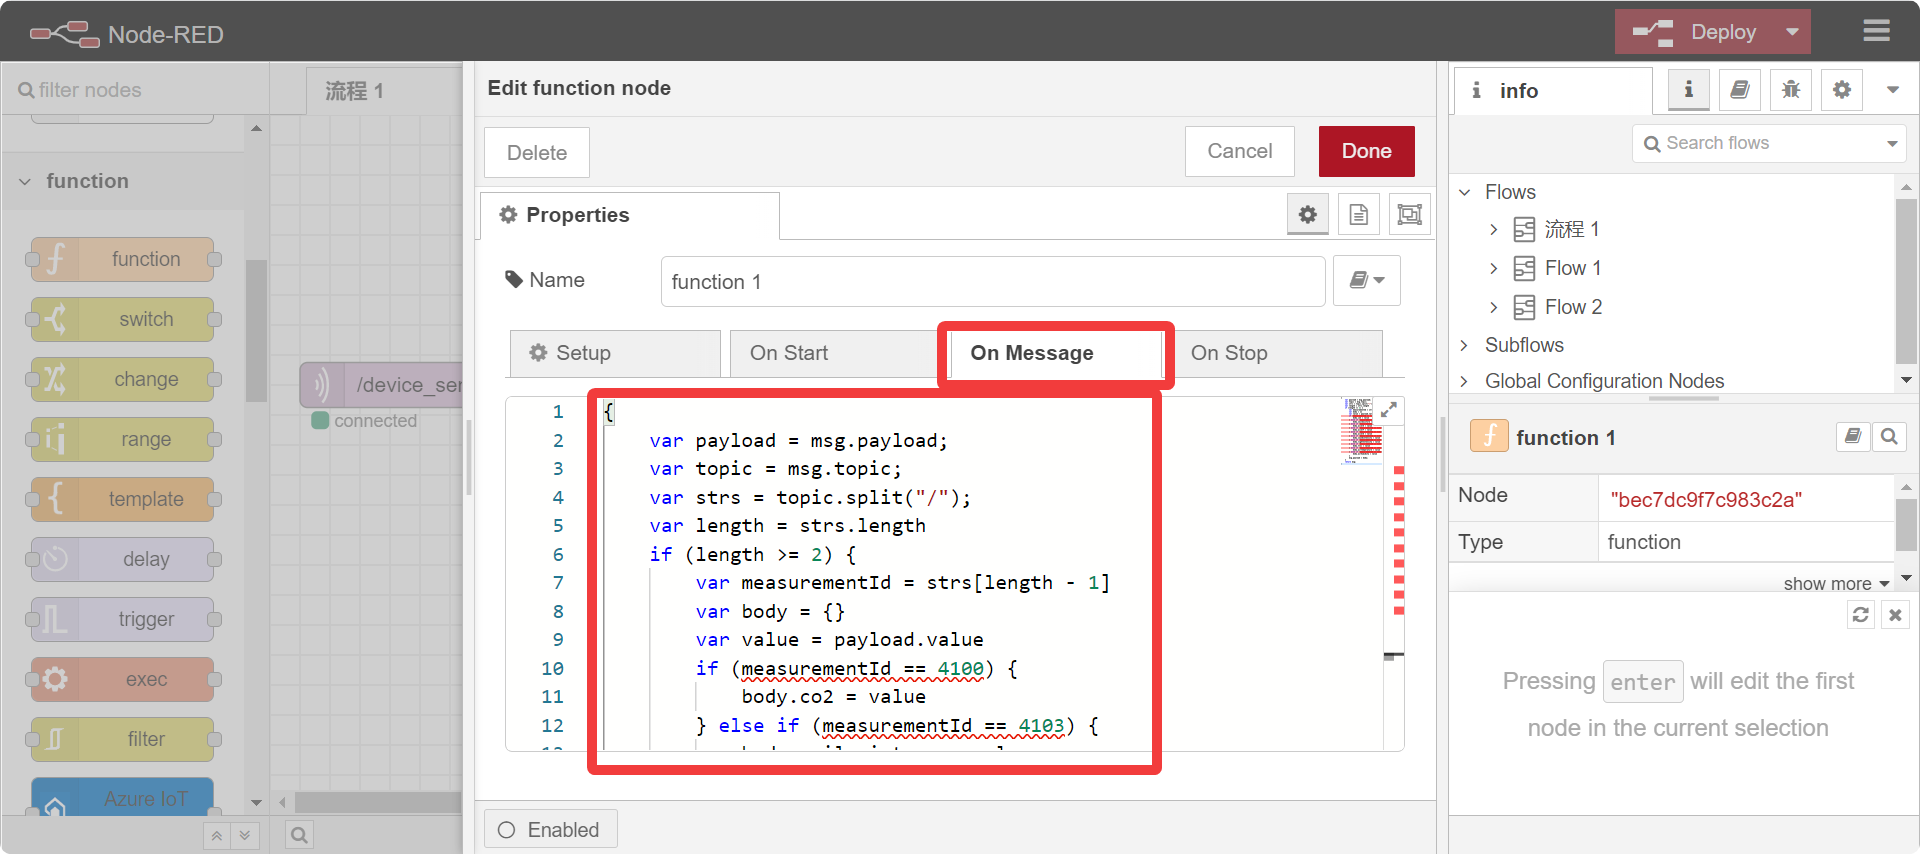
{
    var payload = msg.payload;
    var topic = msg.topic;
    var strs = topic.split("/");
    var length = strs.length
    if(length>=2){
        var measurementId = strs[length-1]
        var body = {}
        var value = payload.value
        if(measurementId==4100){
            body.co2 = value
        }else if(measurementId==4103){
            body.soilmoisture= value
        }else if(measurementId==4150){
            body.accelX= value
        }else if(measurementId==4151){
            body.accelY = value
        }else if(measurementId==4152){
            body.accelZ = value
        }else if(measurementId==4192){
            body.soundintensity = value
        }else if(measurementId==4193){
            body.lightIntensity = value
        }else if(measurementId==4195){
            body.tvoc = value
        }else if(measurementId==4097){
            body.airtemperature = value
        }else if(measurementId==4098){
            body.airhumidity = value
        }else if(measurementId==4175){
            body.AIdetection_1 = value
        }else if(measurementId==4176){
            body.AIdetection_2 = value
        }else if(measurementId==4177){
            body.AIdetection_3 = value
        }else if(measurementId==4178){
            body.AIdetection_4 = value
        }else if(measurementId==4179){
            body.AIdetection_5 = value
        }else if(measurementId==4180){
            body.AIdetection_6 = value
        }else if(measurementId==4181){
            body.AIdetection_7 = value
        }else if(measurementId==4182){
            body.AIdetection_8 = value
        }else if(measurementId==4183){
            body.AIdetection_9 = value
        }else if(measurementId==4184){
            body.AIdetection_10 = value
        }
        msg.payload = body;
    }
    return msg;
}
Then we connect all the nodes and click on the Deploy button and if everything is set up correctly you will be able to see the mqtt in node showing connected.
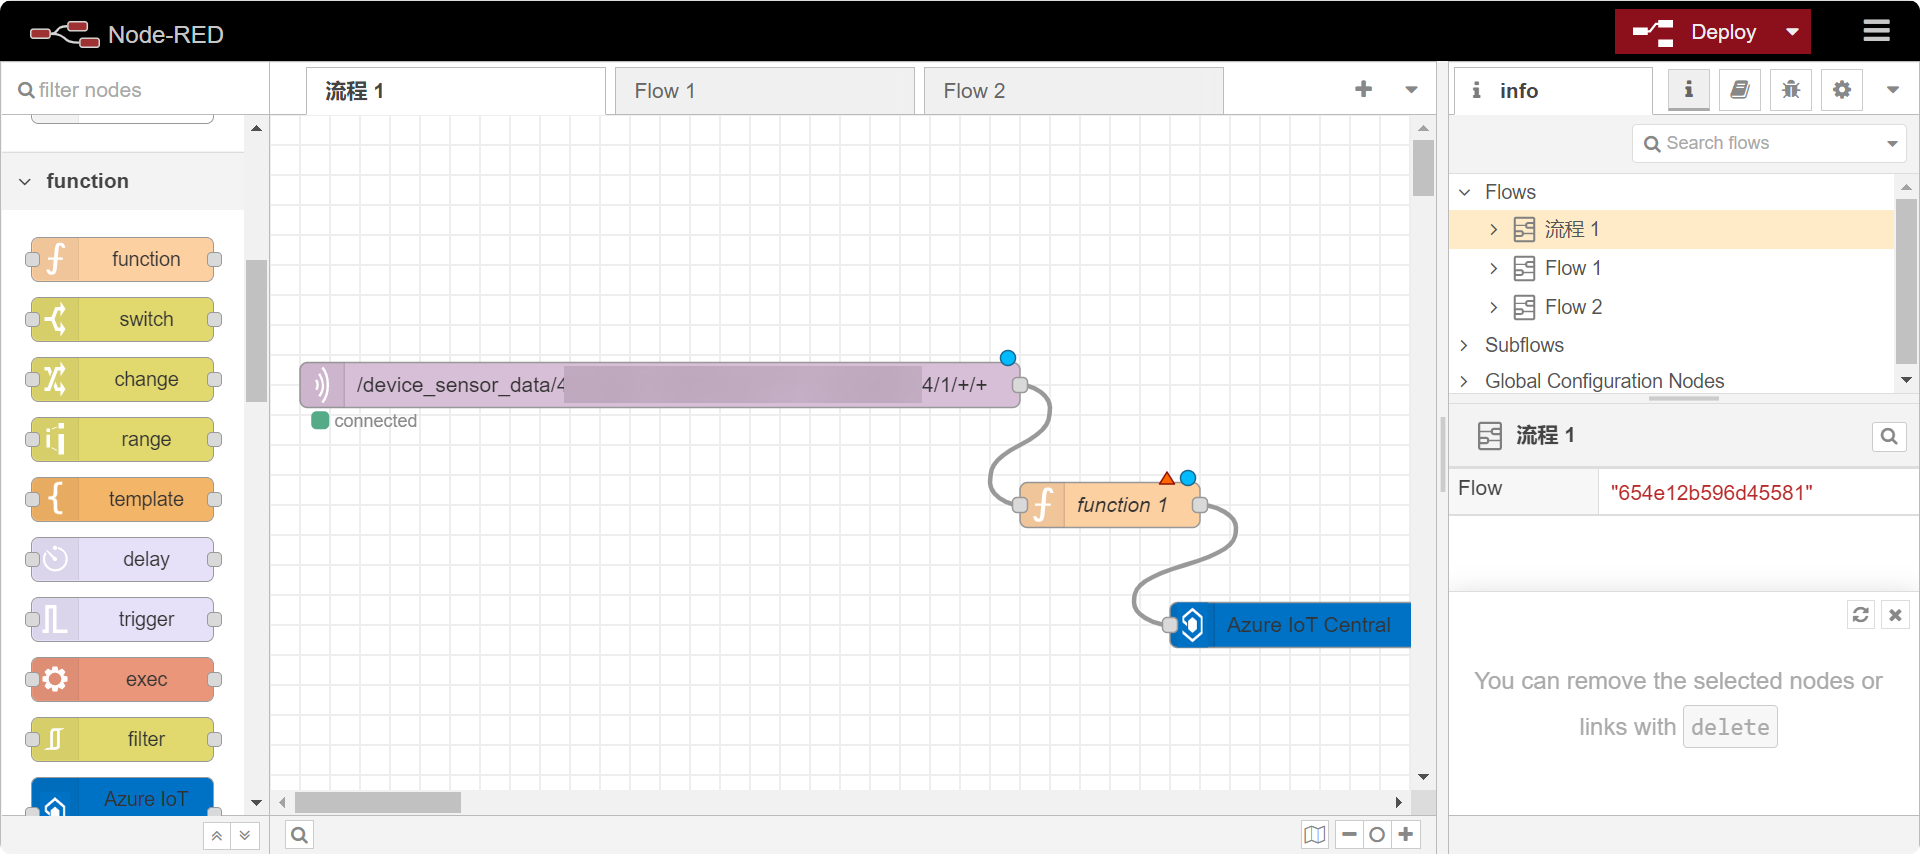
If you want to see the logging information of the data, you can add a debug node after the function node.
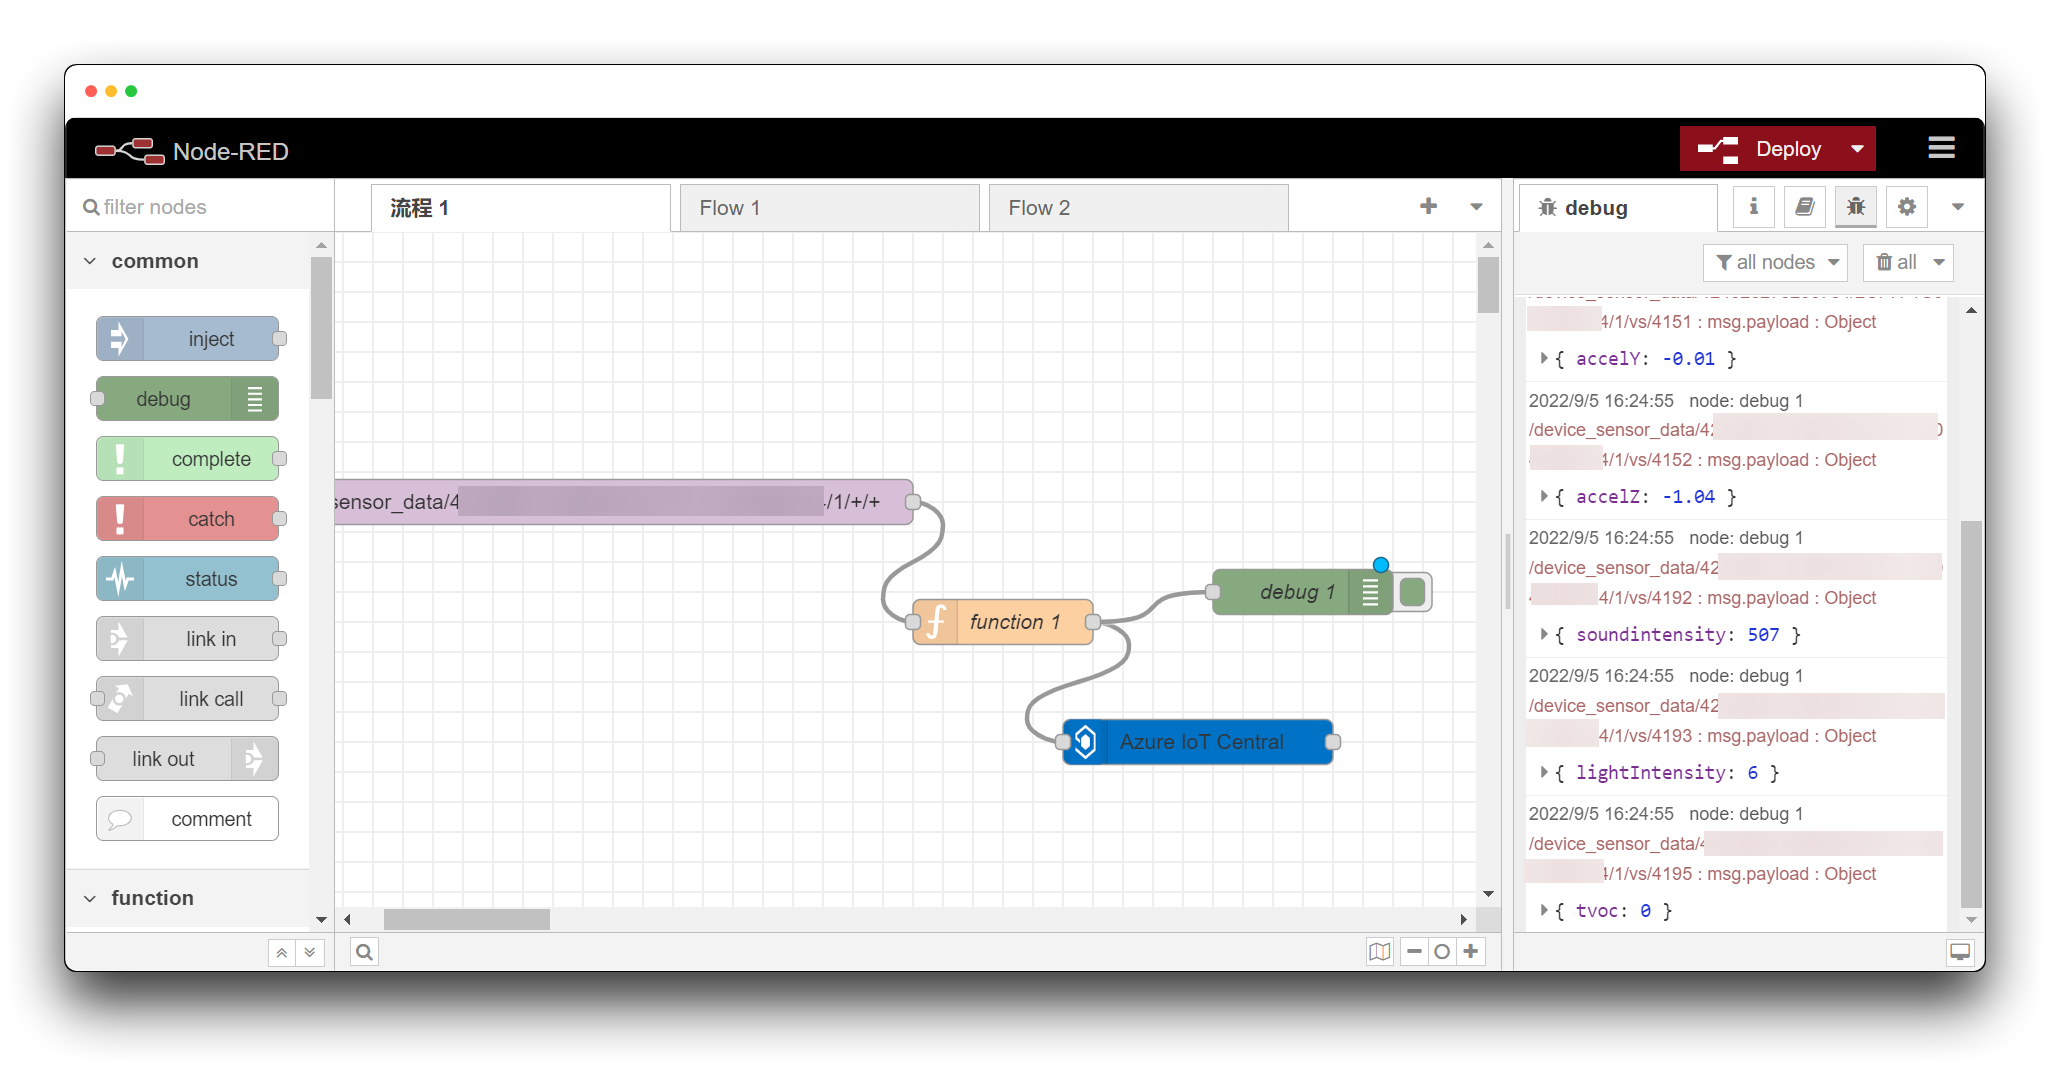
Once the Wio Terminal starts powering up and working and starts sending data to SenseCAP PaaS server, then we can check the data on Azure Iot Central.
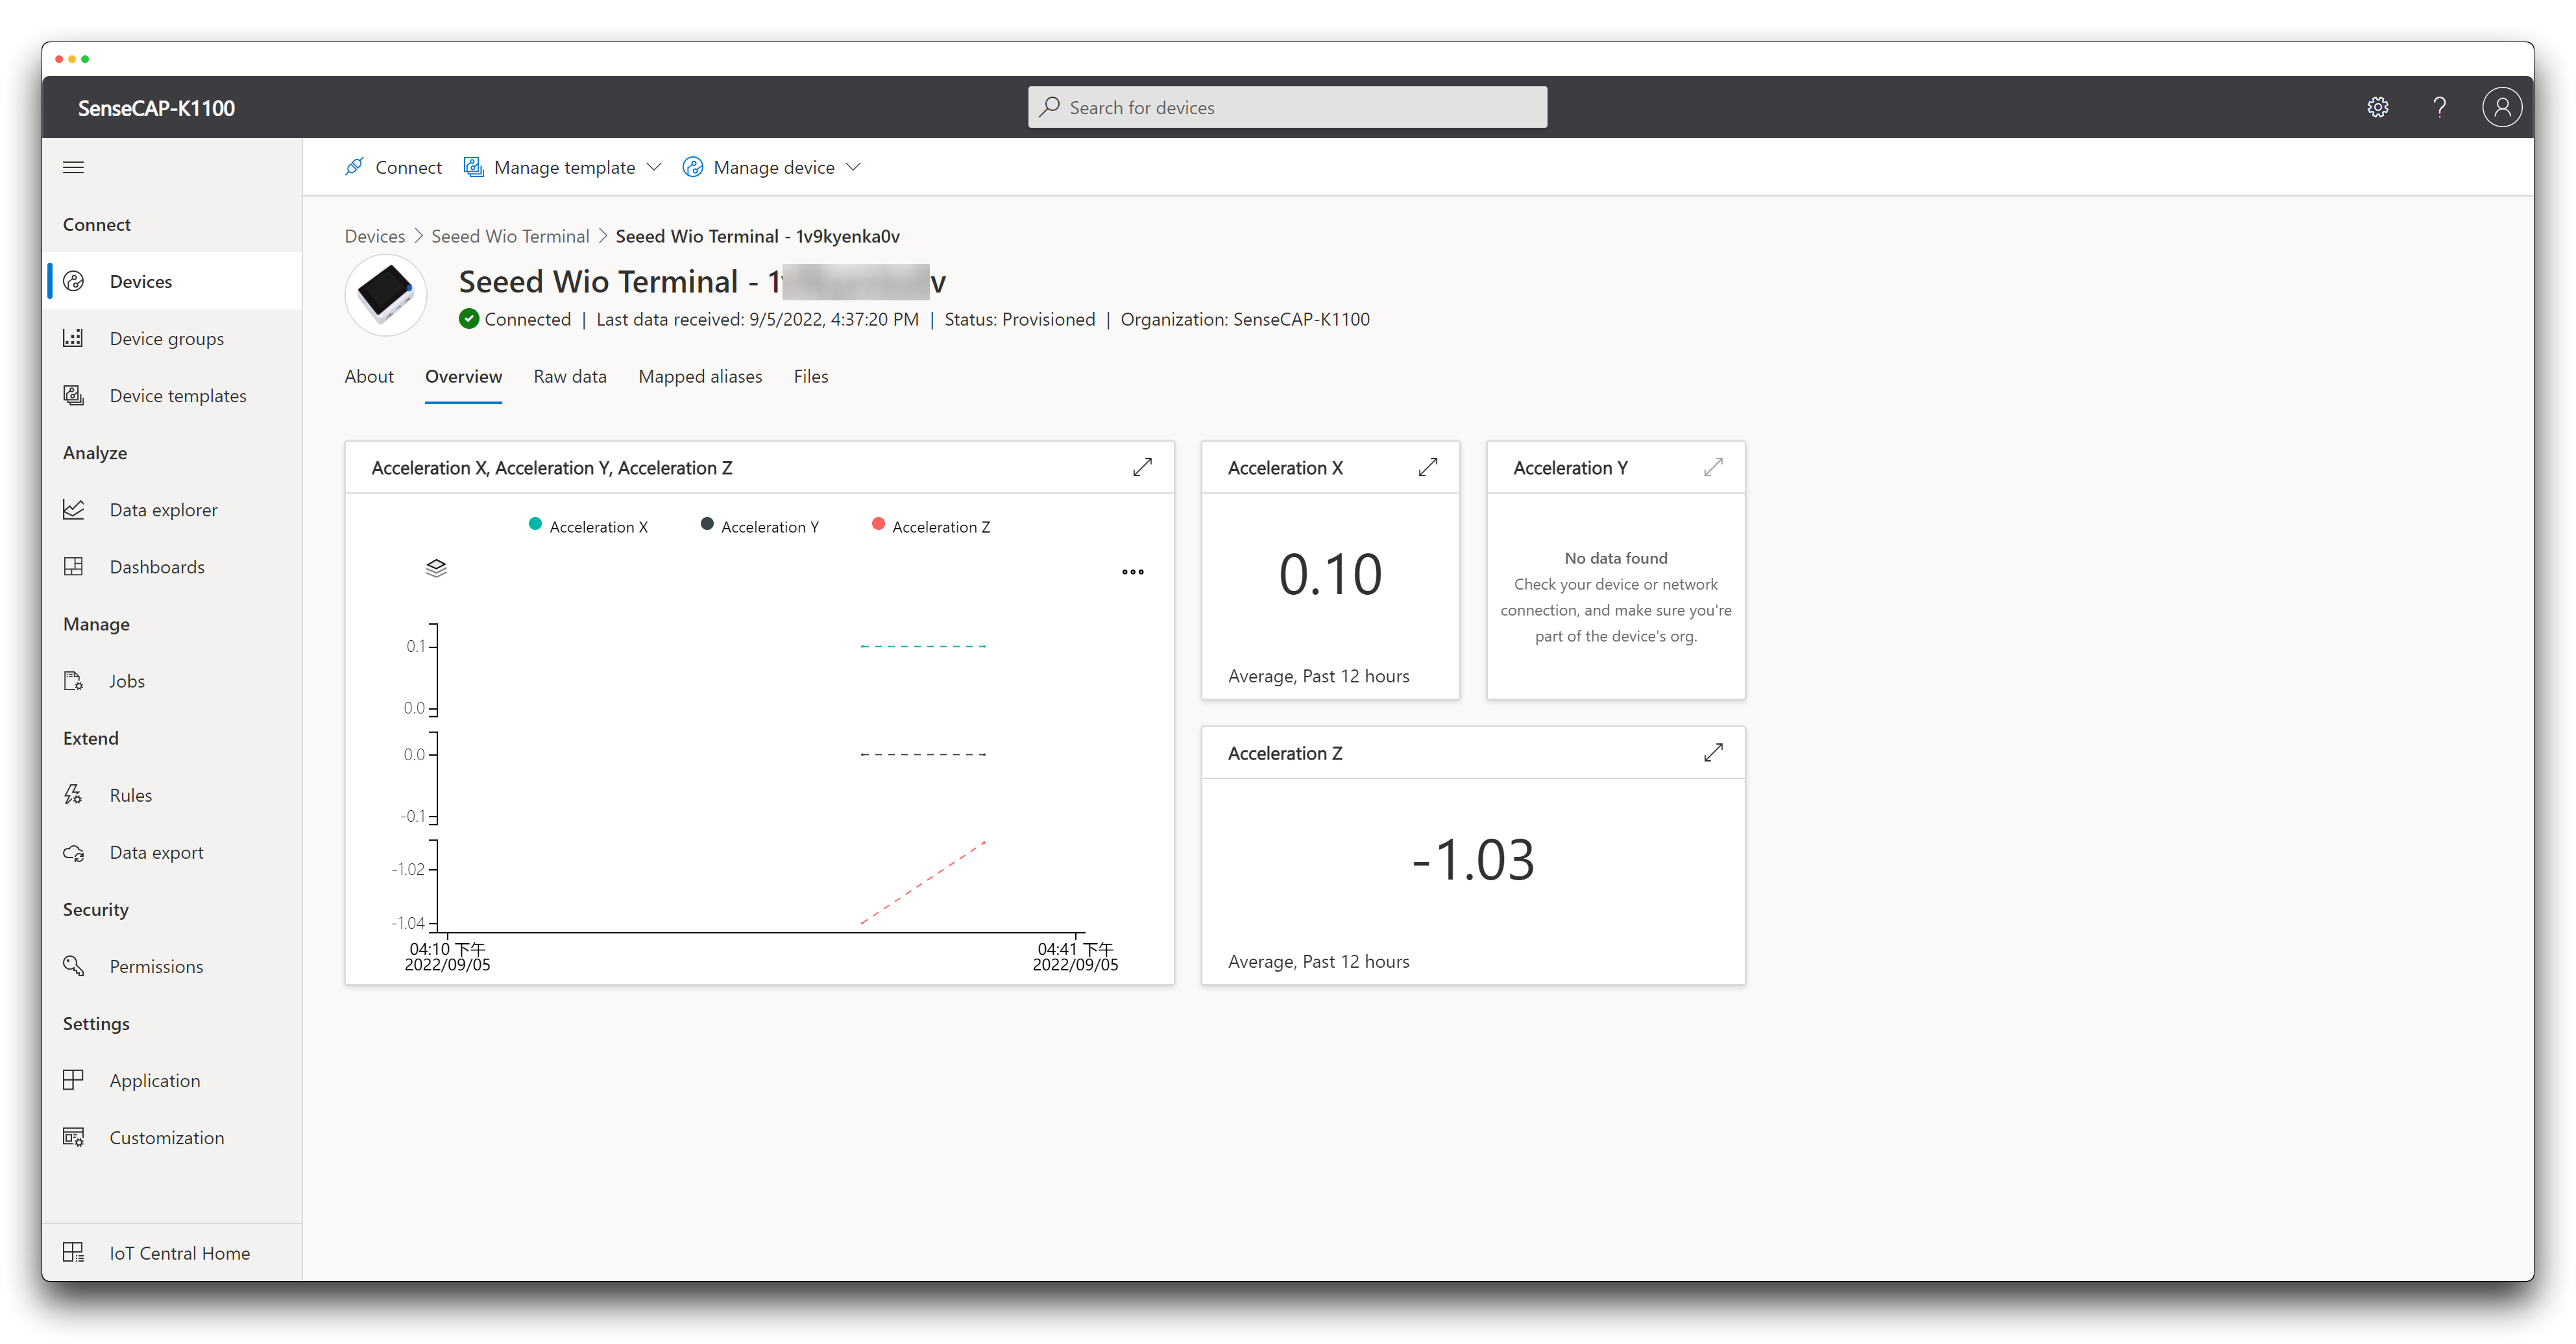
Data Presentation
However, as we have not set the type of the sensor, the data visible in the Raw data column are placed in Unmodeled data, so we need to parse the data according to the code above.
We need to change the template style displayed in the template.
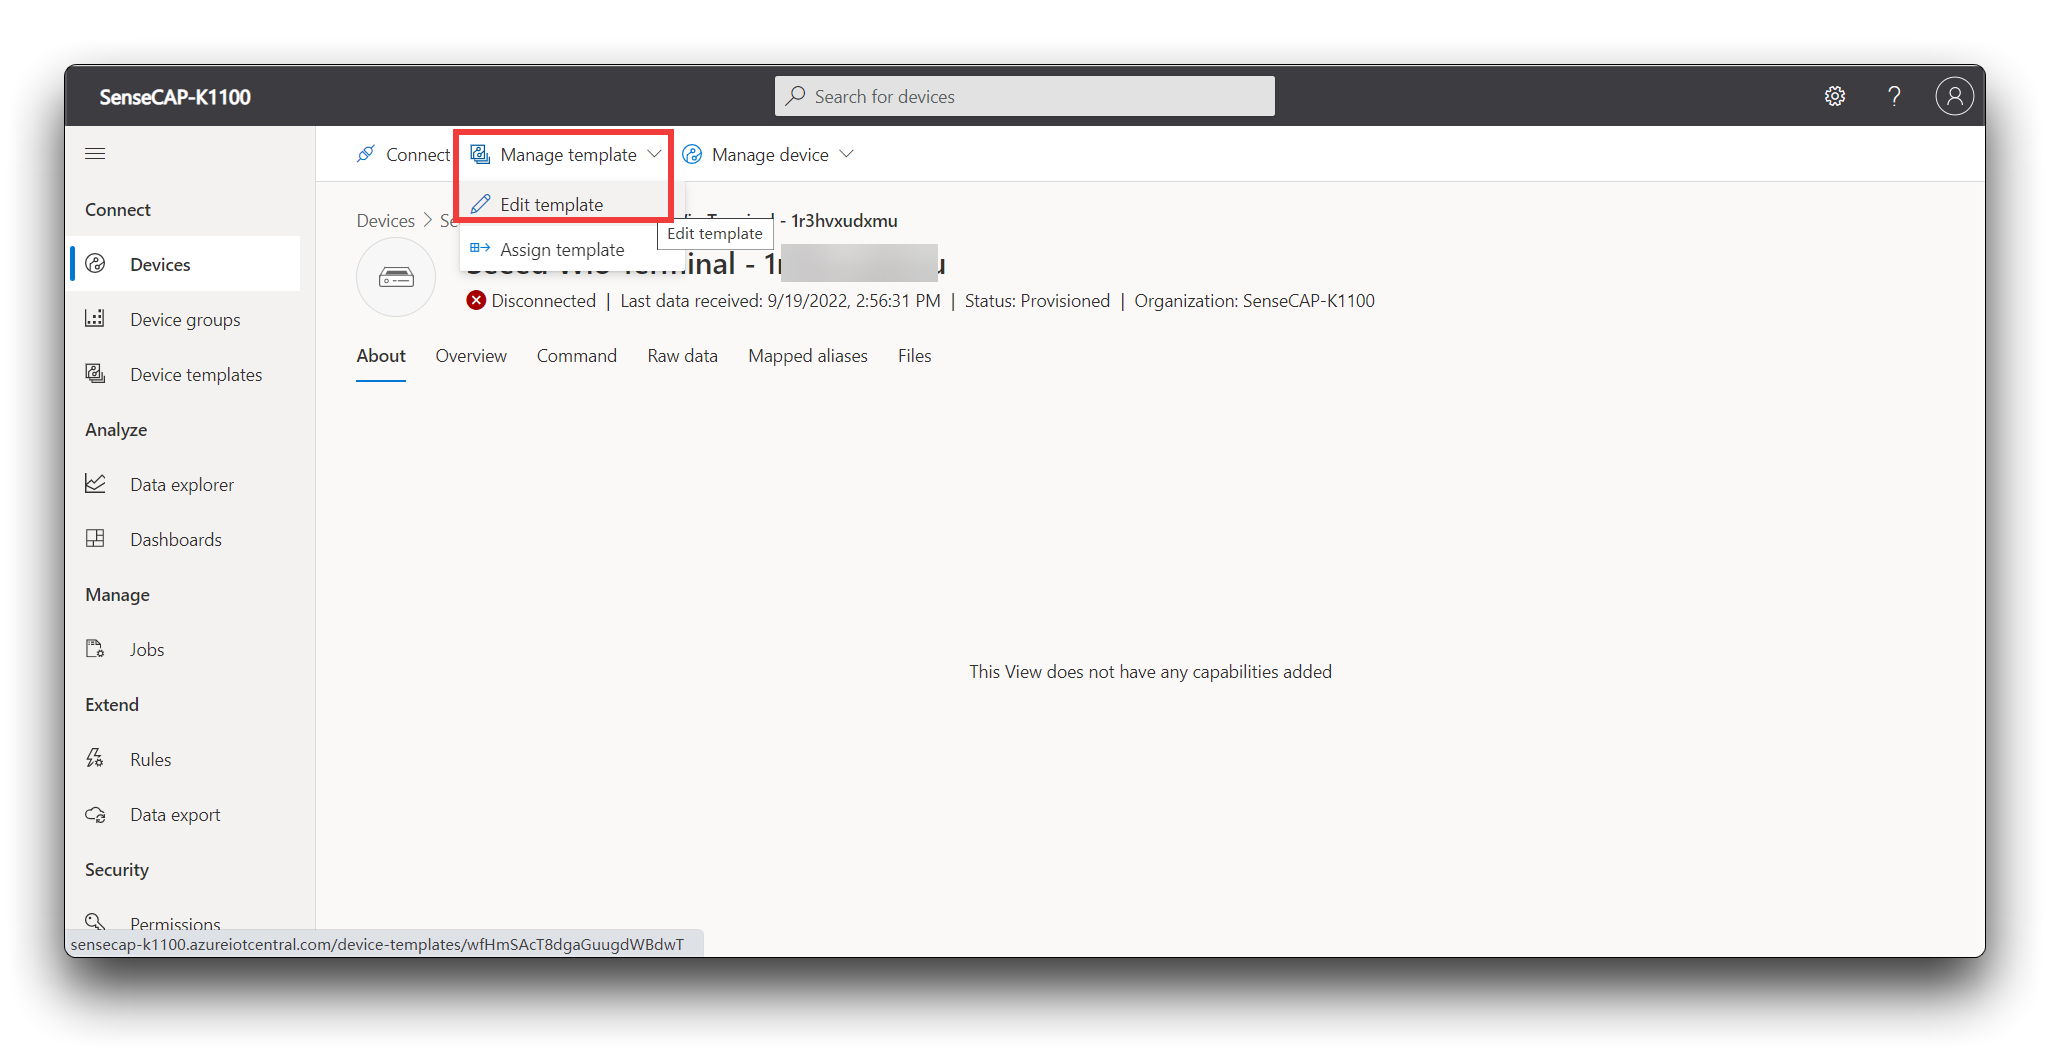
Once you have made your changes, please just click on Save and then click on Publish. All changes in the Device template will need to be saved and Publish following this procedure before they will take effect.
Please fill in the Display name here according to the name of the JavaScript code provided above.
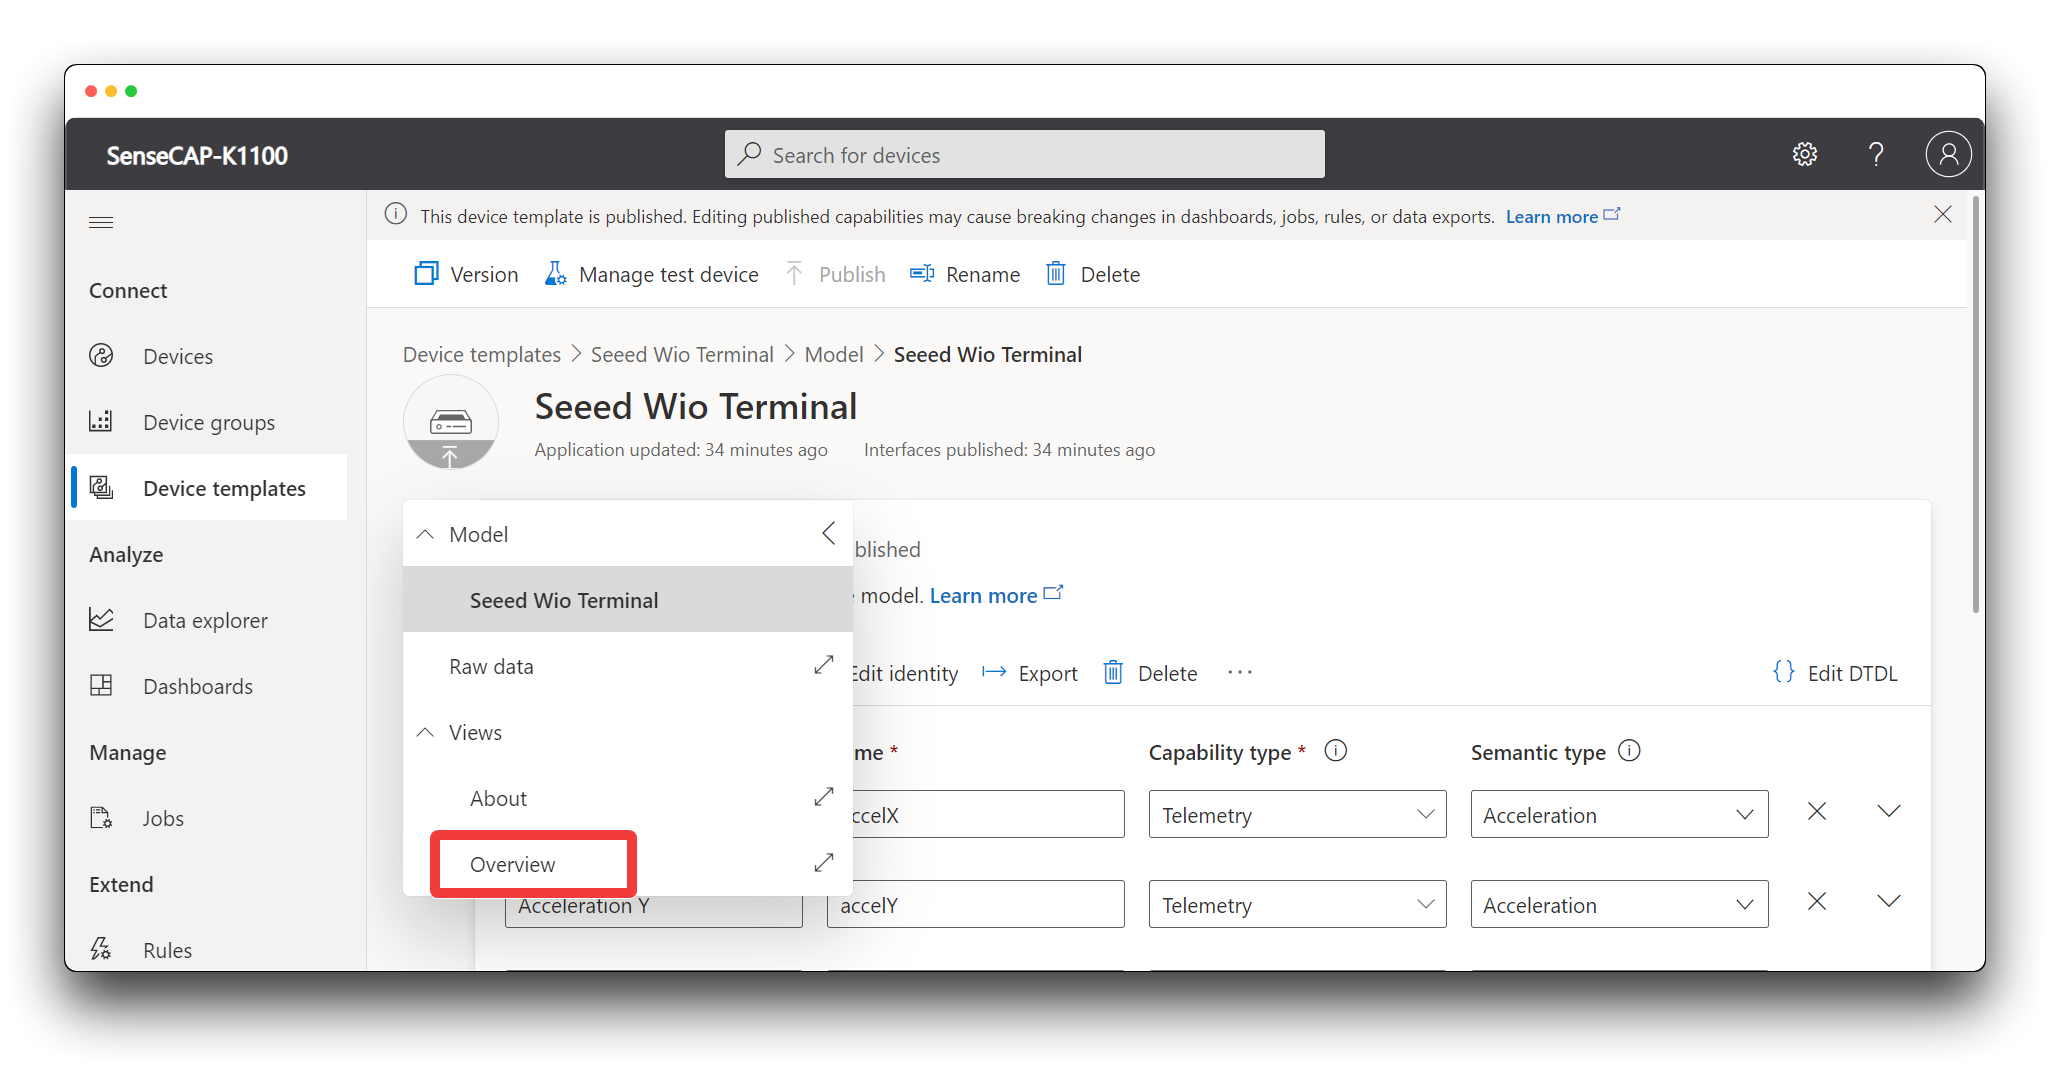
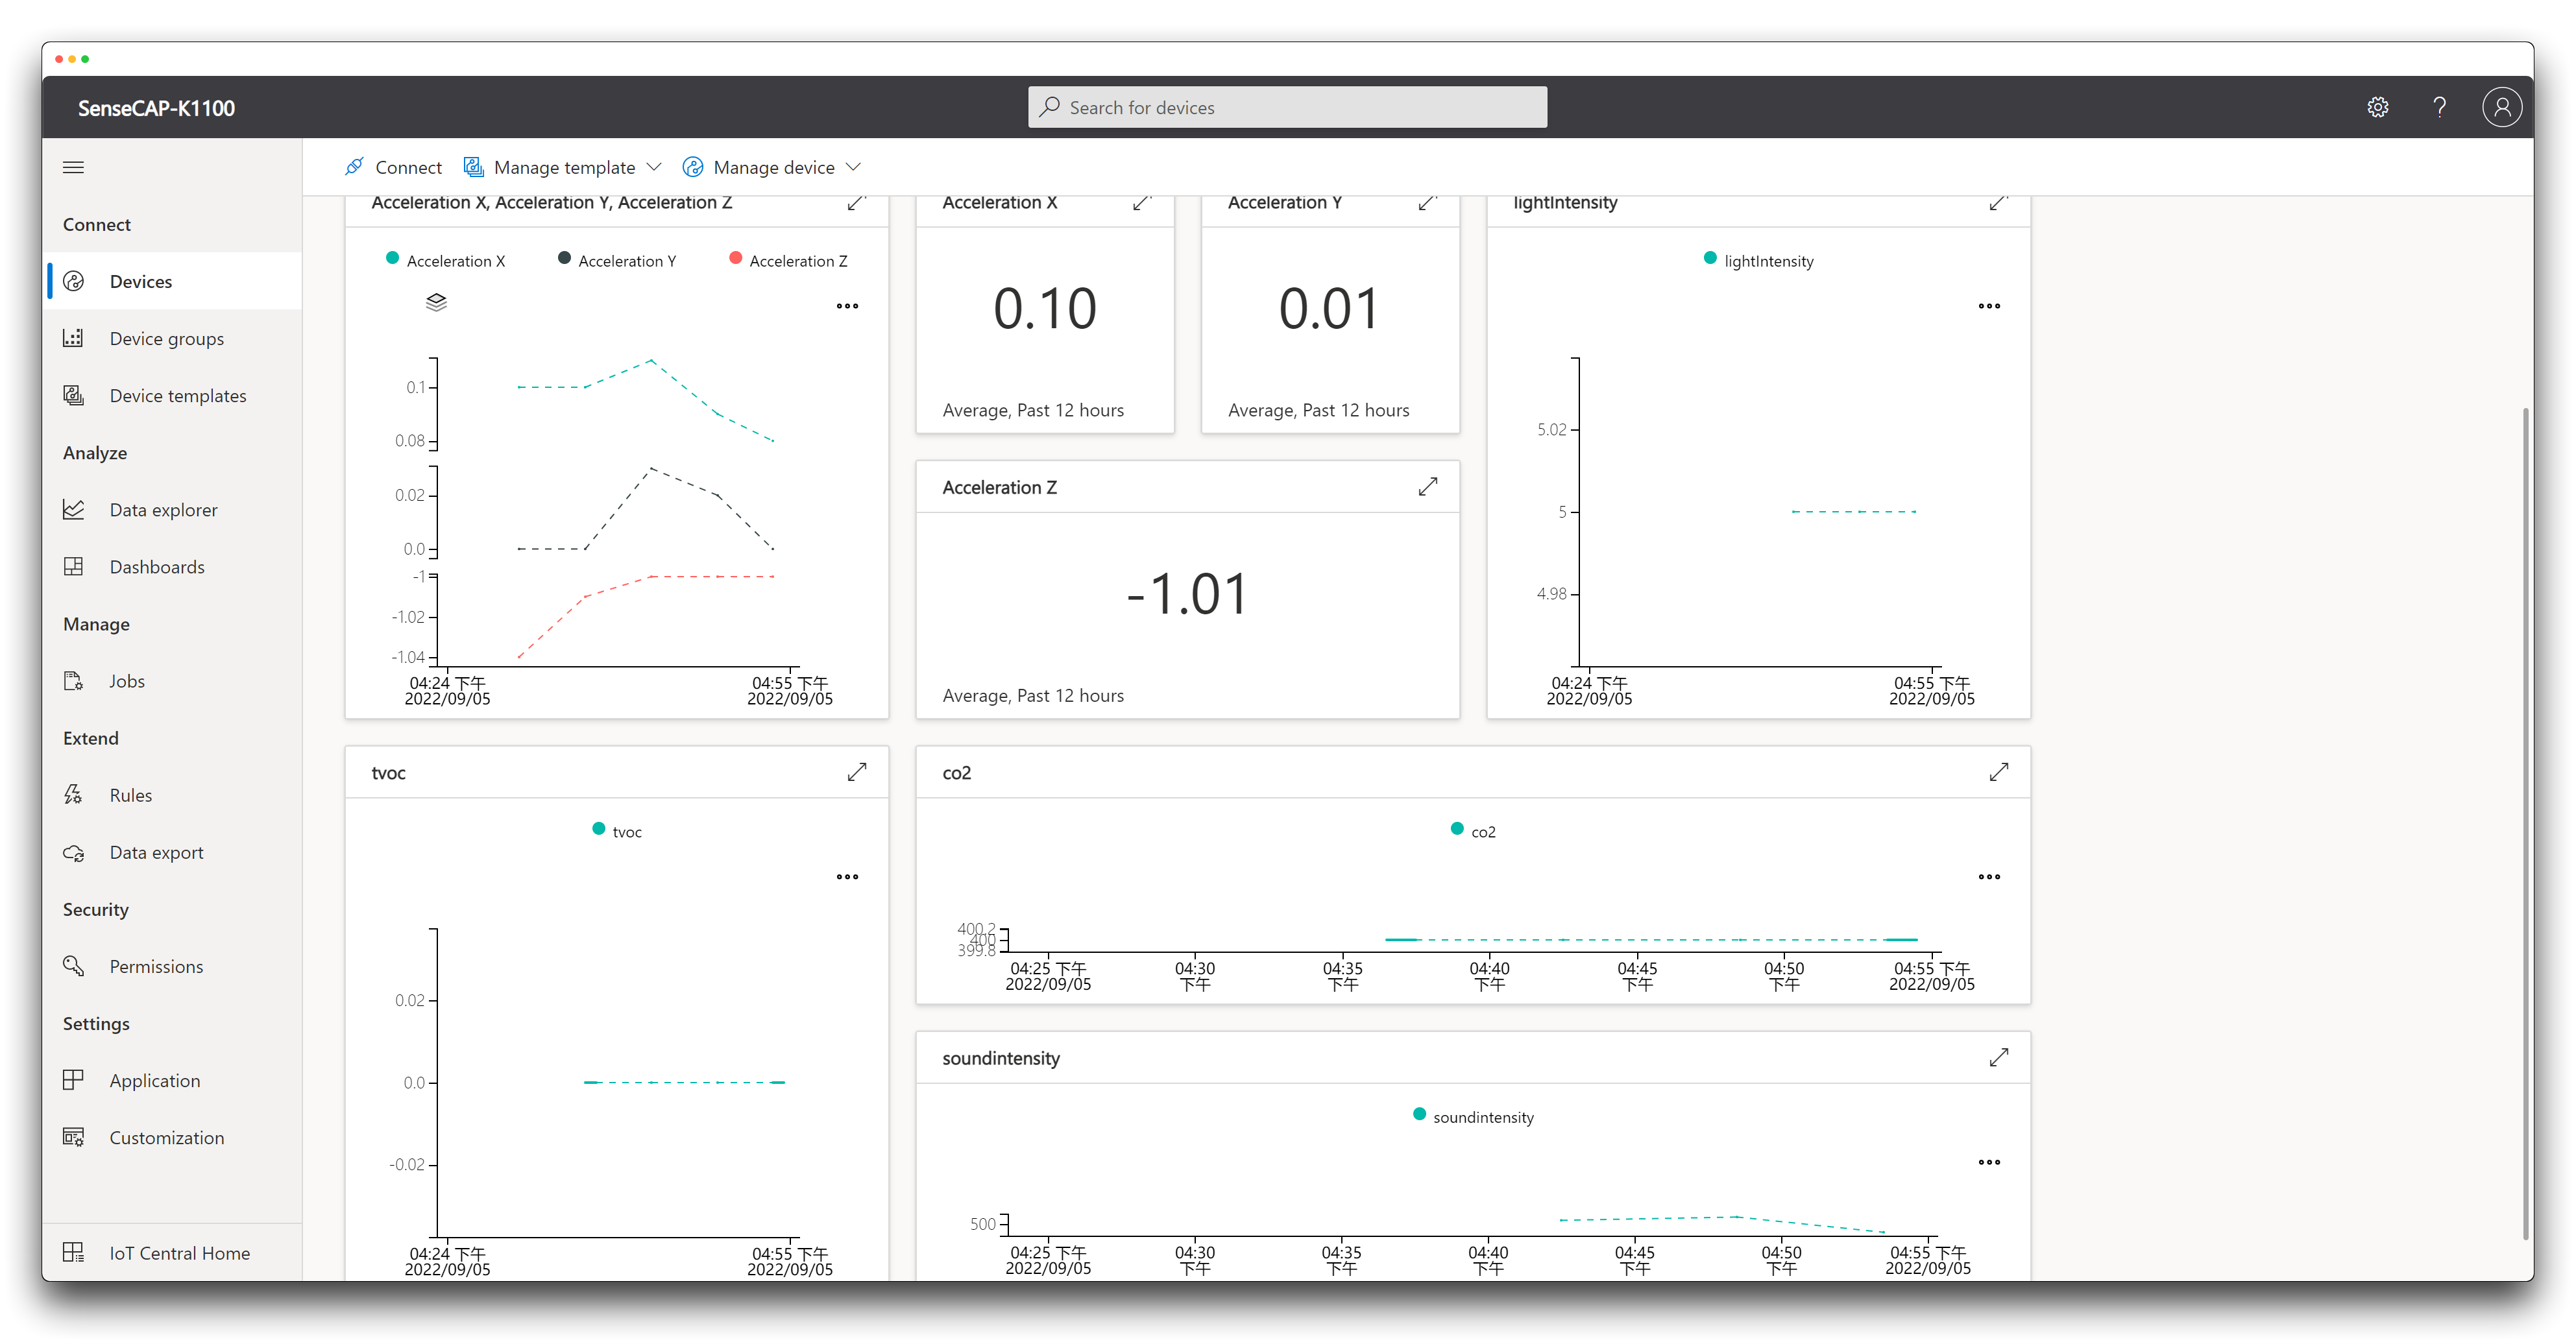
Of course, if you want to enrich your data dashboard page, you can also configure it to be displayed in Overview.
Click on Overview on the left navigation menu.
Collapse select a telemetry drop-down menu and select the telemetry that you want to visualize.
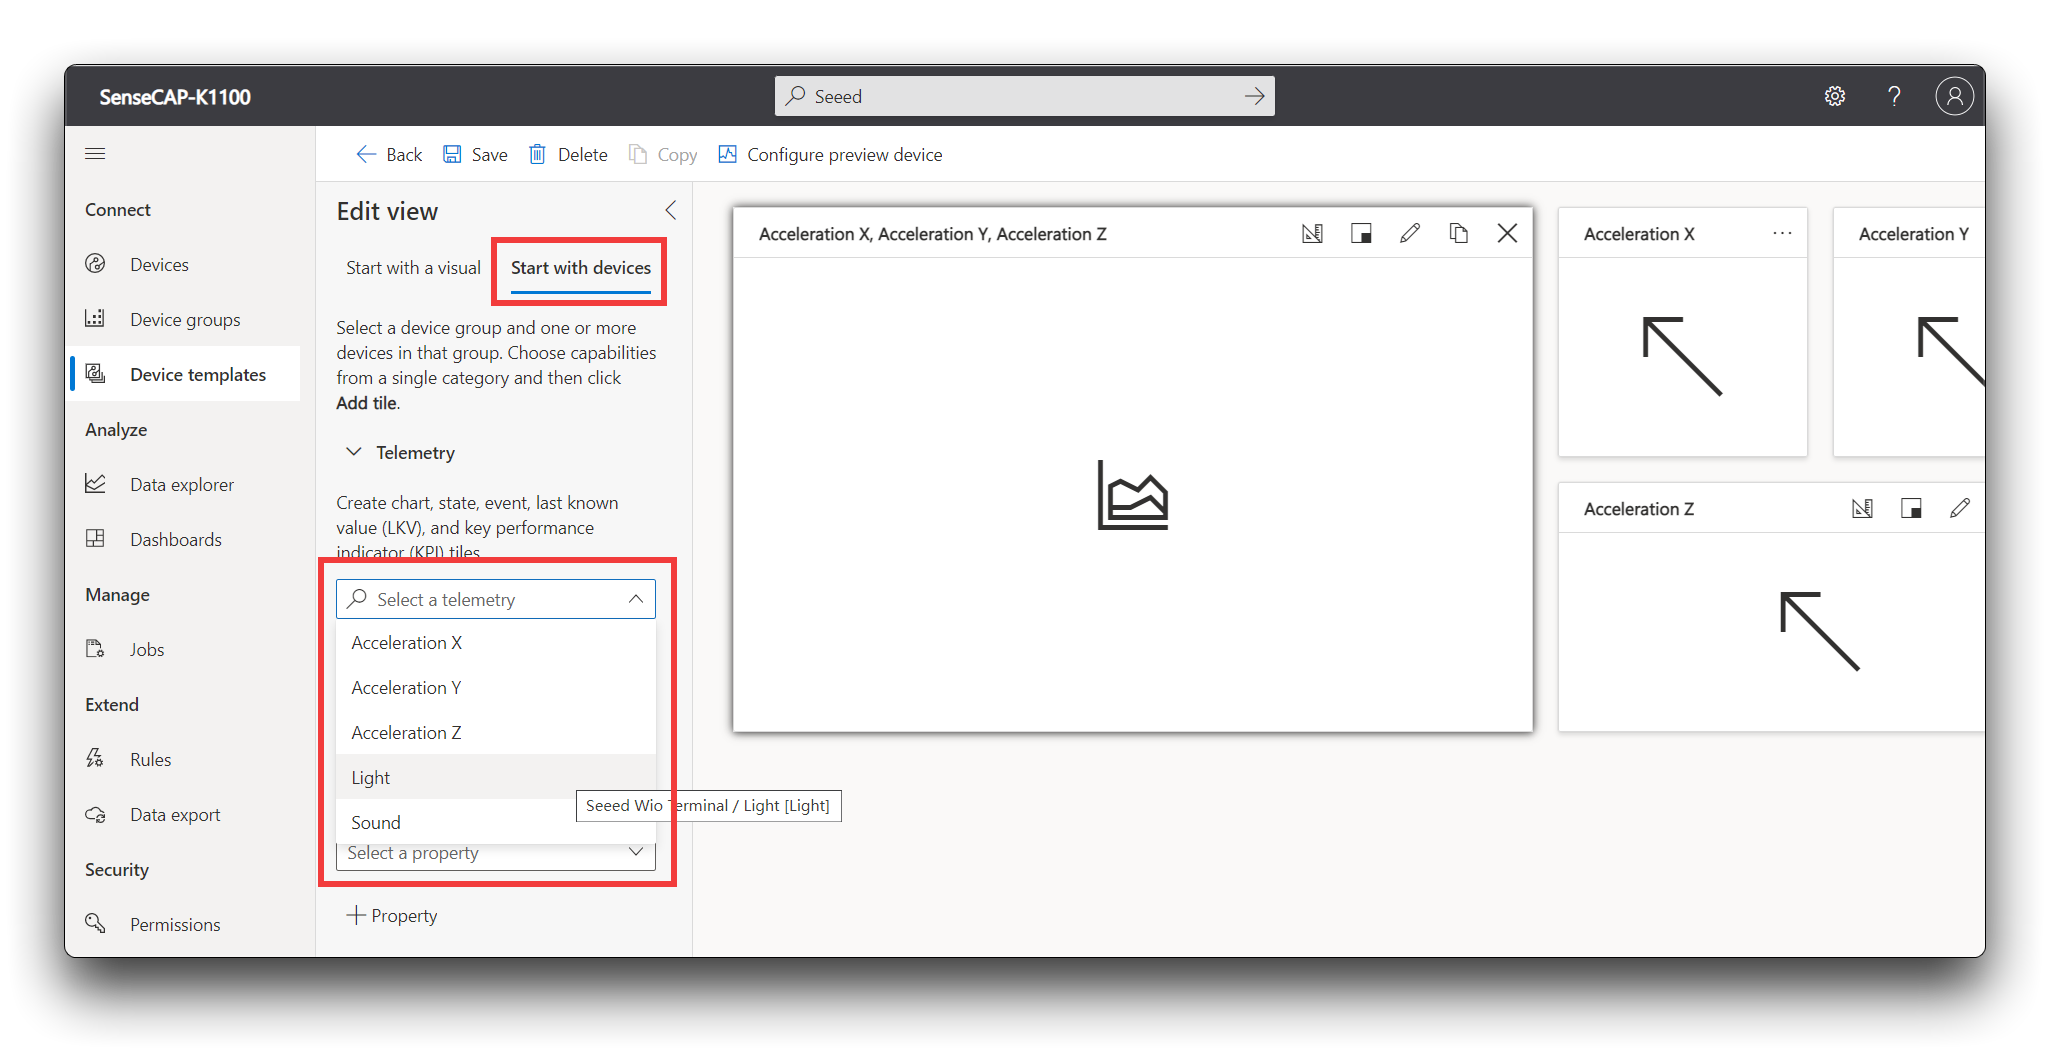
Click Add tile and you will see the tile added into the Azure IoT Central Dashboard.
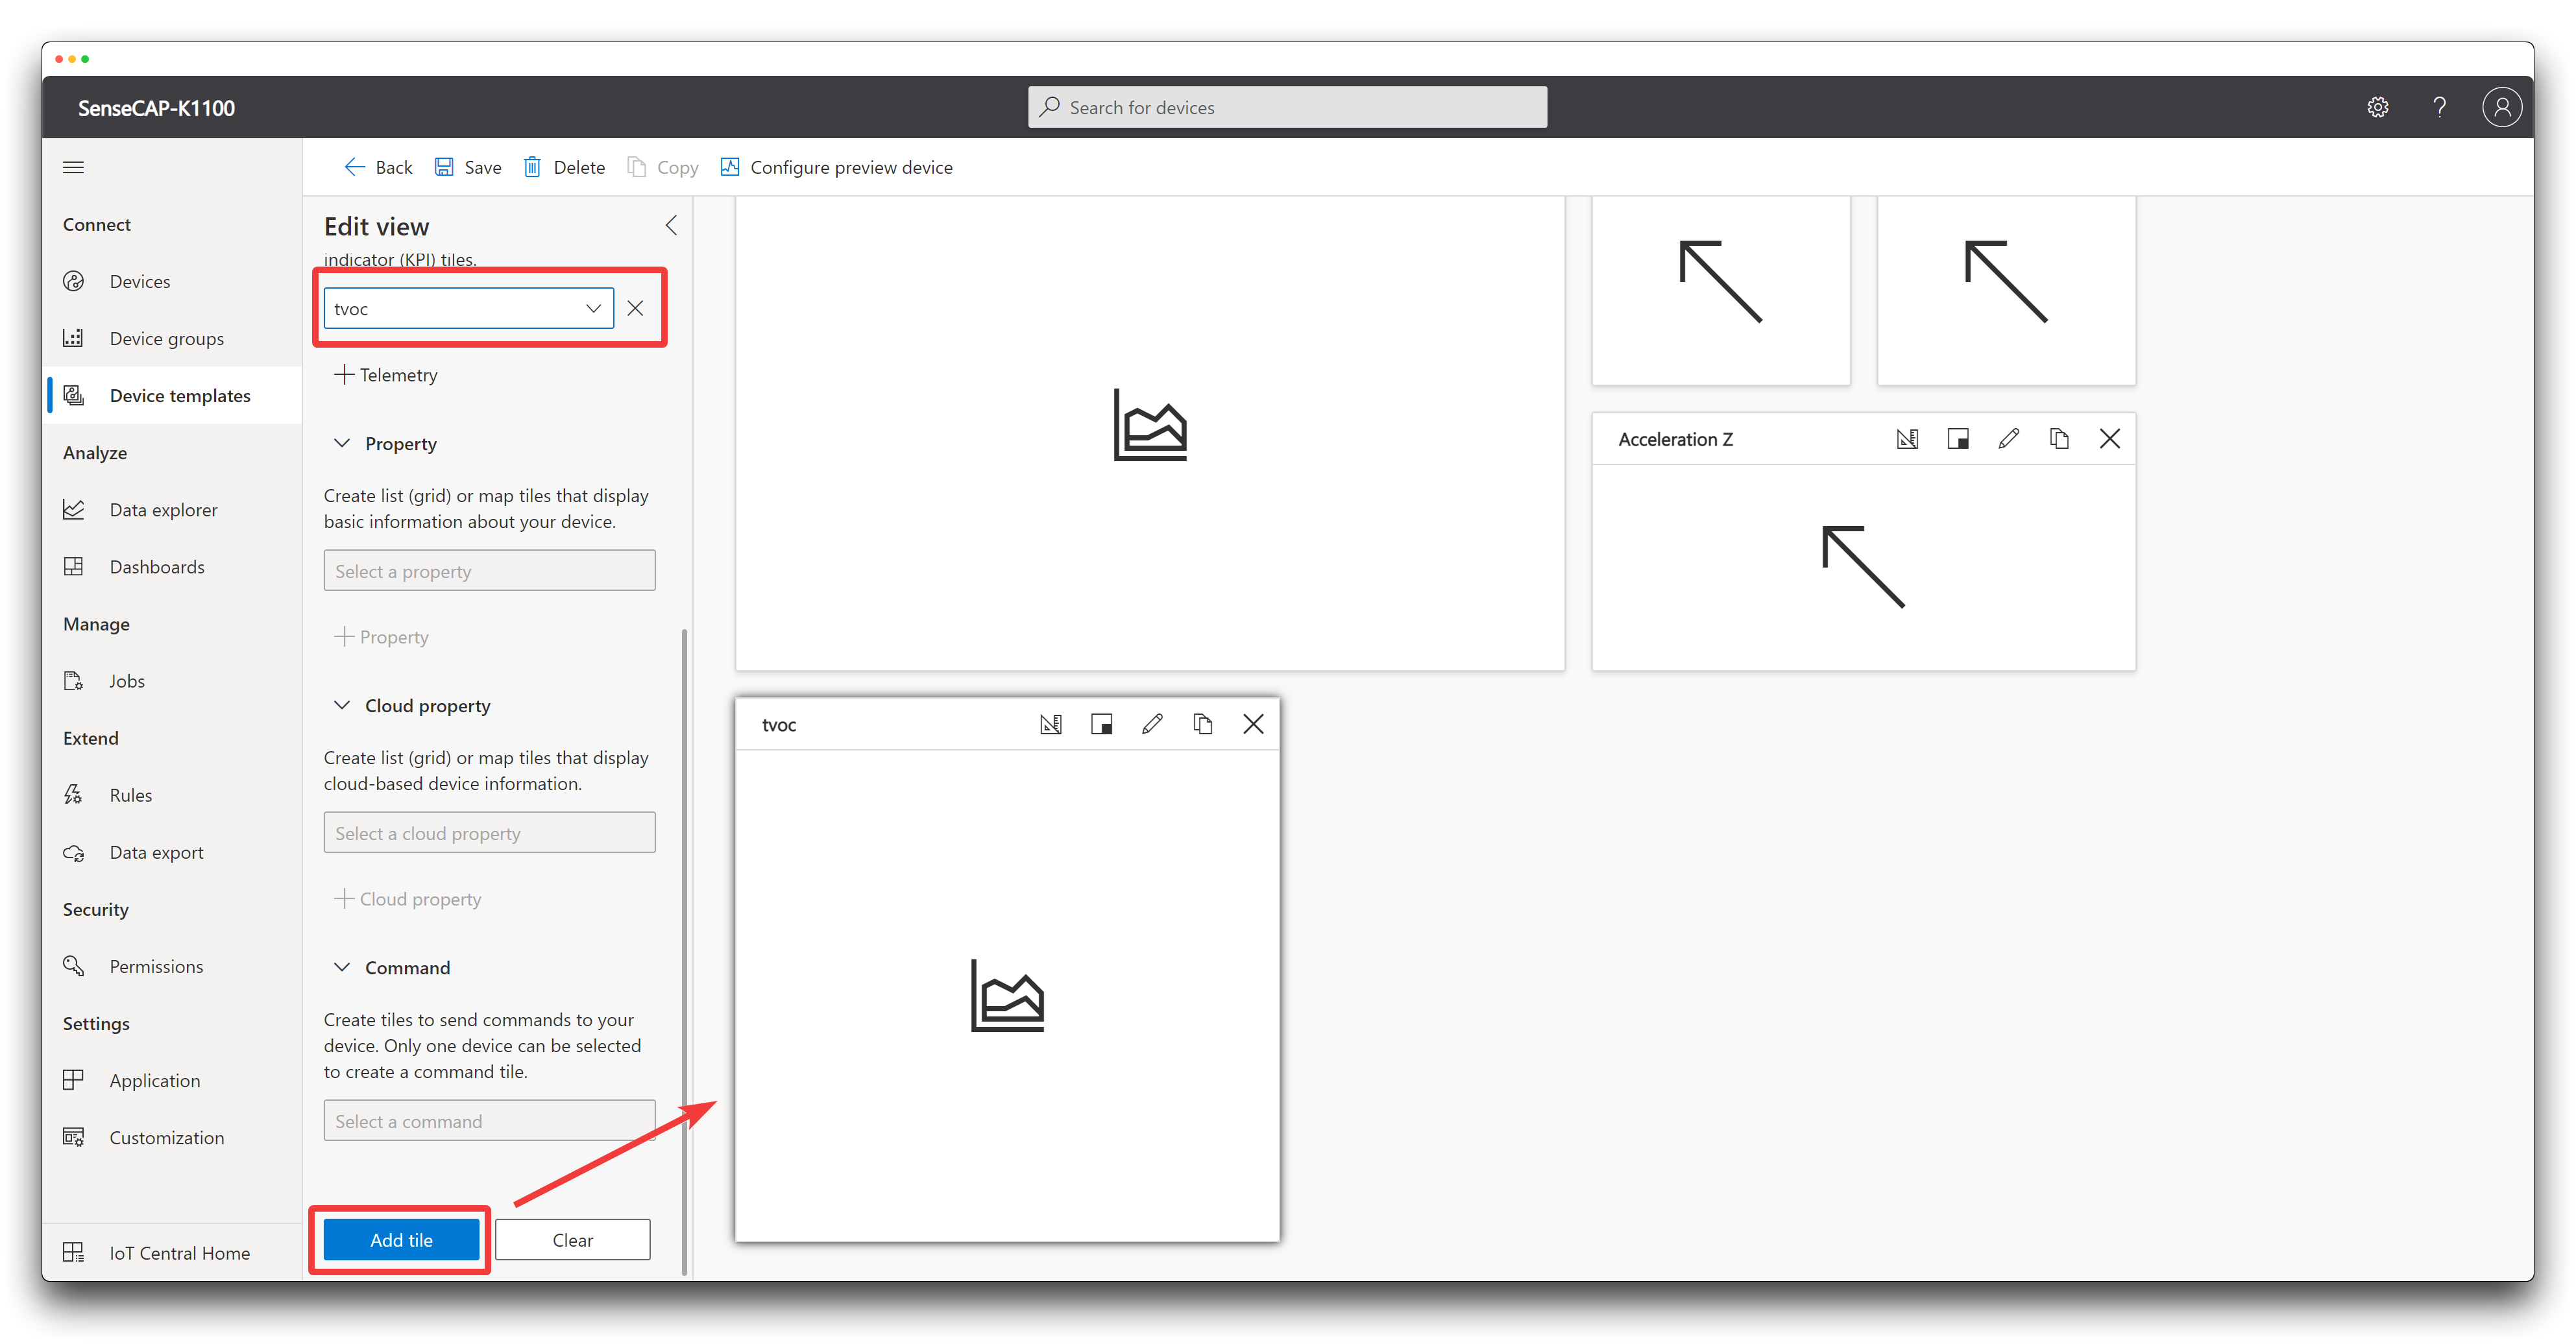
Note: You can resize or change the visualization of the tiles according to your preference
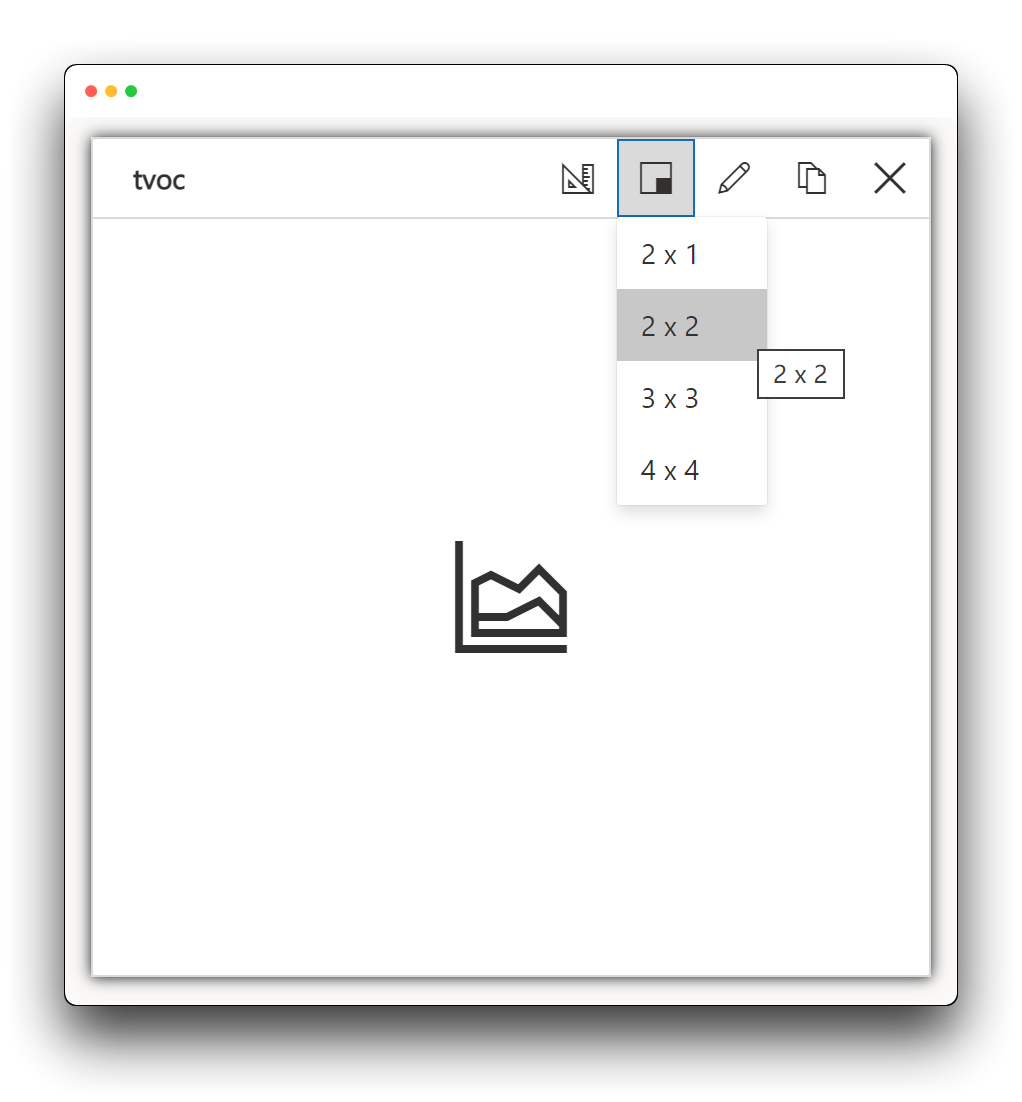
So next, customise your sensor data monitoring dashboard to your liking!
Troubleshoot
Q1: Why can't I find the Palette in Node-RED?
A: If you cannot find the Palette in the settings, check your terminal for an error message when you start Node-RED.
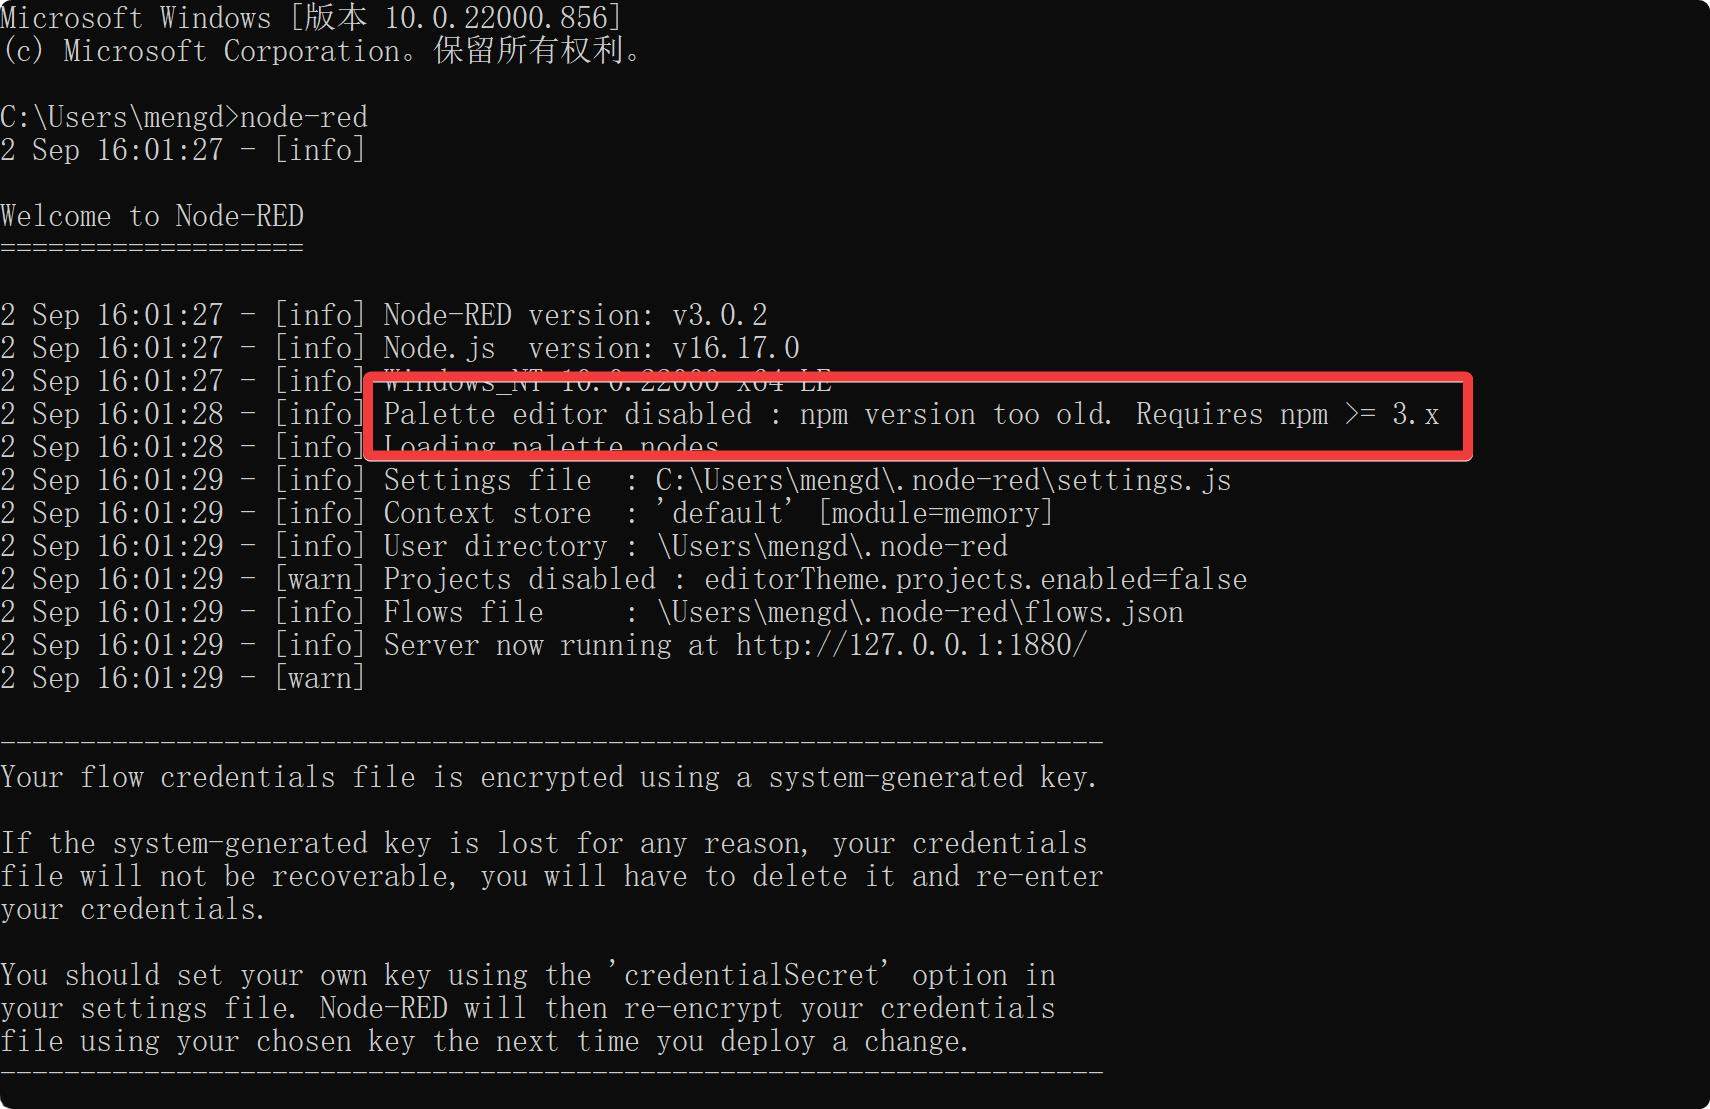
The most common scenario is that your npm version is too old to start the Palette editor.
If your situation is as described above, run Powershell as administrator and enter the following command to upgrade npm.
npm install -g npm
Then just restart Node-RED.
Tech Support & Product Discussion
Thank you for choosing our products! We are here to provide you with different support to ensure that your experience with our products is as smooth as possible. We offer several communication channels to cater to different preferences and needs.