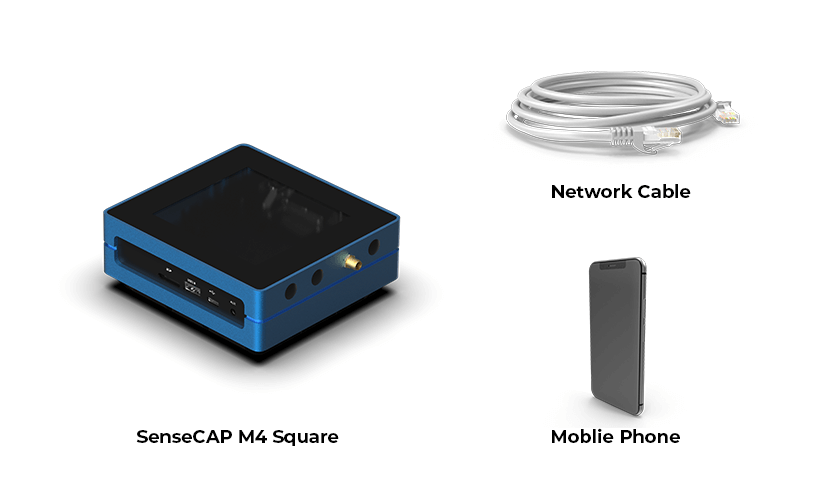
SenseCAP M4 Square Quick Start
SenseCAP M4 Square provides the easiest way to deploy The Next Generation Computational Network(FluxNode). No Linux command, No need to build an environment, and only 4 steps to finish the deployment.
Prerequisites
- Network sufficient upload speed to deploy a CUMULUS FluxNode (25Mbps Upload Minimum)
- A new CUMULUS FluxNodes created
What You Need
Stake Flux CUMULUS Node
The tutorial takes Binance as an example
Step1 Go to the exchange to buy Flux
-
Download the Binance App and resgister an account
-
Flux cannot be purchased with fiat currency. Please buy USDT first, then convert USDT to Flux
-
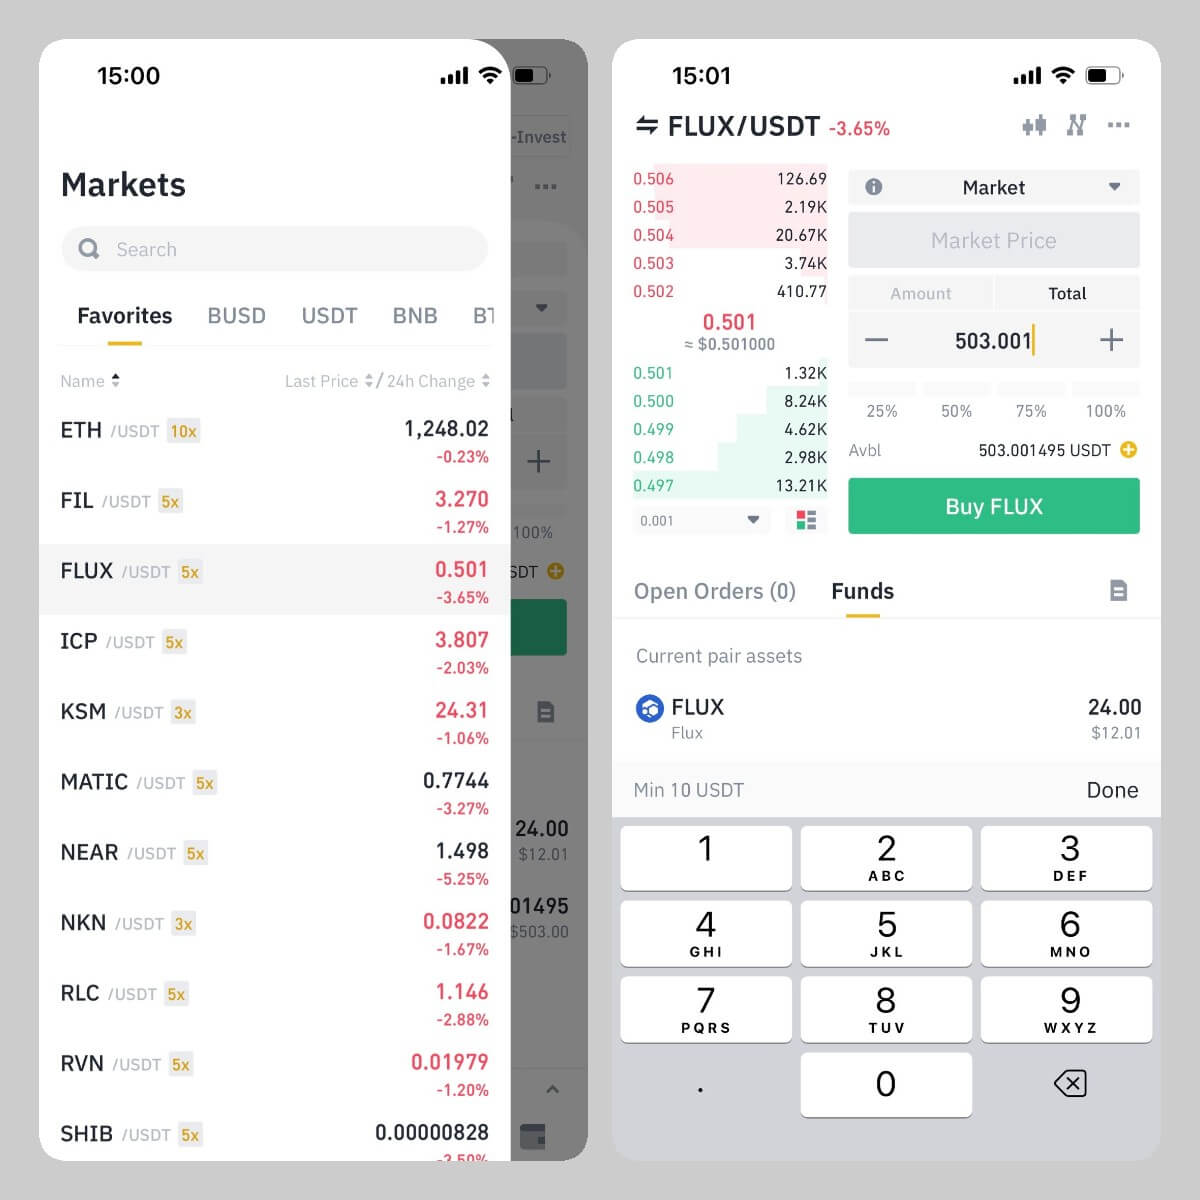
At the Trade page, select spot and the Market select FLUX/USDT
-
Enter the number of USDT and ensure that the converted Flux is greater than 1000
-
Click Buy button, Now you have successfully purchased flux
Step2 Download the Zelcore App and register your account
-
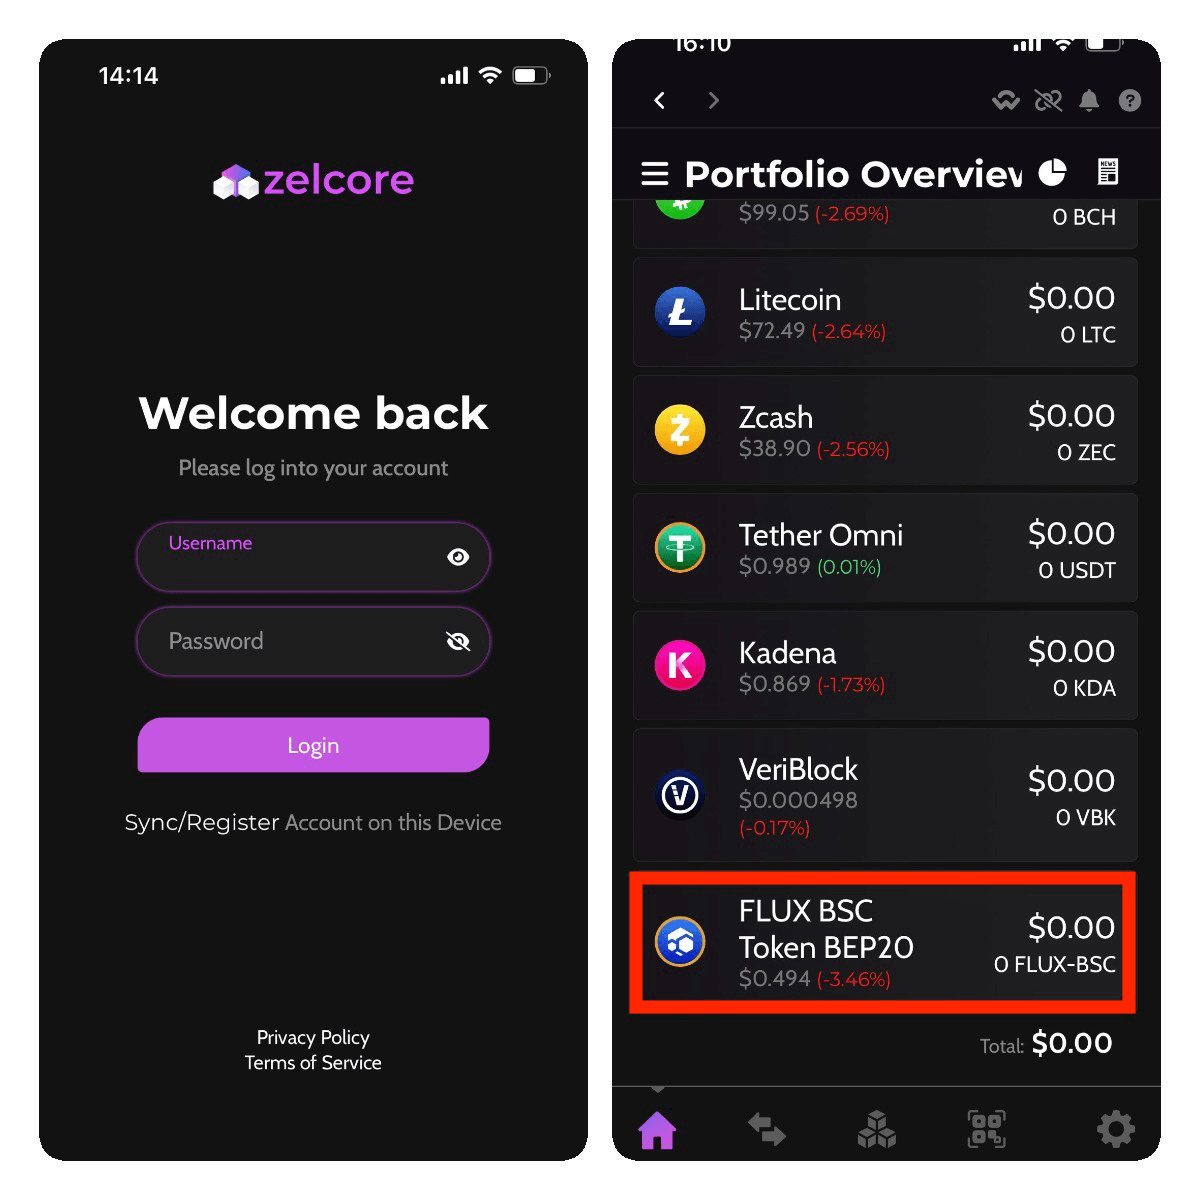
Download Zelcore App and login your Zelcore account
-
At Portfolio page, click Add Assets button to add FLUX BSC asset (Payments portfolio)
Step3 Withdraw Flux from Binance to Zelcore Wallet
-
Open Binance App and visit the Wallet page
-
Visit Flux, click Withdraw and select Send via Crypto Network
- Input withdraw info and send
- Address: Open Zelcore App, Copy the FLUX BSC receive address, and paste into the Binance
- Network: Select BB Smart Chain (BEP20)
- Amount: 1000+ flux
- Send From: Spot&Funding Wallet
- Check your withdraw info and send to Zelcore
Step4 Create a new Flux Cumulus Node
-
Open Zelcore App, and check your Flux have sent your FLUX BSC asset (Payments portfolio)
-
Visit Apps Page, and open Fusion to swap FLUX BSC to Flux(Payments portfolio).
- Sell Asset: Select FLUX BSC
- Buy Asset: Select FLUX
Note: Ensure you have enough BNB to afford the swap fee
-
Send the Flux from the Payments portfolio to another portfolio.
-
Now you can deploy the new Flux Cumulus node on SenseCAP M4 Sqaure!
Deploy FluxNode on SenseCAP M4 Square
Step1 Power up and connect to internet
-
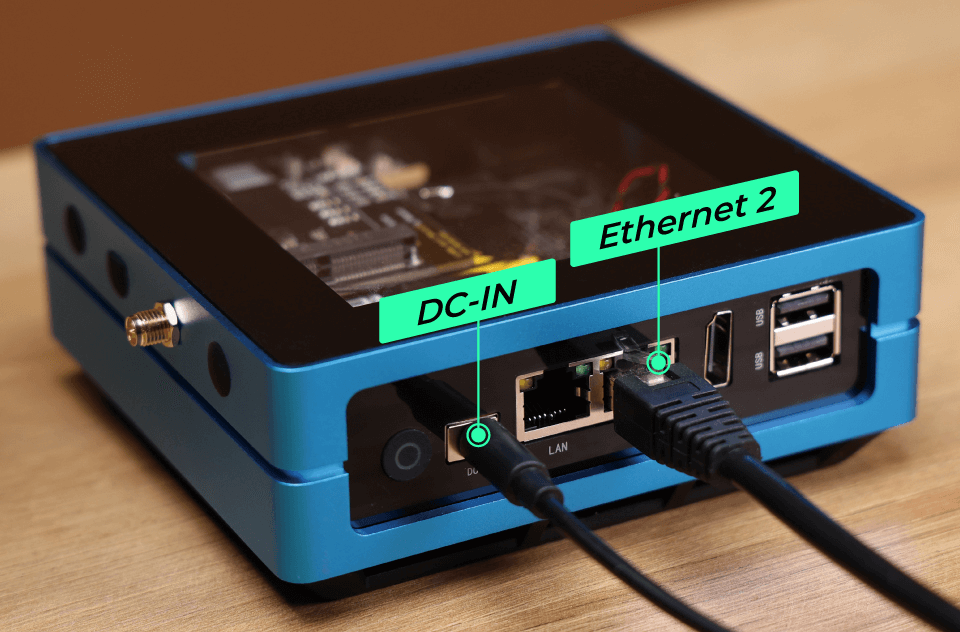
Plug the provided 12V/2A power adaptor into the DC-IN power connector.
-
Connect the network cable to the Ethernet2.
-
The device will automatically self-setup. Steady orange on L3 indicates the setup and connection to the internet are successful.
Step2 Install SenseCAP Hotspot App and Zelcore App
-
SenseCAP Hotspot App is designed to set up and manage devices. Please scan the following QR code to install SenseCAP Hotspot App.
-
Sign up SenseCAP account with your email or log in directly.

- Zelcore App is released by Flux to find, manage, trade, and truly own your digital assets, FluxNode, and information, Please click on the following picture to install Zelcore App.
Step3 Set up SenseCAP M4
- Press the thimble on the bottom left of the device, and the end cap is lifted then take it down.
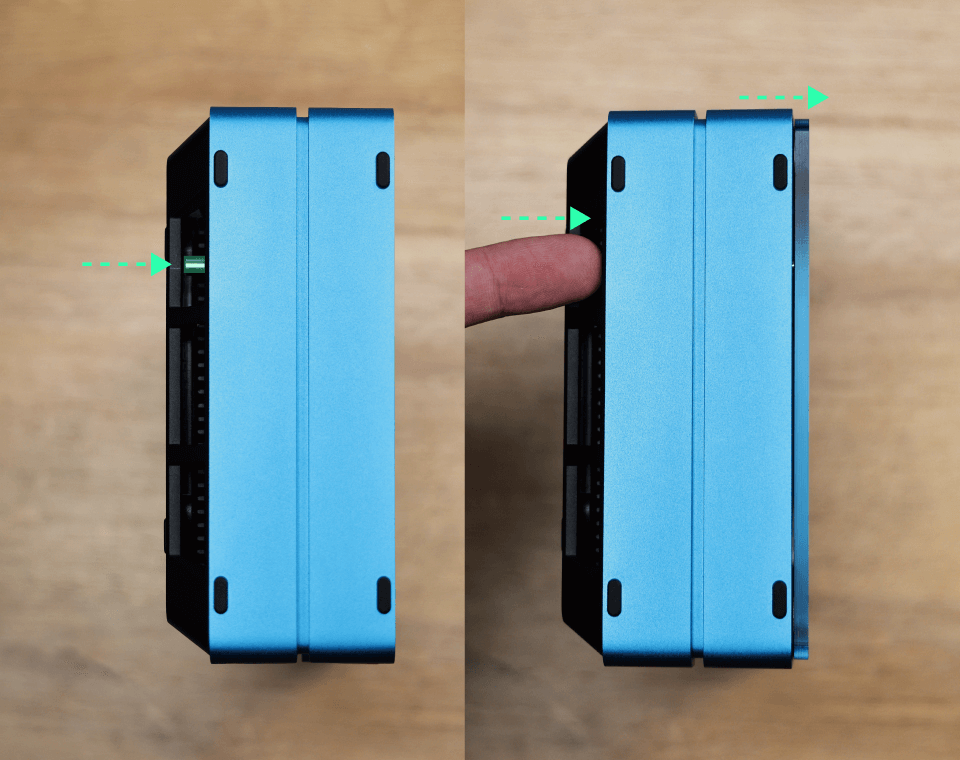
- Press B1 button for 5s until the L2 indicator flashes blue to turn on Bluetooth configure mode.

- Select Flux and click Setup on SenseCAP Hotspot App
- Scan the device via Bluetooth
- Select the device to Connect
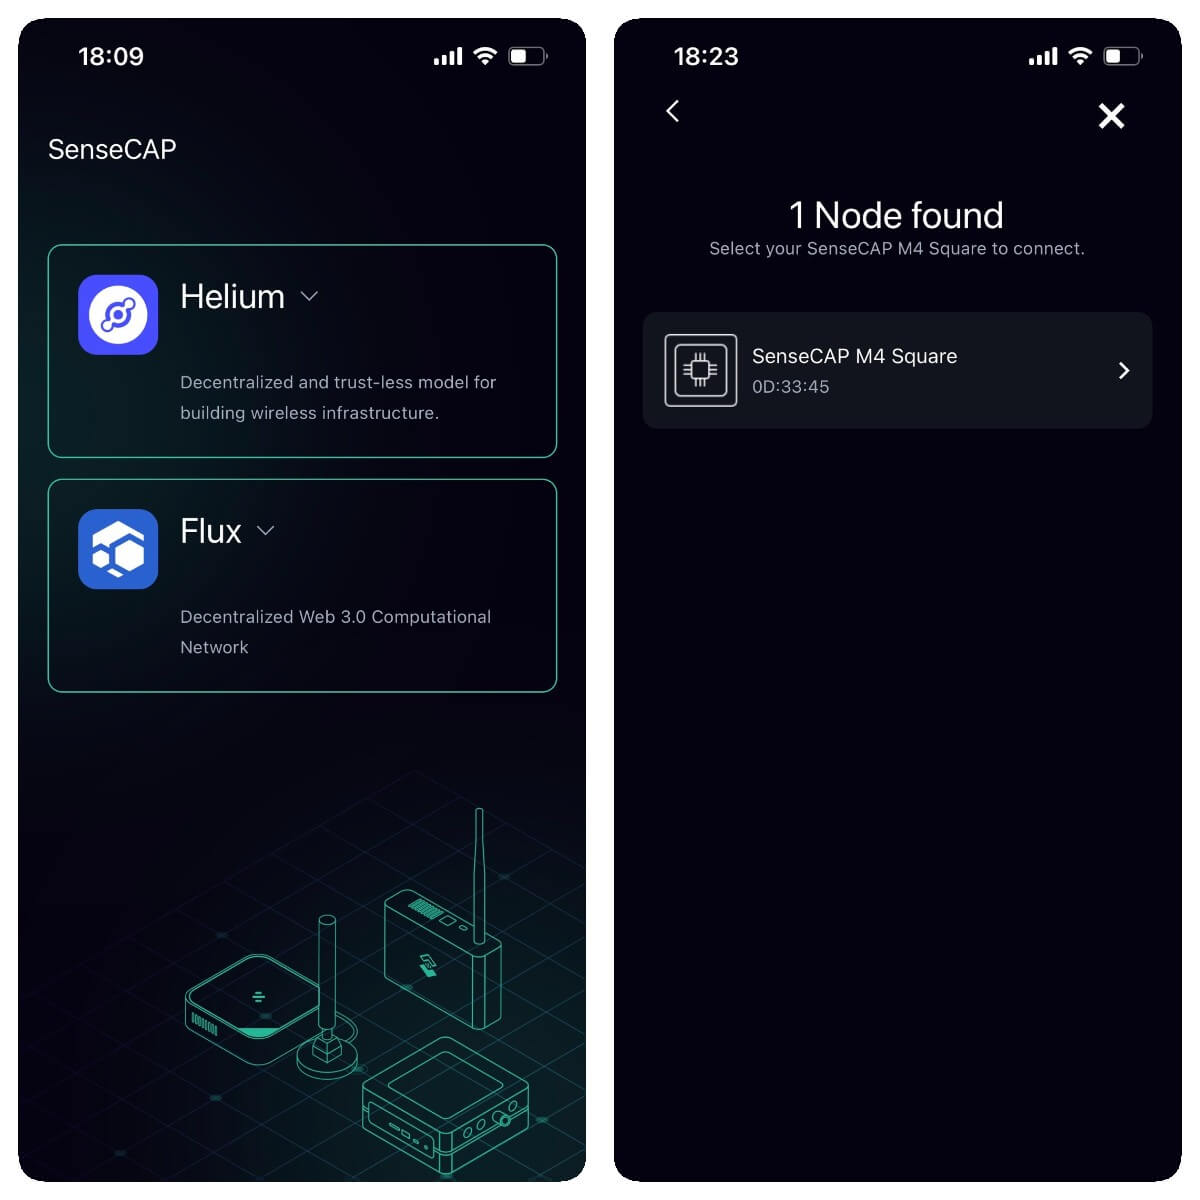
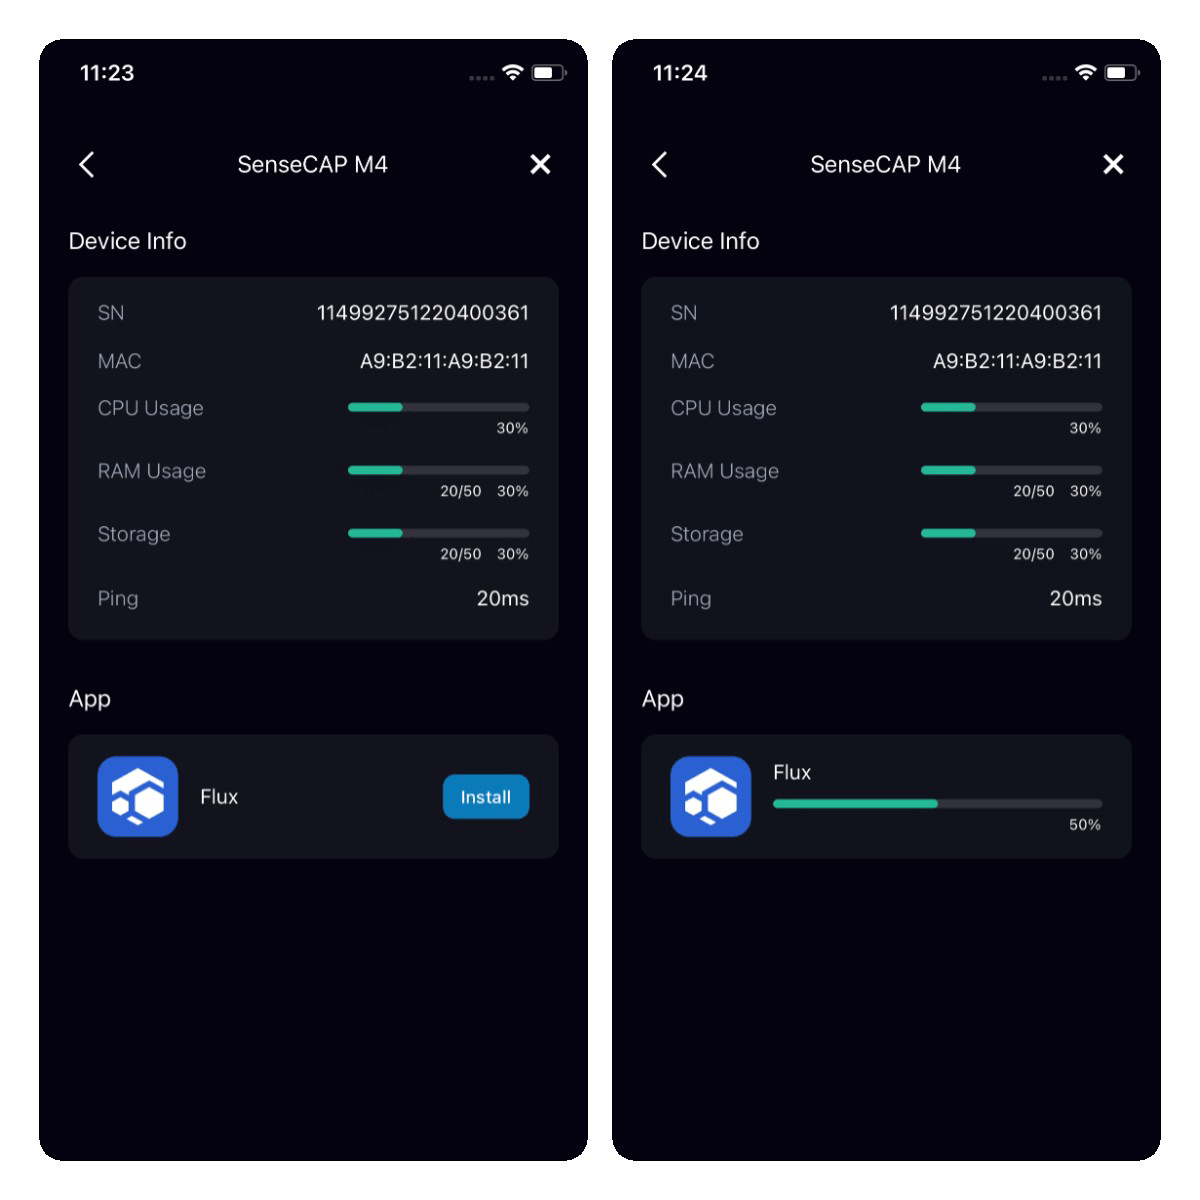
- App connects to the device successfully. now click the install button to install flux dApp on the device.
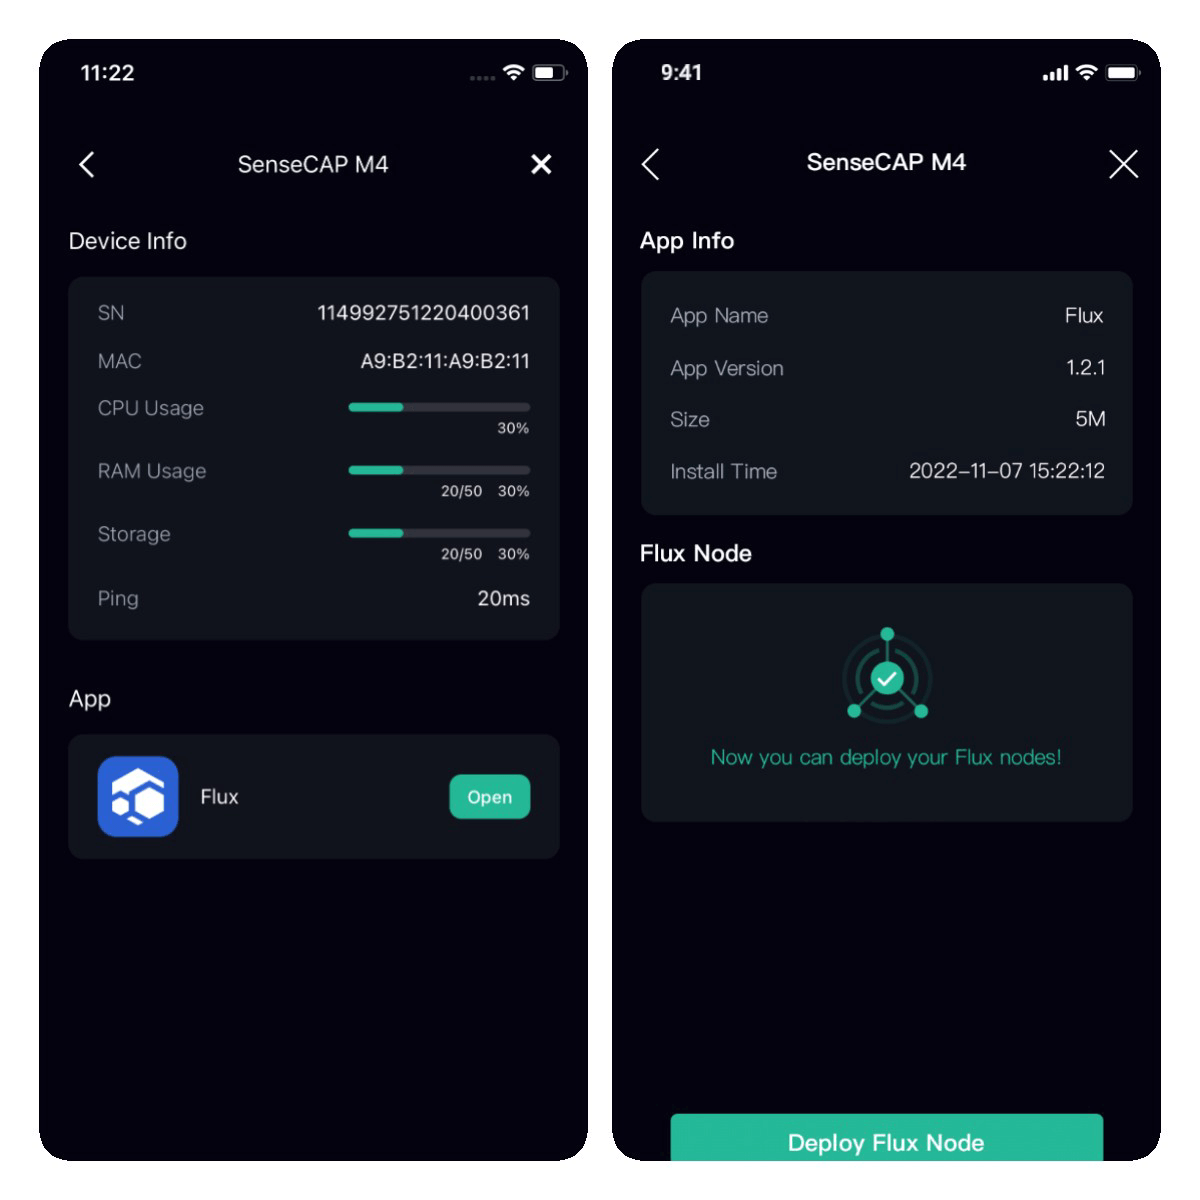
Step4 Deploy Flux Node
- Flux dApp installation is complete, now click the Open button and start to deploy CUMULUS FluxNode.
Note: Please purchase 1000 Flux as collateral and transfer it to your Zelcore Flux wallets for CUMULUS FluxNode setup.
Guide
- FluxNode SetUp Guide
- Flux Light Node Setup Video Tutorial Guide (Setup Zelcore& Deposit Flux tutorial is from 8:07 to 12:30)
- Input Identity Key, Collateral TX ID, Output Index, Zel ID, and Kadena Address from Zelcore APP, please download Zelcore for more information.
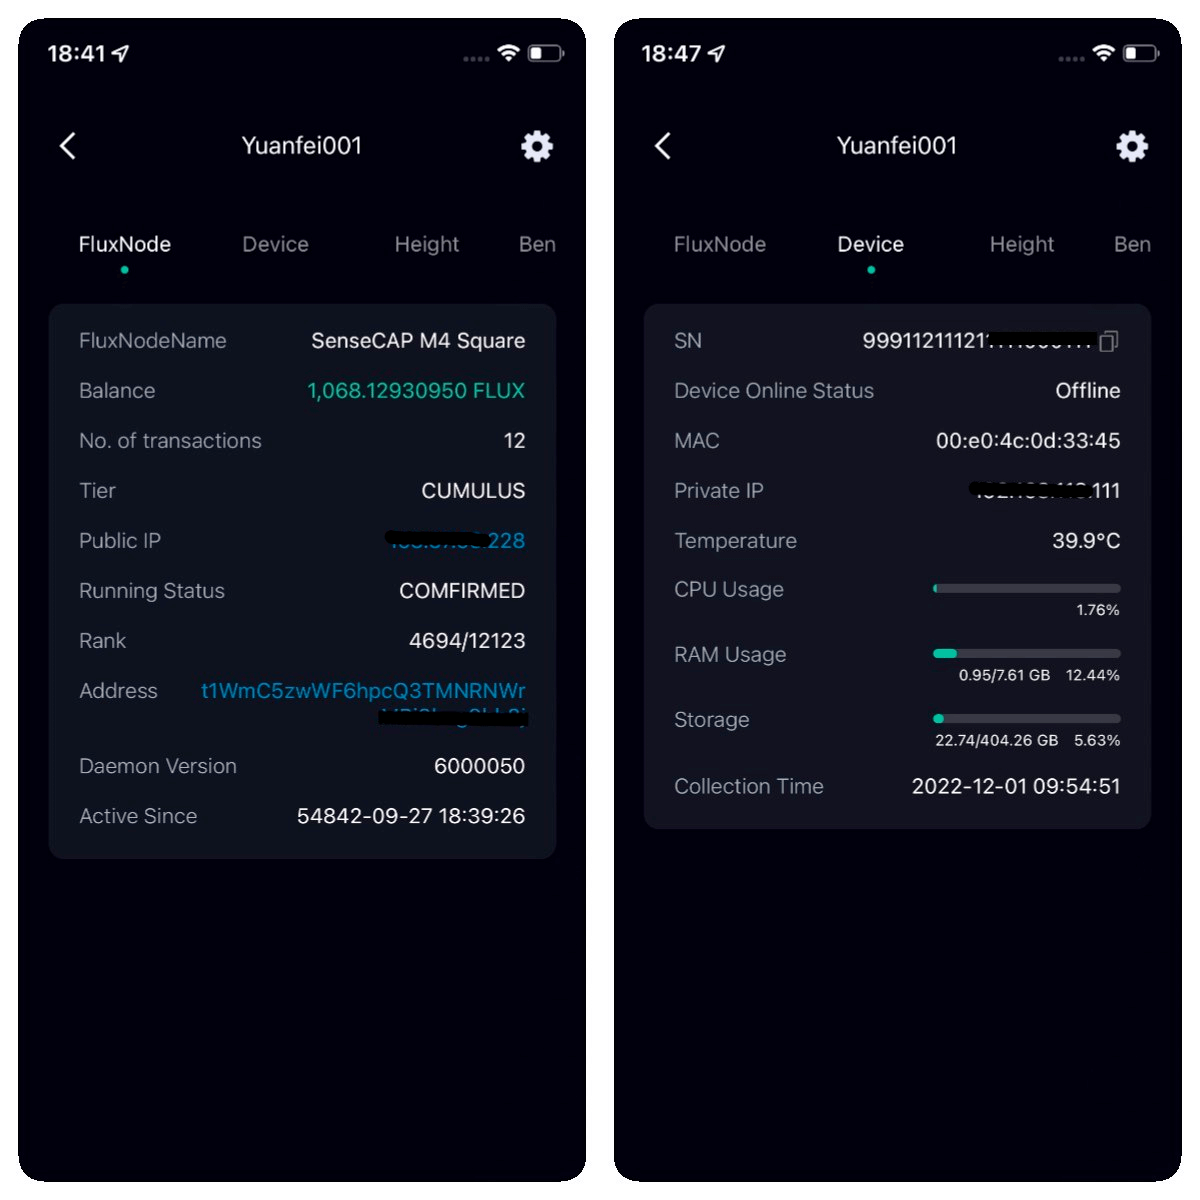
Identity Key: click Apps > click FluxNodes on Apps page > click your FluxNode > click edit on the expand menu > click Identity Key to copy it
Collateral TX ID: click Apps > click FluxNodes on Apps page > click your FluxNode > click Edit on the expand menu > click Collateral TX ID to copy it
Output Index: click Apps > click FluxNodes on Apps page > click your FluxNode > click Edit on the expand menu > click Output Index to copy it
Zel ID: click Apps > click Zel ID on Apps page > click QR code to copy Zel ID
Kadena Address: NIMBUS and STRATUS can input Kadena address to get additional KDA rewards. if you deploy CUMULUS no need to input it. click Portfolio > click Show Zero Sum on the page > click Kadena > click Details > click Receive action > click QR code to copy Kadena address
- Click Start Deploy, then SenseCAP M4 will deploy FluxNode automatically. The deployment time depends on the device network, please make sure the device has a good network. Now App can disconnect from the SenseCAP M4 or keep monitoring the deployment progress with App.
Note: Make sure your device network has a public IP and DownloadSpeed >= 25 Mb/s and UploadSpeed >= 25 Mb/s. Otherwise, Flux benchmark will fail.
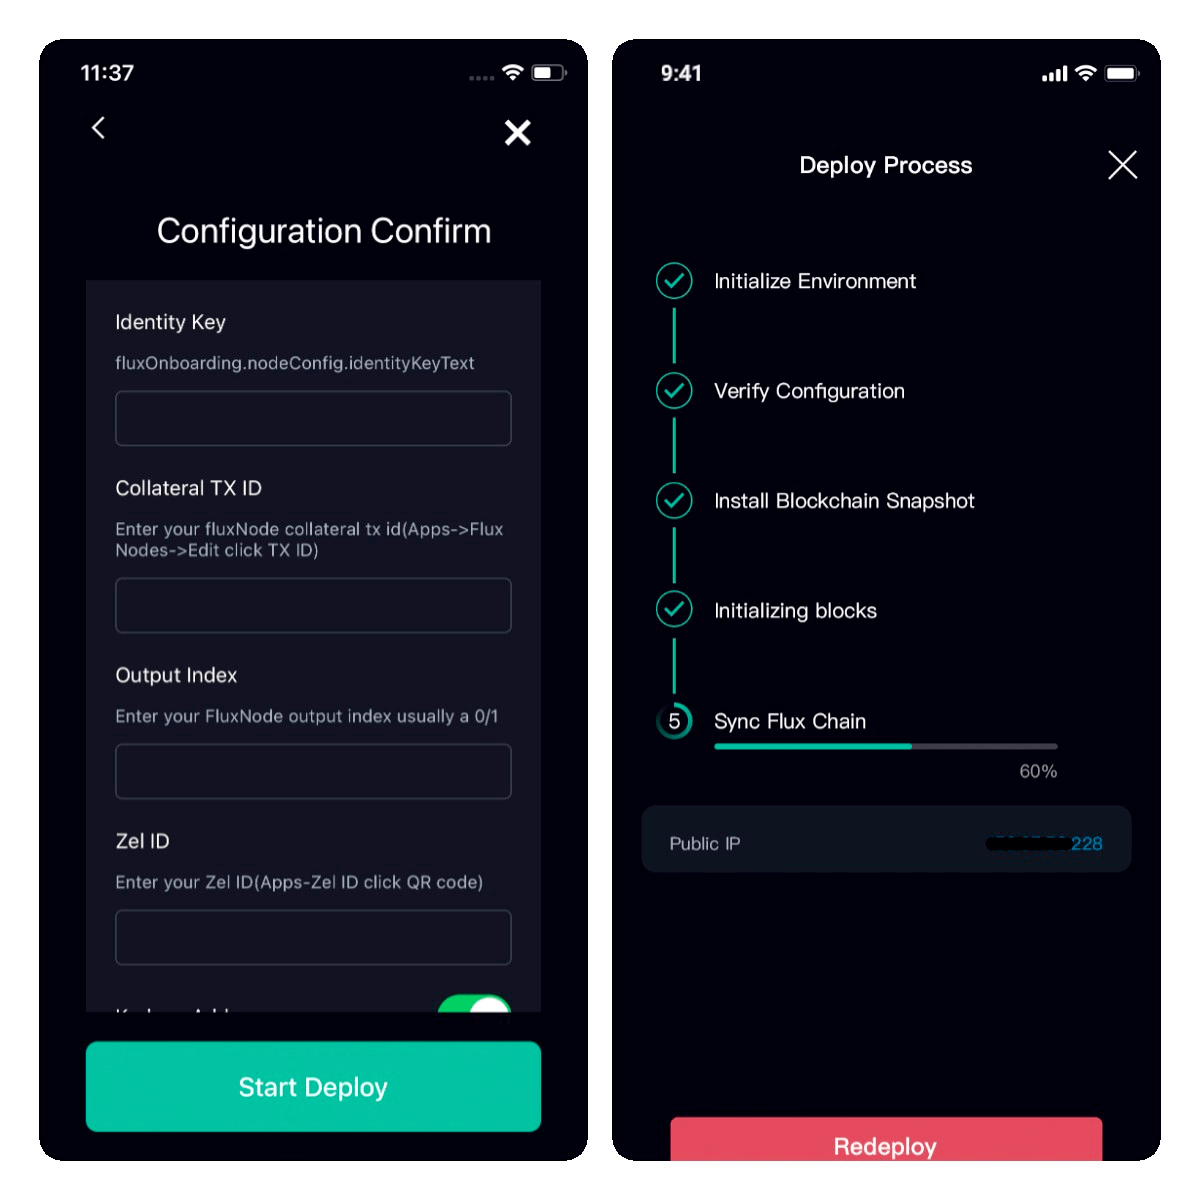
- when start syncing Flux chain, Please go to Zelcore App and input the public IP and name in your FluxNode. Then click the Start button to start your FluxNode.
If your FluxNode is running well and that is passing benchmarks. It will take 1 block to be processed for your FluxNode status to change to Started and 1-10 blocks (2 to 20 minutes) to get Confirmed. Confirmed is the final status. You can check on FluxOS by refreshing the home page if the node gets Confirmed, it will say on Status page.
Advanced Features
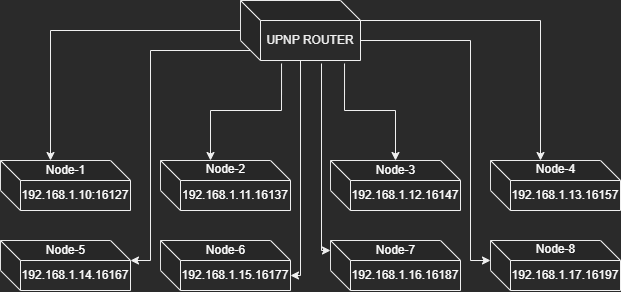
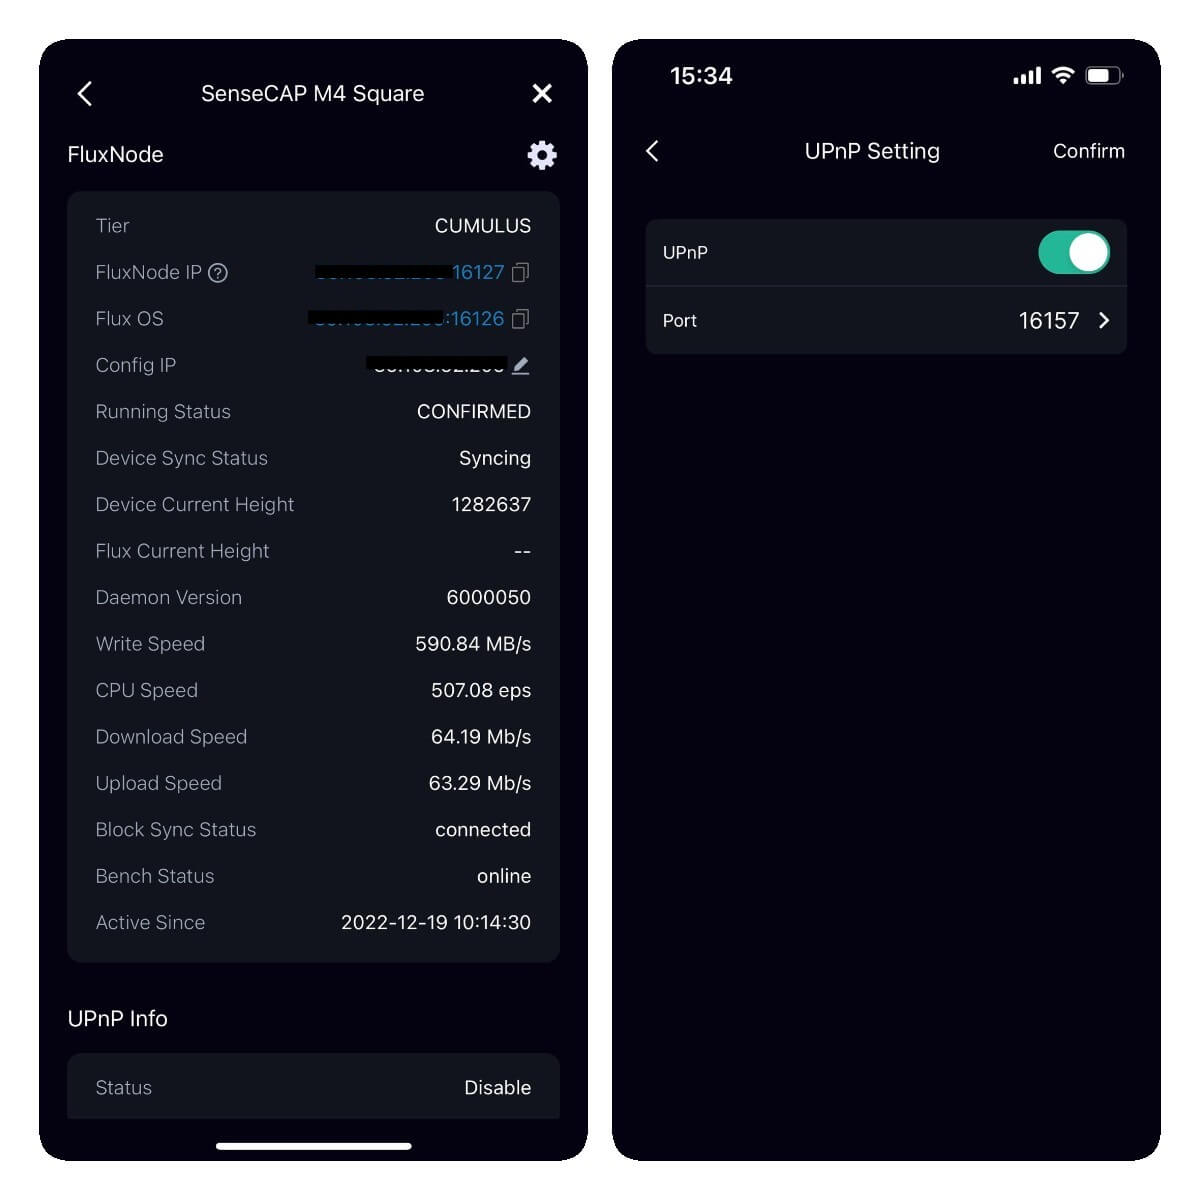
UPnP Setting
UPnP stands for universal plug and play which essentially allows devices on your network to request ports to be opened by your router for incoming traffic. UPNP can be an easier solution if your router is supported and sticks to proper upnp standards.
If you want to deploy multiple SenseCAP M4 Squares on a single external IP address, make sure that the router where the device is connected supports UPnP and turns it on.
Note: a single external IP address maximum supports deploy 8 FluxNodes.
-
1 SenseCAP M4 Square has deployed FluxNode
-
2 SenseCAP Hotspot App Connect M4 via Bluetooth
-
3 Click the setting icon and UPnP Setting
-
4 Enable UPnP and choose a port that is not used
-
5 Click confirm and send the config
-
6 Now the M4 UPnP is enabled the UPnP status is ENABLE
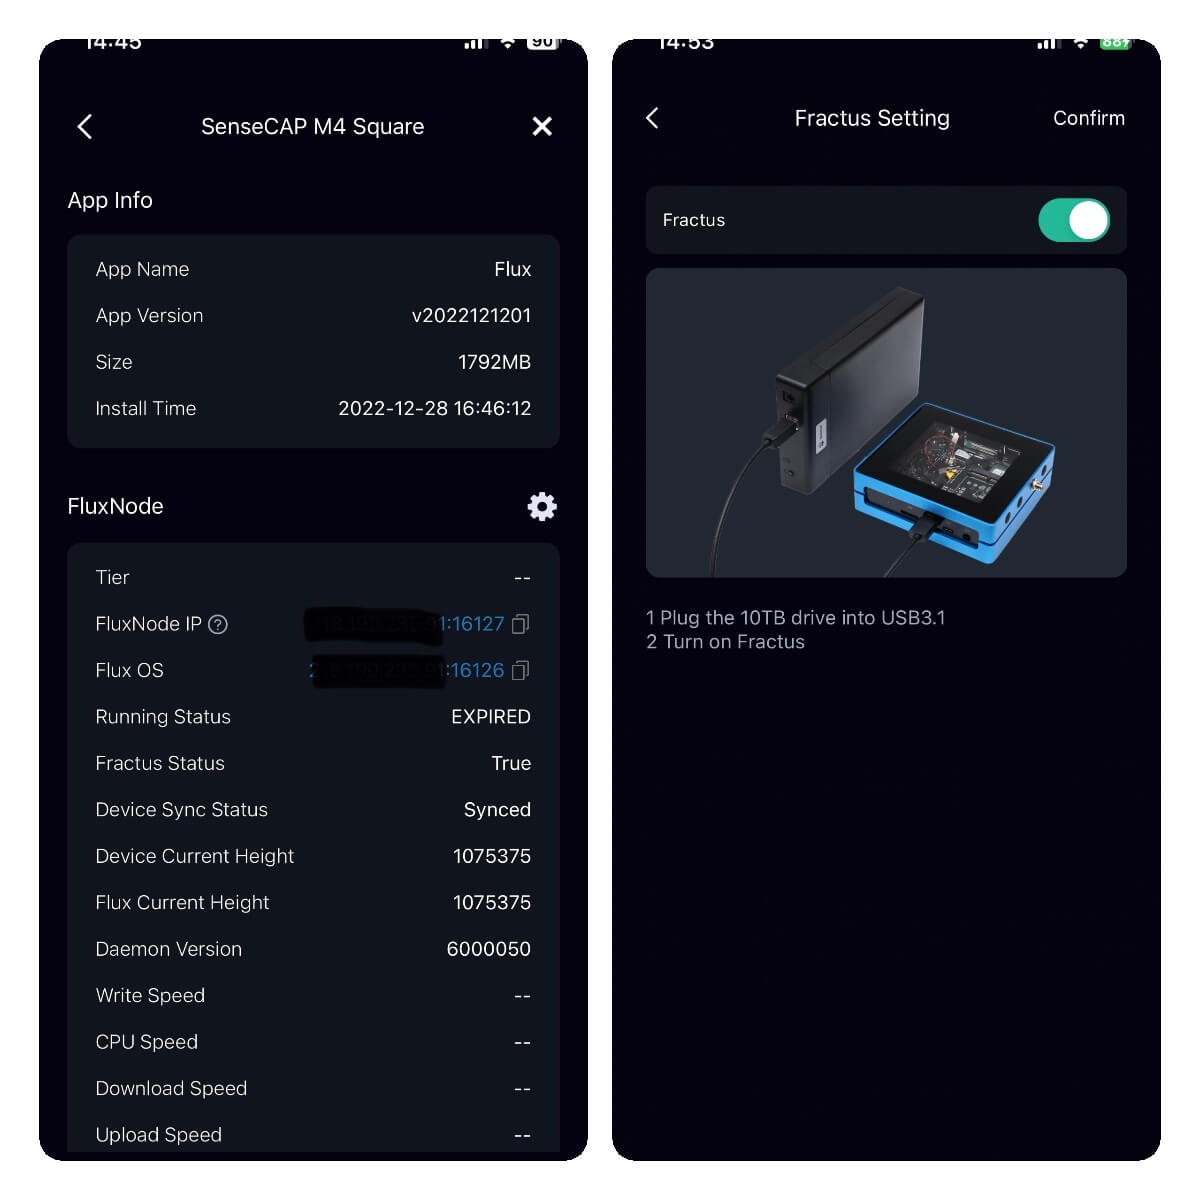
Fractus Setting
The Fractus node was born to increase the Flux network storage. A Fractus node is a Cumulus tier node that provides at least 10TB of storage. Fractus nodes will earn an additional 15% Flux on top of the native Flux block reward.
Minimum requirements for running Fractus nodes:
- A 1000 Flux collateral.
- 2 CPU Cores.
- 4 CPU Threads.
- 240 CPU Events Per Second.
- 9250 GB of storage on a single partition (Raid allowed).
- 80MB/s Disk Write Speed.
- 100Mb/s Download/Upload.
- 1 SenseCAP M4 Square has deployed FluxNode
- 2 Plug a 10TB drive into SenseCAP M4 Square USB3.1
- 3 SenseCAP Hotspot App Connect M4 via Bluetooth
- 4 Click the setting icon and Fractus Setting
- 5 Turn on Fractus and click on Confirm to send the configuration
- 6 Now the M4 Fractus is open and the Fractus status is True
Add to Dashboard
For more information about your SenseCAP M4 Square, Please add it to SenseCAP dashboard.
-
Add directly: On FluxNode page, click + icon and input customized name and SN(in device label) to add your device to Dashboard
-
Add via Bluetooth: if your M4 has deployed FluxNode, connect M4 with SenseCAP Hotspot App via Bluetooth. and then add it to dashboard.
Restore Block
Connect M4 with SenseCAP Hotspot App via Bluetooth. and then open the Flux app and click Restore Block button.M4 will restore blocks automatically and no need for other steps. The restore time depends on the device network, please make sure the device has a good network.
Delete
Please operate carefully! Delete the CUMULUS FluxNode that has been deployed on SenseCAP M4. Connect M4 with SenseCAP Hotspot App via Bluetooth. and then open the Flux app and click Delete button to delete FluxNode.
Redeploy
Please operate carefully! Redeploy will automatically delete the deployed FluxNode first. Connect M4 with SenseCAP Hotspot App via Bluetooth. and then open the Flux app and click Redeploy button and input new FluxNode info to redeploy.
Decentralized App Supported List
-
Flux Cumulus Node
-
Flux Cumulus Fractus (TBD)
Flux Cumulus Node Network Configuration
To ensure proper operation of your Flux Node please be sure to setup your networking appropriately. Below we will cover single and multi-node network requirements.
Requirements
-
A external IP address, The maximum number of Flux nodes supported on a single external IP address is 8. If you have more than eight devices, you may need more external ip addresses
-
Stable wired network environment, ≥25 Mbps Bandwidth
-
Router supports UPNP, and port forwarding functions, to forward ports to the device.
Setup Single Node
Refer to the flux official documentation
Setup Multi-node
SenseCAP M4 Square does not support multiple FluxNodes