Edge IoT - Sending Sensor Data to Cloud
This tutorial demonstrate how to read sensor values connnected to the ODYSSEY - X86J41x5 and sends the data to Microsoft Azure IoT Hub, where this data can be displayed or processed for further IoT applications.
Receiving Raw Data
Visulization of Data
Introduction
IoT Hub is an Microsoft Azure service that enables you to ingest high volumes of telemetry from your IOT devices into cloud for storing or processing.
Prerequireties
-
Install Python 3 on ODYSSEY - X86J41x5
-
An Microsoft Azure account. If you don't have one, create a free account before you begin.
-
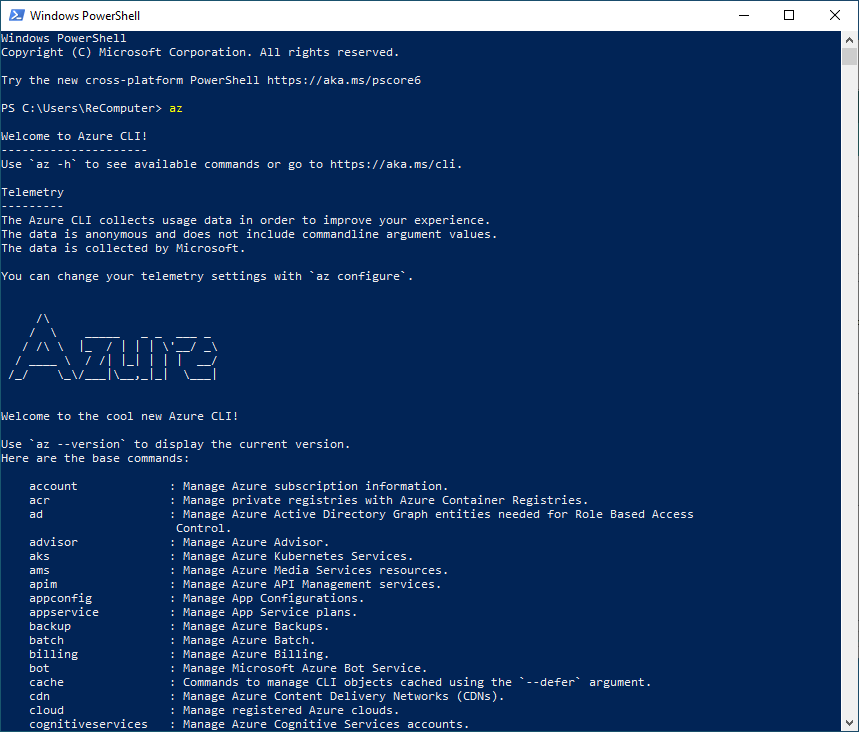
Download and Install Azure CLI, a command-line tool for managing Azure resources.
Once installed Azure CLI, open cmd or Powershell and run az command and you should see screen as below:
Azure CLI Pre-configurations
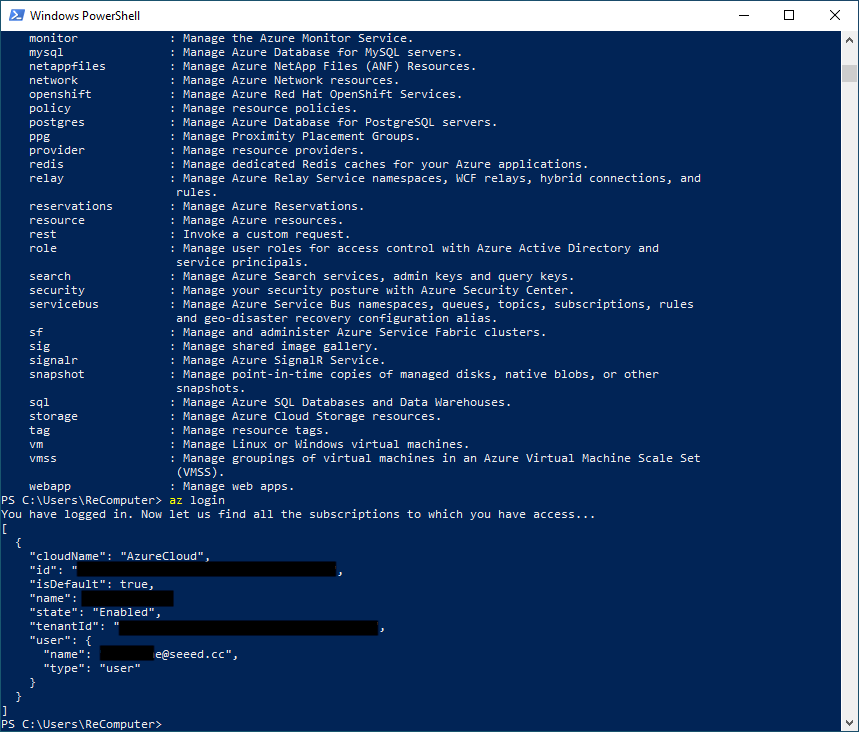
Log into Azure
Open cmd or Powershell and run the az login command. A browser window will appear and log in your Microsoft Azure account.
Adding Microsoft IoT Azure Extensions for Azure CLI
Run the following command to add the Microsoft Azure IoT Extension for Azure CLI to your Cloud Shell instance. The IOT Extension adds IoT Hub, IoT Edge, and IoT Device Provisioning Service (DPS) specific commands to Azure CLI.
az extension add --name azure-cli-iot-ext
Creating an IoT Hub
This part describes how to create an IoT Hub using Azure portal:
1.Sign in to the Azure portal.
2.Choose Create an resource, and Search the Marketplace IoT Hub.
3.Select IoT Hub and click Create.
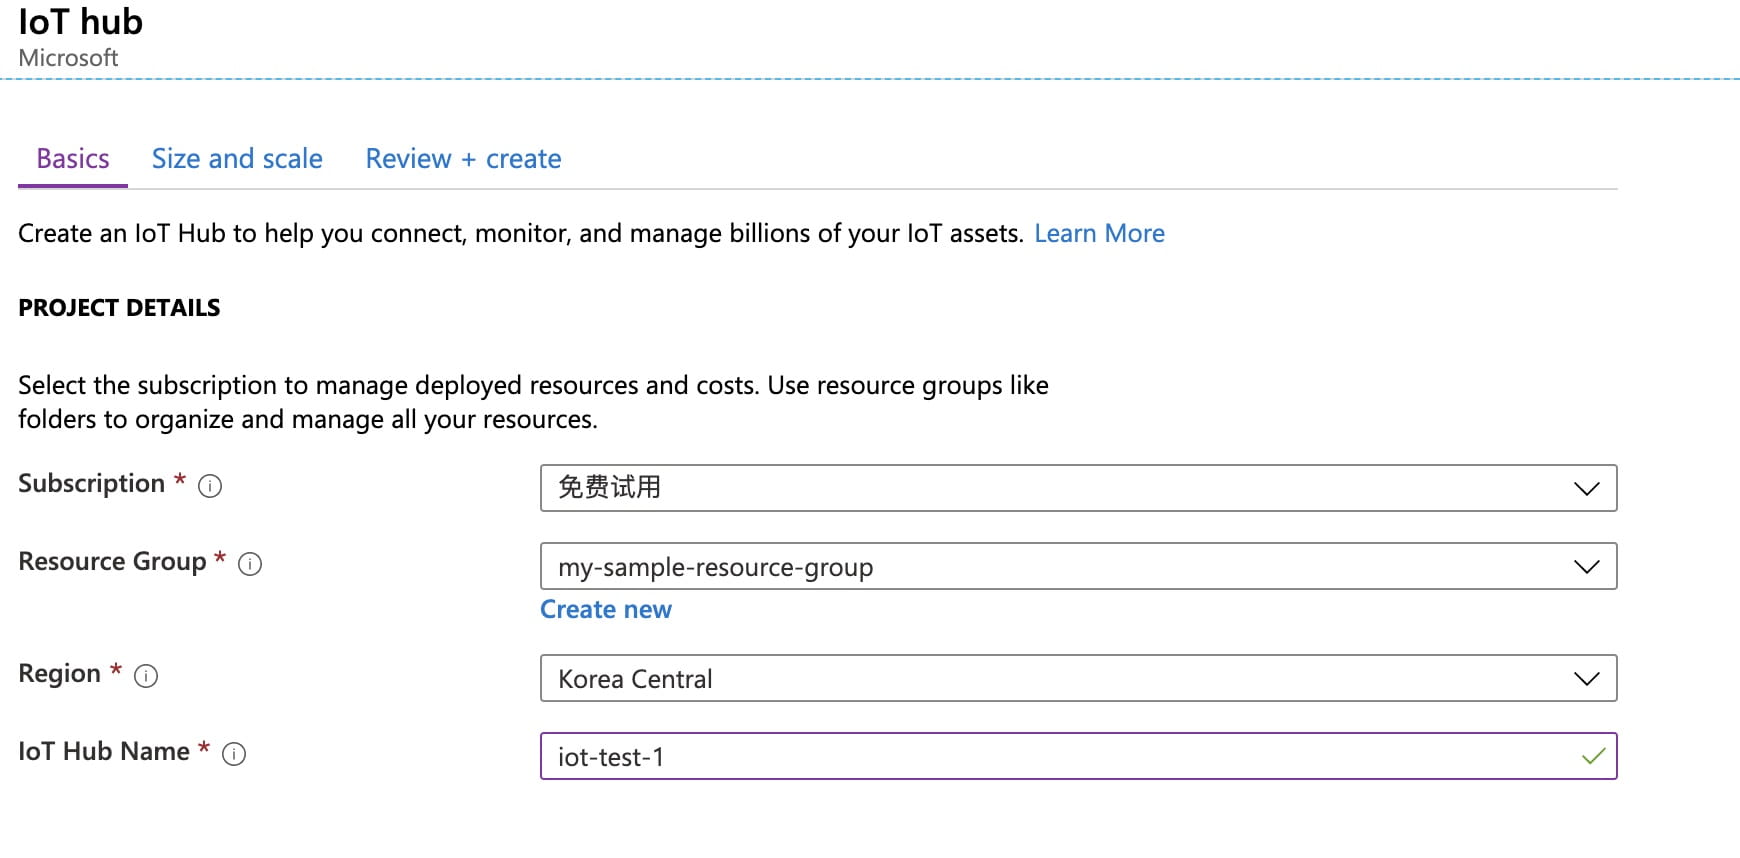
4.On the Basics tab, complete the field:
-
Subscription: Select the subscription to use for your hub.
-
Resource Group: Select a resource group or create a new one. To create a new one, select Create new and fill in the name you want to use.
-
Region: Select the region in which your hub to be located. Select the region that is closest to you.
-
IoT Hub Name: Enter a name for your IoT hub. This name must be globally unique. If name is available, a green check mark will appear.
Important Note: the IoT hub will be pubilicity discoverable as a DNS endpoint, so ensure to avoid any sensitive information while naming the IoT Hub.
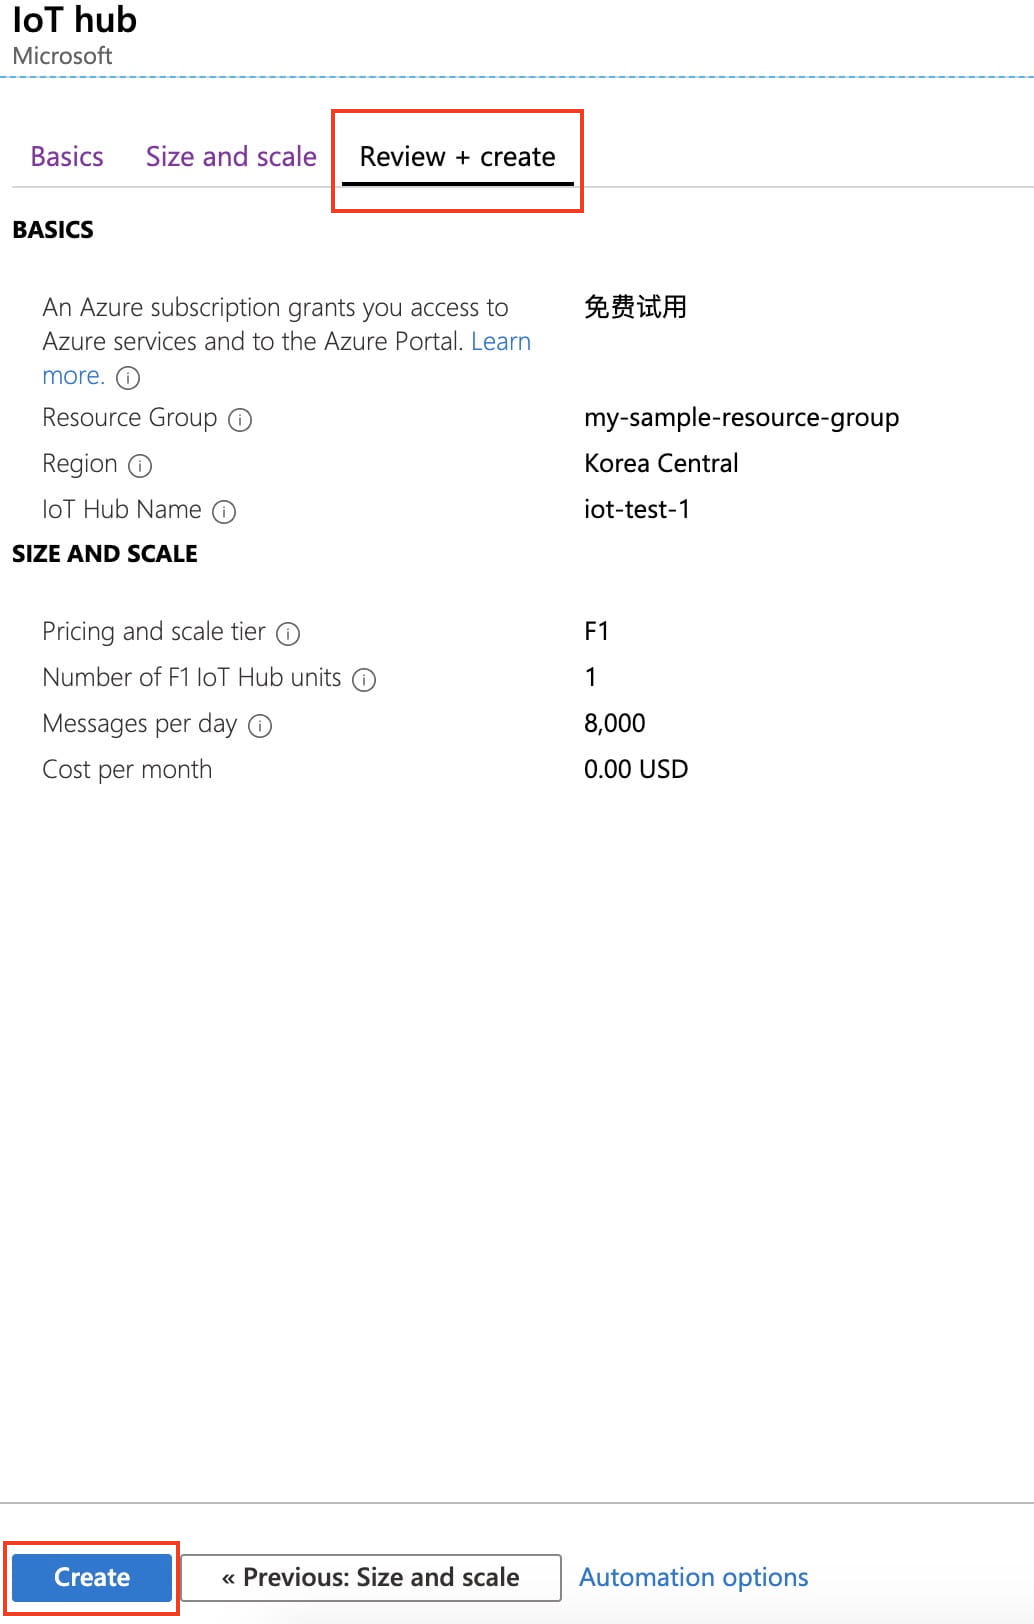
1.Select Next: Size and scale to continue:
- Pricing and scale tier: Select F1: Free tier for now. You can choose from several tiers, depending on how many features and how many messages you send through your solution per day.
2.Select Review + create tab to review settings and click Create to create your new IoT Hub. Creating the IoT might take few minutes.
Register a Device
A device must be registered with your IoT Hub before it can connect:
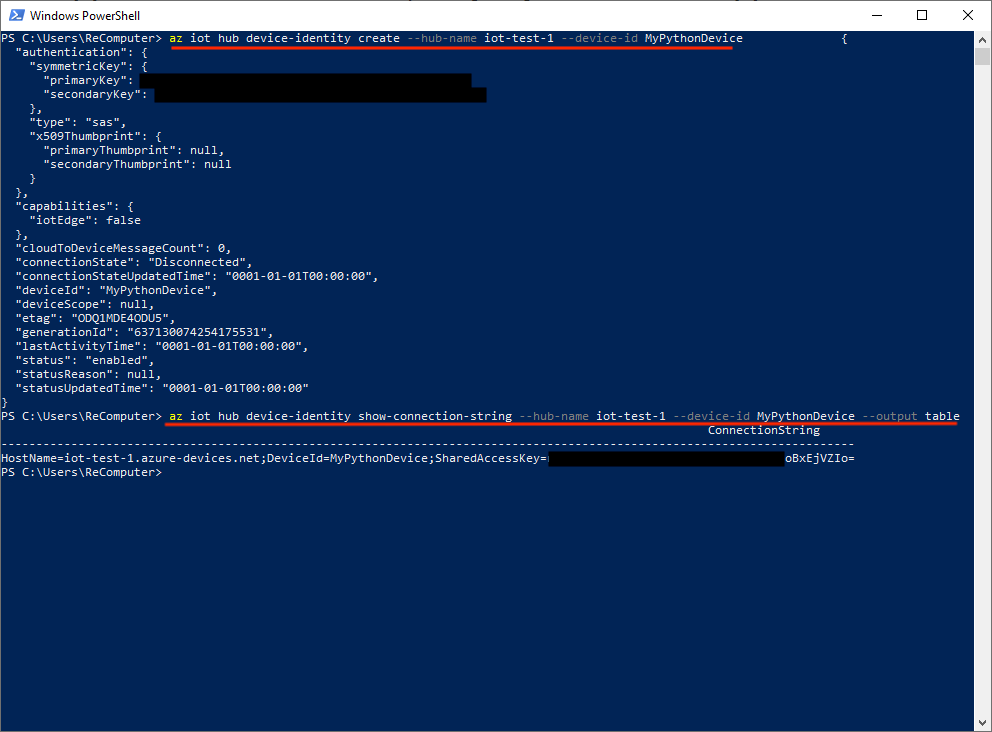
1.Run the following command in cmd or Powershell to add the IoT Hub CLI extension and to create the device identity:
az iot hub device-identity create --hub-name iot-test-1 --device-id MyPythonDevice
Note
-
hub-name-> Replaceiot-test-1with your created IoT Hub name. -
device-id->MyPythonDevice. This is the name of the device that is registering. In my case, MyPythonDevice is the device id.
2.Run the following commands to get the device connection string for the device we registered.
az iot hub device-identity show-connection-string --hub-name iot-test-1 --device-id MyPythonDevice --output table
Make a note of the device connection string, which looks like: HostName={YourIoTHubName}.azure-devices.net;DeviceId=MyPythonDevice;SharedAccessKey={YourSharedAccessKey}. This will be used later.
Note
- Replace your
hub-nameanddevice-id, the same as above.
Collecting Data using Arduino Core
This section simply use Arduino core to read sensor values and prints the readings to the Serial monitor, which can be read using python from elsewhere.
1.Follow Getting Started to download, install and configure Arduino IDE.
2.Connect a Grove Light sensor signal wire to A0 of ODYSSEY - X86J41x5, and also power and ground. Please refer to to Pinout diagram in Getting Started for more information.
3.Upload the following Code to ODYSSEY - X86J41x5 using Arduino IDE. Remember to select the correct Board and Port. Make a note of the Port here, which will be used later. In my case, the port is COM4.
Arduino Code
#define LIGHT A0
#define Serial SerialUSB

void setup() {
  // put your setup code here, to run once:
  Serial.begin(115200);
  pinMode(LIGHT, INPUT);

}

void loop() {
  // put your main code here, to run repeatedly:
  int state = analogRead(LIGHT);
  Serial.println(state);

  delay(500);

}
4.Open Serial Monitor in Arduino IDE to check if the program is running correctly.
Sending Light Sensor Readings to Azure IoT Hub
The light sensor readings are printed to Serial, and Python is used to extract this data an send to Azure IoT Hub.
1.Open Powershell and run the following command to install the required python libraries.
pip install azure-iot-device
pip install pyserial
2.Copy the following Python code and Save it to your Local Drive. Use a text editor to make the following changes.
-
Replace the value of the
serialPortvariable to the Serial Port that we made a note easier. -
Replace the value of the
CONNECTION_STRINGvariable with the device connection string that we also made a note earlier.
Python Code
# Copyright (c) Microsoft. All rights reserved.
# Licensed under the MIT license. See LICENSE file in the project root for full license information.

import time
import serial


# Using the Python Device SDK for IoT Hub:
#   https://github.com/Azure/azure-iot-sdk-python
# The sample connects to a device-specific MQTT endpoint on your IoT Hub.
from azure.iot.device import IoTHubDeviceClient, Message

# Settings for reading from Arduino Serial
serialPort= "COM4" #Change it to your Serial Port, Check in Arudino IDE
baudRate = 115200
ser = serial.Serial(serialPort, baudRate, timeout=0.5)

# The device connection string to authenticate the device with your IoT hub.
# Using the Azure CLI:
# az iot hub device-identity show-connection-string --hub-name {YourIoTHubName} --device-id MyNodeDevice --output table
CONNECTION_STRING = "HostName=iot-test-1.azure-devices.net;DeviceId=MyPythonDevice;SharedAccessKey=xxxxxxxxxxxxxxxxxxxxxxxxxxxxxxxxxxxxxxxxxxxx"

# Define the JSON message to send to IoT Hub.
MSG_TXT = '{{"Light": {light}}}'

def iothub_client_init():
    # Create an IoT Hub client
    client = IoTHubDeviceClient.create_from_connection_string(CONNECTION_STRING)
    return client

def iothub_client_telemetry_sample_run():

    try:
        client = iothub_client_init()
        print ( "IoT Hub device sending periodic messages, press Ctrl-C to exit" )

        while True:
            # Build the message with simulated telemetry values.
            time.sleep(0.1)
            light = ser.readline().decode("UTF-8")[:-2]
            if light:
              msg_txt_formatted = MSG_TXT.format(light=light)
              message = Message(msg_txt_formatted)

              # Send the message.
              print( "Sending message: {}".format(message) )
              client.send_message(message)
              print ( "Message successfully sent" )
              time.sleep(1)


    except KeyboardInterrupt:
        print ( "IoTHubClient sample stopped" )
        ser.close()

if __name__ == '__main__':
    print ( "IoT Hub Quickstart #1 - Simulated device" )
    print ( "Press Ctrl-C to exit" )
    iothub_client_telemetry_sample_run()
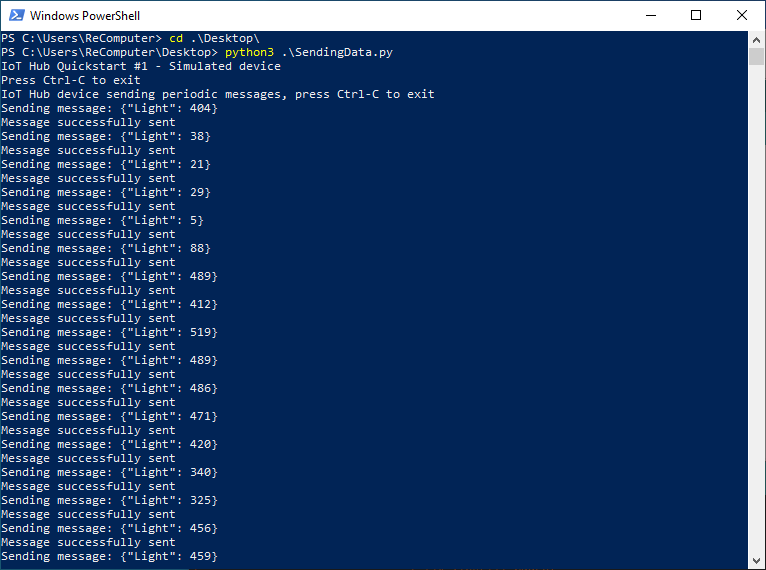
3.In Powershell, navigate to the directory that you just saved the python file. Run the Python script to send the sensor data to Azure IoT Hub.
Note: In my case, the Python file is named SendingData.py, change the command to the name you saved the file.
python3 SendingData.py
The following screenshot shows the output of sending sensor data to Azure IoT Hub.
Reading Data from Azure IoT Hub
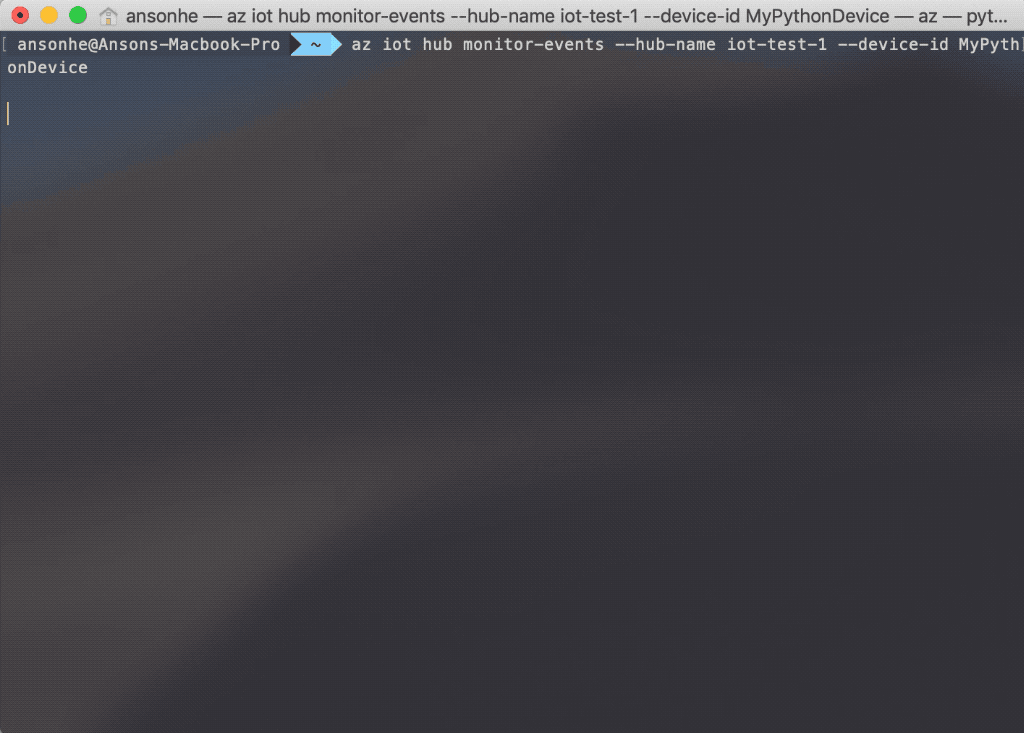
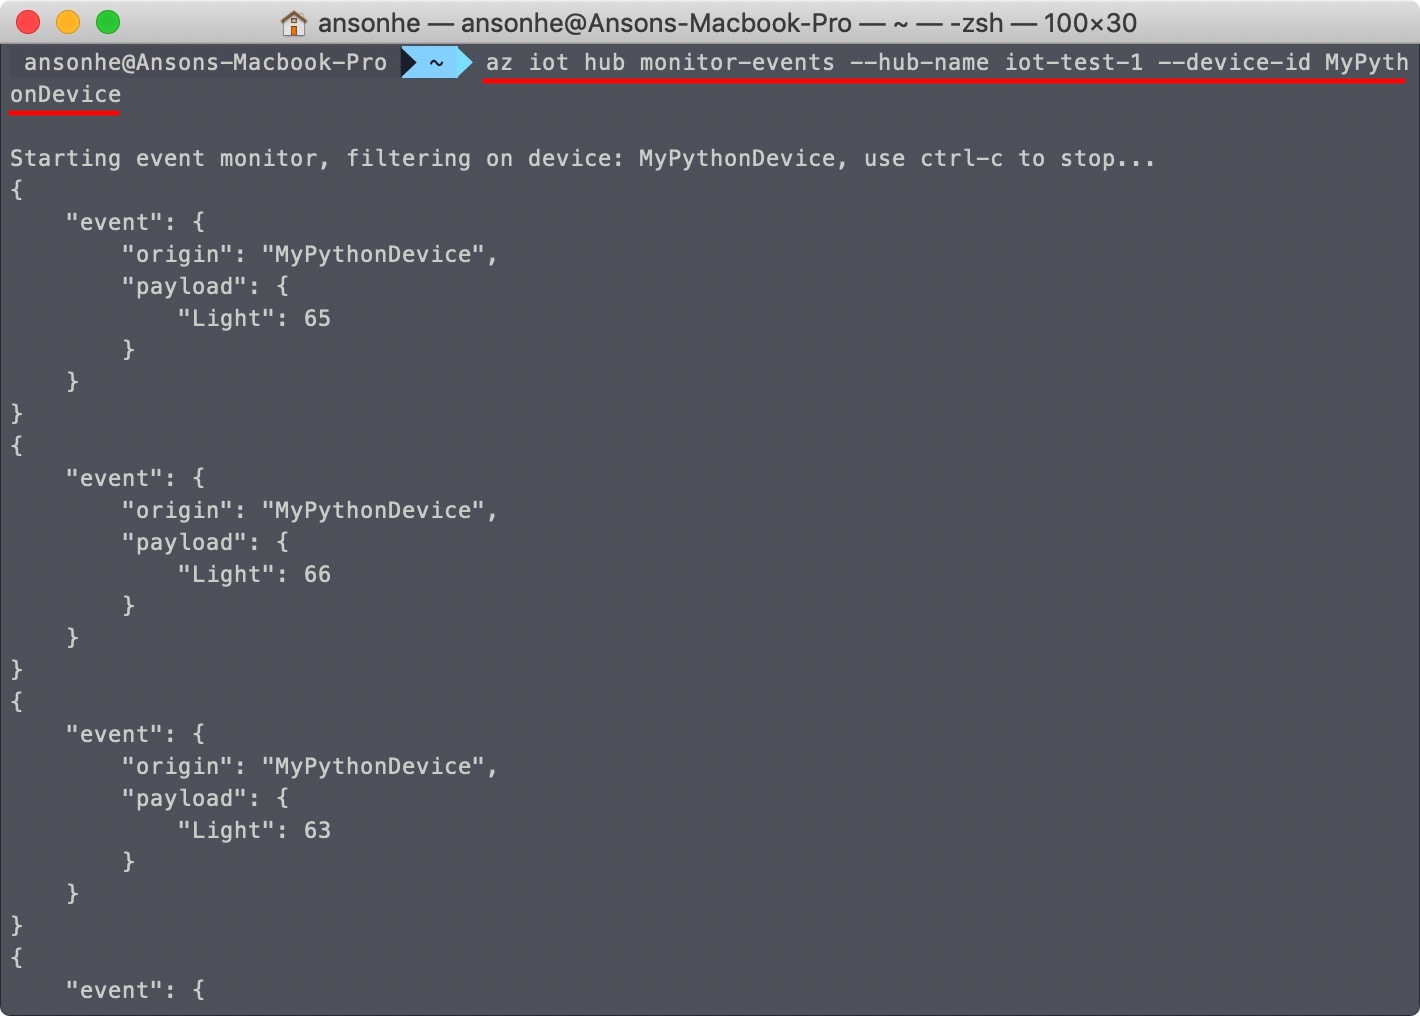
The IoT Hub CLI extension can connect to the service-side Events endpoint on IoT Hub. The extension receives the device-to-cloud messages sent from our device.
Run the following command in any terminal and you can start monitoring messages sent to the Azure IoT Hub.
az iot hub monitor-events --hub-name iot-test-1 --device-id MyPythonDevice
Note
- Replace your
hub-nameanddevice-id, the same as above.
The following screenshot shows the messages sent from ODYSSEY - X86J41x5 to the Iot Hub. This data can be processed or displayed.
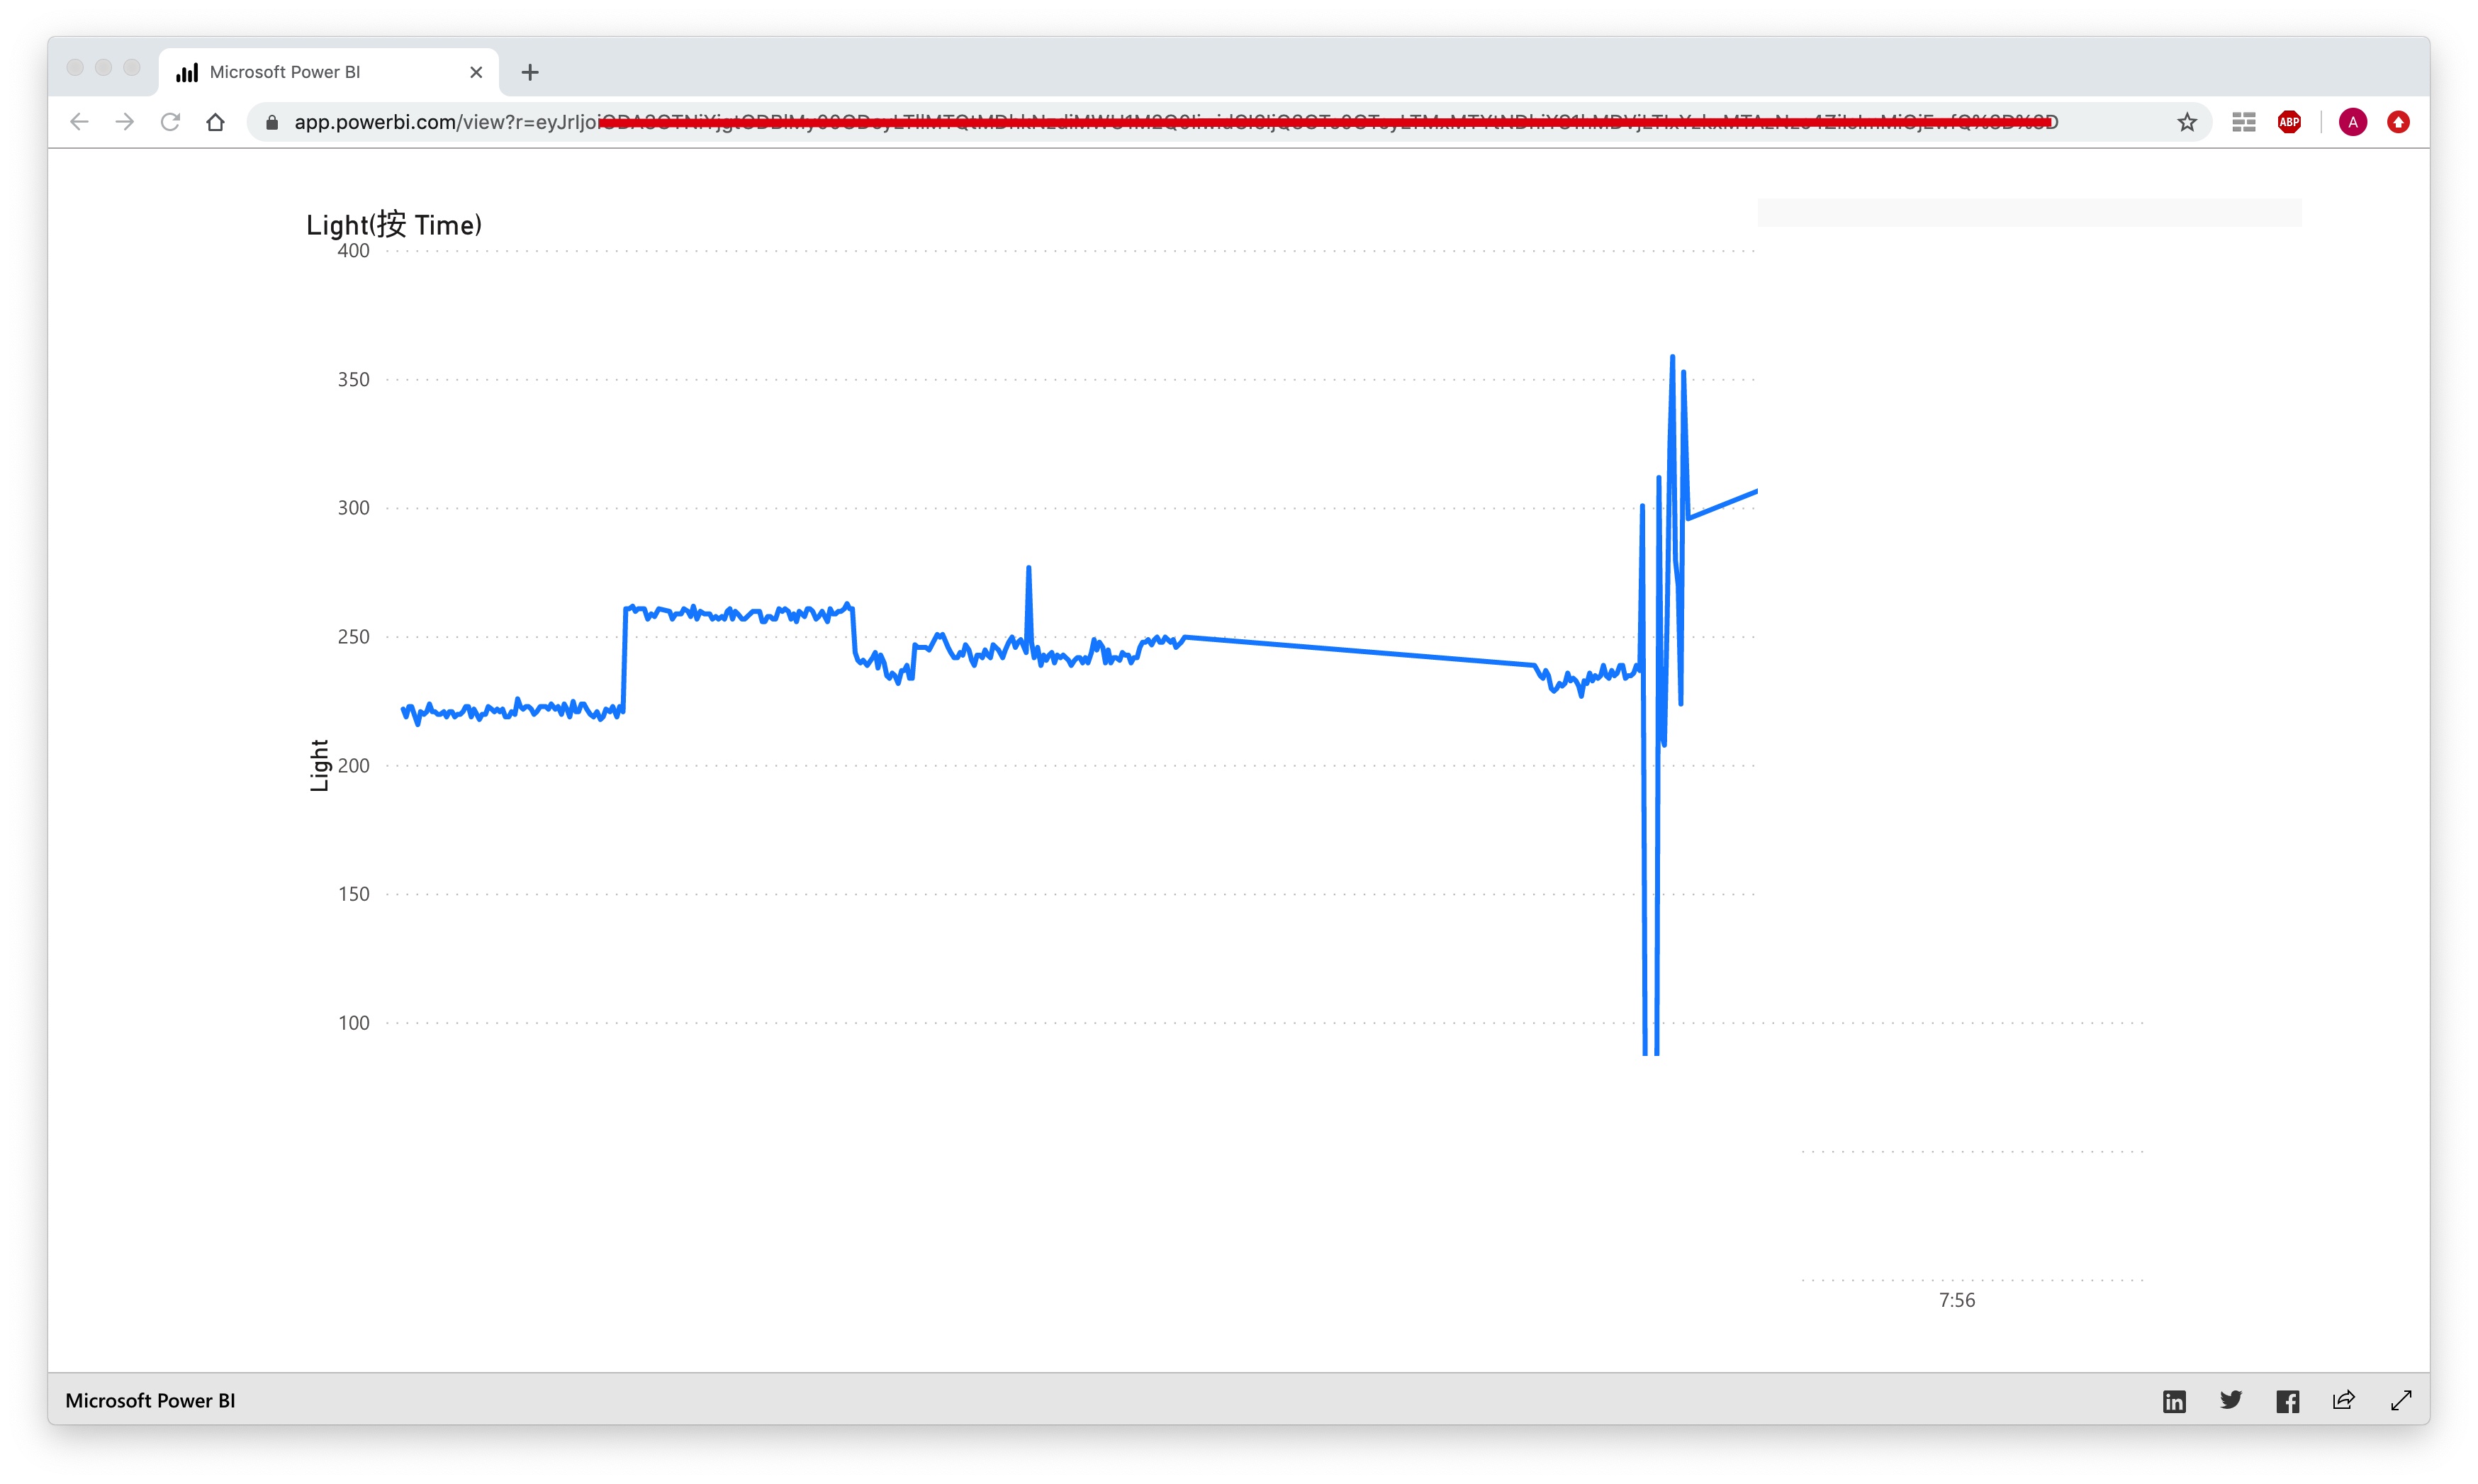
Real-time visualization of Sensor data Using Microsoft Power BI
In this section, we will process to display the light sensor reading in real-time using Microsoft Power BI. If you don't have a Power BI account, sign up a free a account before you begin.
Note: Make sure you have followed all the previous steps and messages can be receive by the IoT Hub sucessfully.
Add a consumer group to your IoT Hub
Consumer groups provide independent views into the event stream that enable apps and Azure services to independently consume data from the same Event Hub endpoint.
To add a consumer group:
1.Sign in to the Azure portal.
2.Open your IoT Hub, select Built-in endpoints, under Consumer Groups enter a name to create a new consumer group, and Save.
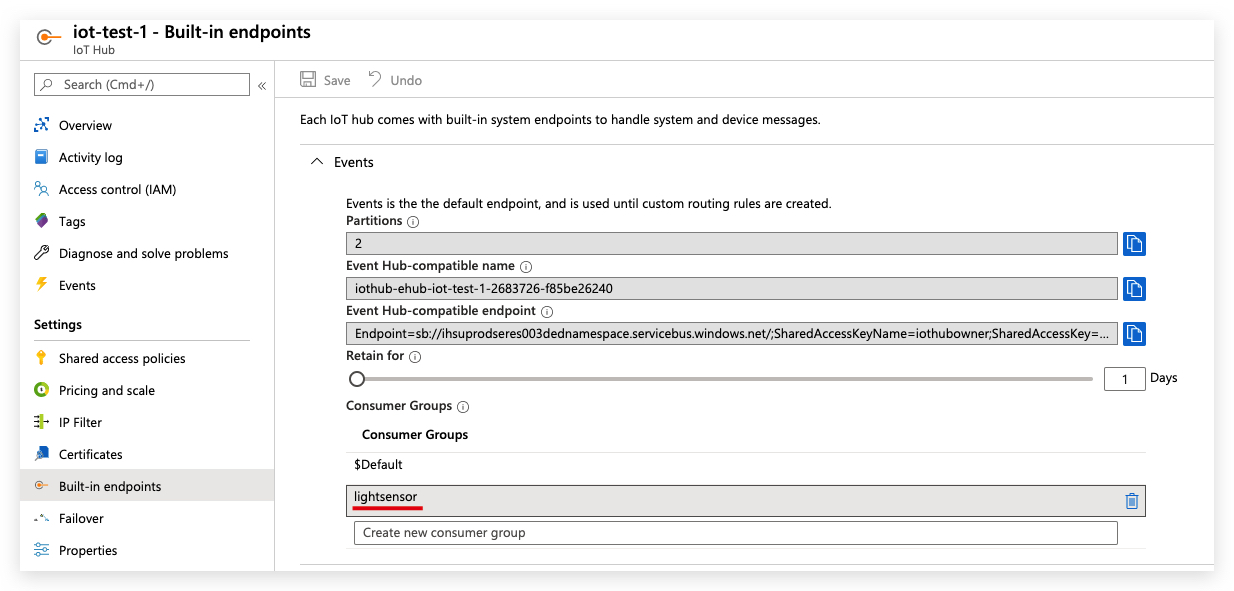
In my case, lightsensor is the new consumer group.
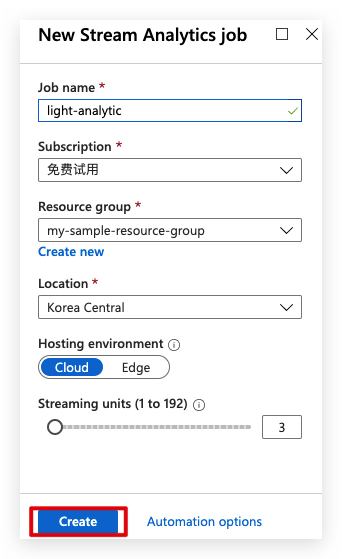
Create, configure and run a Stream Analytic Job
To create a Stream Analytic Job:
3.Sign in to the Azure portal.
4.Choose Create an resource, and Search the Marketplace Stream Analytics job.
5.Select Stream Analytics job and click Create.
6.Complete the field as follow, and Create:
-
Job name: The name of the job. The name must be globally unique. In my case, it is
light-analytic -
Resource group: Use the same resource group that your IoT hub uses.
-
Location: Use the same location as your resource group.
Add an Input to the Stream Analytics job
1.Open the Stream Analytics job
2.Under Job topology click Inputs.
3.Click Add stream input -> IoT Hub
4.Complete the field as follow:
-
Input alias: Your input name. This can be anything.
-
IoT Hub: Choose the one we used all along.
-
Consumer group: Choose the one we just created.

1.Select Save.
Add an Output to the Stream Analytics Job
2.Open the Stream Analytics job
3.Under Job topology click Outputs.
4.Click Add -> Power BI
5.Authorize with your Microsoft Power BI account.
6.Complete the field as follows:
-
Output alias: Your output name. This also be can anything.
-
Authentication mode: Choose User token.
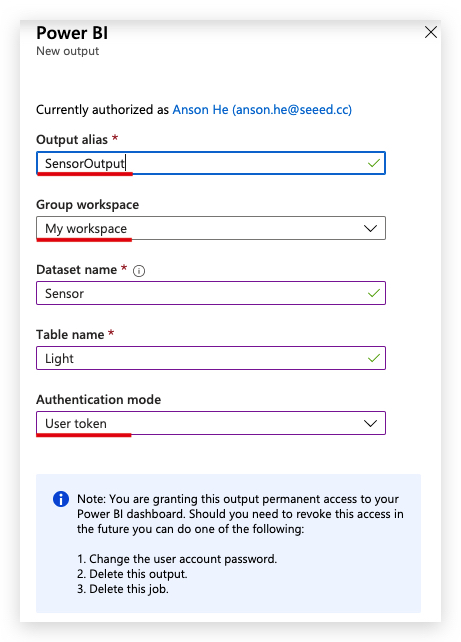
7.Select Save.
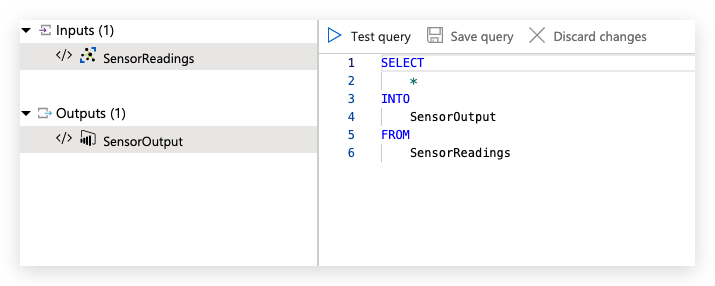
Configure the query of the Stream Analytics job
1.Under Job topology click Query.
2.Replace [YourInputAlias] with the input alias. In my case, it is SensorReadings.
3.Replace [YourOutputAlias] with the output alias. In my case, it is SensorOutput.
Run the Stream Analytics job
1.Under Overview click Start -> Now -> Start. The job status changes from Stopped to Running.
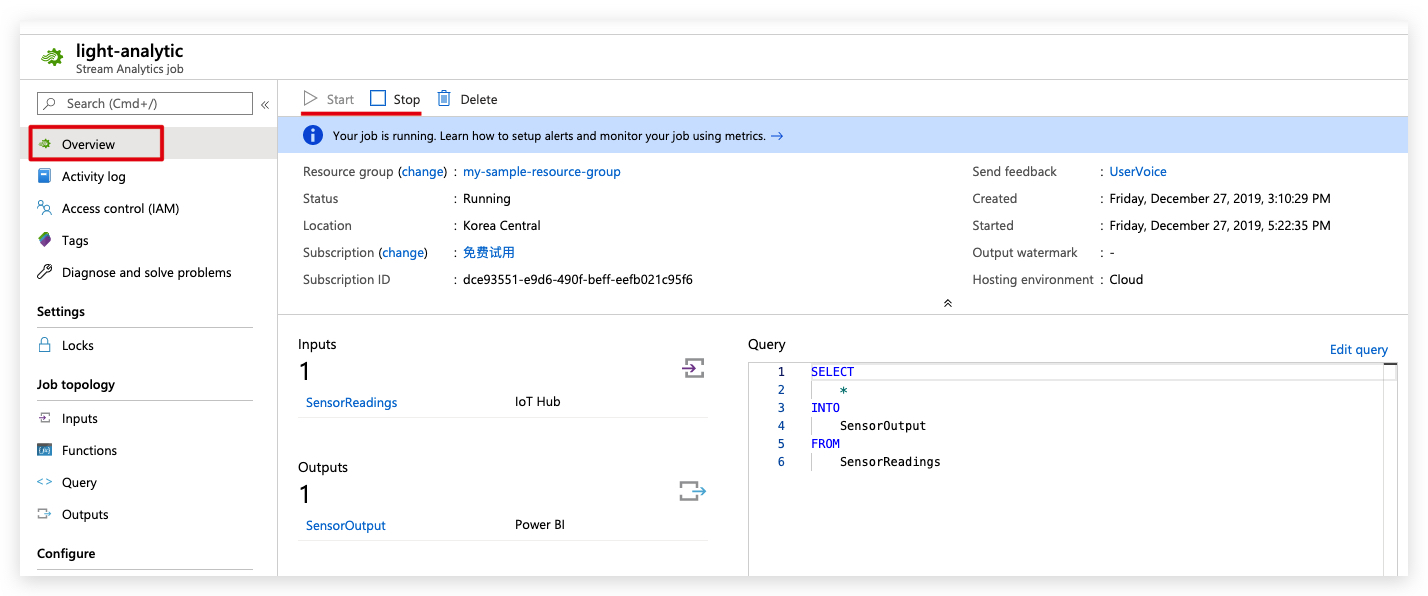
Note: To start getting sensor readings, remember to run the Python script in ODYSSEY - X86J41x5 to send data to cloud.
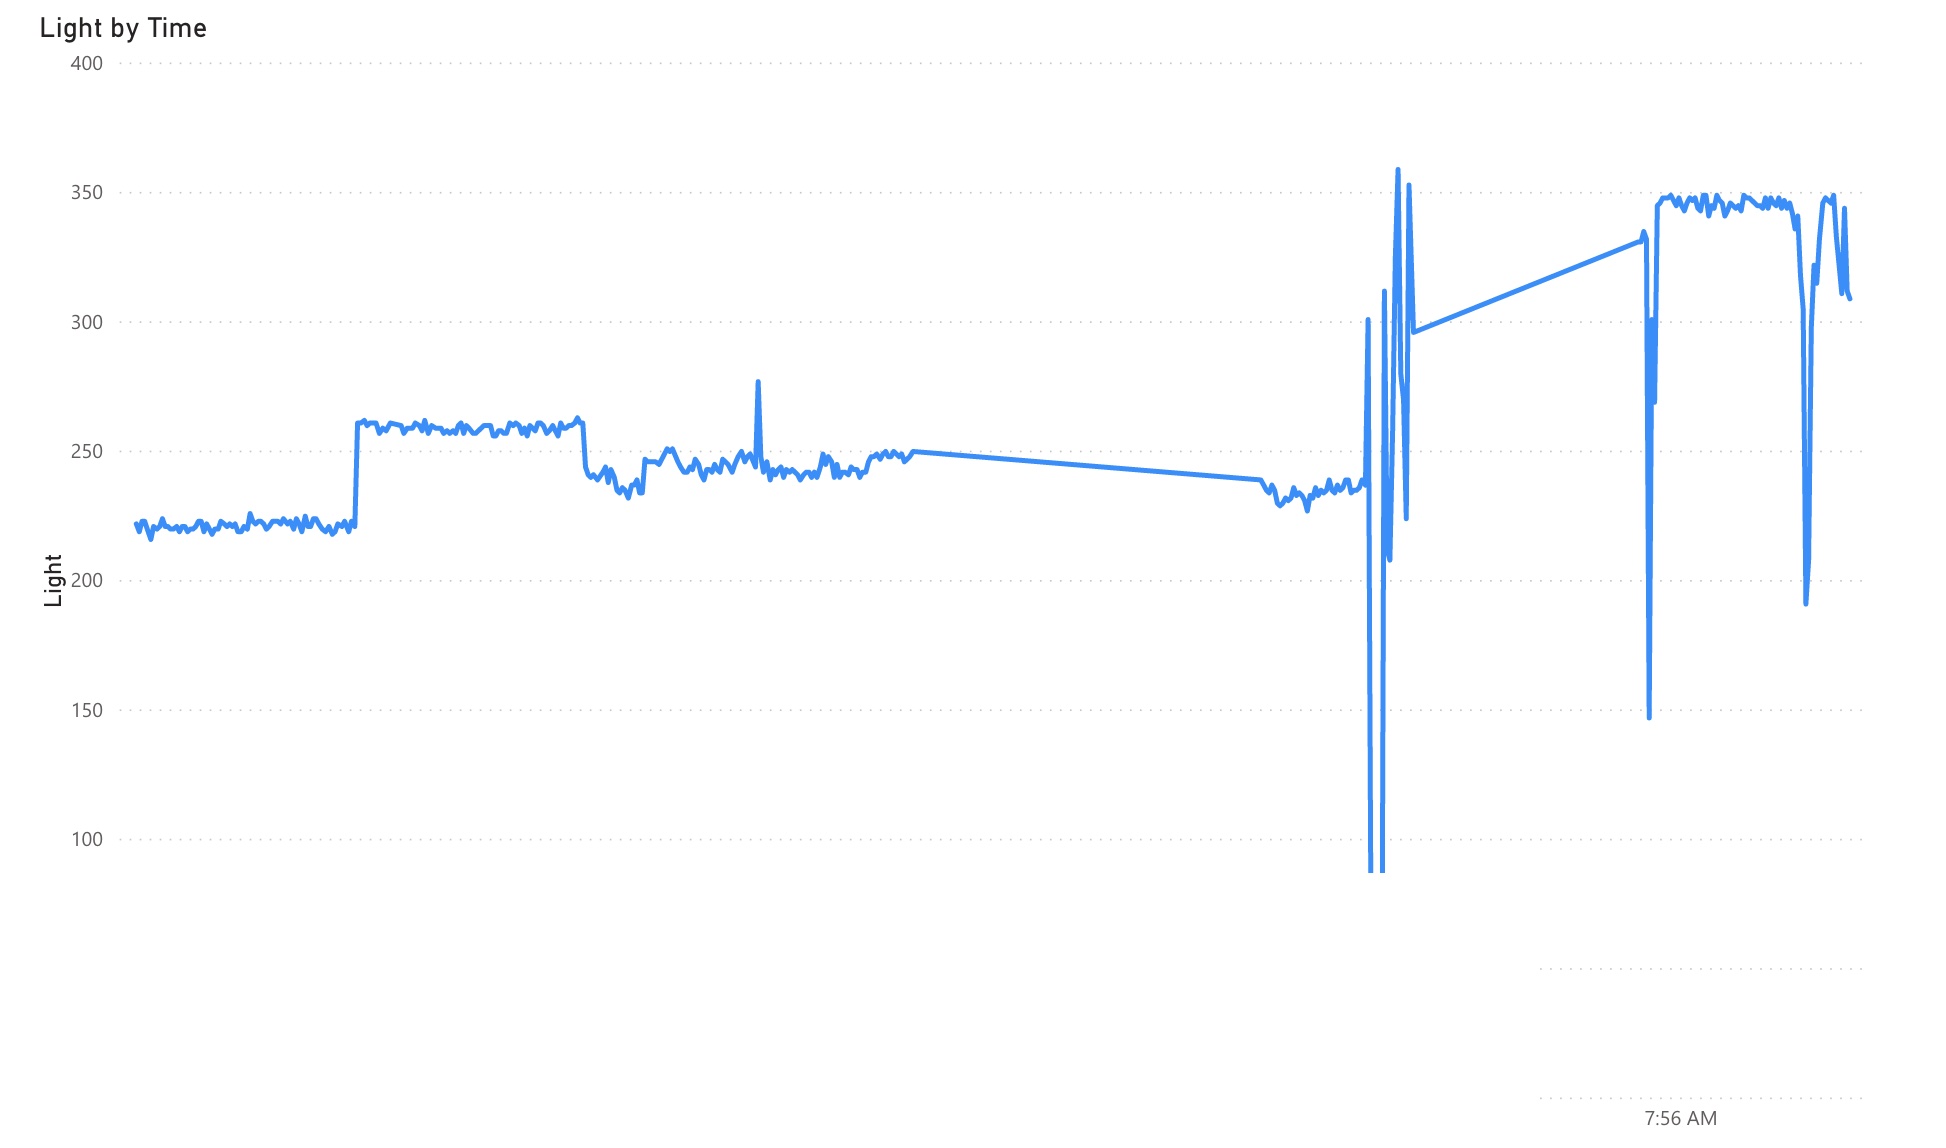
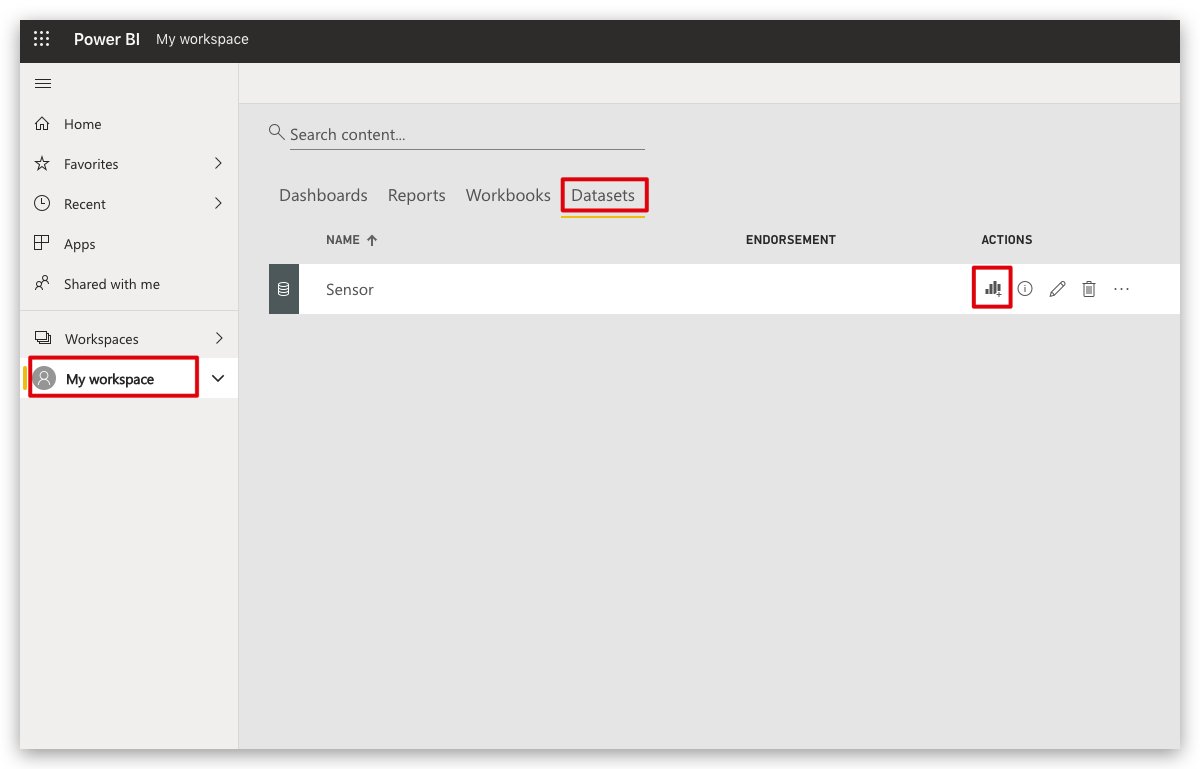
Create and publish a Power BI report to visulize data
1.Sign in to your Power BI account.
2.Under Workplaces -> My workspace, select Datasets and you should see the datasheet you specified earlier.
3.Under Actions select the first icon(Create report)
4.Create a line chart to show real-time light sensor value over time.
-
Under Visualizations select Line chart.
-
Under Fields select EventEnqueuedUtcTime.
-
Under Fields select Light.
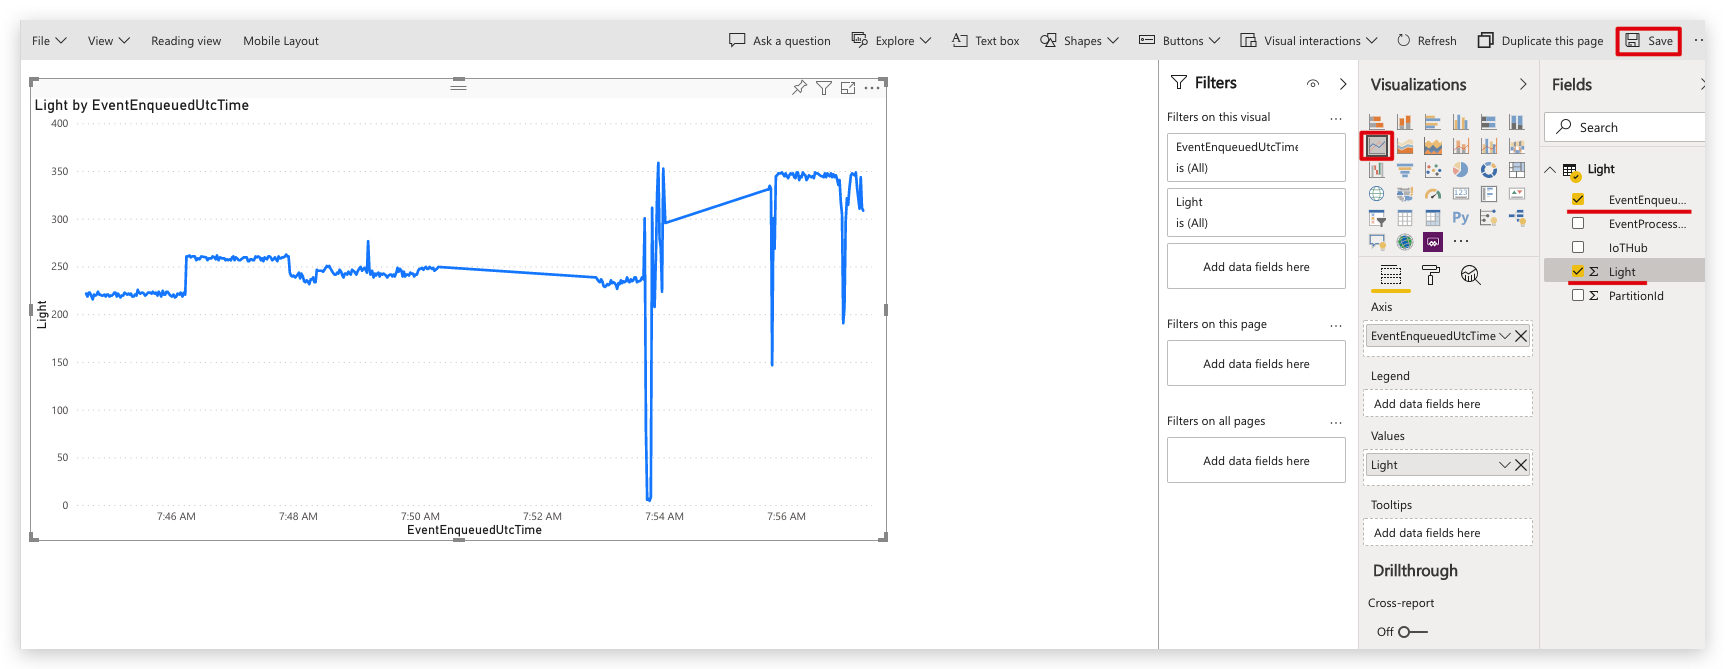
5.Click Save to save Report.
6.Click File -> Publish to web -> Create embed code -> Publish
Now you can view the sensor reading on a dashboard via Power BI!
Microsoft also offers the Power BI mobile apps for viewing and interacting with your Power BI dashboards and reports on your mobile device.
Further Development
You've successfully set up your ODYSSEY - X86J41x5 for one of the IoT scenario, you can now implement this and build your own IoT solutions!
For more technical support please visit Azure IoT.
Tech Support & Product Discussion
Thank you for choosing our products! We are here to provide you with different support to ensure that your experience with our products is as smooth as possible. We offer several communication channels to cater to different preferences and needs.