RS485 Air Temperature, Humidity and Barometric Pressure Sensor(S-THP-01A)

An IP56 RS485 Air Temp, Humi and Barometric pressure sensor has a wide operating range of 0-100% RH, -40 to 125°C, and 300-1100 hPa. It is ideal for applications such as smart agriculture, weather monitoring, calculating evapotranspiration, mold prevention and more. By integrating this sensor with the SenseCAP S2100 data logger, users can achieve seamless data collection and management.
Upgradable to Industrial Sensors
With the SenseCAP S2100 data logger, you can easily turn this sensor into a LoRaWAN® sensor. Seeed not only helps you with prototyping but also offers you the possibility to expand your project with the SenseCAP series of robust industrial sensors.
Play with S2100 LoRaWAN Data Logger
On this page, we'll guide you through the process of connecting the S2100 LoRaWAN Data Logger with an RS485 Air Temperature, Humidity, and Barometric Pressure Sensor, enabling you to create a robust, industrial-grade LoRaWAN wireless sensor that can be used commercially in just five minutes.
Get Started
Preparation
Hardware
Materials required
| SenseCAP S2100 Data Logger | RS485 RS485 Air Temperature, Humidity and Barometric Pressure Sensor | Cross screwdriver |
|---|---|---|
 |  |  |
1. Prepare data logger, RS485 Air Temperature, Humidity and Barometric Pressure Sensor, gateway, and tools
-
Data logger: It is a LoRaWAN converter that converts MODBUS RS485/Analog/GPIO sensors into LoRa-enabled sensors and therefore transfers data through the LoRaWAN protocol.
-
RS485 Air Temperature, Humidity and Barometric Pressure Sensor: This sensor accurately measures air temperature, humidity, and barometric pressure within the ranges of 0-100% RH, -40 to 125°C, and 300-1100 hPa. It is suitable for precise industrial environmental monitoring applications.
-
Cross screwdriver: Used to assemble the sensor probe.
-
Gateway: The LoRaWAN sensor transmits data to a LoRaWAN gateway, which then transmits it to the cloud server. If you don't have a gateway, there are two options:
- Option 1: Sensors work in areas covered by Helium Network(Check on Helium Explorer). Wherever the helium network is available, you can use sensors to transfer data without purchasing a gateway.
- Option 2: Buy a gateway.
- Download the SenseCAP Mate App for configuration:

The preparation is done. Let's get started!
2. Network Architecture
Let's start with LoRaWAN's networking. The data logger converts sensor data into LoRa data and uploads the data to the gateway. The gateway uploads the data to the server.

3. Connect RS485 Air Temperature, Humidity and Barometric Pressure Sensor
- Step 1: Uncrew the three screws on the data logger

- Step 2: Remove the bottom cover and take out the inside PCBA until the screw terminals are accessible. You do not need to take out the entire board

- Step 3: Remove the thread cap by unscrewing in clockwise counter-clockwise direction

- Step 4: Pass the included cable through the thread cap and the bottom cover

- Step 5: Connect the wires of the cable into the screw terminal as follows

Tips: If you are using another protocol, such as 4-20mA, please refer to the pin table:
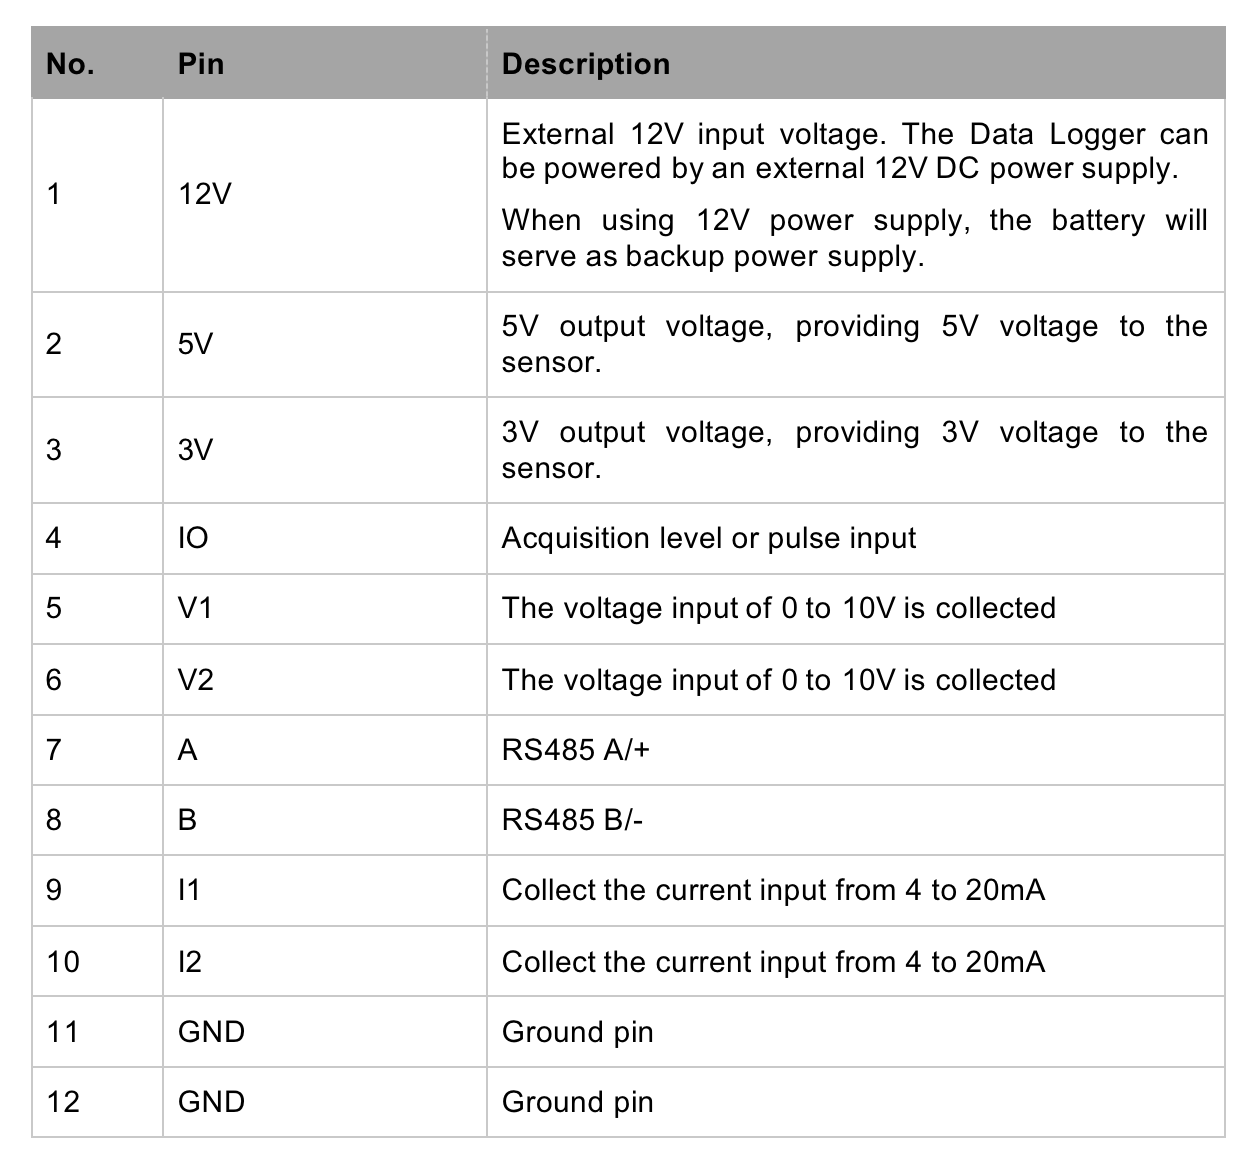
Wire sequence of the RS485 Air Temperature, Humidity and Barometric Pressure Sensor:


- Step 6: Put back the hardware unit inside the case, close it from bottom cover and screw it back

- Step 7: Tighten the thread cap and secure the cable in place

Once all the connections are done for the Ultrasonic Level Sensor and the Data Logger, it should look like below

4. Configure Settings for Data Logger and RS485 Air Temperature, Humidity and Barometric Pressure Sensor Communication
- Step 1: Select S2100 Data Logger and Click Setup on the config page.
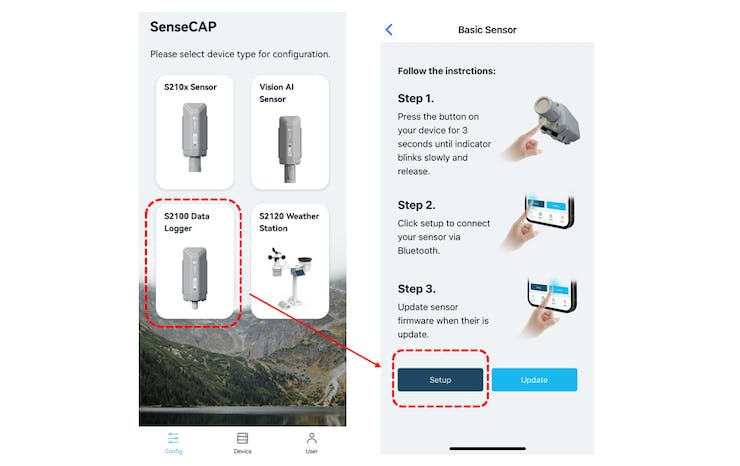
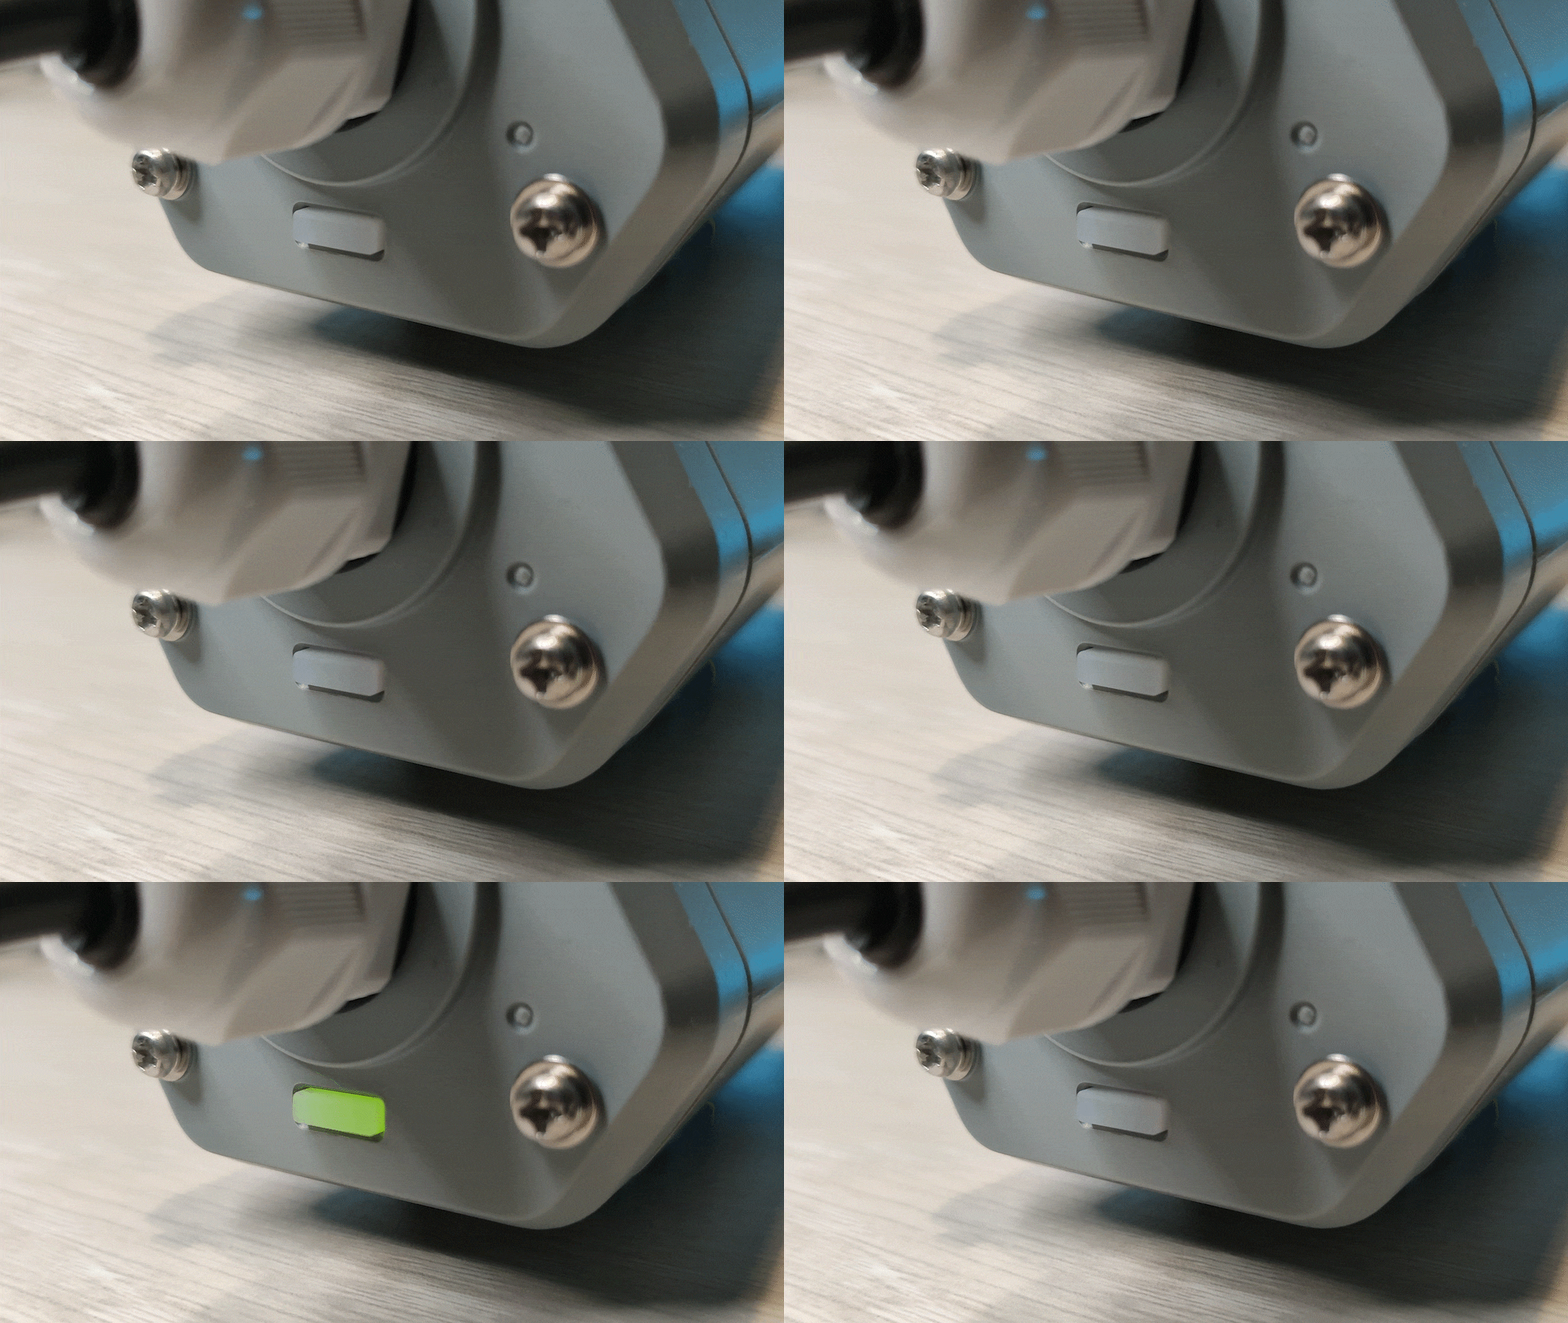
- Step 2: Press the button and hold for 3 seconds, the green LED will flash at 1s frequency. Then click Scan to start scanning the data logger's Bluetooth.
- Step 3: Configure the LoRaWAN and sensor parameters(including RS485 Modbus-RTU command).
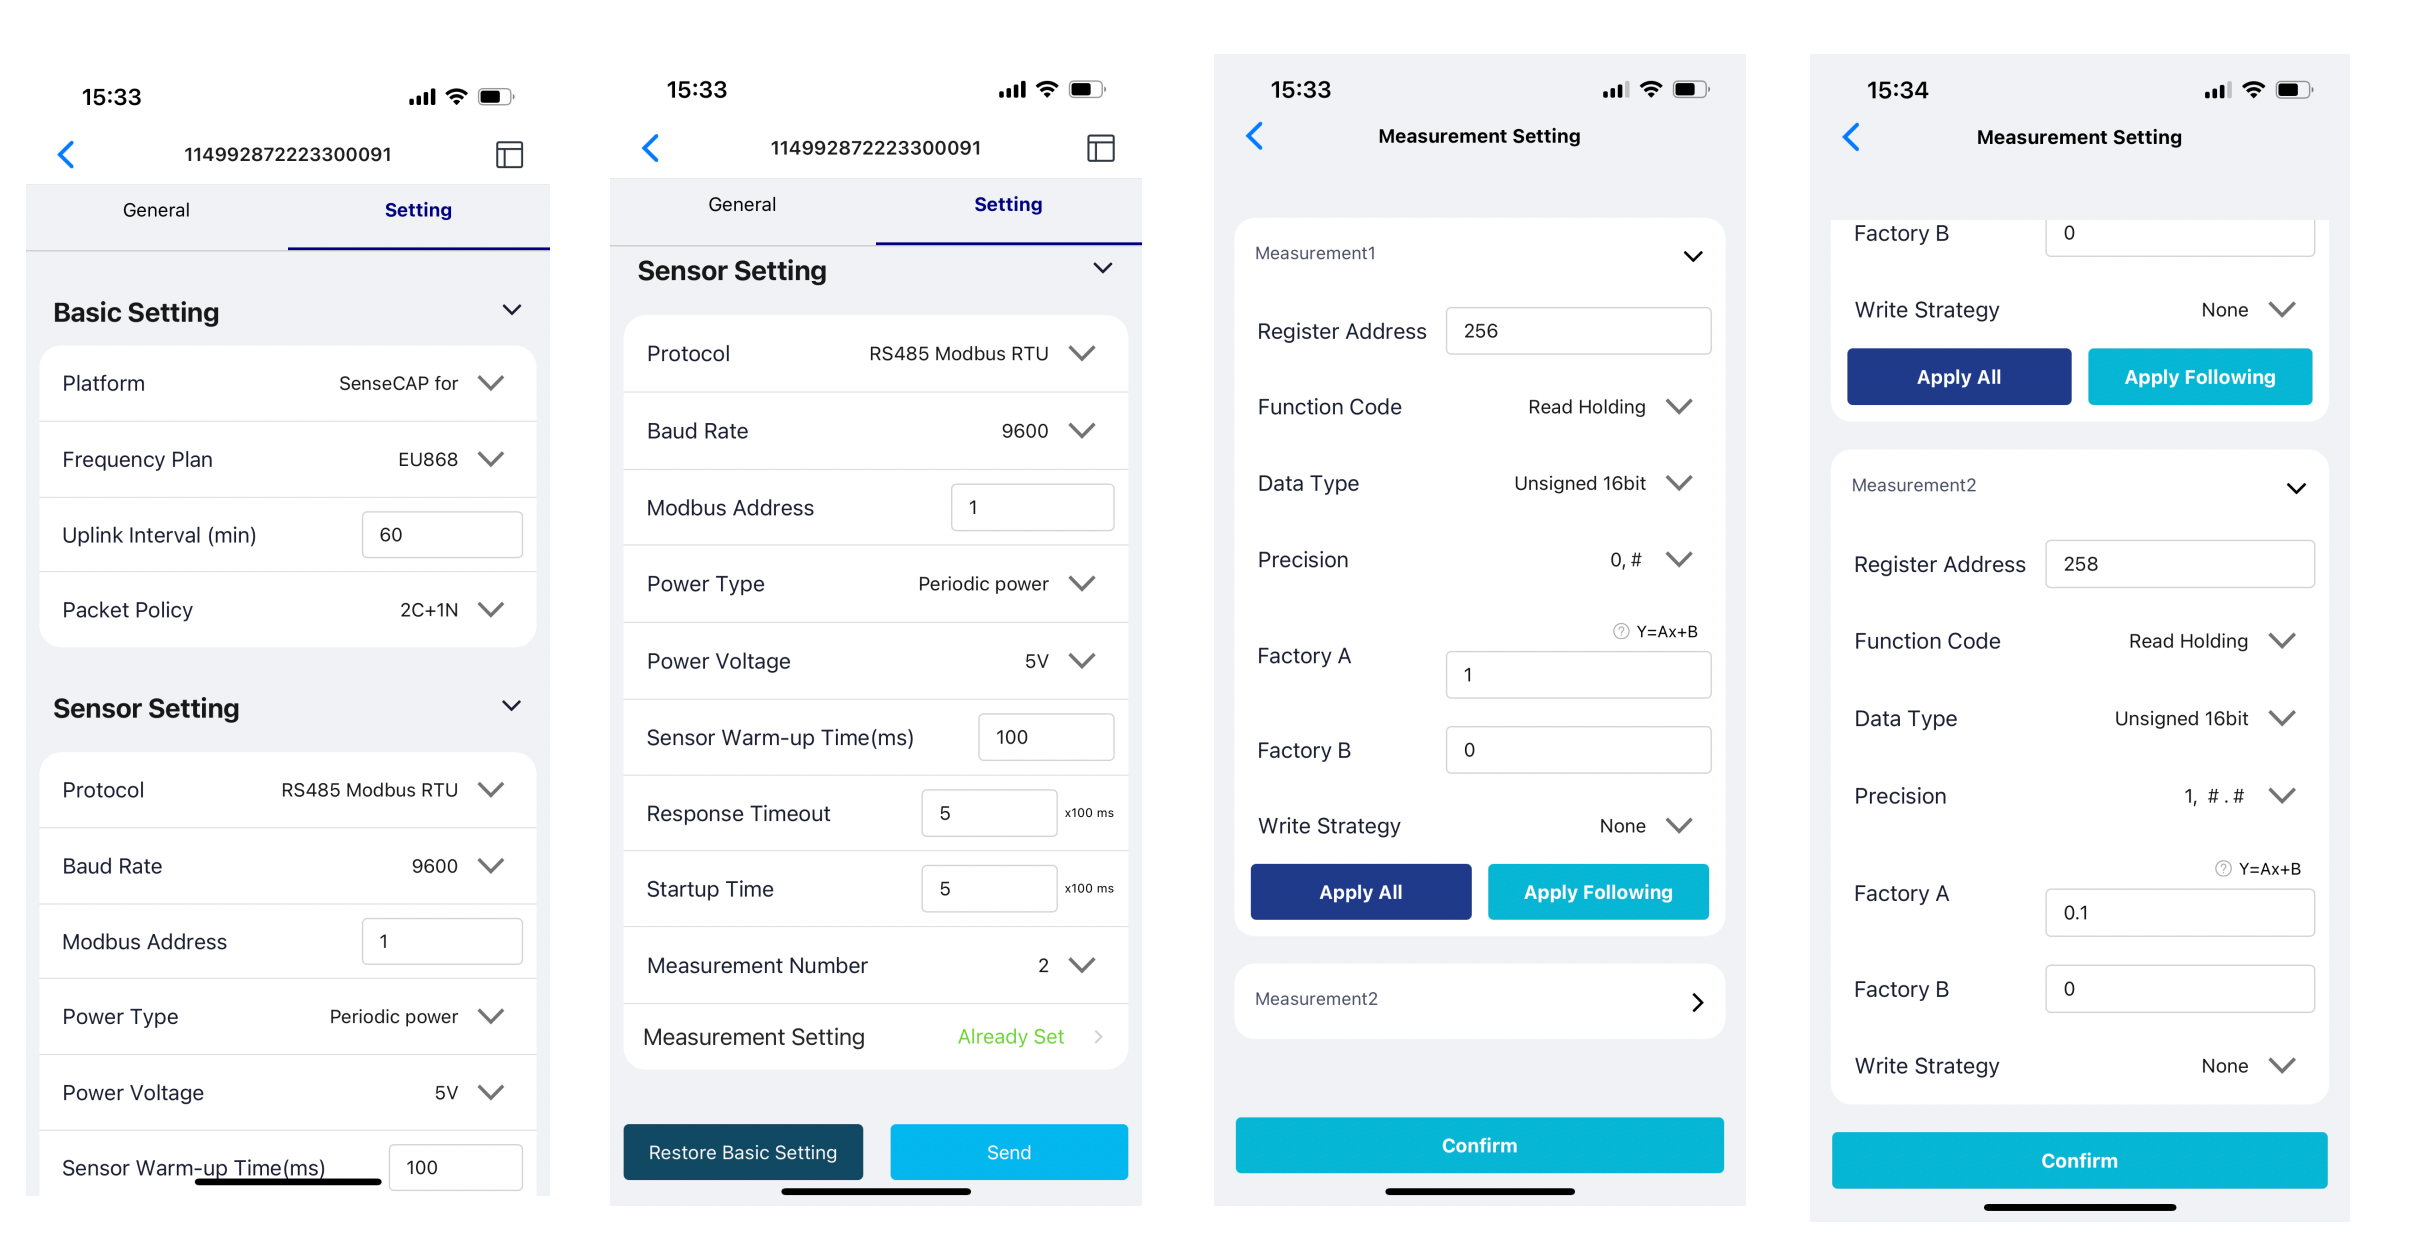
How to import template
-
**Step 1:**Please click this template link and choose your browser to download it. (http://sensecap.seeed.cc/portalapi/template/23ad5050-c24b-11ed-af3d-4b3b31721270)
-
Step 2: Tap "➕" in the upper right corner, select "import Template", then select the downloaded file, and the template will be imported.
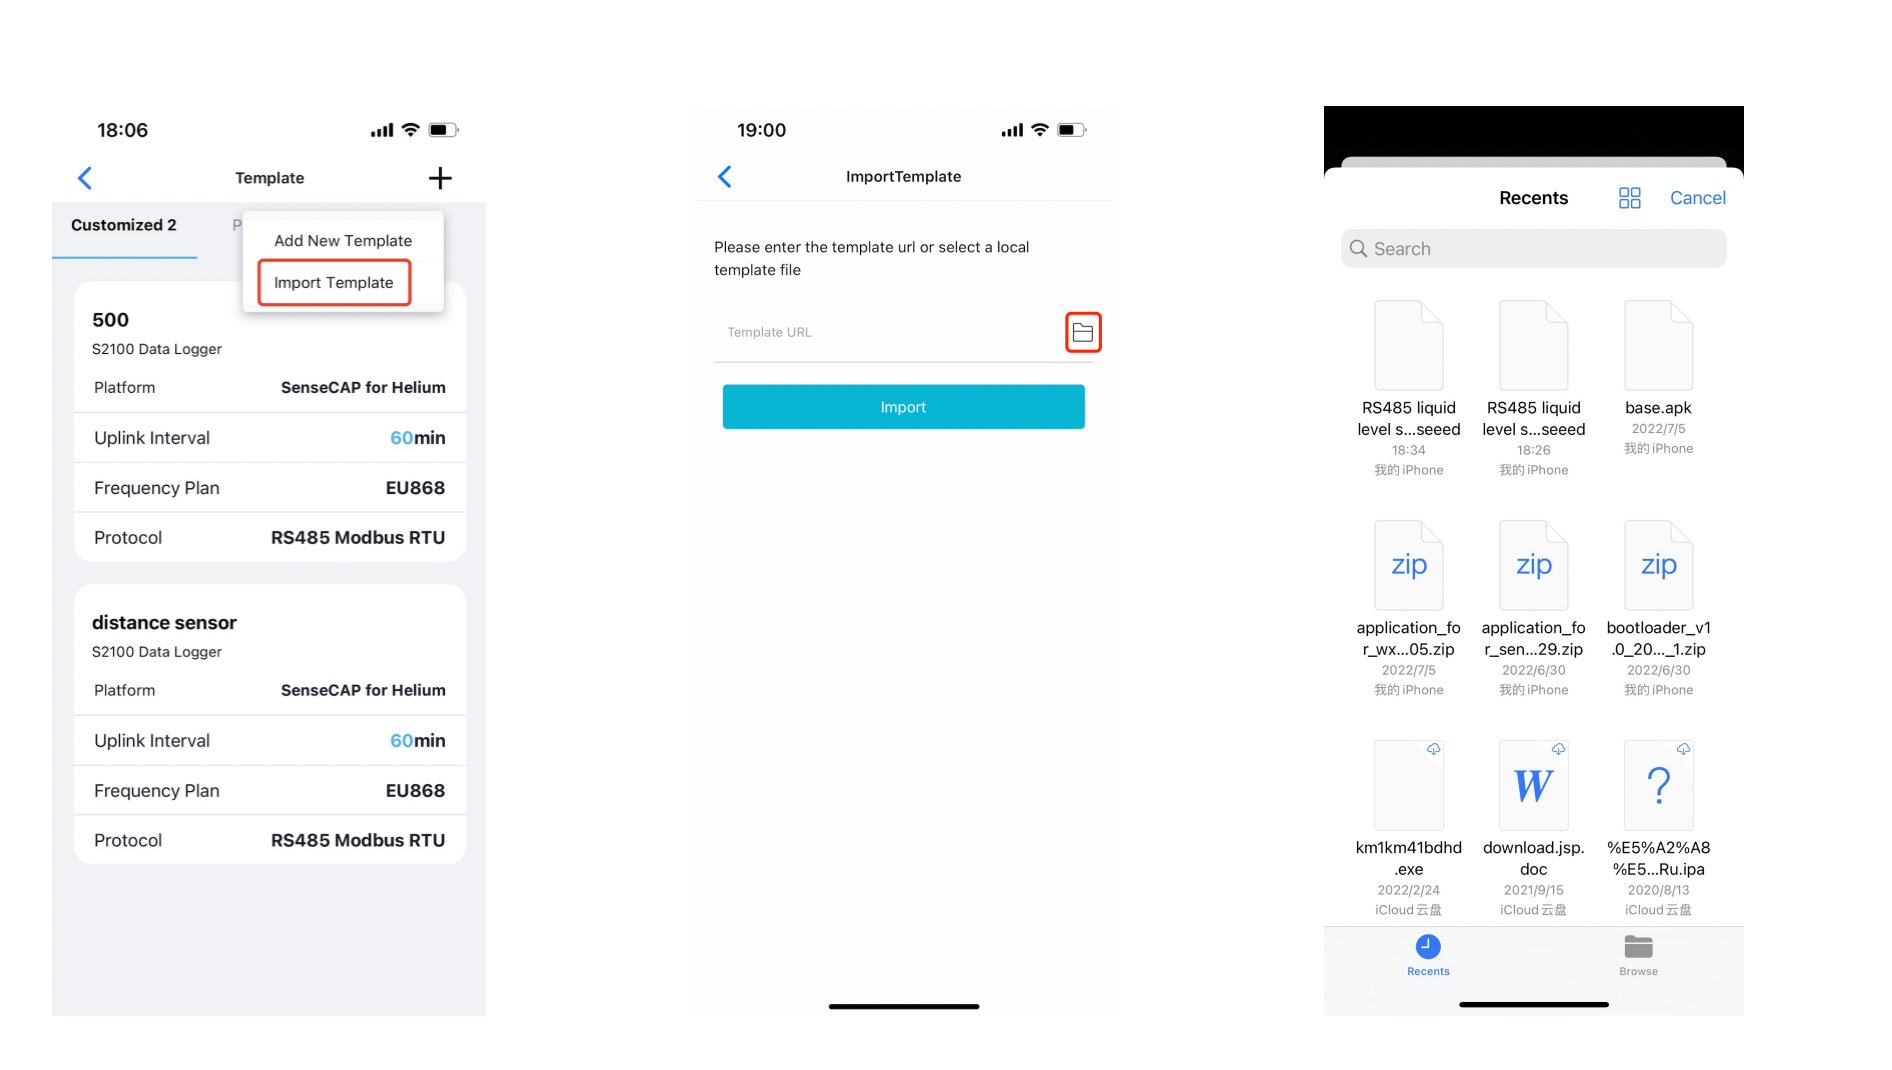
- Step 3: Click Send and Test the sensor by clicking Measure
The distance and temperature of the sensor are obtained successfully!
5. Upload the data to SenseCAP Portal and Mate App
- Step 1: Go back to the app home page and Data Logger Red LEDs will start blinking for a couple of seconds followed by Green LEDs blinking for a brief amount of time to indicate that the LoRaWAN connection is successful and the data is sent. Alternatively you can click the button on the data logger once, to force this data sending. Before uploading data, make sure the gateway is working properly or has helium network coverage.
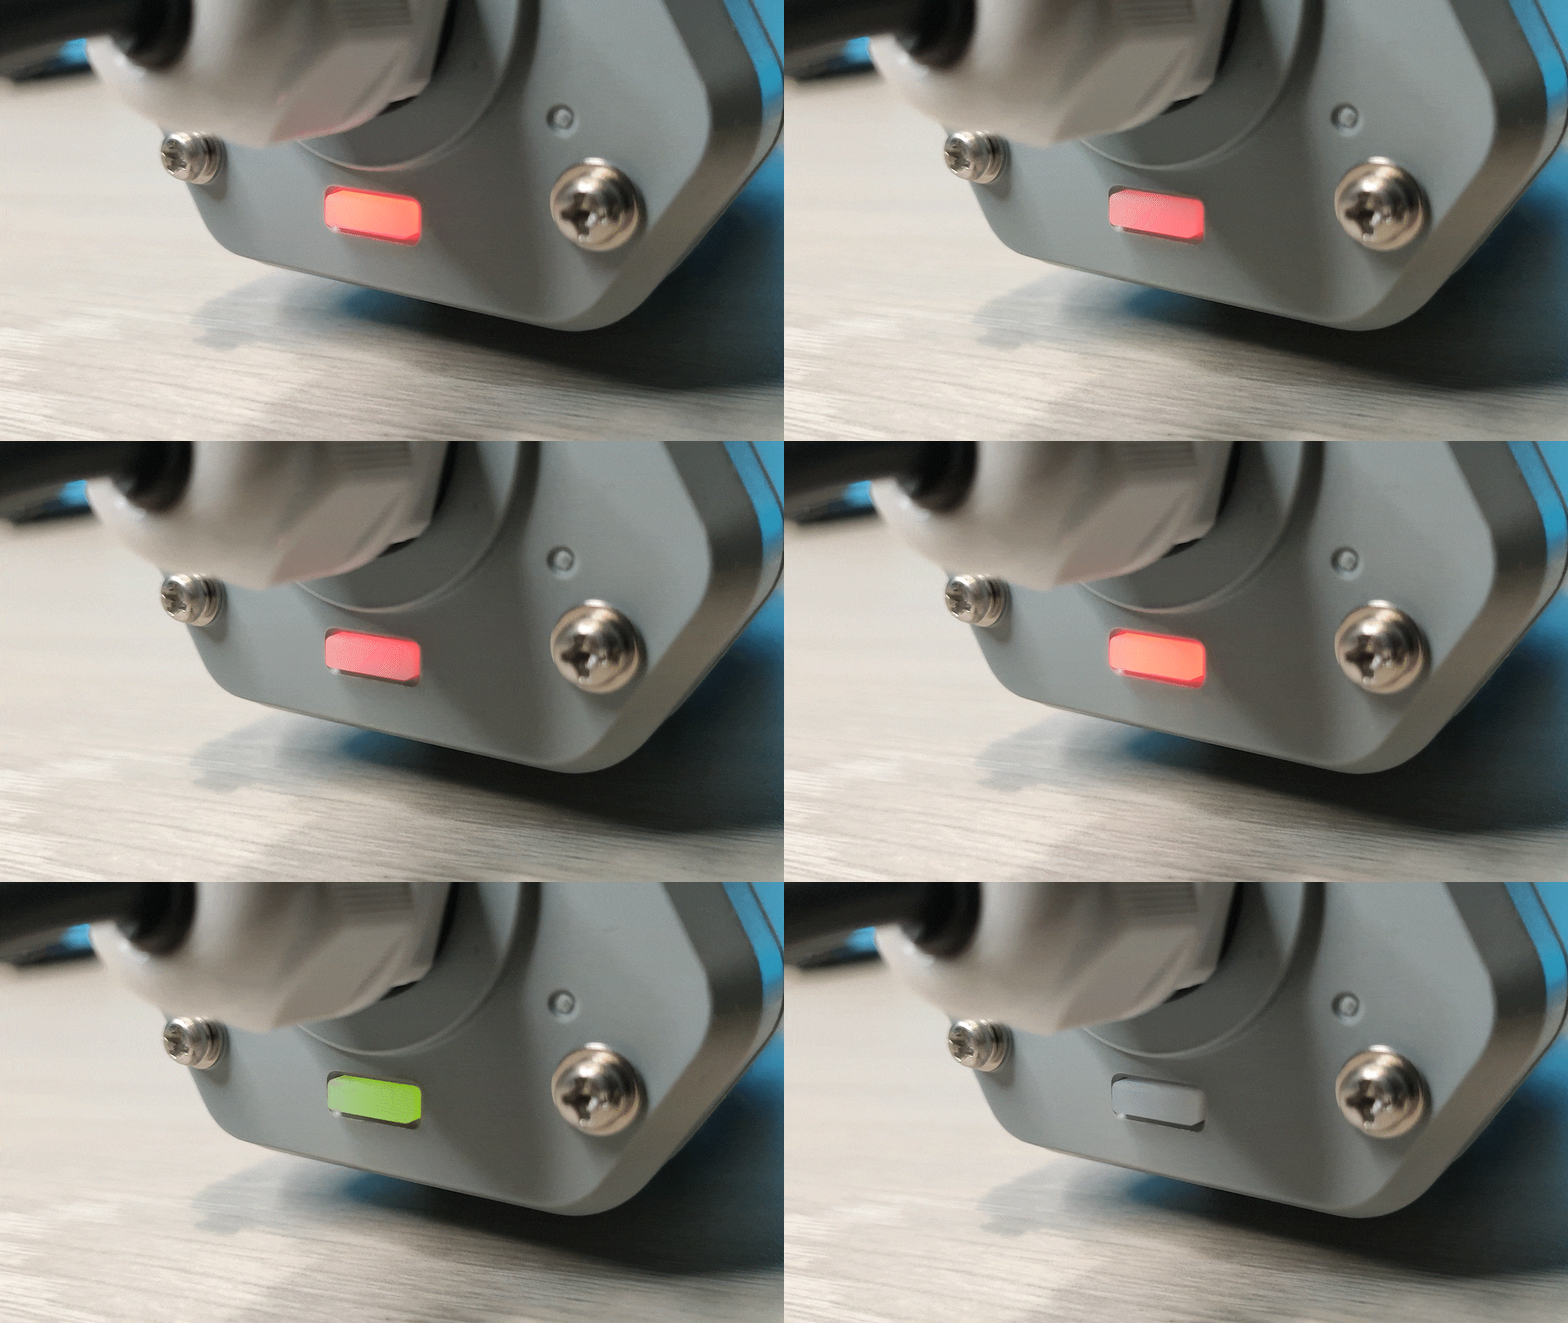
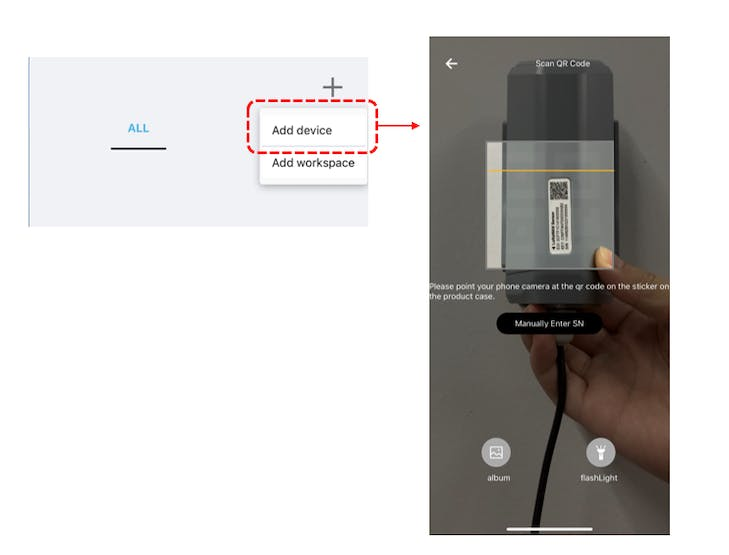
Now we need to add this sensor to SenseCAP platform in order to view the data on the cloud
- Step 2: Binding the data logger via scanning the QR code.
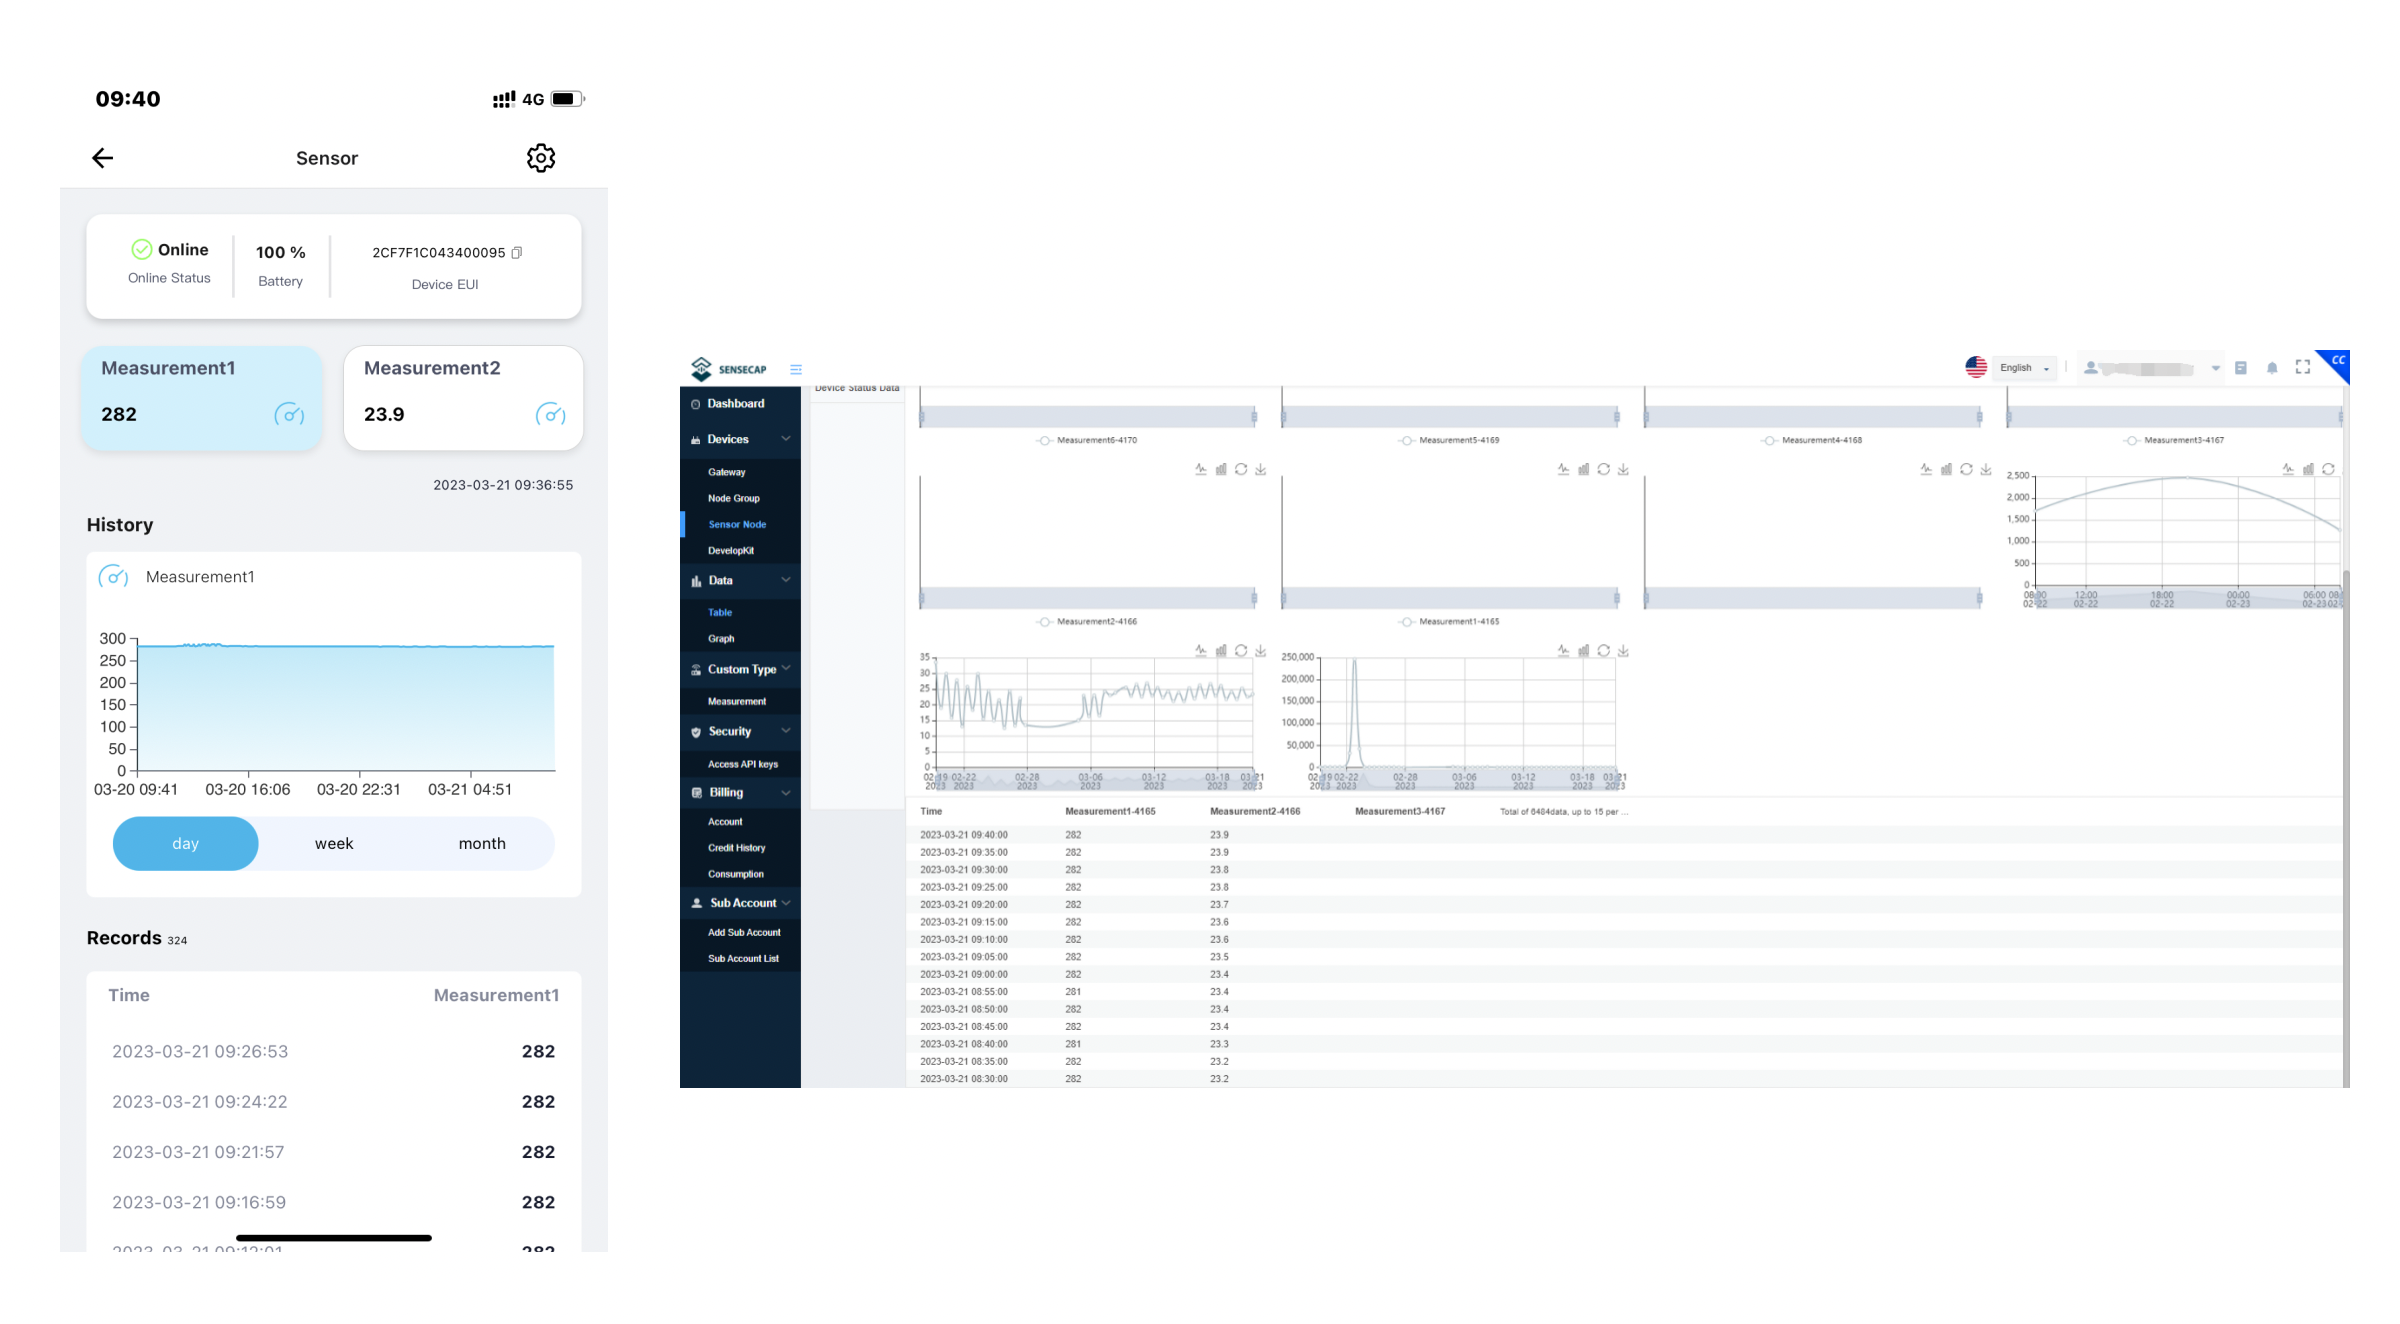
- Step 3: Check the data on App and Portal.(https://sensecap.seeed.cc/)
6. Test the sensor in a real environment
Fast application to the outdoor real scene for long-term monitoring.

At present, a LoRaWAN sensor has been developed.
Resources
- [PDF] RS485 Air Temperature, Humidity and Barometric Pressure Sensor
- [PDF] SenseCAP S2100 Data Logger User Guide
Tech Support & Product Discussion
Thank you for choosing our products! We are here to provide you with different support to ensure that your experience with our products is as smooth as possible. We offer several communication channels to cater to different preferences and needs.
