60GHz mmWave Sensor - Human Static Sleep Breathing Monitoring (MR60BHA1)
Introduction
The MR60BHA1 60GHz radar module applies FMCW detected theory to implement simultaneous personal breathing rate and heart rate detention in high accuracy, providing a fully total private and secure environment, independently from other noisy influences. It is a standard biotic radar system in consumer electronics, healthcare as well as industrial applications. In this wiki, we will introduce you how to utilize it.
Application
- Smart home
- Health care
- Breathing rate detection
- Heartbeat rate detection
- Smart hotel
- Medical assistants
Feature
- Enabled theory: Implement radar detection based on FMCW FM continuous wave signals
- Standard algorithm: Sense and output simultaneously human respiratory rate and heart rhythm in the self-adaption environment
- Perfect privacy protection: Apply FMCW monitoring technology to provide surveillance capabilities without identification
- Health-friendly working status: Output power as low as harmless to the human body
- High stability: Independ from temperature, humidity, noise, airflow, dust, light, and other environmental influences
- High measured accuracy: Achieve heartbeat accuracy up to 85% and achieve breathing accuracy up to 90 %
- High flexibility hardware design radar: Support secondary development, adapt to various scenarios applications
Specification
| Parameter content | Minimum | Typical | Maximum | Unit |
|---|---|---|---|---|
| Performance | ||||
| Detection distance (thoracic) | 0.4 | 1.5 | m | |
| Respiratory measurement accuracy | 90 | % | ||
| Heartbeat measurement accuracy | 95 | % | ||
| Refresh time | 1 | 30 | S | |
| Observation set-up time | 20 | S | ||
| Operating parameters | ||||
| Operating voltage (VCC) | 4.6 | 5 | 6 | V |
| Operating current (ICC) | 150 | mA | ||
| Operating temperature (TOP) | -20 | 60 | ℃ | |
| Storage temperature (TST) | -40 | 80 | ℃ | |
| Launch parameters | ||||
| Operating frequency (fTX) | 58 | 60 | 63.5 | GHz |
| Transmitted power (Pout) | 6 | dBm | ||
| Antenna parameters | ||||
| Antenna gain (GANT) | 4 | dBi | ||
| Horizontal beam (-3dB) | -20 | 20 | o | |
| Vertical beam (-3dB) | -20 | 20 | o |
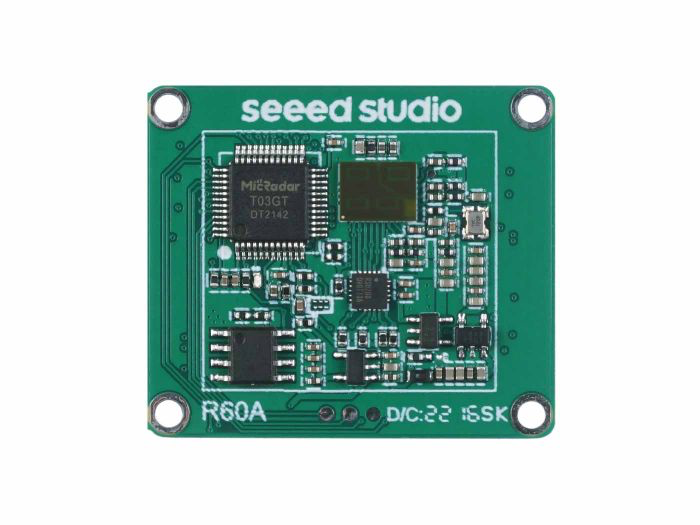
Hardware Overview
Before everything starts, it is quite essential to have some basic parameters of the product. The following table provides information about the characteristics of 60GHz mmWave Breathing and Heartbeat Module.
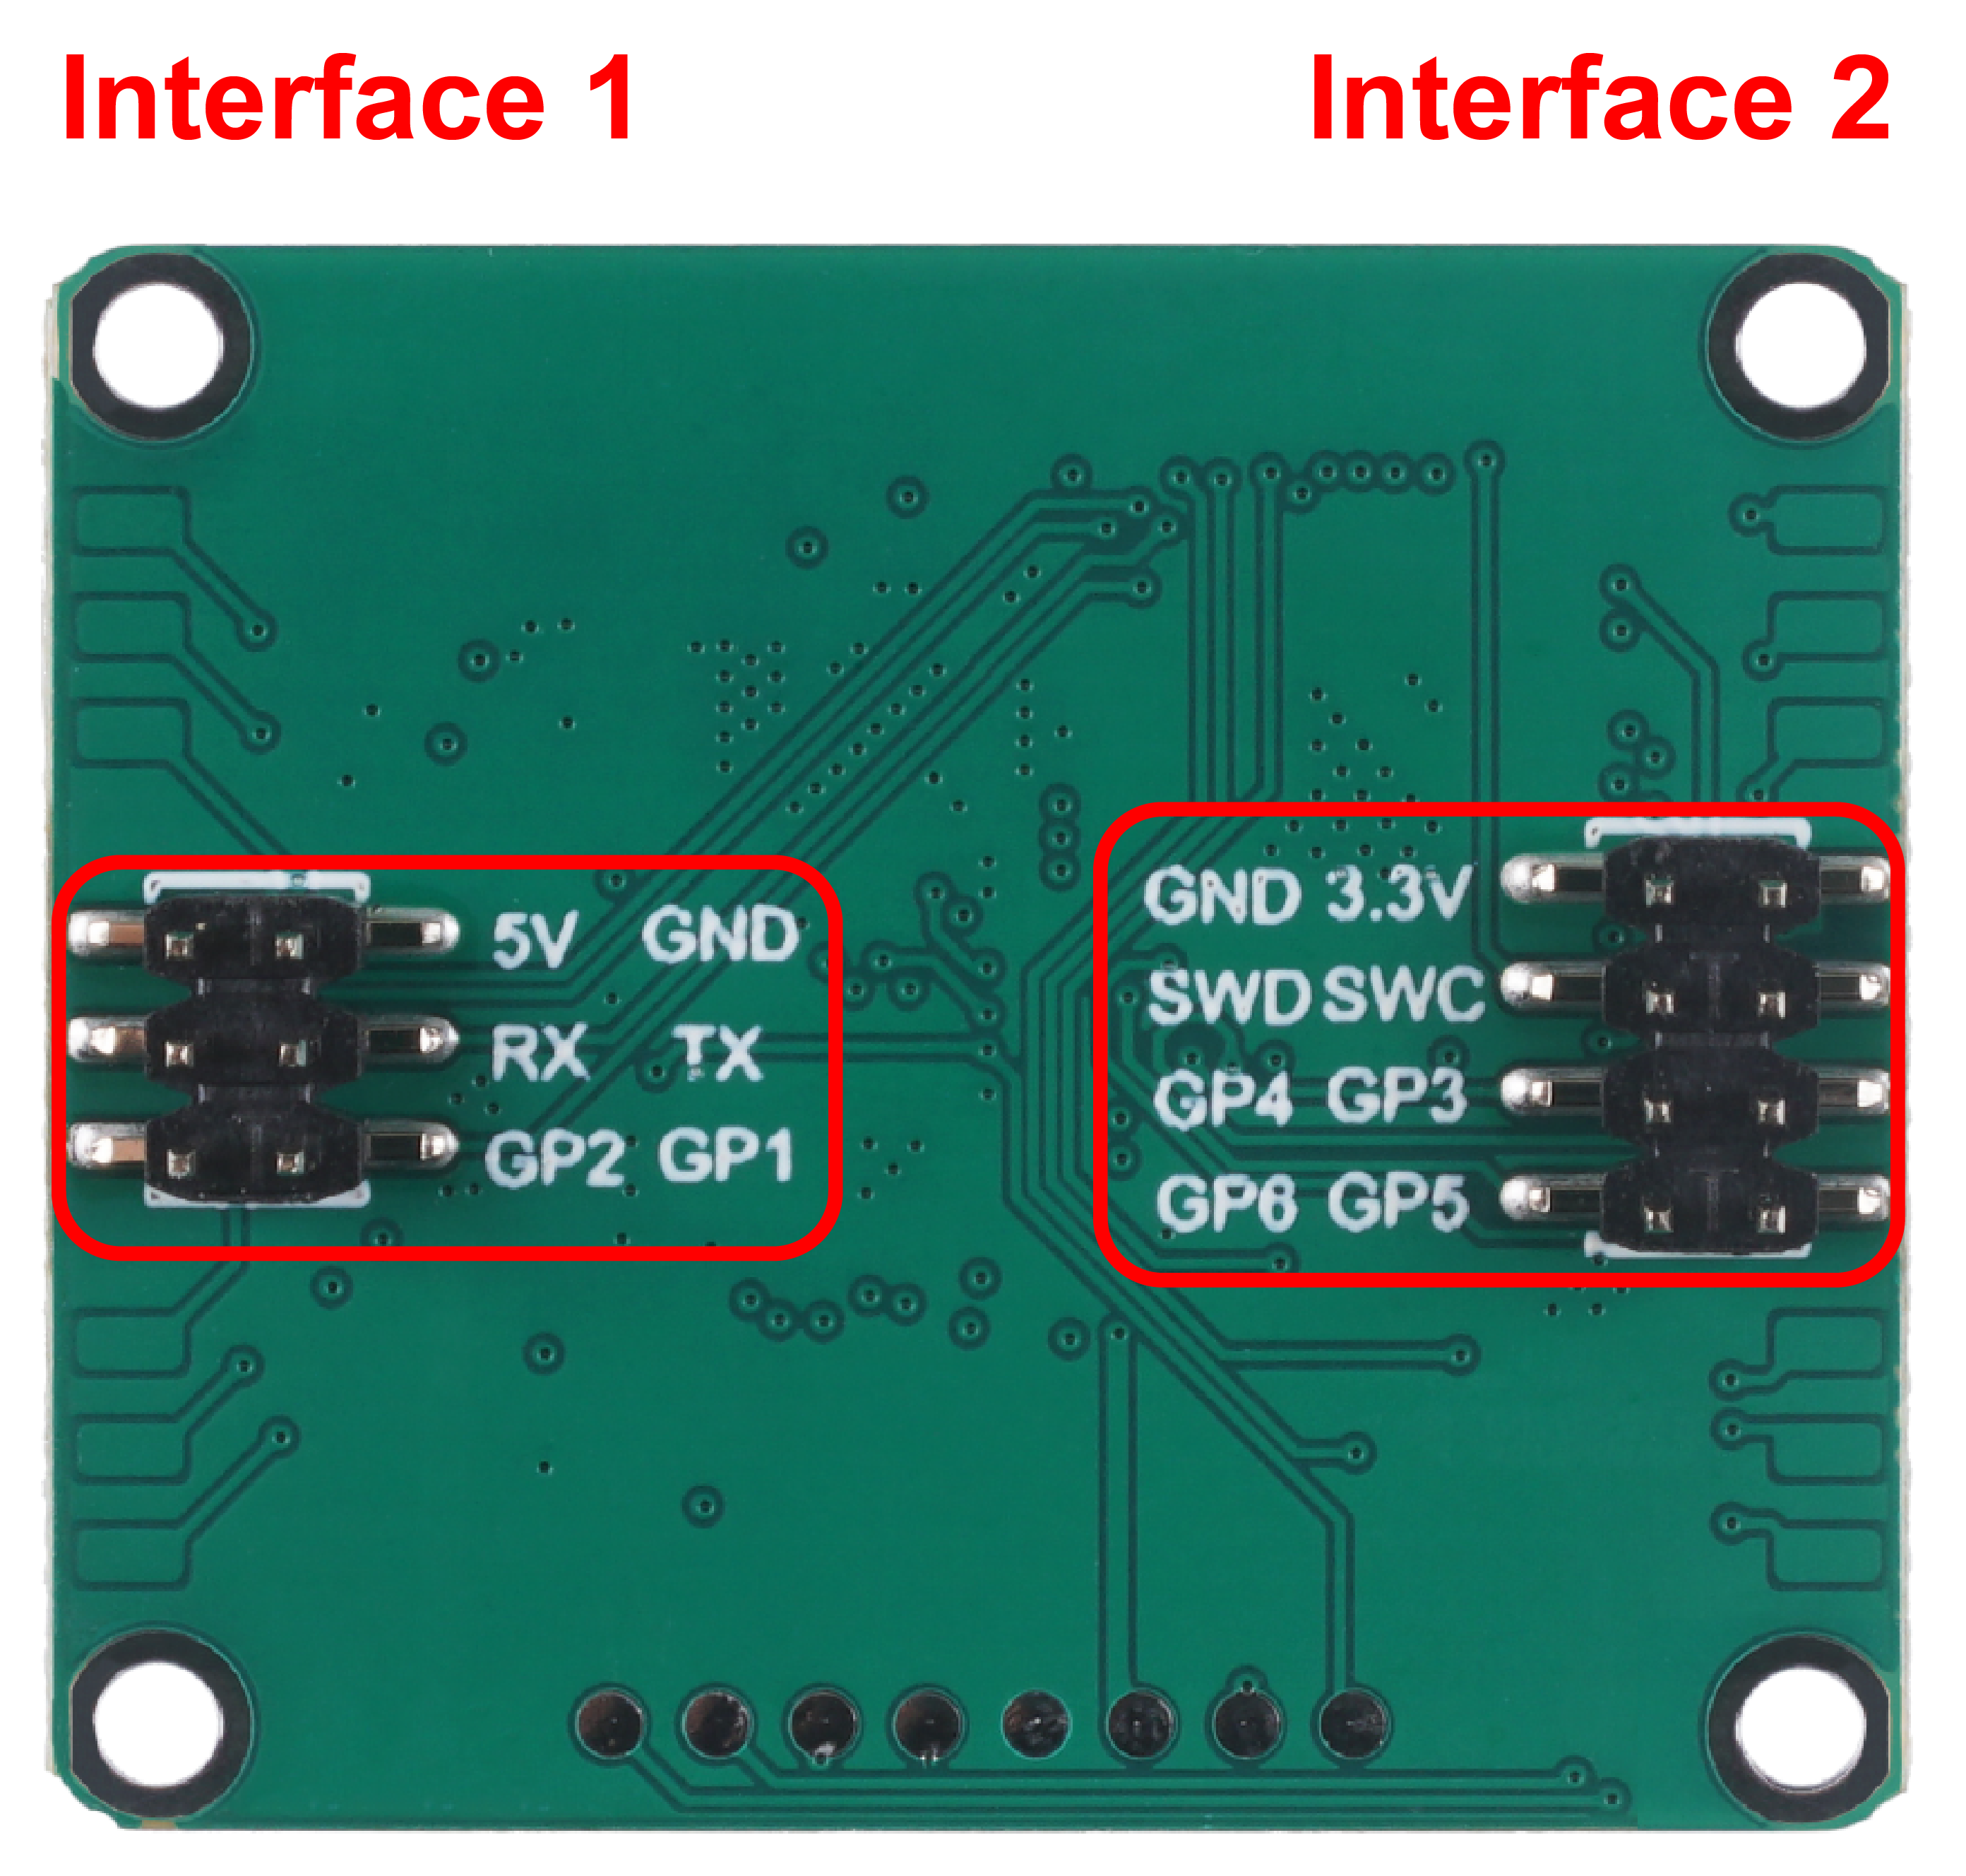
- Interface 1:
- The 5V pin is the power supply interface for the sensor.
- RX and TX are the data transmission interfaces for the sensor. RX means serial receive and TX means serial transmit.
- The human presence status output interface. You can use the level of these two pins to determine the current human movement in the environment.
- GP2 output: high level - occupied, low level - unoccupied.
- GP1 output: high level - active, low level - stationary.
- Interface 2:
- Flash firmware pinout: GND/3.3V/SWD/SWC.
- Overhead input/output pins: GP3~GP6.
Getting Started
Firmware Version Updates
The mmwave sensor has undergone a long period of technical precipitation and valuable suggestions provided by users, and we have been iterating on the original product to provide more accurate and reliable monitoring results and a better experience for our users.
Newly shipped sensors are shipped with the latest firmware by default to ensure the latest product experience. However, for the sake of the old user experience, we hereby provide the latest firmware and update method to ensure that you can use our latest technology.
Universal method - use J-link to burn firmware
If you encounter the wrong firmware or radar anomaly, firmware malfunction, etc., using this method to re-flash the firmware is the most effective way.
Download of the latest firmware
| Firmware Version | Download Address |
|---|---|
| Jlink_MR60BHA1-V230104.bin | Download |
| Jlink_MR60BHA1-V230904.bin | Download |
-
Please check the function of your product carefully, please do not mix with other mmwave sensors to brush this firmware, otherwise it may cause abnormal product function, the consequences need to be your own responsibility!
-
Please also note that different ways of updating the firmware use different firmware content, what you are downloading is the firmware burned via J-link.
To update your radar to the latest version
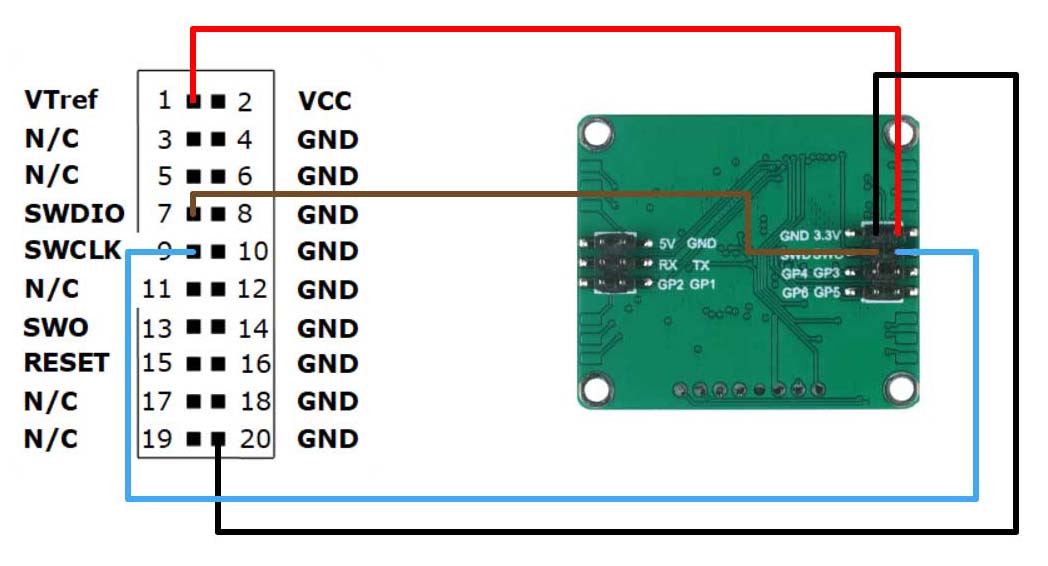
Step1. You will need to have a Jlink and MR60BHA1 60GHz mmWave Sensor.
Connect the radar and Jlink together via Dupont wire as shown in the diagram below.
Step2. Download the necessary software and firmware.
| File | Download Address |
|---|---|
| JlinkV644e.rar | Download |
| Pack_Segger_AT32F4xx_v1.3.3.zip | Download |
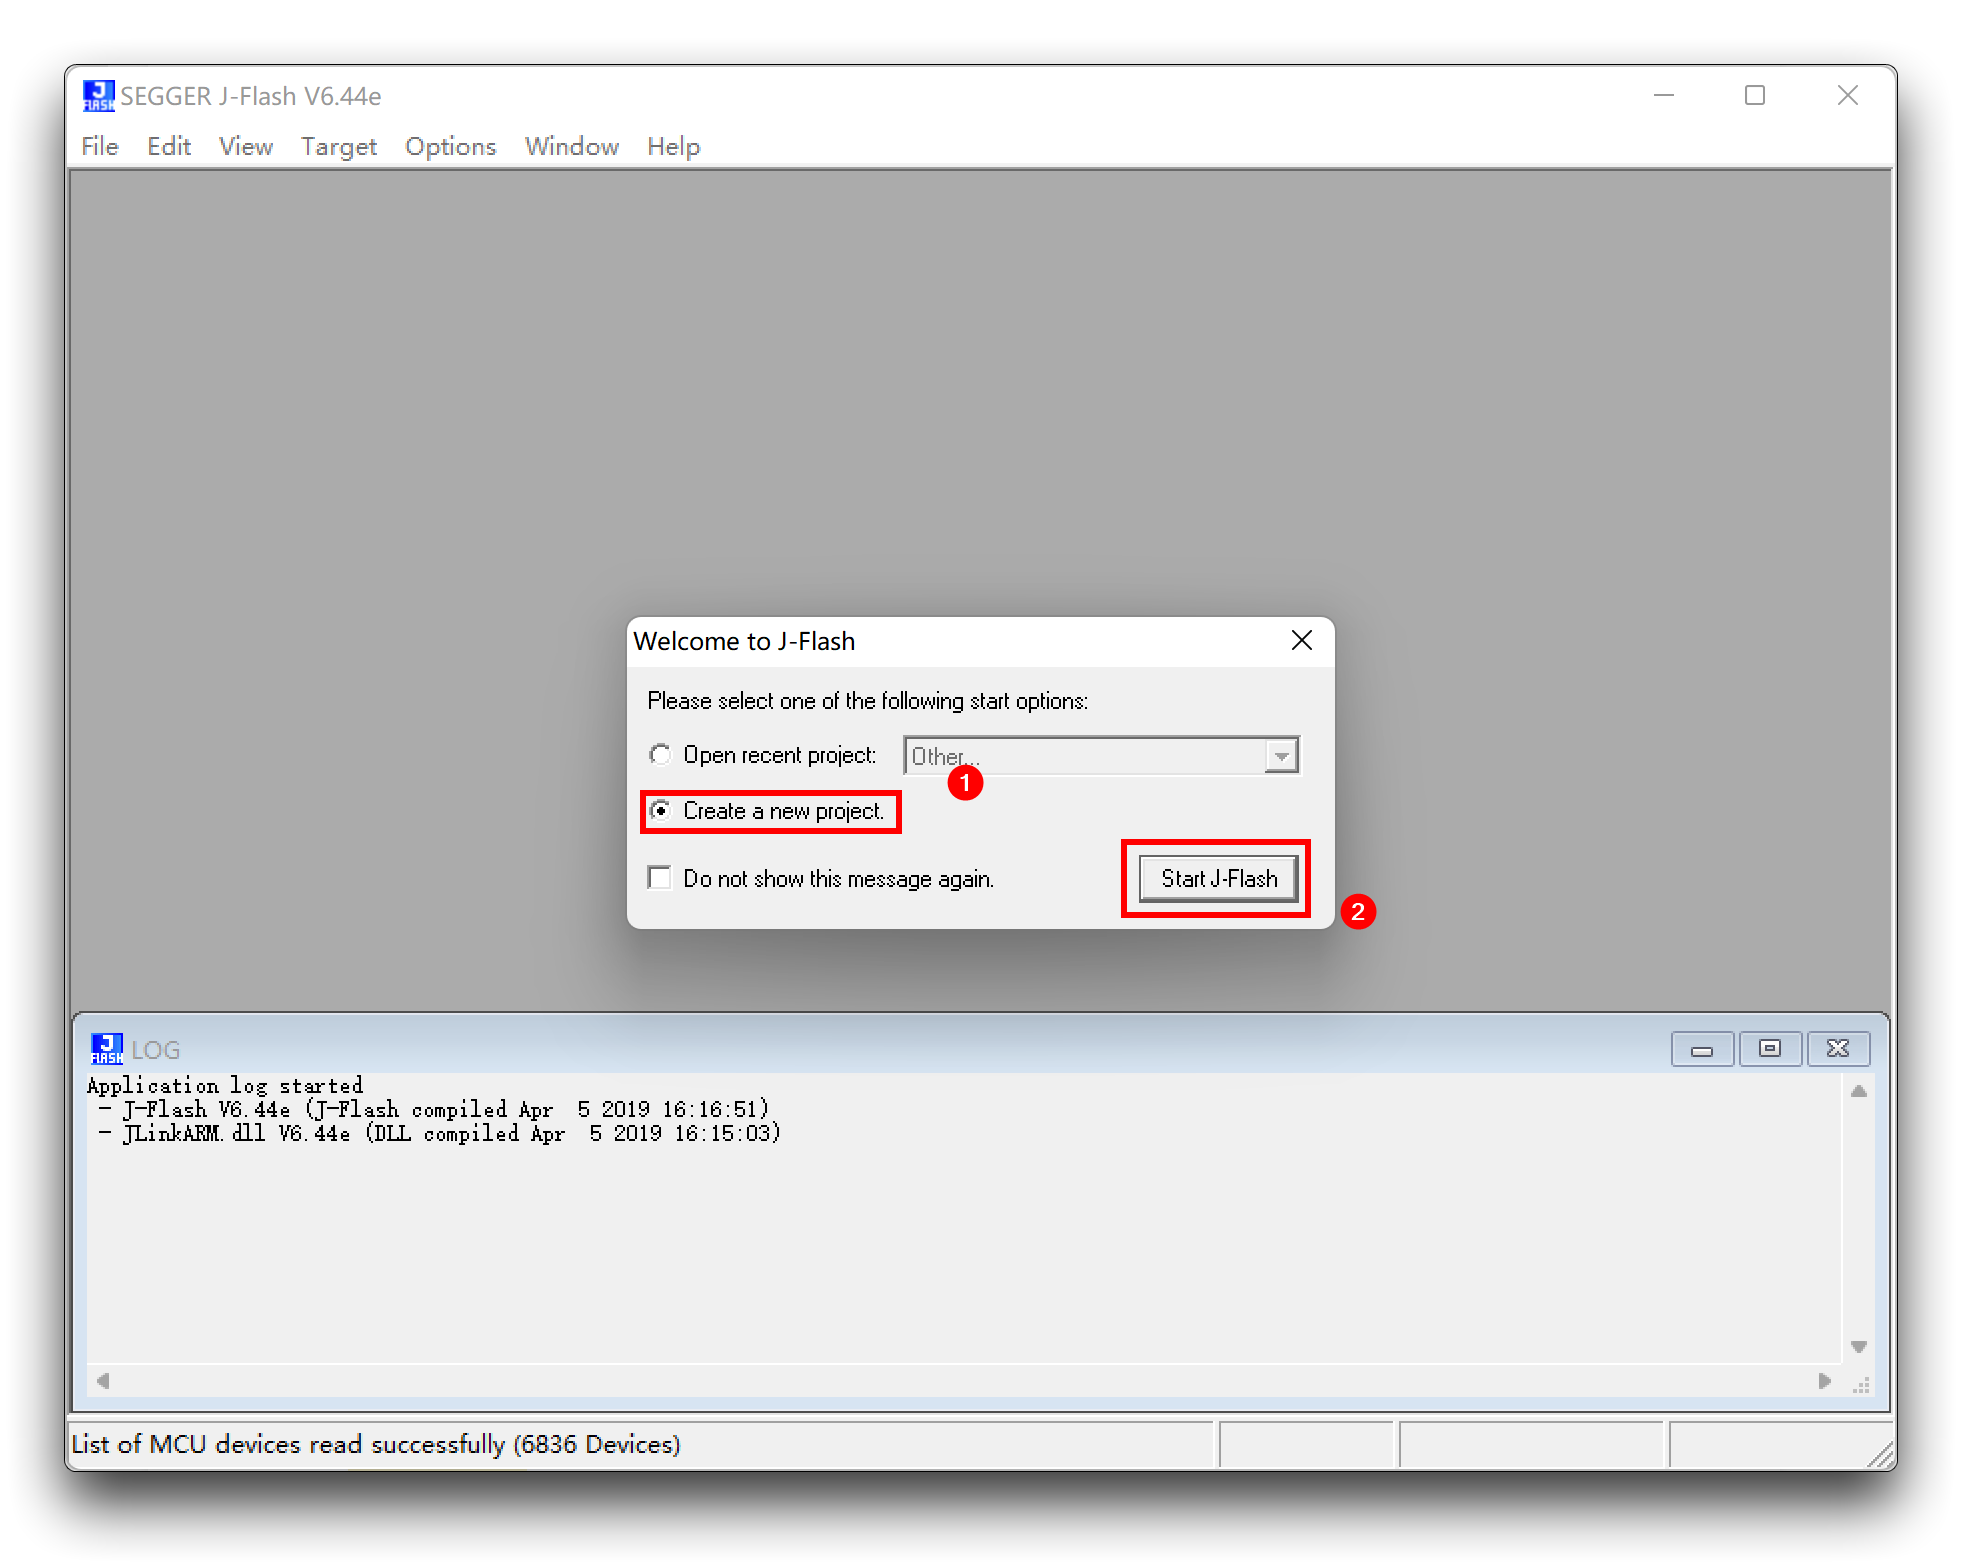
Step3. Unzip JlinkV644e.rar and open the JLink_Windows_V644e.exe file inside.
Just follow the default options to install. Once the installation is complete, start the J-Flash V6.44e software.
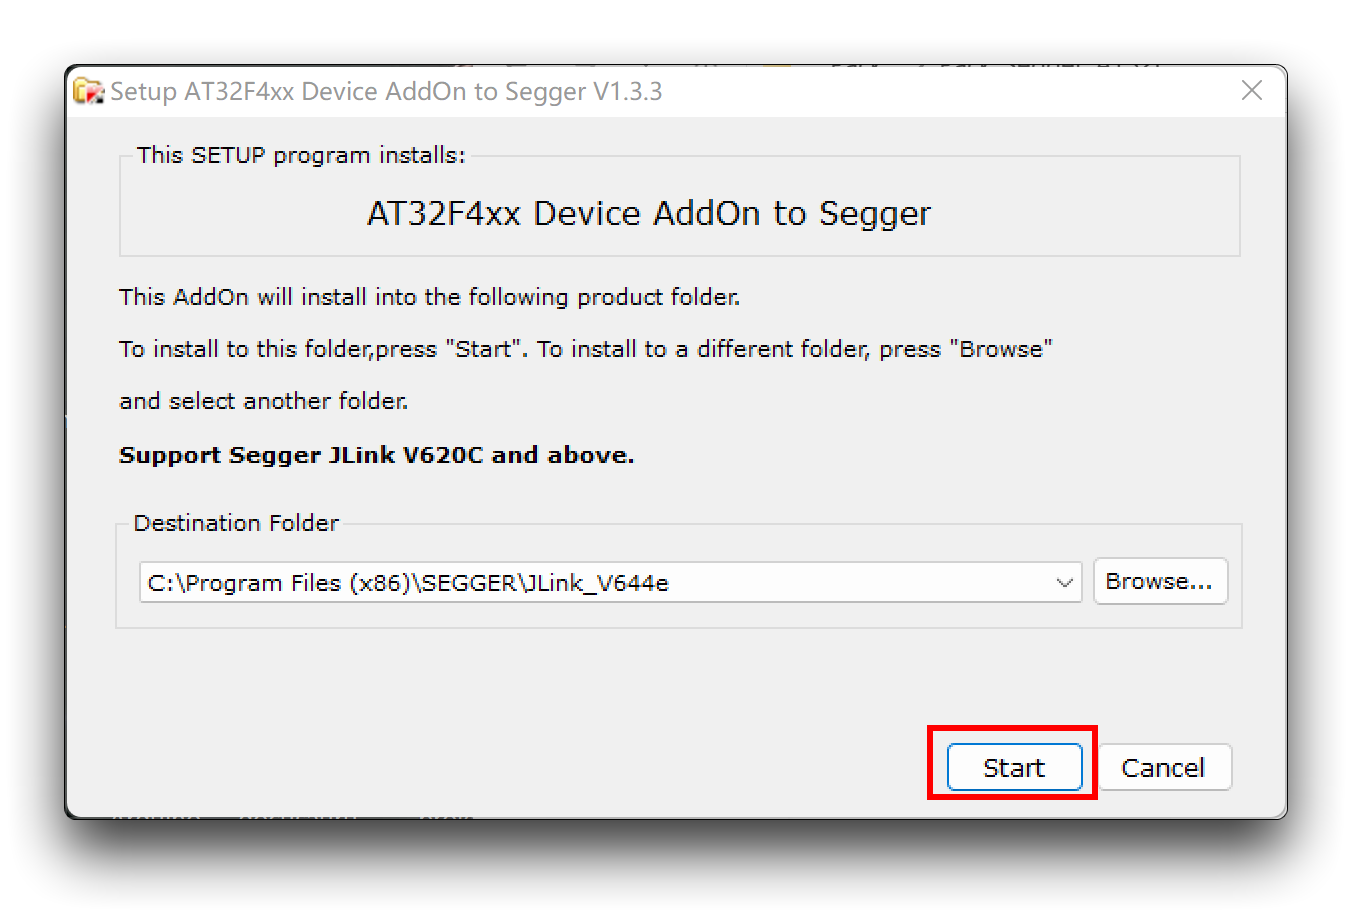
Step4. Install the chip package.
Unzip Pack_Segger_AT32F4xx_v1.3.3.zip and open Segger_AT32F4xx_AddOn.exe inside.
Step5. Create a new project.
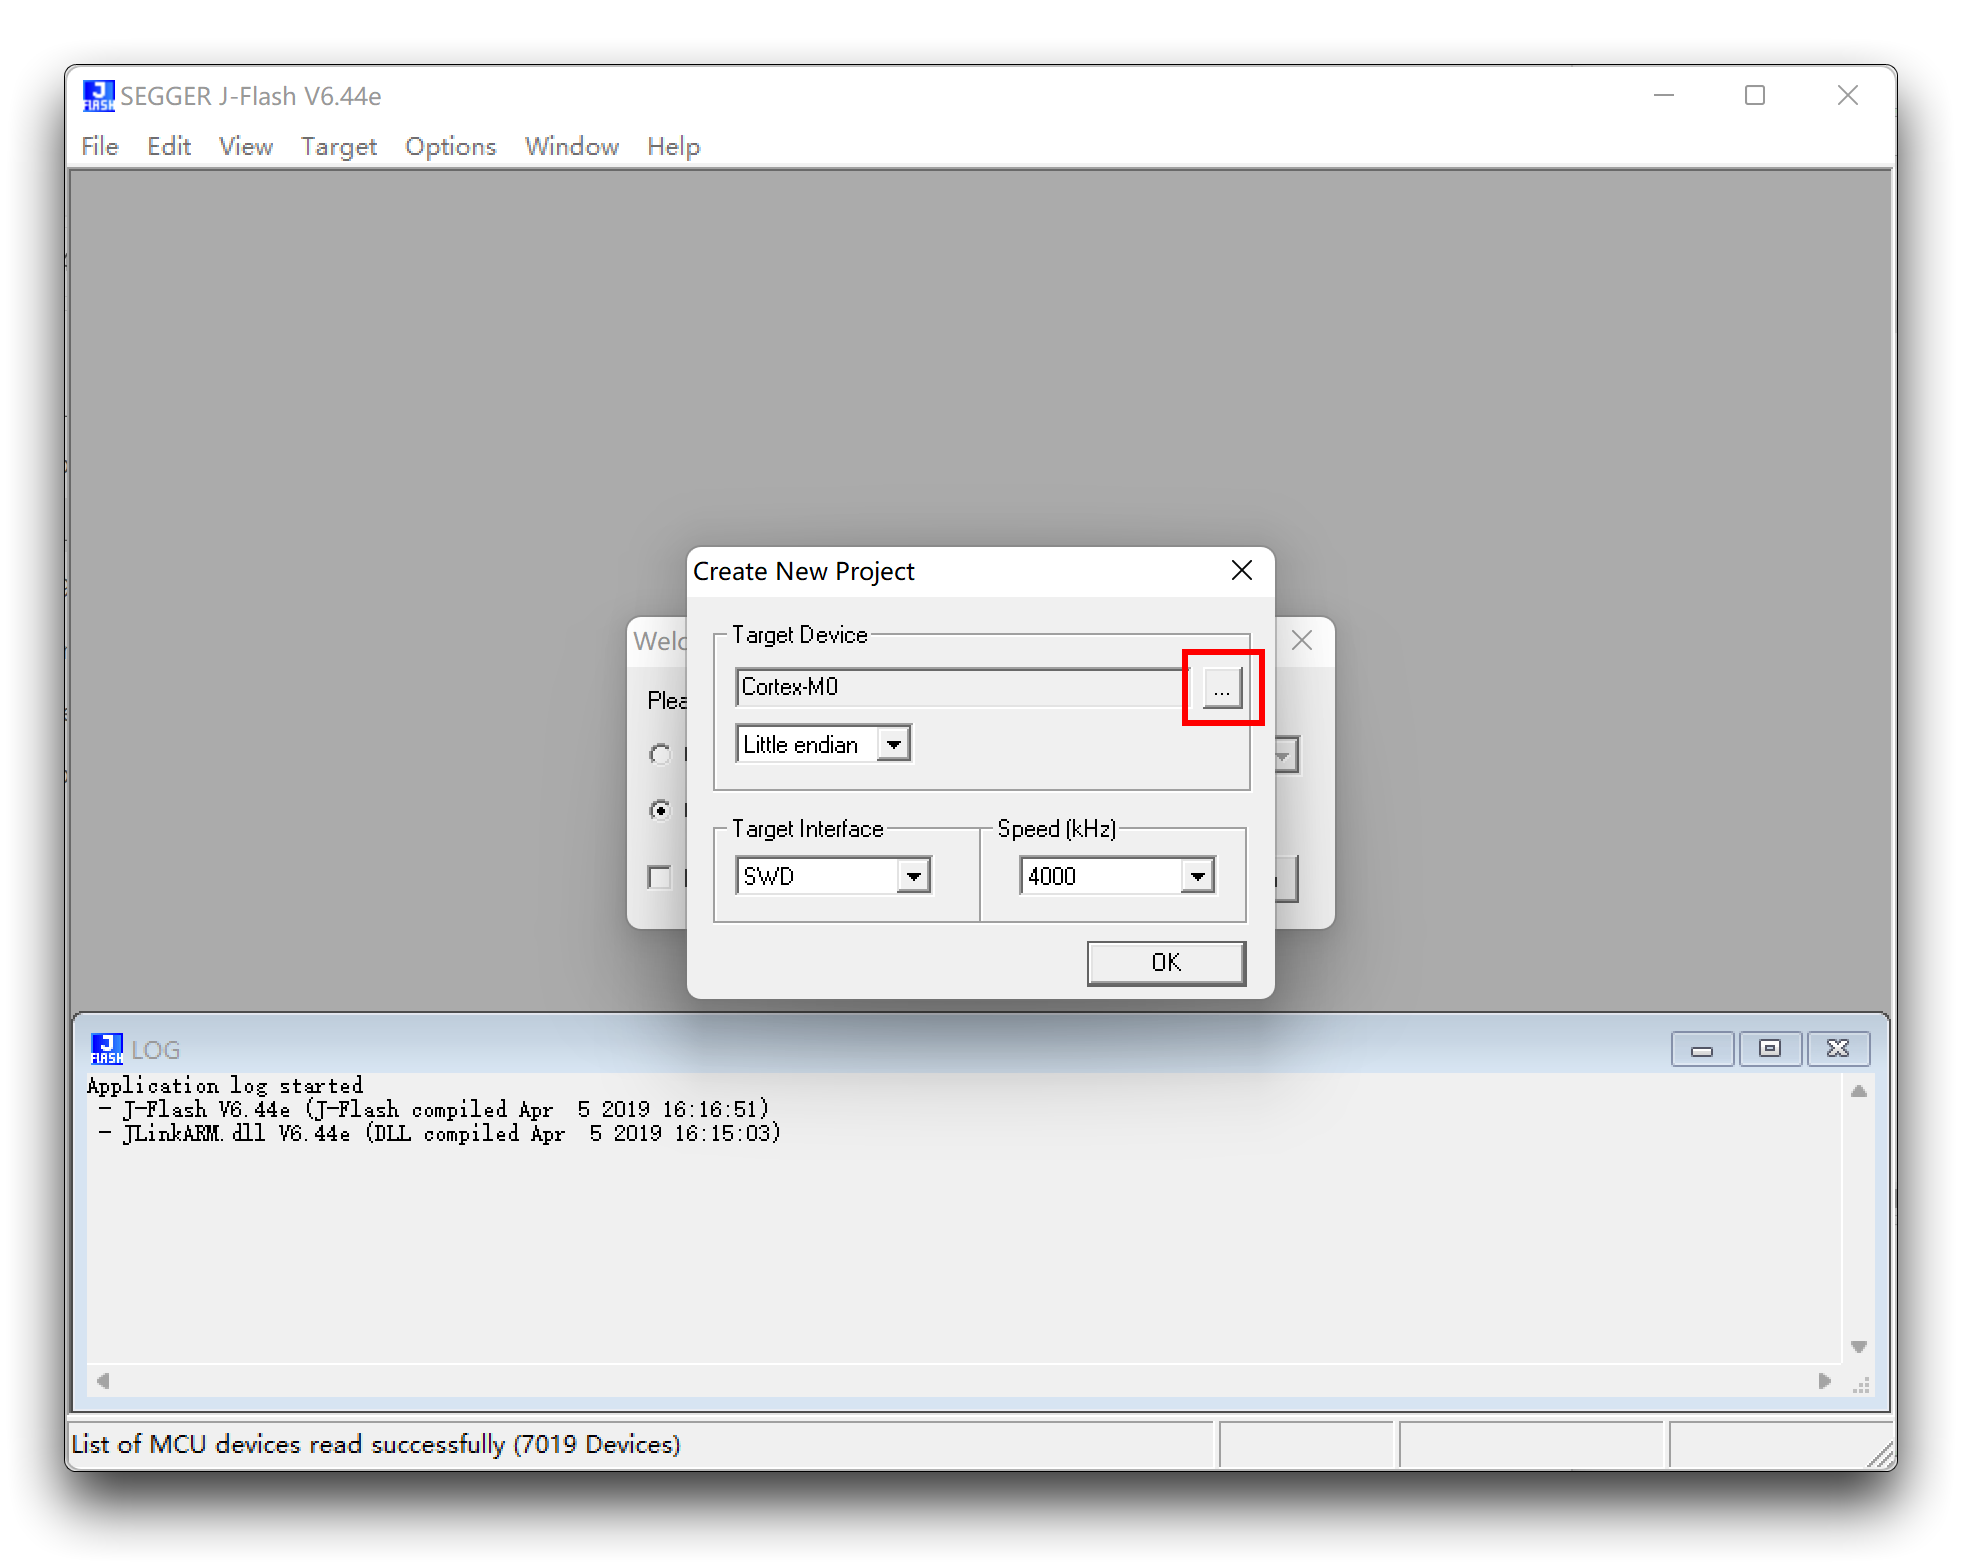
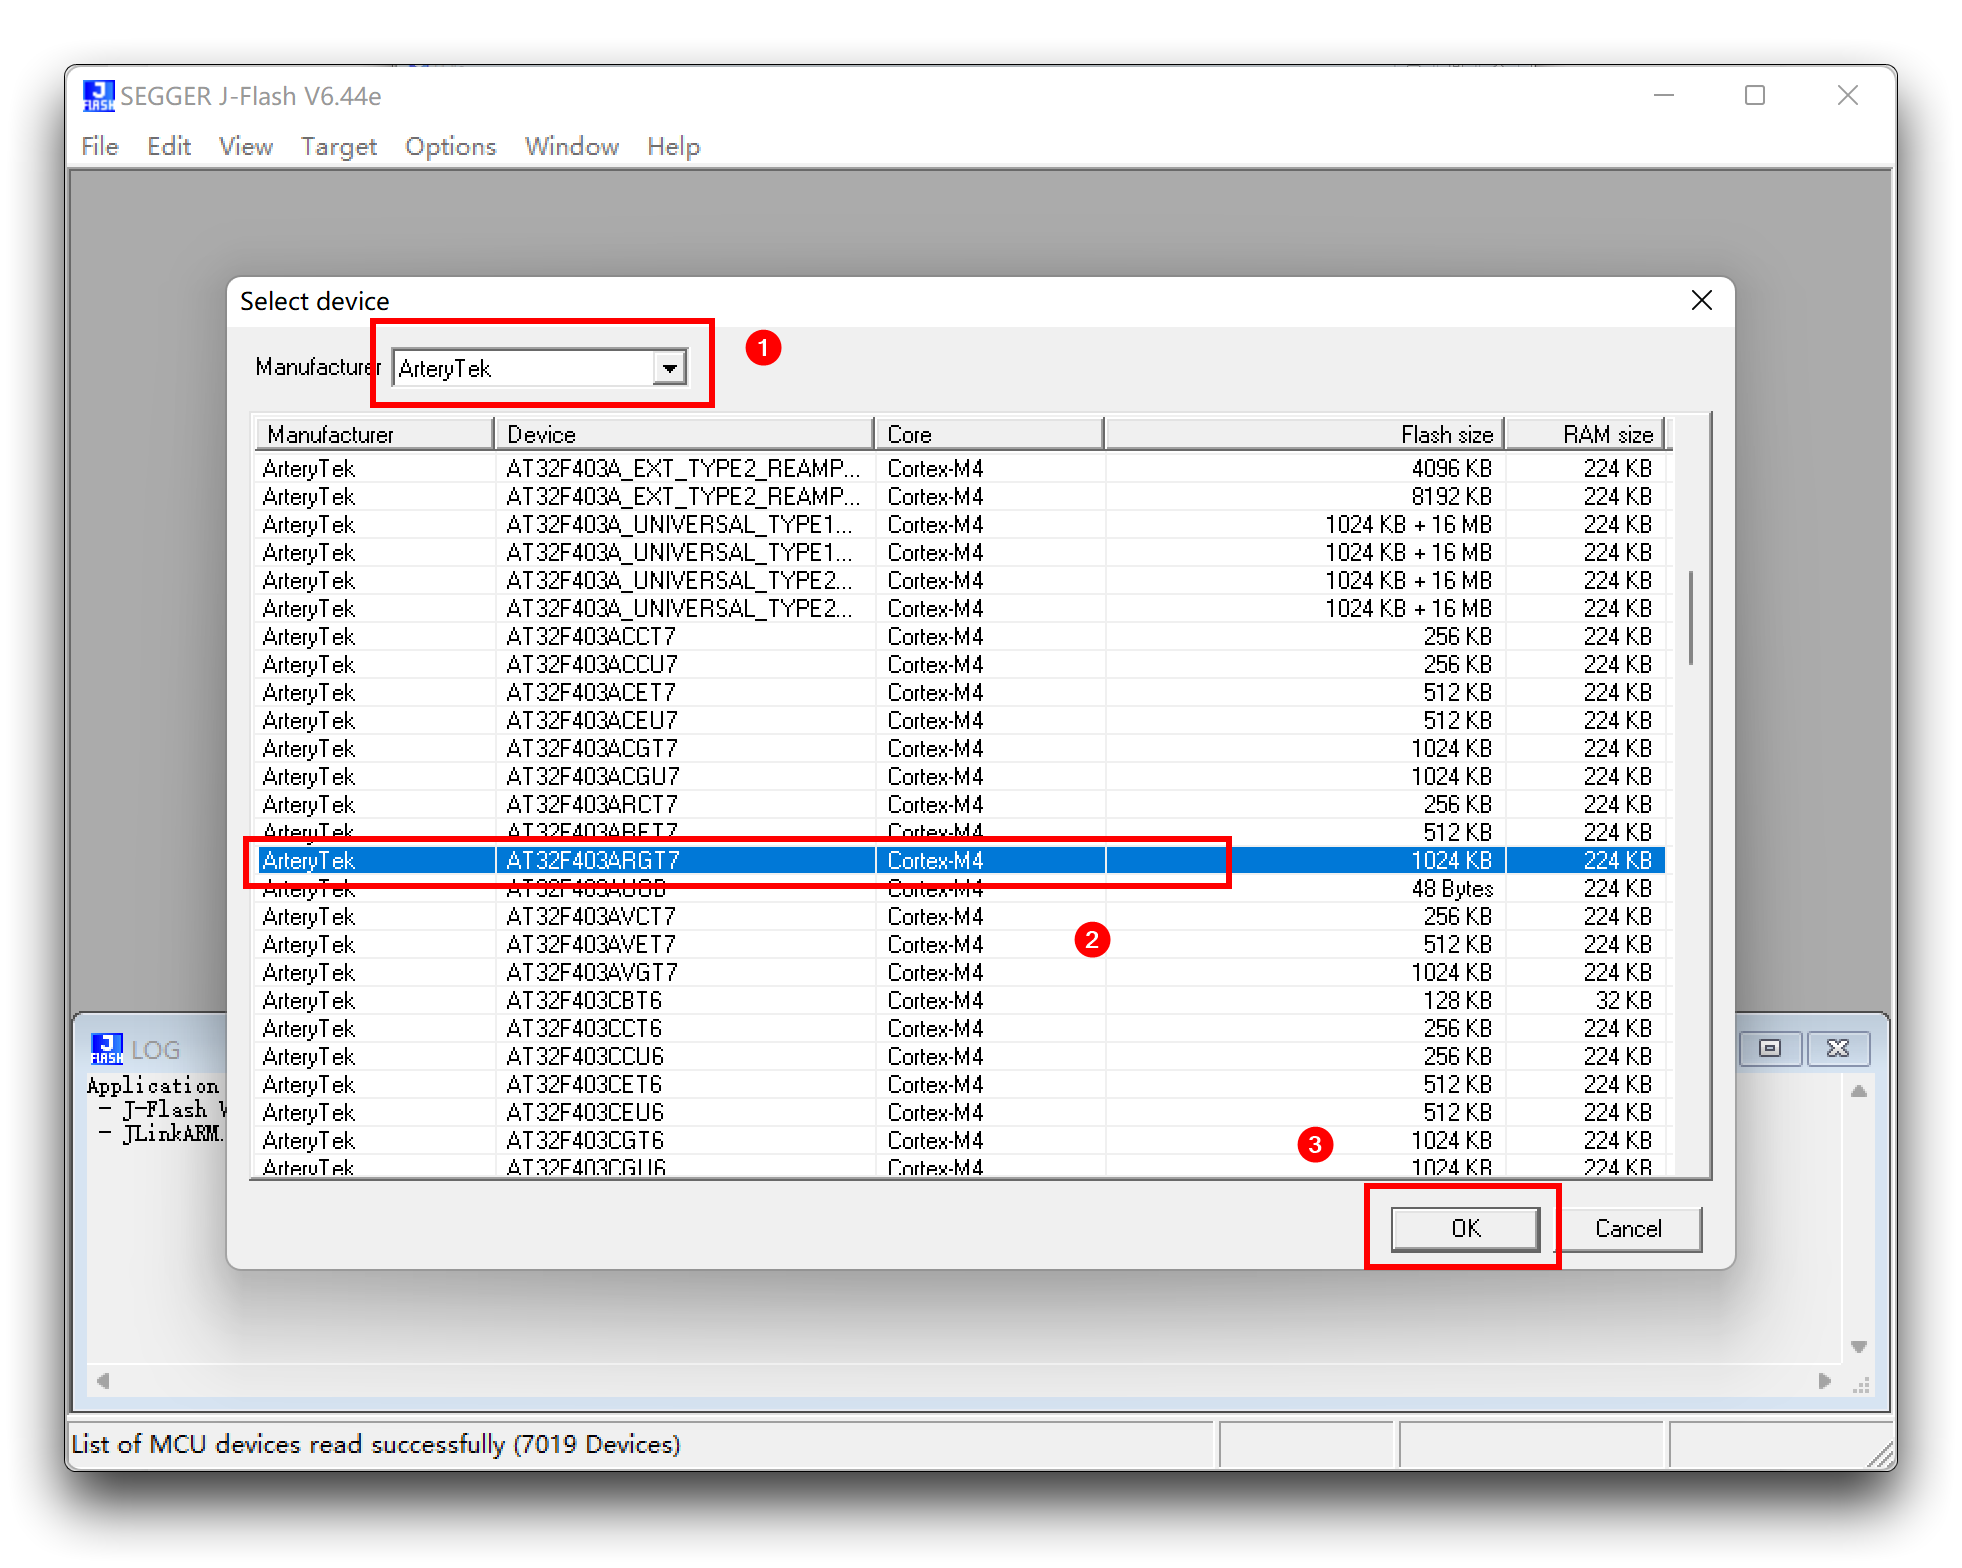
Find and choose AT32F403ARGT7.
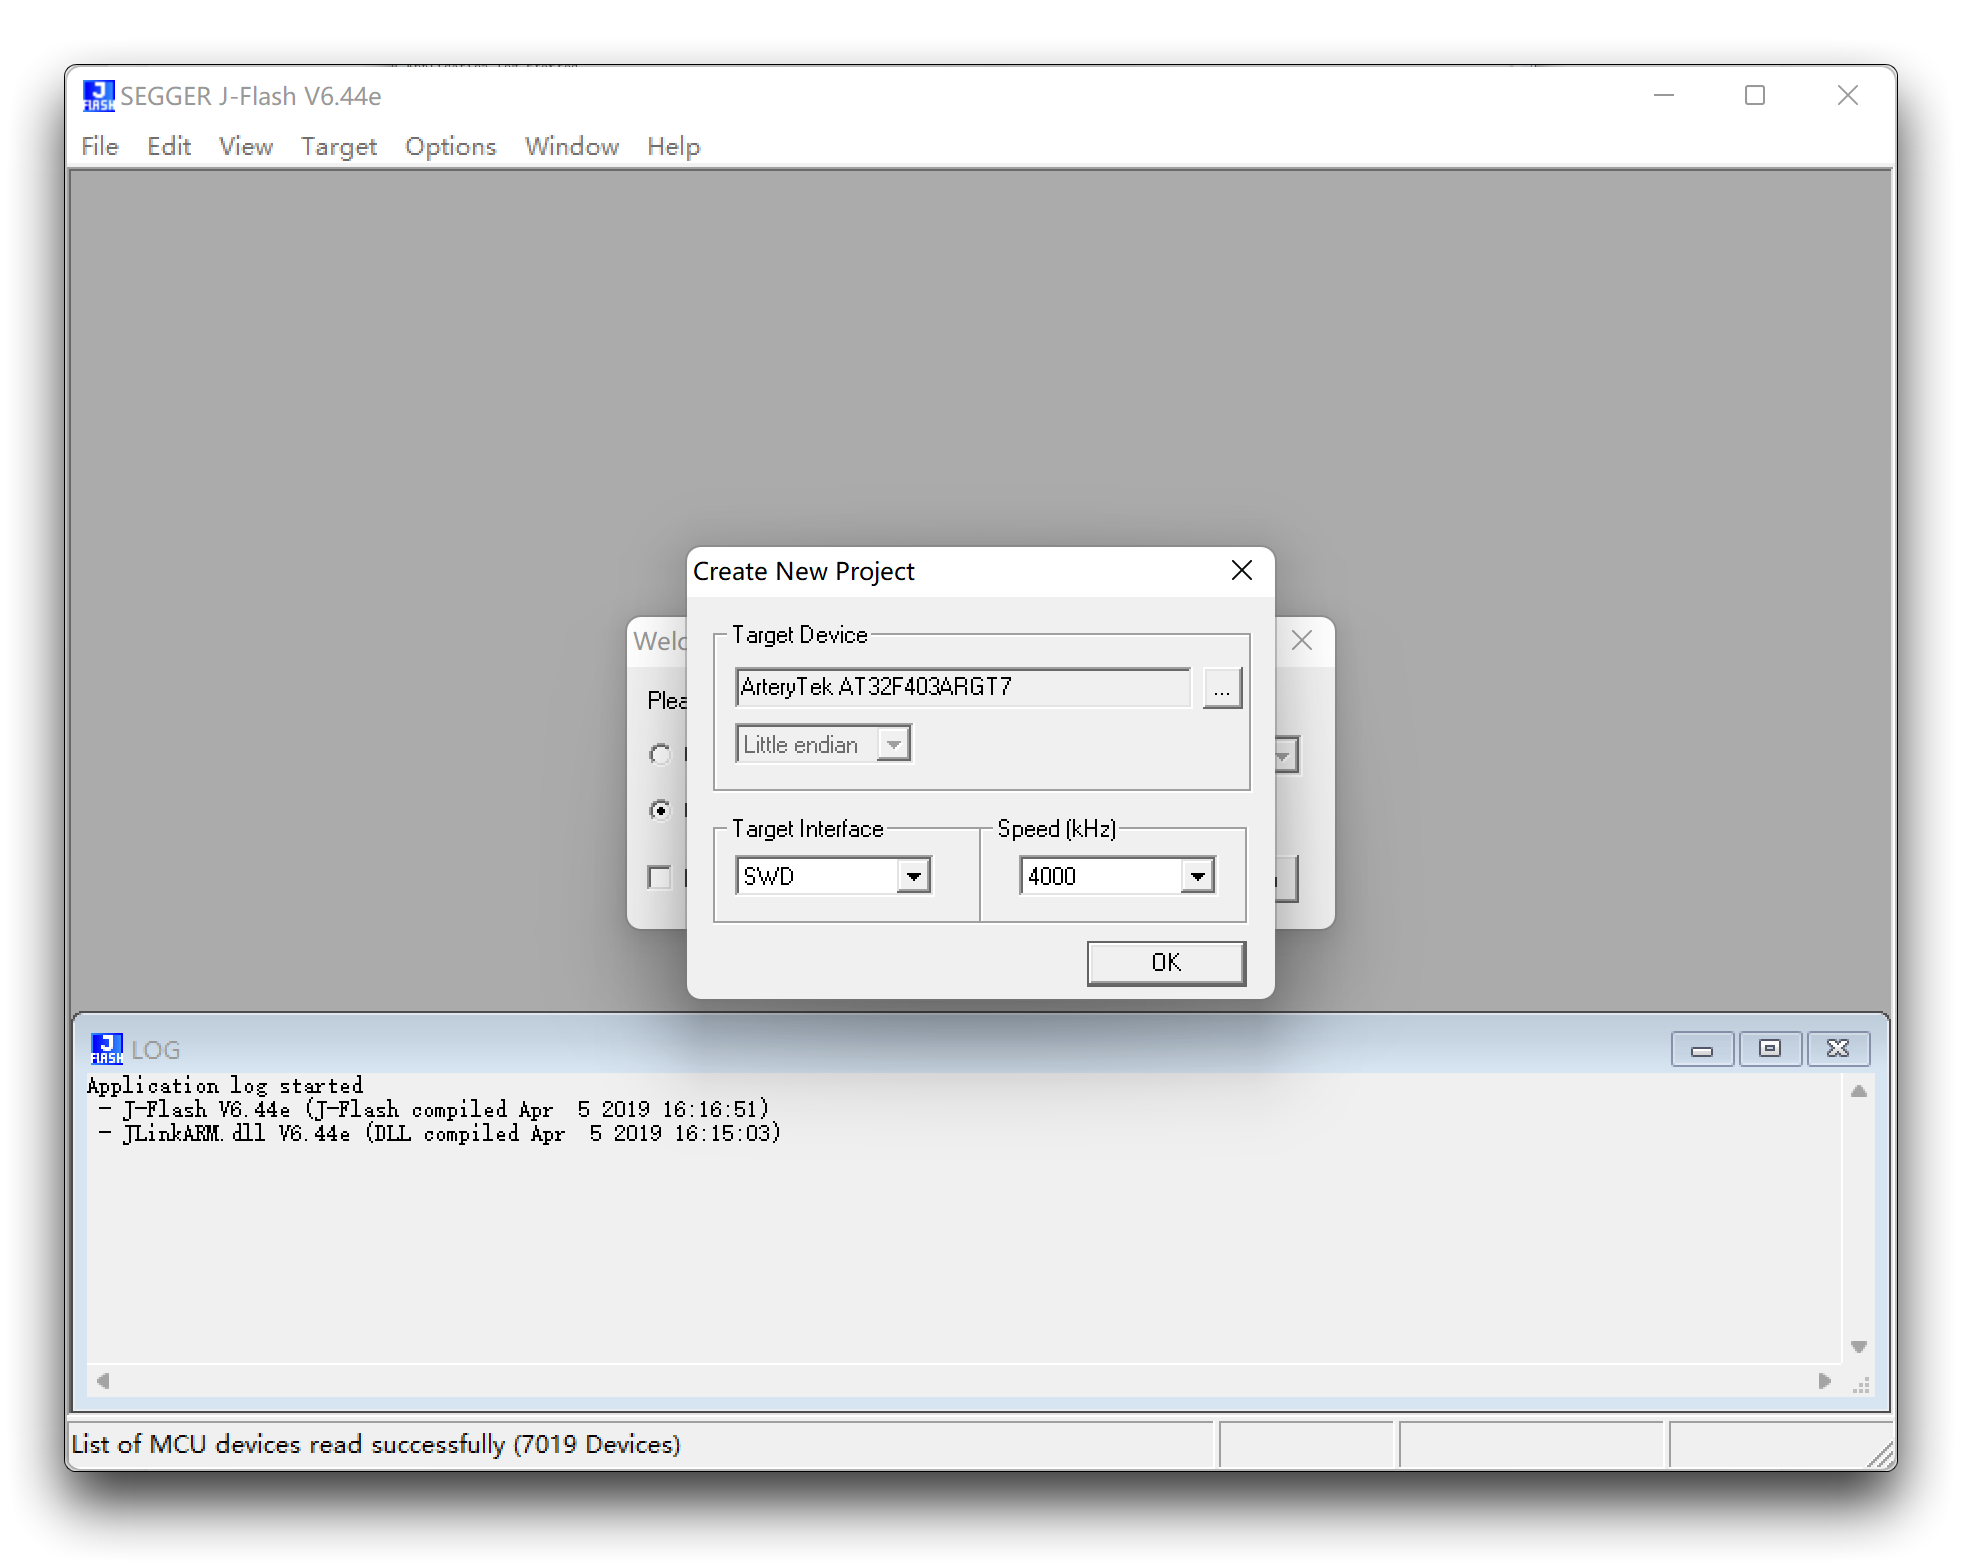
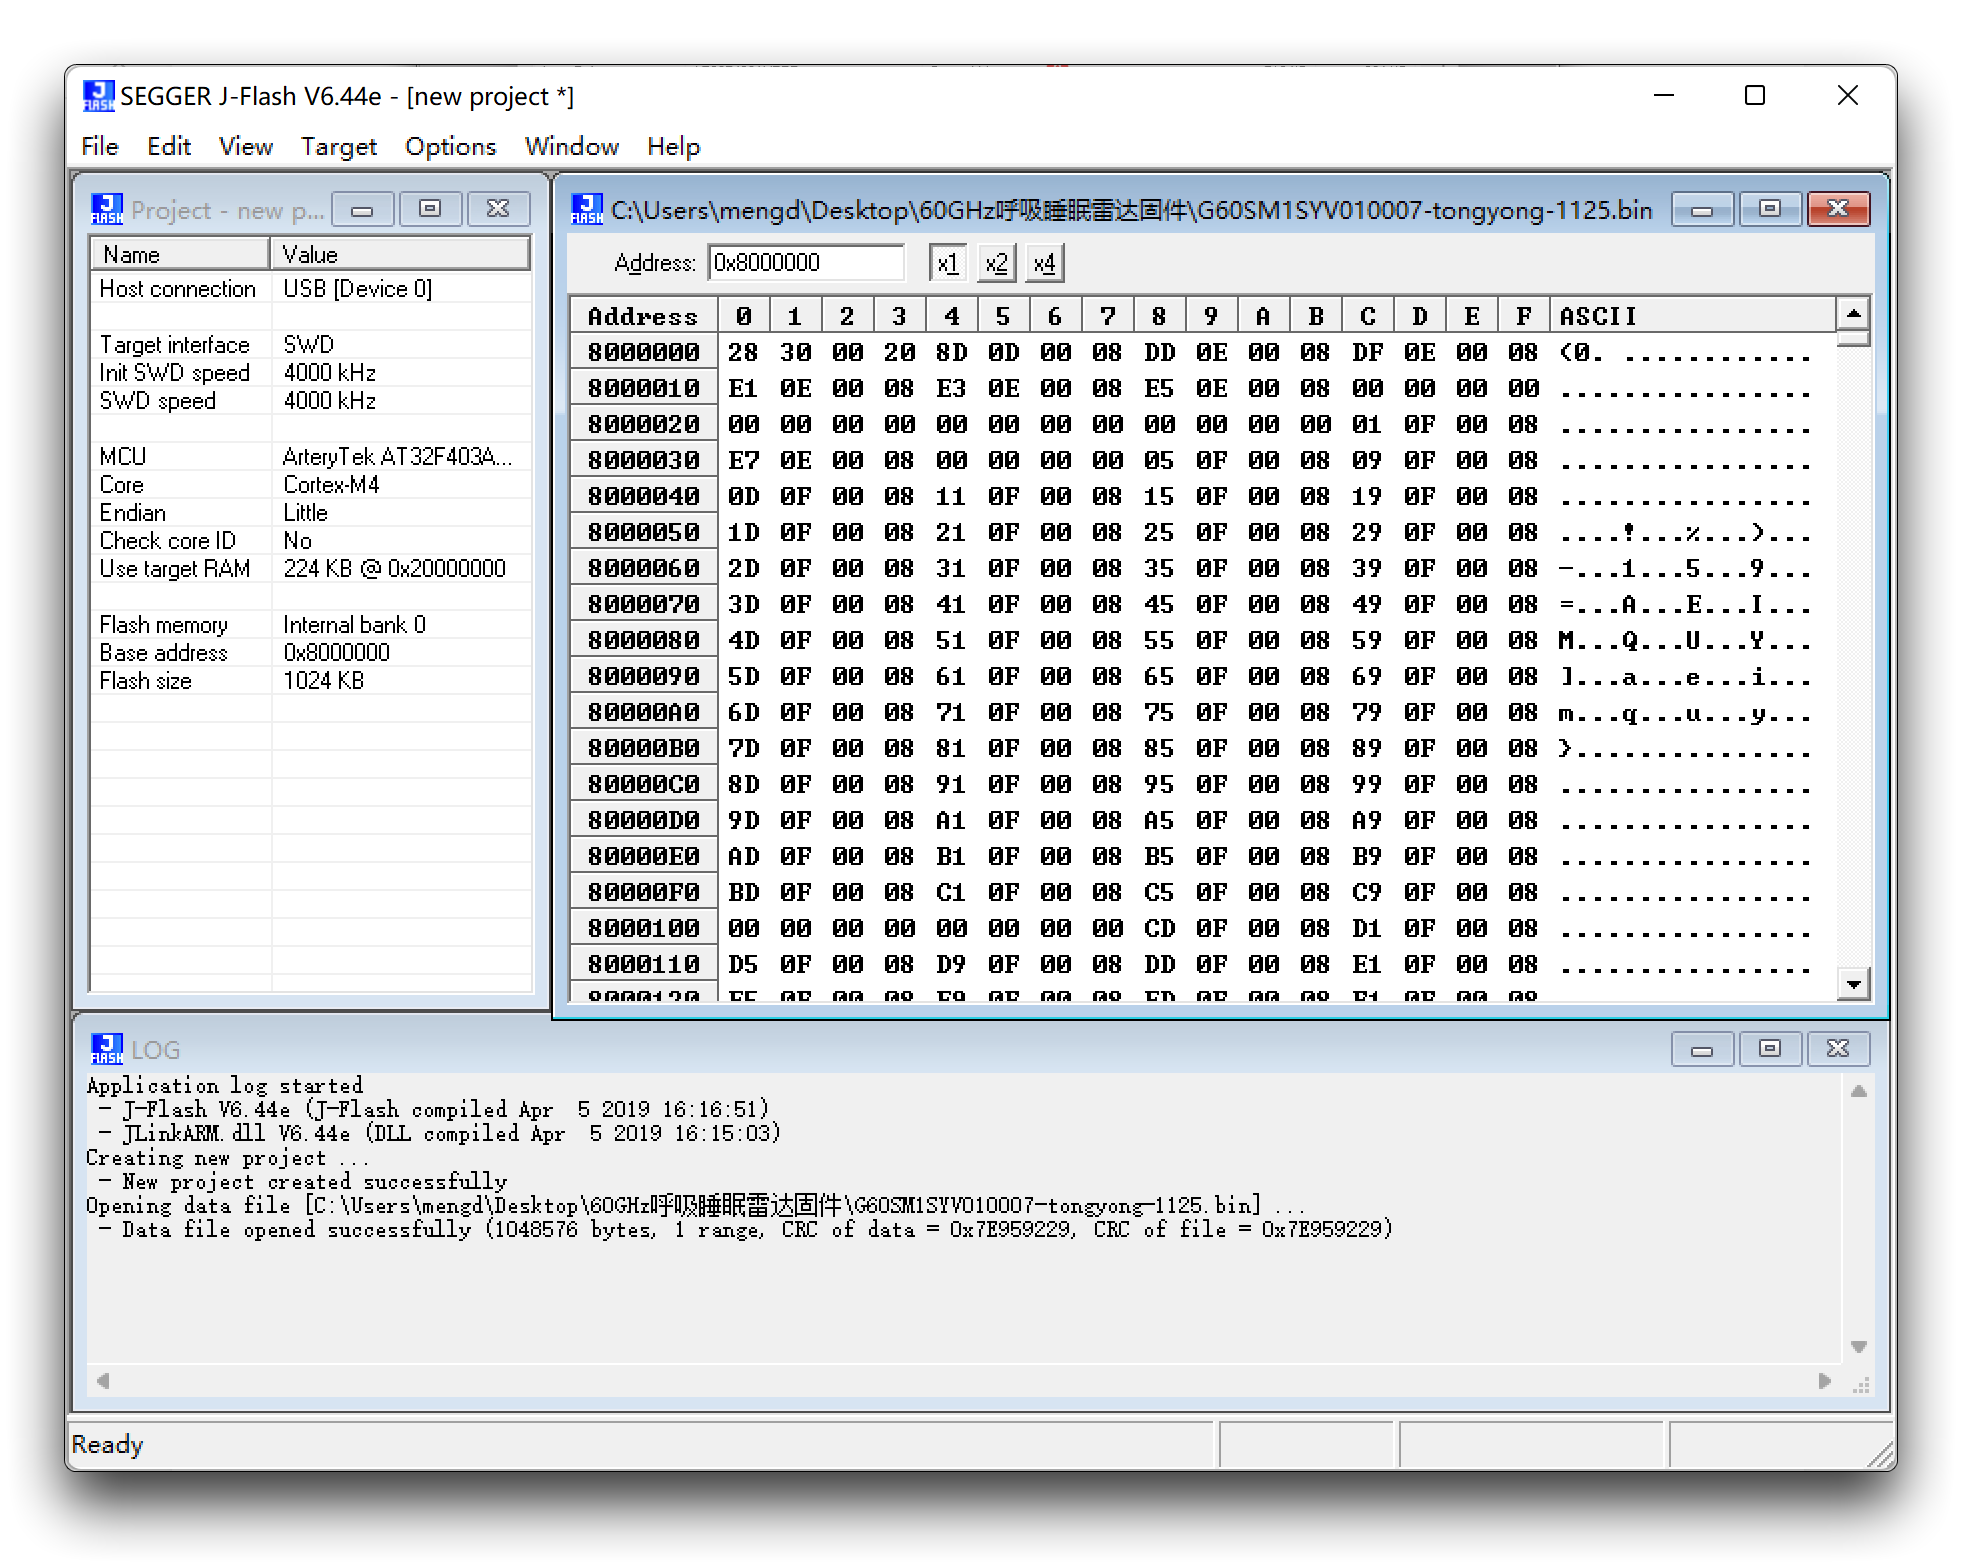
Step6. Drag and drop the radar firmware (.bin file) into this software and a window will pop up, we will just use its default starting address of 0x8000000.
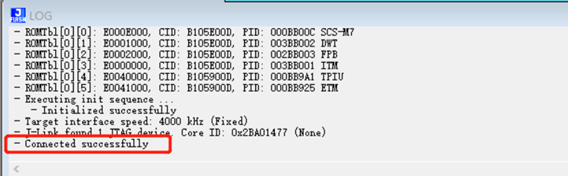
Step7. Clink Target -> Connect

When the connection is successful it will show Connected successfully.
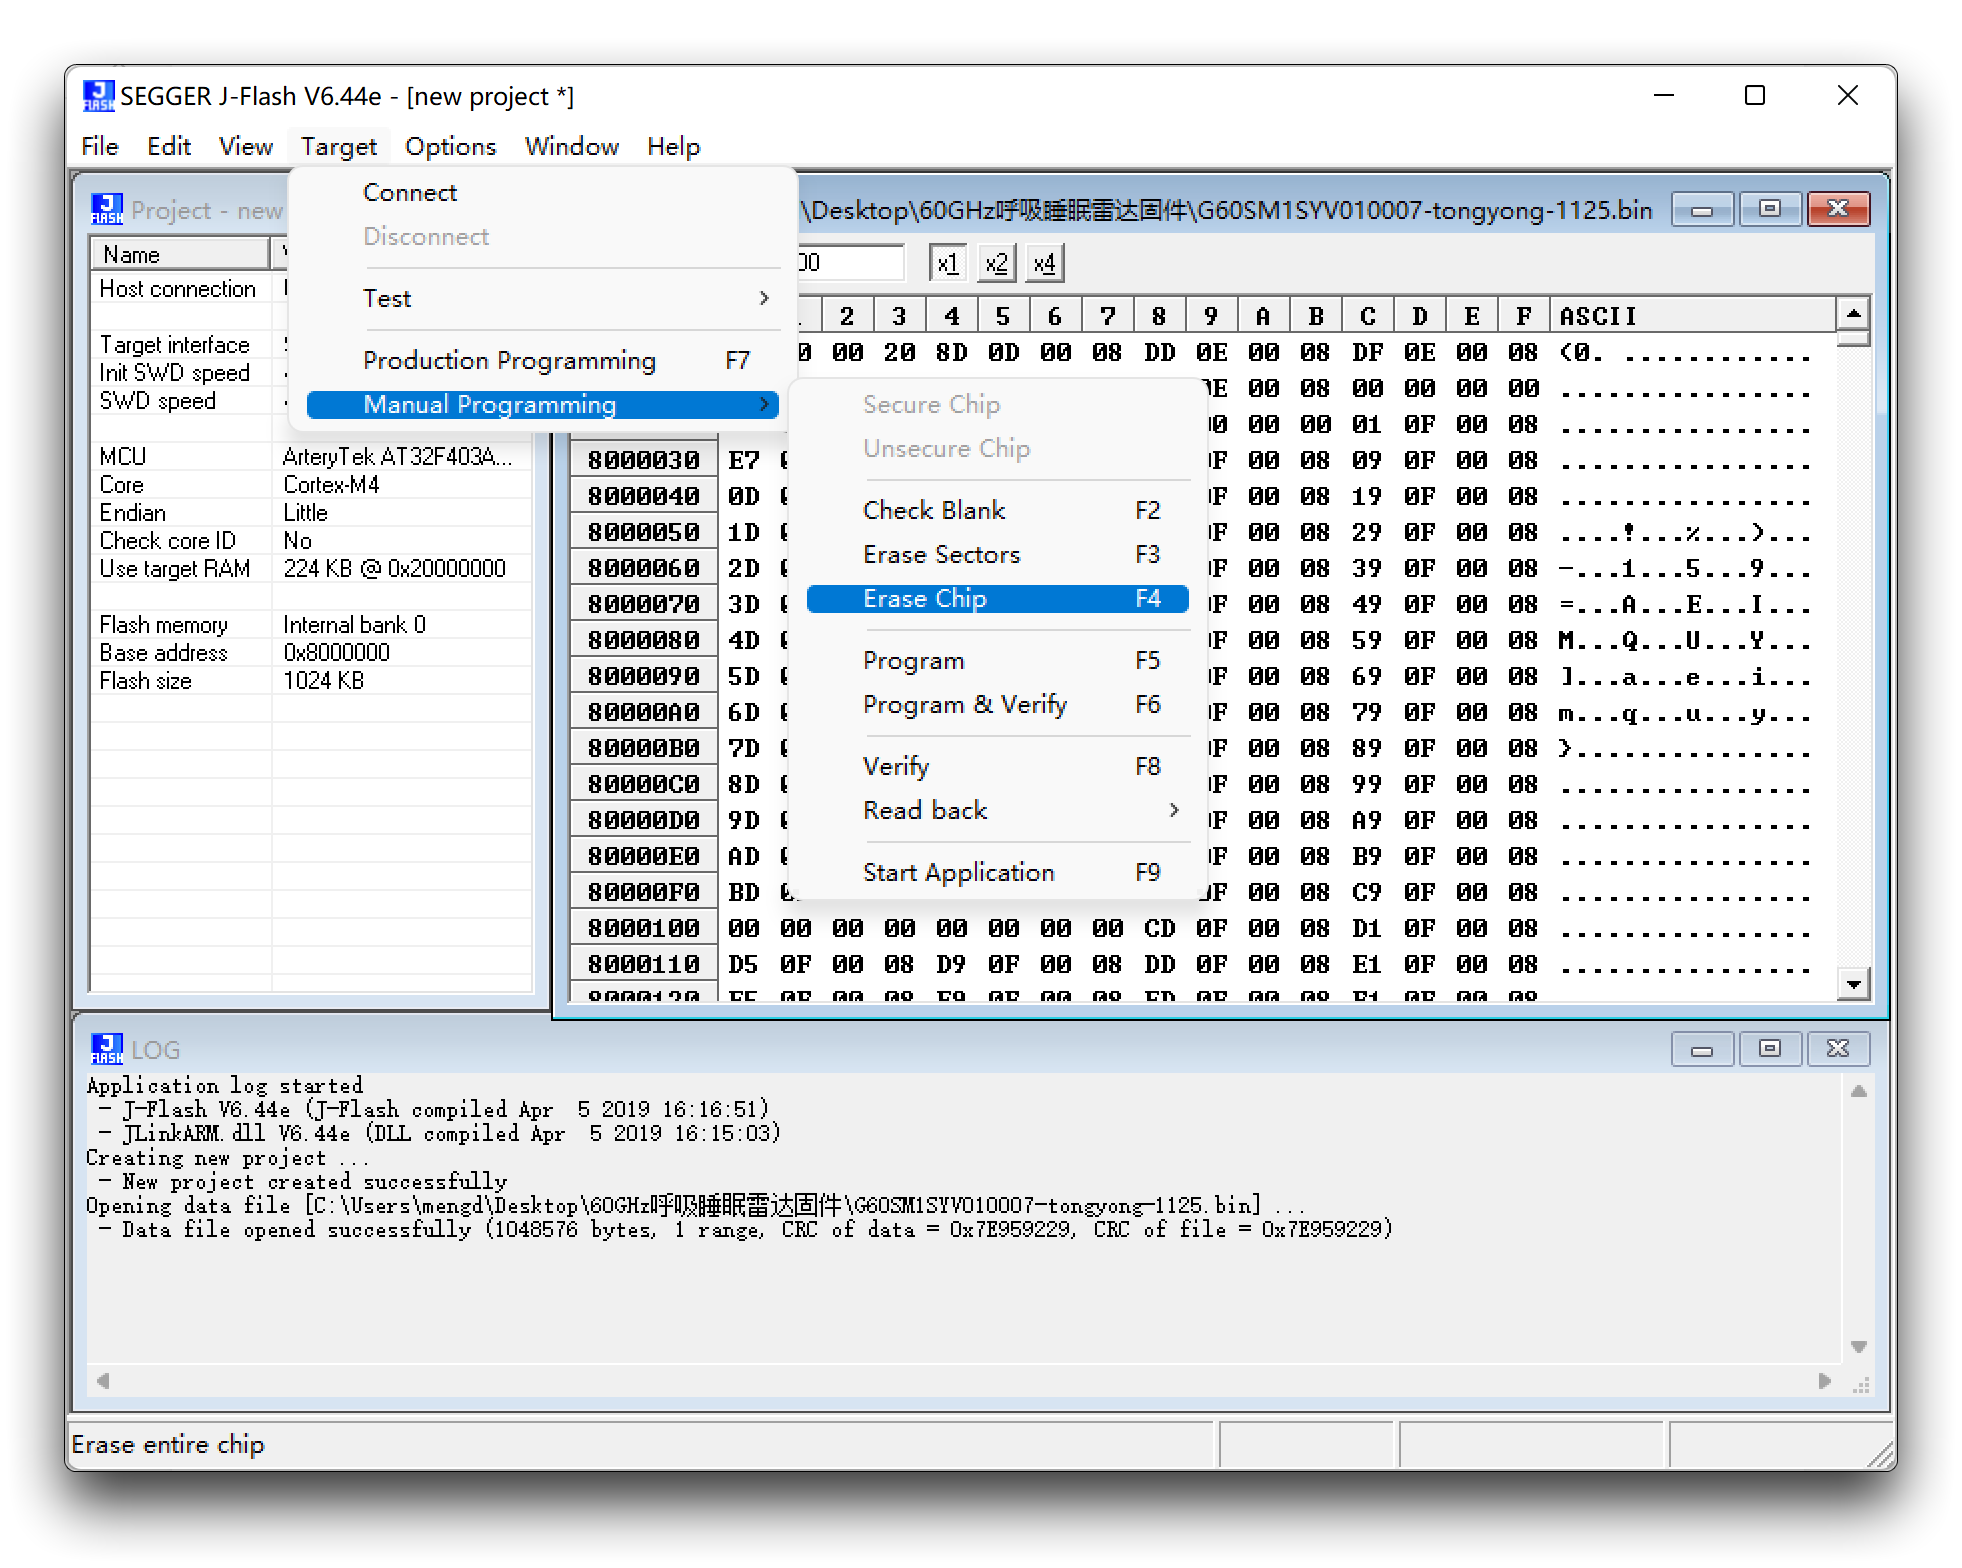
Erase firmware: Target -> manual Programming -> Erase Chip
Upgrade firmware: Target -> manual Programming -> Program & Verify
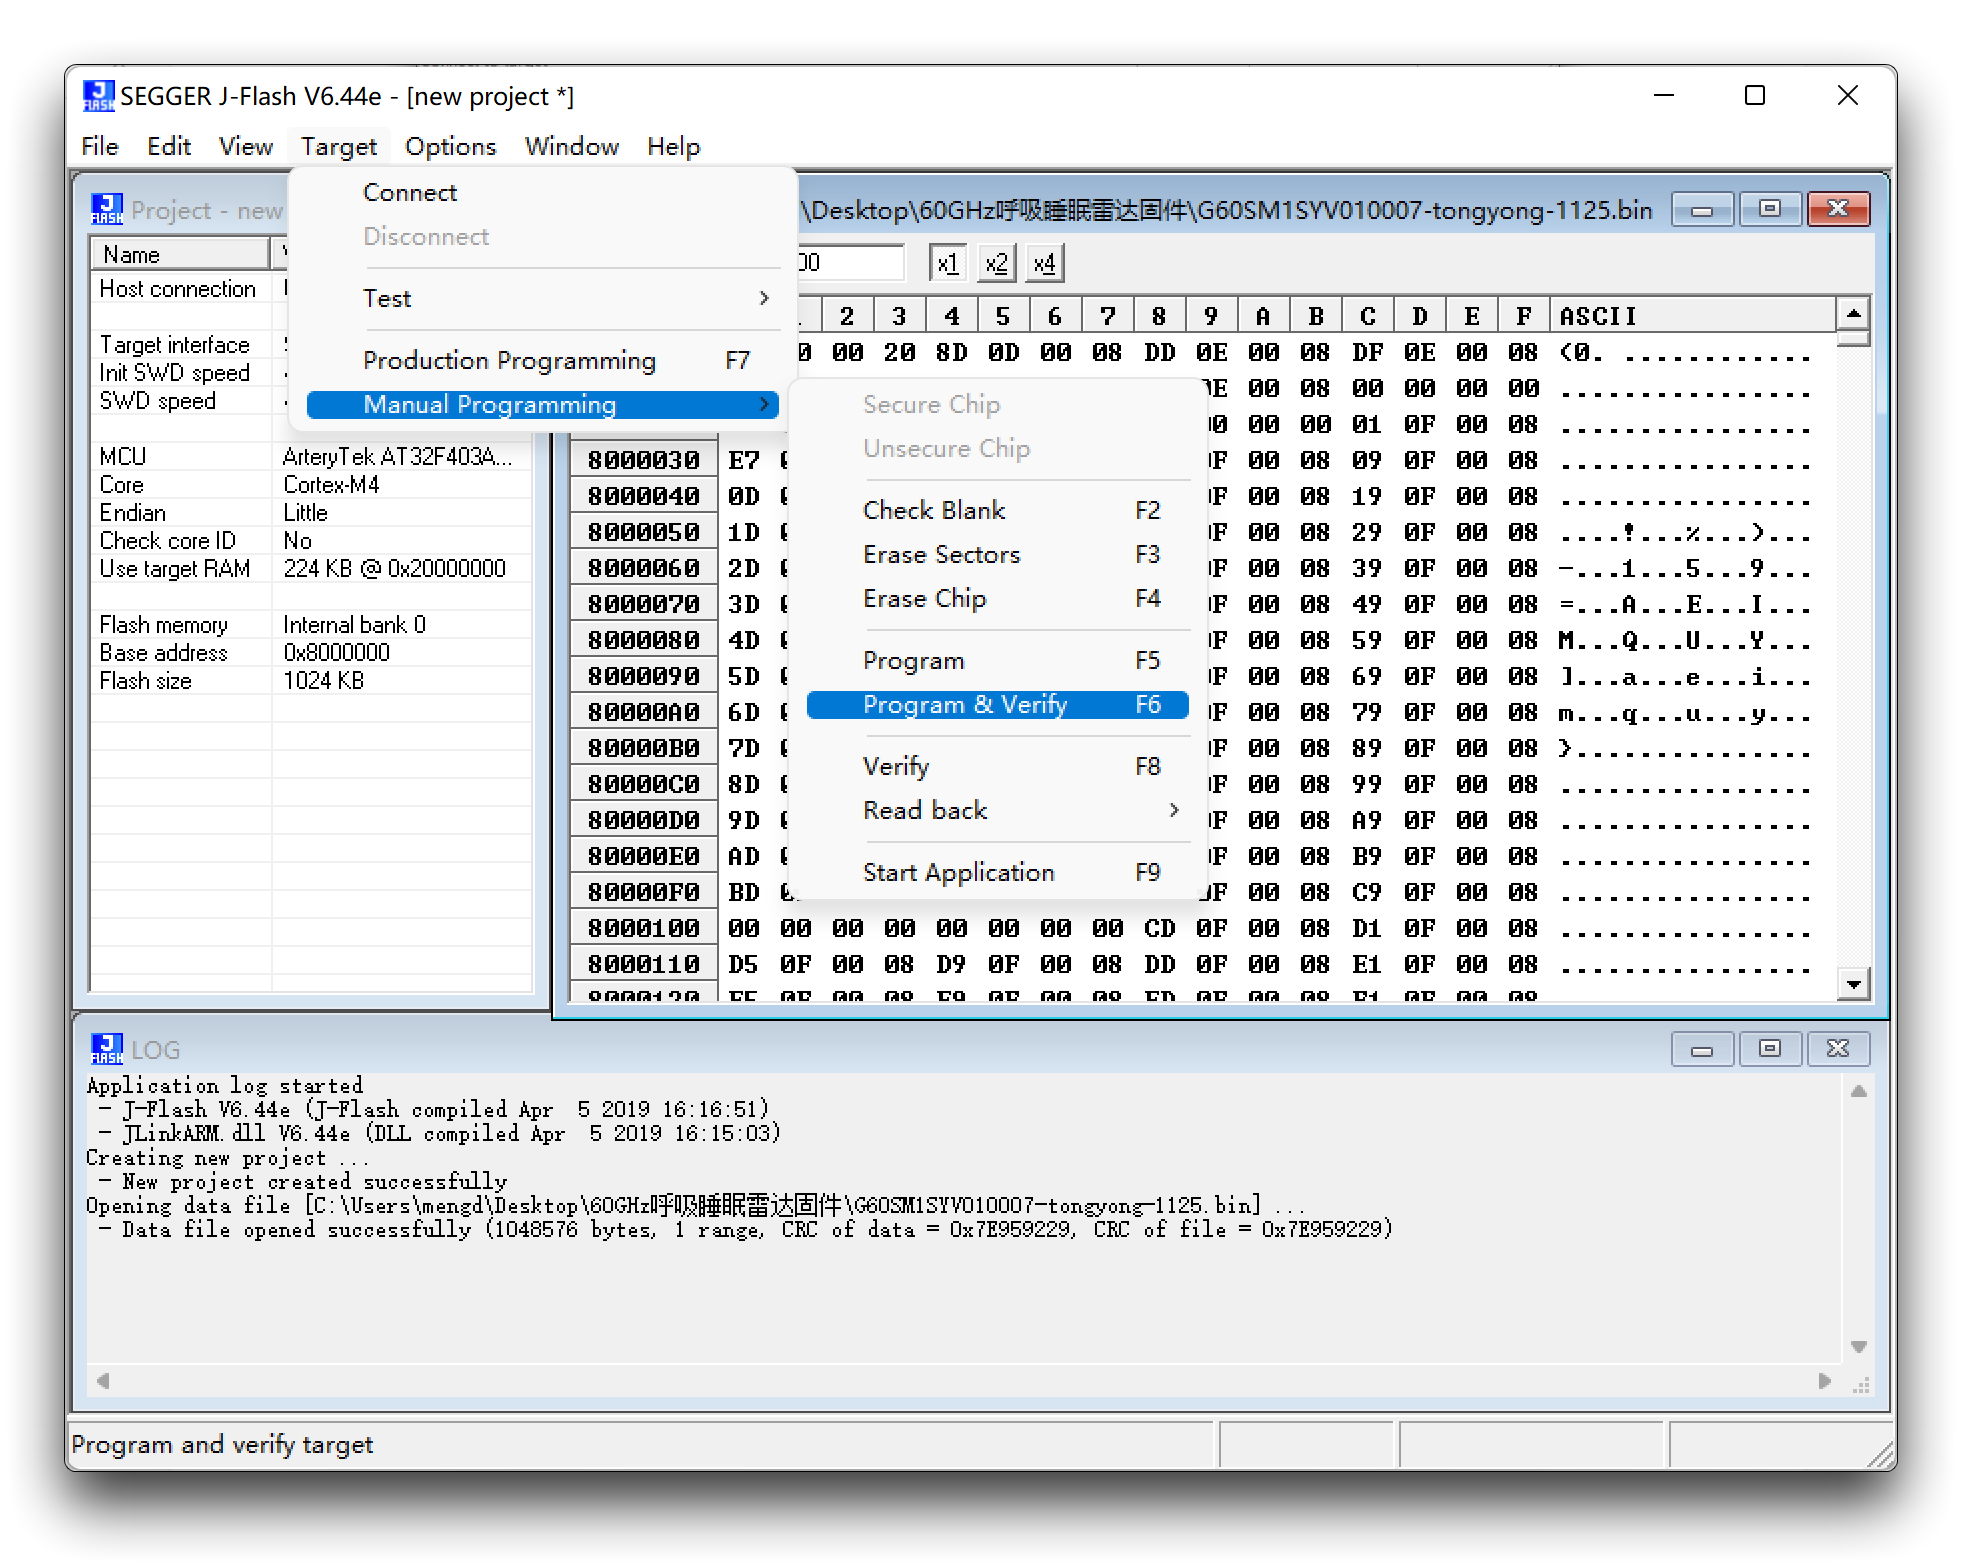
At this point, the firmware update is complete.
Update firmware via UART
Considering that J-link is expensive, it is too extravagant to buy a J-link for the vast majority of users who only need to update their radar firmware, so we offer an update method via UART.
Download of the latest firmware
| Firmware Version | Download Address |
|---|---|
| UART_MR60BHA1-230104.bin | Download |
| UART_MR60BHA1-230904.bin | Download |
-
Please check the function of your product carefully, please do not mix with other mmwave sensors to brush this firmware, otherwise it may cause abnormal product function, the consequences need to be your own responsibility!
-
Please also note that different ways of updating the firmware use different firmware content, what you are downloading is the firmware burned via UART.
-
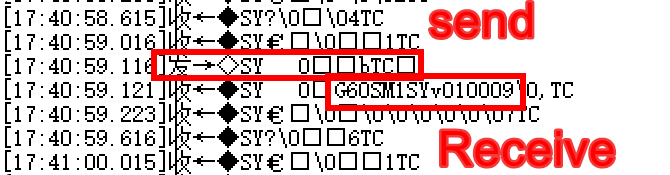
Make sure your radar firmware version is at least version G60SM1SYv010003 before using the UART to upgrade the firmware, otherwise it may disable the radar, at which point you'll have to use J-link to burn the firmware to use it!
You can query the firmware version number information by sending the command 0x53 0x59 0x02 0xA4 0x00 0x01 0x0F 0x62 0x54 0x43 to Radar. The data reported by the radar is then displayed as a string, and you will see an effect similar to the one shown below.
G60SM1SYv010009 is the model number reported on the radar, where 10009 is the version number. This means that this sensor supports UART upgrade.
To update your radar to the latest version
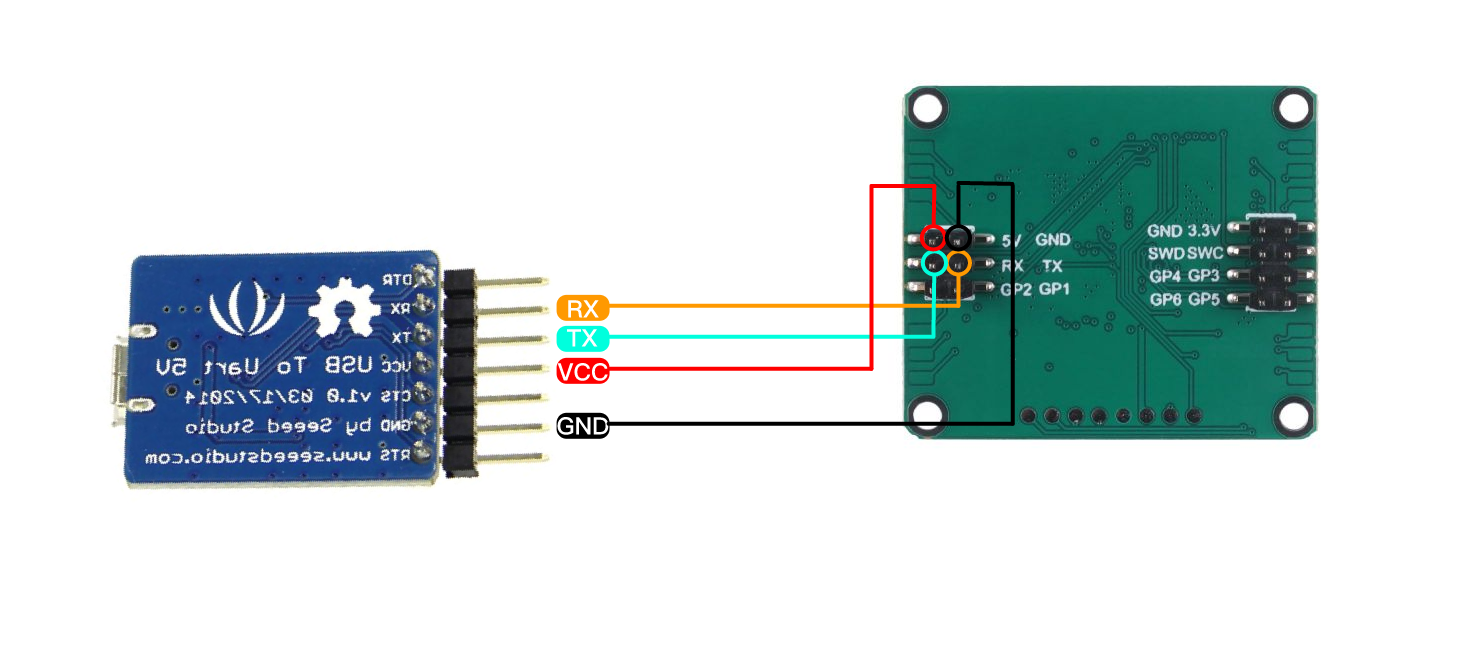
Step 1. You will need to have a UART to USB and MR60BHA1 60GHz mmWave Sensor.
Connect the radar and UART to USB together via Dupont wire as shown in the diagram below.
Step 2. Download the necessary software and firmware.
| File | Download Address |
|---|---|
| PackageMake-v1.1.1.zip | Download |
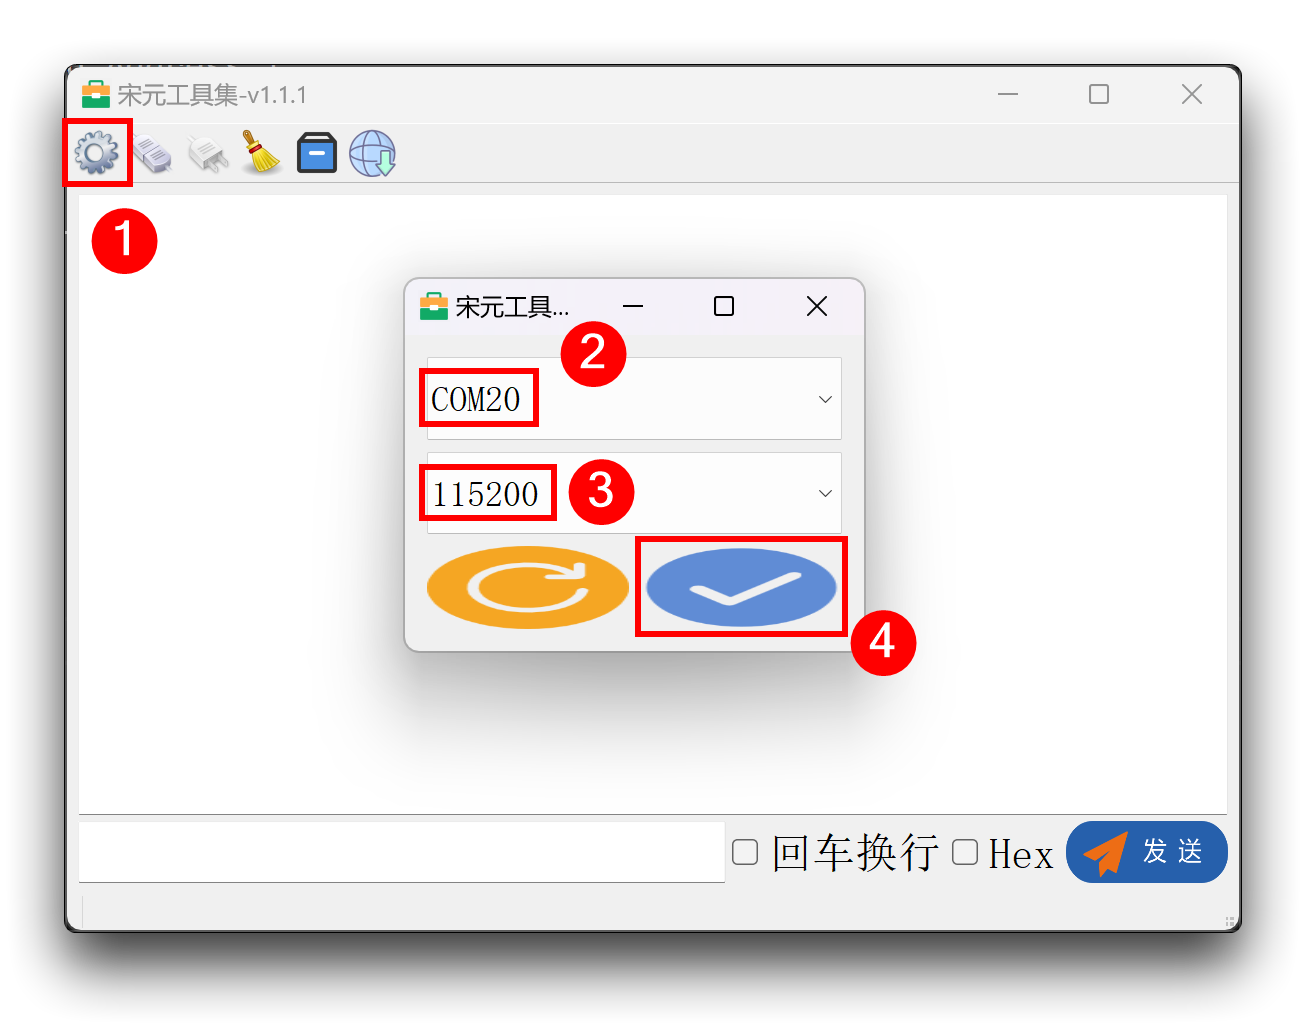
Step 3. Unzip the package PackageMake-v1.1.1.zip and open the PackageMake-v1.1.1.exe file inside.
Connect the UART to USB with the sensor connected to the computer, click the gear pattern in the upper left corner of the software, select the port number, set the baud rate to 115200, and then click the bottom right corner to confirm. (If the port number is not found, check the connection and then click the refresh button in the lower left corner to retry)
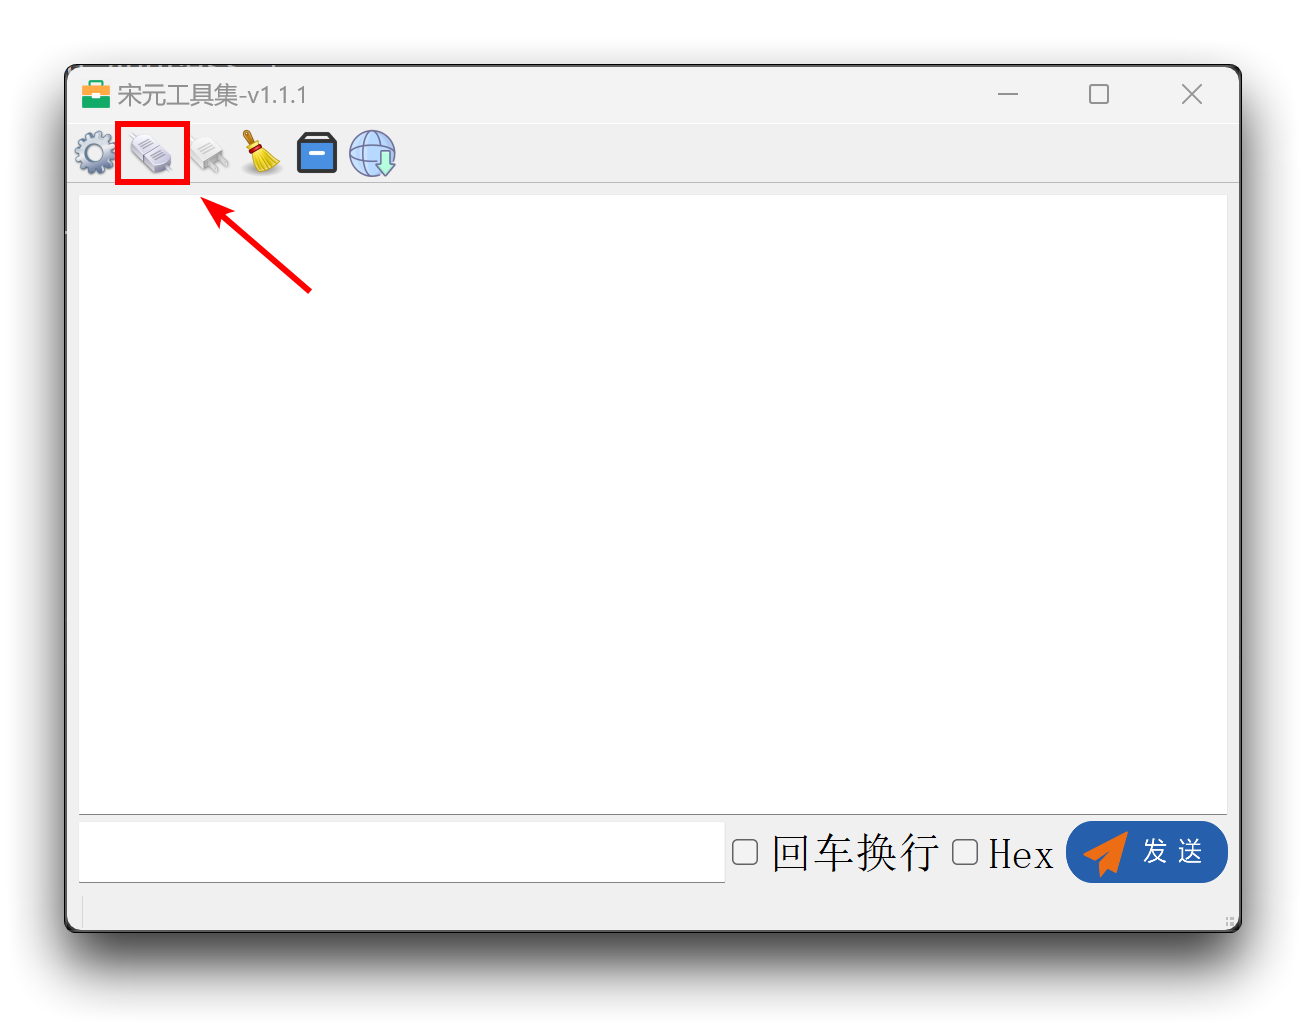
Step 4. Connecting the sensor
After you have finished setting up the serial port as described above, click on the second icon in the upper right corner and you will see the raw data from the radar printed out if the port is selected correctly.
Step 5. Update firmware
Click the last icon in the upper right corner of the left mouse button, this will bring up a window to select the firmware. Please select the firmware version you have downloaded.
After the selection is complete, the selected file path will appear under the software, please double check if the selected firmware version and model is consistent with the sensor you are using.
To upgrade the firmware, please double click the left mouse button to the last image on the top left of the software, then the firmware will start downloading to the sensor.
Wait for the progress bar to finish and the firmware update is complete.
Use of the upper computer
Connect the sensor directly to the computer's usb port via a UART to USB device. The wiring is shown in the table below.
| |||
| UART to USB | MR60BHA1 Sensor | ||
| 5V | --> | 5V | |
| GND | --> | GND | |
| RX | --> | TX | |
| TX | --> | RX | |
In addition to the serial software mentioned above, you can also use the upper computer software designed for radar directly.
If you are using an older version of the OP and firmware, please upgrade to the latest version as soon as possible to ensure you can enjoy the software protocol and Wiki content.
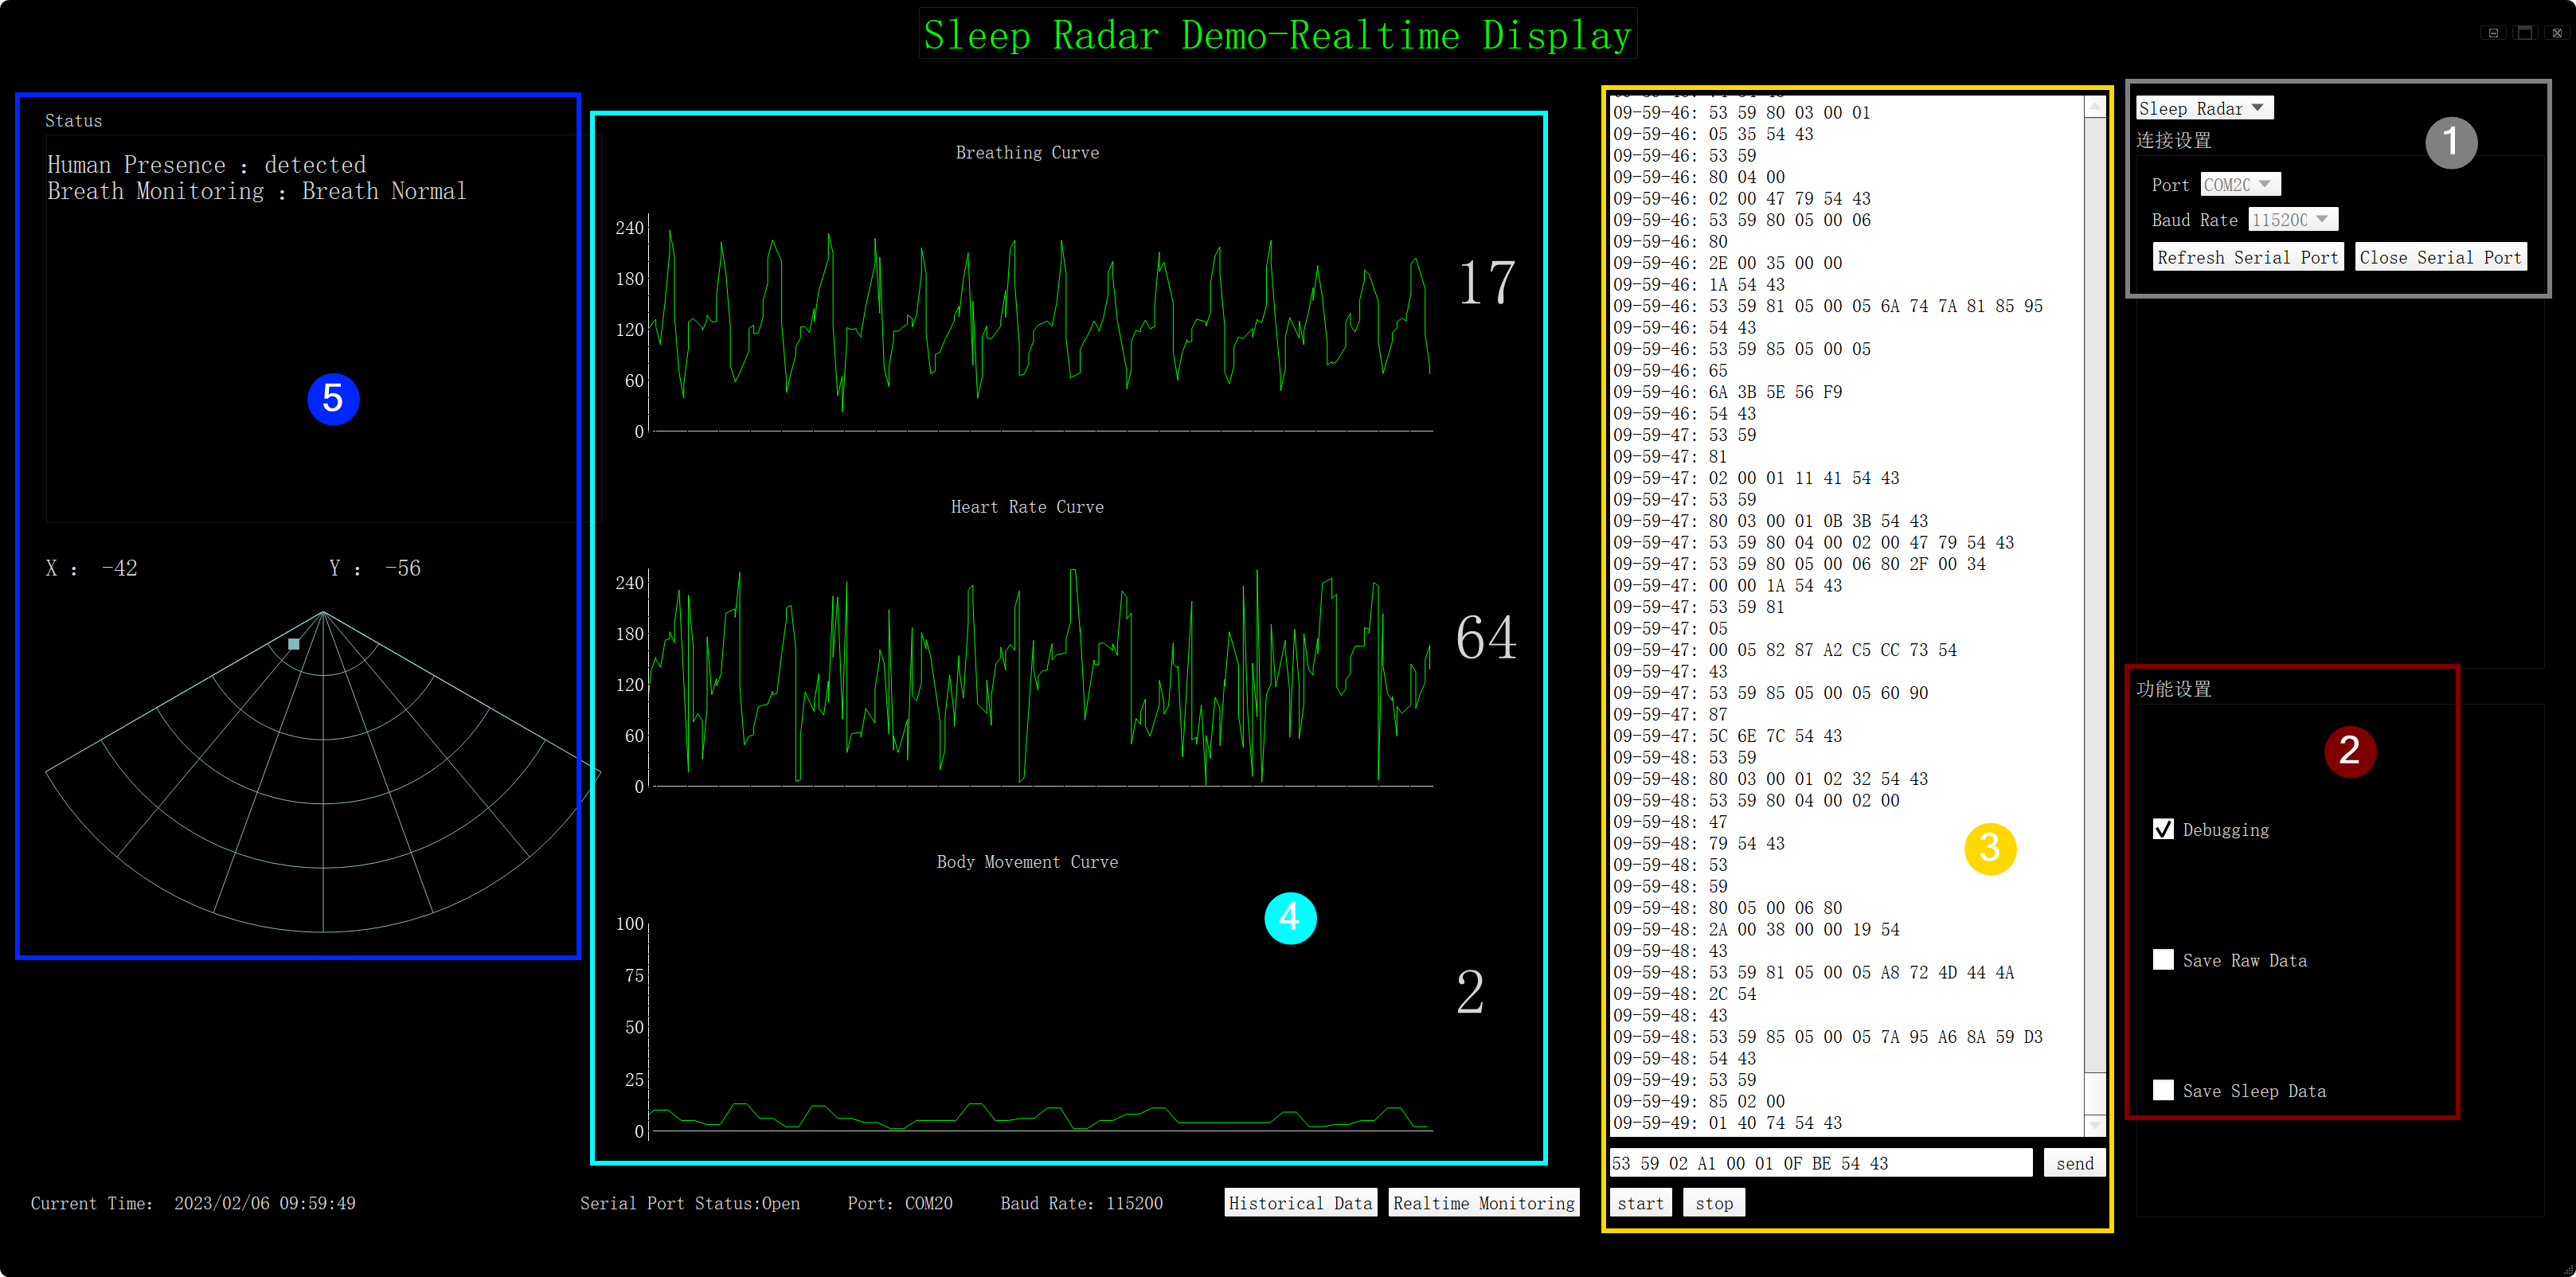
The following five sections explain the role of each part of the software.
-
Connection Setup
Select the port to which the sensor is connected to the computer. It is usually necessary to refresh the port by clicking the Refresh Serial Port button before selecting it. Once the serial port is selected correctly, the data is automatically updated in circle 4 (if any data is available).
-
Function Setting
- Debugging: When this function is turned on, real-time raw data can be output in the software. This is the window in circle 3 in the figure.
- Save Raw Data: When you click on it, you can choose to keep the original data to your local computer. Note, however, that this option does not save new data after the button is clicked, only the most recent historical data.
- Save Sleep Data: When you click on it, you can choose the path to save the raw data information related to sleep, while other data will not be saved. Note, however, that this option does not save new data after the button is clicked, only the most recent historical data.
-
Serial Monitor
This window appears when the Debugging option in circle 2 is checked, at which point the area displays real-time sensor data frames. At the bottom you can send command frames to the sensor. The commands that can be sent or queried can be found in the user manual of the sensor.
-
Graphic Display
This shows the line graph in real time. The data content displayed is respiratory rate, heart rate, and physical parameters, respectively. The horizontal coordinate is the time and the vertical coordinate is the corresponding data.
-
Status & Orientation
This area allows you to observe the state of human presence and the orientation of the human body. The human body orientation data is for reference only.
Sensor development with Arduino
Arduino Library Overview
If this is your first time using Arduino, we highly recommend you to refer to Getting Started with Arduino.
The library code used in this example can be downloaded by clicking the icon below.
Function
Before we get started developing a sketch, let's look at the available functions of the library.
-
void recvRadarBytes()—— This function collects the data frames reported by the Sensor via the UART according to the frame headers and frame tails in the Sensor data protocol. Used in conjunction with theshowData()function, the collected data information can be printed out via the serial port.-
Input parameters: None
-
Return value: None
-
-
void showData()—— This function serves to print out the complete data frame reported by the Sensor at once via the serial port and needs to be used in conjunction with therecvRadarBytes()function.-
Input parameters: None
-
Return value: None
-
-
void HumanExis_Func()—— This function is responsible for parsing the data frames of the Sensor and outputting the relevant data on the state of the human presence.-
Input parameters: None
-
Return value:
-
unsigned int sensor_report—— The value returned indicates which status class the parsed data frame belongs to. The specific categories can be found in the Default Variables section. Human movement information is reported only when changes occur. -
int bodysign_val—— The value returned represents the value of the Human Movement Parameter. This value is reported once per second. -
float distance—— The sensor determines the current distance to the human body, the value is in meters. This value is reported once every 2 seconds. -
float Dir_x, Dir_y, Dir_z—— Indicates the body position information detected by the sensor. The human position information has positive and negative units in meters. This value is reported once every 2 seconds.
-
-
-
void Breath_Heart()—— This function is responsible for parsing the respiration and heartbeat data from the sensor and returning the associated values.-
Input parameters: None
-
Return value:
-
unsigned int sensor_report—— The value returned indicates which status class the parsed data frame belongs to. The specific categories can be found in the Default Variables section. -
unsigned int heart_rate—— Heart rate values. Reported every 3 seconds. Value range 0~100. -
unsigned int heart_point_1, heart_point_2, heart_point_3, heart_point_4, heart_point_5—— Heart rate waveform data. 5 bytes represent 5 values in 1s in real time, the waveform is sine wave data, the central axis is 128 which means when the heart rate intensity is 0, it will be displayed as 128. This value is reported once per second. -
unsigned int breath_rate—— Breathing values. Reported every 3 seconds. Value range 0~20. -
unsigned int breath_point_1, breath_point_2, breath_point_3, breath_point_4, breath_point_5—— Breath rate waveform data. 5 bytes represent 5 values in 1s in real time, the waveform is sine wave data, the central axis is 128 which means when the heart rate intensity is 0, it will be displayed as 128. This value is reported once per second.
-
-
-
void SleepInf_Decode()—— This function is responsible for parsing the sleep data information reported by the sensors. It is only valid when the monitored people has entered the bed and has been asleep for more than five minutes. Please make sure that Sleep state transfer mode is enabled when using this function.-
Input parameters: None
-
Return value:
-
unsigned int sensor_report—— The value returned indicates which status class the parsed data frame belongs to. The specific categories can be found in the Default Variables section. -
unsigned int awake_time—— This value indicates the waking time of the monitored person if the person has gone to bed. This value will be reported every ten minutes along with other sleep status data. -
unsigned int light_time—— This value indicates the light sleep time of the monitored character in case the character is already in bed. This value will be reported every ten minutes along with other sleep status data. -
unsigned int deep_time—— This value indicates the deep sleep time of the monitored character in case the character is already in bed. This value will be reported every ten minutes along with other sleep status data. -
unsigned int sleep_score—— This value indicates the sleep quality score. This information is reported at the end of the sleep process. -
boolean existence—— The value indicates the human presence information. A return result of True indicates the presence of a human, and a return result of False indicates the absence of a human. This value will be reported every ten minutes along with other sleep status data. -
unsigned int sleep_status—— This value indicates the sleep state. There are four sleep states, namely, leaving the bed, awake, light sleep, and deep sleep. This value will be reported every ten minutes along with other sleep status data. -
unsigned int breath_rate—— Average heartbeat over 10 minutes. This value will be reported every ten minutes along with other sleep status data. -
unsigned int heart_rate—— Average breathing over ten minutes. This value will be reported every ten minutes along with other sleep status data. -
unsigned int turn_num—— Number of turnovers in ten minutes. This value will be reported every ten minutes along with other sleep status data. -
unsigned int substantial_move_ratio—— Ten minutes of substantial movement of the character accounted for. This value will be reported every ten minutes along with other sleep status data. -
unsigned int samll_move_ratio—— The percentage of small movements of the characters in ten minutes. This value will be reported every ten minutes along with other sleep status data. -
unsigned int apnea_num—— The number of apneas in ten minutes. This value will be reported every ten minutes along with other sleep status data. -
unsigned int sleep_time—— Total hours of sleep. Report when the sensor determines that the sleep process is over. -
unsigned int awake_time_radio—— The percentage of time that a person is awake. Report when the sensor determines that the sleep process is over. -
unsigned int light_time_radio—— Percentage of time spent in light sleep. Report when the sensor determines that the sleep process is over. -
unsigned int deep_time_radio—— Percentage of time spent in deep sleep. Report when the sensor determines that the sleep process is over. -
unsigned int outbed_time—— The amount of time a person is out of bed. Report when the sensor determines that the sleep process is over. -
unsigned int outbed_num—— The number of times a person leaves the bed. Report when the sensor determines that the sleep process is over.
-
-
-
void send_func(const unsigned char* buff, int len, bool cyclic /*=false*/)—— The function is used for sending query frames and command frames.-
Input parameters:
-
buff—— The data frame you want to send to the Sensor. -
len—— The length of the data frame you want to send to the Sensor. -
cyclic—— Cyclic send switch. The default is false, which can be set to true if you wish to send this data frame cyclically.
-
-
Return value: None
-
-
void ModeSelect_fuc(int mode)—— This function is used to select the operating mode of the sensor. There are two modes of operation, the sleep state transmission mode and the real-time data transmission mode. In the sleep state transmission mode, the sleep monitoring function is on (SleepInf_Decode()is valid). In real-time data transmission mode, the sleep monitoring function is off (SleepInf_Decode()is invalid), but waveform data is reported.-
Input parameters:
mode—— The selected mode number. 1 indicates real-time data transmission mode and 2 indicates sleep state transmission mode.
-
Return value: None
-
-
void reset_func()—— The function serves to reset the Sensor.-
Input parameters: None
-
Return value: None
-
Default Variables
#define MESSAGE_HEAD1 0x53      //Data frame header1
#define MESSAGE_HEAD2 0x59      //Data frame header2

#define MESSAGE_END1  0x54      //End1 of data frame
#define MESSAGE_END2  0x43      //End2 of data frame

#define HUMAN_PSE_RADAR 0x80    //Human presence data

#define PRESENCE_INF 0x01       //Presence Information
#define SOMEONE_HERE 0x01       //Someone here
#define NOONE_HERE 0x00         //Noone here

#define MOVE_INF 0x02           //Campaign Information
#define PSE_NONE 0x00           //None
#define STATIONARY 0x01         //A person is stationary
#define MOVEMENT 0x02           //A person in motion

#define BODY_SIG 0x03           //Body movement information

#define DISTANCE 0x04           //Distance from the person being detected

#define DIRECTIONS 0x05         //Body orientation

#define HEART_INF 0x85          //Heart rate information

#define HEART_RATE 0x02         //Heart rate

#define HEART_RATE_WAVE 0x05    //Heart rate waveform (No analysis for now)

#define BREATH_RATE_RADAR 0x81  //Respiratory heart rate data

#define BREATH_INF 0x01         //Breathing data
#define BREATH_NORMAL 0x01      //Normal breathing
#define BREATH_RAPID 0x02       //Acute respiratory abnormalities
#define BREATH_SLOW 0x03        //Slow heartbeat
#define BREATH_NONE 0x04        //Radar detection nothing

#define BREATH_VAL 0x02         //Breathing values

#define BREATH_WAVE 0x05        //Respiratory waveform (No analysis for now)

#define SLEEP_INF 0x84          //Sleep information

#define INOUT_BED 0x01          //In bed or out of bed
#define OUT_BED 0x00            //Out of bed
#define IN_BED 0x01             //In bed
#define INOUT_NONE 0x02         //None (Display in real-time detection mode)

#define SLEEP_STATE 0x02        //Sleep state
#define DEEP_SLEEP 0x00         //Deep sleep
#define LIGHT_SLEEP 0x01        //Light sleep
#define AWAKE 0x02              //Awake
#define SLEEP_NONE 0x03         //None (Display in real-time detection mode)

#define AWAKE_TIME 0x03         //Awake time

#define LIGHTSLEEP_TIME 0x04    //Light sleep time

#define DEEPSLEEP_TIME 0x05     //Deep sleep time

#define SLEEP_SCORE 0x06        //Sleep quality score

#define SLEEP_STATUE 0x0C       //Sleep integrated status reporte

#define SLEEP_QUALITY 0x0D      //Comprehensive information reporting on sleep quality

#define SLEEP_ERROR 0x0E        //Abnormal sleep reporte

#define SLEEP_LESS4H 0x00        //Sleep less than 4 hours
#define SLEEP_OVER12H 0x01       //Sleep over 12 hours
#define SLEEP_LONGTIMENOONE 0x02 //Unusual situation, no one for a long time
#define SLEEP_ERRORNONE 0x03     //None

#define reset_frame_len 10      //Reset data frame length
//Reset data frame
const unsigned char breath_reset_frame[10] = {0x53, 0x59, 0x01, 0x02, 0x00, 0x01, 0x0F, 0xBF, 0x54, 0x43};

#define mode_frame_len 10       //Mode selection command frame length
//Mode selection command frame
const unsigned char realtime_mode_frame[10] = {0x53, 0x59, 0x84, 0x0F, 0x00, 0x01, 0x00, 0x40, 0x54, 0x43};
const unsigned char sleepstatus_mode_frame[10] = {0x53, 0x59, 0x84, 0x0F, 0x00, 0x01, 0x01, 0x41, 0x54, 0x43};

//Return status, Use in arduino
//Possible values for sensor_report
#define NOONE 0x01
#define SOMEONE 0x02
#define NONEPSE 0x03
#define STATION 0x04
#define MOVE 0x05
#define BODYVAL 0x06
#define DISVAL 0x07
#define DIREVAL 0x08

#define HEARTRATEVAL 0x09
#define HEARTRATEWAVE 0x10
#define BREATHNOR 0x11
#define BREATHRAPID 0x12
#define BREATHSLOW 0x13
#define BREATHNONE 0x14
#define BREATHVAL 0x15
#define BREATHWAVE 0x16

#define OUTBED 0x17
#define INBED 0x18
#define NOINOUT 0x19
#define SLEEPAWAKE 0x20
#define SLEEPLIGHT 0x21
#define SLEEPDEEP 0x22
#define SLEEPNONE 0x23
#define AWAKETIME 0x24
#define LIGHTTIME 0x25
#define DEEPTIME 0x26
#define SLEEPSCORE 0x27
#define SLEEPSTATUE 0x28
#define SLEEPQUALITY 0x29
#define SLEEPLESS4H 0x30
#define SLEEPOVER12H 0x31
#define LONGTIMENOONE 0x32
#define ERRORNONE 0x33


unsigned int sensor_report = 0, bodysign_val = 0, awake_time = 0, light_time = 0, deep_time = 0, sleep_score = 0, turn_num = 0;
unsigned int heart_rate = 0, heart_point_1 = 0, heart_point_2 = 0, heart_point_3 = 0, heart_point_4 = 0, heart_point_5 = 0;
unsigned int breath_rate = 0, breath_point_1 = 0, breath_point_2 = 0, breath_point_3 = 0, breath_point_4 = 0, breath_point_5 = 0;
unsigned int substantial_move_ratio = 0, samll_move_ratio = 0, apnea_num = 0, sleep_status = 0, sleep_time = 0;
unsigned int awake_time_radio = 0, light_time_radio = 0, deep_time_radio = 0;
unsigned int outbed_time = 0, outbed_num = 0;
float distance = 0;
float Dir_x = 0, Dir_y = 0, Dir_z = 0;
boolean existence;
Installation
Step 1. You need to Install an Arduino Software.

Step 2. Launch the Arduino application.
Step 3. Select your development board model and add it to the Arduino IDE.
-
If you want to use Seeeduino V4.2 for the later routines, please refer to this tutorial to finish adding.
-
If you want to use Seeeduino XIAO for the later routines, please refer to this tutorial to finish adding.
-
If you want to use XIAO RP2040 for the later routines, please refer to this tutorial to finish adding.
-
If you want to use XIAO BLE for the later routines, please refer to this tutorial to finish adding.
-
If you want to use XIAO ESP32C3 for the later routines, please refer to this tutorial to finish adding.
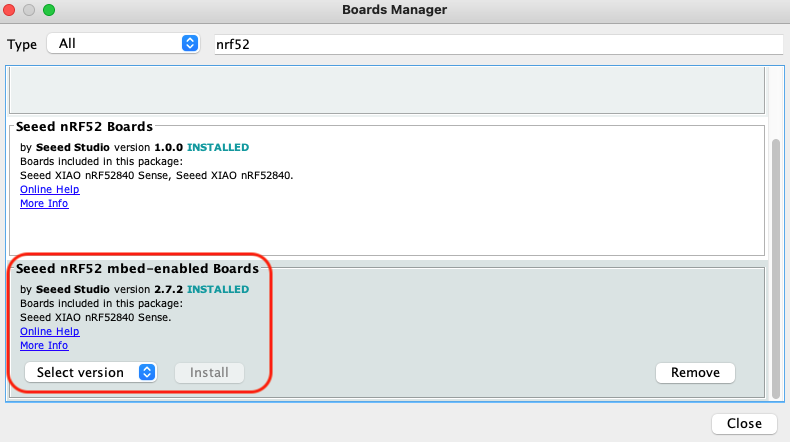
For XIAO nRF52840, please select Seeed nRF52 mbed-enabled Boards, otherwise an error may be reported when running programs.
Step 4. Install the Arduino code library.
Start by getting the code base from GitHub and downloading it to your local computer.
Since you have downloaded the zip Library, open your Arduino IDE, click on Sketch > Include Library > Add .ZIP Library. Choose the zip file you just downloaded,and if the library install correct, you will see Library added to your libraries in the notice window. Which means the library is installed successfully.

Arduino Example
Now that we have our library installed and we understand the basic functions, let's run some examples for our XIAO BLE to see how it behaves.
Materials Required
Before completing the following examples, you will need to prepare the following materials.
|  |  |
| 60GHz MR60BHA1 Sensor | Seeed XIAO BLE nRF52840 Sense | 2mm to 2.54mm Pitch Ribbon Cable |
Step 1. Connect the device to the computer through the main board. The wiring diagram is shown in the table below.
 | |||
| Seeed Studio XIAO nRF52840 | MR60BHA1 Sensor | ||
| 5V | --> | 5V | |
| GND | --> | GND | |
| RX | --> | D6 | |
| TX | --> | D7 | |
Step 2. In the menu bar in the upper left corner of the Arduino IDE, select tool, choose the type of development board you are using, and select the corresponding serial port.
If you are using MacOS, the serial port name of the device will often start with /dev/cu.usbmodem xxx, ending with the name of the device. If you are using Windows, the device's serial port name will often begin with COM, again ending with the device's name.

In this example, we will demonstrate how the radar works with our popular product XIAO BLE.
Demo1 Raw data export
This example will guide you through the process of printing out the raw data reported by the Sensor via the serial port.
The following example program is in the examples folder of the library called MR60BHA1_print_rawdata.
#include "Arduino.h"
#include <60ghzbreathheart.h>

//#include <SoftwareSerial.h>
// Choose any two pins that can be used with SoftwareSerial to RX & TX
//#define RX_Pin A2
//#define TX_Pin A3

//SoftwareSerial mySerial = SoftwareSerial(RX_Pin, TX_Pin);

// we'll be using software serial
//BreathHeart_60GHz radar = BreathHeart_60GHz(&mySerial);

// can also try hardware serial with
BreathHeart_60GHz radar = BreathHeart_60GHz(&Serial1);

void setup() {
  // put your setup code here, to run once:
  Serial.begin(115200);
  Serial1.begin(115200);

  //  mySerial.begin(115200);

  while(!Serial);   //When the serial port is opened, the program starts to execute.

  Serial.println("Readly");
}

void loop()
{
  // put your main code here, to run repeatedly:
  radar.recvRadarBytes();           //Receive radar data and start processing
  radar.showData();                 //Serial port prints a set of received data frames
  delay(200);                       //Add time delay to avoid program jam
}
If you are using XIAO ESP32 series and there is no data feedback from mmwave radar. You can try to change the code above from Serial1.begin(115200); to Serial1.begin(115200, SERIAL_8N1, D7, D6);.
In this program, we are using the XIAO nRF52840's hardware Serial1 port to connect to the Sensor and use the hardware Serial port Serial to output data, so we need to initialise this serial port separately in the initialisation function Setup().
In the main loop() function we use the function recvRadarBytes() to receive data frames from the Sensor and then use the showData() function to print out the received data frames via the serial port.
In this program, it is important to note that there is an interval between the reception and output of every two data frames to avoid a jam on the main board. This time should be no less than 150ms.
This means that there is no way for the main board to receive all the data frames reported by the Sensor, but as the number of frames reported by the Sensor is very large and frequent, this does not affect the accuracy of using the Sensor to determine the environment.
Upload program. Opening your serial monitor to a baud rate of 115200 should show the result. The output should look something like the below image.

Demo2: Use of human presence detection function
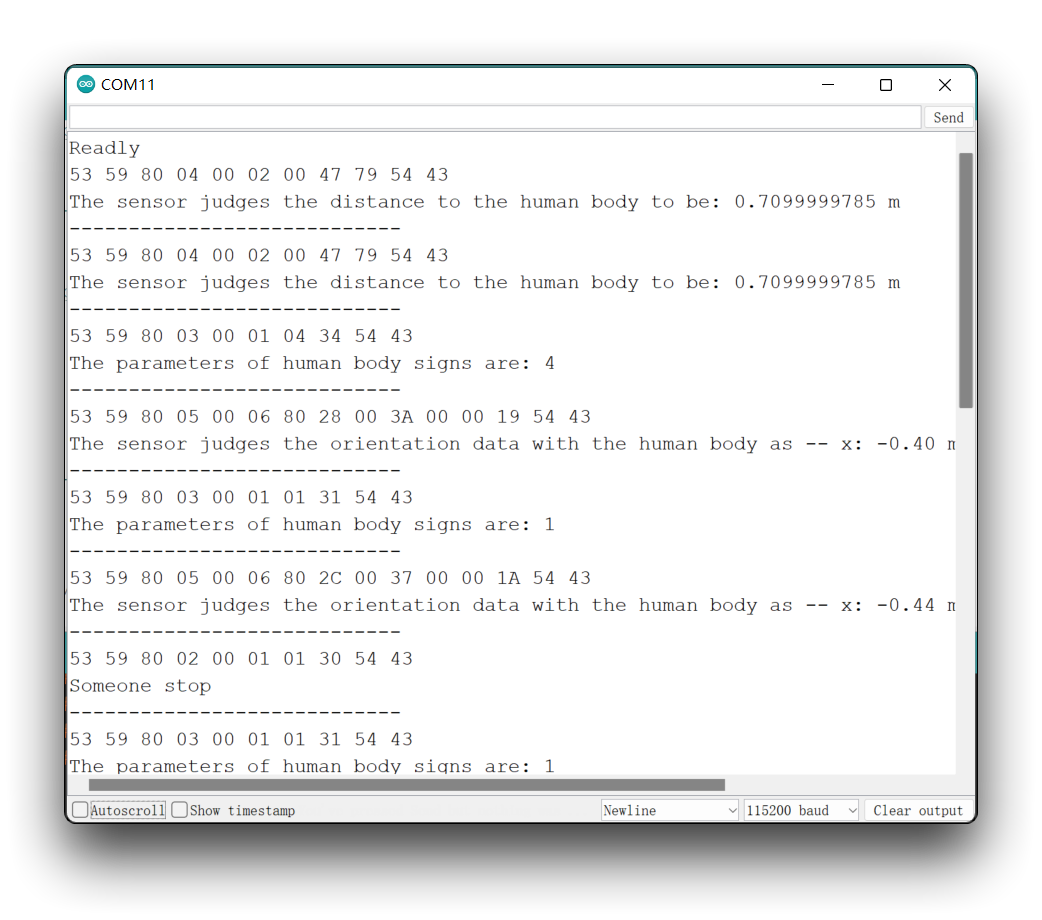
In this example, we will explain how to use the function of human presence detection and print out all the values of this function in the function through the serial monitor.
The following example program is in the examples folder of the library called MR60BHA1_human_existence_inf_output.
#include "Arduino.h"
#include <60ghzbreathheart.h>

//#include <SoftwareSerial.h>
// Choose any two pins that can be used with SoftwareSerial to RX & TX
//#define RX_Pin A2
//#define TX_Pin A3

//SoftwareSerial mySerial = SoftwareSerial(RX_Pin, TX_Pin);

// we'll be using software serial
//BreathHeart_60GHz radar = BreathHeart_60GHz(&mySerial);

// can also try hardware serial with
BreathHeart_60GHz radar = BreathHeart_60GHz(&Serial1);

void setup() {
  // put your setup code here, to run once:
  Serial.begin(115200);
  Serial1.begin(115200);

  //  mySerial.begin(115200);

  while(!Serial);   //When the serial port is opened, the program starts to execute.

  Serial.println("Readly");
}

void loop()
{
  // put your main code here, to run repeatedly:
  radar.HumanExis_Func();           //Human existence information output
  if(radar.sensor_report != 0x00){
    switch(radar.sensor_report){
      case NOONE:
        Serial.println("Nobody here.");
        Serial.println("----------------------------");
        break;
      case SOMEONE:
        Serial.println("Someone is here.");
        Serial.println("----------------------------");
        break;
      case NONEPSE:
        Serial.println("No human activity messages.");
        Serial.println("----------------------------");
        break;
      case STATION:
        Serial.println("Someone stop");
        Serial.println("----------------------------");
        break;
      case MOVE:
        Serial.println("Someone moving");
        Serial.println("----------------------------");
        break;
      case BODYVAL:
        Serial.print("The parameters of human body signs are: ");
        Serial.println(radar.bodysign_val, DEC);
        Serial.println("----------------------------");
        break;
      case DISVAL:
        Serial.print("The sensor judges the distance to the human body to be: ");
        Serial.print(radar.distance, DEC);
        Serial.println(" m");
        Serial.println("----------------------------");
        break;
      case DIREVAL:
        Serial.print("The sensor judges the orientation data with the human body as -- x: ");
        Serial.print(radar.Dir_x);
        Serial.print(" m, y: ");
        Serial.print(radar.Dir_y);
        Serial.print(" m, z: ");
        Serial.print(radar.Dir_z);
        Serial.println(" m");
        Serial.println("----------------------------");
        break;
    }
  }
  delay(200);                       //Add time delay to avoid program jam
}
If you are using XIAO ESP32 series and there is no data feedback from mmwave radar. You can try to change the code above from Serial1.begin(115200); to Serial1.begin(115200, SERIAL_8N1, D7, D6);.
In this example, the function to detect the presence of a human body is implemented by the HumanExis_Func() function. The basic logic of the program implementation is that the HumanExis_Func() function assigns the status information reported by the sensor to the sensor_report variable. Based on the value of sensor_report, we then print out all the values in that state through the serial port.
Note that the sensor_report corresponds to the data output from the serial port under indentation. For example, the bodysign_val variable representing the sign parameter is only valid when sensor_report is BODYVAL, and is not present in other sensor_reports reported by the sensor.
Upload program. Opening your serial monitor to a baud rate of 115200 should show the result. The output should look something like the below image.
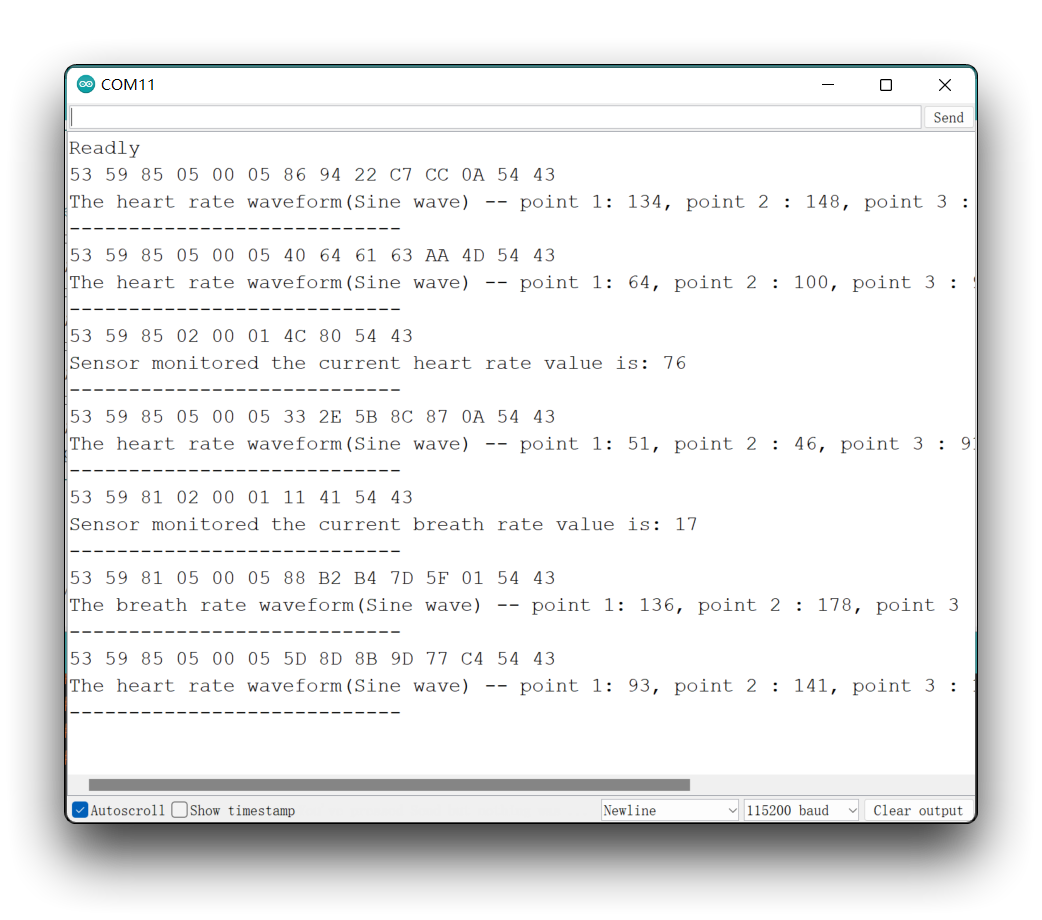
Demo3: The use of respiratory and heartbeat functions in the resting people
In this example, we will use the Breath_Heart() function to detect the breathing and heart rate of a stationary human body.
Our emphasis is on detecting breathing and heart rate in a stationary human body. Please do not use the product while the human body is in motion, as we have limited the heart rate and breathing of the sensor. The maximum heart rate will not exceed 100 and the maximum respiratory rate will not exceed 25.
The following example program is in the examples folder of the library called MR60BHA1_Breath_heartbeat_inf_output.
#include "Arduino.h"
#include <60ghzbreathheart.h>

//#include <SoftwareSerial.h>
// Choose any two pins that can be used with SoftwareSerial to RX & TX
//#define RX_Pin A2
//#define TX_Pin A3

//SoftwareSerial mySerial = SoftwareSerial(RX_Pin, TX_Pin);

// we'll be using software serial
//BreathHeart_60GHz radar = BreathHeart_60GHz(&mySerial);

// can also try hardware serial with
BreathHeart_60GHz radar = BreathHeart_60GHz(&Serial1);

void setup() {
  // put your setup code here, to run once:
  Serial.begin(115200);
  Serial1.begin(115200);

  //  mySerial.begin(115200);

  while(!Serial);   //When the serial port is opened, the program starts to execute.

  Serial.println("Readly");

  // radar.ModeSelect_fuc(1);  //1: indicates real-time transmission mode, 2: indicates sleep state mode.
  //After setting the mode, if you do not see data returned, you may need to re-power the sensor.
}

void loop()
{
  // put your main code here, to run repeatedly:
  radar.Breath_Heart();           //Breath and heartbeat information output
  if(radar.sensor_report != 0x00){
    switch(radar.sensor_report){
      case HEARTRATEVAL:
        Serial.print("Sensor monitored the current heart rate value is: ");
        Serial.println(radar.heart_rate, DEC);
        Serial.println("----------------------------");
        break;
      case HEARTRATEWAVE:  //Valid only when real-time data transfer mode is on
        Serial.print("The heart rate waveform(Sine wave) -- point 1: ");
        Serial.print(radar.heart_point_1);
        Serial.print(", point 2 : ");
        Serial.print(radar.heart_point_2);
        Serial.print(", point 3 : ");
        Serial.print(radar.heart_point_3);
        Serial.print(", point 4 : ");
        Serial.print(radar.heart_point_4);
        Serial.print(", point 5 : ");
        Serial.println(radar.heart_point_5);
        Serial.println("----------------------------");
        break;
      case BREATHNOR:
        Serial.println("Sensor detects current breath rate is normal.");
        Serial.println("----------------------------");
        break;
      case BREATHRAPID:
        Serial.println("Sensor detects current breath rate is too fast.");
        Serial.println("----------------------------");
        break;
      case BREATHSLOW:
        Serial.println("Sensor detects current breath rate is too slow.");
        Serial.println("----------------------------");
        break;
      case BREATHNONE:
        Serial.println("There is no breathing information yet, please wait...");
        Serial.println("----------------------------");
        break;
      case BREATHVAL:
        Serial.print("Sensor monitored the current breath rate value is: ");
        Serial.println(radar.breath_rate, DEC);
        Serial.println("----------------------------");
        break;
      case BREATHWAVE:  //Valid only when real-time data transfer mode is on
        Serial.print("The breath rate waveform(Sine wave) -- point 1: ");
        Serial.print(radar.breath_point_1);
        Serial.print(", point 2 : ");
        Serial.print(radar.breath_point_2);
        Serial.print(", point 3 : ");
        Serial.print(radar.breath_point_3);
        Serial.print(", point 4 : ");
        Serial.print(radar.breath_point_4);
        Serial.print(", point 5 : ");
        Serial.println(radar.breath_point_5);
        Serial.println("----------------------------");
        break;
    }
  }
  delay(200);                       //Add time delay to avoid program jam
}
If you are using XIAO ESP32 series and there is no data feedback from mmwave radar. You can try to change the code above from Serial1.begin(115200); to Serial1.begin(115200, SERIAL_8N1, D7, D6);.
Upload program. Opening your serial monitor to a baud rate of 115200 should show the result. The output should look something like the below image.
If you want to see waveform data, switch the sensor to real-time data transmission mode. After switching modes, the sensor may need to be re-powered to take effect.
Demo4: Use of the sleep function
In this example, we will guide you how to get the information about sleep by using the SleepInf_Decode() function. Please make sure that you or the testing people is ready to go to bed before using this example.
By default, the sensor is in sleep state transmission mode. In this mode, the sleep monitoring function is on. If you switch to real-time data transmission mode, then sleep data may not be available. If you want to change the transfer mode, you can use the ModeSelect_fuc() function to do so. Examples of use can also be found in the MR60BHA1_Transfer_mode_selection in the examples folder. After switching modes, the sensor may need to be re-powered to take effect.
The data related to sleep needs to be reported when a person is in bed, and the current firmware defaults to judging that someone is in bed after a person state lasts 5 minutes.
The following example program is in the examples folder of the library called MR60BHA1_Sleep_inf_output.
#include "Arduino.h"
#include <60ghzbreathheart.h>
//#include <SoftwareSerial.h>
// Choose any two pins that can be used with SoftwareSerial to RX & TX
//#define RX_Pin A2
//#define TX_Pin A3
//SoftwareSerial mySerial = SoftwareSerial(RX_Pin, TX_Pin);
// we'll be using software serial
//BreathHeart_60GHz radar = BreathHeart_60GHz(&mySerial);
// can also try hardware serial with
BreathHeart_60GHz radar = BreathHeart_60GHz(&Serial1);
void setup() {
// put your setup code here, to run once:
Serial.begin(115200);
Serial1.begin(115200);
// mySerial.begin(115200);
while(!Serial); //When the serial port is opened, the program starts to execute.
Serial.println("Readly");
}
void loop()
{
// put your main code here, to run repeatedly:
radar.SleepInf_Decode(); //Sleep-related information output. Data output begins when the monitoring figure is in bed for five minutes.
if(radar.sensor_report != 0x00){
switch(radar.sensor_report){
case OUTBED:
Serial.println("Sensor detects someone currently leaving the bed.");
Serial.println("----------------------------");
break;
case INBED:
Serial.println("Sensor detects that someone is currently in bed.");
Serial.println("----------------------------");
break;
case NOINOUT:
Serial.println("No subject is detected leaving or going to bed.");
Serial.println("----------------------------");
break;
case SLEEPAWAKE:
Serial.println("Sensor detects that the monitoring people is awake.");
Serial.println("----------------------------");
break;
case SLEEPLIGHT:
Serial.println("Sensor detects that the monitoring people is in light sleeping.");
Serial.println("----------------------------");
break;
case SLEEPDEEP:
Serial.println("Sensor detects that the monitoring people is in deep sleeping.");
Serial.println("----------------------------");
break;
case SLEEPNONE:
Serial.println("Sleep state of the object is not detected.");
Serial.println("----------------------------");
break;
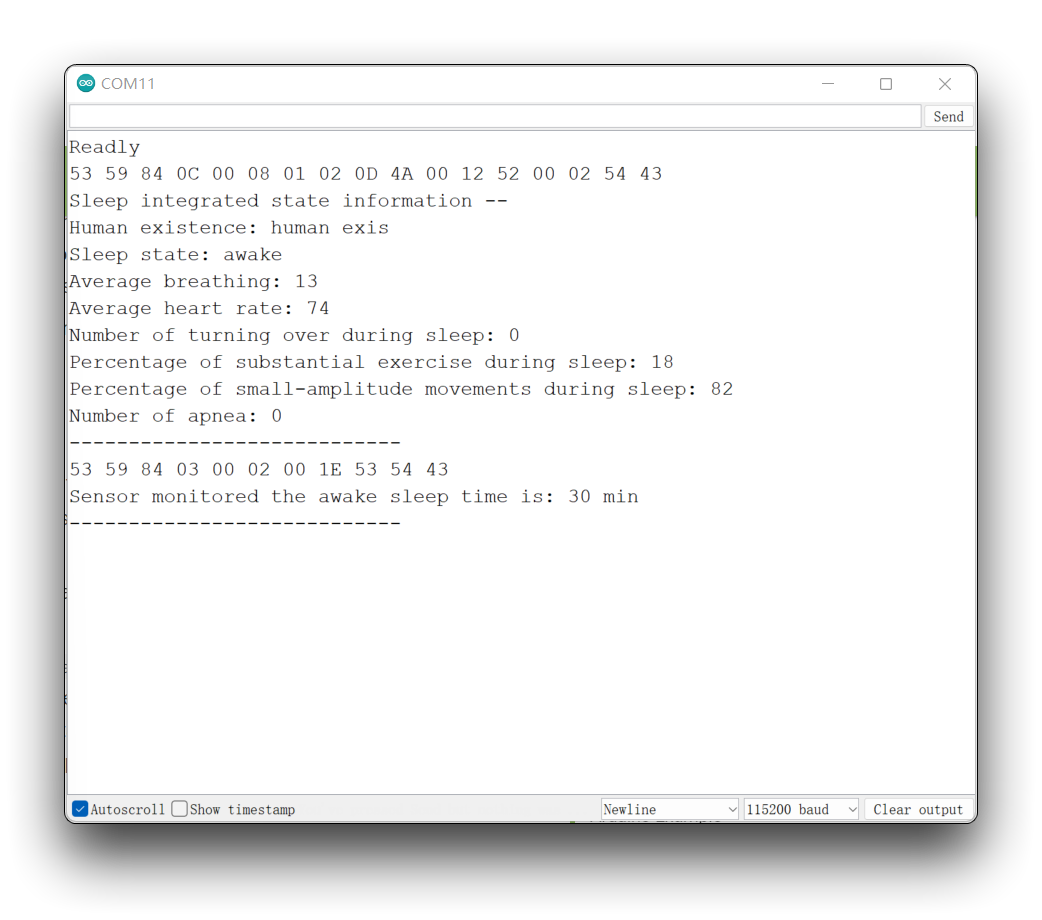
case AWAKETIME:
Serial.print("Sensor monitored the awake sleep time is: ");
Serial.print(radar.awake_time);
Serial.println(" min");
Serial.println("----------------------------");
break;
case LIGHTTIME:
Serial.print("Sensor monitored the light sleep time is: ");
Serial.print(radar.light_time);
Serial.println(" min");
Serial.println("----------------------------");
break;
case DEEPTIME:
Serial.print("Sensor monitored the deep sleep time is: ");
Serial.print(radar.deep_time);
Serial.println(" min");
Serial.println("----------------------------");
break;
case SLEEPSCORE:
Serial.print("Sensor judgment sleep score is: ");
Serial.println(radar.sleep_score);
Serial.println("----------------------------");
break;
case SLEEPSTATUE:
Serial.println("Sleep integrated state information -- ");
Serial.print("Human existence: ");
if(radar.existence)Serial.println("human exis");
else Serial.println("human non-existent");
Serial.print("Sleep state: ");
if(radar.sleep_status == SLEEPDEEP)Serial.println("sleeping soundly");
else if(radar.sleep_status == SLEEPLIGHT)Serial.println("light sleep");
else if(radar.sleep_status == SLEEPAWAKE)Serial.println("awake");
else if(radar.sleep_status == SLEEPNONE)Serial.println("off the bed");
Serial.print("Average breathing: ");
Serial.println(radar.breath_rate);
Serial.print("Average heart rate: ");
Serial.println(radar.heart_rate);
Serial.print("Number of turning over during sleep: ");
Serial.println(radar.turn_num);
Serial.print("Percentage of substantial exercise during sleep: ");
Serial.println(radar.substantial_move_ratio);
Serial.print("Percentage of small-amplitude movements during sleep: ");
Serial.println(radar.samll_move_ratio);
Serial.print("Number of apnea: ");
Serial.println(radar.apnea_num);
Serial.println("----------------------------");
break;
case SLEEPQUALITY:
Serial.println("Quality of sleep information -- ");
Serial.print("Sleep score: ");
Serial.println(radar.sleep_score);
Serial.print("Total time of sleep: ");
Serial.print(radar.sleep_time);
Serial.println(" min");
Serial.print("Percentage of waking time: ");
Serial.println(radar.awake_time_radio);
Serial.print("Percentage of light sleep time: ");
Serial.println(radar.light_time_radio);
Serial.print("Percentage of deep sleep time: ");
Serial.println(radar.deep_time_radio);
Serial.print("Total time away from bed: ");
Serial.print(radar.outbed_time);
Serial.println(" min");
Serial.print("Total number of times out of bed: ");
Serial.println(radar.outbed_num);
Serial.print("The number of turning over during sleep: ");
Serial.println(radar.turn_num);
Serial.print("Average breathing: ");
Serial.println(radar.breath_rate);
Serial.print("Average heart rate: ");
Serial.println(radar.heart_rate);
Serial.print("Number of apnea: ");
Serial.println(radar.apnea_num);
Serial.println("----------------------------");
break;
case SLEEPLESS4H:
Serial.print("The monitored subjects slept for less than 4 hours.");
Serial.println("----------------------------");
break;
case SLEEPOVER12H:
Serial.print("The length of sleep of the monitored subjects exceeded 12 hours.");
Serial.println("----------------------------");
break;
case LONGTIMENOONE:
Serial.print("Abnormally unoccupied for long periods of time.");
Serial.println("----------------------------");
break;
case ERRORNONE:
Serial.print("No abnormal information.");
Serial.println("----------------------------");
break;
}
}
delay(200); //Add time delay to avoid program jam
}
If you are using XIAO ESP32 series and there is no data feedback from mmwave radar. You can try to change the code above from Serial1.begin(115200); to Serial1.begin(115200, SERIAL_8N1, D7, D6);.
Upload program. Opening your serial monitor to a baud rate of 115200 should show the result. The output should look something like the below image.
Demo5: Send data to Sensor
Based on the details provided in the user manual, the user can send command frames to the sensor to query or set certain states or modes of the sensor according to the actual needs.
The .ino file named MR60BHA1_Send_frame in the examples folder of the sensor library shows us how to send a program that queries the device ID to the sensor.
#include "Arduino.h"
#include <60ghzbreathheart.h>

//#include <SoftwareSerial.h>
// Choose any two pins that can be used with SoftwareSerial to RX & TX
//#define RX_Pin A2
//#define TX_Pin A3

//SoftwareSerial mySerial = SoftwareSerial(RX_Pin, TX_Pin);

// we'll be using software serial
//BreathHeart_60GHz radar = BreathHeart_60GHz(&mySerial);

// can also try hardware serial with
BreathHeart_60GHz radar = BreathHeart_60GHz(&Serial1);

const unsigned char DevID_buff[10] = {0x53, 0x59, 0x02, 0xA1, 0x00, 0x01, 0x0F, 0x5F, 0x54, 0x43};

void setup() {
  // put your setup code here, to run once:
  Serial.begin(115200);
  Serial1.begin(115200);

  //  mySerial.begin(115200);

  while(!Serial);   //When the serial port is opened, the program starts to execute.

  Serial.println("Readly");
}

void loop()
{
  // put your main code here, to run repeatedly:
  radar.send_func(DevID_buff, 10, false);
  delay(50);                       //Do not set the delay time too long, as this may affect the reception of the data frames returned by the radar.
}
If you are using XIAO ESP32 series and there is no data feedback from mmwave radar. You can try to change the code above from Serial1.begin(115200); to Serial1.begin(115200, SERIAL_8N1, D7, D6);.
In the program of this example, you can see that an array DevID_buff[10] is defined, which stores the hexadecimal number of your query device ID, one location per byte.
And the sending is done by send_func(). The parameters passed in are the array of frames to be sent, the length of the array, and whether to send in a loop.
If you need to send your own command frames, then you need to define the correct array according to the frame format provided in the user manual.
Regarding the calculation of the check digit "sum".
All data frames have a checksum bit to ensure that the data is sent or received accurately. The checksum bit is usually in the penultimate bit of the data frame. It is calculated by adding up all the bits preceding the check bit and taking the lower two bits in hexadecimal. Let's take the example of a data frame that queries the device ID.
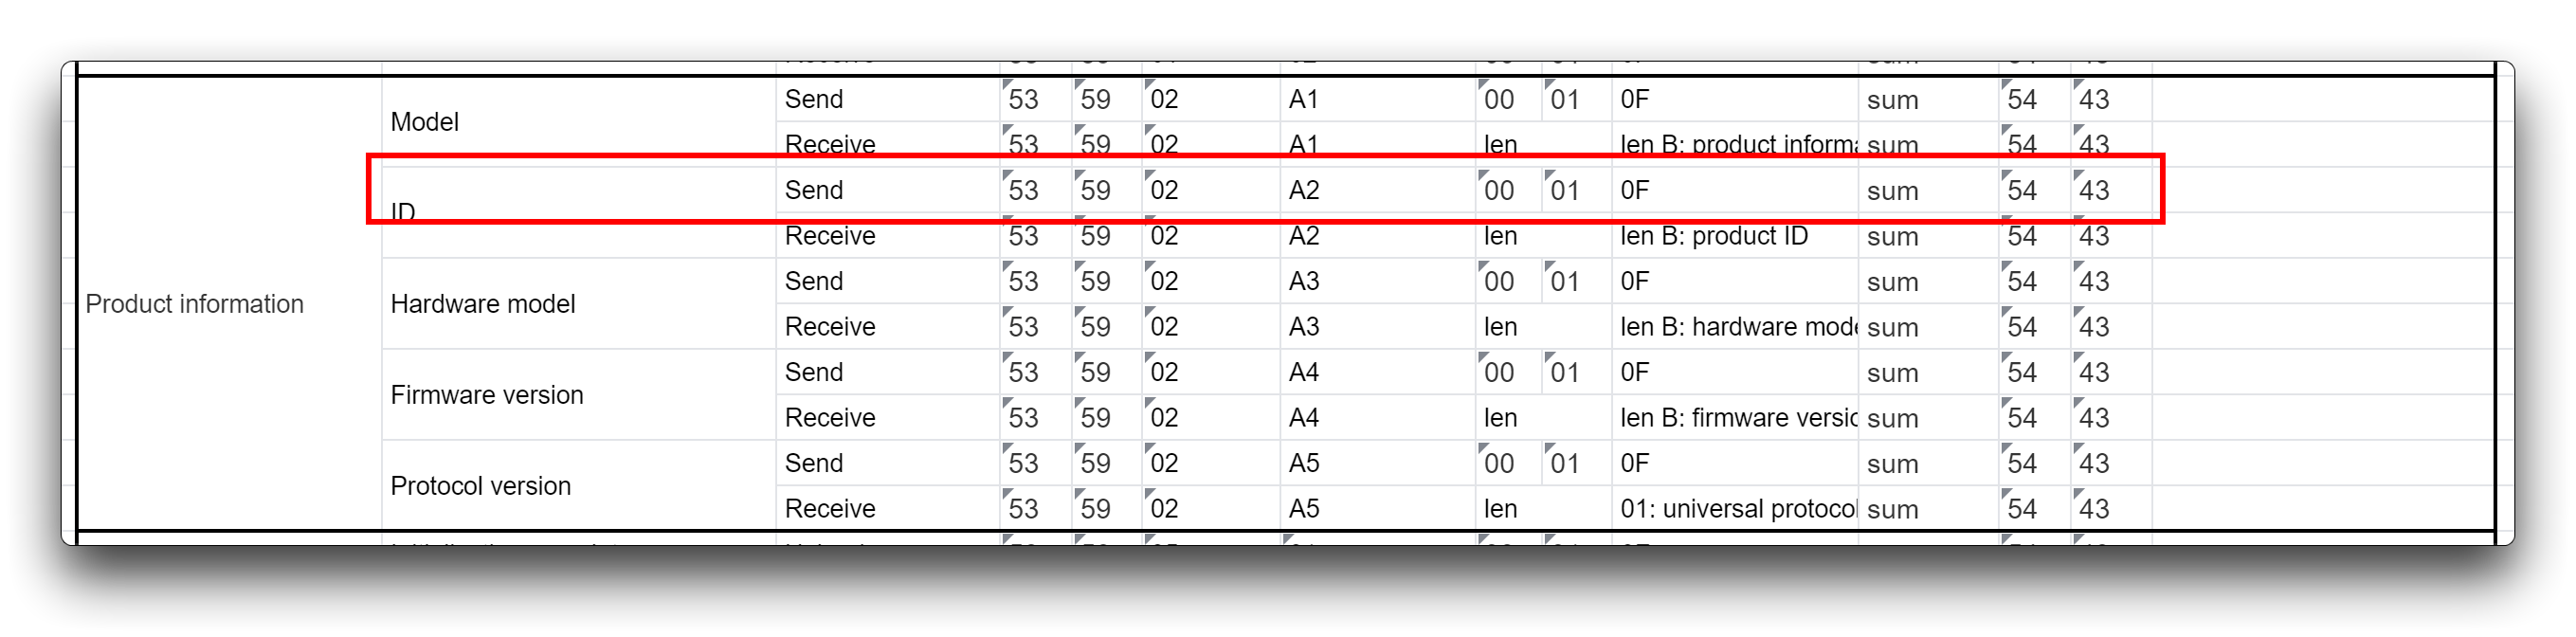
It can be seen that the checksum bit is in the penultimate bit of the entire data frame. Then we start by adding all the previous hexadecimal numbers.
0x53 + 0x59 + 0x02 + 0xA2 + 0x00 + 0x01 + 0x0F = 0x0160
Then we need to take the lower two digits of it, which would be 60, so the checksum of this data frame is 60. If we want to look up the ID of the Sensor, then you can define the following array.
const unsigned char DevID_buff[10] = {0x53, 0x59, 0x02, 0xA1, 0x00, 0x01, 0x0F, 0x60, 0x54, 0x43};
Upload program. Opening your serial monitor to a baud rate of 115200 should show the result. The output should look something like the below image.
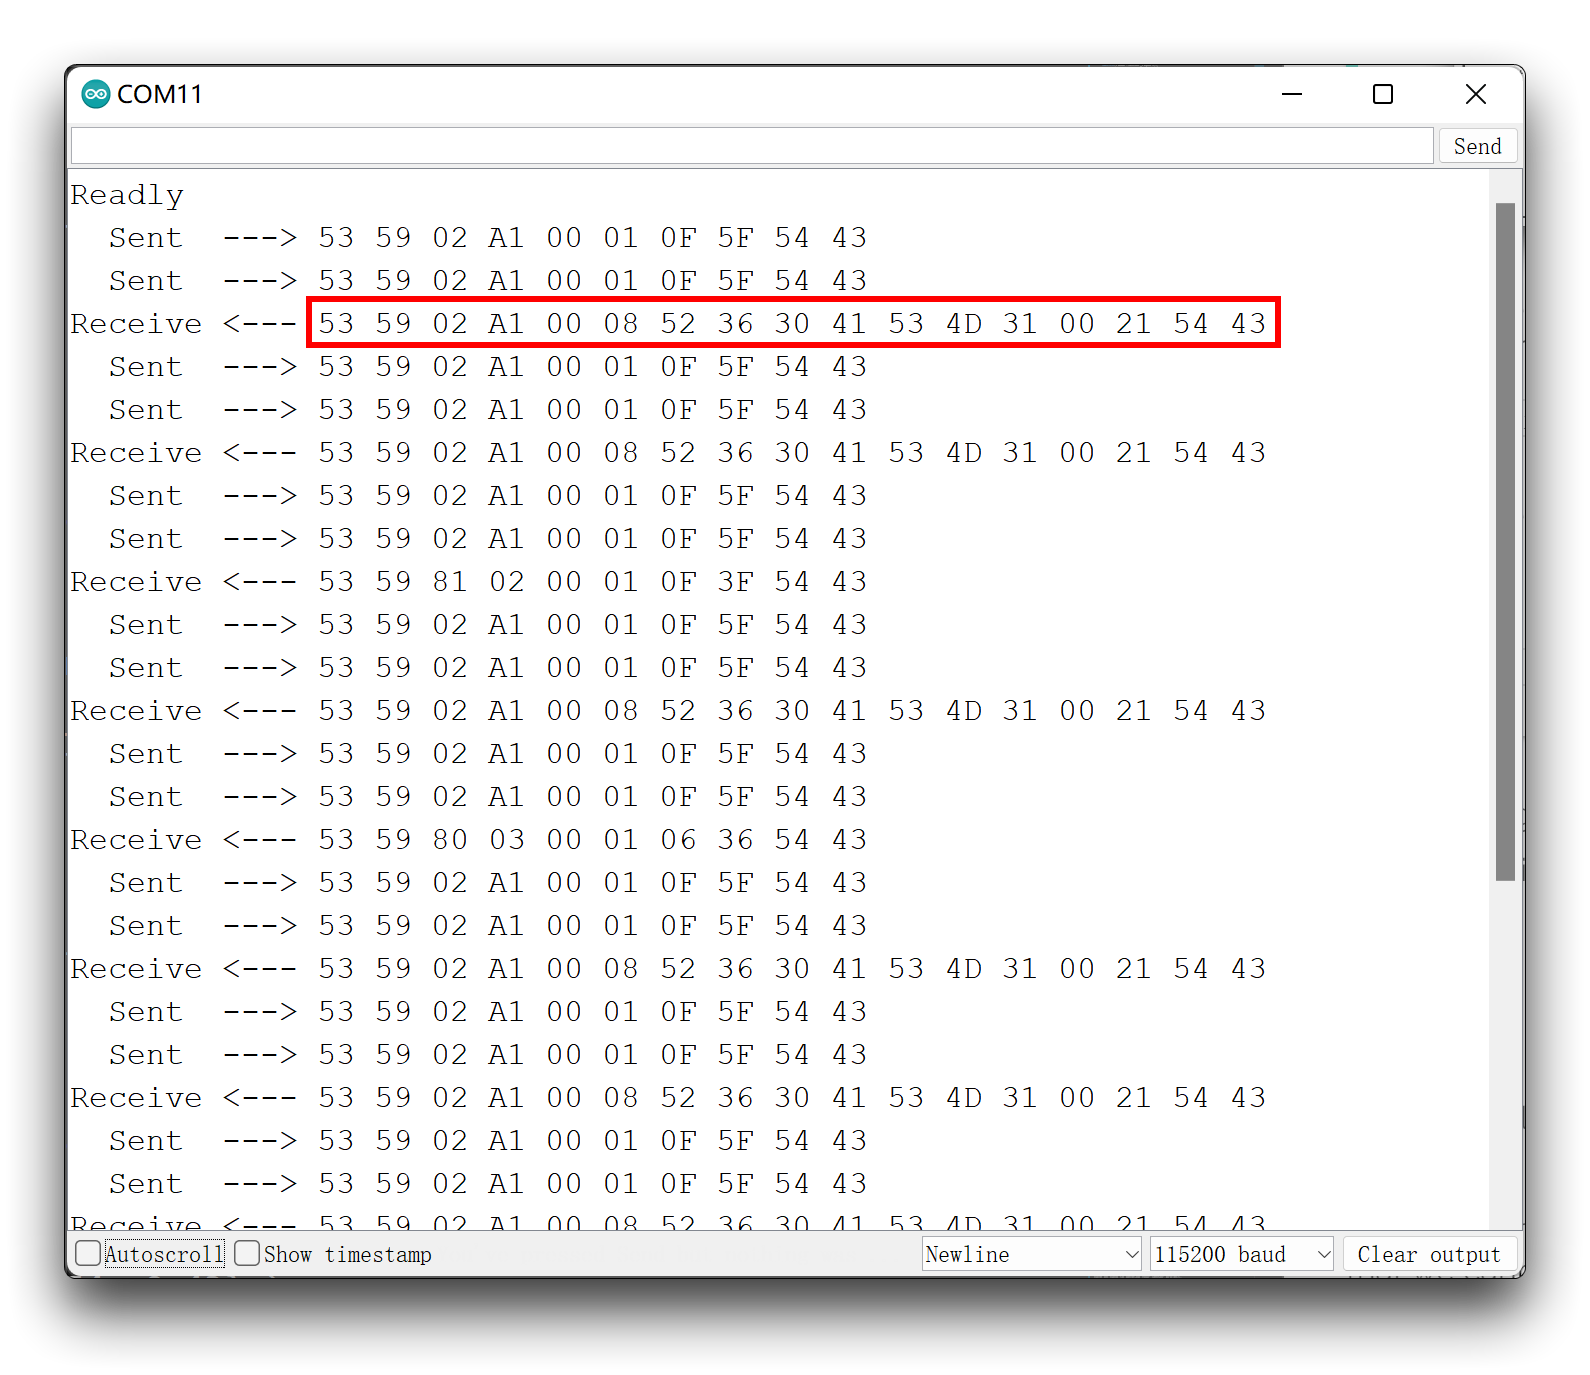
At this point please check the data frames returned and if they match the data frames returned as described in the user manual.
Normally, our commands do not need to be repeated to the Sensor, but as the Sensor replies with messages so fast that we cannot be sure that we will receive the exact data message returned by the Sensor. There are two solutions to this problem.
- Re-upload the above procedure several times.
- Set the third parameter of the
send_func()function (cyclic sending) totrue. Please note, however, that repeatedly sending data frames of the setting type may cause the Sensor to jam, so please use this function with caution. If the Sensor is stuck, disconnect the 5V supply pin from the Sensor and wait a few moments for the function to resume.
Demo6: Reset Sensor
There may be times when you have problems with your Sensor detecting anomalies or when you want to clear all settings on your Sensor, then you can reset your Sensor according to this example.
The following example program is in the examples folder of the library called MR60BHA1_Reset_sensor.
#include "Arduino.h"
#include <60ghzbreathheart.h>

//#include <SoftwareSerial.h>
// Choose any two pins that can be used with SoftwareSerial to RX & TX
//#define RX_Pin A2
//#define TX_Pin A3

//SoftwareSerial mySerial = SoftwareSerial(RX_Pin, TX_Pin);

// we'll be using software serial
//BreathHeart_60GHz radar = BreathHeart_60GHz(&mySerial);

// can also try hardware serial with
BreathHeart_60GHz radar = BreathHeart_60GHz(&Serial1);

void setup() {
  // put your setup code here, to run once:
  Serial.begin(115200);
  Serial1.begin(115200);

  //  mySerial.begin(115200);

  while(!Serial);   //When the serial port is opened, the program starts to execute.

  Serial.println("Readly");

  radar.reset_func();
}

void loop()
{
  // put your main code here, to run repeatedly:
}
If you are using XIAO ESP32 series and there is no data feedback from mmwave radar. You can try to change the code above from Serial1.begin(115200); to Serial1.begin(115200, SERIAL_8N1, D7, D6);.
Resetting the Sensor is very simple, you just need to call reset_func(). The reset only needs to be executed once, so we use it in the Setup() function.
Demo7: Using Arduino/Seeeduino
Our library is Arduino compatible and you can also choose the Arduino you have on hand to develop your Sensor project.
The MR60BHA1 Sensor communicates using the UART serial port, you just need to connect the Sensor to your Arduino as wired below.
| MR60BHA1 Sensor | MCU | |
| 5V | --> | 5V |
| GND | --> | GND |
| RX | --> | soft serial port TX |
| TX | --> | soft serial port RX |
All the functions are applied in the same way as in Demo1 to Demo6 above, so we will not repeat them in this example. In this example, we will give you an overview of how to use the Arduino's soft serial port to get data information from the Sensor.
For notes on the Arduino soft serial port, please refer to the official Arduino documentation.
To avoid data confusion caused by using Serial for both output and data transmission, on the Arduino side we usually use a soft serial port.
The import of the soft serial port library and the definition of the RX and TX pins need to be done earlier in the program. The following program defines the A2 and A3 pins as the RX and TX pins of the soft serial port.
#include <SoftwareSerial.h>
//Choose any two pins that can be used with SoftwareSerial to RX & TX
#define RX_Pin A2
#define TX_Pin A3

SoftwareSerial mySerial = SoftwareSerial(RX_Pin, TX_Pin);

//we'll be using software serial
BreathHeart_60GHz radar = BreathHeart_60GHz(&mySerial);
Also, don't forget to set the baud rate for the soft serial port in the Setup() function.
void setup() {
  // put your setup code here, to run once:
  Serial.begin(115200);

  mySerial.begin(115200);

  while(!Serial);   //When the serial port is opened, the program starts to execute.

  Serial.println("Readly");
}
Using Demo1 as an example, if you want to use the Arduino to print the reported data frames from the Sensor, then the complete program is as follows.
#include "Arduino.h"
#include <60ghzbreathheart.h>

#include <SoftwareSerial.h>
// Choose any two pins that can be used with SoftwareSerial to RX & TX
#define RX_Pin A2
#define TX_Pin A3

SoftwareSerial mySerial = SoftwareSerial(RX_Pin, TX_Pin);

// we'll be using software serial
BreathHeart_60GHz radar = BreathHeart_60GHz(&mySerial);

void setup() {
  // put your setup code here, to run once:
  Serial.begin(115200);

  mySerial.begin(115200);

  while(!Serial);   //When the serial port is opened, the program starts to execute.

  Serial.println("Readly");
}

void loop()
{
  // put your main code here, to run repeatedly:
  radar.recvRadarBytes();           //Receive radar data and start processing
  radar.showData();                 //Serial port prints a set of received data frames
  delay(200);                       //Add time delay to avoid program jam
}
Demo8: Direct connection to PC for data
You can refer to this routine if you want to use an upper computer designed for Sensor, or if you want to use the serial software to get a complete data frame.
Connect the Sensor directly to the computer's usb port via a UART to USB device. The wiring is shown in the table below.
| |||
| UART to USB | MR60BHA1 Sensor | ||
| 5V | --> | 5V | |
| GND | --> | GND | |
| RX | --> | TX | |
| TX | --> | RX | |
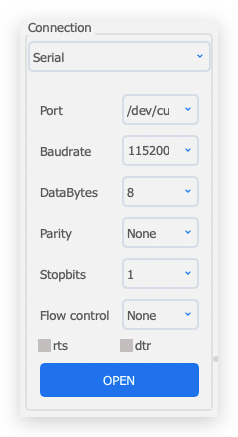
Use a software like serial debugging assistant to select the serial port where the Sensor is located.
MR60BHA1 Sensor needs 5V power supply, otherwise the Sensor may not work properly.
After a successful connection, you will see the Sensor sending a steady stream of messages.

At the same time, you can also send data frames to the Sensor via the software's send function.
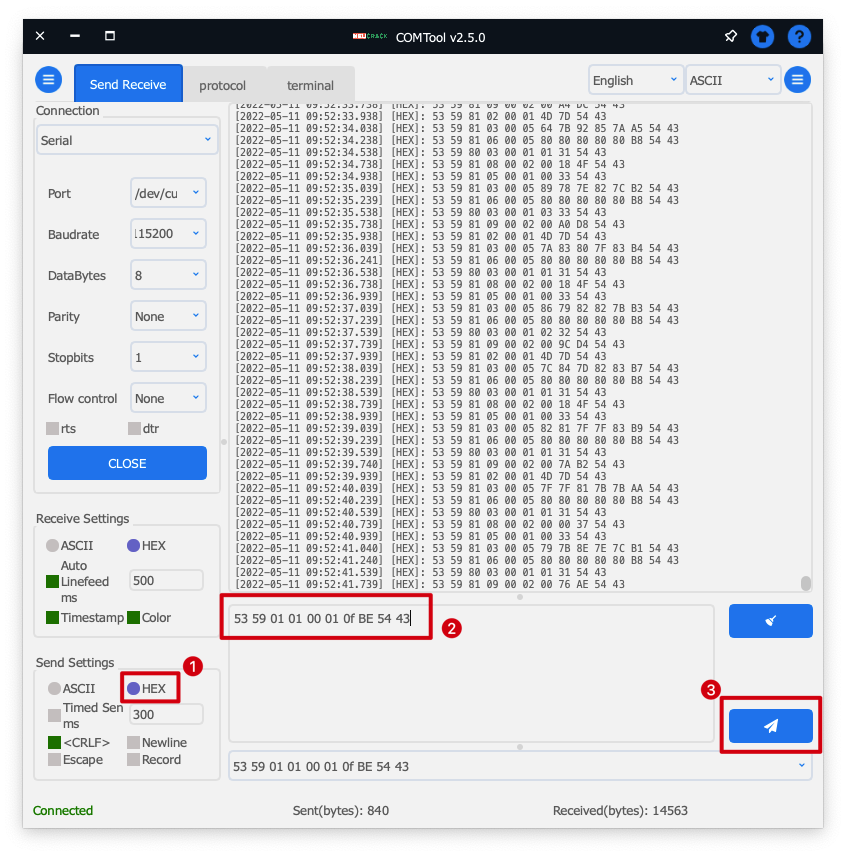
If you choose ASCII as the format for sending data, each data set needs to be prefixed with 0x. If you choose HEX, then each set of data does not need to be prefixed with 0x.
Troubleshooting
FAQ1: Can this Sensor detect more than one person at a time in the same environment?
A: Not available. This Sensor can only be used on a single living object. If more than one person or animal is in the monitoring range, this will have an effect on the results of the monitoring.
FAQ2: Why can't I see anything in the serial monitor with the XIAO ESP32C3?
XIAO ESP32C3 serial port function is not quite consistent with the general Arduino hardware, and using Serial1 directly may cause the USB serial port not to work. For related application cases, please go to the Serial chapter of XIAO ESP32C3 for details.
Resources
- [PDF] Breathing and Heartbeat Radar Sensor Datasheet
- [PDF] Breathing and Heartbeat Radar Sensor User Manual-V1.9
- [PDF] Breathing and Heartbeat Radar Sensor User Manual-V2.3
- [EXE] Upper Computer Software_old version
- [EXE] Upper Computer Software_new version
- [PPTX] Seeed mmWave sensor series V2.0
- [ZIP] 60G-Radar-heartbeat-3D
Tech Support & Product Discussion
Thank you for choosing our products! We are here to provide you with different support to ensure that your experience with our products is as smooth as possible. We offer several communication channels to cater to different preferences and needs.