How to Use PlatformIO IDE For Arduino Programming

As you may have experienced, Arduino IDE may not be the best IDE for Arduino Programming when it comes to productivity, here introduces you a more developing-friendly option! Developing Wio Terminal and Seeeduino XIAO in your favorite developing environment using PlatformIO IDE in Microsoft Visual Studio Code!
What is PlatformIO
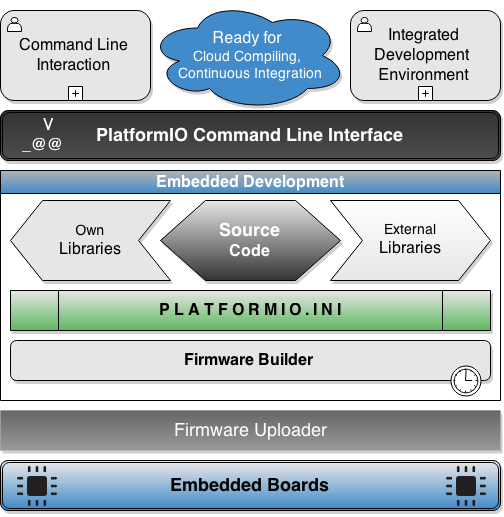
PlatformIO is a cross-platform, cross-architecture, multi-framework professional IDE tool for embedded system and software engineers who write embedded applications. By providing a universal IDE interface using PlatformIO, you are able to program your hardware in a more developing-friendly way!
In this wiki, you will be able to configure PlatformIO to support Wio Terminal and Seeeduino XIAO to begin your programming!
For more information, please visit PlatformIO
Getting Started with Platform IO IDE
PlatformIO supports some of the most popular IDEs and text-editors as plugins. In this wiki, PlatformIO for VSCode is used for example.
For other IDEs, please check the followings for reference:
PlatfromIO for VSCode
- STEP1. Download VSCode
Download and Install the Microsoft Visual Studio Code
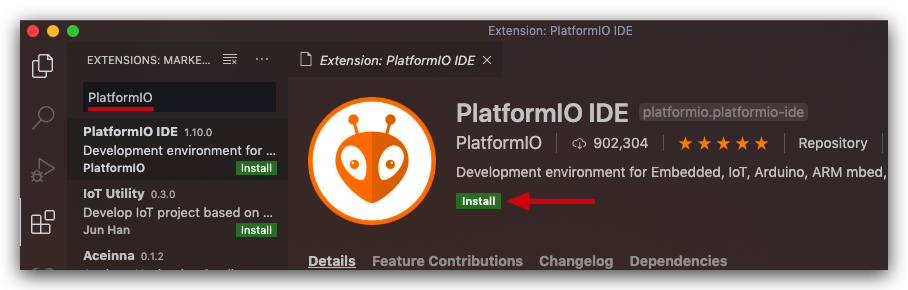
- STEP2. Download the PlatformIO IDE Plugins for VSCode
Open the Extensions Market in VS Code by clicking the Extensions on the left panel or use the keyboard shortcut:
Keyboard Shortcut: Shift+CTRL+X in Windows or Shift+CMD+X in macOS.
Search PlatfromIO in the Extension Market and click Install:
- STEP3. Opening PlatformIO Home Page
Click on “PlatformIO Home” button on the bottom PlatformIO toolbar
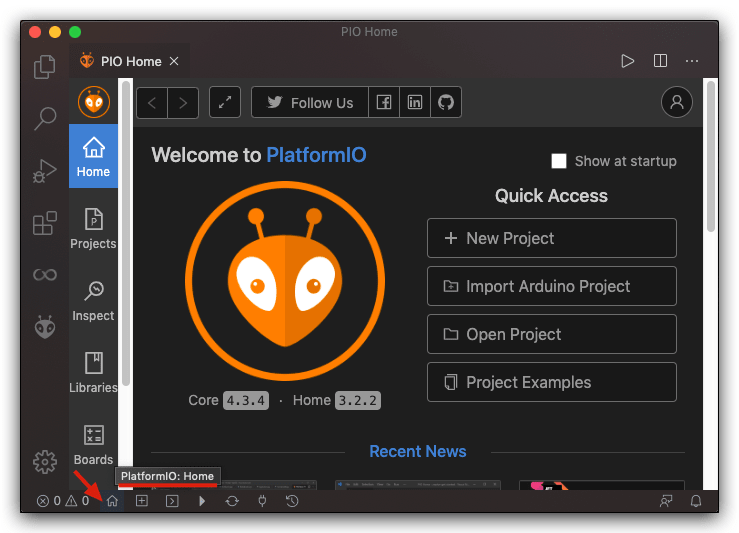
Now, PlatformIO is installed on to your PC!
Configurations for Wio Terminal and Seeeduino XIAO
Wio Terminal and Seeeduino XIAO are now officially supported by PlatformIO:
-
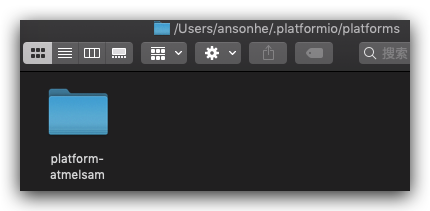
Navigate to the root location of PlatformIO:
-
For Unix:
~/.platformio -
For Windows:
C:\Users\{username}.platformiowhere{username}is your user name.
-
-
Navigate to
platformsfolder. -
Download the configured
platform-atmelsamto theplatformsfolder.
Supported Boards
The configured platform-atmelsam supports the following boards:
- Wio Terminal
- Seeeduino XIAO
- Seeeduino Zero Series:
- Seeeduino LoRaWAN
Tip
Already merged, soon it will no longer need to do this manually.
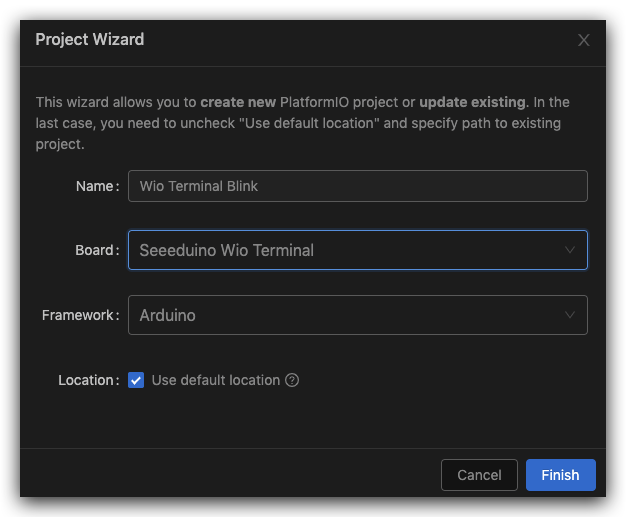
Quick Start
This tutorial introduces you the basics of PlatformIO IDE workflow and demonstrates a simple "Blink" example on Wio Terminal.
-
Click the PlatformIO Home button.
-
Click on New Project and select
Seeed Wio Terminalas board.
- Open
main.cppundersrcfolder and copy the followings:
#include <Arduino.h>

void setup() {
  // initialize digital pin LED_BUILTIN as an output.
  Serial.begin(9600);
  pinMode(LED_BUILTIN, OUTPUT);
}

// the loop function runs over and over again forever
void loop() {
  digitalWrite(LED_BUILTIN, HIGH);   // turn the LED on (HIGH is the voltage level)
  delay(1000);                       // wait for a second
  digitalWrite(LED_BUILTIN, LOW);    // turn the LED off by making the voltage LOW
  delay(1000);                       // wait for a second
}
- Open the
platformio.iniconfiguration file and check it's correct:
[env:seeed_wio_terminal]
platform = atmelsam
board = seeed_wio_terminal
framework = arduino
- Build the project the Build button on the PlatformIO toolbar or Keyboard shortcuts.
Build Projects: ctrl+alt+b in Windows or cmd+shift+b in macOS.
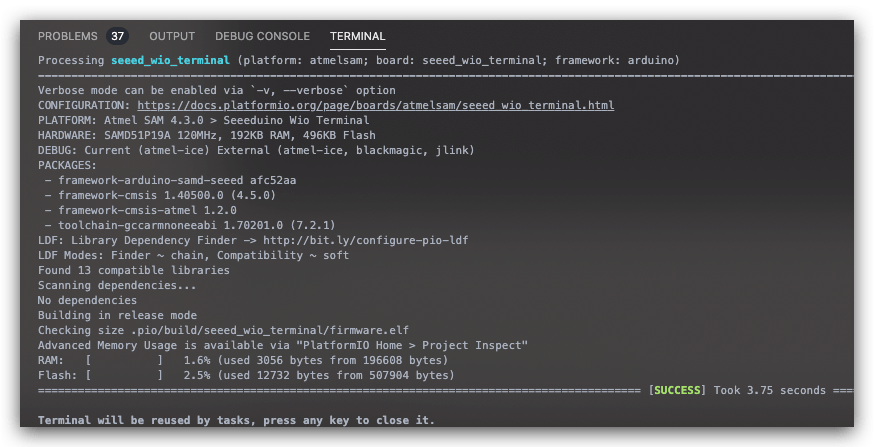
- Upload the project to Wio Terminal by clicking the Upload button on the PlatformIO toolbar.
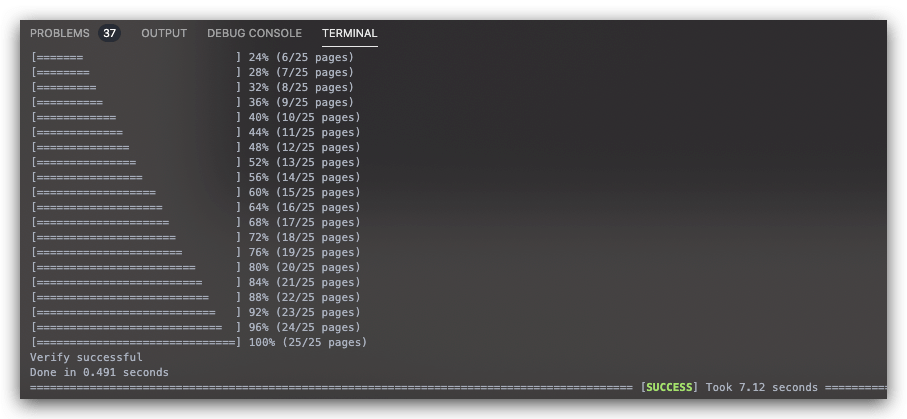
- Now you should see the Wio Terminal's LED blinking!
For more PlatformIO For VSCode Getting Started, please also refer to here .
Adding Libraries to PlatformIO
Importing Libraries Directly
To import libraries directly to PlatformIO from Github, you can configure the platformio.ini and add the lib_deps with the dependent library url as followed:
lib_deps = https://github.com/Seeed-Studio/Seeed_Arduino_LIS3DHTR
- Example Usage:
#include <Arduino.h>
#include<LIS3DHTR.h>

LIS3DHTR<TwoWire> lis;

void setup() {
  Serial.begin(115200);
  lis.begin(Wire1);

  if (!lis) {
    Serial.println("ERROR");
    while(1);
  }
  lis.setOutputDataRate(LIS3DHTR_DATARATE_25HZ); //Data output rate
  lis.setFullScaleRange(LIS3DHTR_RANGE_2G); //Scale range set to 2g
}

void loop() {
  float x_values, y_values, z_values;
  x_values = lis.getAccelerationX();
  y_values = lis.getAccelerationY();
  z_values = lis.getAccelerationZ();

  Serial.print("X: "); Serial.print(x_values);
  Serial.print(" Y: "); Serial.print(y_values);
  Serial.print(" Z: "); Serial.print(z_values);
  Serial.println();
  delay(50);
}
Importing from Arduino
Other way to import libraries is that to point to the Arduino library path in the platformio.ini config file, For Example:
lib_extra_dirs = /Users/{username}/Documents/Arduino/libraries
This is a not direct path to a library with source code. It should be a path to storage that contains libraries grouped by folders. For example, D:\PlatformIO\extra\libraries but not D:\PlatformIO\extra\libraries\FooLibrary.
For more Library options, please see PlatformIO Library docs.
Using the Latest ArduinoCore Library for Seeed
The ArduinoCore in PlatformIO is maintained by PlatformIO itself and sometimes, it is not up to date with the latest released version from Seeed. In this case, you may use the following platformio.ini, for Example:
; PlatformIO Project Configuration File
;
;   Build options: build flags, source filter
;   Upload options: custom upload port, speed and extra flags
;   Library options: dependencies, extra library storages
;   Advanced options: extra scripting
;
; Please visit documentation for the other options and examples
; https://docs.platformio.org/page/projectconf.html

[env:seeed_wio_terminal]
platform = atmelsam
board = seeed_wio_terminal
framework = arduino
platform_packages = framework-arduino-samd-seeed@https://github.com/Seeed-Studio/ArduinoCore-samd.git