Wio RP2040 mini Dev Board with Arduino
Here we gonna use Wio RP2040 mini Dev Board to transmit data through MQTT and Socket with Arduino.
Hardware
Materials required
- Wio RP2040 mini Dev Board x1
- Computer x1
- USB typc C cable x1
Some USB cables can only supply power and cannot transfer data. If you don't have a USB cable or don't know if your USB cable can transmit data, you can check seeed USB type C support USB 3.1.
- Step 1. Prepare a Wio RP2040 mini Dev Board and a Type-C cable.
- Step 2. Press and hold the 'boot' button while you are going to connect the board to computer.

- Step 3. Connect and check if a disk appears on the computer.
If all goes well, the red power LED on Wio RP2040 mini Dev Board should be turn on and a disk should appear on the computer.
Software
Before we start to upload the code and transmit data, you may want to set up the server first.
Communicate with MQTT
MQTT is a Client-Server publish/subscribe messaging transport protocol. Clients can use it as a publisher, a subscriber, or both.
Configure the MQTT server
Download the MQTTX server software and install it on the computer, and then configure the MQTT server. If you can not download the server through the website in your country/region, please prepare the MQTT server by yourself.
We will use the free server of "mqtt.p2hp.com" in this project.
Online server
- Address: mqtt.p2hp.com
- Ports: 1883 (TCP), 8083 (WebSocket)
- Type: EMQ
- MQTT V3.1.1/V5.0 compatible
Enter the MQTTX software to create a new connection, fill in the name, server, port, subject, and then click "Connect" to connect to the server.

After the connection is successful, there will be a pop-up in the upper right corner of the software.

Then set the topic and message below. In this project, we use MQTT to receive or send the messages with Wio RP2040 mini Dev Board.
Fill in the 'topic' as "temperature".
The 'topic' we wirte here is very improtant. Publisher or subscriber can not transmit data unless the 'topics' between them are the same. You will find out more when you upload the code.

Preparations have been completed and the MQTT server is set up. Now we are going to upload the code.
Arduino code with MQTT
If this is your first time using Arduino, we highly recommend you to refer to Getting Started with Arduino.
- Step 1. Install an Arduino Software

Launch the Arduino application
Double-click the Arduino application (arduino.exe) you have previously downloaded.
If the Arduino Software loads in a different language, you can change it in the preferences dialog. See the Arduino Software (IDE) page for details.
- Step 2. Download and open the MQTT example
You can download MQTT.ino here and open it.

- Step 3. Add Wio RP2040 mini Dev Board to your Arduino IDE
Click on File > Preference, and fill Additional Boards Manager URLs with the URL below:
https://files.seeedstudio.com/arduino/package_seeeduino_boards_index.json

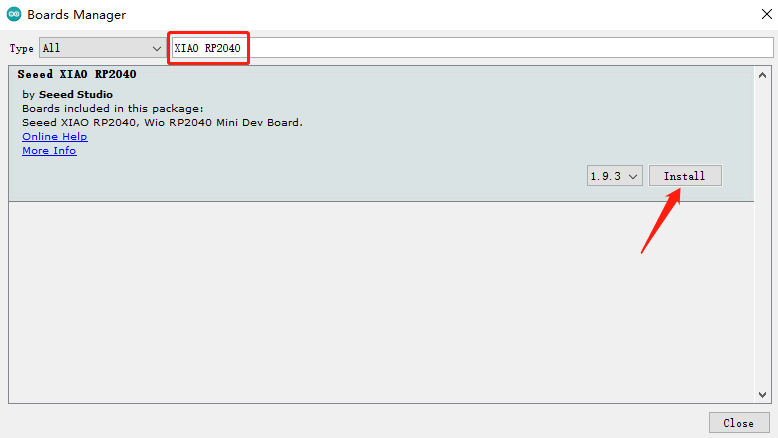
Click Tools-> Board-> Boards Manager..., and write the keyword "XIAO RP2040" in the searching blank. Find the "Seeed XIAO RP2040" and install it.
- Step 4. Select the corresponding board
After installing the board, click Tools-> Board, find "Wio RP2040 Mini Dev Board" and select it.

Once the board is connected to the computer, there is no need to select a port. Because the computer will write a .uf2 file to the board at the first uploading, after that it will automatically select the port.
- Step 5. Upload the program You can now upload the code and open MQTTX to see the results.

- Furthermore
If you send some messages through MQTT, you may see it on Serial Monitor in Arduino, as long as the 'topics' between them are the same.


Communicate with Socket
Now we try using a computer to build a TCP server to send or receive messages through Socket. The software we used here is NetAssist.
Configure the TCP server
-
Double click the downloaded '.exe' file and open NetAssist.
-
Select 'TCP Server' in the upper left corner to set the 'Protocol'.
-
Fill in the 'Local host addr' and 'Local host port' below.
-
Once all is set up, click 'Open' to enter the Server.
The 'Local host addr' and 'Local host port' here are improtant as well as the 'topic' in MQTT. You wouldn't get the message unless these parameters are the same as the code.

Preparations have been completed and the MQTT server is set up. Now we are going to upload the code.
Arduino code with Socket
- Step 1. Download and open the Socket example
You can download Socket.ino here and open it.

- Step 2. Select the corresponding board
After installing the board, click Tools-> Board, find "Wio RP2040 Mini Dev Board" and select it.
Once the board is connected to the computer, there is no need to select a port. Because the computer will write .uf2 file to the board at the first uploading, after that it will automatically select the port.
- Step 3. Upload the program You can now upload the code and open NetAssist to see the results.

- Furthermore
If you send some messages through NetAssist, you may see it on NetAssist, as long as the 'Local Host Addr' and 'Local Host Port' between them are the same.


Tech Support & Product Discussion
if you have any technical issue. submit the issue into our forum. Thank you for choosing our products! We are here to provide you with different support to ensure that your experience with our products is as smooth as possible. We offer several communication channels to cater to different preferences and needs.