Ethernet Connection for Wio Terminal
This wiki introduces how to use the ENC28J60 OVERLAYS HAT for Raspberry Pi on Wio Terminal for stable network connectivity. This is a perfect example of using Raspberry Pi 40 Pi extensions board on Wio Terminal.
Hardware Required
-
40 Pin Pi HAT Adapter board for Wio Terminal (Not released yet)
Hardware Connection
For now, if you want to test out the software, you will fly out leads.
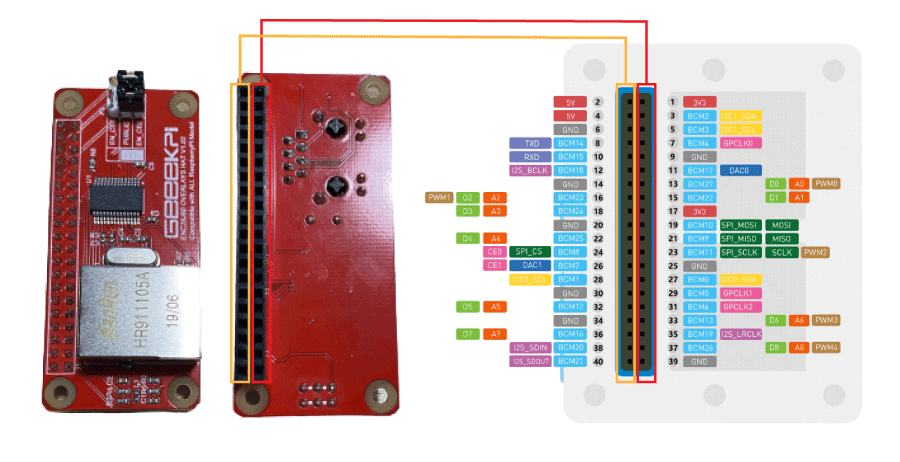
- Plug in the Ethernet cable to the ENC28J60 Overlays Hat.
Installing the UIPEthernet Arduino Library
-
Visit the UIPEthernet repositories and download the entire repo to your local drive.
-
Now, the library can be installed to the Arduino IDE. Open the Arduino IDE, and click
sketch->Include Library->Add .ZIP Library, and choose theUIPEthernetfile that you've have just downloaded.

Simple DHCP Example
This example simply uses DHCP to automatically obtain network configurations from the network host.

Example Code
#include <UIPEthernet.h>

uint8_t mac[6] = {0x74,0x69,0x69,0x2D,0x30,0x31};

void setup() {
  // put your setup code here, to run once:
  Serial.begin(9600);
  while(!Serial);
  Serial.println(F("[testDHCP]"));

  Serial.print("MAC: ");
  for (byte i = 0; i < 6; ++i) {
    Serial.print(mac[i], HEX);
    if (i < 5)
      Serial.print(':');
  }
  Serial.println();

  if (Ethernet.begin(mac) != 1) {
     Serial.println("Failed to configure Ethernet using DHCP");
     while (true) {
        delay(1); // do nothing, no point running without Ethernet hardware
     }
  }

  Serial.print("My IP: ");
  Serial.println(Ethernet.localIP());
  Serial.print("Netmask: ");
  Serial.println(Ethernet.subnetMask());
  Serial.print("Gateway IP: ");
  Serial.println(Ethernet.gatewayIP());
  Serial.print("DNS: ");
  Serial.println(Ethernet.dnsServerIP());
}

void loop() {
  // put your main code here, to run repeatedly:
}
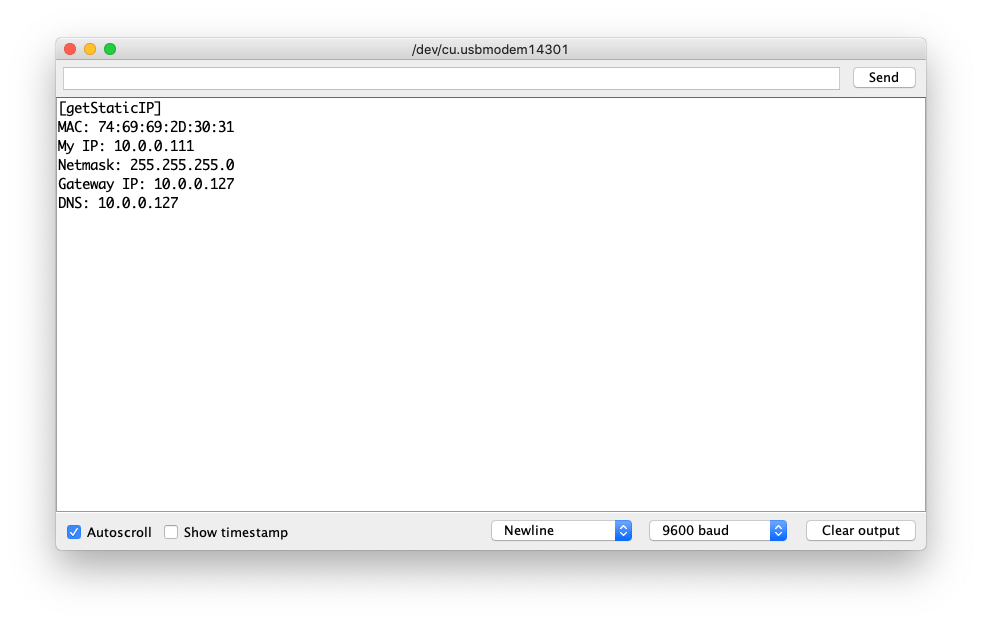
Connecting Network via Static IP
Instead of DHCP, you may also want to use static IP to connect to the network host for different purposes. In this example, you can configure how to connect to the network manually by setting static IP, Netmask, Gateway, and DNS.
Example Code
This could be very useful when you need to connect the device to the specific Gateway and DNS (i.e. Bypass Mode Router/Gateway)
#include <UIPEthernet.h>

// Static Set-up, change the following according to your network
uint8_t mac[6] = {0x74,0x69,0x69,0x2D,0x30,0x31};
IPAddress myIP = {10,0,0,111};
IPAddress myMask = {255,255,255,0};
IPAddress myGatewayIP = {10,0,0,127};
IPAddress myDNS = {10,0,0,127};

void setup() {
  // put your setup code here, to run once:
  Serial.begin(9600);
  while(!Serial);
  Serial.println(F("[getStaticIP]"));

  Serial.print("MAC: ");
  for (byte i = 0; i < 6; ++i) {
    Serial.print(mac[i], HEX);
    if (i < 5)
      Serial.print(':');
  }
  Serial.println();

  Ethernet.begin(mac,myIP, myDNS, myGatewayIP, myMask);

  Serial.print("My IP: ");
  Serial.println(Ethernet.localIP());
  Serial.print("Netmask: ");
  Serial.println(Ethernet.subnetMask());
  Serial.print("Gateway IP: ");
  Serial.println(Ethernet.gatewayIP());
  Serial.print("DNS: ");
  Serial.println(Ethernet.dnsServerIP());
}

void loop() {
  // put your main code here, to run repeatedly:
}
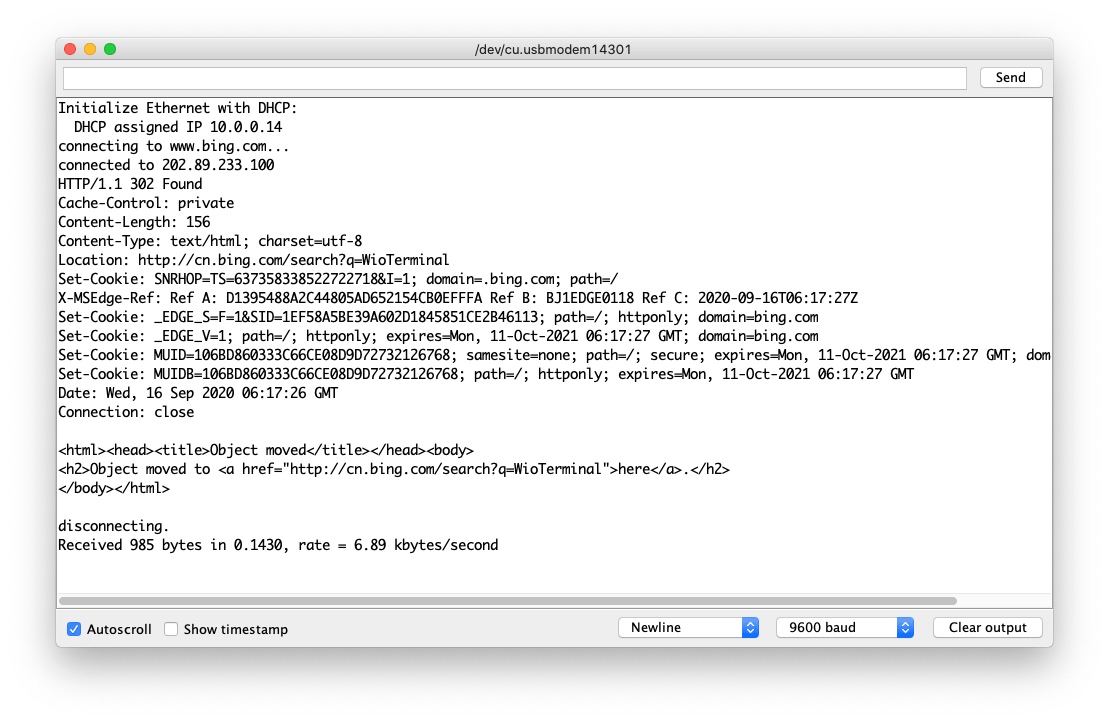
Simple Web Client
Once we have the network connection through the Ethernet, we can use it for TCP client. For example, obtaining data from the internet (HTTP) or getting from a server in the same network.
In this example, it will use DHCP first to setup if fails it will then use static IP to assign. This example connects to the www.bing.com and prints to the Serial monitor.
Example Code
#include <UIPEthernet.h>

// Enter a MAC address for your controller below.
byte mac[] = { 0xDE, 0xAD, 0xBE, 0xEF, 0xFE, 0xED };

char server[] = "www.bing.com";

// Set the static IP address to use if the DHCP fails to assign
IPAddress myIP(10, 0, 0, 187);
IPAddress myMask = {255,255,255,0};
IPAddress myGatewayIP = {10,0,0,127};
IPAddress dnsIP(10, 0, 0, 127);

// Initialize the Ethernet client library
// with the IP address and port of the server
// that you want to connect to (port 80 is default for HTTP):
EthernetClient client;

// Variables to measure the speed
unsigned long beginMicros, endMicros;
unsigned long byteCount = 0;
bool printWebData = true;  // set to false for better speed measurement

void setup() {
  // Open serial communications and wait for port to open:
  Serial.begin(9600);
  while (!Serial) {
    ; // wait for serial port to connect. Needed for native USB port only
  }

  // start the Ethernet connection:
  Serial.println("Initialize Ethernet with DHCP:");
  if (Ethernet.begin(mac) == 0) {
    Serial.println("Failed to configure Ethernet using DHCP");
    // Check for Ethernet hardware present
    if (Ethernet.hardwareStatus() == EthernetNoHardware) {
      Serial.println("Ethernet shield was not found.  Sorry, can't run without hardware. :(");
      while (true) {
        delay(1); // do nothing, no point running without Ethernet hardware
      }
    }
    if (Ethernet.linkStatus() == LinkOFF) {
      Serial.println("Ethernet cable is not connected.");
    }
    // try to congifure using IP address instead of DHCP:
    Ethernet.begin(mac,myIP, dnsIP, myGatewayIP, myMask);
  } else {
    Serial.print("  DHCP assigned IP ");
    Serial.println(Ethernet.localIP());
  }
  // give the Ethernet shield a second to initialize:
  delay(1000);
  Serial.print("connecting to ");
  Serial.print(server);
  Serial.println("...");

  // if you get a connection, report back via serial:
  if (client.connect(server, 80)) {
    Serial.print("connected to ");
    Serial.println(client.remoteIP());
    // Make a HTTP request:
    client.println("GET /search?q=WioTerminal HTTP/1.1");
    client.println("Host: www.bing.com");
    client.println("Connection: close");
    client.println();
  } else {
    // if you didn't get a connection to the server:
    Serial.println("connection failed");
  }
  beginMicros = micros();
}

void loop() {
  // if there are incoming bytes available
  // from the server, read them and print them:
  int len = client.available();
  if (len > 0) {
    byte buffer[80];
    if (len > 80) len = 80;
    client.read(buffer, len);
    if (printWebData) {
      Serial.write(buffer, len); // show in the serial monitor (slows some boards)
    }
    byteCount = byteCount + len;
  }

  // if the server's disconnected, stop the client:
  if (!client.connected()) {
    endMicros = micros();
    Serial.println();
    Serial.println("disconnecting.");
    client.stop();
    Serial.print("Received ");
    Serial.print(byteCount);
    Serial.print(" bytes in ");
    float seconds = (float)(endMicros - beginMicros) / 1000000.0;
    Serial.print(seconds, 4);
    float rate = (float)byteCount / seconds / 1000.0;
    Serial.print(", rate = ");
    Serial.print(rate);
    Serial.print(" kbytes/second");
    Serial.println();

    // do nothing forevermore:
    while (true) {
      delay(1);
    }
  }
}
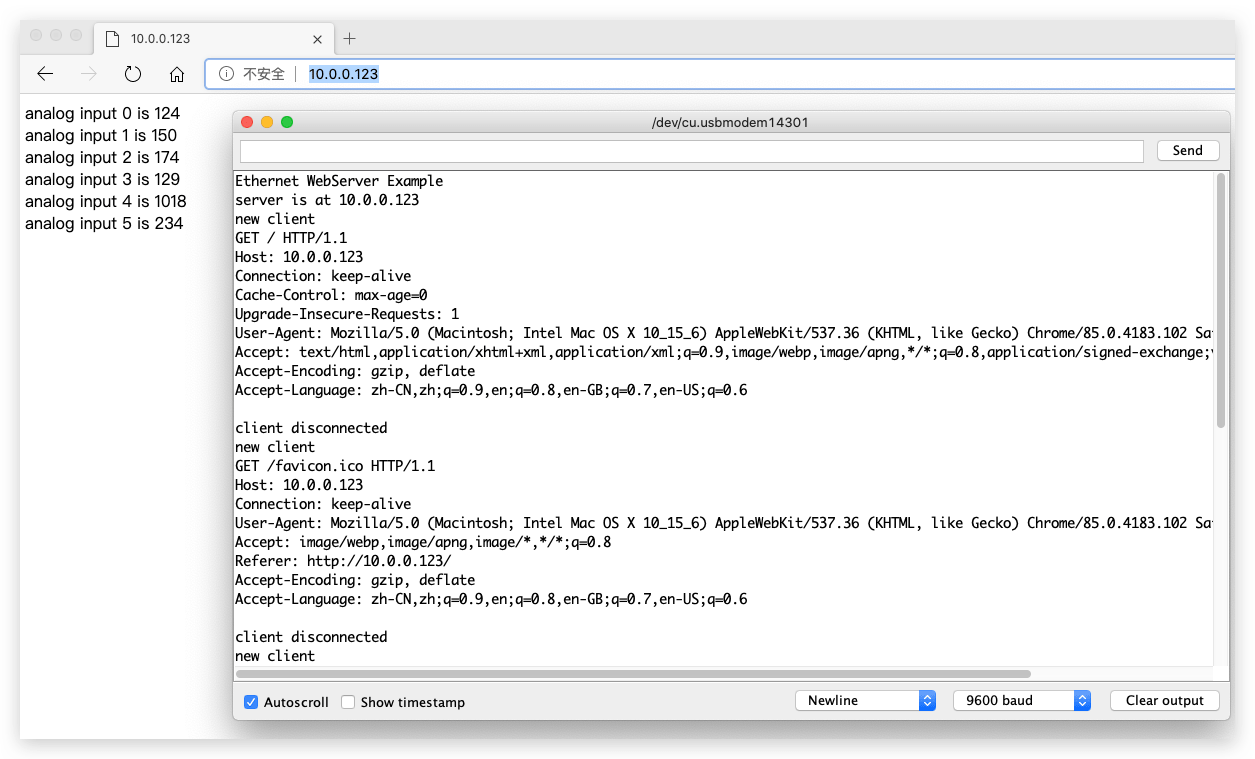
Web Server Example
On the other hand, we have also run the set-up as a web server and allow other devices on the same network to connect to it (i.e. Read the sensor values observed on the Wio Terminal). This could be very useful in some cases due to Ethernet's stability is much better than Wi-Fi.
Example Code
This example configure itself as Web Server and sets up a simple web page printing out values readings from A0 to A5. You may access this from your PC connected in the same network via the IP address.
#include <UIPEthernet.h>

// Enter a MAC address and IP address for your controller below.
// The IP address will be dependent on your local network:
byte mac[] = {
  0xDE, 0xAD, 0xBE, 0xEF, 0xFE, 0xED
};
IPAddress ip(10, 0, 0, 123);

// Initialize the Ethernet server library
// with the IP address and port you want to use
// (port 80 is default for HTTP):
EthernetServer server(80);

void setup() {
  // Open serial communications and wait for port to open:
  Serial.begin(9600);
  while (!Serial) {
    ; // wait for serial port to connect. Needed for native USB port only
  }
  Serial.println("Ethernet WebServer Example");

  // start the Ethernet connection and the server:
  Ethernet.begin(mac, ip);

  // Check for Ethernet hardware present
  if (Ethernet.hardwareStatus() == EthernetNoHardware) {
    Serial.println("Ethernet shield was not found.  Sorry, can't run without hardware. :(");
    while (true) {
      delay(1); // do nothing, no point running without Ethernet hardware
    }
  }
  if (Ethernet.linkStatus() == LinkOFF) {
    Serial.println("Ethernet cable is not connected.");
  }

  // start the server
  server.begin();
  Serial.print("server is at ");
  Serial.println(Ethernet.localIP());
}

void loop() {
  // listen for incoming clients
  EthernetClient client = server.available();
  if (client) {
    Serial.println("new client");
    // an http request ends with a blank line
    bool currentLineIsBlank = true;
    while (client.connected()) {
      if (client.available()) {
        char c = client.read();
        Serial.write(c);
        // if you've gotten to the end of the line (received a newline
        // character) and the line is blank, the http request has ended,
        // so you can send a reply
        if (c == '\n' && currentLineIsBlank) {
          // send a standard http response header
          client.println("HTTP/1.1 200 OK");
          client.println("Content-Type: text/html");
          client.println("Connection: close");  // the connection will be closed after completion of the response
          client.println("Refresh: 5");  // refresh the page automatically every 5 sec
          client.println();
          client.println("<!DOCTYPE HTML>");
          client.println("<html>");
          // output the value of each analog input pin
          for (int analogChannel = 0; analogChannel < 6; analogChannel++) {
            int sensorReading = analogRead(analogChannel);
            client.print("analog input ");
            client.print(analogChannel);
            client.print(" is ");
            client.print(sensorReading);
            client.println("<br />");
          }
          client.println("</html>");
          break;
        }
        if (c == '\n') {
          // you're starting a new line
          currentLineIsBlank = true;
        } else if (c != '\r') {
          // you've gotten a character on the current line
          currentLineIsBlank = false;
        }
      }
    }
    // give the web browser time to receive the data
    delay(1);
    // close the connection:
    client.stop();
    Serial.println("client disconnected");
  }
}
Web Server Testing
This also provides a simple testing sketch using the set-up.
This is the screenshot of ping-ing the web server over 10 hours.
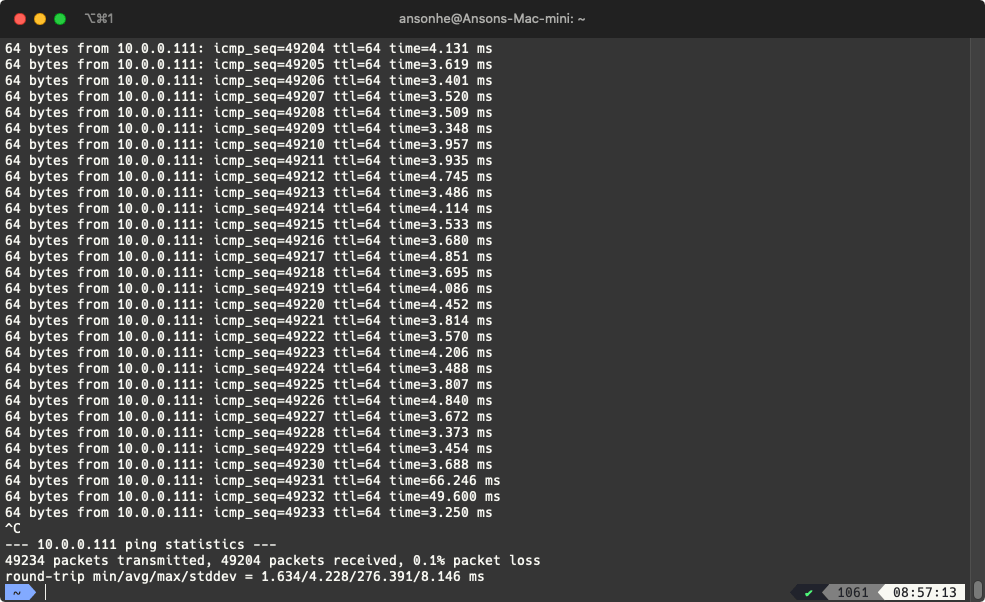
- Under the same network, use your computer to ping the server's IP:
#include <UIPEthernet.h>

// Static IP Set-up
uint8_t mac[6] = {0x74,0x69,0x69,0x2D,0x30,0x31};
IPAddress myIP = {10,0,0,111};
EthernetServer server = EthernetServer(80);

void setup() {
  Serial.begin(9600);
  while(!Serial);
  Ethernet.begin(mac, myIP);
  server.begin();

  Serial.print("My IP: ");
  Serial.println(Ethernet.localIP());
  Serial.print("Netmask: ");
  Serial.println(Ethernet.subnetMask());
  Serial.print("Gateway IP: ");
  Serial.println(Ethernet.gatewayIP());
  Serial.print("DNS: ");
  Serial.println(Ethernet.dnsServerIP());
}

void loop() {
  // get client
  EthernetClient client = server.available();
  if(client && client.connected()) {
        // do stuff (snipped but basically parses HTTP and responds with no other processing)
        client.stop();
  }
}
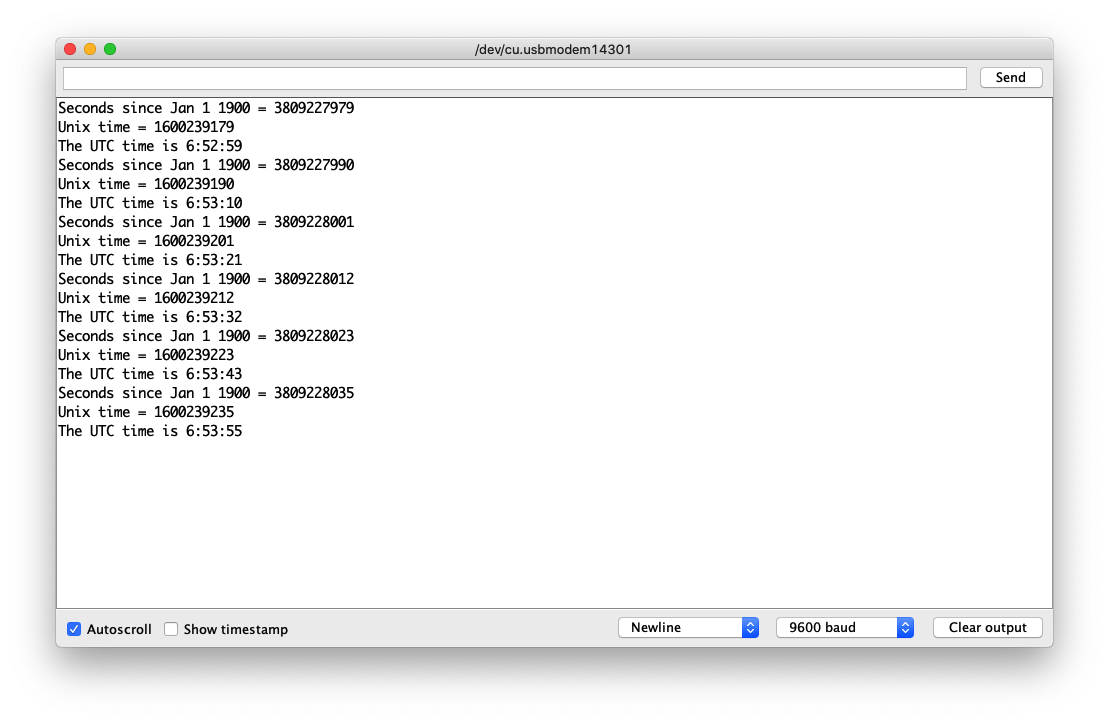
Using UDP For NTP Time
For some situations, UDP is used for network communication. NTP is the perfect example for this. This example simply obtains time from the time.nist.gov NTP server and prints to Serial monitor.
Example Code
#include <UIPEthernet.h>

// Enter a MAC address for your controller below.
// Newer Ethernet shields have a MAC address printed on a sticker on the shield
byte mac[] = {
  0xDE, 0xAD, 0xBE, 0xEF, 0xFE, 0xED
};

unsigned int localPort = 8888;       // local port to listen for UDP packets

const char timeServer[] = "time.nist.gov"; // time.nist.gov NTP server

const int NTP_PACKET_SIZE = 48; // NTP time stamp is in the first 48 bytes of the message

byte packetBuffer[NTP_PACKET_SIZE]; //buffer to hold incoming and outgoing packets

// A UDP instance to let us send and receive packets over UDP
EthernetUDP Udp;

void setup() {
  // Open serial communications and wait for port to open:
  Serial.begin(9600);
  while (!Serial) {
    ; // wait for serial port to connect. Needed for native USB port only
  }

  // start Ethernet and UDP
  if (Ethernet.begin(mac) == 0) {
    Serial.println("Failed to configure Ethernet using DHCP");
    // Check for Ethernet hardware present
    if (Ethernet.hardwareStatus() == EthernetNoHardware) {
      Serial.println("Ethernet shield was not found.  Sorry, can't run without hardware. :(");
    } else if (Ethernet.linkStatus() == LinkOFF) {
      Serial.println("Ethernet cable is not connected.");
    }
    // no point in carrying on, so do nothing forevermore:
    while (true) {
      delay(1);
    }
  }
  Udp.begin(localPort);
}

void loop() {
  sendNTPpacket(timeServer); // send an NTP packet to a time server

  // wait to see if a reply is available
  delay(1000);
  if (Udp.parsePacket()) {
    // We've received a packet, read the data from it
    Udp.read(packetBuffer, NTP_PACKET_SIZE); // read the packet into the buffer

    // the timestamp starts at byte 40 of the received packet and is four bytes,
    // or two words, long. First, extract the two words:

    unsigned long highWord = word(packetBuffer[40], packetBuffer[41]);
    unsigned long lowWord = word(packetBuffer[42], packetBuffer[43]);
    // combine the four bytes (two words) into a long integer
    // this is NTP time (seconds since Jan 1 1900):
    unsigned long secsSince1900 = highWord << 16 | lowWord;
    Serial.print("Seconds since Jan 1 1900 = ");
    Serial.println(secsSince1900);

    // now convert NTP time into everyday time:
    Serial.print("Unix time = ");
    // Unix time starts on Jan 1 1970. In seconds, that's 2208988800:
    const unsigned long seventyYears = 2208988800UL;
    // subtract seventy years:
    unsigned long epoch = secsSince1900 - seventyYears;
    // print Unix time:
    Serial.println(epoch);

    // print the hour, minute and second:
    Serial.print("The UTC time is ");       // UTC is the time at Greenwich Meridian (GMT)
    Serial.print((epoch  % 86400L) / 3600); // print the hour (86400 equals secs per day)
    Serial.print(':');
    if (((epoch % 3600) / 60) < 10) {
      // In the first 10 minutes of each hour, we'll want a leading '0'
      Serial.print('0');
    }
    Serial.print((epoch  % 3600) / 60); // print the minute (3600 equals secs per minute)
    Serial.print(':');
    if ((epoch % 60) < 10) {
      // In the first 10 seconds of each minute, we'll want a leading '0'
      Serial.print('0');
    }
    Serial.println(epoch % 60); // print the second
  }
  // wait ten seconds before asking for the time again
  delay(10000);
  Ethernet.maintain();
}

// send an NTP request to the time server at the given address
void sendNTPpacket(const char * address) {
  // set all bytes in the buffer to 0
  memset(packetBuffer, 0, NTP_PACKET_SIZE);
  // Initialize values needed to form NTP request
  // (see URL above for details on the packets)
  packetBuffer[0] = 0b11100011;   // LI, Version, Mode
  packetBuffer[1] = 0;     // Stratum, or type of clock
  packetBuffer[2] = 6;     // Polling Interval
  packetBuffer[3] = 0xEC;  // Peer Clock Precision
  // 8 bytes of zero for Root Delay & Root Dispersion
  packetBuffer[12]  = 49;
  packetBuffer[13]  = 0x4E;
  packetBuffer[14]  = 49;
  packetBuffer[15]  = 52;

  // all NTP fields have been given values, now
  // you can send a packet requesting a timestamp:
  Udp.beginPacket(address, 123); // NTP requests are to port 123
  Udp.write(packetBuffer, NTP_PACKET_SIZE);
  Udp.endPacket();
}
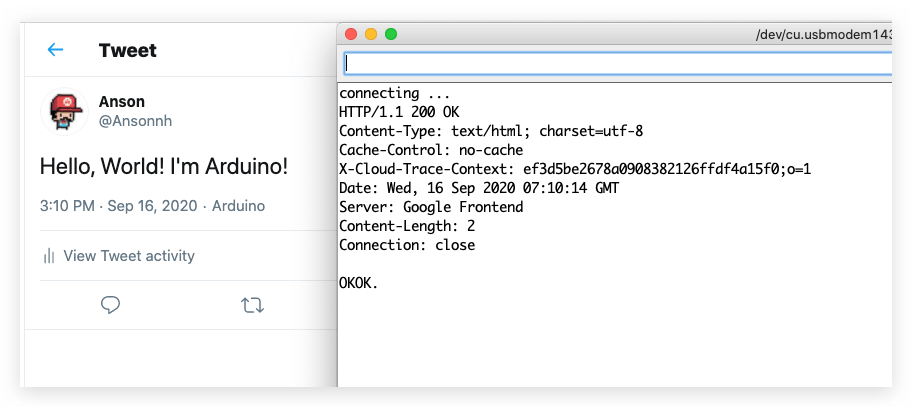
Sending Twitter Example
This is a fun example that uses the Wio Terminal to send twitter. This uses the Tweet Library for Arduino to work around the direct connections of the HTTPs.
Install the Tweet Library for Arduino
-
Visit the Arduno-Twitter-library repositories and download the entire repo to your local drive.
-
Now, the library can be installed to the Arduino IDE. Open the Arduino IDE, and click
sketch->Include Library->Add .ZIP Library, and choose theArduno-Twitter-libraryfile that you've have just downloaded.
This the workaround of connecting to twitter, which may not be safe, do it under your own risk.
Obtain Token
Get a token to post a message using OAuth by clicking here.
Please visit http://arduino-tweet.appspot.com/ for more reference.
Example Code
- Copy the token you obtained from above, and paste to the Arduino sketch.
/*
 *  Check http://arduino-tweet.appspot.com/ for more reference
 */

#include <UIPEthernet.h>
#include <Twitter.h>

uint8_t mac[6] = {0x74,0x69,0x69,0x2D,0x30,0x31};

// Your Token to Tweet (get it from http://arduino-tweet.appspot.com/)
Twitter twitter("YOUR-TOKEN-HERE");

// Message to post
char msg[] = "Hello, World! I'm Arduino!";

void setup()
{
  delay(1000);
  Ethernet.begin(mac);
  // or you can use DHCP for autoomatic IP address configuration.
  // Ethernet.begin(mac);
  Serial.begin(9600);
  while(!Serial);

  Serial.println("connecting ...");
  if (twitter.post(msg)) {
    // Specify &Serial to output received response to Serial.
    // If no output is required, you can just omit the argument, e.g.
    // int status = twitter.wait();
    int status = twitter.wait(&Serial);
    if (status == 200) {
      Serial.println("OK.");
    } else {
      Serial.print("failed : code ");
      Serial.println(status);
    }
  } else {
    Serial.println("connection failed.");
  }
}

void loop()
{
}