Basics of the TFT LCD Screen
Pixel Coordinates Systems
A digital 2-D image is made up of rows and columns of pixels. A pixel in the image is specified by saying which column and which row the pixel is in. In simple terms, a pixel can be identified by a pair of integers providing the column number and the row number. For example, the pixel with coordinates (4,7) would lie in column 4, and row 7.
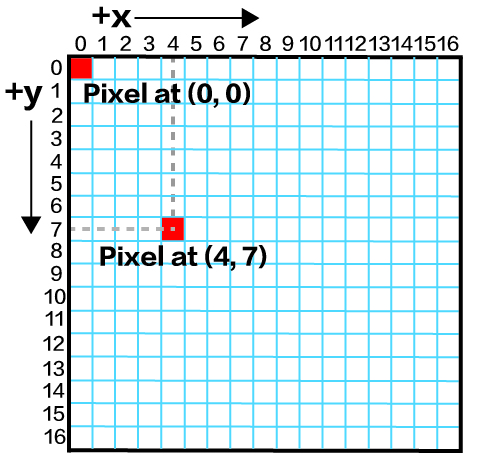
Conventionally, columns are numbered from the top left to right, starting from zero, but in some cases, it can also start from other corners(by setting rotation).
8-bit & 16-bit colour model
Pixels also expressed in colour form, so also better to cover some colour models. The 8 bit and 16 bit colour models are good for MCUs to work with so this is a good start. Theses two colour models consist of 3 colour components - Red, Green, and Blue. Depending on the colour model, these 3 colour components will be stored into 8 bits or 16 bits variable.
8-bit colour
| Bit | 7 | 6 | 5 | 4 | 3 | 2 | 1 | 0 |
|---|---|---|---|---|---|---|---|---|
| Data | Red | Red | Red | Green | Green | Green | Blue | Blue |
16-bit colour
| Bit | 15 | 14 | 13 | 12 | 11 | 10 | 9 | 8 | 7 | 6 | 5 | 4 | 3 | 2 | 1 | 0 |
|---|---|---|---|---|---|---|---|---|---|---|---|---|---|---|---|---|
| Data | Red | Red | Red | Red | Red | Green | Green | Green | Green | Green | Green | Blue | Blue | Blue | Blue | Blue |
Here are some basic pre-defined example colours(16-bit) including in the LCD library:
#define TFT_BLACK       0x0000      /*   0,   0,   0 */
#define TFT_NAVY        0x000F      /*   0,   0, 128 */
#define TFT_DARKGREEN   0x03E0      /*   0, 128,   0 */
#define TFT_DARKCYAN    0x03EF      /*   0, 128, 128 */
#define TFT_MAROON      0x7800      /* 128,   0,   0 */
#define TFT_PURPLE      0x780F      /* 128,   0, 128 */
#define TFT_OLIVE       0x7BE0      /* 128, 128,   0 */
#define TFT_LIGHTGREY   0xC618      /* 192, 192, 192 */
#define TFT_DARKGREY    0x7BEF      /* 128, 128, 128 */
#define TFT_BLUE        0x001F      /*   0,   0, 255 */
#define TFT_GREEN       0x07E0      /*   0, 255,   0 */
#define TFT_CYAN        0x07FF      /*   0, 255, 255 */
#define TFT_RED         0xF800      /* 255,   0,   0 */
#define TFT_MAGENTA     0xF81F      /* 255,   0, 255 */
#define TFT_YELLOW      0xFFE0      /* 255, 255,   0 */
#define TFT_WHITE       0xFFFF      /* 255, 255, 255 */
#define TFT_ORANGE      0xFDA0      /* 255, 180,   0 */
#define TFT_GREENYELLOW 0xB7E0      /* 180, 255,   0 */
TFT LCD Screen Initialisation
To initialise the TFT LCD screen on Wio Terminal:
#include"TFT_eSPI.h"
TFT_eSPI tft;

void setup() {
  ...
    tft.begin();
    tft.setRotation(r);
    digitalWrite(LCD_BACKLIGHT, HIGH); // turn on the backlight
  ...
}
where r is the rotation of the TFT LCD screen (from 0 to 3), meaning which corner it will start.
Example code
This example initialises the TFT LCD screen on Wio Terminal and fills the screen with colour red.
#include"TFT_eSPI.h"
TFT_eSPI tft;

void setup() {
    tft.begin();
    tft.setRotation(3);

    tft.fillScreen(TFT_RED); // fills entire the screen with colour red
}

void loop() {

}
Turning Off The LCD Backlight
To turn off the LCD backlight of Wio Terminal, simply define the LCD Backlight control pin 72Ul and pull it HIGH to turn on and pull it LOW to turn off:
#include"TFT_eSPI.h"
TFT_eSPI tft;
#define LCD_BACKLIGHT (72Ul) // Control Pin of LCD

void setup() {
  // put your setup code here, to run once:

    tft.begin();
    tft.setRotation(3);
    tft.fillScreen(TFT_RED);

    delay(2000);
    // Turning off the LCD backlight
    digitalWrite(LCD_BACKLIGHT, LOW);
    delay(2000);
    // Turning on the LCD backlight
    digitalWrite(LCD_BACKLIGHT, HIGH);
}

void loop() {
  // put your main code here, to run repeatedly:

}
Controlling Brightness of the LCD Backlight
This example is written by Kenta IDA and all credits goes to Kenta IDA.
STEP 1. Download the repo here.
- Under
examples/WioTerminal_BackLightlocation.
STEP 2. Upload the code.
Upload the lcd_backlight_control.ino to Wio Terminal and you will see brightness change on the LCD.
Tech Support & Product Discussion
if you have any technical issue. submit the issue into our forum. Thank you for choosing our products! We are here to provide you with different support to ensure that your experience with our products is as smooth as possible. We offer several communication channels to cater to different preferences and needs.