Wio Terminal Edge Impulse Distinguish Beverage with Multi-channel Gas Sensor
In this wiki, we will introduce how to use Wio Terminal with Edge Impulse to simply deploy a machine learning project. Wio Terminal with the Grove systems can be very powerful, which brings hundreds of sensor data in for analysis and to possibly evaluate different scenarios!
This is a project inspired by Benjamin Cabé's Artificial nose project. Through this article, you will get an understanding of the workflow of Edge Impulse using Wio Terminal.
Hardware Required
-
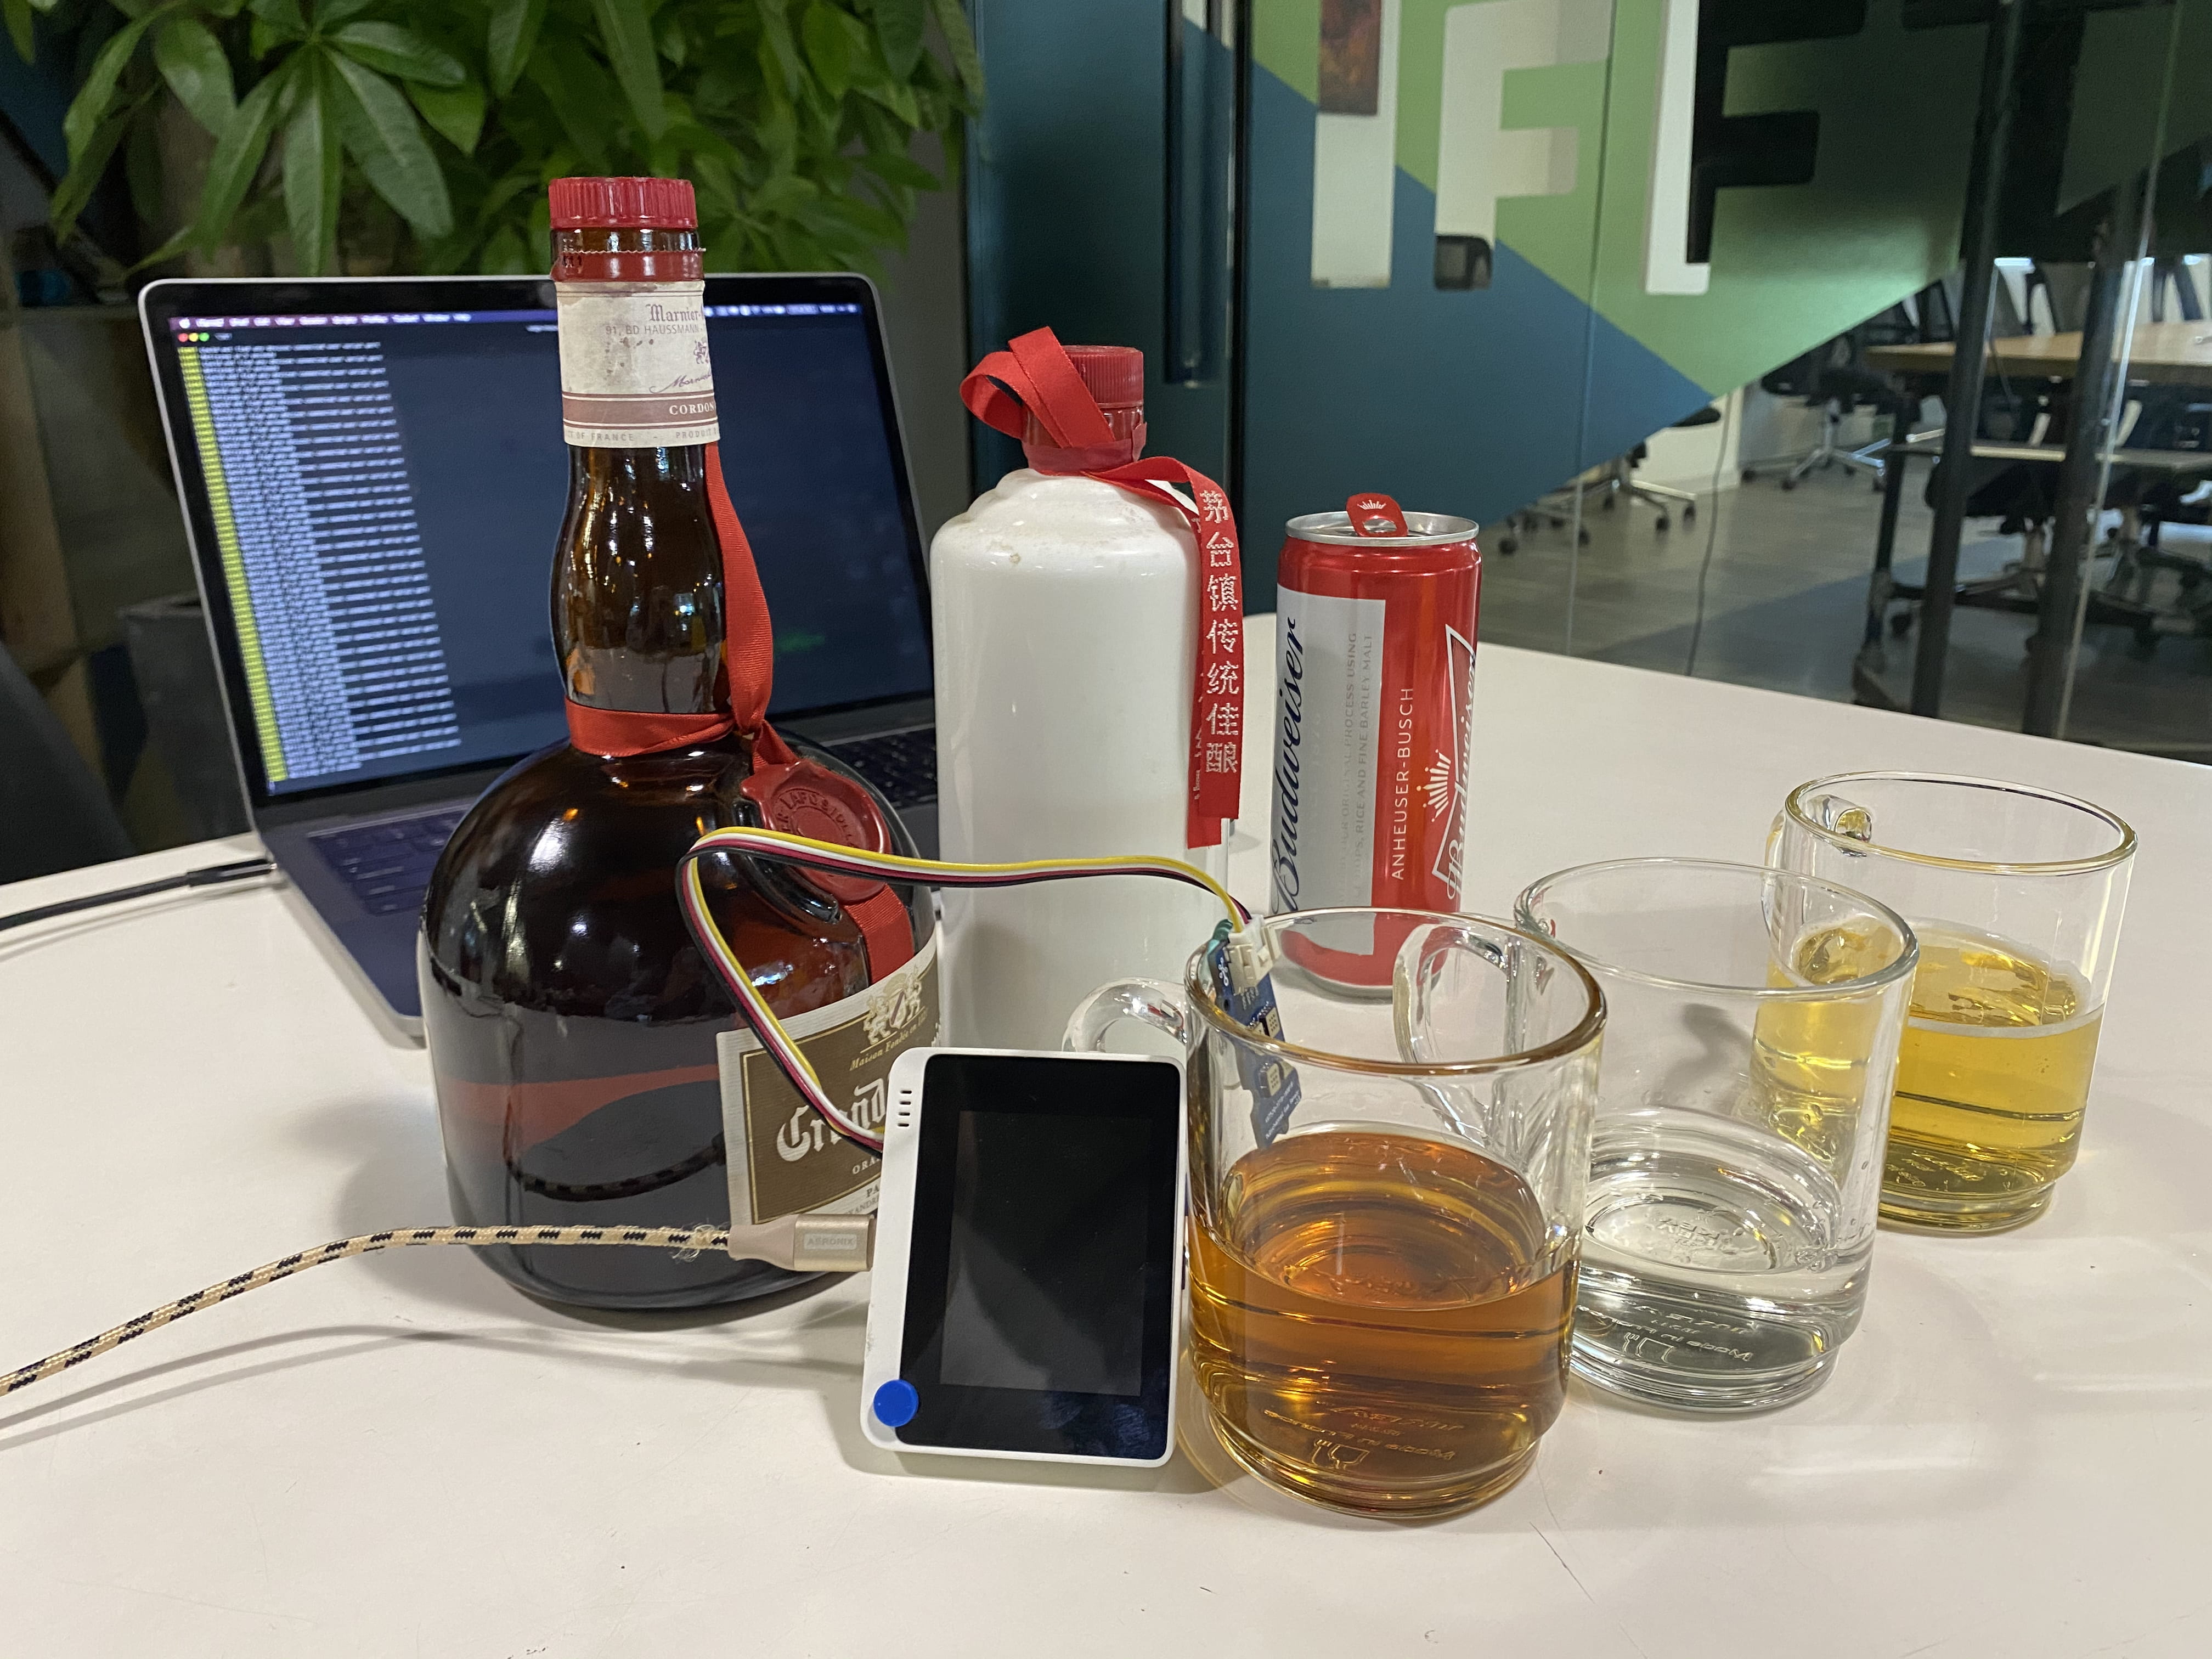
Some alcohol, coffee, cola
Get Started
Let's work you through the workflow of Edge Impulse with Wio Terminal.
1. Connecting to Edge Impulse
① Load the latest device firmware to Wio Terminal
Connect Wio Terminal to your computer. Entering the bootloader mode by sliding the power switch twice quickly. For more reference, please also see here.
An external drive named Arduino should appear in your PC. Drag the downloaded Edge Impulse uf2 firmware files to the Arduino drive. Now, Edge Impulse is loaded on Seeeduino Wio Terminal!
NOTE: Here is the Wio Terminal Edge Impulse source code, you can also build the firmware from here.
② Connect using WebUSB
Go to your Edge Impulse project, and click the Data acquisition tab, then you can see the selection Connect using WebUSB on the upper right. Click it.

Then, you can see a pop-tip, select the paired serial port and "Connect" as the following picture.
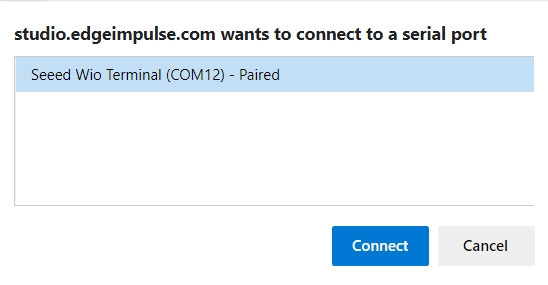
Now, you have successfully connected the Wio Terminal with the Edge Impulse.
2. Collecting Data
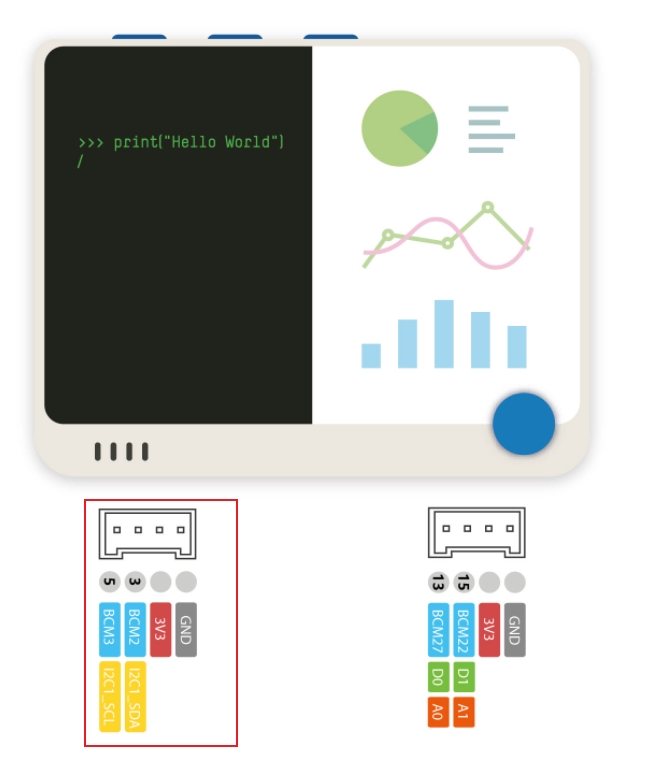
Connect the Grove - Multichannel Gas Sensor v2 to Wio Terminal's Grove I2C port.
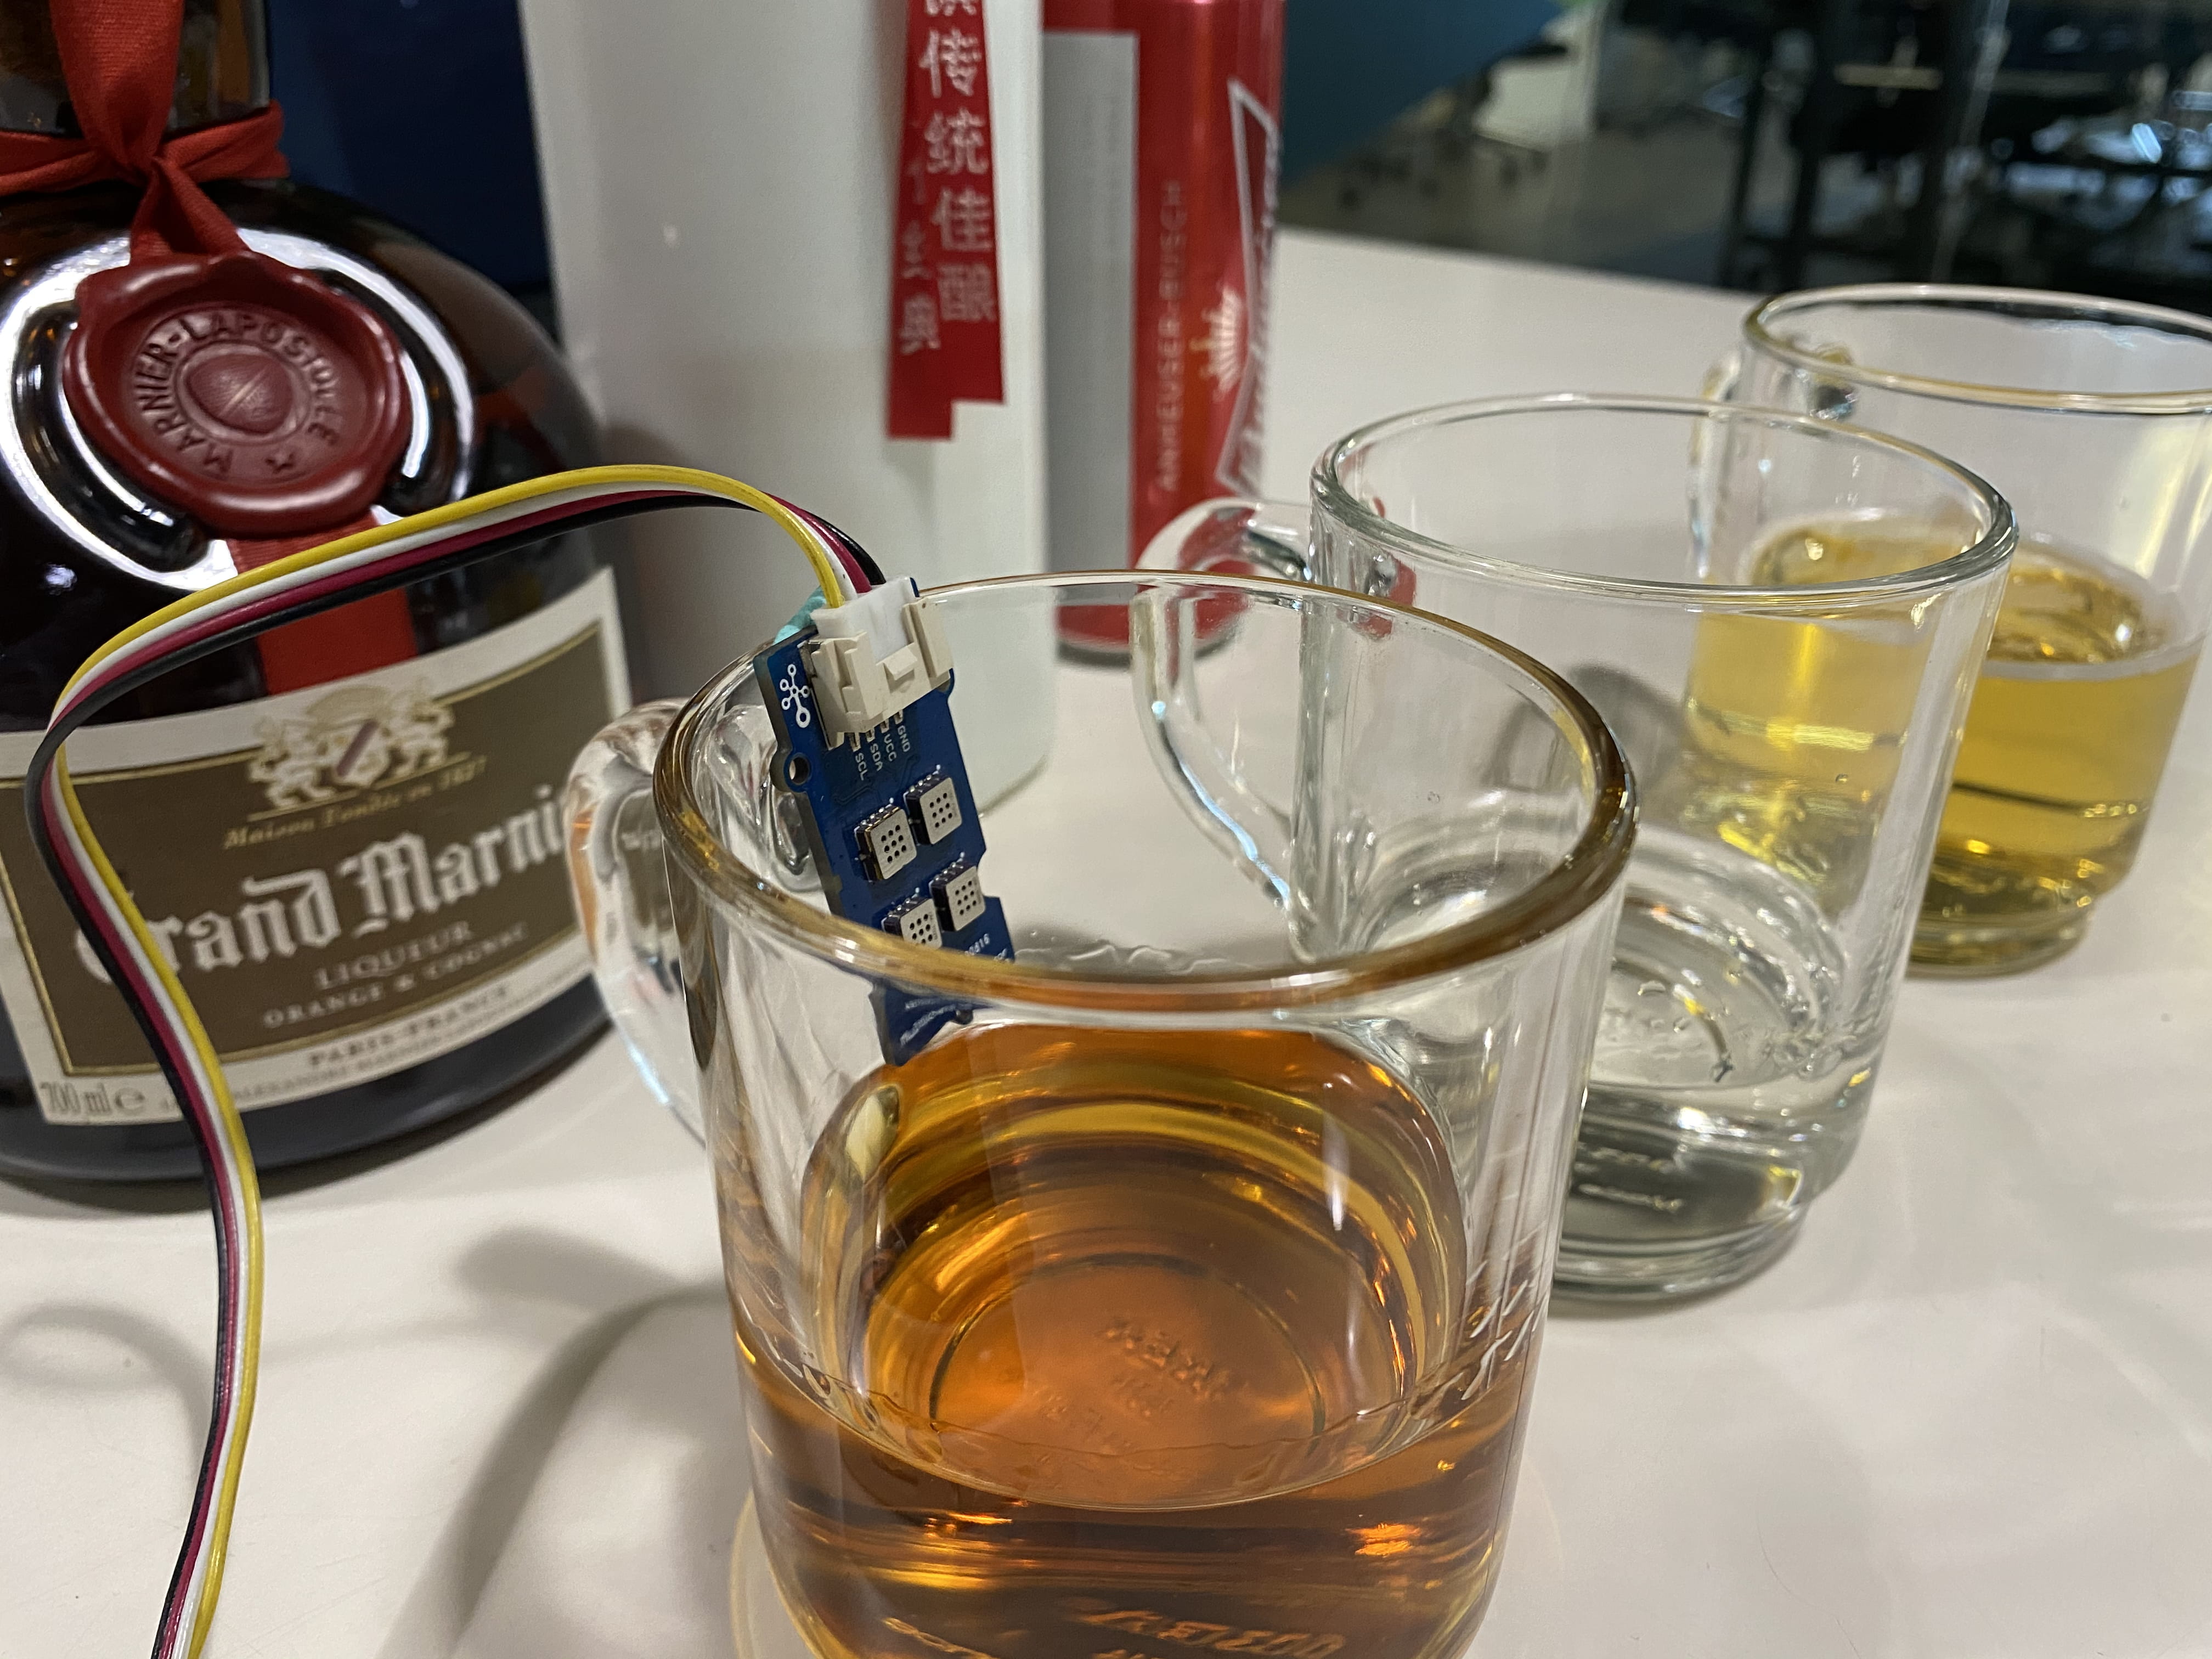
Place the Grove - Multichannel Gas Sensor v2 onto the beverage that you are going to test, in my case it's cola first. One thing to be pointed here, the Grove - Multichannel Gas Sensor v2 can be affected by the surroundings easily, you may want to use a cover to make sure it's sensing the only test content.
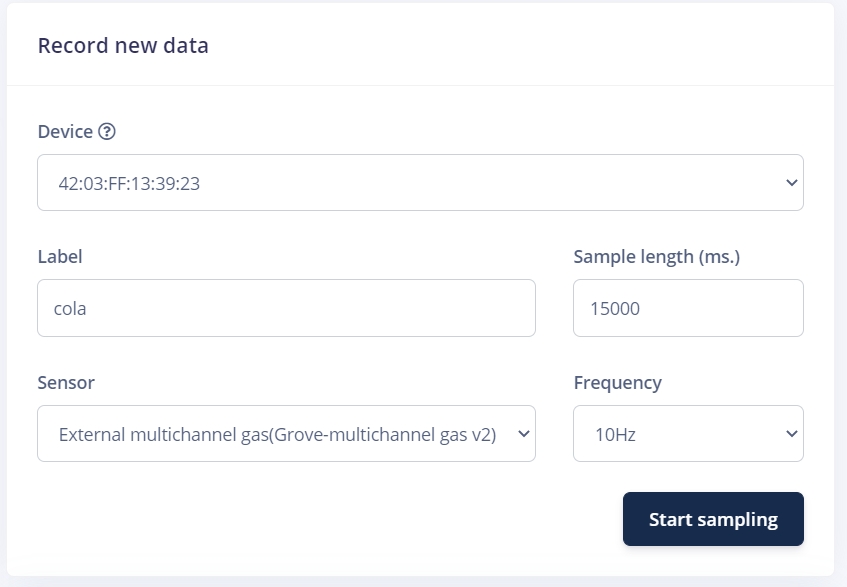
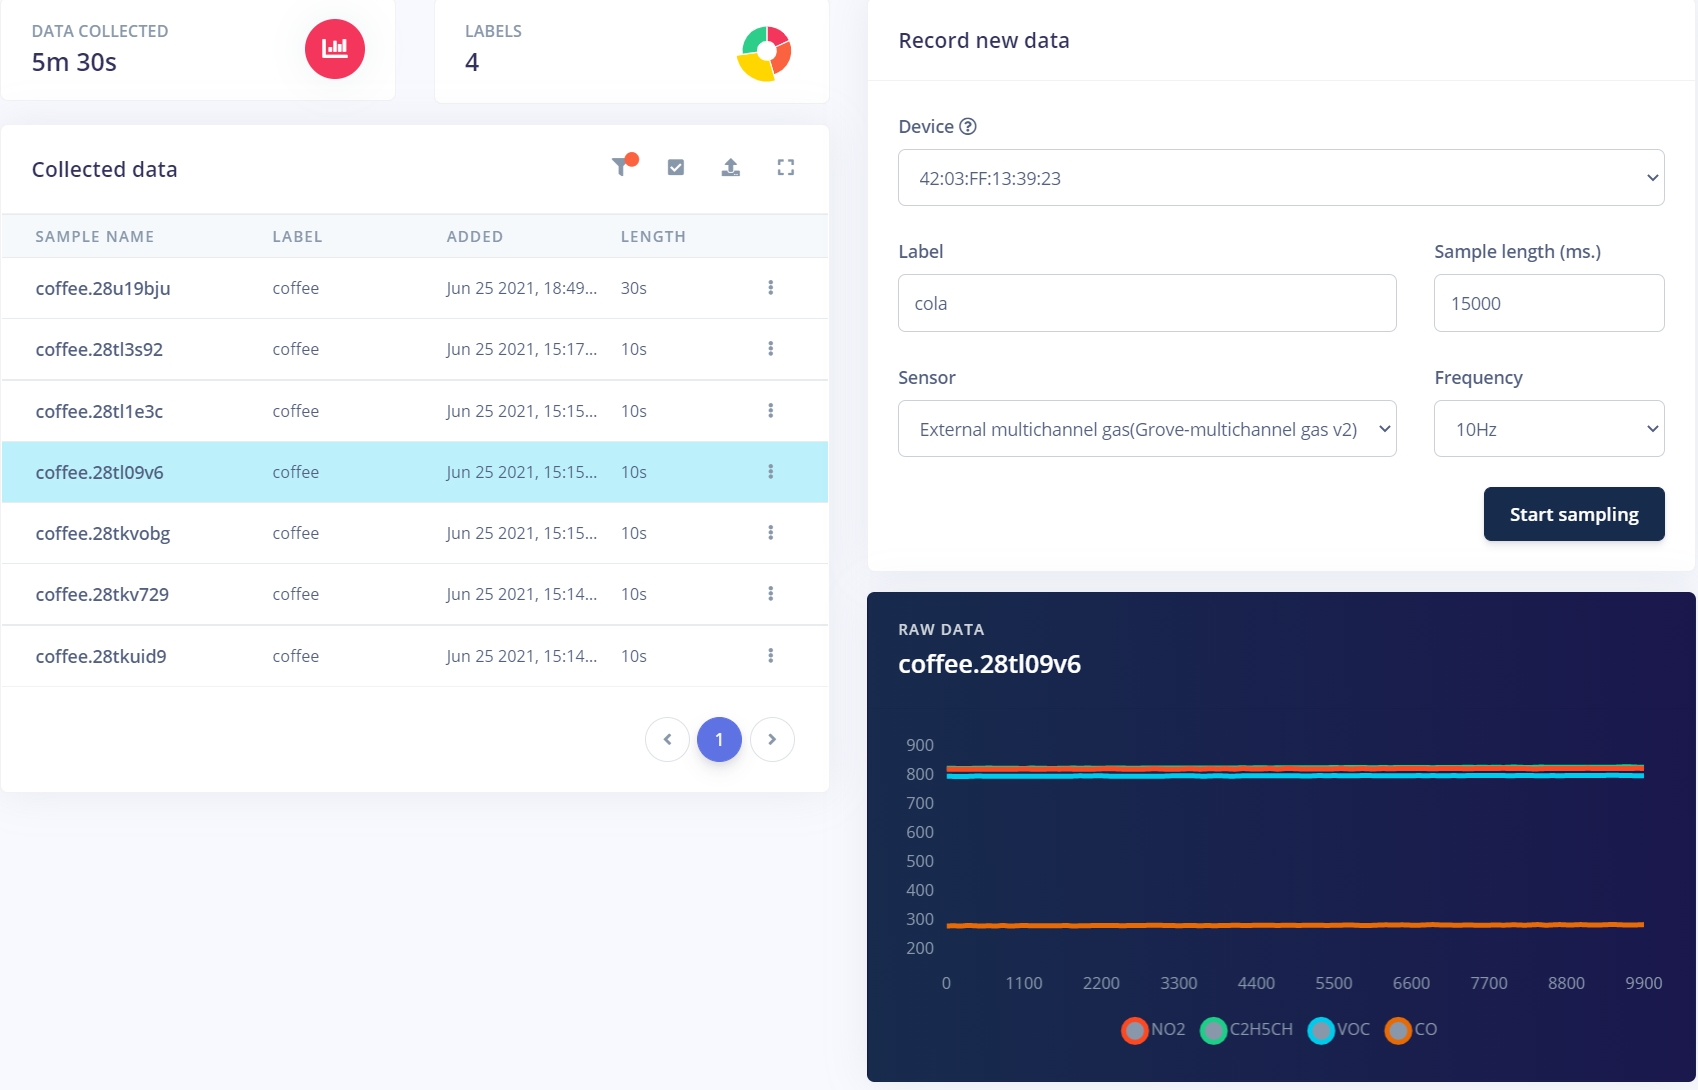
On the Edge Impulse dashboard, navigate to Data acquisition, choose your device, and name your Label. As it implies, the label should name according to your test content so here will also be cola.
Sample length (ms.) will be the length of your sampling time in ms, Sensor choose External multichannel gas and Frequency choose 10Hz.
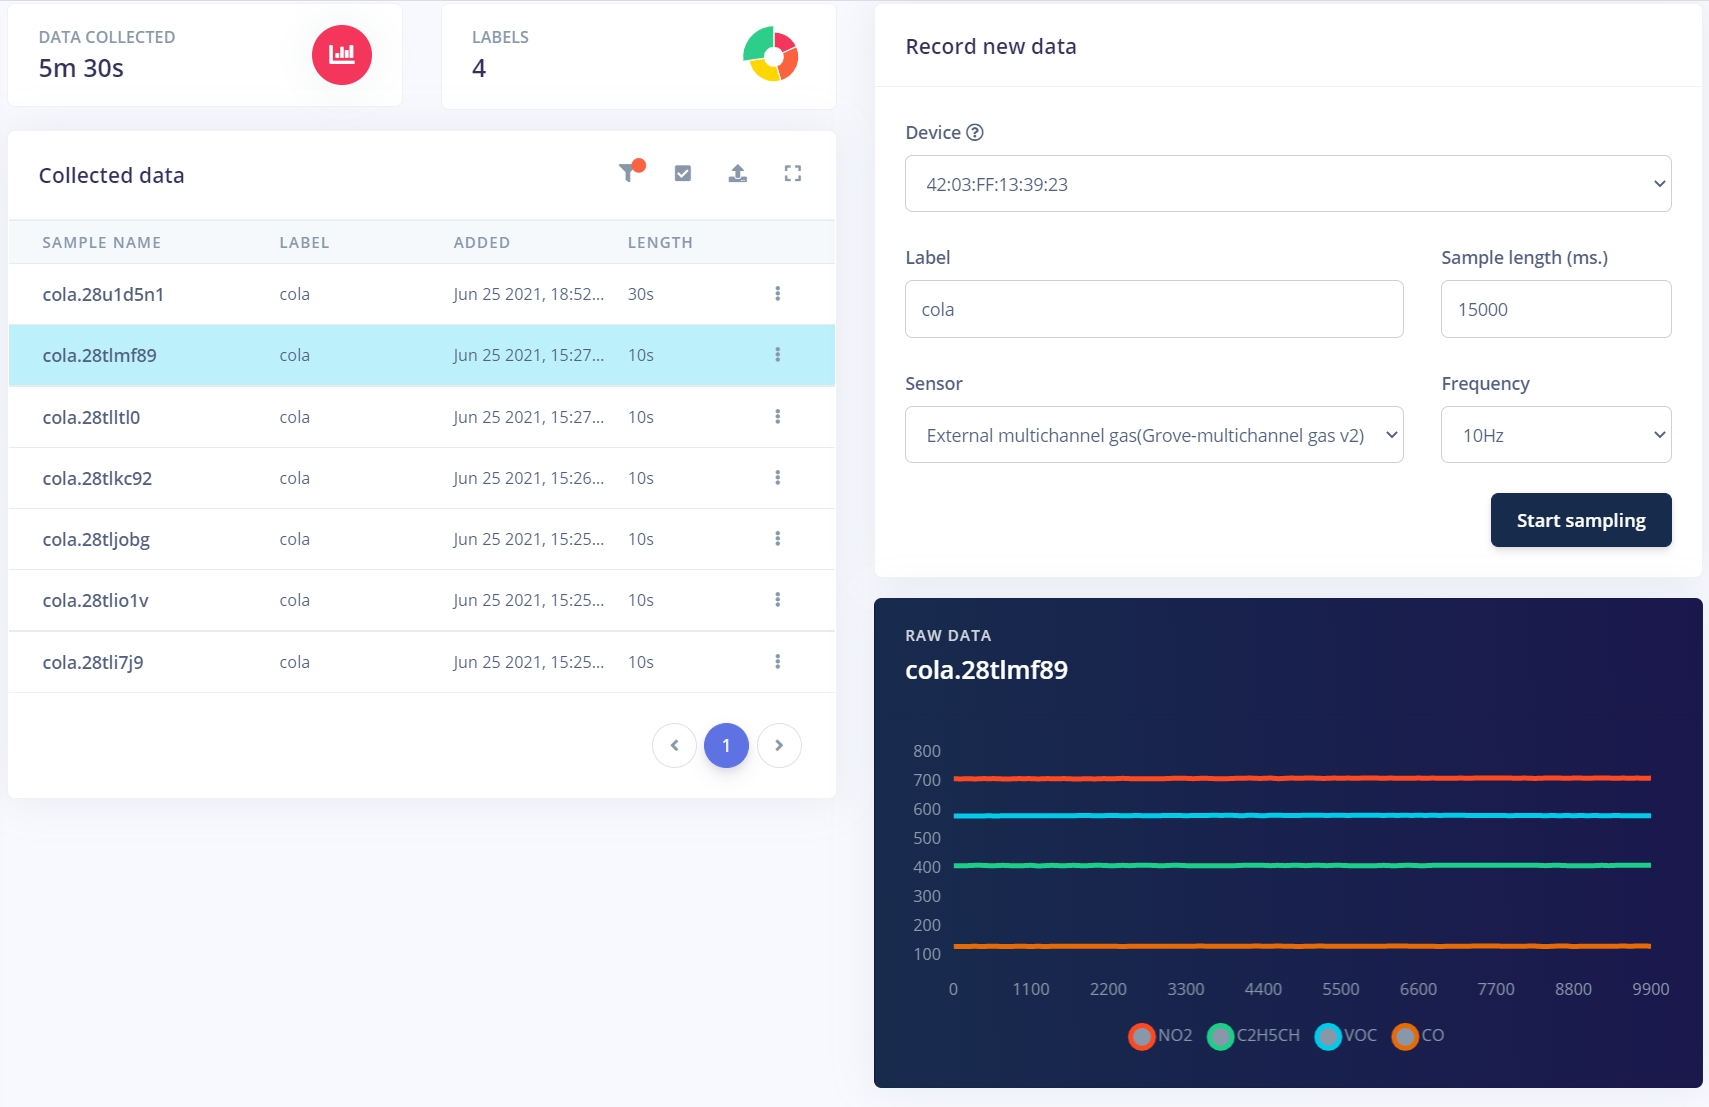
Click Start Sampling and it will start to collect data.
In my test, I have obtained cola data for 10s for 9 times and each time they have similar results. You will need to have data sets that are fairly similar to each other.
If you have data fluctuating a lot and this may be caused by the surrounding.
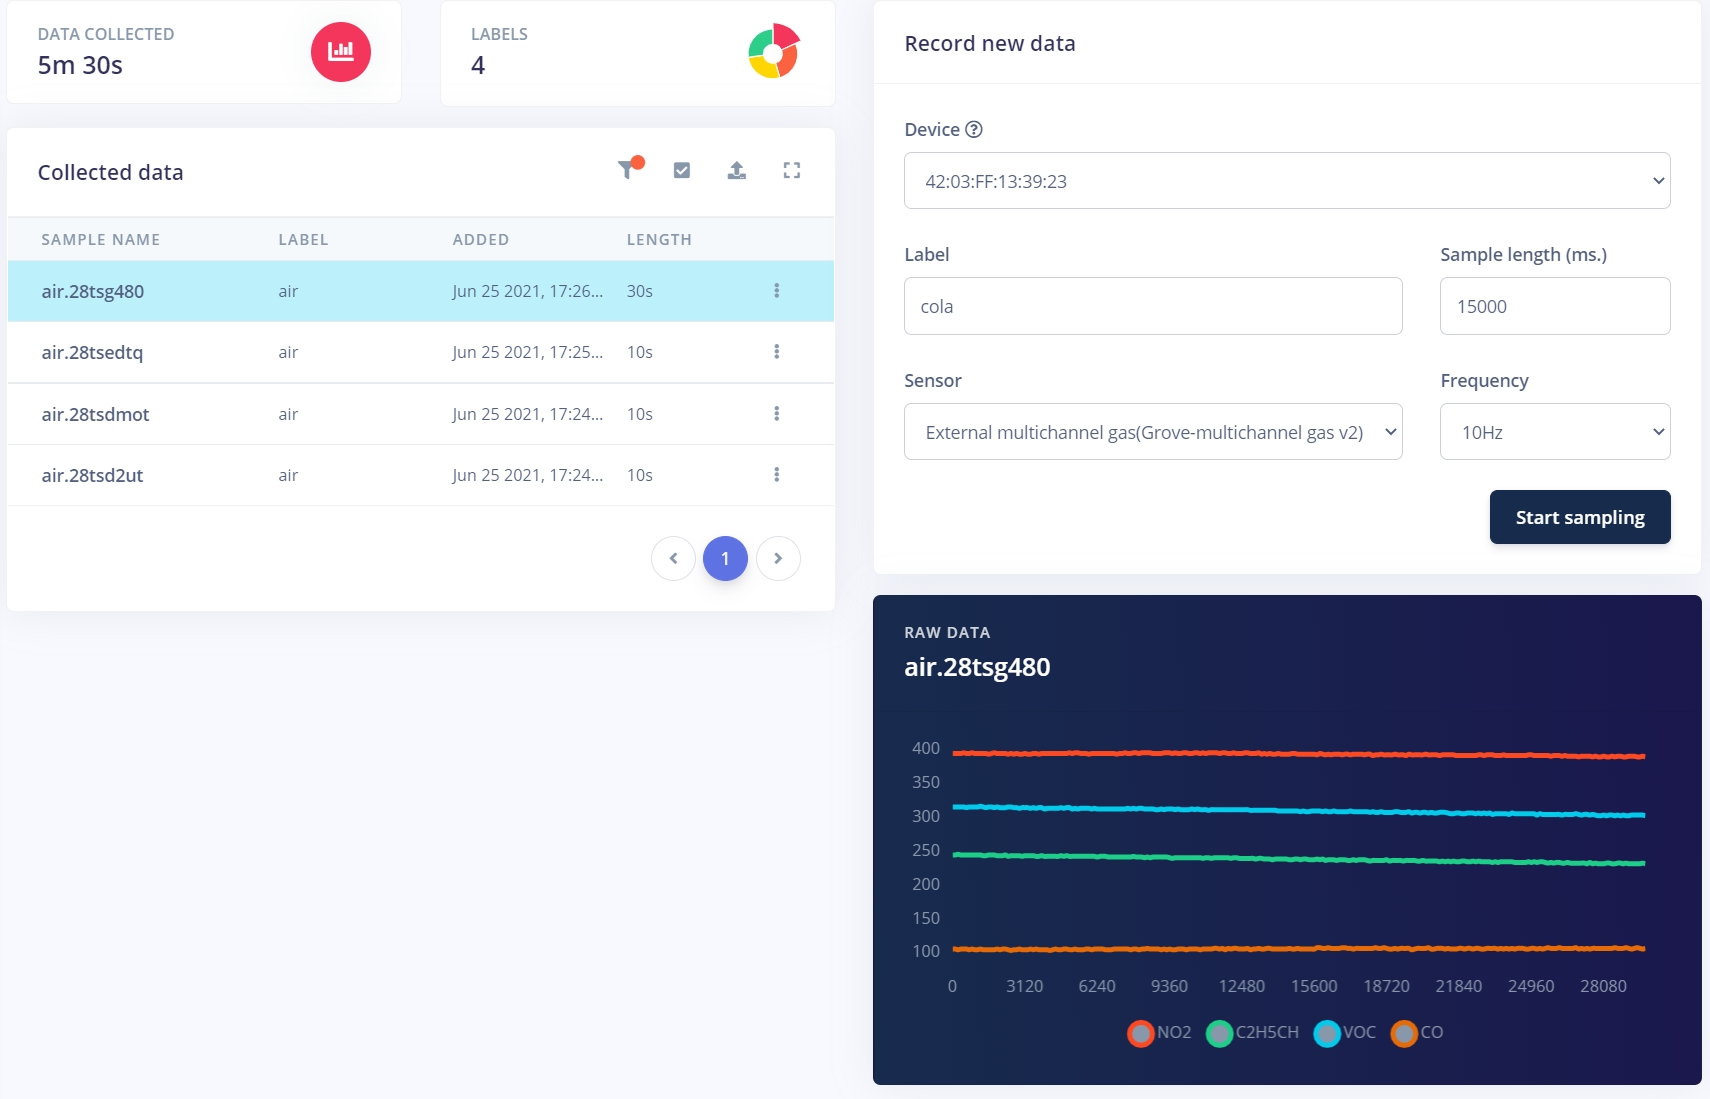
Once you have enough data for one label you can do the exact same step for other labels! In my test, I have three more datasets air, coffee and alcohol:
- air dataset:
- coffee dataset:
- alcohol dataset:
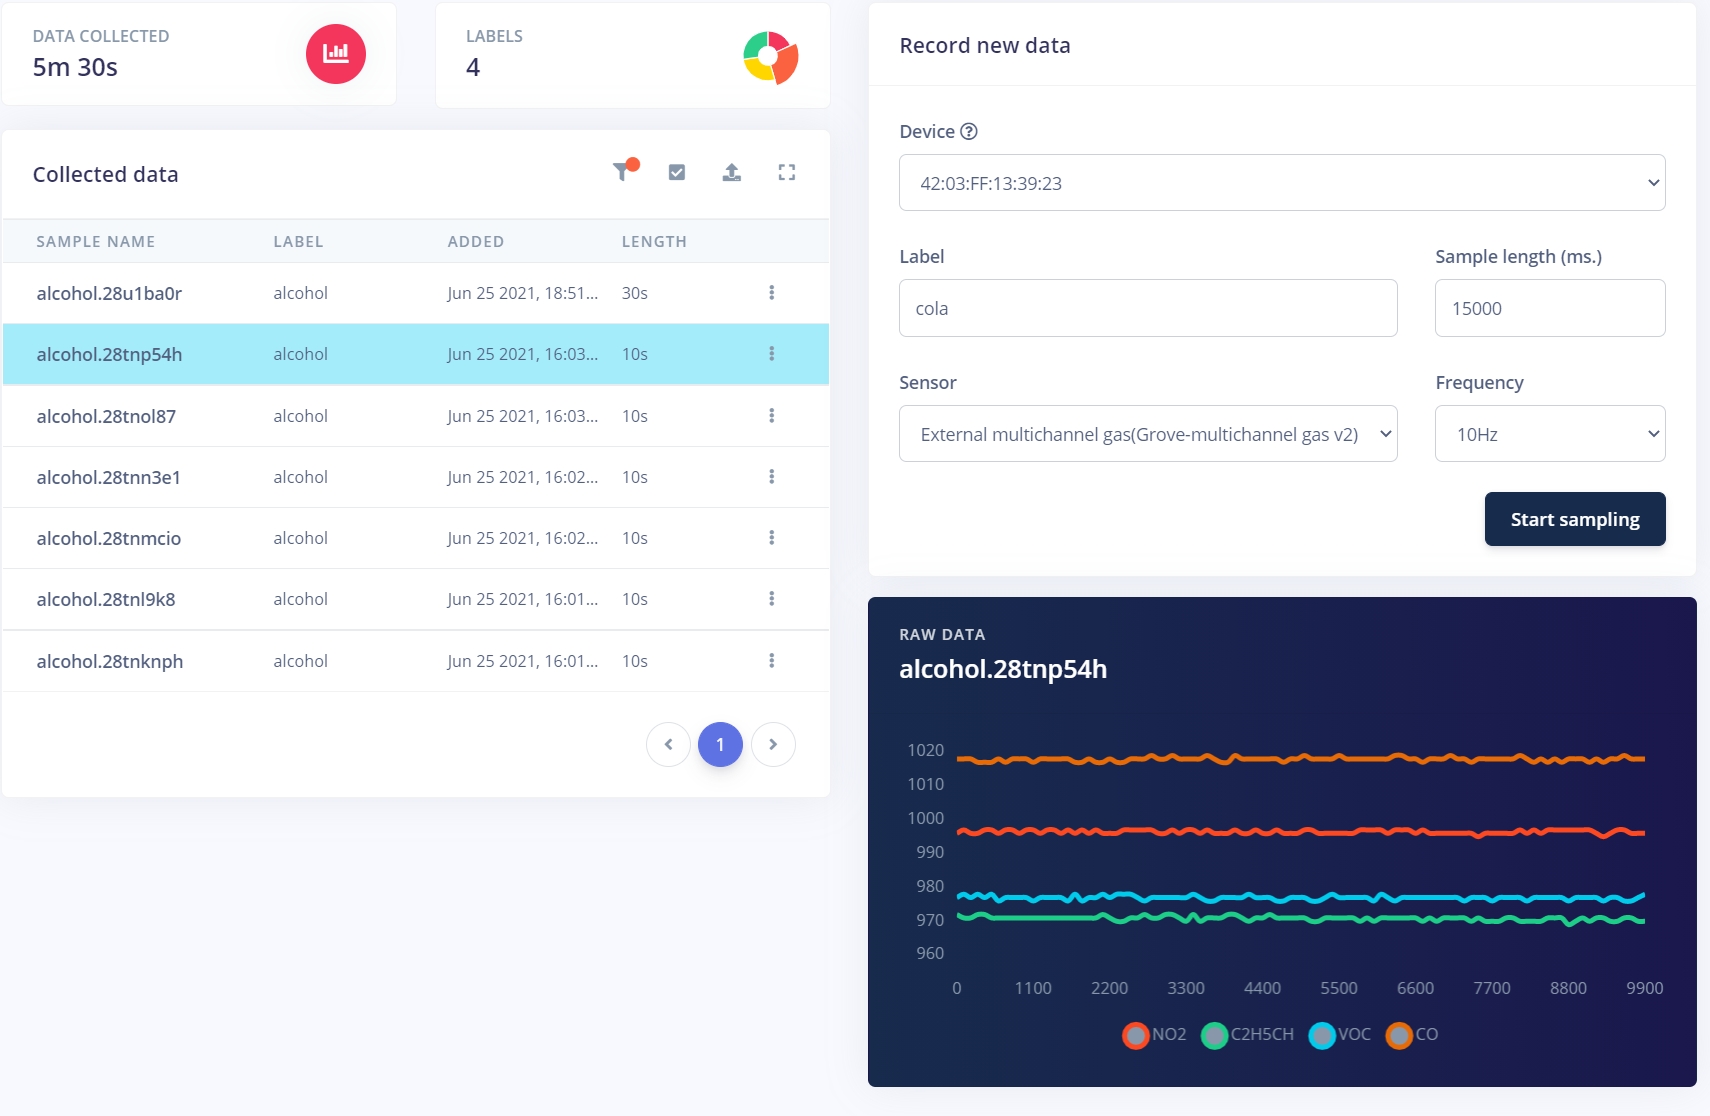
You should see that different beverages will have different gas values which makes it perfect for machine learning! To add more, it is always better to have more data for it to be trained later, and so please feel free to collect more data!
Feel free to do more categories of alcohol!
3. Designing Impulse
Next up, we will need to design the impulse by clicking Impulse Design -> Create Impulse. An impulse takes raw data, uses signal processing to extract features, and then uses a learning block to classify new data. In this example, I added a processing block of raw data with all the input axis and added a Neural Network (Keras) learning block as followed:
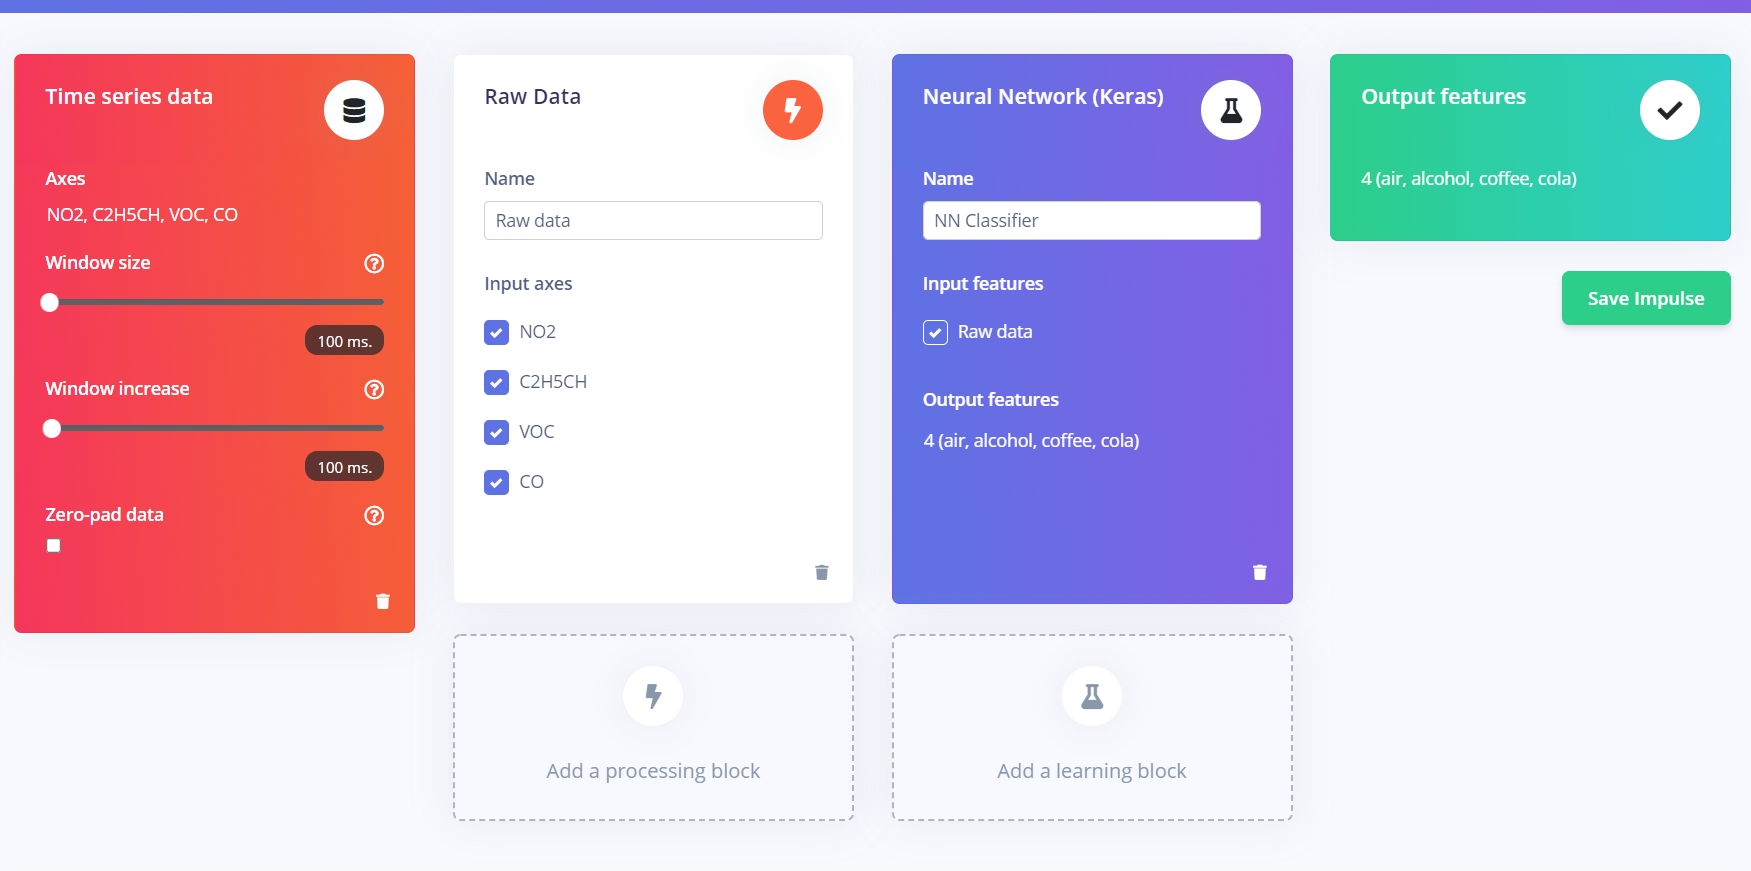
Click Save Impulse and under Impulse design click Raw data and you should see the raw features of the data sets:
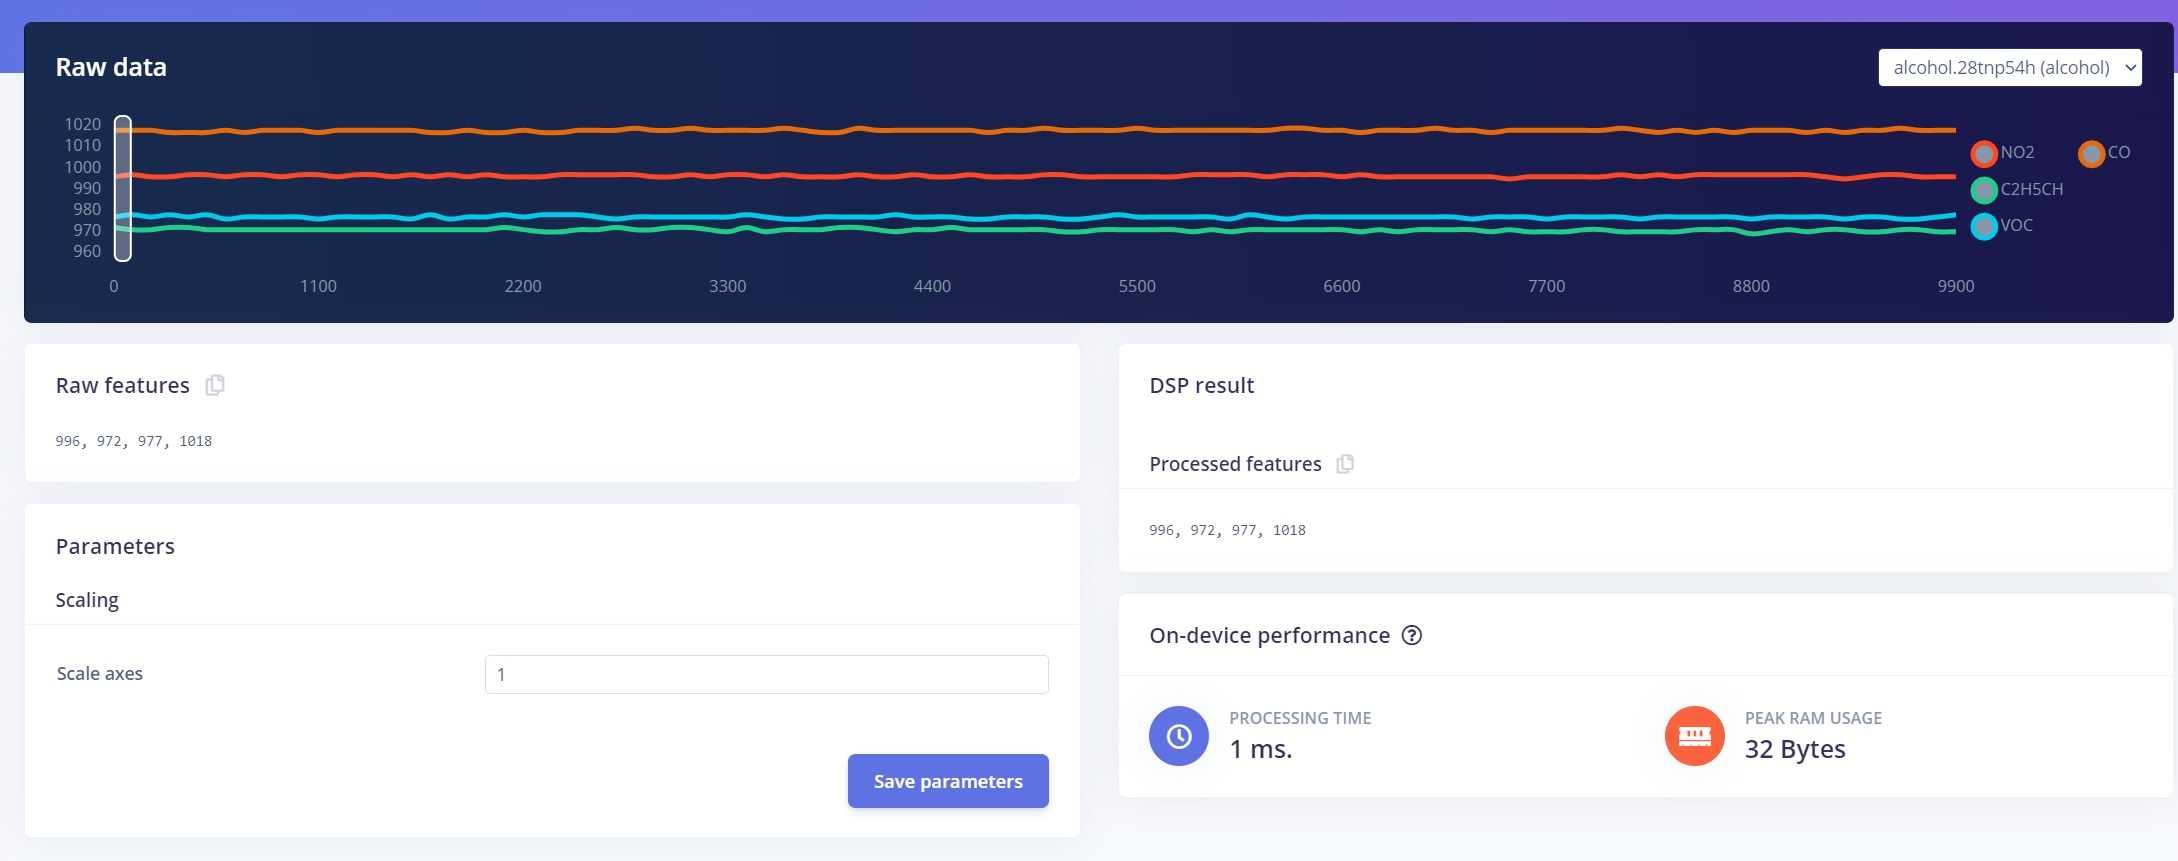
Click Save parameters then it will navigate to another page. Click Generate Features.
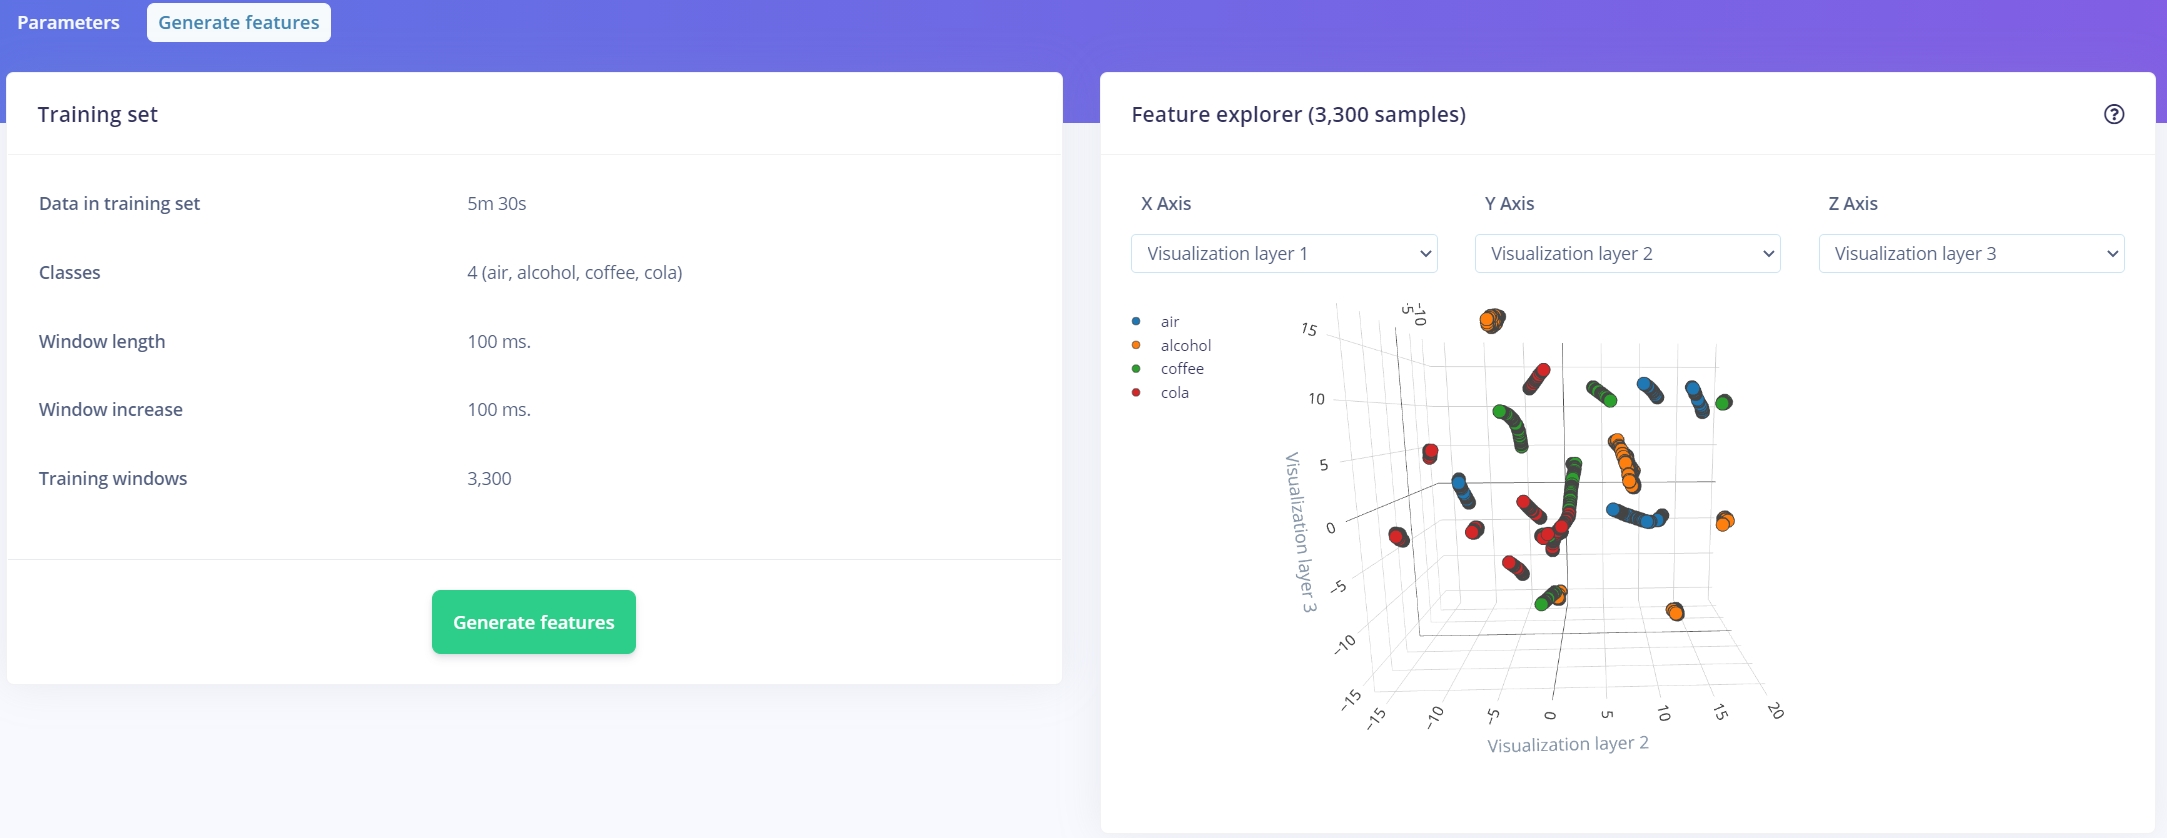
This will generate features from the previous data sets and you will see a graph on the right. If data sets are separated from each other meaning that the data sets are unique to each other which makes it better for machine learning the differences.
4. Training Data
Under Impulse Design, click NN Classifier to configure settings for Neural Network, the following are my settings:
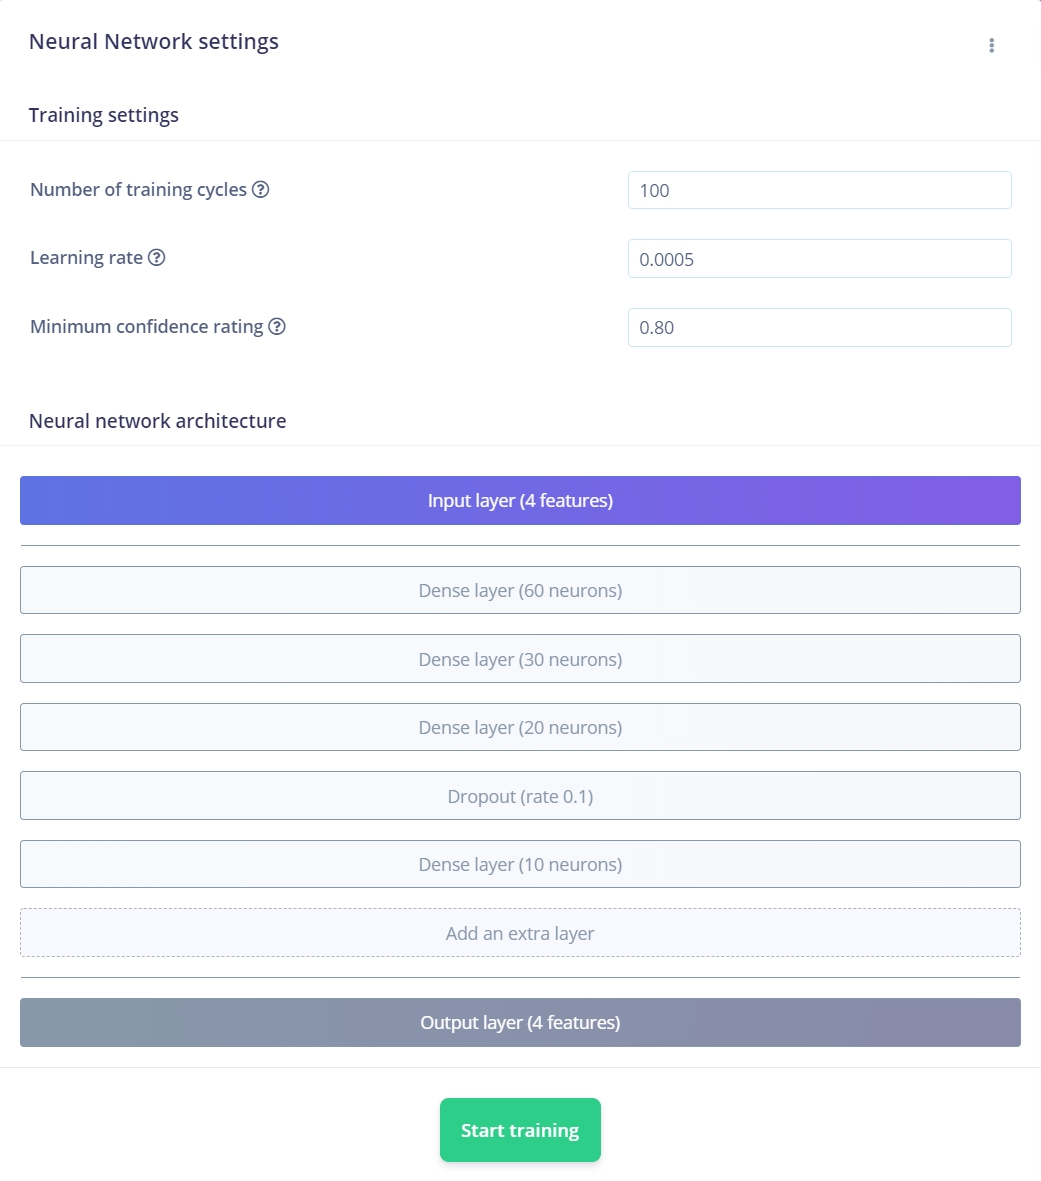
You may want to adjust these settings according to your needs and configure your Neural network architecture, then click Start training! This will perform the training and may take a while.
Once trained, you will see a table of training performance. If your data sets are unique to each other you should get pretty good results! Here is my performance:
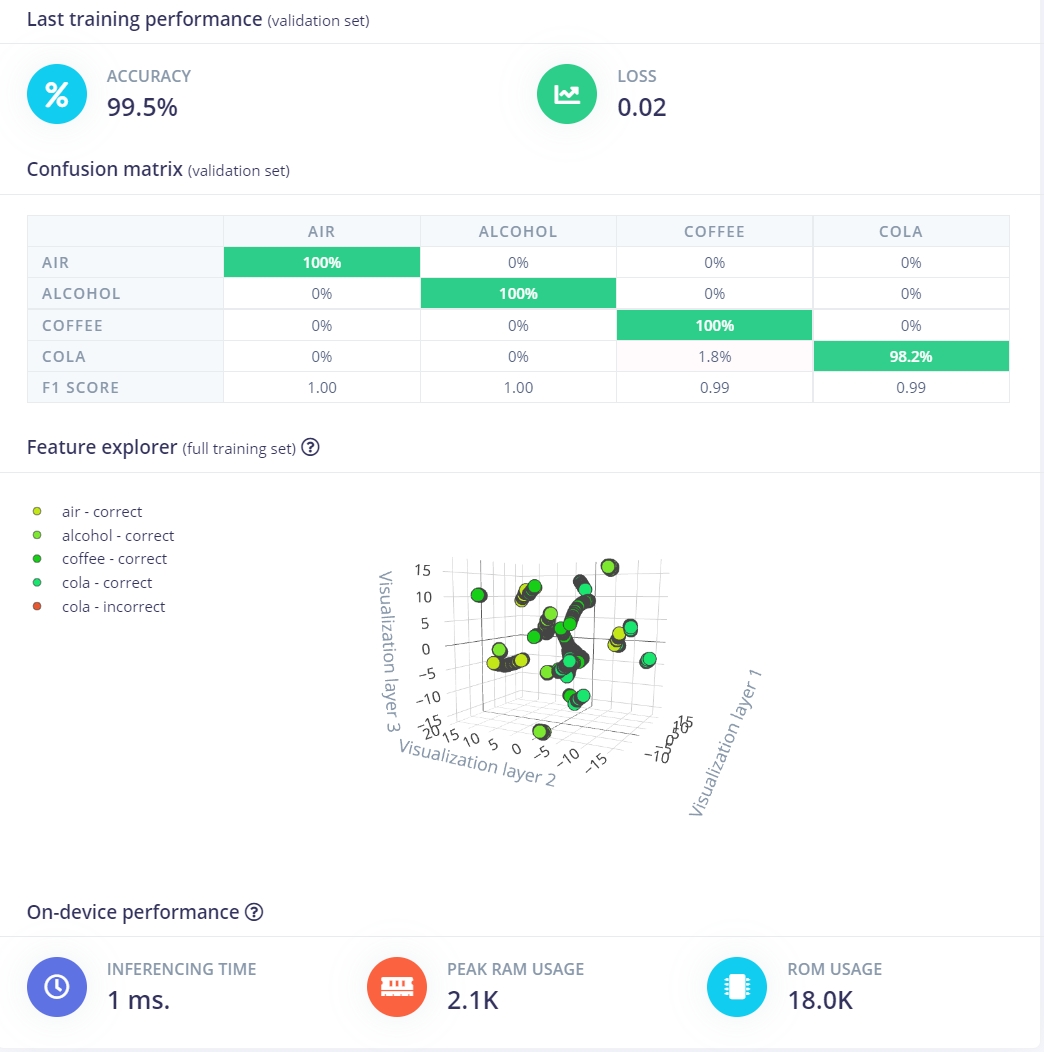
From this, you can see that the accuracy is not bad, this is because there is only 4 cases. You may want to add more cases/tests to this example.
5. Live Classification
Now we have the model trained, we can test the model with new data. Navigate to Live classification, and sample new sets of data for testing.
- Testing Example 1:
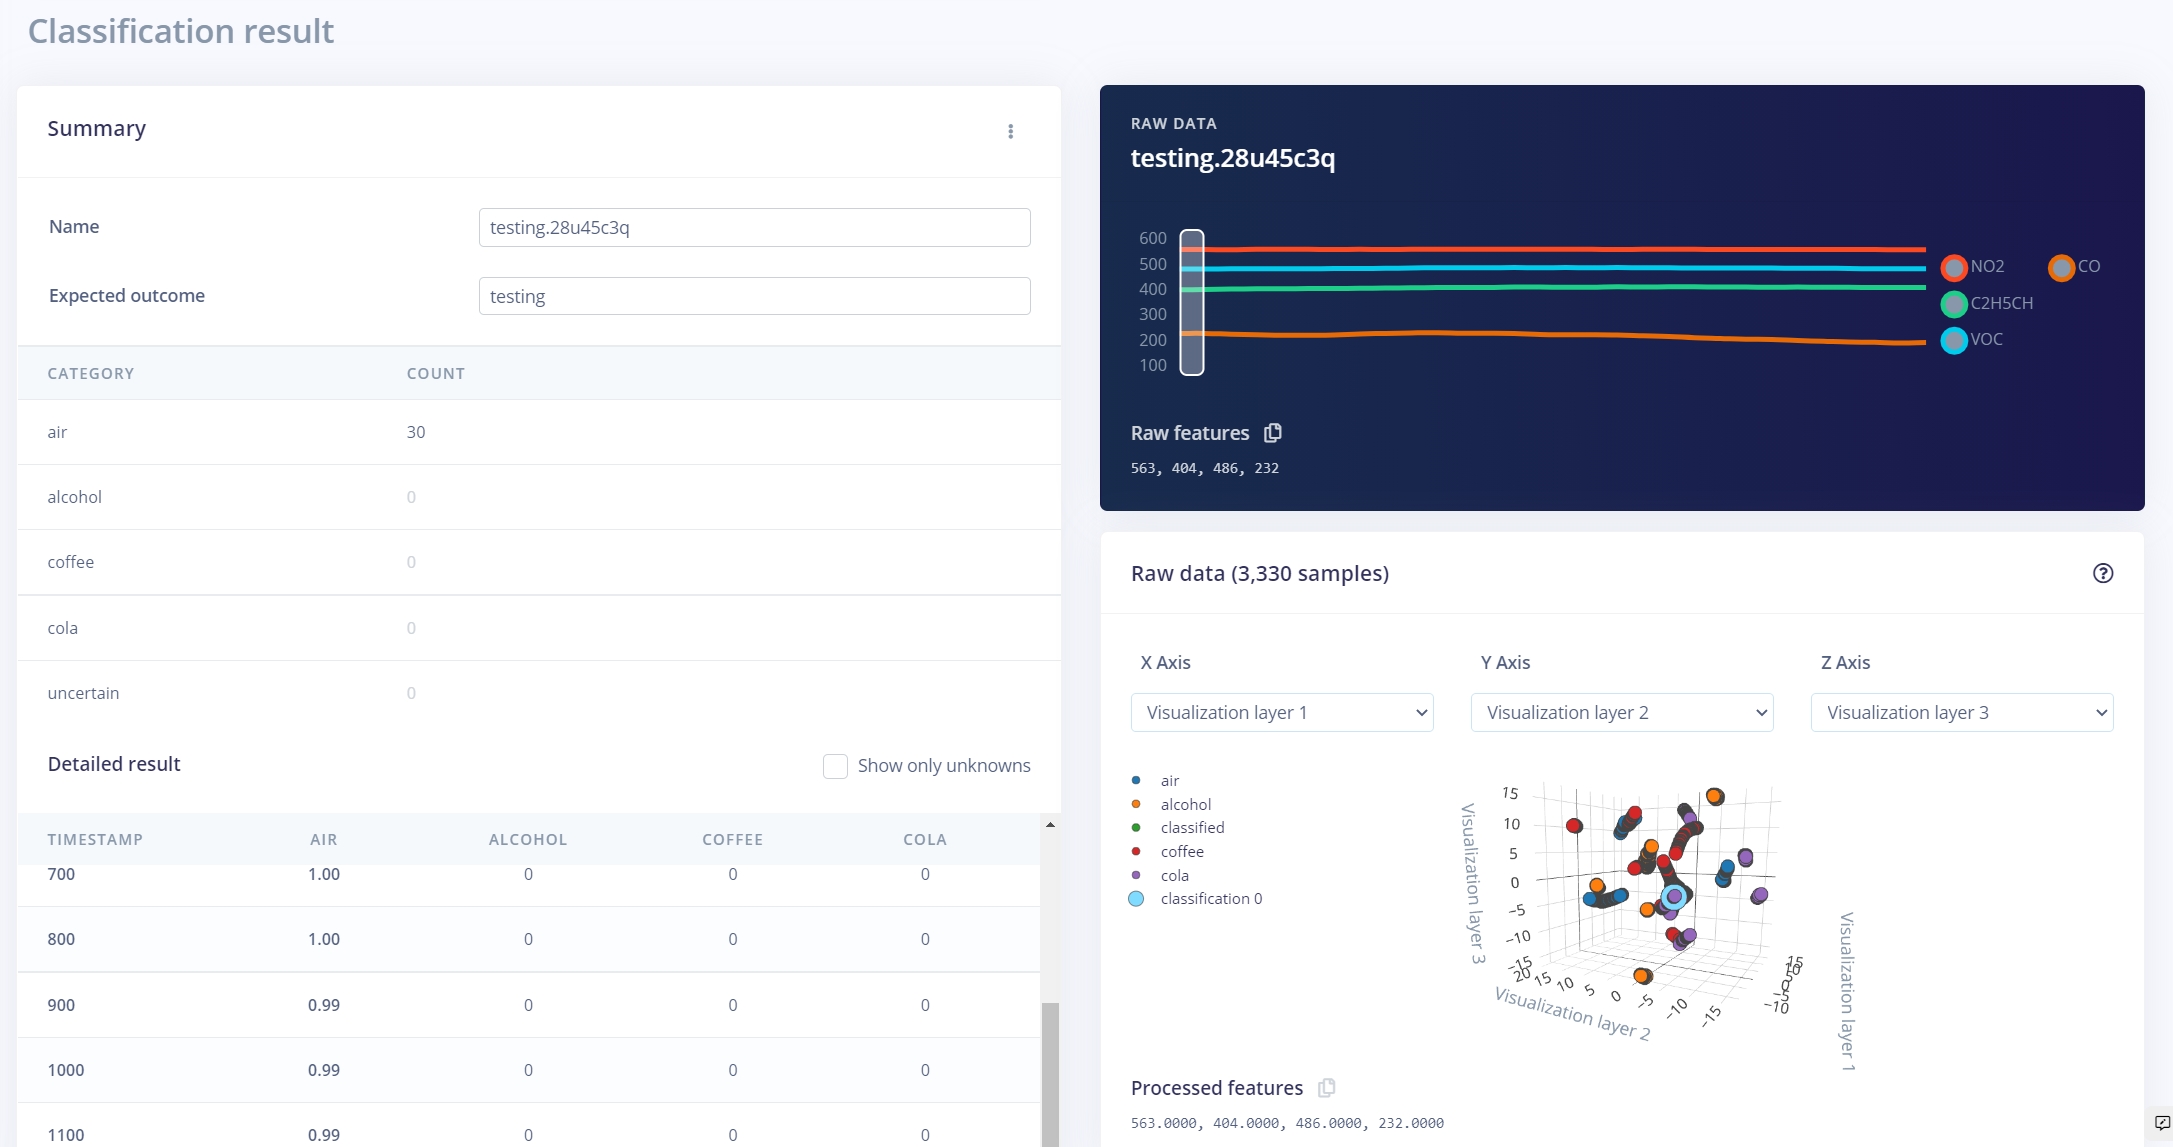
- Testing Example 2:
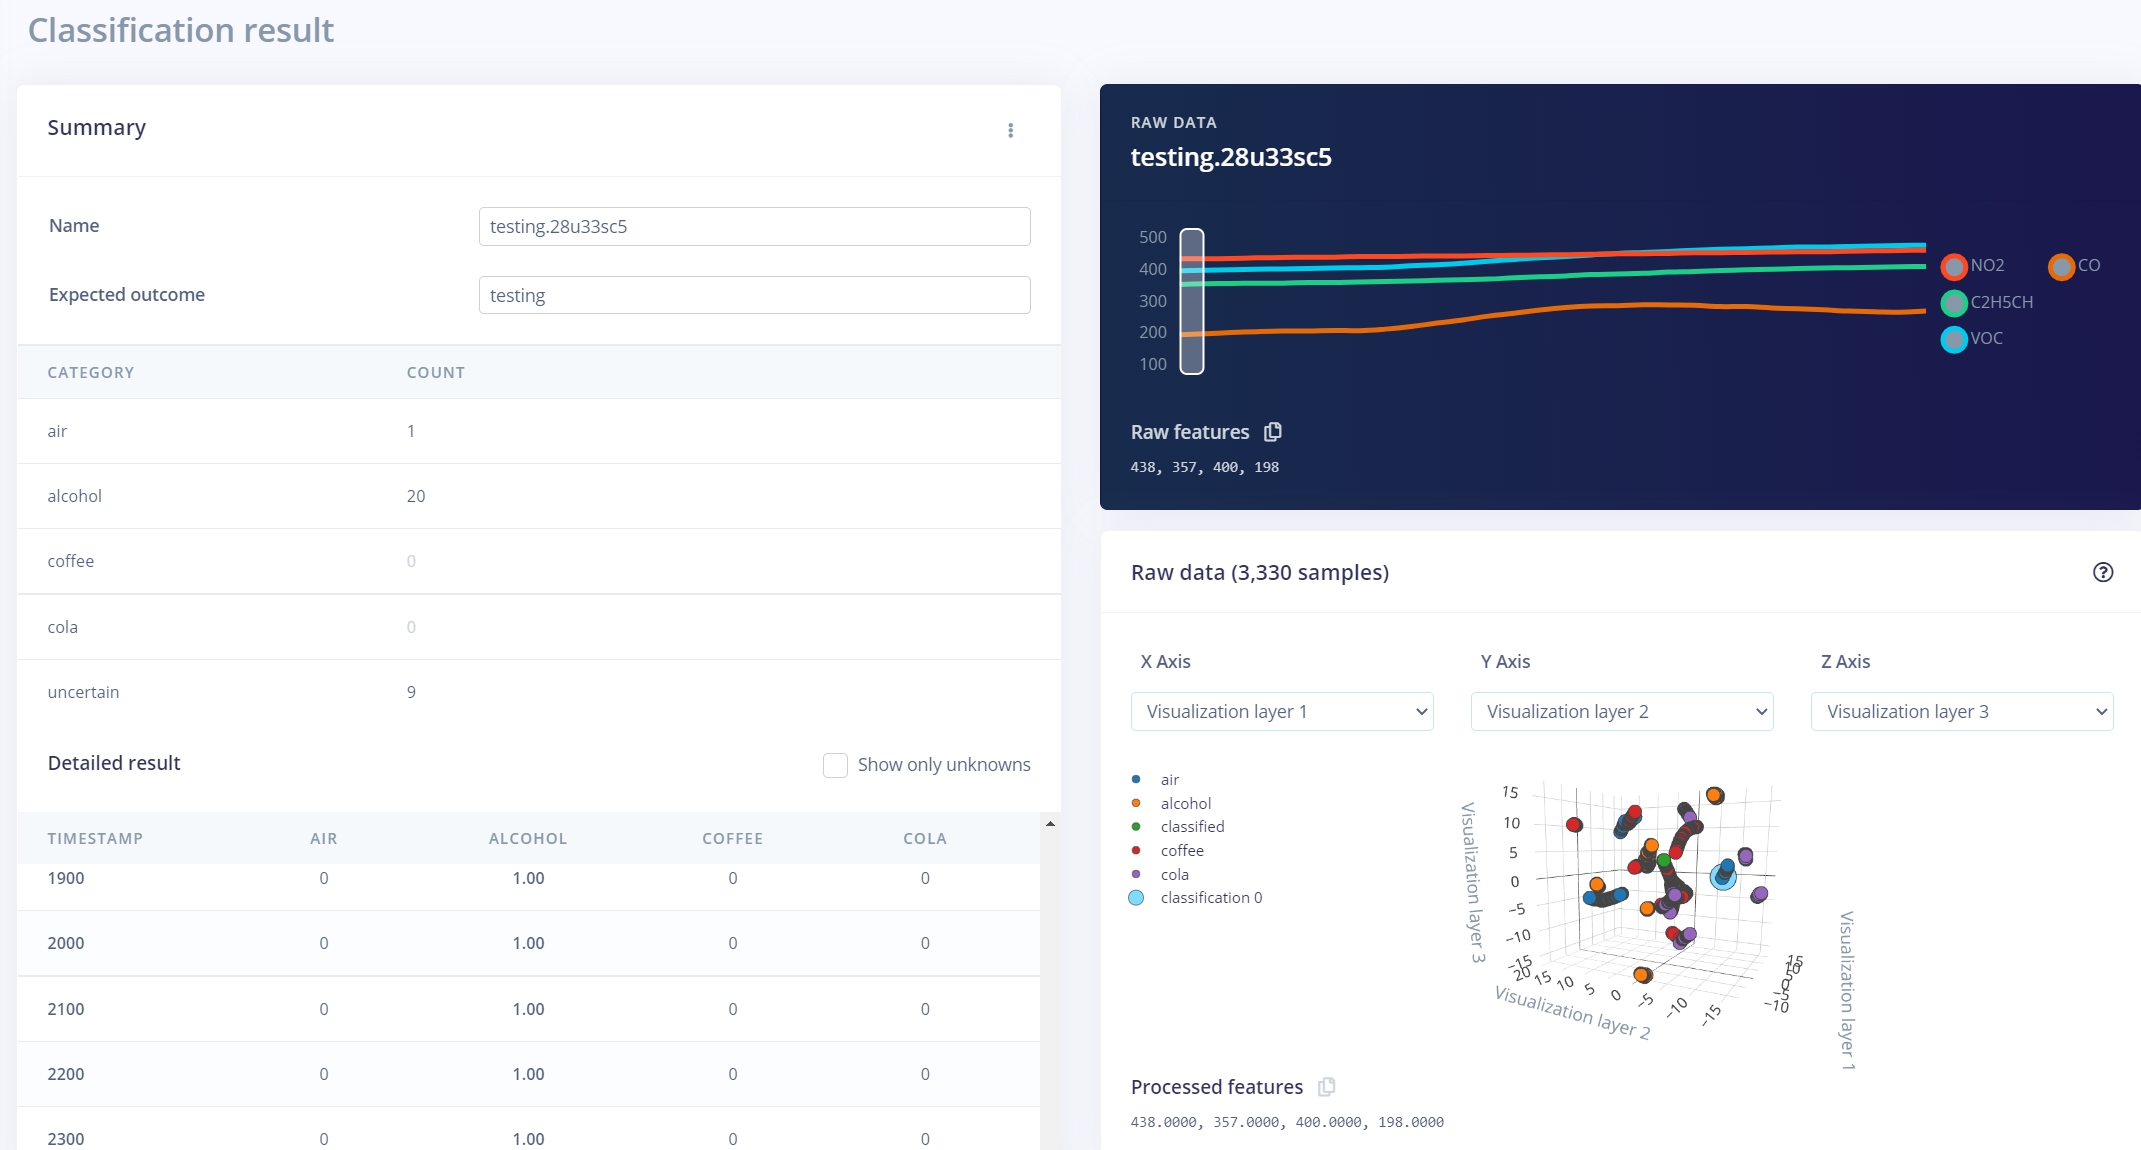
As we can see from the results, this is pretty good results where you are able to distinguish alcohol using the Grove - Multichannel Gas Sensor v2 with the help of Edge Impulse!
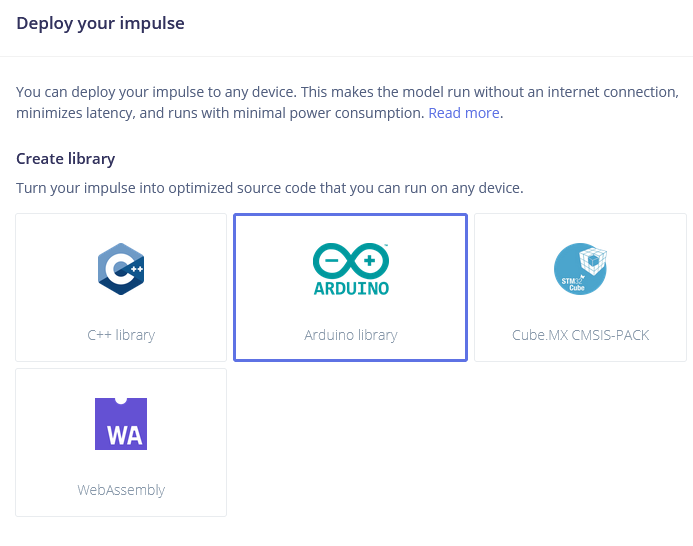
Deploying to Wio Terminal
The next step is deployment on the device. After clicking on the Deployment tab, choose Arduino library and download it.
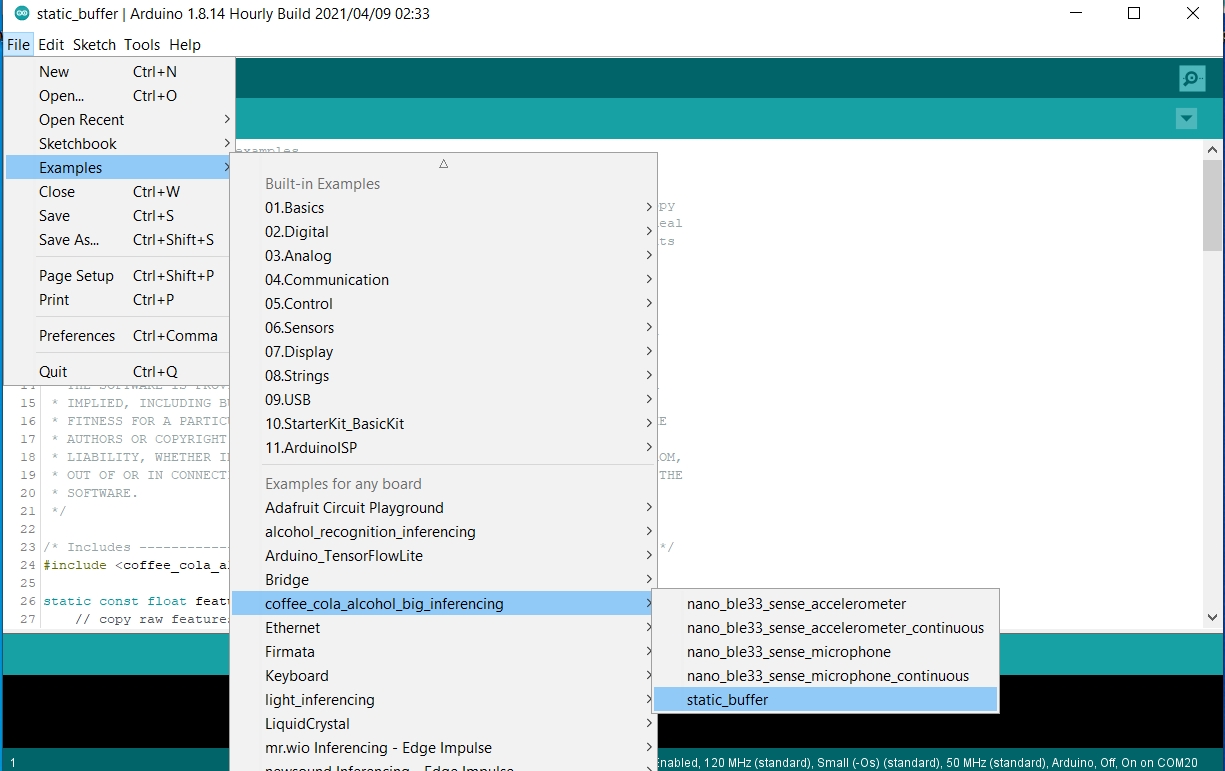
Extract the archive and place it in your Arduino libraries folder. Open Arduino IDE and choose static buffer sketch (located in File -> Examples -> name of your project -> static_buffer) , which already has all the boilerplate code for classification with your model in place. Neat!
The only thing for users to fill in is the function raw_feature_get_data(size_t offset, size_t length, float *out_ptr) .
int raw_feature_get_data(size_t offset, size_t length, float *out_ptr) {
    float features[4];
    features[0]=gas.getGM102B();
    features[1] = gas.getGM302B();
    features[2]=gas.getGM502B();
    features[3]=gas.getGM702B();
    memcpy(out_ptr, features + offset, length * sizeof(float));
    return 0;
}
Complete Code
#include <coffee_cola_alcohol_big_inferencing.h>
#include <Multichannel_Gas_GMXXX.h>
#include <Wire.h>
GAS_GMXXX<TwoWire> gas;

int raw_feature_get_data(size_t offset, size_t length, float *out_ptr) {
    float features[4];

    features[0]=gas.getGM102B();
    features[1] = gas.getGM302B();
    features[2]=gas.getGM502B();
    features[3]=gas.getGM702B();
    memcpy(out_ptr, features + offset, length * sizeof(float));
    return 0;
}

void setup()
{
    // put your setup code here, to run once:
    Serial.begin(115200);
    gas.begin(Wire, 0x08); // use the hardware I2C
    Serial.println("Edge Impulse Inferencing Demo");
}

void loop()
{
    ei_printf("Edge Impulse standalone inferencing (Arduino)\n");


    ei_impulse_result_t result = { 0 };

    // the features are stored into flash, and we don't want to load everything into RAM
    signal_t features_signal;
    features_signal.total_length = sizeof(features) / sizeof(features[0]);
    features_signal.get_data = &raw_feature_get_data;

    // invoke the impulse
    EI_IMPULSE_ERROR res = run_classifier(&features_signal, &result, false /* debug */);
    ei_printf("run_classifier returned: %d\n", res);

    if (res != 0) return;

    // print the predictions
    ei_printf("Predictions ");
    ei_printf("(DSP: %d ms., Classification: %d ms., Anomaly: %d ms.)",
        result.timing.dsp, result.timing.classification, result.timing.anomaly);
    ei_printf(": \n");
    ei_printf("[");
    for (size_t ix = 0; ix < EI_CLASSIFIER_LABEL_COUNT; ix++) {
        ei_printf("%.5f", result.classification[ix].value);
#if EI_CLASSIFIER_HAS_ANOMALY == 1
        ei_printf(", ");
#else
        if (ix != EI_CLASSIFIER_LABEL_COUNT - 1) {
            ei_printf(", ");
        }
#endif
    }
#if EI_CLASSIFIER_HAS_ANOMALY == 1
    ei_printf("%.3f", result.anomaly);
#endif
    ei_printf("]\n");

    // human-readable predictions
    for (size_t ix = 0; ix < EI_CLASSIFIER_LABEL_COUNT; ix++) {
        ei_printf("    %s: %.5f\n", result.classification[ix].label, result.classification[ix].value);
    }
#if EI_CLASSIFIER_HAS_ANOMALY == 1
    ei_printf("    anomaly score: %.3f\n", result.anomaly);
#endif

    delay(1);
}

/**
 * @brief      Printf function uses vsnprintf and output using Arduino Serial
 *
 * @param[in]  format     Variable argument list
 */
void ei_printf(const char *format, ...) {
    static char print_buf[1024] = { 0 };

    va_list args;
    va_start(args, format);
    int r = vsnprintf(print_buf, sizeof(print_buf), format, args);
    va_end(args);

    if (r > 0) {
        Serial.write(print_buf);
    }
}