Getting Started with ePaper Breakout Board

Meet the XIAO eInk Expansion Board, your go-to solution for driving eInk displays with XIAO family effortlessly. Designed with a 24-pin FPC connector, this board provides a seamless link to our eInk product series, if you're looking to expand your options, the 8-pin 2.54 Header allows you to easily integrate any microcontroller of your choice. Think of this board as your eInk's "Best Friend Forever," enhancing its capabilities and making your life easier.
This breakout board does not include an eInk display; the display must be purchased separately.
Introduction
Features
- 24-pin FPC Connector: Provides a robust and reliable connection to eInk displays.
- XIAO Socket: Allows you to use XIAO as the processor, offering a compact yet powerful control solution.
- 8-pin 2.54 Header: Offers flexibility by letting you connect to any microcontroller, opening up a world of possibilities.
- Plug-and-Play: Designed for ease of use, making it perfect for both beginners and experts.
- Versatile Applications: Suitable for a wide range of eInk displays, from small to large sizes.
Applications
- Digital Signage: Use the eInk Breakout Board to create dynamic and energy-efficient digital signs.
- E-Readers: Build your own customized e-reader with features tailored to your needs.
- Smart Home Control Panels: Integrate the board into a smart home system for a sleek and modern control panel.
- Retail Price Tags: Create electronic price tags for a more efficient and eco-friendly retail experience.
- Educational Tools: Develop interactive educational materials that can be easily updated and are energy-efficient.
Hardware Overview
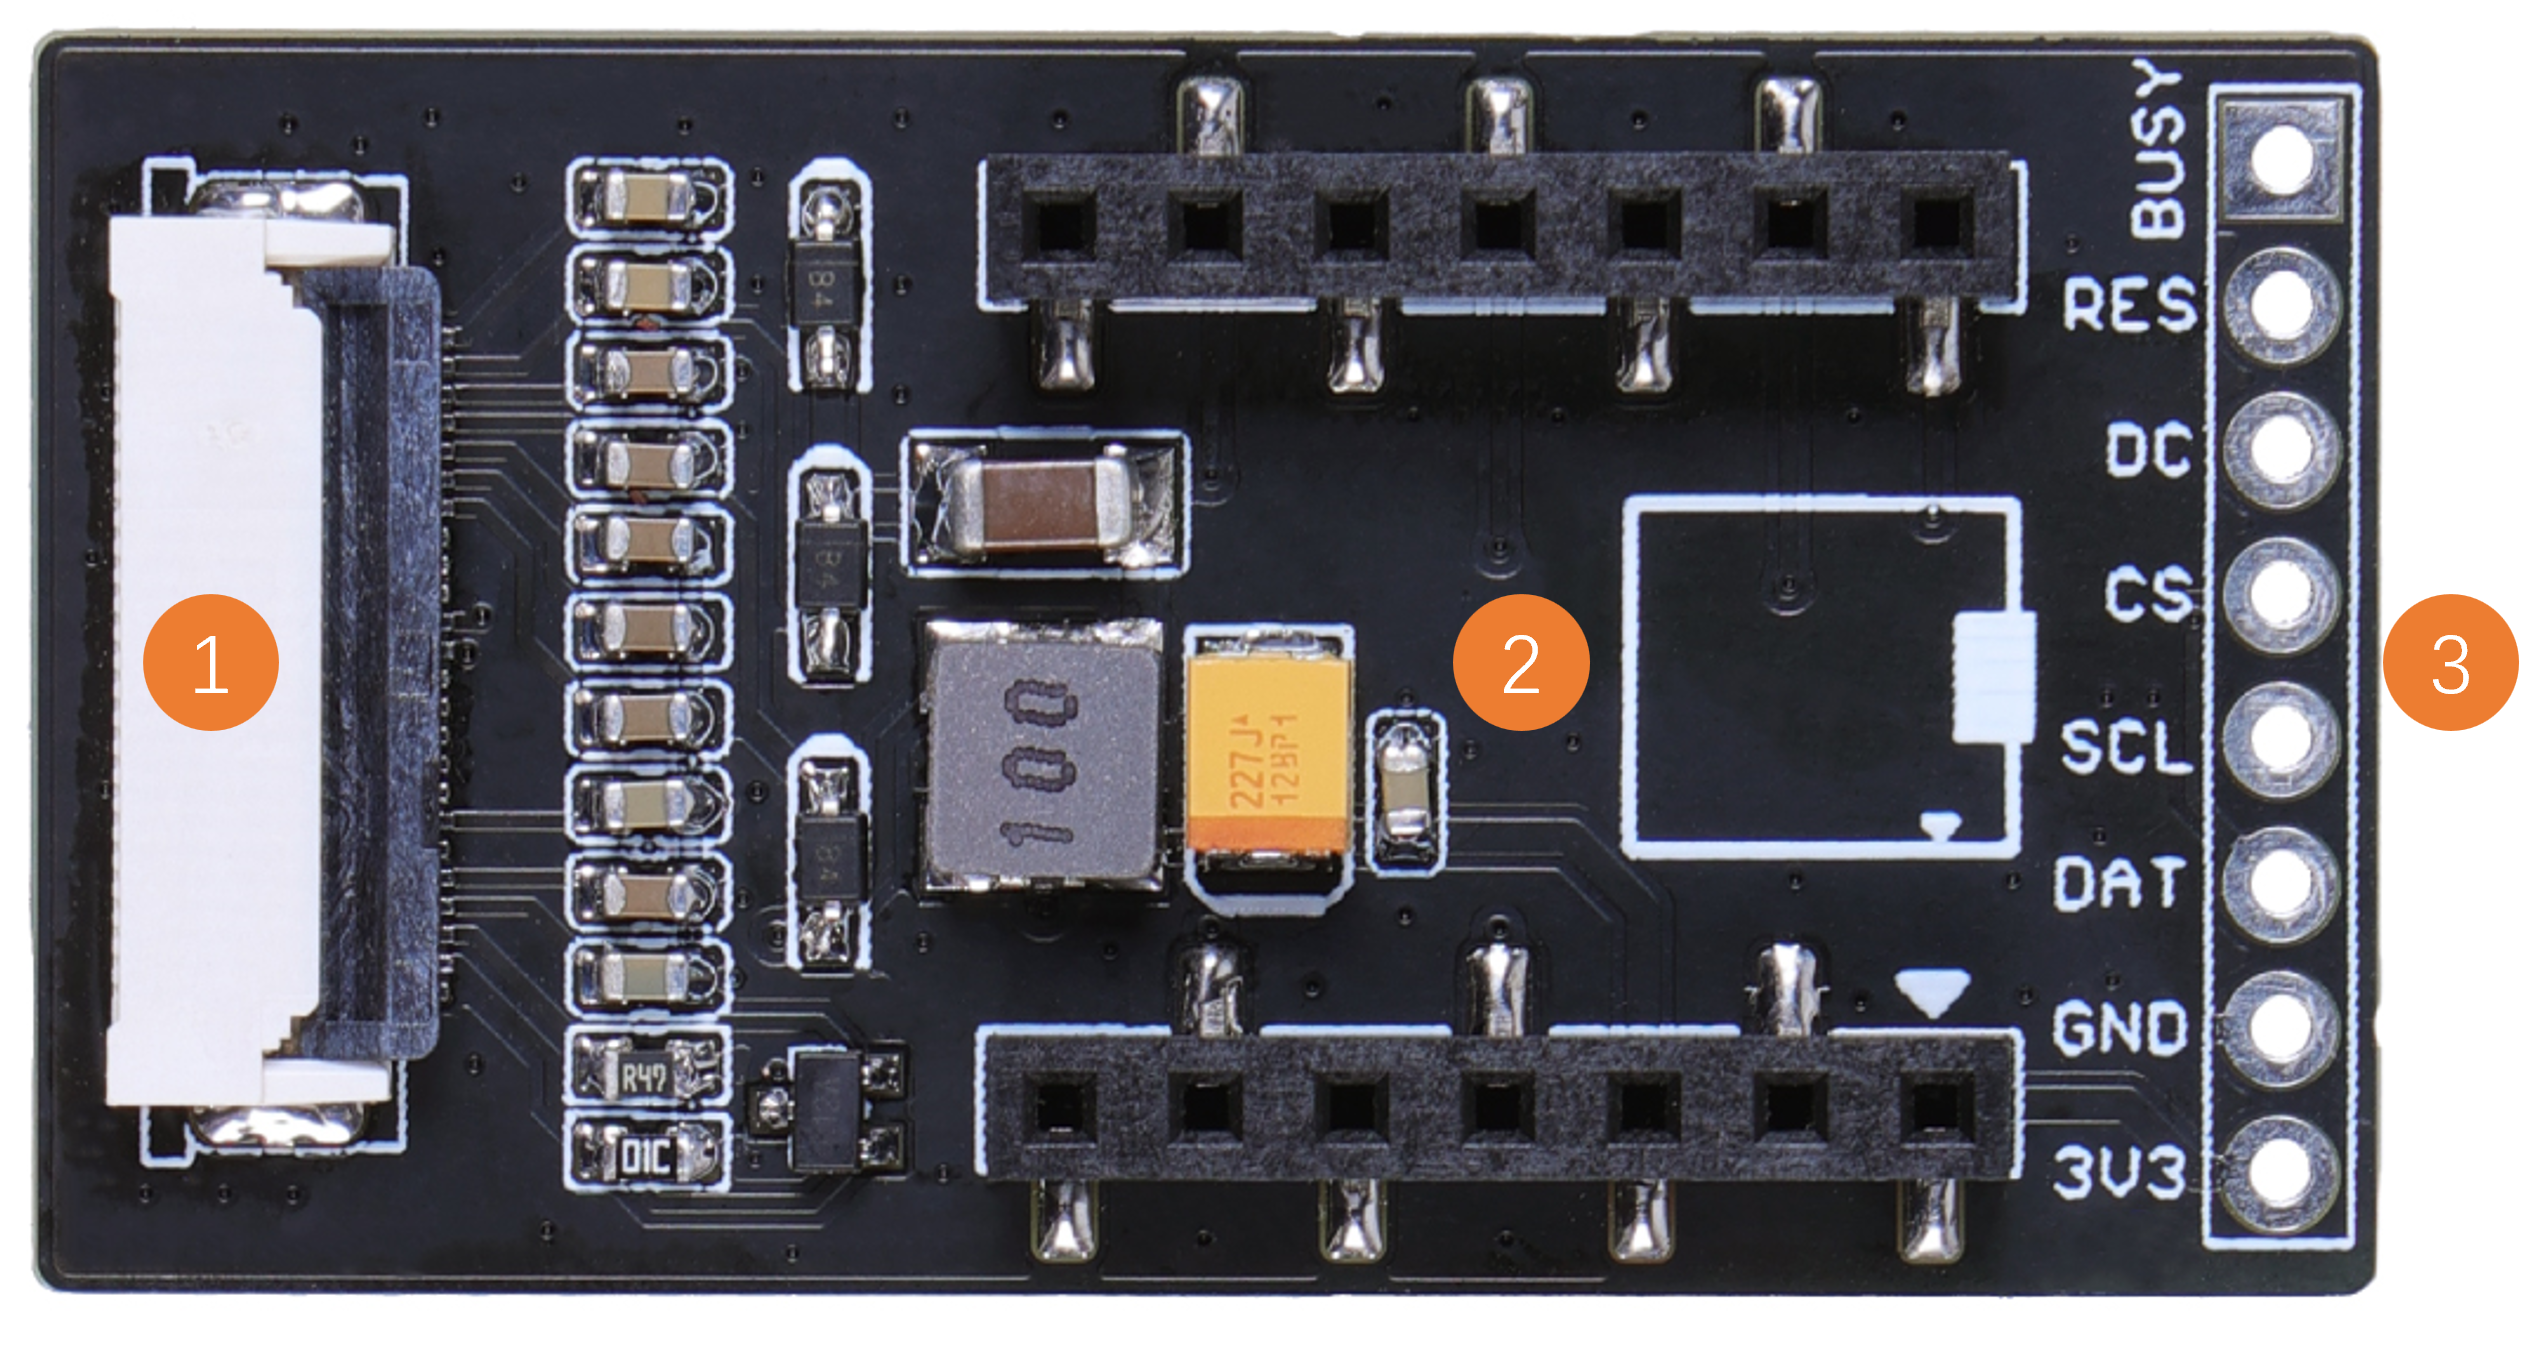
- 24-pin FPC Conncctor: For the 2.13 inch ePaper.
- XIAO Socket: For connecting the Seeed Studio XIAO development board.
- IO Break out: For connecting the others controller, such Arduino UNO or Raspberry Pi.
Pinout Definitions
| eInk SPI Pins | XIAO |
|---|---|
| RST | D0 |
| CS | D1 |
| DC | D3 |
| BUSY | D5 |
| SCK | D8 |
| MOSI | D10 |
Supported eInk
- 1.54-inch E-paper - Dotmatix 200x200
- 2.13-inch E-Paper -Flexible Monochrome 212x104
- 2.13-inch E-Paper - Quadruple 212x104
- 2.9 inch E-paper - Monocolor 128x296
- 4.2-inch E-Paper - Monocolor 400x300
- 4.26-inch E-Paper - Monocolor 800x480
- 5.65-inch E-paper - Sevencolor 600x480
- 5.83-inch E-paper - Monocolor 648x480
Hardware Preparation
Step 1. Material preparation
| Seeed Studio XIAO SAMD21 | Seeed Studio XIAO RP2040 | Seeed Studio XIAO nRF52840 (Sense) | Seeed Studio XIAO ESP32C3 | Seeed Studio XIAO ESP32S3 (Sense) |
|---|---|---|---|---|
 |  |  |  |  |
STEP 2. Insert the XIAO into the XIAO Socket: Align the pins and gently insert your XIAO into the XIAO socket on the board.
STEP 3. Insert the eInk into the FPC Connector: Carefully slide your E-paper into the 24-pin FPC connector on the ePaper Breakout Board.
Software Preparation
The recommended programming tool is the Arduino IDE, and you need to configure the Arduino environment for the XIAO and add the on-board package.
If this is your first time using Arduino, we highly recommend you to refer to Getting Started with Arduino.
Step 1. Launch the Arduino application.
Step 2. Select your development board model and add it to the Arduino IDE.
-
If you want to use Seeed Studio XIAO SAMD21 for the later routines, please refer to this tutorial to finish adding.
-
If you want to use Seeed Studio XIAO RP2040 for the later routines, please refer to this tutorial to finish adding.
-
If you want to use Seeed Studio XIAO nRF52840 for the later routines, please refer to this tutorial to finish adding.
-
If you want to use Seeed Studio XIAO ESP32C3 for the later routines, please refer to this tutorial to finish adding.
-
If you want to use Seeed Studio XIAO ESP32S3 for the later routines, please refer to this tutorial to finish adding.
Install Seeed GFX Library
Step 3. Install Seeed GFX Library
This library has same function as TFT library and no compatible with it. If you have installed TFT library or other similary display libraries, please uninstall it first.
Download and install the Seeed GFX library from GitHub.

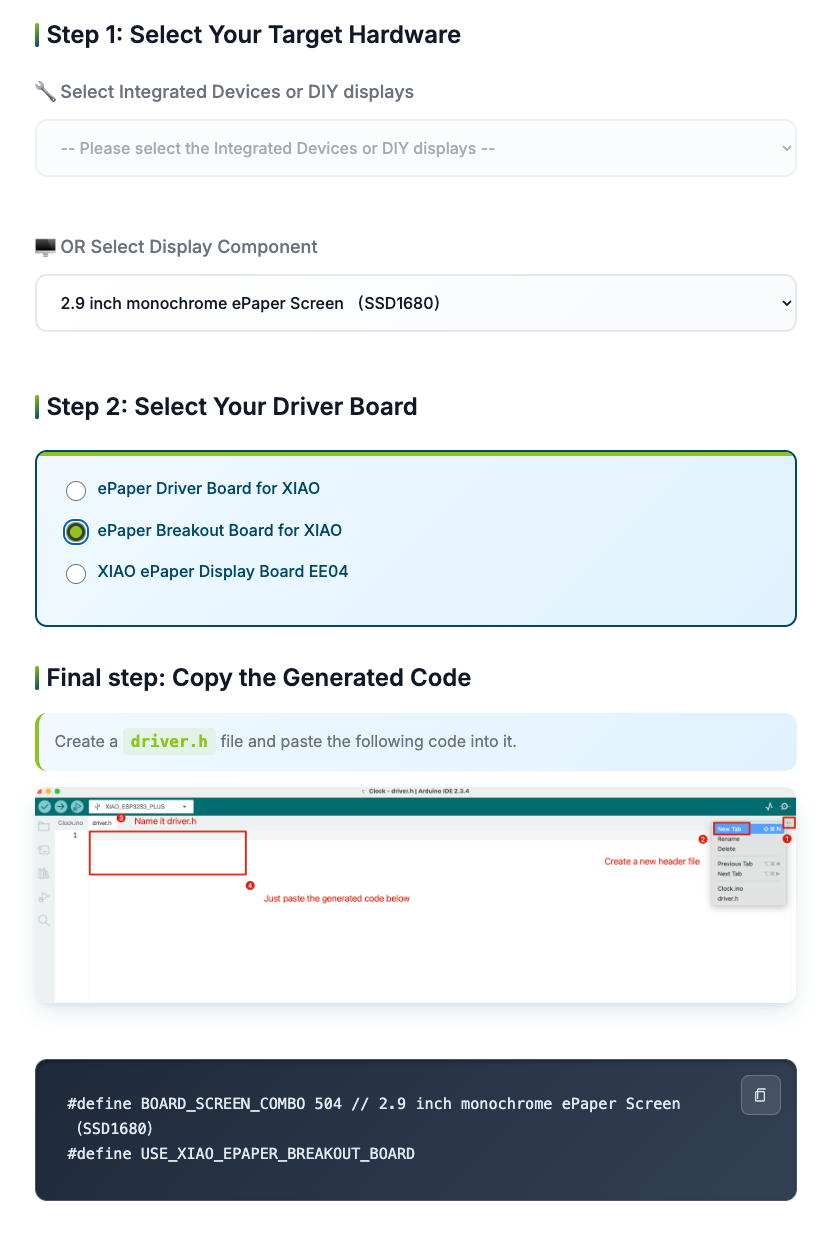
Scroll down and open this link.

Select your device type and it will generate some code. Copy those code and we will use them later.
If you make the wrong choice, the screen will display nothing.
So please make sure your devices or components type.
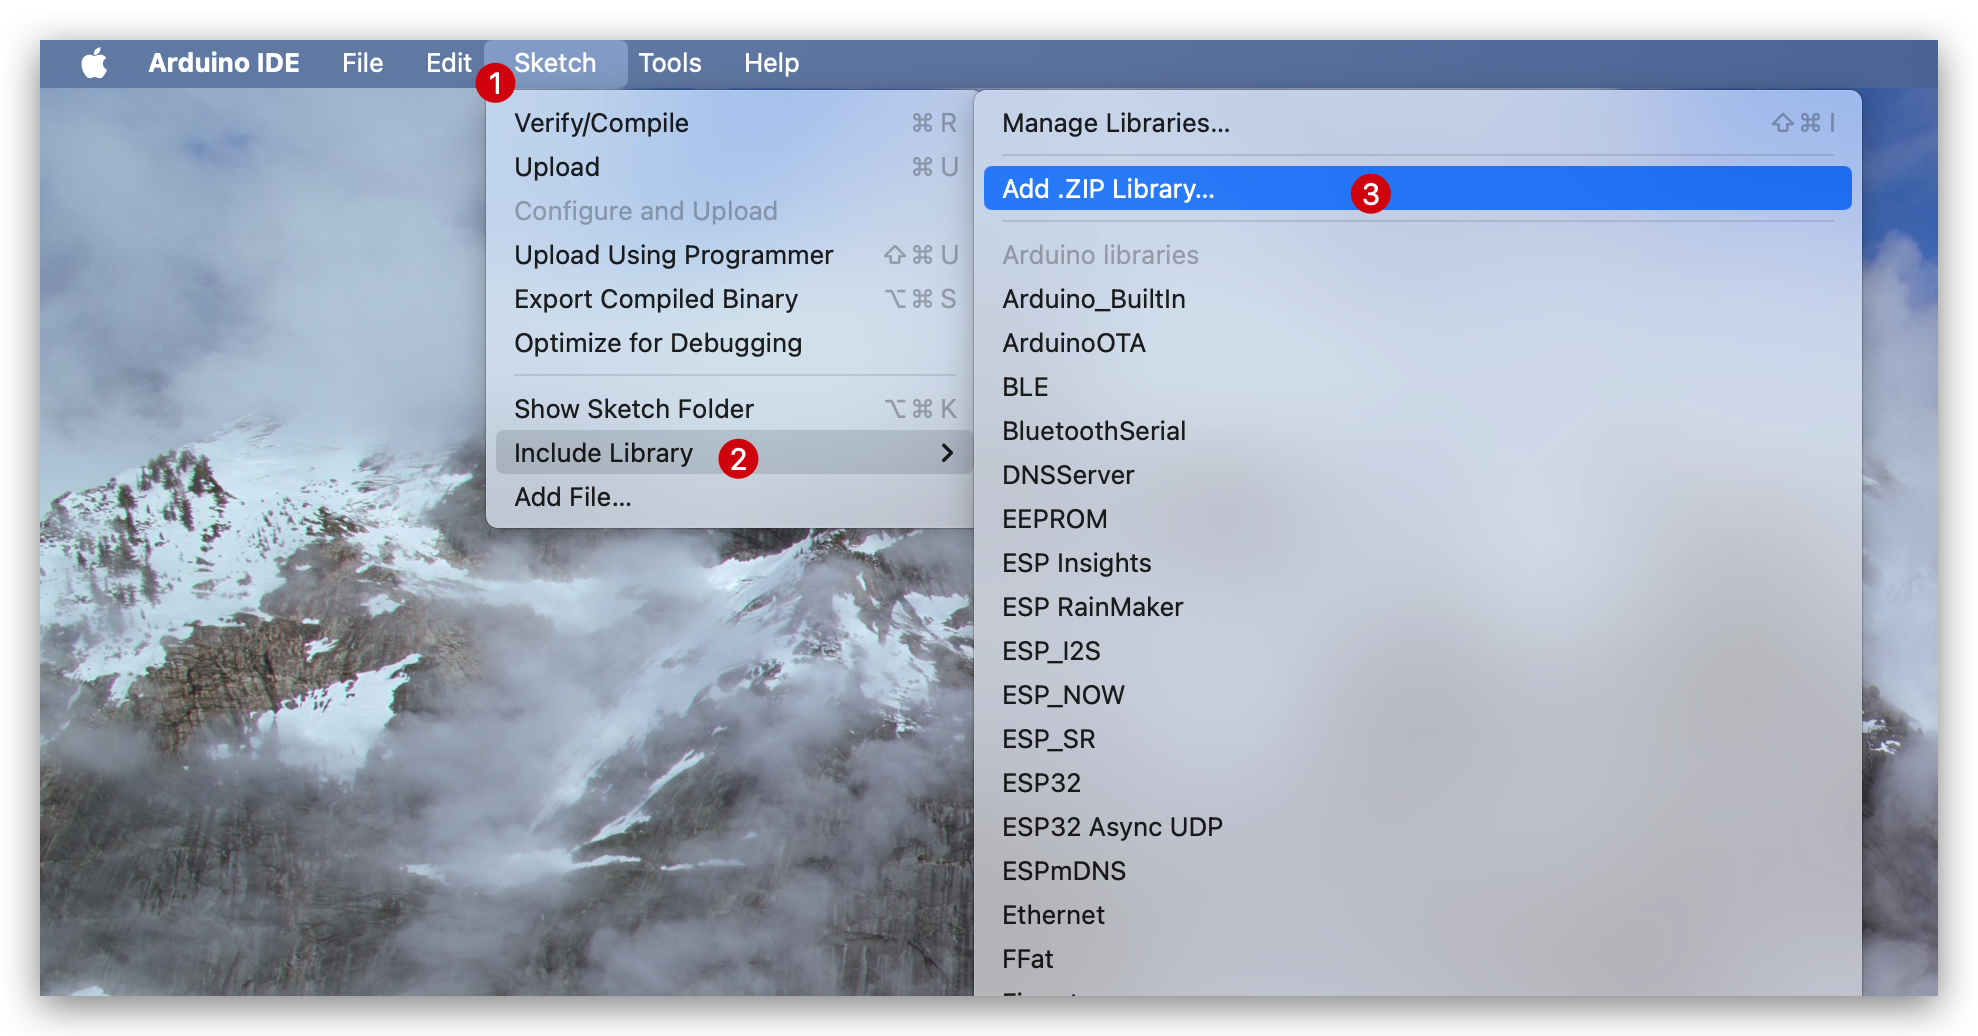
After downloading the library, go to Sketch -> Include Library -> Add .ZIP Library and select the downloaded library.
There are 4 basic examples, open a basic example you like:
- Bitmap: Display a bitmap image.
- Clock: Display a clock.
- Clock_digital: Display a digital clock.
- Shape: Display different sizes of words and shape randomly.

Upload the Code
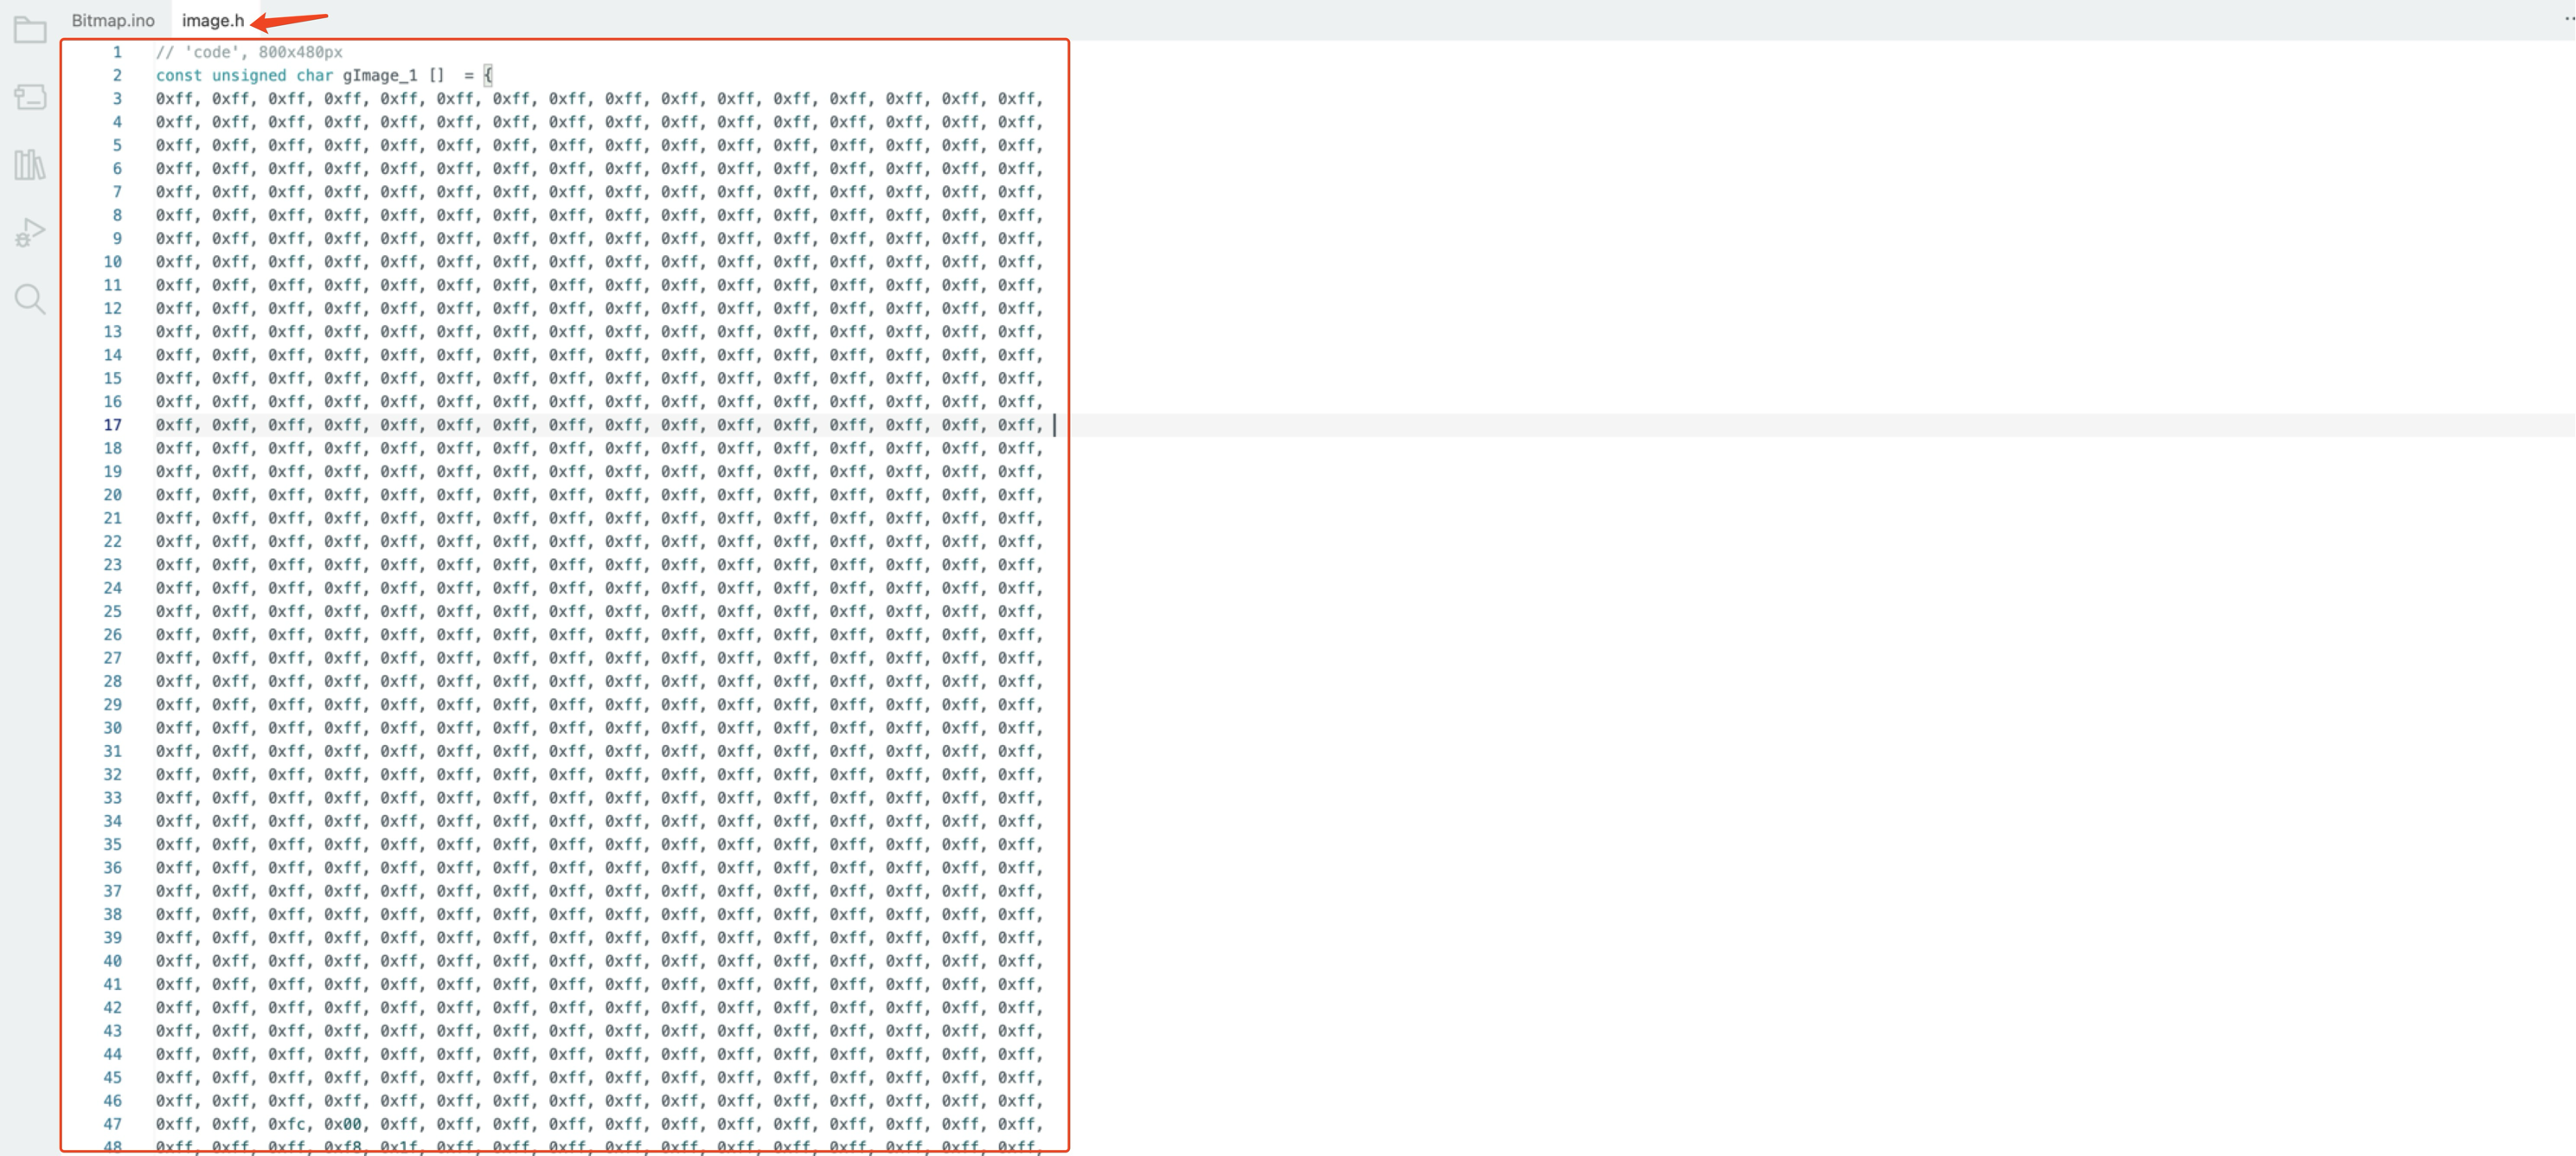
Create a new "driver.h" file and paste those code into it. The code should be like:
#define BOARD_SCREEN_COMBO 504 // 2.9 inch monochrome ePaper Screen (SSD1680)
#define USE_XIAO_EPAPER_BREAKOUT_BOARD
After that, go to Tools -> Board -> XIAO ESP32C6 and Tools -> Port -> Select the port your board is connected to. Then click Upload to upload the code.

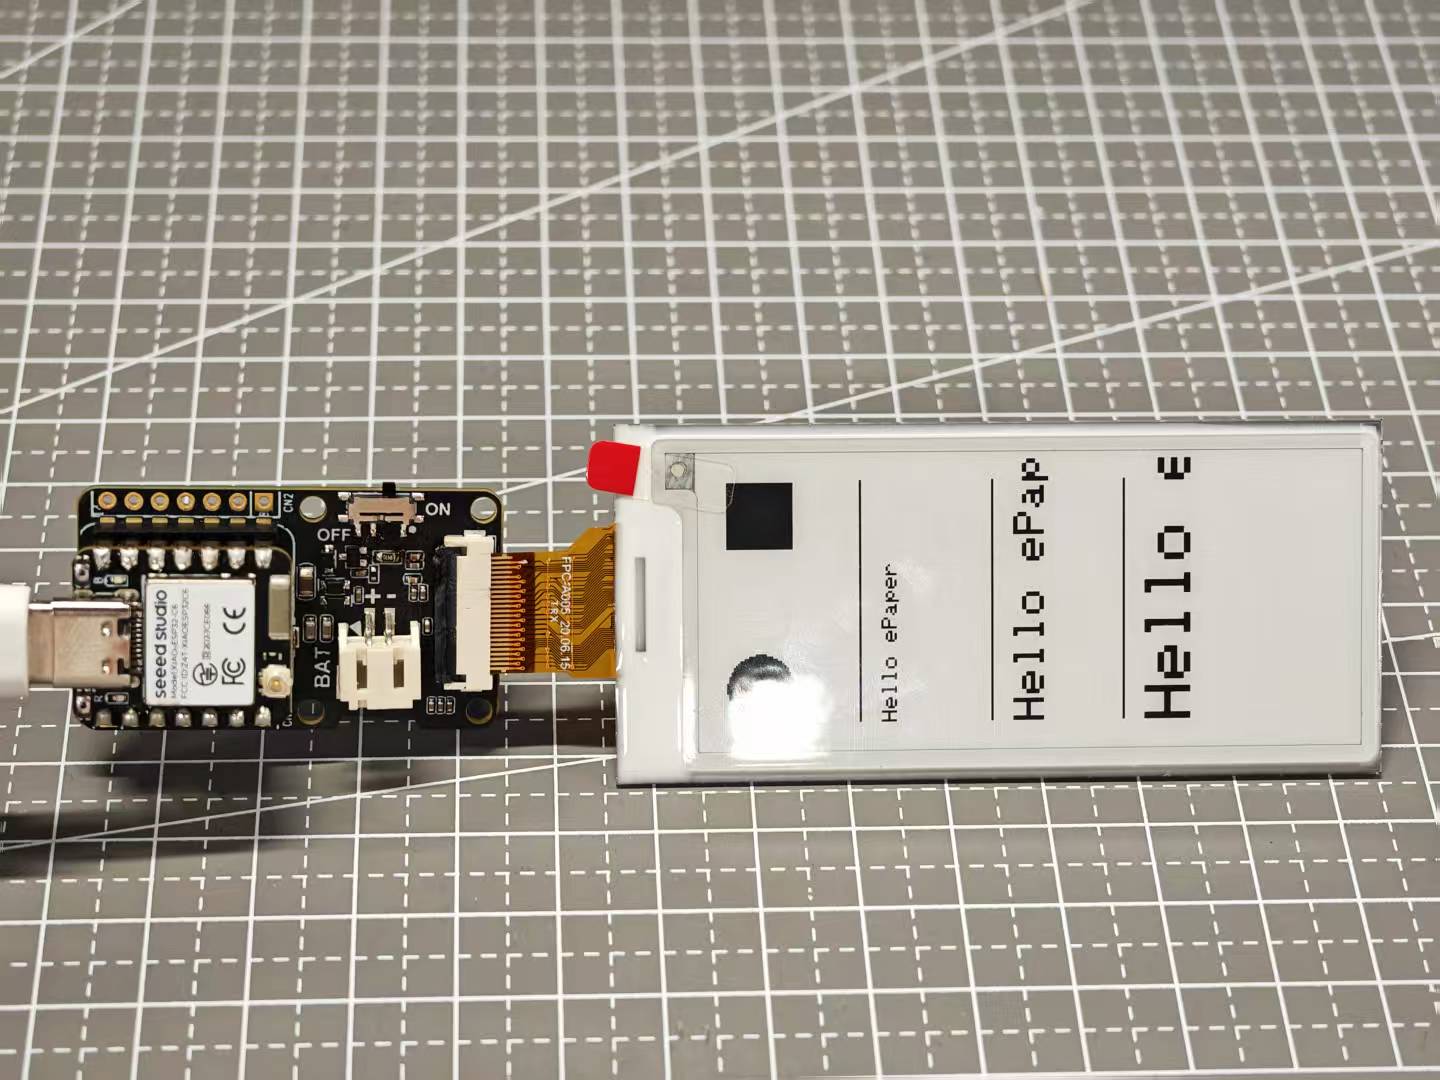
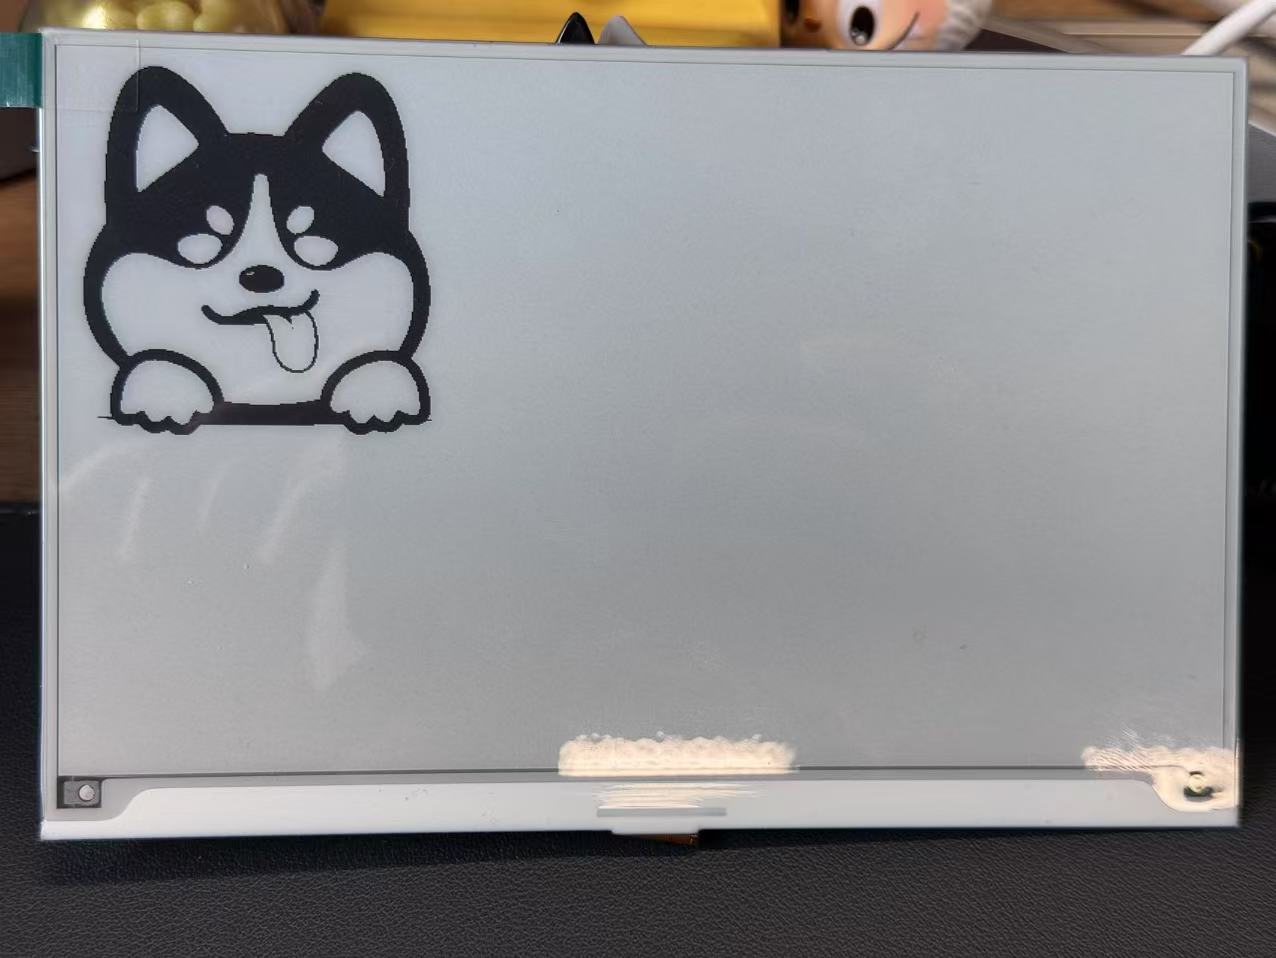
Now you will see the feedback in your epaper screen! Following are the results of Helloworld examples.
If you are using a 1.54-inch or 2.9-inch e-ink screen, due to their driver chips, flickering may occur when using dynamic effects such as clocks. Please be assured this is not a program issue. However, it is not recommended to run dynamic effect examples for extended periods to avoid reducing the screen's lifespan.
If you are using 5.83 and 7.5-inch screens, they have different chips, so they won't have the flickering phenomenon.
Image Extraction Software
Usage of the Websites(recommend)
Here I'm using a 7.5-inch e-inked screen for the test
How to Make Picture
This URL provides a very convenient image extraction operation, which can easily help us realize displaying a variety of images on top of the e-ink screen, let's get started!

Step 1.Select image
First pick the image you want, try not to exceed the size of 800*480.
Step 2.Image Settings
-
Canvas Size(s)
- Canvas Size: Set the dimensions of the canvas. For example, 800 x 480 pixels means the canvas width is 800 pixels and the height is 480 pixels.
-
Background Color
-
Background Color: Choose the background color of the canvas. Options include:
-
White: White background
-
Black: Black background
-
-
Transparent: Transparent background
- Invert Image Color
- Invert Image Color: This option is used to invert the colors of the image. When selected, the colors of the image will be reversed.
-
Brightness / Alpha Threshold
- Brightness / Alpha Threshold: Set the brightness value of the pixels, ranging from 0 to 255. Higher values make the pixels brighter; pixels below this value will turn black.
-
Scaling
- Scaling: Choose the scaling method for the image. Options include:
-
Original size: Maintain the original size
- Other scaling options (specific options may need further explanation)
-
Center
- Center: Choose whether to center the image on the canvas. Note: This option only works if the image is larger than the original size.
Step 3.Preview
Once the settings are complete, you can see a preview of how your image will appear here
Step 4.Output
- Copy the converted code
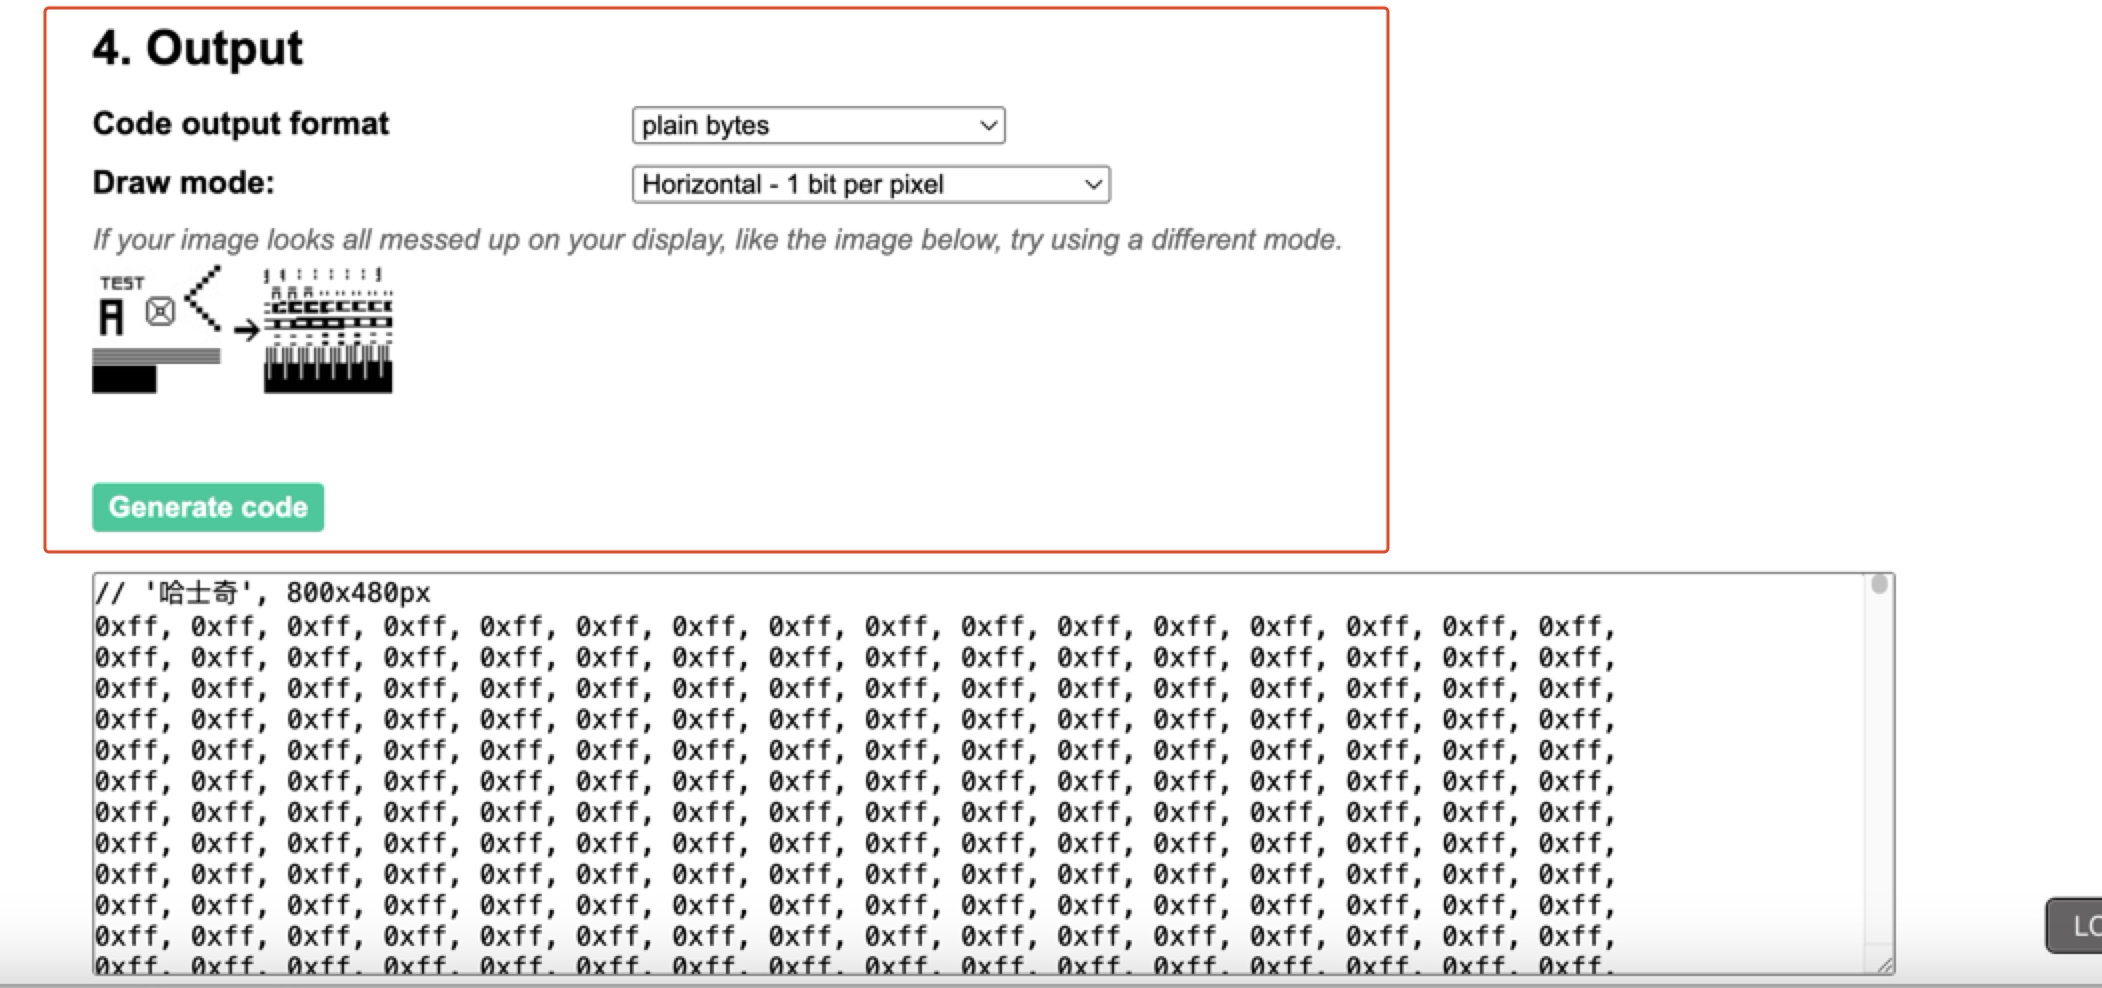
- Replace the image code in this header file
Display Effect
Usage of the Image2lcd software
How to Make Picture
Use the build-in software Paint in Windows to create a picture with the same resolution as the screen you are using, and save it asBMP or JPG file;
Your picture resolution must be the same as the screen you are using, for example, 4.2-inch E-paper is 400 x 300 pixels, then you can not use the size of 300 x 400, it will cause the iamge2lcd output .hfile with an extra 200 bytes.
The colors of the picture should be consistent with the standard colors of the drawing board that come with Windows.The color of the drawing board is as follows:
| E-paper | Colors |
|---|---|
| 1.54-inch E-paper - Dotmatix 200x200 | pure black and white |
| 2.13-inch E-Paper -Flexible Monochrome 212x104 | pure black and white |
| 2.13-inch E-Paper - Quadruple 212x104 | black, white, red, and yellow |
| 2.9 inch E-paper - Monocolor 128x296 | pure black and white |
| 2.9-inch e-paper - Quadruple color 128x296 | black, white, red, and yellow |
| 4.2-inch E-Paper - Monocolor 400x300 | pure black and white |
| 4.26-inch E-Paper - Monocolor 800x480 | pure black and white |
| 5.65-inch E-paper - Sevencolor 600x480 | black, white, red, yellow, blue, green, orange |
| 5.83-inch E-paper - Monocolor 648x480 | pure black and white |
| 7.5-inch E-paper - Monocolor 800x480 | pure black and white |
| 7.5-inch E-paper - Tri-Color 800x480 | pure black and white |
Bitmap Conversion
Step 1. Open Image2lcd.7z, extract it and open the application.
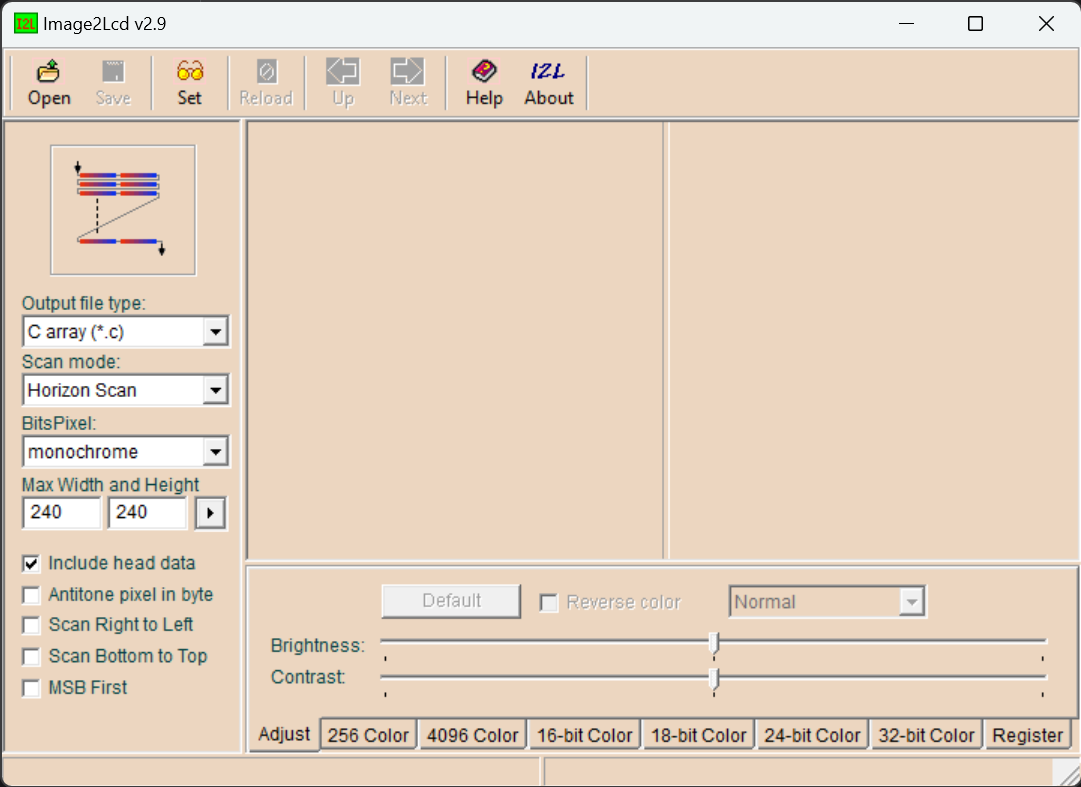
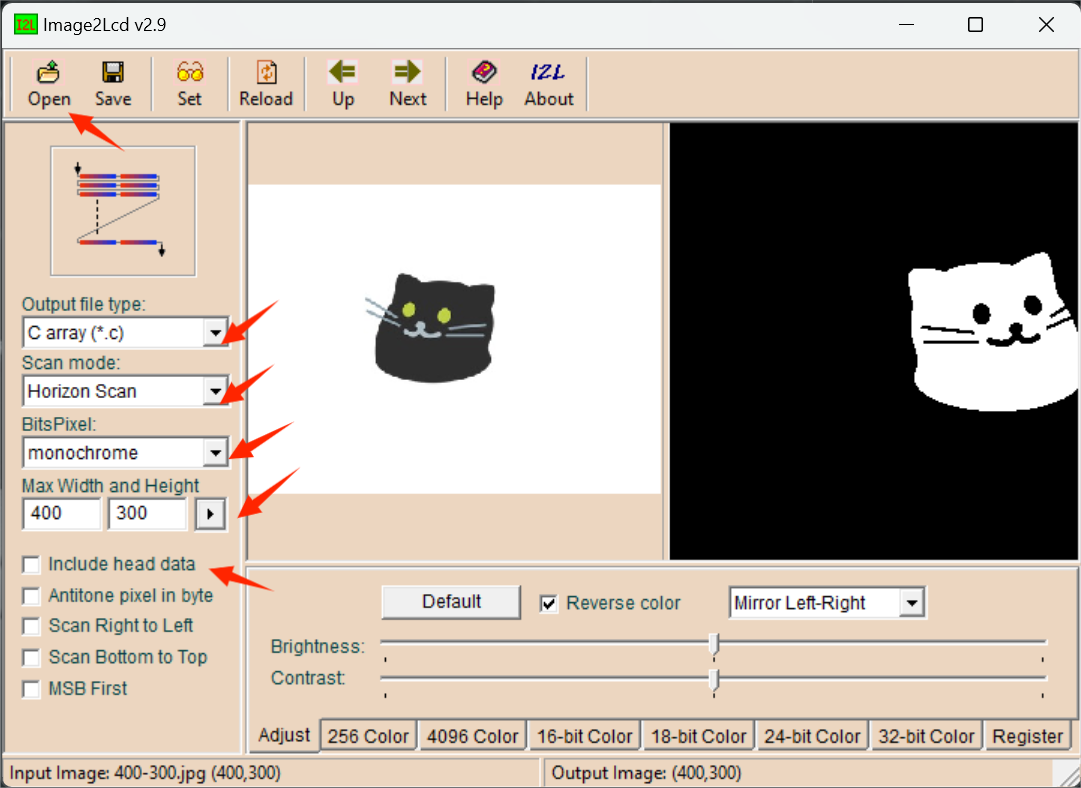
Step 2. Open the picture, select the "Output file type" as the "C array (*.c)", select the "Scan mode" as the "Horizon Scan", the other parameters setting is show in follows:
| Epaper | BitPixl | Max Width and Height | Reverse color | Display mode |
|---|---|---|---|---|
| 1.54-inch E-paper - Dotmatix 200x200 | Monochrome | 200x200 | ✅ | Mirror left-right |
| 2.13-inch E-Paper -Flexible Monochrome 212x104 | Monochrome | 104x212 | ✅ | Normal |
| 2.13-inch E-Paper - Quadruple 212x104 | 4 Gray | 104x212 | / | Normal |
| 2.9 inch E-paper - Monocolor 128x296 | Monochrome | 128x296 | ✅ | Normal |
| 2.9-inch e-paper - Quadruple color 128x296 | 4 Gray | 128x296 | / | Normal |
| 4.2-inch E-Paper - Monocolor 400x300 | Monochrome | 400x300 | ✅ | Mirror left-right |
| 4.26-inch E-Paper - Monocolor 800x480 | Monochrome | 800x480 | / | Mirror left-right |
| 5.65-inch E-paper - Sevencolor 600x480 | 256 colors | 600x448 | / | Normal |
| 5.83-inch E-paper - Monocolor 648x480 | Monochrome | 600x480 | ✅ | Mirror left-right |
| 7.5-inch E-paper - Monocolor 800x480 | Monochrome | 800x480 | ✅ | Mirror left-right |
| 7.5-inch E-paper - Tri-Color 800x480 | Monochrome | 800x480 | / | Normal |
- After set the Max Width and Height, it need to click the arrow to confirm.
- Don't include head data.
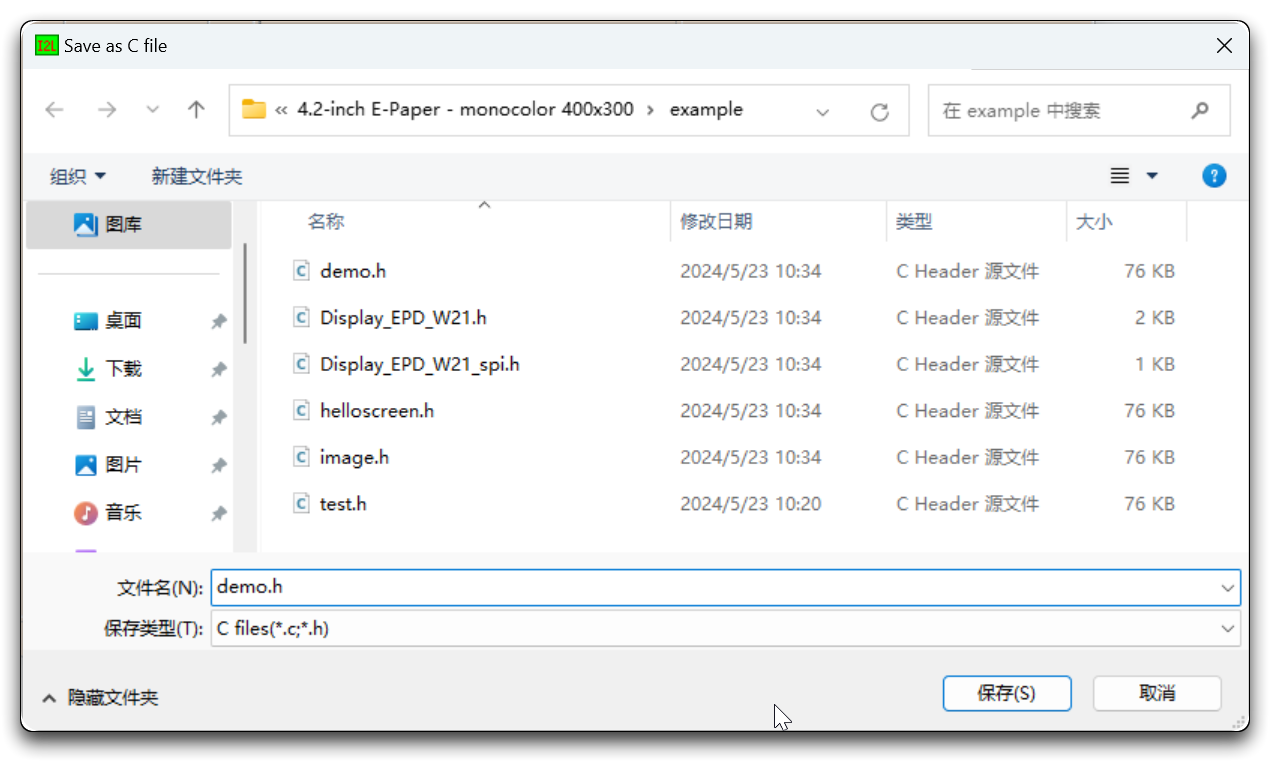
Step 3. Click "Save" to save the the lcd output array as a file of .h.
Resources
- [ZIP] PCB&SCH Eagle file
Tech Support & Product Discussion
Thank you for choosing our products! We are here to provide you with different support to ensure that your experience with our products is as smooth as possible. We offer several communication channels to cater to different preferences and needs.