AI Human Detection and Meshtastic Notification
Introduction
This demo shows an Edge AI remote monitoring solution integrating the reCamera with a Meshtastic LoRa mesh network. By leveraging the on-device inference capabilities of the reCamera, a local YOLO11n model identifies humans and directly triggers a GPIO signal. This physical signal prompts a XIAO ESP32S3 node to broadcast a "Human detected" alert across the Meshtastic network. The architecture supports the integration of multiple reCameras and Meshtastic nodes for expansive coverage.
Hardware Preparation
| Seeed Studio reCamera HQ PoE 8GB/64GB | XIAO ESP32S3 & Wio-SX1262 Kit for Meshtastic & LoRa | Wio Tracker L1(Pro) |
|---|---|---|
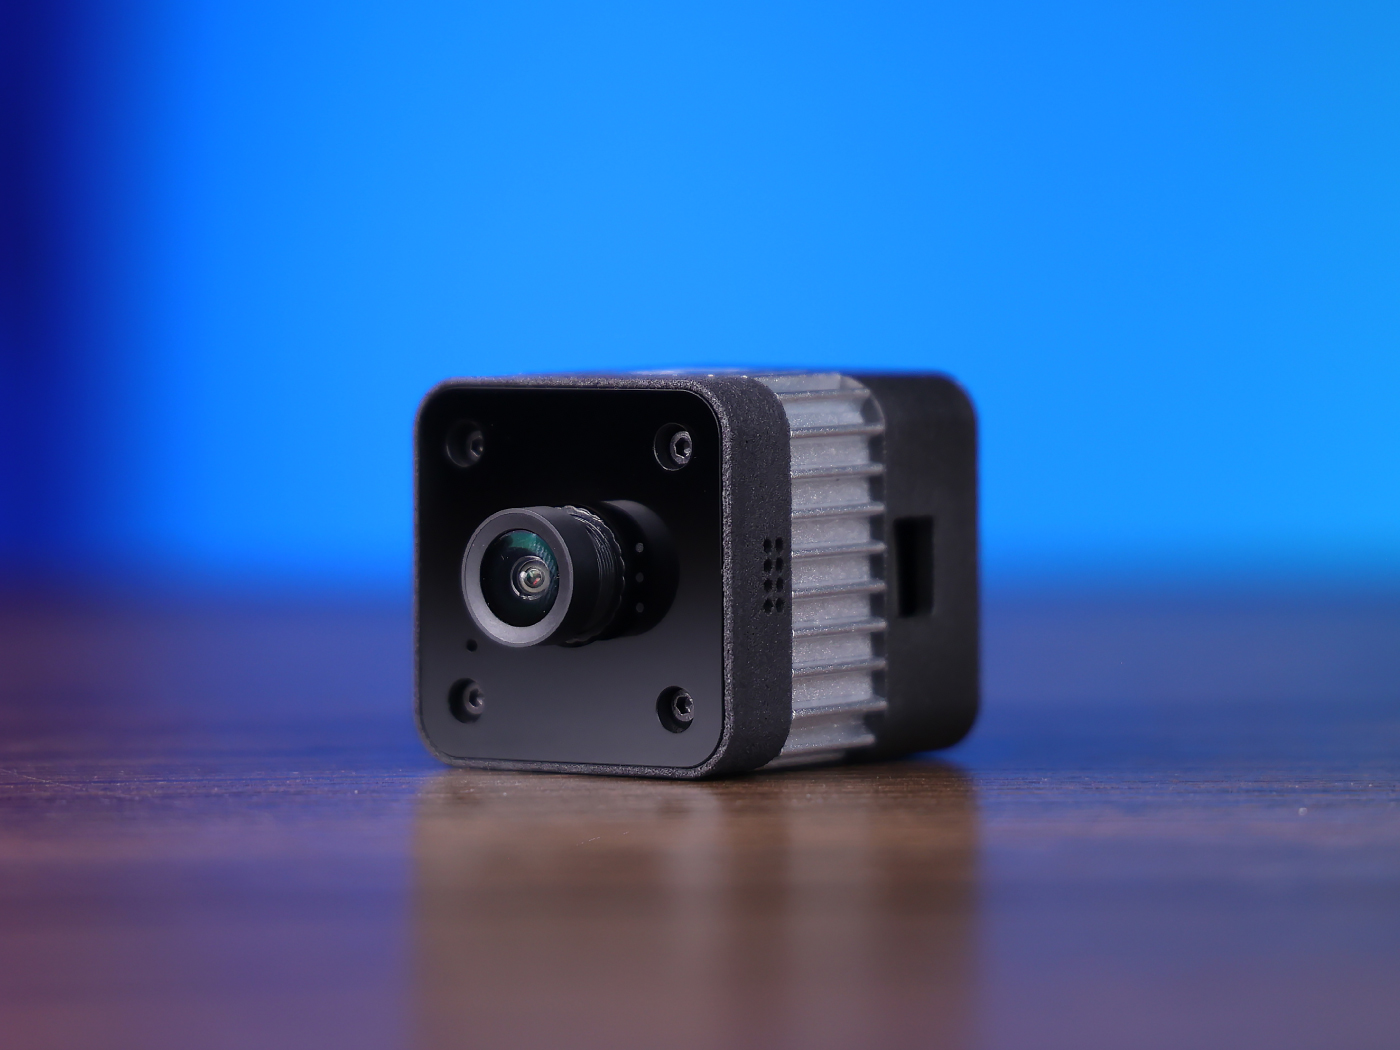 |  | 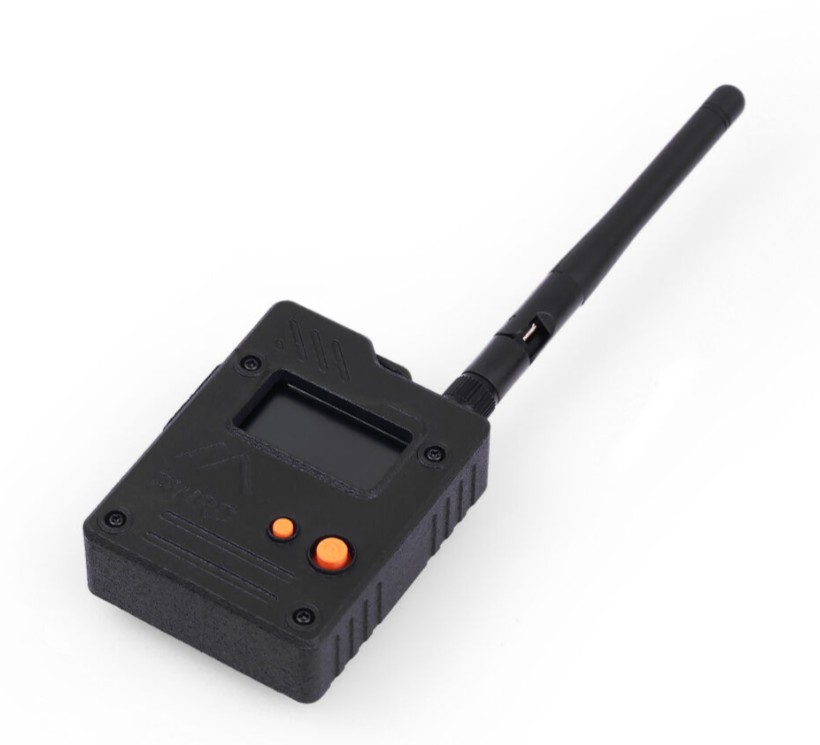 |
Setup Demo
To achieve this demo, we need to configure the reCamera and two Mesh nodes differently. First, run a C++ program on the reCamera, which will trigger a GPIO signal when a person is detected. Subsequently, we need to flash the Meshtastic firmware onto the first Mesh node, enabling this Mesh node to monitor the GPIO signal and send a message to the Meshtastic network when the signal is triggered. The broadcasted message will be received by the second Mesh node; finally, by connecting a phone to the second Mesh node via Bluetooth, the sent message can be viewed on the phone.
reCamera Configuration
Please ensure that the reCamera baseboard you have is the PoE version, as only the PoE version of reCamera has GPIO interfaces. Regarding the differences between the standard version and the PoE version of reCamera, please refer to reCamera 2002(w) 8GB/64GB Hardware Specification and reCamera HQ PoE 8GB/64GB Hardware Specification.
If you have purchased the PoE version of reCamera - reCamera HQ PoE 8GB/64GB you can use it directly to reproduce this demo.
If you have purchased the standard version of reCamera - reCamera 2002(w) 8GB/64GB you need to purchase an additional PoE baseboard - reCamera Base Board PoE and install it on the reCamera, replacing the standard baseboard.
The purpose of the following configuration is to deploy a object detection application on the reCamera. By stopping the default Node-RED services, we enable reCamera to run a dedicated C++ executable program called model_detector.
This setup utilizes a YOLO11n model (trained on the COCO dataset) to perform real-time edge computing.
The ultimate goal is to enable the reCamera to autonomously detect specific objects (humans in this case). Once a detection occurs, the system will trigger a hardware signal by pulling GPIO 490 to a High level. This hardware trigger serves as the bridge to communicate with the XIAO ESP32S3 + Wio SX1262 Meshtastic node.
Expose GPIO Pins
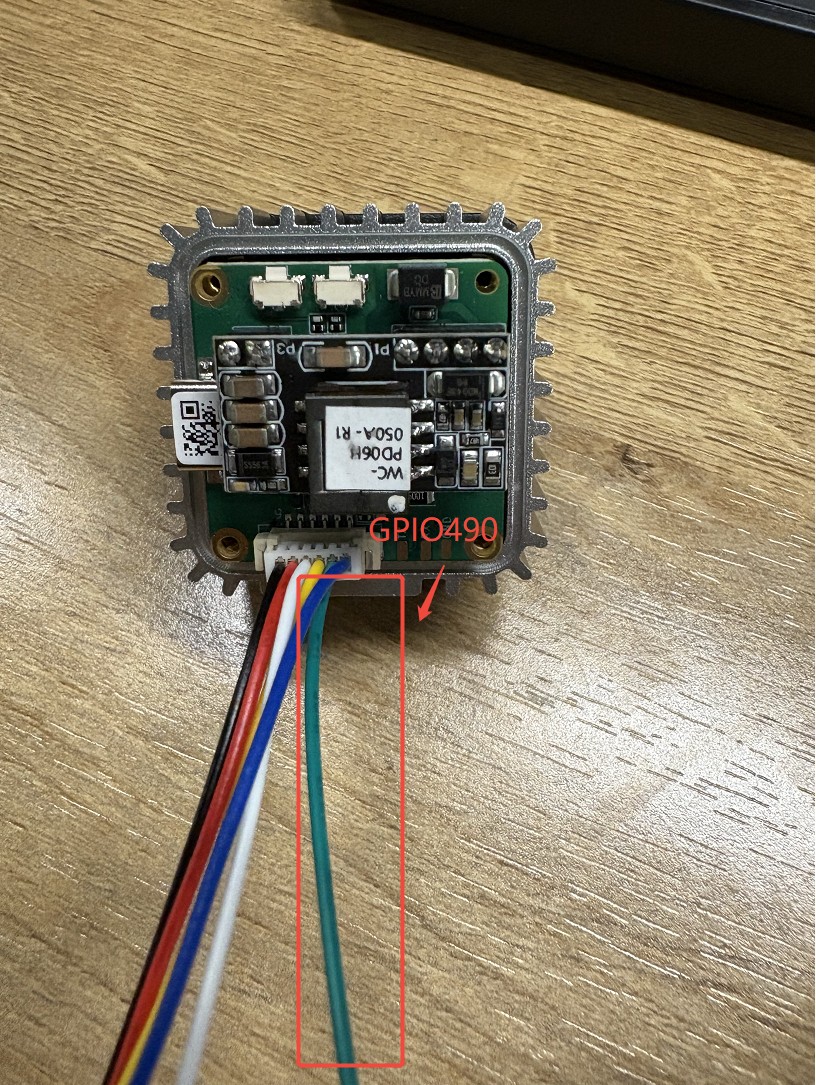
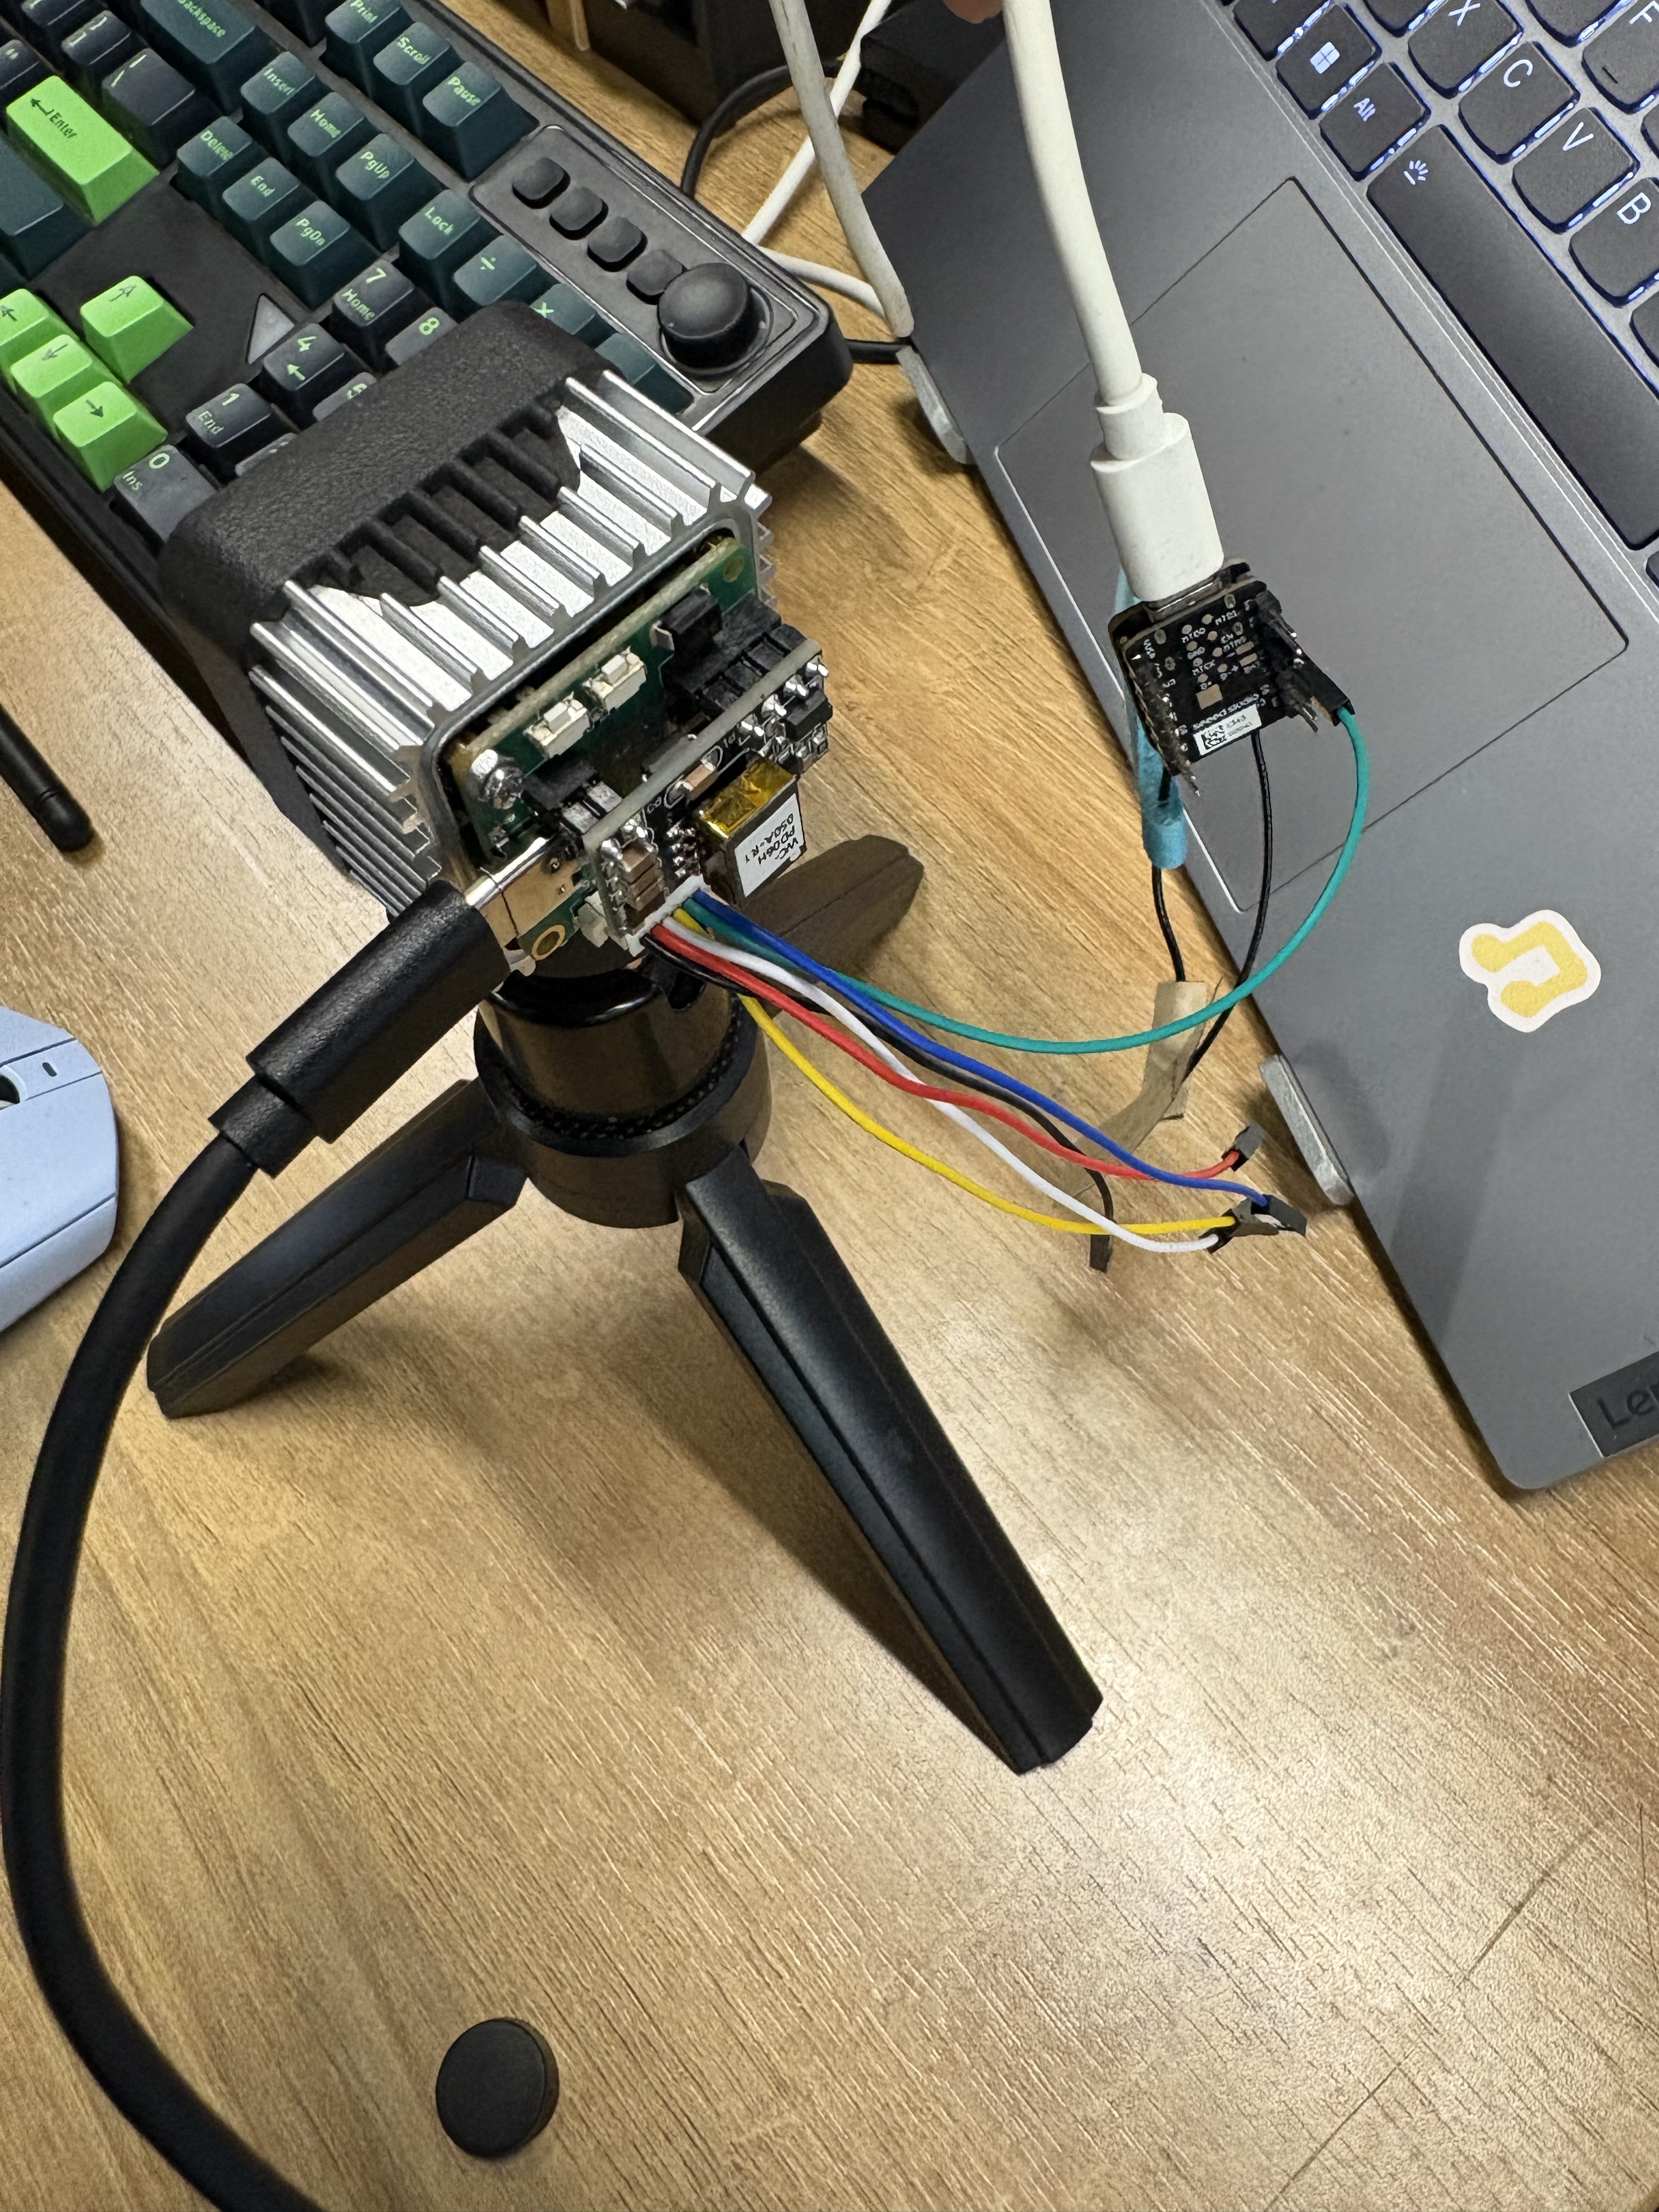
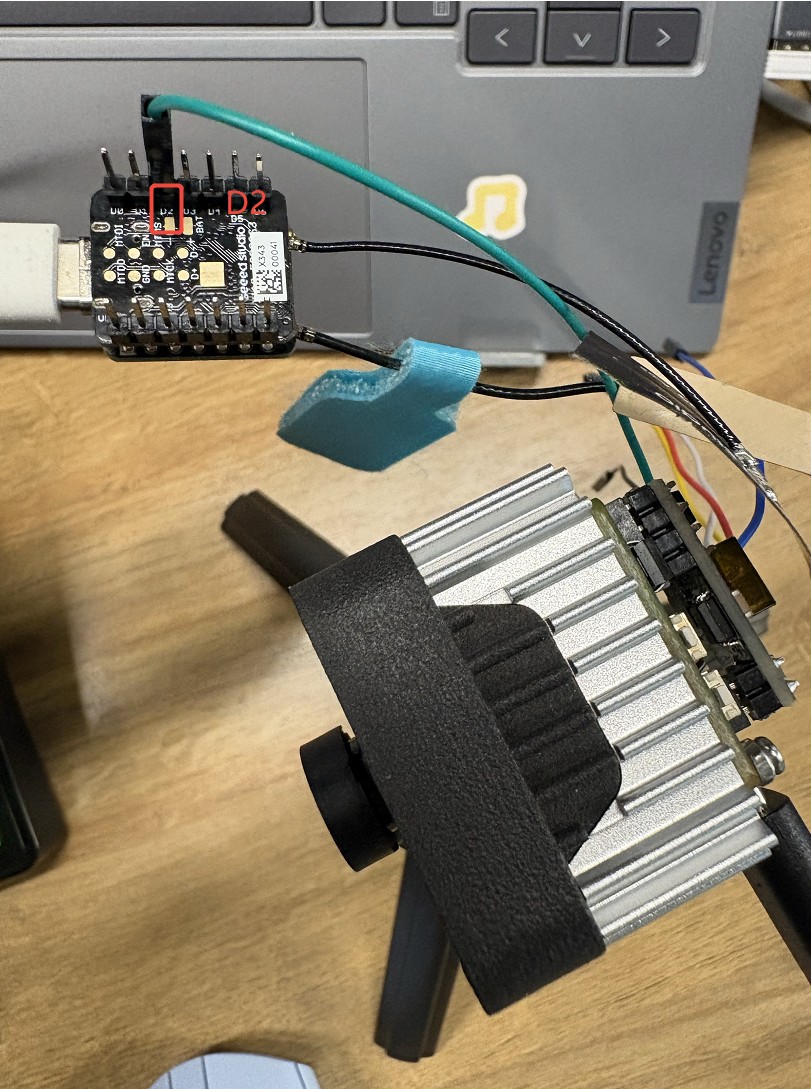
To expose the GPIO pins on the reCamera PoE baseboard, we need to unscrew the baseboard's screws and remove the cover. Then, you will find a connector on the baseboard, which has 6 pins. We will use GPIO 490 and GND from this connector. For more information about the interfaces on the baseboard such as this 6 pin connector, please refer to reCamera Base Board with PoE Hardware Specification.
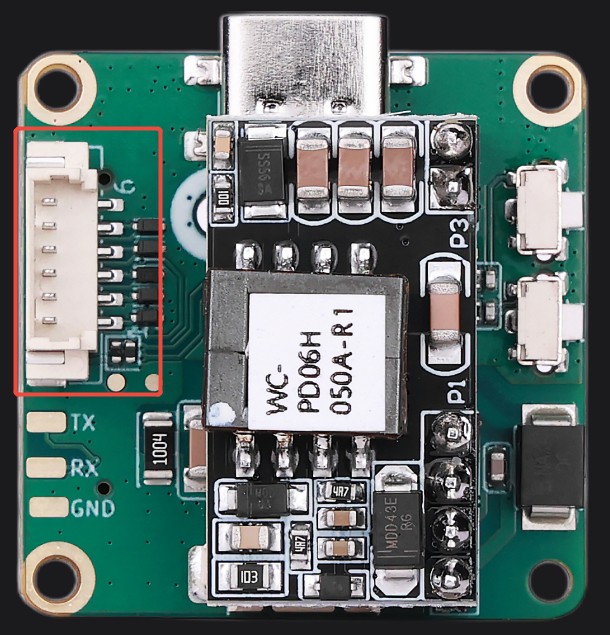
Next, from the reCamera package, take out the extension wire illustrated below. This wire is a MX1.25-Dupont,6P,6Color:Red-Black-Yellow-Green-Blue-White wire.
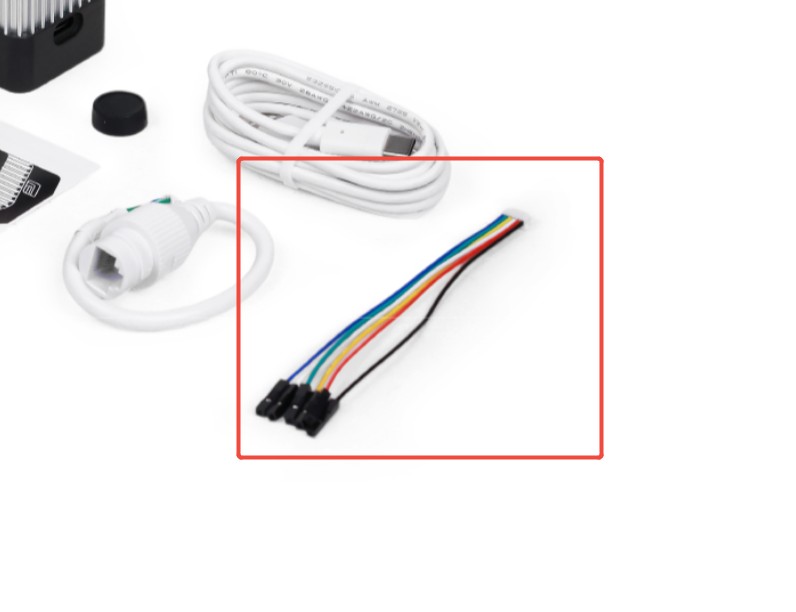
Connect the wire to the baseboard. The final connection should look like the image shown below. GPIO 490 is connected to the green wire while the GND is connected to the black wire.
Login to reCamera
First, upgrade your reCamera to the latest version 0.2.2 following this tutorial: reCamera OS UPgrade Tutorial If your version is already 0.2.2, you can skip this step.
Since reCamera's camera resources are exclusive, the Node-RED and related AI services running by default will occupy the underlying image driver for a long time. If the C++ object detection program is started directly while these services are running, it will cause conflicts between multiple processes, leading to the C++ program failing to start due to the inability to access the camera normally.
Therefore, we need to access the reCamera via SSH to ensure the device can still be controlled remotely after closing the Web services; subsequently, execute commands in the reCamera terminal via SSH to stop background processes such as Node-RED, thereby releasing the lock on the camera and clearing the necessary hardware access path for the model_detector program.
Establish SSH Connection
Use tools like MobaXTerm to log in to reCamera via SSH. Default IP: Usually 192.168.42.1
- After logging in, it is recommended to switch to the
/userdata/directory, as it is typically used for storing user data and models.
Stop Node-RED Related Services
Since the Node-RED service running by default on reCamera consumes significant system resources, you must execute the following three commands to stop it before running the C++ Demo:
sudo /etc/init.d/S03node-red stop
sudo /etc/init.d/S91sscma-node stop
sudo /etc/init.d/S93sscma-supervisor stop
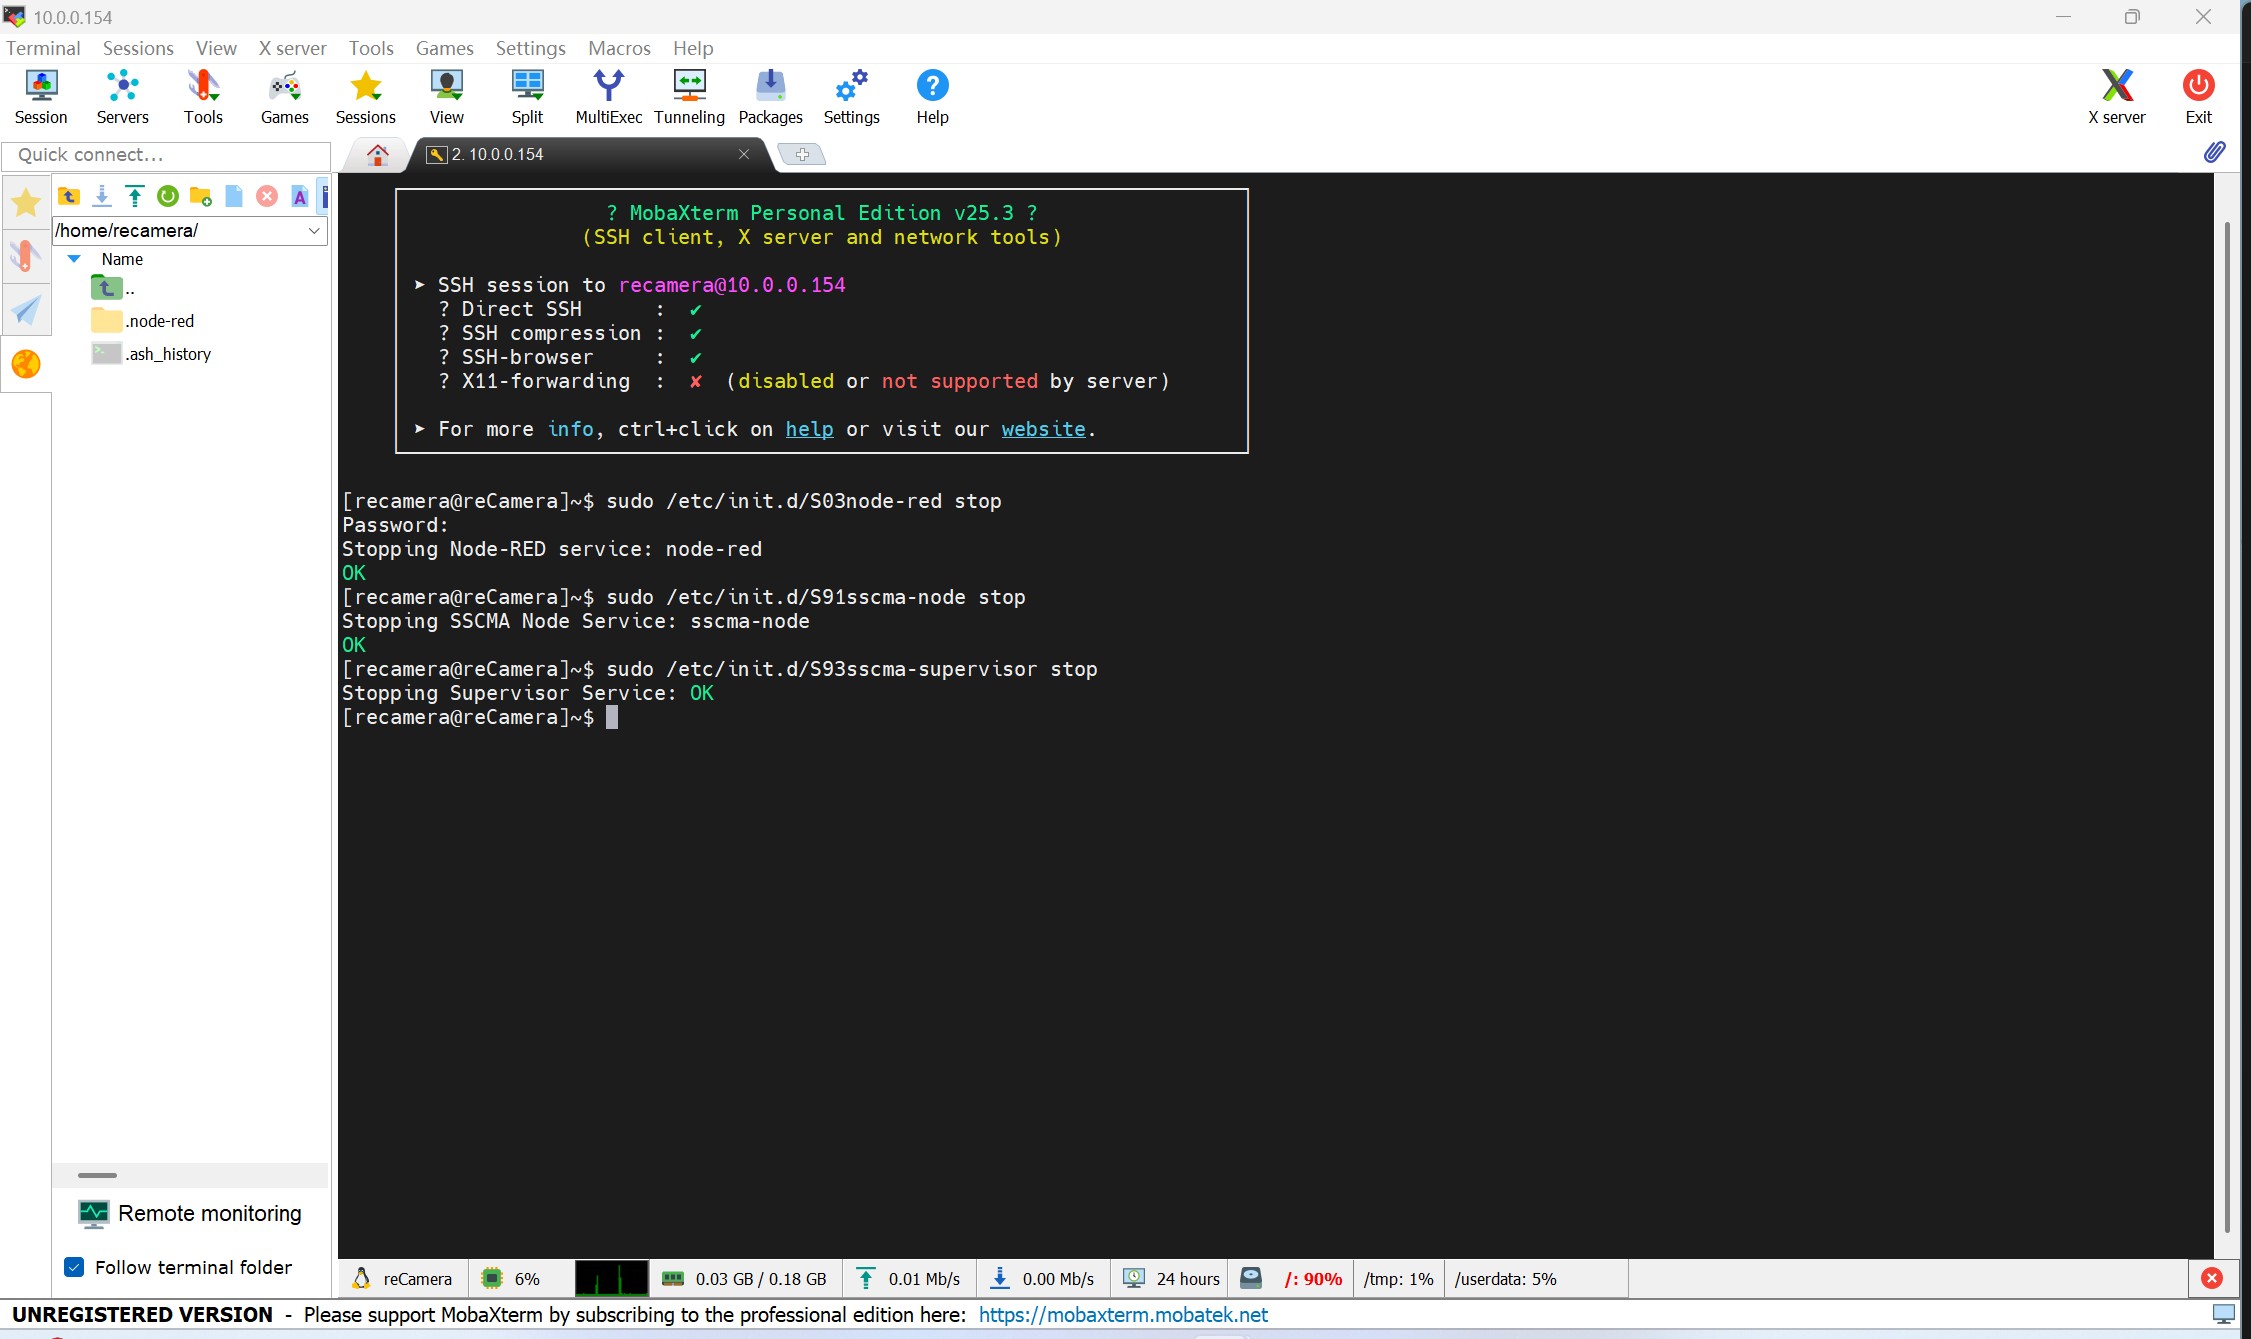
Upload Model and Firmware
Use MobaXTerm’s file transfer function (the upload icon in the left file panel) to upload the following files to the /home/recamera/ directory.
Compiled firmware: e.g., model_detector
Quantized model: e.g., yolo11n_cv181x_int8.cvimodel
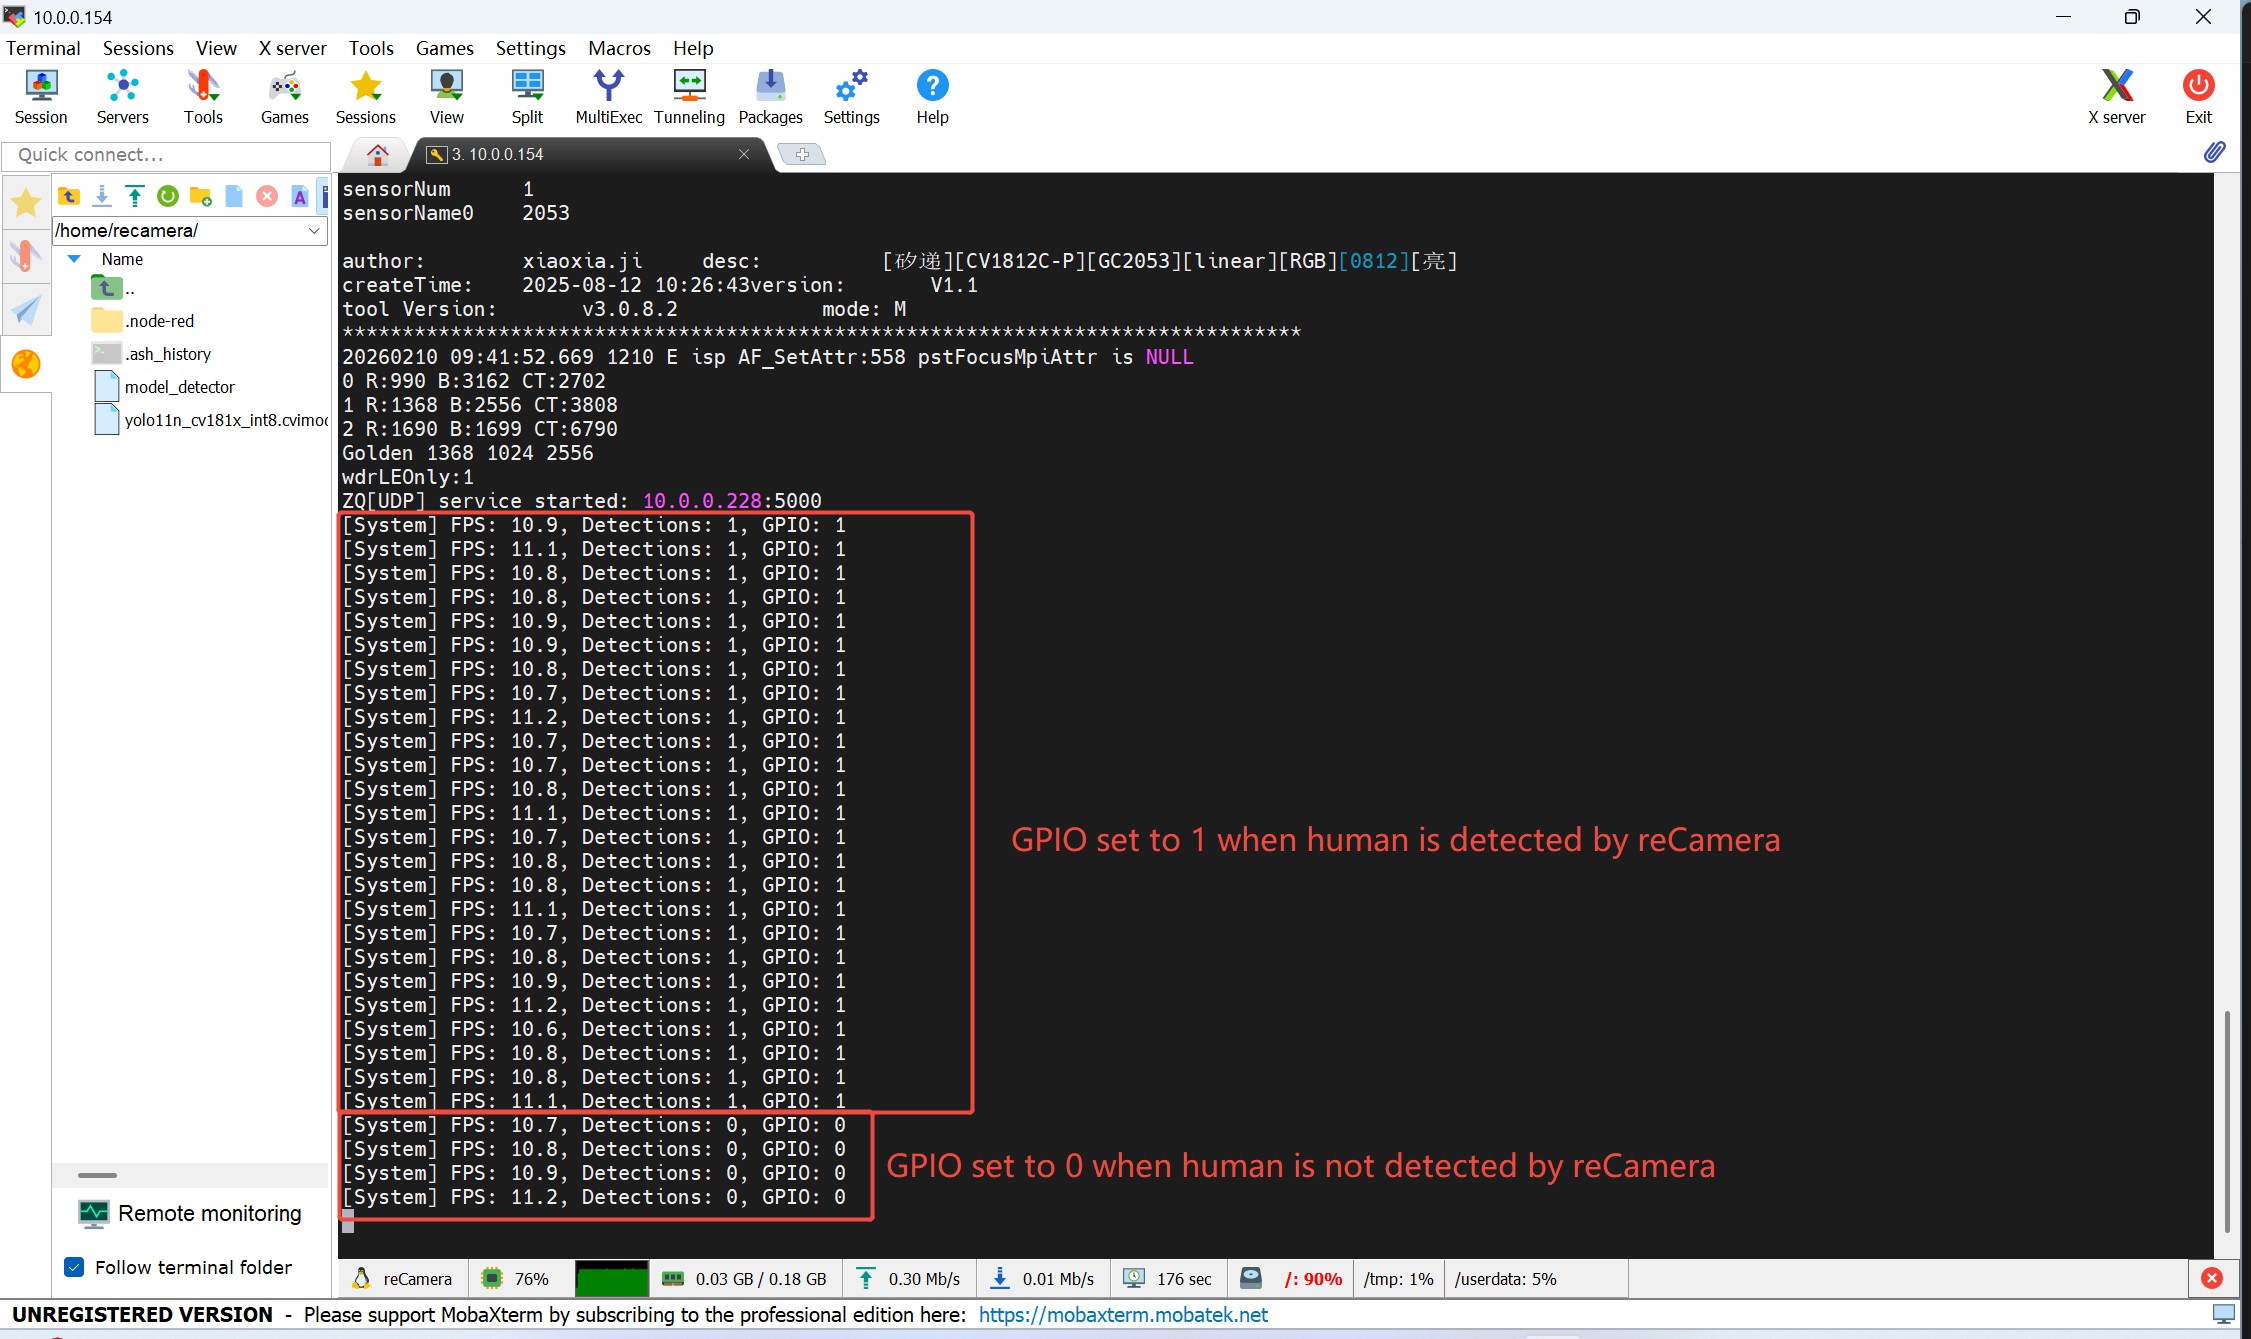
The model_detector here is an executable file. It is generated by configuring the reCamera SDK and cross-compiling C++ source code. The logic of this program is as follows: It uses the uploaded yolo.cvimodel to detect if a human exists in the frame. If a human is detected, GPIO 490 on the reCamera PoE base board will be set to High; otherwise, it will remain Low.
Since setting up the cross-compilation environment can be complex, we have provided the pre-compiled executable for your convenience. You can simply download and upload it directly to your reCamera. Compiled C++ Model Detector Code
Regarding the model file, it is a YOLO11n detection model trained based on the COCO dataset. It contains 80 classes and can recognize common everyday objects such as humans and vehicles. Similarly, we provide a download link so you do not need to train or convert the model yourself. After downloading, you can upload it directly to your reCamera. reCamera Yolo Models
Modifying the source code and performing cross-compilation is recommended for those with experience in embedded systems. If you are interested in exploring this further, please refer to the document.
Grant Permissions and Run
In the terminal, first visit the folder where you upload the compiled firmware and quantized model. Then add execution permissions to the firmware and start the detection program.
chmod +x model_detector
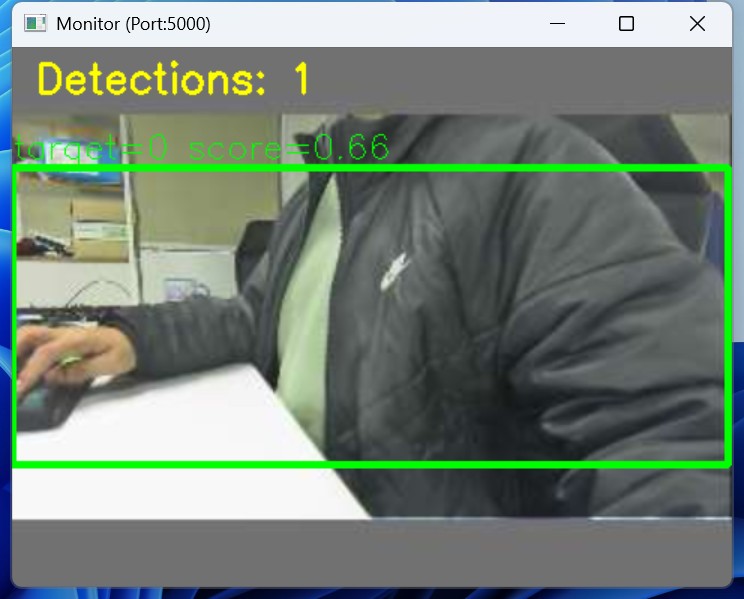
For visual demonstration, the model_detector program features an integrated UDP video streaming function. As long as the reCamera and your PC are on the same local network (LAN), you can achieve real-time preview by running the program on the reCamera while executing the udp_receiver.py script on your PC.
This UDP stream is strictly for local monitoring and demonstration purposes (a "bonus" feature). Due to the physical bandwidth constraints of LoRa technology, video streaming is neither supported nor possible over the Meshtastic network. The actual data transmitted across the Mesh network is limited to lightweight text alerts, such as "Human detected."
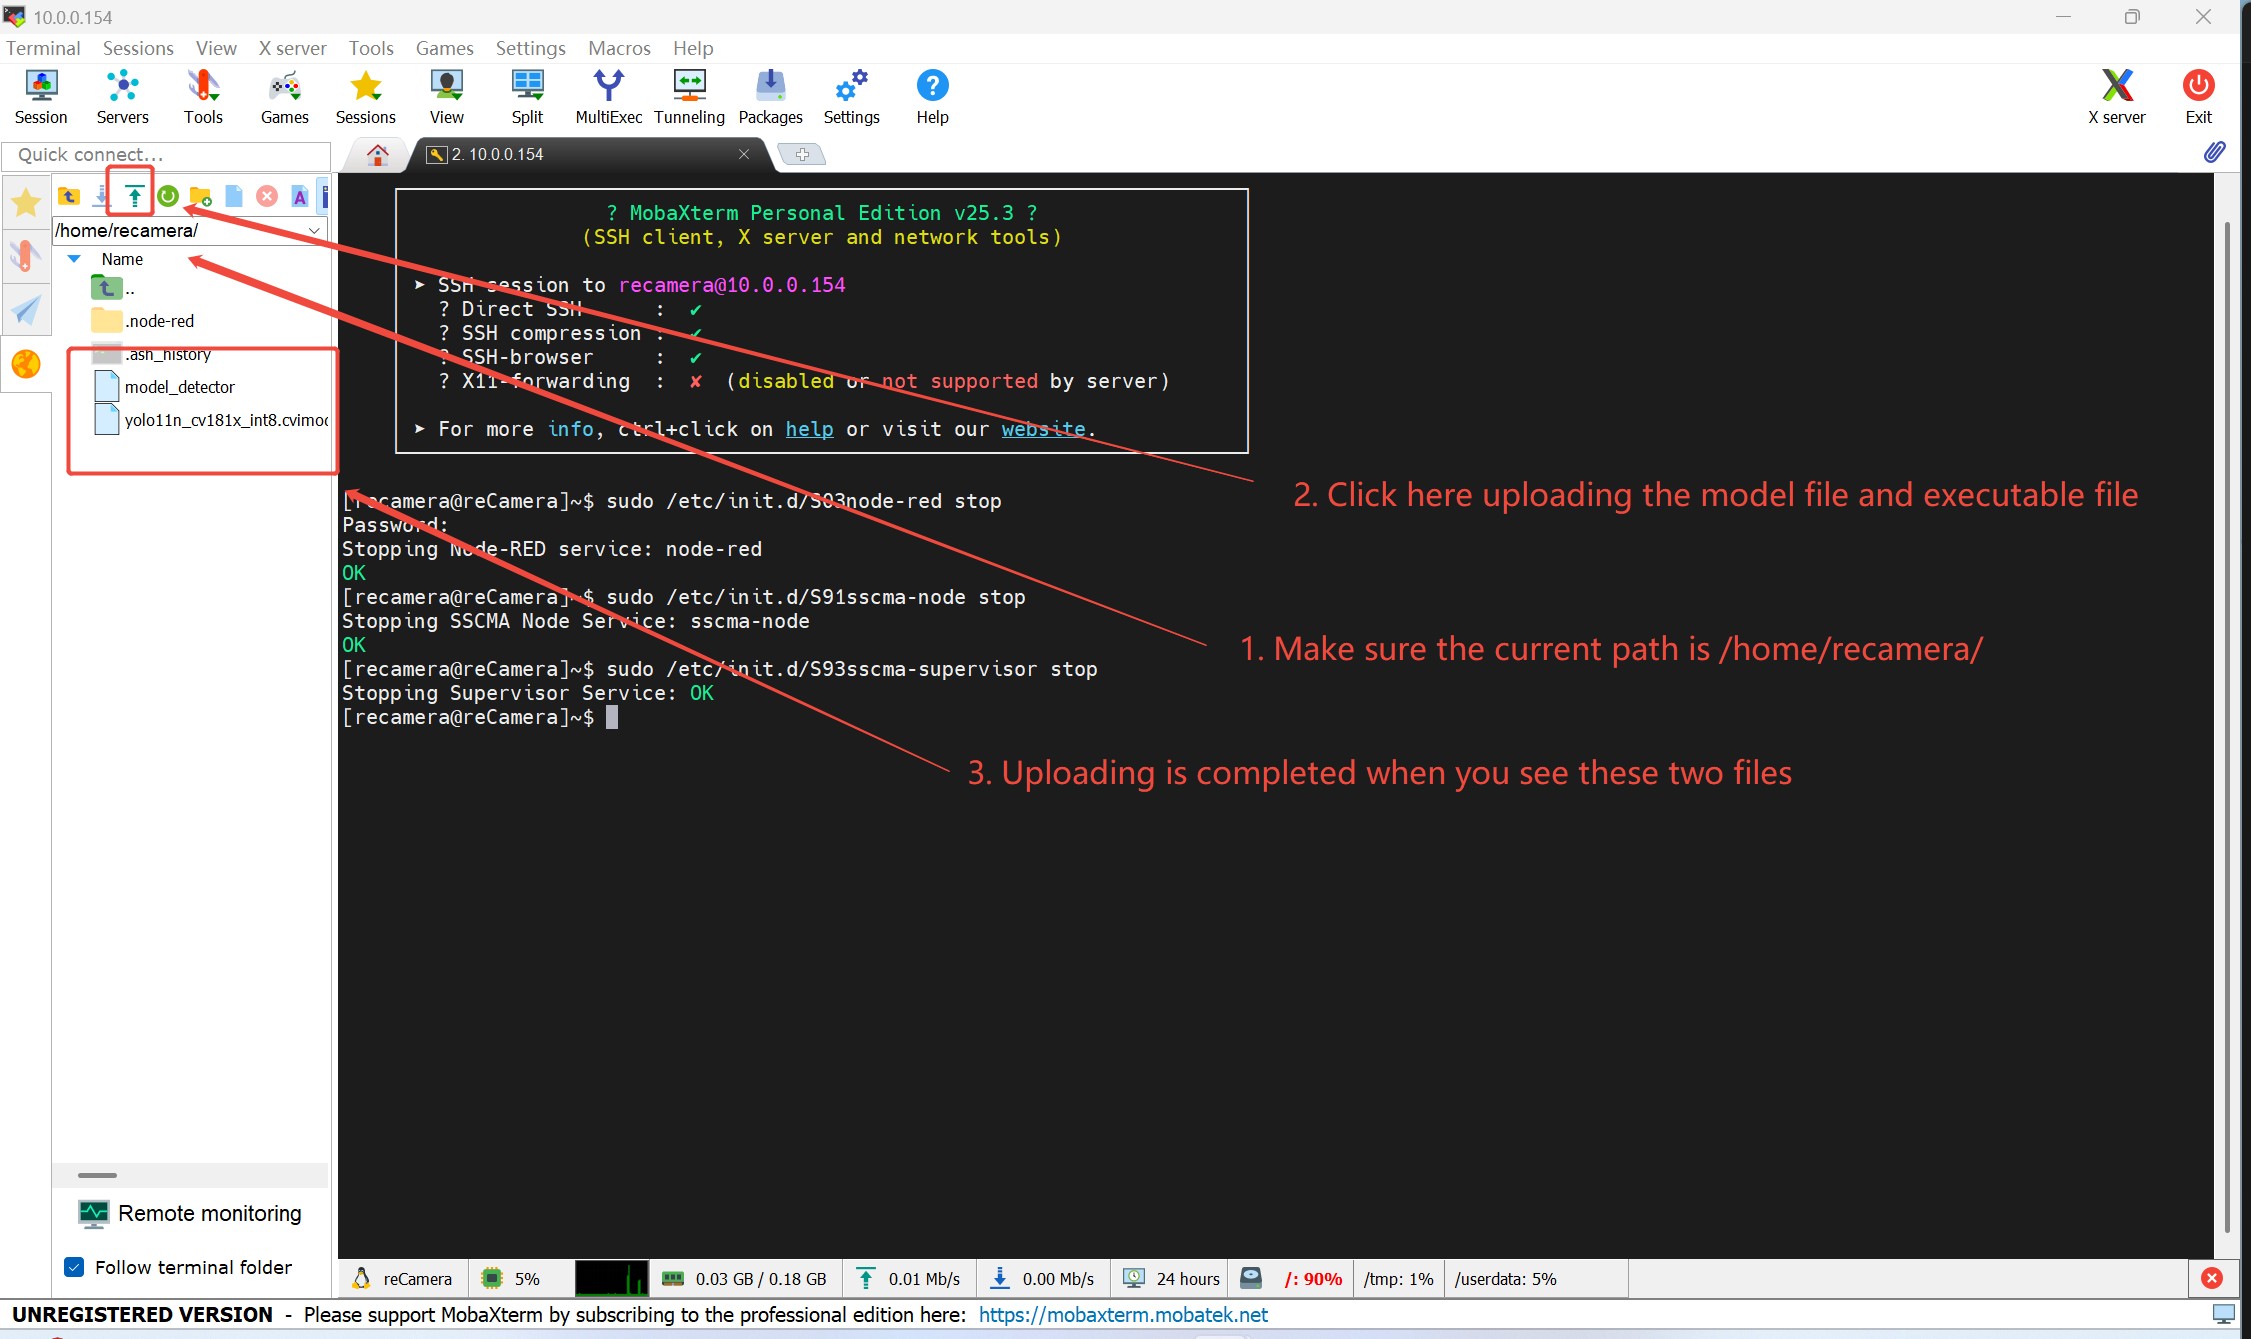
Execute the following command to run the model_detector program using 0.5(50%) as the confidence threshold example:
sudo ./model_detector [model_name] [confidence_threshold] [PC_IP_address] [udp_port]
where:
[model_name]: The name of the quantized model file. In this example, it isyolo11n_cv181x_int8.cvimodel.[confidence_threshold]: The confidence threshold between 0.0 and 1.0 for object detection. A higher value means fewer detections but higher accuracy. In this example, it is0.5.[PC_IP_address]: The IP address of your PC where theudp_receiver.pyscript will run. In this example, it is10.0.0.228. Always remember to use the IP address of your PC, not mine.[udp_port]: The UDP port number used for video streaming. In this example, it is5000.
Here is the complete example command:
sudo ./model_detector yolo11n_cv181x_int8.cvimodel 0.5 10.0.0.228 5000
Now, we will setup up the udp_receiver.py script on your PC. Make sure your PC installed Python, OpenCV and NumPy library. Then, download the udp_receiver.py script from the link udp_receiver.py and execute it on your PC. In this example, it is run on Windows Powershell:
python .\udp_receiver.py --port [udp_port] --scale [scale_factor]
where:
[udp_port]: The UDP port number used for video streaming from reCamera. In this example, it is5000.[scale_factor]: The scale factor for resizing the video frame. In this example, it is1.5.
Here is the complete example command:
python .\udp_receiver.py --port 5000 --scale 1.5
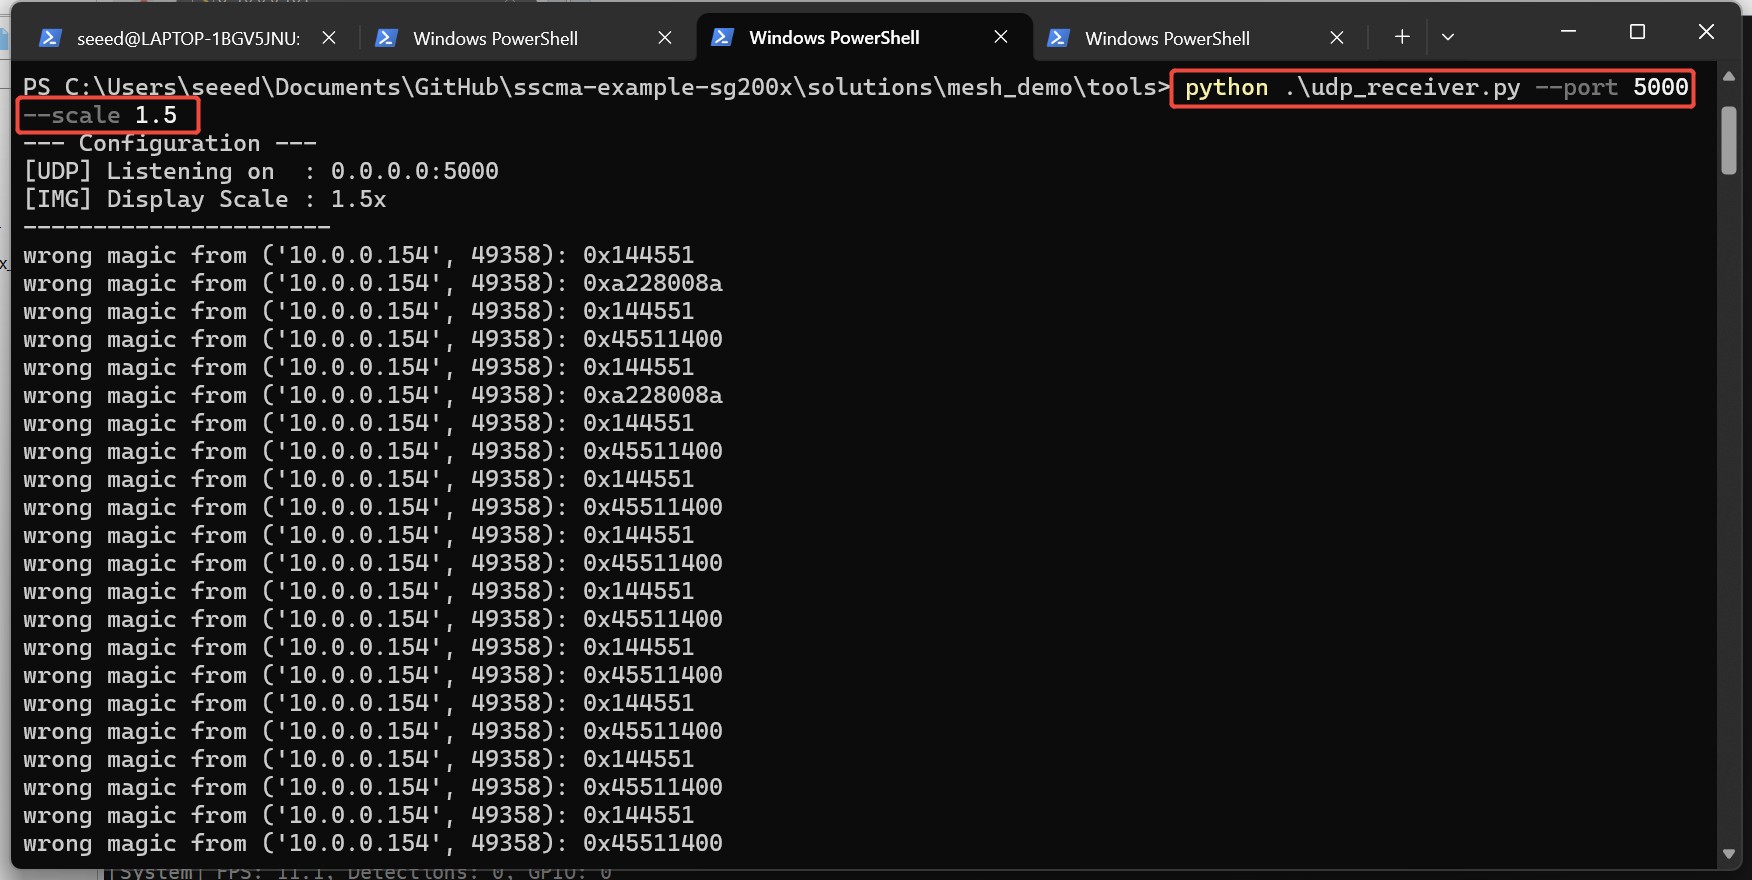
Finally, you will see real-time detected class information (e.g., Class 0) and their coordinates in the terminal.
Meanwhile a live video stream will be displayed on your PC:
XIAO ESP32S3 + Wio-SX1262(Meshtastic Node) Configuration
Now, we will configure the first Mesh node. This node is responsible for receiving the IO output from the reCamera and broadcasting a text message: "Human detected".
Firmware Flashing
A specific Mesh firmware must be flashed to the device. Due to the unique channel management mechanism of Mesh networks, information output by the DetectionSensor module to Channel 0 in standard firmware is typically discarded. This design is intentional to prevent high-frequency detection data from clogging the Mesh network channels. Please follow steps below:
Before flashing, temporarily remove the Wio SX1262 expansion board from the XIAO. While the expansion board does not interfere with the flashing process itself, it physically obstructs the BOOT button on the XIAO ESP32S3.
- First, download the pre-compiled Mesh firmware Custom Meshtastic Firmware.
- Connect the XIAO ESP32S3 to your computer via a USB cable and enter Bootloader mode. You can refer to this guide XIAO S3 bootloader guide
- Use a web-based flashing toolMeshtastic Web Flasher select the Seeed XIAO esp32s3 device, then select firmware you just downloaded and finally click the Flash button to burn the firmware onto the XIAO ESP32S3. A video tutorial is available but remind flash the download firmware rather than Meshtastic official firmwareFlash Firmware Video.
- Once the flashing is complete and no errors are reported, unplug the XIAO ESP32S3 to power it off. Reinstall the Wio SX1262 expansion board, and then reconnect the USB cable to your computer. The device will now boot up with the new firmware.
Configure the Mesh Node
There are two ways to configure Mesh nodes. First, connect the device to your computer with a USB cable, and then you can 1: Use another Mesh web tool: Meshtastic Web Client to access the mesh node via serial 2: Download the Meshtastic mobile app to access the Mesh node via Bluetooth on your phone. Here we demonstrate using the Meshtastic Web Client on a PC to configure the esp32s3 and Wio Tracker.
The UI of the Mesh app on iOS and Android, as well as the UI of the meshtastic web client tool, may be different, but specific configurations, such as configuring LoRa frequency bands, can all be found in their corresponding configuration options. Therefore, if you do not have iOS, there is no need to worry; apps on other platforms will certainly have the corresponding configuration options.
Meshtastic Web FlasherandMeshtastic Web Client, are two official web tools provided by Meshtastic. They are used to configure Mesh nodes and flash Mesh firmware, respectively. Please do not confuse them with each other.
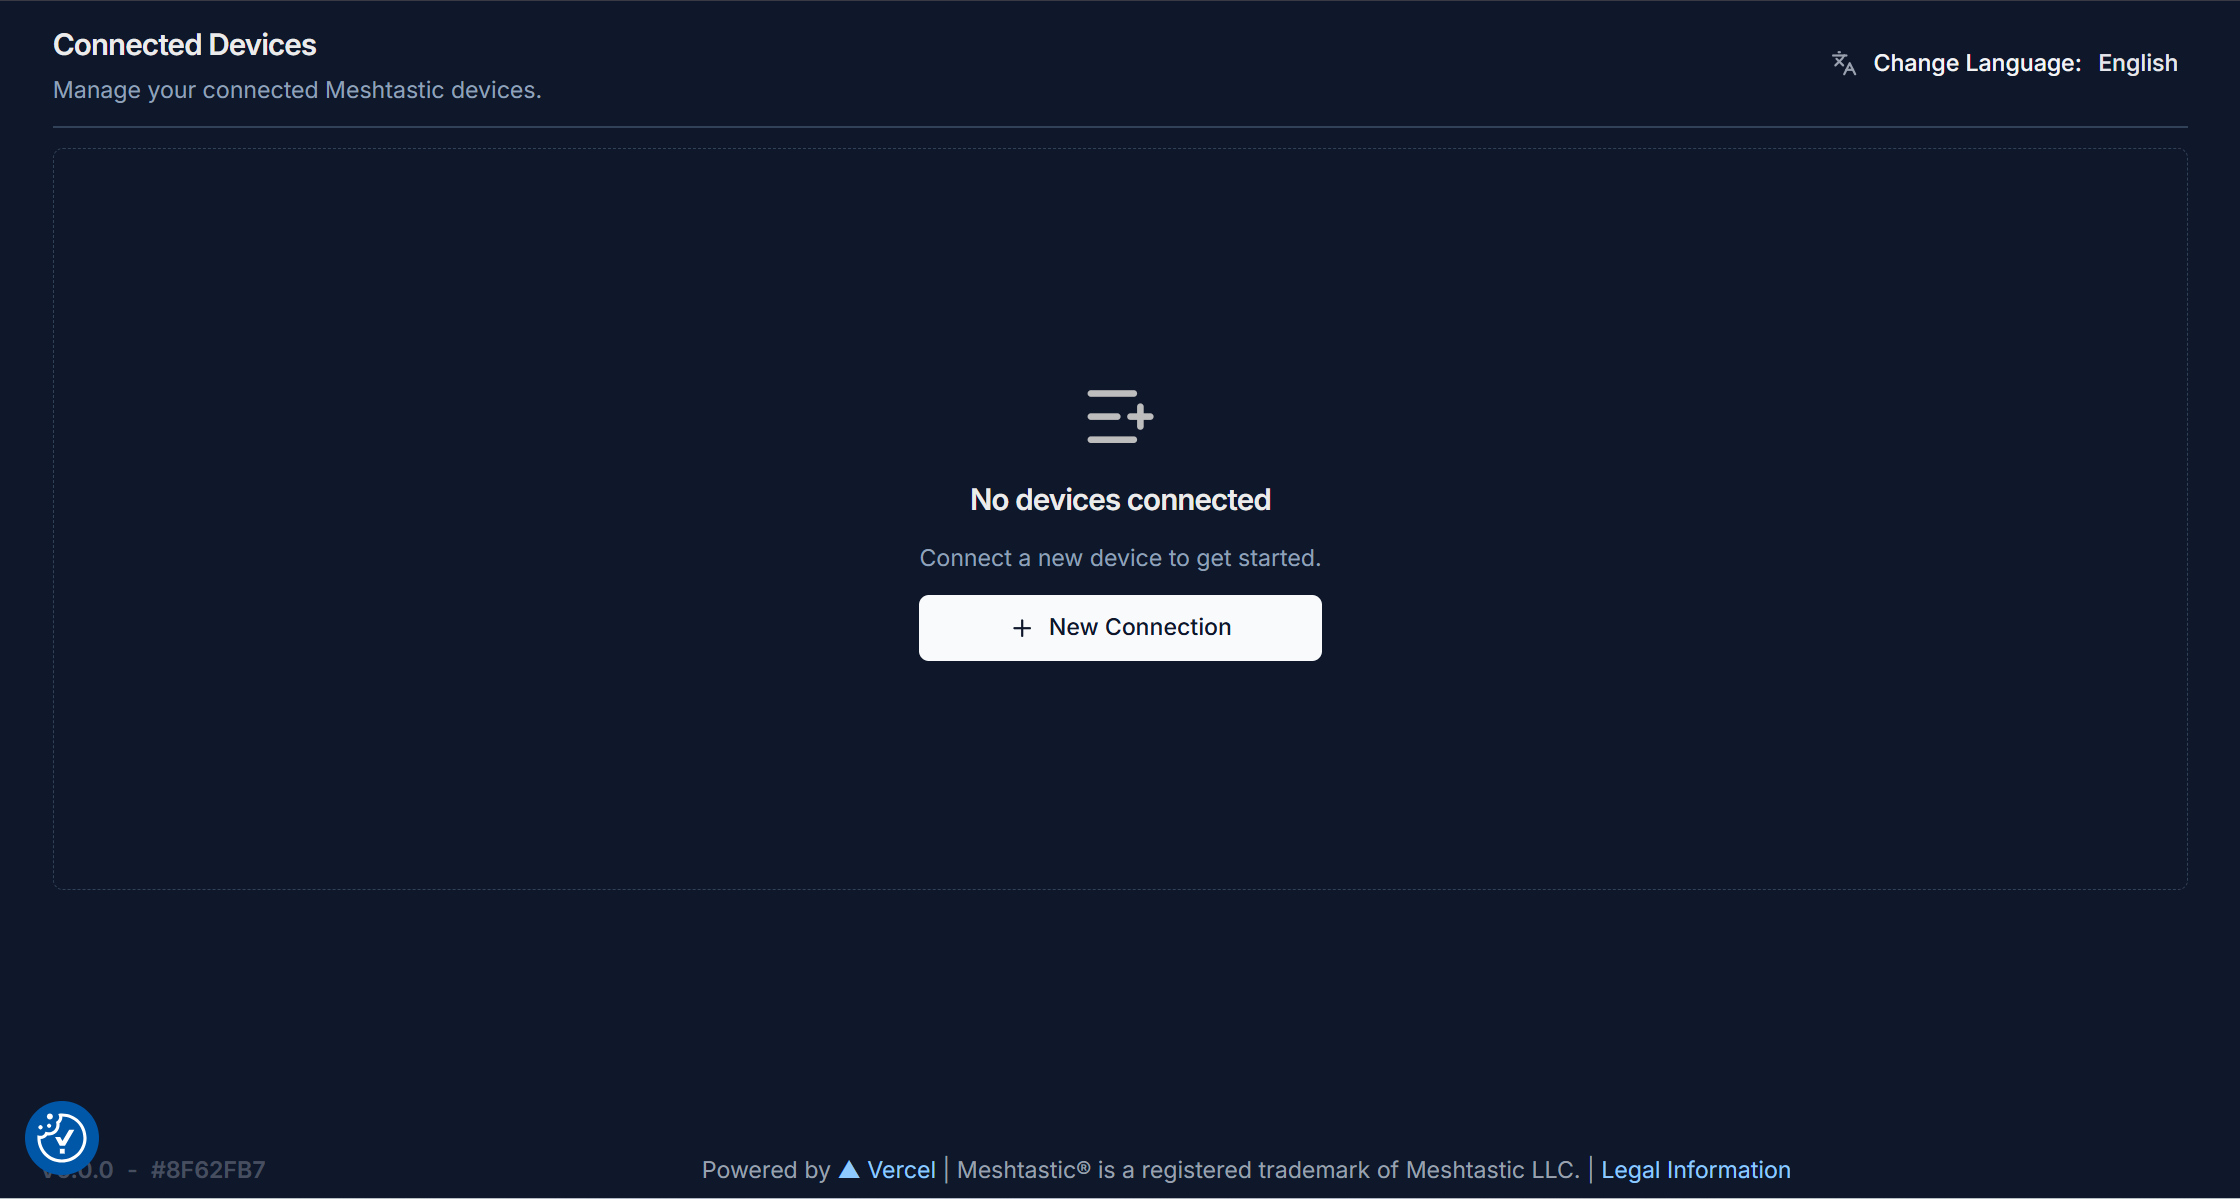
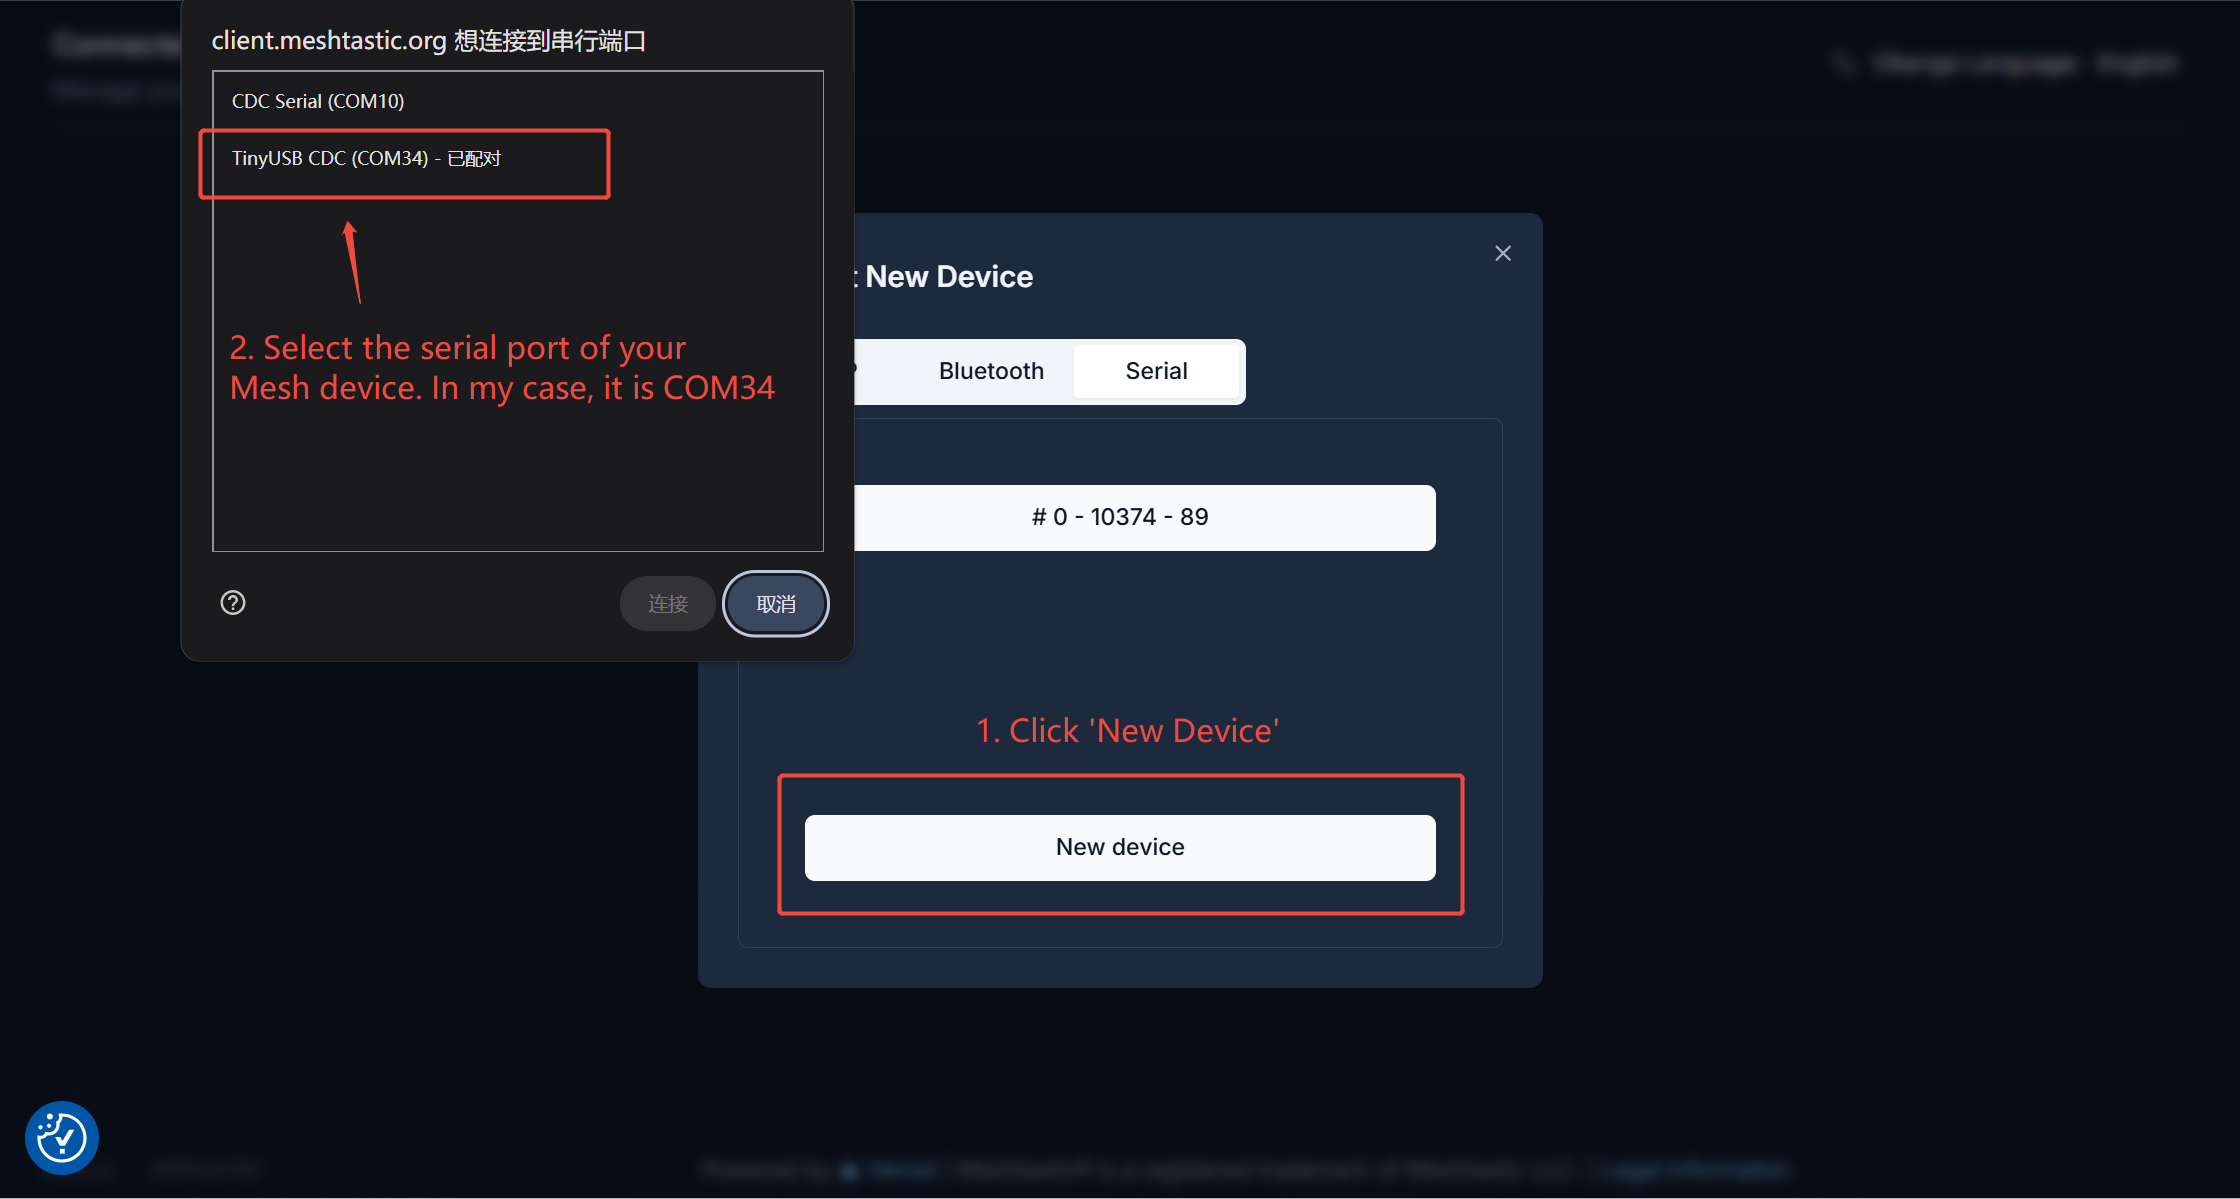
1.Ensure your XIAO esp32s3 Mesh node is connected to the computer via a USB cable. Open the Meshtastic Web Client and you will see the initial page. Now click "+ New Connection".
2.Click "Serial", then click "New Device", and select the port for your Mesh node.
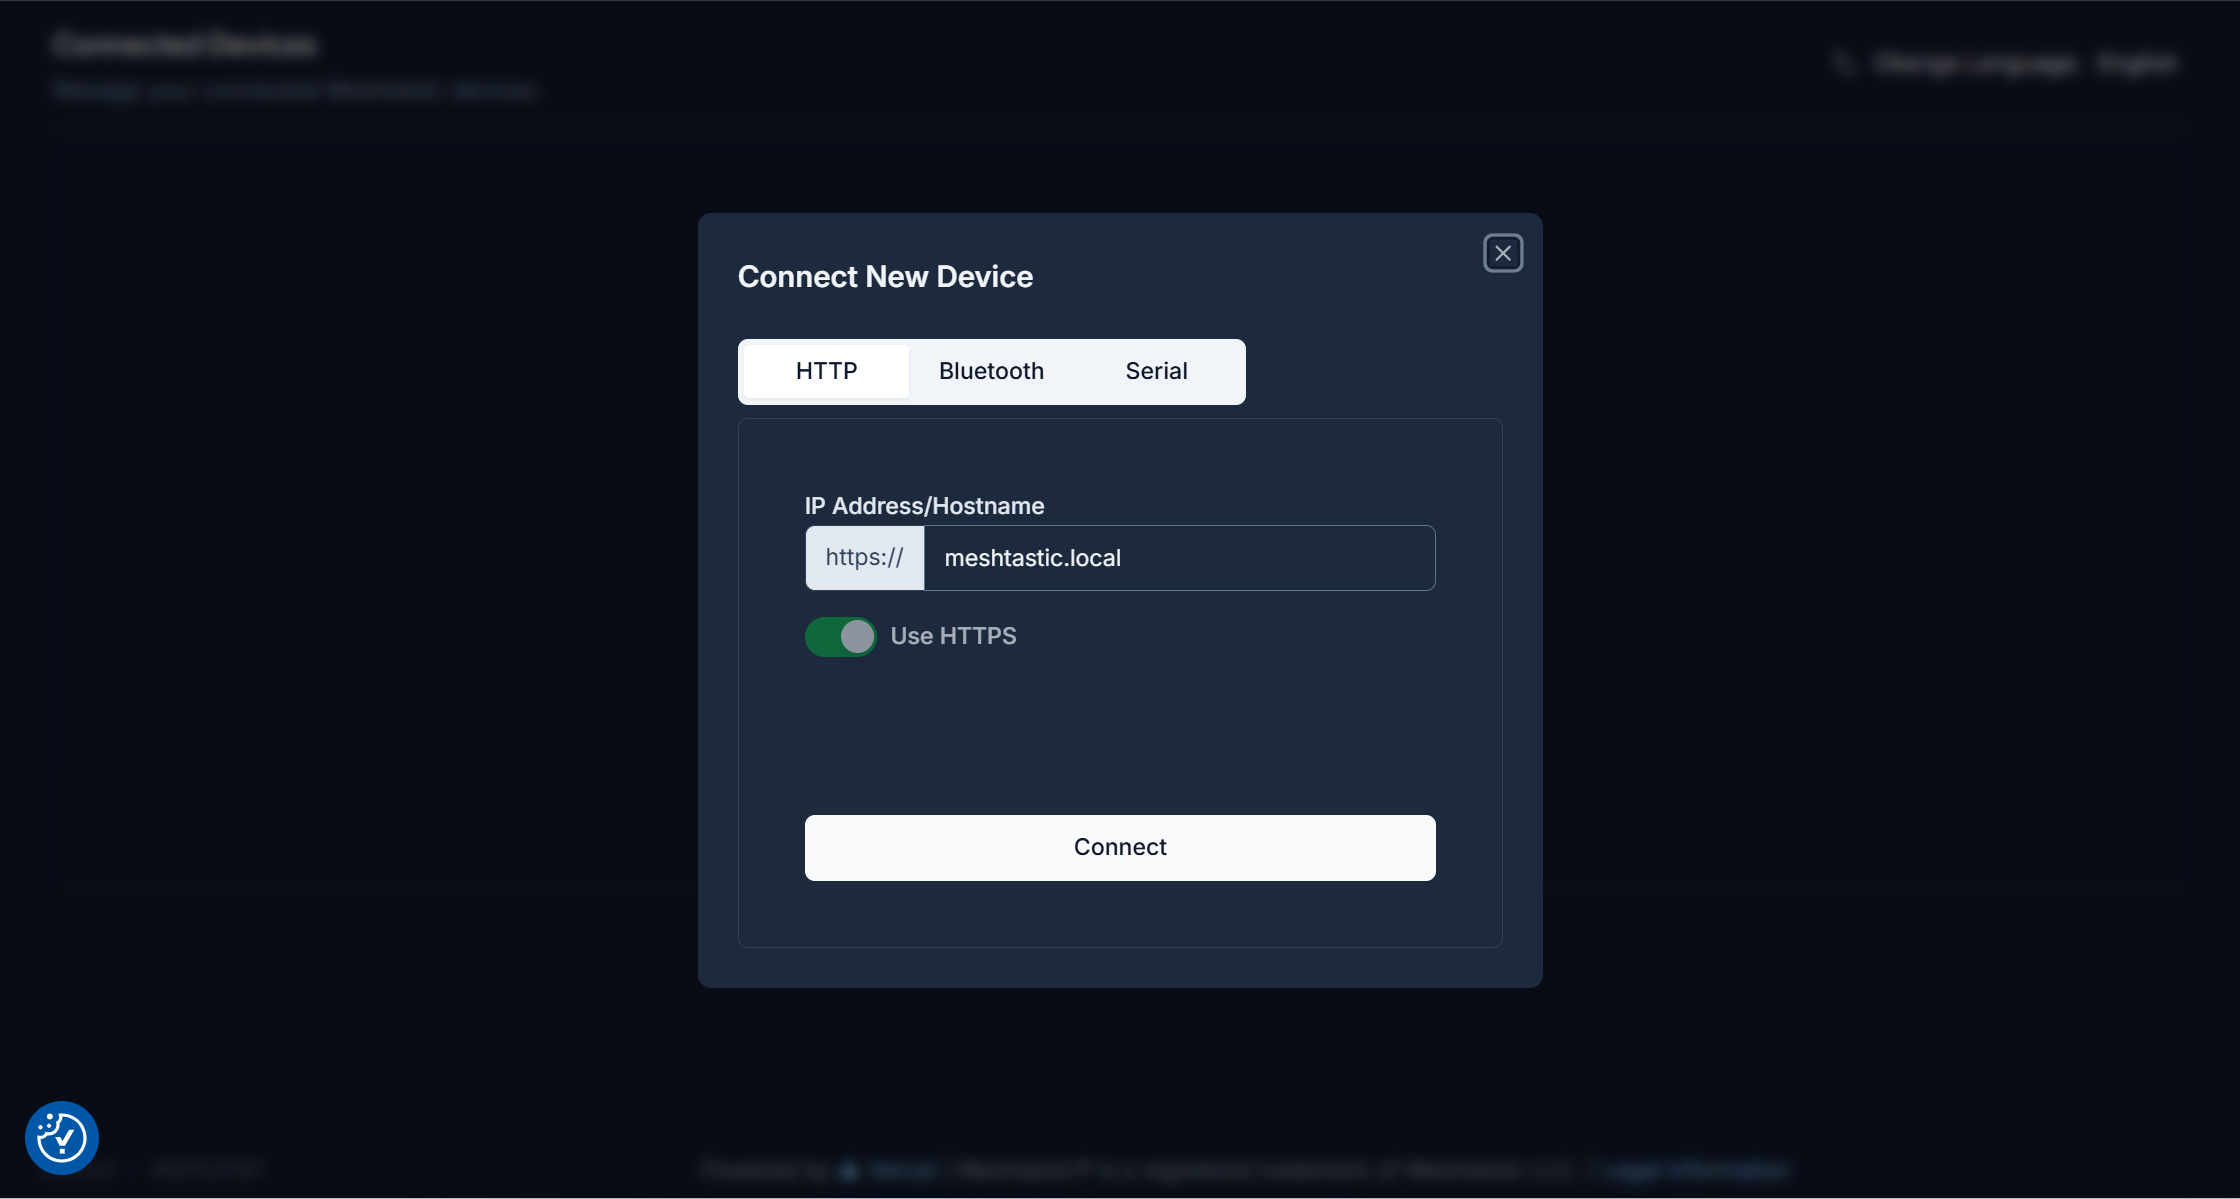
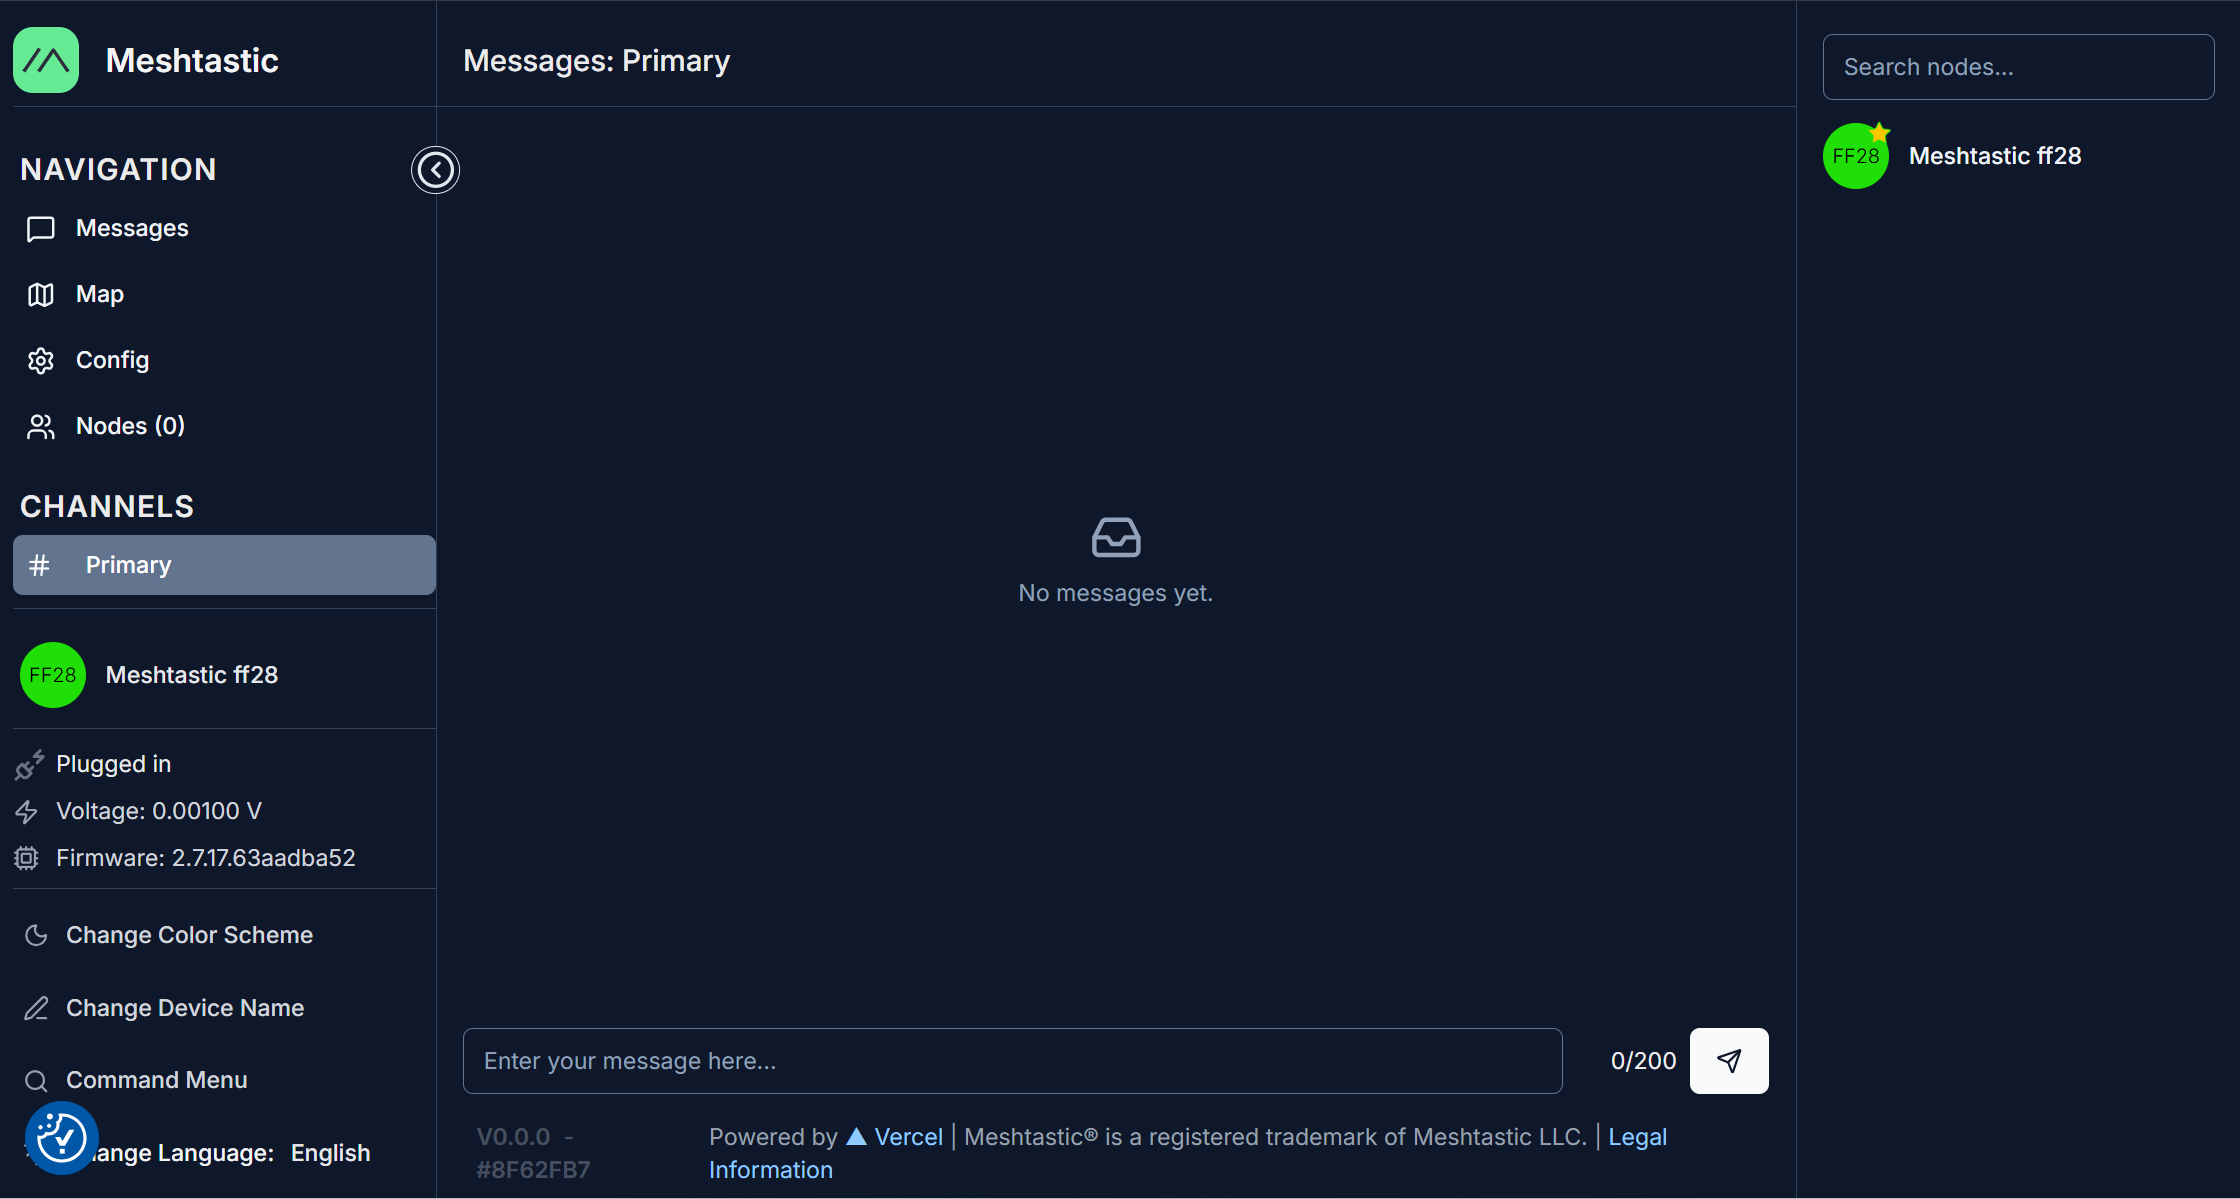
3.Enter the device configuration page; here, my device name is "Meshtastic ff28".
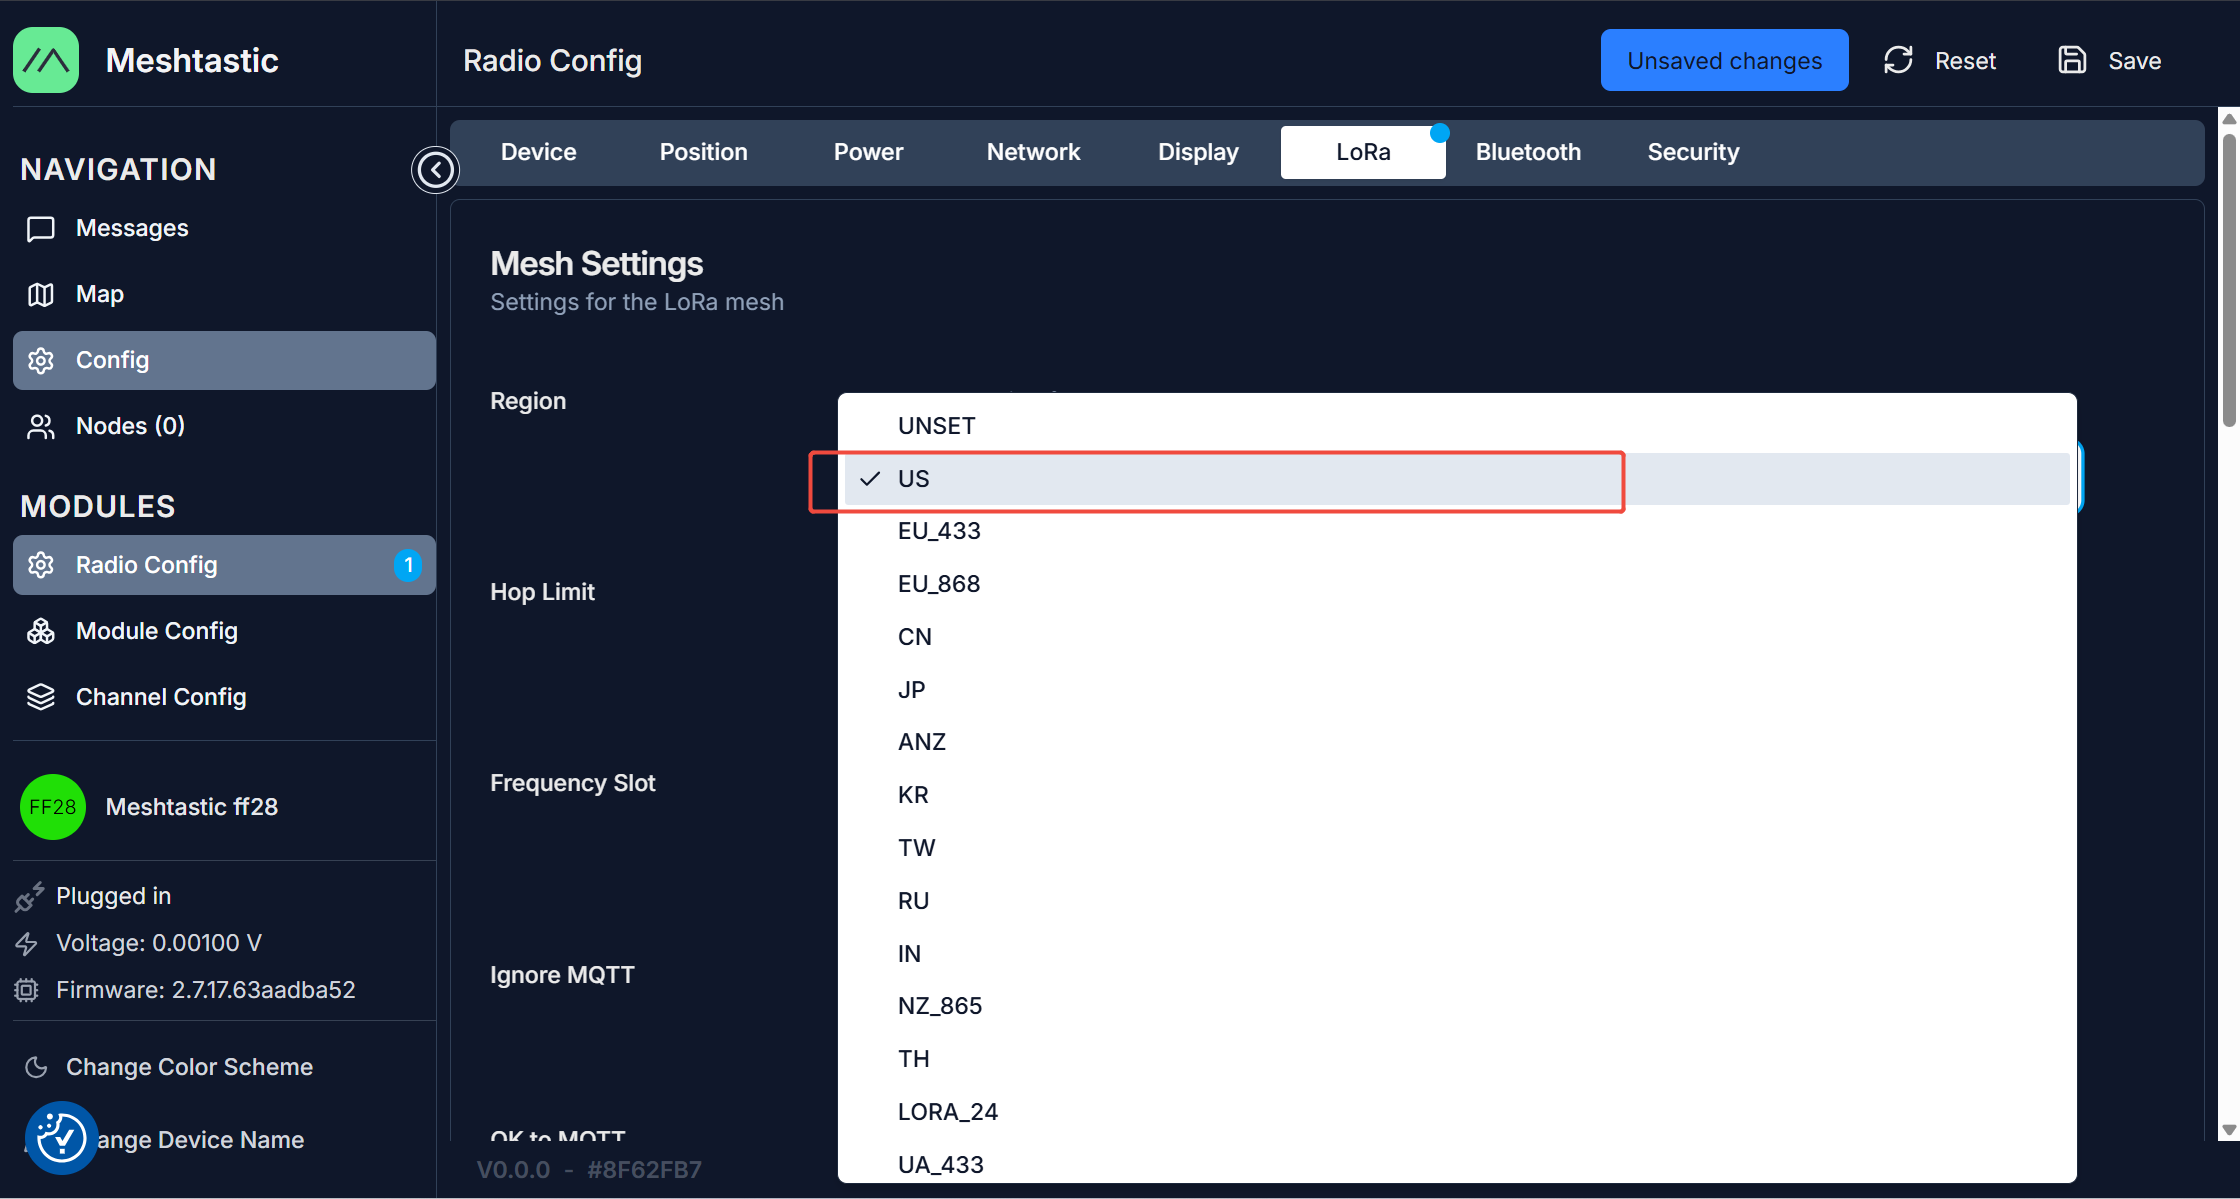
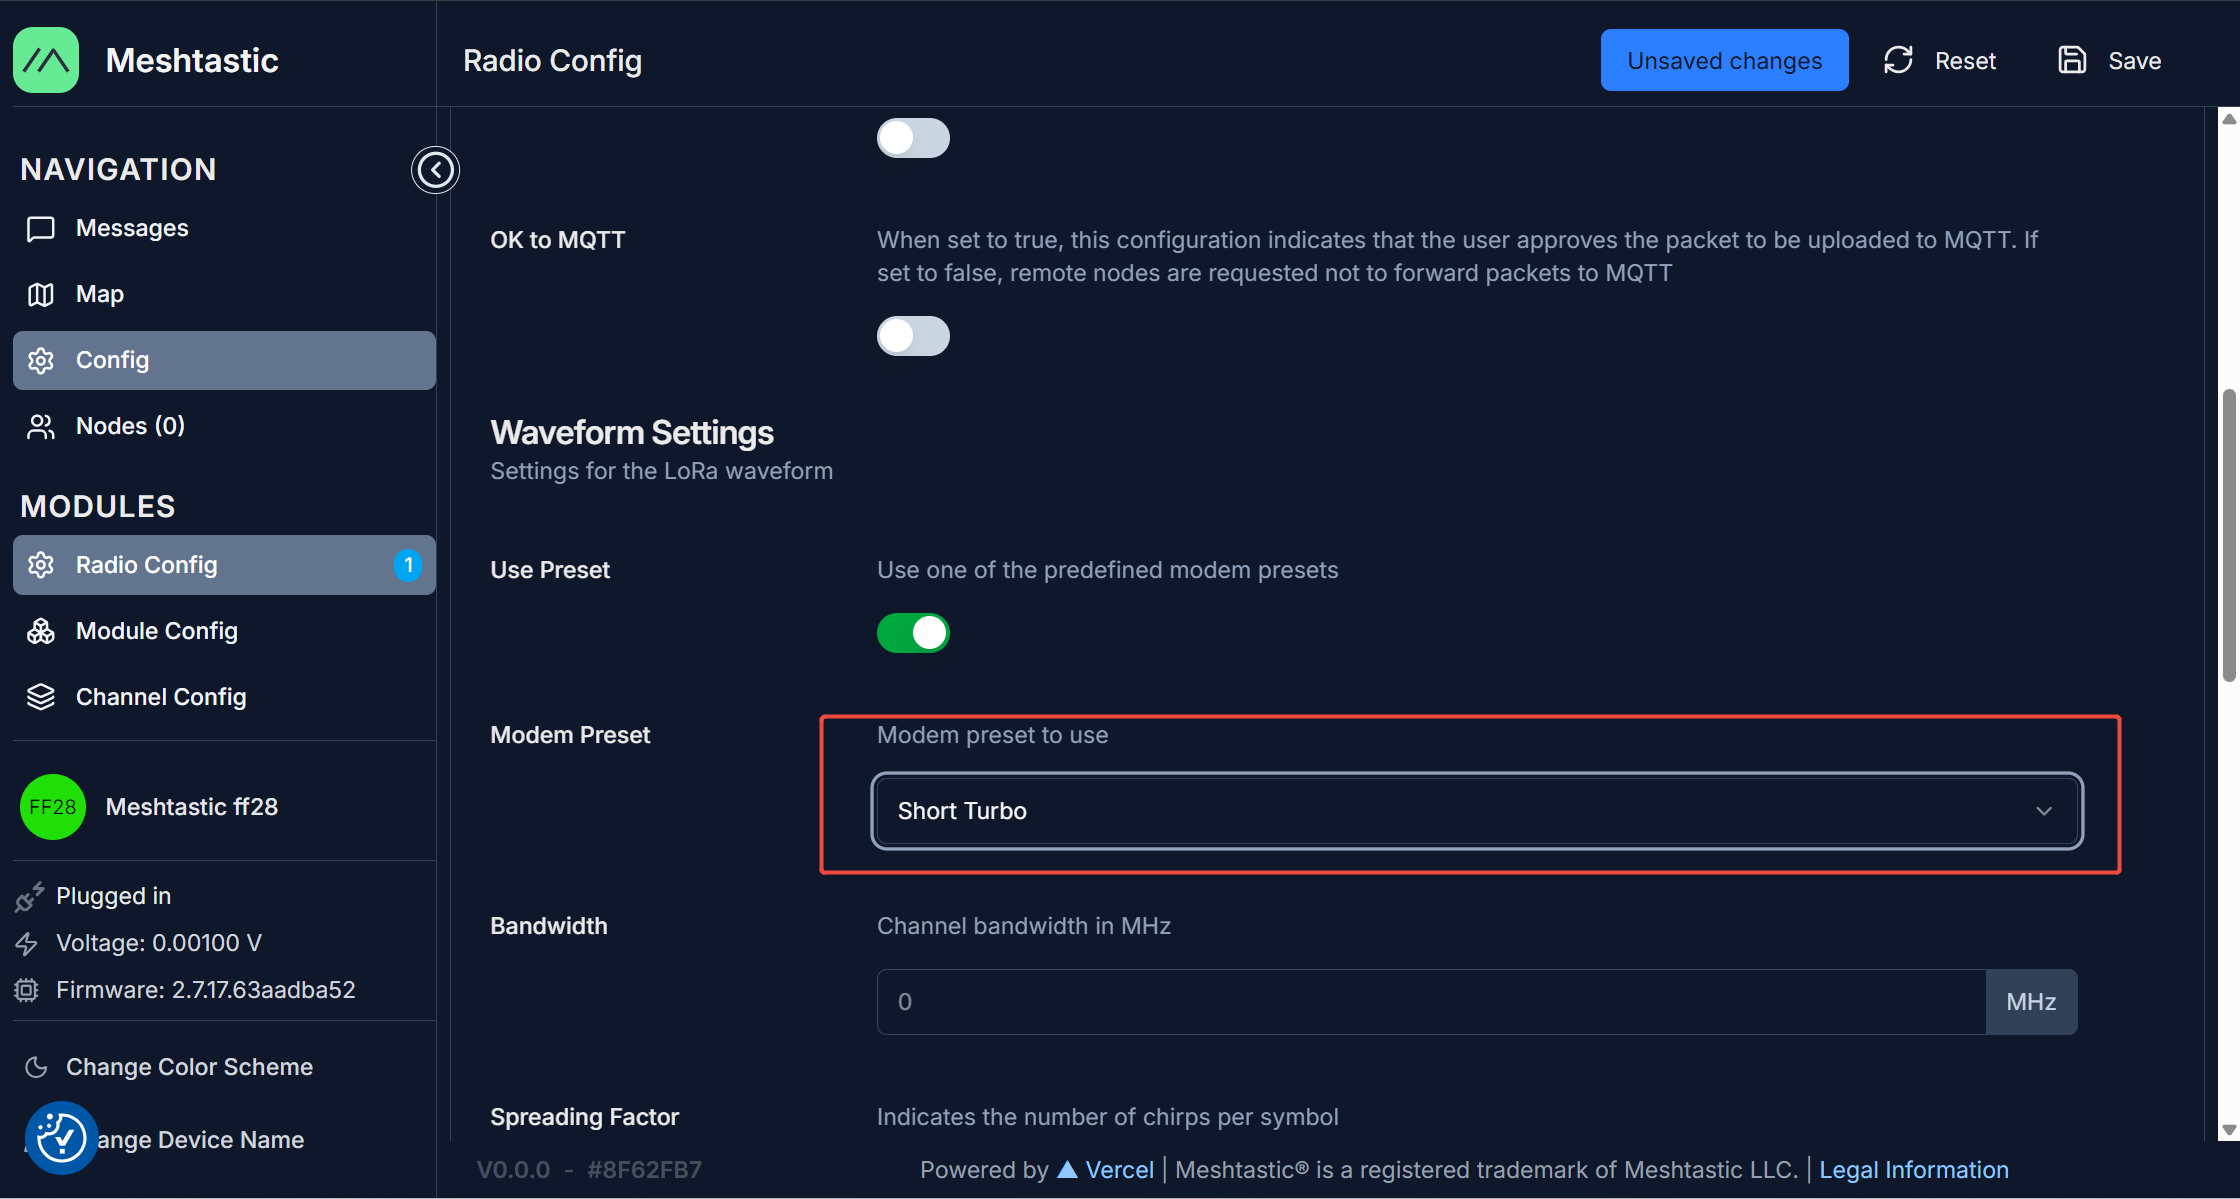
4.Click'Config' -> 'Radio config' -> 'LoRa'
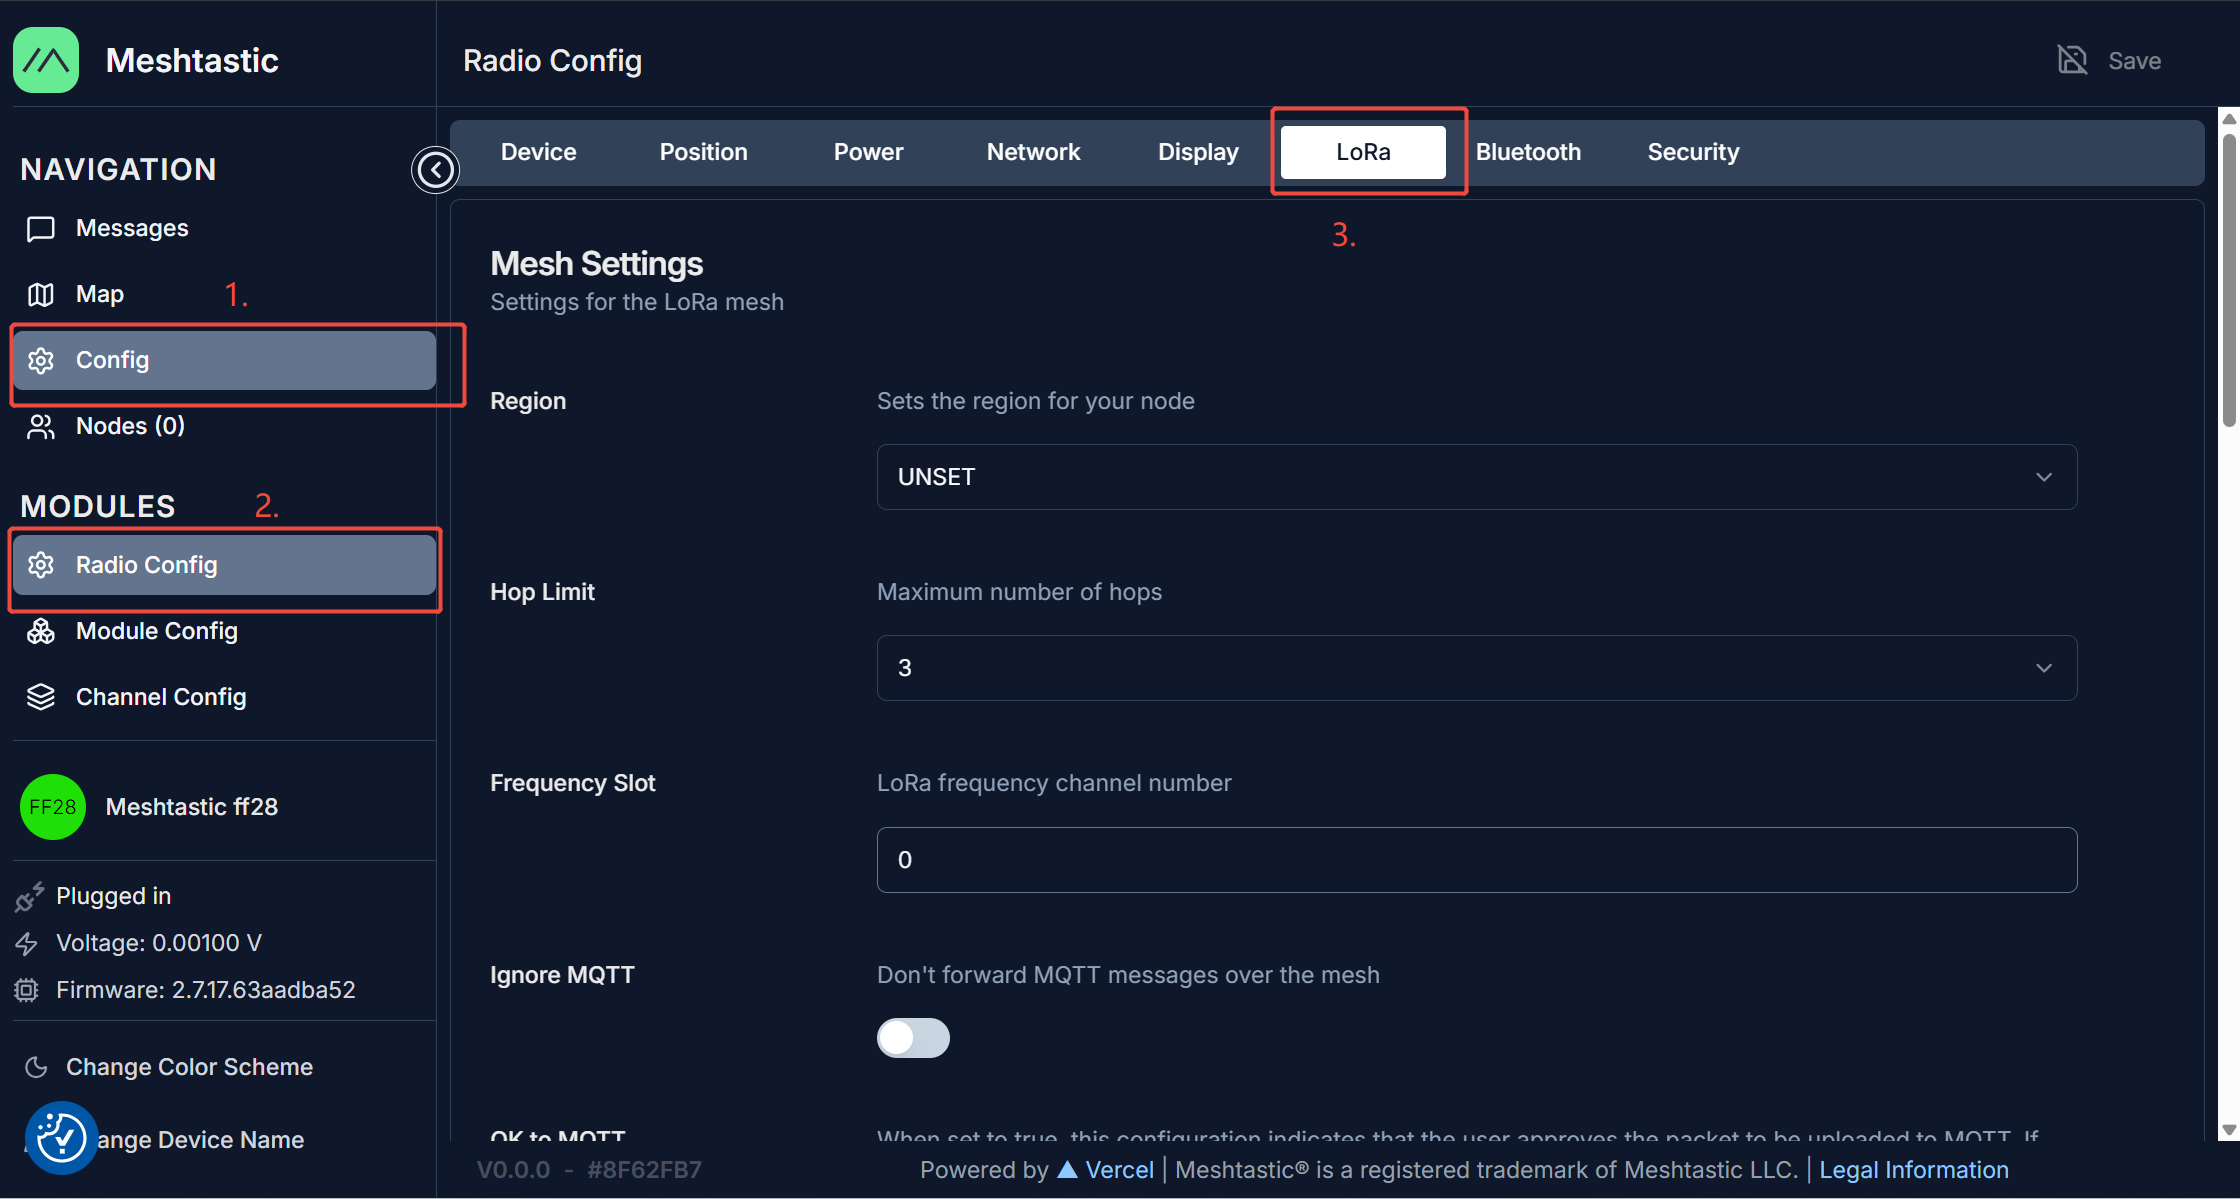
5.Set 'Region' and 'Modem Preset' to 'US' and 'Short Turbo' respectively:
Actually, there are no strict restrictions on the Region and Modem Preset configurations, but you must ensure that the Region and Modem Preset settings of the two Mesh node devices you have are consistent. In this document, we use 'US' and 'Short Turbo' as examples.
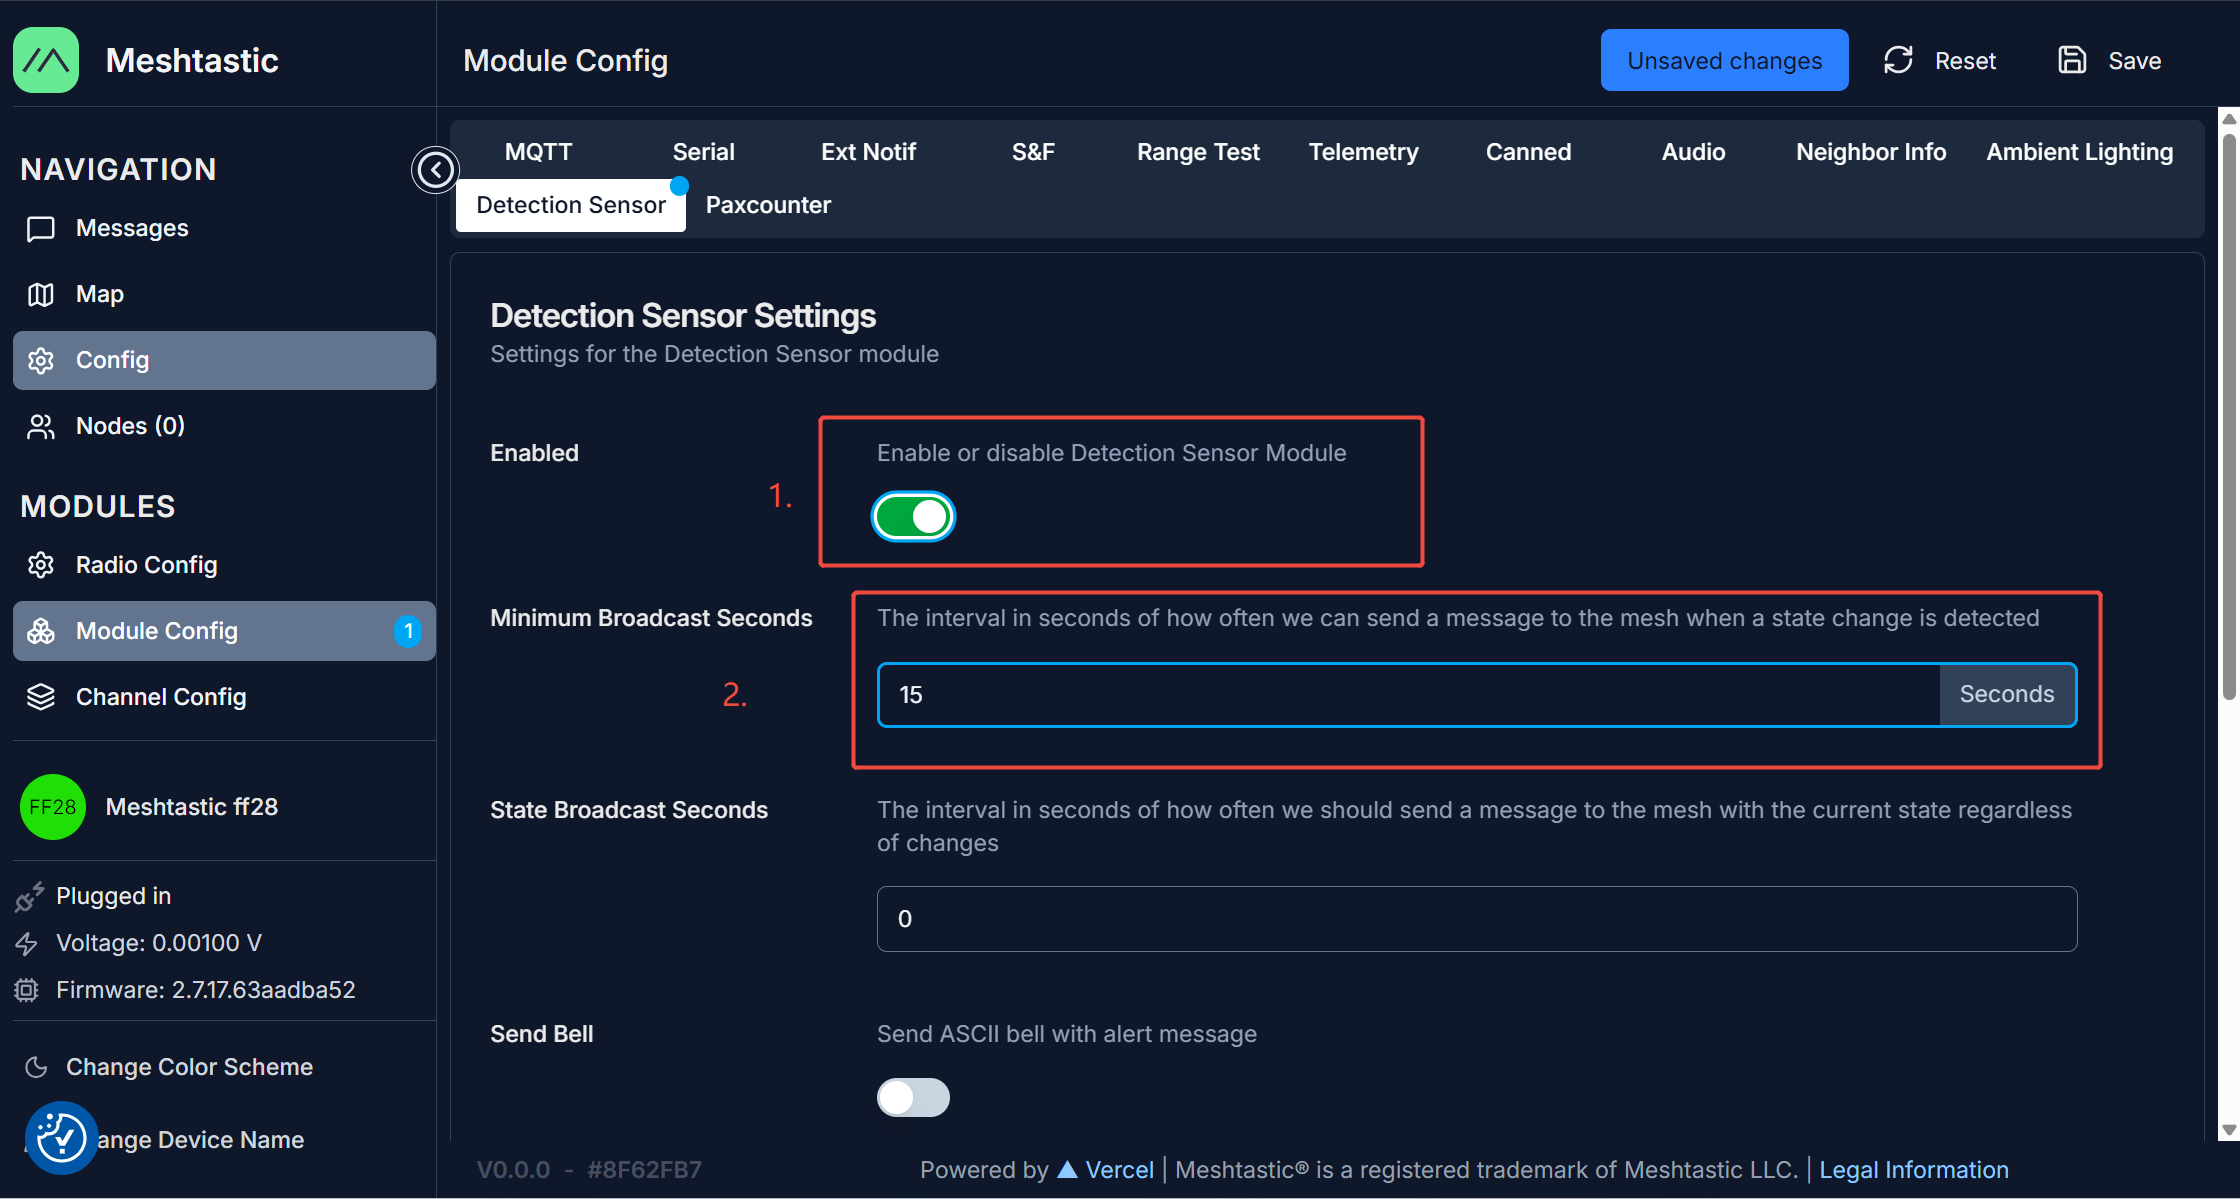
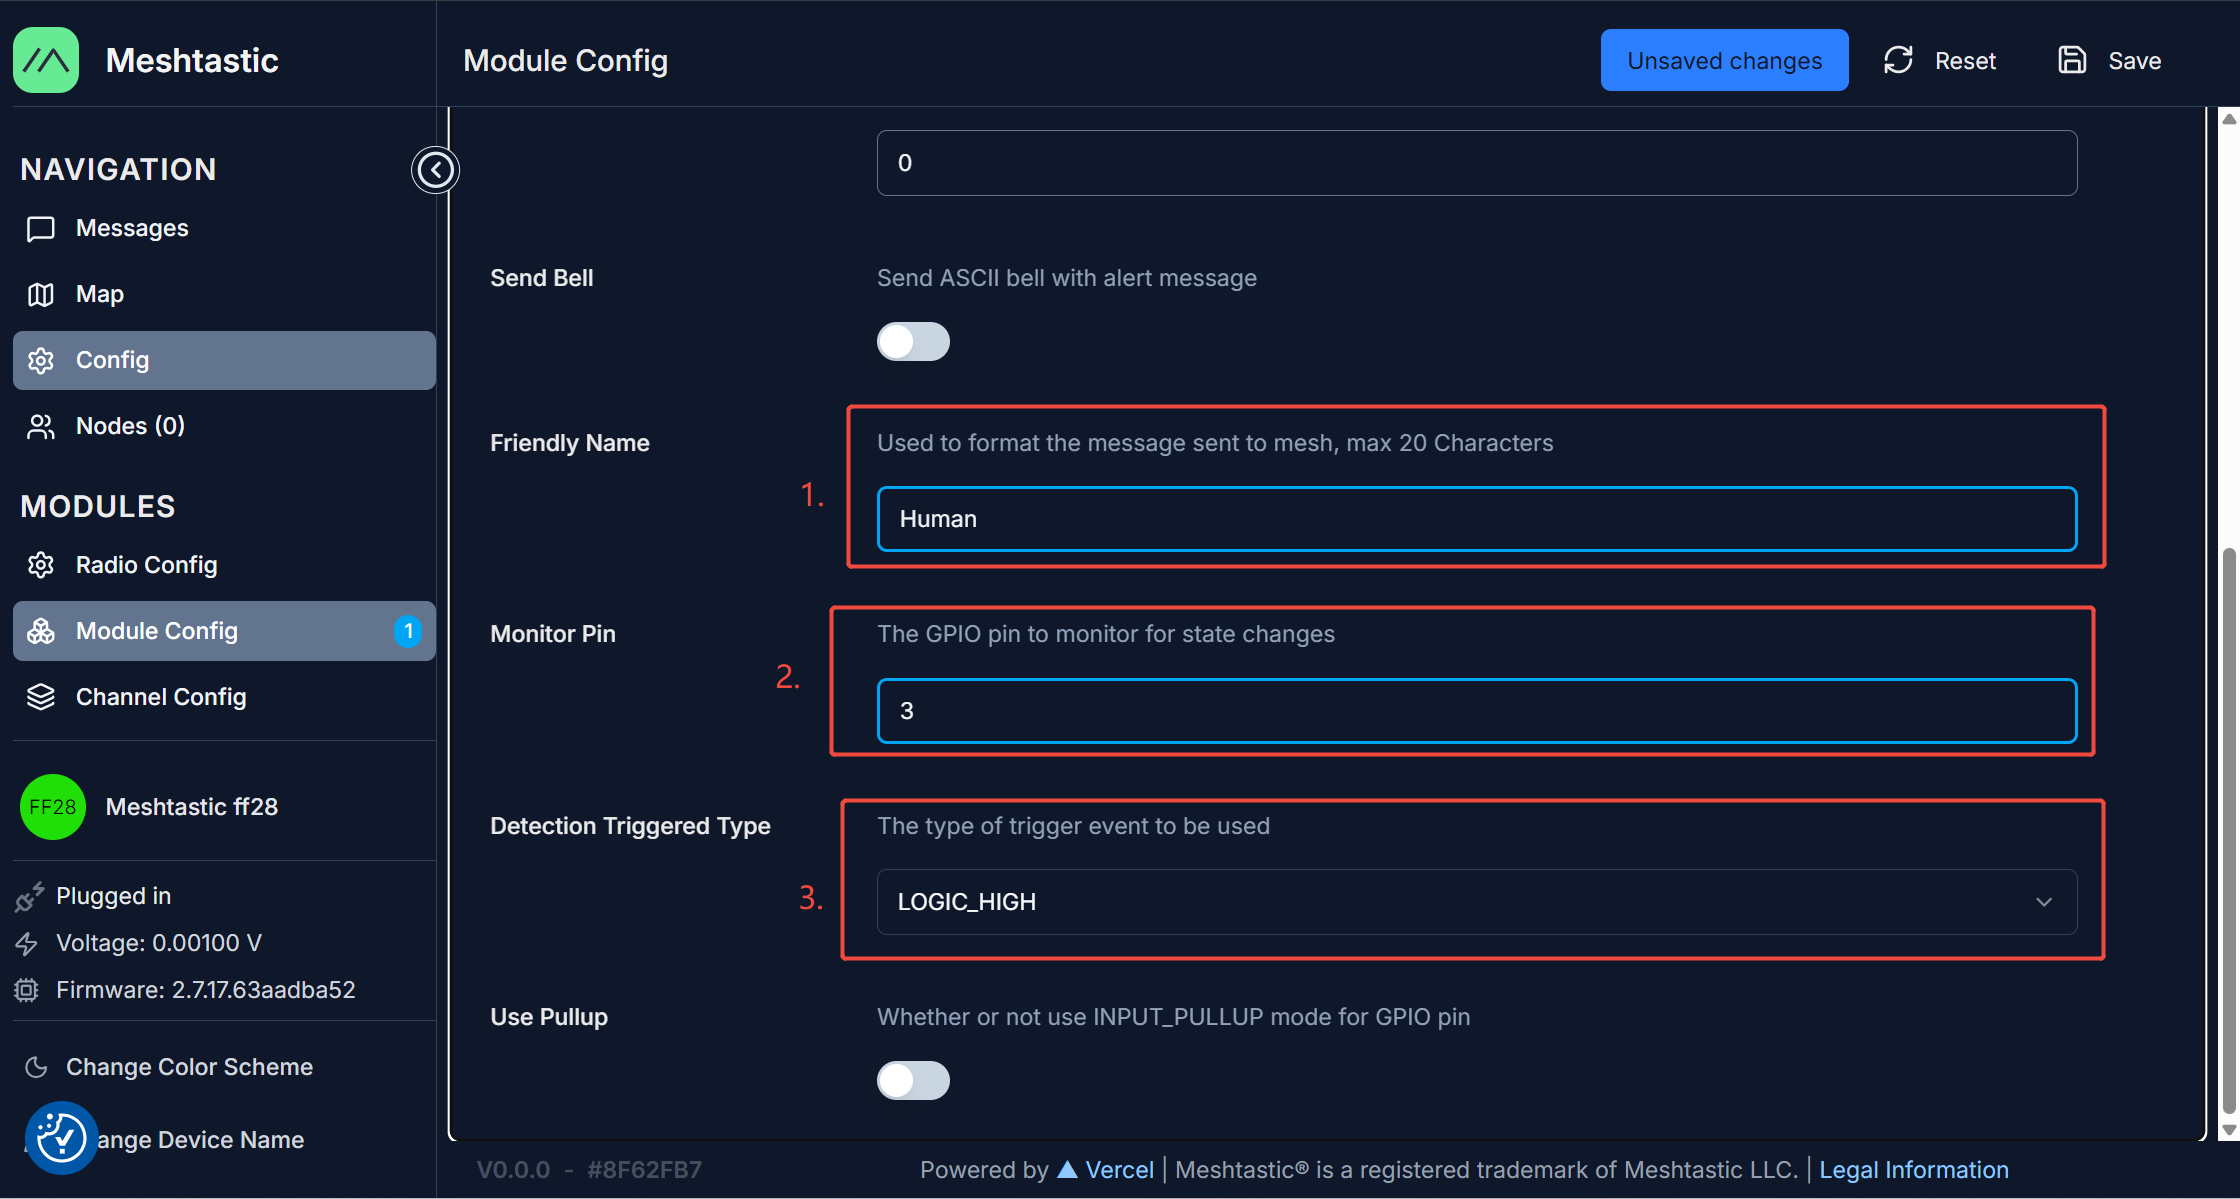
6.Now, let's go to 'Module Config' and select 'DetectionSensor'.
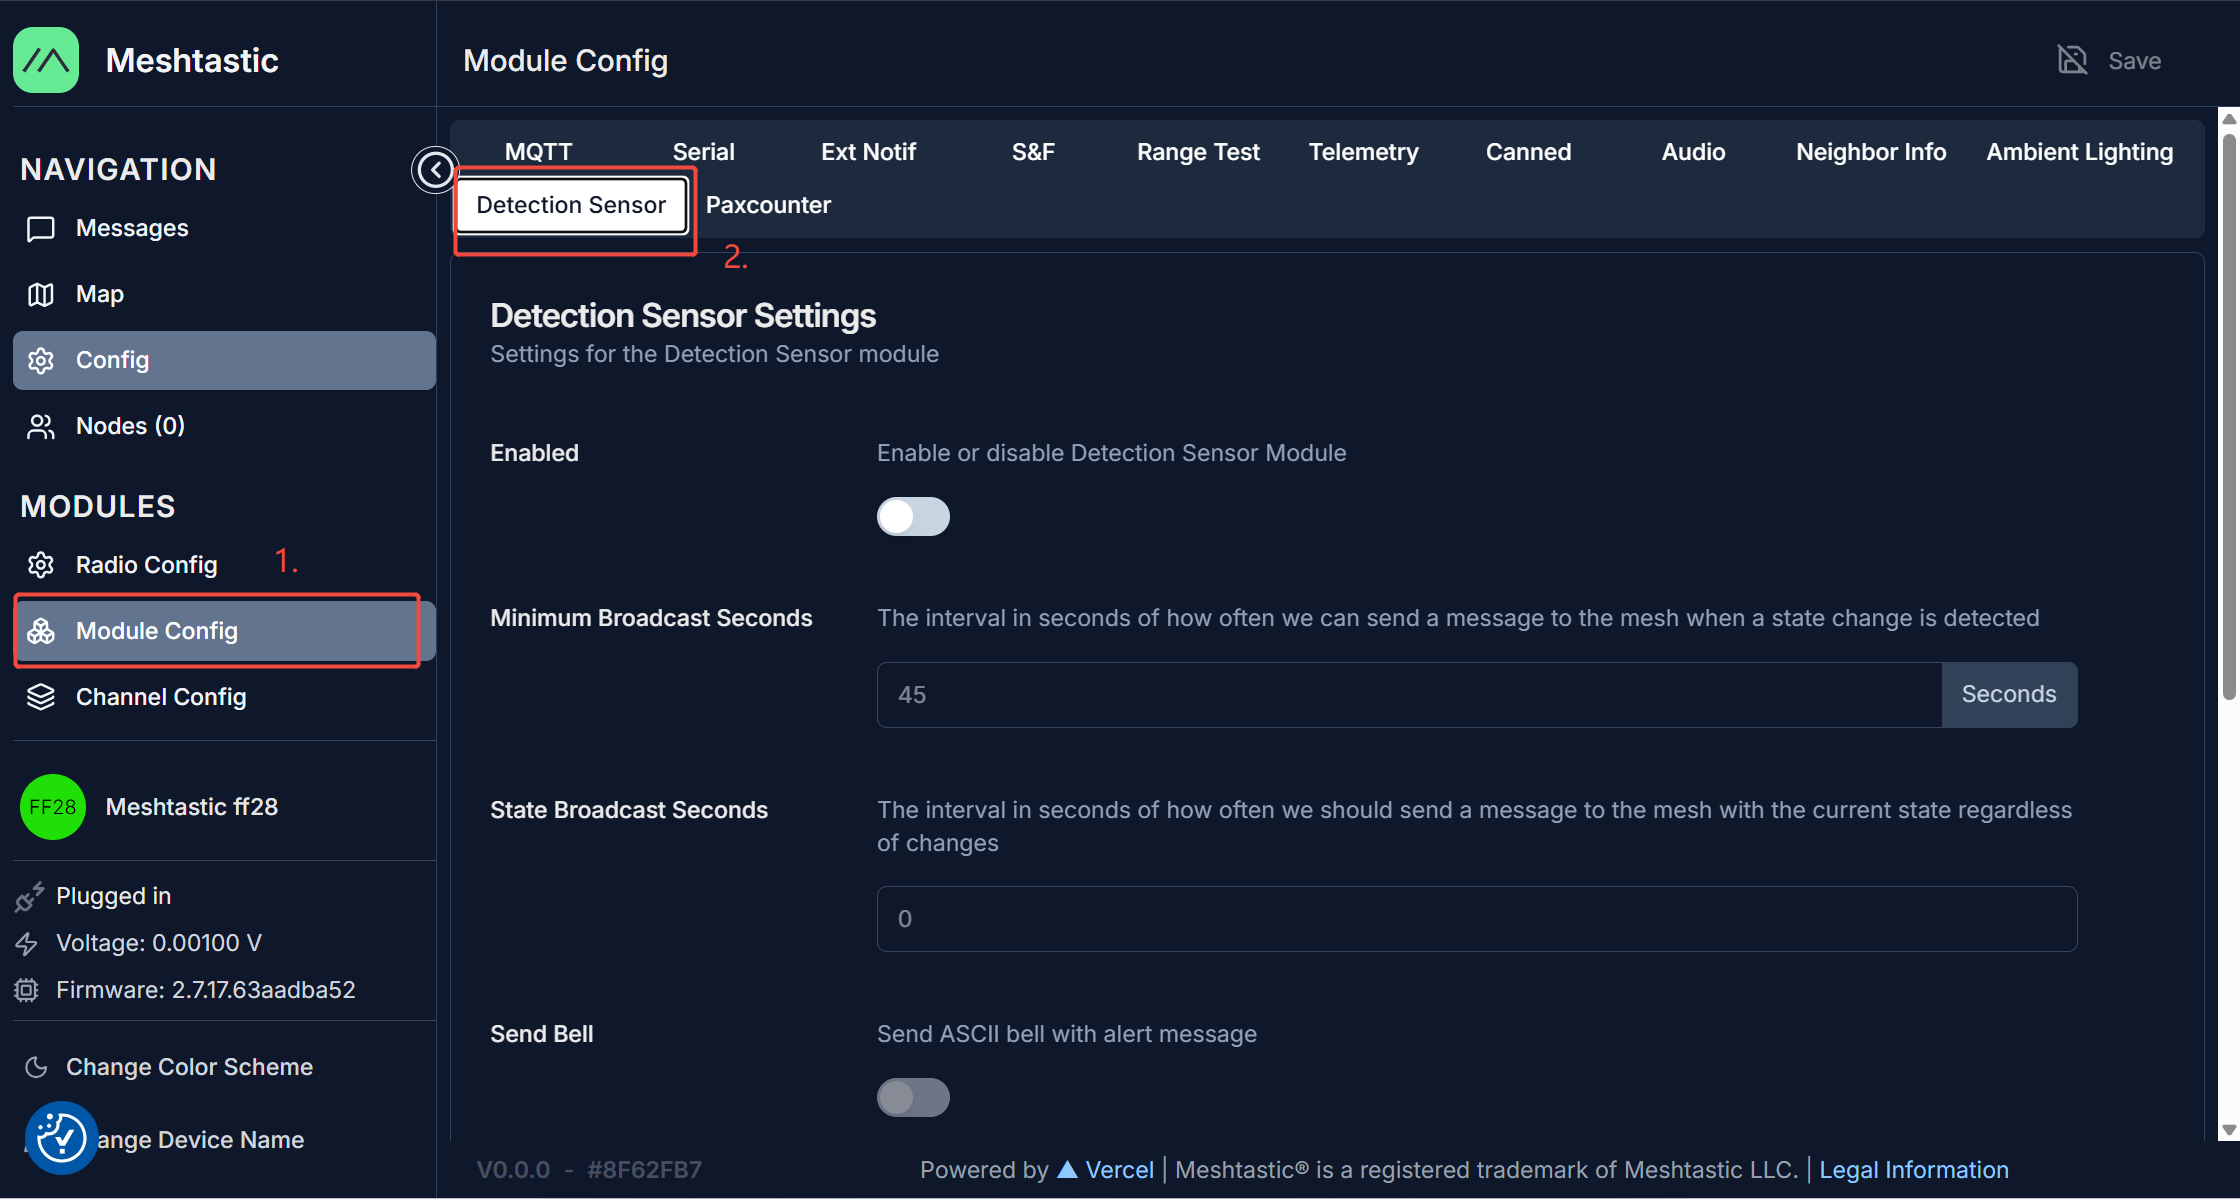
7.Enable this module, and then set the transmission interval to 15 seconds.
8.Friendly Name is set to 'Human', Monitor Pin is set to '3', and Detection Triggered Type is set to 'LOGIC_HIGH'.
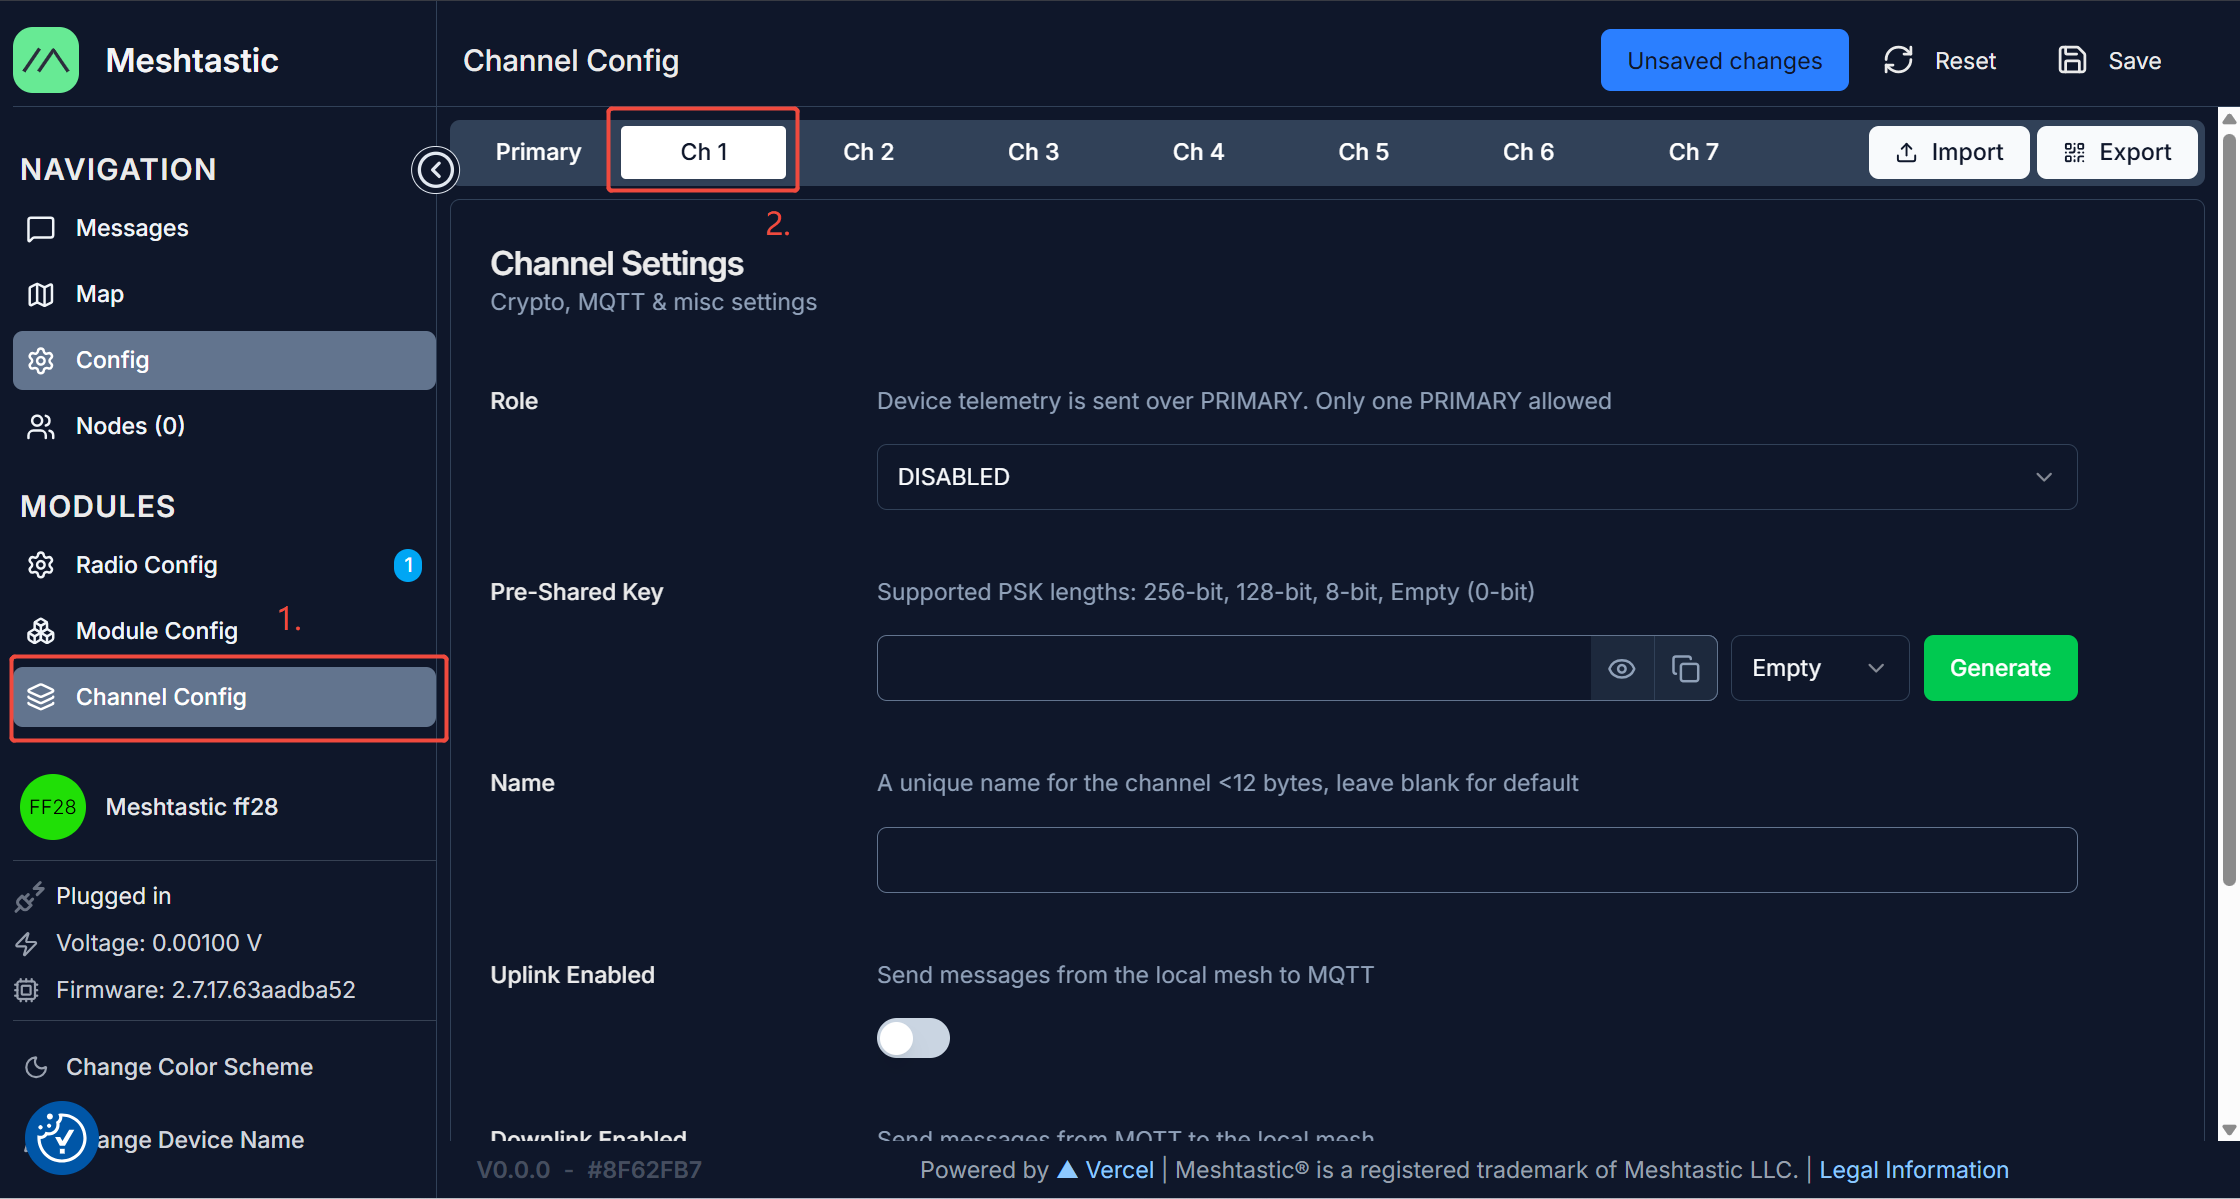
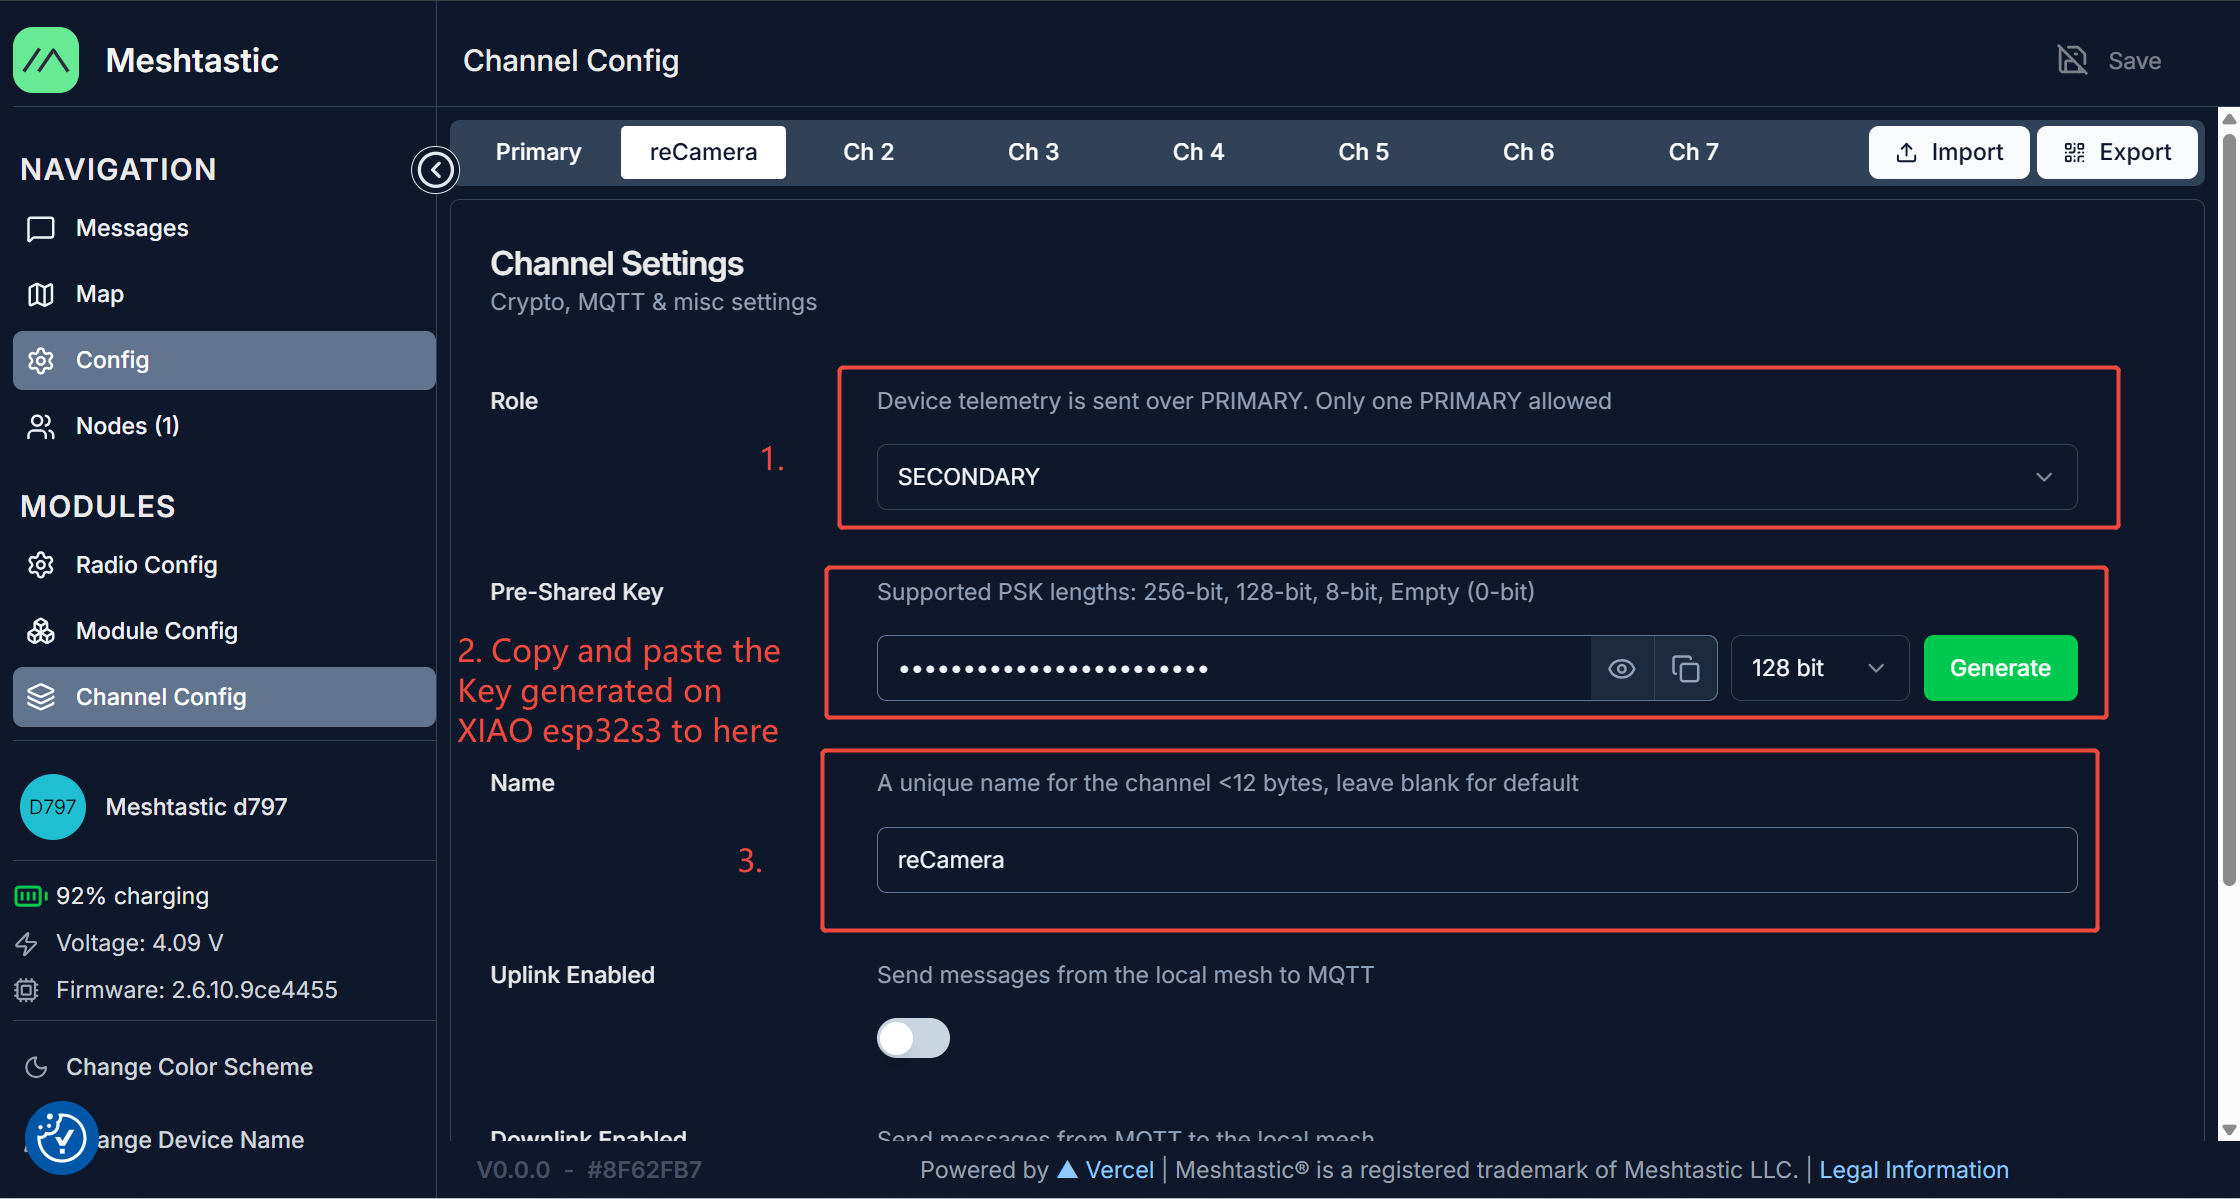
9.Now, let's go to 'Channel Config' and select 'Ch1'.
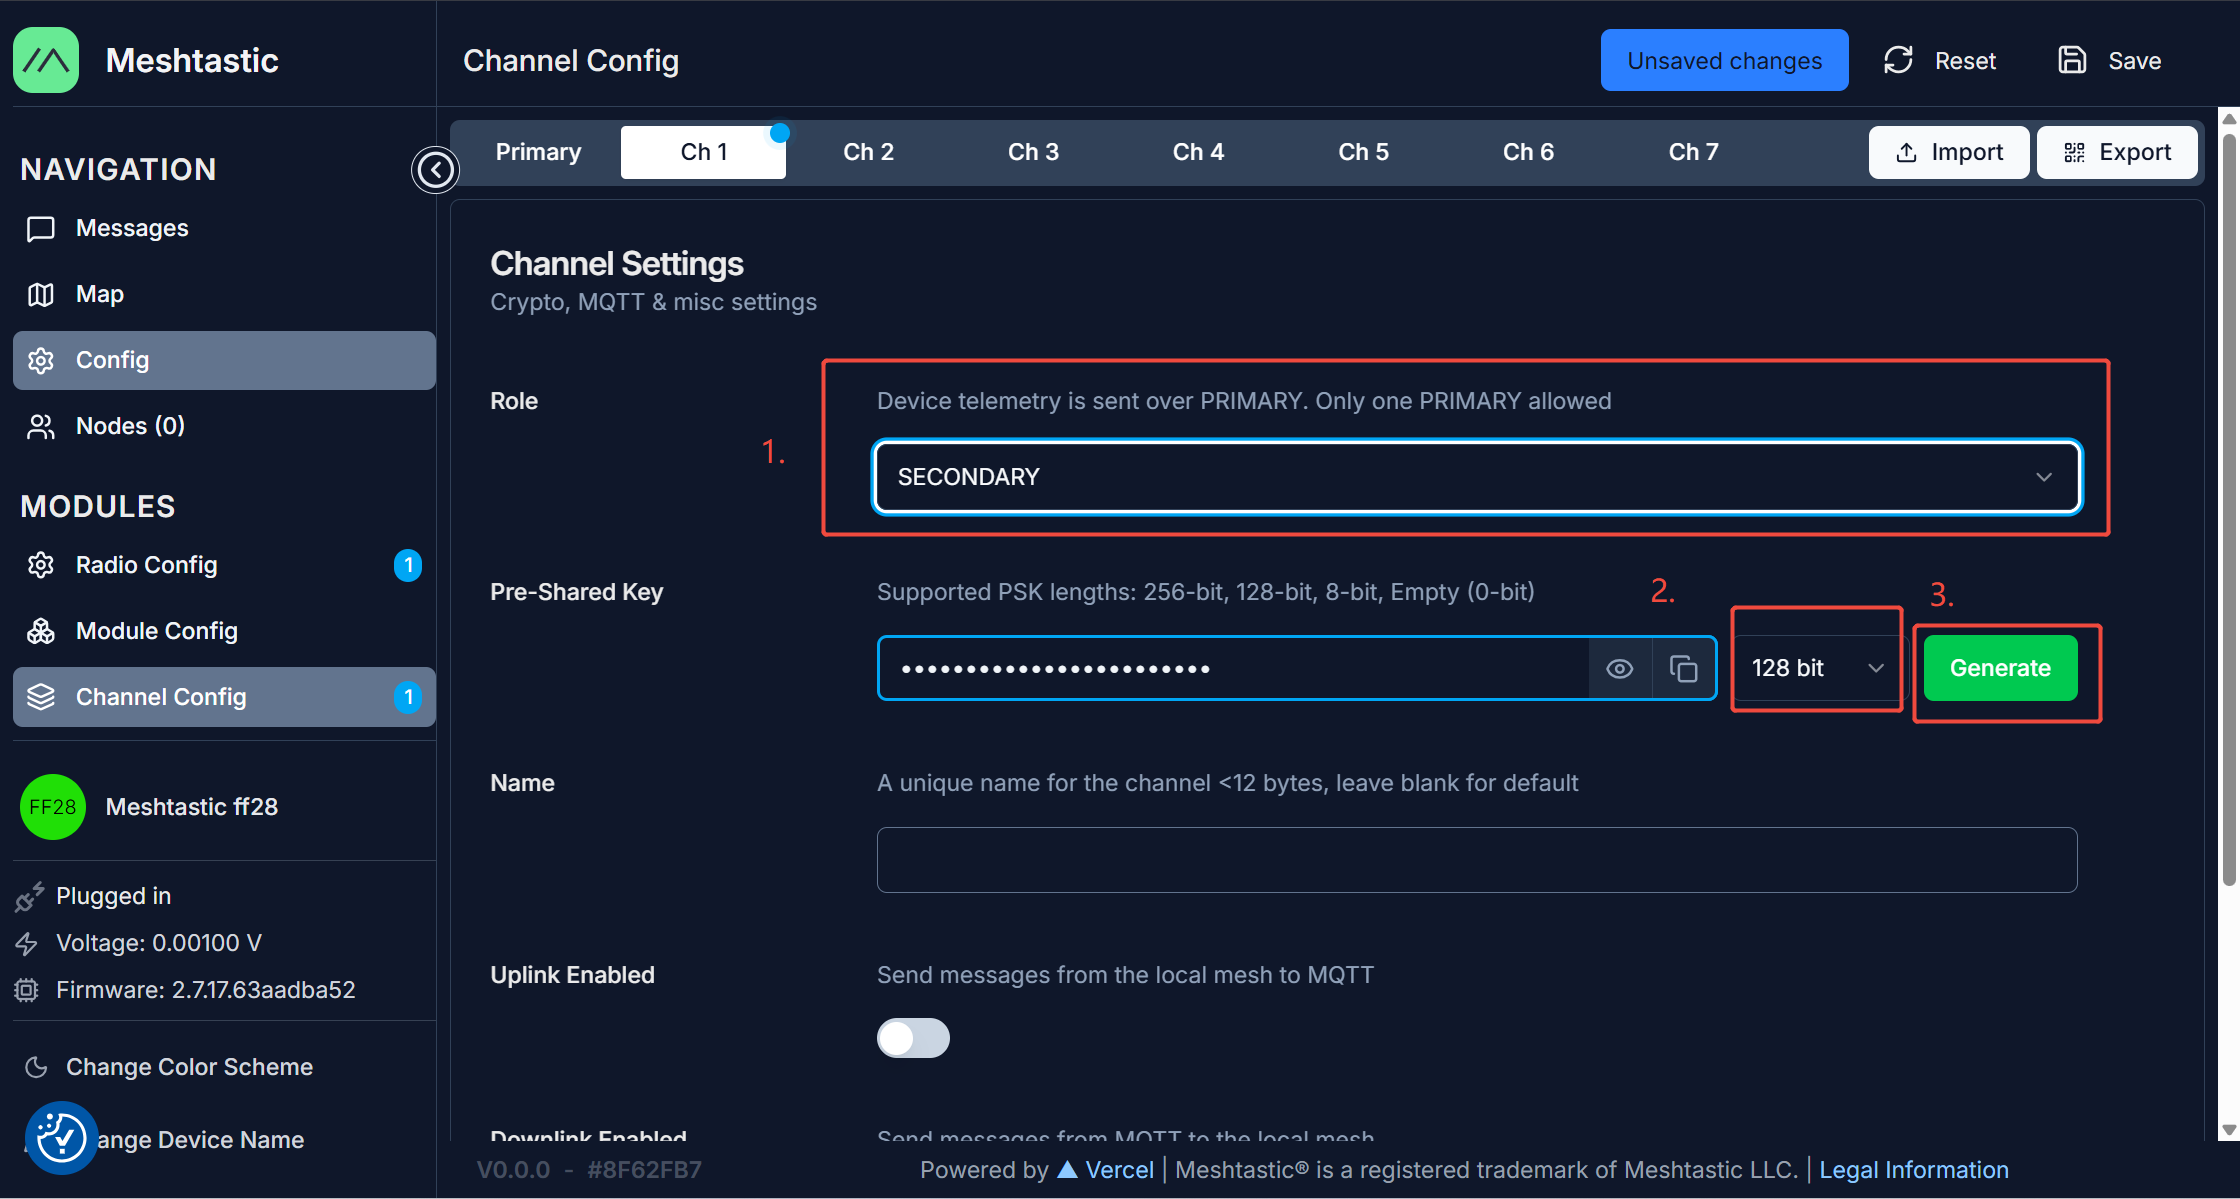
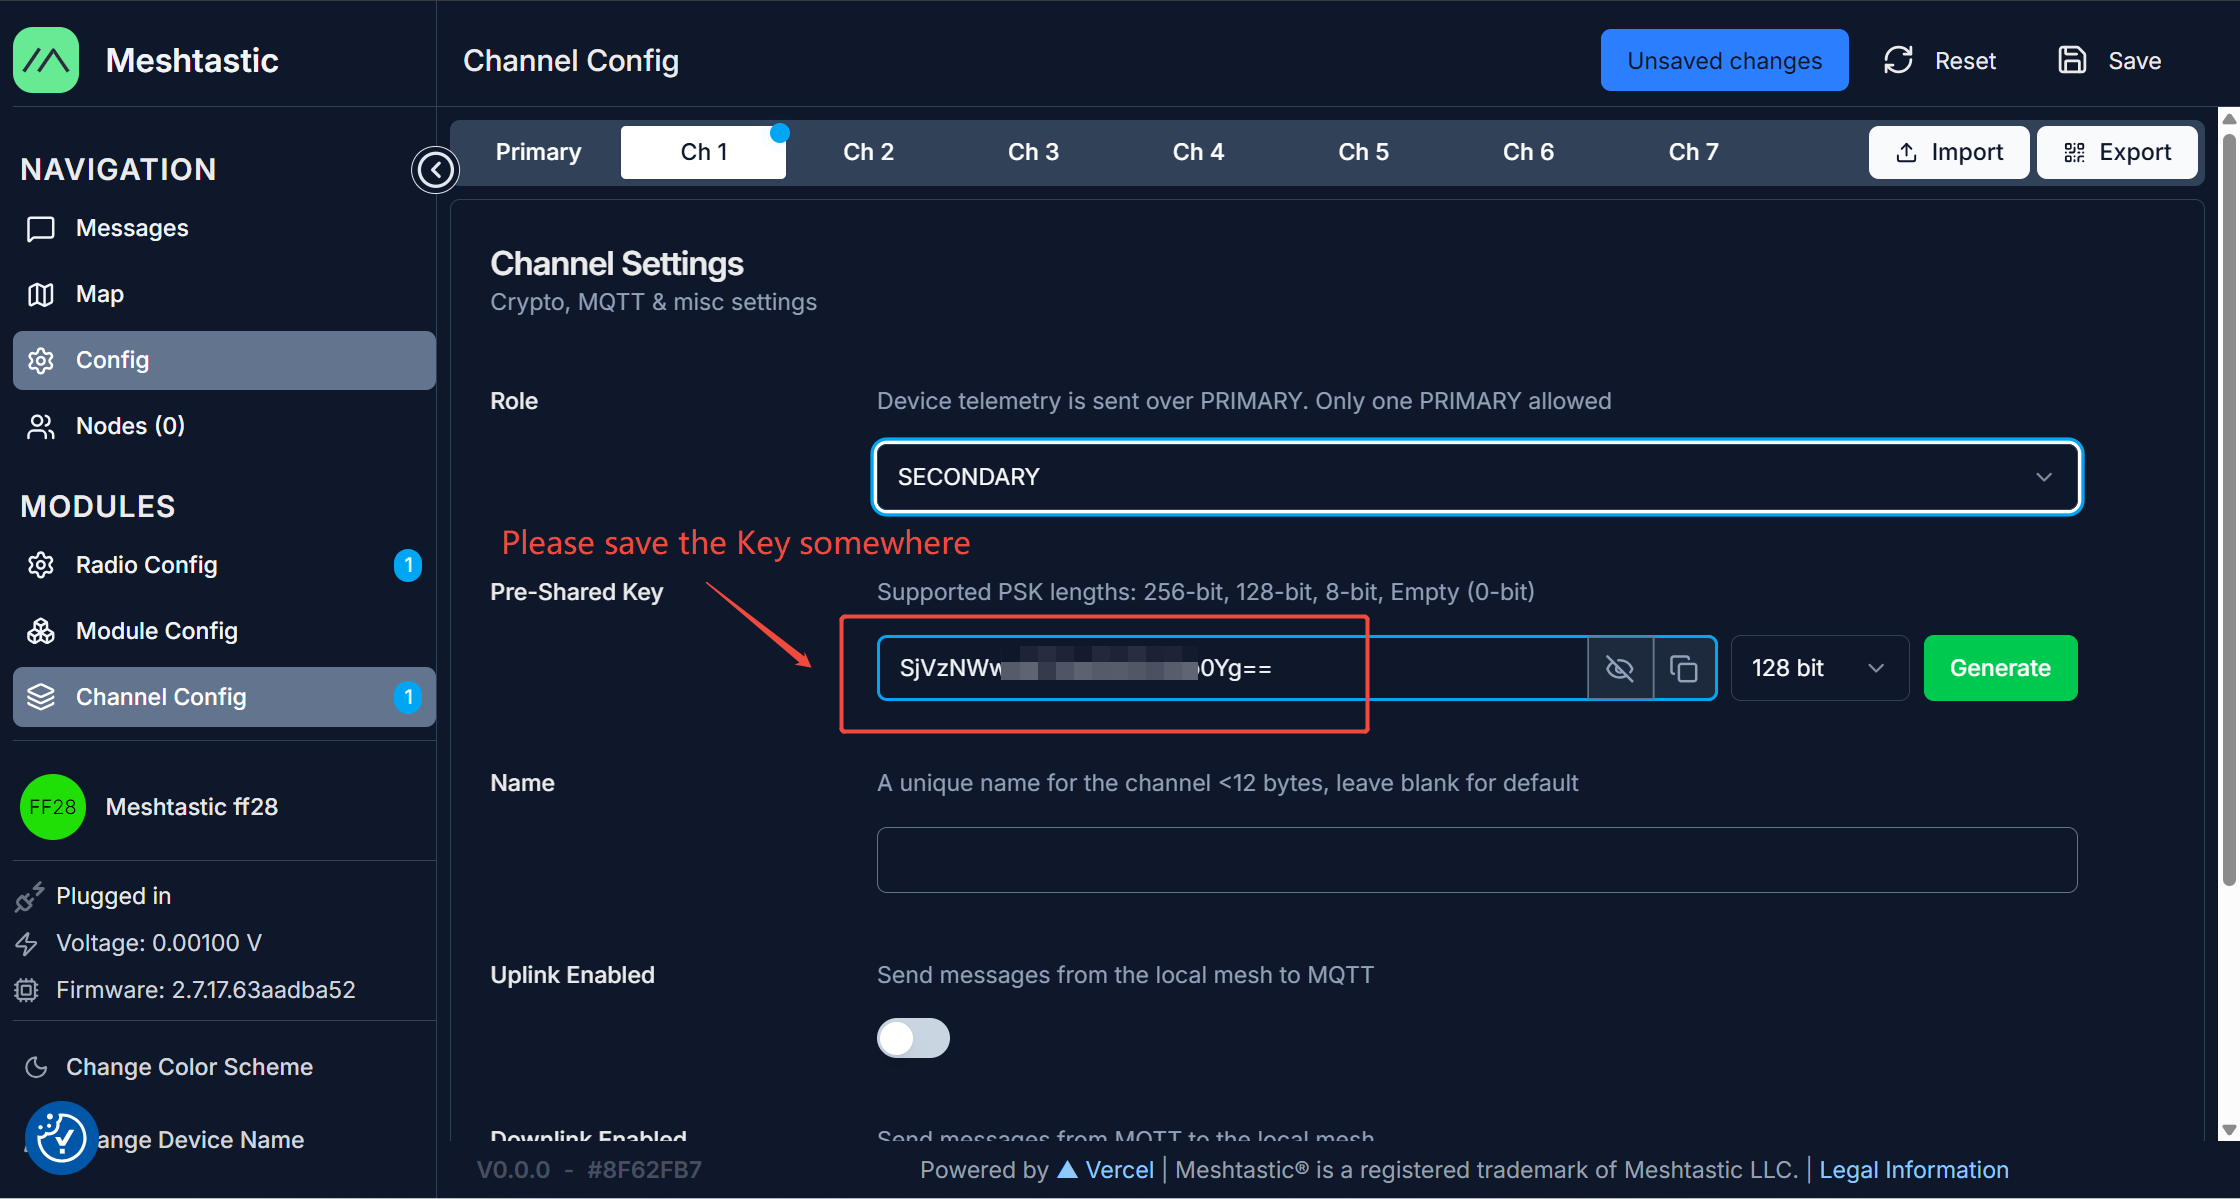
10.Set 'Role' to 'SECONDARY' and select '128 bit' for Pre-Shared Key format. Then click 'Generate' to create a random 128-bit Pre-Shared Key. Remember this Key, and save it to a text file for later use. Also, set the Name to 'reCamera'.
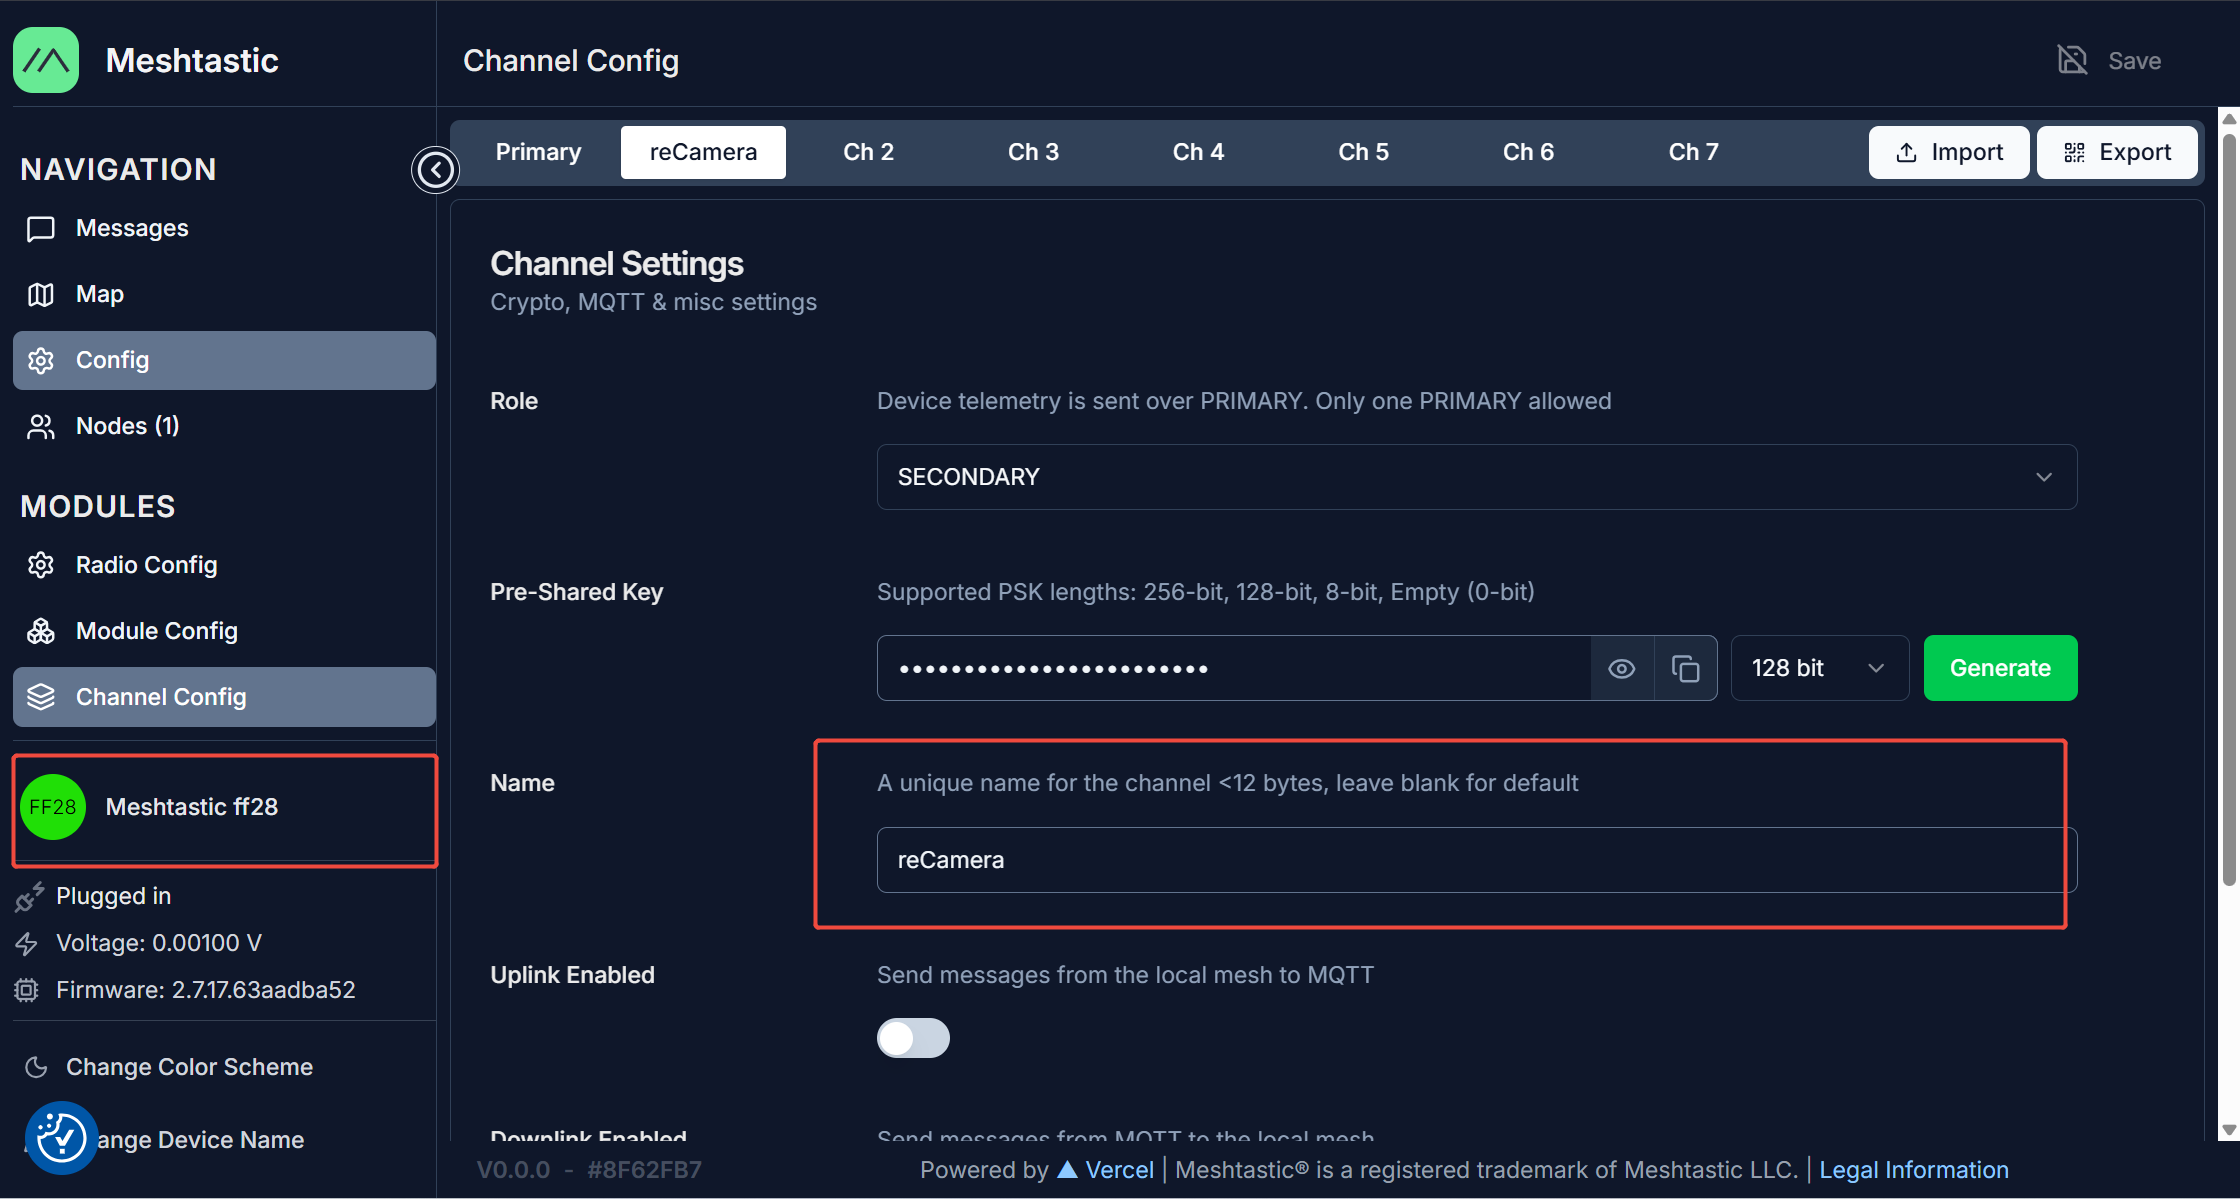
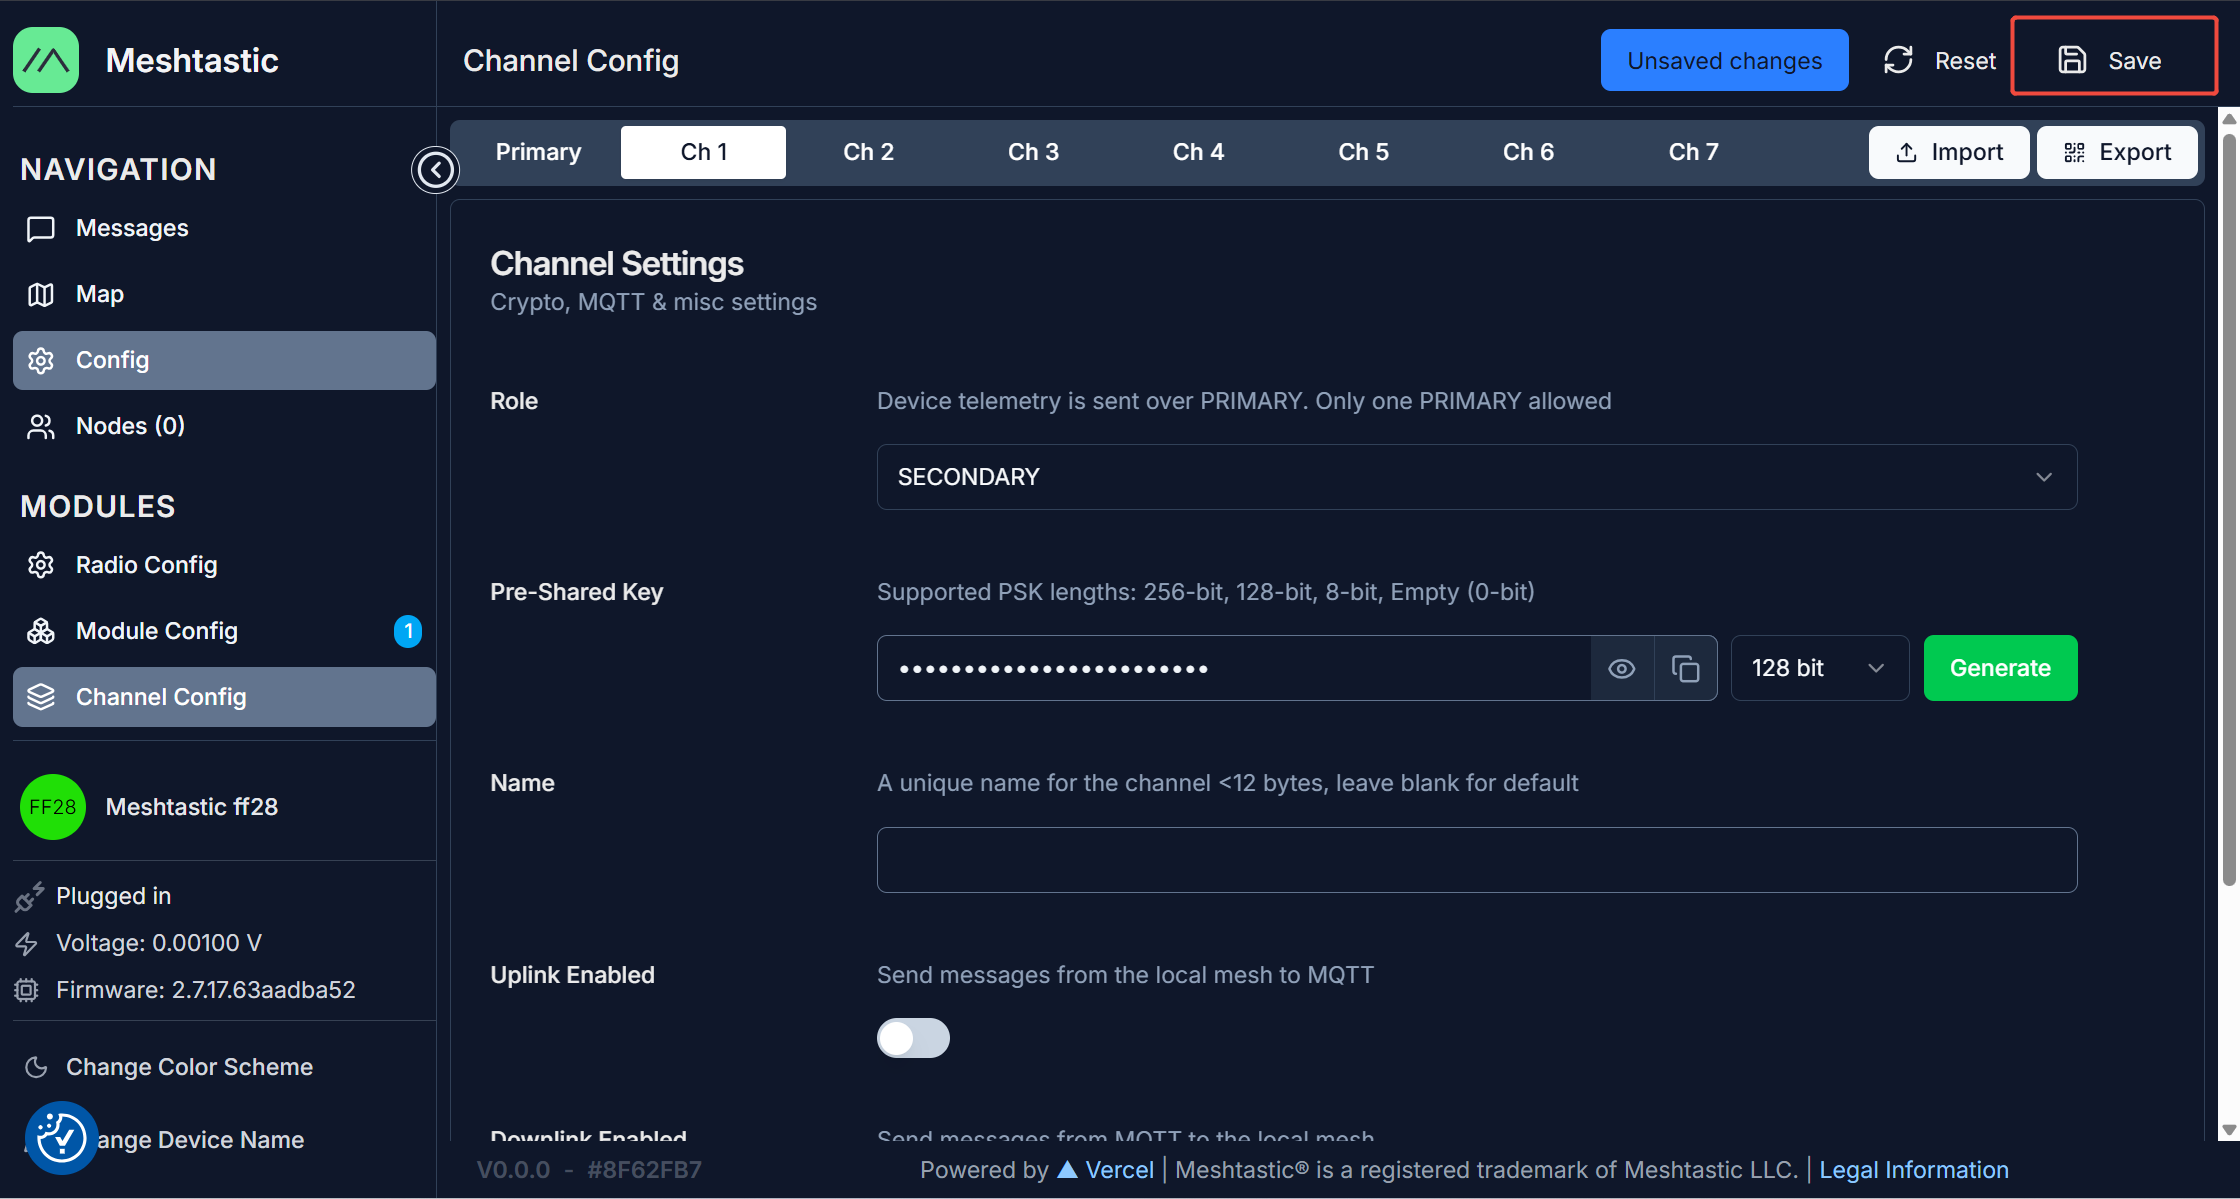
11.Finally, click 'Save' to save the configuration. Wait for the device to save the configuration and then restart.
SjVzNWwzNTEwQWZUWlo0Yg==
Wio Tracker L1(Meshtastic Node) Configuration
The configuration for Wio Tracker is simliar about, we still useMeshtastic Web Flasherselect 'Wio Tracker L1' and burn Official Meshtastic Firmware rather thant the custom firmware you downloaded about. Please refer to Wio Tracker L1 Firmware Flashing Tutorial
Same as above, we set the Region and Modem Preset to 'US' and 'Short Turbo' for Wio Tracker L1. Then, enable its Channel1 and set the Pre-Shared Key to the 128-bit Key you generated above.
Assembly
Same as above, we connect GPIO490(Green wire) on reCamera to D2 and GND to GND pin on XIAO esp32s3. Then, the system will run.
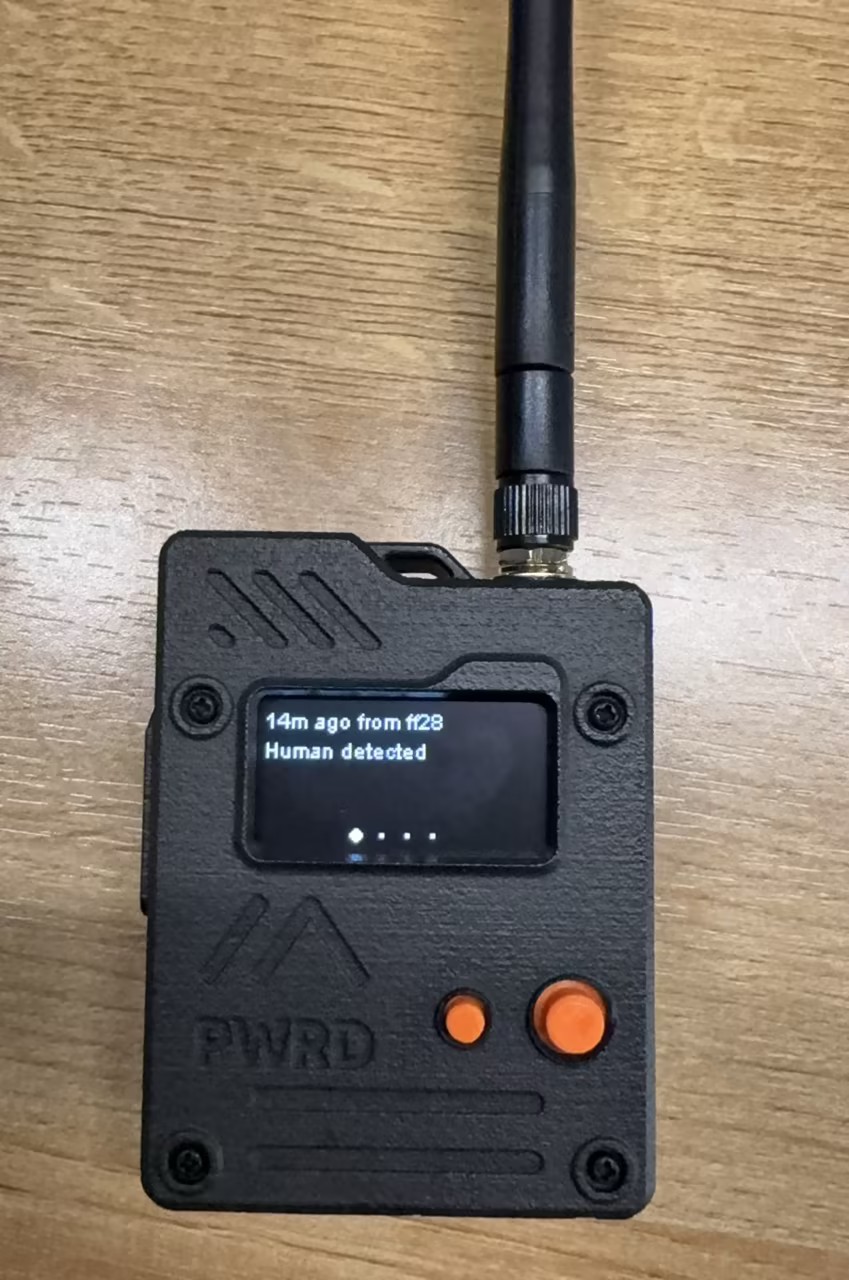
When the connection is established, you will hear a sound from Wio Tracker L1, and the display on Wio Tracker L1 will show 'Human detected' text.
Tech Support & Product Discussion
Thank you for choosing our products! If you need guidance on specific customization goals or want to extend the workflow further, feel free to reach out. We are here to provide you with different support to ensure that your experience with our products is as smooth as possible. We offer several communication channels to cater to different preferences and needs.