AI NVR with reServer Jetson
Introduction
With the advancement of artificial intelligence technology, traditional video surveillance systems are evolving towards greater intelligence. AI NVR (Network Video Recorder) combines artificial intelligence with video surveillance technology, enabling not only the recording of video but also real-time analysis, recognition, and processing of video content. This enhances the efficiency and accuracy of security monitoring. This article will introduce how to implement an AI NVR using the NVIDIA Jetson platform.
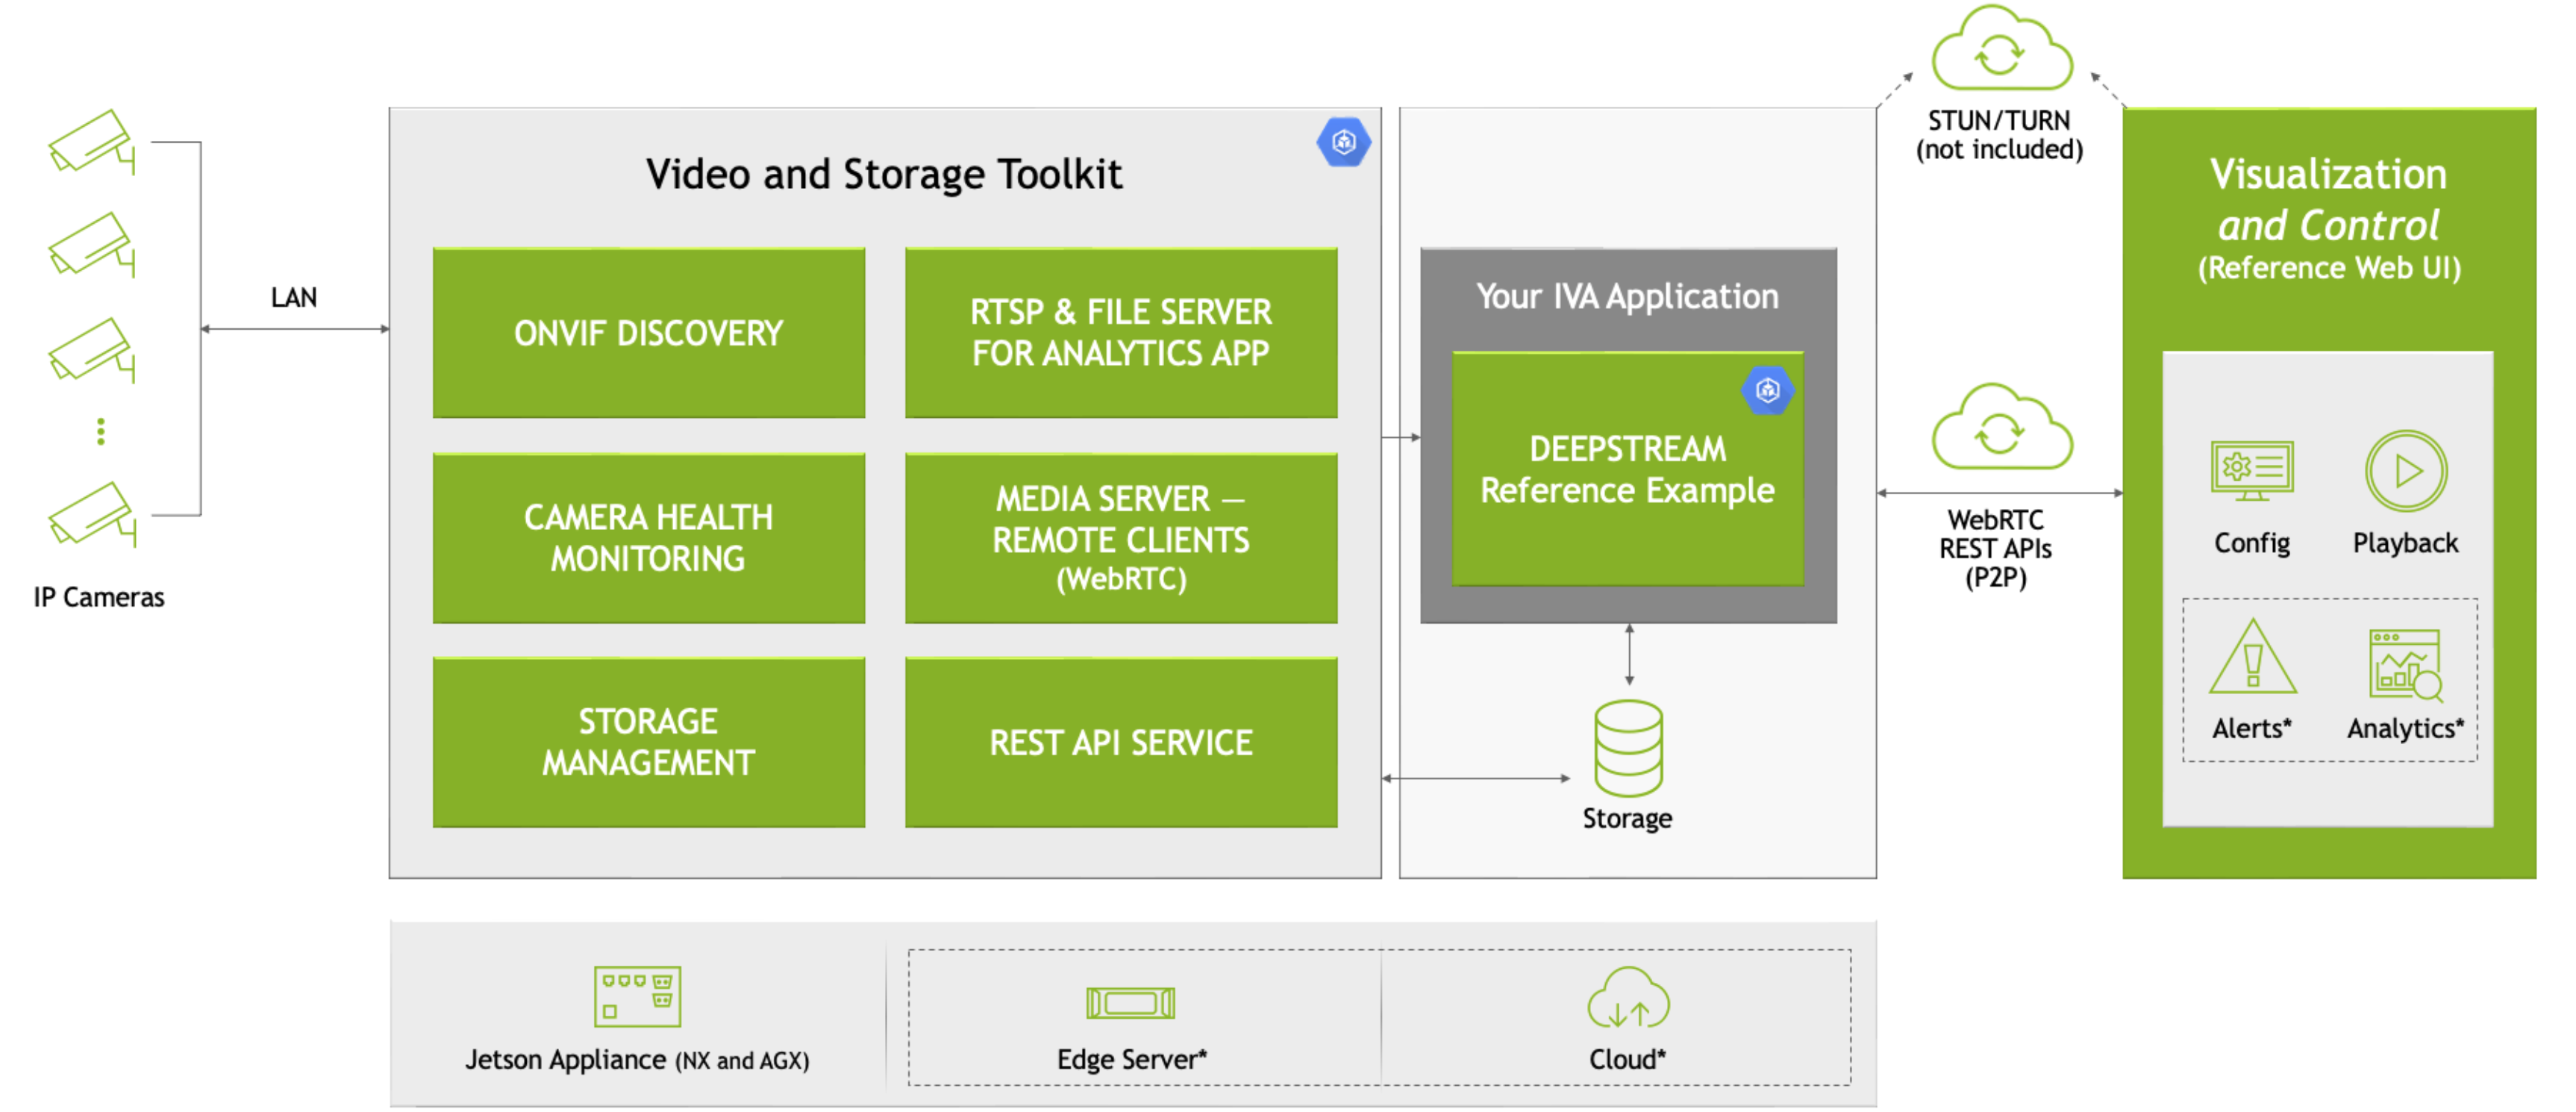
In this wiki, we will use Nvidia VST and other microservices from the Jetson Platform Service to quickly deploy a local AI NVR on a Jetson device. Here, we use VST to add cameras, employ the DeepStream pedestrian detection model to detect objects, and display the detection results along with the original video stream on the VST video wall.
What is an AI NVR?
An AI NVR is a device that integrates video recording and artificial intelligence analysis functions. Unlike traditional NVRs, an AI NVR can automatically identify key events in video footage, such as intrusions or missing objects, and even trigger alarms based on predefined rules. This level of intelligence relies on powerful computing capabilities and deep learning algorithms.
Why Choose the reServer (NVIDIA Jetson) Platform?
NVIDIA Jetson is a high-performance, low-power embedded computing platform, making it ideal for AI and deep learning applications. The Jetson platform is equipped with NVIDIA GPUs, which accelerate the deep learning inference process and support a wide range of AI tools and frameworks, such as TensorFlow and PyTorch.
reServer is an edge computing device based on the Nvidia Jetson platform. It features a compact design, passive cooling, 5x RJ45 GbE with PoE, 2x drive bays for 2.5" HDD/SSD, and a wealth of industrial interfaces, making it an ideal choice for edge AI IoT devices.
Prerequisites
- Jetson Orin device(with the jetpack 6.0 OS).
- IP Camera.
In this wiki, we will accomplish the following tasks using the reServer Industrial J4012, but you can also try using other Jetson devices.
We can follow the instructions in this wiki to flash the latest JetPack 6.0 system onto the reServer.

Getting Started
Hardware Connection
- Connect the Jetson device to the network, mouse, keyboard, and monitor.
- Connect the IP Camera to the network.
Of course, you can also remotely access the Jetson device via SSH over the local network.
Step1. Install nvidia-jetson-services
Open the terminal of Jetson device and enter:
sudo apt update
sudo apt install nvidia-jetson-services
Then we can find that there are many microservices in /opt/nvidia/jetson/services/.

Step2. Modify the ingress configuration
In the /opt/nvidia/jetson/services/ingress/config/ directory, create a new file named ai-nvr-nginx.conf and fill it with:
# specify you service discovery config here

location /emdx/ {
    rewrite ^/emdx/?(.*)$ /$1 break;
    proxy_set_header Host $host;
    proxy_set_header X-Real-IP $remote_addr;
    proxy_set_header X-Forwarded-For $proxy_add_x_forwarded_for;
    access_log /var/log/nginx/access.log timed_combined;
    proxy_pass http://emdx_api;
}

location /ws-emdx/ {
    rewrite ^/ws-emdx/?(.*)$ /$1 break;
    proxy_set_header Host $host;
    proxy_pass http://emdx_websocket;
    proxy_http_version 1.1;
    proxy_set_header Upgrade $http_upgrade;
    proxy_set_header Connection "upgrade";
}
Step 3. Modify the NVR data storage location (optional)
Open the file /opt/nvidia/jetson/services/vst/config/vst_storage.json and change the directory as needed.
{
    "data_path": "/home/seeed/VST/storage/data/",
    "video_path": "/home/seeed/VST/storage/video/",
    "total_video_storage_size_MB": 10000
}
Step 4. Start the VST service
The VST service depends on other services, so all dependent services need to be started together.
sudo systemctl start jetson-redis
sudo systemctl start jetson-ingress
sudo systemctl start jetson-vst
After the microservices start, the corresponding Docker containers will be created.

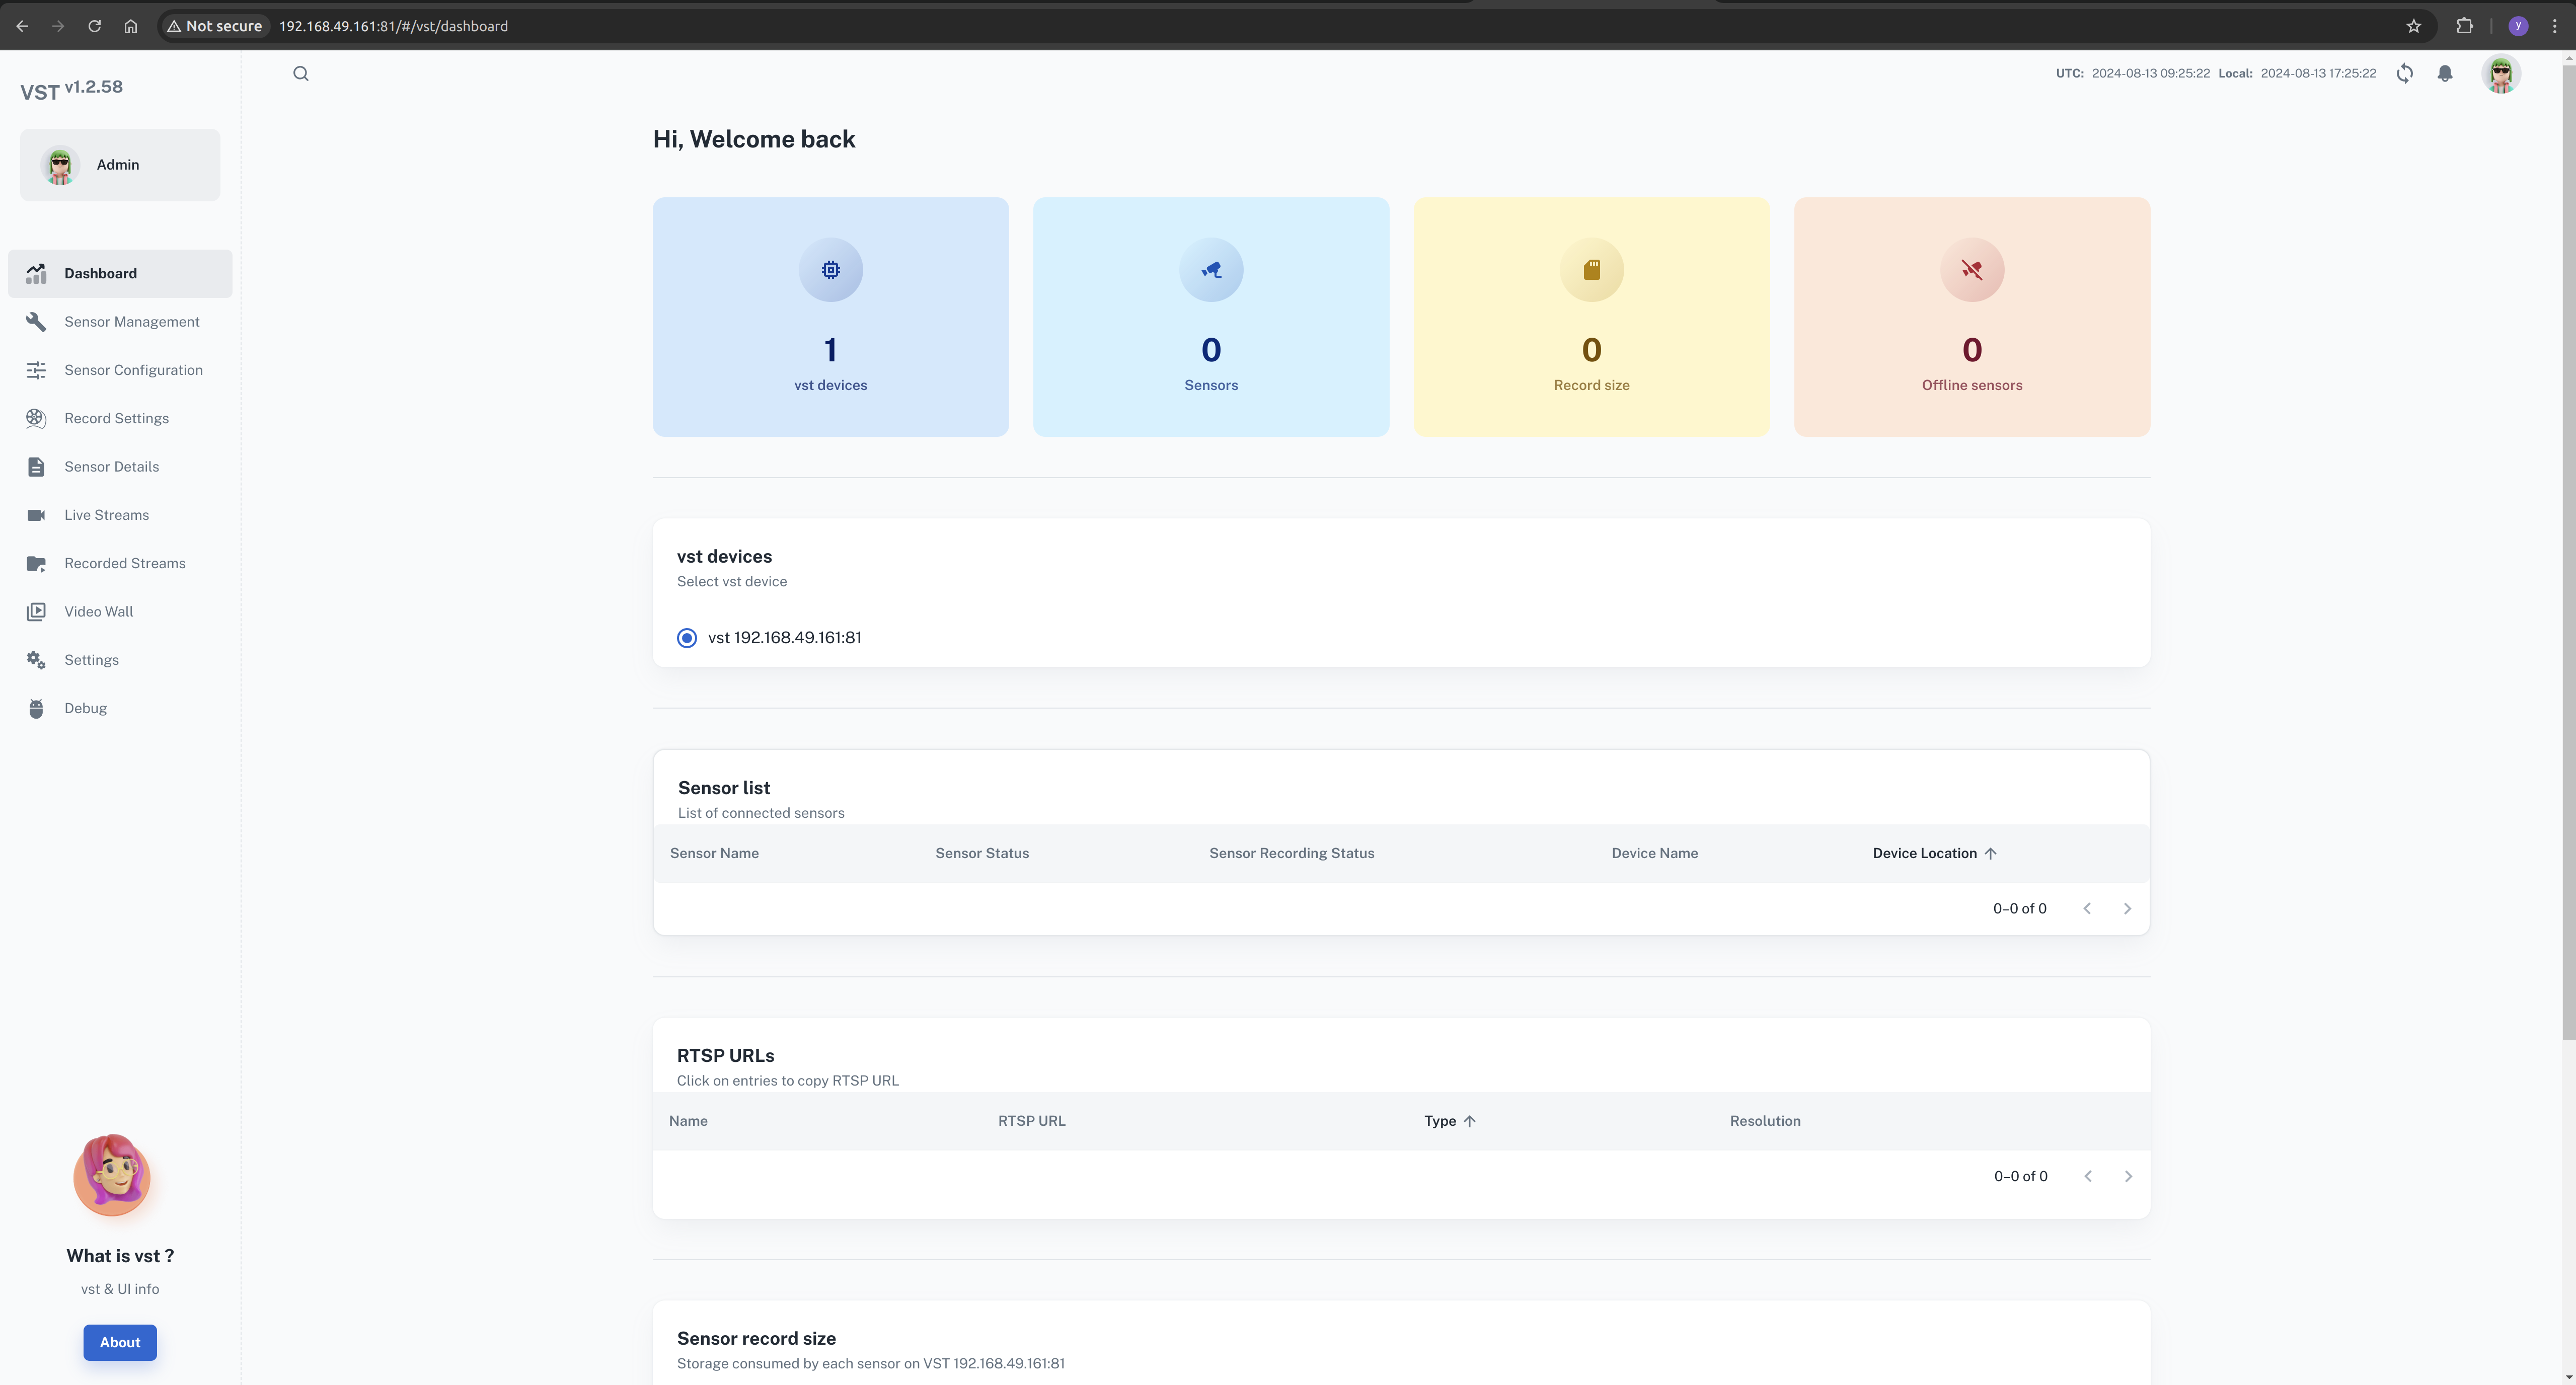
Now, we can open the VST web UI in the browser.
In the local network, open the browser and enter: http://<ip-of-jetson>:81/
Step5. Download the AI NVR configuration file
Open the browser and go to the download page.
Download(Top right corner) --> Browser(Diect Download)
cd <path-of-download>
unzip files.zip
cd files
tar -xvf ai_nvr-1.1.0.tar.gz
cd ai_nvr
Step6. Modify the DeepStream configuration file
We want to be able to see the model's inference results in real-time, so we need to modify DeepStream's input method. Here, we can configure it to output as RTSP.
Locate this configuration file and update its contents.
<path-of-ai_nvr>/config/deepstream/pn26/service-maker/ds-config-0_nx16.yaml
ds-config-0_nx16.yaml
################################################################################
# SPDX-FileCopyrightText: Copyright (c) 2024 NVIDIA CORPORATION & AFFILIATES. All rights reserved.
# SPDX-License-Identifier: MIT
#
# Permission is hereby granted, free of charge, to any person obtaining a
# copy of this software and associated documentation files (the "Software"),
# to deal in the Software without restriction, including without limitation
# the rights to use, copy, modify, merge, publish, distribute, sublicense,
# and/or sell copies of the Software, and to permit persons to whom the
# Software is furnished to do so, subject to the following conditions:
#
# The above copyright notice and this permission notice shall be included in
# all copies or substantial portions of the Software.
#
# THE SOFTWARE IS PROVIDED "AS IS", WITHOUT WARRANTY OF ANY KIND, EXPRESS OR
# IMPLIED, INCLUDING BUT NOT LIMITED TO THE WARRANTIES OF MERCHANTABILITY,
# FITNESS FOR A PARTICULAR PURPOSE AND NONINFRINGEMENT. IN NO EVENT SHALL
# THE AUTHORS OR COPYRIGHT HOLDERS BE LIABLE FOR ANY CLAIM, DAMAGES OR OTHER
# LIABILITY, WHETHER IN AN ACTION OF CONTRACT, TORT OR OTHERWISE, ARISING
# FROM, OUT OF OR IN CONNECTION WITH THE SOFTWARE OR THE USE OR OTHER
# DEALINGS IN THE SOFTWARE.
################################################################################

deepstream:
  nodes:
  - type: nvinfer
    # name of the primary inference must be 'pgie' for test app to route streams here
    name: pgie
    properties:
      config-file-path: "/ds-config-files/pn26/config_infer_primary_RN34_PN26_960x544_dla0_orin_unprune_nx.txt"
      model-engine-file: "/pn26-files/dla0_pn26_jp6_halfmem_bs4.engine"
      unique-id: 1
      # be sure to rename model-engine-file whenever batch-size is changed
      batch-size: 4
  - type: nvtracker
    name: tracker
    properties:
      ll-config-file: "/ds-config-files/pn26/config_tracker_NvDCF_PNv2.6_Interval_1_PVA.yml;/ds-config-files/pn26/config_tracker_NvDCF_PNv2.6_Interval_1_PVA.yml"
      ll-lib-file: "/opt/nvidia/deepstream/deepstream/lib/libnvds_nvmultiobjecttracker.so"
      sub-batches: "2:2"
      tracker-width: 960
      tracker-height: 544
  - type: nvmsgconv
    name: msgconv
    properties:
      payload-type: 1
  - type: nvmsgbroker
    name: msgbroker
    properties:
      config: "/ds-config-files/pn26/cfg_redis.txt"
      proto-lib: "/opt/nvidia/deepstream/deepstream/lib/libnvds_redis_proto.so"
      conn-str: "localhost;6379;test"
      topic: "test"
      sync: false
      async: false
  - type: queue
    name: checkpoint
  - type: nvmultistreamtiler
    name: tiler
    properties:
      width: 1280
      height: 720
  - type: nvdsosd
    name: osd
  - type: nvvideoconvert
    name: converter
  - type: tee
    name: tee
  - type: queue
    name: queue_tracker
  - type: queue
    name: queue_tee
  - type: queue
    name: queue_tiler
  - type: queue
    name: queue_msgconv
  - type: queue
    name: queue_converter
  - type: queue
    name: queue_osd
  - type: queue
    name: queue_sink
  - type: queue
    name: queue_msgbroker
  - type: nvvideoconvert
    name: converter1
  - type: nvrtspoutsinkbin
    name: sink
    properties:
      rtsp-port: 8555
      sync: false
  - type: sample_video_probe.sample_video_probe
    name: osd_counter
    properties:
      font-size: 15
  edges:
    pgie: [queue_tracker, osd_counter]
    queue_tracker: tracker
    tracker: queue_tee
    queue_tee: tee
    tee: [queue_tiler, queue_msgconv]
    queue_tiler: tiler
    tiler: queue_converter
    queue_converter: converter
    converter: queue_osd
    queue_osd: osd
    osd: queue_sink
    queue_sink: converter1
    converter1: sink
    queue_msgconv: msgconv
    msgconv: queue_msgbroker
    queue_msgbroker: msgbroker
Please note the model of your Jetson device. In this case, the Orin Nx 16GB module is being used. If you are using a different model, please locate the corresponding configuration file and make the necessary modifications.
Add the WDM_WL_NAME_IGNORE_REGEX environment variable under SDR in compose file. Here, My Jetson device is reServer J4012 which powerd by Orin Nx 16GB, so I need to edit this compose file:
<path-of-ai_nvr>/compose_nx16.yaml
...
WDM_CONSUMER_GRP_ID: sdr-deepstream-cg
WDM_CLUSTER_CONTAINER_NAMES: '["deepstream", "vst"]'
WDM_WL_NAME_IGNORE_REGEX: ".*deepstream.*"
...
Step7. Start the AI NVR application
In the Jetson terminal, enter the appropriate command to start the AI NVR application.
cd <path-of-download>/files/ai_nvr

# Orin AGX:
# sudo docker compose -f compose_agx.yaml up -d --force-recreate
# Orin NX16:
sudo docker compose -f compose_nx16.yaml up -d --force-recreate
# Orin NX8:
# sudo docker compose -f compose_nx8.yaml up -d --force-recreate
# Orin Nano:
# sudo docker compose -f compose_nano.yaml up -d --force-recreate
During the startup process, the application will create additional Docker containers, such as DeepStream.

Setp8. Configure the local AI NVR through the web UI
At this point, we have successfully installed and started the AI NVR application on the Jetson device. The next step is to configure the camera through the web UI.
In the local network, open the browser and enter: http://<ip-of-jetson>:30080/vst/
Manually configure the IP camera and Deepstream output video stream.
Sensor Management --> Add device manually --> Submit
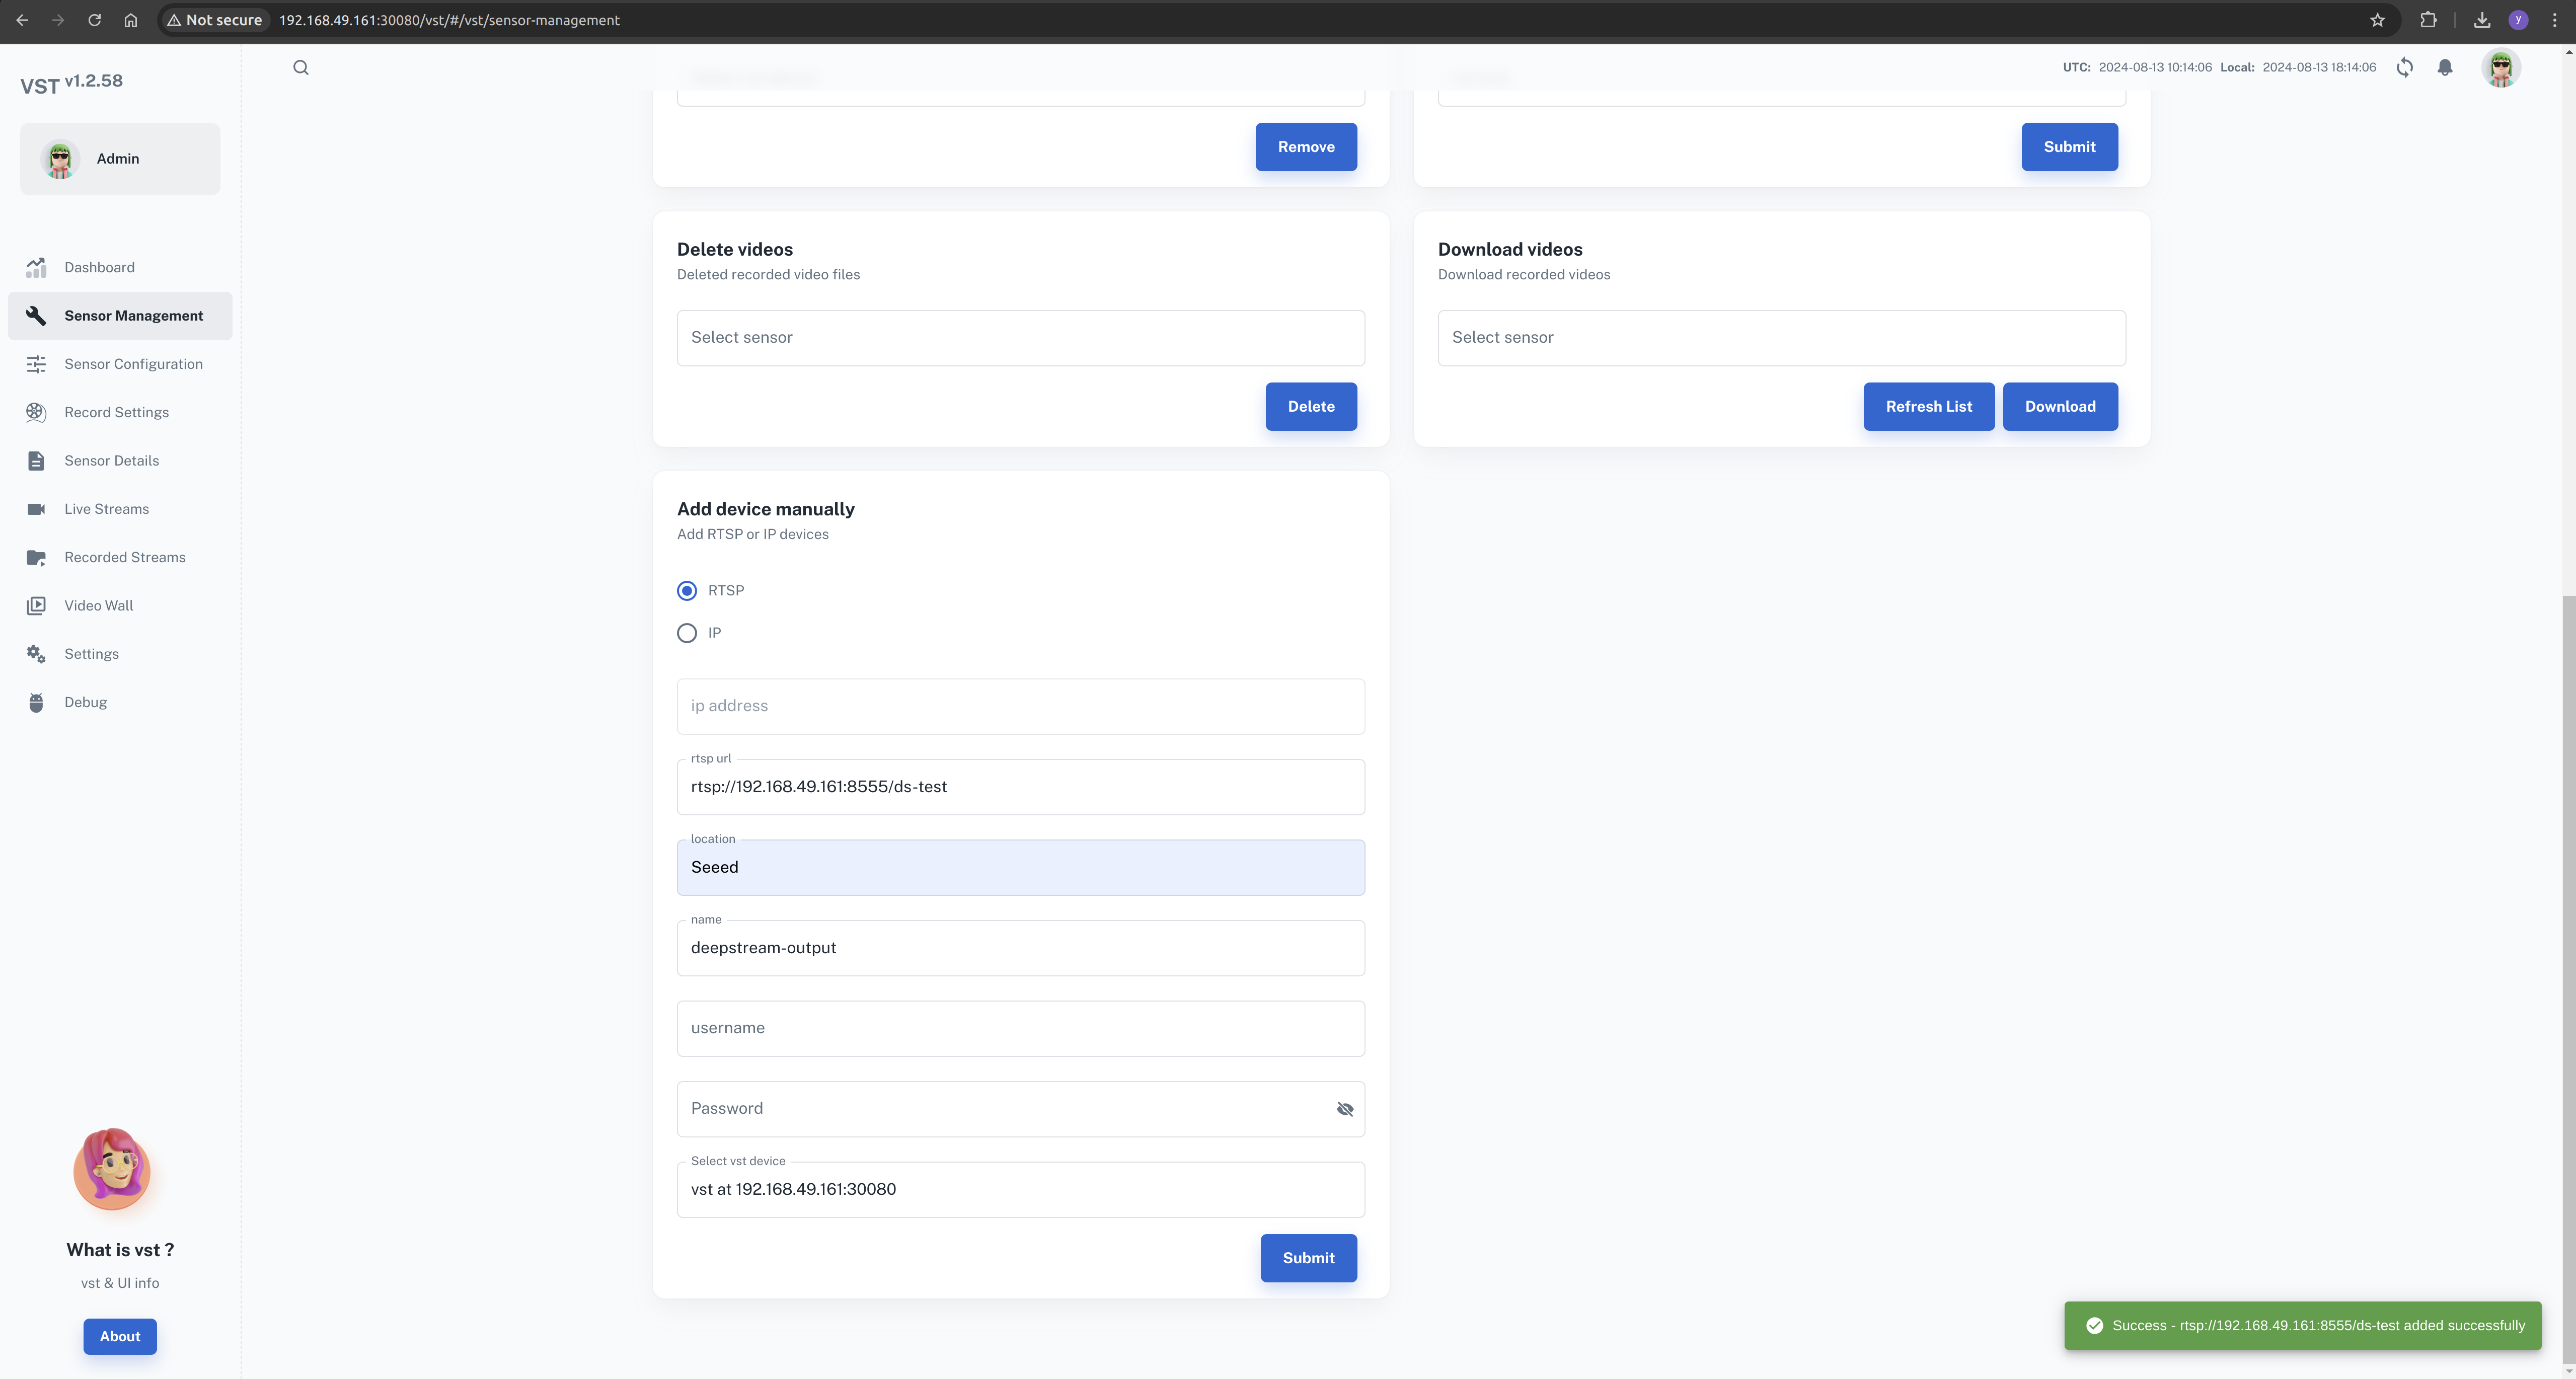
Here, we need to enter a valid camera address or the RTSP stream path.
The DeepStream output stream is rtsp://192.168.49.161:8555/ds-test.
This depends on the DeepStream configuration file, which can be modified according to your needs.
When configuring the deepstream output stream , we need to add the deepstream field in camera name
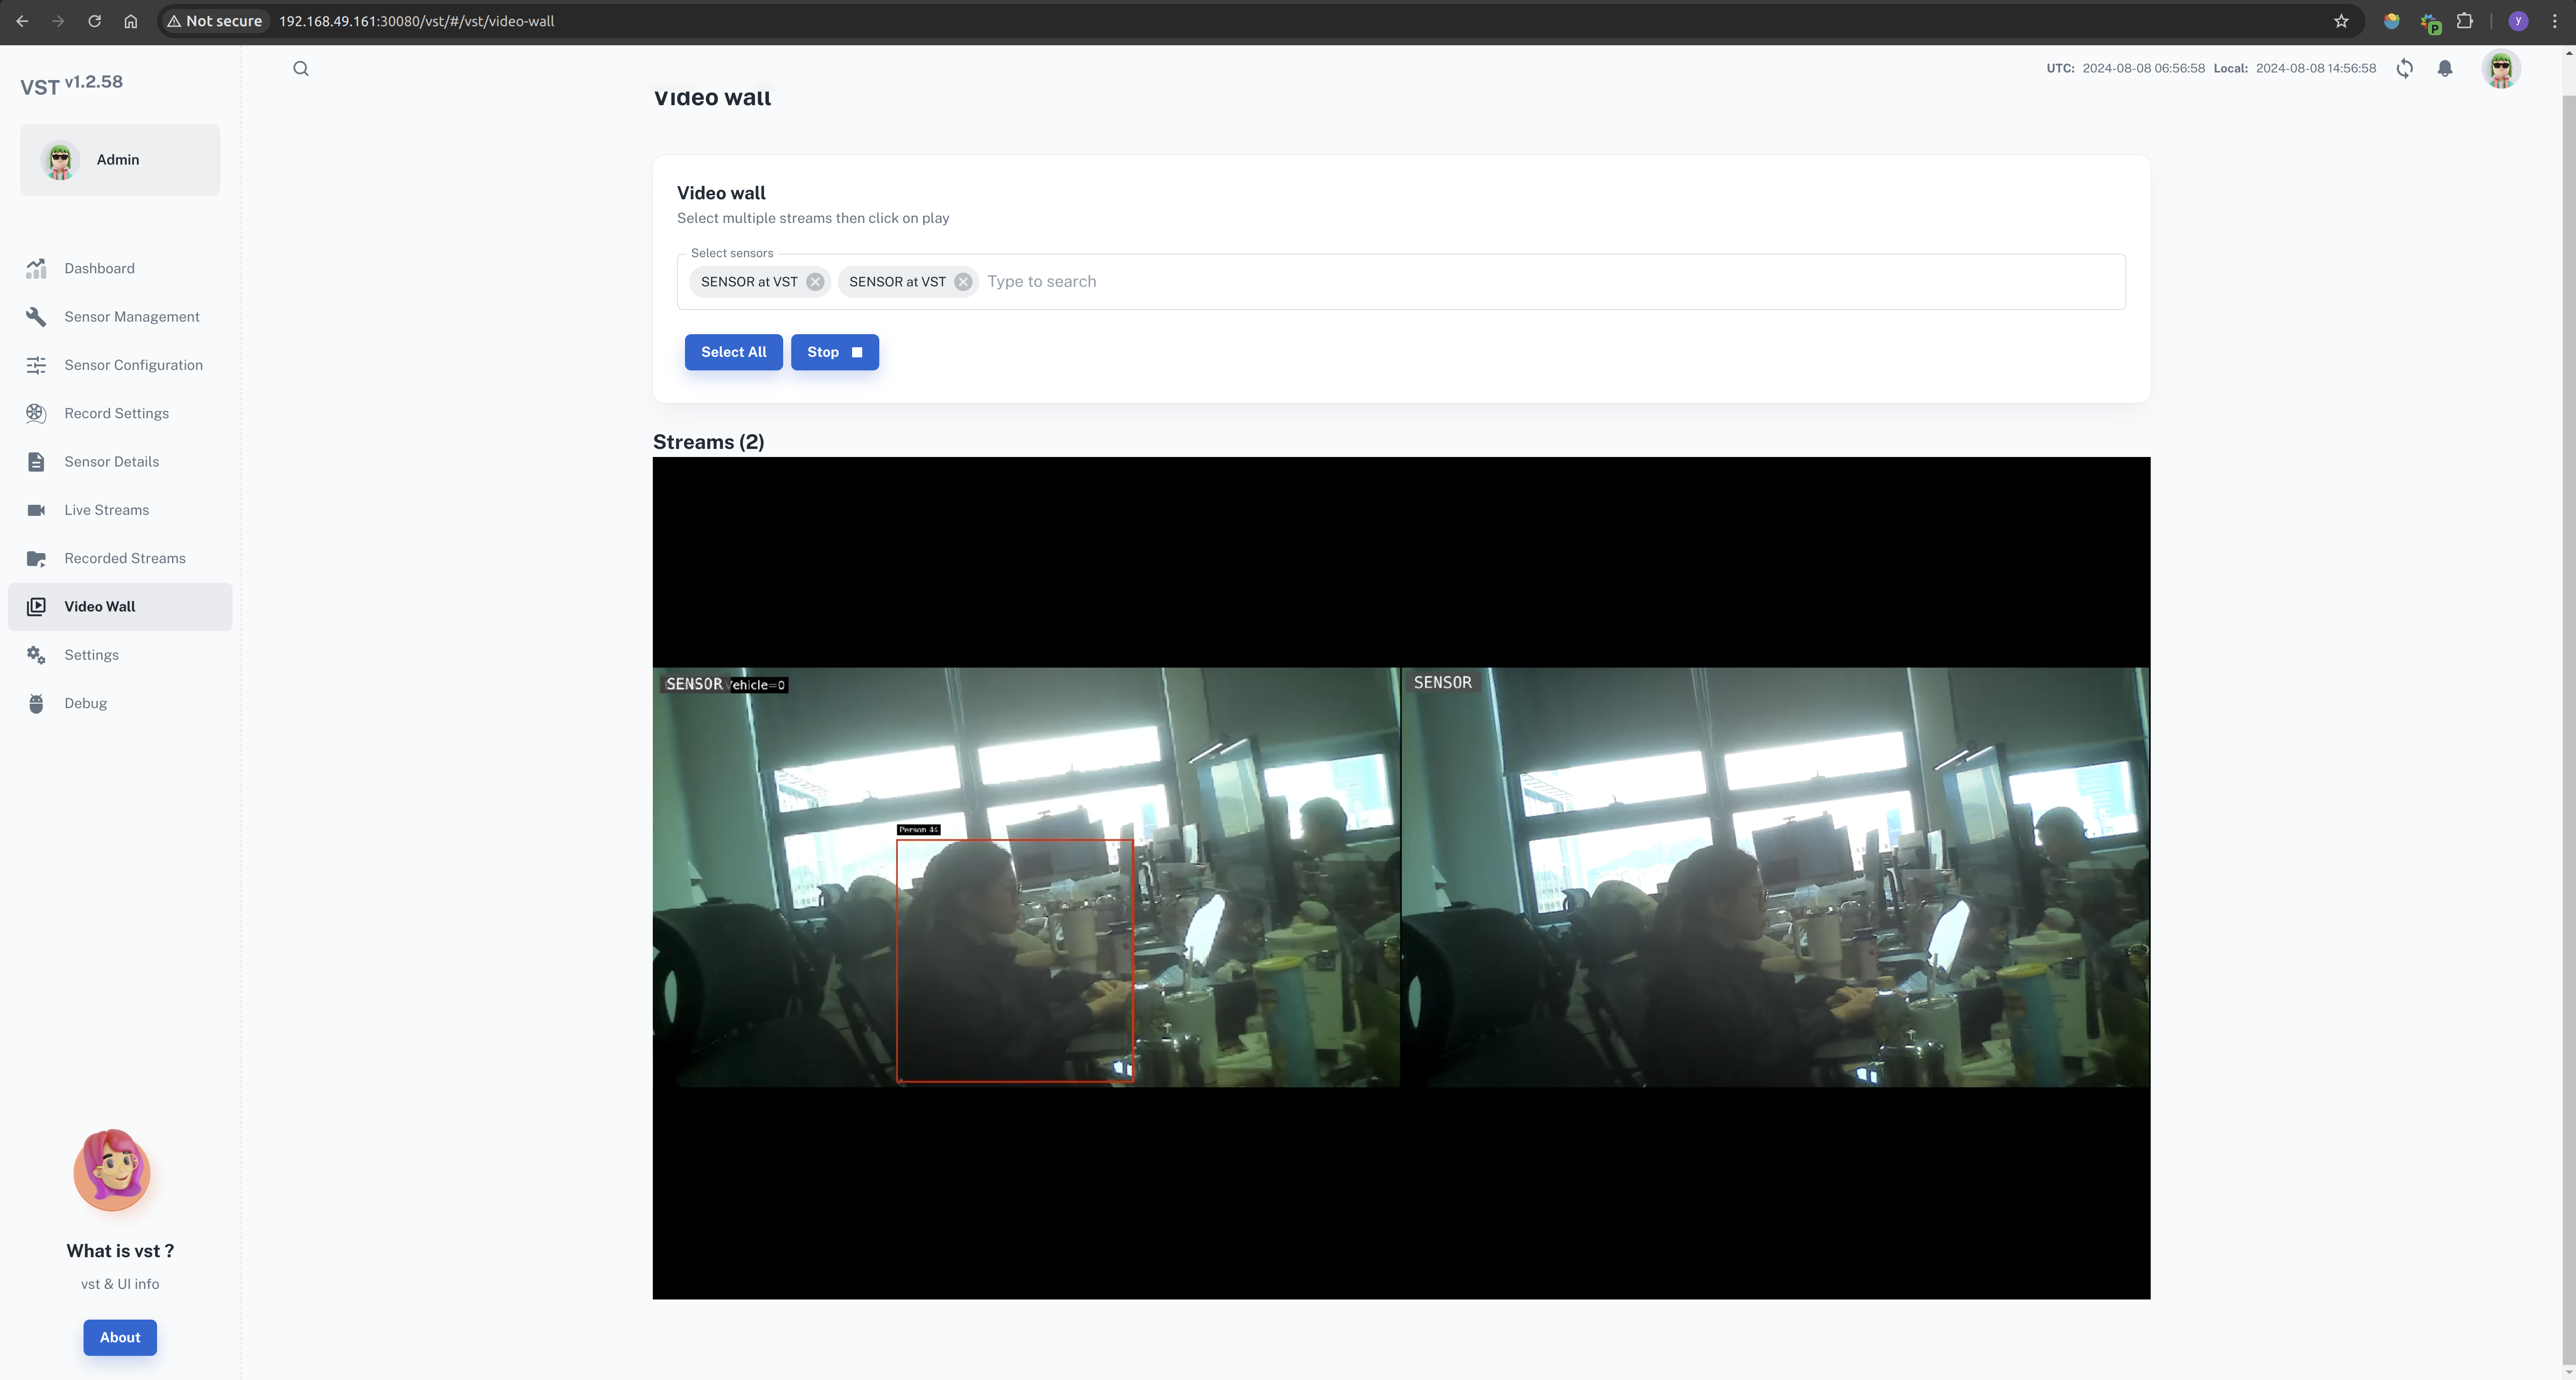
Once the configuration is successful, you can view all the feeds on the video wall.
Video Wall --> Select All --> Start
Close the ai-nvr application
In the Jetson terminal, enter the appropriate command to close the AI NVR application.
cd <path-of-download>/files/ai_nvr

# Orin AGX:
# sudo docker compose -f compose_agx.yaml down --remove-orphans

# Orin NX16:
sudo docker compose -f compose_nx16.yaml down --remove-orphans

# Orin NX8:
# sudo docker compose -f compose_nx8.yaml down --remove-orphans

# Orin Nano:
# sudo docker compose -f compose_nano.yaml down --remove-orphans
The services may be stopped using the commands:
sudo systemctl stop <service-name>
such as:
sudo systemctl stop jetson-redis
sudo systemctl stop jetson-ingress
sudo systemctl stop jetson-vst
References
- https://developer.nvidia.com/embedded/jetpack/jetson-platform-services-get-started
- https://docs.nvidia.com/jetson/jps/moj-overview.html
Tech Support & Product Discussion
Thank you for choosing our products! We are here to provide you with different support to ensure that your experience with our products is as smooth as possible. We offer several communication channels to cater to different preferences and needs.