AI remote wireless monitoring system based on reCamera and Wifi Halow
If you are an outdoor enthusiast, are you often troubled by the lack of a network in the wild, the limited coverage of traditional WiFi, and the inability of the camera to transmit real-time images over long distances? Through this Wiki, you can implement your own AI remote wireless monitoring system, based on the reCamera series and Wifi Halow graph transmission module. Of course, you can have more imagination, including the following but not limited:
-
You want wireless monitoring for your entire property but no wiring or routers needed, with onboard AI detecting suspicious activity.
-
You have a truck and want to detect any suspicious person close to the vehicle, but the network is unstable all the year round and cannot upload video in real time or ordinary cameras must rely on the cloud.
-
When you are exploring the forest, you want to receive the fixed camera images of the camp at any time to identify whether there are bears or other dangerous animals, but the ordinary wireless distance is too short.
So why can reCamera and Wifi Halow realize the system? First of all, reCamera provide the end-side AI with 1Tops computing power. So it can run AI inside the gadget without relying on other edge device.
It also integrates with Node-RED and makes development process very convenient and efficient. If you want rtsp to push stream or use WebSocket to send data, you only need to drag the node to implement it, and you do not need to build a large number of programs from scratch. Check the link for more details: Node-RED Tutorial on reCamera
Here is an example of Node-RED development: just simply drag 3 nodes to build a AI vision workflow:
In terms of Wi-Fi HaLow, it is a low-frequency wireless technology designed for the Internet of Things, offering the advantages of long range, low power consumption, and high bandwidth. In the 902–928 MHz frequency band, it can achieve a maximum transmission rate of approximately 16 Mbps under an 8 MHz bandwidth, with a communication distance reaching up to 1 km.
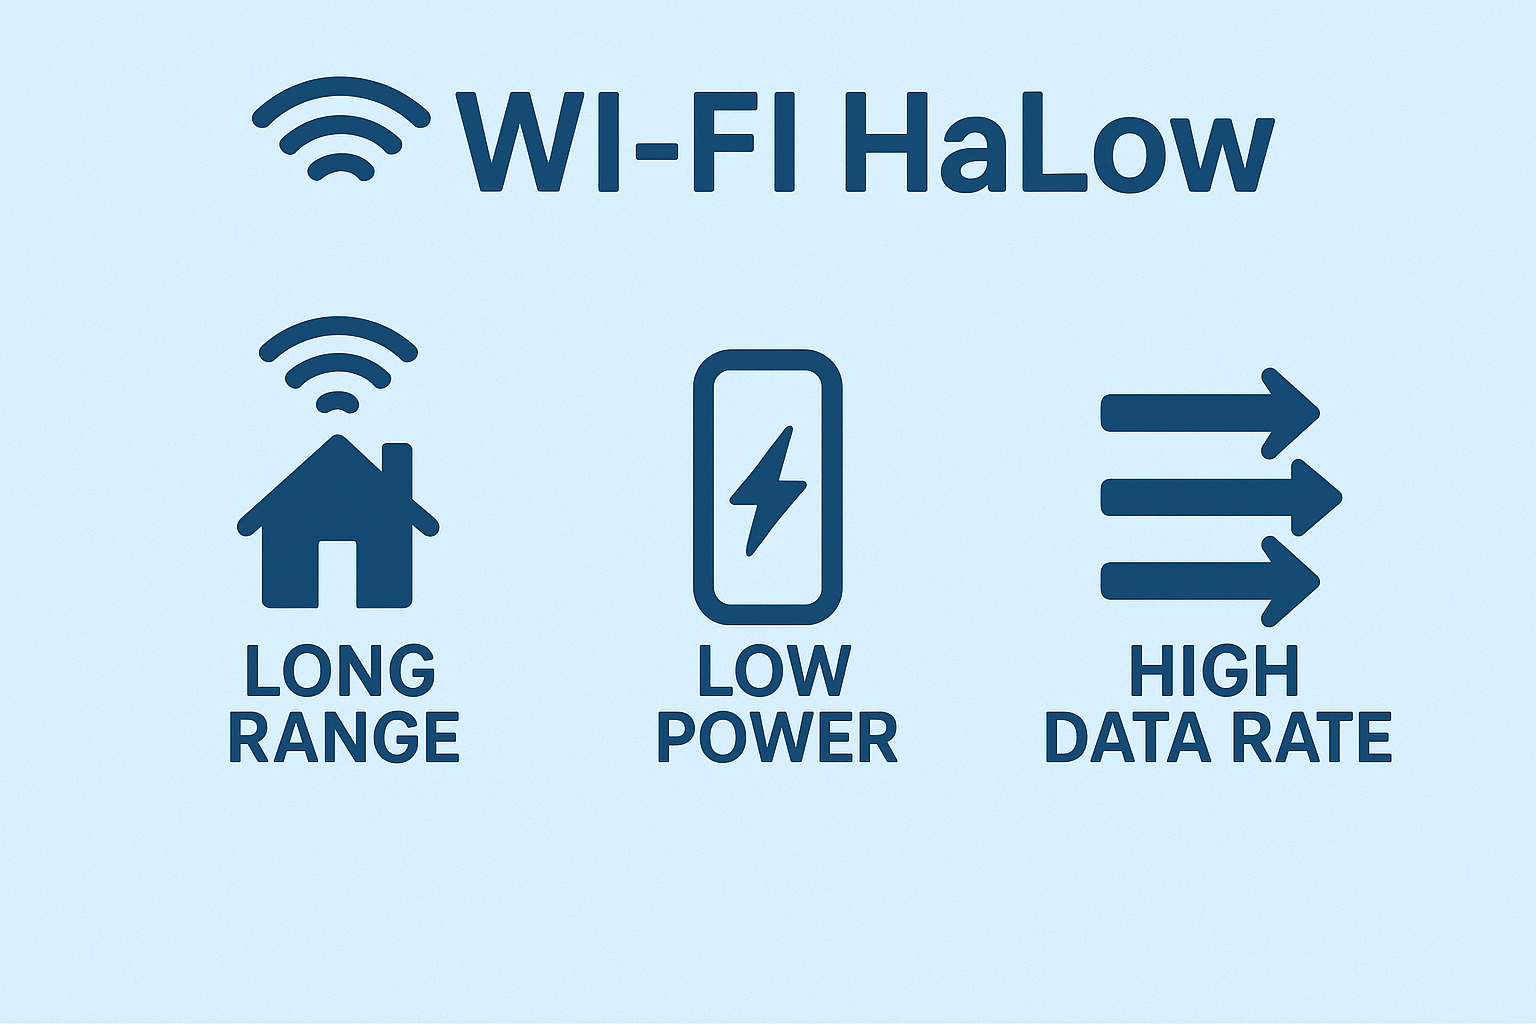
Compared with traditional 2.4G/5G Wi-Fi, HaLow provides stronger penetration and wider coverage; and compared with other long-range communication methods such as LoRa and Sub-GHz, HaLow offers higher bandwidth, capable of supporting the transmission of various media including text, audio, images, and even video streams simultaneously.
| Feature | Wi-Fi (2.4/5GHz) | Wi-Fi HaLow (802.11ah) | LoRaWAN |
|---|---|---|---|
| Frequency Band | 2.4GHz / 5GHz | Sub-GHz (902–928MHz) | Sub-GHz (e.g., 868/915MHz) |
| Coverage Range | 50–100 m | Up to ~1 km | 2–15 km (environment dependent) |
| Penetration Ability | Medium | Strong (better wall penetration) | Very strong |
| Typical Data Rate | Hundreds of Mbps to Gbps | Up to ~16 Mbps (8 MHz channel) | Very low (0.3–50 kbps) |
| Latency | Low | Low (supports images/video) | High (seconds) |
| Power Consumption | Medium–High | Lower than traditional Wi-Fi | Very low |
| Suitable Scenarios | Local networks, HD/4K video | Long-range video, remote monitoring, industrial IoT | Long-range sensing, telemetry, ultra-low-power IoT |
Therefore, this system can reduce the technical threshold for you to develop an intelligent monitoring system, so that non-professional users can easily get started. Specifically, it provides:
-
Edge AI model: No need to build your own AI architecture from ground up, no need a AI team, no need to understand the algorithm, use it when you power on.
-
Built-in computing power: No rely on laptops, desktops or other edge computing devices
-
Node-RED graphical programming tool: No need to master the front and back end programming, no need to go deep into the computer network, system integration and other professional knowledge
-
Remote wireless connection: No need for complex wiring, no need for switches/routers
Overall architecture
The system structure is very simple. The two HaLow modules use Ethernet cable to connect the reCamera and reTerminal respectively. After that, the two devices transmit wirelessly through Wifi HaLow.

Hardware preparation
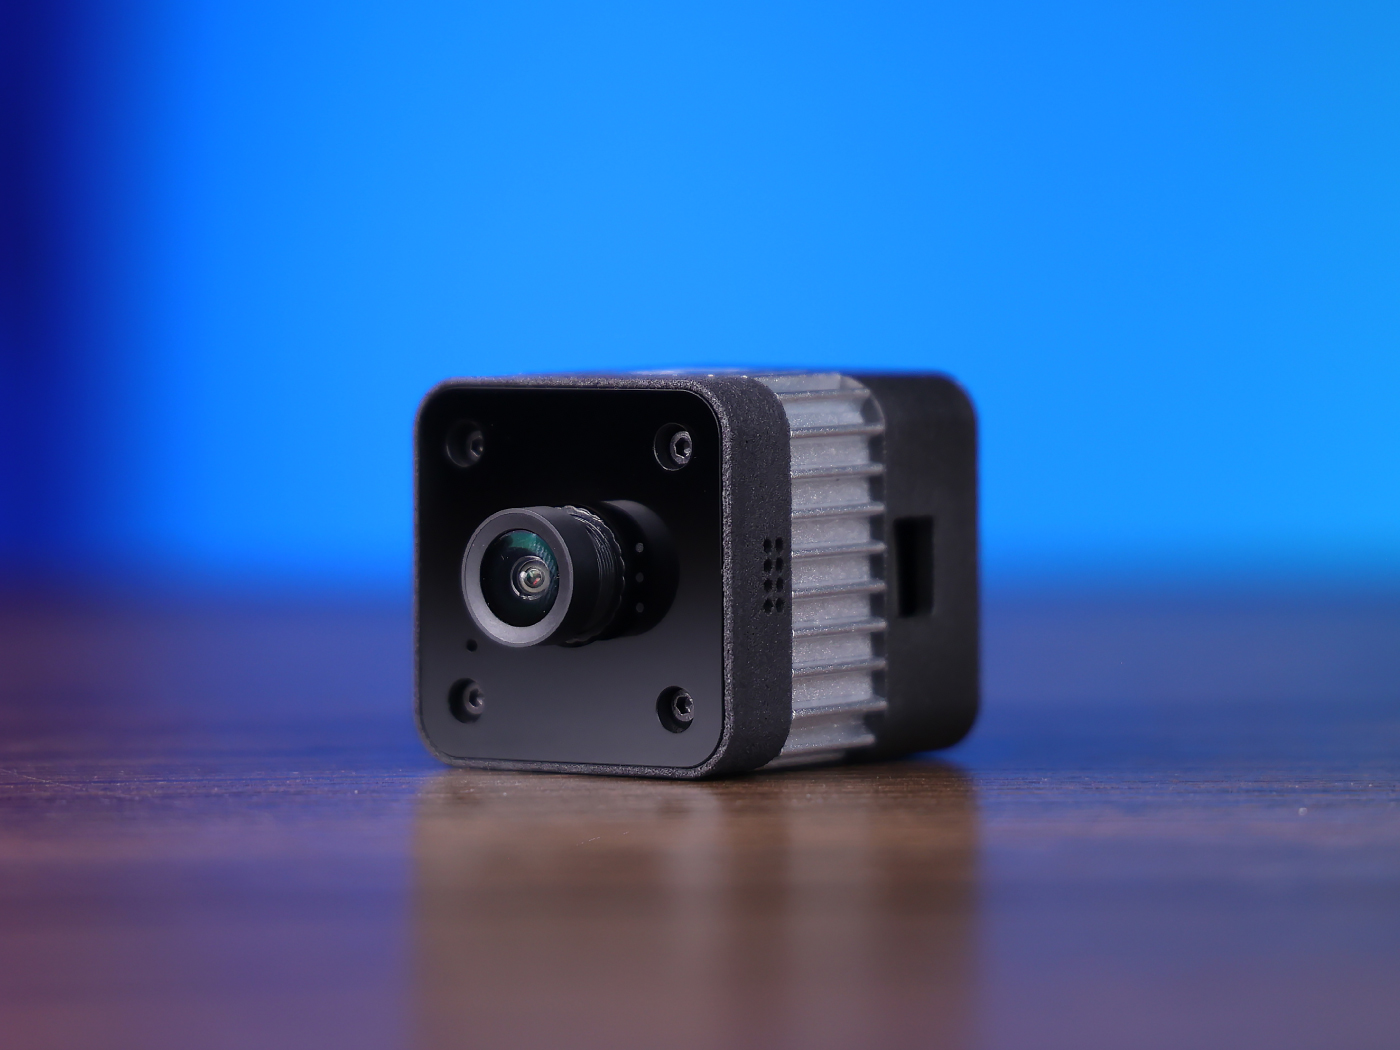
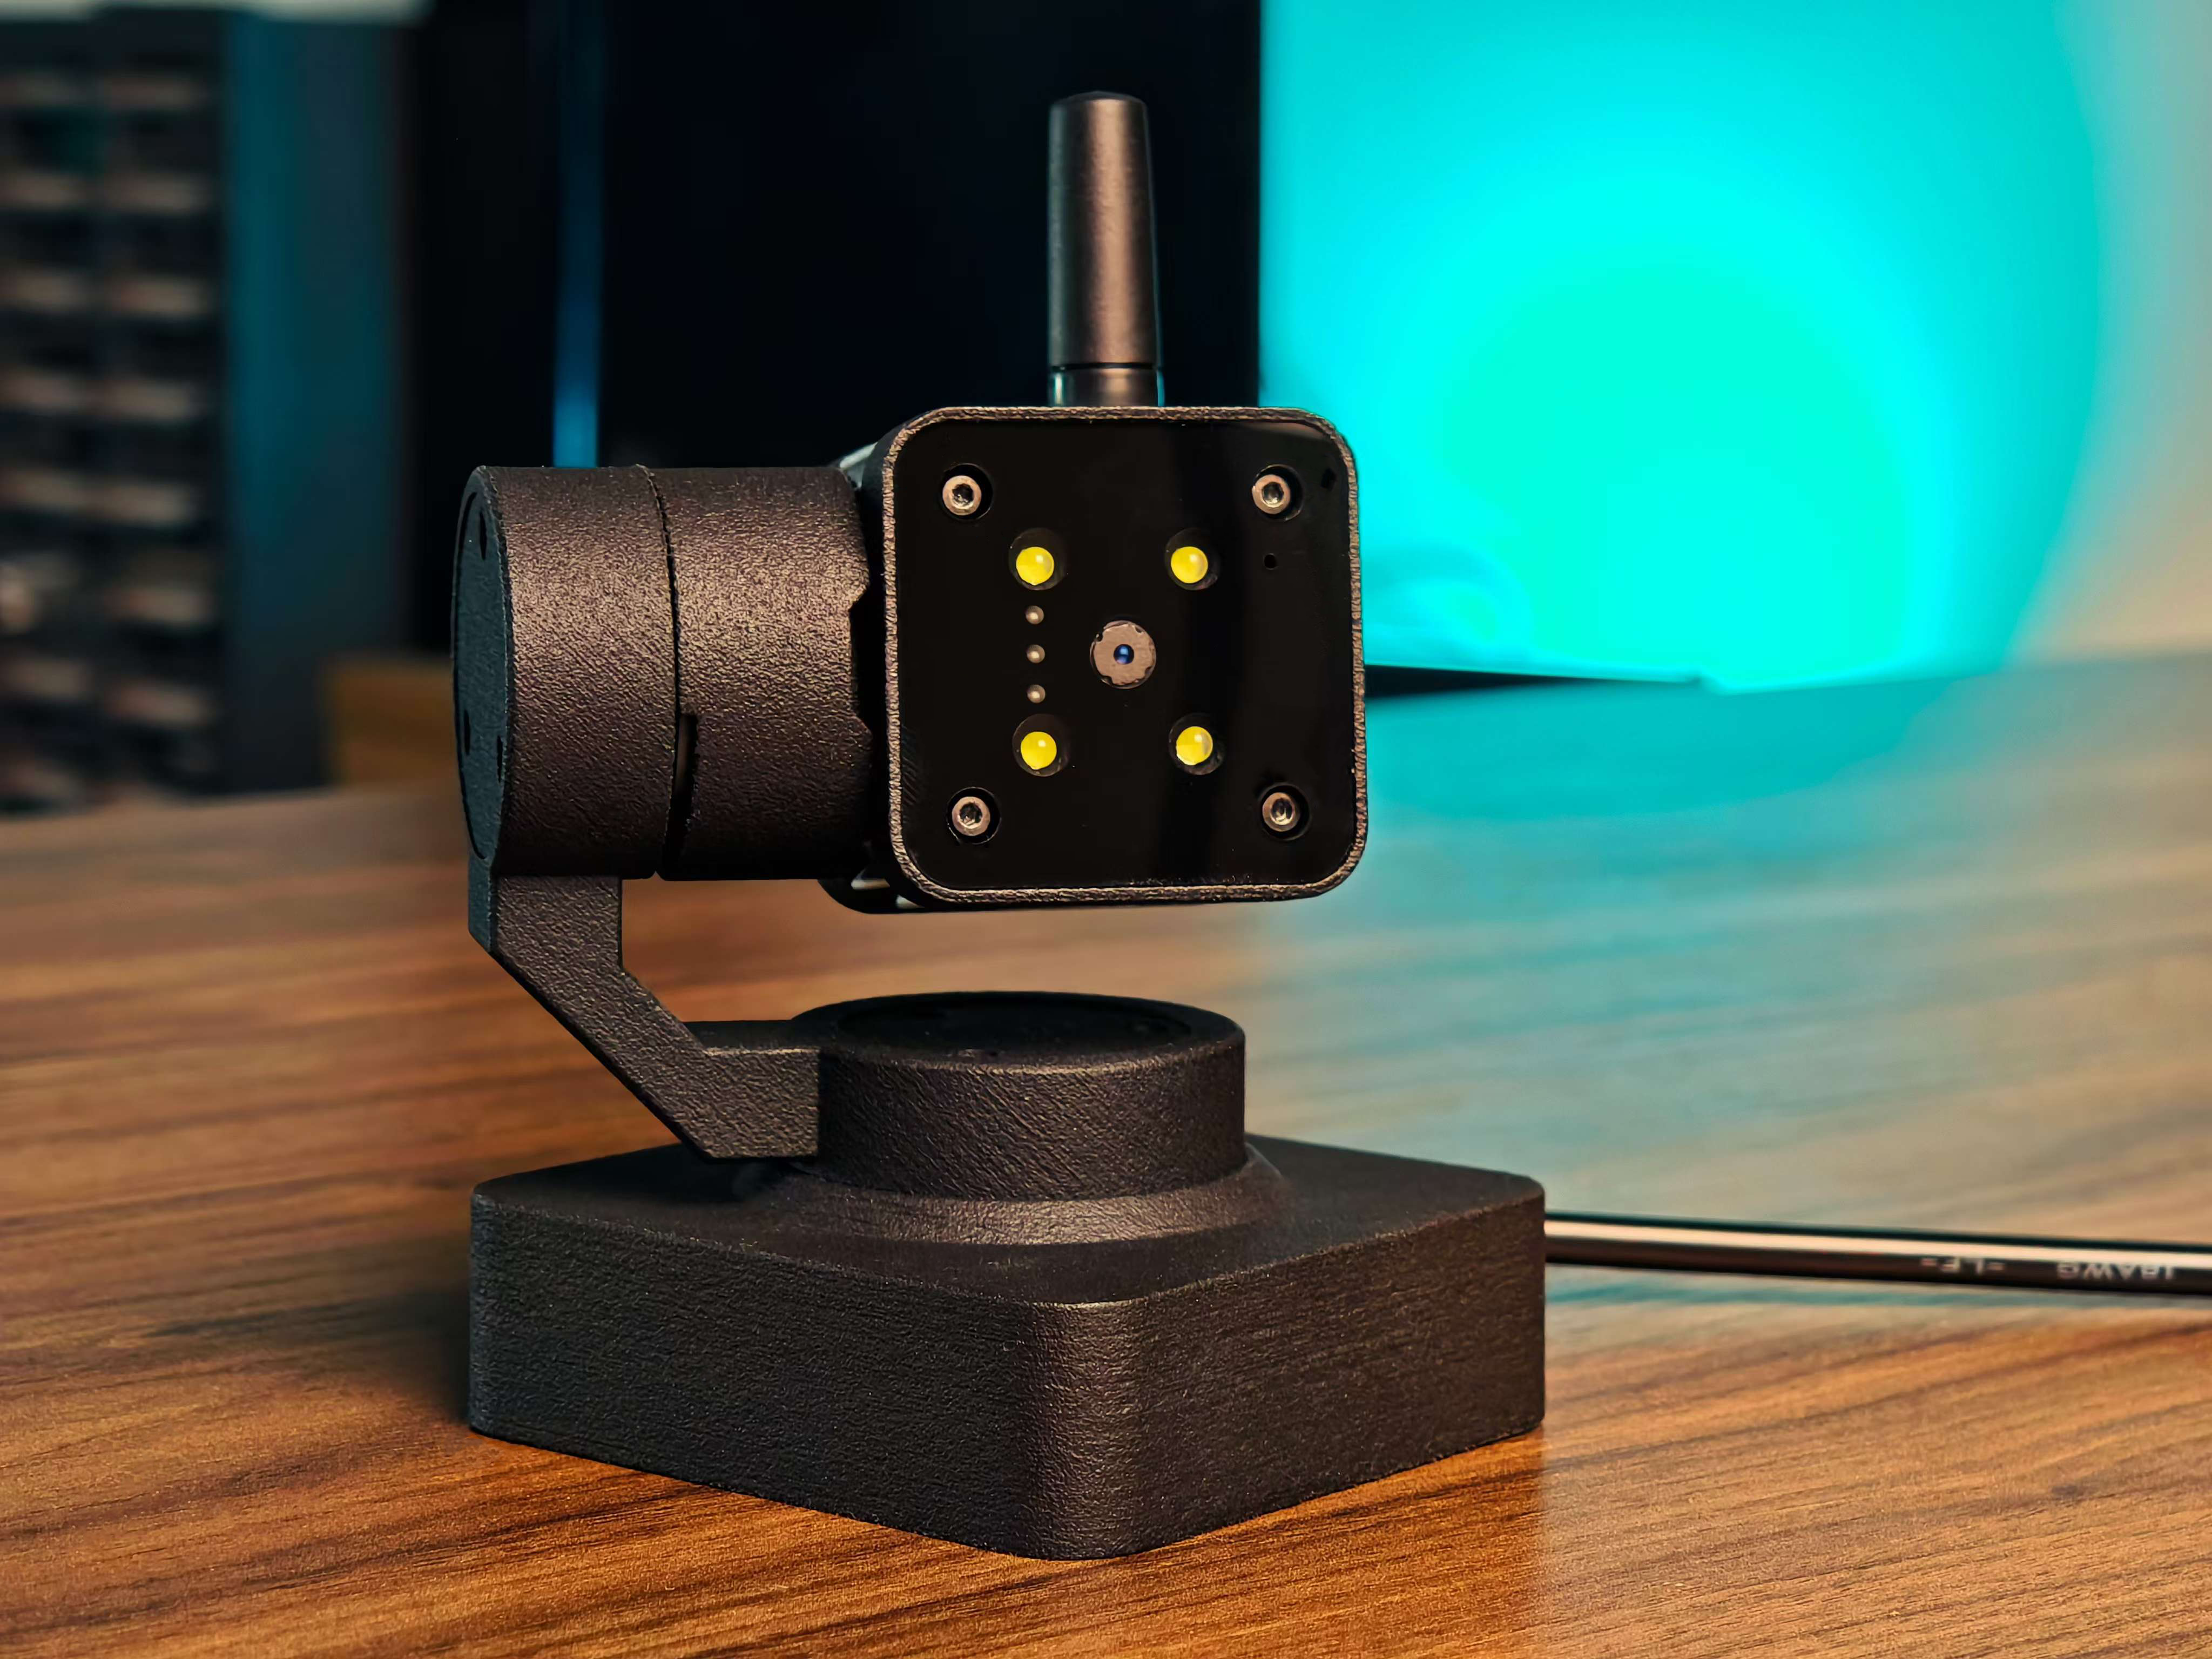
To complete this project, you will need any of three reCamera reCamera - reCamera 2002 Series, reCamera HQ PoE, reCamera Gimbal.
📦 reCamera
| Seeed Studio reCamera 2002W 8GB/64GB | Seeed Studio reCamera 2002HQ PoE 64GB | Seeed Studio reCamera Gimbal |
|---|---|---|
 |  |  |
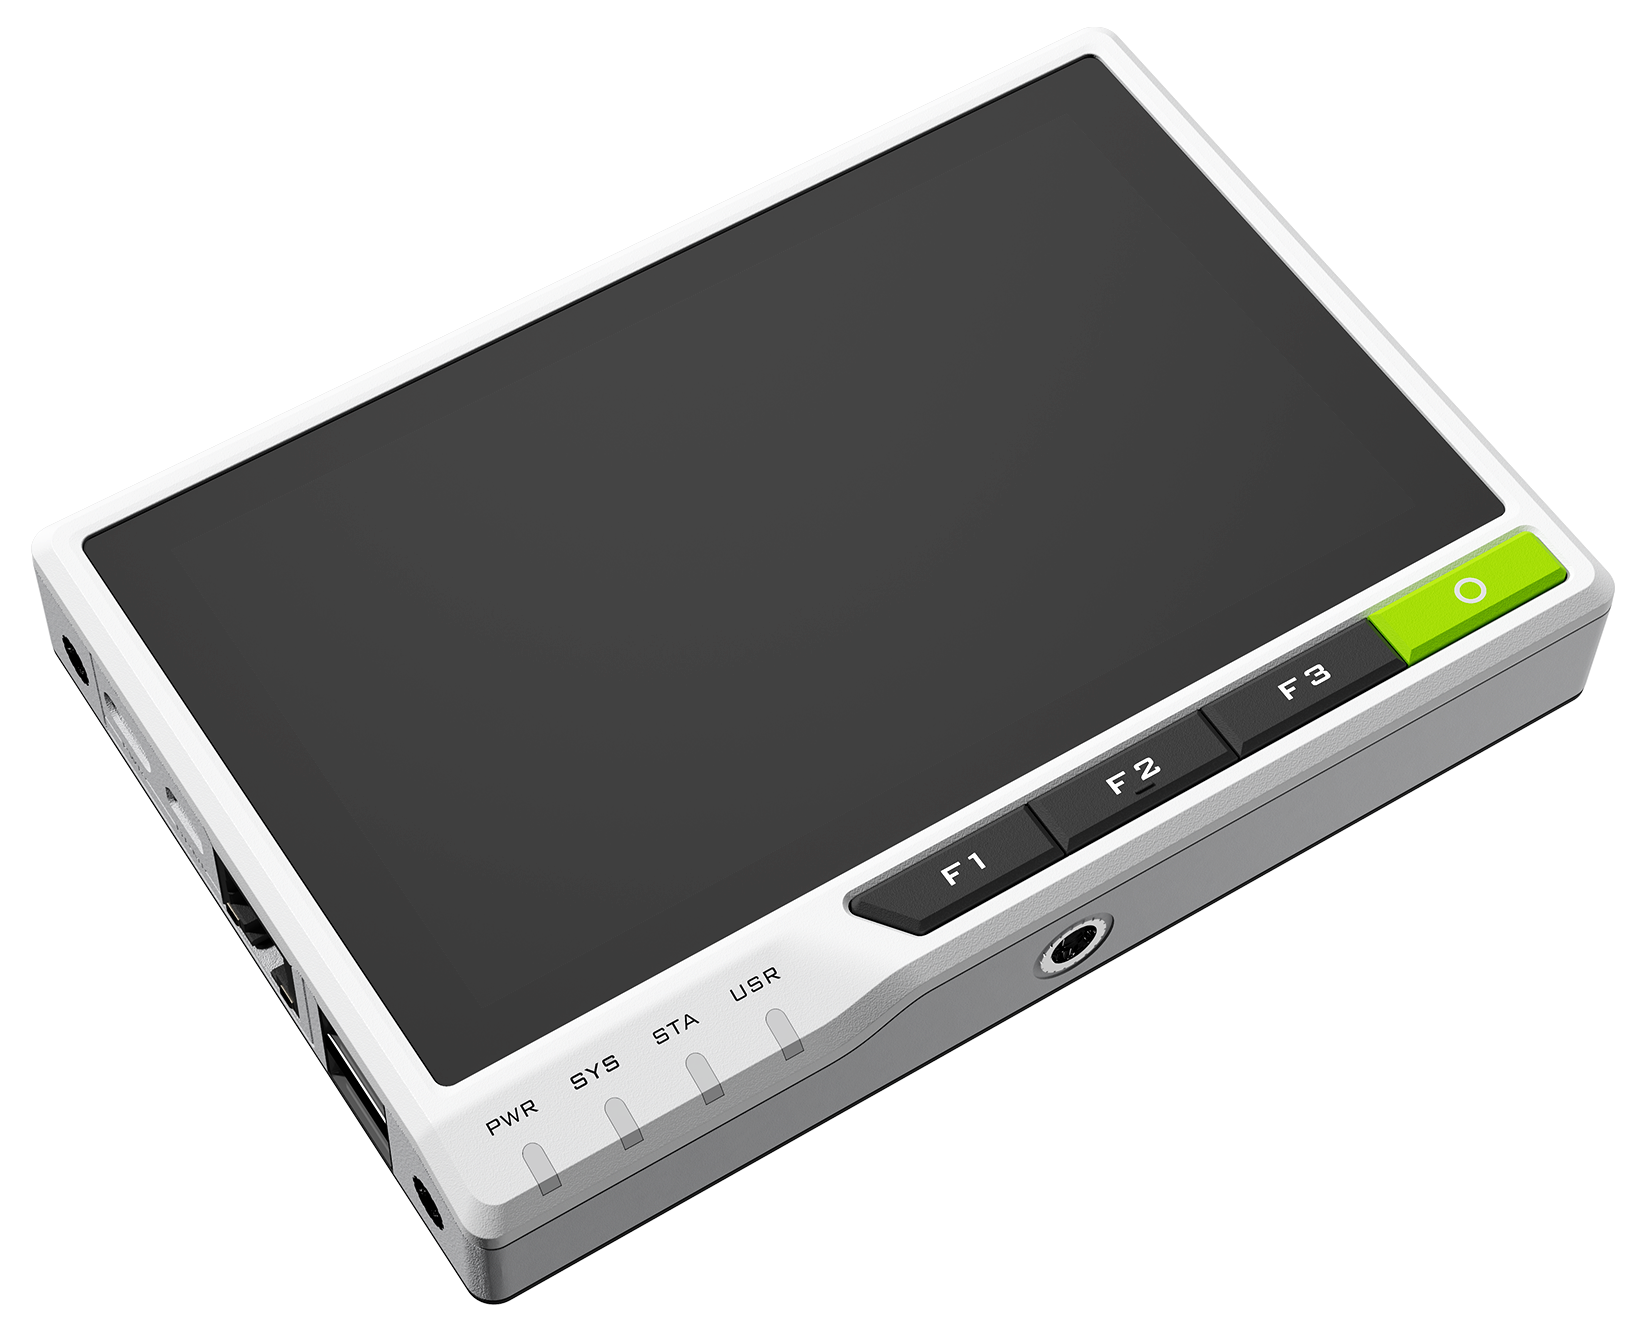
reTerminal and Expansion Boards
reTerminal if you want to move the application, you can use the reTerminal with a dedicated expansion board, expansion board built-in two 18650 batteries.
The reTerminal here can be replaced by any edge computing device with a network port and a screen. Including but not limited to notebooks, desktops, development boards, etc. We encourage you to try more. Just use reTerminal to demonstrate in this tutorial, reTerminal is a Raspberry Pi CM4 terminal device with multiple interfaces such as network ports.
| Seeed Studio reTerminal - 5'' HMI CM4108032 | Seeed Studio reTerminal E10-1 Expansion Board(Optional) |
|---|---|
 |  |
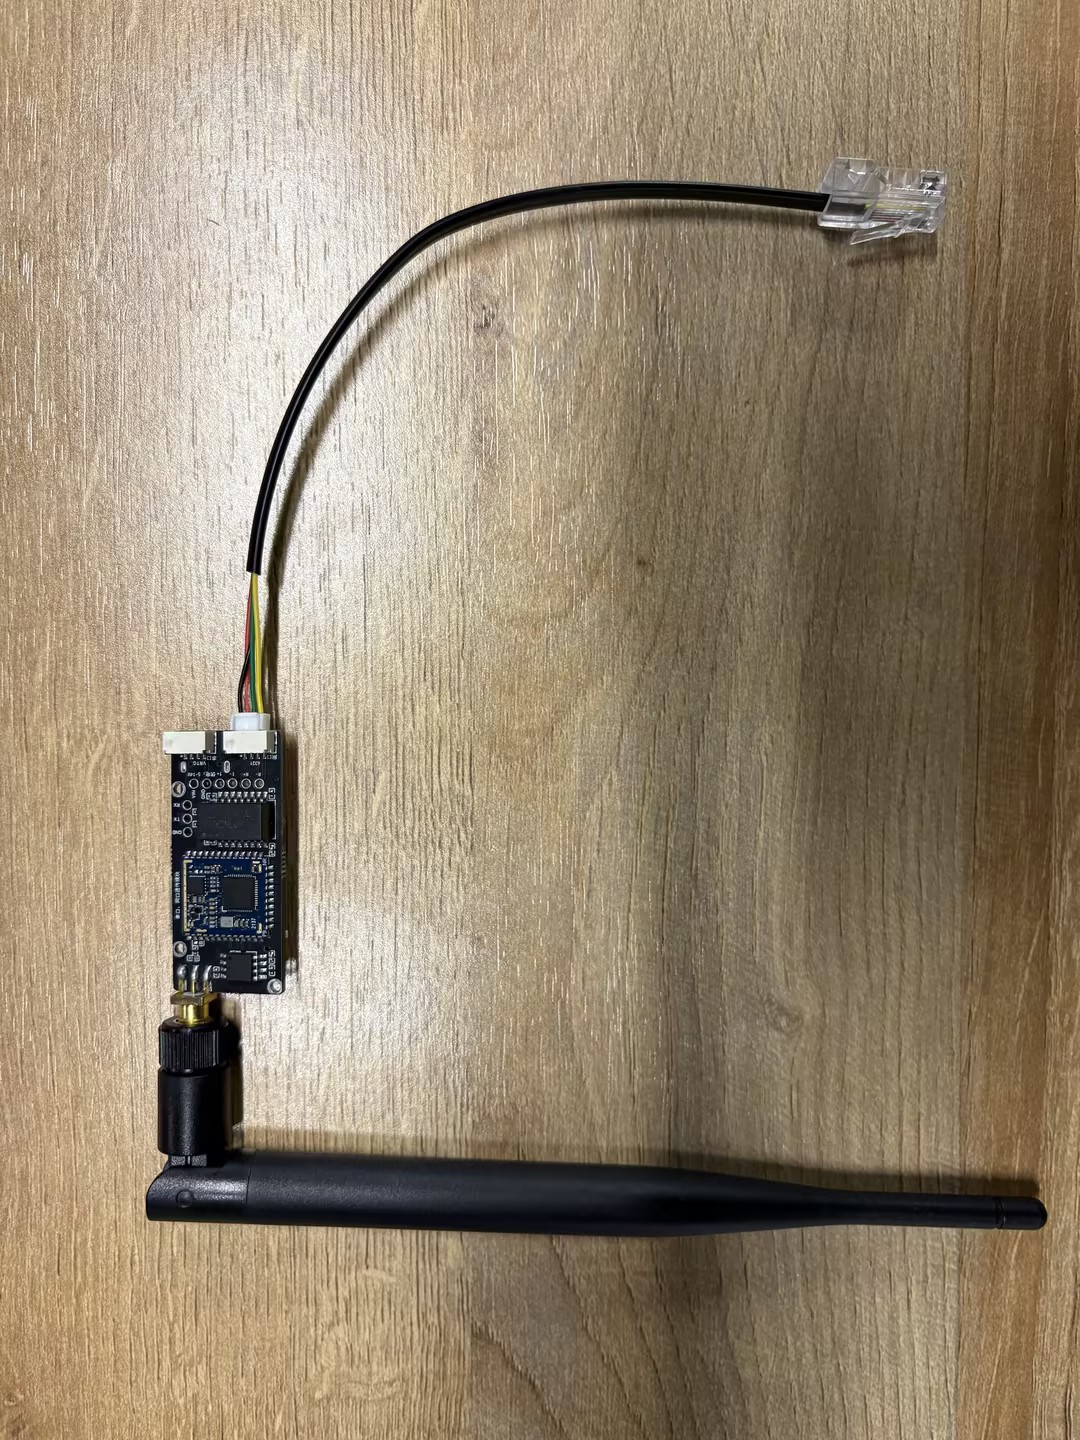
Wifi Halow Image Transmission Module
This is the Wifi Halow module we used in the project. The operating frequency band is 902-928 MHz, the bandwidth is 8 MHz, the maximum speed is 16 Mbps, the maximum communication distance can reach 1km, and the transmission power is 20 dBm. The device provides IPEX antenna interface, 10/100 Mbps network port, TTL serial port (up to 350 kbps), supports WPA2-PSK AES encryption, 5V/12V power supply, and reliable operation from -20 C to 70 C, average power consumption 1.5W.
Tool preparation
-
PC: Used to connect the reCamera for debugging. Subsequent operations need to log in to the back end of the reCamera and brush the strawberry pie operating system for the reTerminal. At the same time, debug will be more convenient if there are problems on the PC, and all kinds of software tools are complete.
-
3 USB-C cables:
One connection is reCamera to supply power to the PC, and the other two are used to supply power to the Wifi Halow module.
-
Keyboard/Mouse: Connect reTerminal for debugging.
-
5V3A USB-C Power Adapter Strawberry Pi 4/5 Same Power Supply to Power reTerminal. Purchase Link: 5V3A USB-C Power Supply
-
(Optional)12V DC Power Supply Used to power the reTerminal expansion board. Purchase link: 12V DC Power Supply(US/EU)
-
(Optional) reCamera Triangle Bracket Purchase Link: Mini Tripod
You don't have to struggle with the device's power supply, Raspberry Pi 4/5 power supply, can be used by reTerminal at the same time if you intend to use the expansion board, only 12V DC power supply, no longer need 5V3A USB-C power, because the reTerminal can get power directly from the expansion board.
Detailed Tutorial: reCamera Wifi Halow Module Configuration reTerminal Configuration
The general idea of the whole system is to let the reCamera form a network with the terminal equipment through Wifi HaloW. First, configure static IP on the terminal equipment (reTerminal) and reCamera, because outdoor or mobile applications cannot have routers, there is no DHCP service, and IP needs to be manually assigned.
After the IP is assigned, these devices form a "local area network", and they can access each other through IP. At this time, create stream nodes and WebSocket nodes on the reCamera through Node-RED, send the video stream in the form of rtsp push stream, and send the yolo detection result via WebSocket.
Finally, the video stream and AI detection results are accessed on the terminal device, such as VLC Media Player on Windows/Linux. This tutorial will demonstrate how to obtain rtsp push stream through ffplay on Linux.
Phase 1: Configure reCamera
Step 1.1 Login reCamera
Connect the reCamera to the computer with a USB-C line. It takes some time to start the device just after it is powered on. After waiting for 1-2 minutes, open any web browser and enter ** 192.68.42.1 ** to enter the reCamera system.
You need to configure your own password for the first login. Please remember your password and use it later. After entering the reCamera system, you should see this page:
If you don't see this page, refresh your browser.
If your device has been used or configured before, it is possible to jump directly to the Workspace. At this time, the website is: 'http:// 192.168.42.1/#/workspace' Please jump to the next step. Anyway, just get into the Workspace.
If the refresh still does not resolve, please reset the device or contact technical support to resolve.
Step 1.2 Configure the camera node
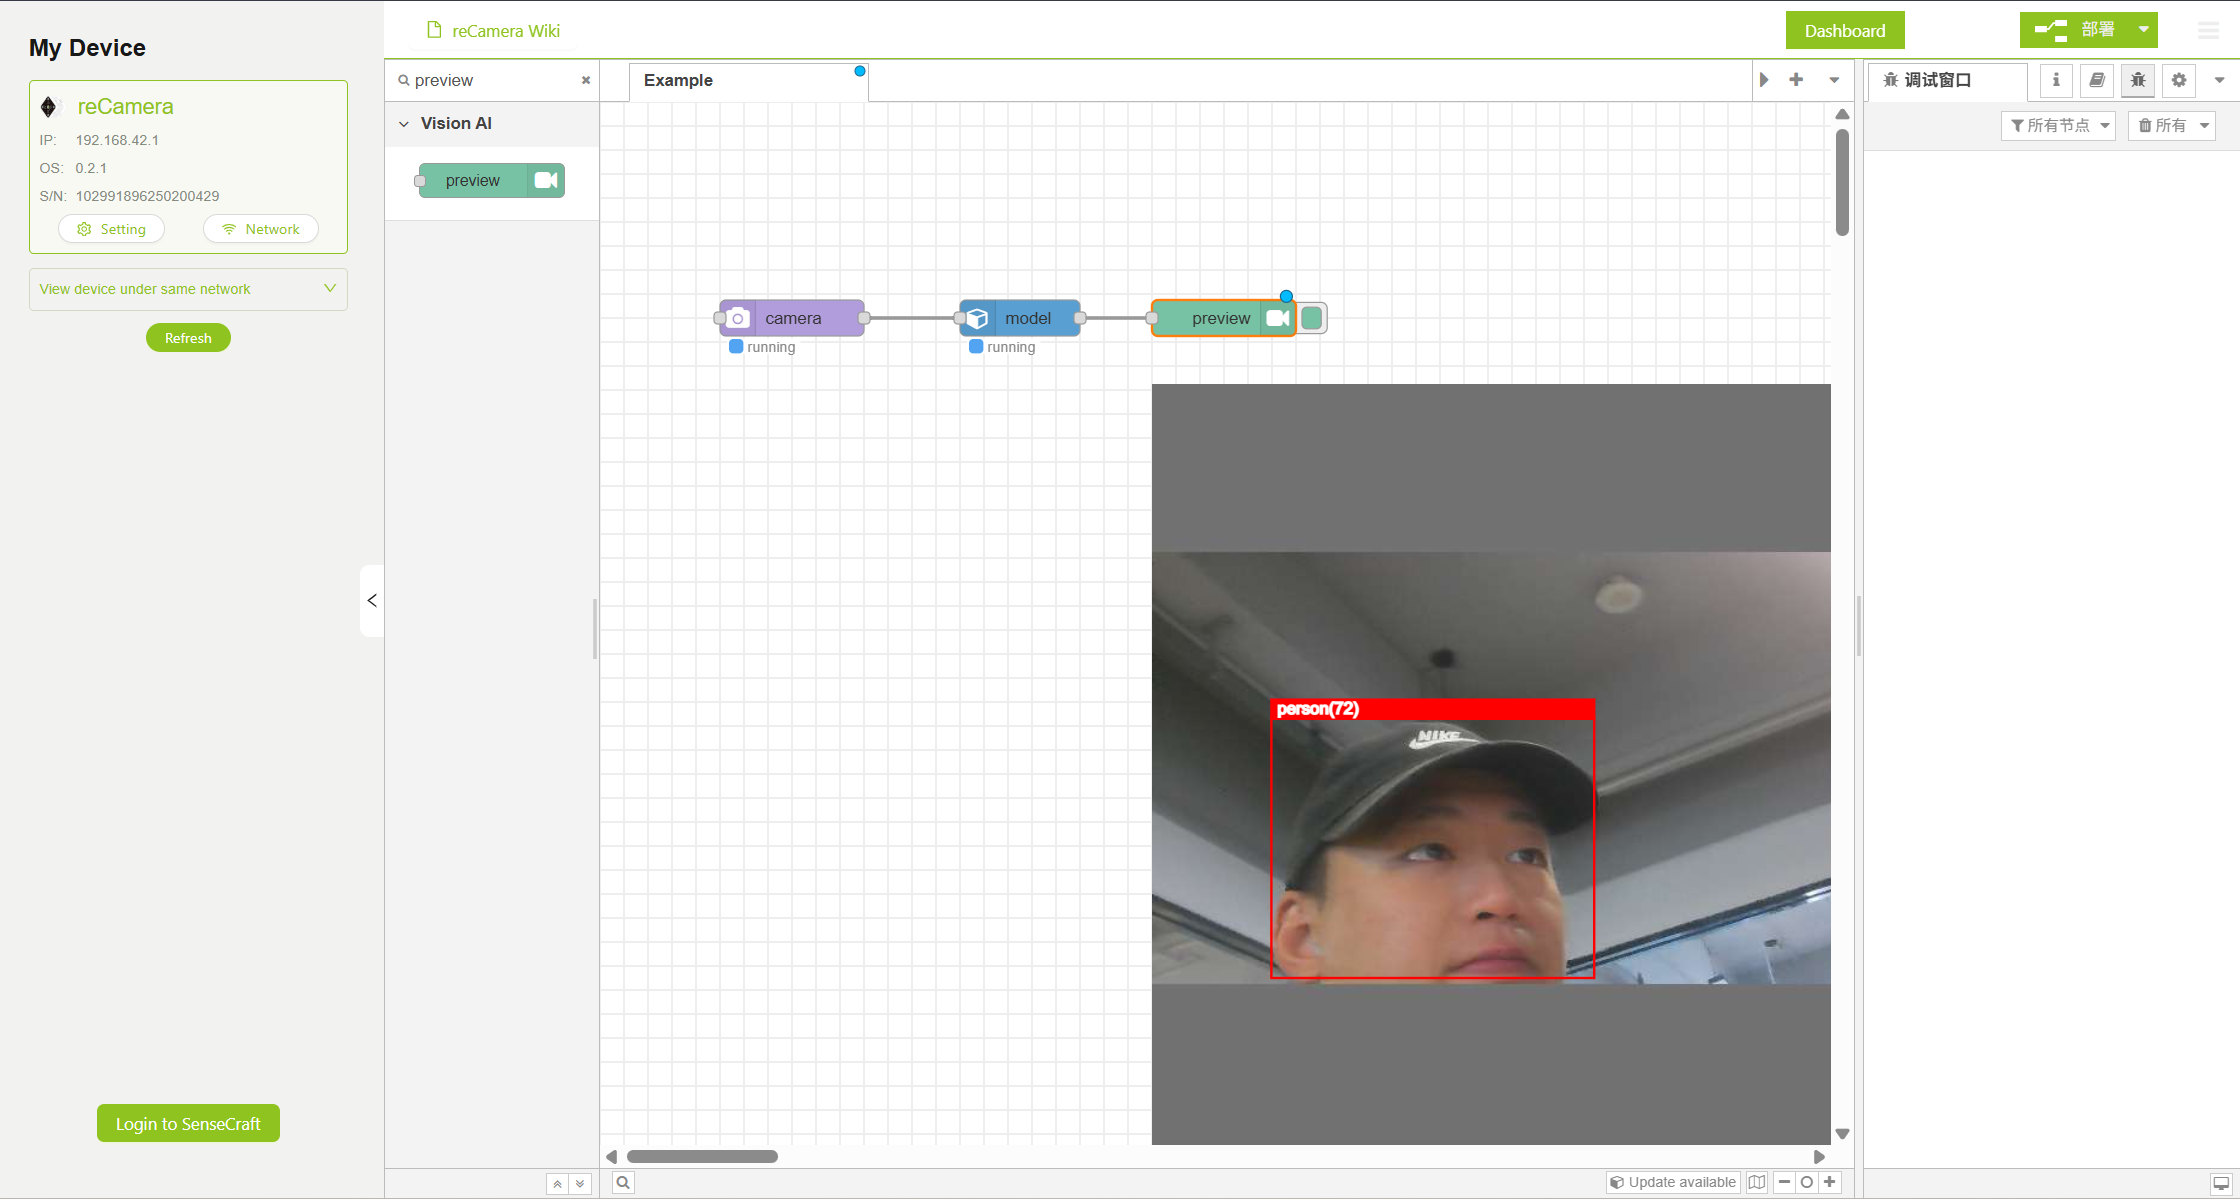
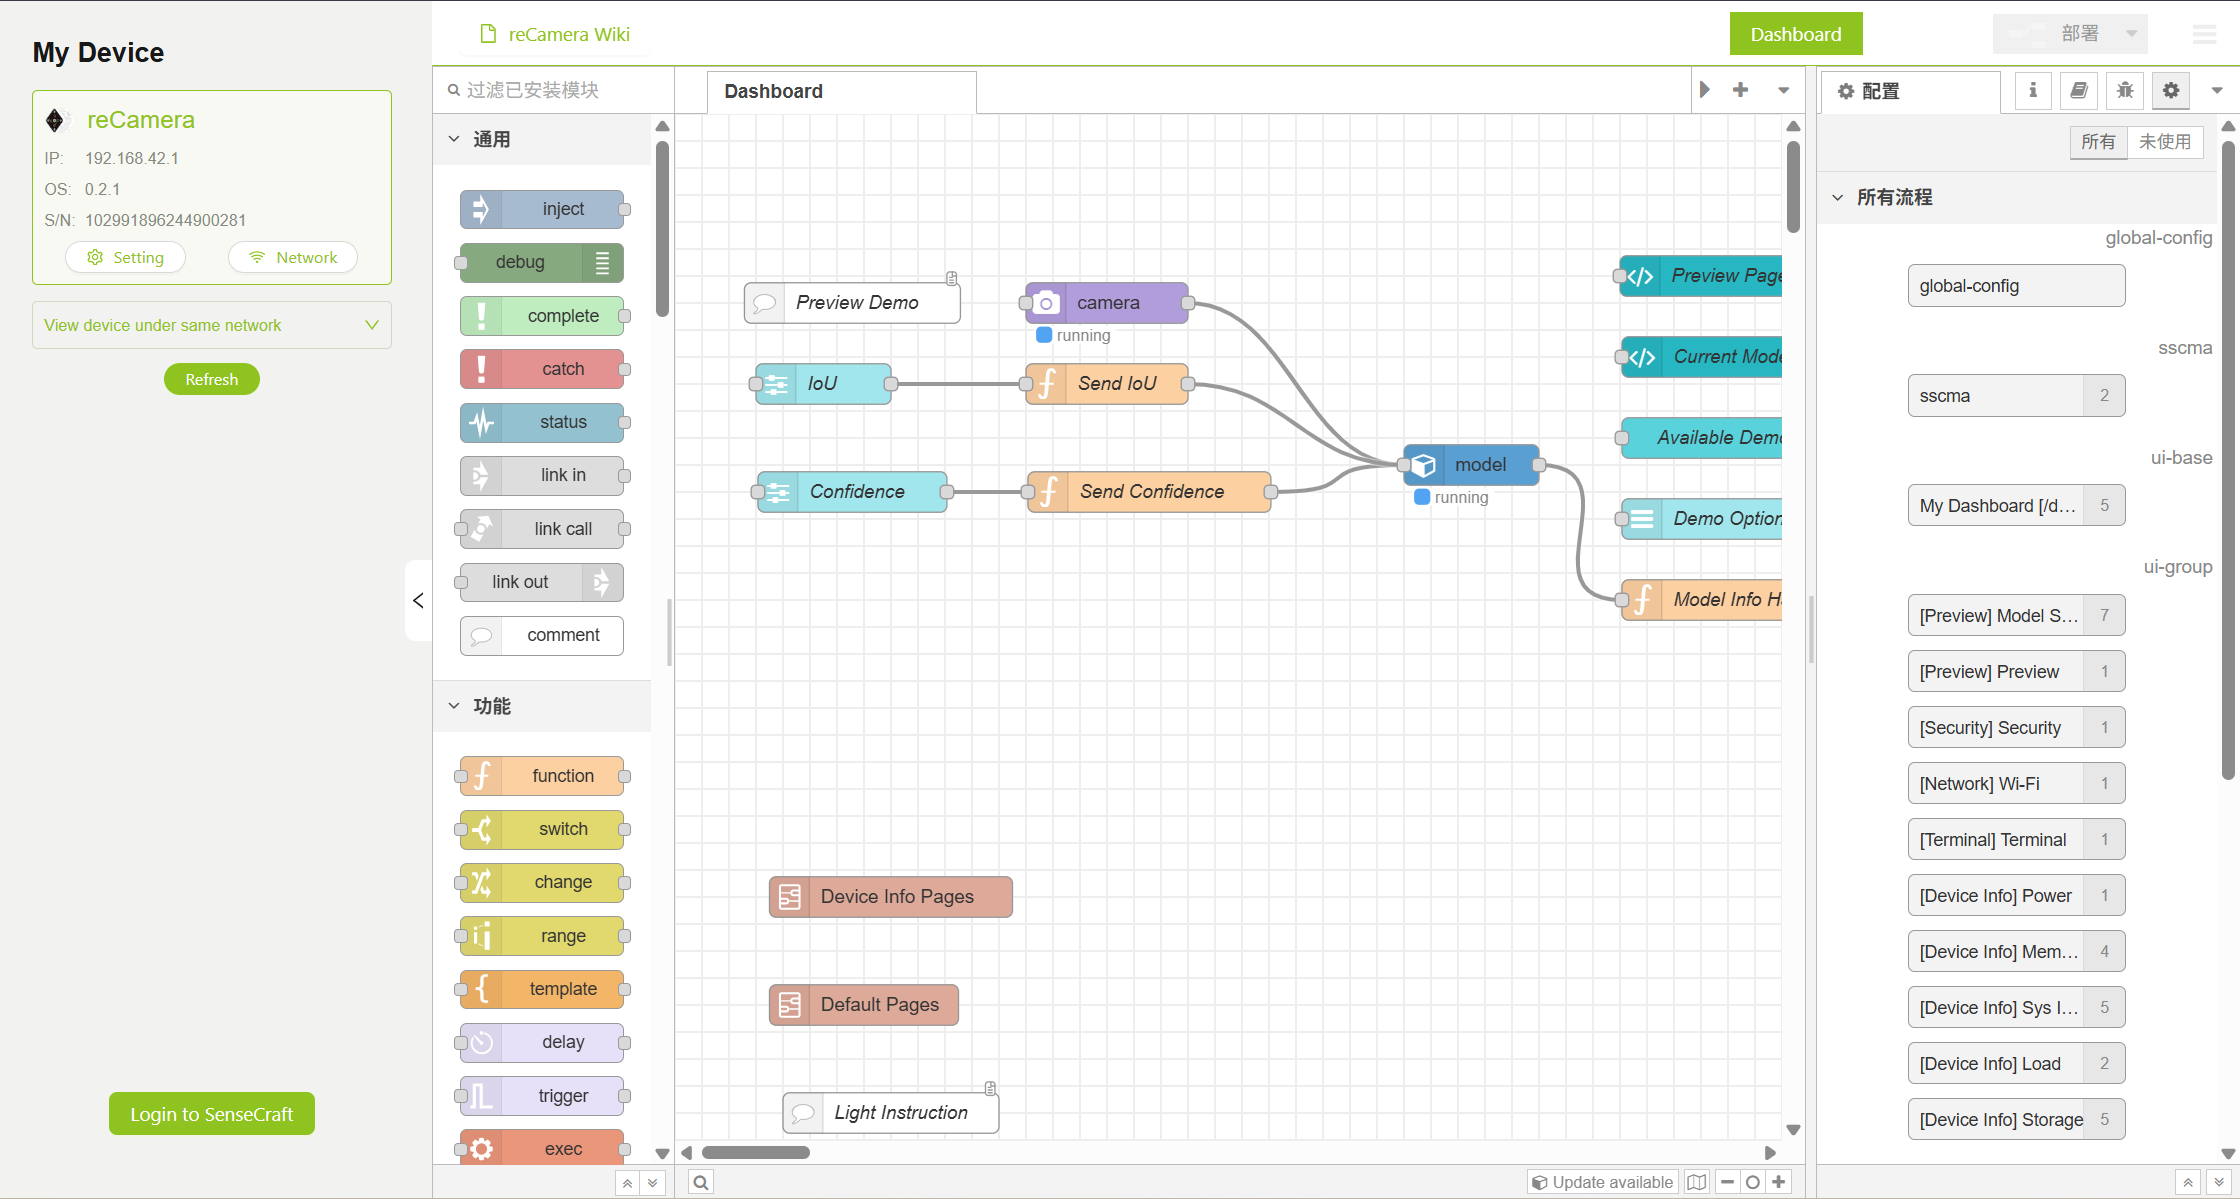
Click the green button in the lower right corner of the page to enter the Workspace.
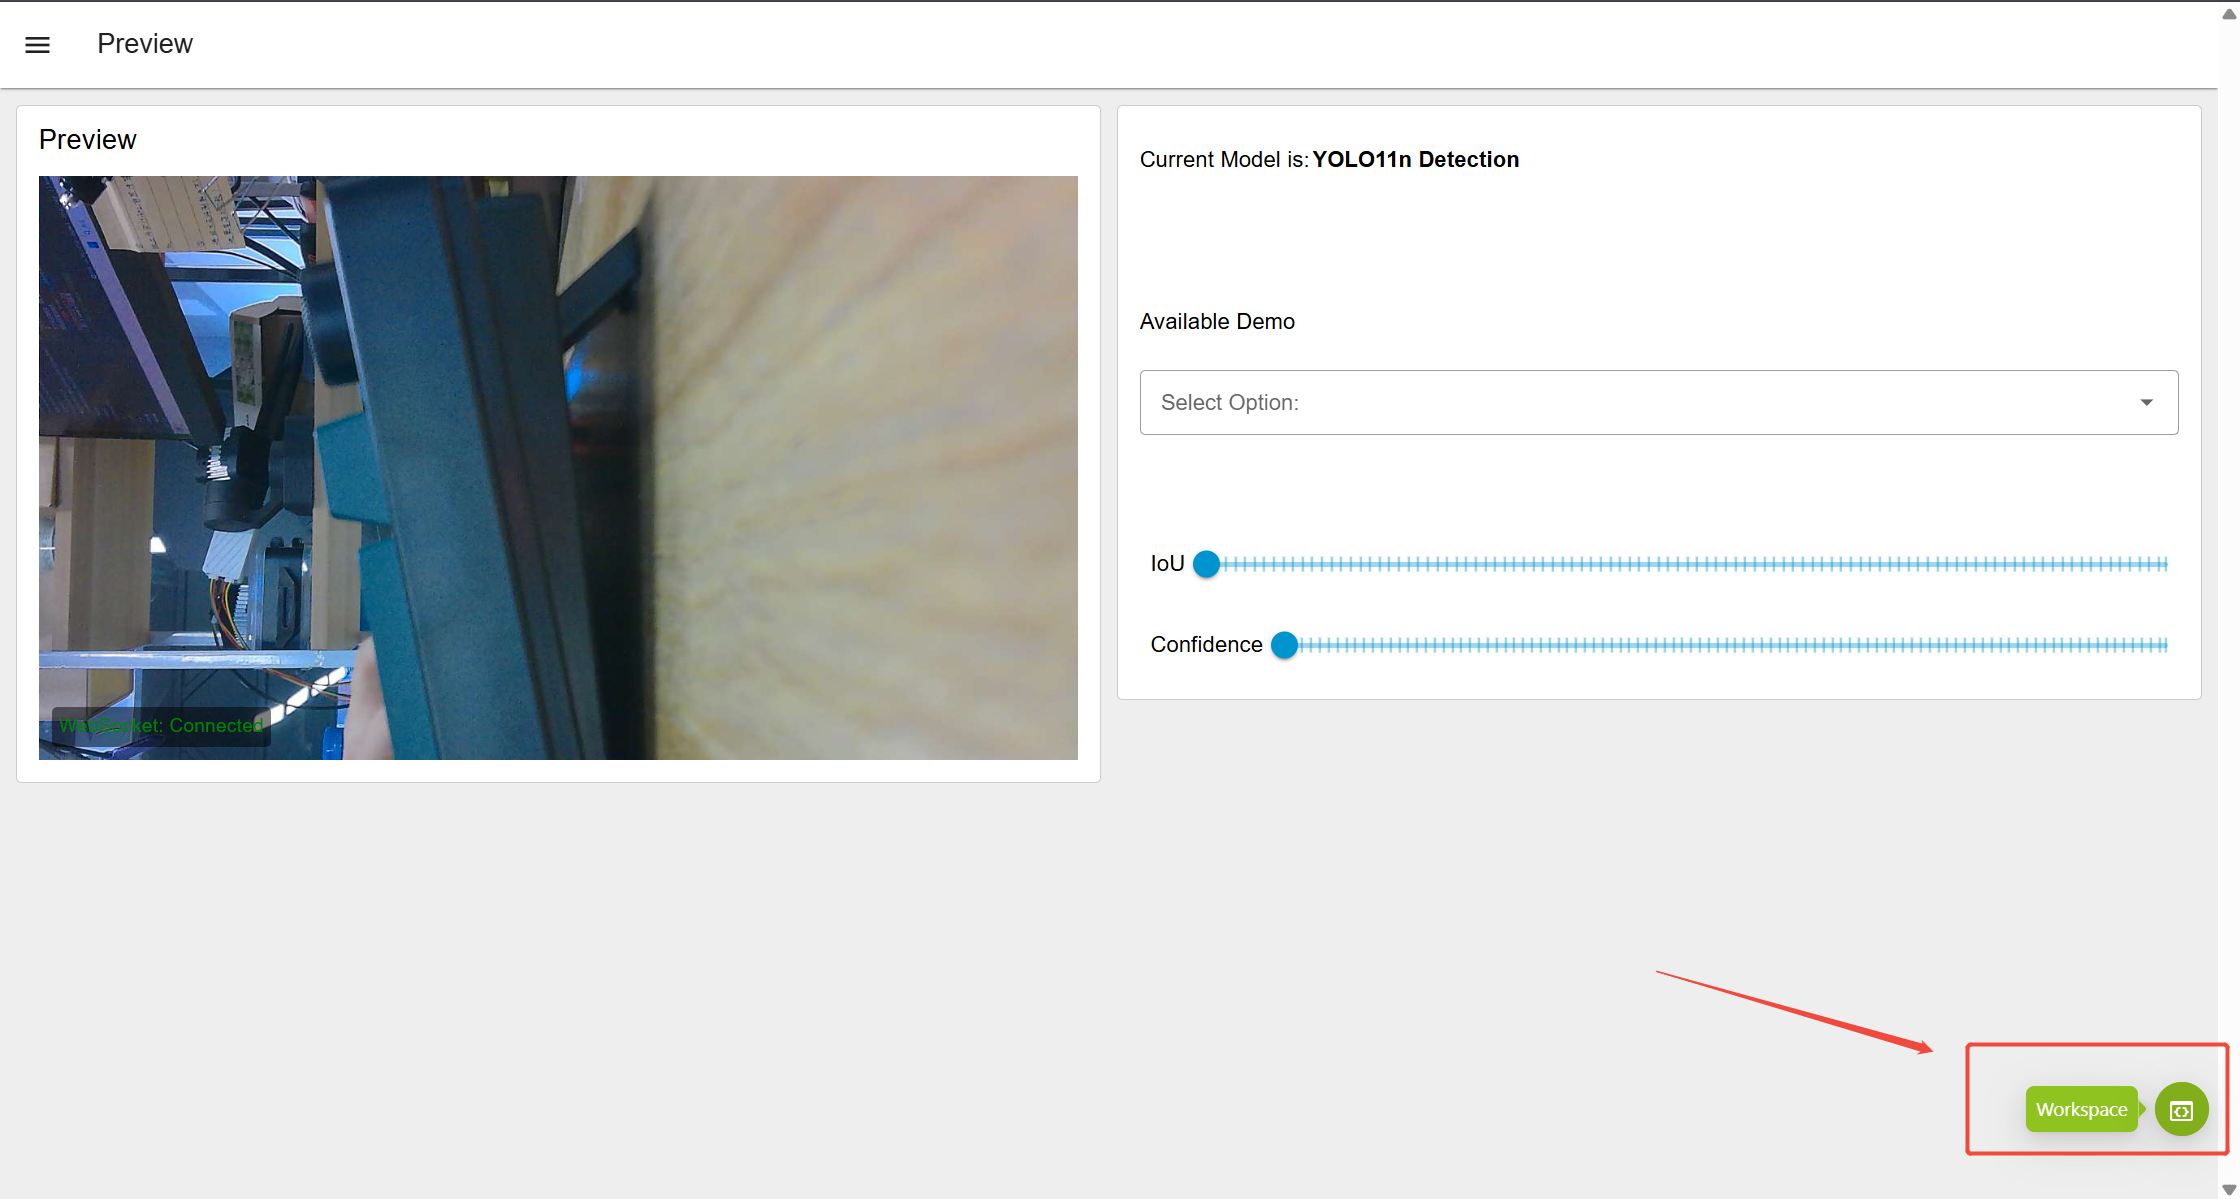
Workspace page display
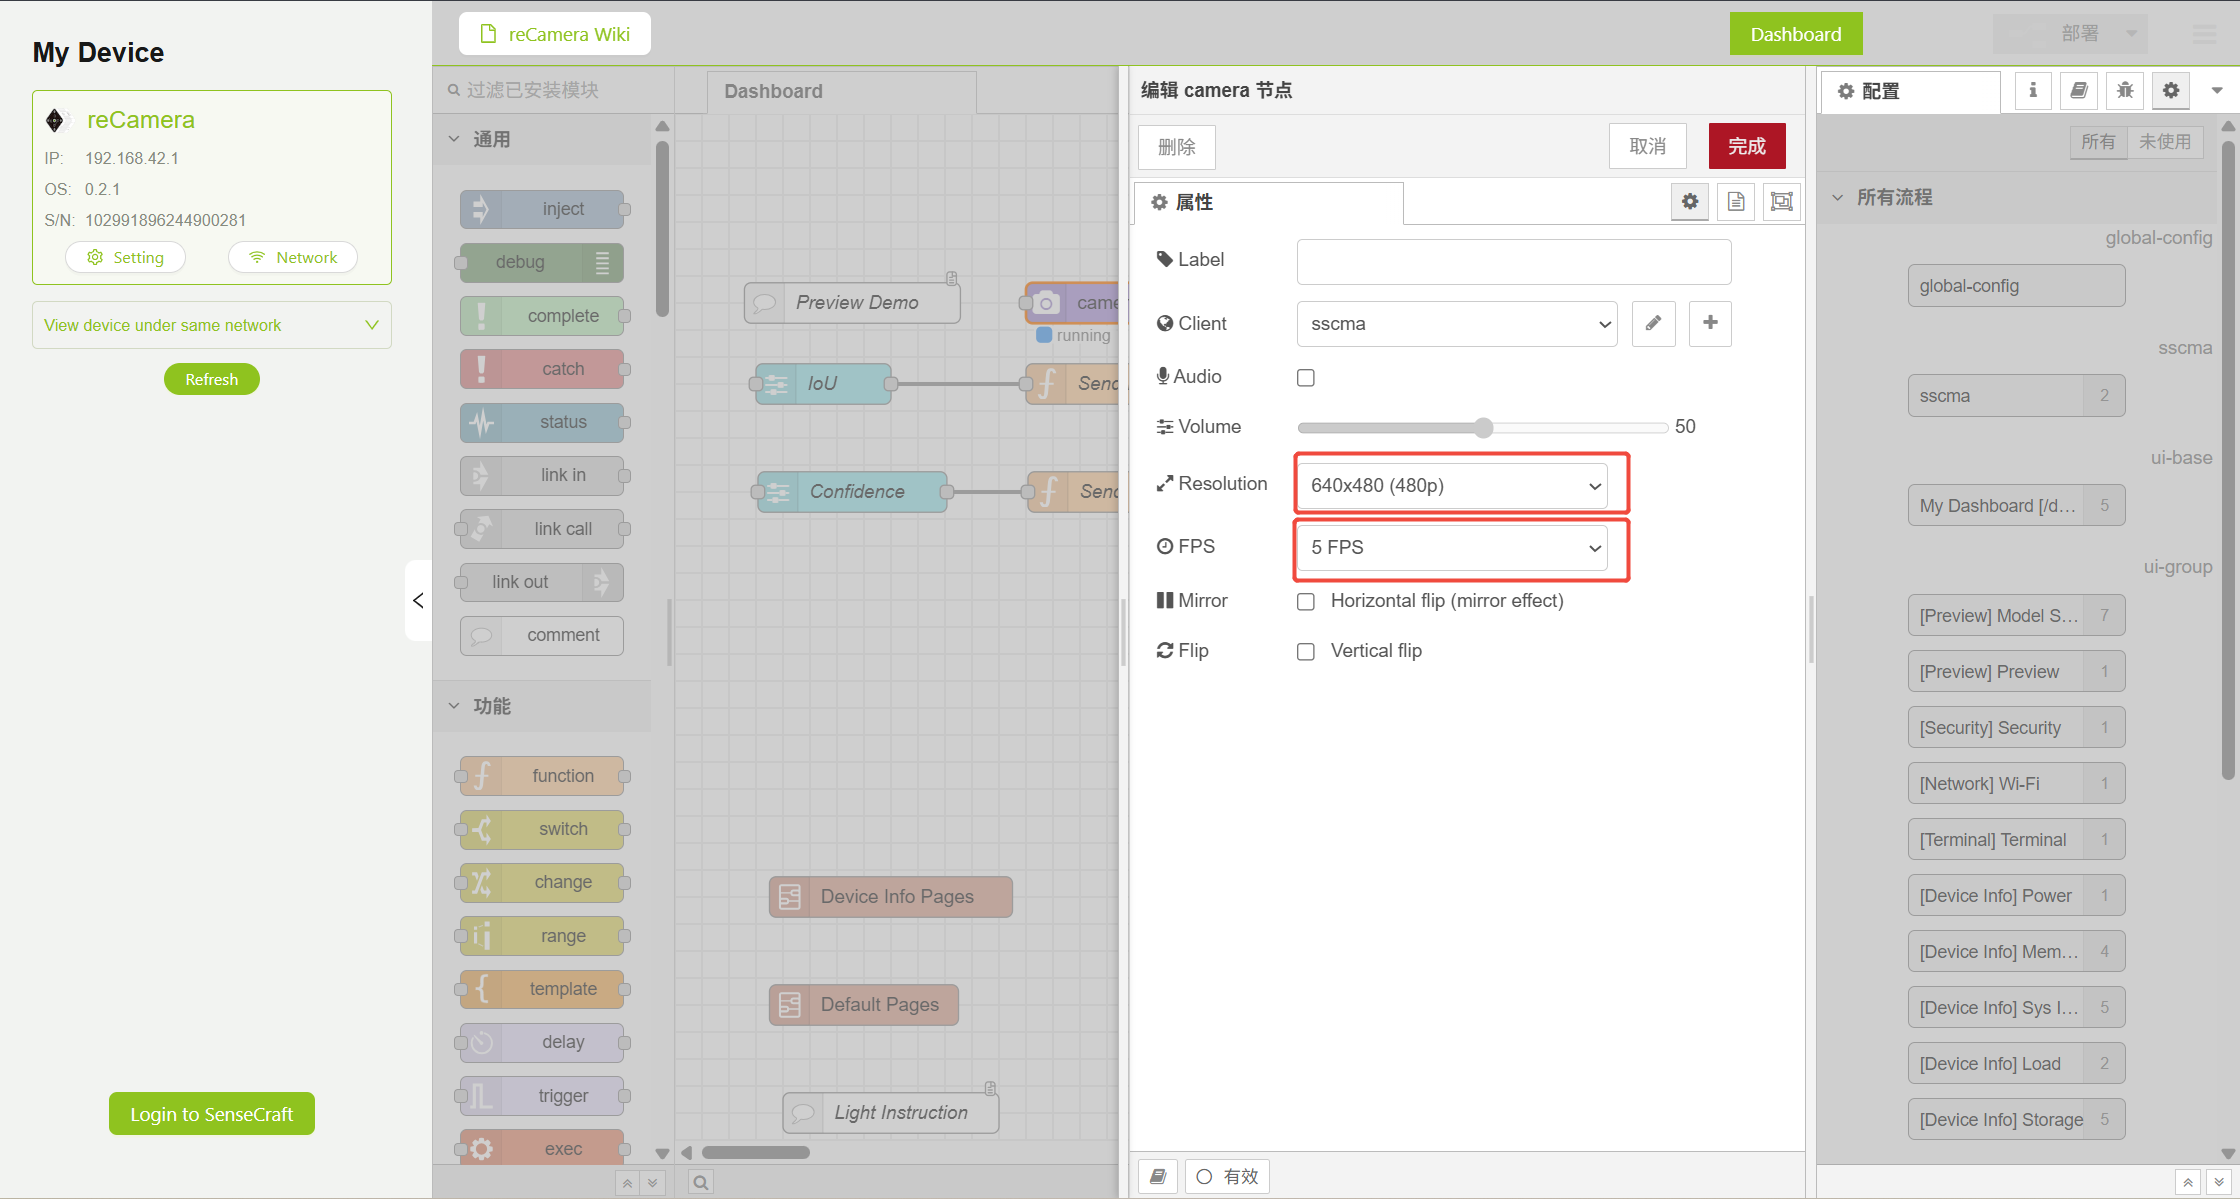
Double-click the camera node to enter the configuration page. To ensure fluency, we configure the camera node as 480P, 5 frames. You can try a higher resolution or frame rate, but the latency may be higher.
Step 1.3 Configure the stream node
As mentioned above, we need to configure rtsp push stream on Node-RED. In the node list on the left, search the 'stream' node or slide the mouse wheel down to the bottom to find the Stream node. After the configuration method, please refer to: Node-Red Stream Node ConfigurationAfter configuration, you should get the following results:
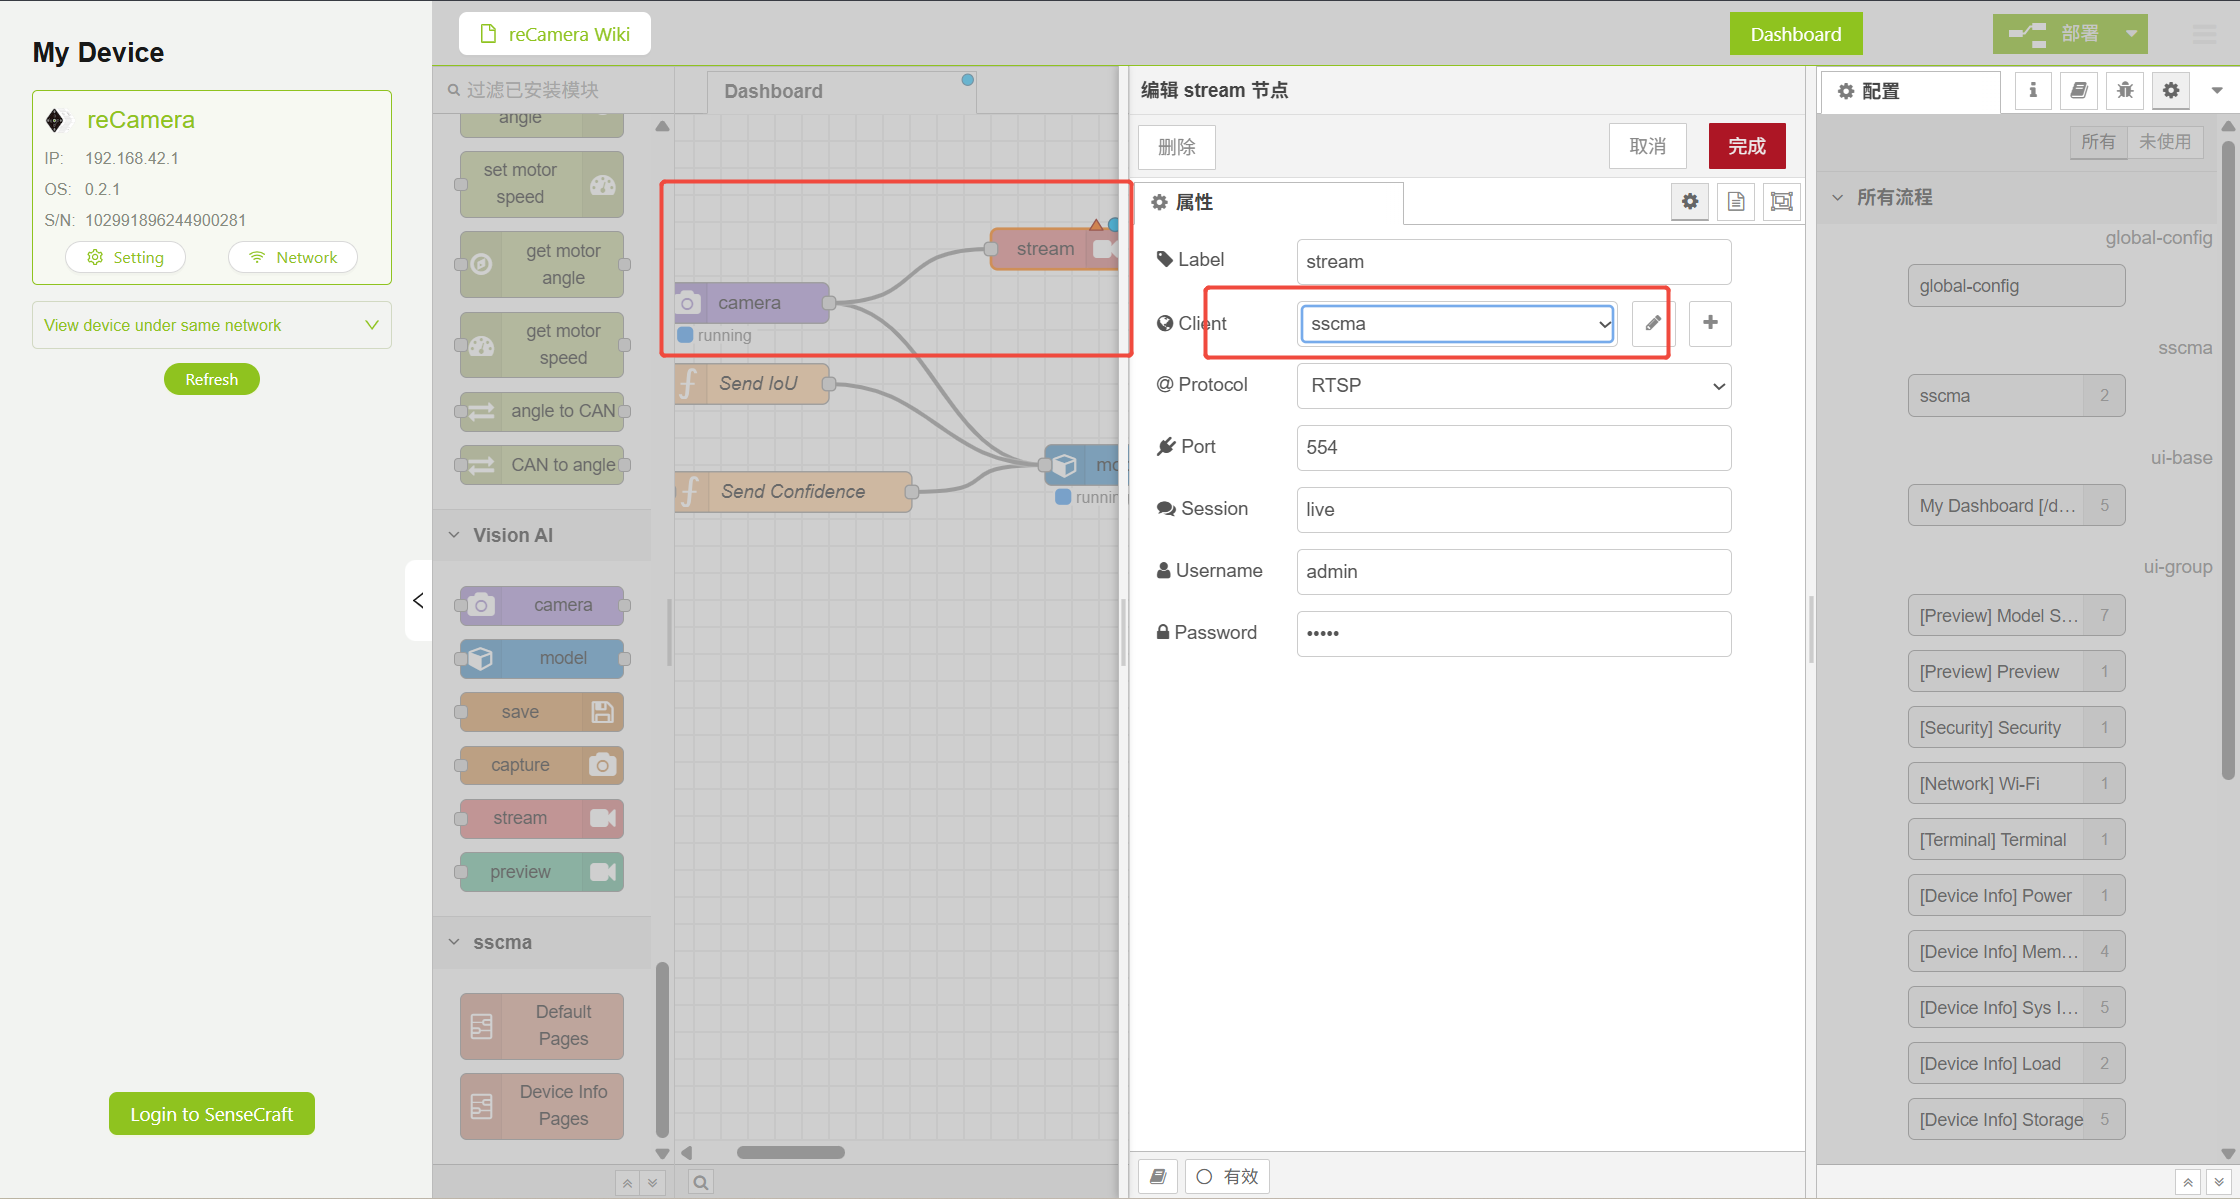
Please fully follow the Node-RED tutorial to ensure that your output is to sscma, and the final video stream will be output to: rtsp:// admin:admin@192.168.xxx.xxx:554/live, where 192.168.xxx.xxx is the static IP address of the reCamera. Static IP can be configured freely. 192.168.10.100 is used for demonstration here.
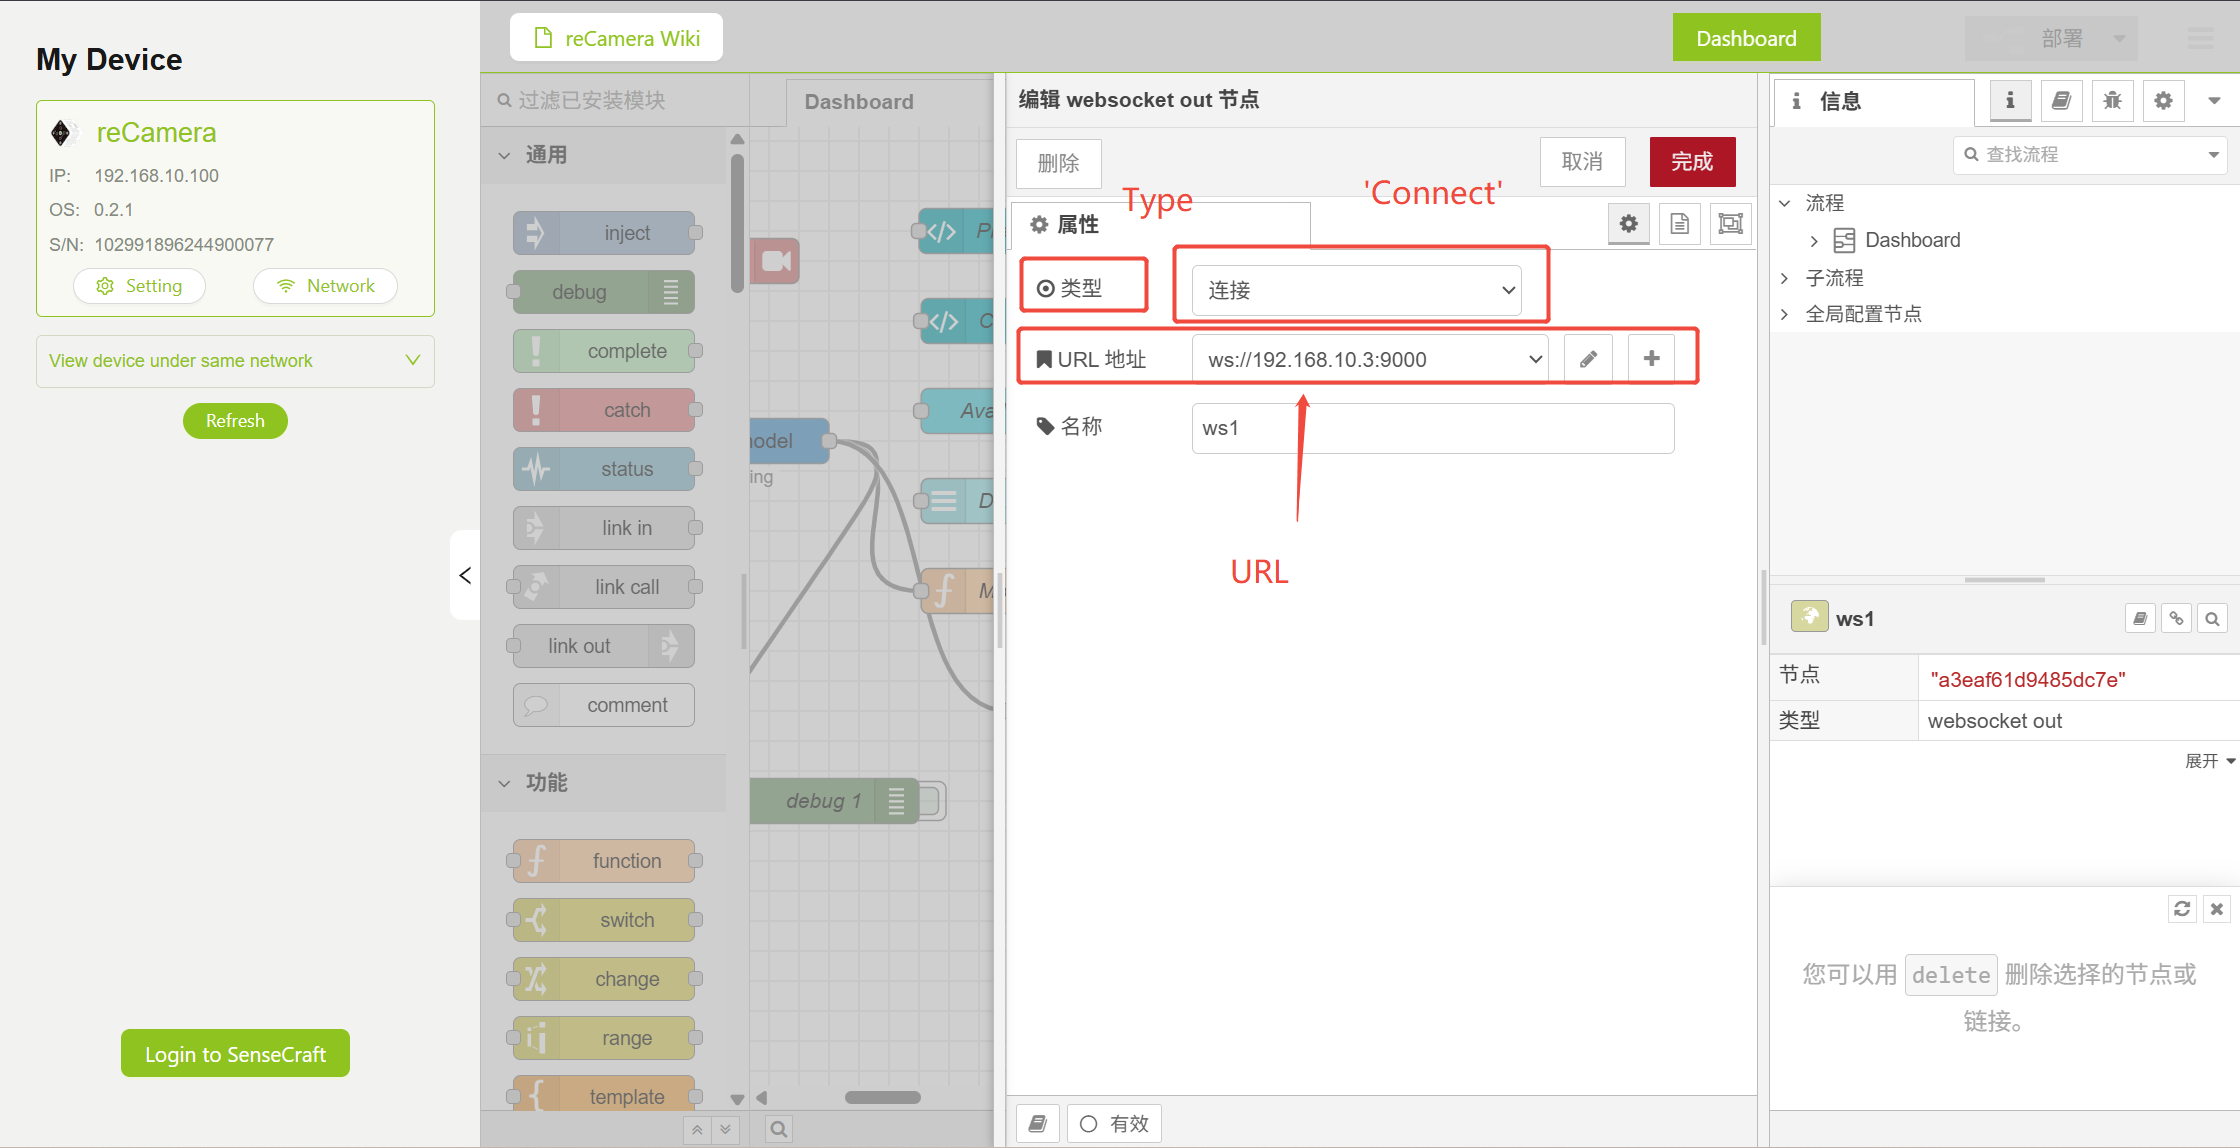
Step 1.4.1 Configure the WebSocket node
In order to display the results detected by yolo on the terminal equipment, we need to send the detection results via WebSocket. The type of WebSocket node should be configured as 'connect' rather than 'listen'.
When configuring the URL of WebSocket node here, it needs to be configured as ws://192.168. nnn.nnn:9000 In fact, 192.168.nnn.nnn is the static IP address of the reTerminal or your own other terminal equipment, not reCamera static IP address above. 192.168.10.3 is used here for demonstration. The final result is as follows:
Step 1.5. Enter the settings page
Or on the Workspace page that just modified Node RED, click "Setting" in the upper left corner'
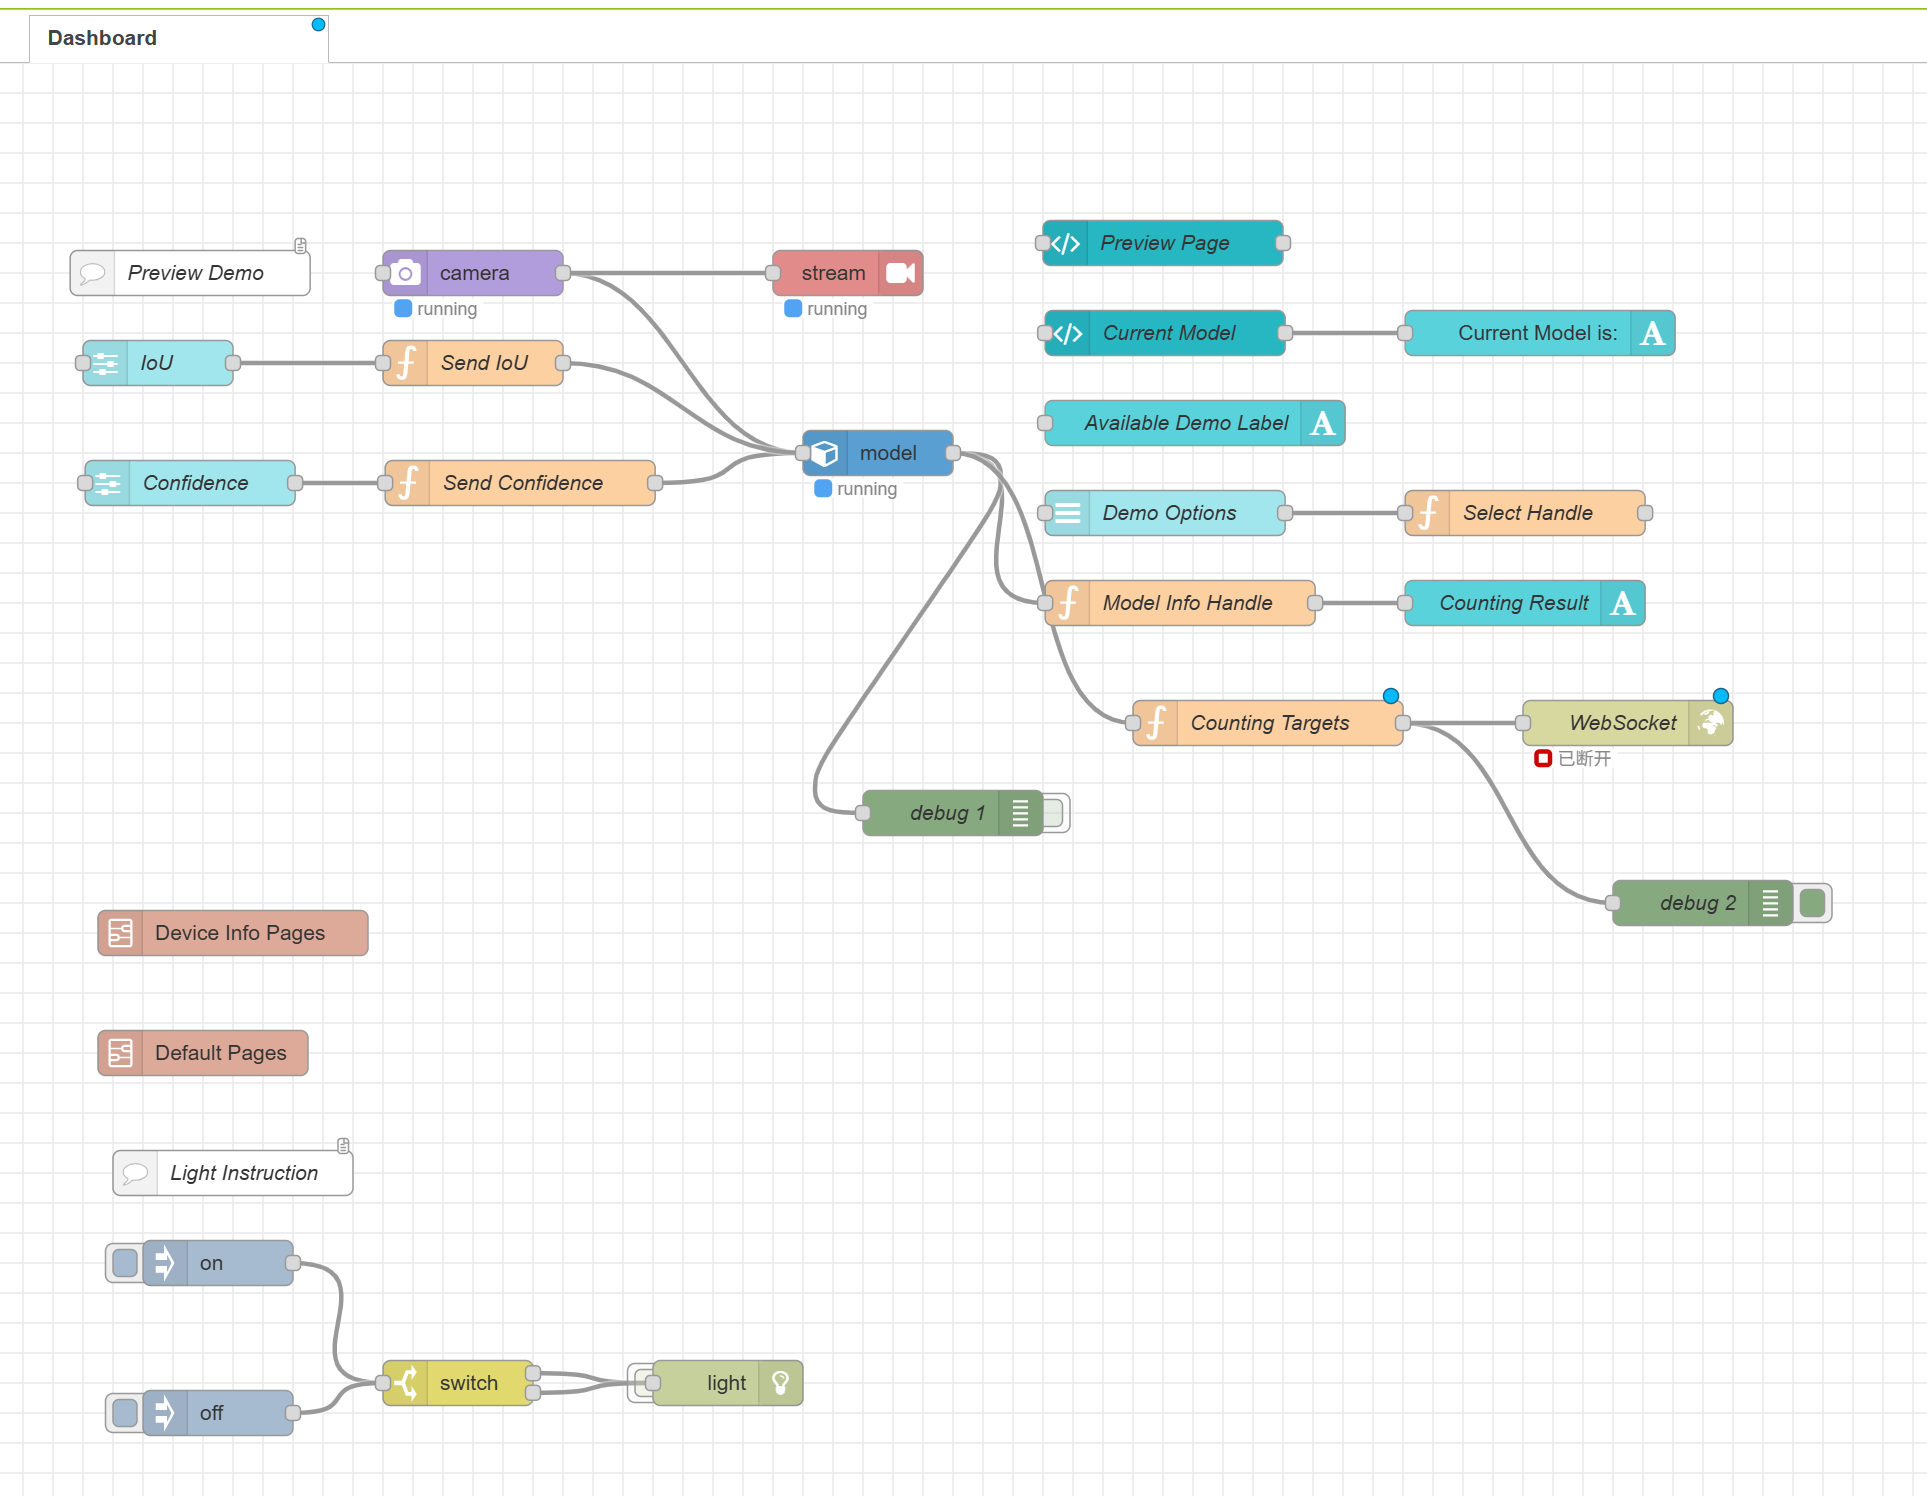
Figure 4: Workspace Setting Frame
Step 1.6 Enter the reCamera terminal
After entering the settings page, select 'Terminal' to enter the reCamera command line
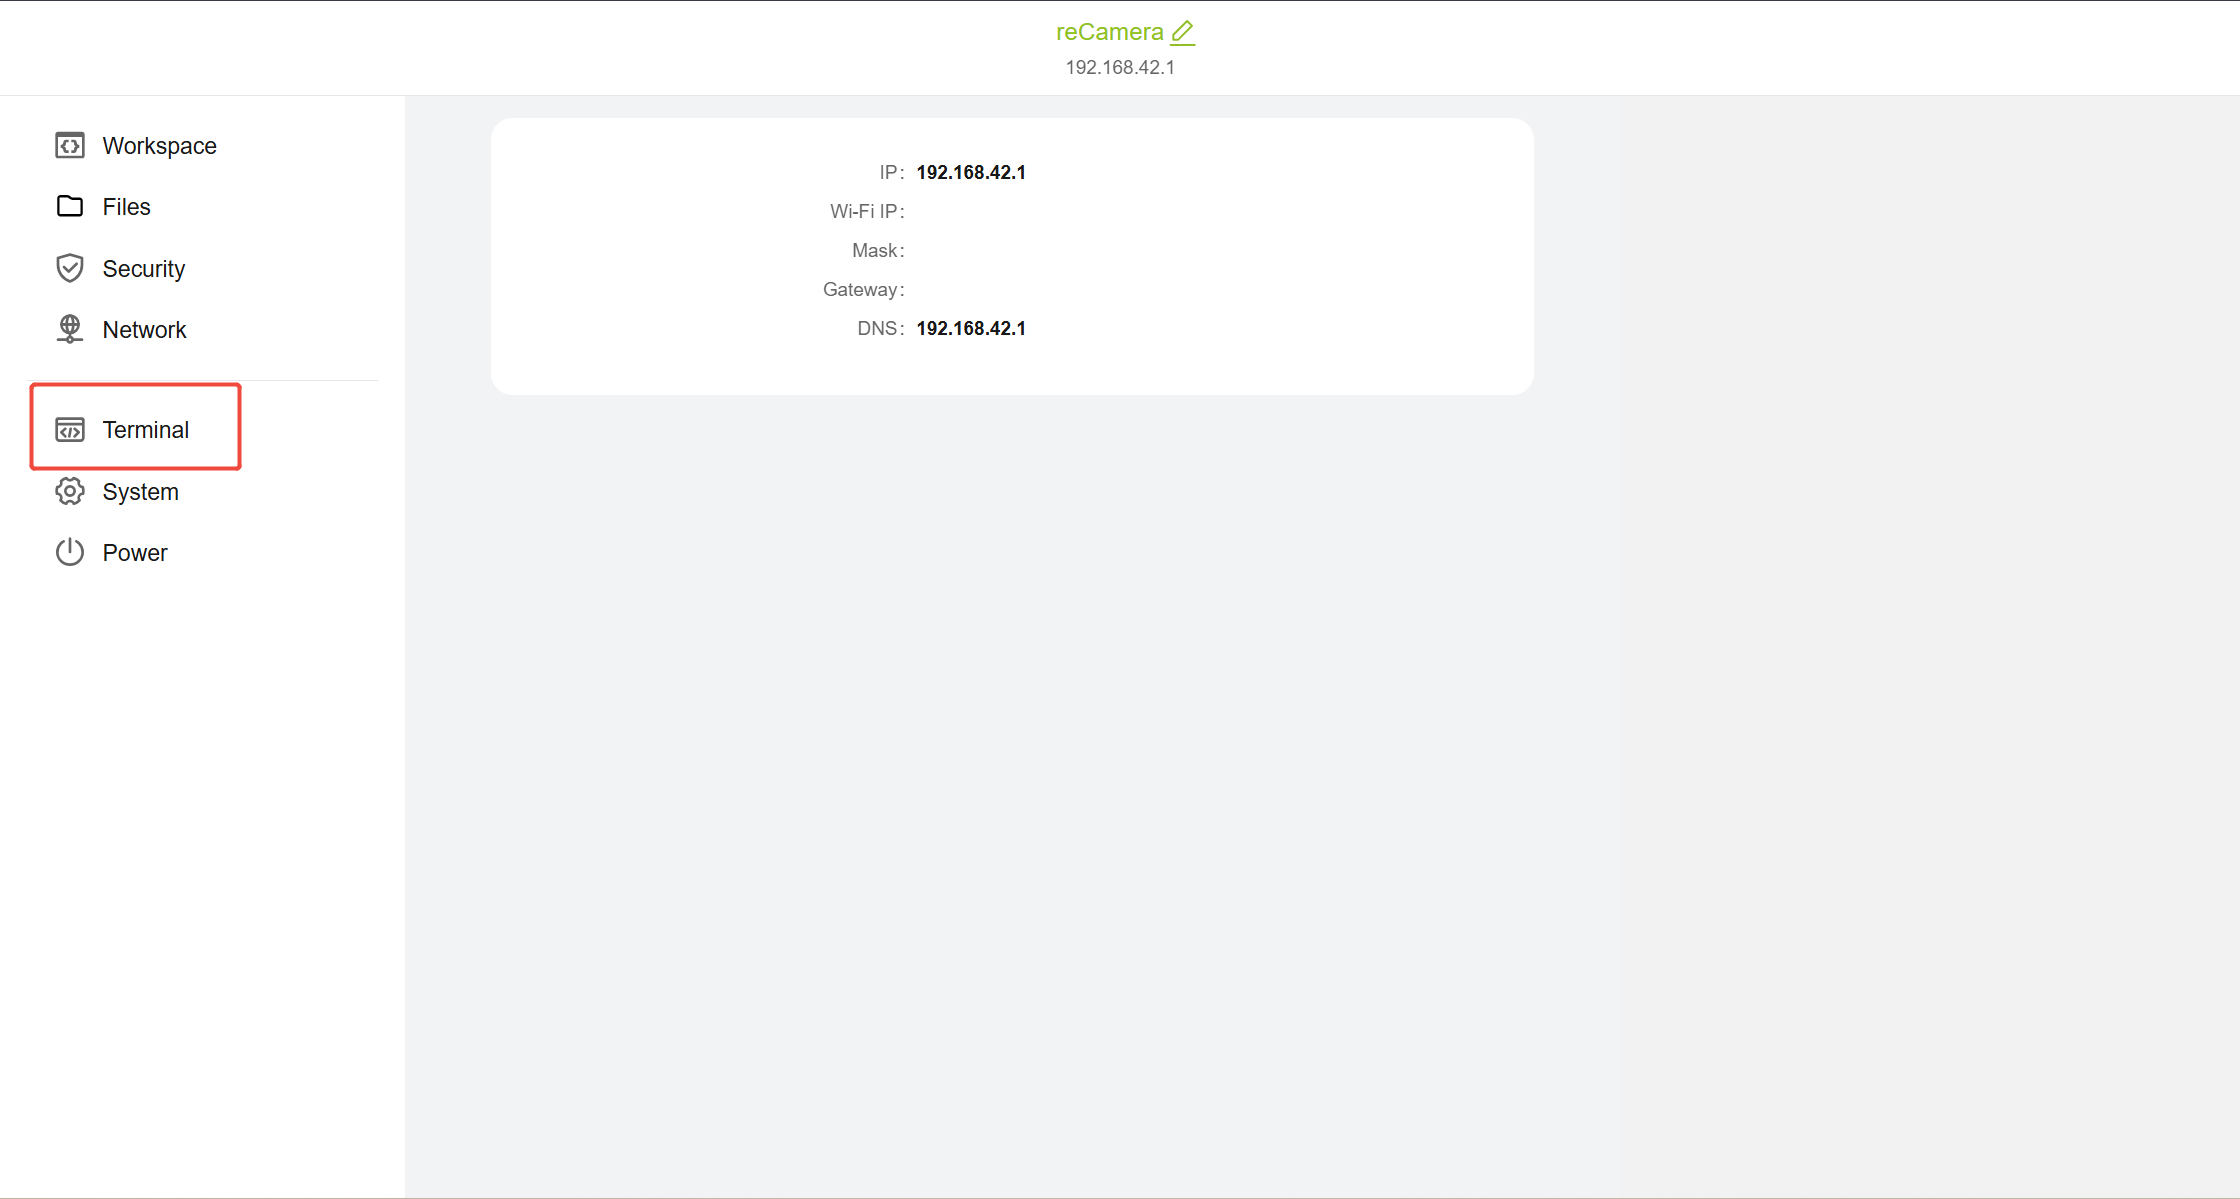
Figure 5: Set Page Terminal Frame
After clicking the Terminal, you need to log in again, enter the user name: 'recamera', and then enter the set password to use the Terminal. the effect is as follows. if you forget your password, please refer to the following tutorial to reset the device: reCamera Factory Reset
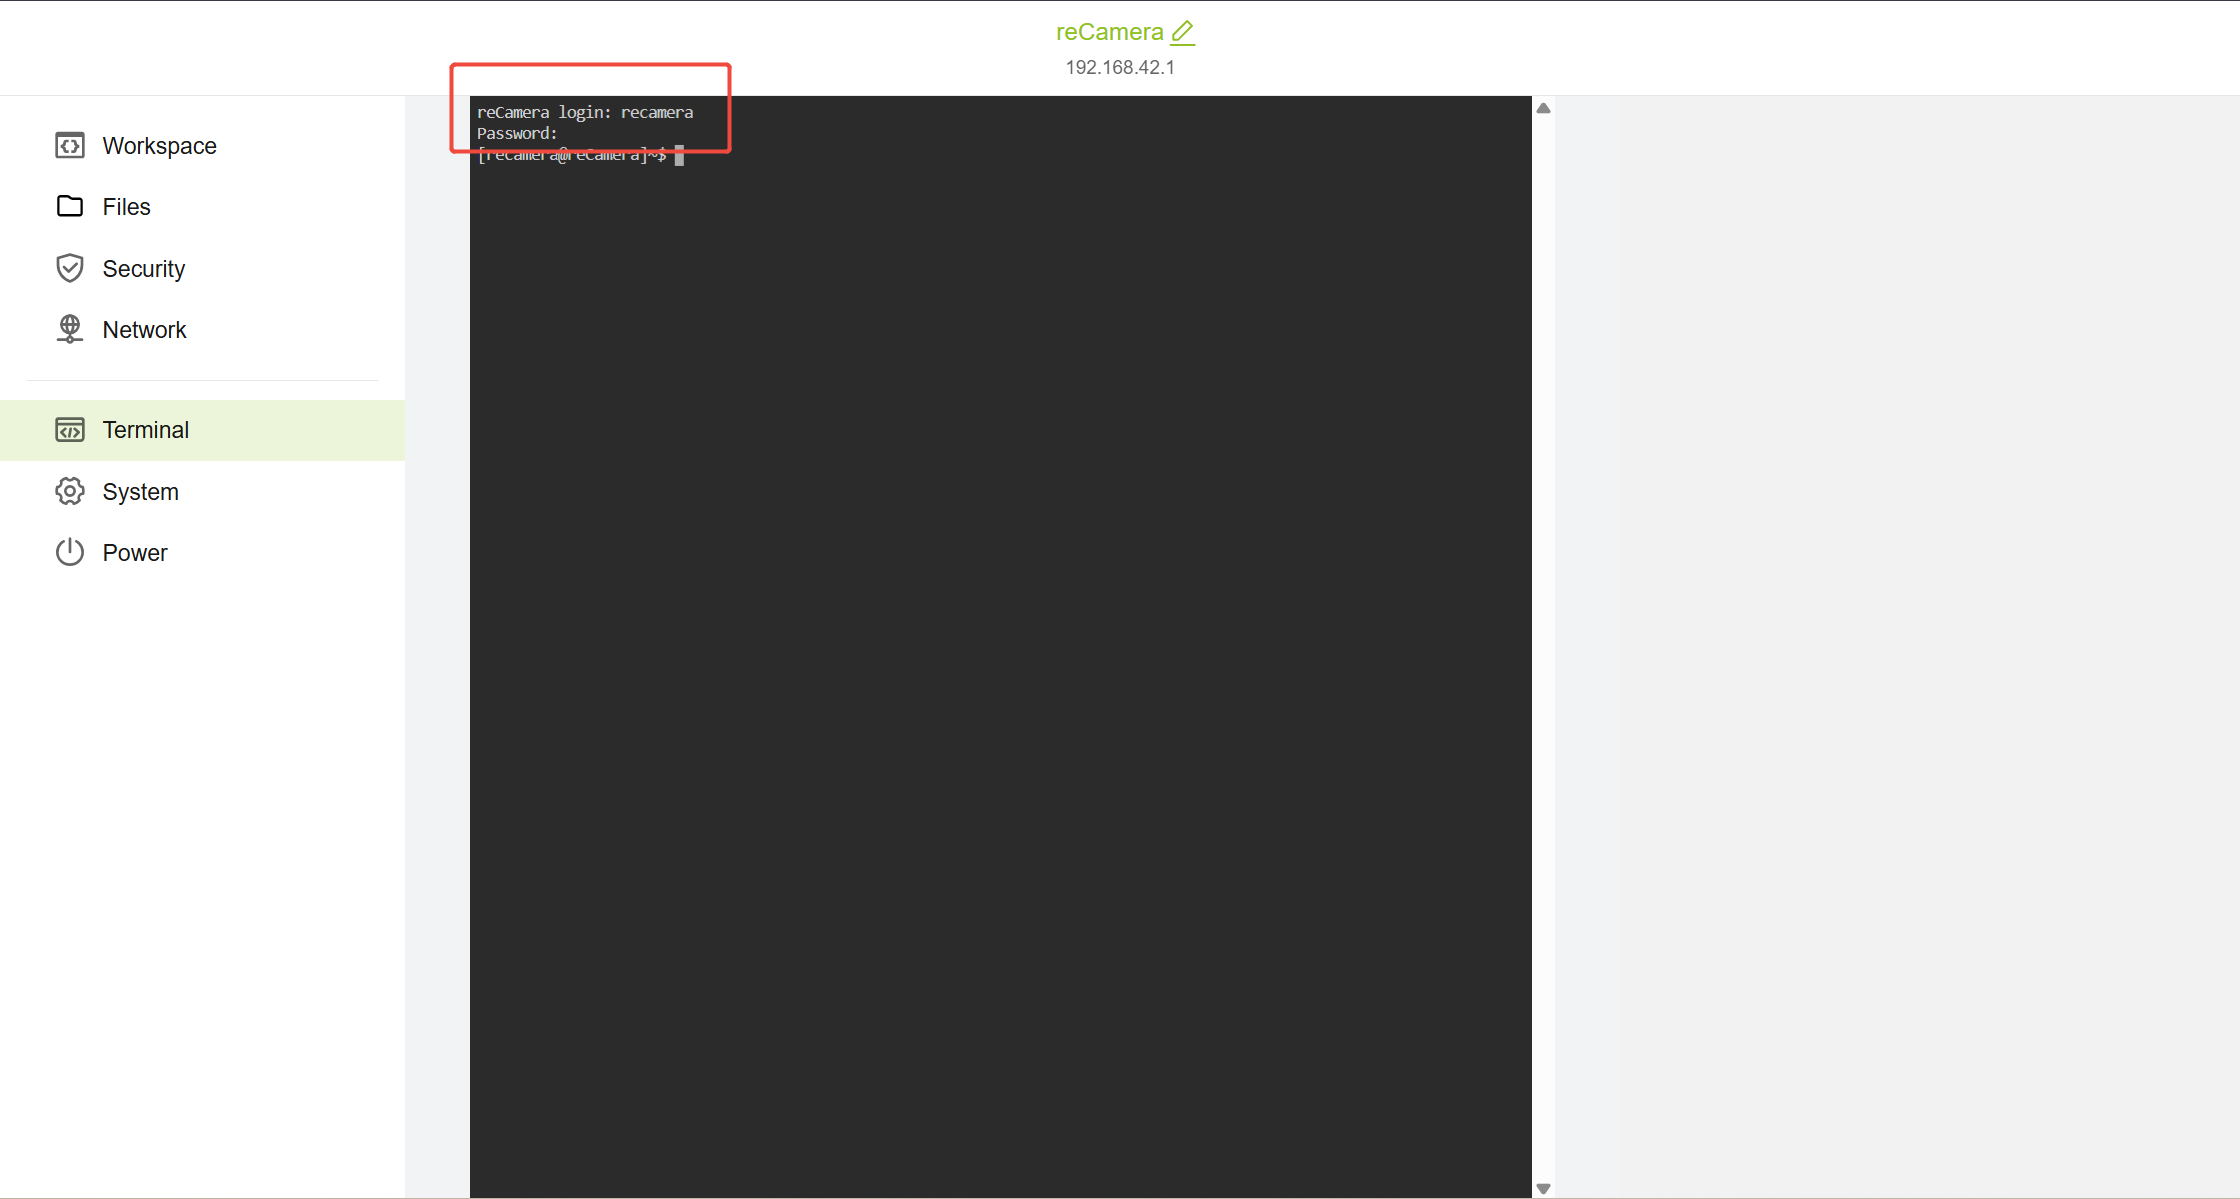
Figure 6: Effect of Terminal page after login
Step 1.7 Configure reCamera Static IP
On the reCamera, we need to configure the network through the traditional Linux network system (ifupdown). The method is very simple. We only need to enter the network configuration file and configure the Ethernet port on the reCamera to the static IP you want: 192.168.xxx.xxx.xxx. Here I configure the static IP
102.168.10.100 First enter the network configuration file through the vi editor and enter the following command on the reCamera terminal:
sudo vi /etc/network/interfaces
Please add at the end of the file:
auto eth0
iface eth0 inet static
address 192.168.10.100
netmask 255.255.255.0
gateway 192.168.10.1
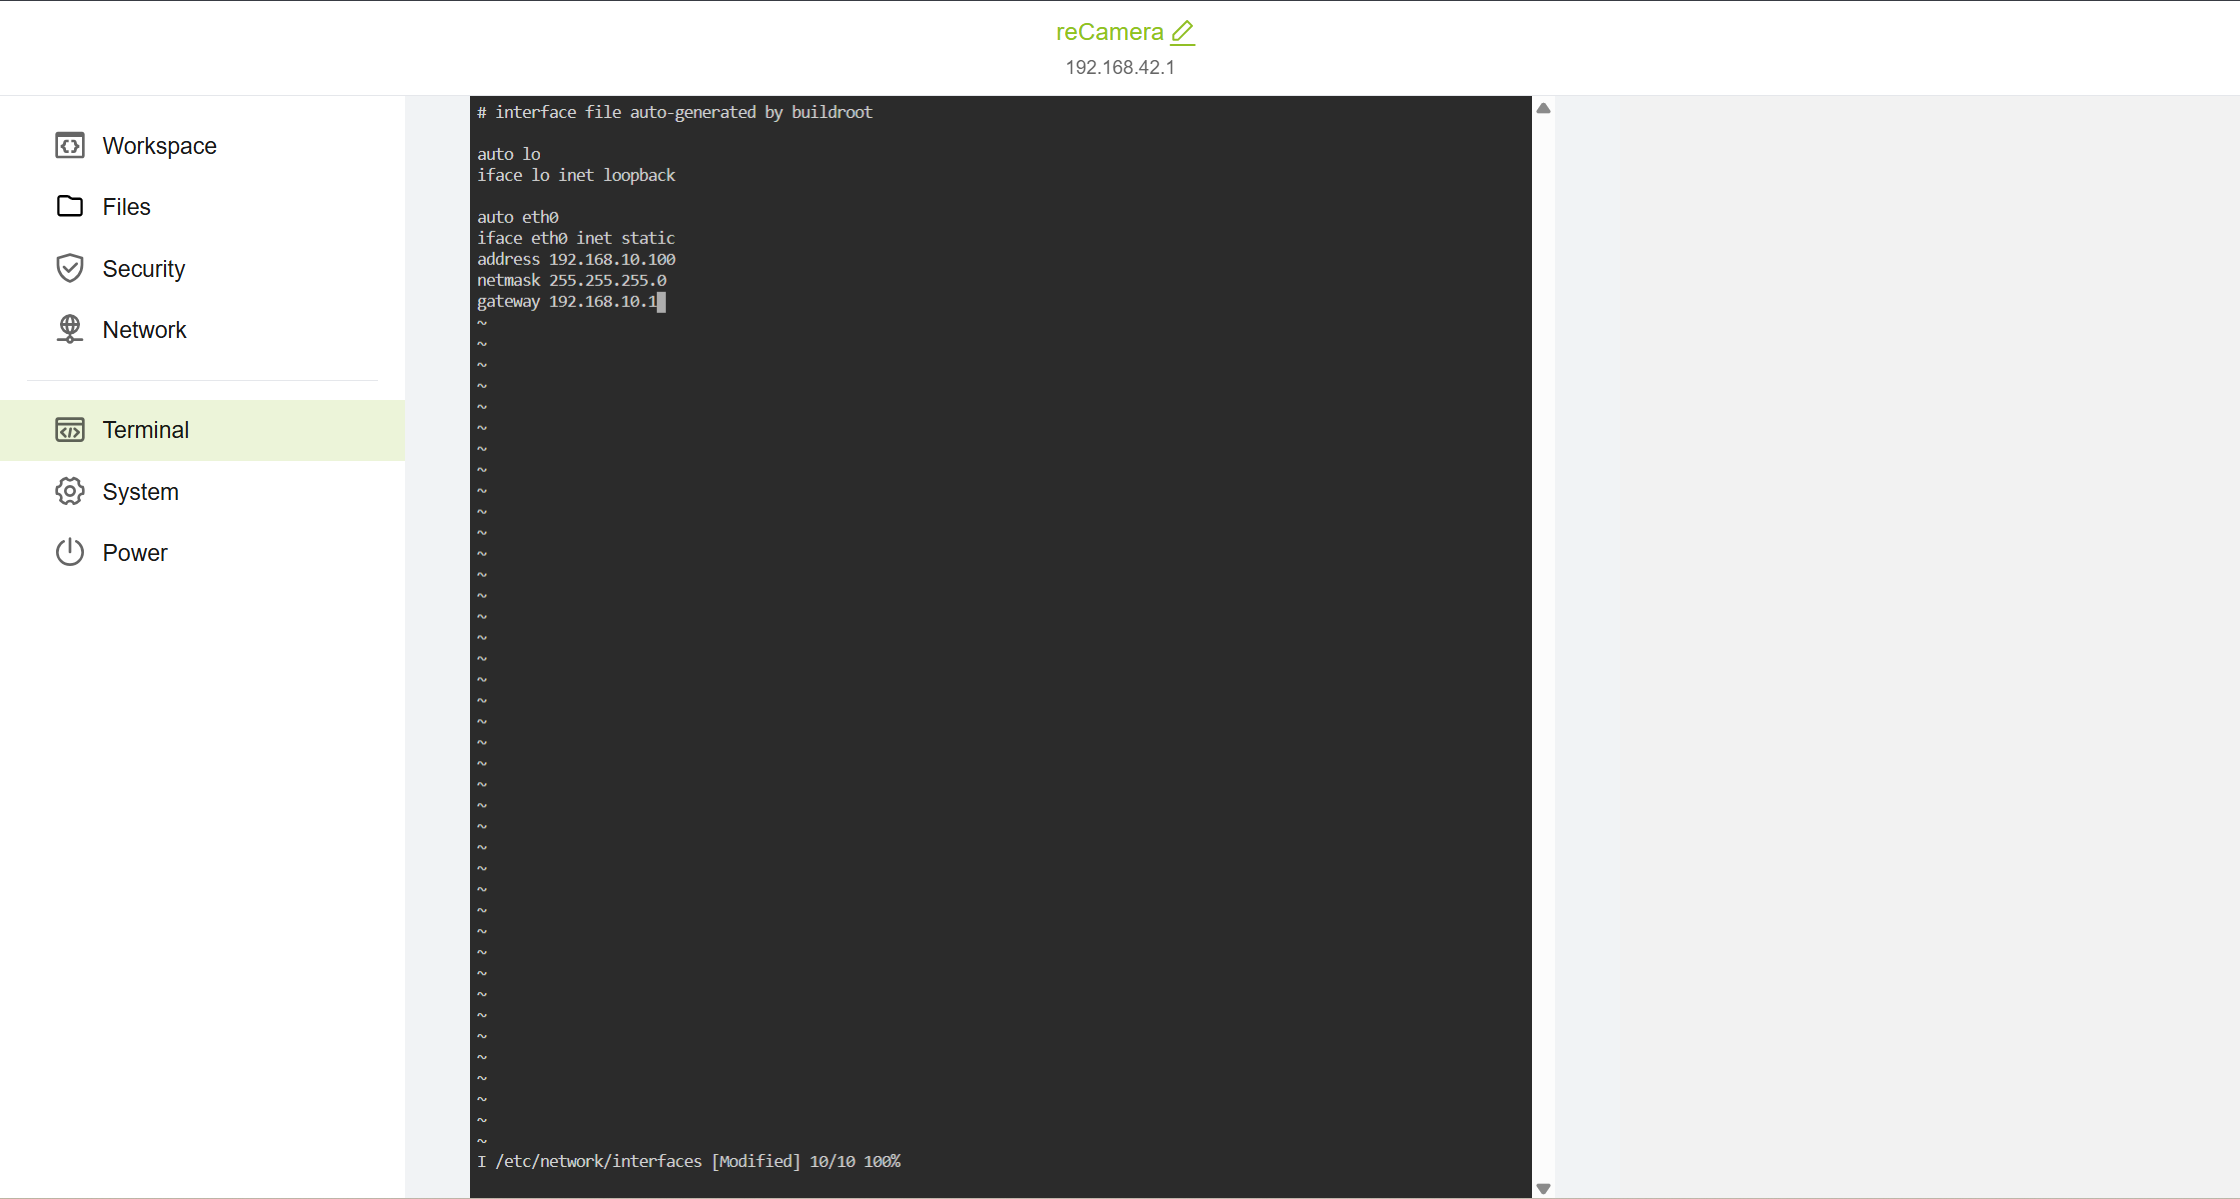
These code set the Ethernet port of the configuration reCamera is static IP 192.168.10.100, the subnet mask is 255.255.255.0, and the gateway is 192.168.10.1. Of course, you can use 192.168.3.xxx or 192.168.42.xxx for specific IP free configuration. However, please make sure that it is in the same network segment as your reTerminal or terminal equipment. For example, your reCamera is 192.168.33, then the reTerminal needs to be configured as 192.168.33.nnn. If the static IP of the reTerminal becomes 192.168.32.nnn or 192.168.34.nnn, communication cannot be made.
After adding the above code, enter ''':wq''' to exit the vi editor and return to the reCamera terminal. Then enter '''sudo reboot ''' to restart the reCamera.
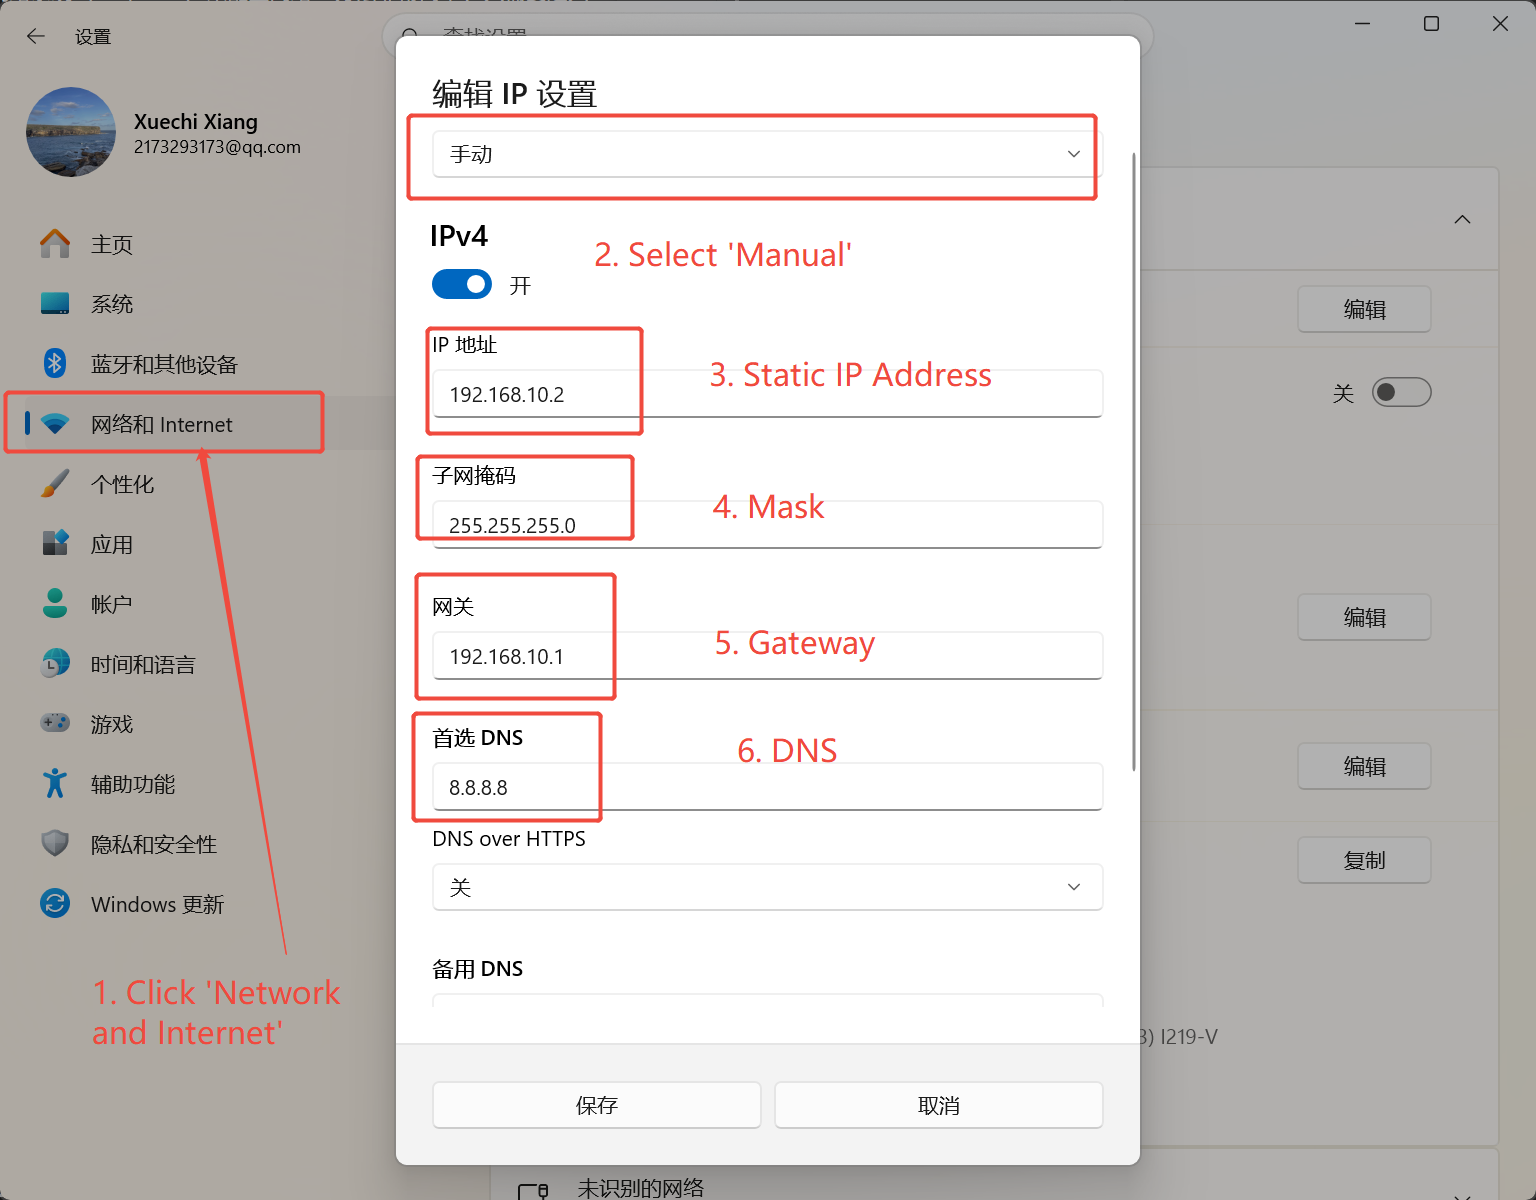
It should be noted that after the static IP is configured, the reCamera must be connected to the PC with a network cable. At the same time, the static IP must be configured on the PC before logging in to the reCamera again. The newly configured reCamera static IP is used when logging in. Window is used to configure static IP as a demonstration here. Again, for all devices configured with static IP, it must be ensured that they are on the same network segment, such as reCamera-192.168.10.100 and reTerminal-192.168.10.3, laptop (Windows)-192.168.10.2 Otherwise, they cannot communicate with each other. The reference configuration on the Windows is as follows:
Step 1.8 Check Static IP Configuration
Repeat step 1.5 to return the reCamera Settings and check whether the static IP is configured successfully:
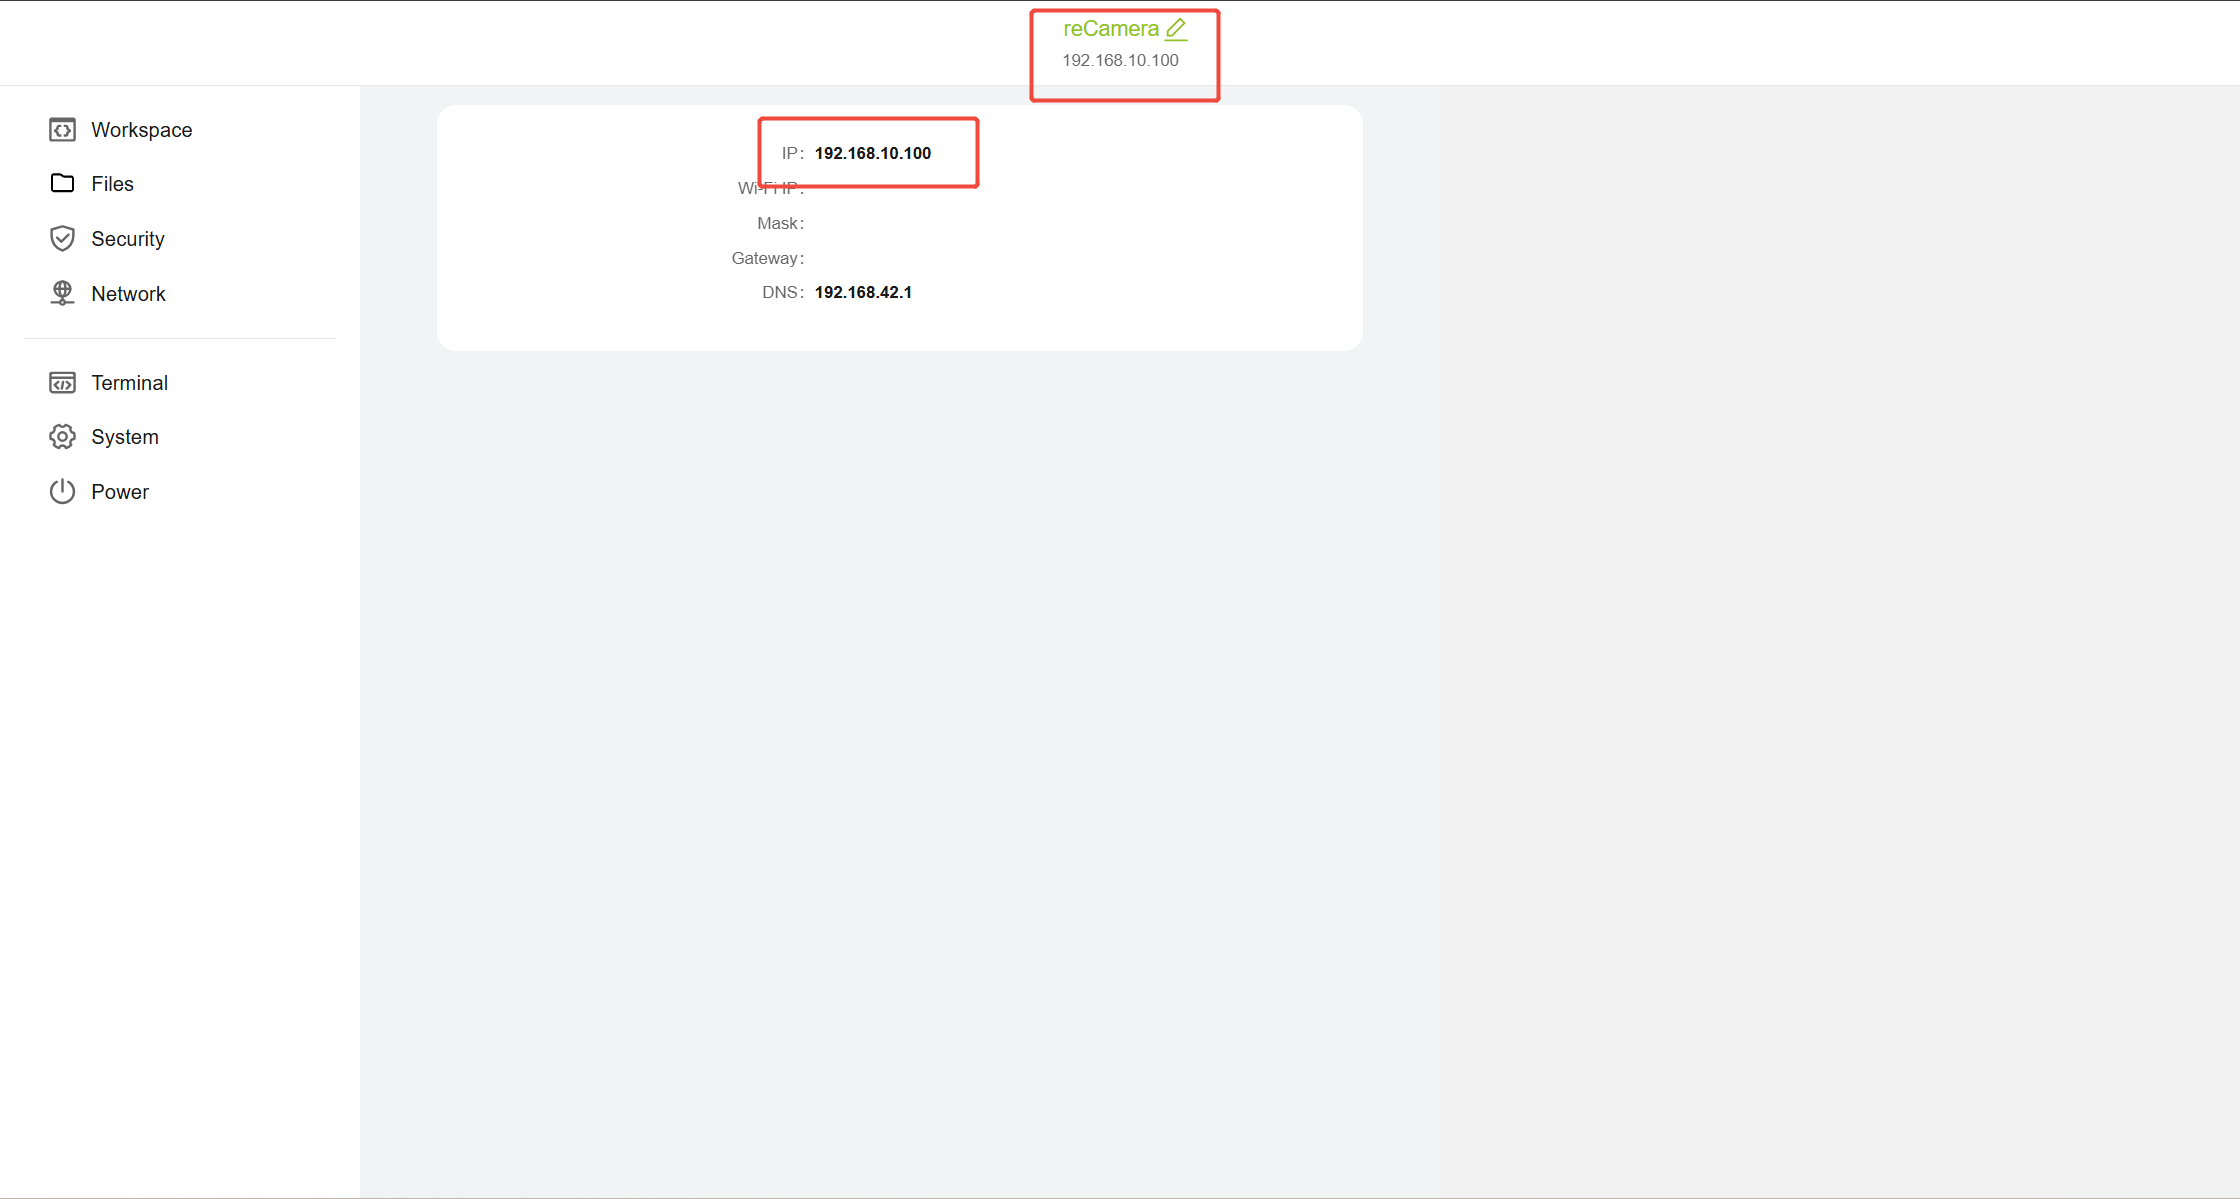
Good, now we have a static IP configured on the reCamera, now let's move on to the next stage
Phase 2: Configure Wifi HaLow Image Transmission Module
Step 2.1 Set the working mode of the two HaLow modules
First, set one of the Wifi HaloW modules to AP mode and the other to STA mode. Don't worry about whether the AT or STA module is connected to the reCamera/terminal. The order is not important, but at least one STA and one AP mode module are guaranteed.
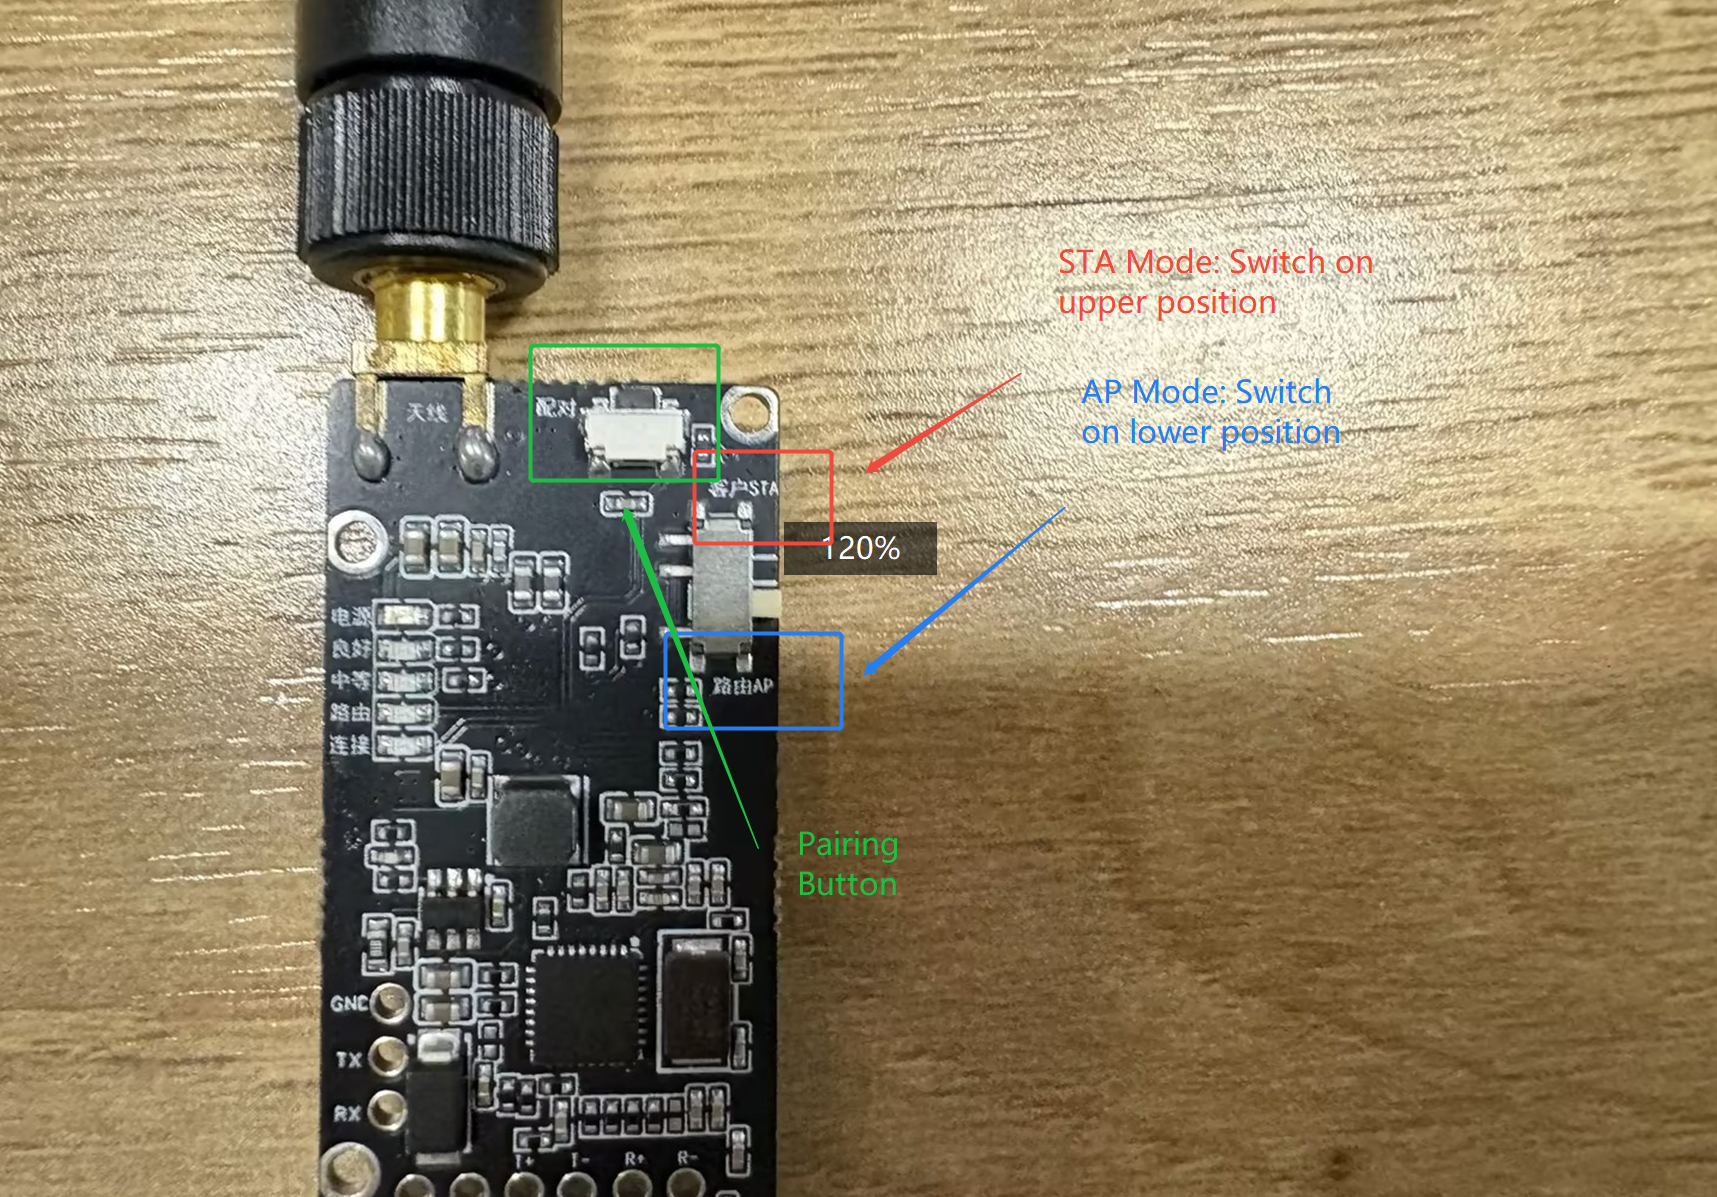
Step 2.2 Pairing HaLow Module
Now press the pairing button on both modules at the same time:
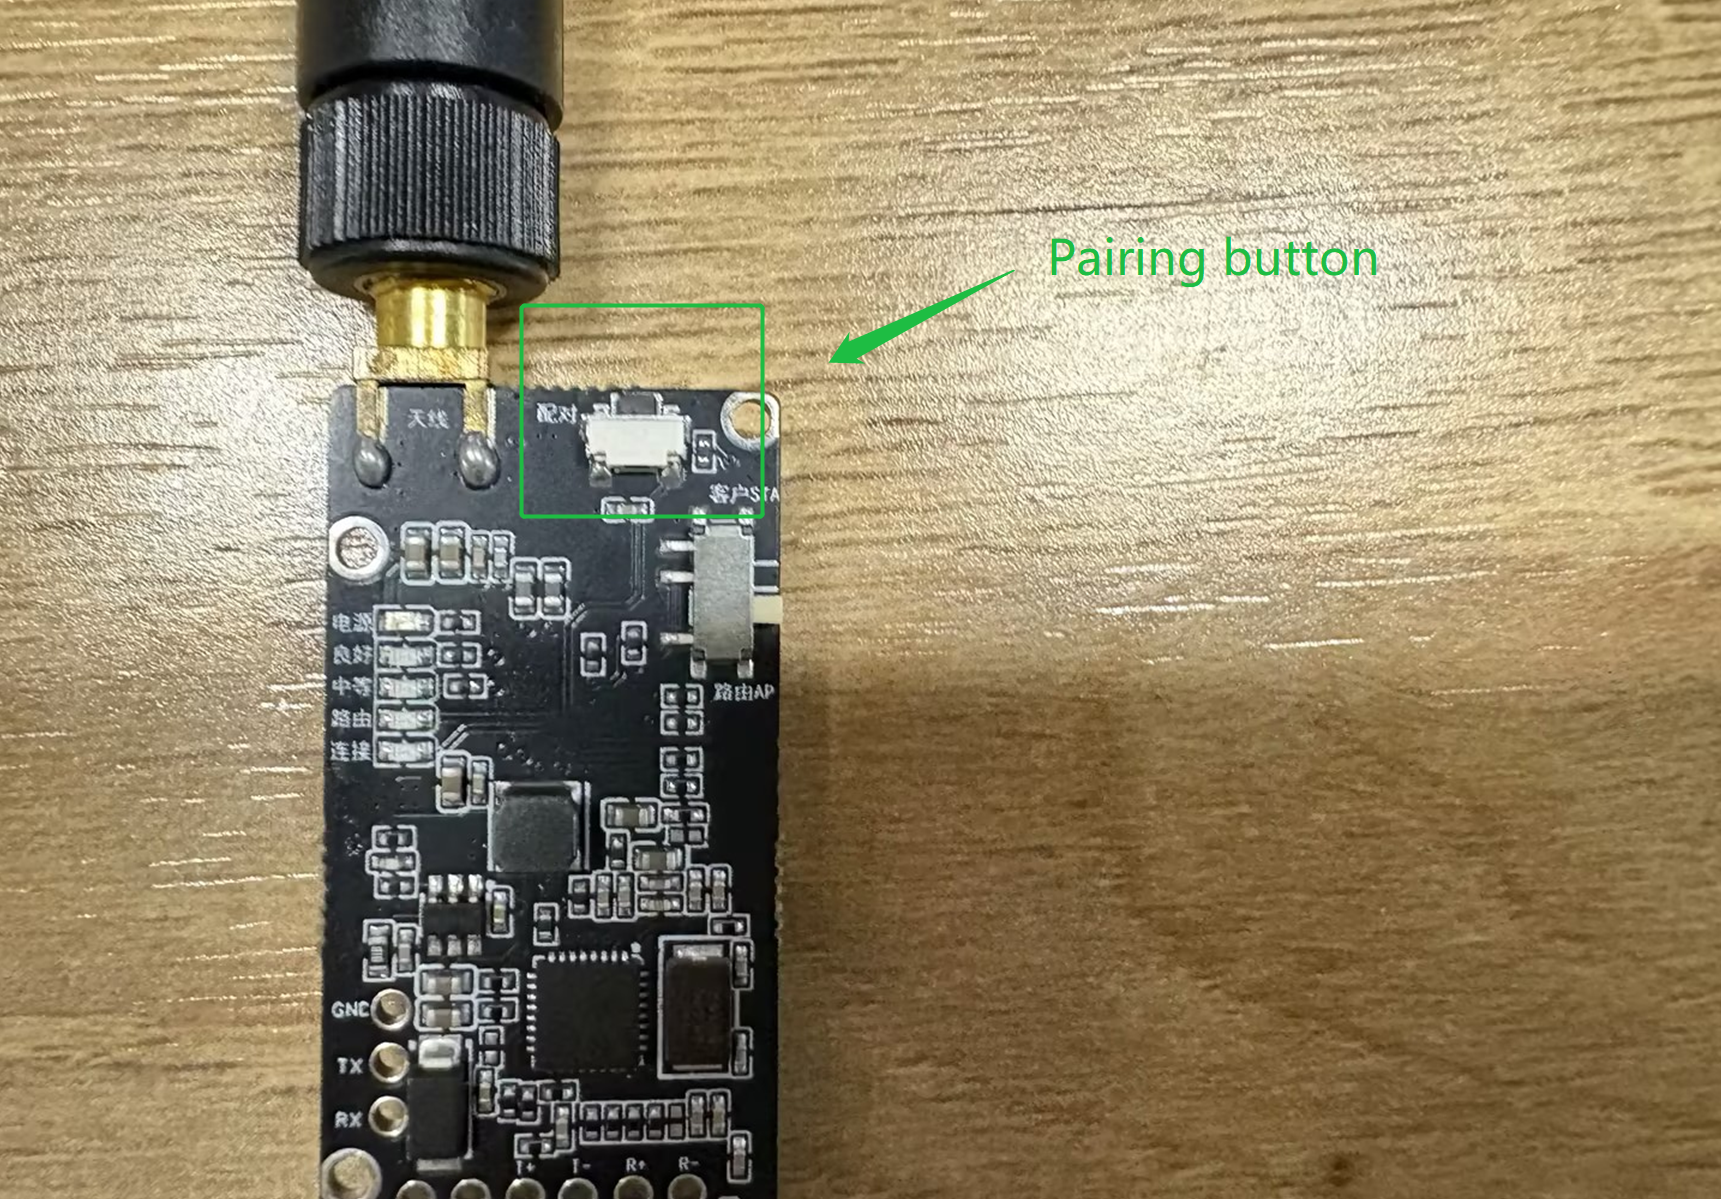
After that, the green LED on the two modules will flash. When the flashing stops and the green LED is always on, the module pairing is successful.
Very good! You have successfully paired two Wifi Halow modules, they can now be seen as both ends of a network cable, can be used to connect reCamera and terminal equipment.
Phase 3: Configure End Devices (reTerminal)
We are now going to configure static IP on the reTerminal. Theoretically, there are many methods, such as NetworkManager. NetworkManager is a network management daemon in Linux system, which automatically helps you manage all network connection tools such as Wi-Fi/Ethernet/IP address/DHCP/hotspot/routing. You can try to pass the NetworkManager. However, in order to reduce the learning cost, we use the same method as reCamera, configure a static IP address through '/etc/network/interfaces.
Again, the reTerminal can be replaced with any (edge) computing device with a network port and screen, including but not limited to laptops, desktops, development boards, etc. For fixed location monitoring, Windows laptops/desktops can be used. For mobile deployment, Raspberry Pi-based end devices with screens can be used. This tutorial uses reTerminal reTerminal E10 expansion board (expansion board for outdoor power supply). You can choose your own power supply.
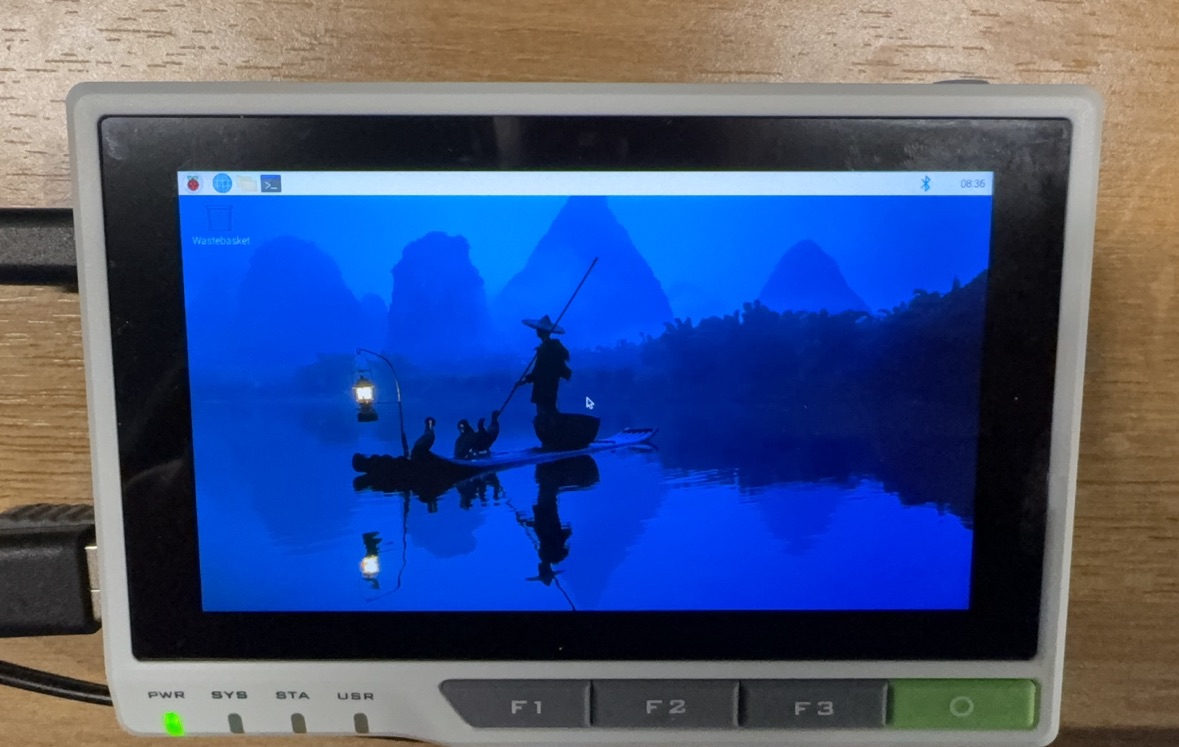
Step 3.1 Start reTerminal
reTerminal the factory comes with the system, you can enter the Raspbian directly in theory. However, if the green LED in the lower left corner lights up/flashes but the screen is black after power-on, please refer to the following tutorial to re-burn the system. This step requires external display debugging. reTerminal Initialization Tutorial
Step 3.2 Disable NetworkManager Service
Connect the keyboard and mouse to the reTerminal, and press Ctrl Alt T to open the terminal. Because the NetworkManager conflicts with the above method, we need to disable the NetworkManager service. Execute on the reTerminal terminal:
sudo systemctl stop NetworkManager
sudo systemctl disable NetworkManager
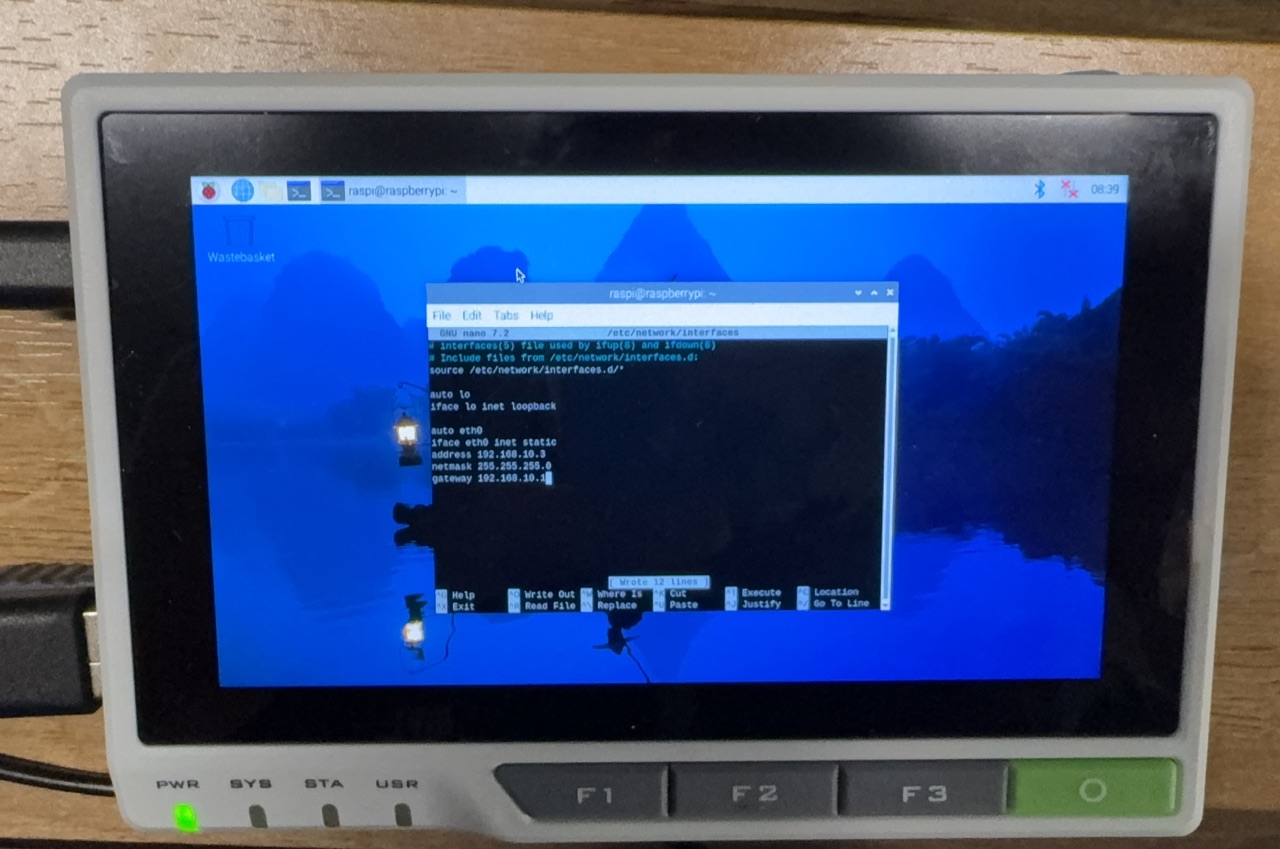
Step 3.3 Configure reTerminal Static IP
As with step 1.7, at the reTerminal terminal:
sudo nano /etc/network/interfaces
Go to the network configuration file and add the following at the end of the file. Here the reTerminal static IP is set to 192.168.10.3:
auto eth0
iface eth0 inet static
address 192.168.10.3
netmask 255.255.255.0
gateway 192.168.10.1
If you want to reuse the NetworkManager in the future, you only need to delete the newly added 'auto eth0' 4 lines in'/etc/network/interfaces', totaling 5 lines.
Then execute:
sudo systemctl enable NetworkManager
sudo systemctl restart NetworkManager
Save ctrl s, ctrl x and exit. Then enter '''reboot''' to restart the reTerminal.
Step 3.4 Verify Static IP Configuration
Return to the reTerminal terminal and run the following command: '''ifconfig''' to verify whether the static IP address is successfully configured.
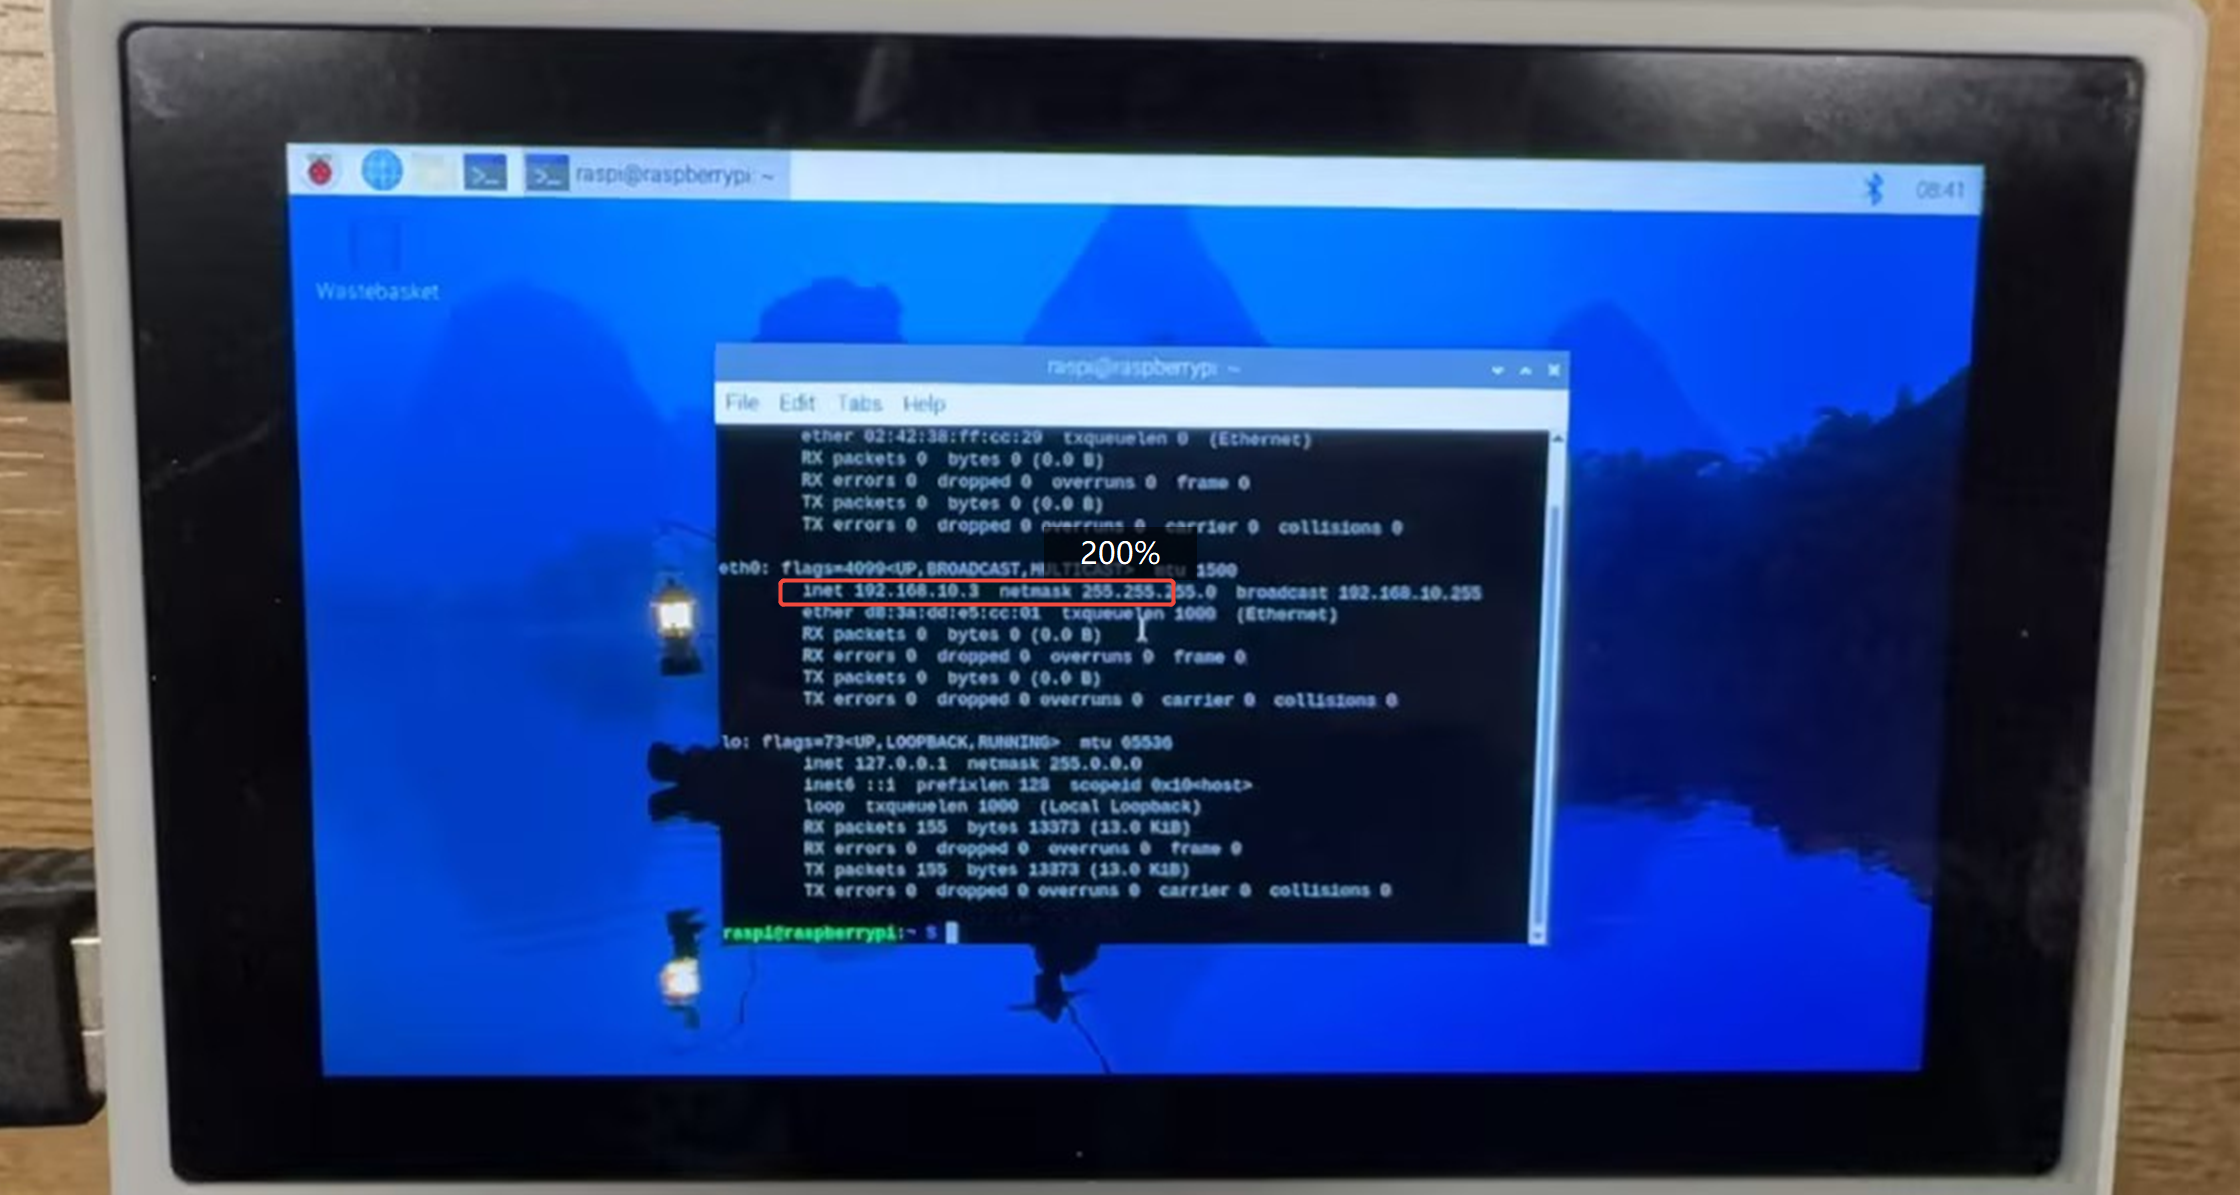
If you see IP = 192.168.10.3 in 'eth0', it means success.
Perfect! All equipment is set up, now you can enter the next stage :)
Phase 4: Connect and Play
Do you remember that we configured rtsp push stream node in step 1.2? There is already an rtsp video stream in: '''rtsp:// admin:admin@192.168.xxx.xxx:554/live''' here' 192.168.xxx.xxx' is the ** reCamera static IP ** that you manually configured in step 1.6, not the reTermnial static IP. In my case, the corresponding rtsp push stream is:
rtsp://admin:[email protected]:554/live
In fact, you can use any software method to open the video stream, such as VLC Player.
However, for ease of use, we use the ffplay command in ffmpeg to open the rtsp video stream directly on the terminal.
Step 4.1 Install the reTerminal Expansion Board
Reference tutorial: reTerminal E10 Install Guide
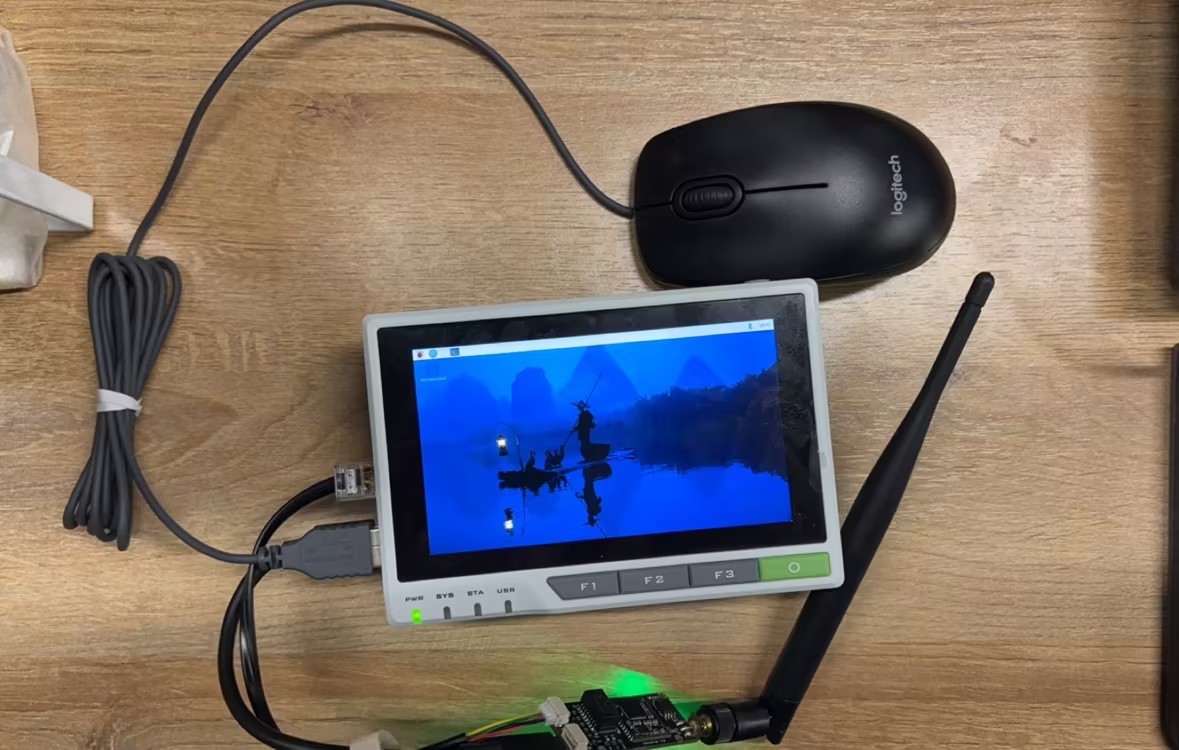
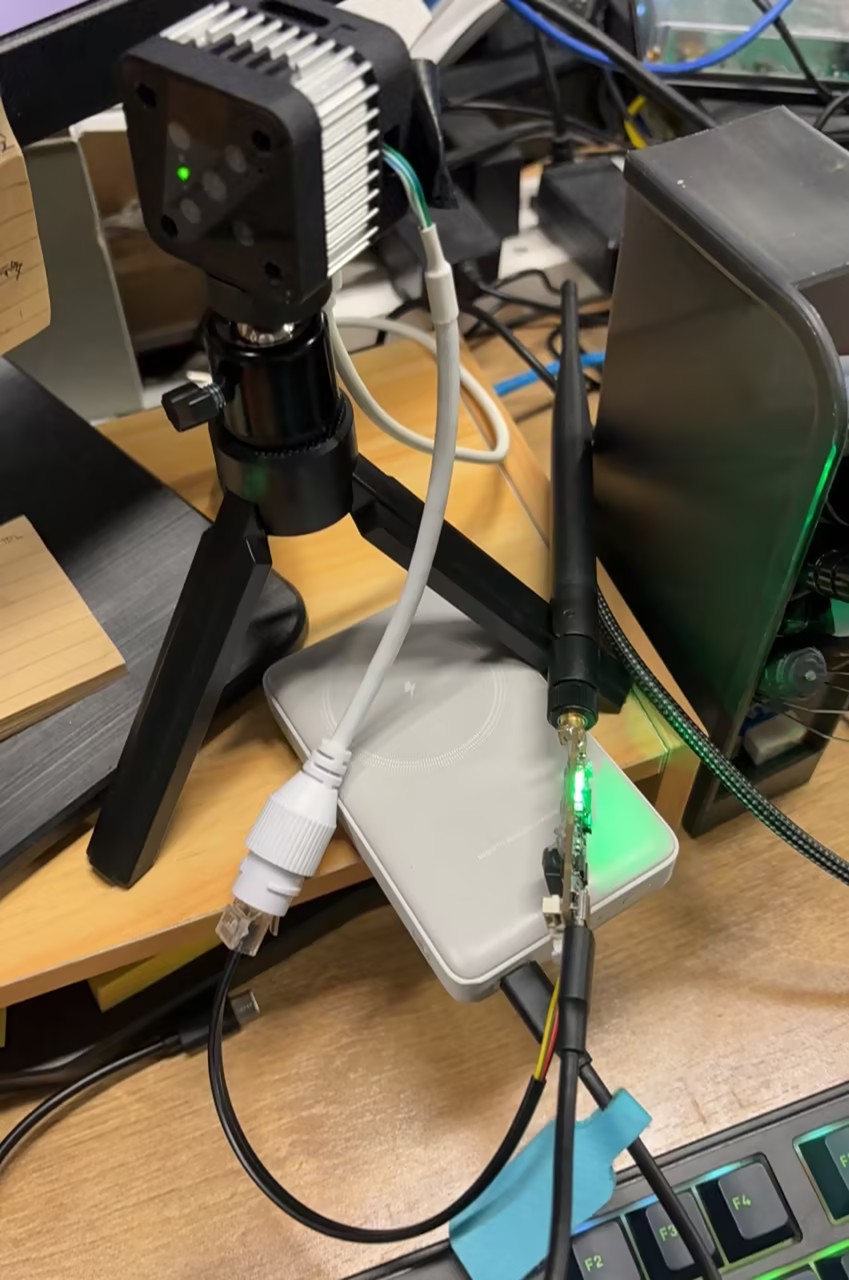
After installing the expansion board, you can use the usbc port on the reTerminal to supply power to the HaLow module, and the two usba ports can be connected to the mouse and keyboard.
Step 4.2 Install Wifi HaLow Image Transmission Module
Install the two matched image transmission modules on the reCamera and reTerminal
Step 4.3 Install ffmpeg and nmap reTerminal
ffmpeg is used to obtain rtsp push stream, nmap is used to list. execute in the reTerminal Terminal:
sudo apt install ffmpeg
sudo apt install nmap
Step 4.4 plays rtsp video stream
Run the ffplay command to obtain the reCamera rtsp stream (belonging to the ffmpeg command):
ffplay -rtsp_transport udp -max_delay 20000 -probesize 2M rtsp://admin:[email protected]:554/live
Here's an explanation of the parameters in the ffplay command:
-'-rtsp_transport udp': Specifies to use the UDP transport protocol, because the reCamera uses UDP streaming by default.
-'-max_delay 20000': Set the maximum delay to 20 seconds for handling network delays.
-'-probesize 2M': Set the probe size to 2MB to increase the playback speed of the video stream.
-'rtsp:// admin:admin@192.168.10.100:554/live': This is the reCamera rtsp ingesting address. Replace it with your own address.
At this time will pop up a new window, rtsp video stream will be displayed inside, double-click the window can be full-screen playback.
Alternatively, you can use VLC Player or GStreamer to open the rtsp video stream. Run following command in reTerminal terminal to install GStreamer:
sudo apt update
sudo apt install -y \
    gstreamer1.0-tools \
    gstreamer1.0-plugins-base \
    gstreamer1.0-plugins-good \
    gstreamer1.0-plugins-bad \
    gstreamer1.0-plugins-ugly \
    gstreamer1.0-libav \
    gstreamer1.0-rtsp \
    gstreamer1.0-x \
    gstreamer1.0-gl \
    gstreamer1.0-alsa \
    gstreamer1.0-pulseaudio
Then run the command to play the rtsp video stream:
gst-launch-1.0 rtspsrc location=rtsp://admin:[email protected]:554/live latency=2000 ! rtph264depay ! h264parse ! avdec_h264 ! videoconvert ! autovideosink
bus
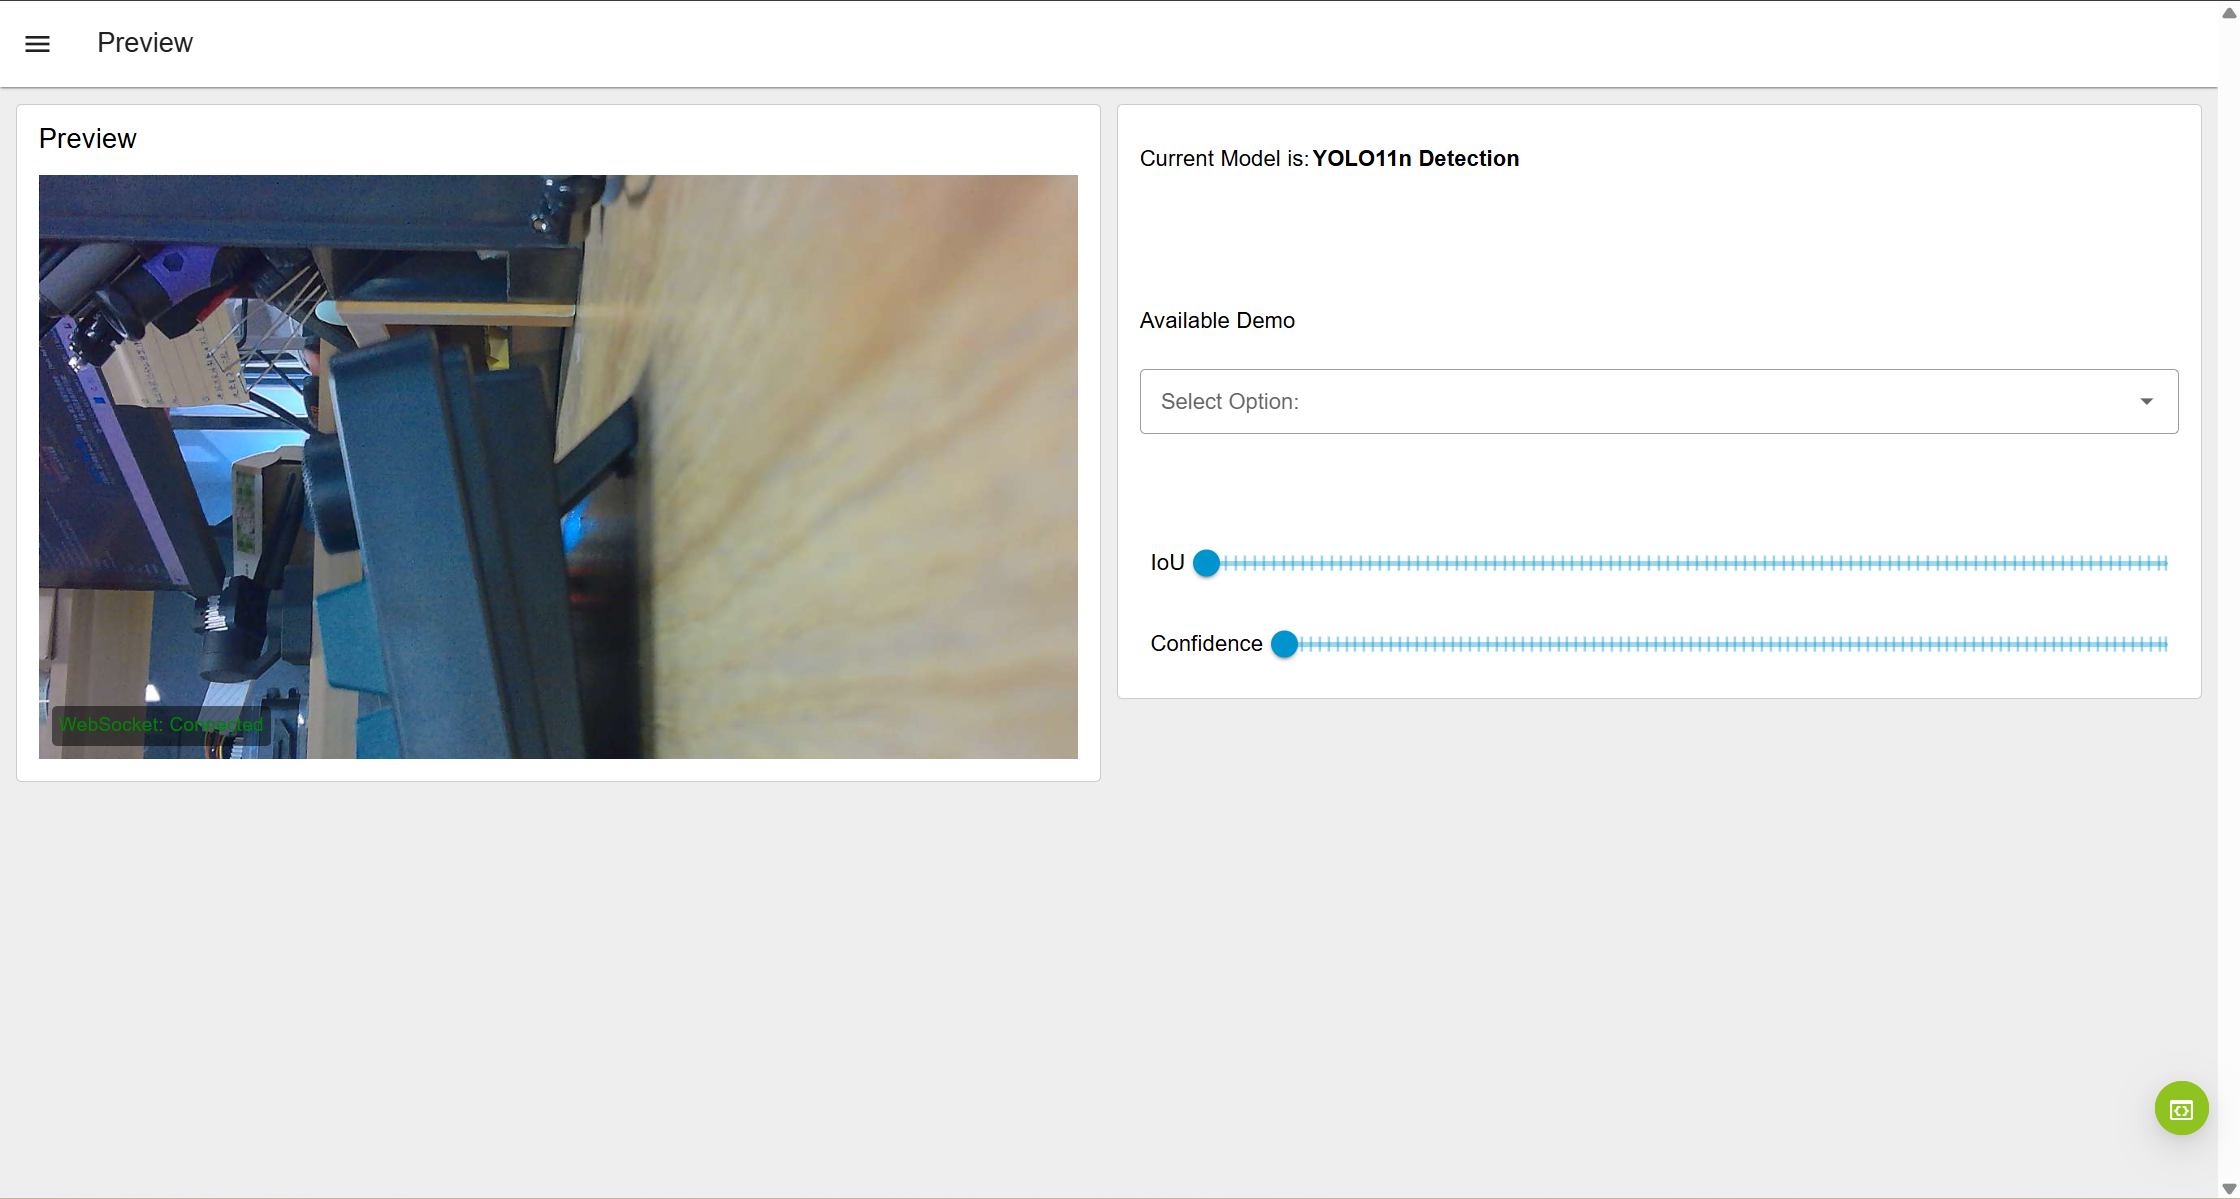
Step 4.5 Monitor Yolo Test Results
Press Ctrl + Alt + T to open a new terminal on the reTerminal. We will start a WebSocket server to receive AI detection results. Run the following command:
wscat -l 9000
When the server starts, it will show:
Listening on port 9000 (press CTRL+C to quit)
Keep this terminal open to display the detection results pushed from the reCamera.
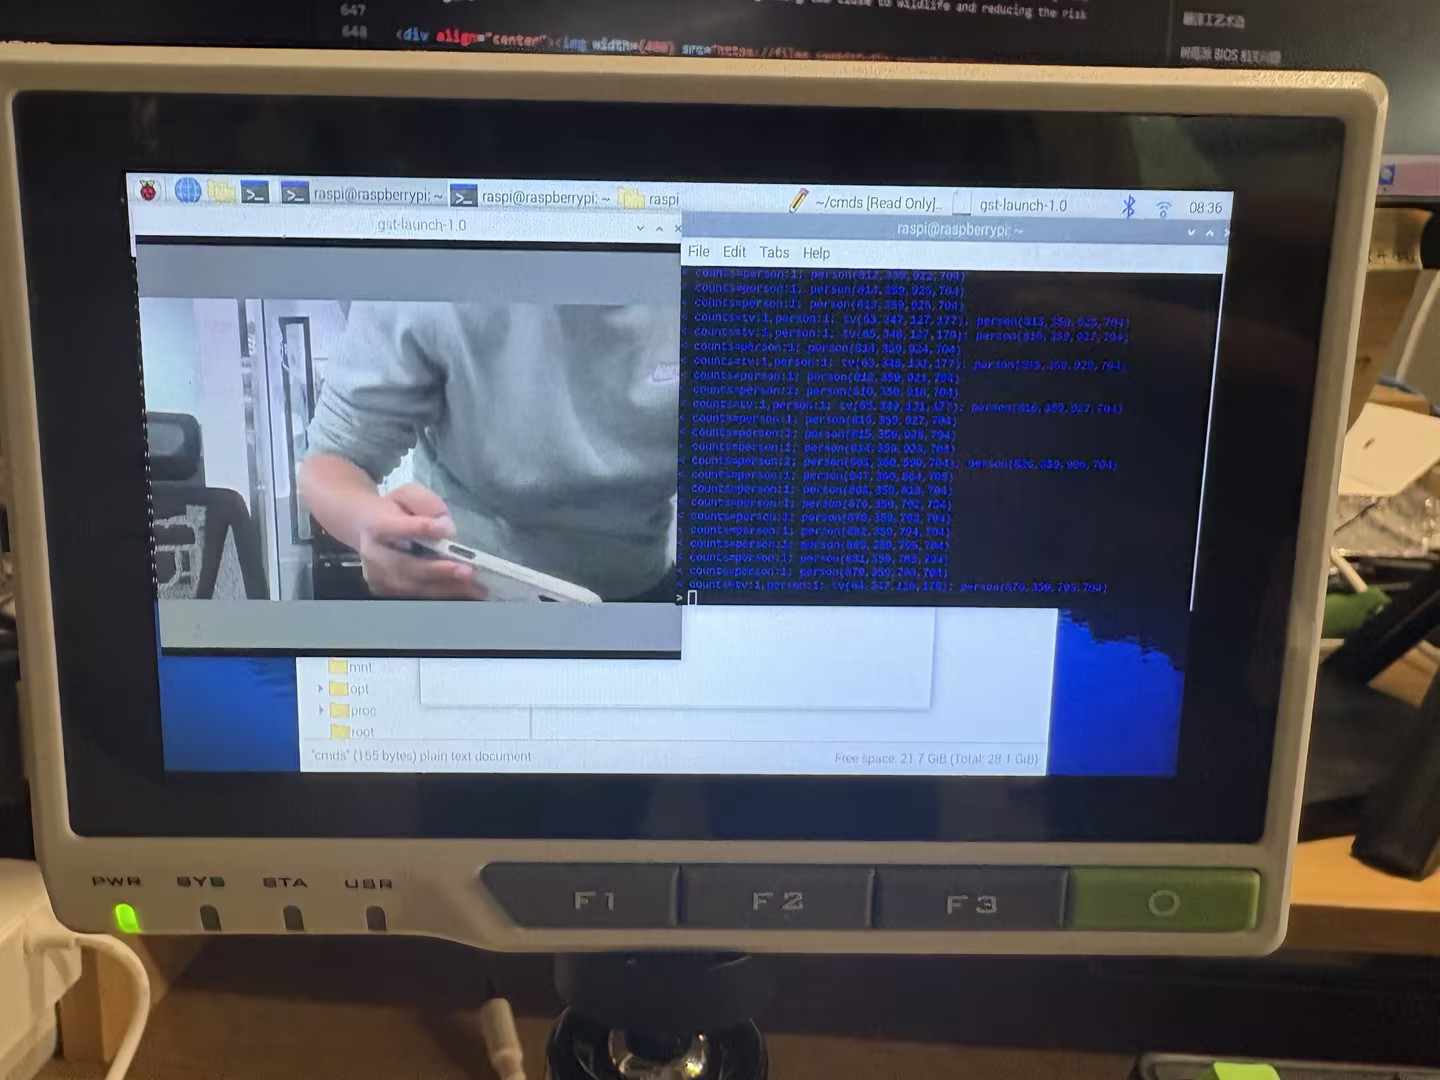
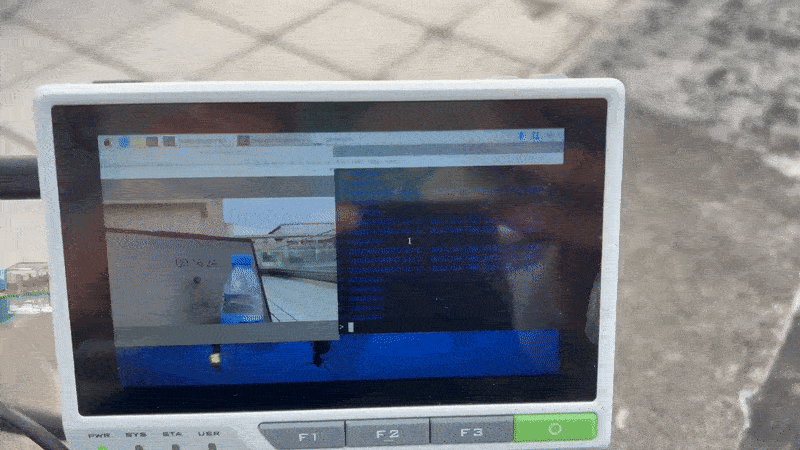
The image above shows the RTSP streaming via GStreamer and the text AI detection results via WebSocket.
The terminal on the left demostrates the detection results:
< counts=person:1; person(682,359,1175,704)
< counts=person:1; person(649,359,1247,704)
< counts=person:1; person(678,359,1188,704)
< counts=person:1; person(652,359,1240,704)
< counts=person:1; person(656,359,1227,704)
< counts=person:1; person(648,359,1236,704)
< counts=person:1; person(648,359,1243,704)
< counts=person:1; person(650,359,1227,703)
< counts=person:1; person(652,359,1241,704)
< counts=person:1; person(646,359,1246,704)
< counts=person:1; person(647,359,1244,704)
< counts=person:1; person(653,359,1252,704)
< counts=person:1; person(650,359,1238,704)
Congratulations! You have implemented your own remote AI detection system.
Explore What’s Possible
As mentioned at the beginning, this project is just a simple example of remote AI detection. You can expand it to more complex scenarios. We will introduce some examples here. All these examples will be updated to Github later.
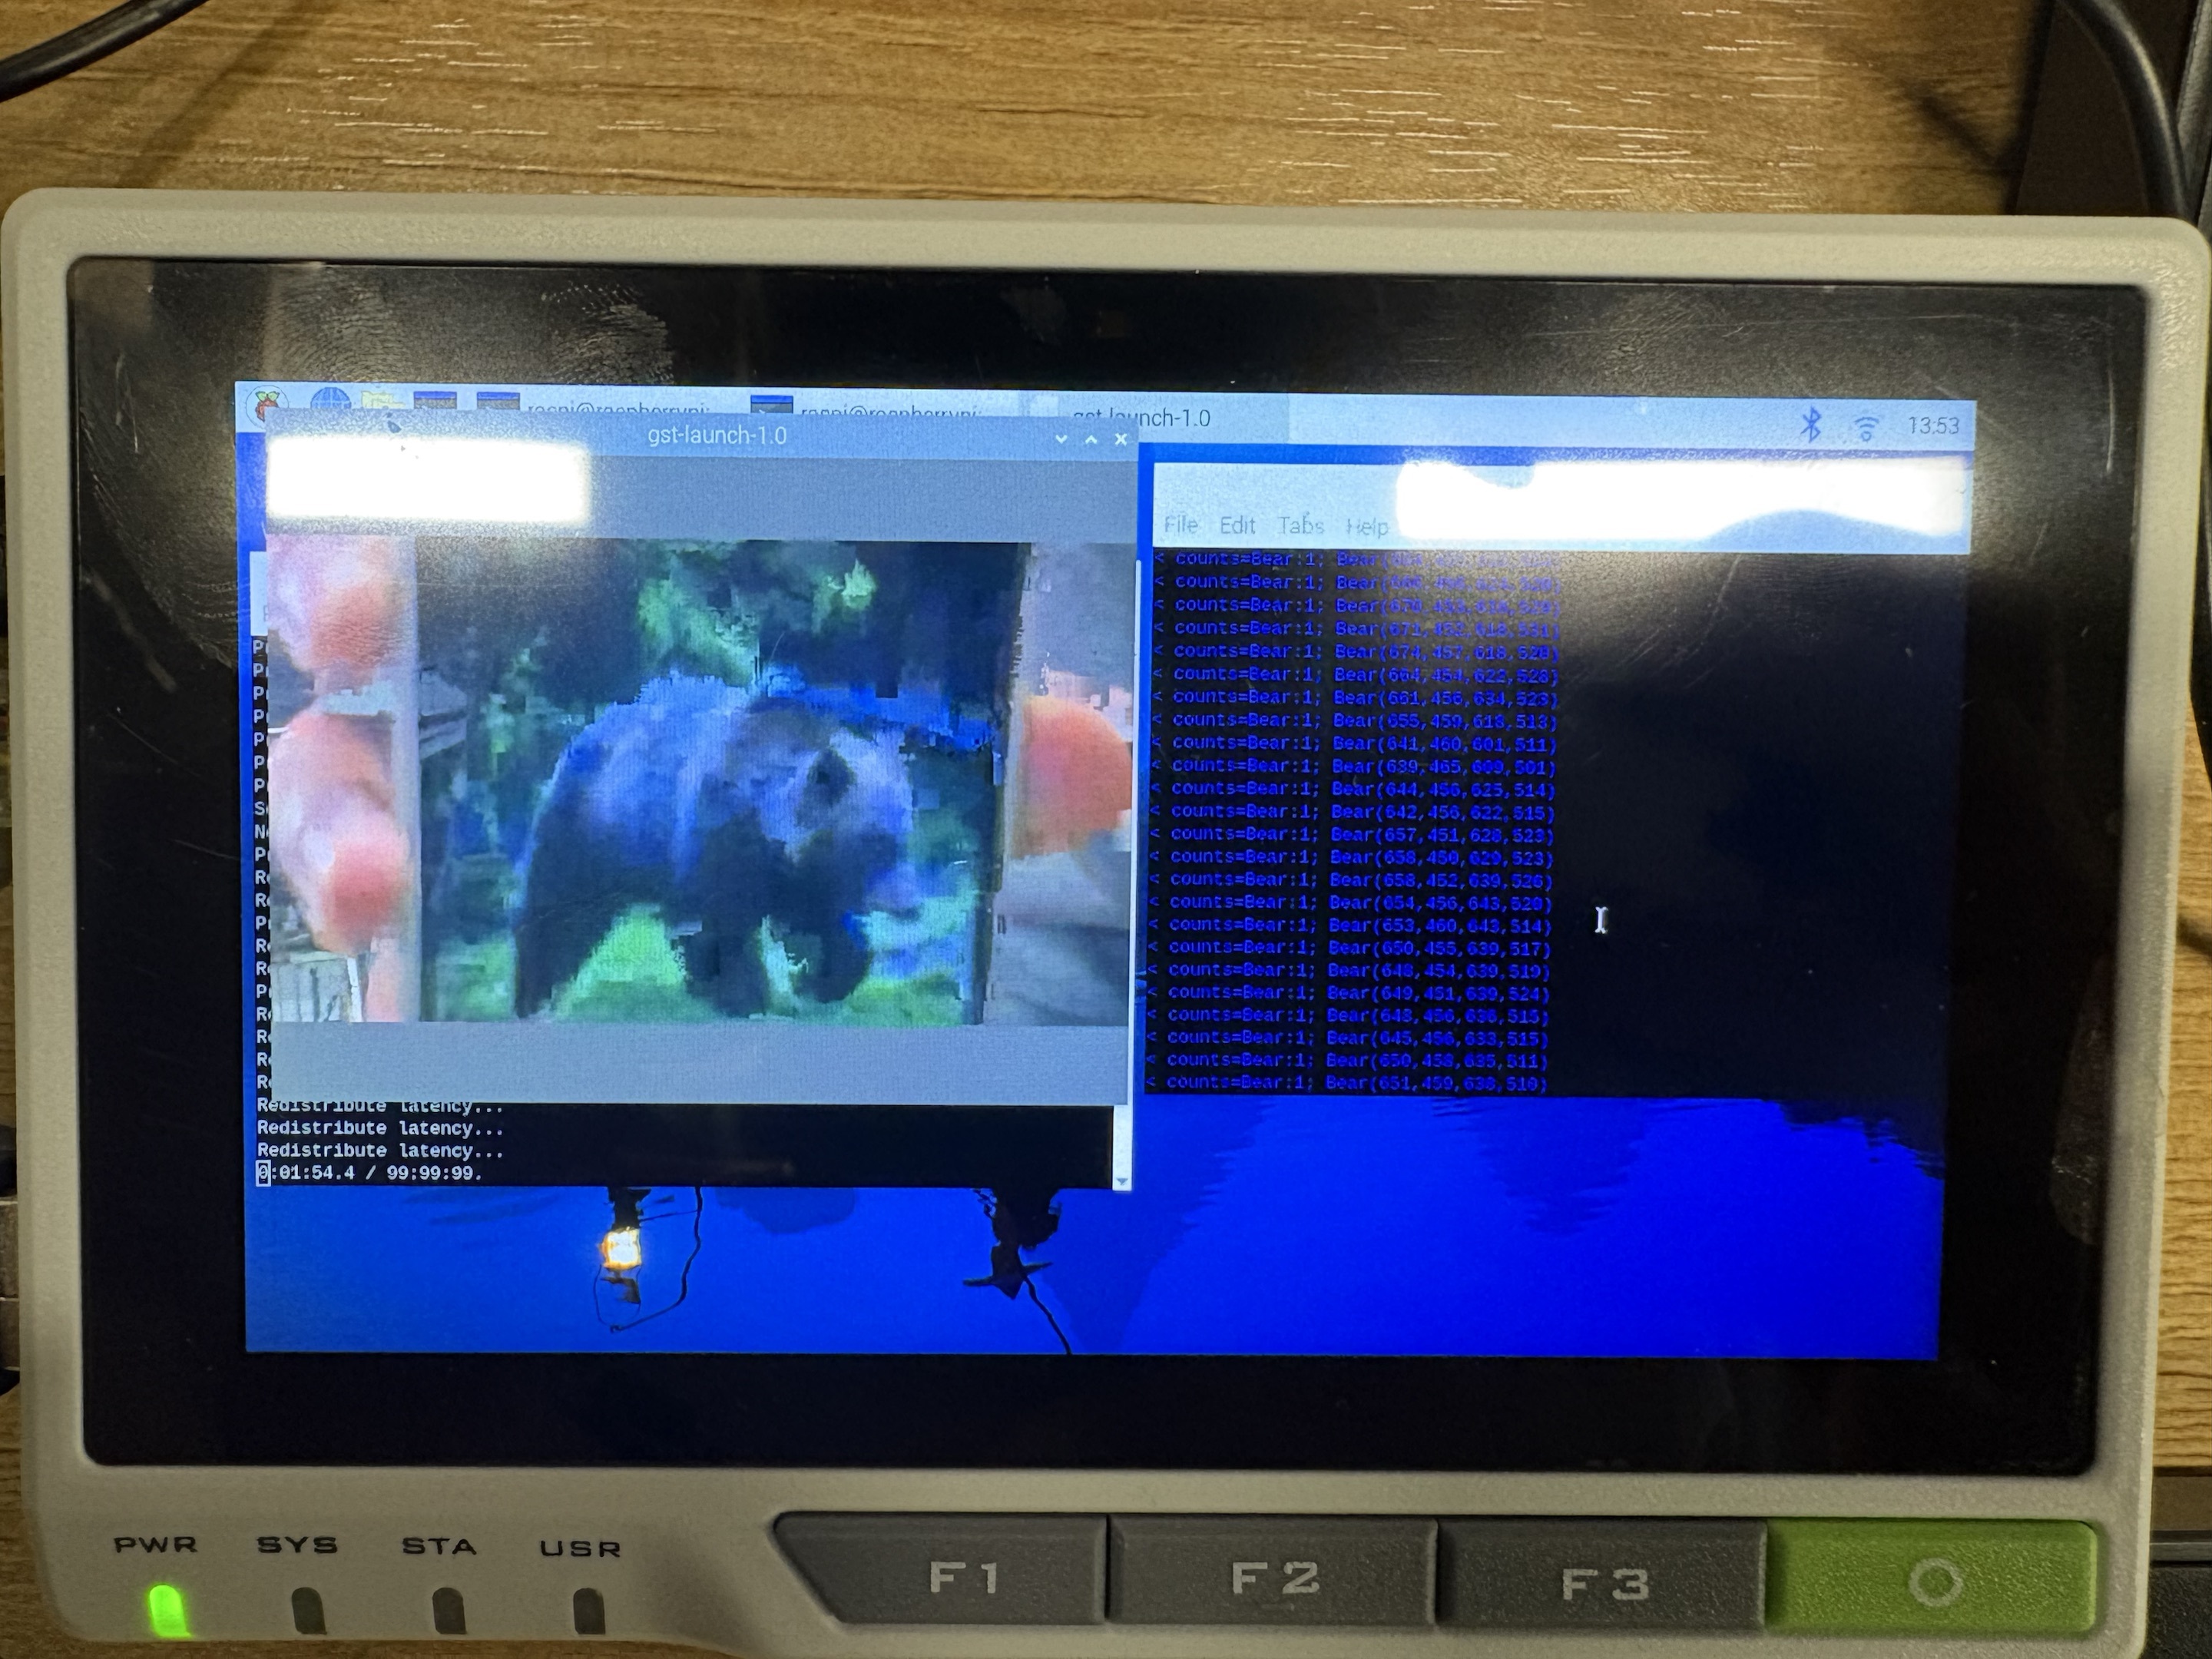
Case 1: Wild Camp Bear Warning System
Upload a bear-detection model to the reCamera and deploy the device at a fixed position in a forest campsite to detect potential bear intrusions. You can monitor the area from a distance through the reTerminal or other devices, helping you avoid getting too close to wildlife and reducing the risk of danger.
Tech Support & Product Discussion
Thank you for choosing our products! We are here to provide you with different support to ensure that your experience with our products is as smooth as possible. We offer several communication channels to cater to different preferences and needs.