Flash JetPack with WSL2
Introduction
This tutorial demonstrates how to flash JetPack on Jetson devices using Windows Subsystem for Linux 2 (WSL2). This method allows Windows users to flash JetPack without setting up a dedicated Ubuntu machine.
This is not considered a stable solution and there won't be active support. If you encounter errors, please use a native Ubuntu host instead.
Prerequisites
System Requirements
- Windows: Windows 10 1903 (Build 18362.1049 or later) or Windows 11
- WSL: WSL2 is required
- usbipd-win: Version 4.x and above
Check Your System
Check your Windows build version:
reg query "HKLM\SOFTWARE\Microsoft\Windows NT\CurrentVersion" /v CurrentBuild
Check WSL version:
wsl -v
Check usbipd version:
usbipd --version
Recommended WSL Distributions
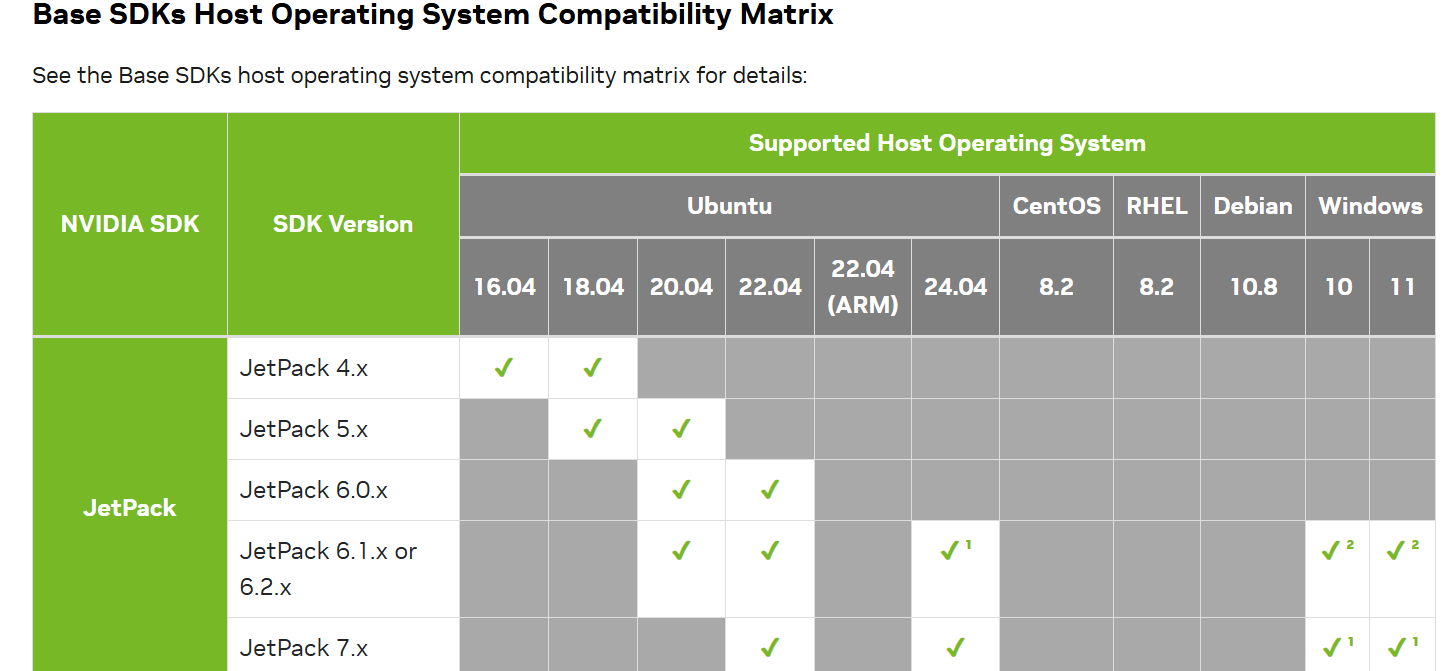
| JetPack Version | Recommended WSL Distributions |
|---|---|
| JetPack 4.x | Ubuntu 18.04 |
| JetPack 5.x | Ubuntu 18.04 / Ubuntu 20.04 |
| JetPack 6.x | Ubuntu 20.04 / Ubuntu 22.04 |
For specific version requirements, please refer to NVIDIA SDK Manager documentation.
Install distributions from Microsoft Store or use command line:
# For example, install Ubuntu 22.04
wsl --install -d Ubuntu-22.04
Setup WSL2 Kernel
Customized WSL Kernel
A customized WSL kernel is required to support different USB devices. You can either:
- Use the pre-built kernel below
- Build your own kernel following this guide
Pre-built Kernel Download: OneDrive Link
- SHA256:
f249022feab9372d448d236a4401e087d0f150dd6b3367b571f0b9a703bd2d38
To verify kernel compatibility, check for RNDIS support after installation.
Replace Standard WSL Kernel
- Shutdown WSL:
wsl --shutdown
- Configure WSL kernel:
For Windows 11 (or later Windows 10 builds):
- Open WSL Settings GUI application
- Navigate to settings and configure the custom kernel path
For all Windows versions:
Edit the .wslconfig file:
notepad $env:USERPROFILE\.wslconfig
Add the following configuration under [wsl2]:
[wsl2]
kernel=D:\\WSL_Kernel\\bzImage
Replace D:\\WSL_Kernel\\bzImage with the actual path to your downloaded kernel file.
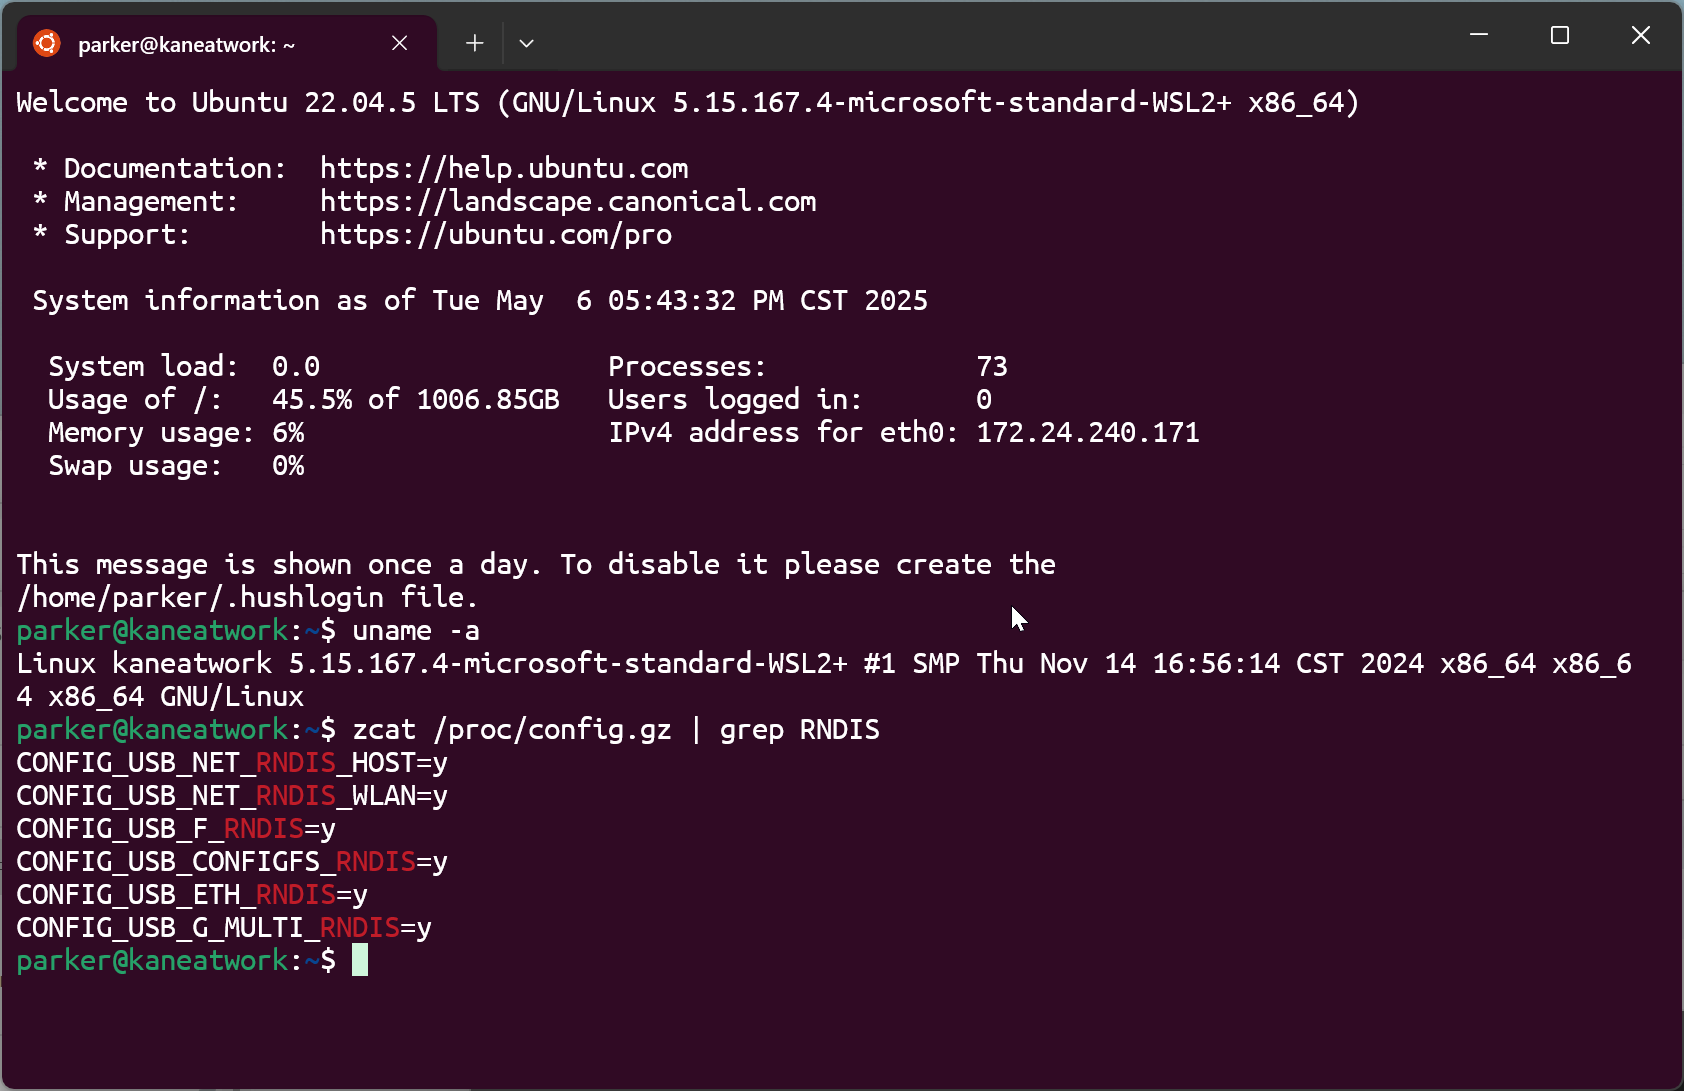
- Restart WSL and verify:
# Restart WSL
wsl

# Check kernel information
uname -a

# Check RNDIS features
zcat /proc/config.gz | grep RNDIS
Flash JetPack
Most flashing steps are identical to native Ubuntu. This example uses reComputer J4012.
Step 1: Download JetPack
Download the appropriate JetPack version for your device from the Seeed Flashing Summary Page. This page provides:
- JetPack images for all Seeed Jetson devices
- Detailed instructions for entering force recovery mode for each device
When moving files from Windows to WSL, be careful with file permissions.
Move and verify the file:
# Move file from Windows drive to WSL storage
mv /mnt/c/Users/seeed/Downloads/mfi_recomputer-<xxxx>.tar.gz ~

# Remove execute permission
chmod -x mfi_recomputer-<xxxx>.tar.gz

# Verify SHA256 checksum
sha256sum mfi_recomputer-<xxxx>.tar.gz
Replace seeed with your actual Windows username in the path /mnt/c/Users/seeed/Downloads/.
Step 2: Enter Force Recovery Mode
For device-specific recovery mode instructions (pin locations, button combinations), refer to the Seeed Flashing Summary Page and select your device model.
General steps for most devices:
- Power off your Jetson device completely
- Short the FEC and GND pins using a jumper cap or tweezers
- Connect the USB-C data cable to your Windows host
- Connect power to the device
- Wait 2-3 seconds, then remove the jumper cap
Your device will enter force recovery mode.
The example above shows reComputer J4012. Pin locations vary by device - always check your device's specific documentation.
Step 3: Attach USB Device to WSL
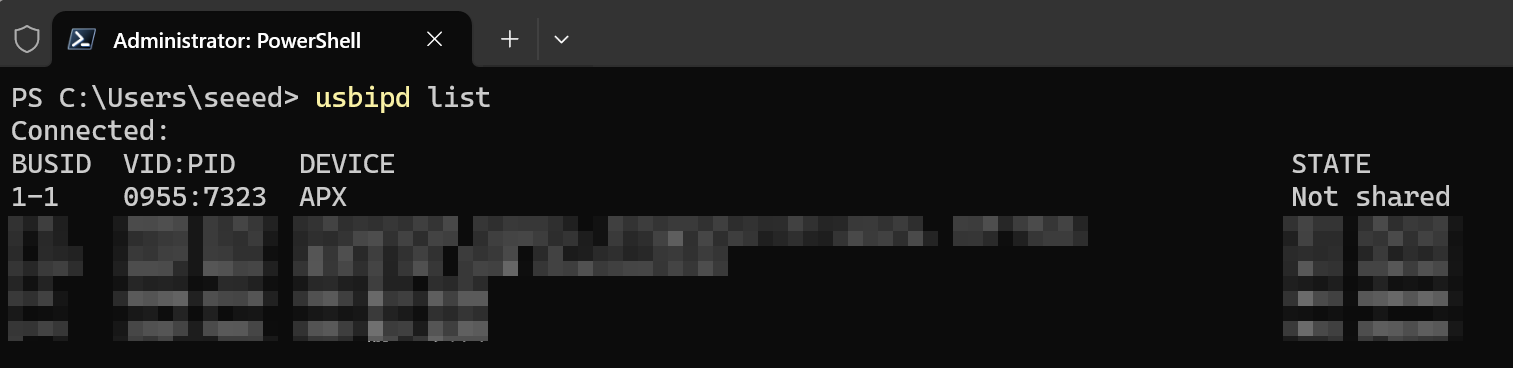
Open PowerShell or Windows Terminal with Administrator privileges.
List USB devices (in PowerShell):
usbipd list
If you see usbipd: command not found, make sure usbipd-win is installed and added to your system PATH. You may need to restart your terminal after installation.
You should see your device listed as APX, indicating it's in force recovery mode.
Bind the device (in PowerShell):
usbipd bind -b 1-1 -f
Replace 1-1 with your actual bus ID shown in the usbipd list output.
Use usbipd list again to verify the STATE has changed to Shared(forced).

Attach to WSL (in PowerShell):
usbipd attach -b 1-1 --wsl --auto-attach
You should see output similar to:
usbipd: info: Using WSL distribution 'Ubuntu-22.04' to attach; the device will be available in all WSL 2 distributions.
usbipd: info: Using IP address 172.24.240.1 to reach the host.
usbipd: info: Starting endless attach loop; press Ctrl+C to quit.
WSL Attached

Keep this terminal window open. Press Ctrl+C only after flashing is complete.
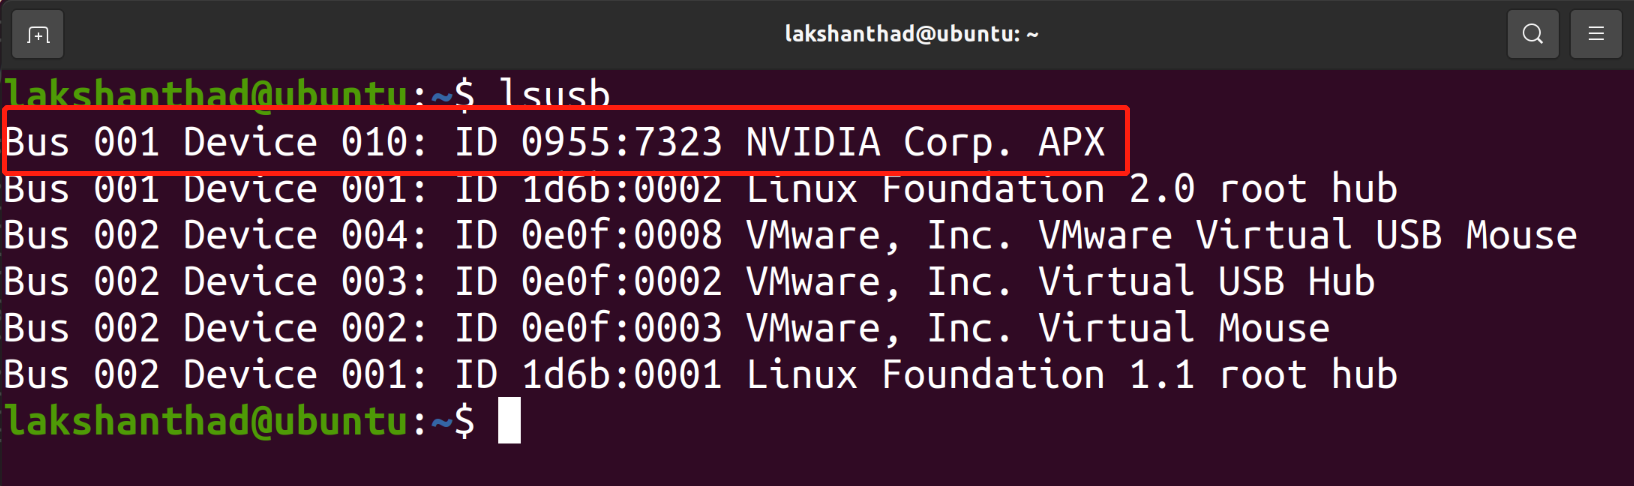
Verify in WSL:
Launch WSL in a new terminal and check:
lsusb
You should see output like:
Bus 002 Device 001: ID 1d6b:0003 Linux Foundation 3.0 root hub
Bus 001 Device 002: ID 0955:7323 NVIDIA Corp. APX
Bus 001 Device 001: ID 1d6b:0002 Linux Foundation 2.0 root hub

The device has successfully connected to WSL.
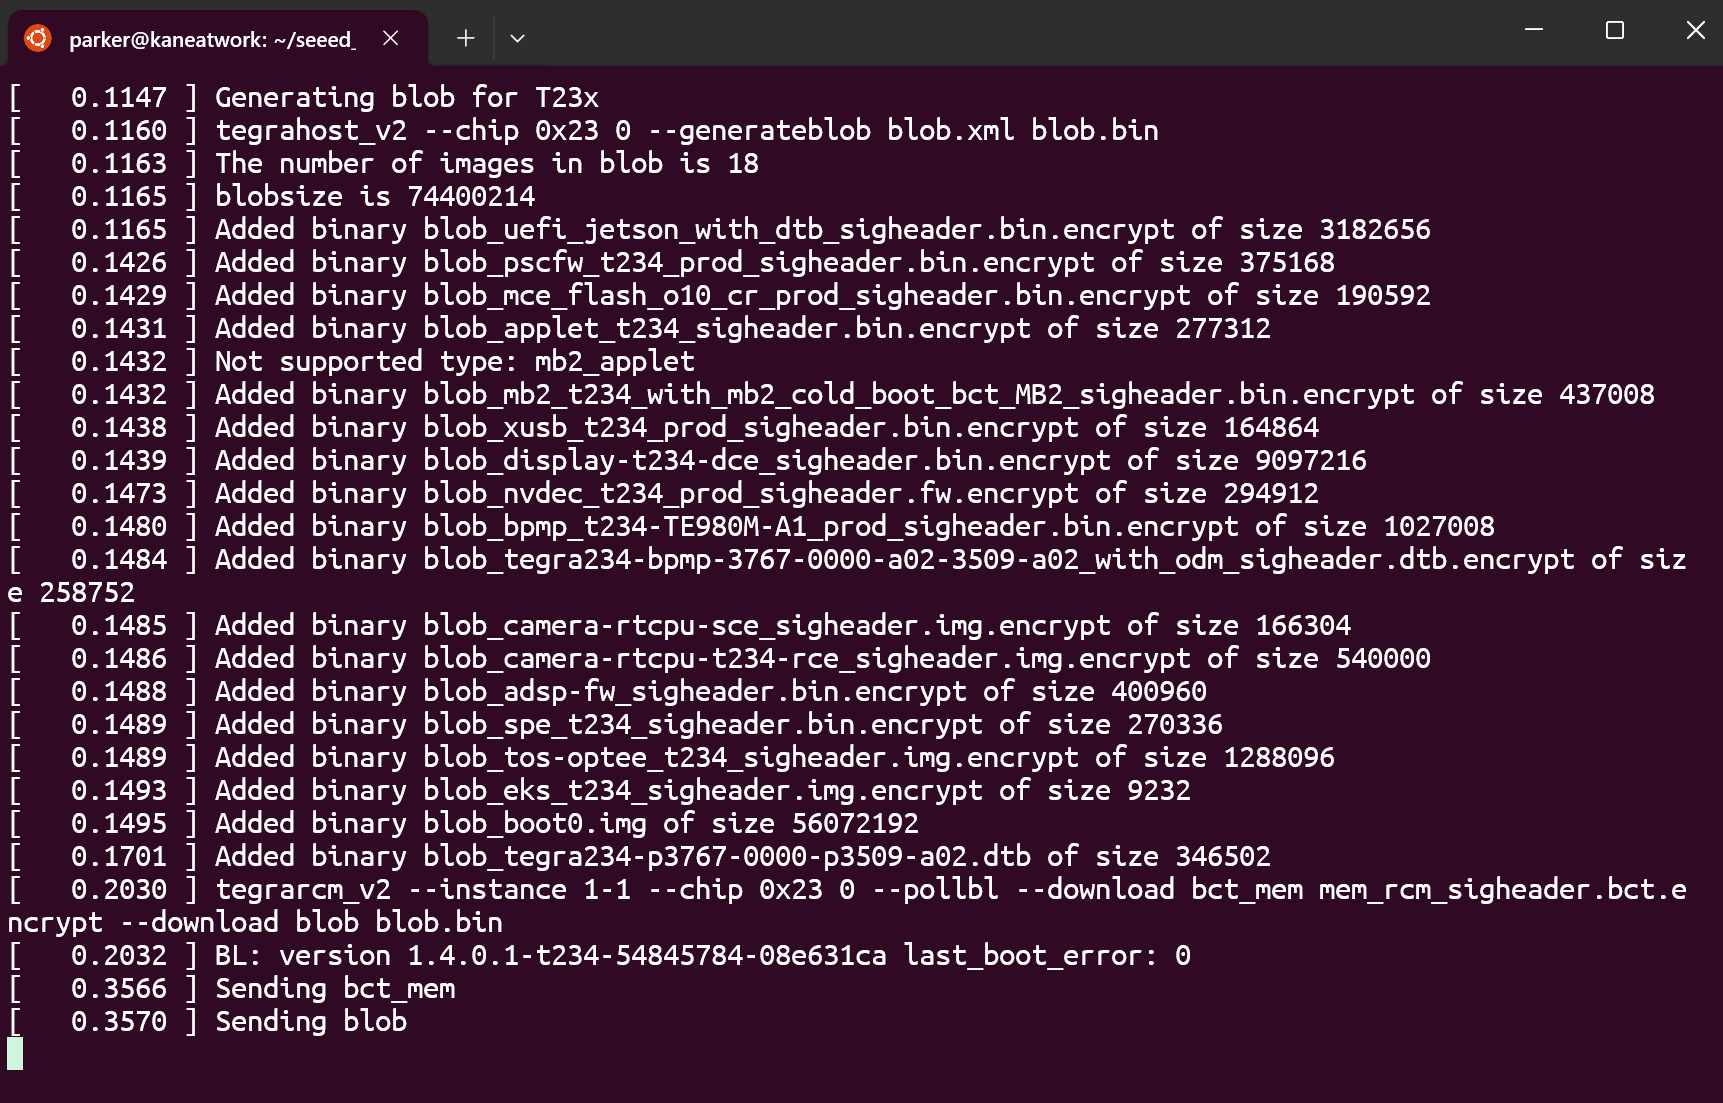
Step 4: Flash the Device
Navigate to your JetPack directory and execute the flash command:
Choose the appropriate flashing method based on your device and requirements:
Option 1: Seeed BSP (Recommended for Seeed Devices)
For Seeed reComputer devices, use the pre-built Massflash package:
sudo ./tools/kernel_flash/l4t_initrd_flash.sh --flash-only --massflash 1 --network usb0 --showlogs
Ensure you have installed flash prerequisites:
sudo apt install qemu-user-static sshpass abootimg nfs-kernel-server libxml2-utils binutils -y
Option 2: NVIDIA SDK Manager
For NVIDIA official developer kits or when you need SDK components:
1. Launch SDK Manager:
sdkmanager
2. Follow the on-screen instructions to complete the flashing process.
For more detailed SDK Manager instructions on WSL2, refer to the NVIDIA official documentation.
Known Limitation: SDK Manager cannot flash to external NVMe/SSD storage devices via WSL2. If you need to flash to an external SSD, use Option 3 (Initrd Flash) or use a native Ubuntu host.
Option 3: Initrd Flash (For Official NVIDIA Developer Kits)
For NVIDIA official developer kits (Jetson Orin Nano Developer Kit, etc.):
An example for Jetson Orin Nano Super Developer Kit:
# Download Jetson Linux
wget https://developer.nvidia.com/downloads/embedded/l4t/r36_release_v4.3/release/Jetson_Linux_r36.4.3_aarch64.tbz2

# Download Root Filesystem
wget https://developer.nvidia.com/downloads/embedded/l4t/r36_release_v4.3/release/Tegra_Linux_Sample-Root-Filesystem_r36.4.3_aarch64.tbz2

# Extract Jetson Linux
tar xpf Jetson_Linux_r36.4.3_aarch64.tbz2

# Extract Root Filesystem
sudo tar xpf Tegra_Linux_Sample-Root-Filesystem_r36.4.3_aarch64.tbz2 -C ./Linux_for_Tegra/rootfs

# Install prerequisites
sudo ./tools/l4t_flash_prerequisites.sh

# Apply binaries
sudo ./apply_binaries.sh

# Flash
sudo ./tools/kernel_flash/l4t_initrd_flash.sh --external-device nvme0n1p1 -c tools/kernel_flash/flash_l4t_external.xml -p "-c bootloader/t186ref/cfg/flash_t234_qspi.xml" --showlogs --network usb0 jetson-orin-nano-devkit internal
Replace jetson-orin-nano-devkit with your specific device target. Check NVIDIA's documentation for the correct target name.
When the flash process completes successfully, you will see output similar to:
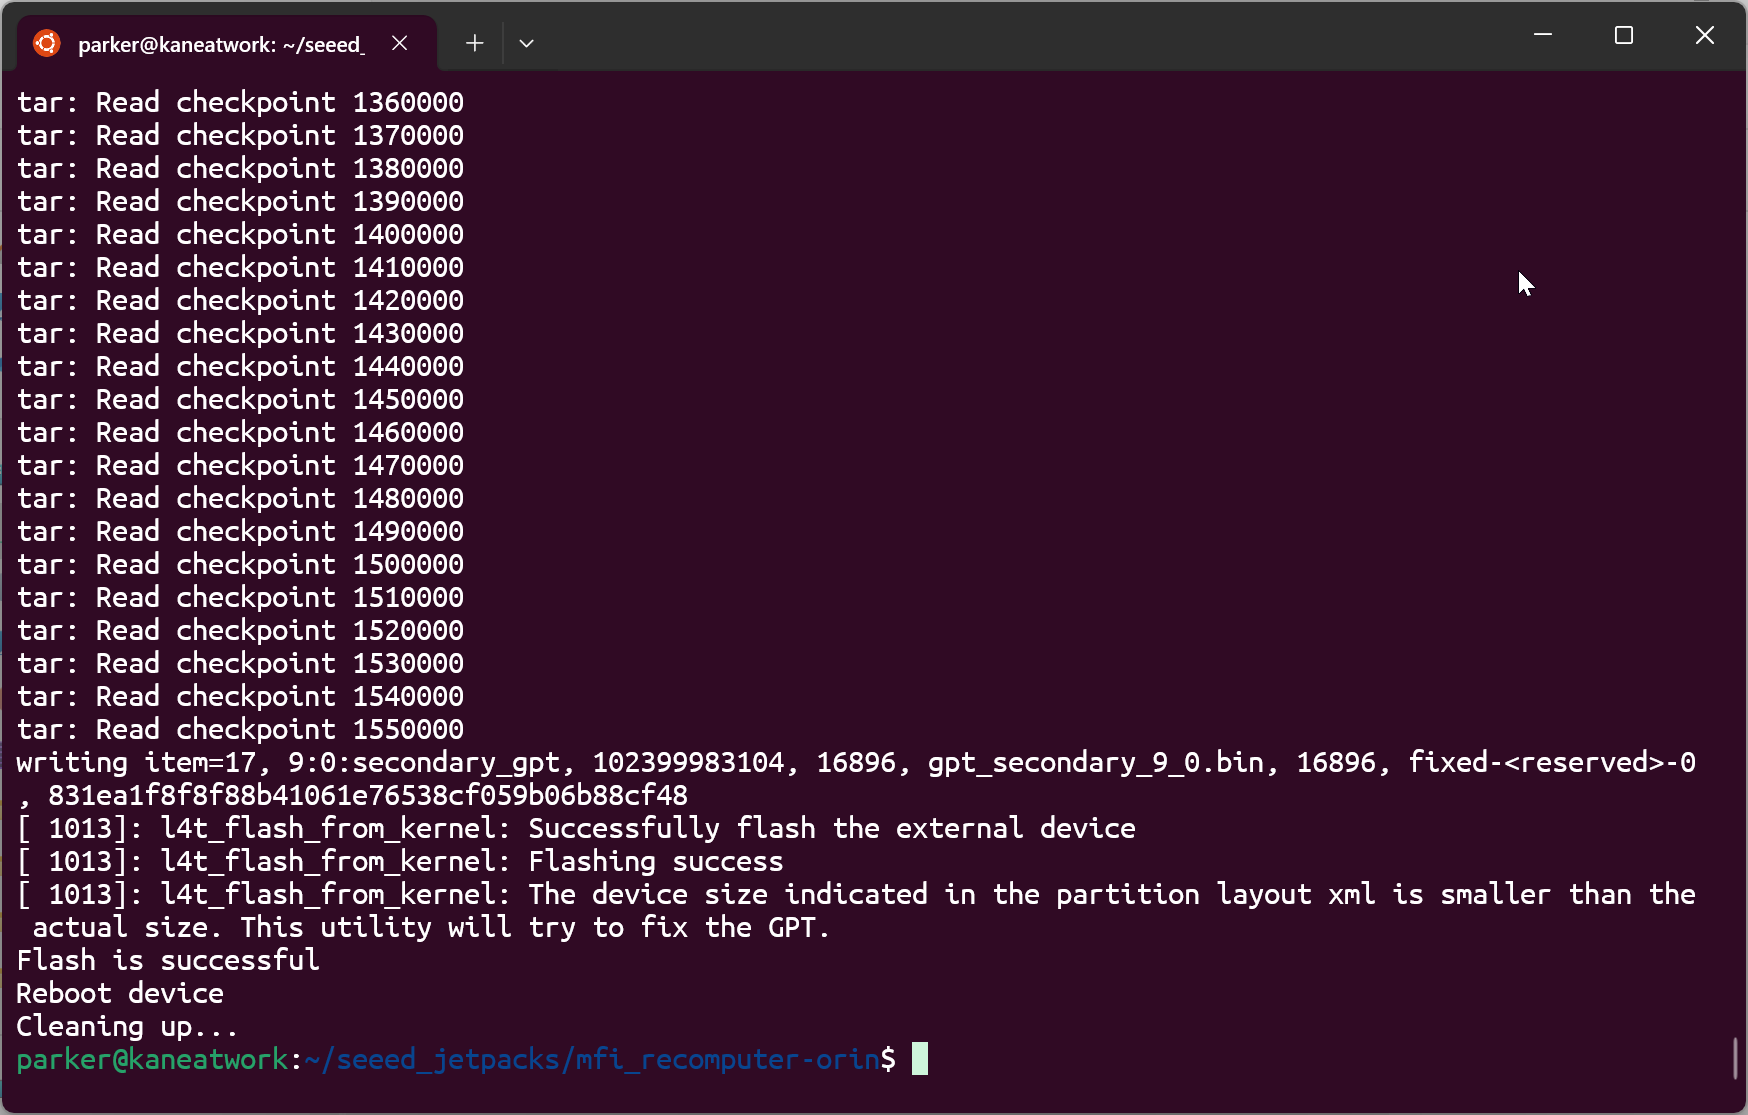
After flashing completes, you can detach the USB device from WSL:
usbipd detach -b 1-1

Troubleshooting
USB Device Not Showing in WSL
- Ensure usbipd-win is version 4.x or above
- Verify the device is in force recovery mode (should show as APX)
- Try re-binding the device with the
-f(force) flag - Disable Windows Defender Firewall or antivirus software temporarily, as they may block USB device access
- Try a different USB port (preferably USB 3.0)
Flashing Fails or Times Out
- Use a native Ubuntu host if issues persist
- Check USB cable quality and connection (use the original cable if possible)
- Ensure adequate power supply to the Jetson device (use a 5V/4A power adapter)
- Close any other software that might be using the USB device
- Try flashing without
--auto-attachflag and monitor the connection manually
Permission Issues
- Always run usbipd commands with Administrator privileges
- Verify file permissions when moving files from Windows to WSL
- If you get permission denied errors in WSL, try:
sudo chmod 666 /dev/bus/usb/001/*
WSL Kernel Issues
If you see errors about missing USB support:
- Verify the custom kernel is correctly loaded:
uname -rshould show a version different from the standard WSL kernel - Check RNDIS support:
zcat /proc/config.gz | grep CONFIG_USB_NET_RNDIS - If issues persist, rebuild the kernel following the official guide
Tech Support & Product Discussion
Thank you for choosing our products! We are here to provide you with different support to ensure that your experience with our products is as smooth as possible. We offer several communication channels to cater to different preferences and needs.