reComputer Rugged J401 for Industrial Vision
Introduction
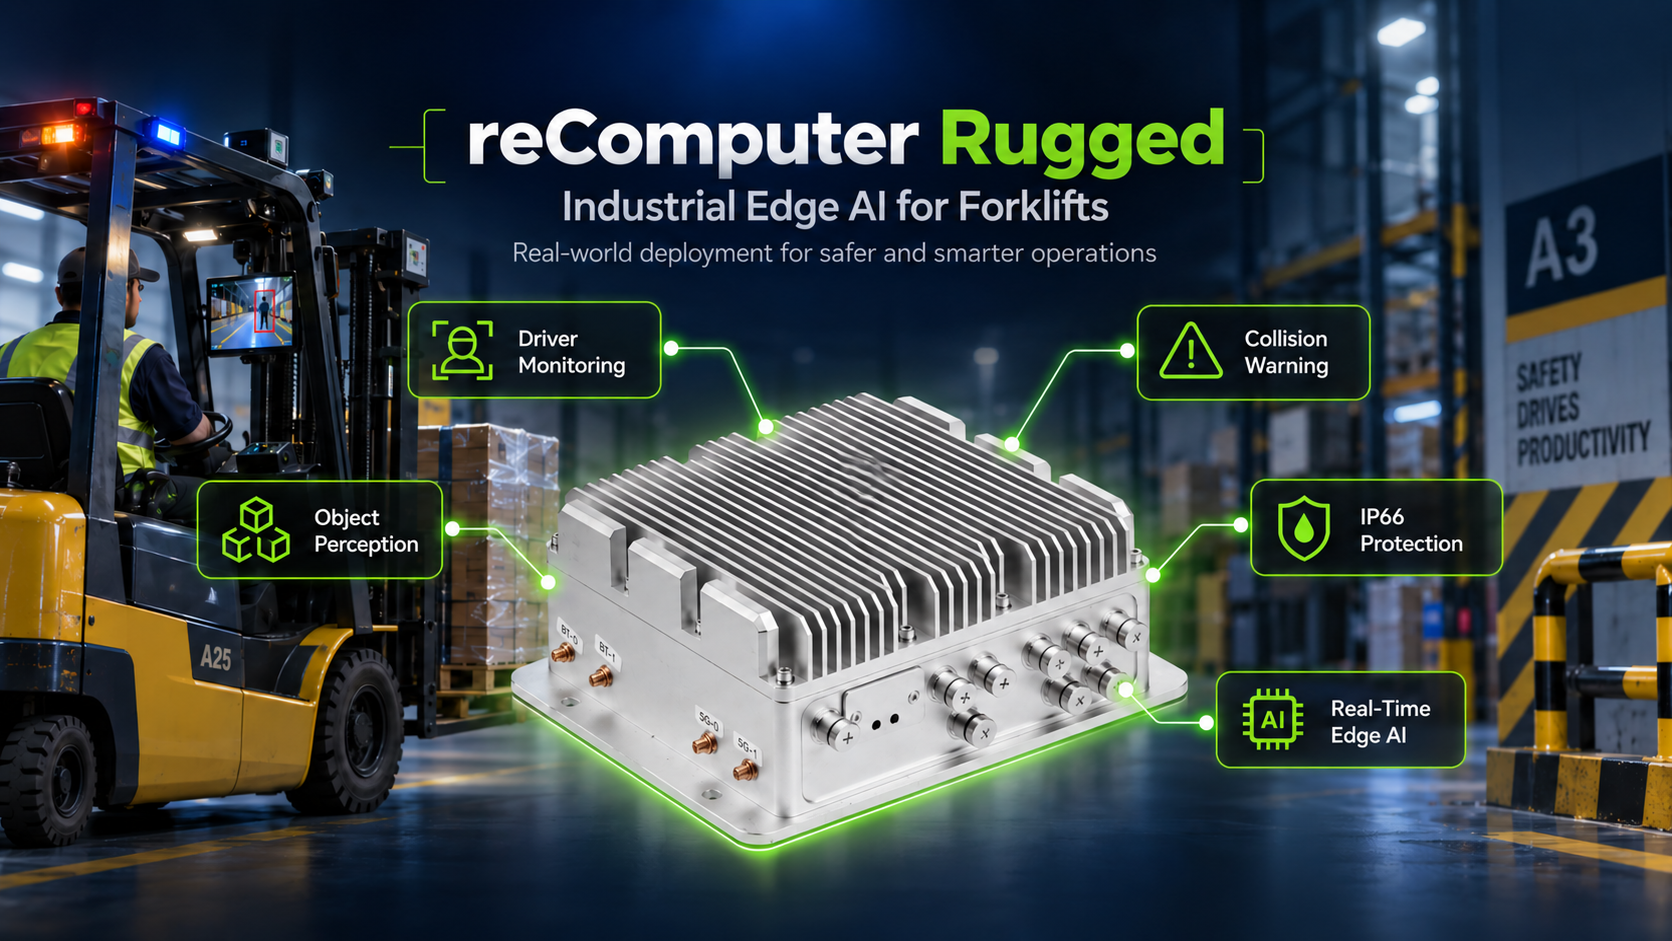
Industrial forklifts work in loading bays, warehouses, outdoor yards, cold stores, and wash-down areas. Dust, water, vibration, temperature changes, and unreliable network coverage make these difficult places for a conventional computer. A vehicle-mounted vision system needs sealed hardware, secure connectors, stable camera power, and enough local compute to process video on the vehicle.
This wiki introduces several ways computer vision can be used on industrial forklifts. The example uses reComputer Rugged J401 as the edge controller. Its IP66 enclosure, M12 connectors, vibration resistance, four PoE ports, and Jetson Orin NX allow it to sit close to the cameras and run the vision workloads locally.
The example covers four practical jobs: tracking a selected object in front of the forklift, watching the rear blind area, checking driver fatigue and helmet use, and recording footage for later review. All four are managed from one web console.
This project is an assistance prototype, not a functional-safety system. It has no safety certification and must not replace the operator's own checks. The rear warning view reports SYSTEM ERROR if the camera or inference pipeline fails.
Prerequisites
- reComputer Rugged J4012 / J3011
- JetPack 5.1.3 already installed
- POE Camera / USB Camera
- Internet connection for package and model download
- At least 30 GB of free storage recommended
Vision Applications for Industrial Forklifts
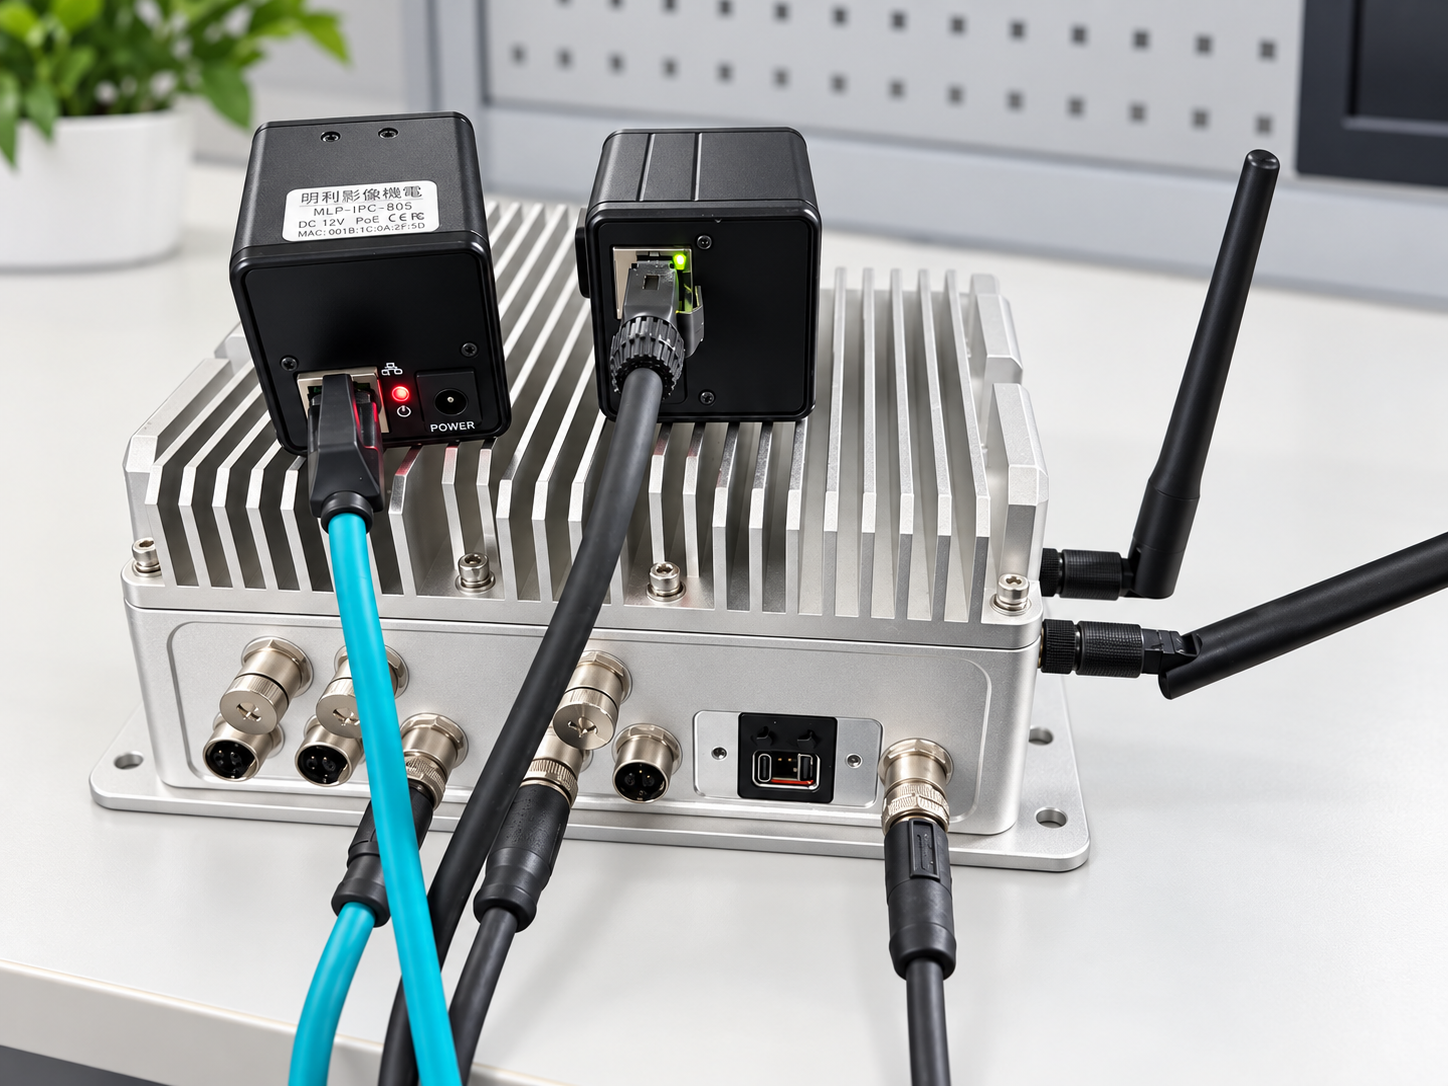
This case uses two 48V POE cameras and one USB camera. Depending on different scenarios, these cameras can be freely replaced.
Hardware Connection
Front-view target tracking
During pallet handling, the operator may need to keep a particular load or working area in view while the forklift moves. The front application uses EfficientTAM for click-to-segment tracking. The operator selects a target in the video, and the system follows its outline across later frames.
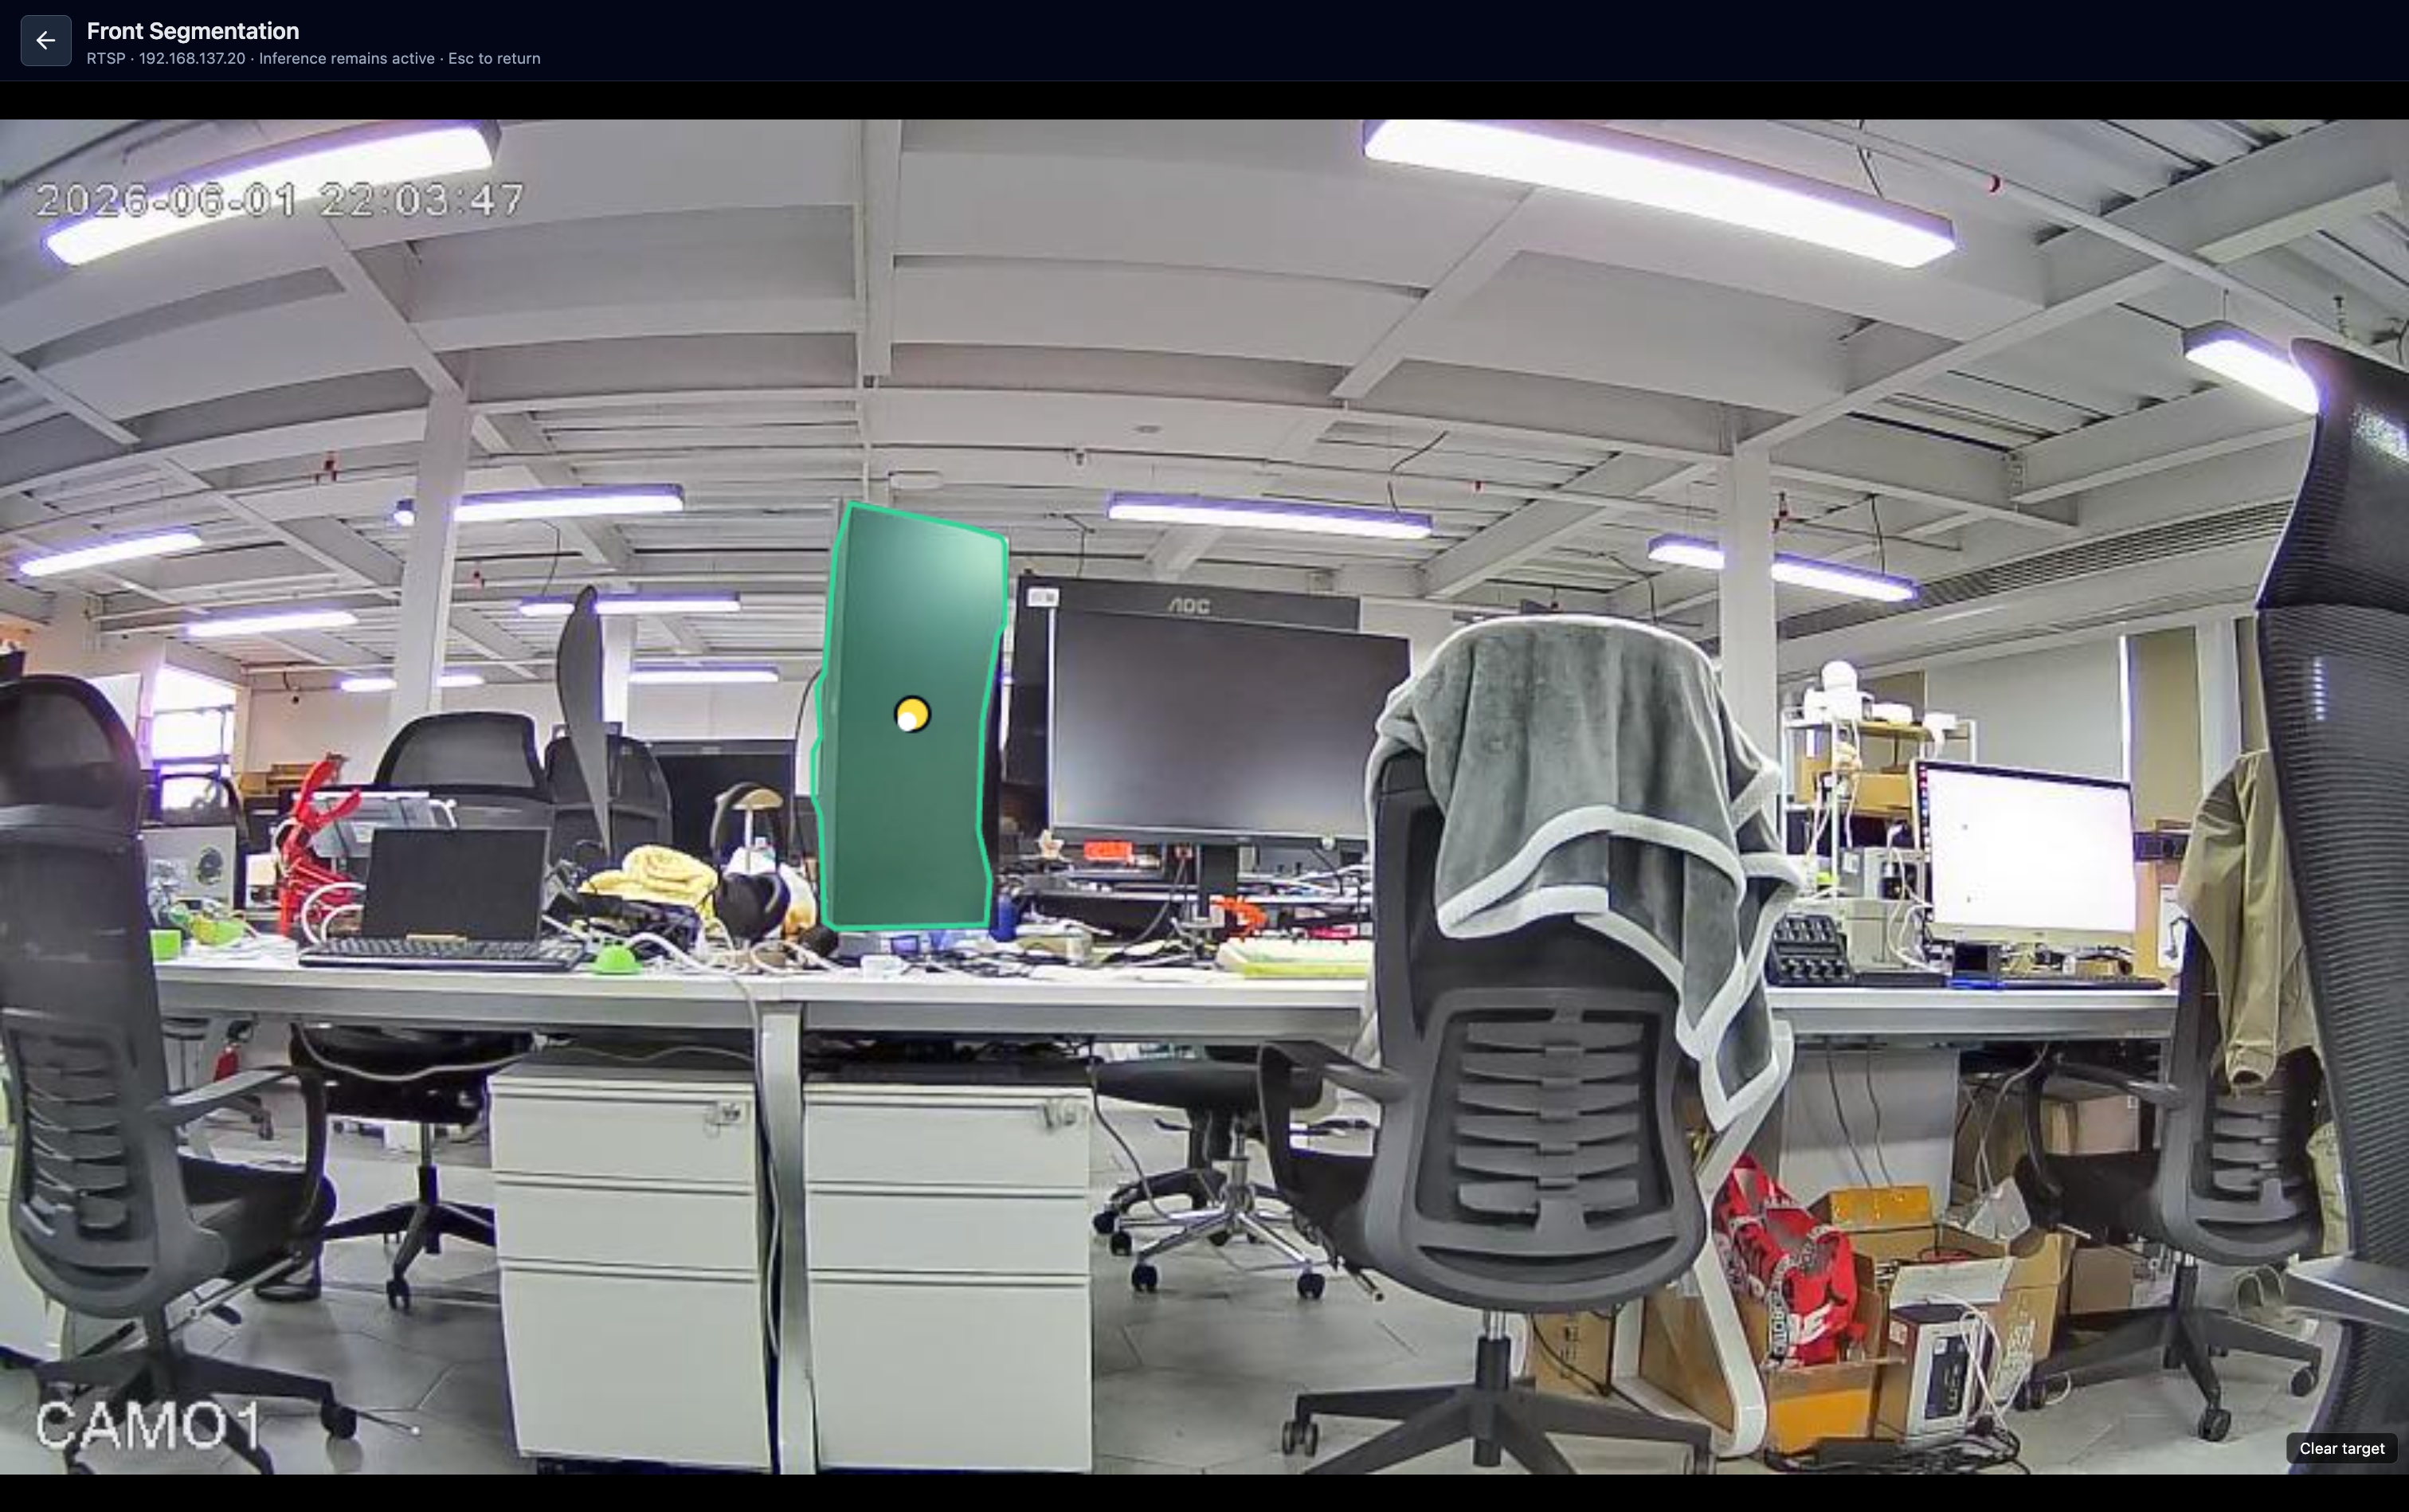
This is interactive tracking, not automatic object recognition. It is useful when the target changes from one task to the next and the operator can select it directly.
Rear-area warning
The counterweight and mast leave large blind areas around a forklift. A rear-facing PoE camera uses Depth Anything V2 to estimate scene depth and a person detector to watch the working area behind the vehicle. The interface reports SAFE, WARNING, or DANGER according to the configured distance thresholds.
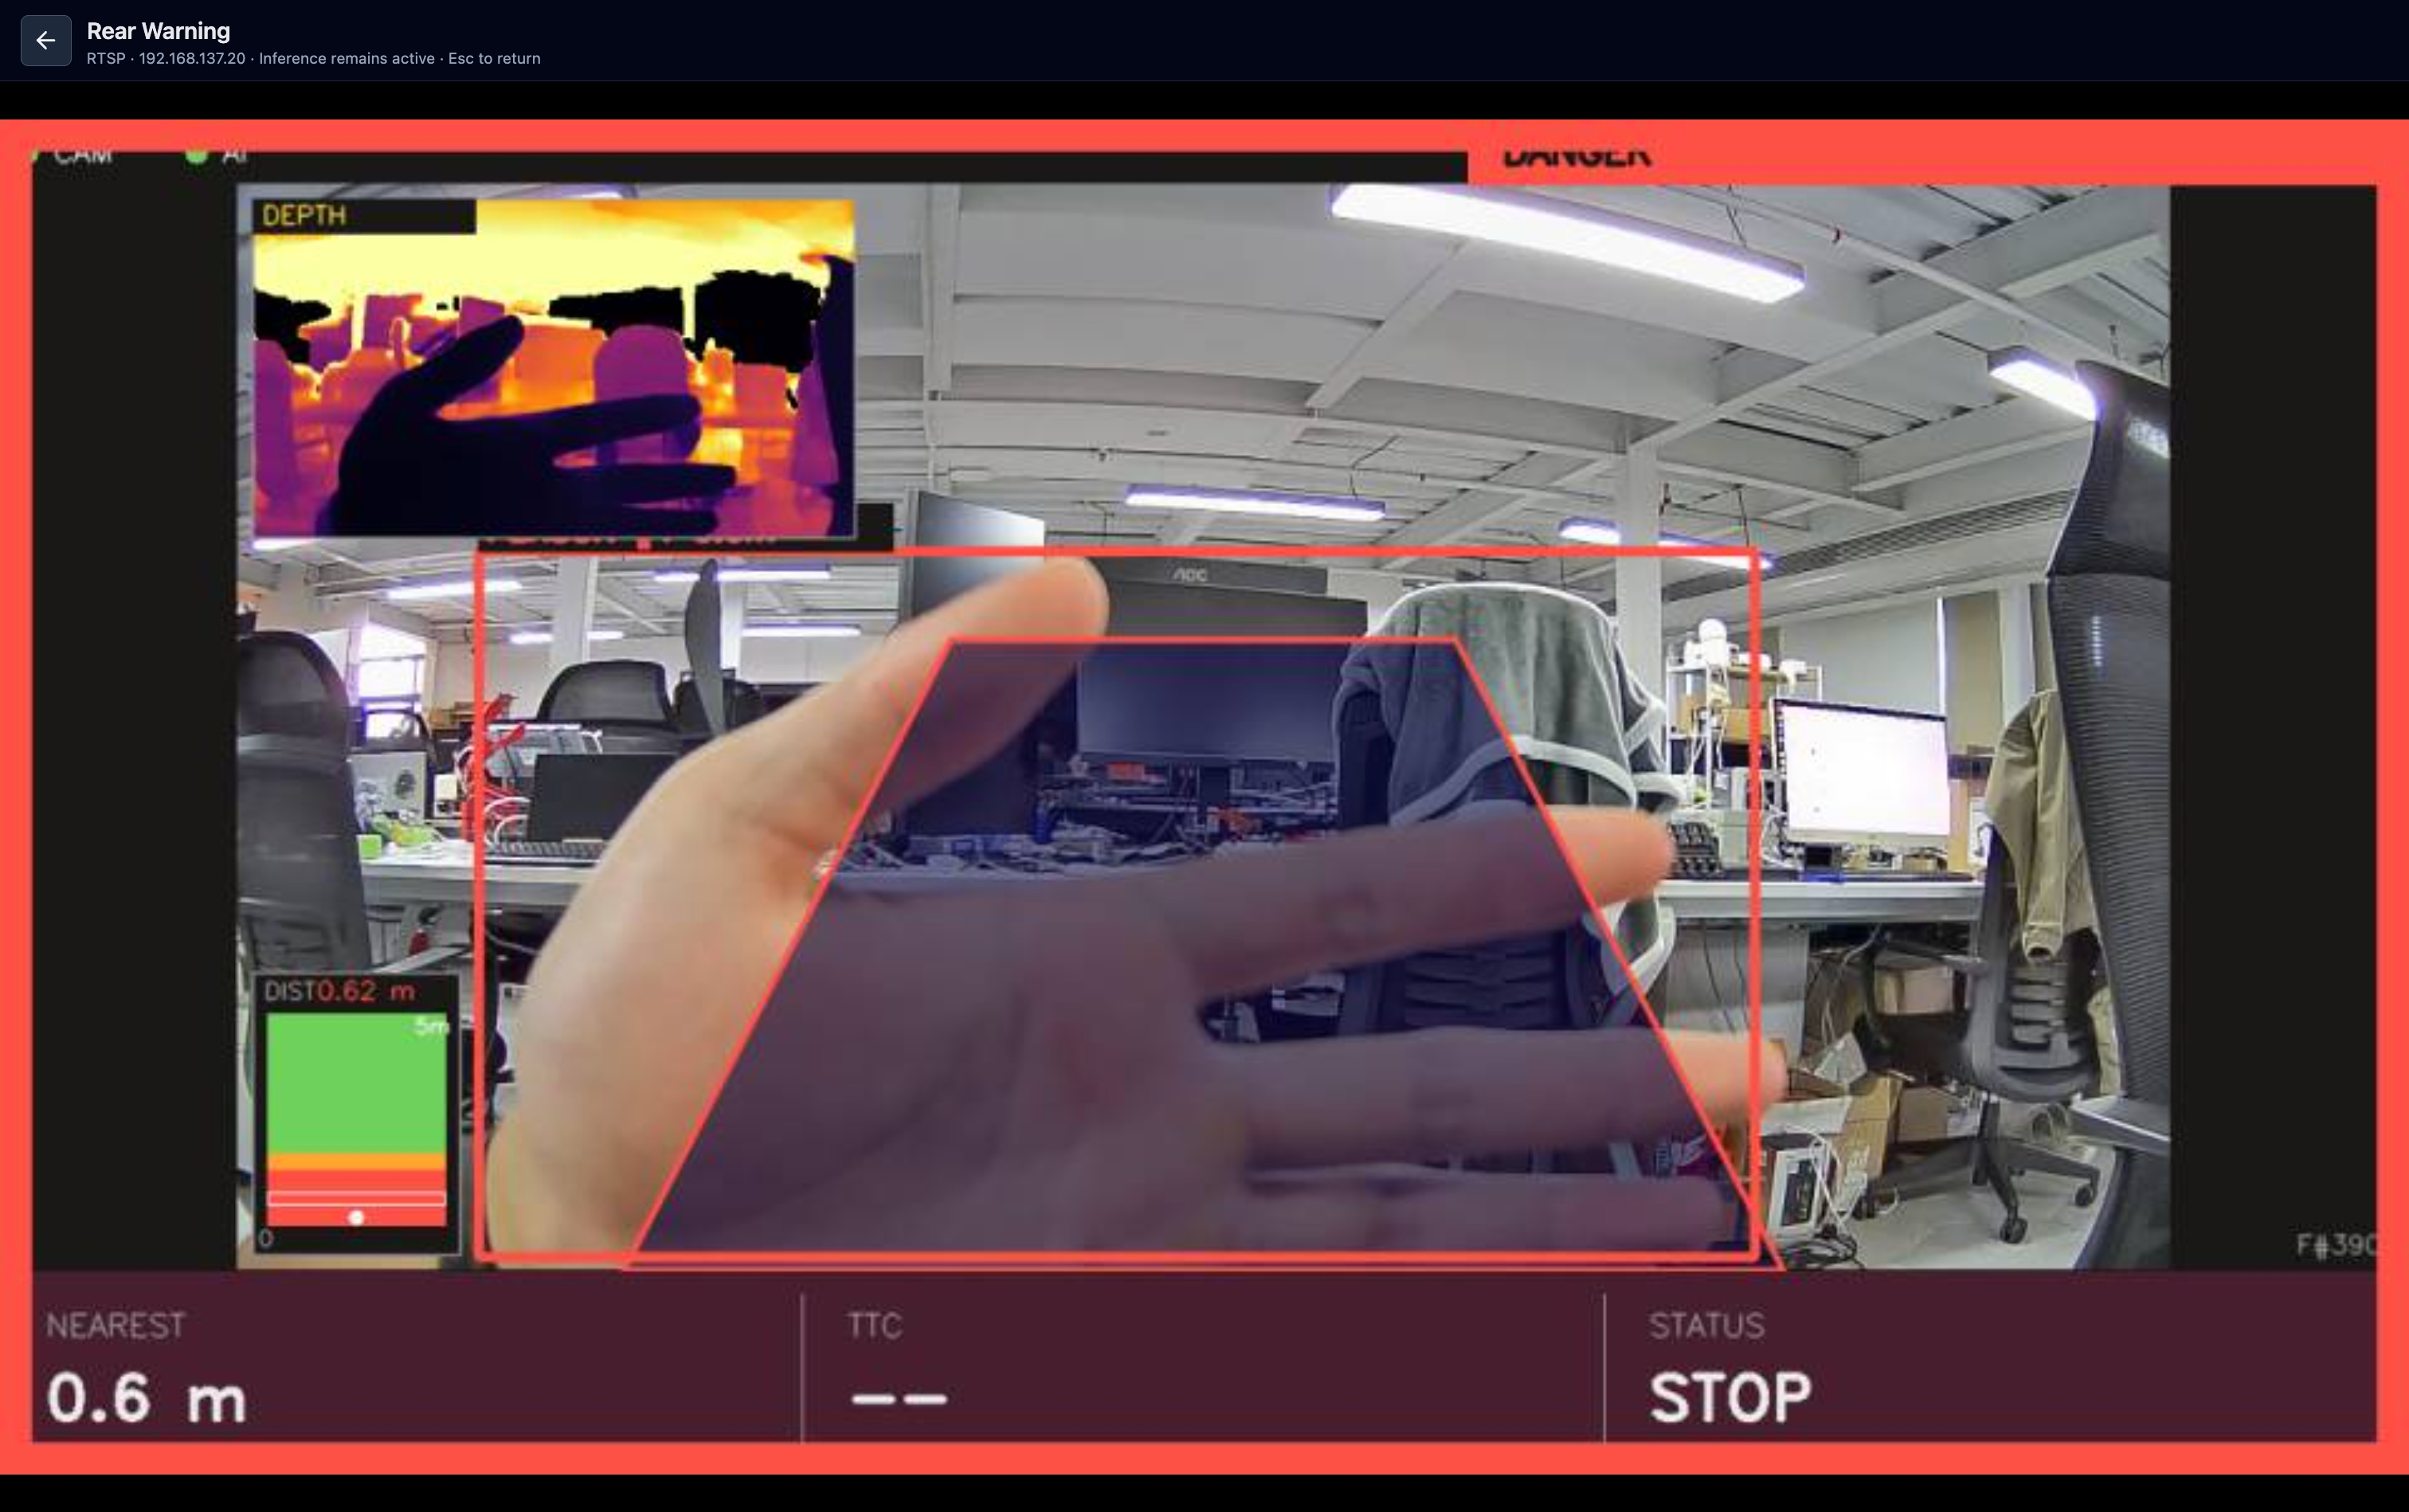
Monocular depth estimation has limitations. The actual distance is not reliable. It is necessary to adjust the alarm threshold based on the on-site conditions and requirements!
Driver and PPE monitoring
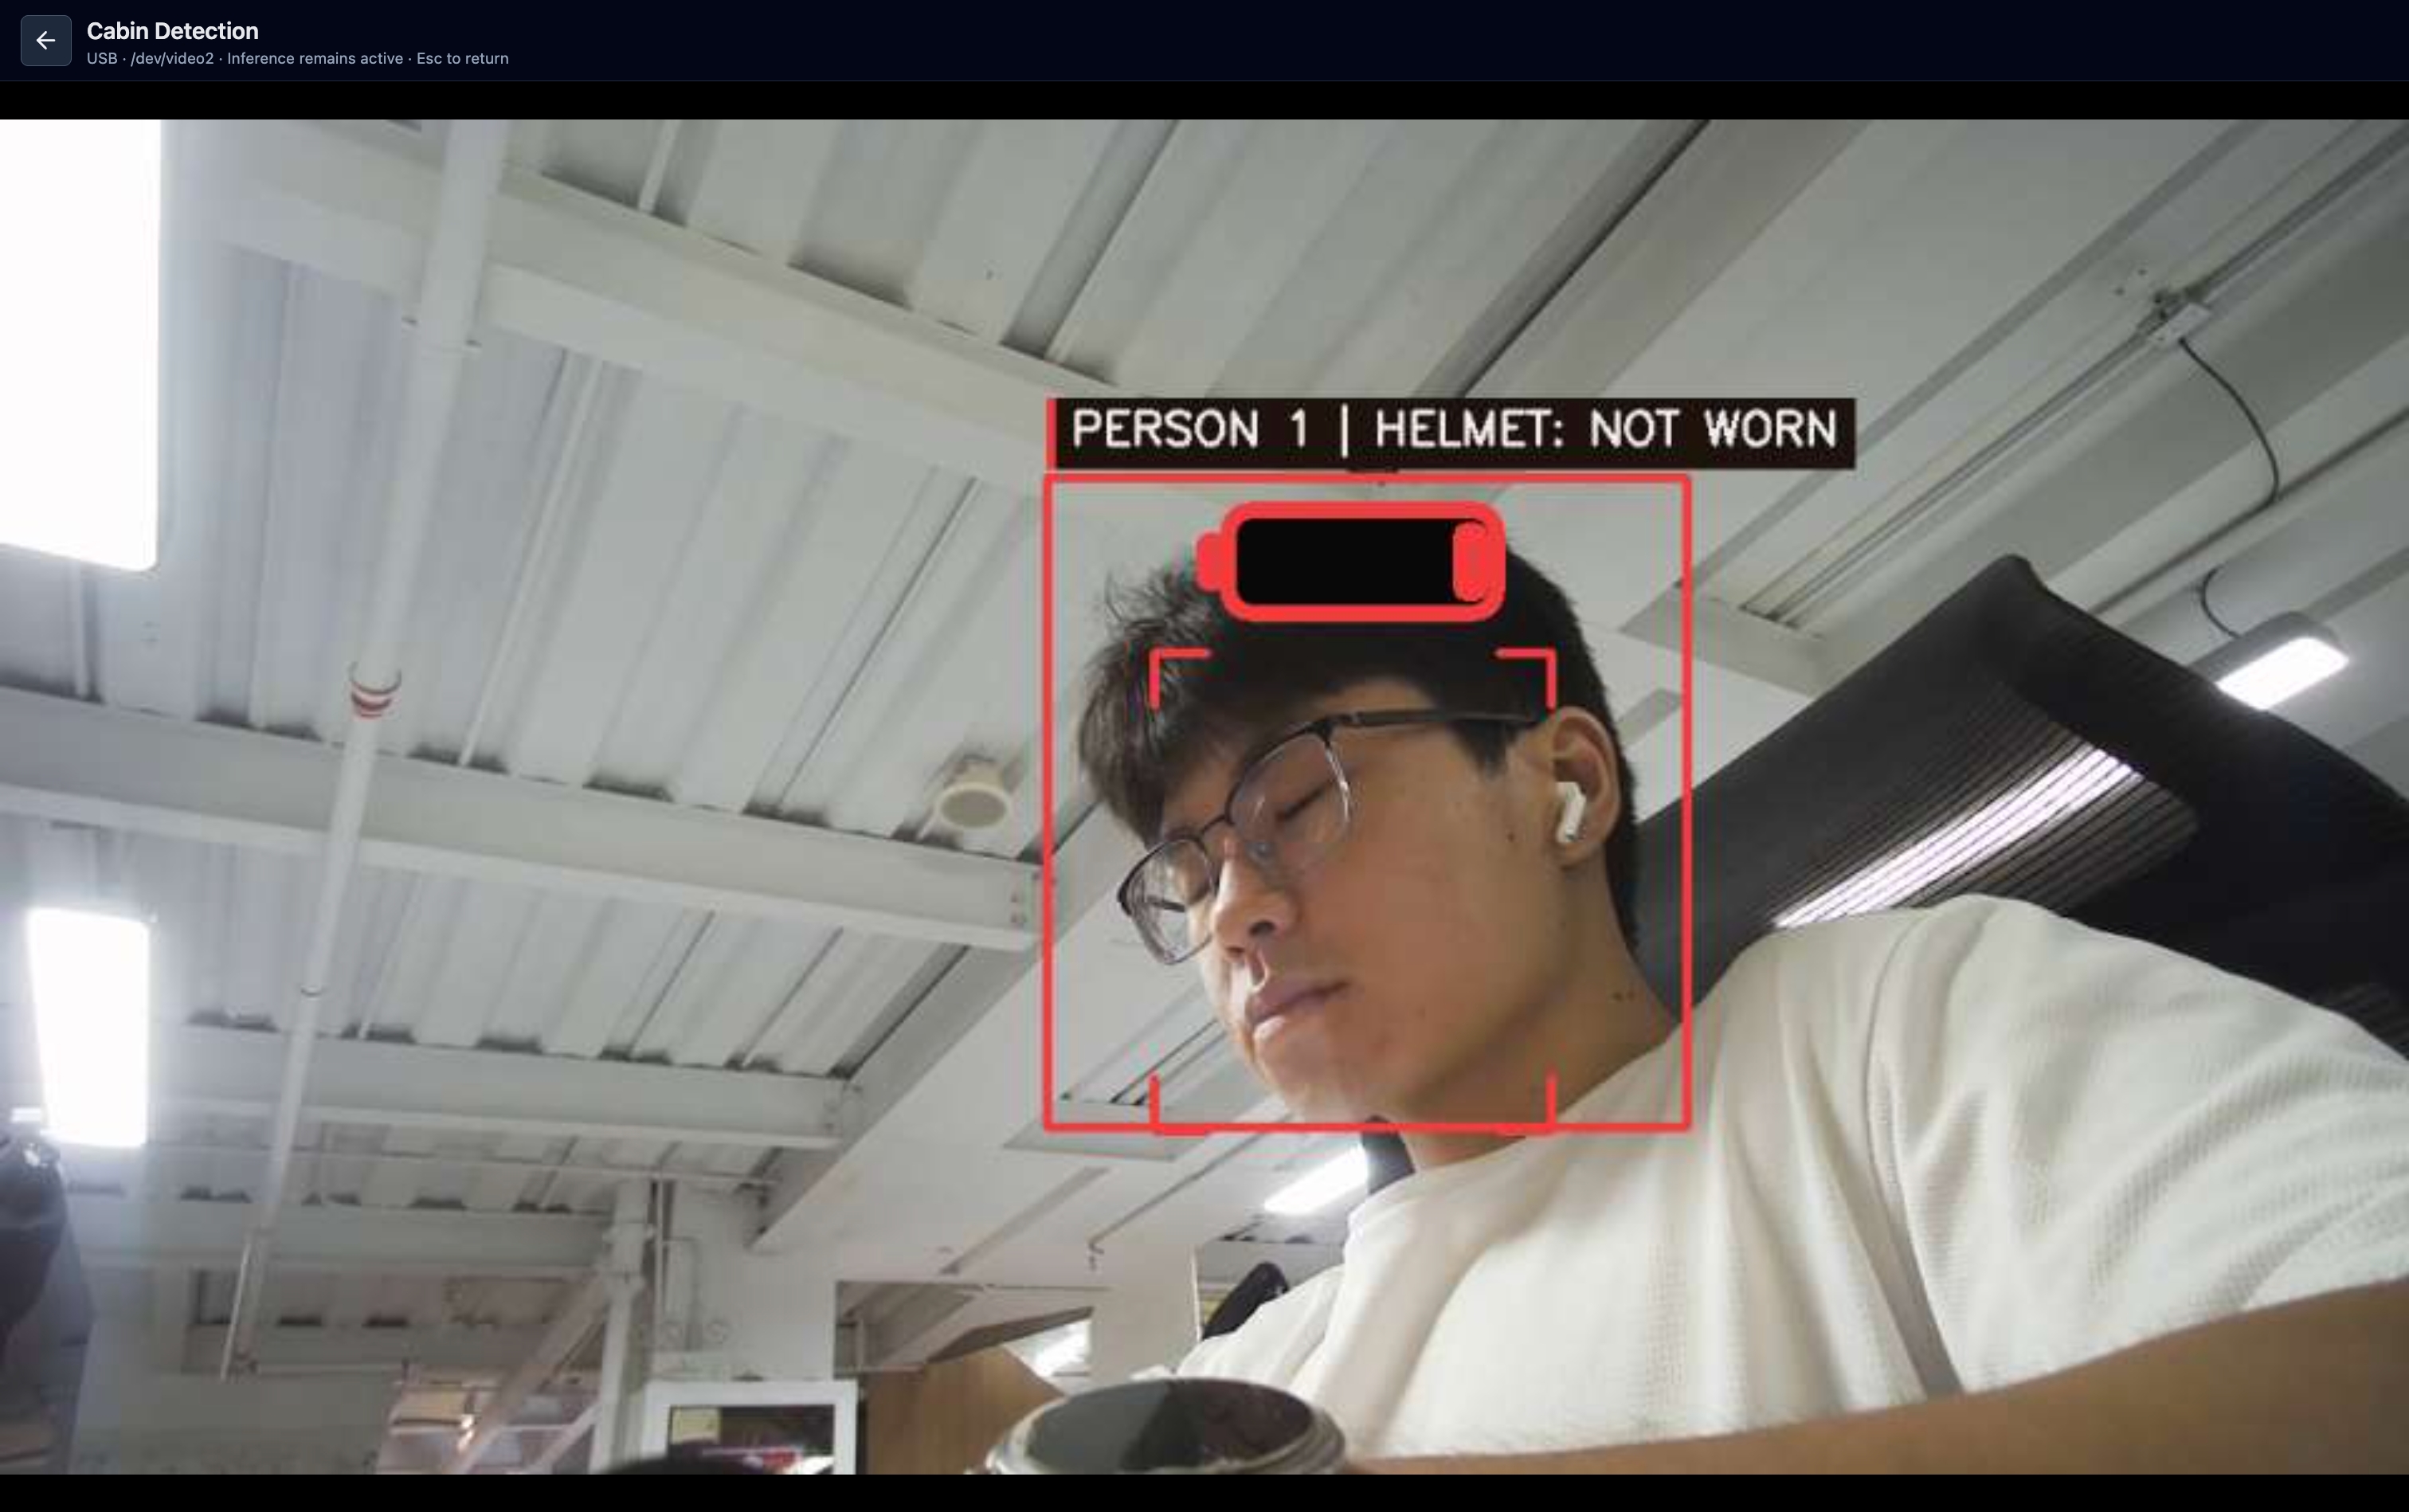
A cabin camera can check conditions that are not visible from the outside. MediaPipe face landmarks provide fatigue-related signals, while a separate model checks helmet status. When the model algorithm detects driver fatigue during operation, it activates a warning light to alert the driver and prevent major safety accidents caused by fatigued driving.
Multi-camera recording
We can display monitoring images from different perspectives on a single dashboard, making it convenient to monitor the situation in real time.
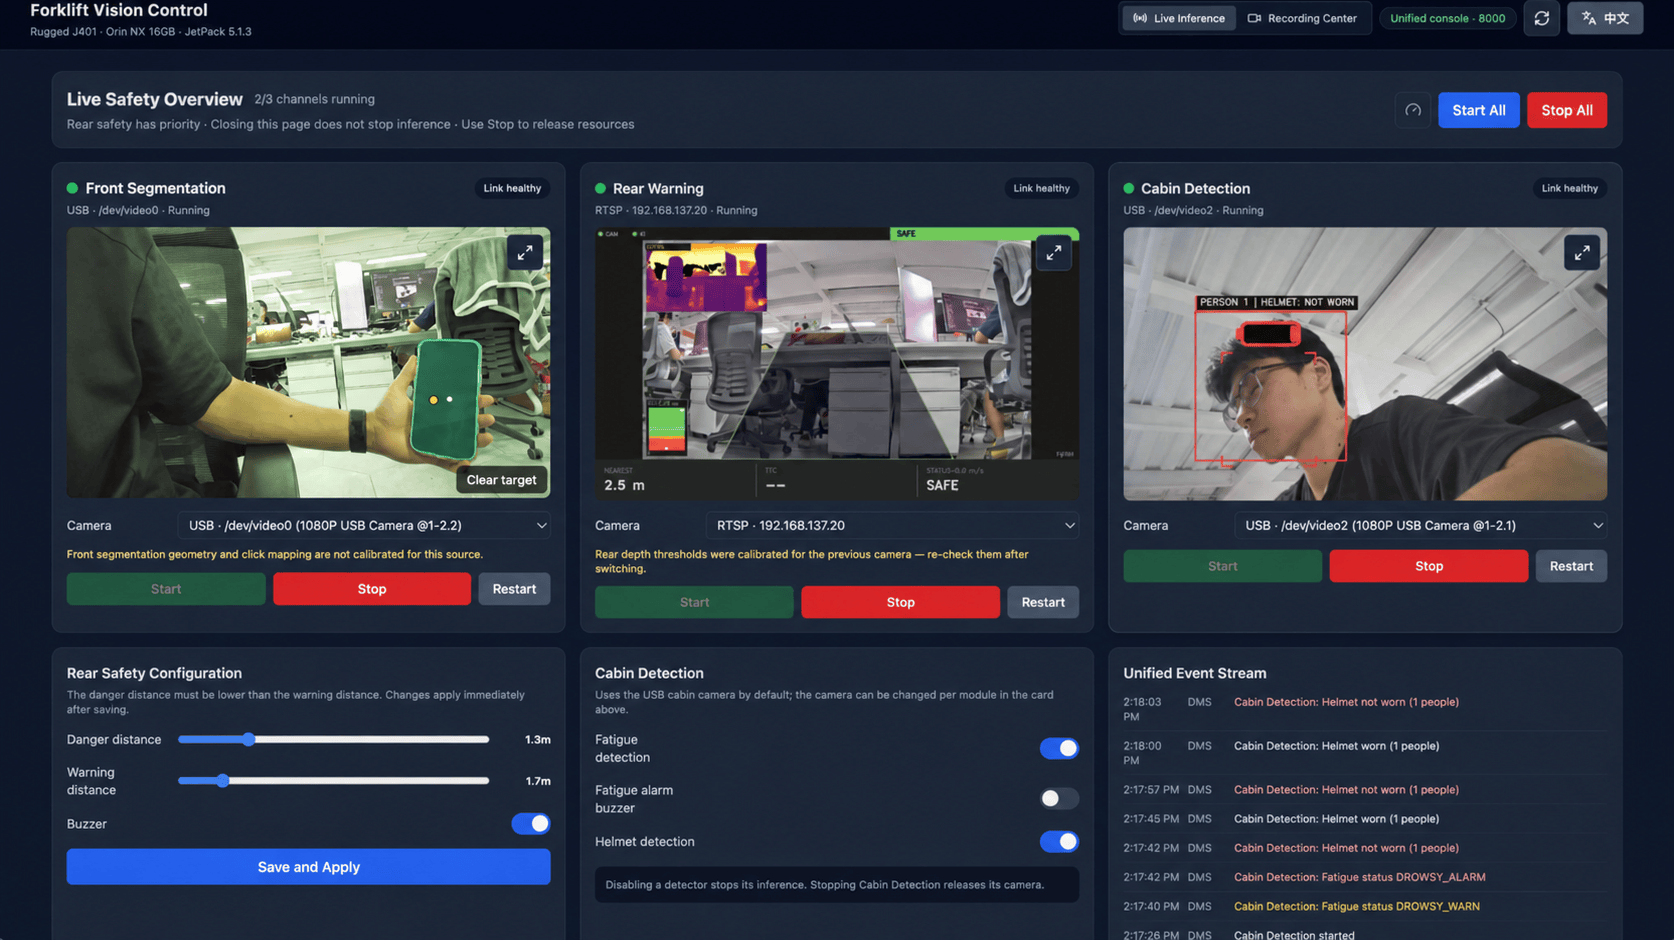
System Overview
| Application | Camera | Vision method |
|---|---|---|
| Front | PoE RTSP | EfficientTAM click-to-segment tracking |
| Rear | PoE RTSP | Depth Anything V2 metric-depth warning with SAFE, WARNING, DANGER, and SYSTEM ERROR states |
| Cabin | USB UVC | MediaPipe fatigue detection and helmet status |
| Recording | Any configured camera | 1080p H.264 MP4 recording without AI inference |
The FastAPI server starts and stops each application, prevents two applications from opening the same camera, and sends the video streams to the browser. Models and cameras remain idle until they are requested, so an unused application does not occupy GPU memory.
Deploy the Example Application
Step 1. Install system packages
sudo apt-get update
sudo apt-get install -y python3.8-venv python3-opencv libopenblas-base logrotate nodejs npm

python3 -c "import cv2; print([line.strip() for line in cv2.getBuildInformation().splitlines() if 'GStreamer' in line])"
The output must show GStreamer: YES. Do not replace the system OpenCV with the PyPI opencv-python wheel; that wheel does not provide the GStreamer support used for RTSP capture on this setup.
Step 2. Clone the project and create the environment
git clone https://github.com/zibochen6/rugged_cv_demo.git /home/seeed/workspace/seg_demo
cd /home/seeed/workspace/seg_demo

python3 -m venv .venv
.venv/bin/python -m pip install --upgrade pip setuptools wheel
.venv/bin/pip install "numpy==1.24.4"

curl -fL --retry 3 -o /tmp/torch-2.1.0a0+41361538.nv23.06-cp38-cp38-linux_aarch64.whl \
  https://developer.download.nvidia.com/compute/redist/jp/v512/pytorch/torch-2.1.0a0+41361538.nv23.06-cp38-cp38-linux_aarch64.whl
.venv/bin/pip install /tmp/torch-2.1.0a0+41361538.nv23.06-cp38-cp38-linux_aarch64.whl

git clone --branch v0.16.2 --depth 1 https://github.com/pytorch/vision.git /tmp/vision
cd /tmp/vision
MAX_JOBS=4 /home/seeed/workspace/seg_demo/.venv/bin/python setup.py install
cd /home/seeed/workspace/seg_demo
Point the virtual environment at the JetPack OpenCV and TensorRT packages, then install the project dependencies:
SP="$(.venv/bin/python -c 'import site; print(site.getsitepackages()[0])')"
printf "import sys; sys.path.insert(0, '/usr/lib/python3.8/dist-packages')\n" \
  > "$SP/_system_opencv_prepend.pth"

.venv/bin/pip install -r requirements-jetson.txt
.venv/bin/pip install -r backend/requirements.txt

cd frontend
npm ci
npm run build
cd ..
Step 3. Install EfficientTAM and download the models
mkdir -p third_party checkpoints models/onnx models/tensorrt models/mediapipe
git clone --depth 1 https://github.com/yformer/EfficientTAM.git third_party/EfficientTAM

Efficient_Track_Anything_BUILD_CUDA=0 .venv/bin/pip install \
  -e third_party/EfficientTAM --no-build-isolation --no-deps --ignore-requires-python

.venv/bin/pip install --no-deps "ultralytics==8.3.40" "ultralytics-thop==2.0.14"
.venv/bin/pip install "onnx==1.14.1" "matplotlib==3.7.5" "pandas==2.0.3" \
  "seaborn==0.13.2" "psutil==6.1.1" "py-cpuinfo==9.0.0" "scipy==1.10.1"

curl -fL --retry 3 -o checkpoints/efficienttam_ti_512x512.pt \
  https://huggingface.co/yunyangx/efficient-track-anything/resolve/main/efficienttam_ti_512x512.pt

.venv/bin/huggingface-cli download depth-anything/Depth-Anything-V2-Metric-Indoor-Small-hf \
  --local-dir checkpoints/depth_anything_v2_metric_indoor_small

curl -fL --retry 3 -o models/mediapipe/face_landmarker.task \
  https://storage.googleapis.com/mediapipe-models/face_landmarker/face_landmarker/float16/latest/face_landmarker.task

curl -fL --retry 3 -o checkpoints/yolov8n.pt \
  https://github.com/ultralytics/assets/releases/download/v8.3.0/yolov8n.pt
Export the ONNX models and build the TensorRT engines
Create export_depth_onnx.py in the project root:
import os
import torch
from transformers import DepthAnythingForDepthEstimation

cam_w, cam_h = 2304, 1296
longest, multiple = 518, 14
scale = longest / float(max(cam_h, cam_w))
in_h = max(multiple, (int(round(cam_h * scale)) // multiple) * multiple)
in_w = max(multiple, (int(round(cam_w * scale)) // multiple) * multiple)
output = "models/onnx/depth_metric_small_518.onnx"

model = DepthAnythingForDepthEstimation.from_pretrained(
    "checkpoints/depth_anything_v2_metric_indoor_small"
).eval()


class Wrapped(torch.nn.Module):
    def __init__(self, depth_model):
        super().__init__()
        self.depth_model = depth_model

    def forward(self, pixel_values):
        return self.depth_model(pixel_values=pixel_values).predicted_depth


os.makedirs(os.path.dirname(output), exist_ok=True)
torch.onnx.export(
    Wrapped(model),
    (torch.zeros((1, 3, in_h, in_w), dtype=torch.float32),),
    output,
    input_names=["pixel_values"],
    output_names=["predicted_depth"],
    opset_version=16,
    do_constant_folding=True,
)
print("ONNX written:", output)
Export the depth and person models, then download the experimental helmet model:
.venv/bin/python export_depth_onnx.py

.venv/bin/python - <<'PY'
from pathlib import Path
from ultralytics import YOLO

result = Path(YOLO("checkpoints/yolov8n.pt").export(
    format="onnx", imgsz=640, opset=12, simplify=False, dynamic=False
))
Path("models/onnx/yolov8n_person.onnx").write_bytes(result.read_bytes())
PY

curl -fL --retry 3 -o models/onnx/ppe_hard_hat.experimental.onnx \
  https://raw.githubusercontent.com/Sanaurrehmanarain/object-detection-yolov8/main/best.onnx
Build all three engines on the J401. TensorRT engines are tied to the GPU architecture and TensorRT version, so do not copy engines built on another computer.
TRTEXEC=/usr/src/tensorrt/bin/trtexec
[ -x "$TRTEXEC" ] || TRTEXEC="$(command -v trtexec)"

"$TRTEXEC" --onnx=models/onnx/depth_metric_small_518.onnx \
  --saveEngine=models/tensorrt/depth_metric_small_518_fp16.engine \
  --fp16 --workspace=1024

"$TRTEXEC" --onnx=models/onnx/yolov8n_person.onnx \
  --saveEngine=models/tensorrt/yolov8n_person_fp16.engine \
  --fp16 --workspace=2048

"$TRTEXEC" --onnx=models/onnx/ppe_hard_hat.experimental.onnx \
  --saveEngine=models/tensorrt/ppe_hard_hat_fp16.engine \
  --fp16 --workspace=1024
Step 4. Install the service and configure the cameras
Preview the system changes before installing the service:
sudo ./deploy/install.sh --dry-run
sudo ./deploy/install.sh
Store the RTSP credentials in the protected environment file:
sudo tee /etc/seg-demo/visual-hub.env >/dev/null <<'EOF'
FRONT_CAMERA_URL=rtsp://<user>:<password>@192.168.10.20:554/
REAR_CAMERA_URL=rtsp://<user>:<password>@192.168.10.21:554/
DMS_CAMERA=usb:0
EOF
sudo chmod 600 /etc/seg-demo/visual-hub.env

sudo systemctl start visual-hub
curl -s http://127.0.0.1:8000/api/health
Try the Applications
Open the following address from a browser on the same LAN:
http://<Jetson-LAN-IP>:8000/
Use the camera selector on each card to confirm the front, rear, and cabin sources. A camera already in use is unavailable to the other applications until it stops. Test each application separately before using Start All.
Track an object in front of the forklift
- Select the front-facing PoE camera and start the front application.
- Click the object or load that should be tracked.
- Add negative points if the mask includes part of the background.
- Clear the selection before choosing another target.
The first model load takes several seconds. Once a target is selected, the mask follows it through later frames and attempts to lock onto it again if it briefly leaves the view.
Check the rear working area
Select the rear-facing PoE camera and start the rear application. The status panel changes between SAFE, WARNING, and DANGER as the estimated distance crosses the configured thresholds.
Before using the displayed distance, set the camera intrinsics, mounting height, pitch, and distance correction in configs/warning.yaml. A different camera or mounting position requires a new calibration.
Enable cabin monitoring
Select the cabin USB camera and start the cabin application. Fatigue and helmet checks have separate switches. Turn off the path that is not required; its model will not be loaded.
Place the camera where the driver's face is visible without blocking the operator's view. Test it under the same lighting conditions used during normal shifts.
Useful service commands:
sudo systemctl restart visual-hub
./scripts/run_visual_hub.sh status
./scripts/run_visual_hub.sh stop
journalctl -u visual-hub -f
Measured Performance
These figures were measured with the four applications running on a reComputer Rugged J401 with Jetson Orin NX 16GB. Run sudo nvpmodel -m 0 && sudo jetson_clocks before comparing results.
| Application | Configuration | Measured result |
|---|---|---|
| Front segmentation | EfficientTAM-Ti, 512, PyTorch bf16 | About 13.2 FPS; first load takes 7 to 8 seconds |
| Rear warning | Depth Anything V2 Metric Small, TensorRT FP16 | About 21 FPS depth processing |
| Cabin monitoring | 1280x720 USB camera | About 5.4 FPS with fatigue and helmet checks |
| Recording | Three streams, nvv4l2h264enc | 3 x 1920x1080 at 15 FPS H.264 |
Actual throughput depends on camera resolution, power mode, temperature, and the number of active applications.
Troubleshooting
| Symptom | Check | Fix |
|---|---|---|
| Port 8000 is unavailable | systemctl status visual-hub | Restart the service and inspect journalctl -u visual-hub |
An application reports CAMERA_BUSY | curl -s http://127.0.0.1:8000/api/hub/status | Stop the application or recording job that holds the camera |
| A USB camera will not open | sudo dmesg | grep -i "not enough bandwidth" | Move it to USB 3 or stop the other USB stream |
| An RTSP stream freezes | Check frame_age_s in the application status | Confirm camera power, PoE budget, network route, and RTSP credentials |
| The front view takes several seconds to appear | journalctl -u visual-hub | The first EfficientTAM model load normally takes 7 to 8 seconds |
For a camera missing from the selector, check the inventory first:
curl -s http://127.0.0.1:8000/api/hub/cameras
Add extra RTSP sources to HUB_EXTRA_CAMERAS in /etc/seg-demo/visual-hub.env, or enter the URL through the manual row in the selector.
Safety and Application Limits
- Rear-area warning uses monocular depth, not a physical distance sensor. Low light, reflections, transparent objects, a dirty lens, or heavy vibration can produce bad estimates.
- Cabin monitoring uses RGB images and fixed timing rules. It has no per-driver calibration or night-vision support.
- Front tracking follows one user-selected target. It does not identify the object or decide whether it is safe to move it.
- The helmet model is experimental. Review its accuracy, training data, and license before operational use.
Demo Video
Resources
- reComputer Rugged J40 Datasheet
- Carrier Board Schematic
- PSE Board Schematic
- 3D File
- Linux_for_Tegra Source Code
- NVIDIA Jetson Devices Comparison
- rugged_cv_demo project repository
- EfficientTAM
- Depth Anything V2 Metric Indoor Small
- MediaPipe Face Landmarker
- Getting Started with reComputer Rugged J40
Tech Support & Product Discussion
Thank you for choosing our products! We are here to provide you with different support to ensure that your experience with our products is as smooth as possible. We offer several communication channels to cater to different preferences and needs.