YOLOv26 Dual USB Camera Image Processing System on Jetson
This wiki demonstrates how to build a dual USB camera image processing system based on YOLOv26 model and TensorRT acceleration from scratch. The system includes the following features:
- Dual Camera Parallel Processing: Real-time video stream processing for two USB cameras simultaneously
- Multi-task Vision Analysis: Object detection, pose estimation, image segmentation (SAM model)
- TensorRT Acceleration: Significantly improve inference speed using NVIDIA TensorRT engine
- Web Interface Preview: View processing results in real-time through a browser
- MJPEG Compression: Reduce USB bandwidth usage and improve system stability
Prerequisites
- reComputer J4012 or Other products of the reCompuer series
- 2 USB cameras
- USB Type-C data transmission cable(Connect the camera)
Download from GitHub
Method 1: Clone the Entire Repository (Recommended)
This is the simplest method to get all files at once:
# 1. Navigate to your home directory
# !!Replace this with your own username
cd /home/seeed

# 2. Clone the repository
git clone https://github.com/bleaaach/yolov26_jetson.git

# 3. Navigate to the project directory
cd yolov26_jetson

# 4. View downloaded files
ls -la
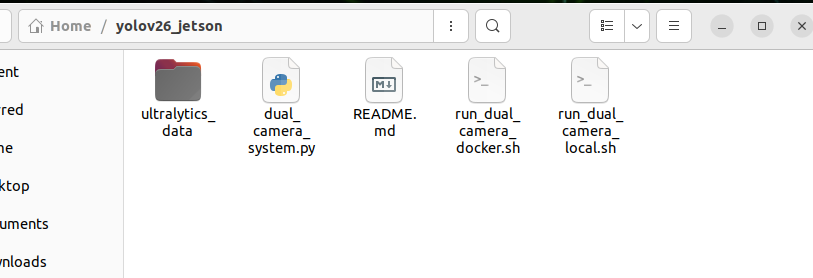
You should see the following files:
run_dual_camera_docker.sh- Docker deployment scriptrun_dual_camera_local.sh- Local deployment scriptREADME.md- This documentation file
Method 2: Download Individual Files
If you only need specific script files, you can download them individually using wget:
# 1. Navigate to your home directory
cd /home/seeed

# 2. Create project directory
mkdir -p yolov26_jetson
cd yolov26_jetson

# 3. Download Docker script
wget https://raw.githubusercontent.com/bleaaach/yolov26_jetson/main/run_dual_camera_docker.sh

# 4. Download Local script
wget https://raw.githubusercontent.com/bleaaach/yolov26_jetson/main/run_dual_camera_local.sh

# 5. Download README documentation
wget https://raw.githubusercontent.com/bleaaach/yolov26_jetson/main/README.md

# 6. View downloaded files
ls -la
Verify Downloaded Files
After downloading, verify that the files exist:
# View file list
ls -la

# Check file permissions
If the scripts don't have execute permissions, add them:
# Add execute permissions
chmod +x run_dual_camera_docker.sh
chmod +x run_dual_camera_local.sh

# Check again
ls -la
Comparison of Two Deployment Methods
| Feature | Docker Method | Local Method |
|---|---|---|
| Environment Isolation | ✅ Fully isolated, doesn't pollute host environment | ❌ Directly installed on host |
| Deployment Speed | ✅ Fast, one-click startup | ❌ Requires manual installation of many dependencies |
| Hardware Access | ⚠️ Requires device mapping configuration | ✅ Direct access to all hardware |
| Performance | ⚠️ Has container overhead | ✅ Better performance |
| Storage Space | ⚠️ Requires ~2GB Docker image | ✅ Less storage usage |
| Recommended Use Case | Quick testing, multi-device deployment | Production environment, best performance |
(Option 1)Local Environment Setup
Step 1. Update Package List and Install pip
# Update package list
sudo apt update

# Install pip
sudo apt install python3-pip -y

# Upgrade pip
pip install -U pip
If pip is not pre-installed on the system, use the following command to install:
# Download get-pip.py
curl https://bootstrap.pypa.io/get-pip.py -o get-pip.py

# Install pip
python3 get-pip.py --user
Step 2. Install Ultralytics Package
Install Ultralytics and its optional dependencies (for model export):
# Install Ultralytics
~/.local/bin/pip install ultralytics[export]
Step 3. Install PyTorch and Torchvision
Important: PyTorch and Torchvision installed via pip are not compatible with Jetson's ARM64 architecture. You need to manually install versions built specifically for Jetson.
First uninstall incompatible versions:
# Uninstall incompatible versions
~/.local/bin/pip uninstall torch torchvision -y
Then install JetPack 6.1 compatible versions:
# Install PyTorch 2.5.0
~/.local/bin/pip install https://github.com/ultralytics/assets/releases/download/v0.0.0/torch-2.5.0a0+872d972e41.nv24.08-cp310-cp310-linux_aarch64.whl

# Install Torchvision 0.20
~/.local/bin/pip install https://github.com/ultralytics/assets/releases/download/v0.0.0/torchvision-0.20.0a0+afc54f7-cp310-cp310-linux_aarch64.whl
If GitHub download is slow, you can use an acceleration proxy:
# Use gh proxy to download PyTorch
~/.local/bin/pip install https://gh-proxy.com/https://github.com/ultralytics/assets/releases/download/v0.0.0/torch-2.5.0a0+872d972e41.nv24.08-cp310-cp310-linux_aarch64.whl

# Use gh proxy to download Torchvision
~/.local/bin/pip install https://gh-proxy.com/https://github.com/ultralytics/assets/releases/download/v0.0.0/torchvision-0.20.0a0+afc54f7-cp310-cp310-linux_aarch64.whl
Step 4. Install cuSPARSELt
cuSPARSELt is a dependency of PyTorch 2.5.0 and needs to be installed separately:
# Install cuSPARSELt
sudo apt-get install -y libcusparselt0
Step 5. Install onnxruntime-gpu
onnxruntime-gpu is used for some model export functions. Since the package on PyPI doesn't contain aarch64 binaries for Jetson, manual installation is required:
# Install onnxruntime-gpu 1.23.0
~/.local/bin/pip install https://gh-proxy.com/https://github.com/ultralytics/assets/releases/download/v0.0.0/onnxruntime_gpu-1.23.0-cp310-cp310-linux_aarch64.whl
Or use version 1.20.0:
# Install onnxruntime-gpu 1.20.0
~/.local/bin/pip install https://gh-proxy.com/https://github.com/ultralytics/assets/releases/download/v0.0.0/onnxruntime_gpu-1.20.0-cp310-cp310-linux_aarch64.whl
Step 6. Configure PATH Environment Variable
Since user installation mode is used, pip installed executables are located in the ~/.local/bin/ directory. It's recommended to add this directory to the PATH environment variable:
# Add to .bashrc
echo 'export PATH=$PATH:~/.local/bin' >> ~/.bashrc

# Reload .bashrc
source ~/.bashrc
Step 7. Verify Installation
Check installed package versions:
# Check versions
python3 -c "import ultralytics; import torch; import torchvision; import onnxruntime; print('ultralytics version:', ultralytics.__version__); print('torch version:', torch.__version__); print('torchvision version:', torchvision.__version__); print('onnxruntime version:', onnxruntime.__version__)"
Expected output:
ultralytics version: 8.4.7
torch version: 2.5.0a0+872d972e41.nv24.08
torchvision version: 0.20.0a0+afc54f7
onnxruntime version: 1.23.0
Step 8. Test YOLOv26 Inference Functionality
from ultralytics import YOLO
import torch

# Check if CUDA is available
print(f"CUDA available: {torch.cuda.is_available()}")
if torch.cuda.is_available():
    print(f"CUDA device count: {torch.cuda.device_count()}")
    print(f"CUDA device name: {torch.cuda.get_device_name(0)}")

# Load YOLOv26n model
model = YOLO('yolo26v26n.pt')
print(f"Model loaded successfully!")

# Perform inference test
results = model('https://ultralytics.com/images/bus.jpg')
print(f"Inference successful! Detected {len(results[0].boxes)} objects")

# Display detection results
for i, box in enumerate(results[0].boxes):
    cls_id = int(box.cls[0])
    conf = float(box.conf[0])
    cls_name = model.names[cls_id]
    print(f"  Object {i+1}: {cls_name} (confidence: {conf:.2f})")
Step 9. Prepare Model Files
Ensure model files are downloaded to the correct location:
# Check model directory
ls -la /home/seeed/ultralytics_data/

# Create directory if it doesn't exist
mkdir -p /home/seeed/ultralytics_data
If model files don't exist, download them first:
# Navigate to model directory
cd /home/seeed/ultralytics_data
# Download object detection model
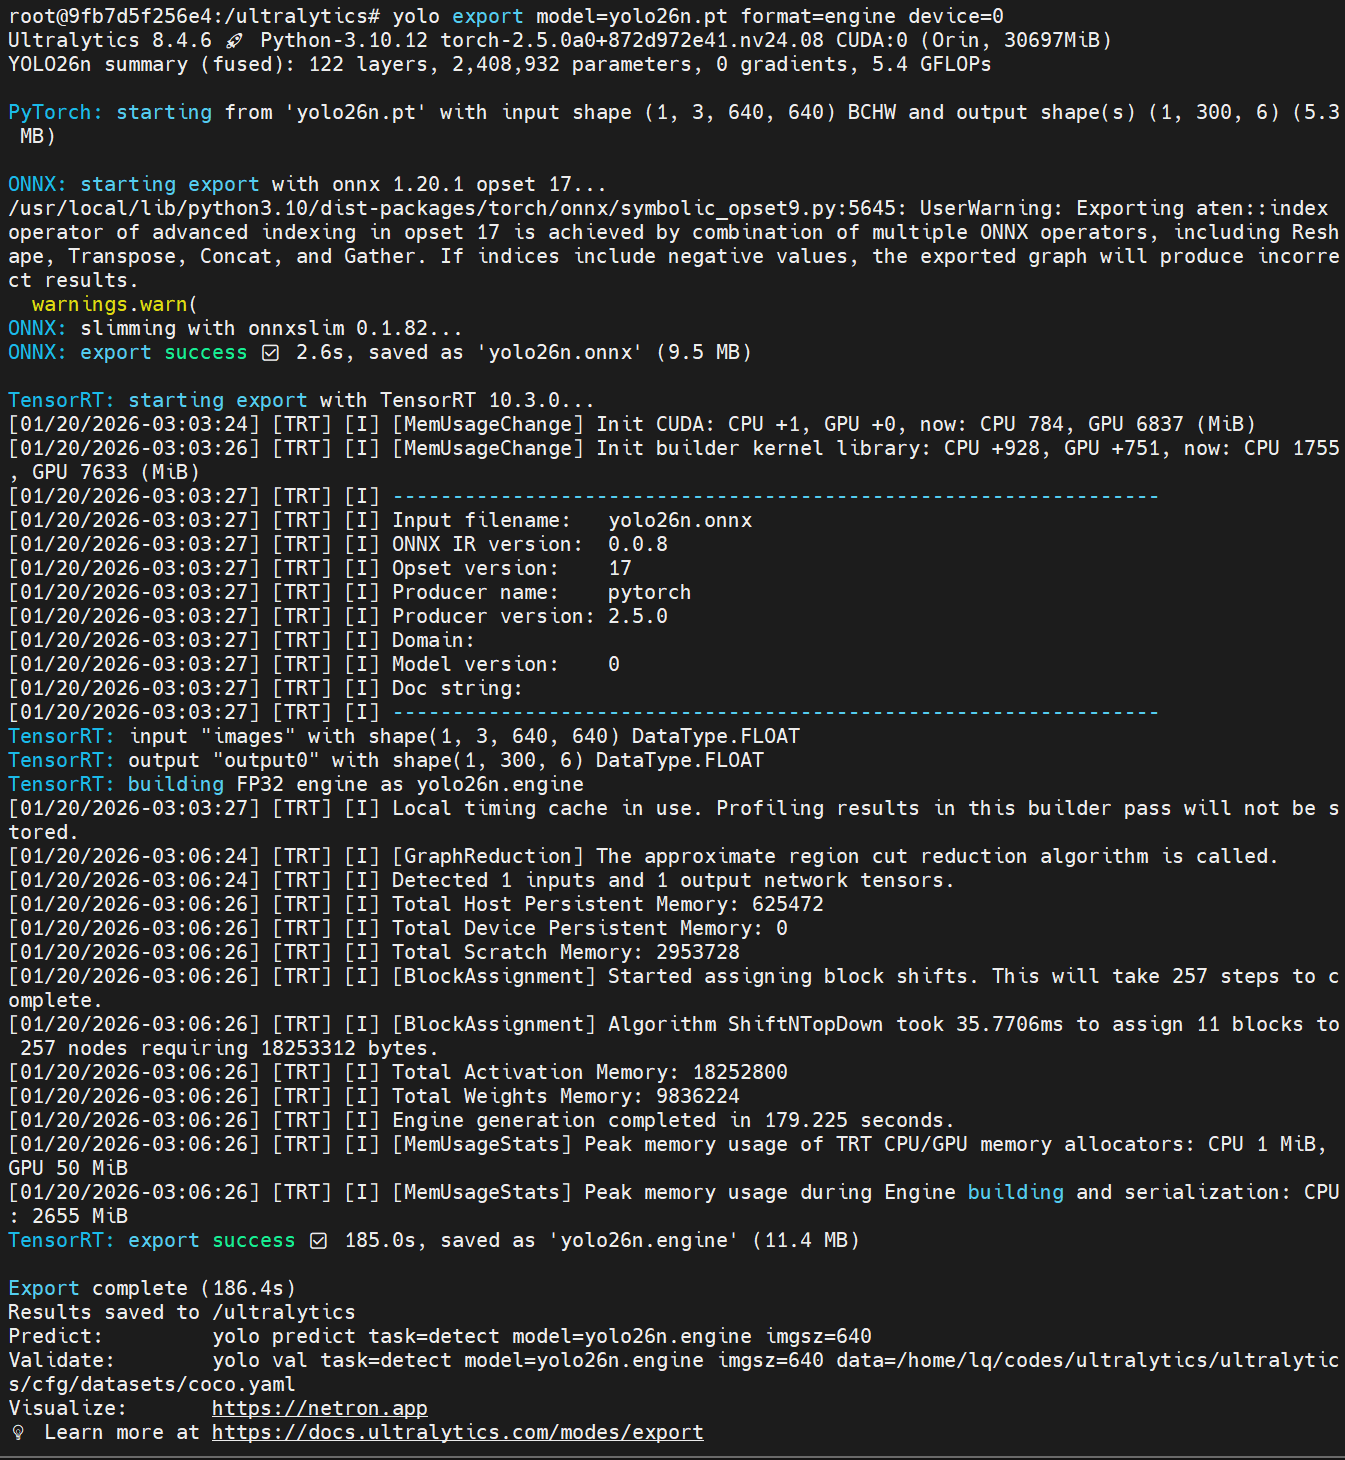
yolo export model=yolov26n.pt format=engine device=0
# Download pose estimation model
yolo export model=yolov26n-pose.pt format=engine device=0
# Download segmentation model
yolo export model=yolov26n-seg.pt format=engine device=0
# Verify model files
ls -la
You should see the following files:
yolo26n.engineyolo26n-pose.engineyolo26n-seg.engine
Step 10. Run Local Script
Now you can run the Local script:
# 1. Navigate to project directory
cd /home/seeed/yolov26_jetson

# 2. Ensure script has execute permissions
chmod +x run_dual_camera_local.sh

# 3. Run Local script
./run_dual_camera_local.sh
(Option 2)Docker Environment Setup
Step 1. Ensure Docker is Installed
First check if Docker is installed:
# Check Docker version
docker --version
If Docker is not installed, install it first:
# Update package list
sudo apt update

# Install Docker
sudo apt install docker.io -y

# Start Docker service
sudo systemctl start docker

# Add current user to docker group
sudo usermod -aG docker $USER

# Re-login to apply changes
newgrp docker
For more details on configuring Docker environment, please refer to this GitHub repository: https://github.com/zibochen6/reComputer-Jetson-for-Beginners/tree/main/3-Basic-Tools-and-Getting-Started/3.7-Docker/
Step 2. Ensure Docker Service is Running
# Check Docker service status
sudo systemctl status docker
If Docker is not running, start it:
# Start Docker service
sudo systemctl start docker
Step 3. Prepare Model Files
Ensure model files are downloaded to the correct location:
# Check model directory
ls -la /home/seeed/ultralytics_data/

# Create directory if it doesn't exist
mkdir -p /home/seeed/ultralytics_data
If model files don't exist, download them first:
# Navigate to model directory
cd /home/seeed/ultralytics_data

# Download object detection model
yolo export model=yolov26n.pt format=engine device=0

# Download pose estimation model
yolo export model=yolov26n-pose.pt format=engine device=0

# Download segmentation model
yolo export model=yolov26n-seg.pt format=engine device=0

# Verify model files
ls -la
You should see the following files:
yolo26n.engineyolo26n-pose.engineyolo26n-seg.engine
Step 4. Run Docker Script
Now you can run the Docker script:
# 1. Navigate to project directory
cd /home/seeed/yolov26_jetson

# 2. Ensure script has execute permissions
chmod +x run_dual_camera_docker.sh

# 3. Run Docker script
./run_dual_camera_docker.sh
Step 5. Access Web Interface
Open the following address in your browser:
http://localhost:5000
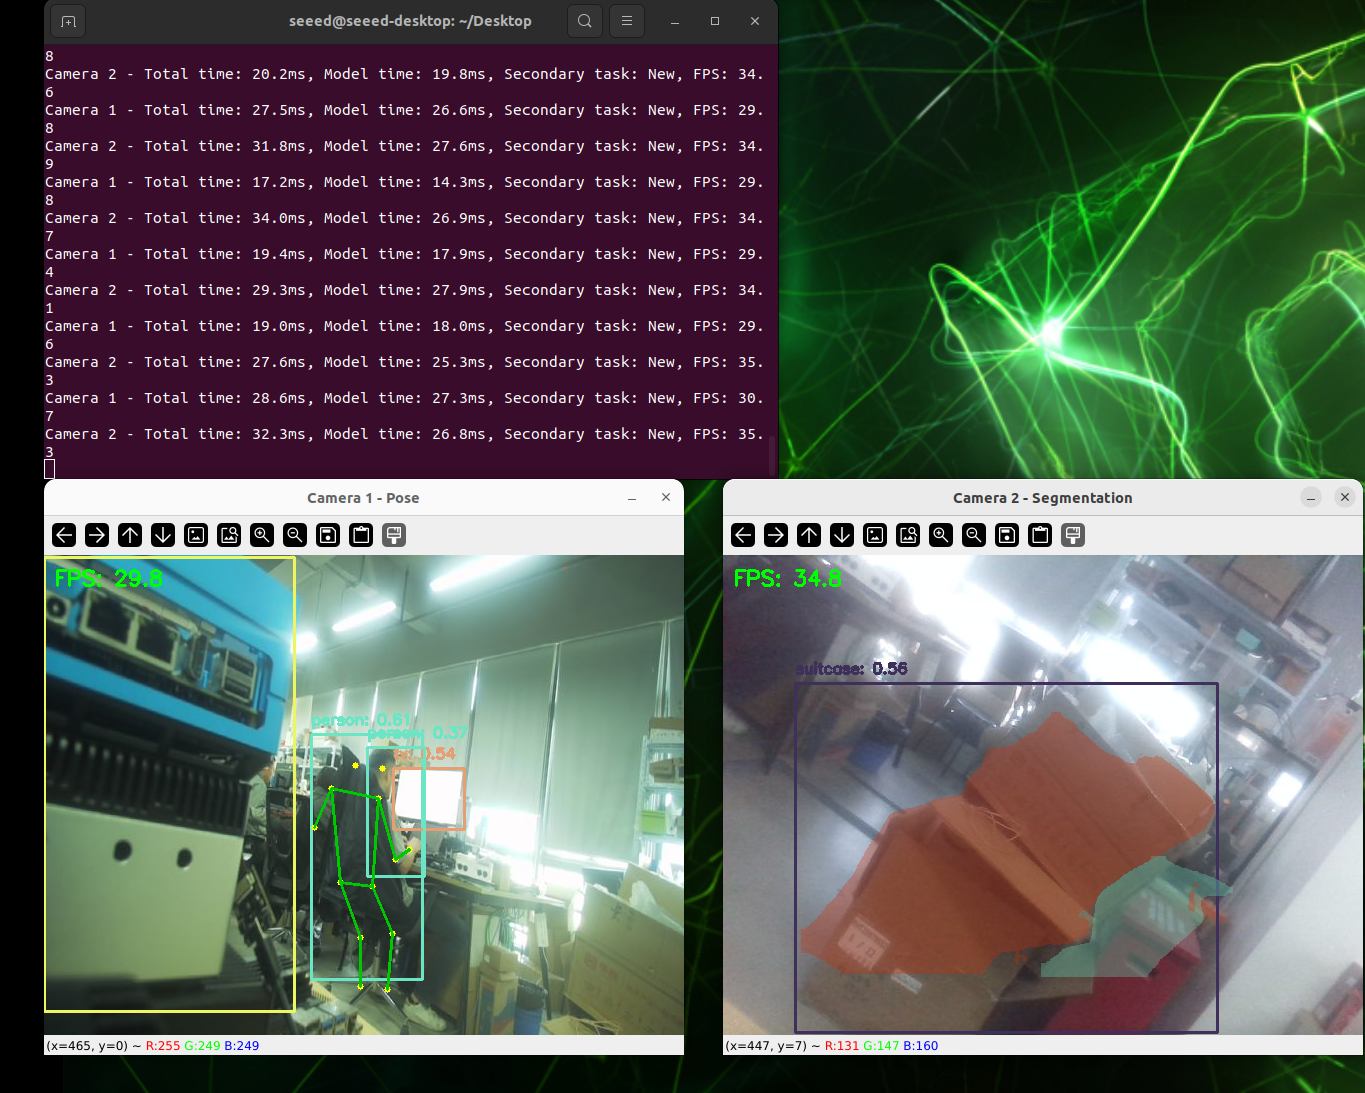
At this moment the browser will display the real-time feeds from both cameras side-by-side, similar to “Left Camera Feed | Right Camera Feed”. The actual frame rate and resolution depend on your hardware performance.
If you need to restart the system:
# 1. Stop and remove existing container
docker rm -f dual-camera-system

# 2. Re-run script
cd /home/seeed/yolov26_jetson
./run_dual_camera_docker.sh
Resources
Tech Support & Product Discussion
Thank you for choosing Seeed Studio products! For technical support and product discussion, please use the following channels: