AI Voice Interaction with reCamera
Introduction
This project demonstrates a way to interact with reCamera through natural language. After visual reasoning triggers audio recording, reCamera sends the recording to the server, processes it through the complete STT (Speech-to-Text) → LLM (Large Language Model Reasoning) → TTS (Text-to-Speech) pipeline, and the synthesized voice is returned to reCamera for playback, enabling natural language conversation.
Have you ever wanted a camera that can not only "see" but also "understand" and "speak"? Through the architecture of this project, using the microphone and speaker of the reCamera, the device is no longer just a visual tool but an intelligent assistant capable of natural conversation. This includes but is not limited to the following scenarios:
-
Smart Access Control Assistant: Install reCamera at the entrance, where visitors can complete identity registration, leave messages, or get directions through voice alone, without the need for an additional interactive screen.
-
Factory Safety Inspection Partner: In industrial environments, when workers' hands are occupied, they can trigger voice interaction through gestures to ask the AI assistant about equipment status, operation manuals, or report abnormalities.
-
Accessibility-Assisted Interaction: Provide a voice control entry point for visually impaired or mobility-limited users, enabling natural language conversation with the device through simple gesture triggers to obtain environmental information or send commands.
-
Education and Exhibition Guide: In museums or exhibition halls, visitors can trigger voice interaction through gestures to ask the AI assistant about exhibit information and receive personalized guided tours.
Demo Video
System Architecture
The entire system is collaboratively completed by two parts: reCamera side and PC server side. The architecture is as follows:
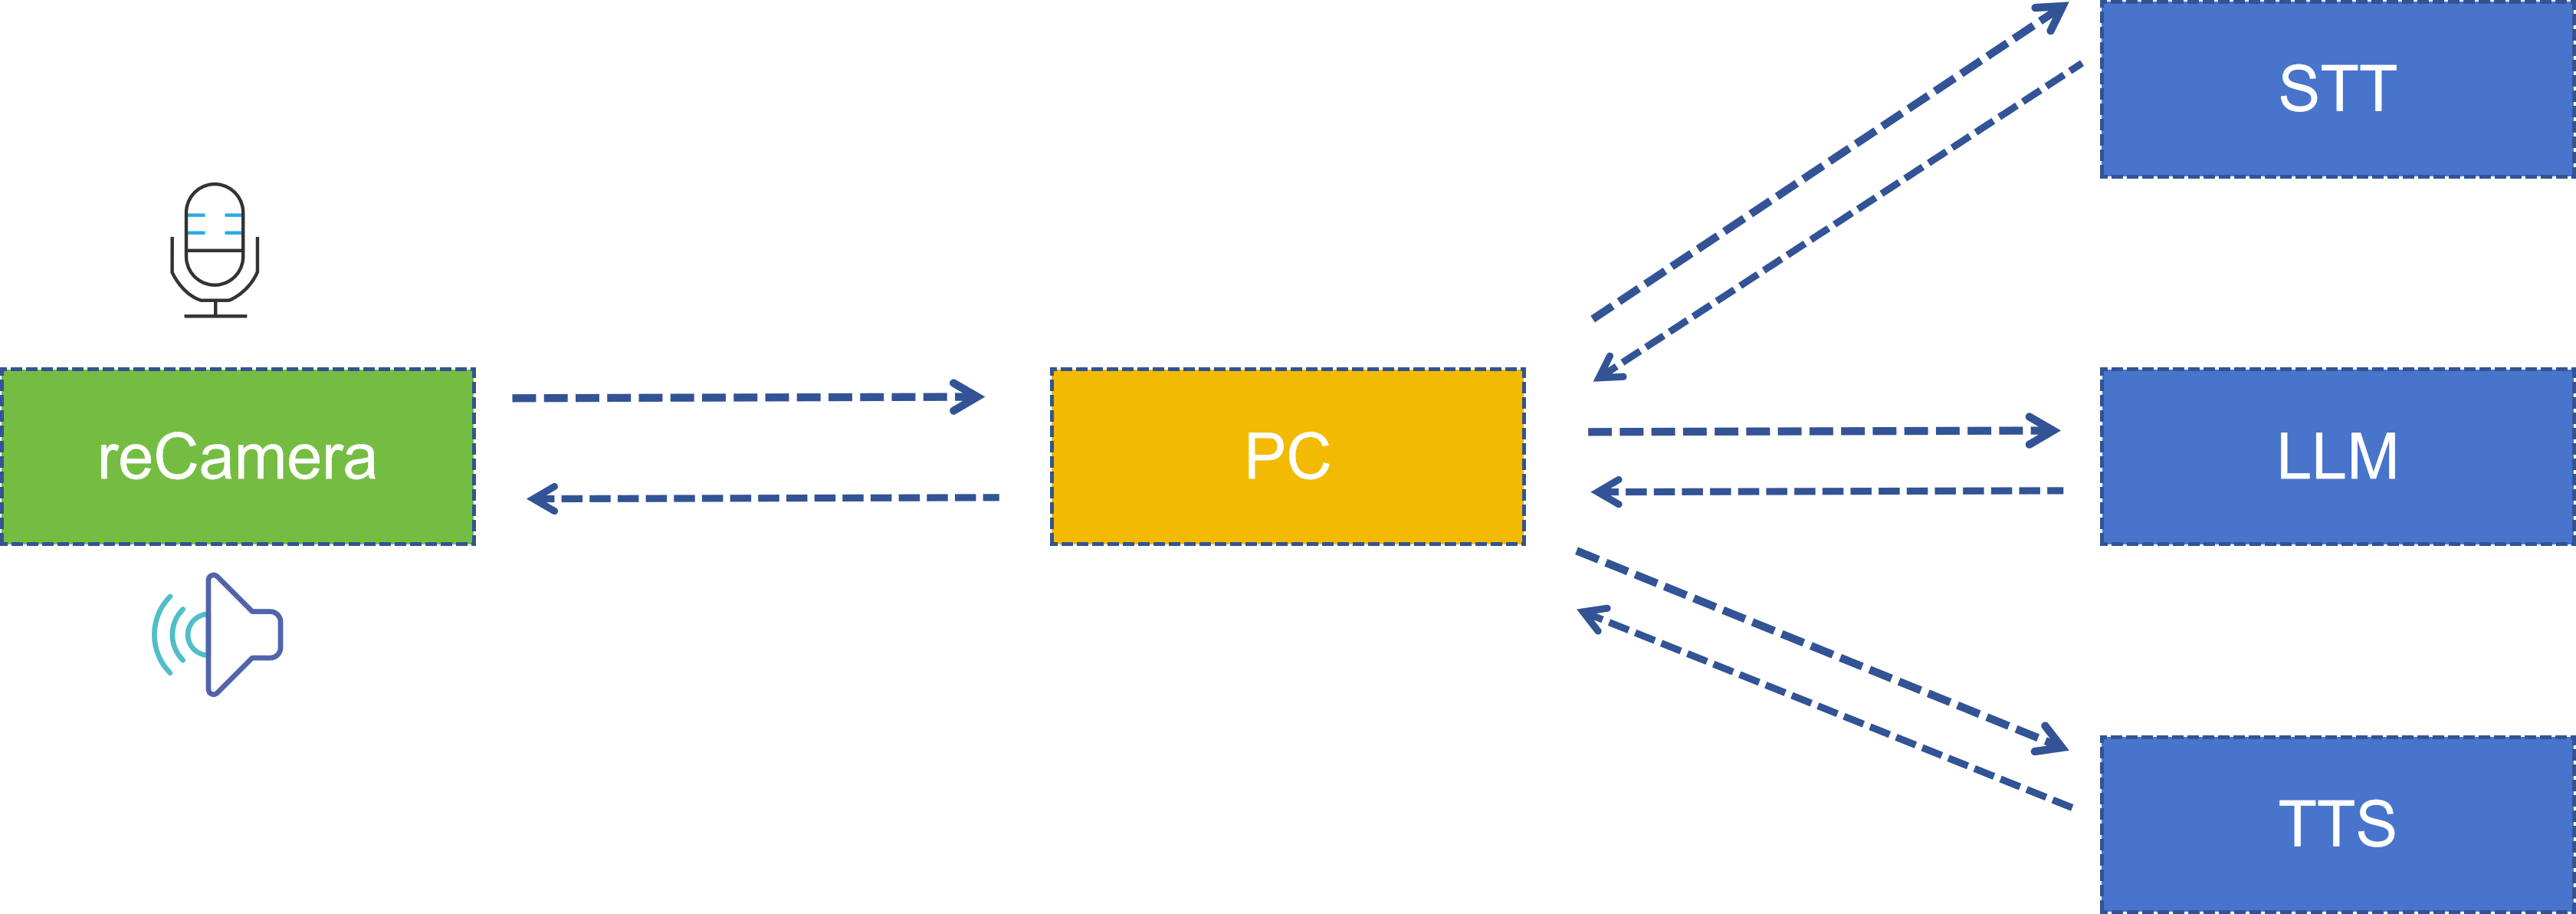
| Stage | Execution Location | Technology/Model Used | Description |
|---|---|---|---|
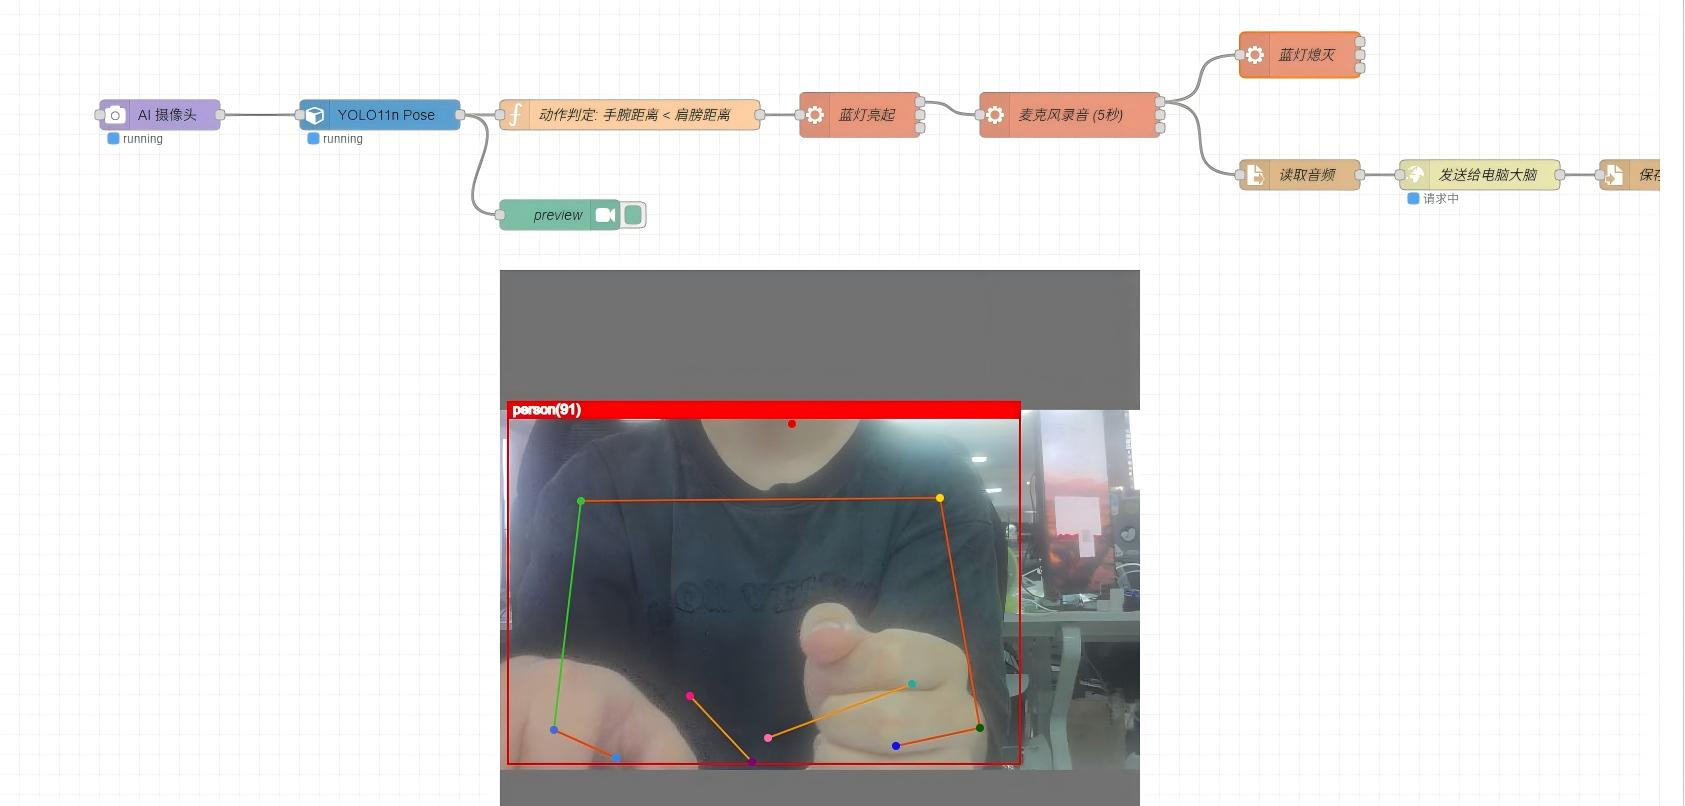
| Pose Detection | reCamera | YOLO11n Pose | Detects 17 human body keypoints |
| Pose Judgment | reCamera (Node-RED Function) | Custom logic | Compares shoulder and elbow keypoint distances |
| Recording/Playback | reCamera | arecord / aplay | 16kHz mono PCM |
| Speech Recognition (STT) | PC Server | iFlytek Speech Dictation API | Audio to text |
| Large Model Reasoning (LLM) | PC Server | Spark Large Model Spark Lite | Generates intelligent responses |
| Text-to-Speech (TTS) | PC Server | iFlytek Speech Synthesis API | Text to audio |
Hardware Preparation
To run this demo, you need the following hardware:
- One reCamera device (supports all reCamera variants)
- One PC computer (for running the voice processing service, must be on the same LAN as reCamera)
You can choose any version of reCamera based on your deployment needs:
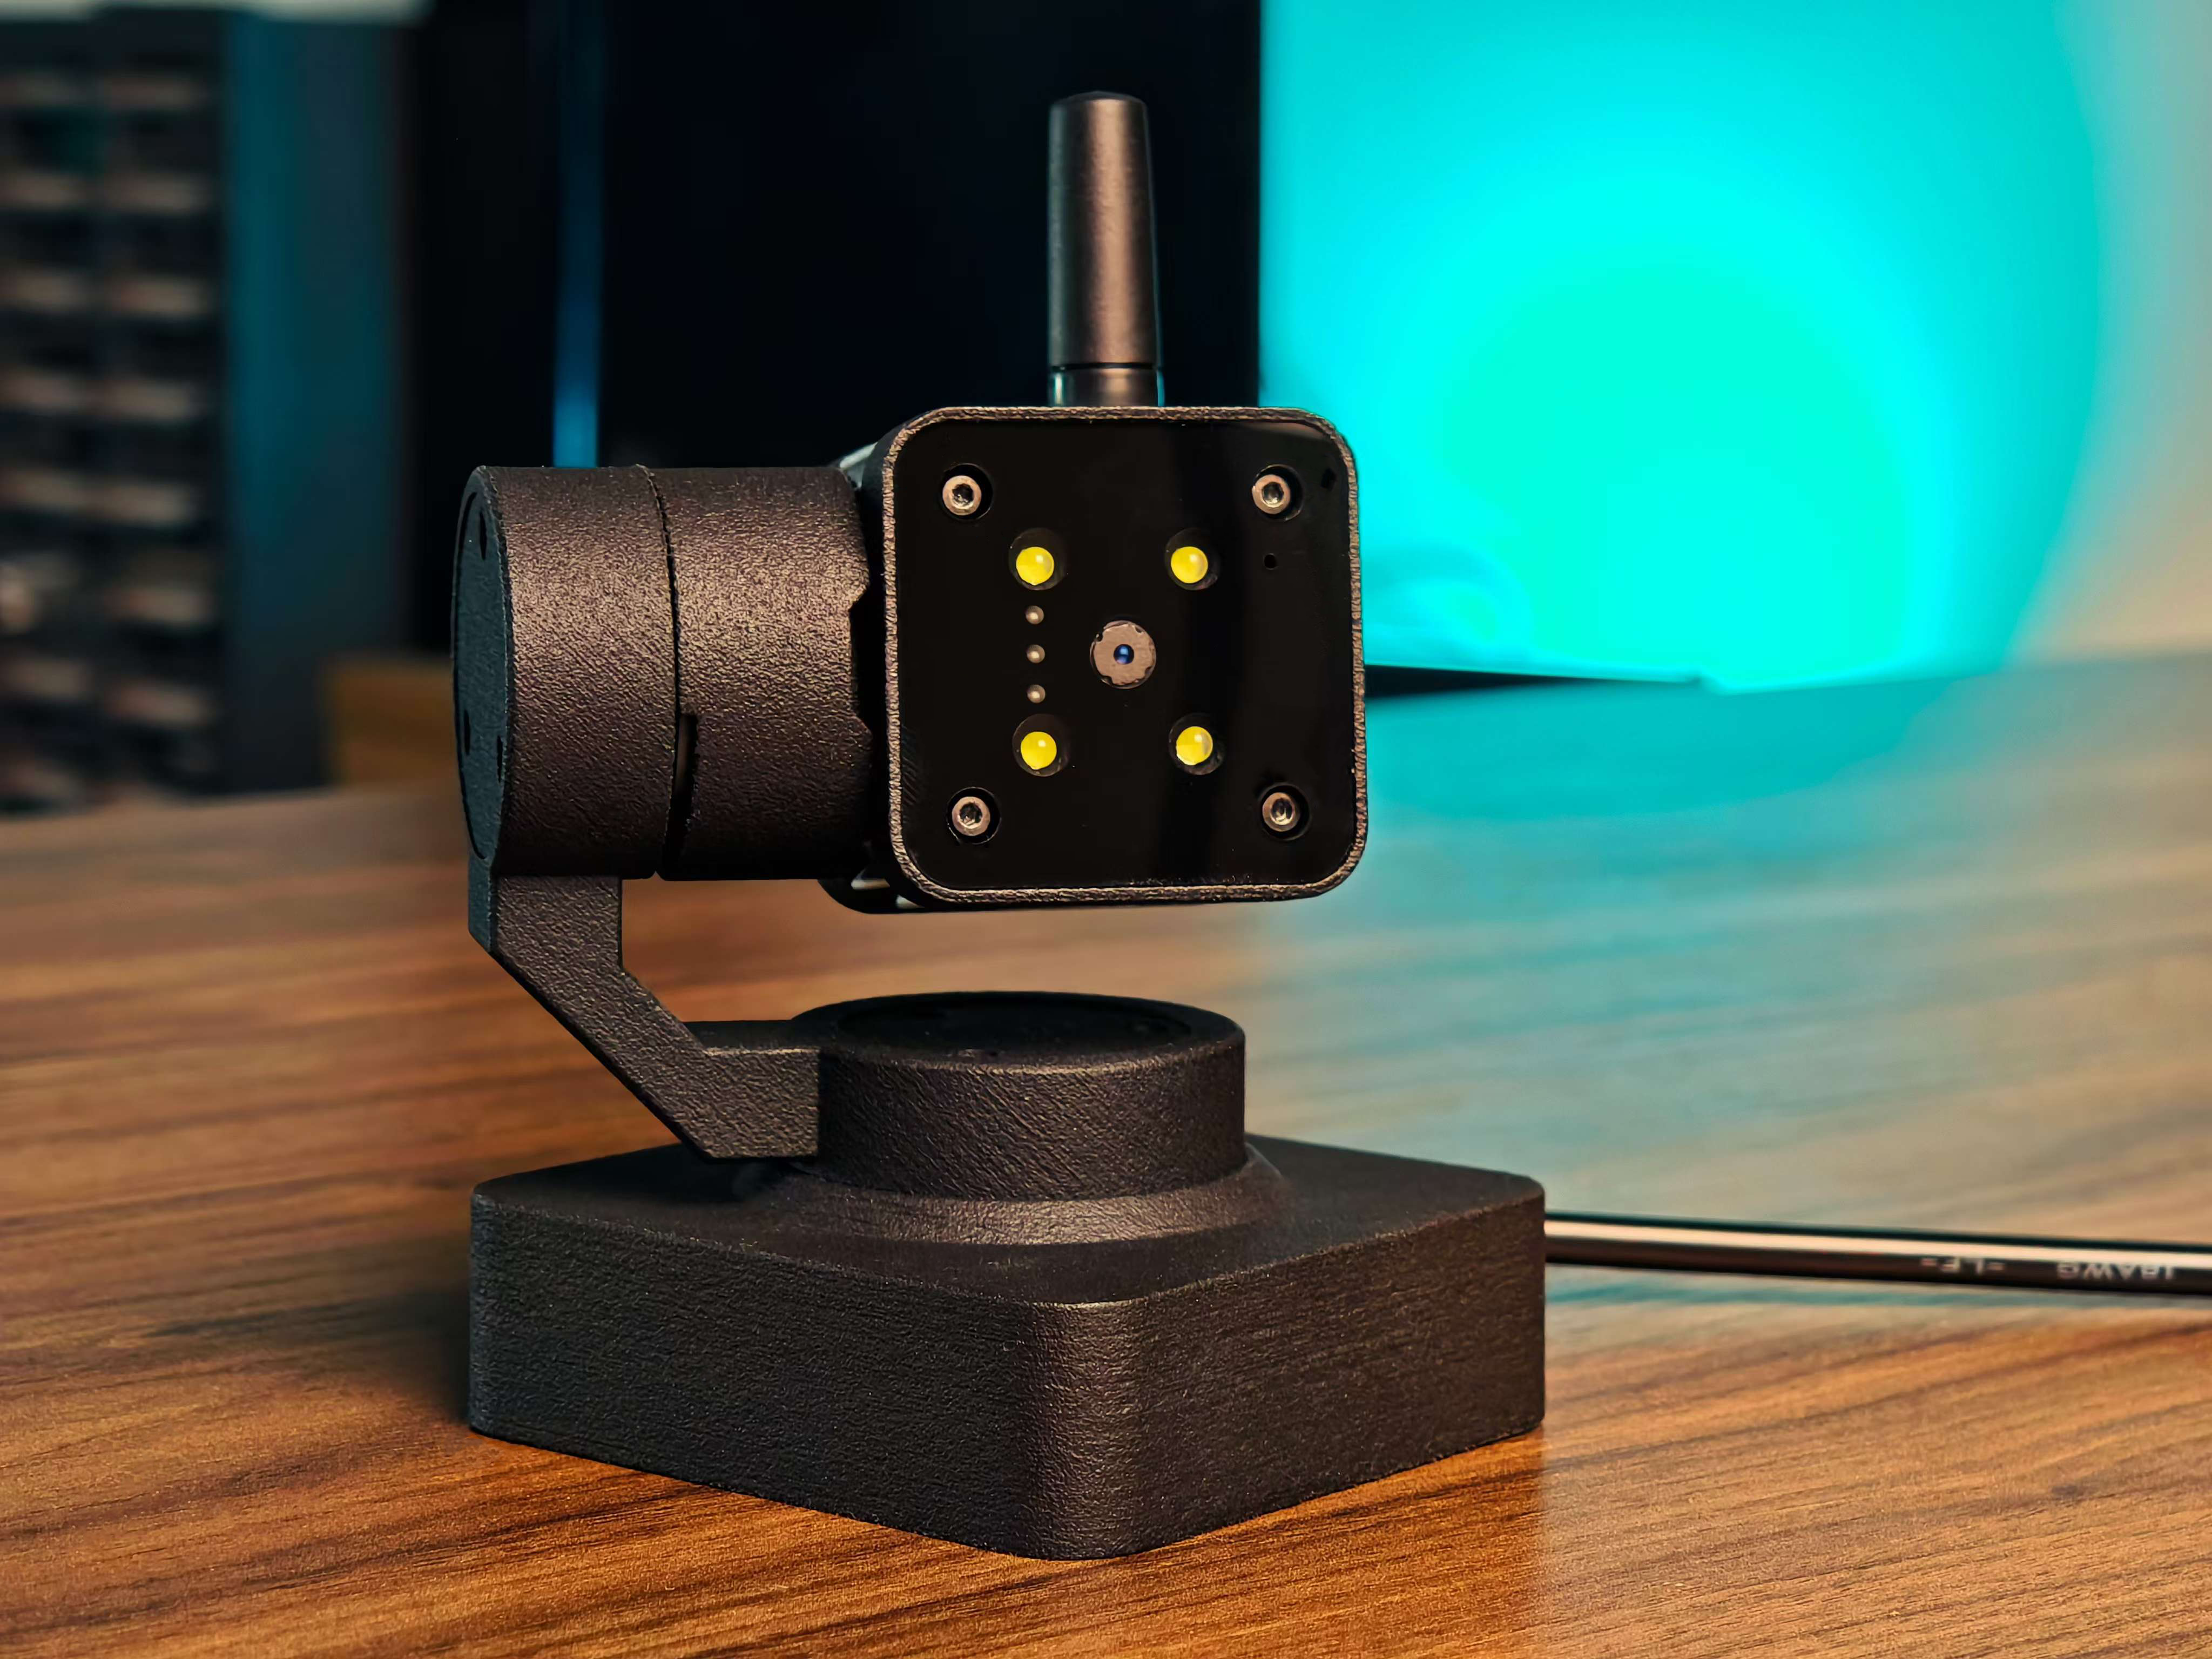
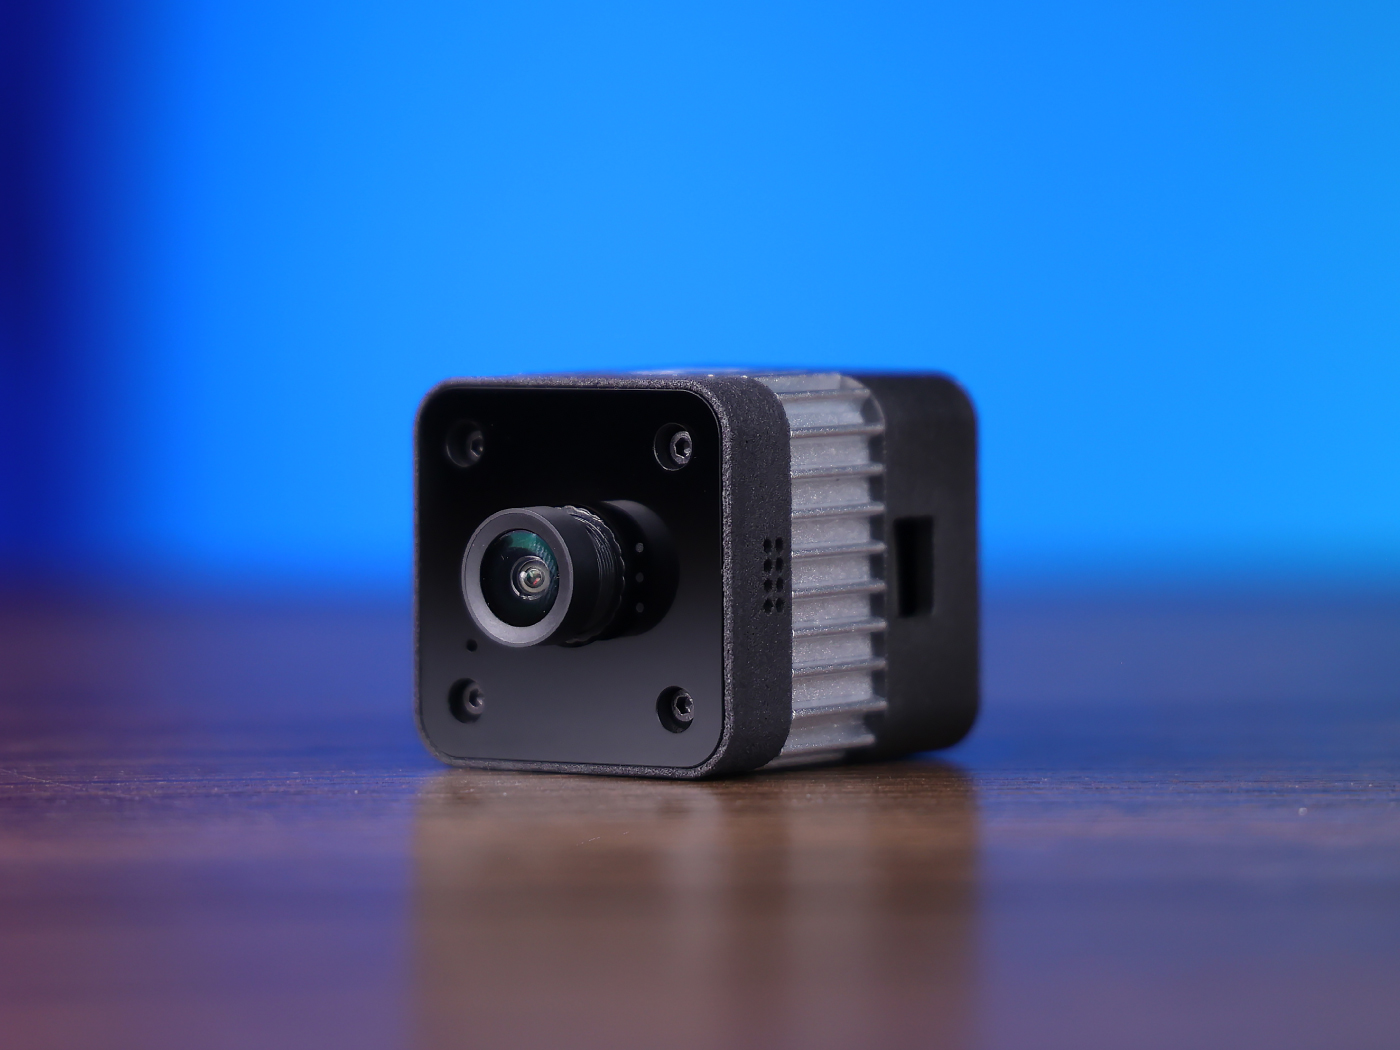
- reCamera 2002 Series (Wi-Fi)
- reCamera Gimbal
- reCamera HQ PoE (Ethernet + PoE)
Note: The PoE version does not support Wi-Fi and must be connected to the same local network through a PoE-enabled switch.
| reCamera 2002 Series | reCamera Gimbal | reCamera HQ PoE |
|---|---|---|
 |  |  |
Setting Up the Demo
Step 1: Configure reCamera
First, follow the official getting started guide to complete the basic configuration of reCamera: reCamera Getting Started
After completing the initial setup, ensure the device is powered on and properly connected to the network. Then, access the address 192.168.42.1 through a browser to log in to reCamera and enter the Node-RED workspace.
If you can successfully access the Node-RED workflow interface as shown below, the configuration is complete.

Step 2: Import the Node-RED Workflow
This demo provides a pre-configured workflow file with all the necessary nodes and connections for the intelligent voice assistant already set up. You need to follow the steps below to make some configurations to properly run this project.
Create a new application, then download the AI Voice Assistant workflow file from the SenseCraft AI Platform and import it directly into reCamera. For SenseCraft AI tutorials, please refer to the link Access SenseCraft AI reCamera Dashboard.
If you can successfully access the Node-RED workflow interface as shown below, the workflow has been imported successfully.

Step 3: Configure Workflow Parameters
After importing the workflow, you need to modify the parameters in sections 3.1 through 3.5 below according to your actual network environment and system settings.
3.1 Model Node
The Model node in the workflow comes with several pre-trained models. You can select and configure various model parameters here. This demo uses the YOLO11n Pose model to detect human poses.
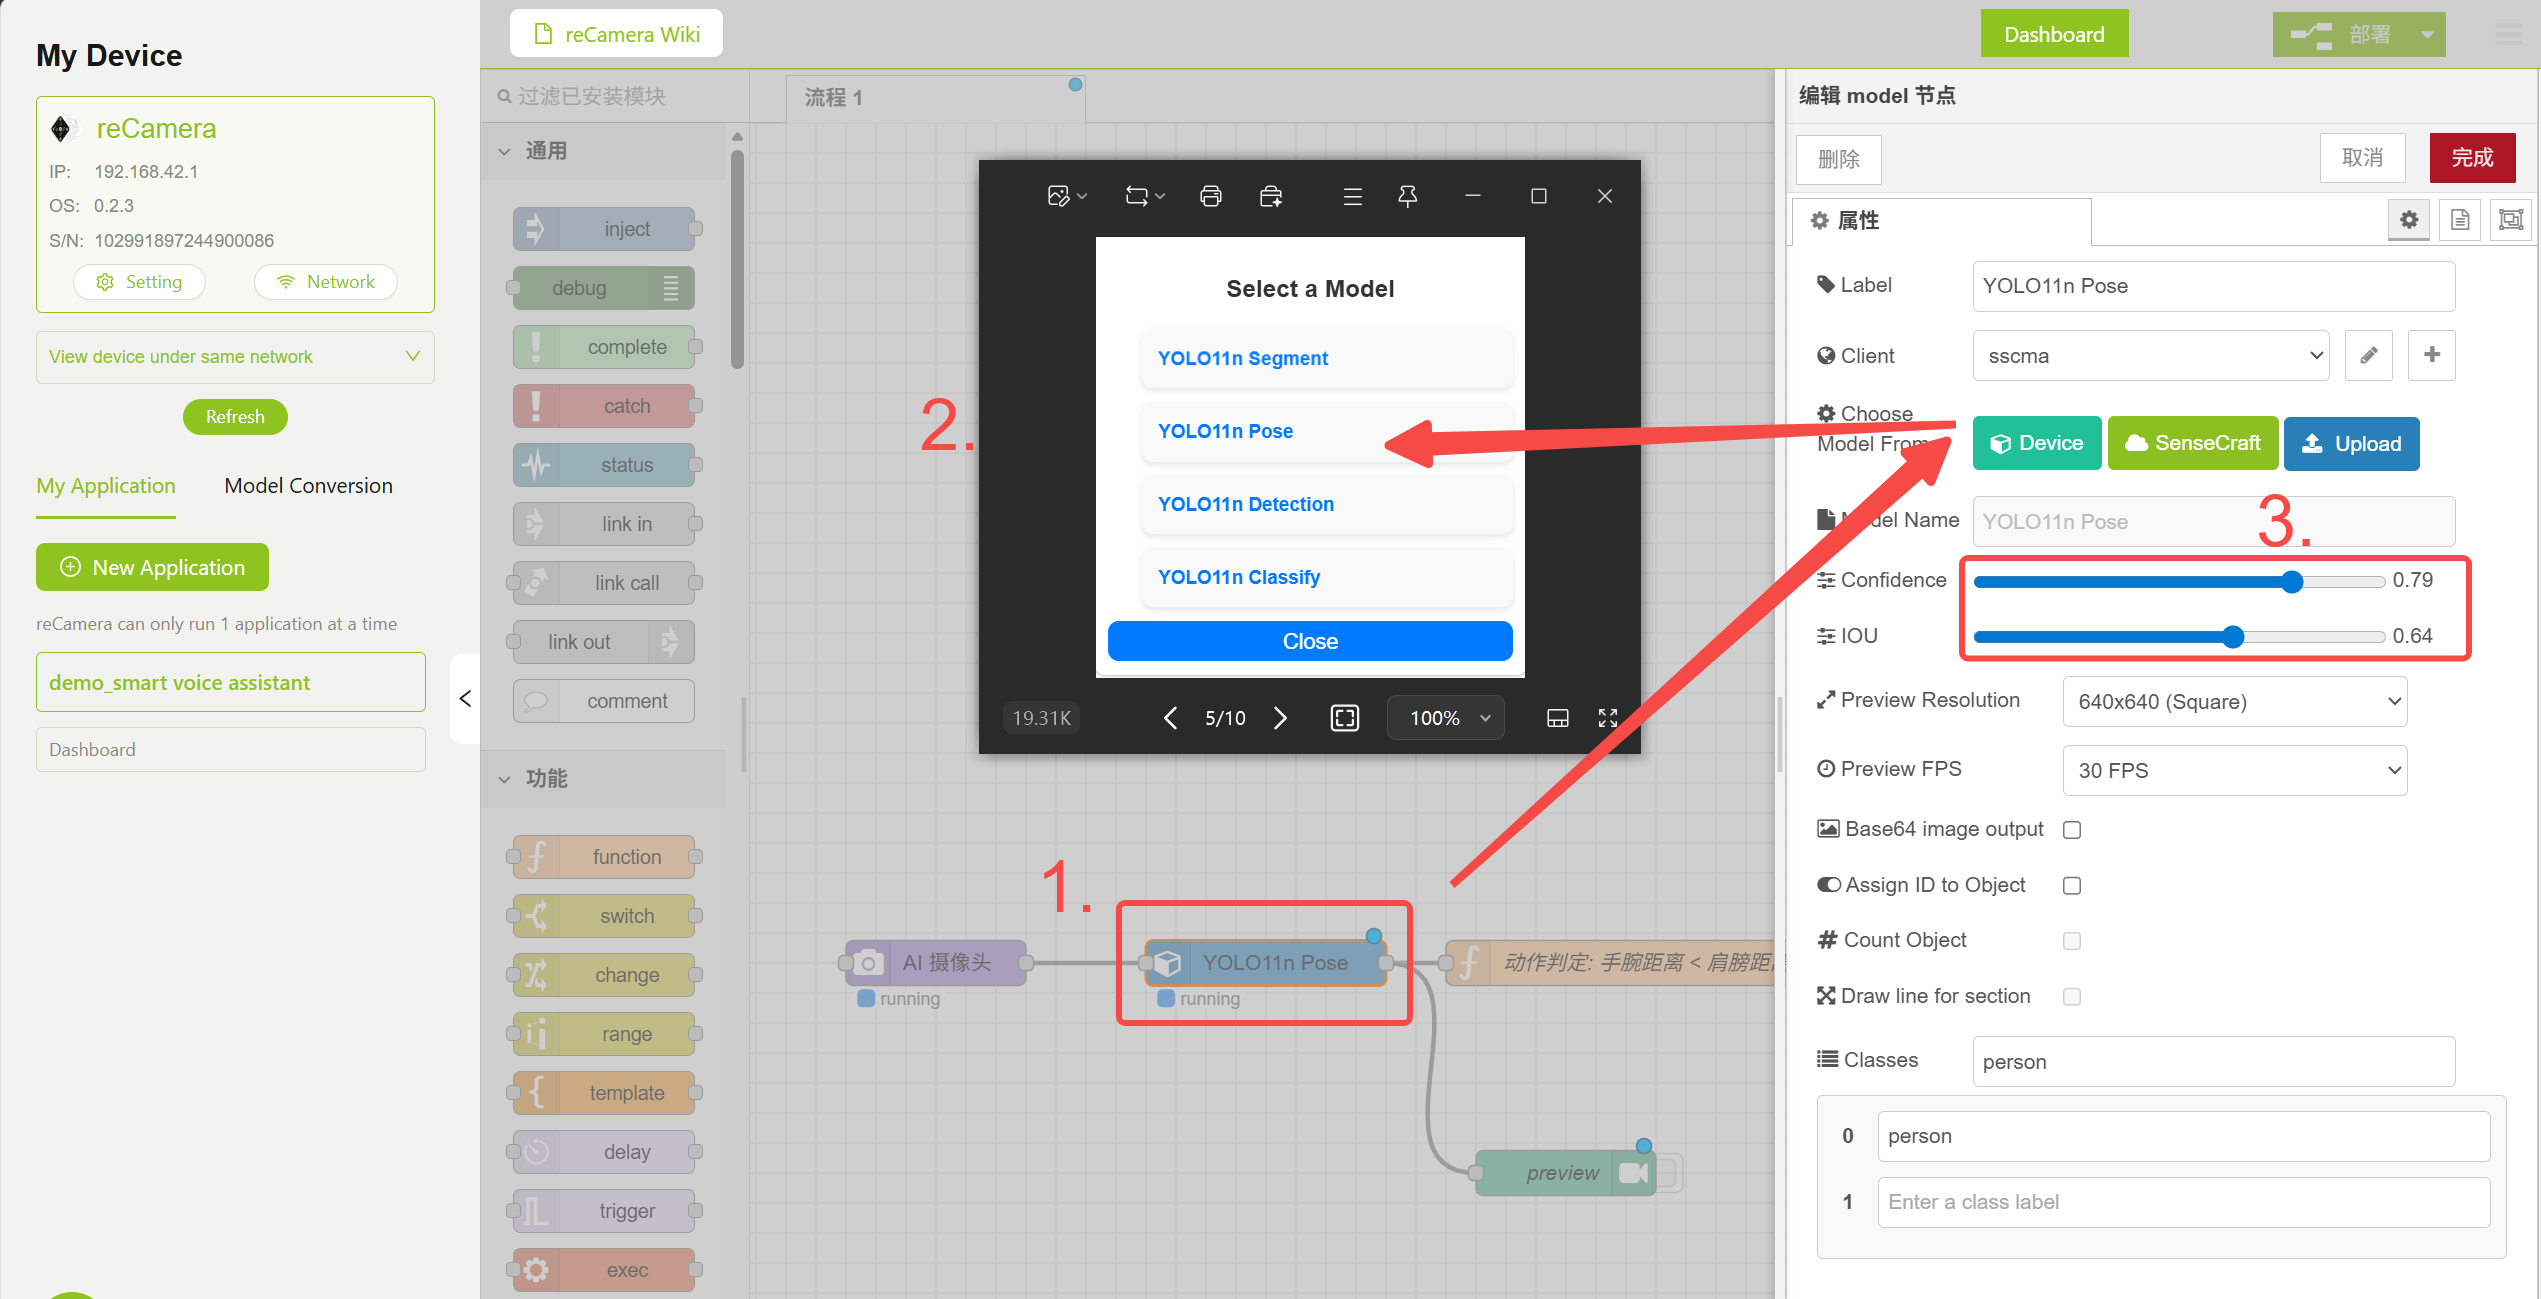
Model Node Configuration
3.2 Model Node — Pose Judgment Logic
The Function node contains pose judgment logic that determines whether to trigger voice interaction by comparing shoulder keypoint distance with elbow keypoint distance. You can adjust the Confidence and IOU parameters in the Model node to reduce false positives, or modify the logic code in the Function node below to implement additional features.
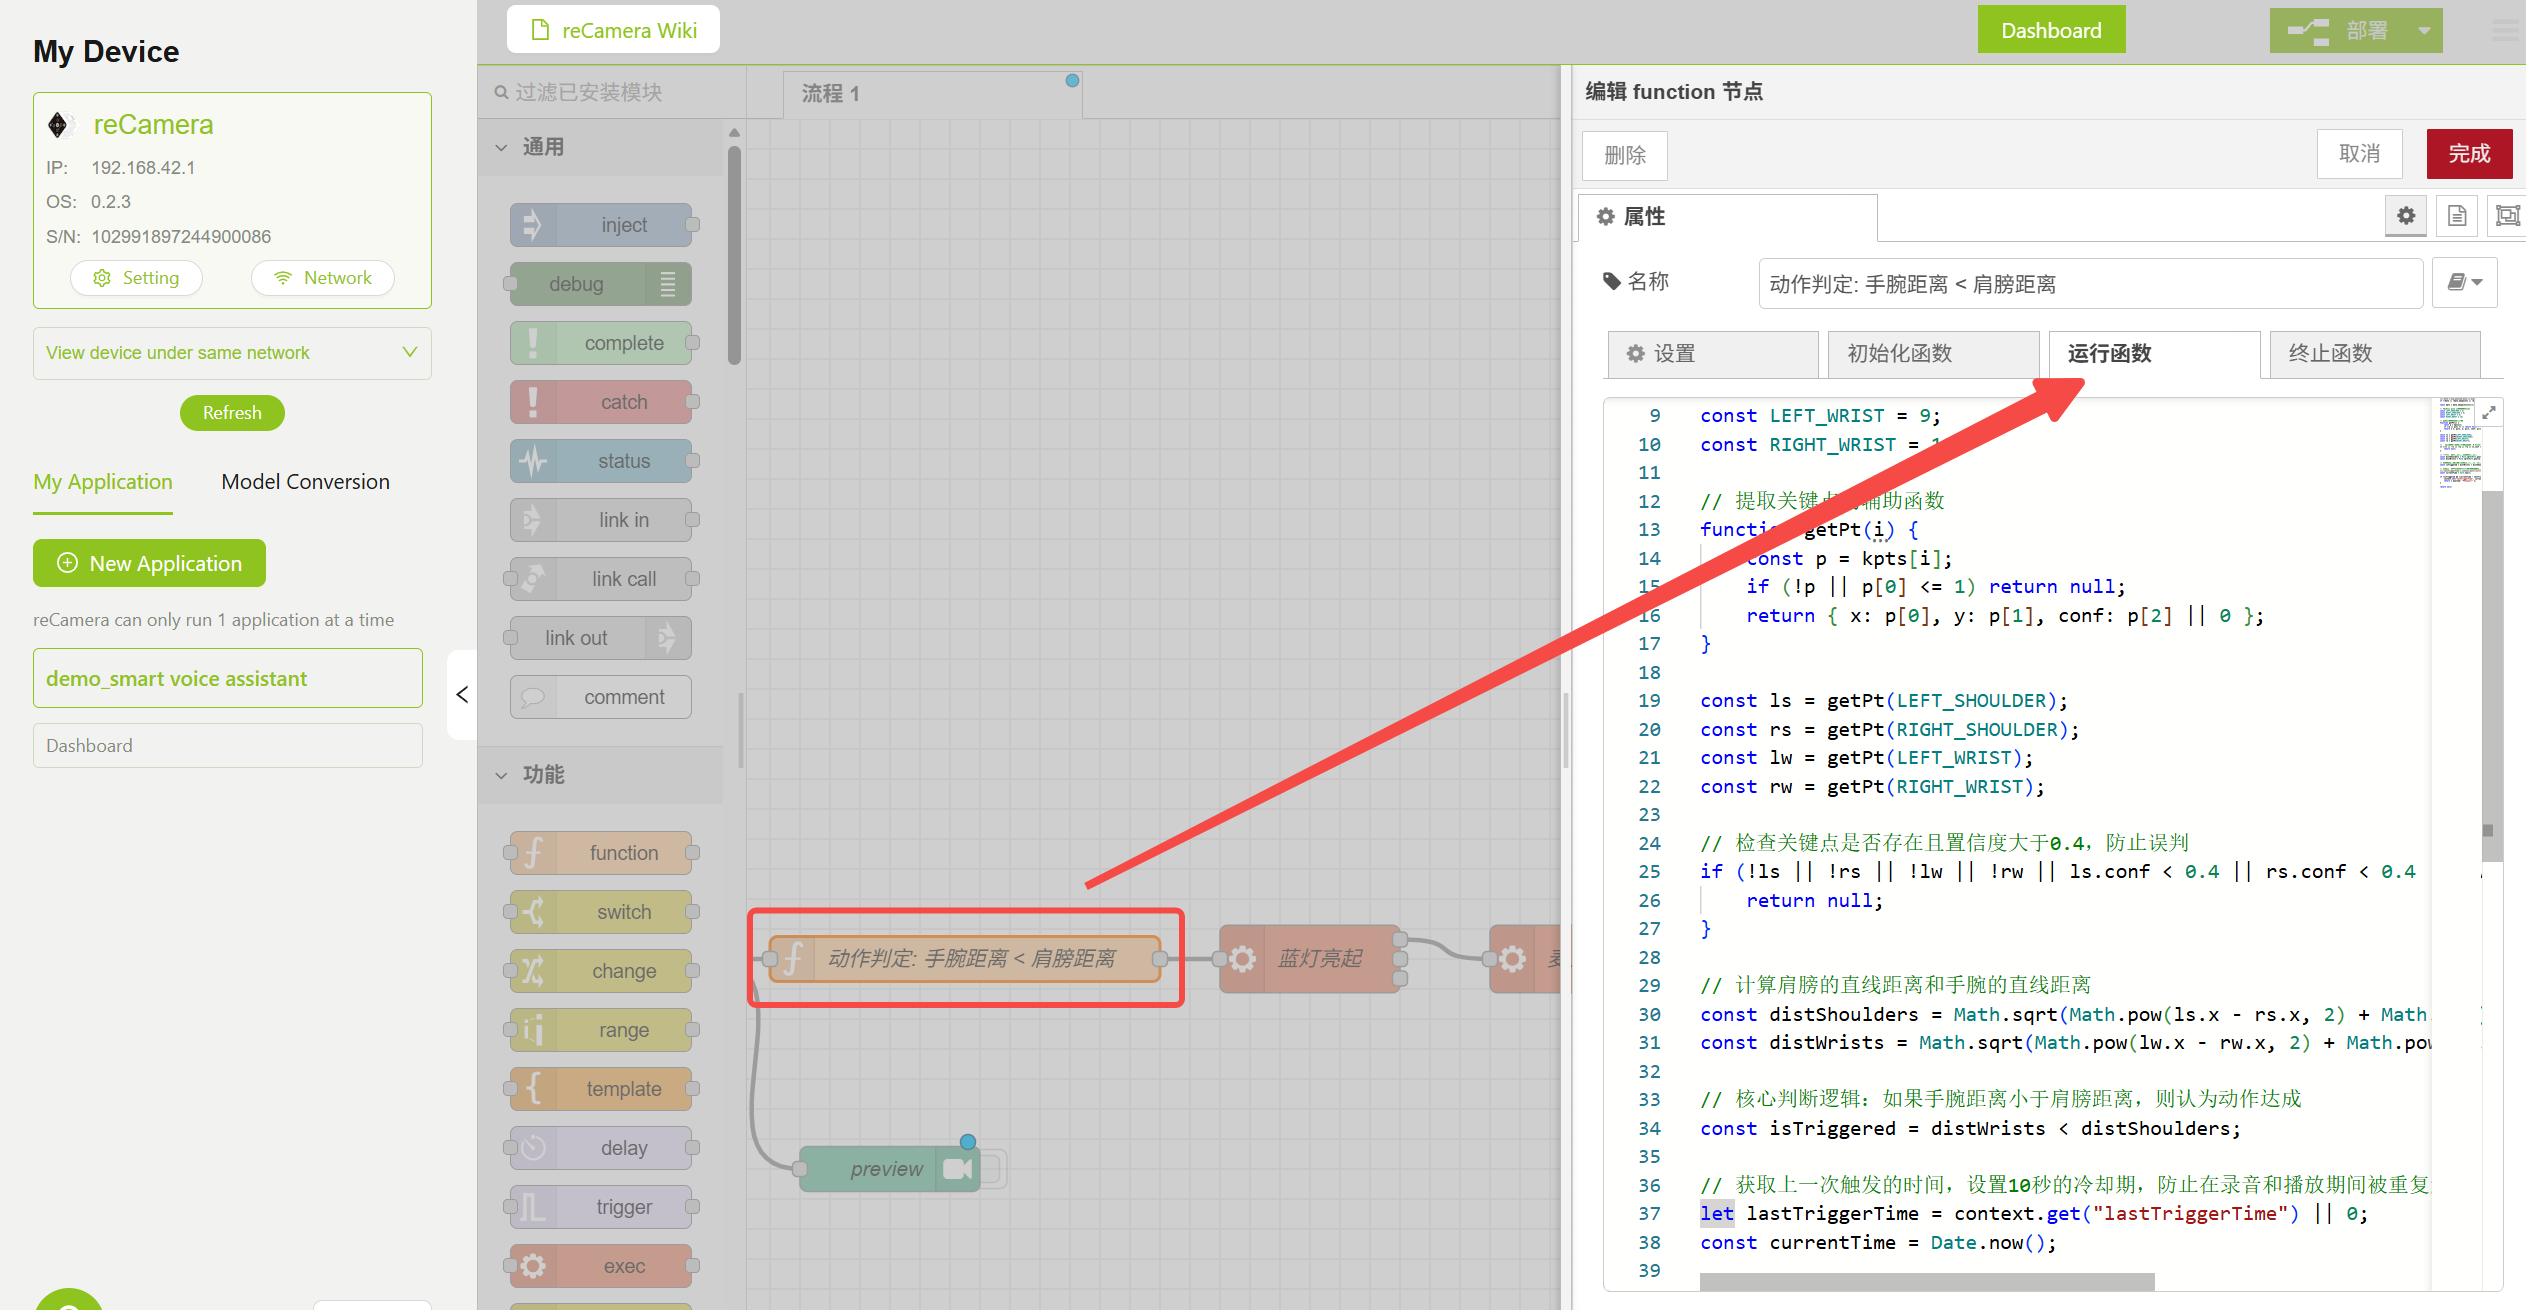
Pose Judgment Function Node Configuration
3.3 Exec Node — LED Control and Recording
The workflow uses Exec nodes to execute system commands for controlling the LED and recording. Double-click the corresponding node and modify the reCamera root password according to your actual setup:
echo "your_Password" | sudo -S sh -c 'echo 1 > /sys/class/leds/blue/brightness'
- Turn on and off the blue LED (indicating recording has started)
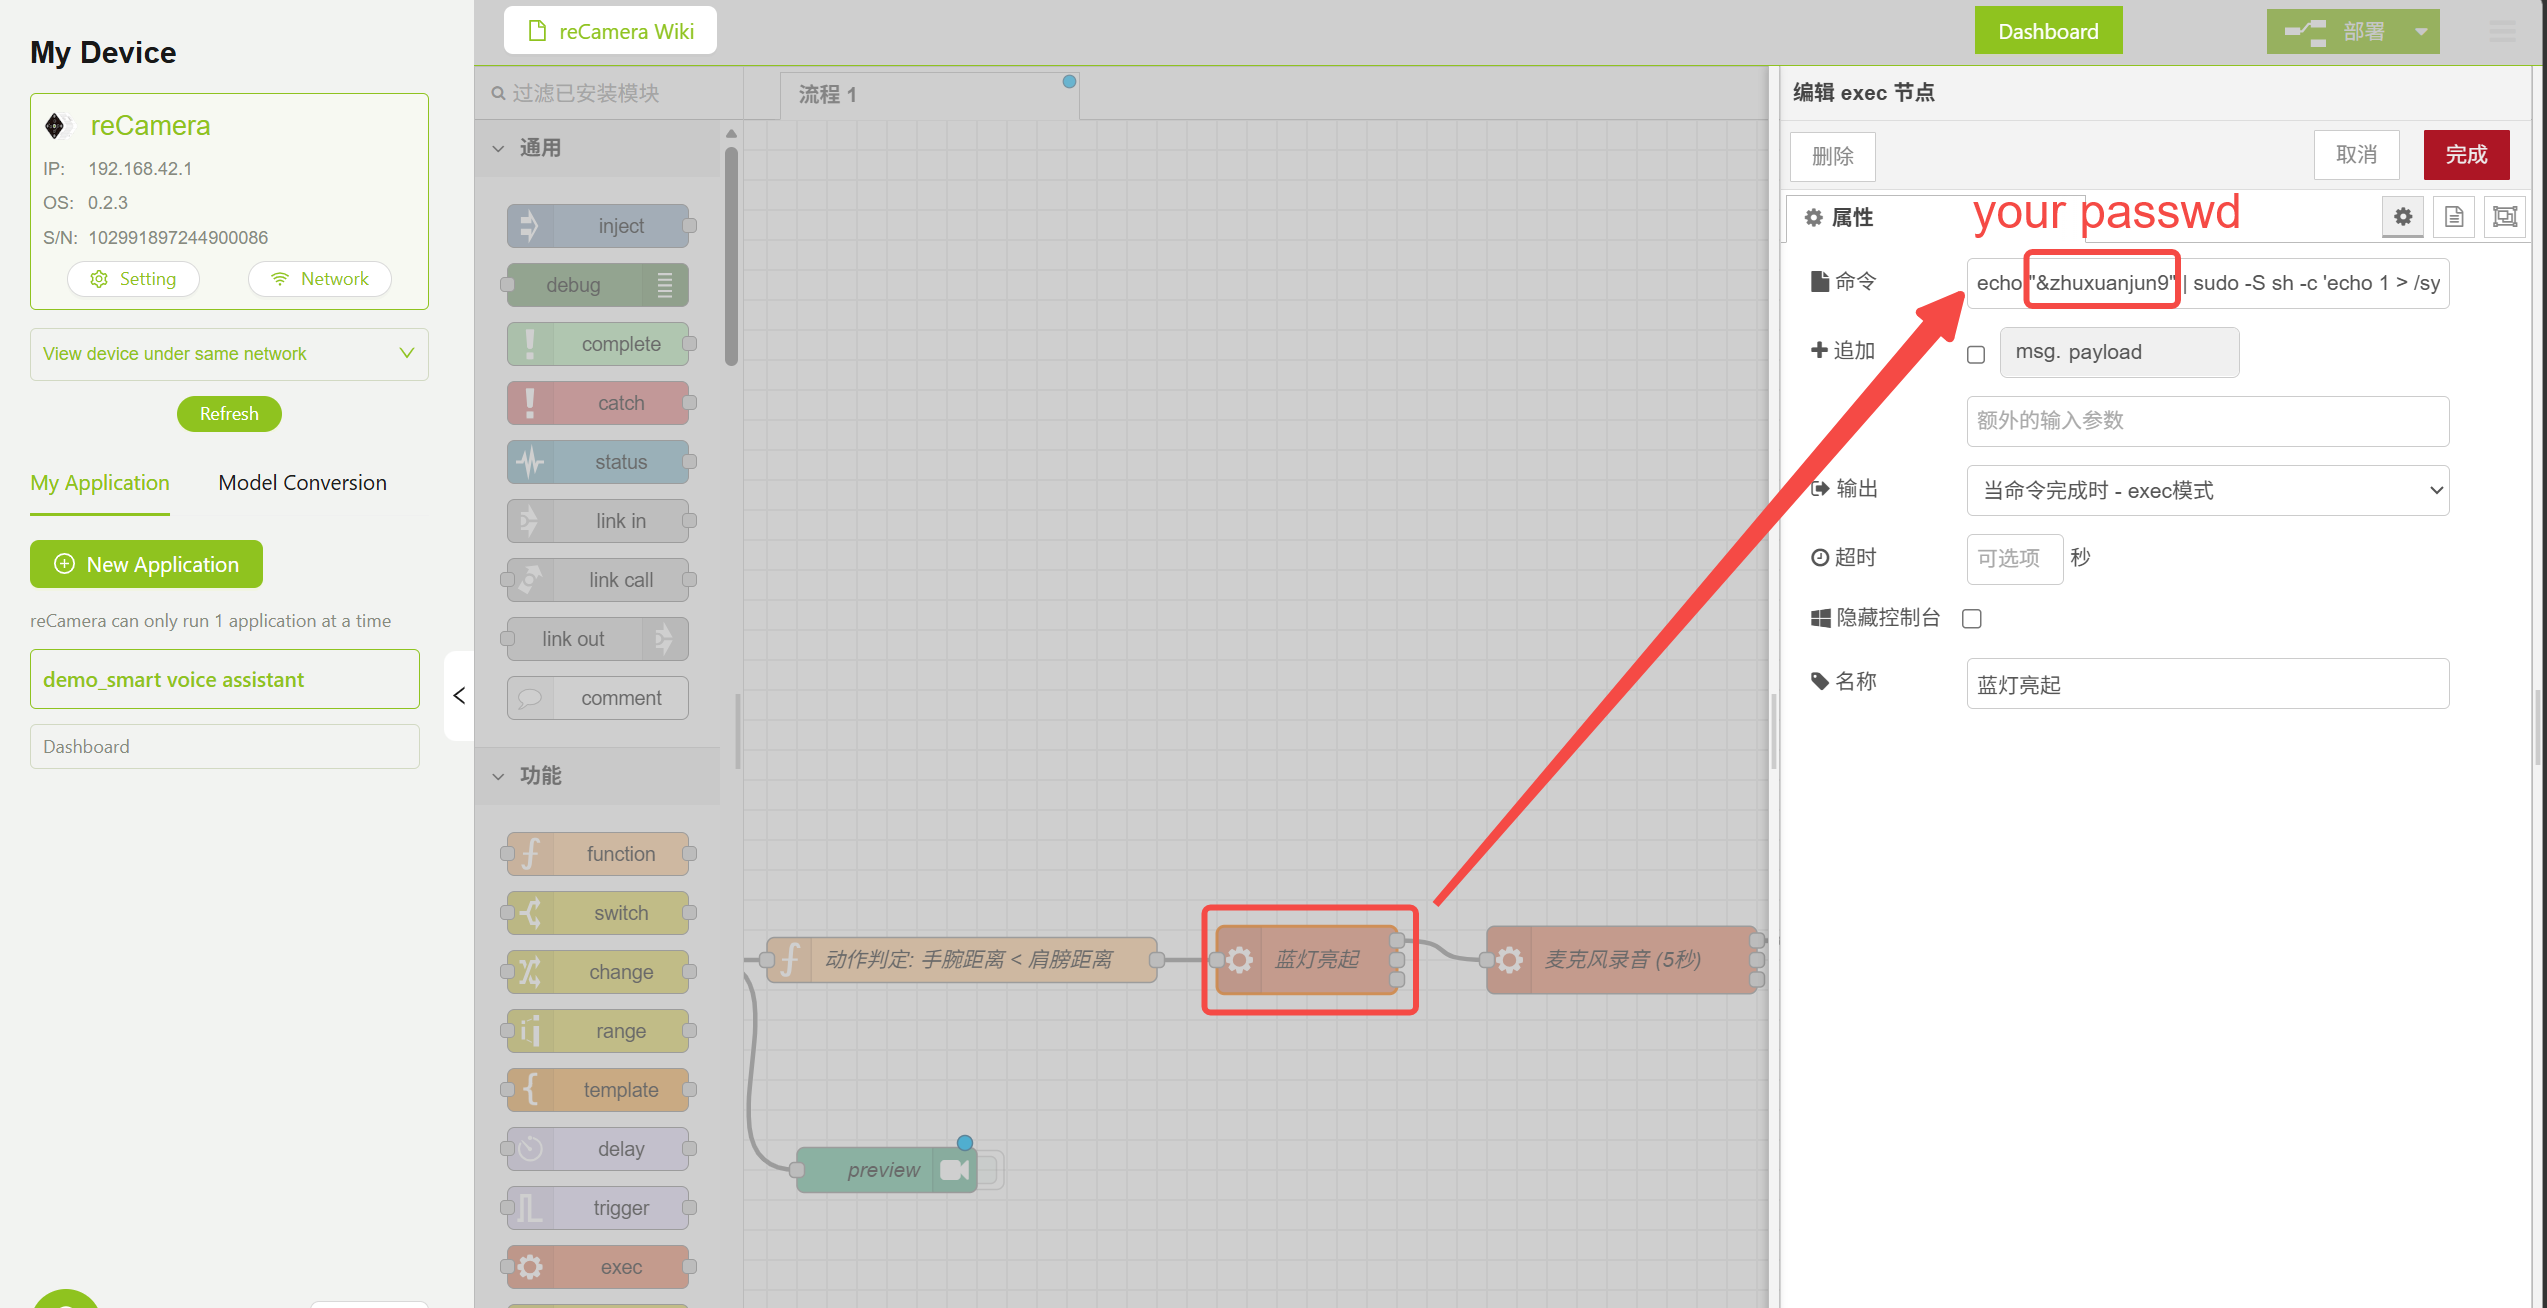
Turn On LED Node Parameter Configuration
3.4 HTTP Request Node — Audio Send Address
Find the HTTP Request node in the workflow and modify the URL to your PC server address. This requires you to complete Step 4 and run server.py first, then fill in the address in the corresponding position shown below.
http://<PC_IP_ADDRESS>:5000/interact
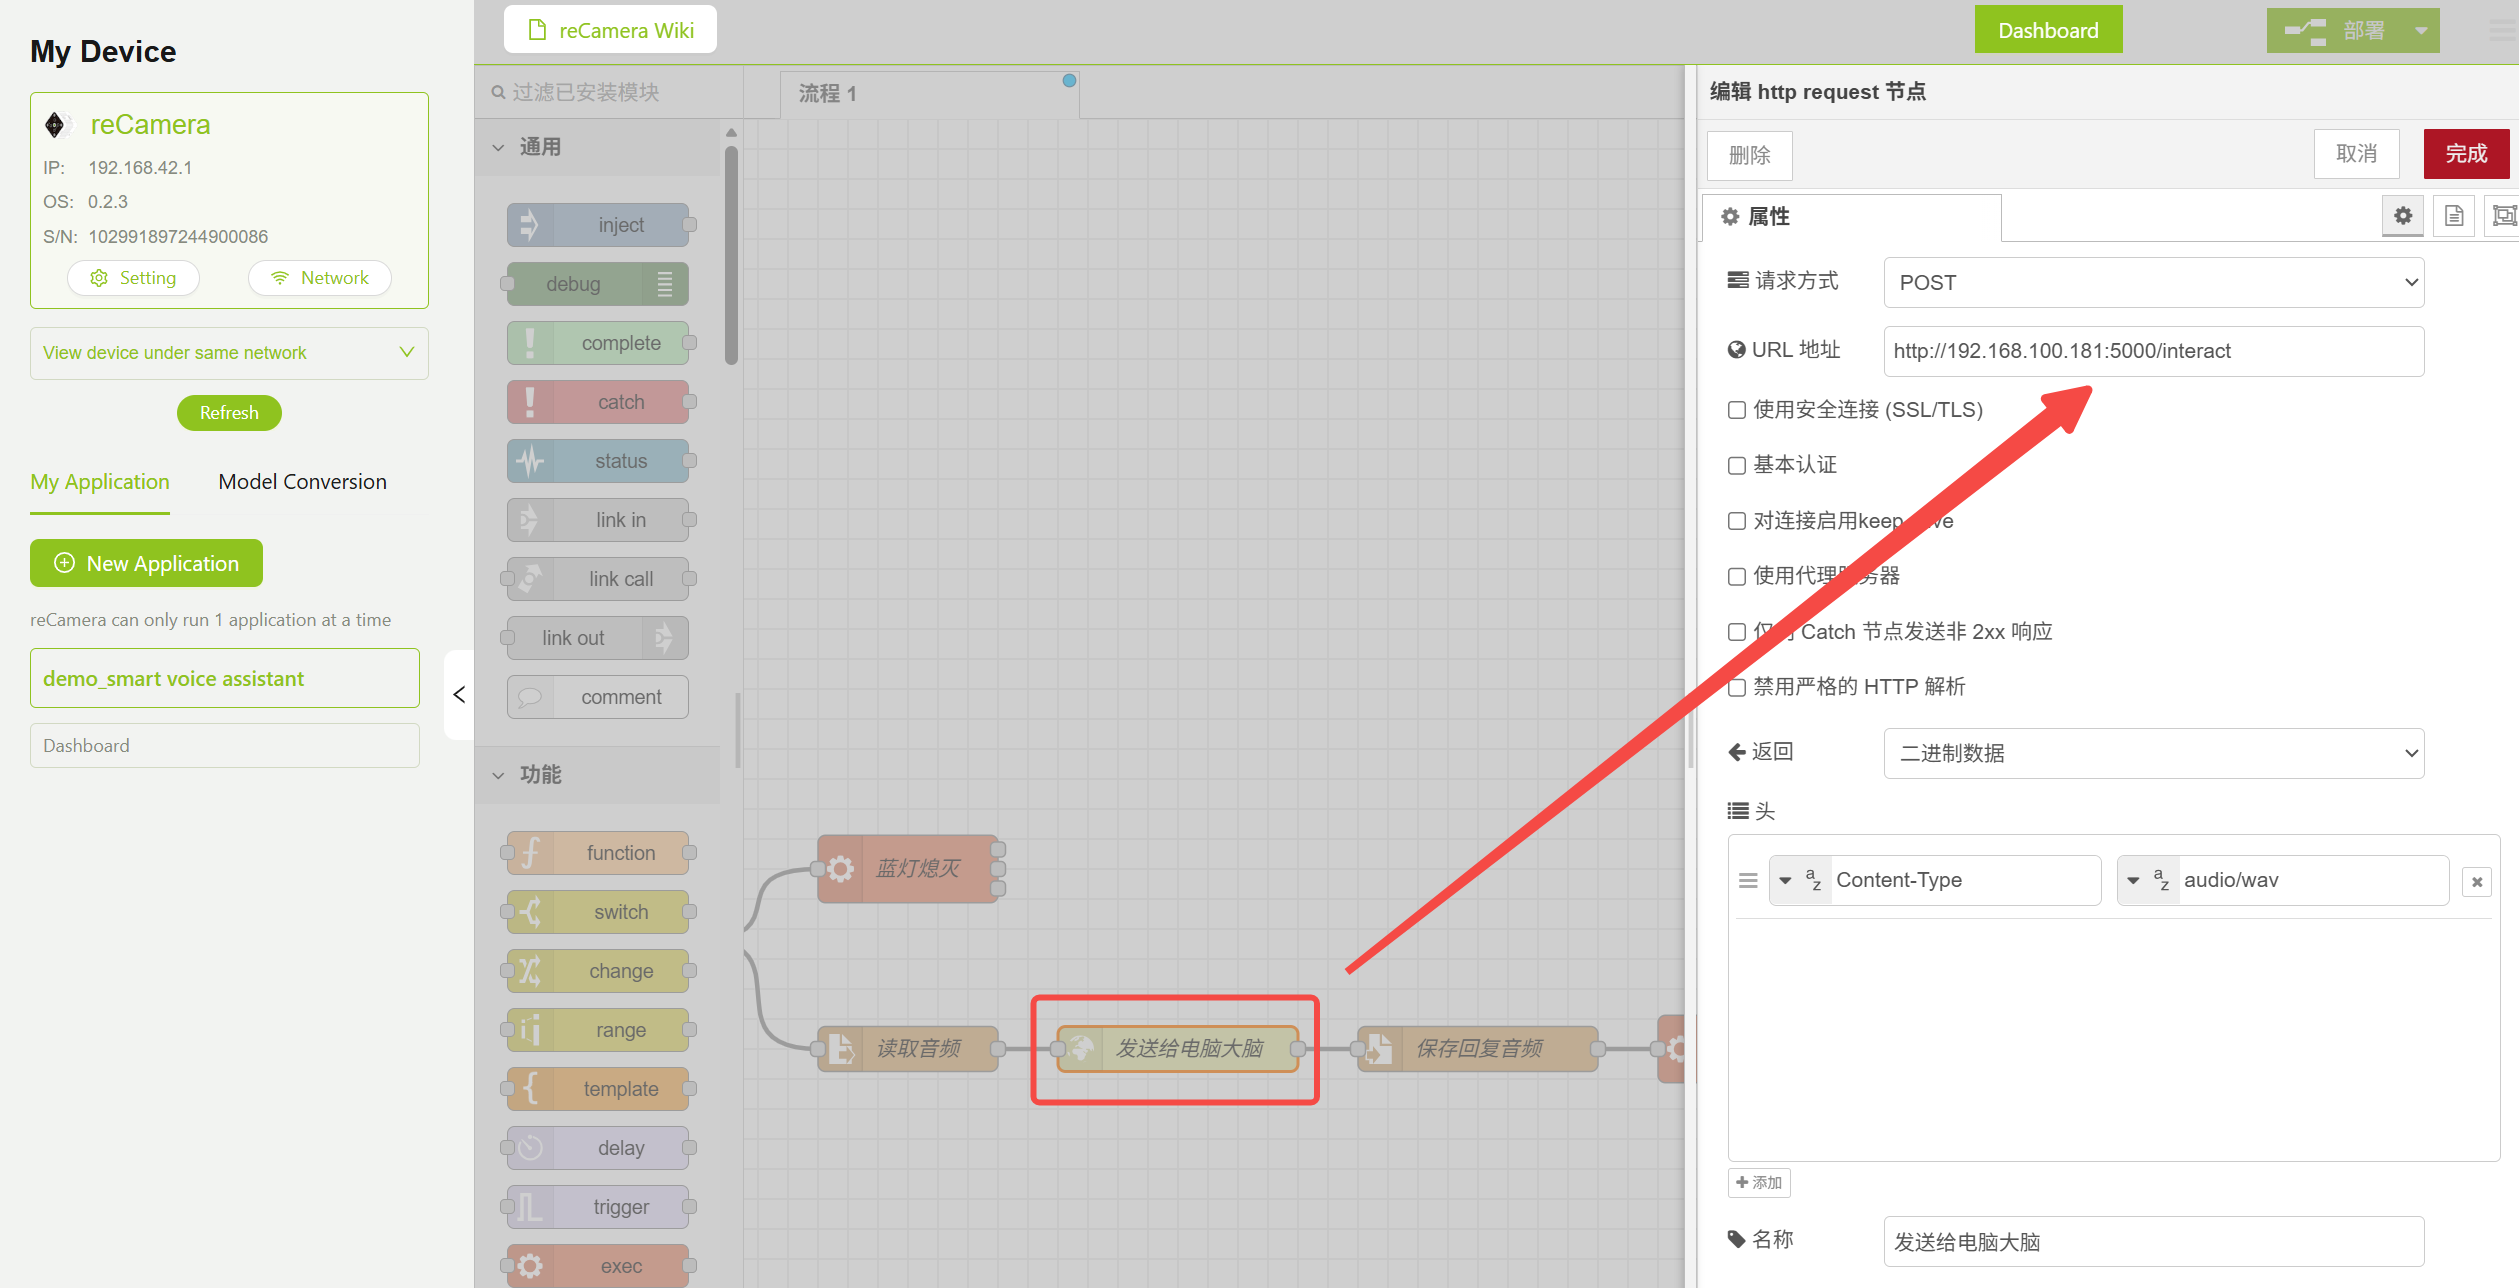
HTTP Request Node Parameter Configuration
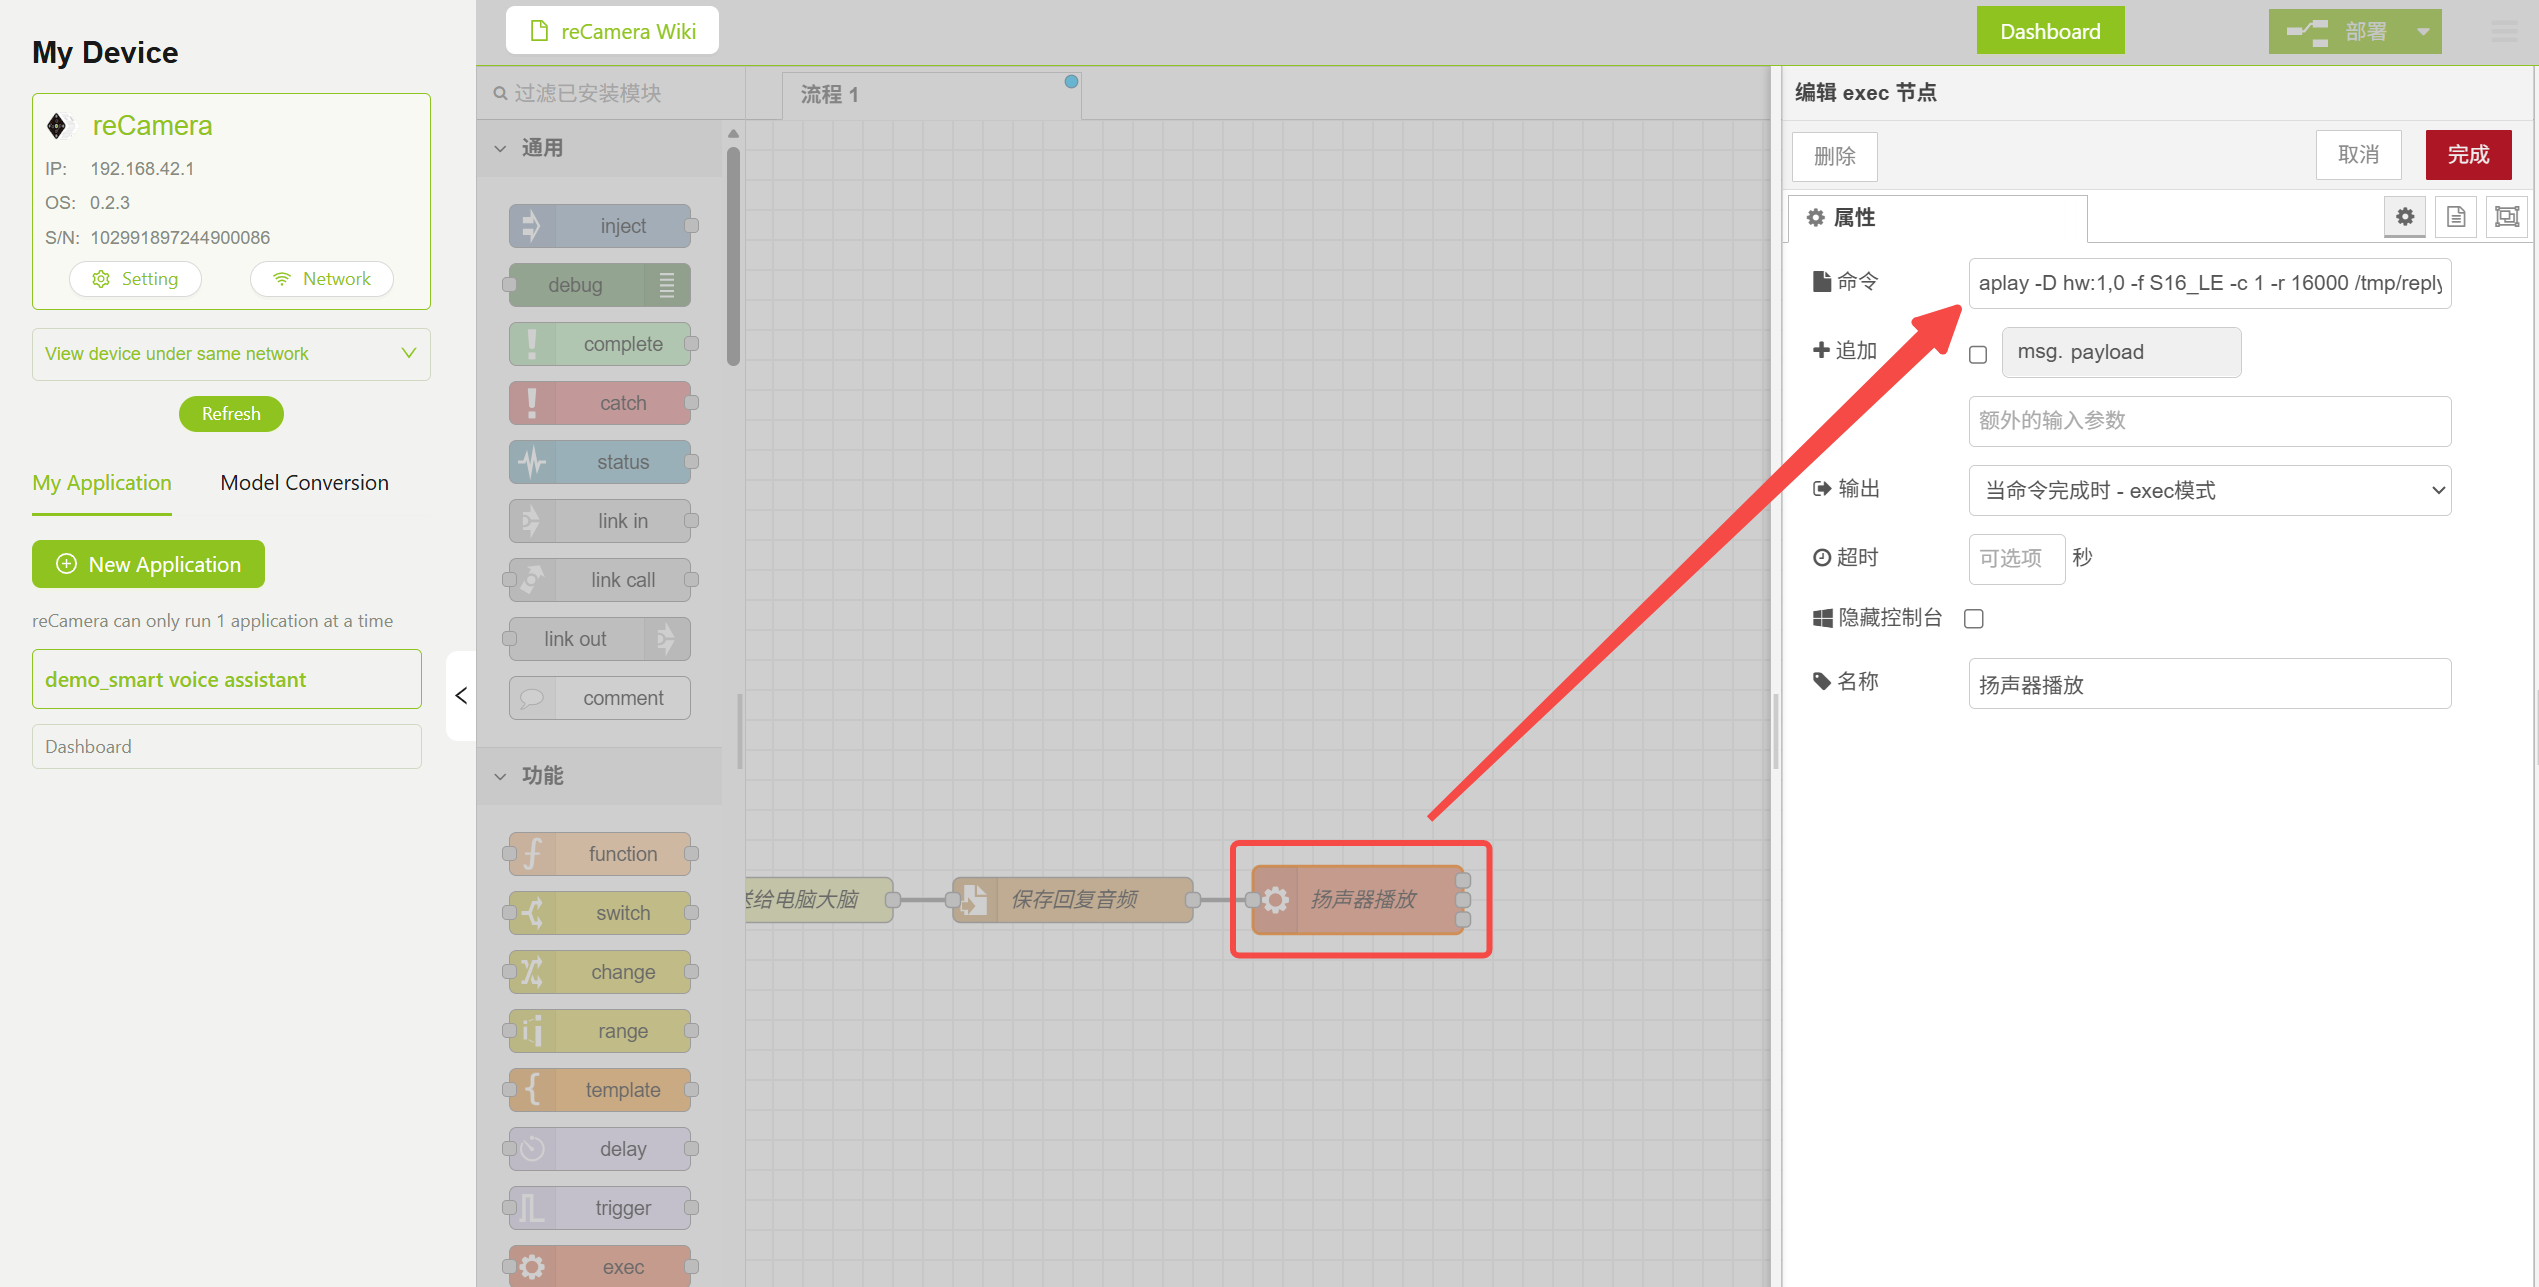
3.5 Exec Node — Audio Playback
The returned audio is played through the aplay command. You need to specify the correct audio parameters to match the TTS model's output format (16kHz, mono, 16-bit):
aplay -D hw:1,0 -f S16_LE -c 1 -r 16000 /tmp/reply.wav
Audio Playback Node Parameter Configuration
Step 4: Deploy the Voice Processing Service on PC
The voice processing service runs on the PC and is responsible for completing the entire STT → LLM → TTS voice processing pipeline.
4.1 Prerequisites
Ensure the following environment is installed on your PC:
- Python 3.8+
- pip package manager
4.2 Get the Code and Install Dependencies
Get the server-side Python code for the AI Voice Assistant from the repository. After downloading the project code to your PC, enter the service directory and install the Python dependencies:
cd server/
pip install -r requirements.txt
The main dependencies include:
| Package | Purpose |
|---|---|
| Flask | HTTP service framework |
| websocket-client | Communication with iFlytek API |
| certifi | SSL certificate verification |
| pydub | Audio processing |
4.3 Configure API Keys
Before running the service, you need to configure the iFlytek API keys. Please go to the iFlytek Open Platform to register an account and activate the following three services:
| Service | Purpose | Activation Link |
|---|---|---|
| Speech Dictation (STT) | Convert user speech to text | iFlytek Speech Dictation |
| Spark Large Model (LLM) | Generate intelligent responses based on text | iFlytek Spark Large Model |
| Speech Synthesis (TTS) | Convert response text to speech | iFlytek Speech Synthesis |
After activation, fill in your API keys in server.py:
# 1. STT Speech Recognition Configuration
STT_APPID = "your_APPID"
STT_APISecret = "your_APISecret"
STT_APIKey = "your_APIKey"

# 2. TTS Speech Synthesis Configuration
TTS_APPID = "your_APPID"
TTS_APISecret = "your_APISecret"
TTS_APIKey = "your_APIKey"

# 3. LLM Spark Large Model Configuration (Spark Lite)
LLM_APPID = "your_APPID"
LLM_APISecret = "your_APISecret"
LLM_APIKey = "your_APIKey"
This demo uses the Spark Lite model (free). You can also switch to a more advanced model version as needed, or use large models from other providers.
4.4 Start the Service
python server.py

Server Startup Log
After the service starts, it will wait for audio requests from reCamera. Please ensure that the PC's firewall allows inbound connections on port 5000 and that the PC and reCamera are on the same LAN.Step 5: Run the Demo
- Ensure that
server.pyon the PC is started and running - Click Deploy in Node-RED to deploy the workflow
- Stand in front of the reCamera and make an arms crossed gesture (shoulder distance less than elbow distance)
- The blue LED on the reCamera lights up, indicating recording has started
- Speak your question into the microphone
- After the blue LED turns off, reCamera sends the audio to the server and plays the response after receiving it.
Triggering the Voice Conversation Flow
Received reCamera audio,length:160044 bytes
User said:Hi,who are you?
LLM is thinking……
LLM reply:Hi,I′m the voice assistant on your smart camera reCamera.I'm here to help you with any questions or concerns you may have.
Generating speech……
Speech delivered! Waiting for next interaction.
192.168.4.53--[11/Jun/2026 16:38:14]"POST /interact HTTP/1.1" 200 -

Server Log
Workflow Details
The high-level logic of the entire workflow is as follows:
-
Video Input and Pose Detection The camera continuously captures video frames, and the YOLO11 pose estimation model detects human body keypoints (17 keypoints in total, including shoulders, elbows, wrists, etc.).
-
Gesture Trigger Judgment The Function node calculates the distance between left and right shoulder keypoints and the distance between left and right elbow keypoints. When shoulder distance < elbow distance, it is determined as a trigger gesture (i.e., arms crossed pose).
-
Recording Process After triggering: turn on blue LED → record audio → turn off blue LED.
-
Audio Processing and Dialogue Generation After recording is complete, the audio data is POSTed to the PC's Flask service via HTTP Request, executing:
- STT: iFlytek Speech Dictation API converts audio to text
- LLM: Spark Large Model (Spark Lite) generates intelligent responses based on user input
- TTS: iFlytek Speech Synthesis API converts response text to audio
-
Audio Playback The PC returns WAV audio, and reCamera plays the response voice through the
aplaycommand.
Notes
- The current recording interval is set to 10 seconds. If the STT → LLM → TTS processing time exceeds this interval, multiple triggers may cause pipeline congestion. It is recommended to control the LLM response word count (the current system prompt limits it to 50 words or less) to reduce processing time.
- If congestion causes the CPU to become unresponsive, you can adjust the Confidence attribute in the Model node to reduce false positives and control the trigger frequency.
- When playing back returned audio using
aplay, please specify the correct parameters (-f S16_LE -c 1 -r 16000), otherwise playback may not work properly. Refer to the TTS-generated audio for specific parameters.
Tech Support & Product Discussion
Thank you for choosing our products! If you need guidance on specific customization goals or want to further extend the workflow, please feel free to contact us. We are here to provide you with different levels of support to ensure your experience with our products is as smooth as possible. We offer various communication channels to meet different preferences and needs.