ChirpStack R1X Gateway Integration with SenseCAP S2101
Introduction
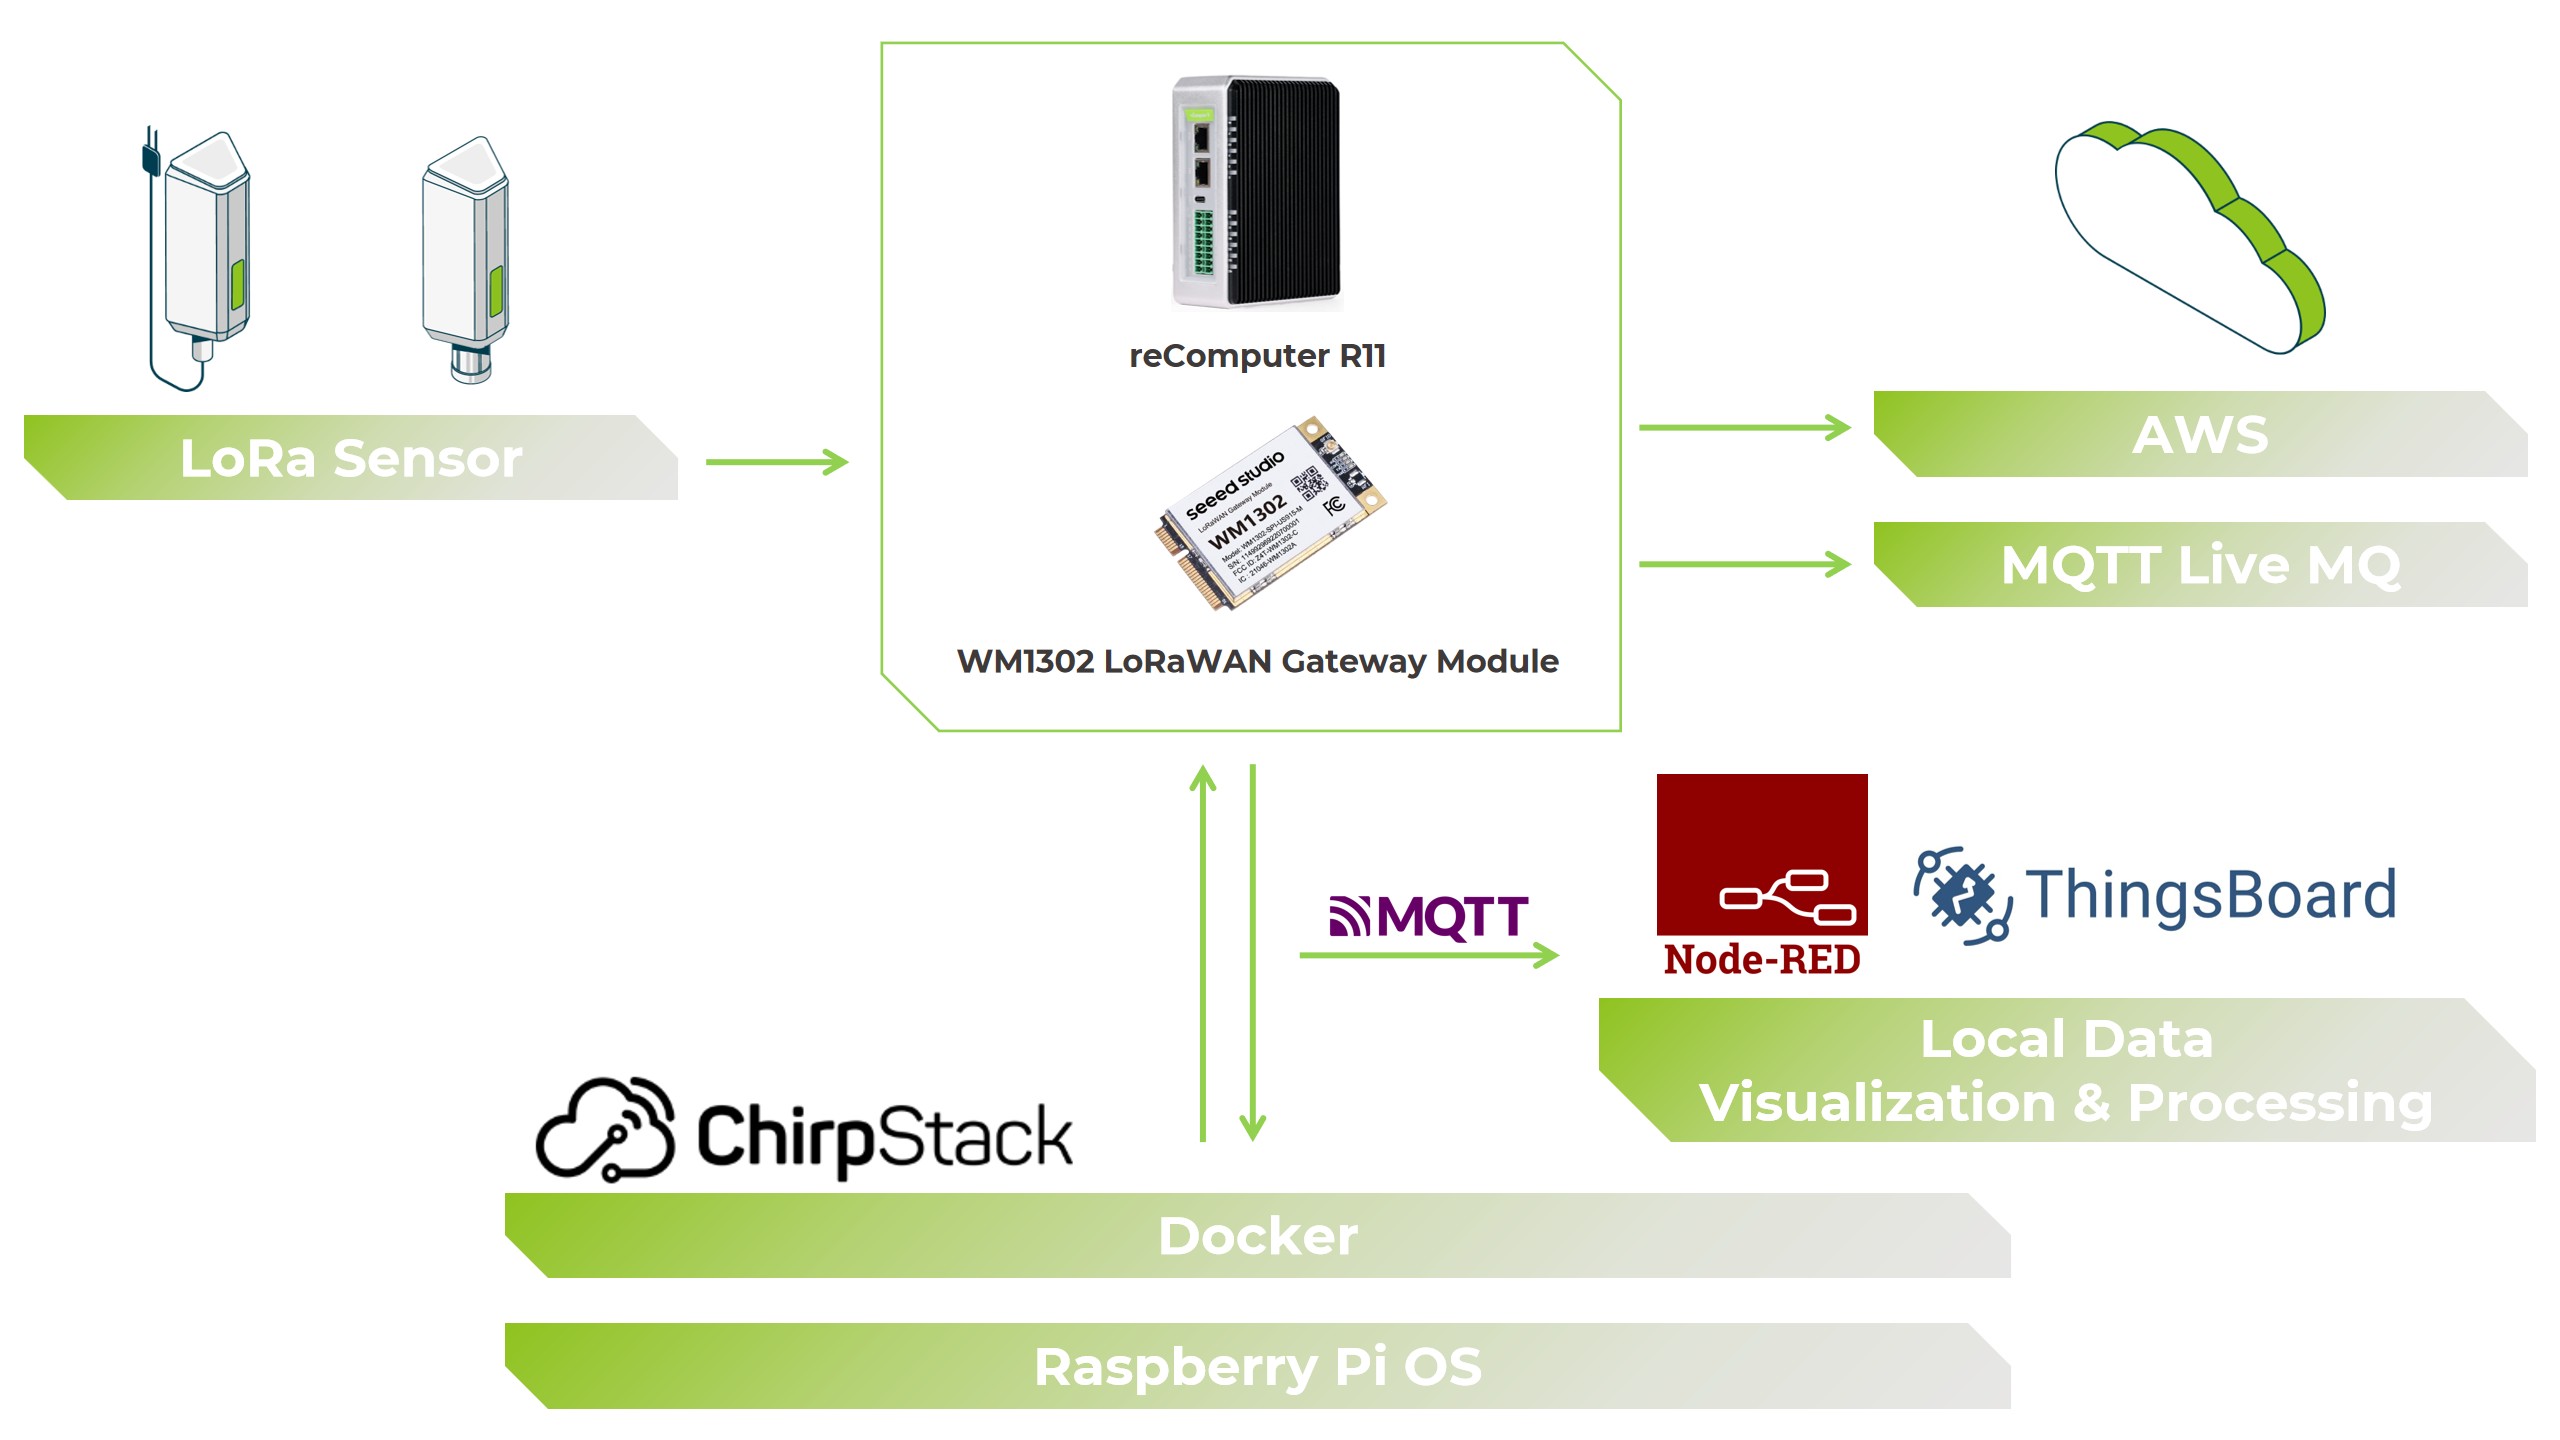
This guide walks you through setting up a complete LoRaWAN gateway solution using ChirpStack on the Seeed reComputer R11 edge controller, powered by Raspberry Pi. With the WM1302 LoRa concentrator module, the R1X device functions as a powerful gateway capable of reliable long-range wireless communication. By configuring the Semtech Packet Forwarder, LoRa data can be seamlessly transmitted to ChirpStack, which manages network and application layers. We will use Docker to simplify the installation and deployment of ChirpStack services, ensuring a modular and scalable setup. Finally, the system integrates with MQTT, enabling secure and real-time IoT data streaming from LoRa devices like the SenseCAP S2101 sensor to applications accessible anywhere in the world.
Hardware Required
| reComputer R1X | WM1302 LoRaWAN Gateway Module | SenseCAP S2101 |
|---|---|---|
 | 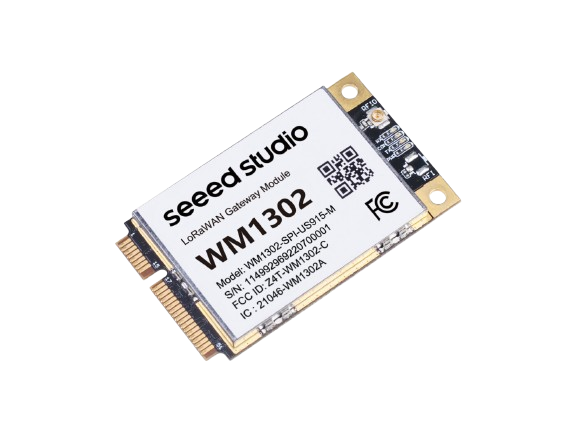 |  |
Docker Installation Guide
1. Update System Packages
sudo apt update
sudo apt upgrade
2. Install Docker
curl -fsSL https://get.docker.com -o get-docker.sh
sudo sh get-docker.sh
3. Add User to Docker Group
sudo usermod -aG docker ${USER}
4. Reboot System
sudo reboot
5. Verify Installation
docker run hello-world
6. Install Docker Compose
sudo apt install docker-compose
Run Packet Forwarder
The WM1302 LoRa concentrator requires the Semtech Packet Forwarder to relay data between the LoRa module and ChirpStack. The reComputer R11 provides a prebuilt setup guide for LoRa modules.
Refer to the official Seeed Wiki for installation steps: Seeed reComputer R11 LoRa Module Guide
Once installed, follow the steps below to configure and run the Packet Forwarder.
1. Modify Configuration
Open the configuration file corresponding to your LoRa region. For example, for US915:
nano global_conf.json.sx1250.US915
Update the gateway_conf section to point to your ChirpStack server:
"gateway_conf": {
    "gateway_ID": "AA555A0000000000",
    /* change with default server address/ports */
    "server_address": "localhost",
    "serv_port_up": 1700,
    "serv_port_down": 1700
}
Replace
AA555A0000000000with your actual Gateway ID. We will keep as it is Use the correct JSON file for your LoRaWAN region, depending on the module you purchased.
Save the file and exit:
- Press CTRL + X,
- Then Y,
- And finally Enter.
2. Start Packet Forwarder
Run the Packet Forwarder using the updated configuration:
./lora_pkt_fwd -c global_conf.json.sx1250.US915
Start Gateway
For Download the docker Compose file you need to visit this page on reComputer and Download it. Link
Then modify the frequency band according to your settings in yaml file
 chirpstack-gateway-bridge:
    image: chirpstack/chirpstack-gateway-bridge:4
    restart: unless-stopped
    ports:
      - "1700:1700/udp"
    volumes:
      - ./configuration/chirpstack-gateway-bridge:/etc/chirpstack-gateway-bridge
    environment:
      - INTEGRATION__MQTT__EVENT_TOPIC_TEMPLATE=us915_0/gateway/{{ .GatewayID }}/event/{{ .EventType }}
      - INTEGRATION__MQTT__STATE_TOPIC_TEMPLATE=us915_0/gateway/{{ .GatewayID }}/state/{{ .StateType }}
      - INTEGRATION__MQTT__COMMAND_TOPIC_TEMPLATE=us915_0/gateway/{{ .GatewayID }}/command/#
    depends_on:
      - mosquitto
After installing ChirpStack, you can register your R11 LoRa gateway and start processing data.
Start ChirpStack Services
If not already running, launch all ChirpStack services:
sudo docker-compose up -d
Verify the containers are running:
sudo docker ps
Access ChirpStack Web UI
- Open a web browser and navigate to:
http://localhost:8080/
- Log in with the default credentials:
Username: admin
Password: admin
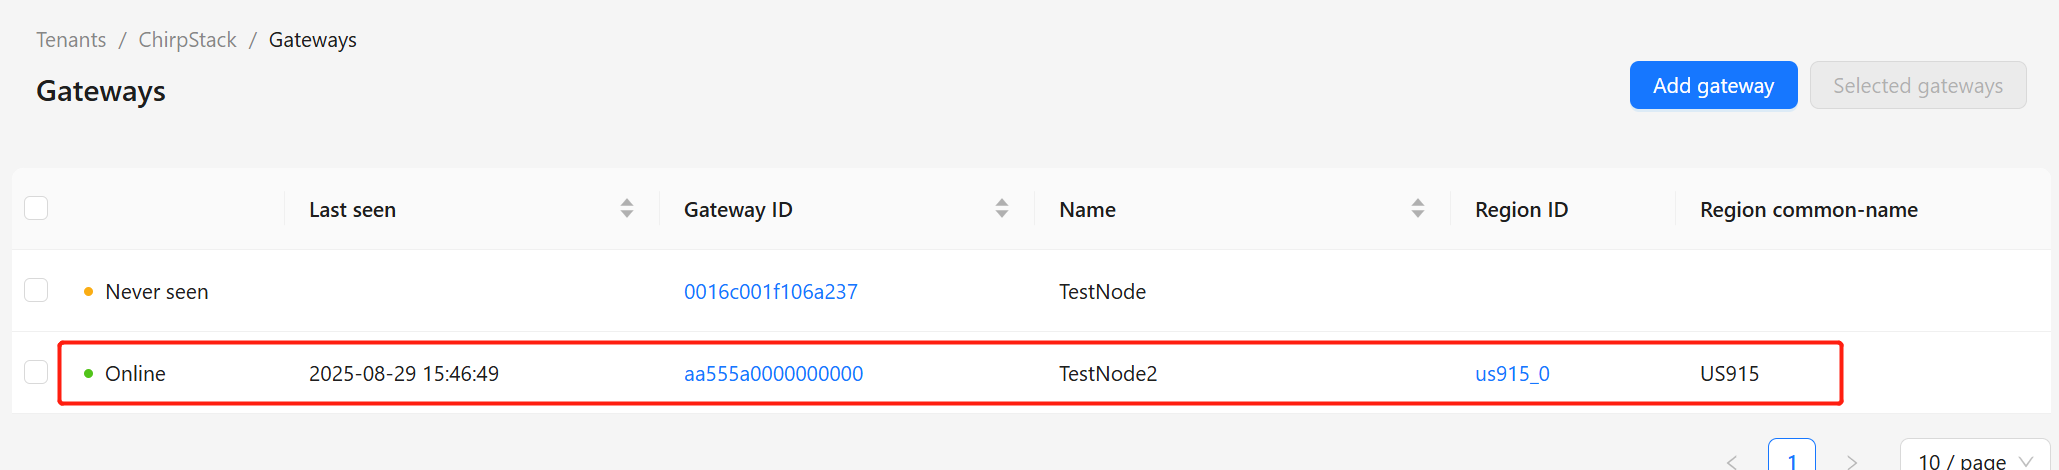
Add Your Gateway
- In the ChirpStack UI, go to Gateways → Create Gateway
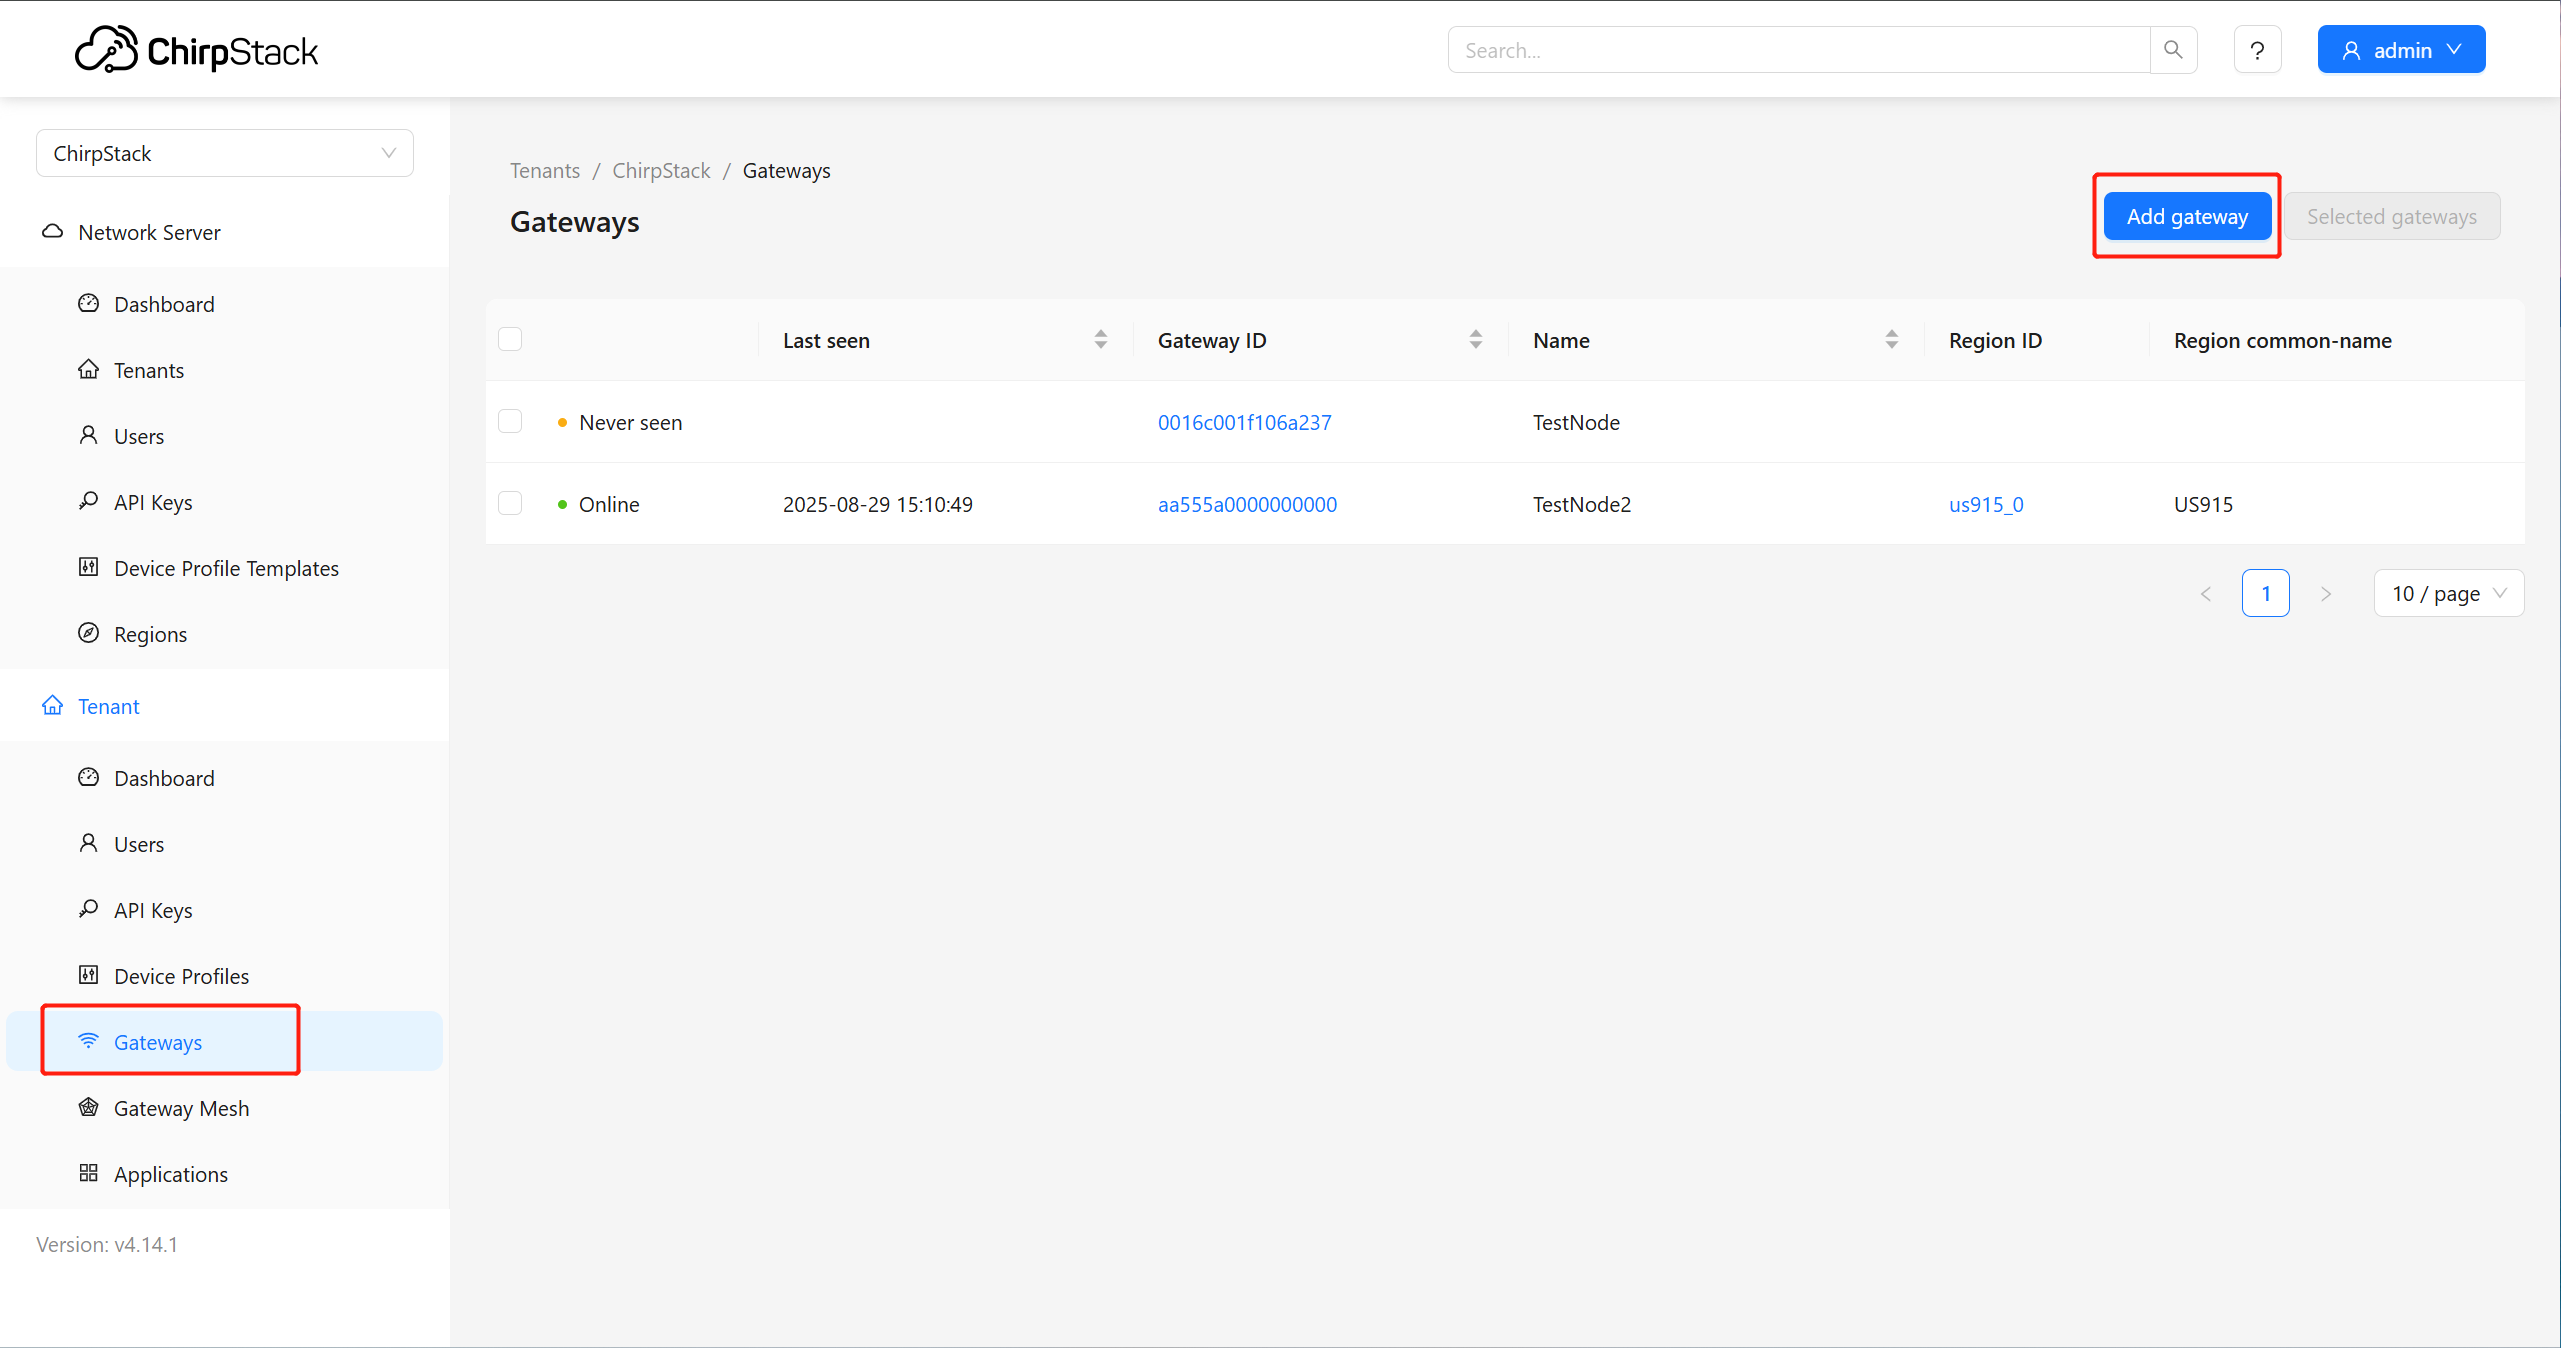
-
Enter the following details:
- Gateway ID:
AA555A0000000000(replace with your actual Gateway ID) - Name: Give a descriptive name for your gateway
- Gateway ID:
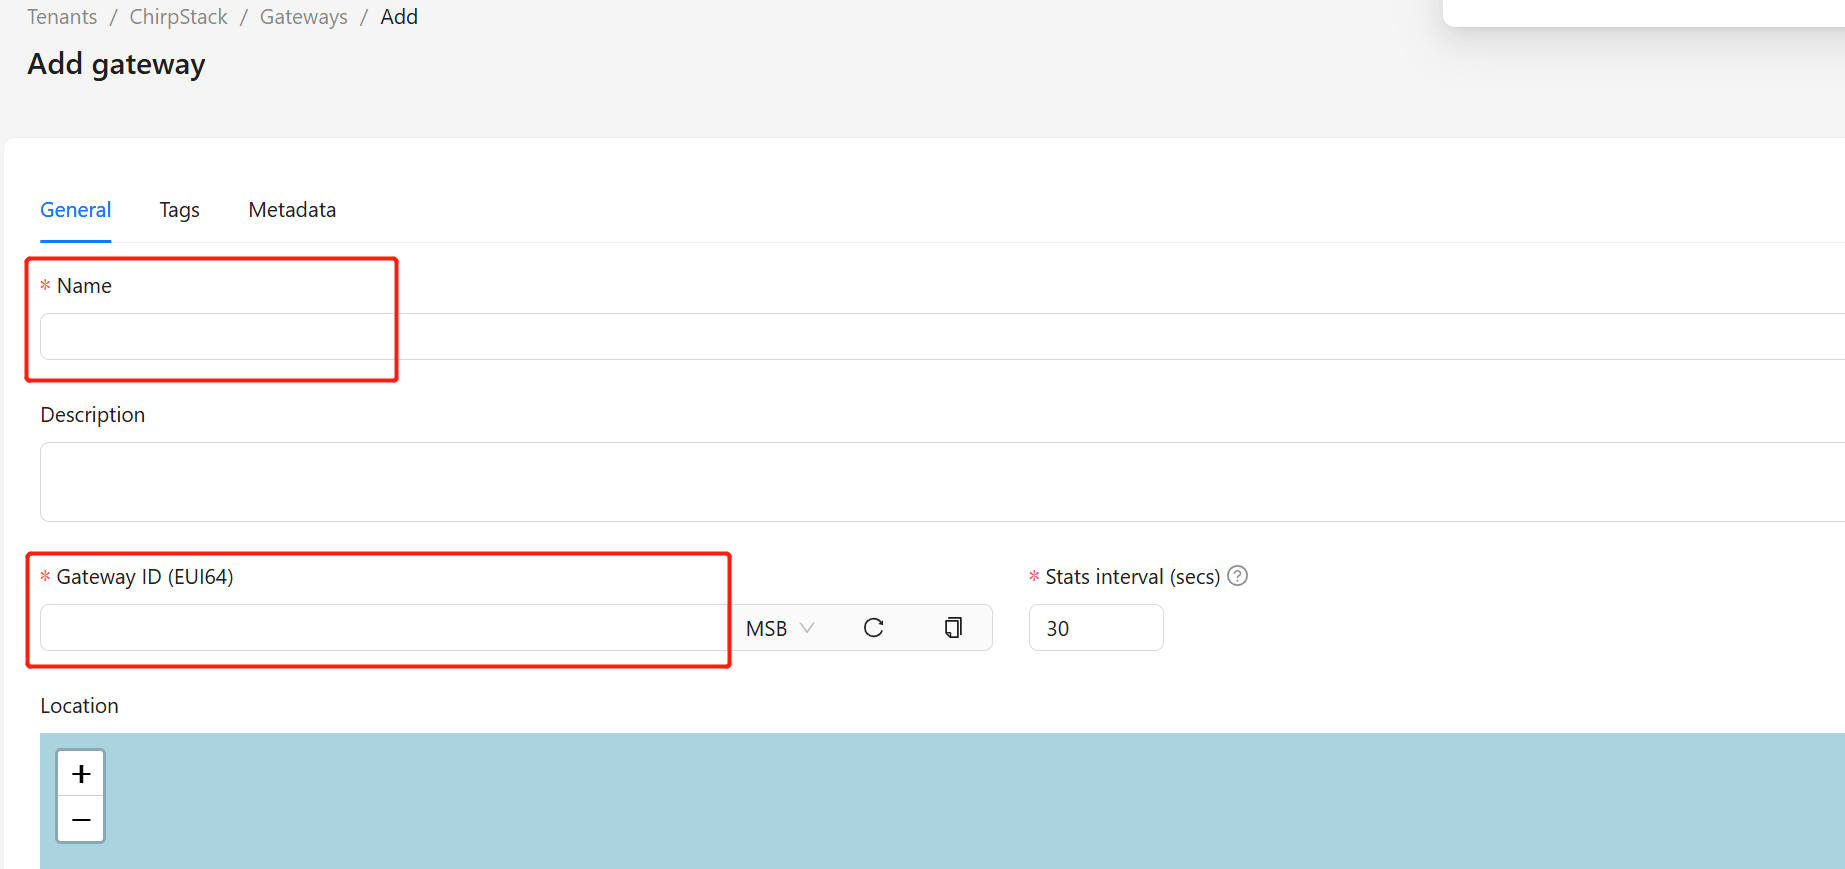
-
Click Create Gateway to register it.
-
After this, you will be able to view the gateway in the ChirpStack UI
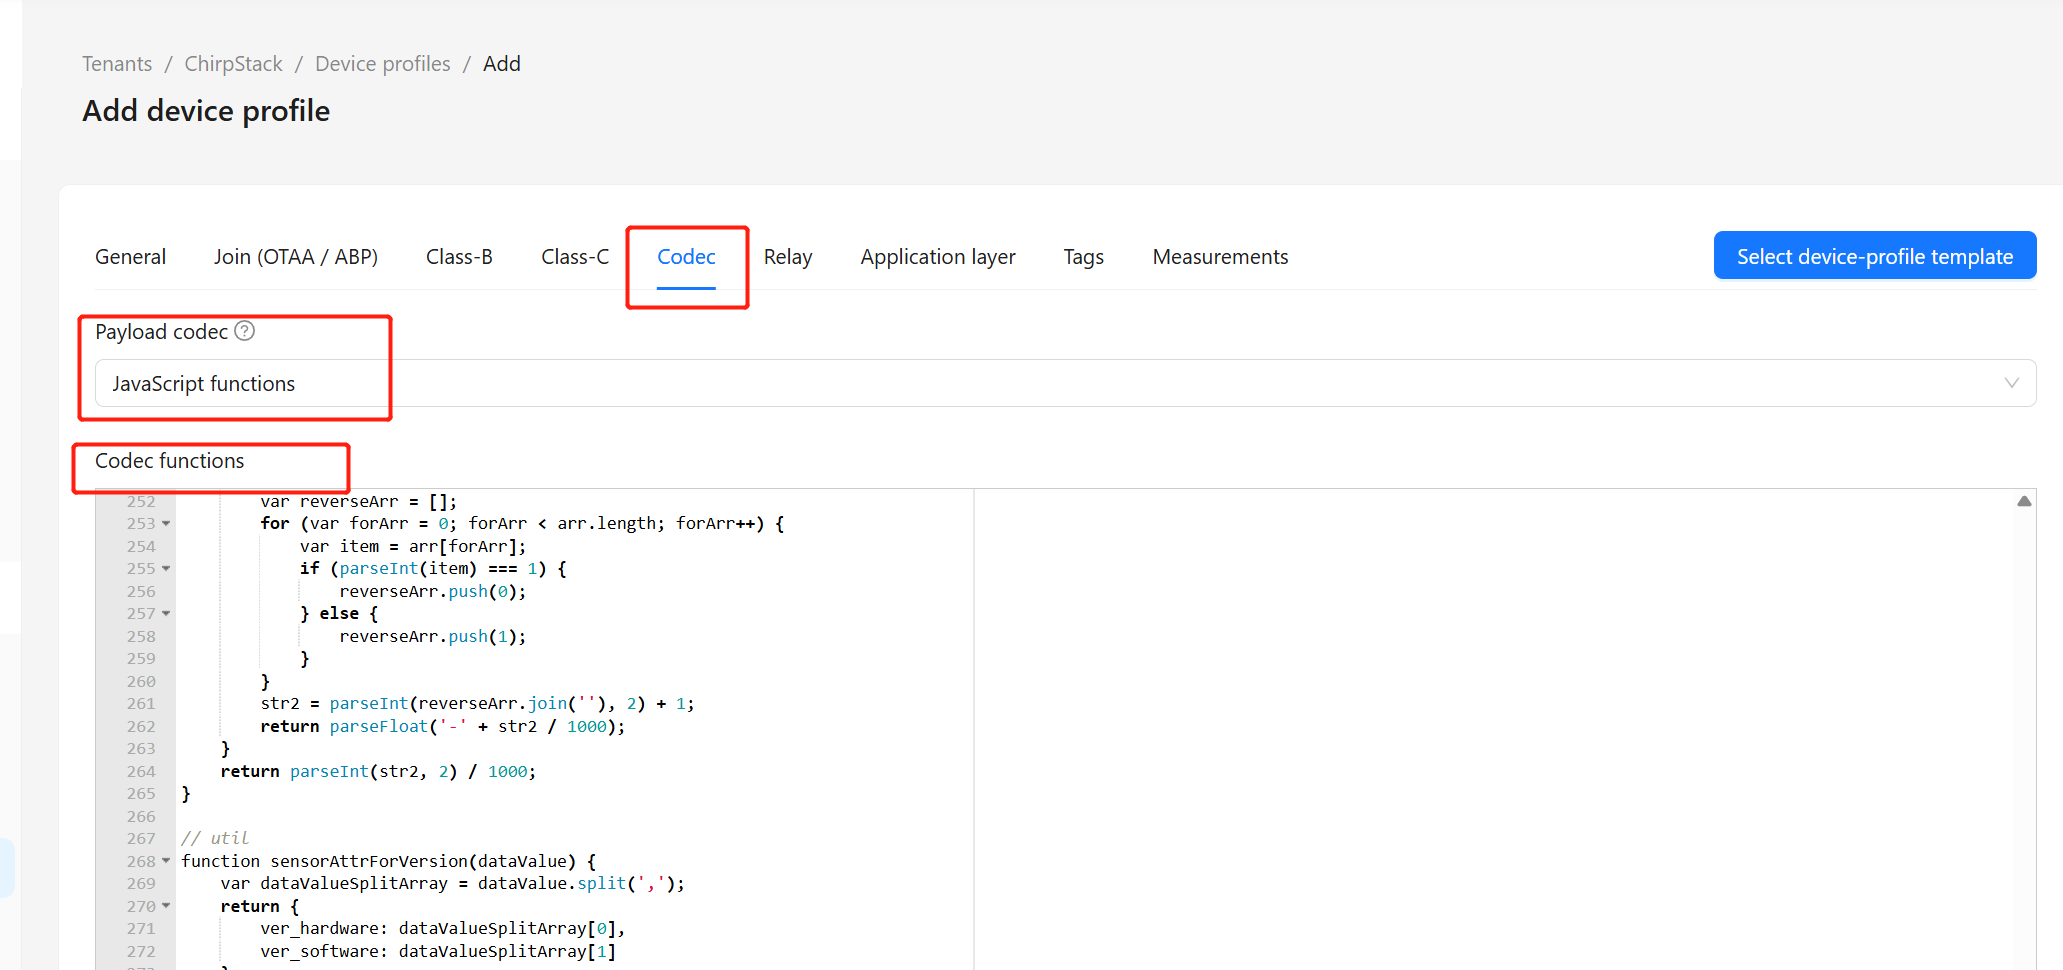
Add Device Profile
To connect a LoRaWAN device (e.g., SenseCAP S2101) to ChirpStack, you first need to create a Device Profile.
-
Navigate to Device Profiles → Create Device Profile
-
Enter the following details:
- Name: Give a descriptive name for your device profile
- Region: Select the region/sub-band that matches your device and gateway (e.g.,
US915)

-
Navigate to the Codec tab:
- Select JavaScript Functions
- Paste the codec for your device
⚠️ The codec is specific to your LoRa device. For example, if you are using Seeed S201x, you can use the code below. If you are using a different device, consult the manufacturer for the correct codec.
- Copy and paste the codec in the Uplink/Downlink Codec section and save the profile.
.js
function decodeUplink(input) {
    return Decode(input.fPort, input.bytes, input.variables);
}

function Decode(fPort, bytes, variables) {
    var bytesString = bytes2HexString(bytes).toLocaleUpperCase();
    var fport = parseInt(fPort);
    var decoded = {
        valid: true,
        err: 0,
        payload: bytesString,
        messages: []
    };

    // CRC check
    if (!crc16Check(bytesString)) {
        decoded['valid'] = false;
        decoded['err'] = -1; // "crc check fail."
        return { data: decoded };
    }

    // Length Check
    if ((bytesString.length / 2 - 2) % 7 !== 0) {
        decoded['valid'] = false;
        decoded['err'] = -2; // "length check fail."
        return { data: decoded };
    }

    // Cache sensor id
    var sensorEuiLowBytes;
    var sensorEuiHighBytes;

    // Handle each frame
    var frameArray = divideBy7Bytes(bytesString);
    for (var forFrame = 0; forFrame < frameArray.length; forFrame++) {
        var frame = frameArray[forFrame];
        var channel = strTo10SysNub(frame.substring(0, 2));
        var dataID = strTo10SysNub(frame.substring(2, 6));
        var dataValue = frame.substring(6, 14);
        var realDataValue = isSpecialDataId(dataID) ? ttnDataSpecialFormat(dataID, dataValue) : ttnDataFormat(dataValue);

        if (checkDataIdIsMeasureUpload(dataID)) {
            decoded.messages.push({
                type: 'report_telemetry',
                measurementId: dataID,
                measurementValue: realDataValue
            });
        } else if (isSpecialDataId(dataID) || dataID === 5 || dataID === 6) {
            switch (dataID) {
                case 0x00: // node version
                    var versionData = sensorAttrForVersion(realDataValue);
                    decoded.messages.push({
                        type: 'upload_version',
                        hardwareVersion: versionData.ver_hardware,
                        softwareVersion: versionData.ver_software
                    });
                    break;
                case 1: // sensor version
                    break;
                case 2: // sensor eui low
                    sensorEuiLowBytes = realDataValue;
                    break;
                case 3: // sensor eui high
                    sensorEuiHighBytes = realDataValue;
                    break;
                case 7: // battery + interval
                    decoded.messages.push({
                        type: 'upload_battery',
                        battery: realDataValue.power
                    }, {
                        type: 'upload_interval',
                        interval: parseInt(realDataValue.interval) * 60
                    });
                    break;
                case 9:
                    decoded.messages.push({
                        type: 'model_info',
                        detectionType: realDataValue.detectionType,
                        modelId: realDataValue.modelId,
                        modelVer: realDataValue.modelVer
                    });
                    break;
                case 0x120: // remove sensor
                    decoded.messages.push({
                        type: 'report_remove_sensor',
                        channel: 1
                    });
                    break;
                default:
                    break;
            }
        } else {
            decoded.messages.push({
                type: 'unknown_message',
                dataID: dataID,
                dataValue: dataValue
            });
        }
    }

    if (sensorEuiHighBytes && sensorEuiLowBytes) {
        decoded.messages.unshift({
            type: 'upload_sensor_id',
            channel: 1,
            sensorId: (sensorEuiHighBytes + sensorEuiLowBytes).toUpperCase()
        });
    }

    return { data: decoded };
}

// ---------- Utils ----------
function crc16Check(data) {
    return true;
}

function bytes2HexString(arrBytes) {
    var str = '';
    for (var i = 0; i < arrBytes.length; i++) {
        var num = arrBytes[i];
        var tmp = (num < 0 ? (255 + num + 1) : num).toString(16);
        if (tmp.length === 1) tmp = '0' + tmp;
        str += tmp;
    }
    return str;
}

function divideBy7Bytes(str) {
    var frameArray = [];
    for (var i = 0; i < str.length - 4; i += 14) {
        frameArray.push(str.substring(i, i + 14));
    }
    return frameArray;
}

function littleEndianTransform(data) {
    var arr = [];
    for (var i = 0; i < data.length; i += 2) {
        arr.push(data.substring(i, i + 2));
    }
    return arr.reverse();
}

function strTo10SysNub(str) {
    var arr = littleEndianTransform(str);
    return parseInt(arr.join(''), 16);
}

function checkDataIdIsMeasureUpload(dataId) {
    return parseInt(dataId) > 4096;
}

function isSpecialDataId(dataID) {
    switch (dataID) {
        case 0:
        case 1:
        case 2:
        case 3:
        case 4:
        case 7:
        case 9:
        case 0x120:
            return true;
        default:
            return false;
    }
}

function ttnDataSpecialFormat(dataId, str) {
    var strReverse = littleEndianTransform(str);
    if (dataId === 2 || dataId === 3) {
        return strReverse.join('');
    }

    var str2 = toBinary(strReverse);
    var arr = [];
    switch (dataId) {
        case 0: case 1: // versions
            for (var k = 0; k < str2.length; k += 16) {
                var tmp = str2.substring(k, k + 16);
                tmp = (parseInt(tmp.substring(0, 8), 2) || 0) + '.' + (parseInt(tmp.substring(8, 16), 2) || 0);
                arr.push(tmp);
            }
            return arr.join(',');
        case 4:
            for (var i = 0; i < str2.length; i += 8) {
                var item = parseInt(str2.substring(i, i + 8), 2);
                arr.push(item < 10 ? '0' + item : item.toString());
            }
            return arr.join('');
        case 7:
            return {
                interval: parseInt(str2.substr(0, 16), 2),
                power: parseInt(str2.substr(-16, 16), 2)
            };
        case 9:
            return {
                detectionType: parseInt(str2.substring(0, 8), 2),
                modelId: parseInt(str2.substring(8, 16), 2),
                modelVer: parseInt(str2.substring(16, 24), 2)
            };
    }
}

function ttnDataFormat(str) {
    var strReverse = littleEndianTransform(str);
    var str2 = toBinary(strReverse);
    if (str2[0] === '1') {
        var arr = str2.split('').map(b => b === '1' ? 0 : 1);
        var val = parseInt(arr.join(''), 2) + 1;
        return parseFloat('-' + val / 1000);
    }
    return parseInt(str2, 2) / 1000;
}

function sensorAttrForVersion(dataValue) {
    var arr = dataValue.split(',');
    return { ver_hardware: arr[0], ver_software: arr[1] };
}

function toBinary(arr) {
    return arr.map(item => {
        var bin = parseInt(item, 16).toString(2).padStart(8, '0');
        return bin;
    }).join('');
}
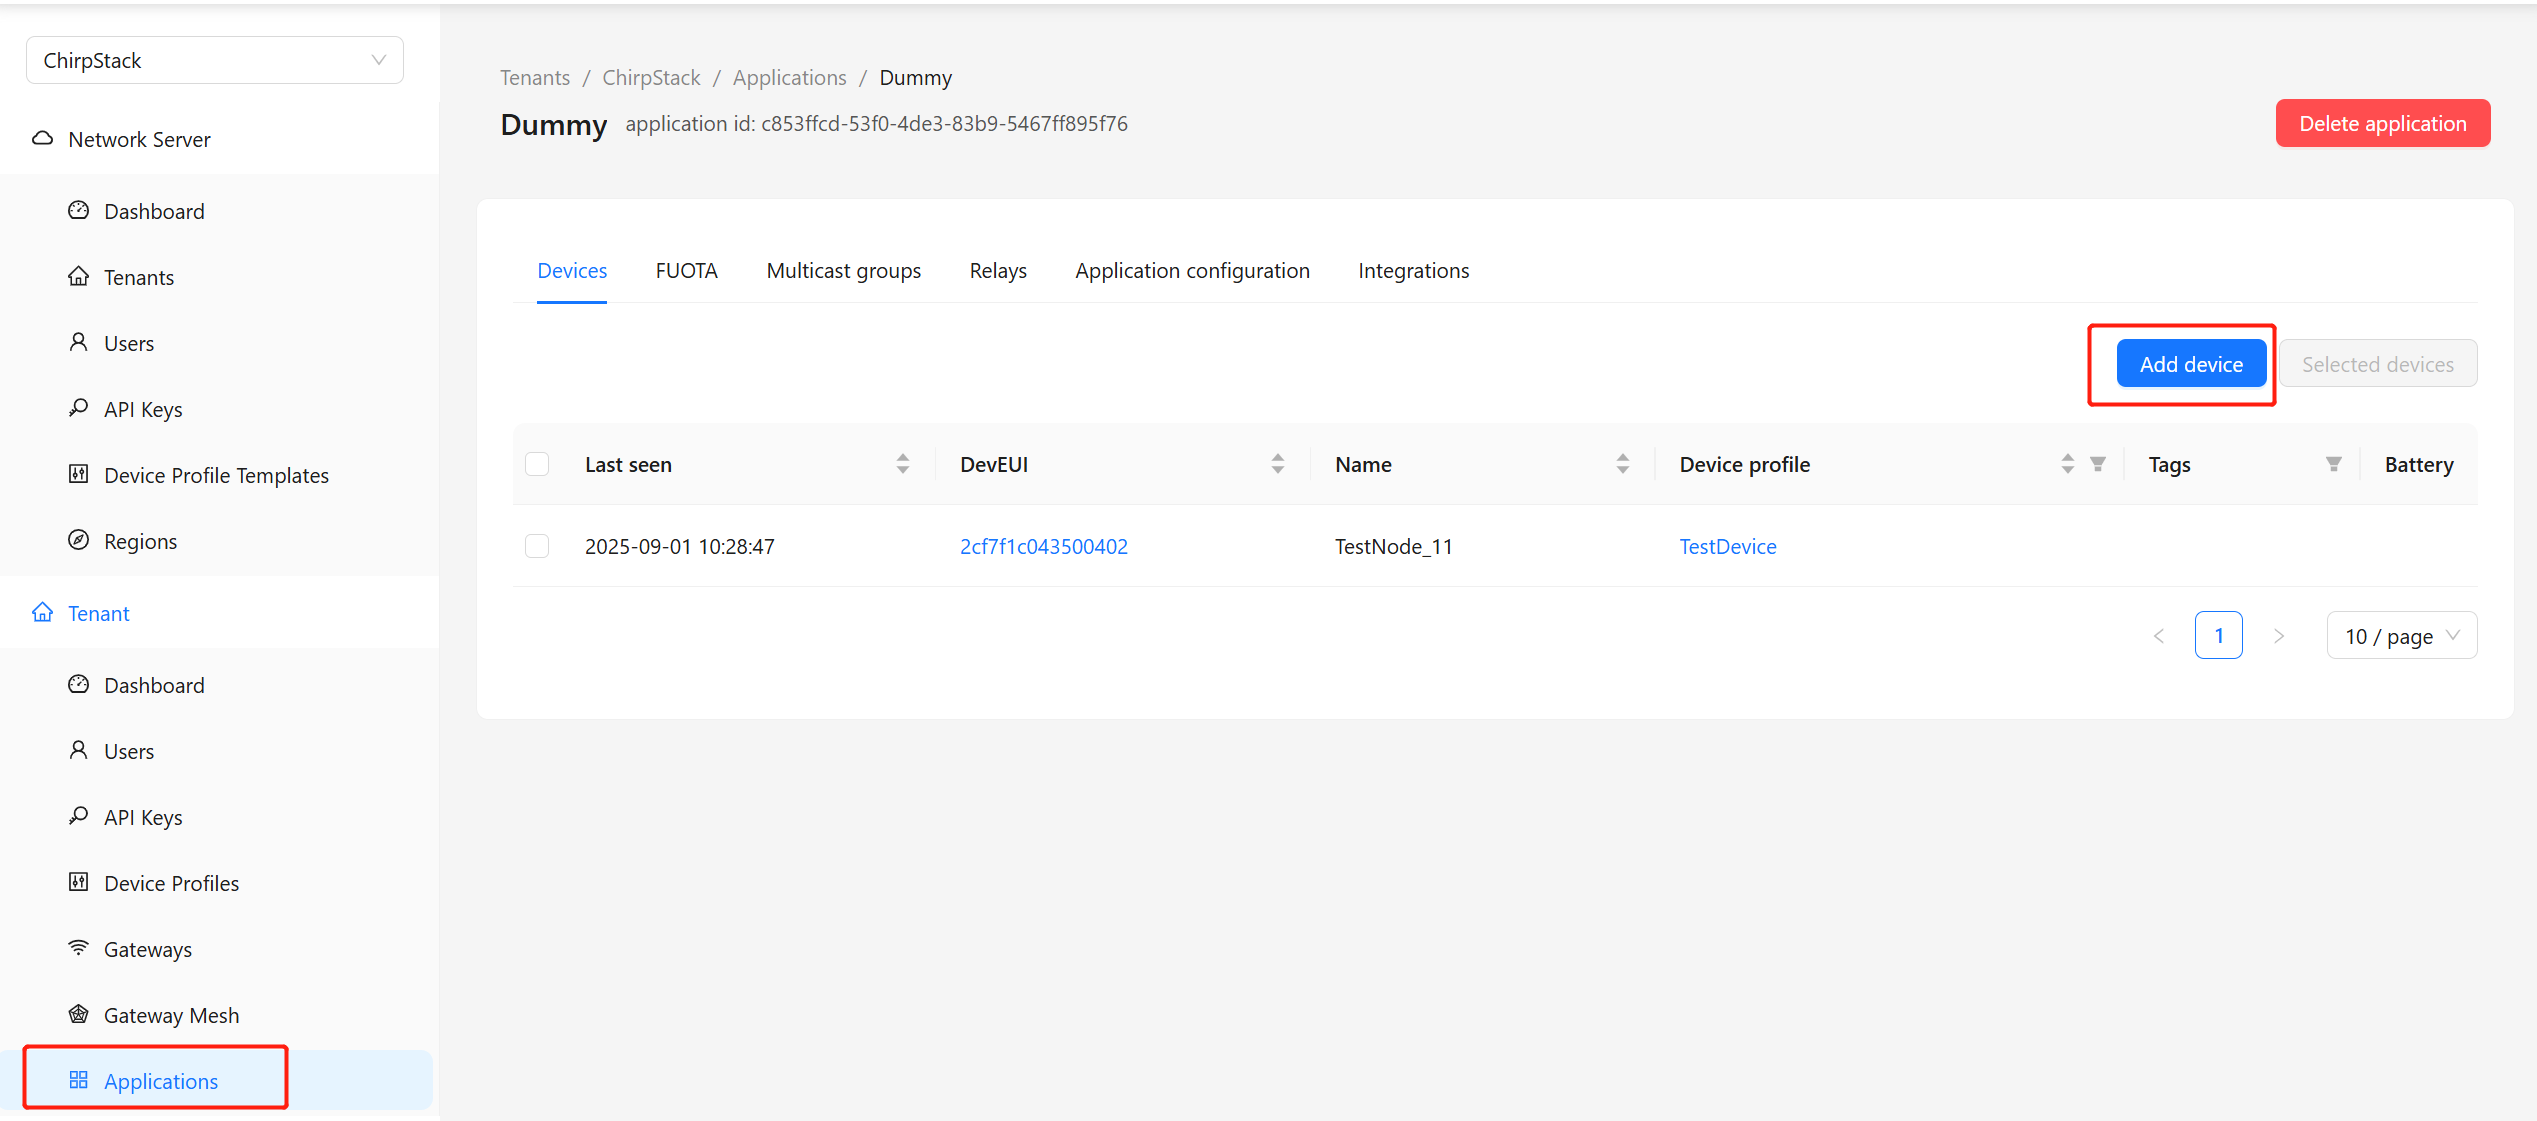
Add Device
Once the Device Profile is created, you can register your LoRaWAN device with ChirpStack.
- Navigate to Tenant → Application and click Add Application
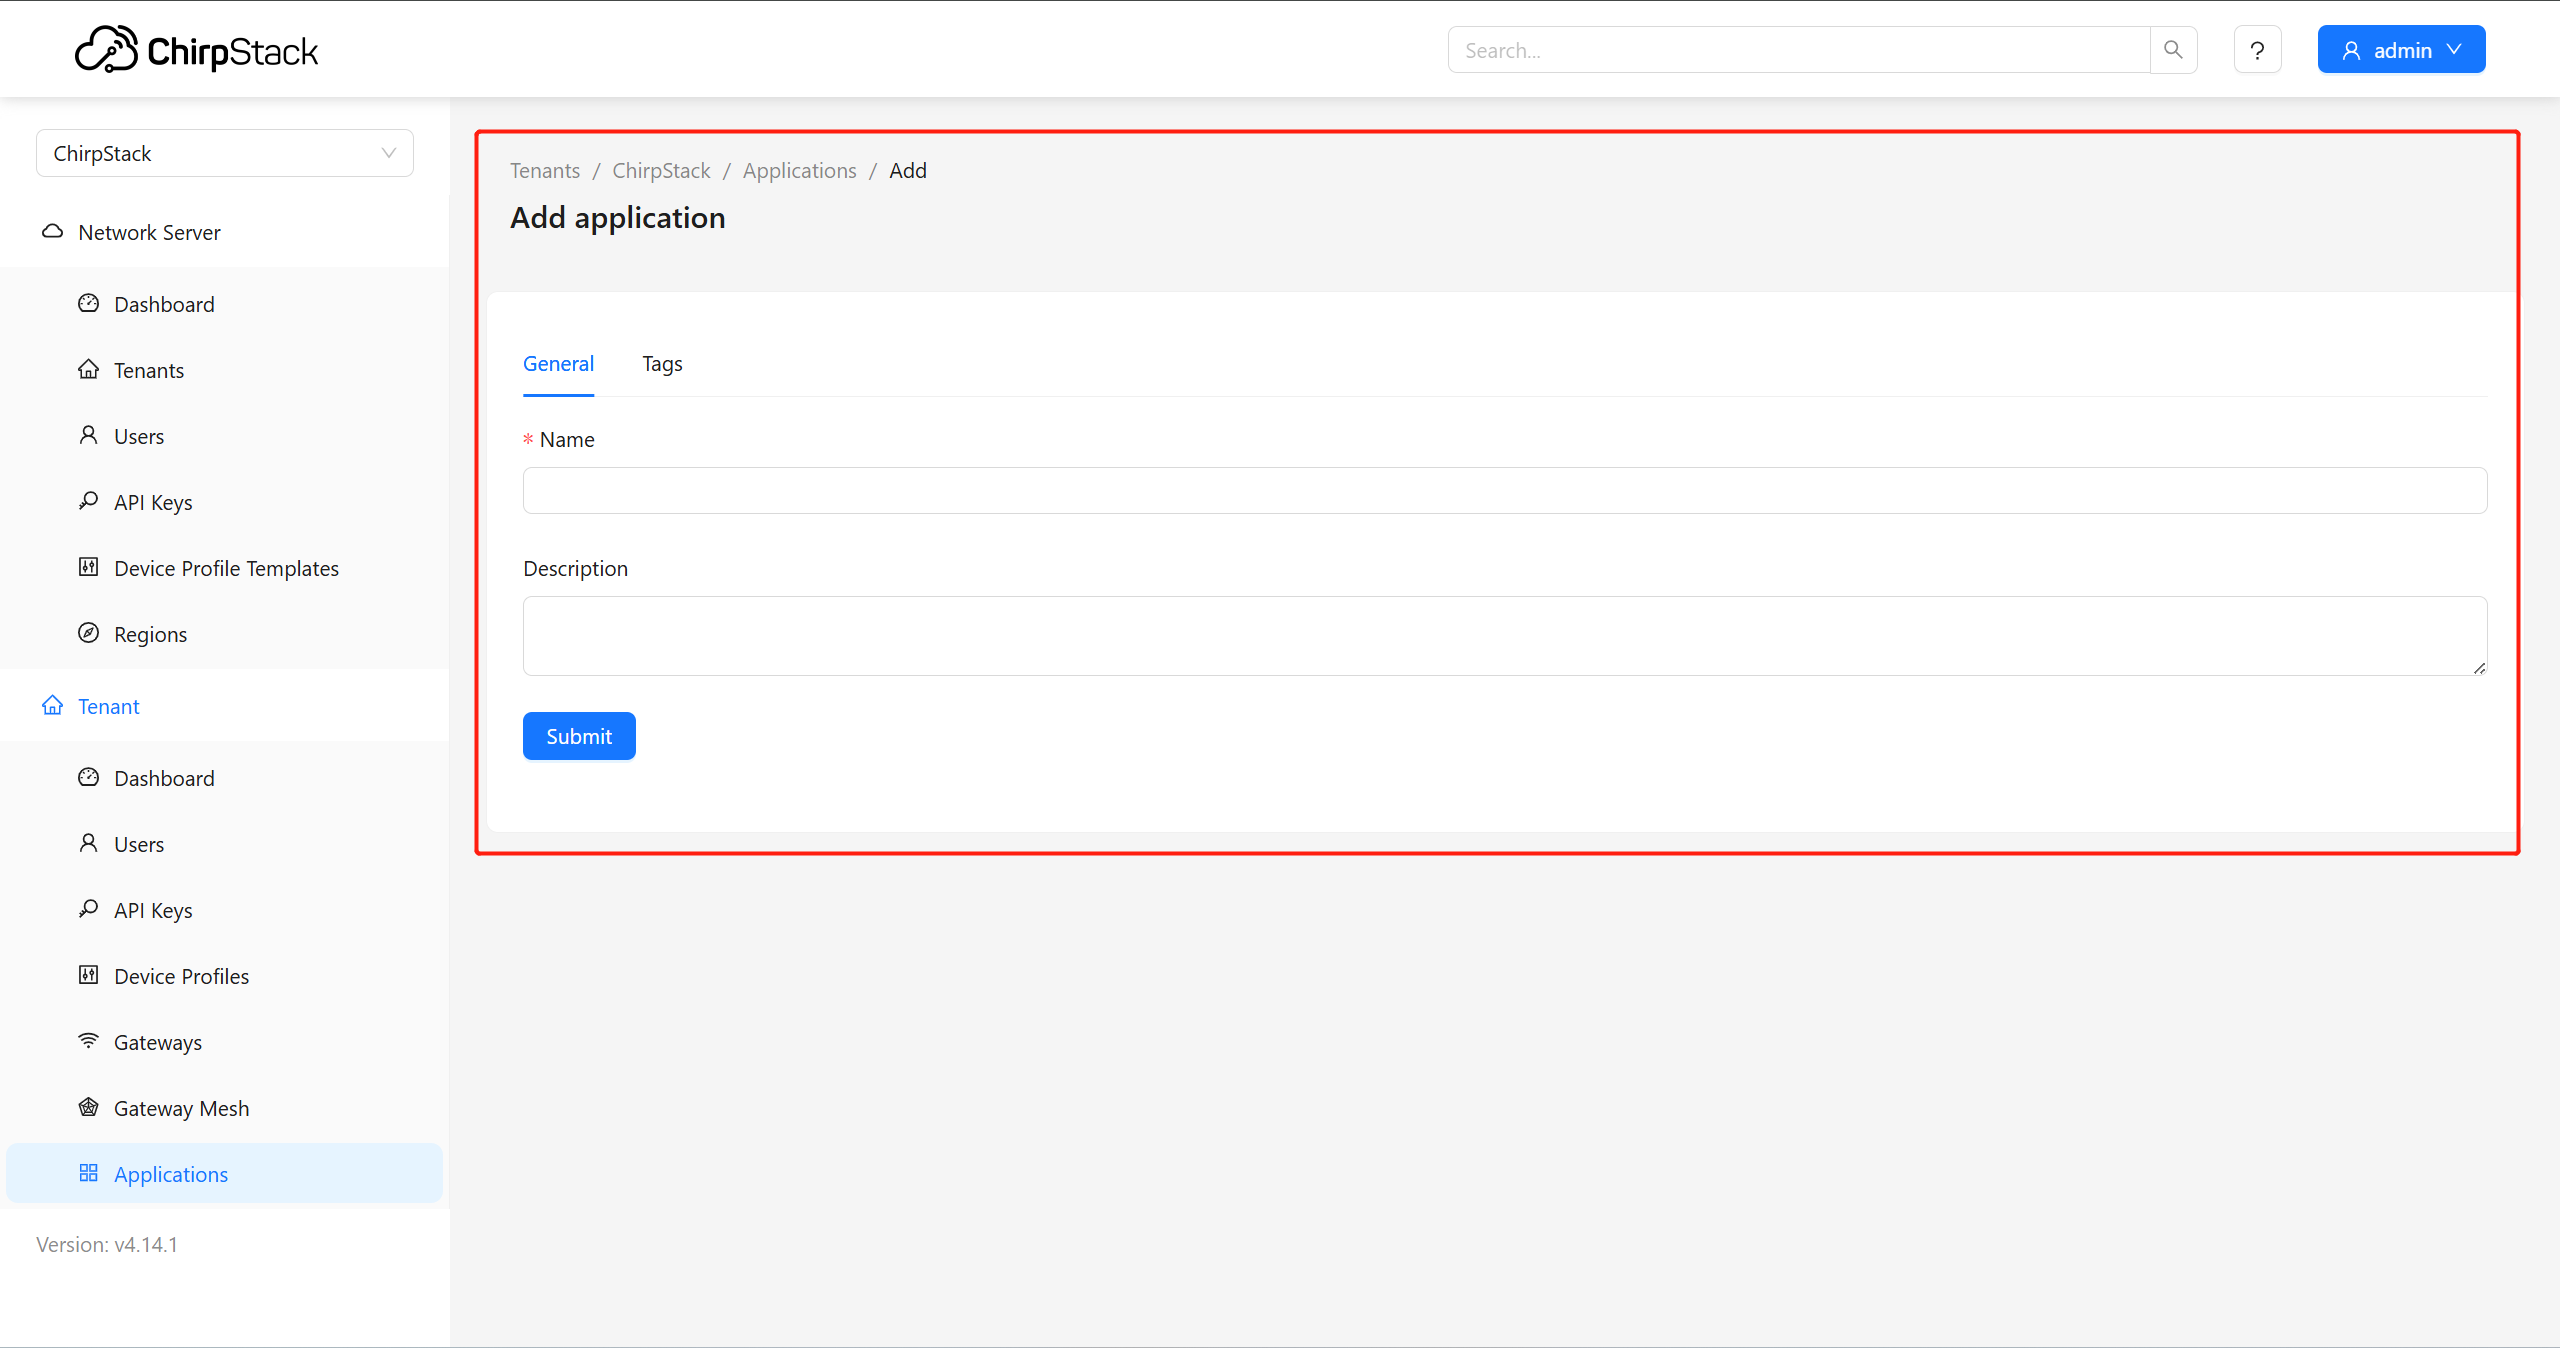
- Enter a Name for your application and save it
- Open your newly created application and click Add Device
-
Enter the following details:
- Device EUI: Paste the EUI from your LoRa device (found in the device datasheet or configuration software, e.g., SenseCAP application)
- Device Profile: Select the device profile you created earlier
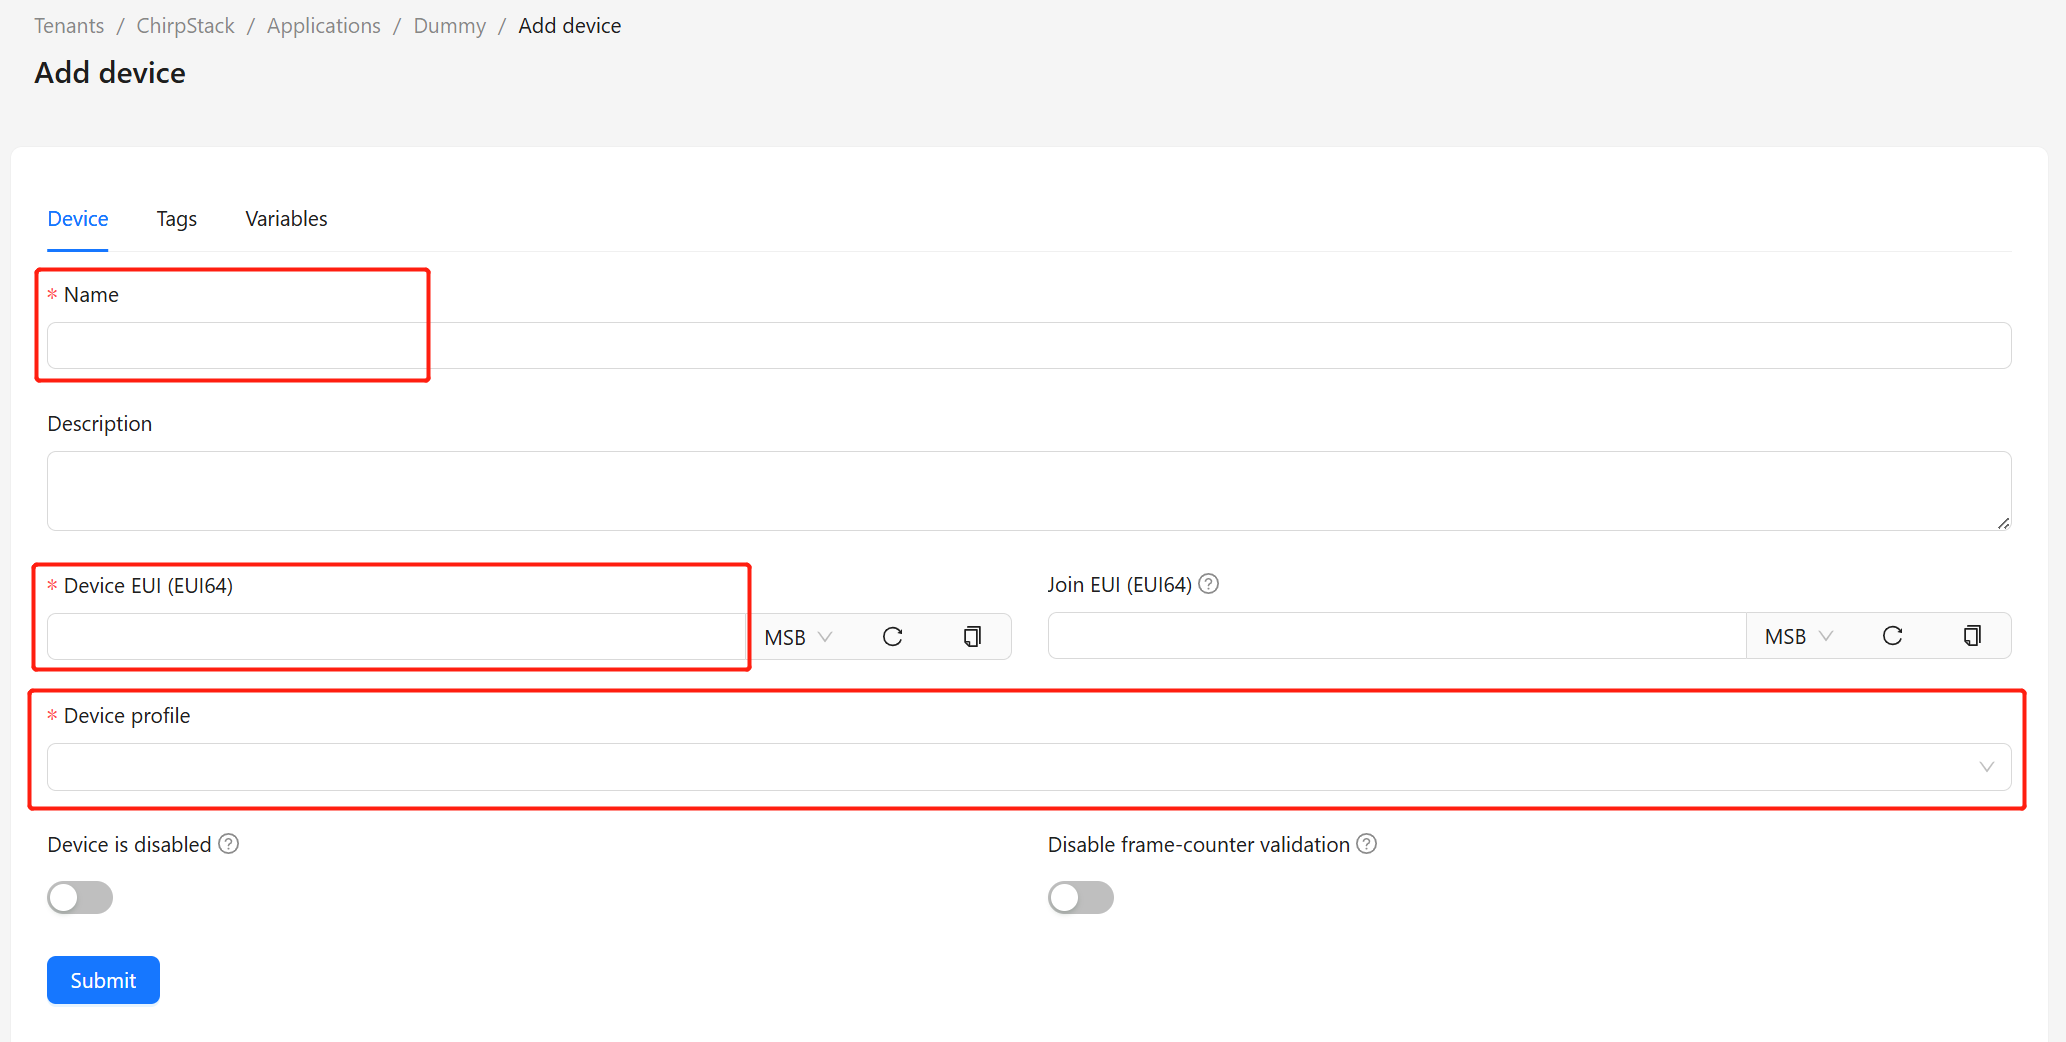
- Enter the Application Key and click Submit

Check Device Status
After adding your LoRaWAN device, you can verify that it is properly connected and transmitting data.
-
Navigate to your application and select the device you added
-
Go to the Events tab
- You should see a join packet when the device successfully joins the network
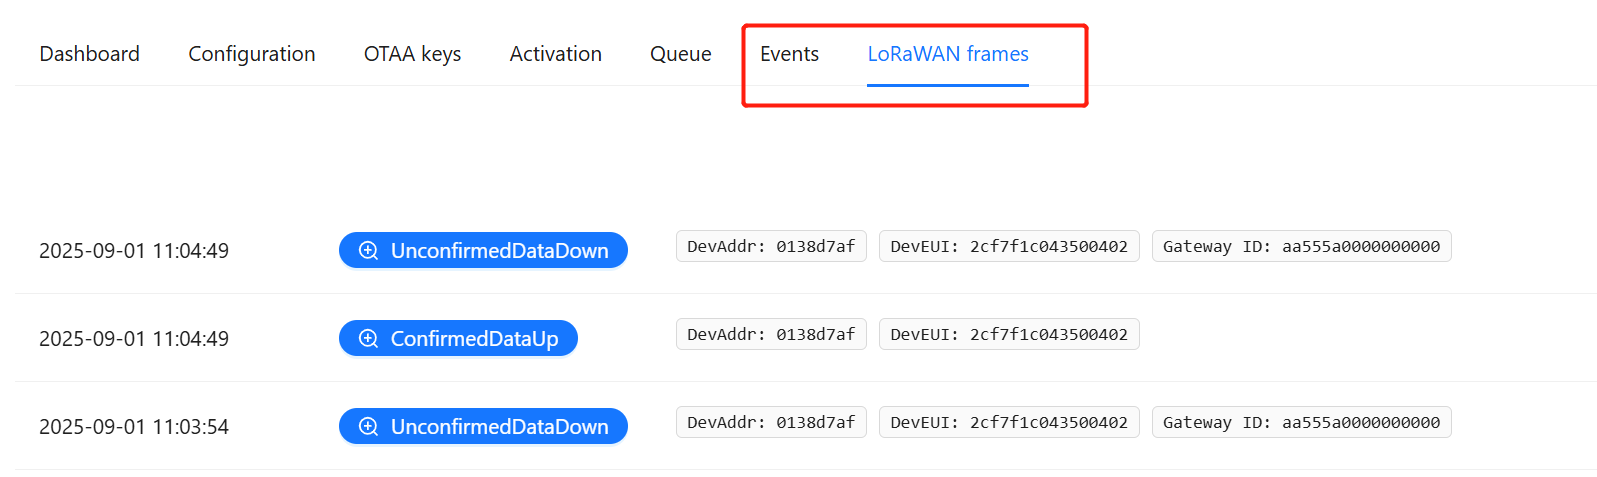
- Click on the packets to view detailed information
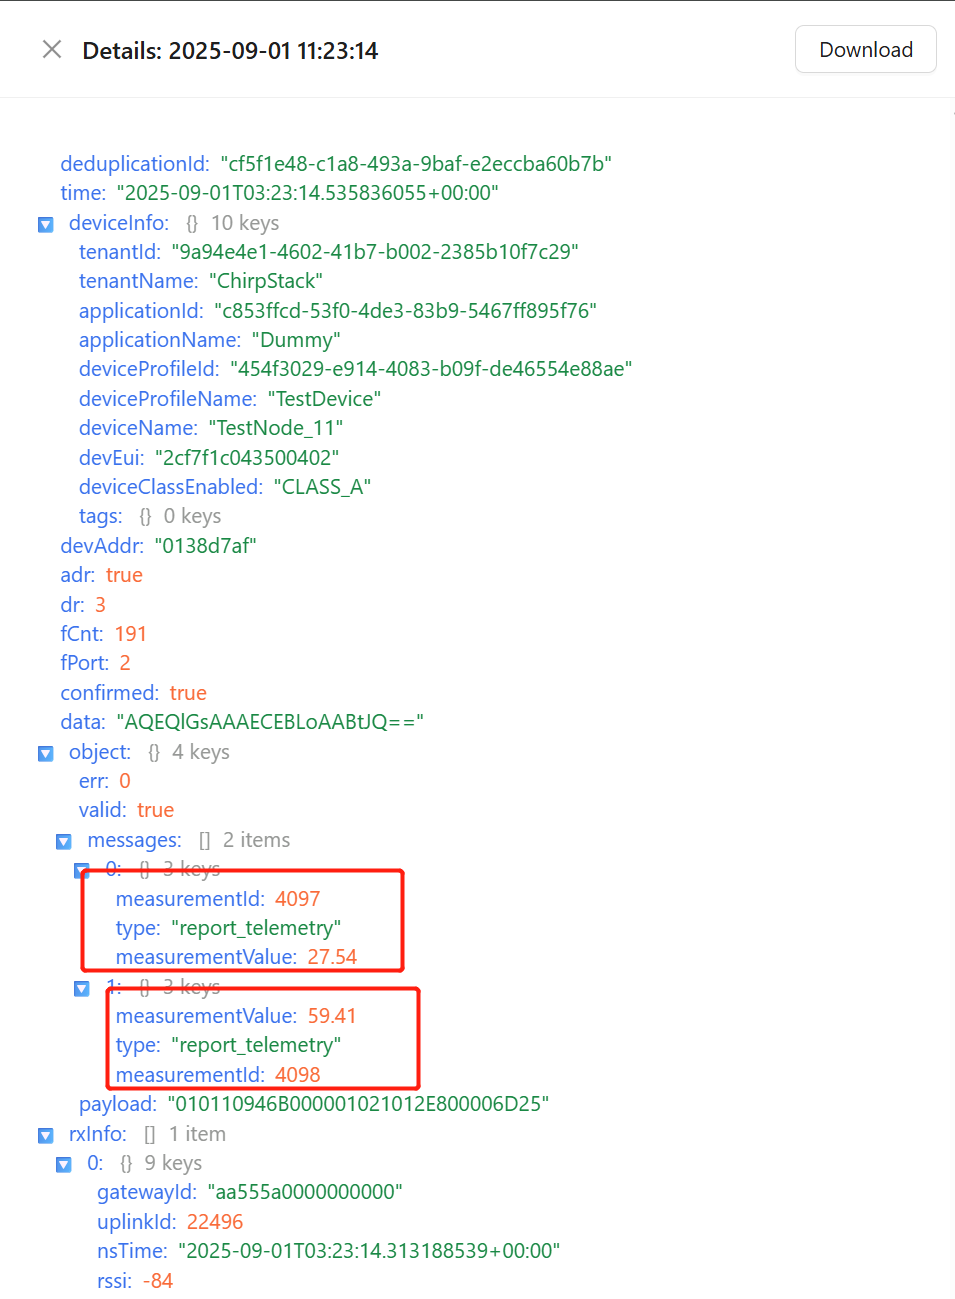
- For example, you can see the temperature and humidity data reported by devices like the SenseCAP S2101
MQTT Integration
ChirpStack uses MQTT to stream data from LoRaWAN devices to applications or dashboards. You can monitor these messages in real-time.
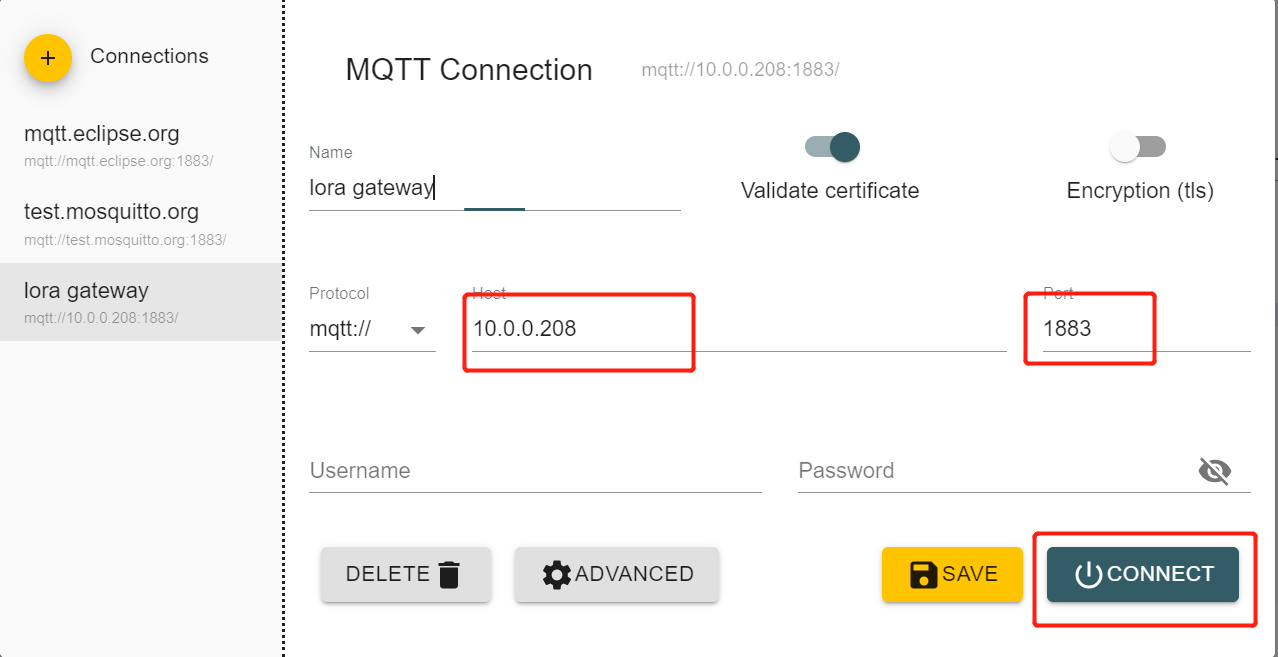
-
Connect your PC to the same network as the reComputer R11 gateway
-
Use an MQTT client such as MQTT Explorer to subscribe to topics
-
Configure the MQTT client:
- Host: IP address of your reComputer R11
- Port:
1883
-
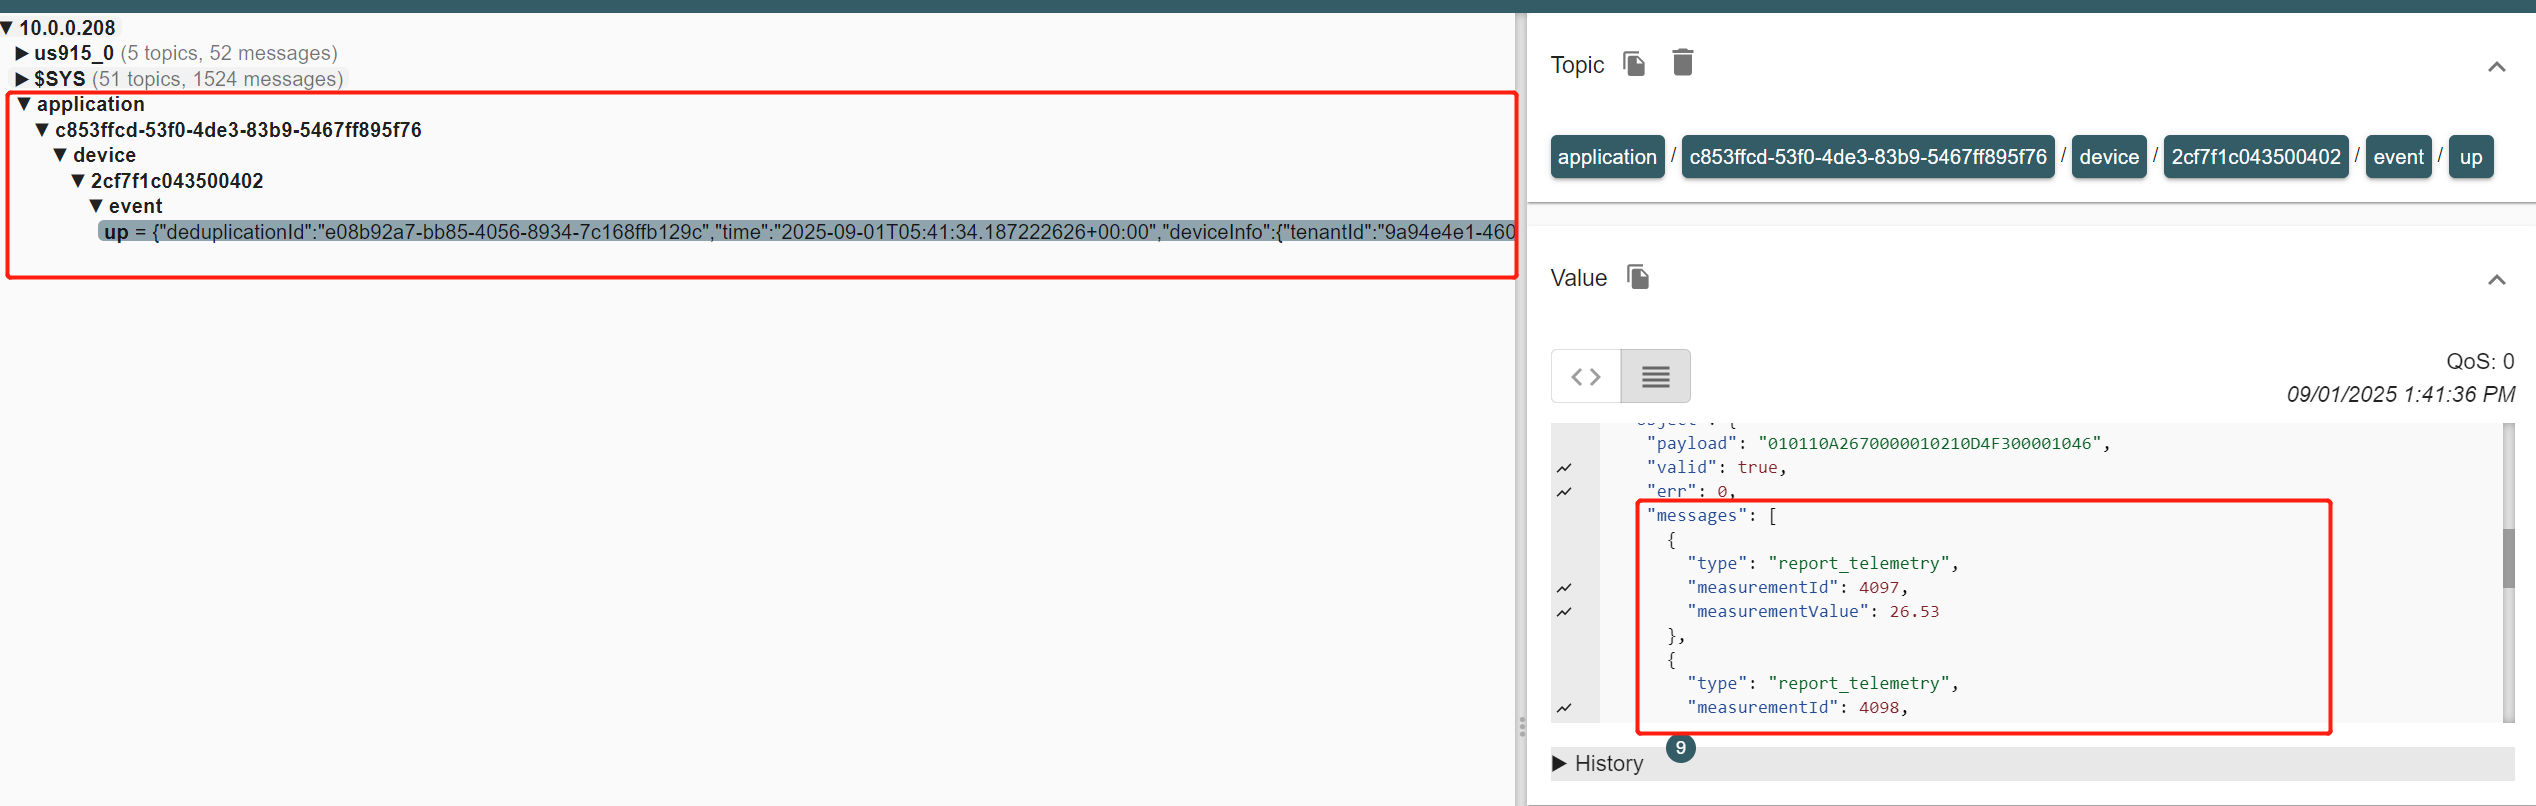
Once connected, you will see a tree of topics representing your devices, for example:
application/c853ffcd-53f0-4de3-83b9-5467ff895f76/device/2cf7f1c043500402/event/up
- Expanding the topic will show uplink messages containing sensor data, such as temperature and humidity for devices like the SenseCAP S2101
Node-RED Integration
You can visualize LoRaWAN device data in Node-RED using MQTT nodes and custom functions.
-
Open Node-RED and drag an MQTT IN node onto the flow
-
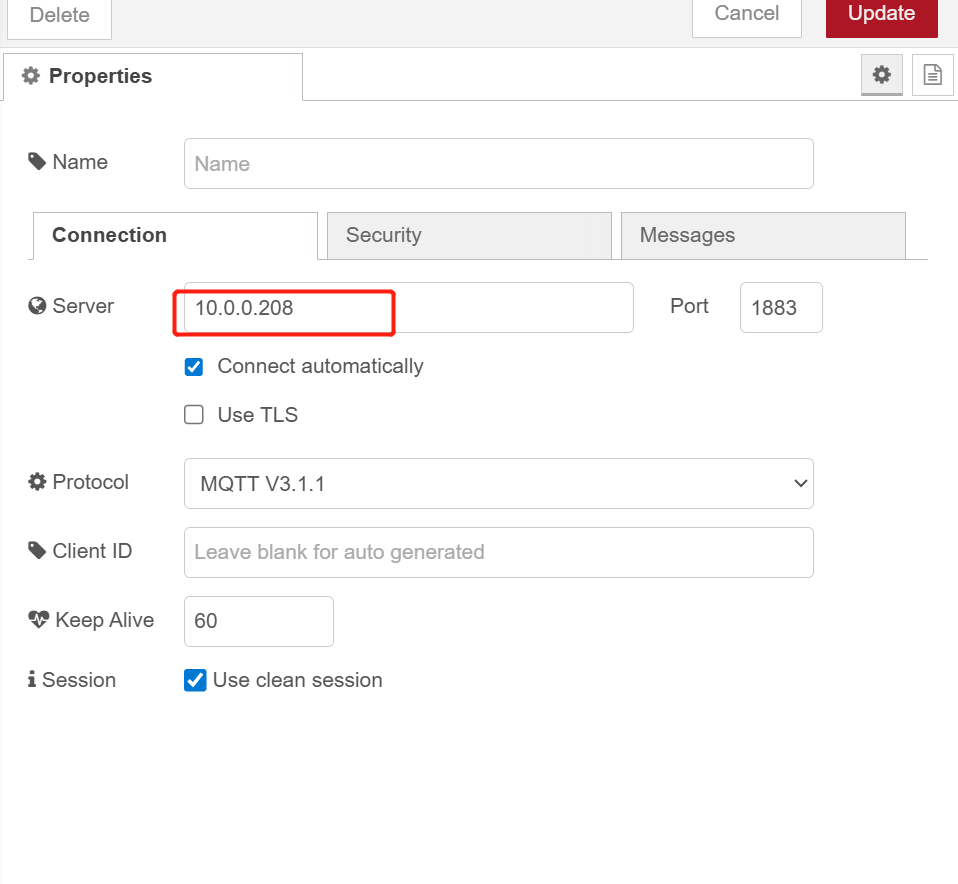
Configure the MQTT node:
- Server: IP of your reComputer R11 (e.g.,
10.0.0.208) - Port:
1883 - Topic:
application/+/device/+/event/up
- Server: IP of your reComputer R11 (e.g.,
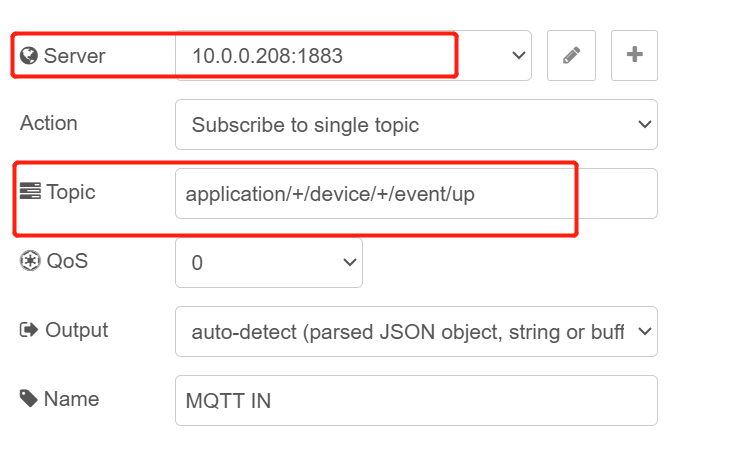
-
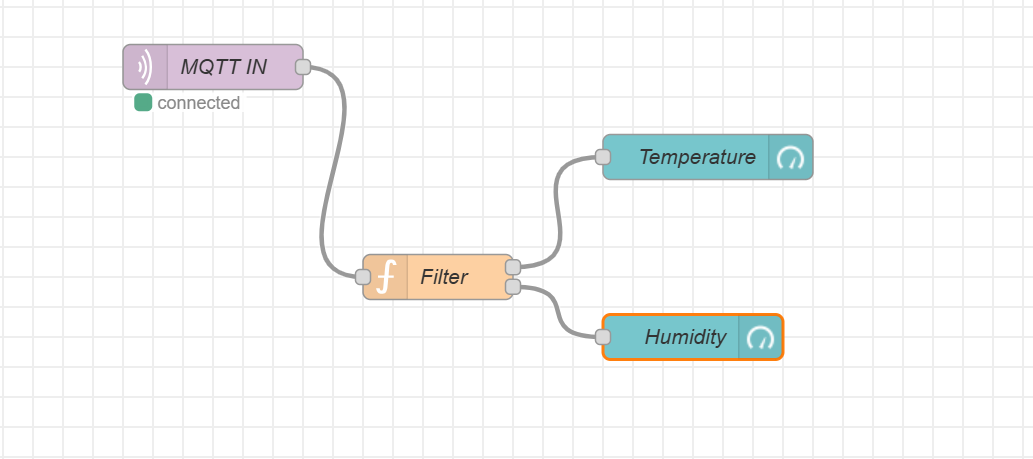
Add a Function node to decode the MQTT message payload
- For example, extract temperature and humidity from the JSON object
   // Get the JSON payload
let data = msg.payload;

if (typeof data === "string") {
    try {
        data = JSON.parse(data);
    } catch (e) {
        node.error("Invalid JSON", msg);
        return [null, null];
    }
}

// Check if "object" and "messages" exist
if (!data.object || !Array.isArray(data.object.messages)) {
    node.warn("No messages found in payload");
    return [null, null];
}

// Find the two measurements
let tempMsg = null;
let humMsg = null;

data.object.messages.forEach(m => {
    if (m.type === "report_telemetry") {
        if (m.measurementId === 4097) {
            tempMsg = { topic: "temperature", payload: m.measurementValue };
        } else if (m.measurementId === 4098) {
            humMsg = { topic: "humidity", payload: m.measurementValue };
        }
    }
});

// Return 2 outputs: [temperature, humidity]
return [tempMsg, humMsg];
-
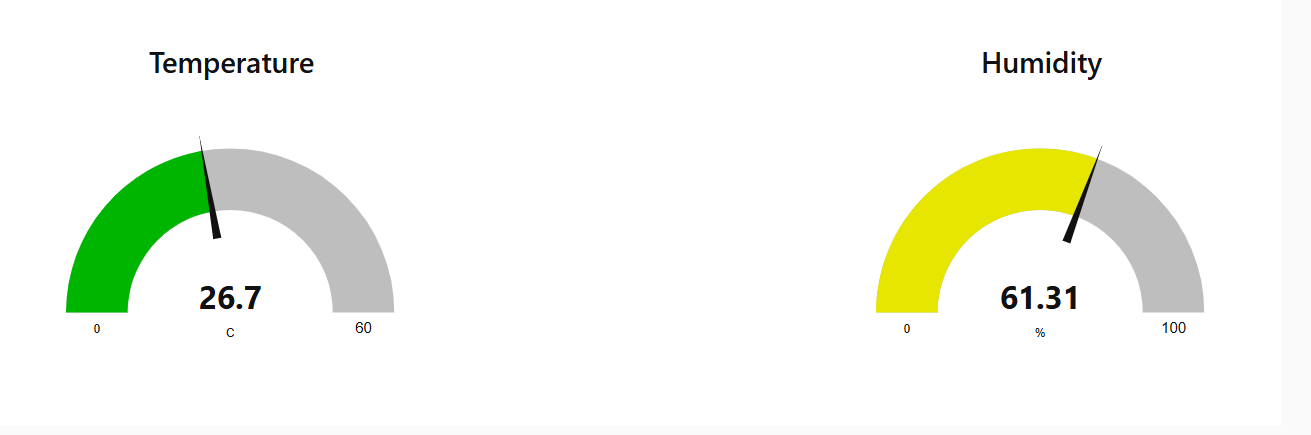
Connect two output nodes from the Function node, one for temperature and one for humidity
-
Connect each output to a Gauge node or any other visualization node in Node-RED to display the sensor readings
Tech Support & Product Discussion
Thank you for choosing our products! We are here to provide you with different support to ensure that your experience with our products is as smooth as possible. We offer several communication channels to cater to different preferences and needs.