Arduino 软件 I2C 用户指南
Arduino 的标准 I2C 库是 Wire 库。虽然这个库在大多数情况下都足够使用,但在某些情况下无法使用:
- I2C 引脚 A4/A5(或 SDA/SCL)已被用于其他用途
- 使用了相同 I2C 地址的设备
因此我们编写了 SoftwareI2C 库来使用数字端口和模拟端口,使多个相同 I2C 地址的设备能够在 Arduino 上工作。
Arduino I2C 扫描器
I2C 扫描器是一个简单的程序,用于扫描 I2C 总线上的设备。您可以将代码上传到 Arduino 来找出模块的 I2C 地址。上传以下程序并打开串口监视器查看结果:
#include <Wire.h>

void setup()
{
    Wire.begin();

    Serial.begin(9600);
    while (!Serial); // Wait for serial monitor
    Serial.println("---I2C Scanner---");
}

void loop()
{
    byte error, address;
    int nDevices;

    Serial.println("Scanning...");

    nDevices = 0;
    for(address = 1; address < 127; address++ )
    {
        Wire.beginTransmission(address);
        error = Wire.endTransmission();

        Wire.beginTransmission(address+1);

    if (error == 0 && Wire.endTransmission() != 0 ) // Special flag for SAMD Series
    {
        Serial.print("I2C device found at address 0x");
        if (address<16)
            Serial.print("0");
        Serial.print(address,HEX);
        Serial.println("!");

        nDevices++;
    }
    else if (error==4)
    {
        Serial.print("Unknown error at address 0x");
        if (address<16)
            Serial.print("0");
        Serial.println(address,HEX);
    }
    }
    if (nDevices == 0)
        Serial.println("No I2C devices found\n");
    else
        Serial.println("done\n");

    delay(5000);           // wait 5 seconds for next scan
}
安装 SoftwareI2C 库
- 请按照如何安装 Arduino 库的步骤来安装库。
- 我们提供了一个 SoftwareI2C 的 Arduino 库,点击这里下载。
示例#1:扫描 I2C 设备地址
连接
这里我们将通过一个简单的演示来展示它是如何工作的。首先,您需要准备以下物品:
| Seeeduino V4.2 | Grove - OLED 显示屏 1.12" | Base Shield |
|---|---|---|
 |  |  |
| 立即购买 | 立即购买 | 立即购买 |
这是一个易于使用的模块,您需要做的就是将模块连接到 Base Shield 的 D2 端口。

如果您没有底板,请按照以下连接方式。
| Arduino 引脚 | OLED 引脚 |
|---|---|
| 数字引脚 3 | SDA |
| 数字引脚 2 | SCL |
| VCC | VCC |
| GND | GND |
软件
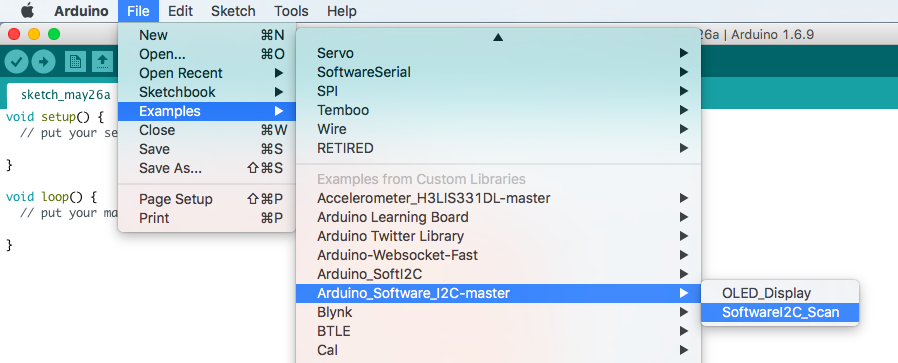
- 通过路径直接打开代码:文件 -> 示例 ->Arduino_Software_I2C-master->SoftwareI2C_Scan。

#include "SoftwareI2C.h"

SoftwareI2C softwarei2c;

void setup()
{
    Serial.begin(115200);
    softwarei2c.begin(3, 2);       // sda, scl
    Serial.println("begin to scan...");
}

void loop()
{
    for(unsigned char i=1; i<=127; i++)
    {
        if(softwarei2c.beginTransmission(i))
        {
            Serial.print("0x");
            Serial.println(i, HEX);

            while(1);
        }
        softwarei2c.endTransmission();
    }

    Serial.println("find nothing");
    while(1);

}
- 将代码上传到 Arduino。
- 请将串口波特率配置为 115200。
- 我们可以从串口监视器中看到 I2C 地址。
示例#2:在2个Grove - OLED显示屏1.12上显示不同信息
连接
这里我们将通过一个简单的演示向您展示其工作原理。首先,您需要准备以下物品:
| Seeeduino V4 | Grove - OLED显示屏1.12`` | Base Shield |
|---|---|---|
 |  |  |
| 立即获取 | 立即获取 | 立即获取 |
- 将一个Grove - OLED显示屏1.12连接到D2端口,另一个连接到D4端口。

软件
-
点击这里下载Grove-OLED-Display-1.12库。
-
将SeeedGrayOLED.cpp和SeeedGrayOLED.h复制到Arduino_Software_I2C-master文件夹
-
编辑SeeedGrayOLED.cpp
- 步骤1:将库从Wire.h更改为SoftwareI2C.h
从
#include "Wire.h"
改为
#include <SoftwareI2C.h>
- 步骤2:添加initSoftwareI2C函数,我们必须为不同的产品更改类名。
void SeeedGrayOLED::initSoftwareI2C(SoftwareI2C *w, int __sda, int __scl)
{
    Wire = w;
    Wire->begin(__sda, __scl);
}
- 步骤3:将所有
Wire.替换为Wire->。例如,将Wire.endTransmission()更改为Wire->endTransmission()。
从
Wire.endTransmission();
改为
Wire->endTransmission();
-
编辑SeeedGrayOLED.h
- 步骤1:将库
Wire.h更改为SoftwareI2C.h
- 步骤1:将库
从
#include "Wire.h"
改为
#include <SoftwareI2C.h>
- 步骤2:将initSoftwareI2C函数添加到public类中
void initSoftwareI2C(SoftwareI2C *w, int __sda, int __scl);
- 步骤3:将SoftwareI2C *Wire添加到private类中
SoftwareI2C *Wire;
- 通过路径直接打开代码:文件 -> 示例 ->Arduino_Software_I2C-master->OLED_Display。

- 我们必须定义SoftwareI2C对象以及SeeedGrayOLED对象。
//定义2个SoftwareI2C对象
#include "SoftwareI2C.h"
SoftwareI2C WireS1;
SoftwareI2C WireS2;

//定义2个SeeedGrayOLED对象
#include "SeeedGrayOLED.h"
#include <avr/pgmspace.h>
SeeedGrayOLED SeeedGrayOled1;
SeeedGrayOLED SeeedGrayOled2;
- 在设置期间我们使用initSoftwareI2C而不是Wire.begin。
SeeedGrayOled1.initSoftwareI2C(&WireS1, 3, 2); // initSoftwareI2C, sda, scl
//定义2个SoftwareI2C对象
#include "SoftwareI2C.h"
SoftwareI2C WireS1;
SoftwareI2C WireS2;

//定义2个SeeedGrayOLED对象
#include "SeeedGrayOLED.h"
#include <avr/pgmspace.h>
SeeedGrayOLED SeeedGrayOled1;
SeeedGrayOLED SeeedGrayOled2;


void setup()
{
  SeeedGrayOled1.initSoftwareI2C(&WireS1, 3, 2);     // initSoftwareI2C, sda, scl

  SeeedGrayOled1.init(SSD1327);
  SeeedGrayOled1.clearDisplay();     //清除显示。
  SeeedGrayOled1.setNormalDisplay(); //设置正常显示模式
  SeeedGrayOled1.setVerticalMode();  // 设置为垂直模式以显示文本


  for(char i=0; i < 12 ; i++)
  {
  SeeedGrayOled1.setTextXY(i,0);  //将光标设置到第i行,第0列
  SeeedGrayOled1.setGrayLevel(i); //设置灰度级别。0-15之间的任何数字。
  SeeedGrayOled1.putString("11111111"); //打印11111111
  }


  SeeedGrayOled2.initSoftwareI2C(&WireS2, 5, 4);     // initSoftwareI2C, sda, scl

  SeeedGrayOled2.init(SSD1327);             //初始化SEEED OLED显示屏
  SeeedGrayOled2.clearDisplay();     //清除显示。
  SeeedGrayOled2.setNormalDisplay(); //设置正常显示模式
  SeeedGrayOled2.setVerticalMode();  // 设置为垂直模式以显示文本

  for(char i=0; i < 12 ; i++)
  {
  SeeedGrayOled2.setTextXY(i,0);  //将光标设置到第i行,第0列
  SeeedGrayOled2.setGrayLevel(i); //设置灰度级别。0-15之间的任何数字。
  SeeedGrayOled2.putString("00000000"); //打印00000000
  }
}

  void loop()
  {

  }
- 上传到Sketch。
- 我们将看到一个屏幕上显示11111111,而另一个屏幕上显示00000000。
库的 API
- begin() 函数:必须首先调用 SoftwareI2C.begin() 来启动使用 SoftwareI2C 库的任何软件 I2C 通信。
SoftwareI2C::begin(int Sda, int Scl)
- beginTransmission 函数:当 ATmega 作为 I2C 主机时使用。设置 SoftwareI2C 库中的内部变量,为向给定地址传输做准备。
SoftwareI2C.beginTransmission(uchar addr)
- endTransmission() 函数:结束向给定地址的传输。
SoftwareI2C.endTransmission()
- write 函数:用参数列表中的数据填充发送数据缓冲区。有 2 个函数。一个是发送一个字节,另一个是数组。
SoftwareI2C.write(uchar dta)
SoftwareI2C::write(uchar len, uchar *dta)
- read 函数:返回接收缓冲区中的字节。
SoftwareI2C.read()
参考资料
技术支持与产品讨论
感谢您选择我们的产品!我们在这里为您提供不同的支持,以确保您使用我们产品的体验尽可能顺畅。我们提供多种沟通渠道,以满足不同的偏好和需求。