XIAO ePaper Display Board(ESP32-S3) - EE04 ePaper Display 与 ESPHome 配合使用
什么是 ESPHome?
ESPHome 是一个开源固件框架,简化了为流行的支持 WiFi 的微控制器创建自定义固件的过程。使用 ESPHome,您可以:
- 使用简单的 YAML 配置文件创建自定义智能家居设备
- 与 Home Assistant 无缝集成,获得统一的智能家居体验
- 通过多种接口(网页、API、MQTT)控制和监控您的设备
- 使用强大的设备端自动化功能自动化您的家居
- 无需物理访问即可通过"空中升级"(OTA)更新无线更新您的设备
入门指南
硬件概述

Home Assistant Green 是自动化您家居的最简单且最注重隐私的方式。它提供轻松的设置,让您只需一个系统就能控制所有智能设备,默认情况下所有数据都存储在本地。该板受益于蓬勃发展的 Home Assistant 生态系统,并将通过开源每月得到改进。
我们还为一些 Seeed Studio 产品编写了如何安装 Home Assistant 的指南,请参考它们。
如果您没有使用 Seeed Studio 产品,您也可以在官方 Home Assistant 网站上查看并学习如何为其他产品安装 Home Assistant。
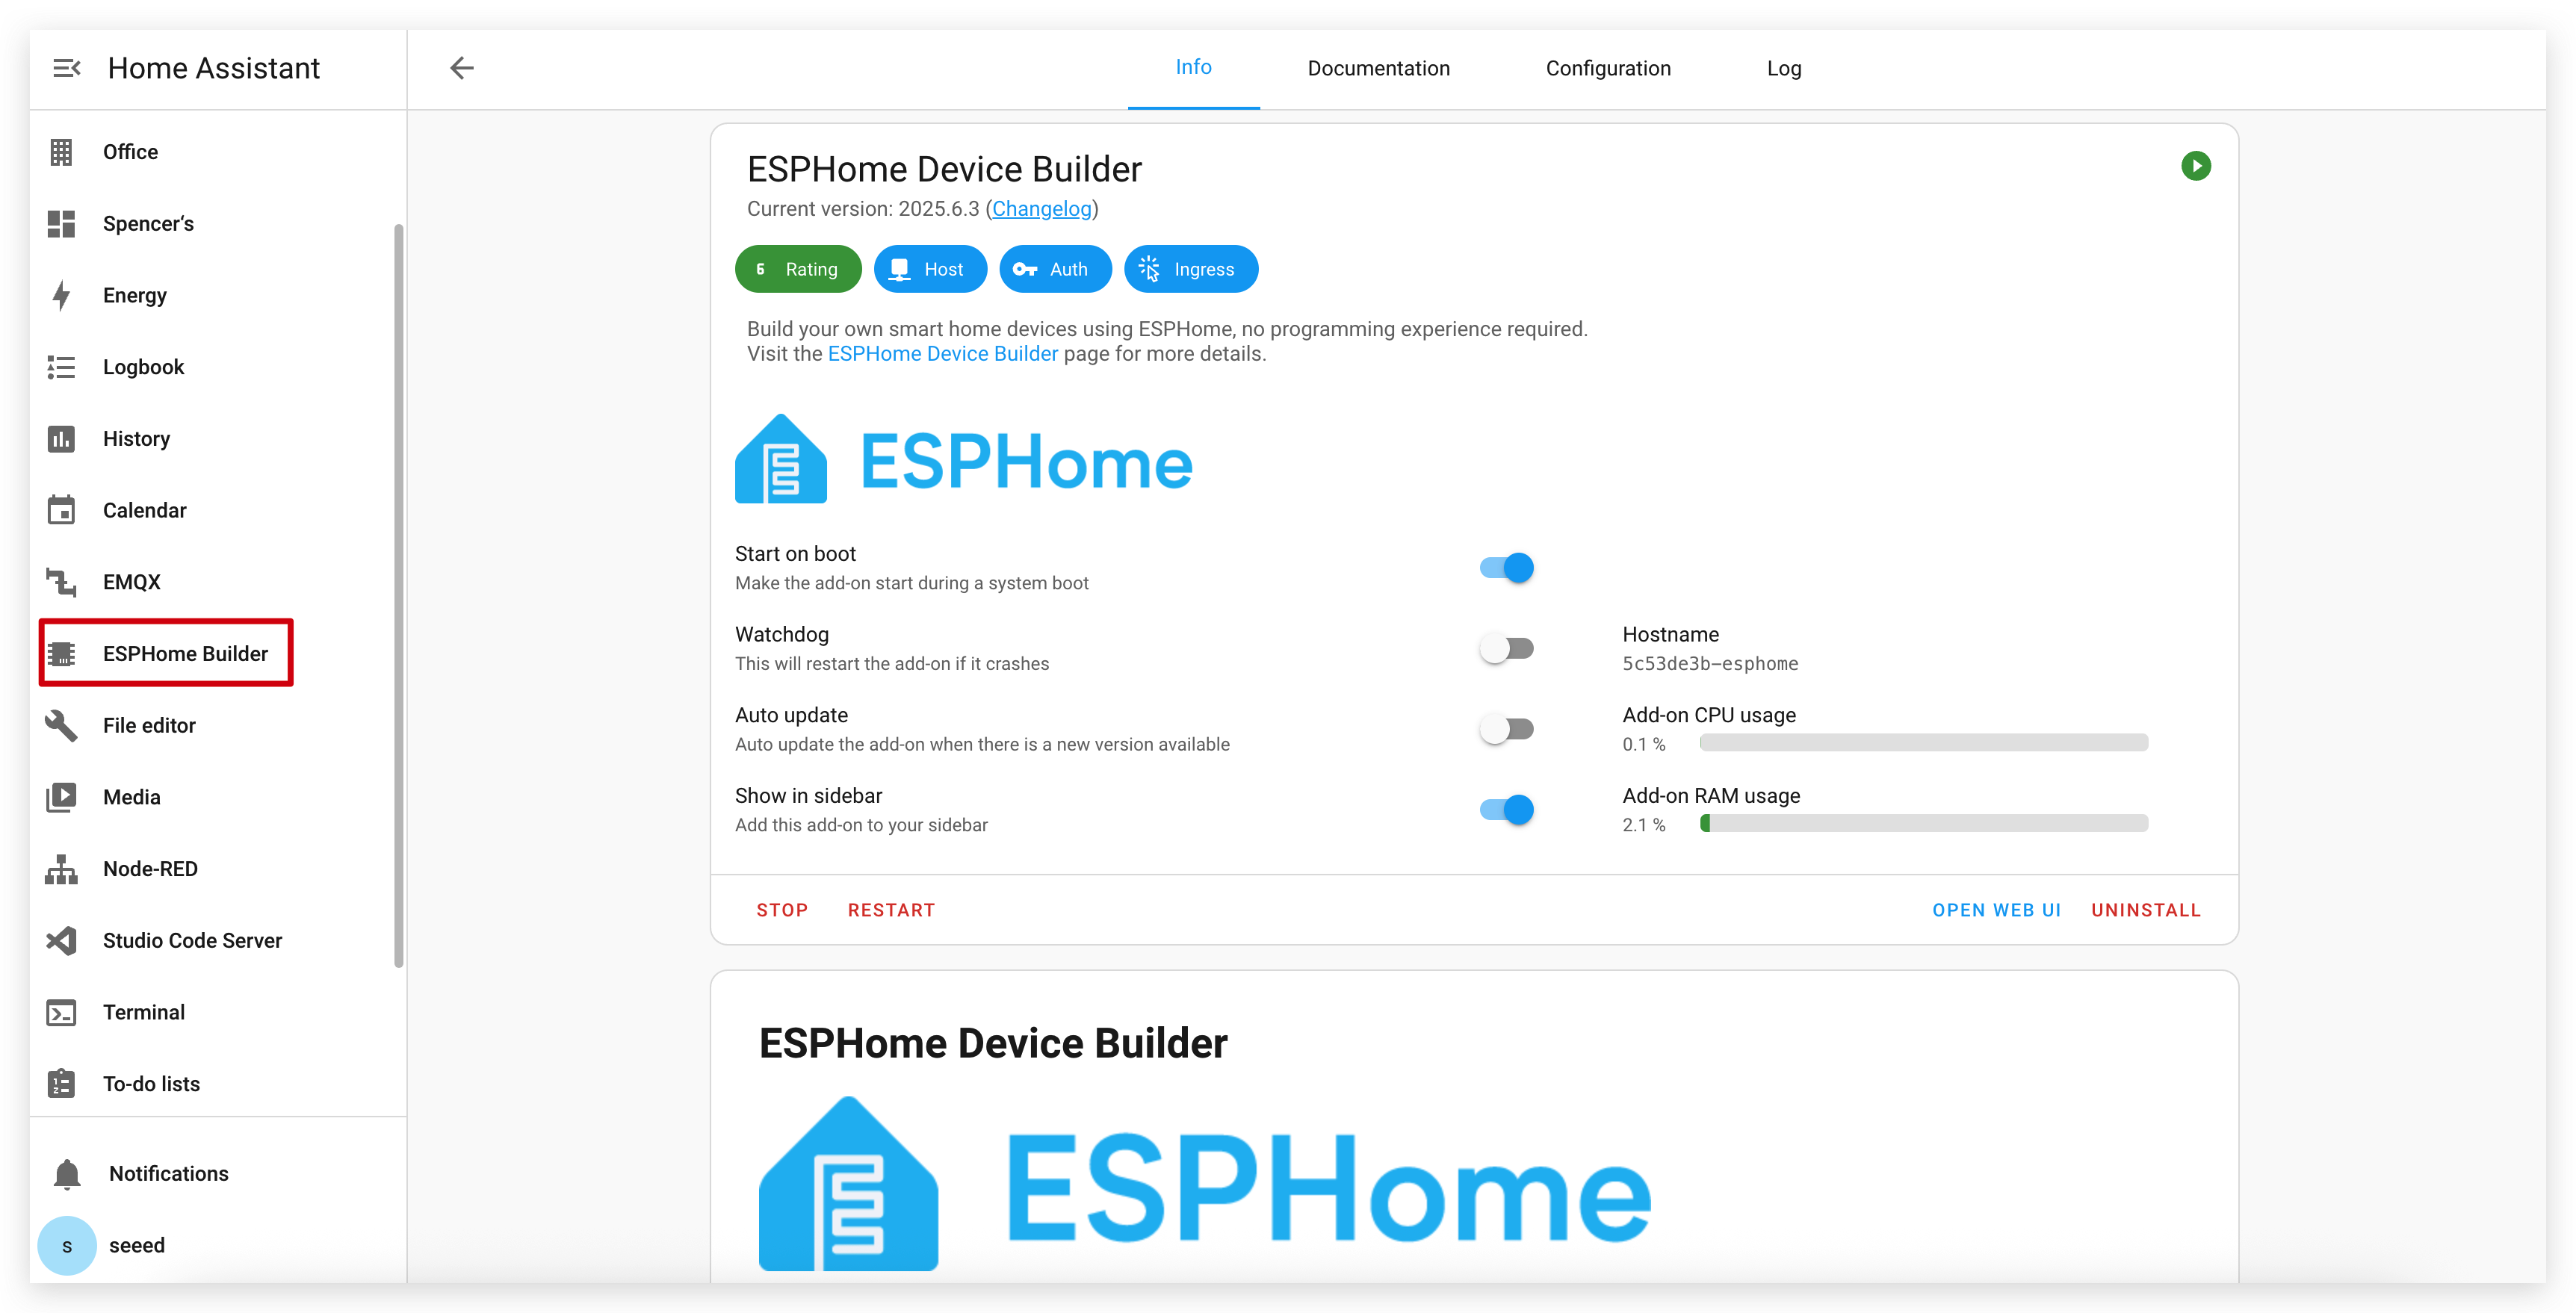
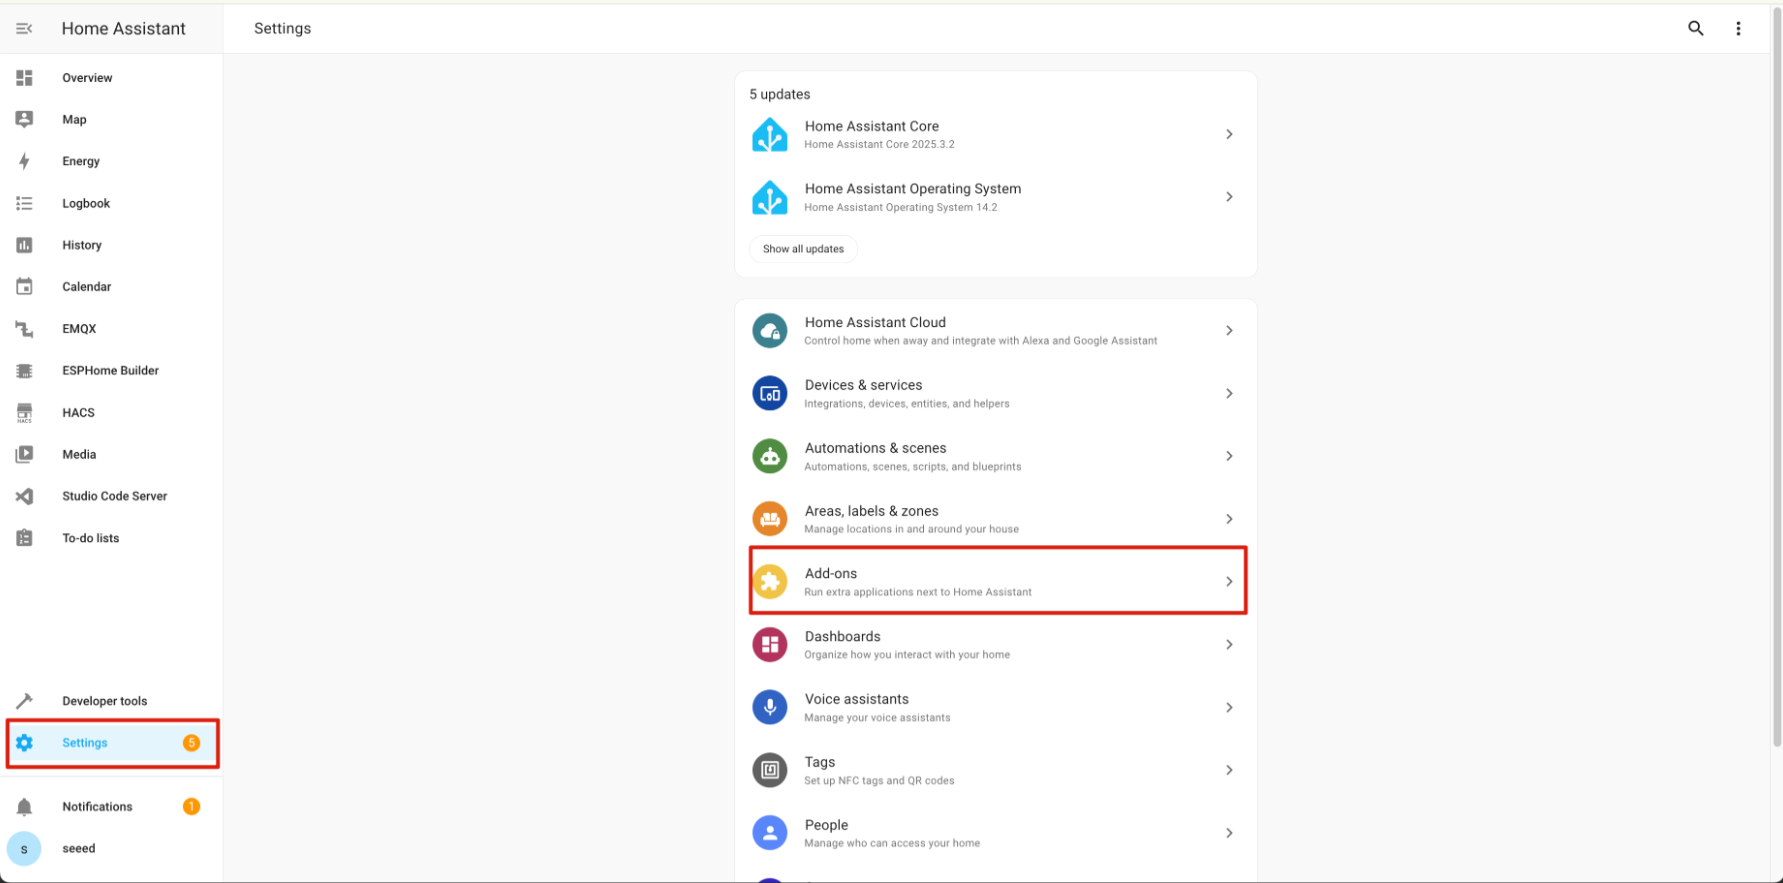
步骤 1. 安装 ESPHome
转到 Settings -> Add-ons -> ADD-ON STORE

输入搜索词 ESPHome。
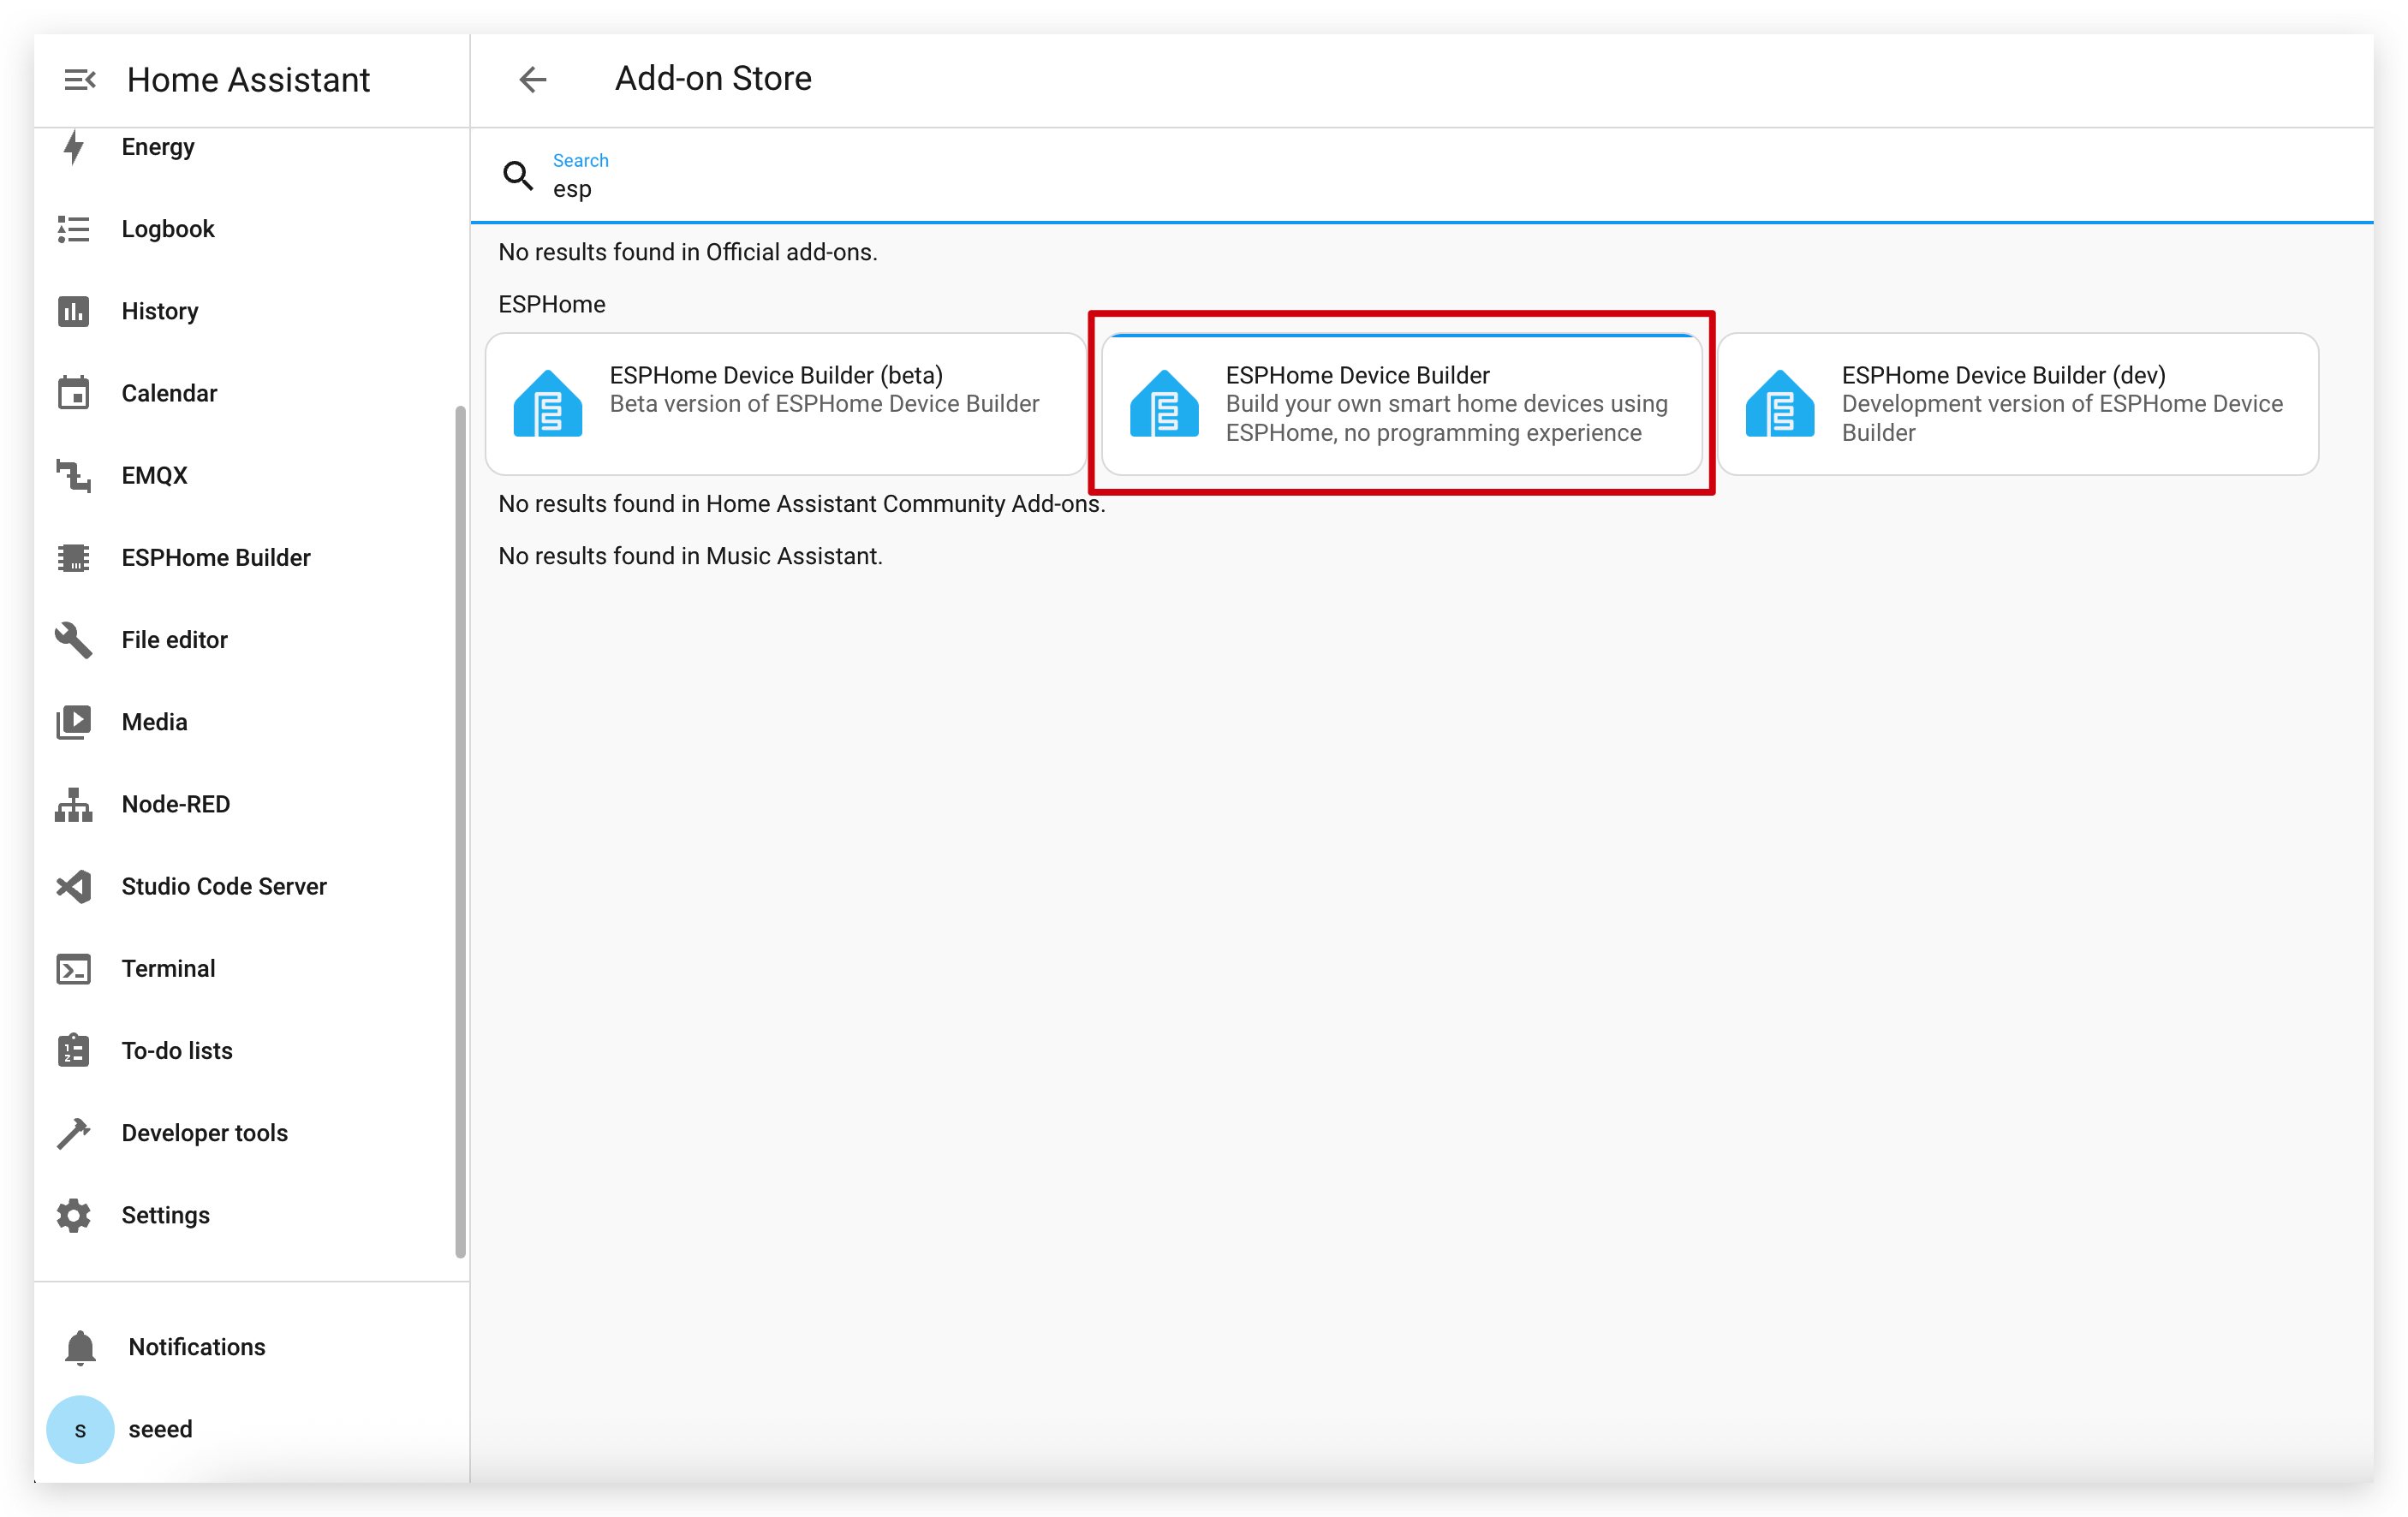
点击 INSTALL 和 START。
如果您在附加组件商店中找不到 ESPHome,请确保您使用的是支持附加组件的 Home Assistant 安装(如 Home Assistant OS 或监督安装)。对于其他安装类型(如 Home Assistant Container),您可能需要使用 Docker 独立运行 ESPHome Device Builder。有关更多详细信息,请参阅 官方 ESPHome 文档。
步骤 2. 添加新设备
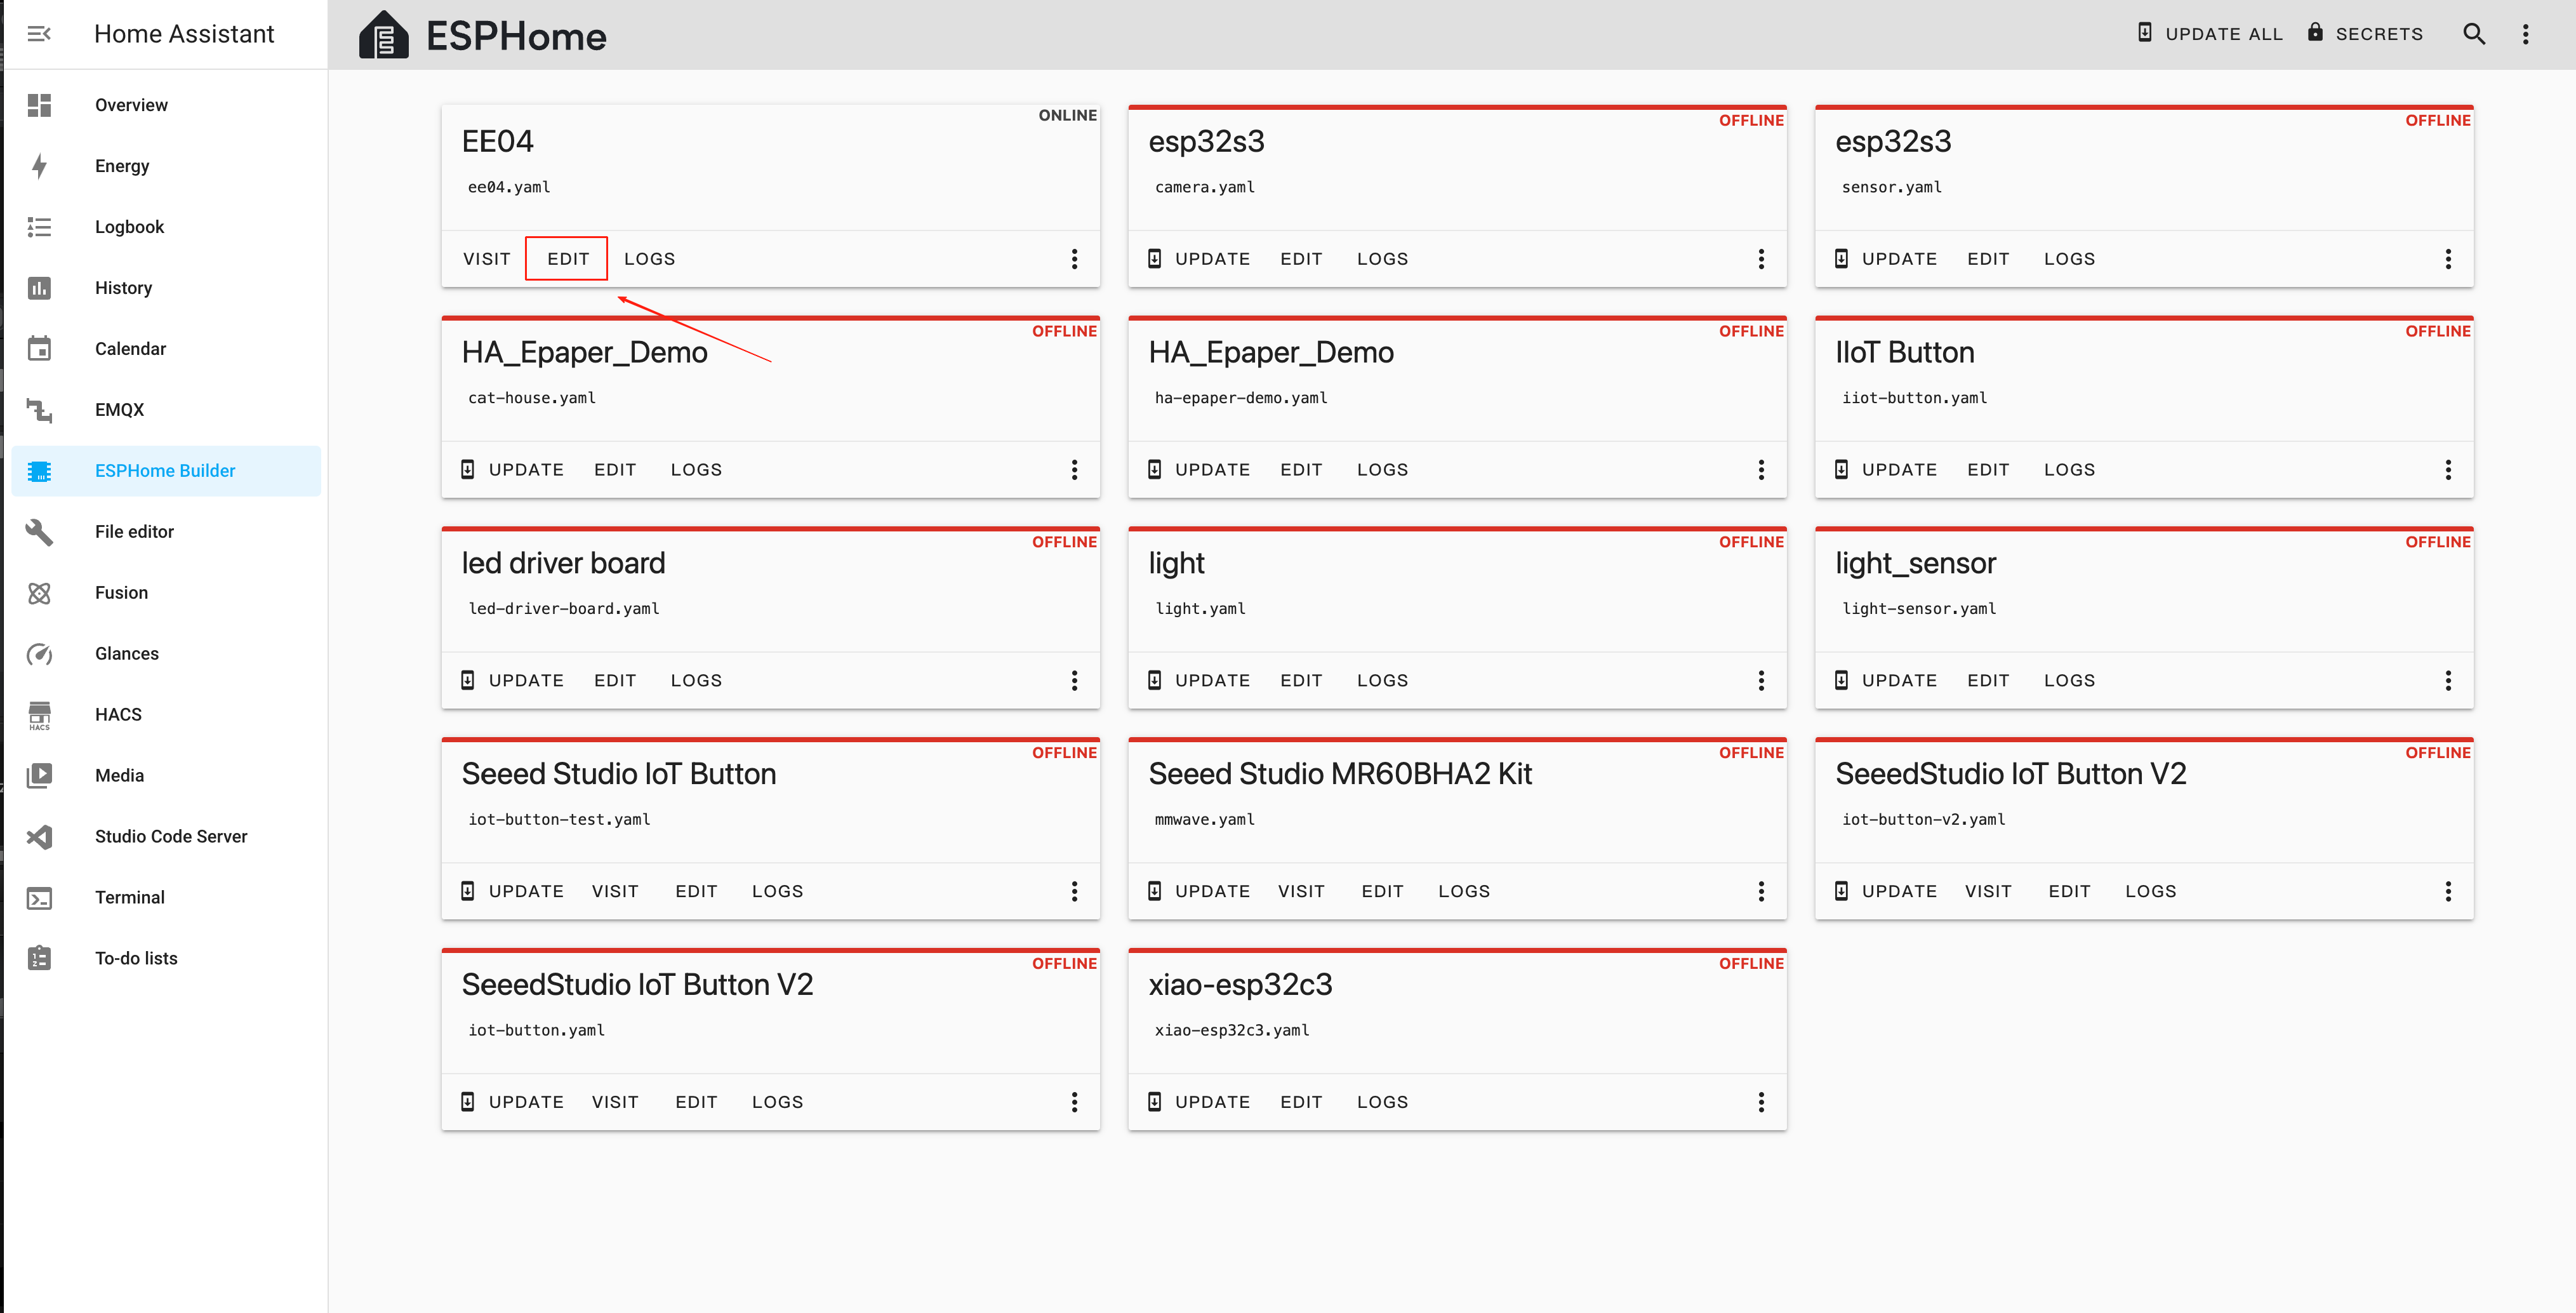
转到 ESPHome 并点击 NEW DEVICE。
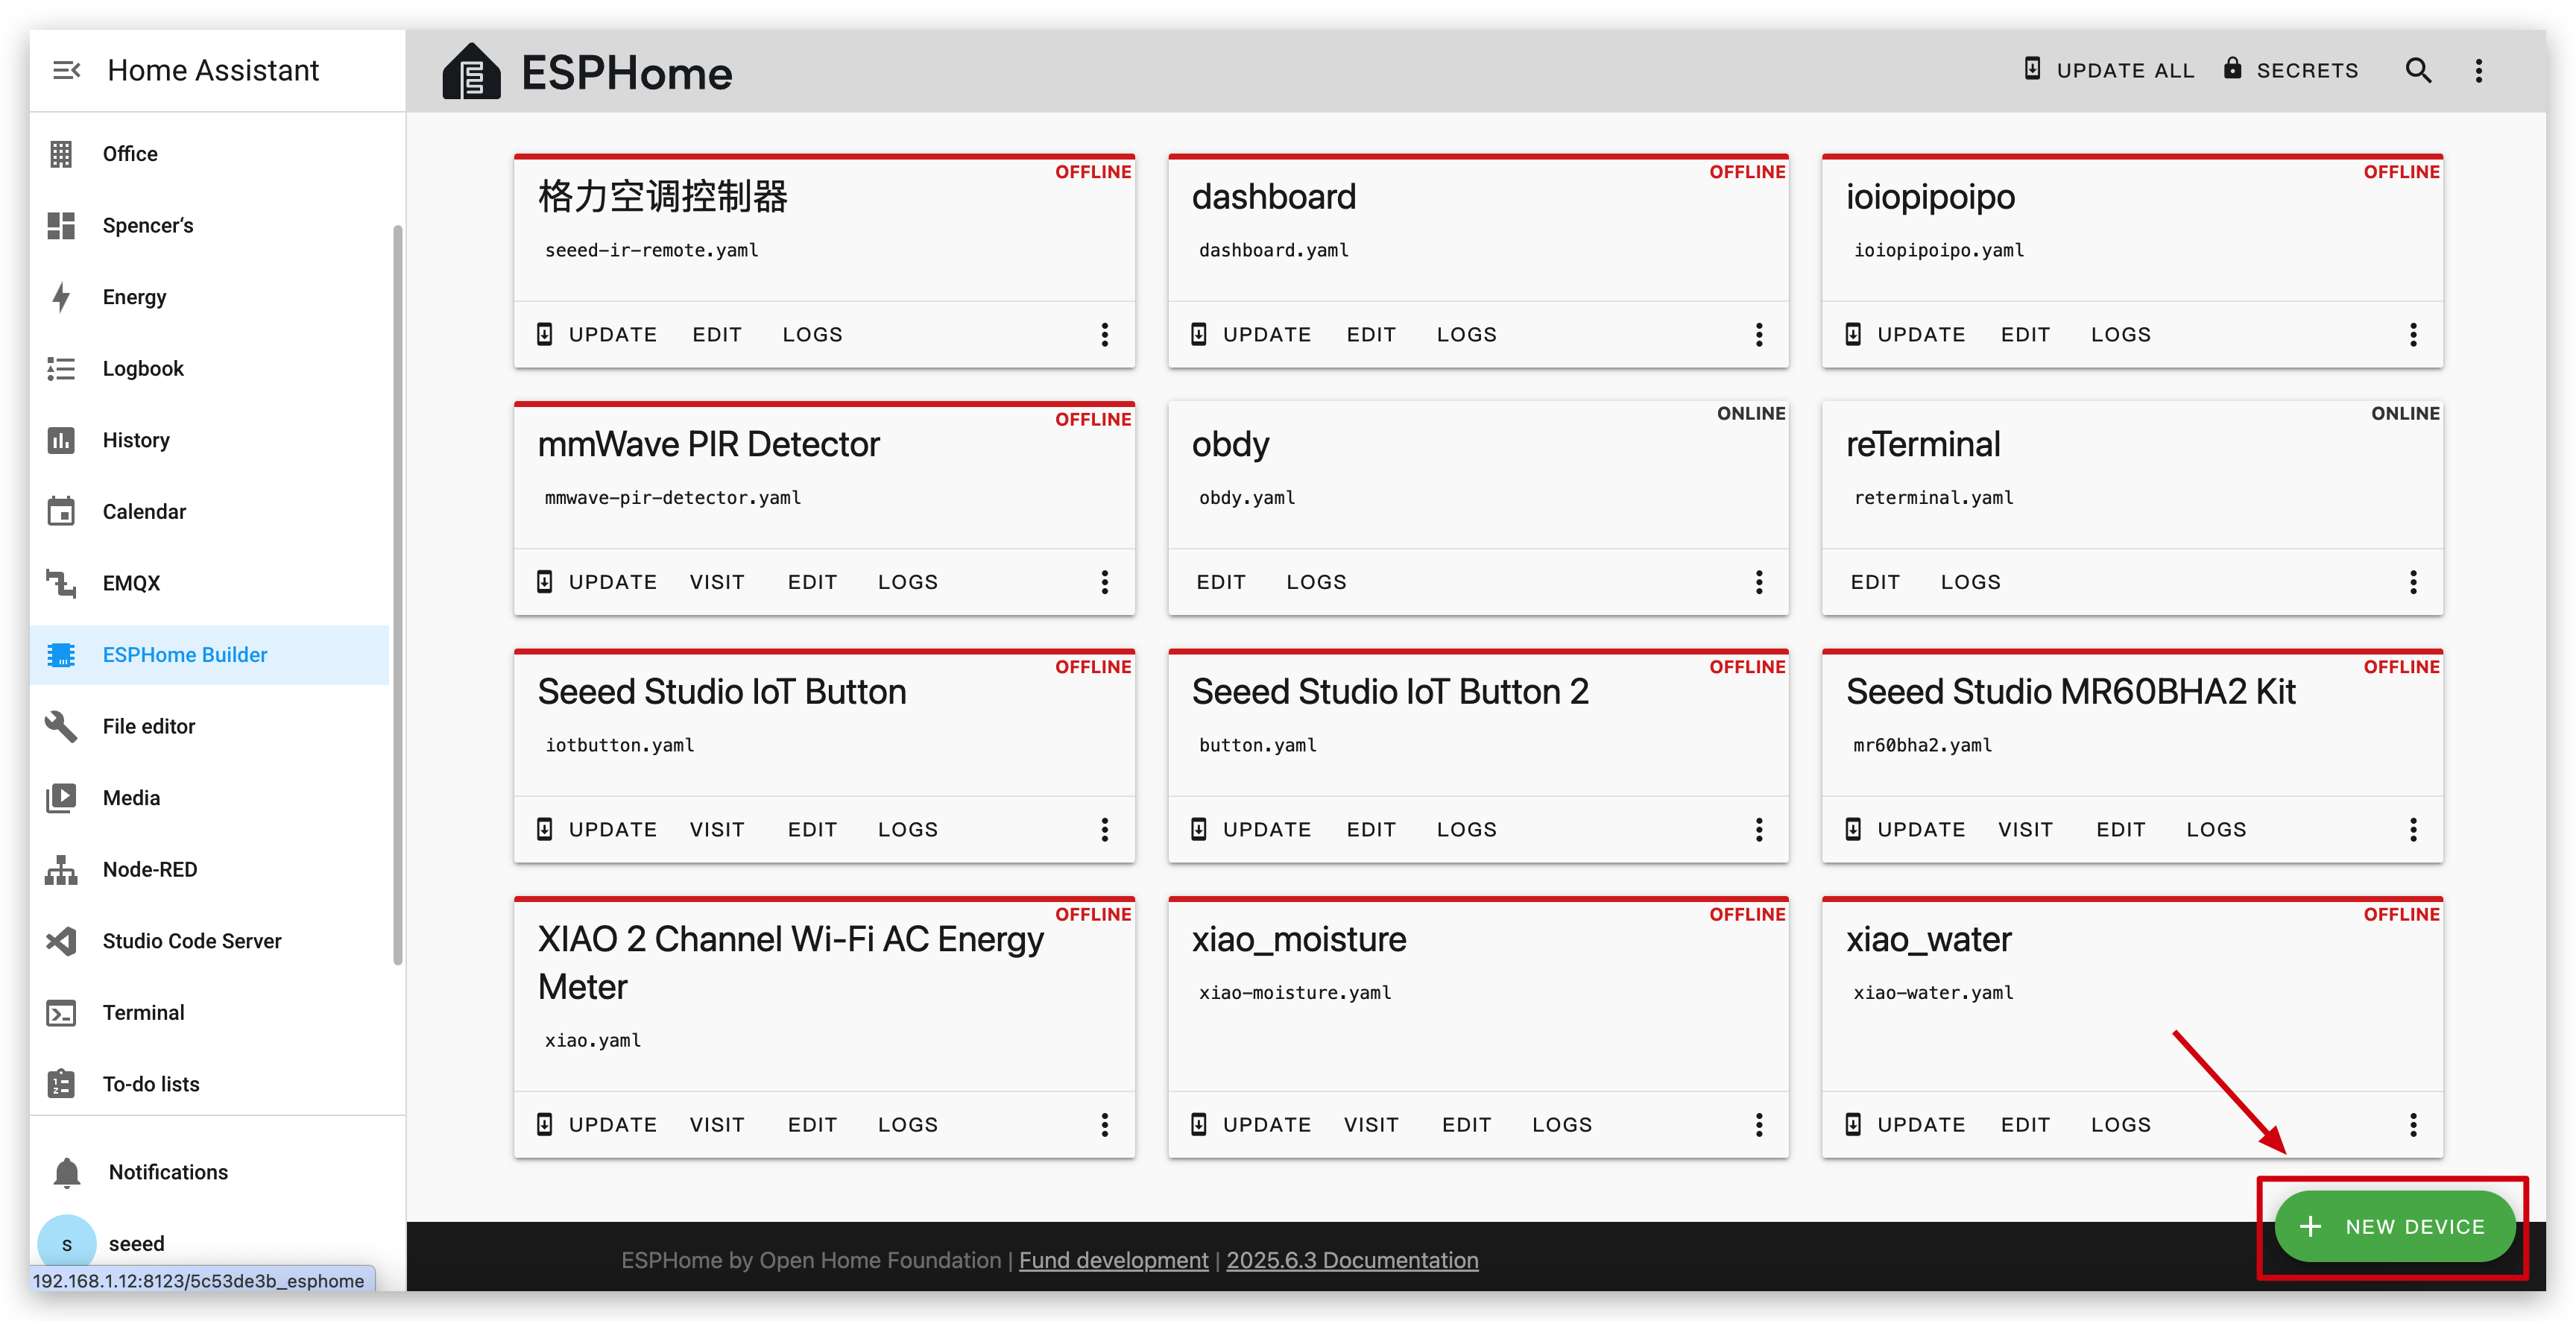
为 XIAO ePaper Display Board(ESP32-S3) - EE04 起一个您喜欢的名称,选择 ESP32-S3 作为芯片类型,然后点击 SKIP。
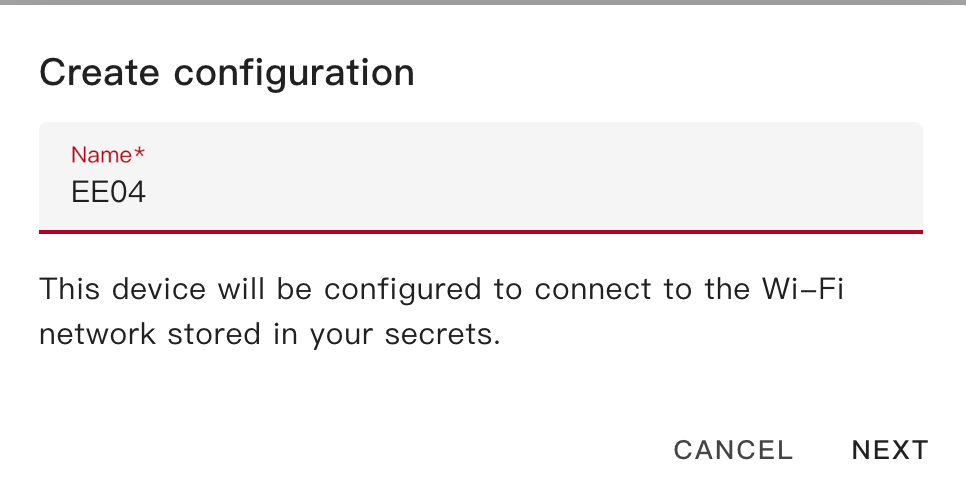
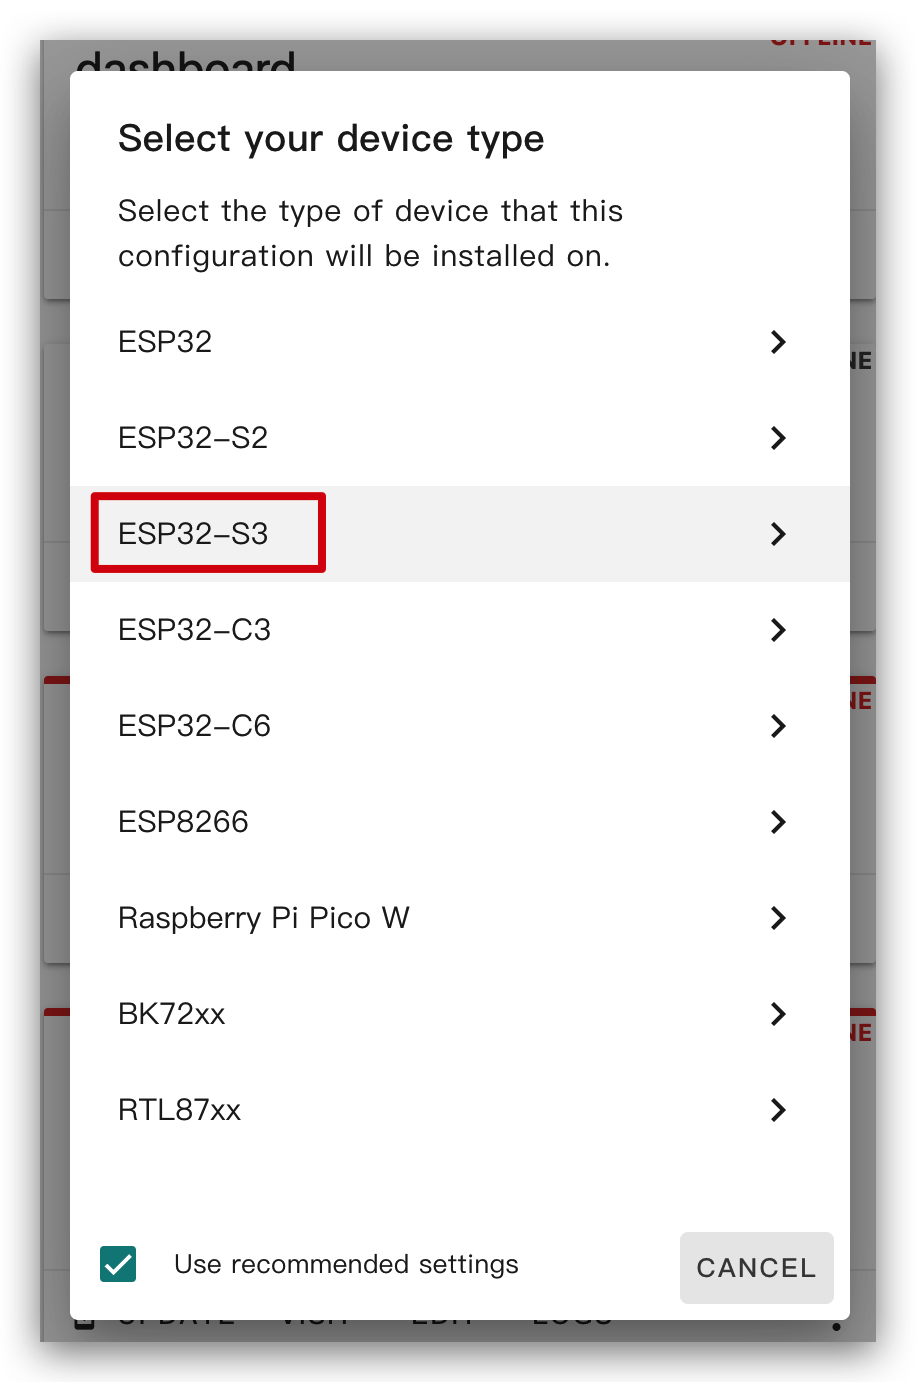
创建新设备后,点击 EDIT。
步骤 3. 安装固件
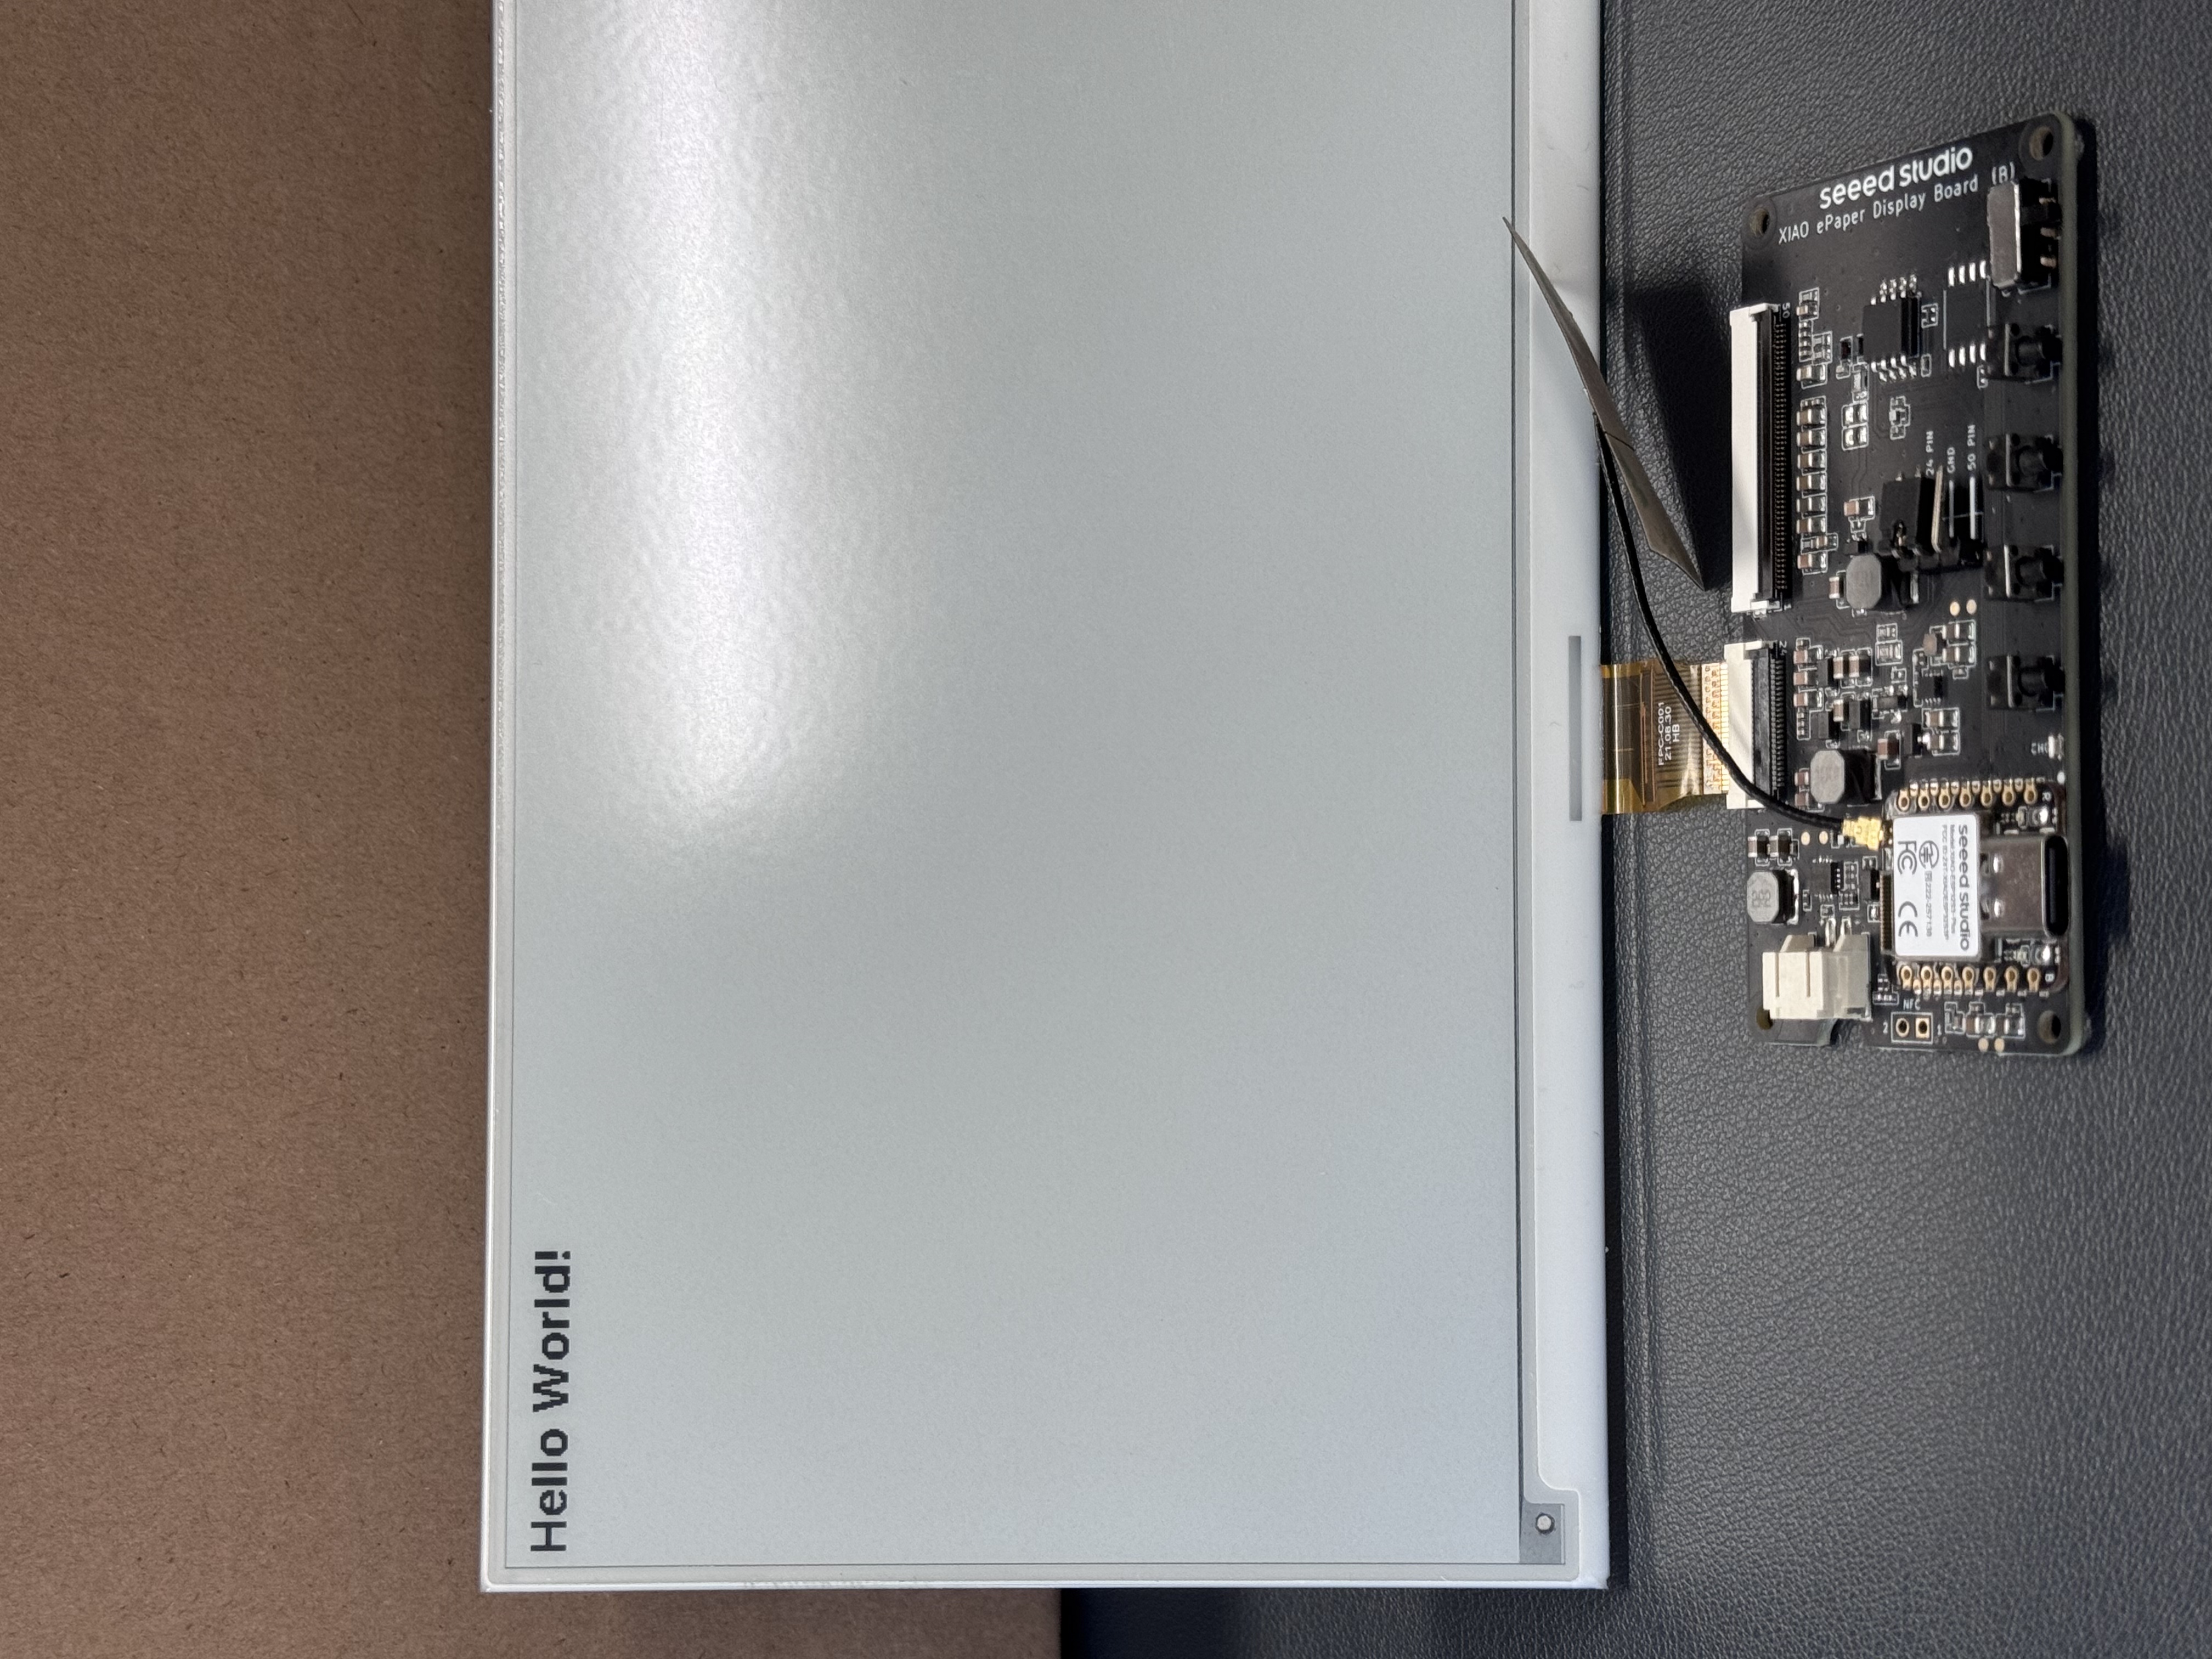
这是一个基本示例,将在显示屏上显示"Hello World!"。
主要目的是向您展示将固件安装到设备的不同方法。
您可以通过复制下面的代码并将其粘贴到 YAML 文件中的 captive_portal 代码行之后来使用此示例。
- 由于以下例程在下载固件之前需要字体,请点击此链接完成配置。
ssid:、password:这里您需要添加网络名称和密码。- 四色 2.13 和 四色 2.9 使用外部库,因此在 ESPHome 中使用的
board名称有所不同。
以下是 24 针连接器屏幕类型:
- 1.54 英寸单色
- 2.13 英寸单色
- 2.13 英寸四色
- 2.9 英寸单色
- 2.9 英寸四色
- 4.2 英寸单色
- 5.83 英寸单色
- 7.5 英寸单色
esphome:
  name: ee04
  friendly_name: EE04

esp32:
  board: esp32-s3-devkitc-1
  framework:
    type: esp-idf

# Enable logging
logger:

# Enable Home Assistant API
api:
  encryption:
    key: "b0AIbJ+kbeMayi1PgSGXtiD1yQCapUBF4A/7v7btys0="

ota:
  - platform: esphome
    password: "5d7cca6f4b3f38aba559ab0d6aaf5926"

wifi:
  ssid:
  password:

  # Enable fallback hotspot (captive portal) in case wifi connection fails
  ap:
    ssid: "Ee04 Fallback Hotspot"
    password: "zxPMBtCEWonm"

# define font to display words
font:
  - file: "gfonts://Inter@700"
    id: myFont
    size: 24

captive_portal:

# define SPI interface
spi:
  clk_pin: GPIO7
  mosi_pin: GPIO9

display:
  - platform: waveshare_epaper
    id: epaper_display
    model: 1.54inv2
    cs_pin: GPIO44
    dc_pin: GPIO10
    busy_pin: GPIO4
    reset_pin:  GPIO38
    rotation: 0
    update_interval: 300s
    lambda: |-
      it.print(0, 0, id(myFont), "Hello World!");
esphome:
  name: ee04
  friendly_name: EE04

esp32:
  board: esp32-s3-devkitc-1
  framework:
    type: esp-idf

# Enable logging
logger:

# Enable Home Assistant API
api:
  encryption:
    key: "b0AIbJ+kbeMayi1PgSGXtiD1yQCapUBF4A/7v7btys0="

ota:
  - platform: esphome
    password: "5d7cca6f4b3f38aba559ab0d6aaf5926"

wifi:
  ssid:
  password:

  # Enable fallback hotspot (captive portal) in case wifi connection fails
  ap:
    ssid: "Ee04 Fallback Hotspot"
    password: "zxPMBtCEWonm"

# define font to display words
font:
  - file: "gfonts://Inter@700"
    id: myFont
    size: 24

captive_portal:

# define SPI interface
spi:
  clk_pin: GPIO7
  mosi_pin: GPIO9

display:
  - platform: waveshare_epaper
    id: epaper_display
    model: 2.13inv2 #More models you can refer to here: https://esphome.io/components/display/waveshare_epaper/
    cs_pin: GPIO44
    dc_pin: GPIO10
    busy_pin: GPIO4
    reset_pin:  GPIO38
    rotation: 0
    update_interval: 300s
    lambda: |-
      it.print(0, 0, id(myFont), "Hello World!");
esphome:
  name: ee04
  friendly_name: EE04
  libraries:
    - SPI


esp32:
  board: esp32-s3-devkitc-1
  framework:
    type: arduino


# Enable logging
logger:

# Enable Home Assistant API
api:
  encryption:
    key: "eg2Jyse0gE146lJ2mVaqAnwteb4U2GJ7d1sZc2BOOsc="

ota:
  - platform: esphome
    password: "e2f184b95aac832509885f676abf5b73"

wifi:
  ssid:
  password:

  # Enable fallback hotspot (captive portal) in case wifi connection fails
  ap:
    ssid: "ESPHome_Epaper"
    password: "123456789"

external_components:
  - source: github://xcjk-tofuture/esphome@dev
    components: [ waveshare_epaper ]

font:
  - file: "gfonts://Inter@700"
    id: font1
    size: 24

captive_portal:

spi:
  clk_pin: GPIO7
  mosi_pin: GPIO9

display:
  - platform: waveshare_epaper
    id: my_display
    model: gdey0213f51
    cs_pin: GPIO44
    dc_pin: GPIO10
    busy_pin: GPIO4
    reset_pin:  GPIO38
    rotation: 90
    update_interval: 30s
    full_update_every: 1
    lambda: |-
      const auto BLACK   = Color(0,   0,   0,   0);
      const auto RED     = Color(255, 0,   0,   0);
      const auto YELLOW  = Color(255, 255, 0,   0);
      const auto WHITE   = Color(255, 255, 255, 0);

      it.fill(YELLOW);
      it.print(0, 0, id(font1), BLACK, "Hello World in BLACK!");
      it.print(0, 30, id(font1), RED, "Hello World in RED!");
      it.print(0, 60, id(font1), YELLOW, "Hello World in YELLOW!");
esphome:
  name: ee04
  friendly_name: EE04

esp32:
  board: esp32-s3-devkitc-1
  framework:
    type: esp-idf

# Enable logging
logger:

# Enable Home Assistant API
api:
  encryption:
    key: "b0AIbJ+kbeMayi1PgSGXtiD1yQCapUBF4A/7v7btys0="

ota:
  - platform: esphome
    password: "5d7cca6f4b3f38aba559ab0d6aaf5926"

wifi:
  ssid:
  password:

  # Enable fallback hotspot (captive portal) in case wifi connection fails
  ap:
    ssid: "Ee04 Fallback Hotspot"
    password: "zxPMBtCEWonm"

# define font to display words
font:
  - file: "gfonts://Inter@700"
    id: myFont
    size: 24

captive_portal:

# define SPI interface
spi:
  clk_pin: GPIO7
  mosi_pin: GPIO9

display:
  - platform: waveshare_epaper
    id: epaper_display
    model: 2.90inv2
    cs_pin: GPIO44
    dc_pin: GPIO10
    busy_pin: GPIO4
    reset_pin:  GPIO38
    rotation: 0
    update_interval: 300s
    lambda: |-
      it.print(0, 0, id(myFont), "Hello World!");
esphome:
  name: ee04
  friendly_name: EE04
  libraries:
    - SPI


esp32:
  board: esp32-s3-devkitc-1
  framework:
    type: arduino


# Enable logging
logger:

# Enable Home Assistant API
api:
  encryption:
    key: "eg2Jyse0gE146lJ2mVaqAnwteb4U2GJ7d1sZc2BOOsc="

ota:
  - platform: esphome
    password: "e2f184b95aac832509885f676abf5b73"

wifi:
  ssid:
  password:

  # Enable fallback hotspot (captive portal) in case wifi connection fails
  ap:
    ssid: "ESPHome_Epaper"
    password: "123456789"

external_components:
  - source: github://xcjk-tofuture/esphome@dev
    components: [ waveshare_epaper ]


# external_components:
#   - source:
#       type: local
#       path: components_epaper
#     components : [waveshare_epaper]

font:
  - file: "gfonts://Inter@700"
    id: font1
    size: 24

captive_portal:

spi:
  clk_pin: GPIO7
  mosi_pin: GPIO9
display:
  - platform: waveshare_epaper
    id: my_display
    model: gdey029f51h
    cs_pin: GPIO44
    dc_pin: GPIO10
    busy_pin: GPIO4
    reset_pin:  GPIO38
    rotation: 90
    update_interval: 30s
    full_update_every: 1
    lambda: |-
      const auto BLACK   = Color(0,   0,   0,   0);
      const auto RED     = Color(255, 0,   0,   0);
      const auto YELLOW  = Color(255, 255, 0,   0);
      const auto WHITE   = Color(255, 255, 255, 0);

      it.print(0, 0, id(font1), BLACK, "Hello World in BLACK!");
      it.print(0, 30, id(font1), RED, "Hello World in RED!");
      it.print(0, 60, id(font1), YELLOW, "Hello World in YELLOW!");
      ESP_LOGD("epaper", "reflash......");
esphome:
  name: ee04
  friendly_name: EE04

esp32:
  board: esp32-s3-devkitc-1
  framework:
    type: esp-idf

# Enable logging
logger:

# Enable Home Assistant API
api:
  encryption:
    key: "b0AIbJ+kbeMayi1PgSGXtiD1yQCapUBF4A/7v7btys0="

ota:
  - platform: esphome
    password: "5d7cca6f4b3f38aba559ab0d6aaf5926"

wifi:
  ssid:
  password:

  # Enable fallback hotspot (captive portal) in case wifi connection fails
  ap:
    ssid: "Ee04 Fallback Hotspot"
    password: "zxPMBtCEWonm"


# define font to display words
font:
  - file: "gfonts://Inter@700"
    id: myFont
    size: 24

captive_portal:

# define SPI interface
spi:
  clk_pin: GPIO7
  mosi_pin: GPIO9

display:
  - platform: waveshare_epaper
    id: epaper_display
    model: gdey042t81
    cs_pin: GPIO44
    dc_pin: GPIO10
    busy_pin: GPIO4
    reset_pin:  GPIO38
    rotation: 0
    update_interval: 300s
    lambda: |-
      it.print(0, 0, id(myFont), "Hello World!");
esphome:
  name: ee04
  friendly_name: EE04

esp32:
  board: esp32-s3-devkitc-1
  framework:
    type: esp-idf

# Enable logging
logger:

# Enable Home Assistant API
api:
  encryption:
    key: "b0AIbJ+kbeMayi1PgSGXtiD1yQCapUBF4A/7v7btys0="

ota:
  - platform: esphome
    password: "5d7cca6f4b3f38aba559ab0d6aaf5926"

wifi:
  ssid:
  password:

  # Enable fallback hotspot (captive portal) in case wifi connection fails
  ap:
    ssid: "Ee04 Fallback Hotspot"
    password: "zxPMBtCEWonm"

# define font to display words
font:
  - file: "gfonts://Inter@700"
    id: myFont
    size: 24

captive_portal:

# define SPI interface
spi:
  clk_pin: GPIO7
  mosi_pin: GPIO9

display:
  - platform: waveshare_epaper
    id: epaper_display
    model: gdey0583t81
    cs_pin: GPIO44
    dc_pin: GPIO10
    busy_pin: GPIO4
    reset_pin:  GPIO38
    rotation: 0
    update_interval: 300s
    lambda: |-
      it.print(0, 0, id(myFont), "Hello World!");
esphome:
  name: ee04
  friendly_name: EE04

esp32:
  board: esp32-s3-devkitc-1
  framework:
    type: esp-idf

# Enable logging
logger:

# Enable Home Assistant API
api:
  encryption:
    key: "b0AIbJ+kbeMayi1PgSGXtiD1yQCapUBF4A/7v7btys0="

ota:
  - platform: esphome
    password: "5d7cca6f4b3f38aba559ab0d6aaf5926"

wifi:
  ssid:
  password:

  # Enable fallback hotspot (captive portal) in case wifi connection fails
  ap:
    ssid: "Ee04 Fallback Hotspot"
    password: "zxPMBtCEWonm"

# define font to display words
font:
  - file: "gfonts://Inter@700"
    id: myFont
    size: 24

captive_portal:

# define SPI interface
spi:
  clk_pin: GPIO7
  mosi_pin: GPIO9

display:
  - platform: waveshare_epaper
    id: epaper_display
    model: 7.50inv2
    cs_pin: GPIO44
    dc_pin: GPIO10
    busy_pin: GPIO4
    reset_pin:  GPIO38
    rotation: 0
    update_interval: 300s
    lambda: |-
      it.print(0, 0, id(myFont), "Hello World!");
以下是 50 针连接器屏幕类型:
- 7.3 英寸 spectra™ 6
esphome:
  name: ee04
  friendly_name: EE04

esp32:
  board: esp32-s3-devkitc-1
  framework:
    type: esp-idf

# Enable logging
logger:

# Enable Home Assistant API
api:
  encryption:
    key: "b0AIbJ+kbeMayi1PgSGXtiD1yQCapUBF4A/7v7btys0="

ota:
  - platform: esphome
    password: "5d7cca6f4b3f38aba559ab0d6aaf5926"

wifi:
  ssid:
  password:

  # Enable fallback hotspot (captive portal) in case wifi connection fails
  ap:
    ssid: "Ee04 Fallback Hotspot"
    password: "zxPMBtCEWonm"

font:
  - file: "gfonts://Inter@700"
    id: font1
    size: 24

captive_portal:

external_components:
  - source:
      type: git
      url: https://github.com/esphome/esphome/
      ref: 2025.10.5
    components: [ epaper_spi, display ]

spi:
  clk_pin: GPIO7
  mosi_pin: GPIO9

display:
  - platform: epaper_spi
    id: my_display
    model: 7.3in-Spectra-E6
    cs_pin: GPIO44
    dc_pin:
      number: GPIO10
      inverted: false
    busy_pin:
      number: GPIO4
      inverted: true
    reset_pin:  GPIO38
    rotation: 0
    update_interval: 30s
    lambda: |-
      const auto BLACK   = Color(0,   0,   0,   0);
      const auto RED     = Color(255, 0,   0,   0);
      const auto BLUE     = Color(0, 0,   255,   0);
      const auto GREEN     = Color(0, 255,   0,   0);
      const auto YELLOW  = Color(255, 255, 0,   0);
      const auto WHITE   = Color(255, 255, 255, 0);

      it.fill(WHITE);
      it.print(0, 0, id(font1), BLACK, "Hello World in BLACK!");
      it.print(0, 30, id(font1), RED, "Hello World in RED!");
      it.print(0, 60, id(font1), YELLOW, "Hello World in YELLOW!");
      it.print(0, 90, id(font1), GREEN, "Hello World in GREEN!");
      it.print(0, 120, id(font1), BLUE, "Hello World in BLUE!");
点击 INSTALL 将代码安装到设备上,您将看到以下图像。

- 通过浏览器安装
- 通过主机安装
- 通过 Wi-Fi 安装
如果您的 Home Assistant 主机(Raspberry PI/Green/Yellow 等)距离您很远,我们建议使用此方法。您可以使用手边的计算机进行安装。
首先,您需要点击 Manual download 下载编译好的固件。

打开这个网站,我们将在这里上传固件到电子纸面板。

返回 ESPHome 下载固件。

选择 Factory format。

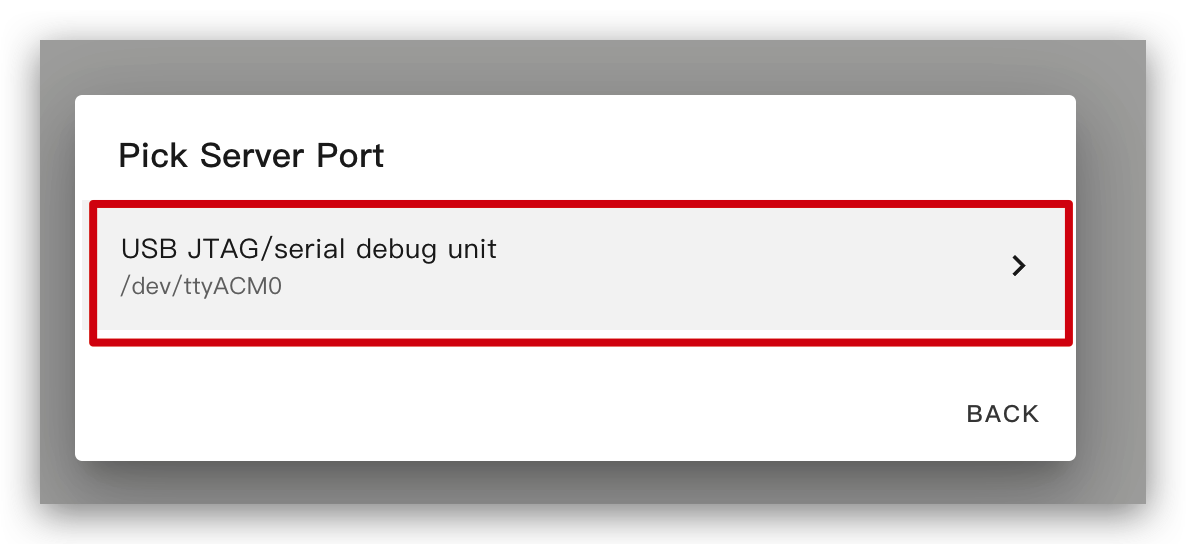
使用 USB 线缆将电子纸面板连接到您的计算机并点击 CONNECT。

选择 usbmodemxxx(Windows 是 COMxxx)并点击连接。

点击 INSTALL 并选择您刚刚下载的固件。

稍等片刻,您将在显示屏上看到 'Hello world!' ~
如果您的 Home Assistant 主机(Raspberry PI/Green/Yellow 等)就在附近,我们建议使用这种方法,因为它更简单。
在将代码安装到设备之前,您需要使用 USB 线缆将此设备连接到运行 Home Assistant 的 Raspberry Pi 或 HA Green(Yellow) 等设备。
按照图像中的选项点击,将代码安装到设备。

稍等片刻,您将看到如下图所示的反馈。这意味着代码正在成功运行。
这是最简单的方法,但前提是在第一次安装程序时,您应该首先使用左侧的方法将程序上传到 ePaper Panel。之后,您可以通过 wifi 上传。另外,确保您的 YAML 配置包含正确配置的 ota 和 api 部分以及有效的加密密钥,以便此方法正常工作。
使用这种方法,您不需要将 ePaper panel 连接到任何设备,只需确保它在线即可。
点击选项,然后固件将自动安装到 ePaper panel。

ESPHome 绘图基础
绘制简单图形
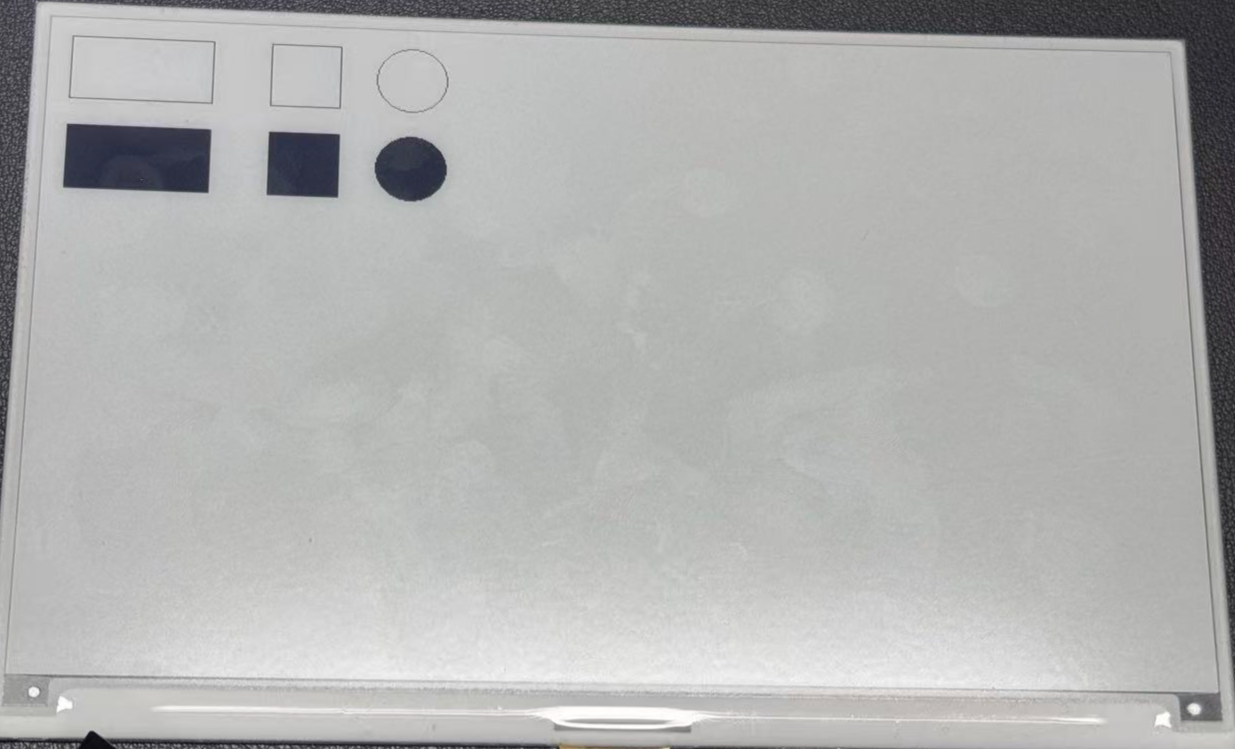
此示例 YAML 代码为 ESPHome 项目配置了 SPI 接口和 XIAO ePaper Display Board(ESP32-S3) - EE04。lambda 部分包含在屏幕上渲染简单形状的绘图命令:
- 两个矩形(一个位于位置 (10, 10),大小为 100x50,另一个位于 (150, 10),大小为 50x50)
- 一个位于 (250, 35) 的圆,半径为 25
- 两个填充矩形(位于 (10, 80) 和 (150, 80))
- 一个位于 (250, 105) 的填充圆,半径为 25
您可以通过复制下面的代码并将其粘贴到 YAML 文件中的 captive_portal 代码行之后来使用此示例。
- 1.54 英寸单色
- 2.13 英寸四色
- 2.13 英寸单色
- 2.9 英寸四色
- 2.9 英寸单色
- 4.2 英寸单色
- 5.83 英寸单色
- 7.5 英寸单色
esphome:
  name: ee04
  friendly_name: EE04

esp32:
  board: esp32-s3-devkitc-1
  framework:
    type: esp-idf

# Enable logging
logger:

# Enable Home Assistant API
api:
  encryption:
    key: "b0AIbJ+kbeMayi1PgSGXtiD1yQCapUBF4A/7v7btys0="

ota:
  - platform: esphome
    password: "5d7cca6f4b3f38aba559ab0d6aaf5926"

wifi:
  ssid:
  password:

  # Enable fallback hotspot (captive portal) in case wifi connection fails
  ap:
    ssid: "Ee04 Fallback Hotspot"
    password: "zxPMBtCEWonm"

captive_portal:

spi:
  clk_pin: GPIO7
  mosi_pin: GPIO9

display:
  - platform: waveshare_epaper
    id: epaper_display
    model: 1.54inv2
    cs_pin: GPIO44
    dc_pin: GPIO10
    busy_pin: GPIO4
    reset_pin:  GPIO38
    rotation: 0
    update_interval: 300s
    lambda: |-
      it.rectangle(10, 10, 100, 50);
      it.rectangle(150, 10, 50, 50);
      it.circle(250, 35, 25);
      it.filled_rectangle(10, 80, 100, 50);
      it.filled_rectangle(150, 80, 50, 50);
      it.filled_circle(250, 105, 25);
esphome:
  name: ee04
  friendly_name: EE04
  libraries:
    - SPI


esp32:
  board: esp32-s3-devkitc-1
  framework:
    type: arduino


# Enable logging
logger:

# Enable Home Assistant API
api:
  encryption:
    key: "eg2Jyse0gE146lJ2mVaqAnwteb4U2GJ7d1sZc2BOOsc="

ota:
  - platform: esphome
    password: "e2f184b95aac832509885f676abf5b73"

wifi:
  ssid:
  password:

  # Enable fallback hotspot (captive portal) in case wifi connection fails
  ap:
    ssid: "ESPHome_Epaper"
    password: "123456789"

external_components:
  - source: github://xcjk-tofuture/esphome@dev
    components: [ waveshare_epaper ]

font:
  - file: "gfonts://Inter@700"
    id: font1
    size: 24

captive_portal:

spi:
  clk_pin: GPIO7
  mosi_pin: GPIO9

display:
  - platform: waveshare_epaper
    id: my_display
    model: gdey0213f51
    cs_pin: GPIO44
    dc_pin: GPIO10
    busy_pin: GPIO4
    reset_pin:  GPIO38
    rotation: 90
    update_interval: 30s
    full_update_every: 1
    lambda: |-
      const auto BLACK   = Color(0,   0,   0,   0);
      const auto RED     = Color(255, 0,   0,   0);
      const auto YELLOW  = Color(255, 255, 0,   0);
      const auto WHITE   = Color(255, 255, 255, 0);

      it.rectangle(10, 10, 100, 50,YELLOW);
      it.rectangle(150, 10, 50, 50,YELLOW);
      it.circle(250, 35, 25,YELLOW);
      it.filled_rectangle(10, 80, 100, 50,YELLOW);
      it.filled_rectangle(150, 80, 50, 50,YELLOW);
      it.filled_circle(250, 105, 25,YELLOW);
esphome:
  name: ee04
  friendly_name: EE04

esp32:
  board: esp32-s3-devkitc-1
  framework:
    type: esp-idf

# Enable logging
logger:

# Enable Home Assistant API
api:
  encryption:
    key: "b0AIbJ+kbeMayi1PgSGXtiD1yQCapUBF4A/7v7btys0="

ota:
  - platform: esphome
    password: "5d7cca6f4b3f38aba559ab0d6aaf5926"

wifi:
  ssid:
  password:

  # Enable fallback hotspot (captive portal) in case wifi connection fails
  ap:
    ssid: "Ee04 Fallback Hotspot"
    password: "zxPMBtCEWonm"

captive_portal:

spi:
  clk_pin: GPIO7
  mosi_pin: GPIO9

display:
  - platform: waveshare_epaper
    id: epaper_display
    model: 2.13inv2 #More models you can refer to here: https://esphome.io/components/display/waveshare_epaper/
    cs_pin: GPIO44
    dc_pin: GPIO10
    busy_pin: GPIO4
    reset_pin:  GPIO38
    rotation: 0
    update_interval: 300s
    lambda: |-
      it.rectangle(10, 10, 100, 50);
      it.rectangle(150, 10, 50, 50);
      it.circle(250, 35, 25);
      it.filled_rectangle(10, 80, 100, 50);
      it.filled_rectangle(150, 80, 50, 50);
      it.filled_circle(250, 105, 25);
esphome:
  name: ee04
  friendly_name: EE04
  libraries:
    - SPI


esp32:
  board: esp32-s3-devkitc-1
  framework:
    type: arduino


# Enable logging
logger:

# Enable Home Assistant API
api:
  encryption:
    key: "eg2Jyse0gE146lJ2mVaqAnwteb4U2GJ7d1sZc2BOOsc="

ota:
  - platform: esphome
    password: "e2f184b95aac832509885f676abf5b73"

wifi:
  ssid:
  password:

  # Enable fallback hotspot (captive portal) in case wifi connection fails
  ap:
    ssid: "ESPHome_Epaper"
    password: "123456789"

external_components:
  - source: github://xcjk-tofuture/esphome@dev
    components: [ waveshare_epaper ]

captive_portal:

spi:
  clk_pin: GPIO7
  mosi_pin: GPIO9

display:
  - platform: waveshare_epaper
    id: my_display
    model: gdey029f51h
    cs_pin: GPIO44
    dc_pin: GPIO10
    busy_pin: GPIO4
    reset_pin:  GPIO38
    rotation: 90
    update_interval: 30s
    full_update_every: 1
    lambda: |-
      const auto BLACK   = Color(0,   0,   0,   0);
      const auto RED     = Color(255, 0,   0,   0);
      const auto YELLOW  = Color(255, 255, 0,   0);
      const auto WHITE   = Color(255, 255, 255, 0);

      it.rectangle(10, 10, 100, 50,YELLOW);
      it.rectangle(150, 10, 50, 50,YELLOW);
      it.circle(250, 35, 25,YELLOW);
      it.filled_rectangle(10, 80, 100, 50,YELLOW);
      it.filled_rectangle(150, 80, 50, 50,YELLOW);
      it.filled_circle(250, 105, 25,YELLOW);
esphome:
  name: ee04
  friendly_name: EE04

esp32:
  board: esp32-s3-devkitc-1
  framework:
    type: esp-idf

# Enable logging
logger:

# Enable Home Assistant API
api:
  encryption:
    key: "b0AIbJ+kbeMayi1PgSGXtiD1yQCapUBF4A/7v7btys0="

ota:
  - platform: esphome
    password: "5d7cca6f4b3f38aba559ab0d6aaf5926"

wifi:
  ssid:
  password:

  # Enable fallback hotspot (captive portal) in case wifi connection fails
  ap:
    ssid: "Ee04 Fallback Hotspot"
    password: "zxPMBtCEWonm"

captive_portal:

spi:
  clk_pin: GPIO7
  mosi_pin: GPIO9

display:
  - platform: waveshare_epaper
    id: epaper_display
    model: 2.90inv2
    cs_pin: GPIO44
    dc_pin: GPIO10
    busy_pin: GPIO4
    reset_pin:  GPIO38
    rotation: 0
    update_interval: 300s
    lambda: |-
      it.rectangle(10, 10, 100, 50);
      it.rectangle(150, 10, 50, 50);
      it.circle(250, 35, 25);
      it.filled_rectangle(10, 80, 100, 50);
      it.filled_rectangle(150, 80, 50, 50);
      it.filled_circle(250, 105, 25);
esphome:
  name: ee04
  friendly_name: EE04

esp32:
  board: esp32-s3-devkitc-1
  framework:
    type: esp-idf

# Enable logging
logger:

# Enable Home Assistant API
api:
  encryption:
    key: "b0AIbJ+kbeMayi1PgSGXtiD1yQCapUBF4A/7v7btys0="

ota:
  - platform: esphome
    password: "5d7cca6f4b3f38aba559ab0d6aaf5926"

wifi:
  ssid:
  password:

  # Enable fallback hotspot (captive portal) in case wifi connection fails
  ap:
    ssid: "Ee04 Fallback Hotspot"
    password: "zxPMBtCEWonm"

captive_portal:

spi:
  clk_pin: GPIO7
  mosi_pin: GPIO9

display:
  - platform: waveshare_epaper
    id: epaper_display
    model: gdey042t81
    cs_pin: GPIO44
    dc_pin: GPIO10
    busy_pin: GPIO4
    reset_pin:  GPIO38
    rotation: 0
    update_interval: 300s
    lambda: |-
      it.rectangle(10, 10, 100, 50);
      it.rectangle(150, 10, 50, 50);
      it.circle(250, 35, 25);
      it.filled_rectangle(10, 80, 100, 50);
      it.filled_rectangle(150, 80, 50, 50);
      it.filled_circle(250, 105, 25);
esphome:
  name: ee04
  friendly_name: EE04

esp32:
  board: esp32-s3-devkitc-1
  framework:
    type: esp-idf

# Enable logging
logger:

# Enable Home Assistant API
api:
  encryption:
    key: "b0AIbJ+kbeMayi1PgSGXtiD1yQCapUBF4A/7v7btys0="

ota:
  - platform: esphome
    password: "5d7cca6f4b3f38aba559ab0d6aaf5926"

wifi:
  ssid:
  password:

  # Enable fallback hotspot (captive portal) in case wifi connection fails
  ap:
    ssid: "Ee04 Fallback Hotspot"
    password: "zxPMBtCEWonm"

captive_portal:

spi:
  clk_pin: GPIO7
  mosi_pin: GPIO9

display:
  - platform: waveshare_epaper
    id: epaper_display
    model: gdey0583t81
    cs_pin: GPIO44
    dc_pin: GPIO10
    busy_pin: GPIO4
    reset_pin:  GPIO38
    rotation: 0
    update_interval: 300s
    lambda: |-
      it.rectangle(10, 10, 100, 50);
      it.rectangle(150, 10, 50, 50);
      it.circle(250, 35, 25);
      it.filled_rectangle(10, 80, 100, 50);
      it.filled_rectangle(150, 80, 50, 50);
      it.filled_circle(250, 105, 25);
esphome:
  name: ee04
  friendly_name: EE04

esp32:
  board: esp32-s3-devkitc-1
  framework:
    type: esp-idf

# Enable logging
logger:

# Enable Home Assistant API
api:
  encryption:
    key: "b0AIbJ+kbeMayi1PgSGXtiD1yQCapUBF4A/7v7btys0="

ota:
  - platform: esphome
    password: "5d7cca6f4b3f38aba559ab0d6aaf5926"

wifi:
  ssid:
  password:

  # Enable fallback hotspot (captive portal) in case wifi connection fails
  ap:
    ssid: "Ee04 Fallback Hotspot"
    password: "zxPMBtCEWonm"

captive_portal:

spi:
  clk_pin: GPIO7
  mosi_pin: GPIO9

display:
  - platform: waveshare_epaper
    id: epaper_display
    model: 7.50inv2
    cs_pin: GPIO44
    dc_pin: GPIO10
    busy_pin: GPIO4
    reset_pin:  GPIO38
    rotation: 0
    update_interval: 300s
    lambda: |-
      it.rectangle(10, 10, 100, 50);
      it.rectangle(150, 10, 50, 50);
      it.circle(250, 35, 25);
      it.filled_rectangle(10, 80, 100, 50);
      it.filled_rectangle(150, 80, 50, 50);
      it.filled_circle(250, 105, 25);
- 7.3 英寸 spectra™ 6
esphome:
  name: ee04
  friendly_name: EE04

esp32:
  board: esp32-s3-devkitc-1
  framework:
    type: esp-idf

# Enable logging
logger:

# Enable Home Assistant API
api:
  encryption:
    key: "b0AIbJ+kbeMayi1PgSGXtiD1yQCapUBF4A/7v7btys0="

ota:
  - platform: esphome
    password: "5d7cca6f4b3f38aba559ab0d6aaf5926"

wifi:
  ssid:
  password:

  # Enable fallback hotspot (captive portal) in case wifi connection fails
  ap:
    ssid: "Ee04 Fallback Hotspot"
    password: "zxPMBtCEWonm"

captive_portal:

external_components:
  - source:
      type: git
      url: https://github.com/esphome/esphome/
      ref: 2025.10.5
    components: [ epaper_spi, display ]

spi:
  clk_pin: GPIO7
  mosi_pin: GPIO9

display:
  - platform: epaper_spi
    id: my_display
    model: 7.3in-Spectra-E6
    cs_pin: GPIO44
    dc_pin:
      number: GPIO10
      inverted: false
    busy_pin:
      number: GPIO4
      inverted: true
    reset_pin:  GPIO38
    rotation: 0
    update_interval: 30s
    lambda: |-
      const auto BLACK   = Color(0,   0,   0,   0);
      const auto RED     = Color(255, 0,   0,   0);
      const auto BLUE     = Color(0, 0,   255,   0);
      const auto GREEN     = Color(0, 255,   0,   0);
      const auto YELLOW  = Color(255, 255, 0,   0);
      const auto WHITE   = Color(255, 255, 255, 0);

      it.rectangle(10, 10, 100, 50,BLACK);
      it.rectangle(150, 10, 50, 50,RED);
      it.circle(250, 35, 25,BLUE);
      it.filled_rectangle(10, 80, 100, 50,GREEN);
      it.filled_rectangle(150, 80, 50, 50,YELLOW);
      it.filled_circle(250, 105, 25,WHITE);
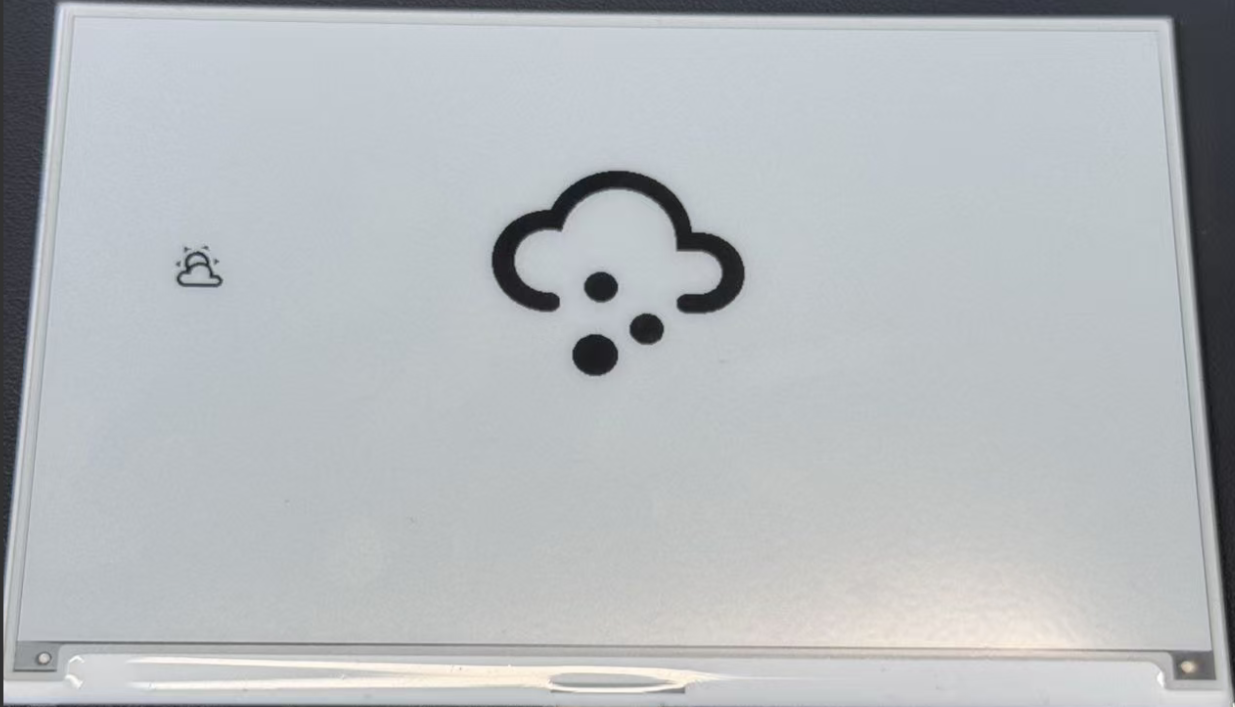
当您看到如下图所示的反馈时,说明代码运行成功。
由于篇幅限制,我们不会过多详述其他图案的绘制方法和原理,如有需要,建议读者阅读 ESPHome 这部分的详细示例。
绘制 TrueType 字体
此示例演示如何使用 TrueType 字体在您的 XIAO ePaper Display Board(ESP32-S3) - EE04 上显示自定义图标。Material Design Icons 提供了大量适合电子纸显示器的可缩放符号。
安装所需工具
步骤 1. 首先,我们需要安装 Studio Code Server 插件来管理文件。导航到 Home Assistant 插件商店,搜索 Studio Code Server 并点击它。
步骤 2. 点击 INSTALL 并等待安装完成。安装完成后,点击 START 启动编辑器。

设置图标字体
步骤 3. 在您的 ESPHome 配置目录中创建一个名为 fonts 的新文件夹。此文件夹将存储显示图标所需的 TrueType 字体文件。
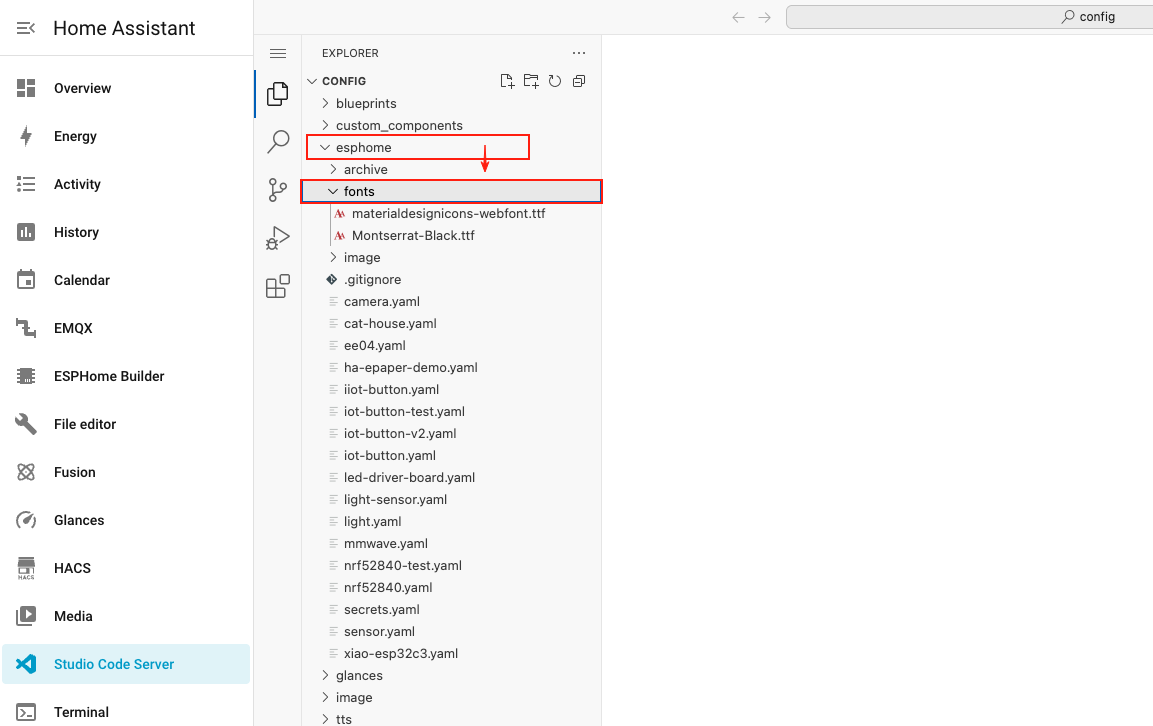
步骤 4. 点击下方按钮下载 Material Design Icons 字体文件并解压内容。
步骤 5. 将下载的字体文件(materialdesignicons-webfont.ttf)上传到您之前创建的 fonts 文件夹中。

为图标配置 ESPHome
步骤 6. 在 captive_portal 部分之后,将以下代码添加到您的 ESPHome 配置文件中。此代码定义了两种图标字体大小,并配置显示器显示天气图标。
- 1.54 英寸单色
- 2.13 英寸四色
- 2.13 英寸单色
- 2.9 英寸四色
- 2.9 英寸单色
- 4.2 英寸单色
- 5.83 英寸单色
- 7.5 英寸单色
esphome:
  name: ee04
  friendly_name: EE04

esp32:
  board: esp32-s3-devkitc-1
  framework:
    type: esp-idf

# Enable logging
logger:

# Enable Home Assistant API
api:
  encryption:
    key: "b0AIbJ+kbeMayi1PgSGXtiD1yQCapUBF4A/7v7btys0="

ota:
  - platform: esphome
    password: "5d7cca6f4b3f38aba559ab0d6aaf5926"

wifi:
  ssid:
  password:

  # Enable fallback hotspot (captive portal) in case wifi connection fails
  ap:
    ssid: "Ee04 Fallback Hotspot"
    password: "zxPMBtCEWonm"

captive_portal:

# define font to display words
font:
  - file: 'fonts/materialdesignicons-webfont.ttf'  # Path to the font file
    id: font_mdi_large
    size: 200        # Large icon size
    glyphs: &mdi-weather-glyphs
      - "\U000F0595" # weather-cloudy icon
      - "\U000F0592" # weather-hail icon
  - file: 'fonts/materialdesignicons-webfont.ttf'
    id: font_mdi_medium   # Medium icon size
    size: 40
    glyphs: *mdi-weather-glyphs

# define SPI interface
spi:
  clk_pin: GPIO7
  mosi_pin: GPIO9

display:
  - platform: waveshare_epaper
    id: epaper_display
    model: 1.54inv2
    cs_pin: GPIO44
    dc_pin: GPIO10
    reset_pin:
      number: GPIO38
      inverted: false
    busy_pin:
      number: GPIO4
      inverted: true
    update_interval: 300s
    lambda: |-
      it.printf(100, 200, id(font_mdi_medium), TextAlign::CENTER, "\U000F0595");
      it.printf(400, 200, id(font_mdi_large), TextAlign::CENTER, "\U000F0592");
esphome:
  name: ee04
  friendly_name: EE04
  libraries:
    - SPI


esp32:
  board: esp32-s3-devkitc-1
  framework:
    type: arduino


# Enable logging
logger:

# Enable Home Assistant API
api:
  encryption:
    key: "eg2Jyse0gE146lJ2mVaqAnwteb4U2GJ7d1sZc2BOOsc="

ota:
  - platform: esphome
    password: "e2f184b95aac832509885f676abf5b73"

wifi:
  ssid:
  password:

  # Enable fallback hotspot (captive portal) in case wifi connection fails
  ap:
    ssid: "ESPHome_Epaper"
    password: "123456789"

external_components:
  - source: github://xcjk-tofuture/esphome@dev
    components: [ waveshare_epaper ]


# define font to display words
font:
  - file: 'fonts/materialdesignicons-webfont.ttf'  # Path to the font file
    id: font_mdi_large
    size: 200        # Large icon size
    glyphs: &mdi-weather-glyphs
      - "\U000F0595" # weather-cloudy icon
      - "\U000F0592" # weather-hail icon
  - file: 'fonts/materialdesignicons-webfont.ttf'
    id: font_mdi_medium   # Medium icon size
    size: 40
    glyphs: *mdi-weather-glyphs

captive_portal:

spi:
  clk_pin: GPIO7
  mosi_pin: GPIO9

display:
  - platform: waveshare_epaper
    id: my_display
    model: gdey0213f51
    cs_pin: GPIO44
    dc_pin: GPIO10
    busy_pin: GPIO4
    reset_pin:  GPIO38
    rotation: 90
    update_interval: 30s
    full_update_every: 1
    lambda: |-
      it.printf(100, 200, id(font_mdi_medium), TextAlign::CENTER, "\U000F0595");
      it.printf(400, 200, id(font_mdi_large), TextAlign::CENTER, "\U000F0592");
esphome:
  name: ee04
  friendly_name: EE04

esp32:
  board: esp32-s3-devkitc-1
  framework:
    type: esp-idf

# Enable logging
logger:

# Enable Home Assistant API
api:
  encryption:
    key: "b0AIbJ+kbeMayi1PgSGXtiD1yQCapUBF4A/7v7btys0="

ota:
  - platform: esphome
    password: "5d7cca6f4b3f38aba559ab0d6aaf5926"

wifi:
  ssid:
  password:

  # Enable fallback hotspot (captive portal) in case wifi connection fails
  ap:
    ssid: "Ee04 Fallback Hotspot"
    password: "zxPMBtCEWonm"

captive_portal:

# define font to display words
font:
  - file: 'fonts/materialdesignicons-webfont.ttf'  # Path to the font file
    id: font_mdi_large
    size: 200        # Large icon size
    glyphs: &mdi-weather-glyphs
      - "\U000F0595" # weather-cloudy icon
      - "\U000F0592" # weather-hail icon
  - file: 'fonts/materialdesignicons-webfont.ttf'
    id: font_mdi_medium   # Medium icon size
    size: 40
    glyphs: *mdi-weather-glyphs

# define SPI interface
spi:
  clk_pin: GPIO7
  mosi_pin: GPIO9

display:
  - platform: waveshare_epaper
    id: epaper_display
    model: 2.13inv2 #More models you can refer to here: https://esphome.io/components/display/waveshare_epaper/
    cs_pin: GPIO44
    dc_pin: GPIO10
    reset_pin:
      number: GPIO38
      inverted: false
    busy_pin:
      number: GPIO4
      inverted: true
    update_interval: 300s
    lambda: |-
      it.printf(100, 200, id(font_mdi_medium), TextAlign::CENTER, "\U000F0595");
      it.printf(400, 200, id(font_mdi_large), TextAlign::CENTER, "\U000F0592");
esphome:
  name: ee04
  friendly_name: EE04
  libraries:
    - SPI


esp32:
  board: esp32-s3-devkitc-1
  framework:
    type: arduino


# Enable logging
logger:

# Enable Home Assistant API
api:
  encryption:
    key: "eg2Jyse0gE146lJ2mVaqAnwteb4U2GJ7d1sZc2BOOsc="

ota:
  - platform: esphome
    password: "e2f184b95aac832509885f676abf5b73"

wifi:
  ssid:
  password:

  # Enable fallback hotspot (captive portal) in case wifi connection fails
  ap:
    ssid: "ESPHome_Epaper"
    password: "123456789"

external_components:
  - source: github://xcjk-tofuture/esphome@dev
    components: [ waveshare_epaper ]


# external_components:
#   - source:
#       type: local
#       path: components_epaper
#     components : [waveshare_epaper]


captive_portal:

# define font to display words
font:
  - file: 'fonts/materialdesignicons-webfont.ttf'  # Path to the font file
    id: font_mdi_large
    size: 200        # Large icon size
    glyphs: &mdi-weather-glyphs
      - "\U000F0595" # weather-cloudy icon
      - "\U000F0592" # weather-hail icon
  - file: 'fonts/materialdesignicons-webfont.ttf'
    id: font_mdi_medium   # Medium icon size
    size: 40
    glyphs: *mdi-weather-glyphs

spi:
  clk_pin: GPIO7
  mosi_pin: GPIO9
display:
  - platform: waveshare_epaper
    id: my_display
    model: gdey029f51h
    cs_pin: GPIO44
    dc_pin: GPIO10
    busy_pin: GPIO4
    reset_pin:  GPIO38
    rotation: 90
    update_interval: 30s
    full_update_every: 1
    lambda: |-
      it.printf(100, 200, id(font_mdi_medium), TextAlign::CENTER, "\U000F0595");
      it.printf(400, 200, id(font_mdi_large), TextAlign::CENTER, "\U000F0592");
esphome:
  name: ee04
  friendly_name: EE04

esp32:
  board: esp32-s3-devkitc-1
  framework:
    type: esp-idf

# Enable logging
logger:

# Enable Home Assistant API
api:
  encryption:
    key: "b0AIbJ+kbeMayi1PgSGXtiD1yQCapUBF4A/7v7btys0="

ota:
  - platform: esphome
    password: "5d7cca6f4b3f38aba559ab0d6aaf5926"

wifi:
  ssid:
  password:

  # Enable fallback hotspot (captive portal) in case wifi connection fails
  ap:
    ssid: "Ee04 Fallback Hotspot"
    password: "zxPMBtCEWonm"

captive_portal:

# define font to display words
font:
  - file: 'fonts/materialdesignicons-webfont.ttf'  # Path to the font file
    id: font_mdi_large
    size: 200        # Large icon size
    glyphs: &mdi-weather-glyphs
      - "\U000F0595" # weather-cloudy icon
      - "\U000F0592" # weather-hail icon
  - file: 'fonts/materialdesignicons-webfont.ttf'
    id: font_mdi_medium   # Medium icon size
    size: 40
    glyphs: *mdi-weather-glyphs

# define SPI interface
spi:
  clk_pin: GPIO7
  mosi_pin: GPIO9

display:
  - platform: waveshare_epaper
    id: epaper_display
    model: 2.90inv2
    cs_pin: GPIO44
    dc_pin: GPIO10
    reset_pin:
      number: GPIO38
      inverted: false
    busy_pin:
      number: GPIO4
      inverted: true
    update_interval: 300s
    lambda: |-
      it.printf(100, 200, id(font_mdi_medium), TextAlign::CENTER, "\U000F0595");
      it.printf(400, 200, id(font_mdi_large), TextAlign::CENTER, "\U000F0592");
esphome:
  name: ee04
  friendly_name: EE04

esp32:
  board: esp32-s3-devkitc-1
  framework:
    type: esp-idf

# Enable logging
logger:

# Enable Home Assistant API
api:
  encryption:
    key: "b0AIbJ+kbeMayi1PgSGXtiD1yQCapUBF4A/7v7btys0="

ota:
  - platform: esphome
    password: "5d7cca6f4b3f38aba559ab0d6aaf5926"

wifi:
  ssid:
  password:

  # Enable fallback hotspot (captive portal) in case wifi connection fails
  ap:
    ssid: "Ee04 Fallback Hotspot"
    password: "zxPMBtCEWonm"

captive_portal:

# define font to display words
font:
  - file: 'fonts/materialdesignicons-webfont.ttf'  # Path to the font file
    id: font_mdi_large
    size: 200        # Large icon size
    glyphs: &mdi-weather-glyphs
      - "\U000F0595" # weather-cloudy icon
      - "\U000F0592" # weather-hail icon
  - file: 'fonts/materialdesignicons-webfont.ttf'
    id: font_mdi_medium   # Medium icon size
    size: 40
    glyphs: *mdi-weather-glyphs

# define SPI interface
spi:
  clk_pin: GPIO7
  mosi_pin: GPIO9

display:
  - platform: waveshare_epaper
    id: epaper_display
    model: gdey042t81
    cs_pin: GPIO44
    dc_pin: GPIO10
    reset_pin:
      number: GPIO38
      inverted: false
    busy_pin:
      number: GPIO4
      inverted: true
    update_interval: 300s
    lambda: |-
      it.printf(100, 200, id(font_mdi_medium), TextAlign::CENTER, "\U000F0595");
      it.printf(400, 200, id(font_mdi_large), TextAlign::CENTER, "\U000F0592");
esphome:
  name: ee04
  friendly_name: EE04

esp32:
  board: esp32-s3-devkitc-1
  framework:
    type: esp-idf

# Enable logging
logger:

# Enable Home Assistant API
api:
  encryption:
    key: "b0AIbJ+kbeMayi1PgSGXtiD1yQCapUBF4A/7v7btys0="

ota:
  - platform: esphome
    password: "5d7cca6f4b3f38aba559ab0d6aaf5926"

wifi:
  ssid:
  password:

  # Enable fallback hotspot (captive portal) in case wifi connection fails
  ap:
    ssid: "Ee04 Fallback Hotspot"
    password: "zxPMBtCEWonm"

captive_portal:

# define font to display words
font:
  - file: 'fonts/materialdesignicons-webfont.ttf'  # Path to the font file
    id: font_mdi_large
    size: 200        # Large icon size
    glyphs: &mdi-weather-glyphs
      - "\U000F0595" # weather-cloudy icon
      - "\U000F0592" # weather-hail icon
  - file: 'fonts/materialdesignicons-webfont.ttf'
    id: font_mdi_medium   # Medium icon size
    size: 40
    glyphs: *mdi-weather-glyphs

# define SPI interface
spi:
  clk_pin: GPIO7
  mosi_pin: GPIO9

display:
  - platform: waveshare_epaper
    id: epaper_display
    model: gdey0583t81
    cs_pin: GPIO44
    dc_pin: GPIO10
    reset_pin:
      number: GPIO38
      inverted: false
    busy_pin:
      number: GPIO4
      inverted: true
    update_interval: 300s
    lambda: |-
      it.printf(100, 200, id(font_mdi_medium), TextAlign::CENTER, "\U000F0595");
      it.printf(400, 200, id(font_mdi_large), TextAlign::CENTER, "\U000F0592");
esphome:
  name: ee04
  friendly_name: EE04

esp32:
  board: esp32-s3-devkitc-1
  framework:
    type: esp-idf

# Enable logging
logger:

# Enable Home Assistant API
api:
  encryption:
    key: "b0AIbJ+kbeMayi1PgSGXtiD1yQCapUBF4A/7v7btys0="

ota:
  - platform: esphome
    password: "5d7cca6f4b3f38aba559ab0d6aaf5926"

wifi:
  ssid:
  password:

  # Enable fallback hotspot (captive portal) in case wifi connection fails
  ap:
    ssid: "Ee04 Fallback Hotspot"
    password: "zxPMBtCEWonm"

captive_portal:

# define font to display words
font:
  - file: 'fonts/materialdesignicons-webfont.ttf'  # Path to the font file
    id: font_mdi_large
    size: 200        # Large icon size
    glyphs: &mdi-weather-glyphs
      - "\U000F0595" # weather-cloudy icon
      - "\U000F0592" # weather-hail icon
  - file: 'fonts/materialdesignicons-webfont.ttf'
    id: font_mdi_medium   # Medium icon size
    size: 40
    glyphs: *mdi-weather-glyphs

# define SPI interface
spi:
  clk_pin: GPIO7
  mosi_pin: GPIO9

display:
  - platform: waveshare_epaper
    id: epaper_display
    model: 7.50inv2
    cs_pin: GPIO44
    dc_pin: GPIO10
    reset_pin:
      number: GPIO38
      inverted: false
    busy_pin:
      number: GPIO4
      inverted: true
    update_interval: 300s
    lambda: |-
      it.printf(100, 200, id(font_mdi_medium), TextAlign::CENTER, "\U000F0595");
      it.printf(400, 200, id(font_mdi_large), TextAlign::CENTER, "\U000F0592");
- 7.3 英寸 spectra™ 6
esphome:
  name: ee04
  friendly_name: EE04

esp32:
  board: esp32-s3-devkitc-1
  framework:
    type: esp-idf

# Enable logging
logger:

# Enable Home Assistant API
api:
  encryption:
    key: "b0AIbJ+kbeMayi1PgSGXtiD1yQCapUBF4A/7v7btys0="

ota:
  - platform: esphome
    password: "5d7cca6f4b3f38aba559ab0d6aaf5926"

wifi:
  ssid:
  password:

  # Enable fallback hotspot (captive portal) in case wifi connection fails
  ap:
    ssid: "Ee04 Fallback Hotspot"
    password: "zxPMBtCEWonm"

captive_portal:

external_components:
  - source:
      type: git
      url: https://github.com/esphome/esphome/
      ref: 2025.10.5
    components: [ epaper_spi, display ]

# define font to display words
font:
  - file: 'fonts/materialdesignicons-webfont.ttf'  # Path to the font file
    id: font_mdi_large
    size: 200        # Large icon size
    glyphs: &mdi-weather-glyphs
      - "\U000F0595" # weather-cloudy icon
      - "\U000F0592" # weather-hail icon
  - file: 'fonts/materialdesignicons-webfont.ttf'
    id: font_mdi_medium   # Medium icon size
    size: 40
    glyphs: *mdi-weather-glyphs

# define SPI interface
spi:
  clk_pin: GPIO7
  mosi_pin: GPIO9

display:
  - platform: epaper_spi
    id: my_display
    model: 7.3in-Spectra-E6
    cs_pin: GPIO44
    dc_pin:
      number: GPIO10
      inverted: false
    busy_pin:
      number: GPIO4
      inverted: true
    reset_pin:  GPIO38
    rotation: 0
    update_interval: 30s
    lambda: |-
      it.printf(100, 200, id(font_mdi_medium), TextAlign::CENTER, "\U000F0595");
      it.printf(400, 200, id(font_mdi_large), TextAlign::CENTER, "\U000F0592");
-
glyphs部分定义了从字体文件中加载哪些图标。仅加载您需要的图标可以节省设备内存。 -
程序从烧录完成到最终显示可能需要 2~3 分钟。
步骤 7. 保存您的配置并将其上传到您的 XIAO ePaper Display Board(ESP32-S3) - EE04。当您看到如下图所示的反馈时,表示代码运行成功。
使用不同图标进行自定义
Material Design Icons 库包含数千个可在项目中使用的图标。以下是查找和使用不同图标的方法:
步骤 1. 点击下方按钮访问 Material Design Icons 网站。
步骤 2. 搜索您想在项目中使用的图标。您可以按类别浏览或使用搜索功能。

步骤 3. 当您找到喜欢的图标时,点击它查看详细信息。查找 Unicode 值,格式为 F0595。
步骤 4. 通过以下方式将 Unicode 值添加到您的 ESPHome 配置中:
- 将其添加到字体配置中的
glyphs列表 - 更新显示代码以使用新图标
例如,要使用 Unicode 为 F0123 的新图标:
glyphs:
  - "\U000F0595" # weather-cloudy icon
  - "\U000F0592" # weather-hail icon
  - "\U000F0123" # your new icon
在显示 lambda 中:
lambda: |-
  it.printf(100, 200, id(font_mdi_medium), TextAlign::CENTER, "\U000F0123");
步骤 5. 保存更新的配置并将其上传到您的设备以查看新图标。
对于天气仪表板,考虑使用 F0590(晴天)、F0591(多云)、F0593(雨天)和 F059E(有风)等图标。
通过将这些图标与我们之前设置的 Home Assistant 天气数据相结合,您可以创建一个动态天气显示,使用适当的图标显示当前天气状况。
显示自定义图像
此示例演示如何在您的 XIAO ePaper Display Board(ESP32-S3) - EE04 上显示自定义图像。您可以使用此功能显示徽标、图标或任何增强仪表板体验的图形。
准备工作
步骤 1. 确保您已在 Home Assistant 中安装了 Studio Code Server 插件。如果您尚未安装,请按照前面示例中的说明进行操作。
步骤 2. 在您的 ESPHome 配置目录中创建一个名为 image 的新文件夹。此文件夹将存储您要显示的图像文件。
config/
└── esphome/
    ├── your_device.yaml
    └── image/         <- Create this folder
添加图像
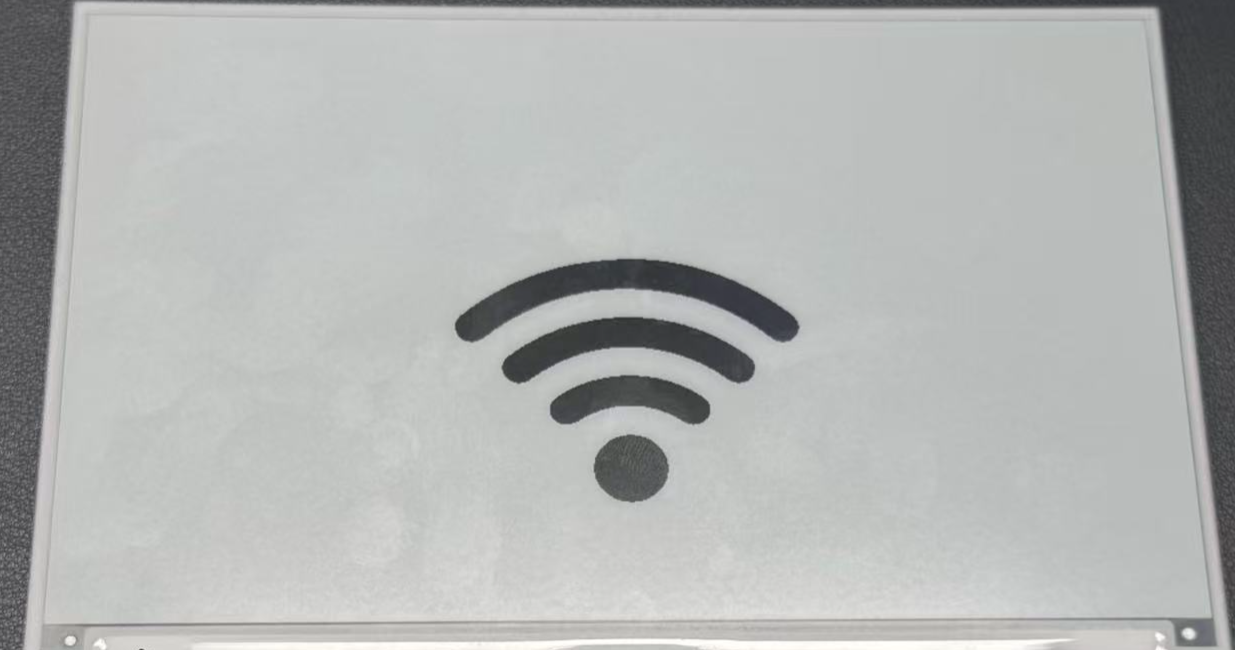
步骤 3. 下载示例图像以测试功能。您可以使用下面提供的 WiFi 图标或使用您自己的图像。
步骤 4. 使用 Studio Code Server 文件管理器将下载的图像上传到您之前创建的 image 文件夹。

为了在电子纸显示器上获得最佳效果,请使用具有清晰黑白区域的高对比度图像。支持 JPG 和 PNG 格式。
配置 ESPHome 进行图像显示
步骤 5. 在 captive_portal 部分之后,将以下代码添加到您的 ESPHome 配置文件中。此代码定义图像资源并配置显示器以显示它。
- 1.54 英寸单色
- 2.13 英寸单色
- 2.13 英寸四色
- 2.9 英寸四色
- 2.9 英寸单色
- 4.2 英寸单色
- 5.83 英寸单色
- 7.5 英寸单色
esphome:
  name: ee04
  friendly_name: EE04

esp32:
  board: esp32-s3-devkitc-1
  framework:
    type: esp-idf

# Enable logging
logger:

# Enable Home Assistant API
api:
  encryption:
    key: "b0AIbJ+kbeMayi1PgSGXtiD1yQCapUBF4A/7v7btys0="

ota:
  - platform: esphome
    password: "5d7cca6f4b3f38aba559ab0d6aaf5926"

wifi:
  ssid:
  password:

  # Enable fallback hotspot (captive portal) in case wifi connection fails
  ap:
    ssid: "Ee04 Fallback Hotspot"
    password: "zxPMBtCEWonm"

captive_portal:

image:
  - file: /config/esphome/image/wifi.jpg    # Path to your image file (JPG or PNG)
    id: myImage
    type: BINARY                            # Binary mode works best for e-paper
    resize: 800x480                         # Resize to match display resolution
    invert_alpha: true                      # Invert colors if needed

spi:
  clk_pin: GPIO7
  mosi_pin: GPIO9

display:
  - platform: waveshare_epaper
    id: epaper_display
    model: 1.54inv2
    cs_pin: GPIO44
    dc_pin: GPIO10
    reset_pin:
      number: GPIO38
      inverted: false
    busy_pin:
      number: GPIO4
      inverted: true
    update_interval: 300s
    lambda: |-
      it.image(0, 0, id(myImage));          # Display image at position (0,0)
esphome:
  name: ee04
  friendly_name: EE04

esp32:
  board: esp32-s3-devkitc-1
  framework:
    type: esp-idf

# Enable logging
logger:

# Enable Home Assistant API
api:
  encryption:
    key: "b0AIbJ+kbeMayi1PgSGXtiD1yQCapUBF4A/7v7btys0="

ota:
  - platform: esphome
    password: "5d7cca6f4b3f38aba559ab0d6aaf5926"

wifi:
  ssid:
  password:

  # Enable fallback hotspot (captive portal) in case wifi connection fails
  ap:
    ssid: "Ee04 Fallback Hotspot"
    password: "zxPMBtCEWonm"

captive_portal:

image:
  - file: /config/esphome/image/wifi.jpg    # Path to your image file (JPG or PNG)
    id: myImage
    type: BINARY                            # Binary mode works best for e-paper
    resize: 800x480                         # Resize to match display resolution
    invert_alpha: true                      # Invert colors if needed

spi:
  clk_pin: GPIO7
  mosi_pin: GPIO9

display:
  - platform: waveshare_epaper
    id: epaper_display
    model: 2.13inv2 #More models you can refer to here: https://esphome.io/components/display/waveshare_epaper/
    cs_pin: GPIO44
    dc_pin: GPIO10
    reset_pin:
      number: GPIO38
      inverted: false
    busy_pin:
      number: GPIO4
      inverted: true
    update_interval: 300s
    lambda: |-
      it.image(0, 0, id(myImage));          # Display image at position (0,0)
esphome:
  name: ee04
  friendly_name: EE04
  libraries:
    - SPI


esp32:
  board: esp32-s3-devkitc-1
  framework:
    type: arduino


# Enable logging
logger:

# Enable Home Assistant API
api:
  encryption:
    key: "eg2Jyse0gE146lJ2mVaqAnwteb4U2GJ7d1sZc2BOOsc="

ota:
  - platform: esphome
    password: "e2f184b95aac832509885f676abf5b73"

wifi:
  ssid:
  password:

  # Enable fallback hotspot (captive portal) in case wifi connection fails
  ap:
    ssid: "ESPHome_Epaper"
    password: "123456789"

external_components:
  - source: github://xcjk-tofuture/esphome@dev
    components: [ waveshare_epaper ]


image:
  - file: /config/esphome/image/wifi.jpg    # Path to your image file (JPG or PNG)
    id: myImage
    type: BINARY                            # Binary mode works best for e-paper
    resize: 800x480                         # Resize to match display resolution
    invert_alpha: true                      # Invert colors if needed

captive_portal:

spi:
  clk_pin: GPIO7
  mosi_pin: GPIO9

display:
  - platform: waveshare_epaper
    id: my_display
    model: gdey0213f51
    cs_pin: GPIO44
    dc_pin: GPIO10
    busy_pin: GPIO4
    reset_pin:  GPIO38
    rotation: 90
    update_interval: 30s
    full_update_every: 1
    lambda: |-
      it.image(0, 0, id(myImage));          # Display image at position (0,0)
esphome:
  name: ee04
  friendly_name: EE04
  libraries:
    - SPI


esp32:
  board: esp32-s3-devkitc-1
  framework:
    type: arduino


# Enable logging
logger:

# Enable Home Assistant API
api:
  encryption:
    key: "eg2Jyse0gE146lJ2mVaqAnwteb4U2GJ7d1sZc2BOOsc="

ota:
  - platform: esphome
    password: "e2f184b95aac832509885f676abf5b73"

wifi:
  ssid:
  password:

  # Enable fallback hotspot (captive portal) in case wifi connection fails
  ap:
    ssid: "ESPHome_Epaper"
    password: "123456789"

external_components:
  - source: github://xcjk-tofuture/esphome@dev
    components: [ waveshare_epaper ]

captive_portal:

image:
  - file: /config/esphome/image/wifi.jpg    # Path to your image file (JPG or PNG)
    id: myImage
    type: BINARY                            # Binary mode works best for e-paper
    resize: 800x480                         # Resize to match display resolution
    invert_alpha: true                      # Invert colors if needed

spi:
  clk_pin: GPIO7
  mosi_pin: GPIO9
display:
  - platform: waveshare_epaper
    id: my_display
    model: gdey029f51h
    cs_pin: GPIO44
    dc_pin: GPIO10
    busy_pin: GPIO4
    reset_pin:  GPIO38
    rotation: 90
    update_interval: 30s
    full_update_every: 1
    lambda: |-
      it.image(0, 0, id(myImage));          # Display image at position (0,0)
esphome:
  name: ee04
  friendly_name: EE04

esp32:
  board: esp32-s3-devkitc-1
  framework:
    type: esp-idf

# Enable logging
logger:

# Enable Home Assistant API
api:
  encryption:
    key: "b0AIbJ+kbeMayi1PgSGXtiD1yQCapUBF4A/7v7btys0="

ota:
  - platform: esphome
    password: "5d7cca6f4b3f38aba559ab0d6aaf5926"

wifi:
  ssid:
  password:

  # Enable fallback hotspot (captive portal) in case wifi connection fails
  ap:
    ssid: "Ee04 Fallback Hotspot"
    password: "zxPMBtCEWonm"

captive_portal:

image:
  - file: /config/esphome/image/wifi.jpg    # Path to your image file (JPG or PNG)
    id: myImage
    type: BINARY                            # Binary mode works best for e-paper
    resize: 800x480                         # Resize to match display resolution
    invert_alpha: true                      # Invert colors if needed

spi:
  clk_pin: GPIO7
  mosi_pin: GPIO9

display:
  - platform: waveshare_epaper
    id: epaper_display
    model: 2.90inv2
    cs_pin: GPIO44
    dc_pin: GPIO10
    reset_pin:
      number: GPIO38
      inverted: false
    busy_pin:
      number: GPIO4
      inverted: true
    update_interval: 300s
    lambda: |-
      it.image(0, 0, id(myImage));          # Display image at position (0,0)
esphome:
  name: ee04
  friendly_name: EE04

esp32:
  board: esp32-s3-devkitc-1
  framework:
    type: esp-idf

# Enable logging
logger:

# Enable Home Assistant API
api:
  encryption:
    key: "b0AIbJ+kbeMayi1PgSGXtiD1yQCapUBF4A/7v7btys0="

ota:
  - platform: esphome
    password: "5d7cca6f4b3f38aba559ab0d6aaf5926"

wifi:
  ssid:
  password:

  # Enable fallback hotspot (captive portal) in case wifi connection fails
  ap:
    ssid: "Ee04 Fallback Hotspot"
    password: "zxPMBtCEWonm"

captive_portal:

image:
  - file: /config/esphome/image/wifi.jpg    # Path to your image file (JPG or PNG)
    id: myImage
    type: BINARY                            # Binary mode works best for e-paper
    resize: 800x480                         # Resize to match display resolution
    invert_alpha: true                      # Invert colors if needed

spi:
  clk_pin: GPIO7
  mosi_pin: GPIO9

display:
  - platform: waveshare_epaper
    id: epaper_display
    model: gdey042t81
    cs_pin: GPIO44
    dc_pin: GPIO10
    reset_pin:
      number: GPIO38
      inverted: false
    busy_pin:
      number: GPIO4
      inverted: true
    update_interval: 300s
    lambda: |-
      it.image(0, 0, id(myImage));          # Display image at position (0,0)
esphome:
  name: ee04
  friendly_name: EE04

esp32:
  board: esp32-s3-devkitc-1
  framework:
    type: esp-idf

# Enable logging
logger:

# Enable Home Assistant API
api:
  encryption:
    key: "b0AIbJ+kbeMayi1PgSGXtiD1yQCapUBF4A/7v7btys0="

ota:
  - platform: esphome
    password: "5d7cca6f4b3f38aba559ab0d6aaf5926"

wifi:
  ssid:
  password:

  # Enable fallback hotspot (captive portal) in case wifi connection fails
  ap:
    ssid: "Ee04 Fallback Hotspot"
    password: "zxPMBtCEWonm"

captive_portal:

image:
  - file: /config/esphome/image/wifi.jpg    # Path to your image file (JPG or PNG)
    id: myImage
    type: BINARY                            # Binary mode works best for e-paper
    resize: 800x480                         # Resize to match display resolution
    invert_alpha: true                      # Invert colors if needed

spi:
  clk_pin: GPIO7
  mosi_pin: GPIO9

display:
  - platform: waveshare_epaper
    id: epaper_display
    model: gdey0583t81
    cs_pin: GPIO44
    dc_pin: GPIO10
    reset_pin:
      number: GPIO38
      inverted: false
    busy_pin:
      number: GPIO4
      inverted: true
    update_interval: 300s
    lambda: |-
      it.image(0, 0, id(myImage));          # Display image at position (0,0)
esphome:
  name: ee04
  friendly_name: EE04

esp32:
  board: esp32-s3-devkitc-1
  framework:
    type: esp-idf

# Enable logging
logger:

# Enable Home Assistant API
api:
  encryption:
    key: "b0AIbJ+kbeMayi1PgSGXtiD1yQCapUBF4A/7v7btys0="

ota:
  - platform: esphome
    password: "5d7cca6f4b3f38aba559ab0d6aaf5926"

wifi:
  ssid:
  password:

  # Enable fallback hotspot (captive portal) in case wifi connection fails
  ap:
    ssid: "Ee04 Fallback Hotspot"
    password: "zxPMBtCEWonm"

captive_portal:

image:
  - file: /config/esphome/image/wifi.jpg    # Path to your image file (JPG or PNG)
    id: myImage
    type: BINARY                            # Binary mode works best for e-paper
    resize: 800x480                         # Resize to match display resolution
    invert_alpha: true                      # Invert colors if needed

spi:
  clk_pin: GPIO7
  mosi_pin: GPIO9

display:
  - platform: waveshare_epaper
    id: epaper_display
    model: 7.50inv2
    cs_pin: GPIO44
    dc_pin: GPIO10
    reset_pin:
      number: GPIO38
      inverted: false
    busy_pin:
      number: GPIO4
      inverted: true
    update_interval: 300s
    lambda: |-
      it.image(0, 0, id(myImage));          # Display image at position (0,0)
- 7.3 英寸 spectra™ 6
esphome:
  name: ee04
  friendly_name: EE04

esp32:
  board: esp32-s3-devkitc-1
  framework:
    type: esp-idf

# Enable logging
logger:

# Enable Home Assistant API
api:
  encryption:
    key: "b0AIbJ+kbeMayi1PgSGXtiD1yQCapUBF4A/7v7btys0="

ota:
  - platform: esphome
    password: "5d7cca6f4b3f38aba559ab0d6aaf5926"

wifi:
  ssid:
  password:

  # Enable fallback hotspot (captive portal) in case wifi connection fails
  ap:
    ssid: "Ee04 Fallback Hotspot"
    password: "zxPMBtCEWonm"

captive_portal:

external_components:
  - source:
      type: git
      url: https://github.com/esphome/esphome/
      ref: 2025.10.5
    components: [ epaper_spi, display ]

image:
  - file: /config/esphome/image/wifi.jpg    # Path to your image file (JPG or PNG)
    id: myImage
    type: BINARY                            # Binary mode works best for e-paper
    resize: 800x480                         # Resize to match display resolution
    invert_alpha: true                      # Invert colors if needed

spi:
  clk_pin: GPIO7
  mosi_pin: GPIO9

display:
  - platform: epaper_spi
    id: my_display
    model: 7.3in-Spectra-E6
    cs_pin: GPIO44
    dc_pin:
      number: GPIO10
      inverted: false
    busy_pin:
      number: GPIO4
      inverted: true
    reset_pin:  GPIO38
    rotation: 0
    update_interval: 30s
    lambda: |-
      it.image(0, 0, id(myImage));          # Display image at position (0,0)
步骤 6. 保存您的配置并将其上传到您的 XIAO ePaper Display Board(ESP32-S3) - EE04。当更新完成后,您的电子纸显示屏将显示图像。
高级图像技术
您可以使用这些额外技术来增强图像显示:
定位图像
要将图像定位到屏幕上的特定坐标:
lambda: |-
  // Display image at position (100,50)
  it.image(100, 50, id(myImage));
图像与文本结合
您可以在同一屏幕上同时显示图像和文本:
lambda: |-
  // Display image
  it.image(0, 0, id(myImage));

  // Add text below or beside the image
  it.printf(400, 400, id(myFont), TextAlign::CENTER, "WiFi Connected");
使用多个图像
要在同一屏幕上显示多个图像,请在配置中定义每个图像:
image:
  - file: /config/esphome/image/wifi.jpg
    id: wifiImage
    type: BINARY
    resize: 200x200

  - file: /config/esphome/image/temperature.png
    id: tempImage
    type: BINARY
    resize: 200x200

# In the display lambda:
lambda: |-
  it.image(50, 50, id(wifiImage));
  it.image(300, 50, id(tempImage));
请记住,电子纸显示器的刷新率有限。update_interval: 300s 设置意味着您的显示器只会每 5 分钟刷新一次。请根据您的需要调整此值,但请注意频繁刷新可能会缩短电子纸显示器的使用寿命。
通过将图像与文本和前面示例中涵盖的其他显示元素相结合,您可以在 XIAO ePaper Display Board(ESP32-S3) - EE04 上创建丰富、信息丰富的仪表板。
参考资料与资源
技术支持与产品讨论
感谢您选择我们的产品!我们在这里为您提供不同的支持,以确保您使用我们产品的体验尽可能顺畅。我们提供多种沟通渠道,以满足不同的偏好和需求。