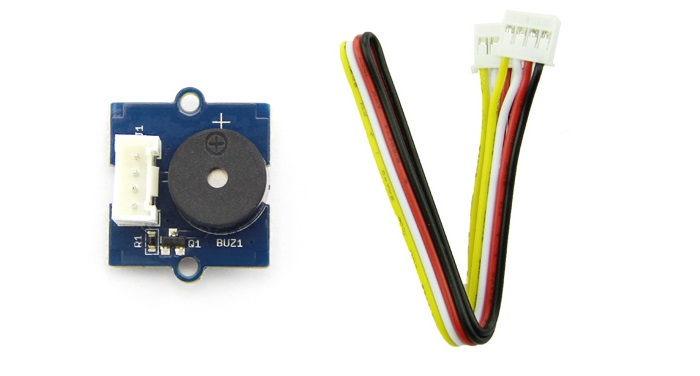
Grove - 蜂鸣器

Grove - 蜂鸣器模块的主要组件是一个压电蜂鸣器。压电蜂鸣器可以连接到数字输出,当输出为高电平时会发出音调。或者,它可以连接到模拟脉宽调制输出以生成各种音调和效果。
版本
| 产品版本 | 变更 | 发布日期 |
|---|---|---|
| Grove-Buzzer V1.0 | 初始版本 | 2010年11月25日 |
| Grove-Buzzer V1.1 | 添加 S9013 晶体管 | 2014年5月30日 |
特性
- 易于使用的压电蜂鸣器
- 使用标准 4 针 Grove 电缆连接到其他 Grove 模块,例如 Grove 电源模块和 Grove - 基础扩展板
有关 Grove 模块的更多详细信息,请参考 Grove 系统
规格
| 项目 | 规格 |
|---|---|
| 工作电压 | 3.3V/5V |
| 声音输出 | ≥85dB |
| 谐振频率 | 2300±300Hz |
支持的平台
| Arduino | Raspberry Pi | |||
|---|---|---|---|---|
 |  |  |  |  |
上述提到的支持平台仅表示模块的软件或理论兼容性。我们通常仅为 Arduino 平台提供软件库或代码示例。不可能为所有可能的 MCU 平台提供软件库或演示代码。因此,用户需要自行编写软件库。
入门指南
使用 Arduino
硬件
- 步骤 1. 准备以下物品:
| Seeeduino V4.2 | Base Shield | Grove - 蜂鸣器 |
|---|---|---|
 |  |  |
| 立即购买 | 立即购买 | 立即购买 |
- 步骤 2. 将 Grove-蜂鸣器连接到 Grove-Base Shield 的 D6 端口。
- 步骤 3. 将 Grove-Base Shield 插入 Seeeduino。
- 步骤 4. 使用 USB 数据线将 Seeeduino 连接到电脑。

如果没有 Grove Base Shield,也可以直接将 Grove-蜂鸣器连接到 Seeeduino,如下所示。
| Seeeduino | Grove-蜂鸣器 |
|---|---|
| 5V | 红色 |
| GND | 黑色 |
| 未连接 | 白色 |
| D6 | 黄色 |
软件
- 步骤 1. 将以下代码复制到 Arduino IDE 并上传。
void setup()
{
  pinMode(6, OUTPUT);
}

void loop()
{
  digitalWrite(6, HIGH);
  delay(1000);
  digitalWrite(6, LOW);
  delay(1000);
}
- 步骤 2. 您将听到蜂鸣器间歇性地响起。
使用 Codecraft
硬件
步骤 1. 将 Grove-蜂鸣器连接到 Base Shield 的 D6 端口。
步骤 2. 将 Base Shield 插入您的 Seeeduino/Arduino。
步骤 3. 使用 USB 数据线将 Seeeduino/Arduino 连接到电脑。
软件
步骤 1. 打开 Codecraft,添加 Arduino 支持,并将主程序拖到工作区。
如果您是第一次使用 Codecraft,请参阅 Codecraft 使用 Arduino 指南。
步骤 2. 按下图拖动模块或打开页面底部提供的 cdc 文件。

将程序上传到您的 Arduino/Seeeduino。
当代码上传完成后,您将听到蜂鸣器间歇性地响起。
使用 Raspberry Pi(搭配 Grove Base Hat for Raspberry Pi)
硬件
- 步骤 1. 准备以下物品:
| Raspberry Pi | Grove Base Hat for RasPi | Grove - 蜂鸣器 |
|---|---|---|
 |  |  |
| 立即购买 | 立即购买 | 立即购买 |
- 步骤 2. 将 Grove Base Hat 插入 Raspberry Pi。
- 步骤 3. 将 Grove 蜂鸣器连接到 Base Hat 的 PWM 端口。
- 步骤 4. 使用 USB 数据线将 Raspberry Pi 连接到电脑。

软件
如果您使用的是 Raspberry Pi 且 Raspberrypi OS >= Bullseye,您必须仅使用 Python3 执行以下命令。
-
步骤 1. 按照 软件设置 配置开发环境,并在 Raspberry Pi 上安装 grove.py。
-
步骤 2. 执行以下命令运行代码。
# Python3 的虚拟环境
virtualenv -p python3 env
source env/bin/activate
# 输入命令
grove_pwm_buzzer
以下是 grove_pwm_buzzer.py 的代码。
from __future__ import print_function

import time
import RPi.GPIO as GPIO

def main():
    from grove.helper import helper
    # helper.root_check()

    print("将 Grove-蜂鸣器插入 Grove-Base-Hat 的 PWM[12 13 VCC GND] 插槽")
    # Grove Base Hat for Raspberry Pi
    pin = 12
    GPIO.setmode(GPIO.BCM)
    GPIO.setup(pin, GPIO.OUT)

    # 创建 PWM 实例
    pwm = GPIO.PWM(pin, 10)
    pwm.start(0)

    chords = [1047, 1175, 1319, 1397, 1568, 1760, 1976]
    # 播放声音(DO、RE、MI 等),每个音符之间暂停 0.5 秒
    try:
        for note in chords:
            pwm.ChangeFrequency(note)
            pwm.ChangeDutyCycle(95)
            time.sleep(0.5)
    finally:
        pwm.stop()
        GPIO.cleanup()

    print("退出程序")

if __name__ == '__main__':
    main()
如果一切正常,蜂鸣器将响几次然后停止,程序将自动退出。
您可以通过按 ctrl+c 退出此程序。
使用 Raspberry Pi(搭配 GrovePi_Plus)
硬件
- 步骤 1. 准备以下物品:
| Raspberry Pi | GrovePi_Plus | Grove - 蜂鸣器 |
|---|---|---|
 |  |  |
| 立即购买 | 立即购买 | 立即购买 |
- 步骤 2. 将 GrovePi_Plus 插入 Raspberry。
- 步骤 3. 将 Grove-蜂鸣器连接到 GrovePi_Plus 的 D8 端口。
- 步骤 4. 使用 USB 数据线将 Raspberry 连接到电脑。

软件
如果您使用的是 Raspberry Pi 且 Raspberrypi OS >= Bullseye,您必须仅使用 Python3 执行以下命令。
- 步骤 1. 按照 设置软件 的说明配置开发环境。
- 步骤 2. 克隆 Github 仓库。
cd ~
git clone https://github.com/DexterInd/GrovePi.git
- 步骤 3. 执行以下命令。
cd ~/GrovePi/Software/Python
python3 grove_buzzer.py
以下是 grove_buzzer.py 的代码。
import time
import grovepi

# 将 Grove 蜂鸣器连接到数字端口 D8
# SIG,NC,VCC,GND
buzzer = 8

grovepi.pinMode(buzzer,"OUTPUT")

while True:
    try:
        # 蜂鸣 1 秒
        grovepi.digitalWrite(buzzer,1)
        print ('start')
        time.sleep(1)

        # 停止蜂鸣 1 秒并重复
        grovepi.digitalWrite(buzzer,0)
        print ('stop')
        time.sleep(1)

    except KeyboardInterrupt:
        grovepi.digitalWrite(buzzer,0)
        break
    except IOError:
        print ("Error")
- 步骤 4. 我们将听到蜂鸣器的开关声。
(env)pi@raspberrypi:~ grove_pwm_buzzer
start
stop
start
stop
使用 TI LaunchPad
硬件
- 此示例展示了如何使用 Grove 蜂鸣器模块播放旋律。它向蜂鸣器发送适当频率的方波,从而生成相应的音调。

软件
/*
  蜂鸣器
  此示例使用蜂鸣器播放旋律。它向蜂鸣器发送适当频率的方波,从而生成相应的音调。

  电路:
  * 蜂鸣器连接到 pin39 (J14 插头上的 Grove Base BoosterPack)
  * 一侧引脚(任意一侧)连接到地
  * 另一侧引脚连接到 VCC
  * LED 正极(长脚)连接到 RED_LED
  * LED 负极(短脚)连接到地

  * 注意:
  此示例代码为公共领域代码。

  https://www.seeedstudio.com/wiki/index.php?title=GROVE_-_Starter_Kit_v1.1b#Grove_-_Buzzer

*/

/* 宏定义 */
#define BUZZER_PIN               39            /* 蜂鸣器的信号引脚 */

int length = 15;         /* 音符数量 */
char notes[] = "ccggaagffeeddc ";
int beats[] = { 1, 1, 1, 1, 1, 1, 2, 1, 1, 1, 1, 1, 1, 2, 4 };
int tempo = 300;

void setup()
{
    /* 设置蜂鸣器引脚为输出 */
    pinMode(BUZZER_PIN, OUTPUT);
}

void loop()
{
    for(int i = 0; i < length; i++) {
        if(notes[i] == ' ') {
            delay(beats[i] * tempo);
        } else {
            playNote(notes[i], beats[i] * tempo);
        }
        delay(tempo / 2);    /* 音符之间的延迟 */
    }

}

/* 播放音调 */
void playTone(int tone, int duration) {
    for (long i = 0; i < duration * 1000L; i += tone * 2) {
        digitalWrite(BUZZER_PIN, HIGH);
        delayMicroseconds(tone);
        digitalWrite(BUZZER_PIN, LOW);
        delayMicroseconds(tone);
    }
}

void playNote(char note, int duration) {
    char names[] = { 'c', 'd', 'e', 'f', 'g', 'a', 'b', 'C' };
    int tones[] = { 1915, 1700, 1519, 1432, 1275, 1136, 1014, 956 };

    // 播放与音符名称对应的音调
    for (int i = 0; i < 8; i++) {
        if (names[i] == note) {
            playTone(tones[i], duration);
        }
    }
}
Grove - 蜂鸣器原理图文件 v1.0
Grove - 蜂鸣器原理图文件 v1.1
资源
- [Eagle&PDF] Grove - 蜂鸣器原理图文件 v1.1
- [Eagle&PDF] Grove - 蜂鸣器原理图文件 v1.0
- [数据手册] S9013 数据手册
- [更多阅读] 木质激光枪
- [Codecraft] CDC 文件

受到《守望先锋》的启发,我们最近制作了一款非常酷的木质激光枪玩具来娱乐!
木质激光枪和枪靶都基于一个名为 Seeeduino Lotus 的 Arduino 板。激光枪上的激光发射器被控制以发射激光脉冲来“激活”枪靶。而枪靶上有 3 个光传感器来检测激光脉冲。看起来很简单,对吧?如果您对我们的项目感兴趣,请为自己或您的孩子制作一个!作为圣诞礼物,花一天时间 DIY 是非常值得的。
项目
Grove - 蜂鸣器简介:我的第一步是使用 Grove 的“即插即用”组件。这主要是一个蜂鸣器。
水浪费监测器:每年有数百万加仑的水被浪费。通过这个项目学习如何节约用水!
蜂鸣器 Grove 模块:
技术支持与产品讨论
感谢您选择我们的产品!我们致力于为您提供多种支持,以确保您使用我们的产品时能够获得尽可能顺畅的体验。我们提供多个沟通渠道,以满足不同的偏好和需求。
