Grove - 数字光传感器
该模块基于I2C光数字转换器TSL2561,将光强度转换为数字信号。与传统的模拟光传感器(如Grove - 光传感器)不同,这个数字模块具有可选择的光谱范围,这得益于其双光敏二极管:红外和全光谱。
我们可以在三种检测模式之间切换来获取读数。它们是红外模式、全光谱模式和人眼可见模式。当在人眼可见模式下运行时,该传感器将给出接近您眼睛感受的读数。

版本
| 产品版本 | 变更 | 发布日期 |
|---|---|---|
| Grove - 数字光传感器 V1.1 | 初始版本 | 2015年10月 |
可升级为工业传感器
通过SenseCAP S2110控制器和S2100数据记录器,您可以轻松将Grove转换为LoRaWAN®传感器。Seeed不仅帮助您进行原型设计,还为您提供了通过SenseCAP系列坚固的工业传感器扩展项目的可能性。
SenseCAP S210x系列工业传感器为环境感知提供开箱即用的体验。请参考具有更高性能和坚固性的S2102无线光强度传感器进行光强度检测。该系列包括土壤湿度、空气温湿度、光强度、CO2、EC和8合1气象站传感器。尝试最新的SenseCAP S210x用于您下一个成功的工业项目。
| SenseCAP工业传感器 |
 |
| S2102 光传感器 |
特性
- 可选择的检测模式
- 高分辨率 16 位数字输出,支持 400 kHz I2C 快速模式
- 宽动态范围:0.1 - 40,000 LUX
- 宽工作温度范围:-40°C 至 85°C
- 可编程中断功能,支持用户定义的上下阈值设置
- I2C 地址 0x29
如果您想使用多个 I2C 设备,请参考 软件 I2C。
有关 Grove 模块的更多详细信息,请参考 Grove 系统
规格参数
| 项目 | 最小值 | 典型值 | 最大值 | 单位 |
|---|---|---|---|---|
| 供电电压,VDD | 3.3 | 5 | 5.1 | V |
| 工作温度 | -30 | \ | 70 | ℃ |
| SCL,SDA 输入低电压 | -0.5 | \ | 0.8 | V |
| SCL,SDA 输入高电压 | 2.3 | \ | 5.1 | V |
支持的平台
| Arduino | Raspberry Pi | |||
|---|---|---|---|---|
上述提到的支持平台表示该模块的软件或理论兼容性。在大多数情况下,我们只为 Arduino 平台提供软件库或代码示例。我们无法为所有可能的 MCU 平台提供软件库/演示代码。因此,用户必须编写自己的软件库。
硬件概述
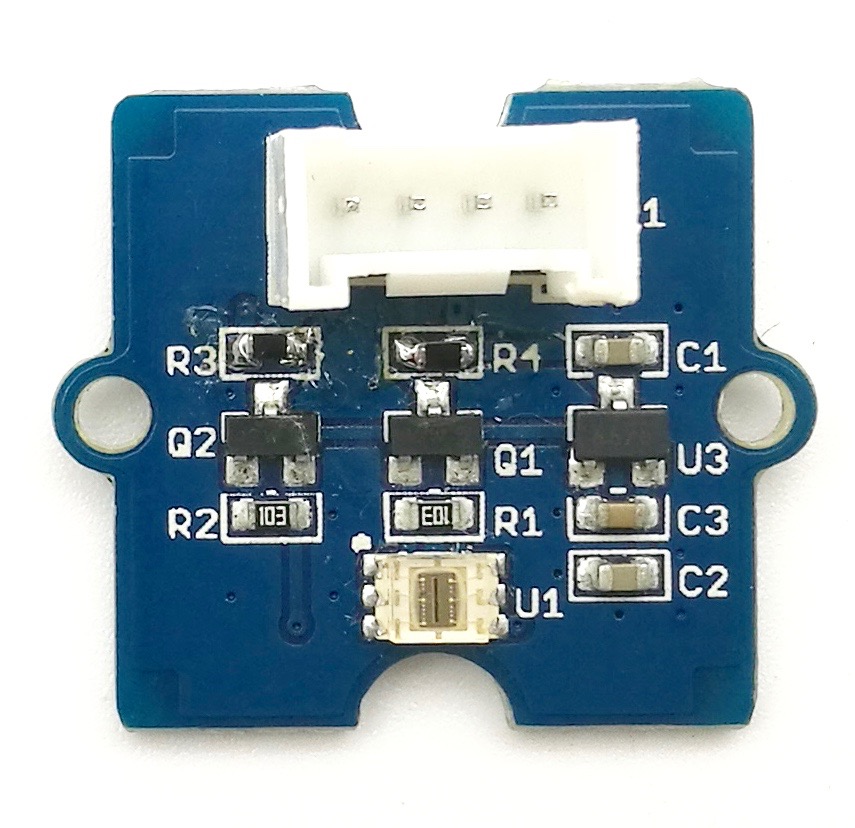
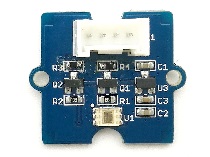
U1: TSL2561 IC,光-数字转换器。以下是功能框图。
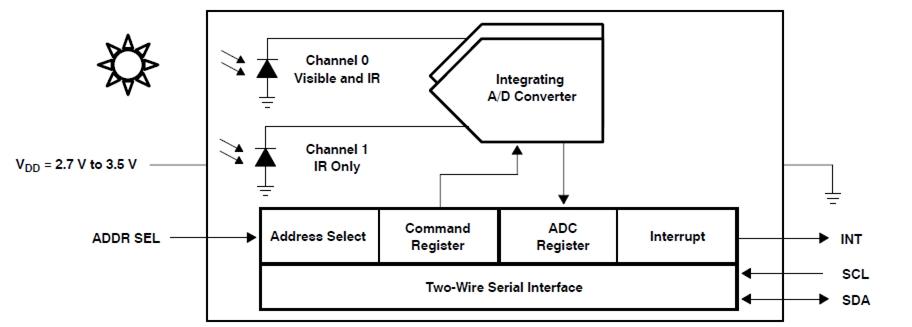
-
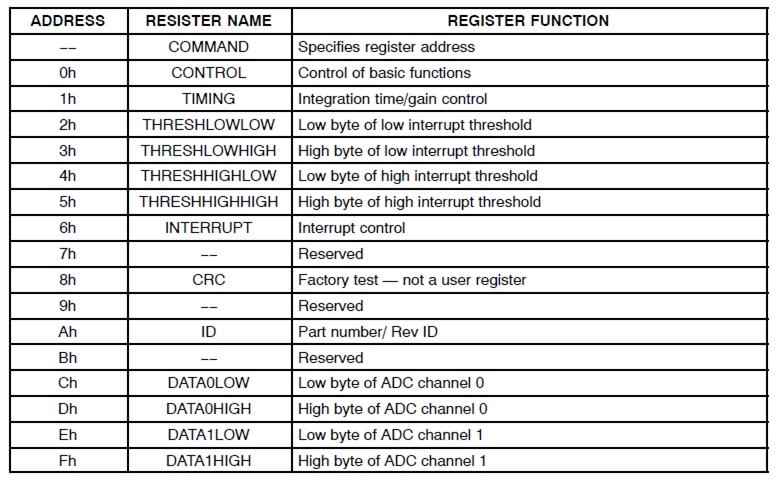
寄存器映射
TSL2561 通过串行接口访问的十六个寄存器(其中三个为保留寄存器)和一个命令寄存器进行控制和监控。这些寄存器提供各种控制功能,并可以读取以确定 ADC 转换的结果。寄存器组总结如下所示。
- 光谱响应曲线
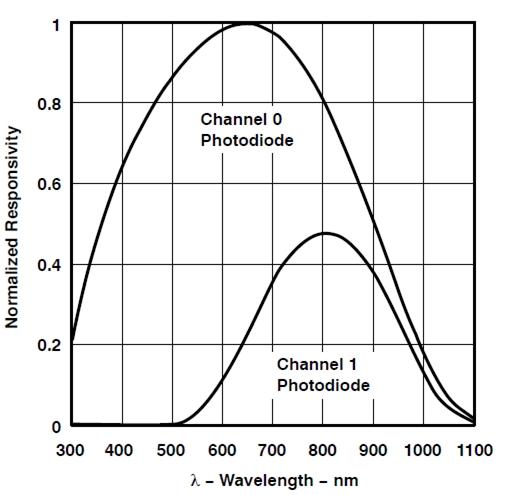
数字光传感器的两个通道具有不同的响应特性。这就是为什么您可以通过同时开启两个通道或关闭其中一个来选择其工作模式。
U3: XC6206MR332 IC,正电压稳压器。
Q1,Q2: BSN20 IC,N 沟道增强型垂直 D-MOS 晶体管。
SCL,SDA: I2C 信号接口
入门指南
如果这是您第一次使用 Arduino,我们强烈建议您在开始之前先查看 Arduino 入门指南。
与 Arduino 一起使用
硬件
- 步骤 1. 准备以下物品:
| Seeeduino V4 | Base Shield | Grove - 数字光传感器 |
|---|---|---|
 |  |  |
| 立即购买 | 立即购买 | 立即购买 |
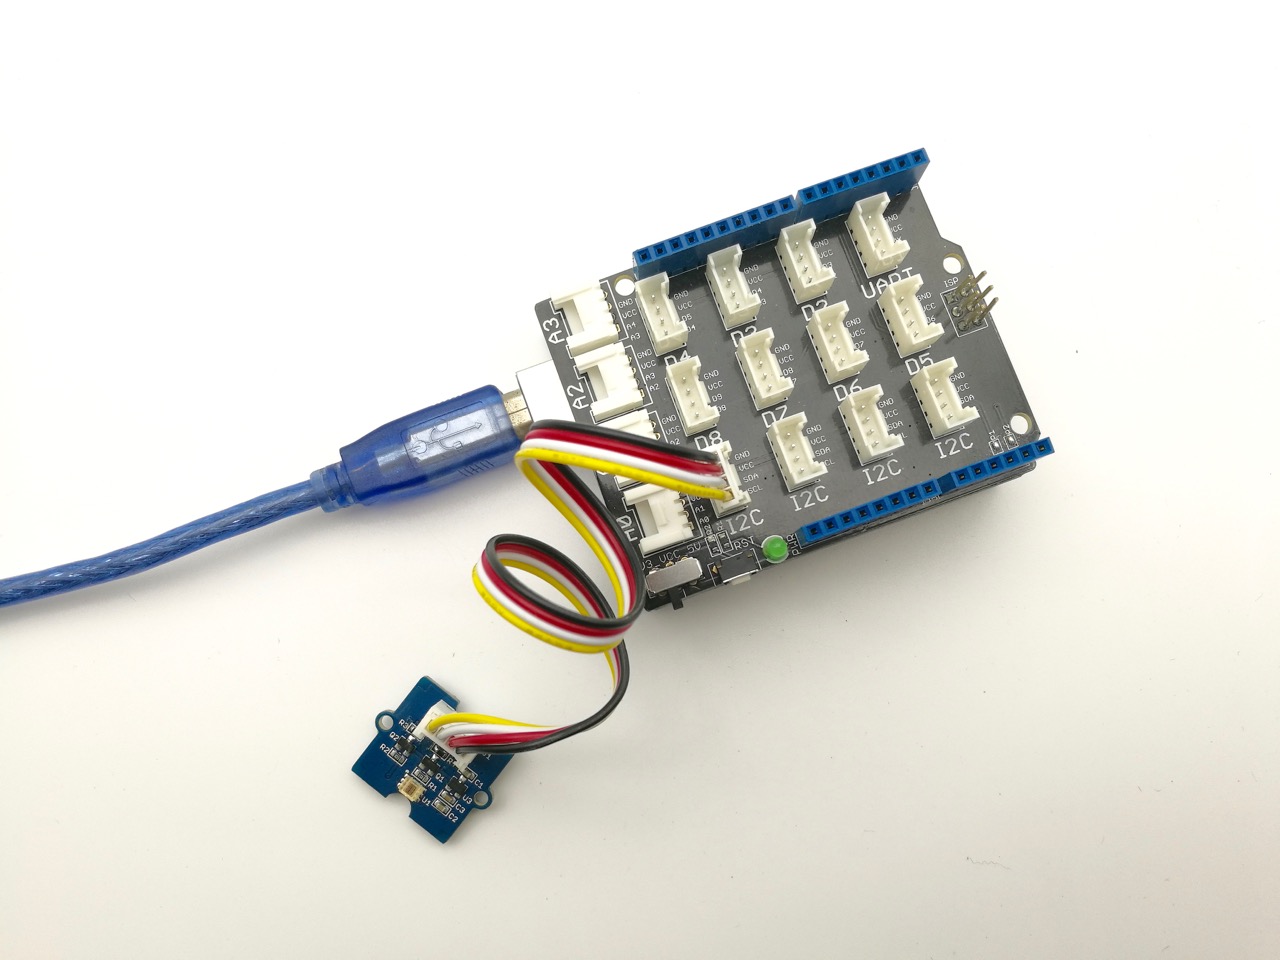
- 步骤 2. 将 Grove - 数字光传感器连接到底板的 I2C 端口。
- 步骤 3. 将底板插入 Arduino。
- 步骤 4. 使用 USB 线将 Arduino 连接到 PC。
软件
- 步骤 1. 从这里下载库文件 数字光传感器库;
- 步骤 2. 请按照 如何安装 Arduino 库 的步骤来安装库。
- 步骤 3. 通过路径直接打开代码:File -> Example ->Digital_Light_Sensor->Digital_Light_Sensor。

- 或者将下面的代码复制到 IDE 中并上传到 Arduino。
/*
Digital_Light_Sensor.ino
A library for TSL2561
Copyright (c) 2012 seeed technology inc.
Author : zhangkun
Create Time:
Change Log :
The MIT License (MIT)
Permission is hereby granted, free of charge, to any person obtaining a copy
of this software and associated documentation files (the "Software"), to deal
in the Software without restriction, including without limitation the rights
to use, copy, modify, merge, publish, distribute, sublicense, and/or sell
copies of the Software, and to permit persons to whom the Software is
furnished to do so, subject to the following conditions:
The above copyright notice and this permission notice shall be included in
all copies or substantial portions of the Software.
THE SOFTWARE IS PROVIDED "AS IS", WITHOUT WARRANTY OF ANY KIND, EXPRESS OR
IMPLIED, INCLUDING BUT NOT LIMITED TO THE WARRANTIES OF MERCHANTABILITY,
FITNESS FOR A PARTICULAR PURPOSE AND NONINFRINGEMENT. IN NO EVENT SHALL THE
AUTHORS OR COPYRIGHT HOLDERS BE LIABLE FOR ANY CLAIM, DAMAGES OR OTHER
LIABILITY, WHETHER IN AN ACTION OF CONTRACT, TORT OR OTHERWISE, ARISING FROM,
OUT OF OR IN CONNECTION WITH THE SOFTWARE OR THE USE OR OTHER DEALINGS IN
THE SOFTWARE.
*/
#include <Wire.h>
#include <Digital_Light_TSL2561.h>
void setup()
{
Wire.begin();
Serial.begin(9600);
TSL2561.init();
}
void loop()
{
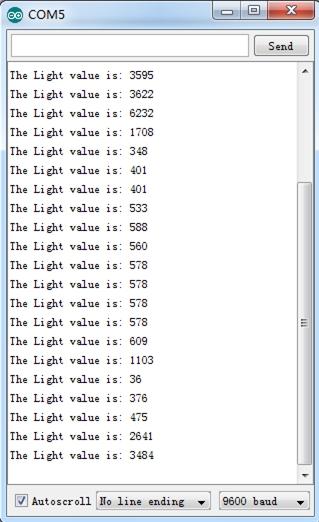
Serial.print("The Light value is: ");
Serial.println(TSL2561.readVisibleLux());
delay(1000);
}
- 步骤 4. 打开串口监视器来监控结果。
与 Raspberry Pi 一起使用
硬件
- 步骤 1. 准备以下物品:
| Raspberry pi | GrovePi_Plus | Grove - 数字光传感器 |
|---|---|---|
 |  | |
| 立即购买 | 立即购买 | 立即购买 |
- 按照 说明 配置开发环境。
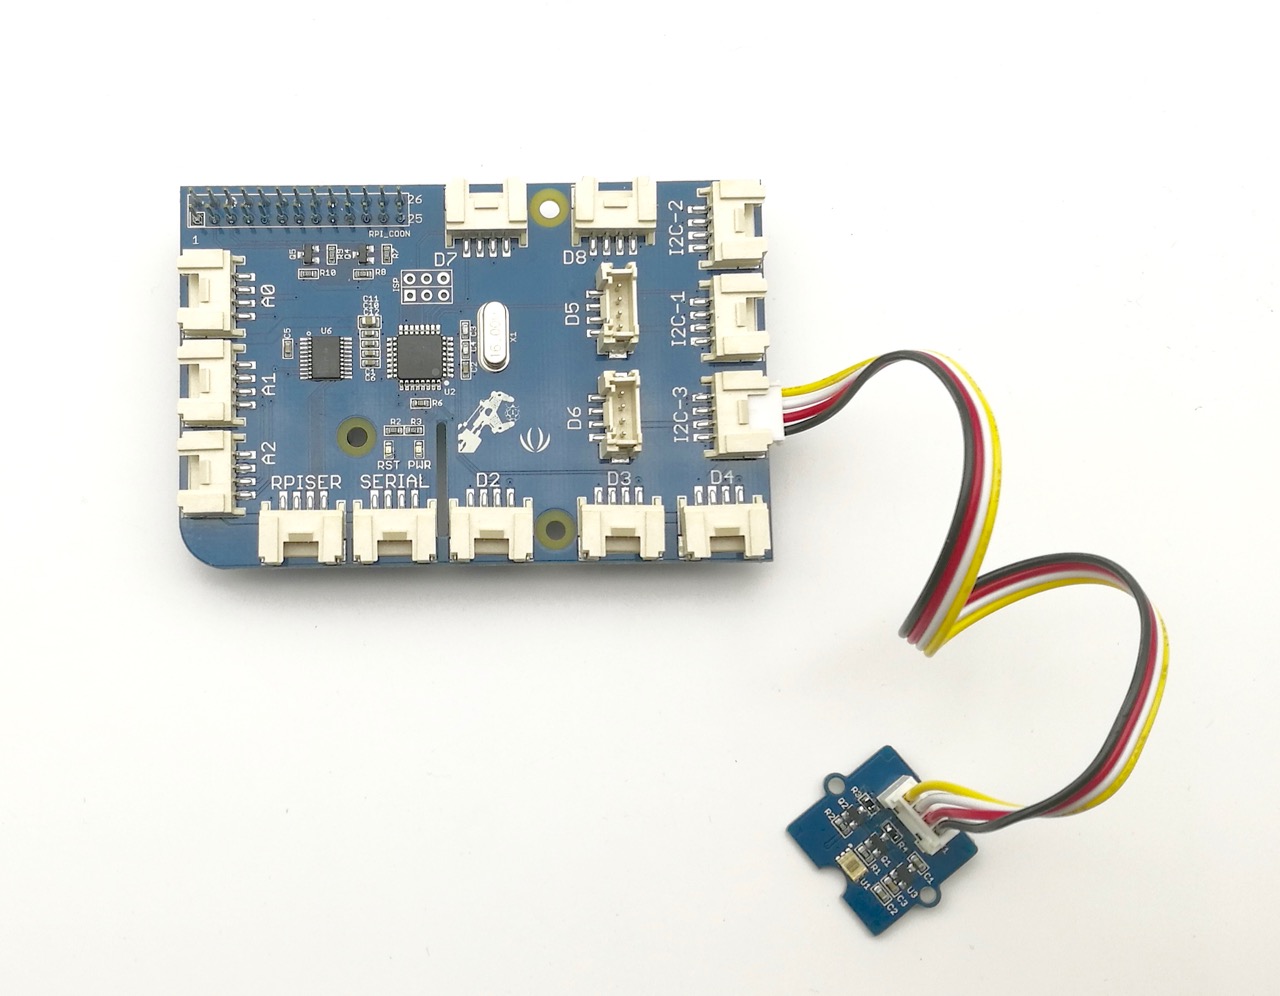
- 使用 grove 线缆将传感器插入 grovepi+ 的 I2C 插座。
软件
如果您使用的是 Raspberry Pi with Raspberrypi OS >= Bullseye,您必须仅使用 Python3 运行此命令行。
-
步骤 1. 按照 Setting Software 配置开发环境。
-
步骤 1. 导航到演示目录:
cd yourpath/GrovePi/Software/Python/grove_i2c_digital_light_sensor/
- 步骤 2. 查看代码
nano grove_i2c_digital_light_sensor.py # "Ctrl+x" 退出 #
#!/usr/bin/python
# TSL2561 I2C Light-To-Digital converter library for the Raspberry Pi.
# 数据手册: https://www.adafruit.com/datasheets/TSL2561.pdf
#
# 此库基于 Cedric Maion 的工作 https://github.com/cmaion/TSL2561
#
# 阅读 http://www.dexterindustries.com/topic/greehouse-project/ 了解关于传感器的论坛讨论

from time import sleep
import smbus
from Adafruit_I2C import Adafruit_I2C
import RPi.GPIO as GPIO
from smbus import SMBus

TSL2561_Control = 0x80
TSL2561_Timing = 0x81
TSL2561_Interrupt = 0x86
TSL2561_Channel0L = 0x8C
TSL2561_Channel0H = 0x8D
TSL2561_Channel1L = 0x8E
TSL2561_Channel1H = 0x8F

TSL2561_Address = 0x29 #设备地址

LUX_SCALE = 14 # 按 2^14 缩放
RATIO_SCALE = 9 # 按 2^9 缩放比率
CH_SCALE = 10 # 按 2^10 缩放通道值
CHSCALE_TINT0 = 0x7517 # 322/11 * 2^CH_SCALE
CHSCALE_TINT1 = 0x0fe7 # 322/81 * 2^CH_SCALE

K1T = 0x0040 # 0.125 * 2^RATIO_SCALE
B1T = 0x01f2 # 0.0304 * 2^LUX_SCALE
M1T = 0x01be # 0.0272 * 2^LUX_SCALE
K2T = 0x0080 # 0.250 * 2^RATIO_SCA
B2T = 0x0214 # 0.0325 * 2^LUX_SCALE
M2T = 0x02d1 # 0.0440 * 2^LUX_SCALE
K3T = 0x00c0 # 0.375 * 2^RATIO_SCALE
B3T = 0x023f # 0.0351 * 2^LUX_SCALE
M3T = 0x037b # 0.0544 * 2^LUX_SCALE
K4T = 0x0100 # 0.50 * 2^RATIO_SCALE
B4T = 0x0270 # 0.0381 * 2^LUX_SCALE
M4T = 0x03fe # 0.0624 * 2^LUX_SCALE
K5T = 0x0138 # 0.61 * 2^RATIO_SCALE
B5T = 0x016f # 0.0224 * 2^LUX_SCALE
M5T = 0x01fc # 0.0310 * 2^LUX_SCALE
K6T = 0x019a # 0.80 * 2^RATIO_SCALE
B6T = 0x00d2 # 0.0128 * 2^LUX_SCALE
M6T = 0x00fb # 0.0153 * 2^LUX_SCALE
K7T = 0x029a # 1.3 * 2^RATIO_SCALE
B7T = 0x0018 # 0.00146 * 2^LUX_SCALE
M7T = 0x0012 # 0.00112 * 2^LUX_SCALE
K8T = 0x029a # 1.3 * 2^RATIO_SCALE
B8T = 0x0000 # 0.000 * 2^LUX_SCALE
M8T = 0x0000 # 0.000 * 2^LUX_SCALE


K1C = 0x0043 # 0.130 * 2^RATIO_SCALE
B1C = 0x0204 # 0.0315 * 2^LUX_SCALE
M1C = 0x01ad # 0.0262 * 2^LUX_SCALE
K2C = 0x0085 # 0.260 * 2^RATIO_SCALE
B2C = 0x0228 # 0.0337 * 2^LUX_SCALE
M2C = 0x02c1 # 0.0430 * 2^LUX_SCALE
K3C = 0x00c8 # 0.390 * 2^RATIO_SCALE
B3C = 0x0253 # 0.0363 * 2^LUX_SCALE
M3C = 0x0363 # 0.0529 * 2^LUX_SCALE
K4C = 0x010a # 0.520 * 2^RATIO_SCALE
B4C = 0x0282 # 0.0392 * 2^LUX_SCALE
M4C = 0x03df # 0.0605 * 2^LUX_SCALE
K5C = 0x014d # 0.65 * 2^RATIO_SCALE
B5C = 0x0177 # 0.0229 * 2^LUX_SCALE
M5C = 0x01dd # 0.0291 * 2^LUX_SCALE
K6C = 0x019a # 0.80 * 2^RATIO_SCALE
B6C = 0x0101 # 0.0157 * 2^LUX_SCALE
M6C = 0x0127 # 0.0180 * 2^LUX_SCALE
K7C = 0x029a # 1.3 * 2^RATIO_SCALE
B7C = 0x0037 # 0.00338 * 2^LUX_SCALE
M7C = 0x002b # 0.00260 * 2^LUX_SCALE
K8C = 0x029a # 1.3 * 2^RATIO_SCALE
B8C = 0x0000 # 0.000 * 2^LUX_SCALE
M8C = 0x0000 # 0.000 * 2^LUX_SCALE

# 总线参数
rev = GPIO.RPI_REVISION
if rev == 2 or rev == 3:
 bus = smbus.SMBus(1)
else:
 bus = smbus.SMBus(0)
i2c = Adafruit_I2C(TSL2561_Address)

debug = False
cooldown_time = 0.005 # 以秒为单位测量
packageType = 0 # 0=T 封装, 1=CS 封装
gain = 0        # 当前增益: 0=1x, 1=16x [动态选择]
gain_m = 1      # 当前增益,作为乘数
timing = 2      # 当前积分时间: 0=13.7ms, 1=101ms, 2=402ms [动态选择]
timing_ms = 0   # 当前积分时间,以毫秒为单位
channel0 = 0    # 可见光+红外传感器的原始当前值
channel1 = 0    # 红外传感器的原始当前值
schannel0 = 0   # 可见光+红外传感器的标准化当前值
schannel1 = 0   # 红外传感器的标准化当前值


def readRegister(address):
 try:
  byteval = i2c.readU8(address)

  sleep(cooldown_time)
  if (debug):
   print("TSL2561.readRegister: returned 0x%02X from reg 0x%02X" % (byteval, address))
  return byteval
 except IOError:
  print("TSL2561.readRegister: error reading byte from reg 0x%02X" % address)
  return -1


def writeRegister(address, val):
 try:
  i2c.write8(address, val)

  sleep(cooldown_time)
  if (debug):
   print("TSL2561.writeRegister: wrote 0x%02X to reg 0x%02X" % (val, address))
 except IOError:

  sleep(cooldown_time)
  print("TSL2561.writeRegister: error writing byte to reg 0x%02X" % address)
  return -1

def powerUp():
 writeRegister(TSL2561_Control, 0x03)

def powerDown():
 writeRegister(TSL2561_Control, 0x00)

def setTintAndGain():
 global gain_m, timing_ms

 if gain == 0:
  gain_m = 1
 else:
  gain_m = 16

 if timing == 0:
  timing_ms = 13.7
 elif timing == 1:
  timing_ms = 101
 else:
  timing_ms = 402
 writeRegister(TSL2561_Timing, timing | gain << 4)

def readLux():
 sleep(float(timing_ms + 1) / 1000)

 ch0_low  = readRegister(TSL2561_Channel0L)
 ch0_high = readRegister(TSL2561_Channel0H)
 ch1_low  = readRegister(TSL2561_Channel1L)
 ch1_high = readRegister(TSL2561_Channel1H)

 global channel0, channel1
 channel0 = (ch0_high<<8) | ch0_low
 channel1 = (ch1_high<<8) | ch1_low

 sleep(cooldown_time)
 if debug:
  print("TSL2561.readVisibleLux: channel 0 = %i, channel 1 = %i [gain=%ix, timing=%ims]" % (channel0, channel1, gain_m, timing_ms))

def readVisibleLux():
 global timing, gain

 powerUp()
 readLux()

 if channel0 < 500 and timing == 0:
  timing = 1
  sleep(cooldown_time)
  if debug:
   print("TSL2561.readVisibleLux: too dark. Increasing integration time from 13.7ms to 101ms")
  setTintAndGain()
  readLux()

 if channel0 < 500 and timing == 1:
  timing = 2
  sleep(cooldown_time)
  if debug:
   print("TSL2561.readVisibleLux: too dark. Increasing integration time from 101ms to 402ms")
  setTintAndGain()
  readLux()

 if channel0 < 500 and timing == 2 and gain == 0:
  gain = 1
  sleep(cooldown_time)
  if debug:
   print("TSL2561.readVisibleLux: too dark. Setting high gain")
  setTintAndGain()
  readLux()

 if (channel0 > 20000 or channel1 > 20000) and timing == 2 and gain == 1:
  gain = 0
  sleep(cooldown_time)
  if debug:
   print("TSL2561.readVisibleLux: enough light. Setting low gain")
  setTintAndGain()
  readLux()

 if (channel0 > 20000 or channel1 > 20000) and timing == 2:
  timing = 1
  sleep(cooldown_time)
  if debug:
   print("TSL2561.readVisibleLux: enough light. Reducing integration time from 402ms to 101ms")
  setTintAndGain()
  readLux()

 if (channel0 > 10000 or channel1 > 10000) and timing == 1:
  timing = 0
  sleep(cooldown_time)
  if debug:
   print("TSL2561.readVisibleLux: enough light. Reducing integration time from 101ms to 13.7ms")
  setTintAndGain()
  readLux()

 powerDown()

 if (timing == 0 and (channel0 > 5000 or channel1 > 5000)) or (timing == 1 and (channel0 > 37000 or channel1 > 37000)) or (timing == 2 and (channel0 > 65000 or channel1 > 65000)):
  # 溢出
  return -1

 return calculateLux(channel0, channel1)

def calculateLux(ch0, ch1):
 chScale = 0
 if timing == 0:   # 13.7 毫秒
  chScale = CHSCALE_TINT0
 elif timing == 1: # 101 毫秒
  chScale = CHSCALE_TINT1;
 else:           # 假设无缩放
  chScale = (1 << CH_SCALE)

 if gain == 0:
  chScale = chScale << 4 # 将 1X 缩放到 16X

 # 缩放通道值
 global schannel0, schannel1
 schannel0 = (ch0 * chScale) >> CH_SCALE
 schannel1 = (ch1 * chScale) >> CH_SCALE

 ratio = 0
 if schannel0 != 0:
  ratio = (schannel1 << (RATIO_SCALE+1)) / schannel0
 ratio = (ratio + 1) >> 1

 if packageType == 0: # T 封装
  if ((ratio >= 0) and (ratio <= K1T)):
   b=B1T; m=M1T;
  elif (ratio <= K2T):
   b=B2T; m=M2T;
  elif (ratio <= K3T):
   b=B3T; m=M3T;
  elif (ratio <= K4T):
   b=B4T; m=M4T;
  elif (ratio <= K5T):
   b=B5T; m=M5T;
  elif (ratio <= K6T):
   b=B6T; m=M6T;
  elif (ratio <= K7T):
   b=B7T; m=M7T;
  elif (ratio > K8T):
   b=B8T; m=M8T;
 elif packageType == 1: # CS 封装
  if ((ratio >= 0) and (ratio <= K1C)):
   b=B1C; m=M1C;
  elif (ratio <= K2C):
   b=B2C; m=M2C;
  elif (ratio <= K3C):
   b=B3C; m=M3C;
  elif (ratio <= K4C):
   b=B4C; m=M4C;
  elif (ratio <= K5C):
   b=B5C; m=M5C;
  elif (ratio <= K6C):
   b=B6C; m=M6C;
  elif (ratio <= K7C):
   b=B7C; m=M7C;

 temp = ((schannel0*b)-(schannel1*m))
 if temp < 0:
  temp = 0;
 temp += (1<<(LUX_SCALE-1))
 # 去掉小数部分
 lux = temp>>LUX_SCALE
 sleep(cooldown_time)
 if debug:
  print("TSL2561.calculateLux: %i" % lux)

 return lux

def init():
 powerUp()
 setTintAndGain()
 writeRegister(TSL2561_Interrupt, 0x00)
 powerDown()

def main():
 init()
 while (True):
  print("Lux: %i [Vis+IR=%i, IR=%i @ Gain=%ix, Timing=%.1fms]" % (readVisibleLux(), channel0, channel1, gain_m, timing_ms))
  sleep(1)

if __name__ == "__main__":
        main()
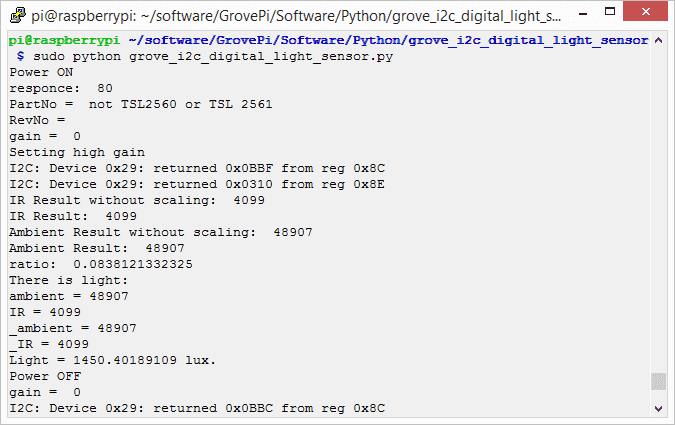
- 步骤 3. 运行演示程序。
sudo python3 grove_i2c_digital_light_sensor.py
- 步骤 4. 这是运行结果。
原理图在线查看器
资源
- [Eagle] Grove - 数字光传感器原理图
- [PDF] Grove - 数字光传感器原理图 PDF 文件
- [PDF] Grove - 数字光传感器 PCB PDF 文件
- [库文件] 库文件 Github Grove-数字光传感器
- [数据手册] TSL2561 数据手册
项目
Seeed LoRa IoTea 解决方案:应用于茶园的自动信息收集系统。它是智能农业信息收集的一部分。
Intel Edison IoT 水培控制器:在波士顿 IoT 黑客马拉松期间使用 Intel Edison 的 IoT 水培控制器。
COI - 光透射计:成品使用 Grove 入门套件 Plus 中提供的光传感器来测量光强度的变化。
技术支持与产品讨论
感谢您选择我们的产品!我们在这里为您提供不同的支持,以确保您使用我们产品的体验尽可能顺畅。我们提供多种沟通渠道,以满足不同的偏好和需求。