Grove - GPS (Air530 / Air530Z)
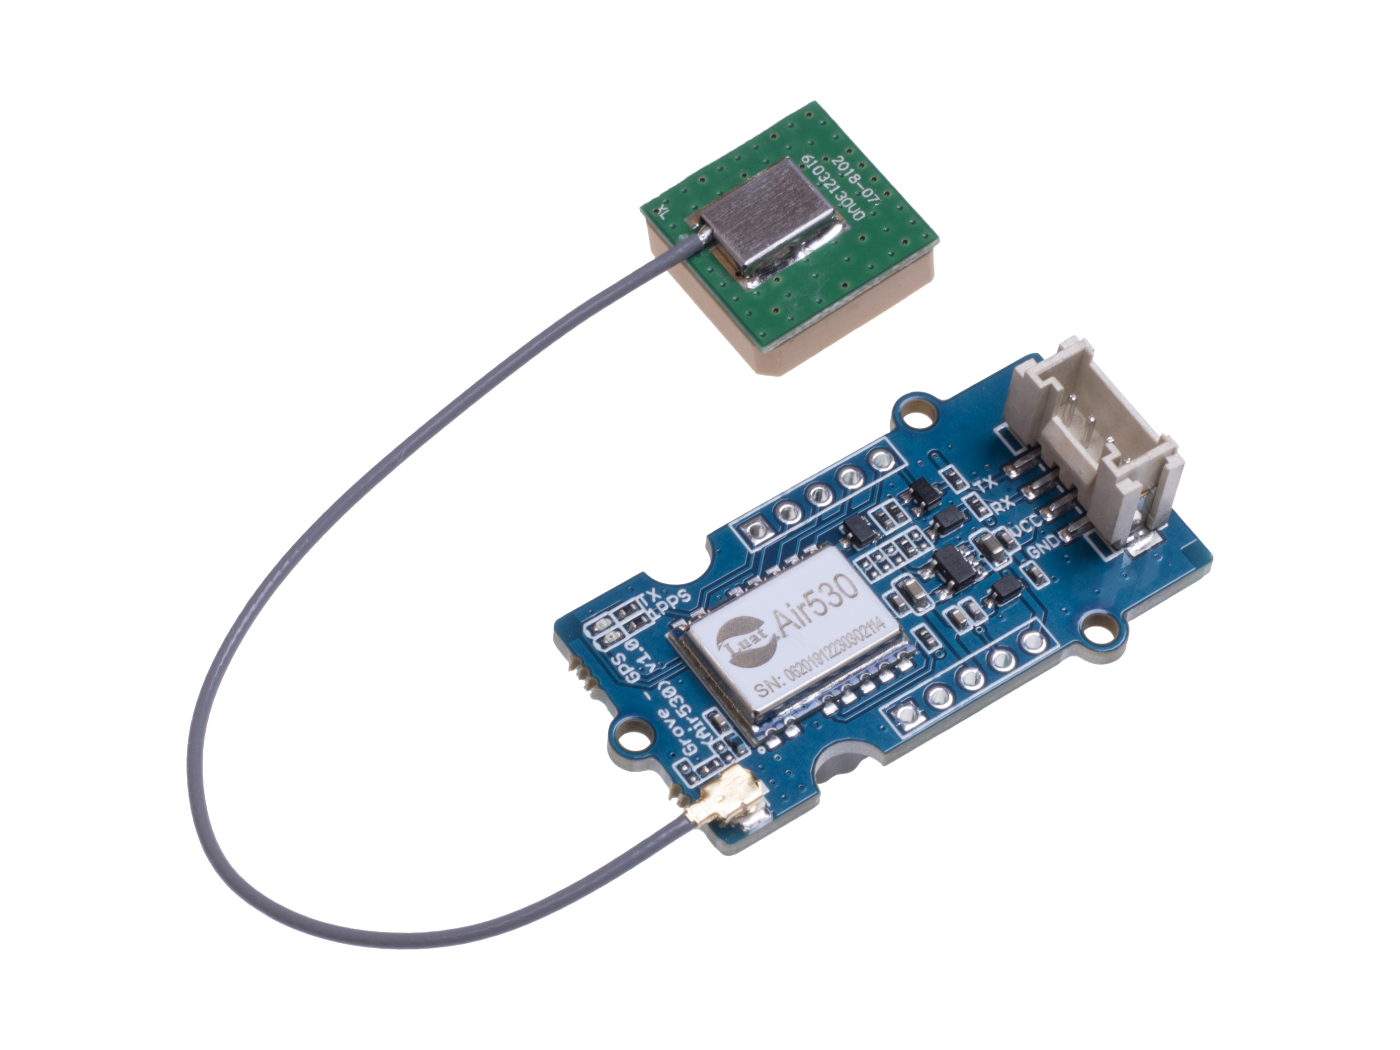
是否困惑于您的GPS在城市或户外环境下仅在一个或少数几个卫星模块下工作不佳?那么您不应该错过我们新的Grove-GPS (Air530 / Air530Z)。它是一个高性能、高度集成的多模式卫星定位和导航模块。它支持GPS / 北斗 / Glonass / Galileo / QZSS / SBAS,这使其适用于汽车导航、智能穿戴和无人机等GNSS定位应用。
我们已经发布了Seeed GPS模块选择指南,它将帮助您选择最适合您需求的GPS模块。
特性
- 成本效益高
- 高度集成的多模式卫星定位和导航
- 紧凑尺寸,易于部署
- 体积小,功耗低
有关Grove模块的更多详细信息,请参考Grove系统
规格参数
| 参数 | 值 |
|---|---|
| 供电电压 | 3.3V/5V |
| 工作电流 | 最高60mA |
| 温启动时间 | 4s |
| 冷启动时间 | 30s |
支持的平台
| Arduino | Raspberry Pi | |||
|---|---|---|---|---|
上述提到的支持平台是/是该模块软件或理论兼容性的指示。在大多数情况下,我们只为Arduino平台提供软件库或代码示例。不可能为所有可能的MCU平台提供软件库/演示代码。因此,用户必须编写自己的软件库。
开始使用
如果这是您第一次使用 Arduino,我们强烈建议您在开始之前先查看 Arduino 入门指南。
与 Arduino 配合使用
此示例通过使用软件串口从 GPS 读取数据,并将其发送回串口。
硬件
- 步骤 1. 准备以下物品:
| Seeeduino V4.2 | Base Shield | Grove - GPS (Air530 / Air530Z) |
|---|---|---|
 |  |  |
| 立即购买 | 立即购买 | 立即购买 |
- 步骤 2. 将 Grove - GPS 连接到 Grove-Base Shield 的 D2 端口。
- 步骤 3. 将 Grove - Base Shield 插入 Seeeduino。
- 步骤 4. 通过 USB 线将 Seeeduino 连接到 PC。

如果我们没有 Grove Base Shield,我们也可以直接将 Grove - GPS 连接到 Seeeduino,如下所示。
| Seeeduino | Grove - GPS |
|---|---|
| 5V | Red |
| GND | Black |
| D3 | White |
| D2 | Yellow |
软件
请注意,u-center 软件仅适用于 Windows。
- 步骤 1. 安装 u-center 软件。
我们建议使用 u-center 2,该软件功能更强大,延迟更少。
- 步骤 2. 将代码复制到 Arduino IDE 中并上传。如果您不知道如何上传代码,请查看 如何上传代码。
#include <SoftwareSerial.h>
SoftwareSerial SoftSerial(2, 3);
unsigned char buffer[64];                   // buffer array for data receive over serial port
int count=0;                                // counter for buffer array
void setup()
{
    SoftSerial.begin(9600);                 // the SoftSerial baud rate
    Serial.begin(9600);                     // the Serial port of Arduino baud rate.
}

void loop()
{
    if (SoftSerial.available())                     // if date is coming from software serial port ==> data is coming from SoftSerial shield
    {
        while(SoftSerial.available())               // reading data into char array
        {
            buffer[count++]=SoftSerial.read();      // writing data into array
            if(count == 64)break;
        }
        Serial.write(buffer,count);                 // if no data transmission ends, write buffer to hardware serial port
        clearBufferArray();                         // call clearBufferArray function to clear the stored data from the array
        count = 0;                                  // set counter of while loop to zero
    }
    if (Serial.available())                 // if data is available on hardware serial port ==> data is coming from PC or notebook
    SoftSerial.write(Serial.read());        // write it to the SoftSerial shield
}


void clearBufferArray()                     // function to clear buffer array
{
    for (int i=0; i<count;i++)
    {
        buffer[i]=NULL;
    }                      // clear all index of array with command NULL
}
-
步骤 3. 打开 U-center。
-
步骤 4. 点击 Receiver -> Port 并选择 Arduino 正在使用的 COM 端口。
-
步骤 5. 点击 Receiver -> Baudrate 并确保选择了 9600。
-
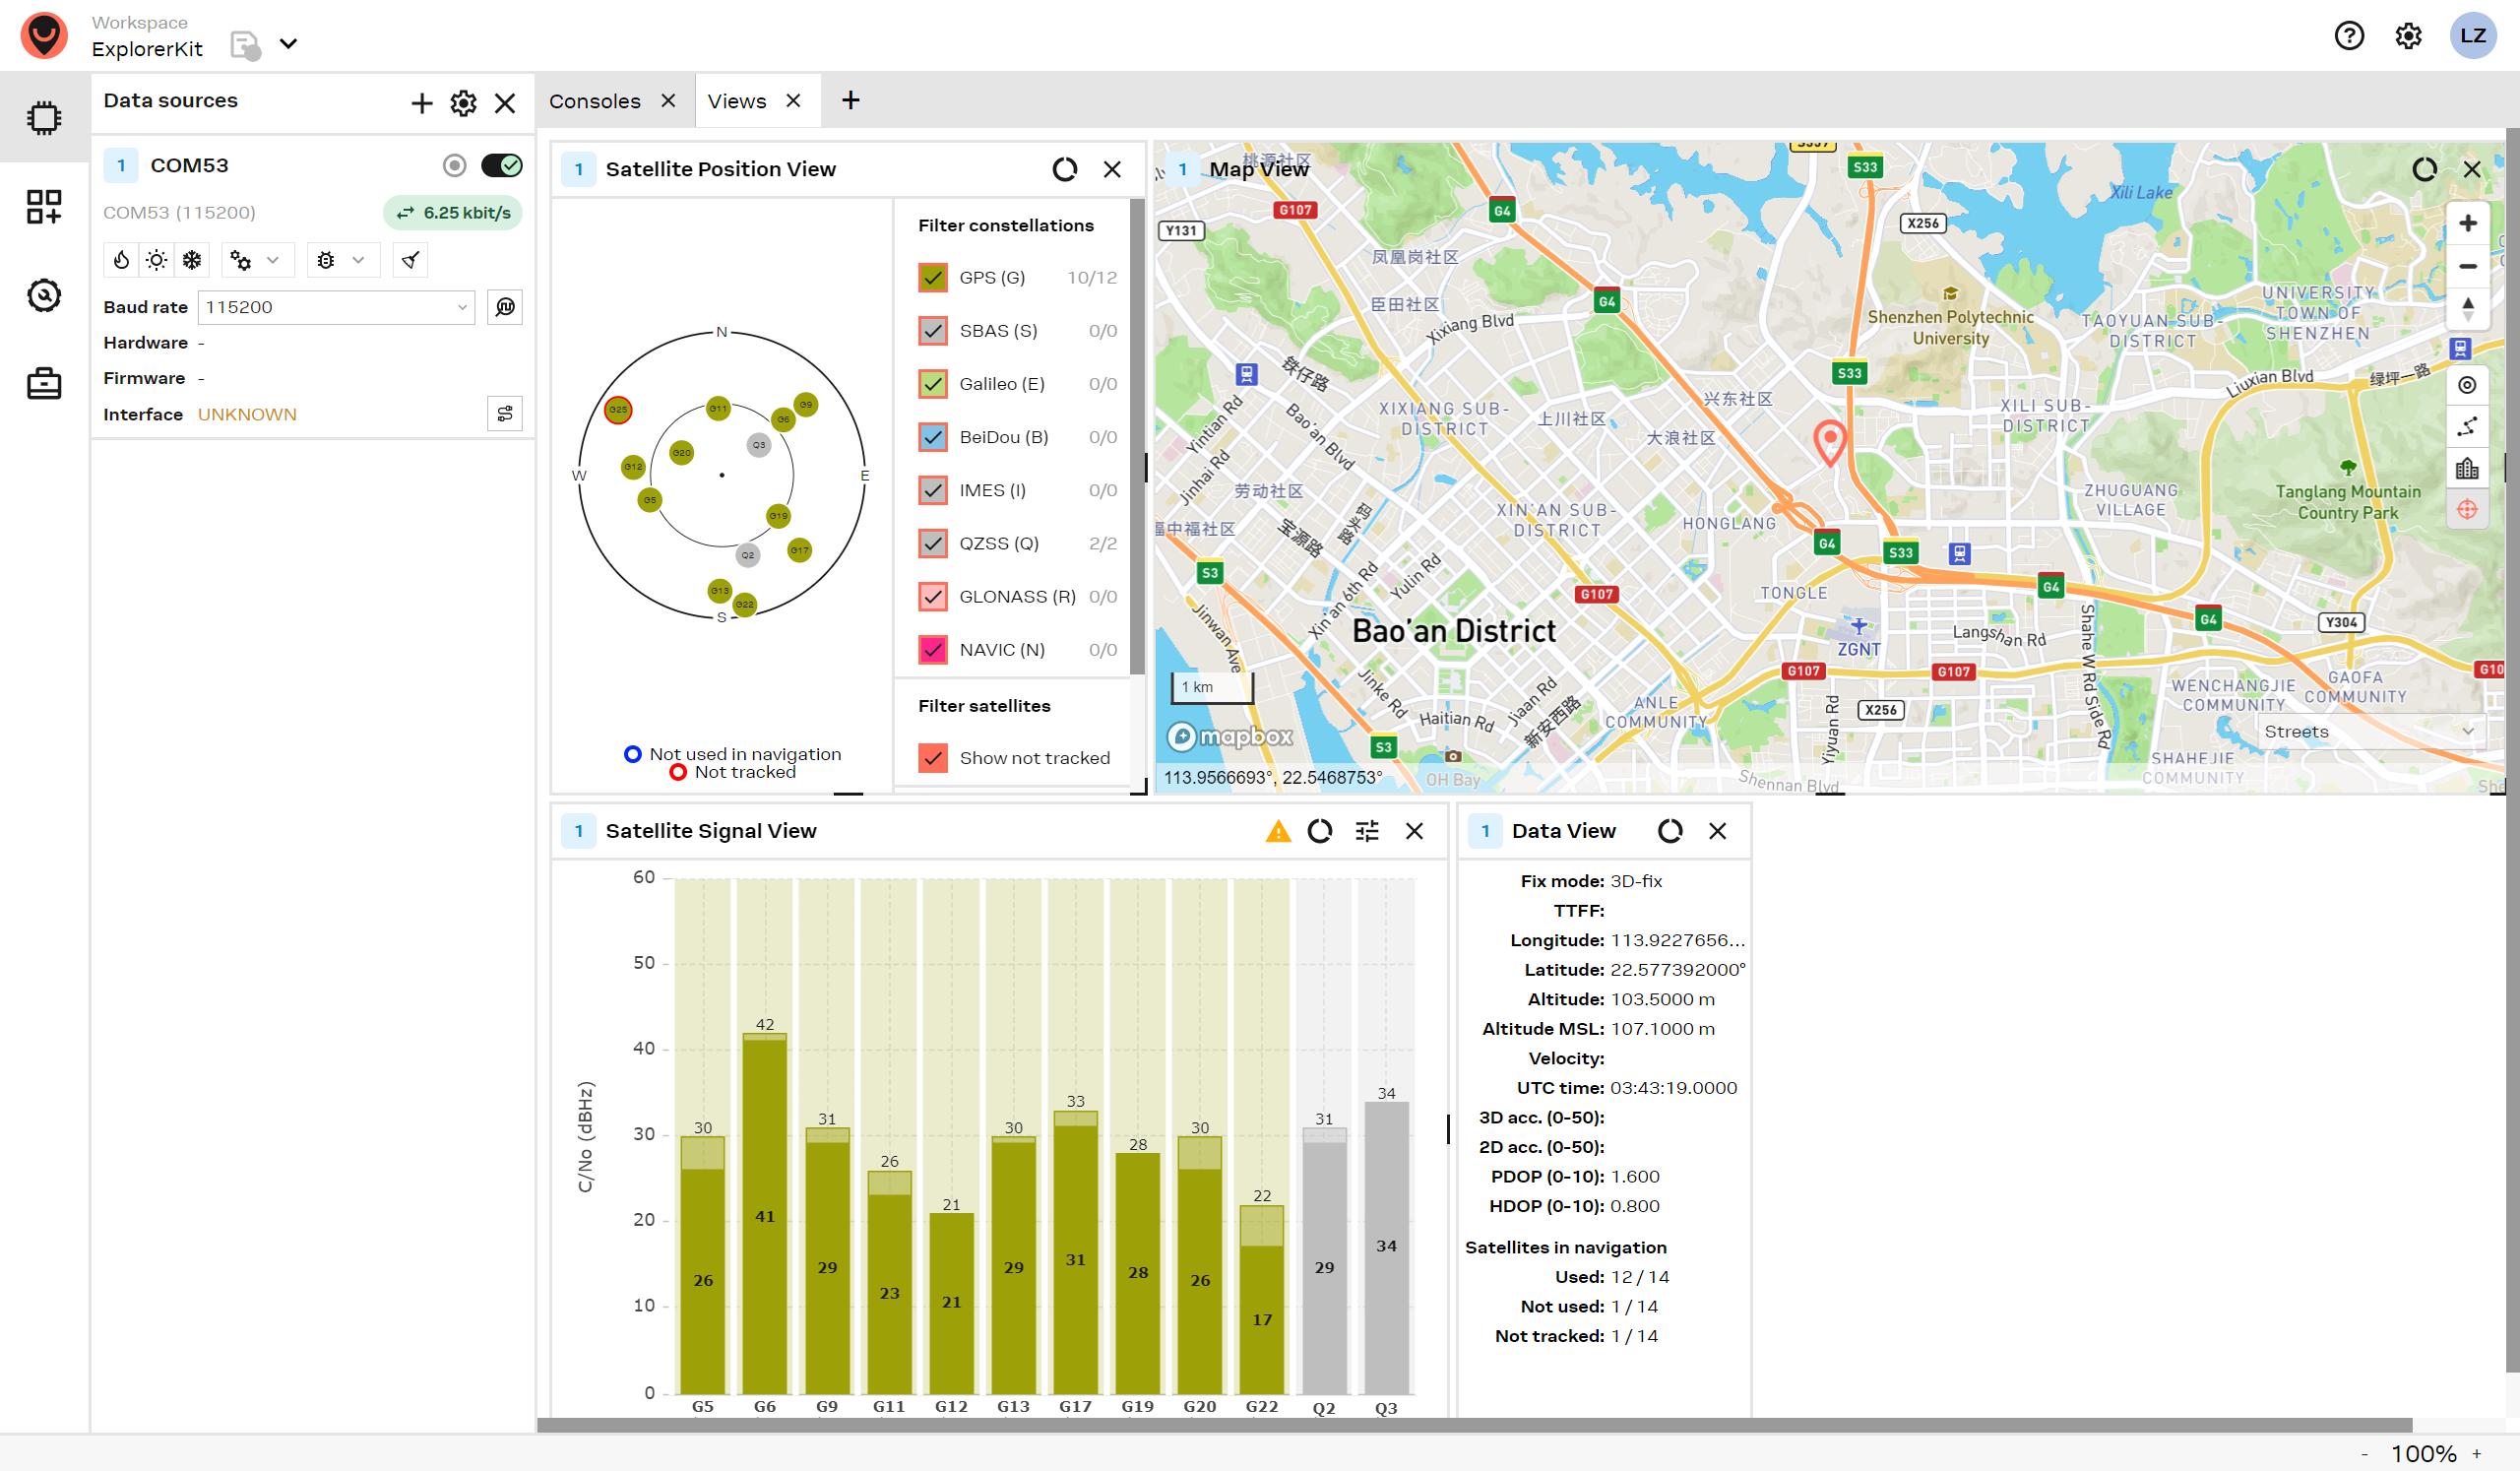
步骤 6. 点击 View -> Text Console,您应该会看到一个窗口,显示 NMEA 数据流。
-
步骤 7. 打开串口监视器,您可以看到如下所示:

我们也可以在 Google Earth 中查看数据:
如果您使用的是 u-center 2,那么您可以跳过以下步骤,所有这些功能都已集成在 u-center 2 中。
-
步骤 1. 点击 File -> Database Export -> Google Earth KML
-
步骤 2. 这应该会启动 Google Earth,显示 u-center 捕获的历史记录。
-
步骤 3. 或者,可以通过按工具栏上的红色圆圈来记录数据,然后会询问您要将记录保存在哪里。
-
步骤 4. 当我们捕获了足够的数据后,点击黑色方块停止记录。
-
步骤 5. 然后我们可以通过将 ubx 文件上传到 GPSVisualizer 来将生成的 .ubx 文件转换为 KML,位置(红点)将显示在地图上,如下所示:

测试最好在户外进行,以避免因信号传输不良而导致的位置不准确。
原理图在线查看器
资源
- [ZIP] GPS 原理图(PDF)
- [PDF] Air 530 用户手册
- [PDF] Air 530Z 用户手册 (中文)
项目
GPS/GPRS 追踪器项目:在这个新项目中,我们将展示使用 GPRS 技术和 MQTT 协议连接的 GPS 追踪器。
技术支持与产品讨论
感谢您选择我们的产品!我们在这里为您提供不同的支持,以确保您使用我们产品的体验尽可能顺畅。我们提供多种沟通渠道,以满足不同的偏好和需求。