Grove - 高温传感器
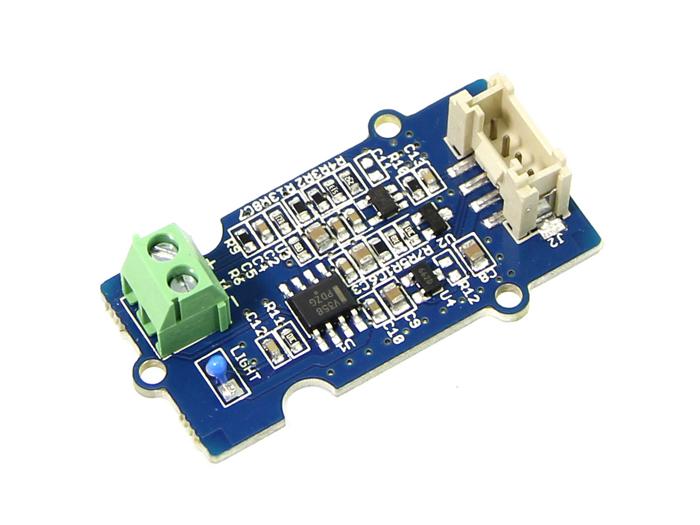
热电偶是非常敏感的器件。它需要一个具有冷端补偿功能的良好放大器。Grove - 高温传感器使用K型热电偶和热电偶放大器,该放大器使用热敏电阻测量环境温度以进行冷端补偿。该传感器的可检测范围为-50~600°C,精度为±(2.0% + 2°C)。
![]()
可升级为工业传感器
通过SenseCAP S2110控制器和S2100数据记录器,您可以轻松将Grove转换为LoRaWAN®传感器。Seeed不仅帮助您进行原型设计,还为您提供了使用SenseCAP系列坚固工业传感器扩展项目的可能性。
SenseCAP S210x系列工业传感器为环境感知提供开箱即用的体验。请参考具有更高性能和稳定性的S2101无线温湿度传感器,用于空气质量监测。该系列包括土壤湿度、空气温湿度、光照强度、CO2、EC和8合1气象站传感器。尝试最新的SenseCAP S210x,助力您下一个成功的工业项目。
| SenseCAP工业传感器 |
 |
| S2101 空气温湿度传感器 |
版本
| 产品版本 | 变更 | 发布日期 |
|---|---|---|
| Grove - 高温传感器 V1.0 | 初始版本 | 2014年2月25日 |
规格参数
| 参数 | 数值/范围 |
|---|---|
| 工作电压 | 3.3-5V |
| 25℃时最大功率额定值 | 300mW |
| 工作温度范围 | -40 ~ +125 ℃ |
| 温度测量范围 | -50 ~ +600 ℃ |
| 放大器输出电压范围 | 0 ~ 3.3 V |
| 热电偶材料 | 玻璃纤维 |
| 冷端补偿 | 环境温度测量 |
| 热电偶温度测量精度 | +/-2.0% (+ 2 ℃) |
| 热电偶温度传感器线缆长度 | 100cm |
| 尺寸 | 20mm x 40mm |
有关Grove模块的更多详细信息,请参考 Grove系统
支持的平台
| Arduino | Raspberry Pi | |||
|---|---|---|---|---|
上述提到的支持平台是/是该模块软件或理论兼容性的指示。在大多数情况下,我们只为Arduino平台提供软件库或代码示例。不可能为所有可能的MCU平台提供软件库/演示代码。因此,用户必须编写自己的软件库。
开始使用
与 Arduino 一起使用
硬件
- 步骤 1. 我们需要准备以下物品:
| Seeeduino V4.2 | Base Shield | Grove-高温传感器 |
|---|---|---|
 |  |  |
| 立即购买 | 立即购买 | 立即购买 |
- 步骤 2. 将 Grove-高温传感器连接到 Base Shield 的 A0 接口。
- 步骤 3. 将 Base Shield 插入 Seeeduino-V4.2。
- 步骤 4. 使用 USB 线将 Seeeduino-V4.2 连接到 PC。
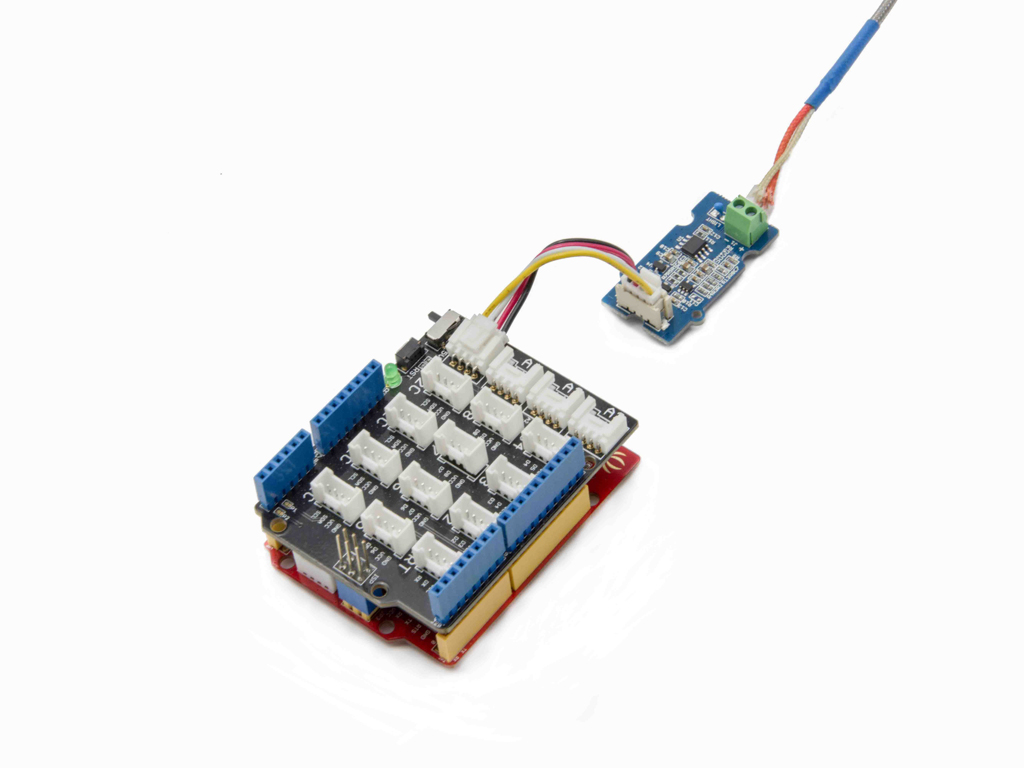
如果我们没有 Base Shield,不用担心,传感器可以直接连接到您的 Arduino。请按照下表与 Arduino 连接。
| Seeeduino |Grove-高温传感器 | |------------------|------- --| | GND | 黑色 | | 5V | 红色 | | A1 | 白色 | | A0 | 黄色 |
软件
- 步骤 1. 从 Github 下载 Grove-高温传感器库。
- 步骤 2. 参考 如何安装库 为 Arduino 安装库。
- 步骤 3. 将代码复制到 Arduino IDE 并上传。
#include "High_Temp.h"

HighTemp ht(A1, A0);

void setup()
{
    Serial.begin(115200);
    Serial.println("grove - hight temperature sensor test demo");
    ht.begin();
}

void loop()
{
    Serial.println(ht.getThmc());
    delay(100);
}
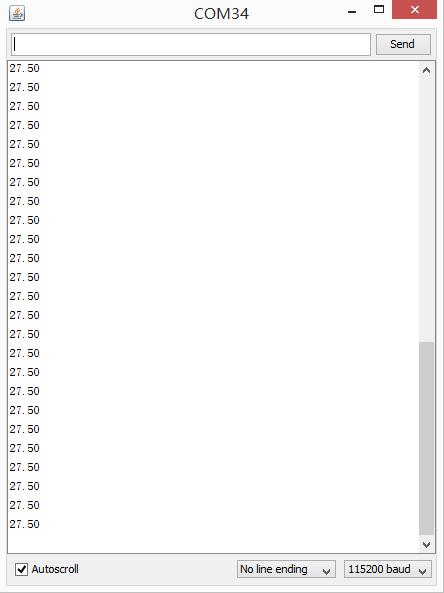
- 步骤 4. 打开串口监视器并设置波特率为 115200,我们将在这里看到以摄氏度为单位的温度。
与 Raspberry Pi 一起使用
硬件
- 步骤 1. 准备以下物品:
| Raspberry pi | GrovePi_Plus | Grove - 超声波测距仪 |
|---|---|---|
 |  | |
| 立即购买 | 立即购买 | 立即购买 |
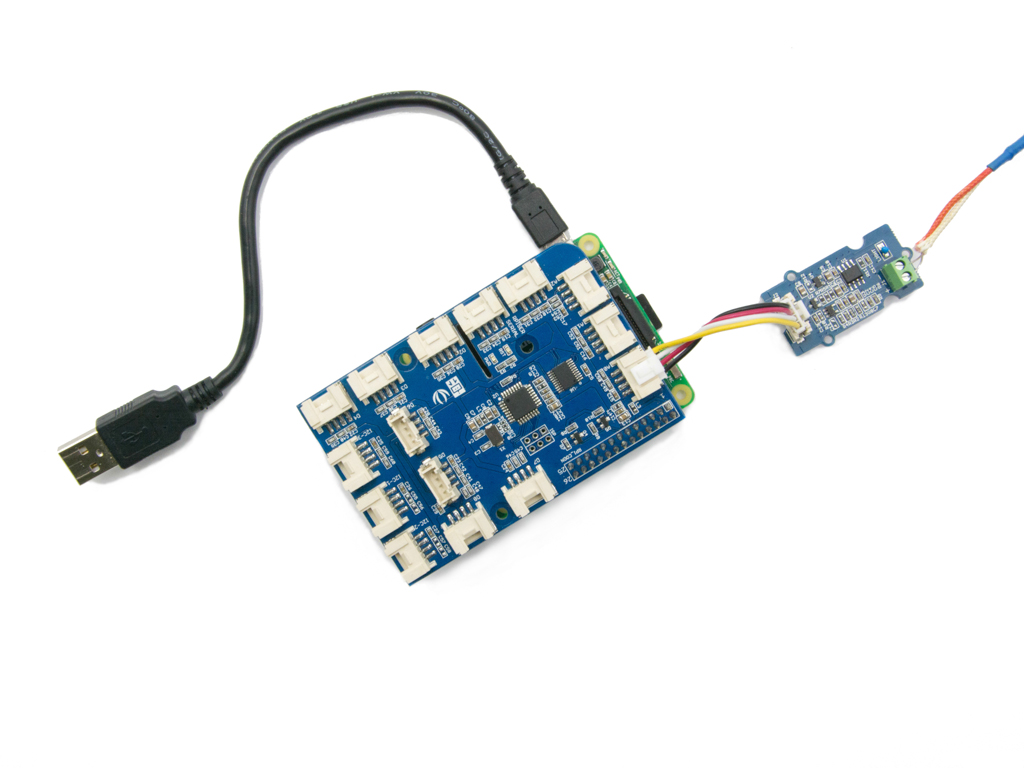
- 步骤 2. 将 GrovePi_Plus 插入 Raspberry。
- 步骤 3. 将 Grove-超声波测距仪连接到 GrovePi_Plus 的 A0 端口。
- 步骤 4. 通过 USB 线将 Raspberry 连接到 PC。
软件
在本 wiki 中,我们使用路径 ~/GrovePi/ 而不是 /home/pi/Desktop/GrovePi,您需要确保步骤 2 和步骤 3 使用相同的路径。
我们强烈建议您更新固件,否则某些传感器可能会出现错误。
如果您使用的是 Raspberry Pi with Raspberrypi OS >= Bullseye,您必须仅使用 Python3 运行此命令行。
- 步骤 3. Git 克隆 Github 仓库。
cd ~
git clone https://github.com/DexterInd/GrovePi.git
- 步骤 4. 执行以下命令使用超声波测距仪测量距离。
cd ~/GrovePi/Software/Python/grove_hightemperature_sensor
python3 high_temperature_example.py
这是 grove_ultrasonic.py 代码。
import grove_hightemperature_sensor as grovepi # our library
from time import sleep # and for the sleep function
import sys # we need this for the exception throwing stuff

# Don't forget to run it with Python 3 !!
# Don't forget to run it with Python 3 !!
# Don't forget to run it with Python 3 !!

def Main():
    room_temperature_pin = 15 # this is equal to A1
    probe_temperature_pin = 14 # this is equal to A0
    # so you have to connect the sensor to A0 port

    # instatiate a HighTemperatureSensor object
    sensor = grovepi.HighTemperatureSensor(room_temperature_pin, probe_temperature_pin)

    # and do this indefinitely
    while True:
        # read the room temperature
        room_temperature = sensor.getRoomTemperature()
        # and also what's important to us: the temperature at the tip of the K-Type sensor
        probe_temperature = sensor.getProbeTemperature()

        # print it in a fashionable way
        print('[room temperature: {:5.2f}°C][probe temperature: {:5.2f}°C]'.format(room_temperature, probe_temperature))
        # and wait for 250 ms before taking another measurement - so we don't overflow the terminal
        sleep(0.25)


if __name__ == "__main__":
    try:
        Main()

    # in case CTRL-C / CTRL-D keys are pressed (or anything else that might interrupt)
    except KeyboardInterrupt:
        print('[Keyboard interrupted]')
        sys.exit(0)

    # in case there's an IO error aka I2C
    except IOError:
        print('[IO Error]')
        sys.exit(0)

    # in case we have a math error (like division by 0 - can happen depending on the read values)
    # or if the values exceed a certain threshold
    # experiment and you'll see
    except ValueError as e:
        print('[{}]'.format(str(e)))
        sys.exit(0)
- 步骤 4. 我们将在终端上看到温度显示如下。
pi@raspberrypi:~/GrovePi/Software/Python/grove_hightemperature_sensor $ python3 high_temperature_example.py
[room temperature: 20.47°C][probe temperature: 32.19°C]
[room temperature: 20.47°C][probe temperature: 32.19°C]
[room temperature: 20.47°C][probe temperature: 32.19°C]
[room temperature: 20.47°C][probe temperature: 32.19°C]
[room temperature: 20.60°C][probe temperature: 32.19°C]
[room temperature: 20.60°C][probe temperature: 32.19°C]
[room temperature: 20.60°C][probe temperature: 32.19°C]
常见问题
Q1: 如何进行Grove高温传感器校准?
A1: 请下载库文件,然后按照以下说明操作。
- 步骤 1. 运行 getTemperature-calibration-measurement.ino 以获取以下信息。
10:02:17.792 -> "You have Scucessfully record the sample data,please copy the following line of code to your clipboard and replace the first line of function loop()
10:02:17.935 ->       double TMP[]={10.29,10.29,10.29,10.29,10.29,10.29,10.29,10.29,10.29,10.29};
10:02:18.038 ->       double Real_temperature[]={10.00,20.00,30.00,40.00,50.00,60.00,70.00,80.00,90.00,100.00};
-
步骤 2. 粘贴到 getTemperature-calibration_demo.ino 并运行校准。
-
步骤 3. 运行 getTemperature.ino 读取温度。
资源
- [PDF] 下载Wiki PDF
- [Eagle] Grove - 高温传感器 Eagle 文件
- [库文件] 高温传感器库
- [数据手册] OPA333 PDF
- [数据手册] LMV358 PDF
技术支持与产品讨论
感谢您选择我们的产品!我们在这里为您提供不同的支持,以确保您使用我们产品的体验尽可能顺畅。我们提供多种沟通渠道,以满足不同的偏好和需求。