Grove - 温湿度传感器(DHT20)
全新的 Grove - 温湿度传感器基于 DHT20 传感器。DHT20 是 DHT11 的升级版本,与之前的版本相比,温度和湿度测量精度更高,测量范围更大。它具有 I2C 输出功能,这意味着使用起来更加简单。

可升级为工业级传感器
通过 SenseCAP S2110 控制器和 S2100 数据记录器,您可以轻松将 Grove 转换为 LoRaWAN® 传感器。Seeed 不仅帮助您进行原型设计,还为您提供了使用 SenseCAP 系列坚固的工业传感器扩展项目的可能性。
SenseCAP S210x 系列工业传感器为环境感知提供开箱即用的体验。请参考具有更高性能和稳定性的 S2101 无线温湿度传感器,用于空气质量监测。该系列包括土壤湿度、空气温湿度、光照强度、CO2、EC 和 8 合 1 气象站传感器。为您下一个成功的工业项目尝试最新的 SenseCAP S210x。
| SenseCAP 工业传感器 |
 |
| S2101 空气温湿度传感器 |
特性
- 高精度:
- 温度精度:± 0.5 ℃
- 湿度精度:± 3 % RH ( 25 ℃ )
- 宽测量范围:
- 测量范围(湿度):0 ~ 100% RH
- 测量范围(温度):-40 ~ + 80 ℃
- 更好的兼容性:
- 数字输出
- I²C 接口
- 完全校准
- 优异的长期稳定性
- 快速响应和抗干扰能力
- 宽电压支持 2.5-5.5V DC
规格参数
| 参数 | 值 |
|---|---|
| 输入电压 | 2.0 V – 5.5 V |
| 湿度测量范围 | 0 ~ 100% RH |
| 温度测量范围 | -40 ~ + 80 ℃ |
| 湿度精度 | ± 3 % RH ( 25 ℃ ) |
| 温度精度 | ± 0.5 ℃ |
| 输出信号 | I2C 信号 |
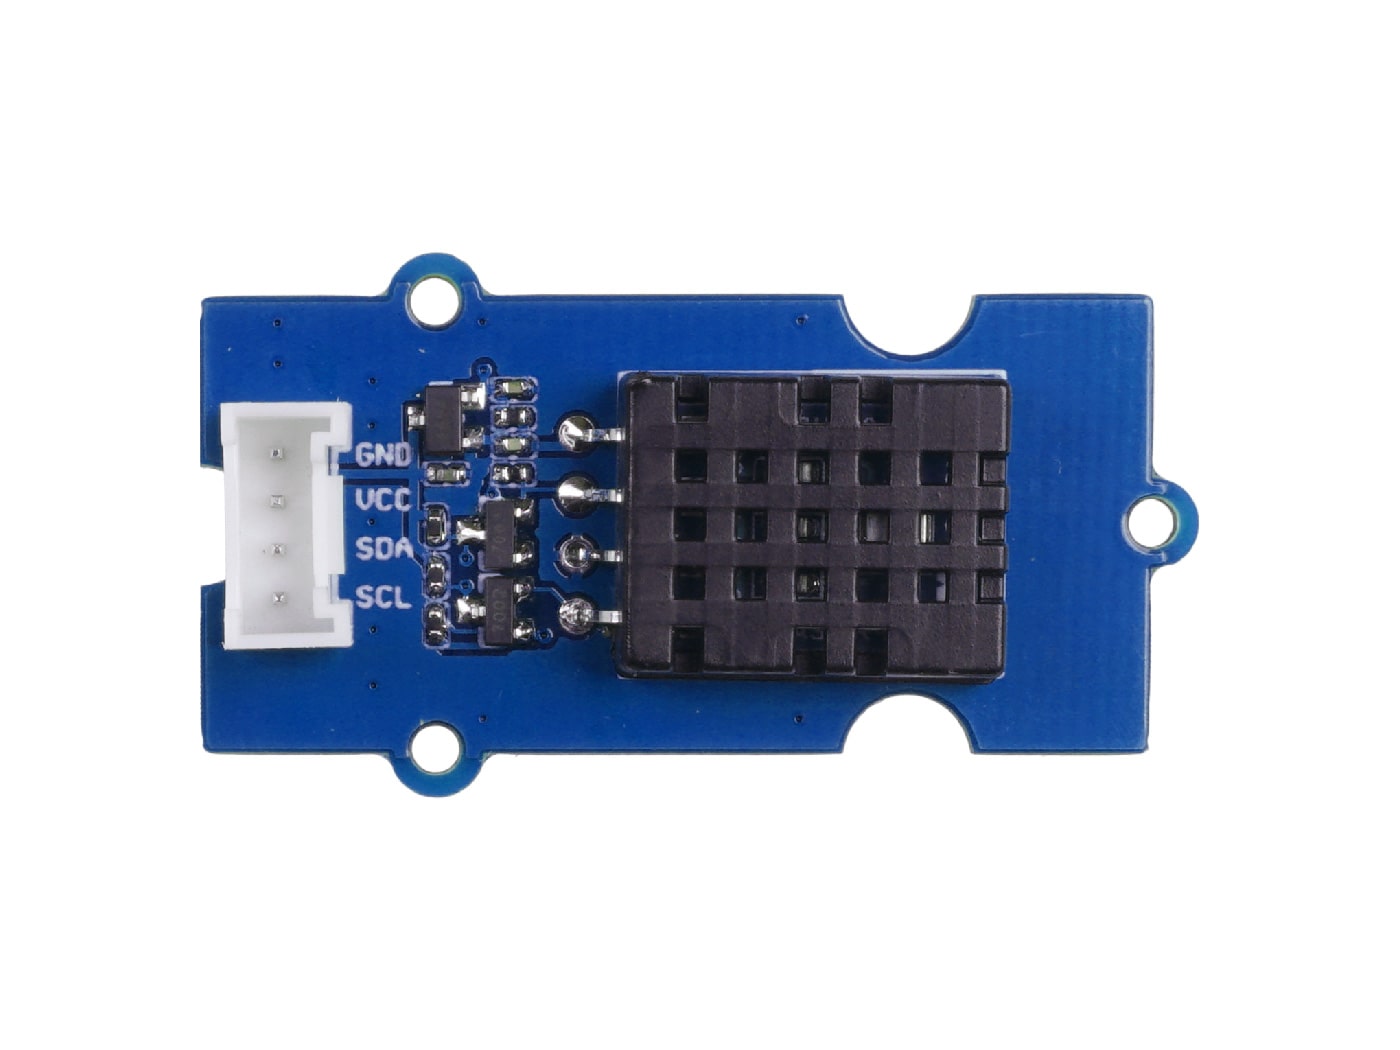
硬件概述
引脚图

支持的平台
| Arduino | Raspberry Pi | |||
|---|---|---|---|---|
上述提到的支持平台表示该模块的软件或理论兼容性。在大多数情况下,我们只为 Arduino 平台提供软件库或代码示例。无法为所有可能的 MCU 平台提供软件库/演示代码。因此,用户必须编写自己的软件库。
入门指南
使用 Arduino
硬件
所需材料
| Seeeduino V4.2 | Base Shield | Grove - 温湿度传感器 V2.0 |
|---|---|---|
 |  |  |
| 立即购买 | 立即购买 | 立即购买 |
-
步骤 1. 将 Grove 温湿度传感器 V2.0 连接到 Grove-Base Shield 的 I2C 端口。
-
步骤 2. 将 Grove - Base Shield 插入 Seeeduino。
-
步骤 3. 通过 USB 线将 Seeeduino 连接到 PC。

软件
如果这是您第一次使用 Arduino,我们强烈建议您在开始之前查看 Arduino 入门指南。
与 DHT11 相比,DHT20 温湿度传感器在供电电压、温湿度测量范围、精度和输出信号质量方面都有明显的改进。
它配备了完全校准的数字 I2C 接口,因此引脚定义略有不同。您应该在这里下载并安装库文件以使用 DHT20。
一切设置完成后,我们可以上传示例代码来查看是否正常工作:
// Example testing sketch for various DHT humidity/temperature sensors
// Written by ladyada, public domain
#include "Wire.h"
#include "DHT.h"
#define DHTTYPE DHT20   // DHT 20
/*Notice: The DHT10 and DHT20 is different from other DHT* sensor ,it uses i2c interface rather than one wire*/
/*So it doesn't require a pin.*/
DHT dht(DHTTYPE);         //   DHT10 DHT20 don't need to define Pin

#if defined(ARDUINO_ARCH_AVR)
    #define debug  Serial

#elif defined(ARDUINO_ARCH_SAMD) ||  defined(ARDUINO_ARCH_SAM)
    #define debug  SerialUSB
#else
    #define debug  Serial
#endif

void setup() {

    debug.begin(115200);
    debug.println("DHTxx test!");
    Wire.begin();

    /*if using WIO link,must pull up the power pin.*/
    // pinMode(PIN_GROVE_POWER, OUTPUT);
    // digitalWrite(PIN_GROVE_POWER, 1);

    dht.begin();
}

void loop() {
    float temp_hum_val[2] = {0};
    // Reading temperature or humidity takes about 250 milliseconds!
    // Sensor readings may also be up to 2 seconds 'old' (its a very slow sensor)


    if (!dht.readTempAndHumidity(temp_hum_val)) {
        debug.print("Humidity: ");
        debug.print(temp_hum_val[0]);
        debug.print(" %\t");
        debug.print("Temperature: ");
        debug.print(temp_hum_val[1]);
        debug.println(" *C");
    } else {
        debug.println("Failed to get temprature and humidity value.");
    }

    delay(1500);
}
上传完成后,我们可以使用 Arduino 中的串口监视器查看结果。

输出应该类似于...:

这些数值基于当前环境。
使用 Raspberry Pi(配合 Grove Base Hat for Raspberry Pi)
硬件
- 步骤 1. 本项目使用的物品:
| Raspberry pi | Grove Base Hat for RasPi | Grove - 温湿度传感器 V2.0 |
|---|---|---|
 |  | |
| 立即购买 | 立即购买 | 立即购买 |
- 步骤 2. 将 Grove Base Hat 插入 Raspberry Pi。
- 步骤 3. 将 Grove - Temperature & Humidity Sensor V2.0 连接到 Base Hat 的 I2C 端口。
- 步骤 4. 通过 USB 线缆将 Raspberry Pi 连接到 PC。
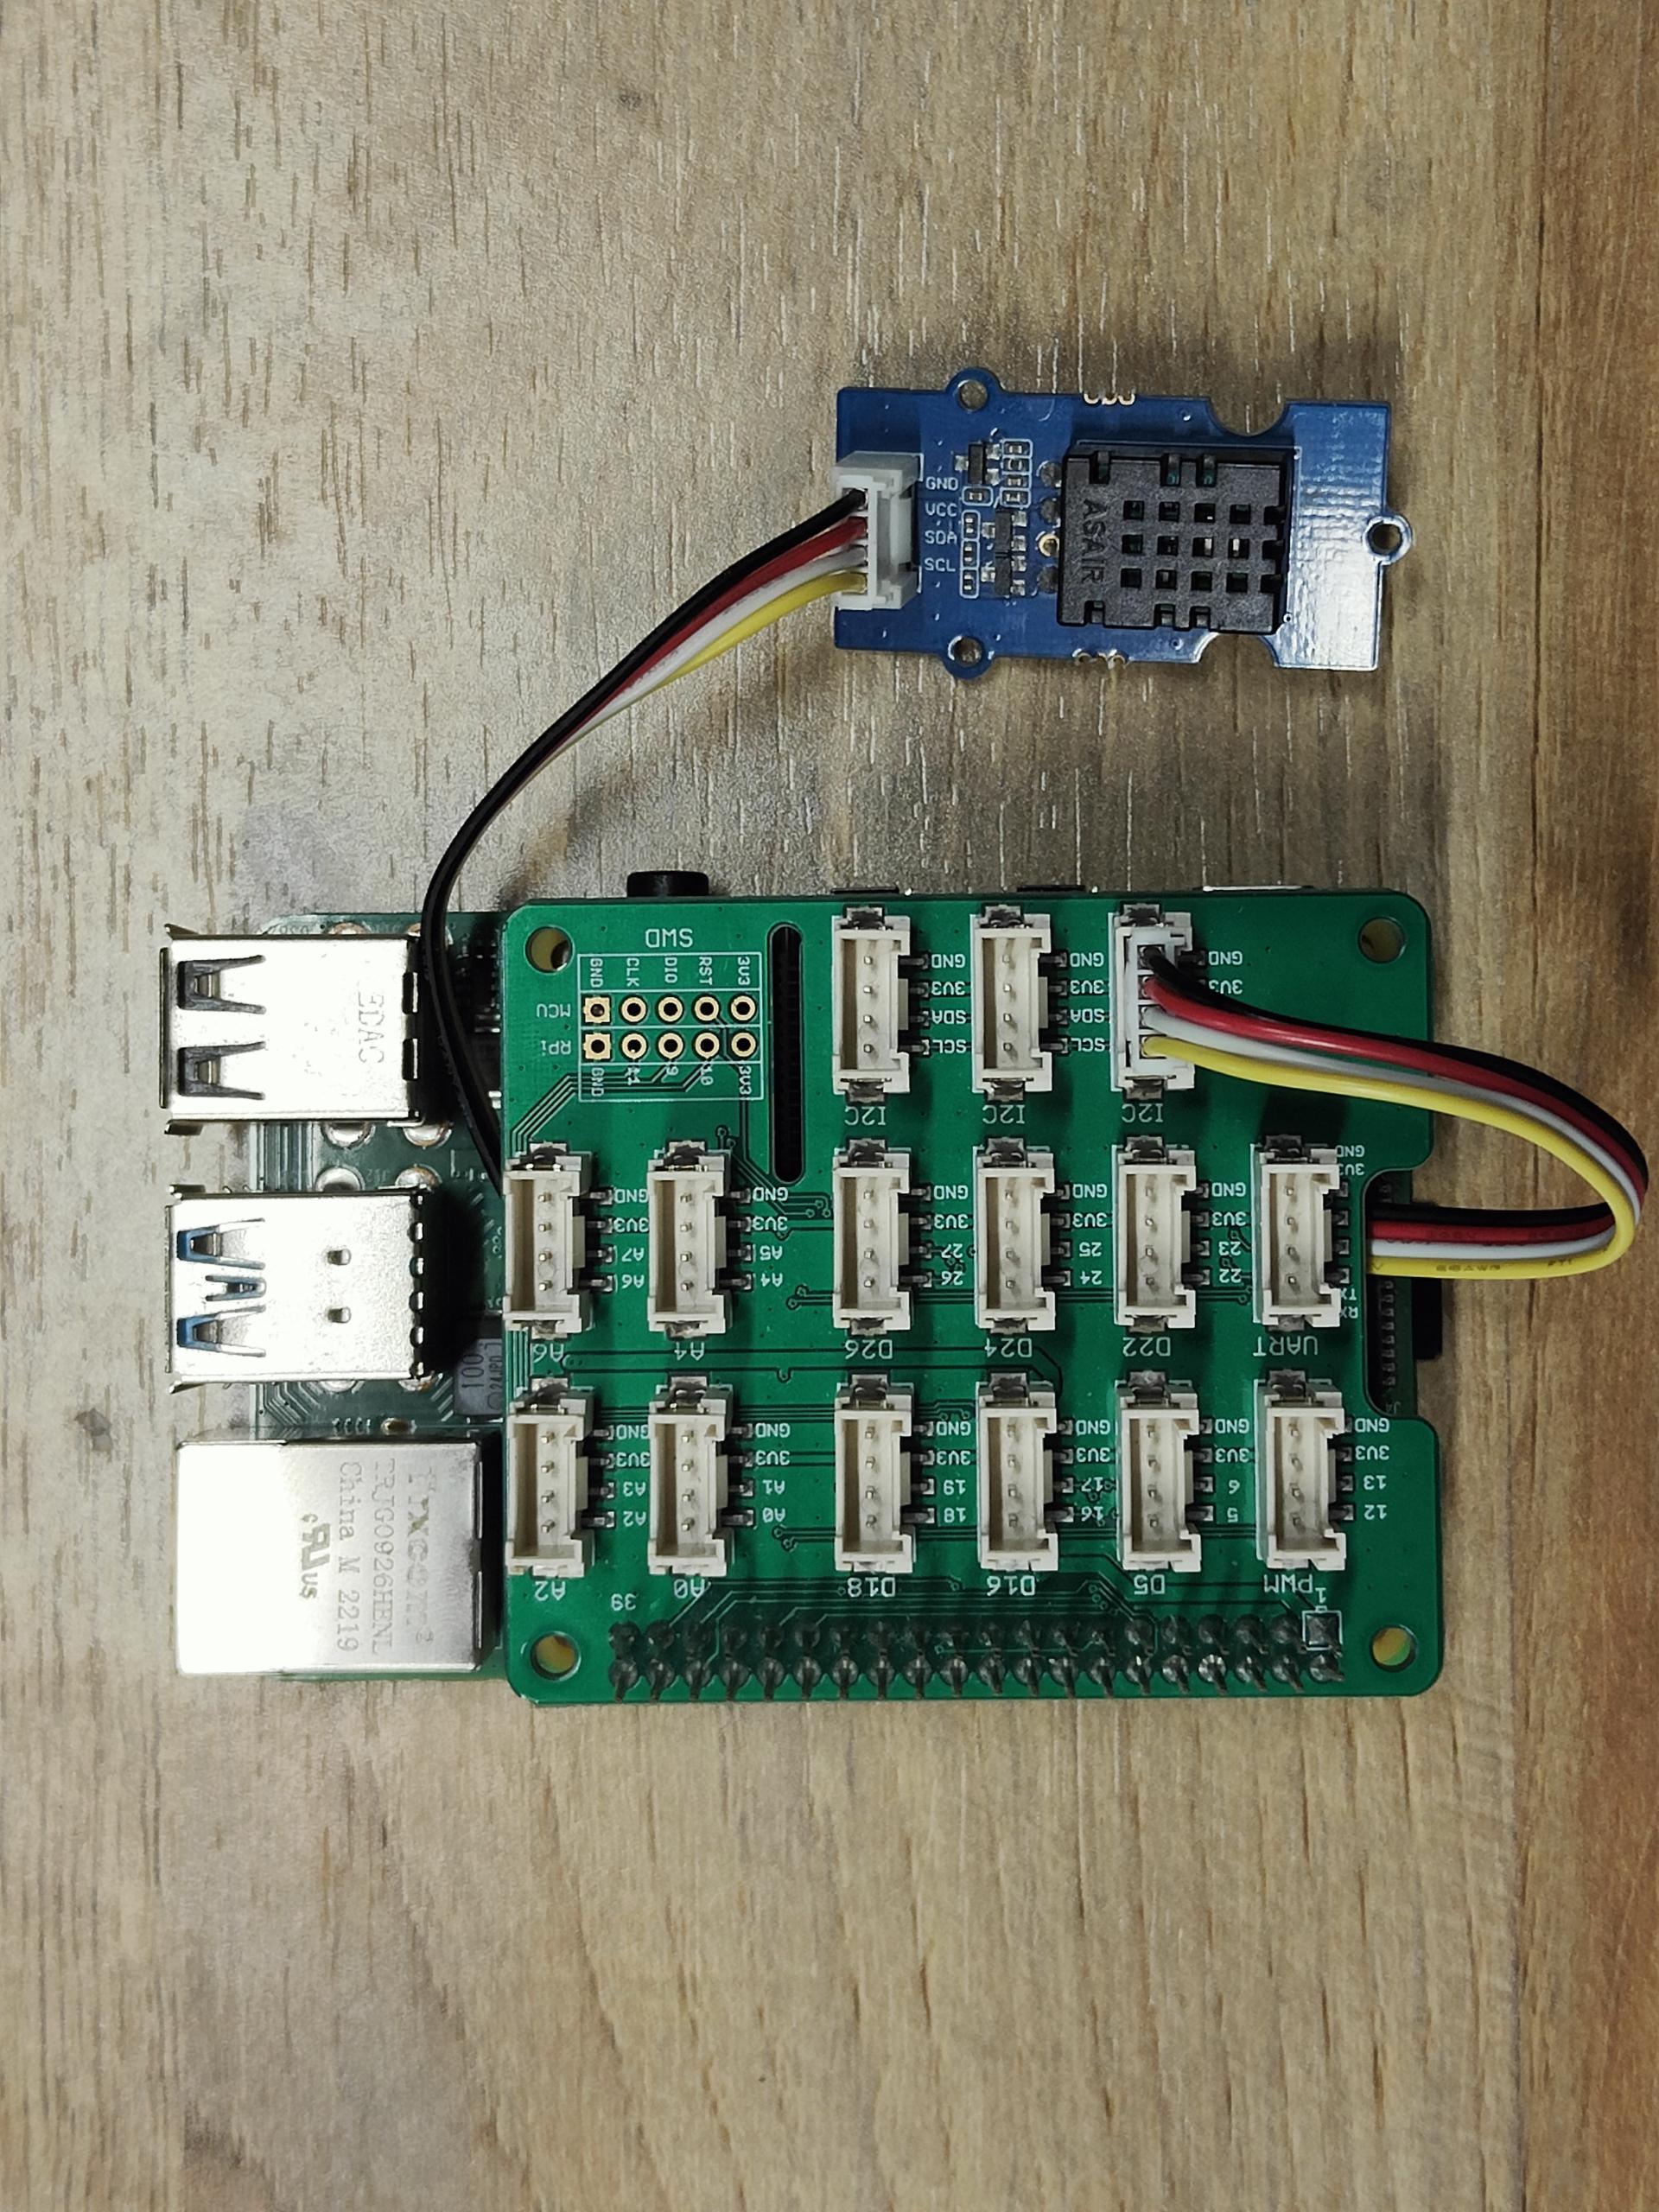
对于步骤 3,您可以将温湿度传感器 pro 连接到任何 GPIO 端口,但请确保使用相应端口号更改命令。
软件
如果您使用的是 Raspberry Pi with Raspberrypi OS >= Bullseye,您必须仅使用 Python3 运行此命令行。
- 步骤 1. 按照 Setting Software 配置开发环境。
其中一个步骤是添加必要的 DHT 库,请确保已安装。
- 步骤 2. 进入相关的虚拟环境。
source ~/grove_env/env/bin/activate
cd ~/grove_env/grove.py/grove
- 步骤 3. 执行以下命令运行代码。
nano ~/grove_env/dht20_demo.py
复制以下代码
import time
import seeed_dht

# for DHT10/20
sensor = seeed_dht.DHT("20")
# sensor = seeed_dht.DHT("10")
# for DHT11/DHT22
#sensor = seeed_dht.DHT("22", 12)

print("DHT11 reading every second, Ctrl+C to quit")
try:
    while True:
        humi, temp = sensor.read()
        print(f"DHT11  Humidity {humi:.1f}%  Temperature {temp:.1f}°C")
        time.sleep(1)
except KeyboardInterrupt:
    print("\nBye")
保存并退出: Ctrl+O → Enter → Ctrl+X
如果一切顺利,您将能够看到以下结果
pi@raspberrypi:~/Seeed_Python_DHT/examples $ python ~/grove_env/dht20_demo.py

DHT20, humidity 39.2%, temperature 29.1*
DHT20, humidity 39.2%, temperature 29.1*
DHT20, humidity 39.2%, temperature 29.1*
DHT20, humidity 39.1%, temperature 29.1*
DHT20, humidity 40.0%, temperature 29.1*
DHT20, humidity 39.9%, temperature 29.1*
DHT20, humidity 40.3%, temperature 29.1*
DHT20, humidity 42.0%, temperature 29.1*
您可以通过简单地按 ++ctrl+c++ 退出此程序。
使用 MicroPython
连接 RaspberryPi Pico
所需材料
| RaspberryPi Pico | Grove Shield for Pi Pico v1.0 | Grove - Temperature & Humidity Sensor V2.0 |
|---|---|---|
 |  | |
| 立即购买 | 立即购买 | 立即购买 |
I2C 连接
-
步骤 1. 将 RaspberryPi Pico 插入 Grove Shield for Pi Pico。
-
步骤 2. 将 Grove - CO2 & Temperature & Humidity Sensor - SCD41 插入 Grove Shield for Pi Pico 的 I2C0 端口。
-
步骤 3. 通过 USB 线缆将 RaspberryPi Pico 连接到 PC。
请注意使用 I2C0,如果使用 I2C1,将无法工作。

这是基本的硬件连接。
软件
- 步骤 1. 我们需要使用第三方库来控制 Grove - Temperature & Humidity Sensor V2.0
-
下载 dht20_demo2.py 和 DHT20.py 库并保存到计算机。
-
使用 Thonny 打开 dht20_demo2.py 和 DHT20.py,点击左上角的 "file" 选项,然后选择 "save as"。

- 选择 "Raspberry Pi Pico" 并保存到 Pico 中。

保存时,Thonny 会要求命名文件。这里我们输入 "dht20_demo2.py" 作为文件名,我们还需要输入文件扩展名,否则无法使用。

- 步骤 2. 开始过程。
- 首先初始化 DHT20.py。

- 启动演示过程,然后您可以看到以下结果。

原理图在线查看器
资源
技术支持与产品讨论
可升级为工业传感器
通过 SenseCAP S2110 控制器和 S2100 数据记录器,您可以轻松将 Grove 转换为 LoRaWAN® 传感器。Seeed 不仅帮助您进行原型设计,还为您提供了使用 SenseCAP 系列坚固的工业传感器扩展项目的可能性。
IP66 外壳、蓝牙配置、与全球 LoRaWAN® 网络的兼容性、内置 19 Ah 电池以及 APP 的强大支持使 SenseCAP S210x 成为工业应用的最佳选择。该系列包括土壤湿度、空气温湿度、光照强度、CO2、EC 传感器以及 8 合 1 气象站。为您下一个成功的工业项目尝试最新的 SenseCAP S210x。
