Grove - 温湿度传感器 (DHT11)
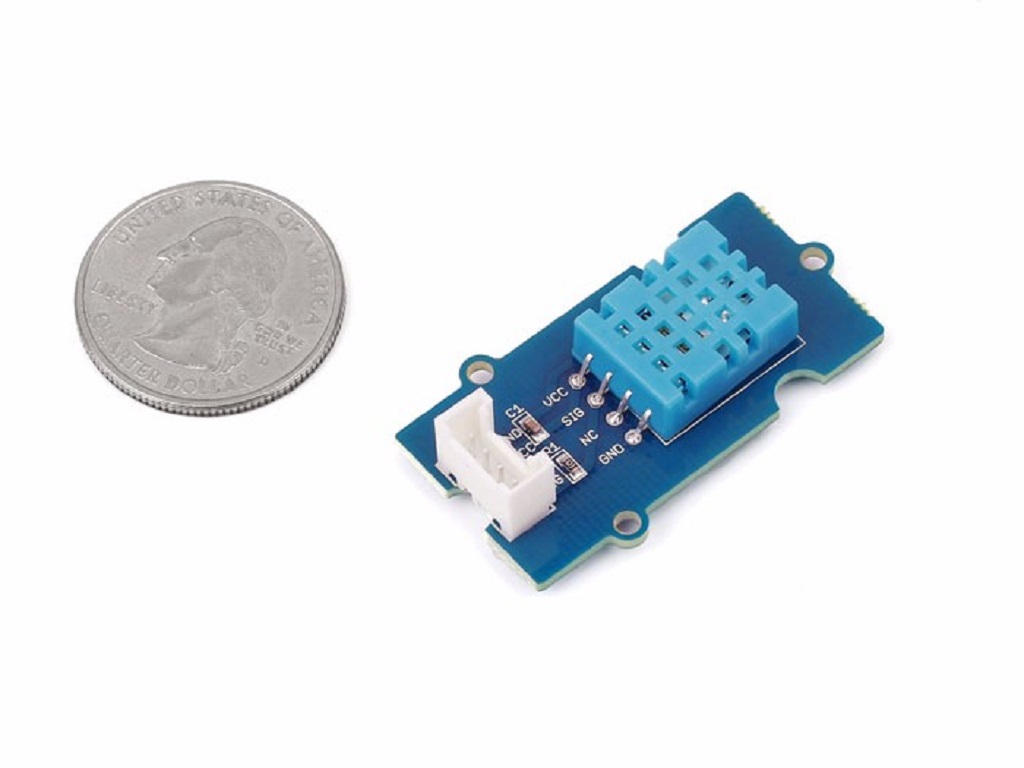
这款温湿度传感器提供预校准的数字输出。独特的电容式传感器元件测量相对湿度,温度通过负温度系数 (NTC) 热敏电阻测量。它具有出色的可靠性和长期稳定性。请注意,此传感器不适用于 0 度以下的温度。
![]()
可升级为工业级传感器
通过 SenseCAP S2110 控制器 和 S2100 数据记录器,您可以轻松将 Grove 转换为 LoRaWAN® 传感器。Seeed 不仅帮助您进行原型设计,还为您提供了通过 SenseCAP 系列坚固的工业传感器扩展项目的可能性。
SenseCAP S210x 系列工业传感器为环境感知提供开箱即用的体验。请参考具有更高性能和坚固性的 S2101 无线温湿度传感器,用于空气质量监测。该系列包括土壤湿度、空气温湿度、光照强度、CO2、EC 和 8 合 1 气象站传感器。试试最新的 SenseCAP S210x,助力您下一个成功的工业项目。
| SenseCAP 工业传感器 |
 |
| S2101 空气温湿度传感器 |
特性
- 相对湿度和温度测量
- 全范围温度补偿校准
- 数字信号
- 长期稳定性
- 长传输距离(>20m)
- 低功耗
有关 Grove 模块的更多详细信息,请参考 Grove 系统
应用场景
- 消费产品
- 气象站
- 湿度调节器
- 空调
规格参数
关键规格
| 项目 | 最小值 |
|---|---|
| PCB 尺寸 | 2.0cm*4.0cm |
| 接口 | 2.0mm 间距排针 |
| IO 结构 | SIG,VCC,GND,NC |
| ROHS | YES |
电气特性
项目 | 条件 | 最小值 | 标准值 | 最大值 | 单位 |
|---|---|---|---|---|---|
VCC | 3.3 | 5 | Volts | ||
测量电流供应 | 1.3 | 2.1 | mA | ||
平均电流供应 | 0.5 | 1.1 | mA | ||
测量范围 | 湿度 | 20% | 90% | RH | |
温度 | 0 | 50 | °C | ||
精度 | 湿度 | ±5% | RH | ||
温度 | ±2 | °C | |||
灵敏度 | 湿度 | 1% | RH | ||
温度 | 1 | °C | |||
重复性 | 湿度 | ±1% | RH | ||
温度 | ±1 | °C | |||
长期稳定性 | ±1% | RH/年 | |||
信号采集周期 | 2 | S |
支持的平台
| Arduino | Raspberry Pi | |||
|---|---|---|---|---|
上述提到的支持平台表示该模块的软件或理论兼容性。在大多数情况下,我们只为 Arduino 平台提供软件库或代码示例。不可能为所有可能的 MCU 平台提供软件库/演示代码。因此,用户必须编写自己的软件库。
入门指南
当 MCU 发送触发信号时,传感器将从低功耗模式切换到活动模式。触发信号后,传感器将向 MCU 发送响应信号,然后发送 40 位采集数据并触发新的信号采集。(请注意,从传感器发送到 MCU 的 40 位采集数据是在触发信号到来之前已经采集的。)一个触发信号接收一次来自传感器的 40 位响应数据。MCU 和传感器之间的通信使用单总线数据。 通信过程如下所示:
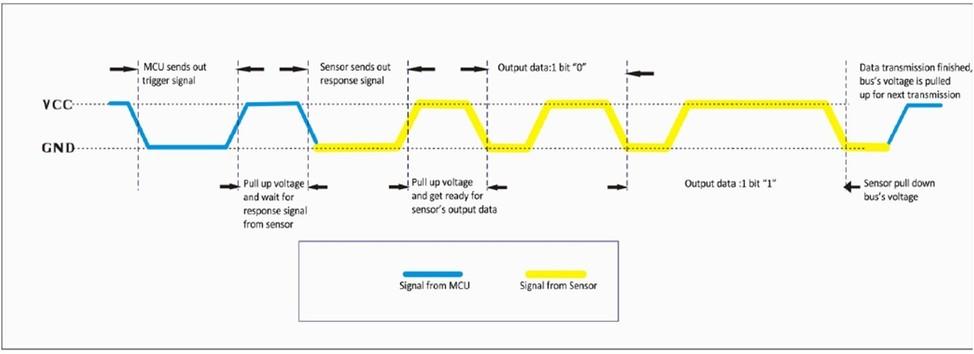
单次通信耗时 5ms。数据的高位先发送。信号数据为 40 位,由 16 位湿度数据、16 位温度数据和 8 位校验和组成。数据格式为:
湿度整数部分 8 位 + 湿度小数部分 8 位
- 温度整数部分 8 位 + 温度小数部分 8 位
- 校验和 8 位。
如果这是您第一次使用 Arduino,我们强烈建议您在开始之前查看 Arduino 入门指南。
与 Arduino 配合使用
硬件
- 步骤 1. 准备以下物品:
| Seeeduino V4.2 | Base Shield | 温湿度传感器 |
|---|---|---|
 |  |  |
| 立即购买 | 立即购买 | 立即购买 |
-
步骤 2. 将 Grove - 温湿度传感器连接到 Grove-Base Shield 的 D2 端口。
-
步骤 3. 将 Grove - Base Shield 插入 Seeeduino。
-
步骤 4. 通过 USB 线将 Seeeduino 连接到 PC。
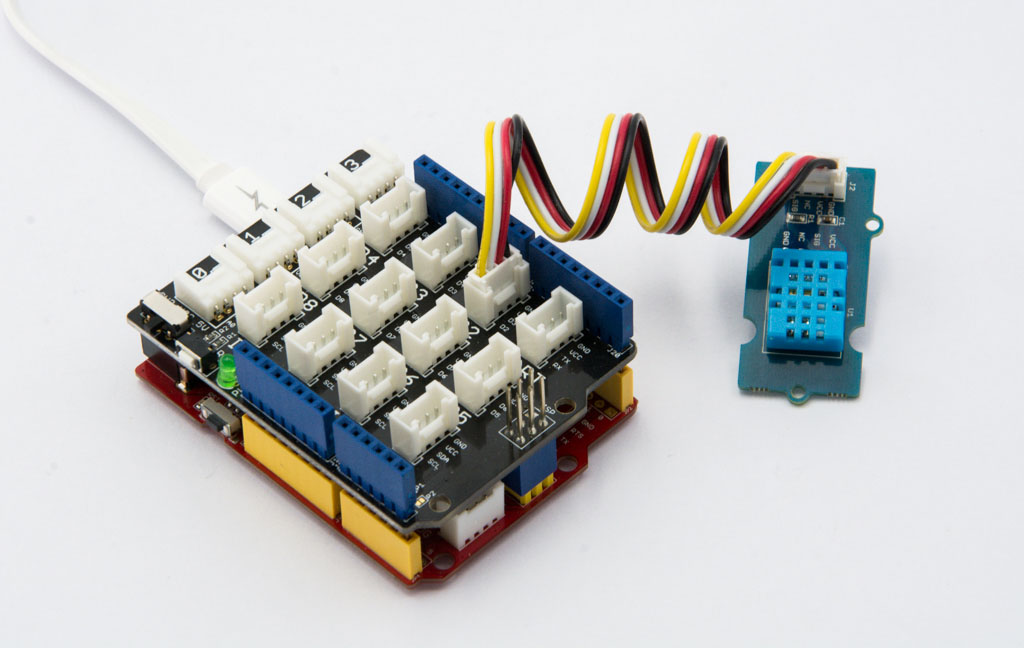
如果我们没有 Grove Base Shield,我们也可以直接将 Grove - Temperature and Humidity Sensor Pro 连接到 Seeeduino,如下所示。
| Seeeduino | Temperature&Humidity Sensor |
|---|---|
| 5V | Red |
| GND | Black |
| Not Conencted | White |
| D2 | Yellow |
软件
-
步骤 1. 从 Github 下载 Seeed DHT 库。
-
步骤 2. 参考 如何安装库 为 Arduino 安装库。
-
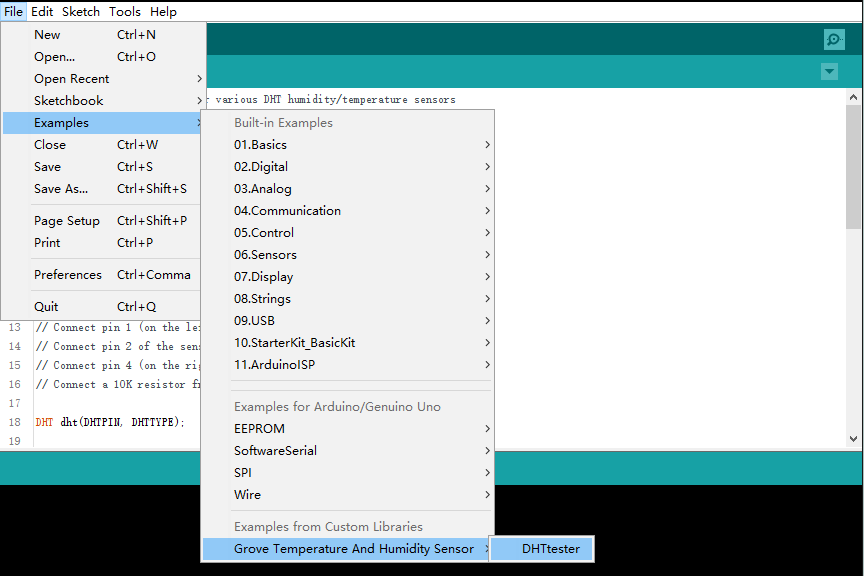
步骤 3. 重启 Arduino IDE。通过路径打开 "DHTtester" 示例:File --> Examples --> Grove_Humidity_Temperature_Sensor-master --> DHTtester。通过这个演示,我们可以读取环境的温度和相对湿度信息。
这个 Grove - Temperature&Humidity Sensor 和我们的另一个产品 Grove-Temperature&Humidity Sensor pro 共享这个库。无论您使用哪个产品,请确保您已经使您板子上传感器的定义行生效,并注释掉其他规格的定义行。例如,我们在 Grove - Temperature&Humidity Sensor 上使用的传感器是 DHT 11。所以传感器规格的定义部分应该是:
#define DHTTYPE DHT11   // DHT 11
//#define DHTTYPE DHT22   // DHT 22  (AM2302)
//#define DHTTYPE DHT21   // DHT 21 (AM2301)
库的默认设置是 DHT 22,所以您需要手动将其更改为 DHT 11。
-
步骤 4. 上传演示程序。如果您不知道如何上传代码,请查看 如何上传代码。
-
步骤 5. 通过点击 Tool-> Serial Monitor 打开 Arduino IDE 的 Serial Monitor。或者同时按下 ++ctrl+shift+m++ 键。如果一切正常,您将获得温度。
结果应该如下:
使用 Codecraft
硬件
步骤 1. 将 Grove - Temperature&Humidity Sensor 连接到 Base Shield 的 D2 端口。
步骤 2. 将 Base Shield 插入您的 Seeeduino/Arduino。
步骤 3. 通过 USB 线缆将 Seeeduino/Arduino 连接到您的 PC。
软件
步骤 1. 打开 Codecraft,添加 Arduino 支持,并将主程序拖到工作区域。
如果这是您第一次使用 Codecraft,请参阅 使用 Arduino 的 Codecraft 指南。
步骤 2. 按照下图拖拽积木块,或打开可在本页面末尾下载的 cdc 文件。
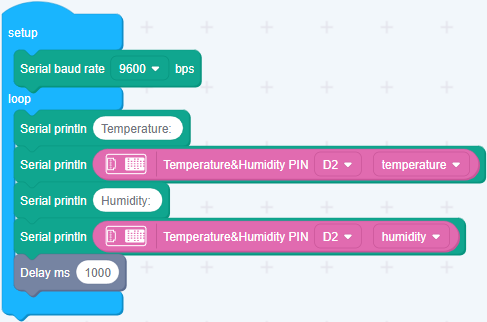
将程序上传到您的 Arduino/Seeeduino。
当代码上传完成后,您将在串口监视器中看到显示的温度和湿度。
使用树莓派(配合 Grove Base Hat for Raspberry Pi)
硬件
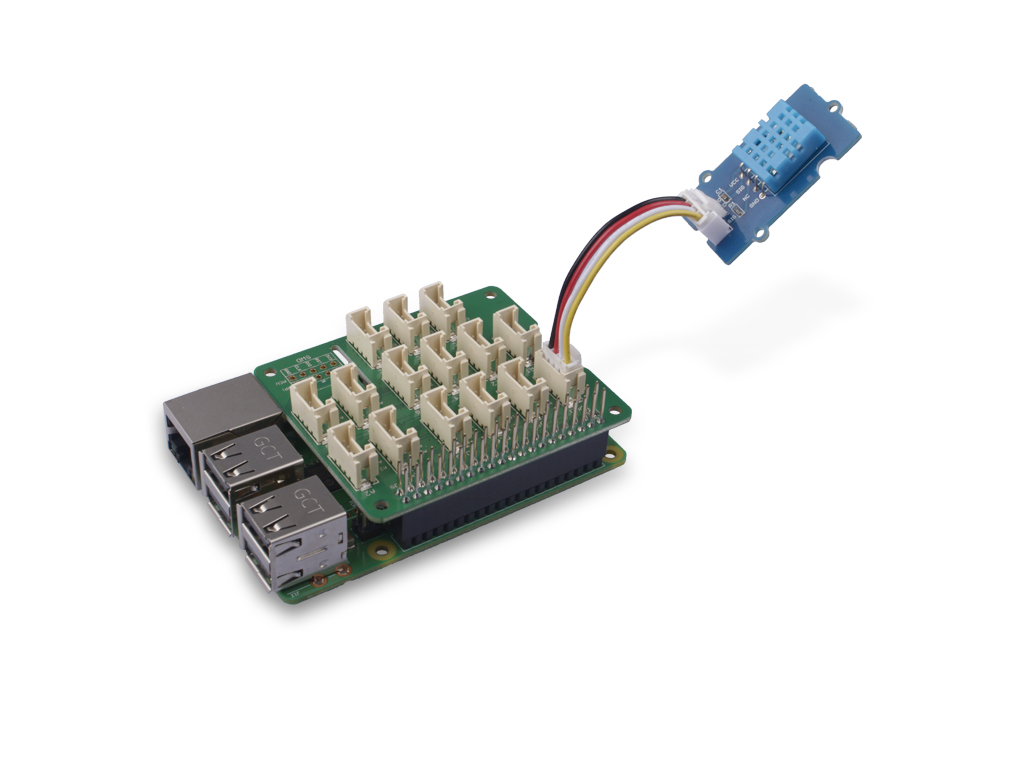
- 步骤 1. 本项目中使用的物品:
| Raspberry pi | Grove Base Hat for RasPi | Grove - Temp & Hum Sensor |
|---|---|---|
 |  | |
| 立即购买 | 立即购买 | 立即购买 |
- 步骤 2. 将 Grove Base Hat 插入树莓派。
- 步骤 3. 将温湿度传感器连接到 Base Hat 的端口 12。
- 步骤 4. 通过 USB 线缆将树莓派连接到 PC。
对于步骤 3,您可以将温湿度传感器连接到任何 GPIO 端口,但请确保您使用相应的端口号更改命令。
软件
如果您使用的是 Raspberry Pi with Raspberrypi OS >= Bullseye,您必须仅使用 Python3 运行此命令行。
- 步骤 1. 按照 Setting Software 配置开发环境。
其中一个步骤是添加必要的 DHT 库,请确保已安装。
- 步骤 2.进入相关的虚拟环境。
source ~/grove_env/env/bin/activate
cd ~/grove_env/grove.py/grove
- 步骤 3. 执行以下命令运行代码。
nano ~/grove_env/dht11_demo.py
复制以下代码
import time
import seeed_dht

sensor = seeed_dht.DHT("11", 12)
print("DHT11 reading every second, Ctrl+C to quit")
try:
    while True:
        humi, temp = sensor.read()
        print(f"DHT11  Humidity {humi:.1f}%  Temperature {temp:.1f}°C")
        time.sleep(1)
except KeyboardInterrupt:
    print("\nBye")
保存并退出: Ctrl+O → Enter → Ctrl+X
如果一切正常,您将能够看到以下结果
pi@raspberrypi:~/Seeed_Python_DHT/examples $ python ~/grove_env/dht11_demo.py
DHT11, humidity 39.2%, temperature 29.1*
DHT11, humidity 39.2%, temperature 29.1*
DHT11, humidity 39.2%, temperature 29.1*
DHT11, humidity 39.1%, temperature 29.1*
DHT11, humidity 40.0%, temperature 29.1*
DHT11, humidity 39.9%, temperature 29.1*
DHT11, humidity 40.3%, temperature 29.1*
DHT11, humidity 42.0%, temperature 29.1*
您可以通过简单地按下 ++ctrl+c++ 来退出此程序。
使用树莓派(配合 GrovePi_Plus)
硬件
首先,您需要准备以下物品:
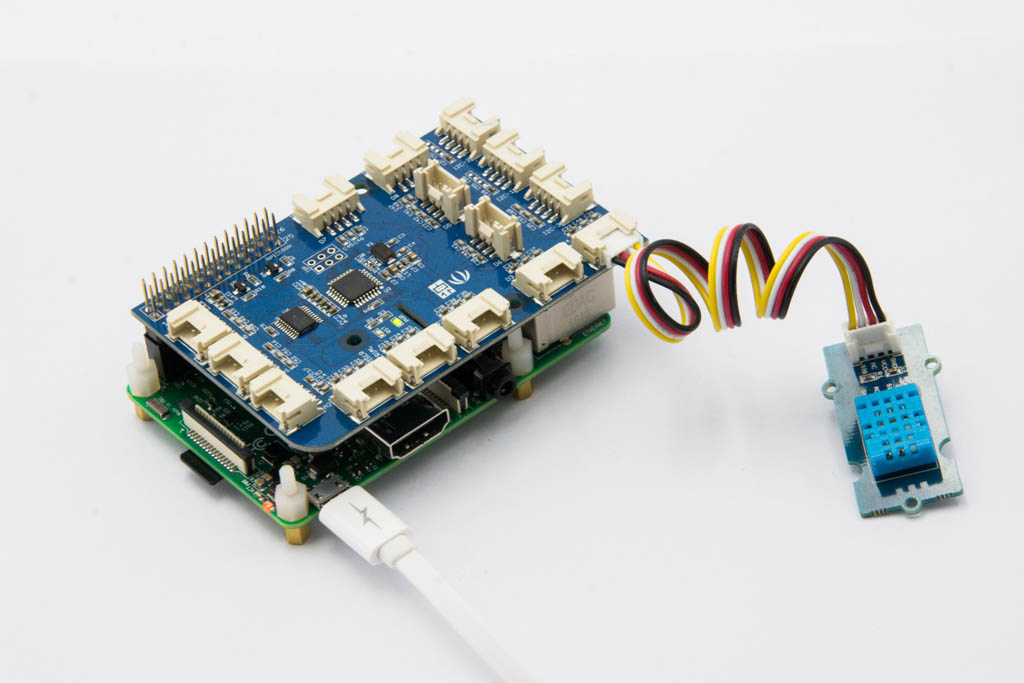
- 步骤 1. 准备以下物品:
| Raspberry pi | GrovePi_Plus | Temperature&Humidity Sensor |
|---|---|---|
 |  | |
| 立即购买 | 立即购买 | 立即购买 |
-
步骤 2. 将 GrovePi_Plus 插入树莓派。
-
步骤 3. 将 Grove - Temperature&Humidity Sensor 连接到 GrovePi_Plus 的 D4 端口。
-
步骤 4. 通过 USB 线缆将树莓派连接到 PC。
软件
-
步骤 1. 按照 Setting Software 配置开发环境。
-
步骤 2. 按照 Updating the Firmware 更新 GrovePi 的最新固件。
在本 wiki 中,我们使用路径 ~/GrovePi/ 而不是 /home/pi/Desktop/GrovePi,您需要确保步骤 2 和步骤 3 使用相同的路径。
我们强烈建议您更新固件,否则对于某些传感器您可能会遇到错误。
如果您使用的是 Raspberry Pi with Raspberrypi OS >= Bullseye,您必须仅使用 Python3 运行此命令行。
- 步骤 3. Git 克隆 Github 仓库。
cd ~
git clone https://github.com/DexterInd/GrovePi.git
- 步骤 4. 检查代码。
cd ~/GrovePi/Software/Python
sudo nano grove_dht_pro.py
代码应该如下:
import grovepi
import math
# Connect the Grove Temperature & Humidity Sensor Pro to digital port D4
# This example uses the blue colored sensor.
# SIG,NC,VCC,GND
sensor = 4  # The Sensor goes on digital port 4.

# temp_humidity_sensor_type
# Grove Base Kit comes with the blue sensor.
blue = 0    # The Blue colored sensor.
white = 1   # The White colored sensor.

while True:
    try:
        # This example uses the blue colored sensor.
        # The first parameter is the port, the second parameter is the type of sensor.
        [temp,humidity] = grovepi.dht(sensor,blue)
        if math.isnan(temp) == False and math.isnan(humidity) == False:
            print("temp = %.02f C humidity =%.02f%%"%(temp, humidity))

    except IOError:
        print ("Error")
然后按 ++ctrl+x++ 退出 nano。
Grove - Temperature&Humidity Sensor 和 Grove - Temperature&Humidity Sensor pro 共享相同的 python 代码,名为 grove_dht_pro.py。唯一的区别是对于语句 [temp,humidity] = grovepi.dht(sensor,blue)。我们对 Grove - Temperature&Humidity Sensor 使用参数 blue,而对 Grove - Temperature&Humidity Sensor pro 使用 white。默认值是 blue,所以对于这个传感器您不需要更改代码。
- 步骤 5. 执行以下命令获取值。
sudo python3 grove_dht_pro.py
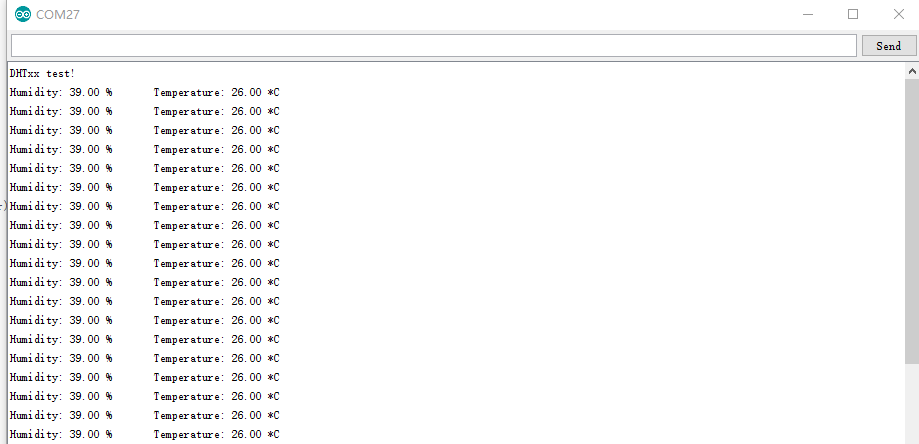
结果应该如下所示:
pi@raspberrypi:~/GrovePi/Software/Python $ sudo python3 grove_dht_pro.py
temp = 26.00 C humidity =40.00%
temp = 26.00 C humidity =40.00%
temp = 26.00 C humidity =40.00%
temp = 26.00 C humidity =40.00%
temp = 26.00 C humidity =40.00%
temp = 26.00 C humidity =40.00%
temp = 26.00 C humidity =40.00%
temp = 26.00 C humidity =40.00%
temp = 26.00 C humidity =40.00%
temp = 26.00 C humidity =40.00%
temp = 26.00 C humidity =40.00%
temp = 26.00 C humidity =40.00%
与 Wio Terminal 配合使用(ArduPy)
硬件
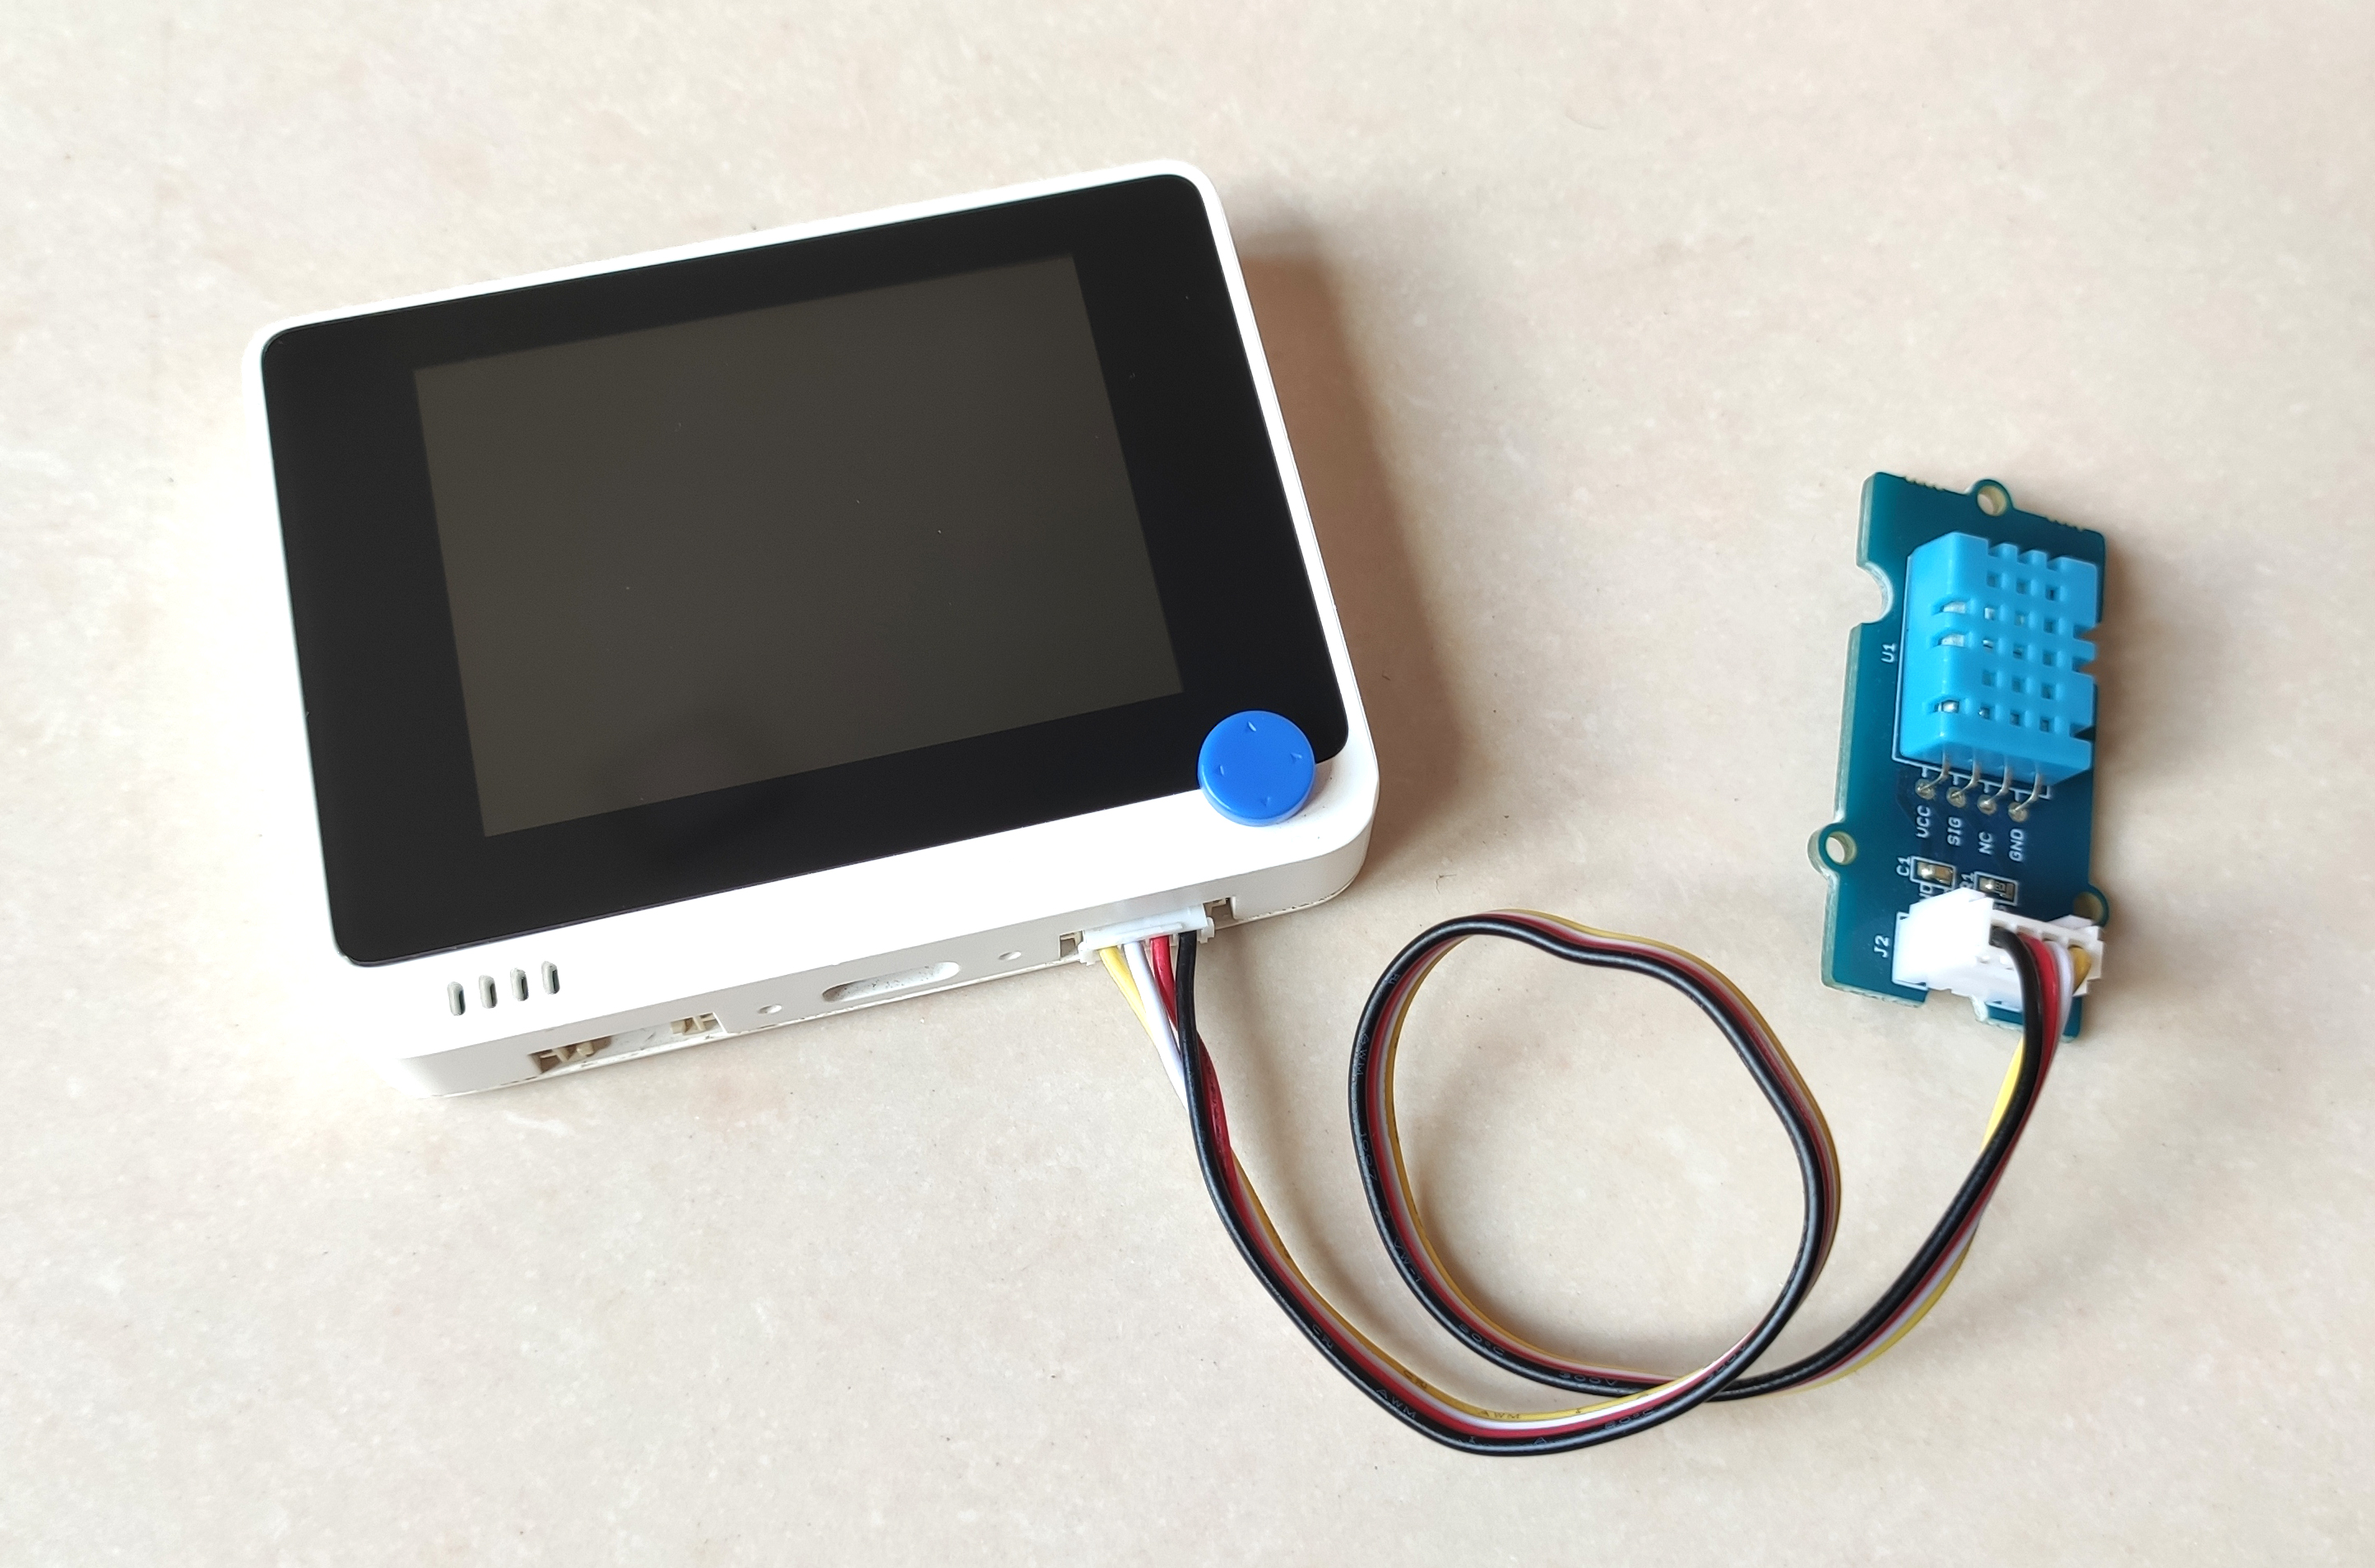
- 步骤 1. 准备以下物品:
| Wio Terminal | Grove - Temperature & Humidity Sensor (DHT11) |
|---|---|
 |  |
| 立即购买 | 立即购买 |
-
步骤 2. 将 Grove - Temperature & Humidity Sensor 连接到 Wio Terminal 的 D0 端口。
-
步骤 3. 通过 USB Type-C 线缆将 Wio Terminal 连接到 PC。
软件
-
步骤 1. 按照 ArduPy 入门指南 在 Wio Terminal 上配置 ArduPy 开发环境。
-
步骤 2. 使用以下命令确保 ArduPy 固件包含 DHT 库。更多信息请参考 这里。
aip install Seeed-Studio/seeed-ardupy-dht/archive/main.zip
aip build
aip flash
- 步骤 3. 复制以下代码并保存为
ArduPy-DHT.py:
from arduino import grove_dht
from machine import LCD, Sprite
import time

dht = grove_dht(0,11)
lcd = LCD() # initialize TFT LCD
spr = Sprite(lcd) # initialize buffer

def main(): # main function
    spr.createSprite(320, 240) # create buffer
    while True: # while loop
        spr.fillSprite(spr.color.WHITE) # fill background

        # two fill rectangles
        spr.fillRect(0,0,160,240,spr.color.DARKGREEN) # fill rectangle in color
        spr.fillRect(160,0,160,240,spr.color.BLUE)

        # temp and humid text draw
        spr.setTextSize(2) # set text size
        spr.setTextColor(spr.color.WHITE,spr.color.DARKGREEN) # set text color
        spr.drawString("Temperature", 15, 65) # draw string
        spr.setTextColor(spr.color.WHITE,spr.color.BLUE)
        spr.drawString("Humidity", 190, 65)

        # obtain readings
        t = dht.temperature # store temperature readings in variable
        h = dht.humidity # store humidity readings in variable

        # display temp readings
        spr.setTextSize(4)
        spr.setTextColor(spr.color.WHITE,spr.color.DARKGREEN)
        spr.drawNumber(int(t),50,110) # display number
        spr.drawString("C", 100, 110)

        # display humi readings
        spr.setTextColor(spr.color.WHITE,spr.color.BLUE) # set text color
        spr.drawNumber(int(h),180,110)
        spr.drawString("%RH", 235, 110)

        spr.pushSprite(0,0) # push to LCD
        time.sleep_ms(100)

        print("temperature:",t,"C", end ="     ")
        print("humidity:",h,"%RH")

if __name__ == "__main__": # check whether this is run from main.py
    main() # execute function
- 步骤 4. 将
ArduPy-DHT.py保存到您知道的位置。运行以下命令并将<YourPythonFilePath>替换为您的ArduPy-DHT.py位置。
aip shell -n -c "runfile <YourPythonFilePath>"
# Example:
# aip shell -n -c "runfile /Users/user/Desktop/ArduPy-DHT.py"
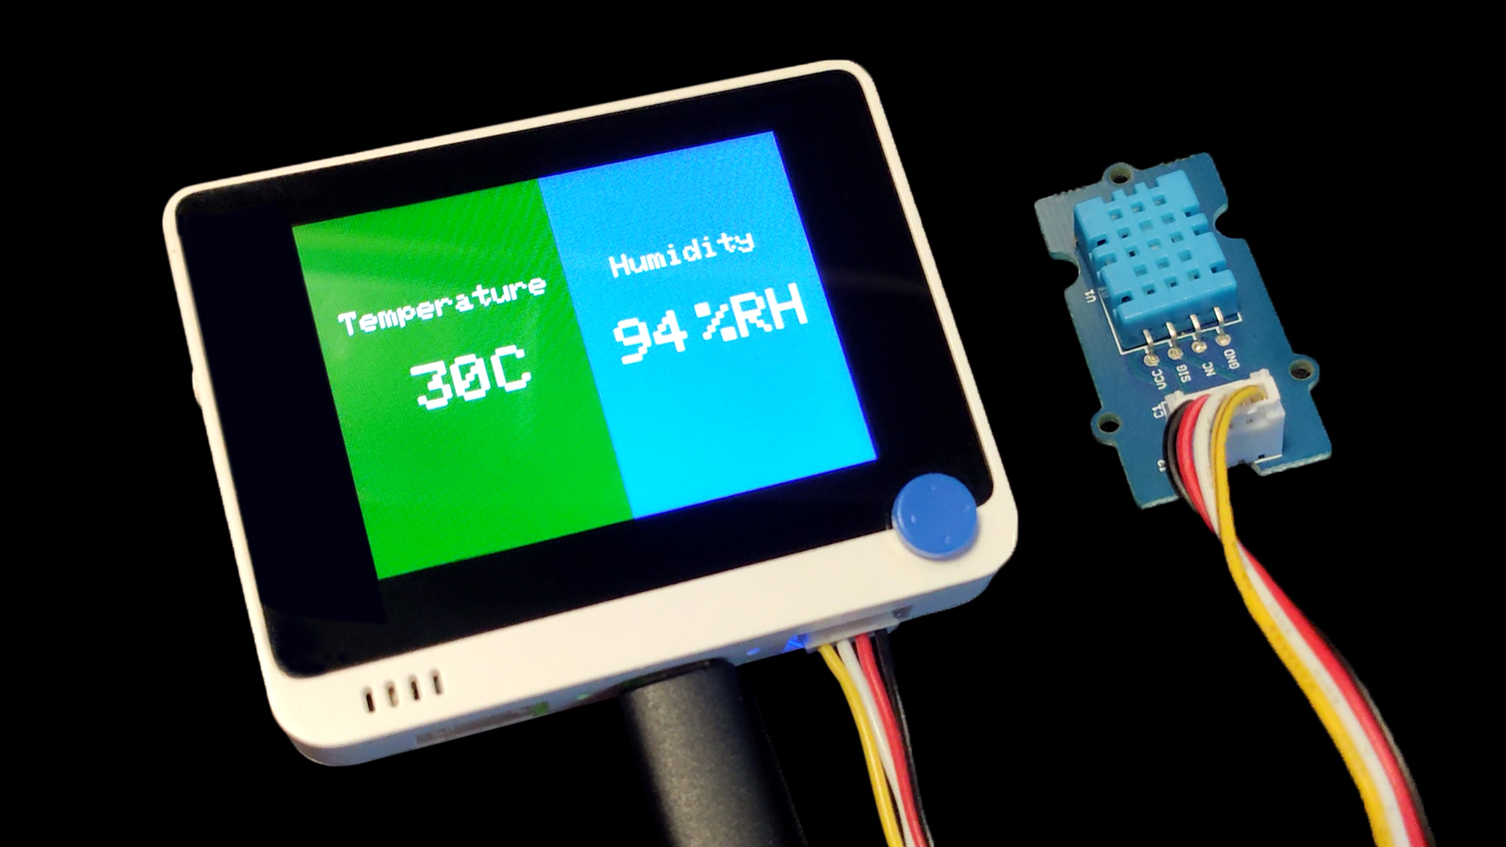
现在,温度和湿度信息将显示在命令提示符/终端窗口以及 Wio Terminal LCD 上。
C:\Users\user>aip shell -n -c "runfile /Users/user/Desktop/ArduPy-DHT.py"
Positional argument (COM4) takes precedence over --open.
Connected to ardupy
temperature: 31.0 C     humidity: 85.0 %RH
temperature: 31.0 C     humidity: 85.0 %RH
temperature: 31.0 C     humidity: 85.0 %RH
temperature: 31.0 C     humidity: 87.0 %RH
temperature: 31.0 C     humidity: 87.0 %RH
temperature: 31.0 C     humidity: 87.0 %RH
temperature: 31.0 C     humidity: 87.0 %RH
temperature: 31.0 C     humidity: 87.0 %RH
temperature: 31.0 C     humidity: 87.0 %RH
temperature: 31.0 C     humidity: 87.0 %RH
在线原理图查看器
资源
-
[Zip] 温湿度传感器 eagle 文件
-
[Zip] 温湿度传感器库
-
[Codecraft] CDC 文件
项目
厕所管理系统:使用该系统,多人可以高效地共享一个厕所。
技术支持与产品讨论
感谢您选择我们的产品!我们在这里为您提供不同的支持,以确保您使用我们产品的体验尽可能顺畅。我们提供多种沟通渠道,以满足不同的偏好和需求。