Jetson Mate 入门指南
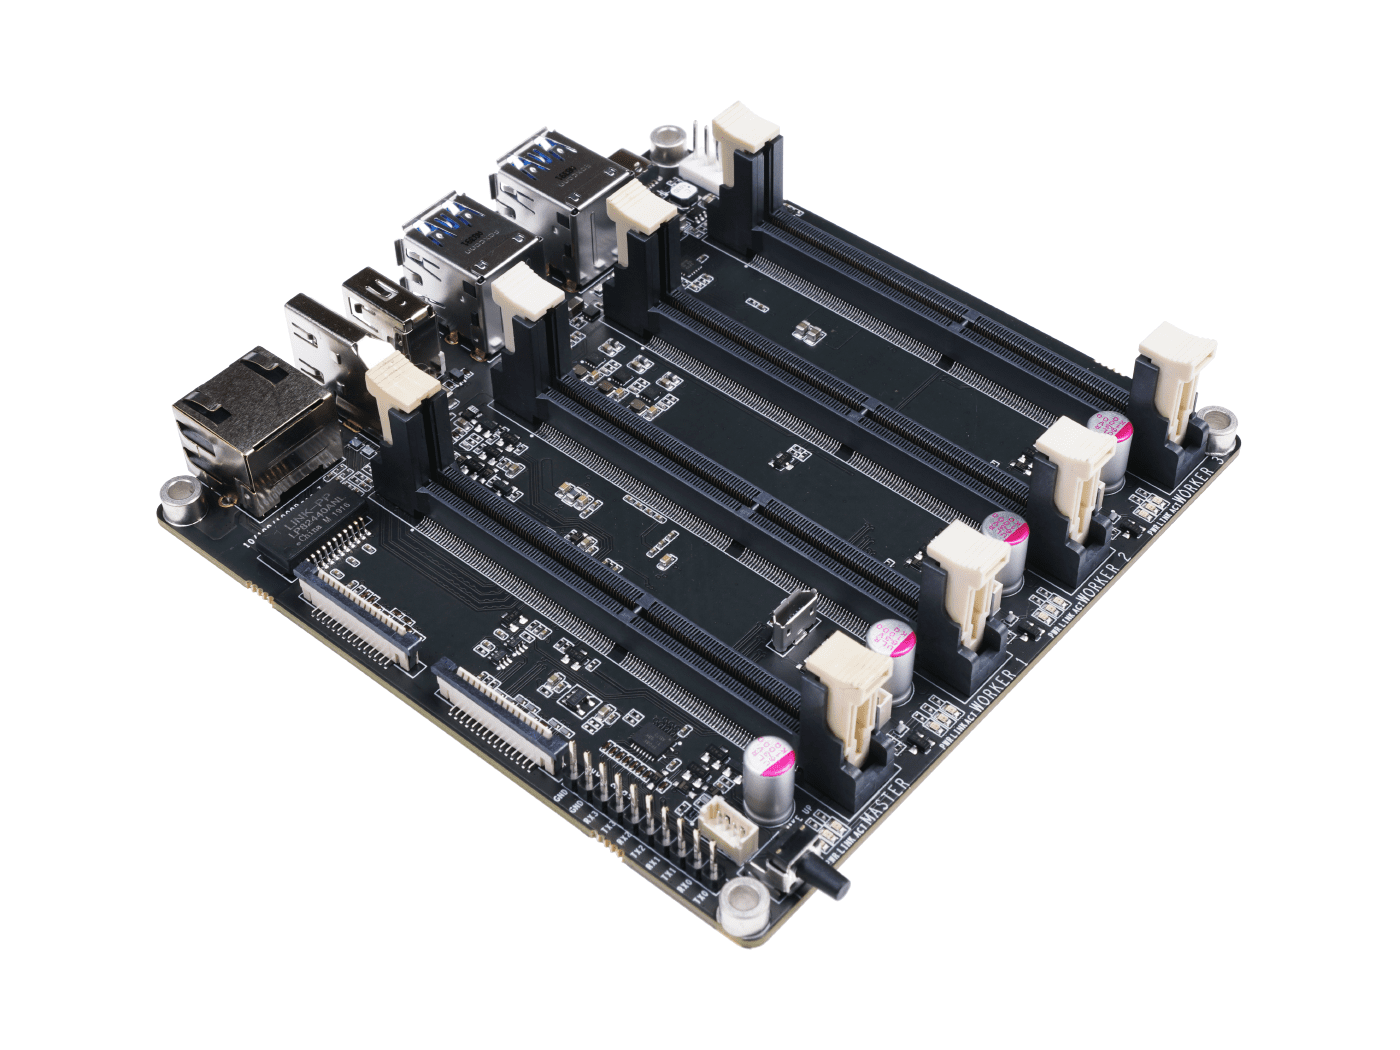
Jetson Mate 是一款载板,最多可以安装 4 个 Nvidia Jetson Nano/NX SoM。板载 5 端口千兆交换机,使 4 个 SoM 能够相互通信。所有 3 个外围 SoM 都可以单独开启或关闭电源。使用 65W 2 端口 PD 充电器(适用于 Jetson Nano SoM)或 90W 2 端口 PD 充电器(适用于 Jetson NX SoM),以及一根以太网线,开发者可以轻松构建自己的 Jetson 集群。
特性
- 易于构建和配置
- 功能强大且紧凑
- 配备专用外壳和风扇
规格
| 规格 | -- |
|---|---|
| 电源 | 65w PD |
| 尺寸 | 110mm x 110mm |
| 板载交换机 | Microchip KSZ9896CTXC |
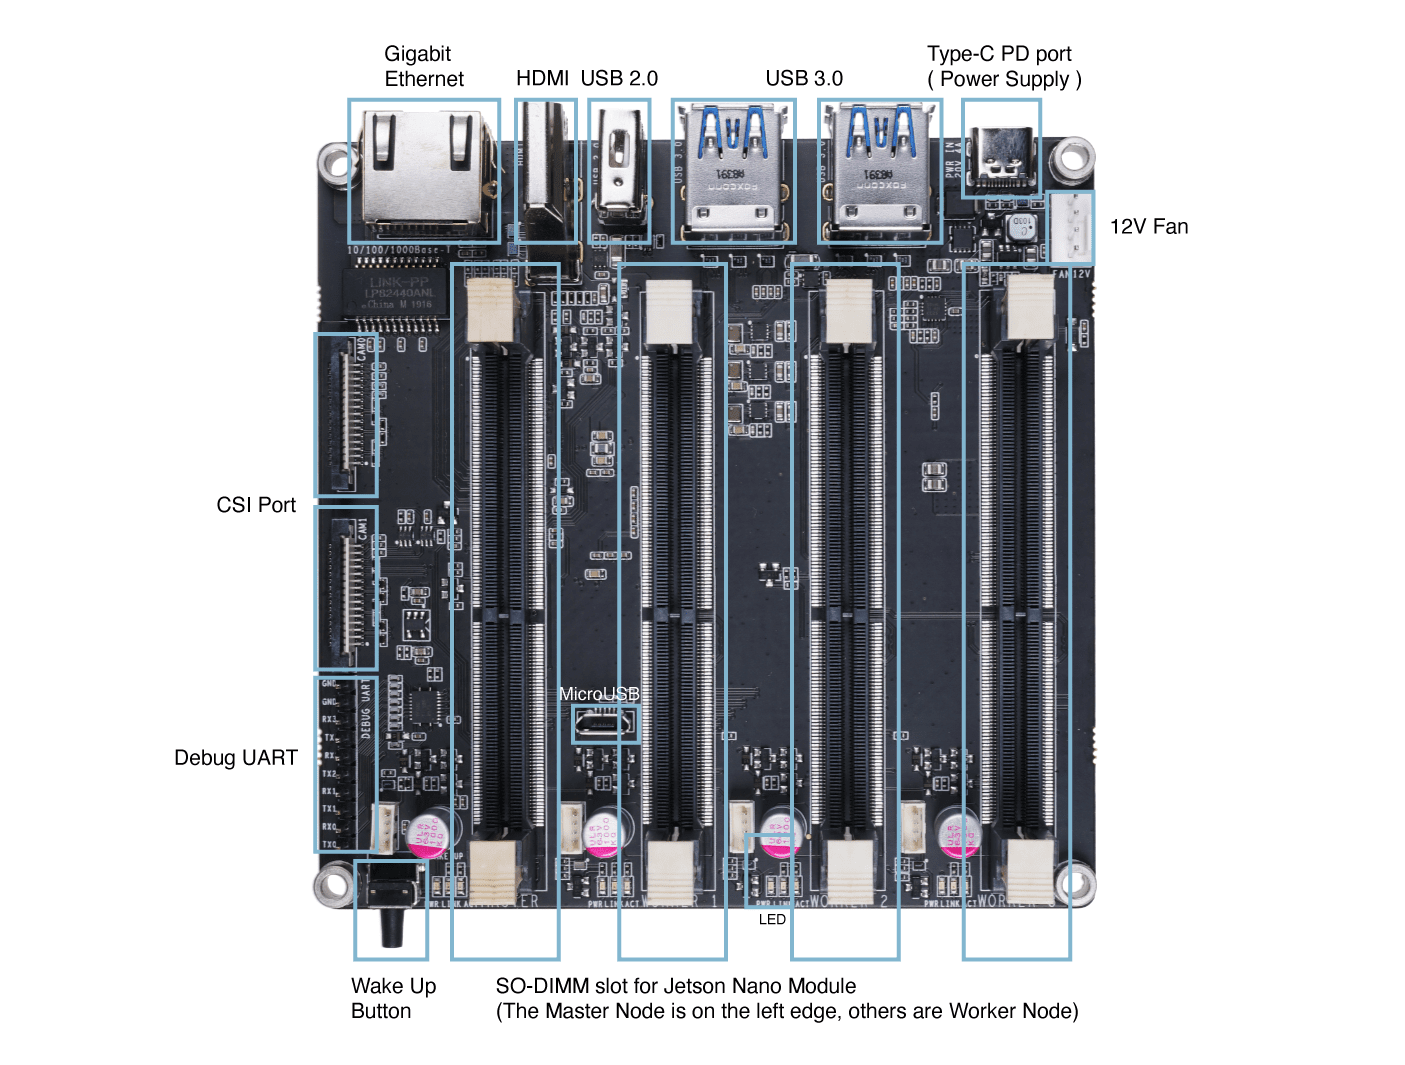
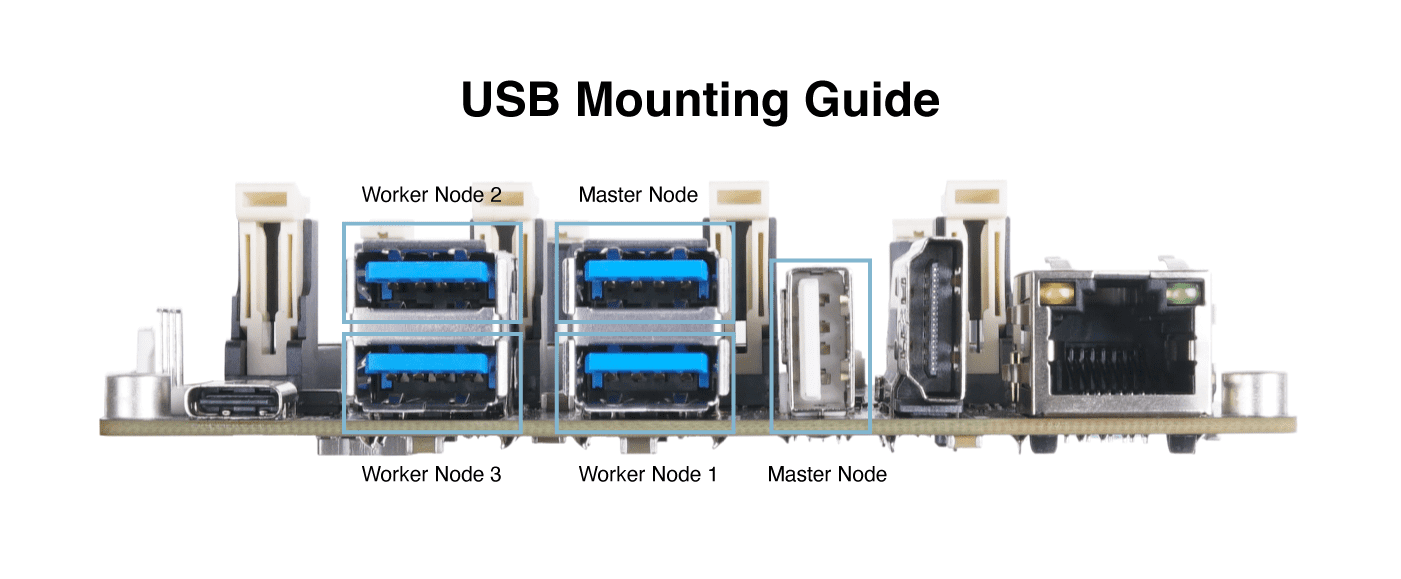
硬件概述
入门指南
!!!Note 在本指南中,主机PC上安装的是Ubuntu 18.04 LTS。目前使用NVIDIA SDK Manager进行系统刷写不支持Ubuntu 20.04。因此请确保使用Ubuntu 18.04或16.04。另外,如果您在虚拟机上运行Ubuntu,建议使用VMware Workstation Player,因为我们已经测试过。不建议使用Oracle VM VirtualBox,因为它无法成功刷写系统。
所需硬件
- Jetson Mate
- Jetson Nano/ NX 模块
- Micro - USB 线缆
- 65W或90W充电适配器,带USB Type-C线缆
- 安装了Ubuntu 18.04或16.04的主机PC
硬件设置
- 步骤1. 将Jetson Nano/ NX模块插入主节点

- 步骤2. 用micro-USB线缆连接Jetson Mate到PC

- 步骤3. 在BOOT和GND引脚之间连接跳线以进入恢复模式

-
步骤4. 将Jetson Mate连接到电源适配器,并按下WAKE按钮开启Jetson Mate
-
步骤5. Jetson Mate开启后移除跳线
-
步骤6. 在主机PC上打开终端窗口并执行以下命令
lsusb

如果输出包含 0955:7f21 NVidia Corp.,则 Jetson Mate 已进入恢复模式
软件设置
如果您使用的是来自开发套件的带有 micro-SD 卡的模块,我们建议您按照 Jetson Nano 指南、Jetson Nano 2GB 指南 和 Jetson Xavier NX 指南 来安装和配置系统
如果您使用的是带有 eMMC 存储的模块,请使用 NVIDIA 官方的 SDK Manager 并按照以下步骤操作
- 步骤 1. 点击 这里 下载 NVIDIA SDK Manager
注意: 根据主机 PC 操作系统选择相关版本。我们在这里选择 Ubuntu,因为本指南中使用的主机 PC 运行的是 Ubuntu 18.04

-
步骤 2. 创建账户或登录 NVIDIA Developer Program Membership
-
步骤 3. 安装 NVIDIA SDK Manager
注意: 双击下载的文件进行安装
- 步骤 4. 打开 NVIDIA SDK Manager,您会注意到它自动检测到连接的 Jetson Nano/ NX 模块

-
步骤 5. 选择连接的模块
-
步骤 6. 在配置窗口中,取消选中 Host Machine。

注意: 这里 DeepStream SDK 也被取消选中。但如果您也计划安装它,可以选中它。但是,eMMC 模块上的 16GB 空间不足以安装此 SDK。
-
步骤 7. 点击 CONTINUE TO STEP 02
-
步骤 8. 查看所需组件并选中 I accept the terms and conditions of the license agreements

注意: 如果您只想安装 Jetson OS,可以取消选中 Jetson SDK Components
-
步骤 9. 点击 CONTINUE TO STEP 03
-
步骤 10. 一旦出现以下错误消息,点击 Create

- 步骤 11. 开始下载和刷写

- 步骤 12. 下载和刷写操作系统完成后,您将看到以下输出

-
步骤 13. 关闭 Jetson Mate
-
步骤 14. 在主机 PC 上打开终端窗口并安装 minicom,这是一个串行终端应用程序
sudo apt update
sudo apt install minicom
注意: 我们将使用此应用程序在主机PC和Jetson Mate之间建立串行连接
- 步骤 15. 在仍通过micro - USB电缆连接到PC的情况下打开Jetson Mate,输入以下命令来识别连接的串行端口
dmesg | grep tty

注意: 这里的端口名称是 ttyACM0
- 步骤 16. 使用 minicom 连接到 Jetson Mate
sudo minicom -b 9600 -D /dev/ttyACM0
注意: -b 是波特率,-D 是设备
- 步骤 17. 完成 Jetson OS 的初始配置

- 步骤 18. 配置完成后,返回 SDK Manager 窗口,输入为 Jetson Mate 设置的用户名和密码,然后点击 Install

注意: 使用在初始配置中设置的用户名和密码
现在将开始下载和安装 SDK 组件

当 SDK manager 成功下载并安装必要组件后,您将看到以下输出

- 步骤 19. 刷写您拥有的所有其余 Jetson Nano/ NX 模块
注意: 所有模块只能在安装到主节点时进行刷写。因此,您应该在主节点上逐个刷写和配置模块。
启动集群
- 步骤 1. 将以太网线从路由器连接到 Jetson Mate
注意: 确保 PC 和 Jetson Mate 连接到同一个路由器
- 步骤 2. 如前所述使用 minicom 进入 Jetson Mate,同时将 micro-USB 连接到主机 PC,然后输入以下命令获取连接到 Jetson Mate 的模块的 IP 地址
ifconfig
- 步骤 3. 在主机 PC 终端上输入以下内容以建立 SSH 连接
注意: 将 user 替换为您的 Jetson Nano/ NX 用户名,将 192.xxx.xx.xx 替换为您的 Jetson Nano/ NX IP 地址
注意: 您也可以通过将 IP 地址替换为主机名来连接到节点
使用 Jetson Mate 构建 Kubernetes 集群
Kubernetes 是一个企业级容器编排系统,从一开始就设计为云原生。它已经发展成为事实上的云容器平台,随着它拥抱新技术(包括容器原生虚拟化和无服务器计算)而持续扩展。
Kubernetes 管理容器及更多内容,从边缘的微规模到大规模,在公有云和私有云环境中都适用。它是"家庭私有云"项目的完美选择,既提供强大的容器编排,又提供了学习这项需求量大且与云深度集成的技术的机会,其名称几乎与"云计算"同义。
在本教程中,我们使用一个主节点和三个工作节点。在以下步骤中,我们将用粗体标明软件是运行在 master 还是在 worker,或者在 worker and master 中。
配置 Docker
worker and master,我们需要配置 docker 运行时使用 "nvidia" 作为默认值。
修改文件 /etc/docker/daemon.json
{
 "default-runtime" : "nvidia",
    "runtimes": {
        "nvidia": {
            "path": "nvidia-container-runtime",
            "runtimeArgs": []
        }
    }
}
重启 Docker 守护进程:
sudo systemctl daemon-reload && sudo systemctl restart docker
验证 Docker 默认运行时为 NVIDIA:
sudo docker info | grep -i runtime
Here’s the sample output:
Runtimes: nvidia runc
Default Runtime: nvidia
安装 Kubernetes
worker 和 master,安装 kubelet、kubeadm 和 kubectl:
sudo apt-get update && sudo apt-get install -y apt-transport-https curl
curl -s https://packages.cloud.google.com/apt/doc/apt-key.gpg | sudo apt-key add -

# Add the Kubernetes repo
cat <<EOF | sudo tee /etc/apt/sources.list.d/kubernetes.list
deb https://apt.kubernetes.io/ kubernetes-xenial main
EOF
sudo apt update && sudo apt install -y kubelet kubeadm kubectl
sudo apt-mark hold kubelet kubeadm kubectl
禁用交换分区,每次重启时都必须关闭它。
sudo swapoff -a
编译 deviceQuery,我们将在接下来的步骤中使用它。
cd /usr/local/cuda/samples/1_Utilities/deviceQuery && sudo make
cd
Configure Kubernetes
master, Initialize the cluster:
sudo kubeadm init --pod-network-cidr=10.244.0.0/16
输出显示了用于将 pod 网络部署到集群以及加入集群的执行命令。如果一切成功,您应该在输出的末尾看到类似这样的内容:
Your Kubernetes control-plane has initialized successfully!

To start using your cluster, you need to run the following as a regular user:

  mkdir -p $HOME/.kube
  sudo cp -i /etc/kubernetes/admin.conf $HOME/.kube/config
  sudo chown $(id -u):$(id -g) $HOME/.kube/config

You should now deploy a pod network to the cluster.
Run "kubectl apply -f [podnetwork].yaml" with one of the options listed at:
  https://kubernetes.io/docs/concepts/cluster-administration/addons/

Then you can join any number of worker nodes by running the following on each as root:

kubeadm join 192.168.2.114:6443 --token zqqoy7.9oi8dpkfmqkop2p5 \
    --discovery-token-ca-cert-hash sha256:71270ea137214422221319c1bdb9ba6d4b76abfa2506753703ed654a90c4982b
使用输出指令,运行以下命令:
mkdir -p $HOME/.kube
sudo cp -i /etc/kubernetes/admin.conf $HOME/.kube/config
sudo chown $(id -u):$(id -g) $HOME/.kube/config
在控制平面节点上安装 pod 网络插件。使用 calico 作为 pod 网络插件:
kubectl apply -f https://raw.githubusercontent.com/coreos/flannel/master/Documentation/kube-flannel.yml
如果你在中国,请改为按照以下步骤操作:
kubectl apply -f https://gitee.com/wj204811/wj204811/raw/master/kube-flannel.yml
确保所有 Pod 都已启动并正在运行:
kubectl get pods --all-namespaces
以下是示例输出:
NAMESPACE     NAME                                       READY   STATUS    RESTARTS   AGE
kube-system   kube-flannel-ds-arm64-gz28t                1/1     Running   0          2m8s
kube-system   coredns-5c98db65d4-d4kgh                   1/1     Running   0          9m8s
kube-system   coredns-5c98db65d4-h6x8m                   1/1     Running   0          9m8s
kube-system   etcd-#yourhost                             1/1     Running   0          8m25s
kube-system   kube-apiserver-#yourhost                   1/1     Running   0          8m7s
kube-system   kube-controller-manager-#yourhost          1/1     Running   0          8m3s
kube-system   kube-proxy-6sh42                           1/1     Running   0          9m7s
kube-system   kube-scheduler-#yourhost                   1/1     Running   0          8m26s
工作节点,将计算节点加入集群,现在是时候将计算节点添加到集群中了。加入计算节点只需要运行在初始化控制平面节点时 kube init 命令结束时提供的 kubeadm join 命令。对于您想要加入集群的其他 Jetson nano,登录到主机,并运行以下命令:
 the cluster - your tokens and ca-cert-hash will vary
$ sudo kubeadm join 192.168.2.114:6443 --token zqqoy7.9oi8dpkfmqkop2p5 \
    --discovery-token-ca-cert-hash sha256:71270ea137214422221319c1bdb9ba6d4b76abfa2506753703ed654a90c4982b
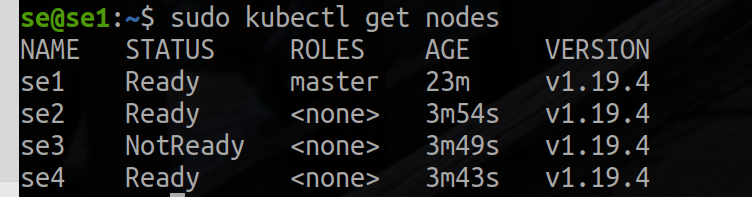
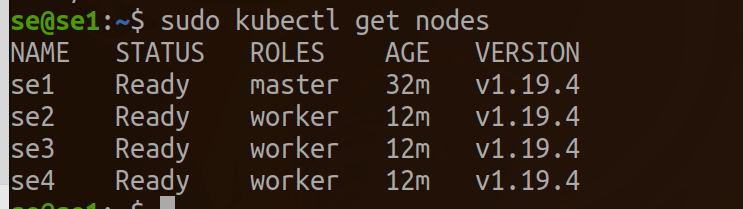
主节点,一旦您在每个节点上完成了加入过程,您应该能够在 kubectl get nodes 的输出中看到新节点:
kubectl get nodes
以下是示例输出:
标记为工作节点的标签。
kubectl label node se2 node-role.kubernetes.io/worker=worker
kubectl label node se3 node-role.kubernetes.io/worker=worker
kubectl label node se4 node-role.kubernetes.io/worker=worker
验证 EGX 2.0 安装是否成功
worker 和 master,要验证 EGX 堆栈是否按预期工作,请按照以下步骤创建一个 pod yaml 文件。如果 get pods 命令显示 pod 状态为 completed,则表示安装成功。您还可以通过验证输出显示 Result=PASS 来确认 cuda-samples.yaml 文件的成功运行。 创建一个 pod yaml 文件,向其中添加以下内容,并将其保存为 samples.yaml:
nano cuda-samples.yaml
将以下内容添加并保存为 cuda-samples.yaml:
apiVersion: v1
kind: Pod
metadata:
  name: nvidia-l4t-base
spec:
  restartPolicy: OnFailure
  containers:
  - name: nvidia-l4t-base
    image: "nvcr.io/nvidia/l4t-base:r32.4.2"
    args:
       - /usr/local/cuda/samples/1_Utilities/deviceQuery/deviceQuery
Create a sample GPU pod:
sudo kubectl apply -f cuda-samples.yaml
检查是否已创建 samples pod:
kubectl get pods
验证样本 pod 日志以支持 CUDA 库:
kubectl logs nvidia-l4t-base
Here’s the sample output:
/usr/local/cuda/samples/1_Utilities/deviceQuery/deviceQuery Starting...
 CUDA Device Query (Runtime API) version (CUDART static linking)
Detected 1 CUDA Capable device(s)

Device 0: "Xavier"
  CUDA Driver Version / Runtime Version          10.2 / 10.2
  CUDA Capability Major/Minor version number:    7.2
  Total amount of global memory:                 7764 MBytes (8140709888 bytes)
  ( 6) Multiprocessors, ( 64) CUDA Cores/MP:     384 CUDA Cores
  GPU Max Clock rate:                            1109 MHz (1.11 GHz)
  Memory Clock rate:                             1109 Mhz
  Memory Bus Width:                              256-bit
  L2 Cache Size:                                 524288 bytes
  Maximum Texture Dimension Size (x,y,z)         1D=(131072), 2D=(131072, 65536), 3D=(16384, 16384, 16384)
  Maximum Layered 1D Texture Size, (num) layers  1D=(32768), 2048 layers
  Maximum Layered 2D Texture Size, (num) layers  2D=(32768, 32768), 2048 layers
  Total amount of constant memory:               65536 bytes
  Total amount of shared memory per block:       49152 bytes
  Total number of registers available per block: 65536
  Warp size:                                     32
  Maximum number of threads per multiprocessor:  2048
  Maximum number of threads per block:           1024
  Max dimension size of a thread block (x,y,z): (1024, 1024, 64)
  Max dimension size of a grid size    (x,y,z): (2147483647, 65535, 65535)
  Maximum memory pitch:                          2147483647 bytes
  Texture alignment:                             512 bytes
  Concurrent copy and kernel execution:          Yes with 1 copy engine(s)
  Run time limit on kernels:                     No
  Integrated GPU sharing Host Memory:            Yes
  Support host page-locked memory mapping:       Yes
  Alignment requirement for Surfaces:            Yes
  Device has ECC support:                        Disabled
  Device supports Unified Addressing (UVA):      Yes
  Device supports Compute Preemption:            Yes
  Supports Cooperative Kernel Launch:            Yes
  Supports MultiDevice Co-op Kernel Launch:      Yes
  Device PCI Domain ID / Bus ID / location ID:   0 / 0 / 0
  Compute Mode:
     < Default (multiple host threads can use ::cudaSetDevice() with device simultaneously) >

deviceQuery, CUDA Driver = CUDART, CUDA Driver Version = 10.2, CUDA Runtime Version = 10.2, NumDevs = 1
Result = PASS
在 Kubernetes 上配置 Jupyter
worker 和 master,添加以下内容并将其保存为 jupyter.yaml:
nano jupyter.yaml
apiVersion: apps/v1 # for versions before 1.9.0 use apps/v1beta2
kind: Deployment
metadata:
  name: cluster-deployment
spec:
  selector:
    matchLabels:
      app: cluster
  replicas: 3 # tells deployment to run 3 pods matching the template
  template:
    metadata:
      labels:
        app: cluster
    spec:
      containers:
      - name: nginx
        image: helmuthva/jetson-nano-jupyter:latest
        ports:
        - containerPort: 8888
Create a jupyter GPU pod:
kubectl apply -f jupyter.yml
检查 jupyter pod 是否已创建并正在运行:
kubectl get pod
创建外部负载均衡器
kubectl expose deployment cluster-deployment --port=8888 --type=LoadBalancer

在这里你可以看到 jupyter 集群在端口 31262 上有外部访问权限。所以我们使用 http://se1.local:31262 来访问 jupyter。
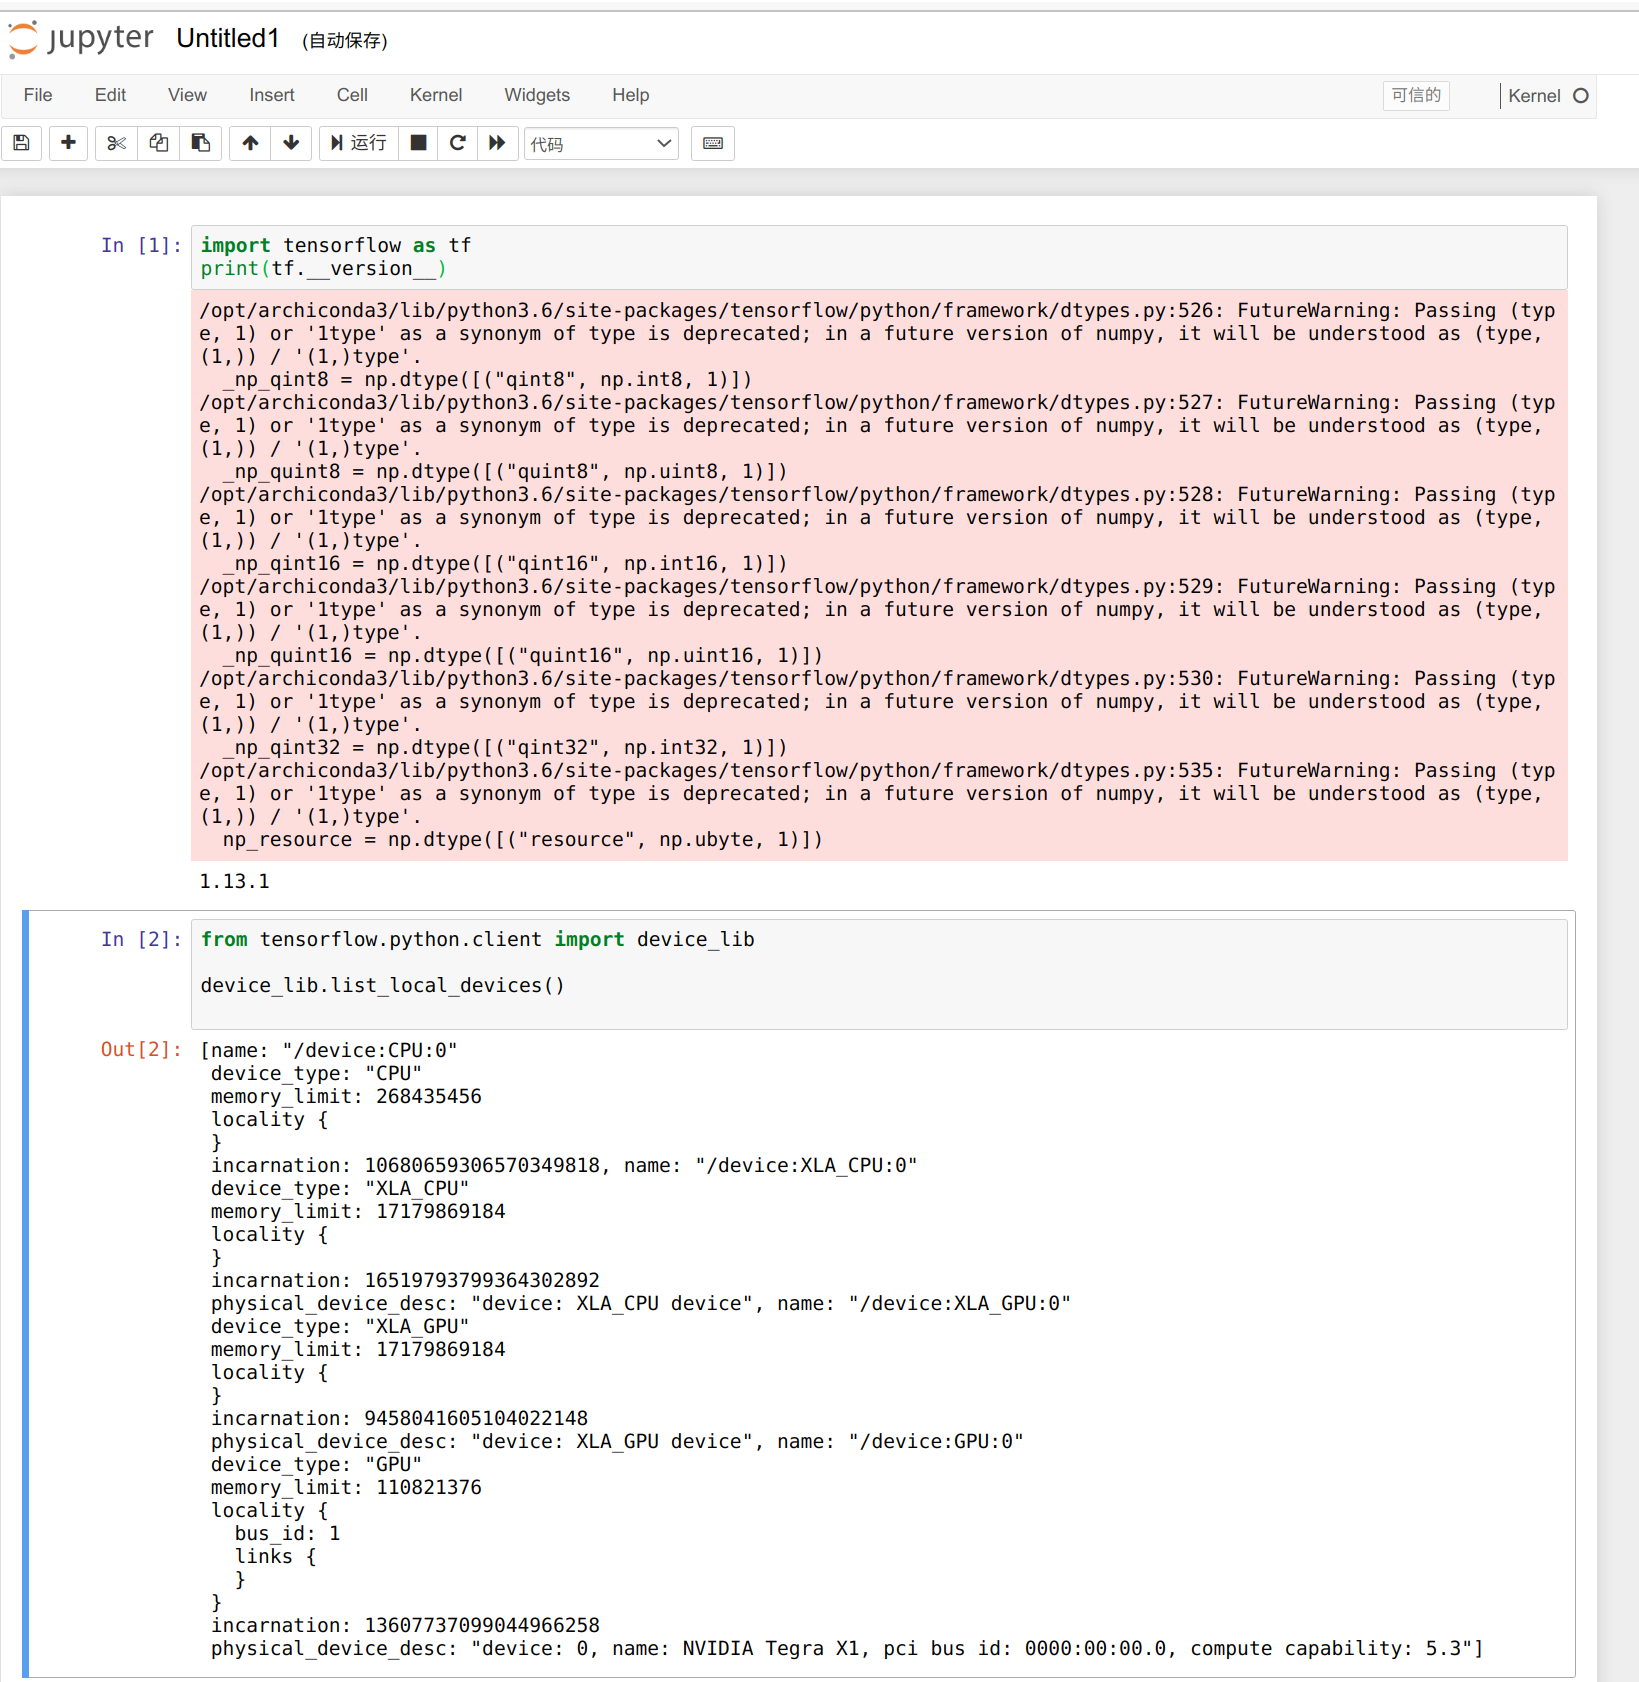
我们可以使用以下代码来检查可用的 GPU 数量,我们只有 3 个工作节点,可用的 GPU 数量是 3。
from tensorflow.python.client import device_lib

def get_available_gpus():
    local_device_protos = device_lib.list_local_devices()
    return [x.name for x in local_device_protos if x.device_type == 'GPU']

get_available_gpus()
好了,这就是显示的结果。
资源
- [PDF] Jetson Mate 原理图
- [PDF] Jetson Mate PCB 顶层
- [PDF] Jetson Mate PCB 底层
技术支持与产品讨论
感谢您选择我们的产品!我们在这里为您提供不同的支持,以确保您使用我们产品的体验尽可能顺畅。我们提供多种沟通渠道,以满足不同的偏好和需求。