Nvidia Jetson 入门指南
本 wiki 是为 ReSpeaker 2-Mics Pi HAT v1 编写的,要区分 v1 和 v2 设备,请参考 如何区分 ReSpeaker 2-Mics Pi HAT 硬件版本。
驱动安装和配置
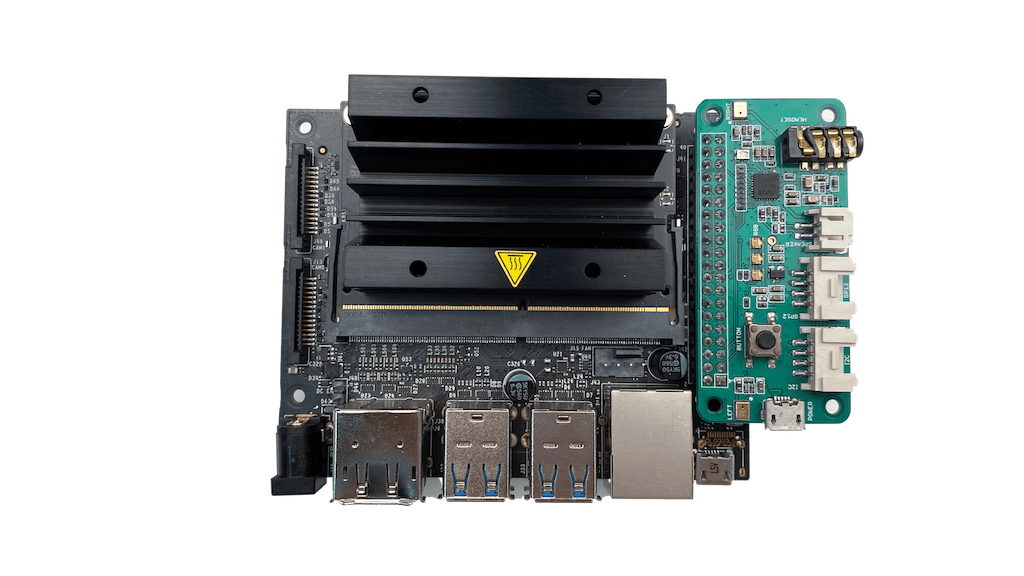
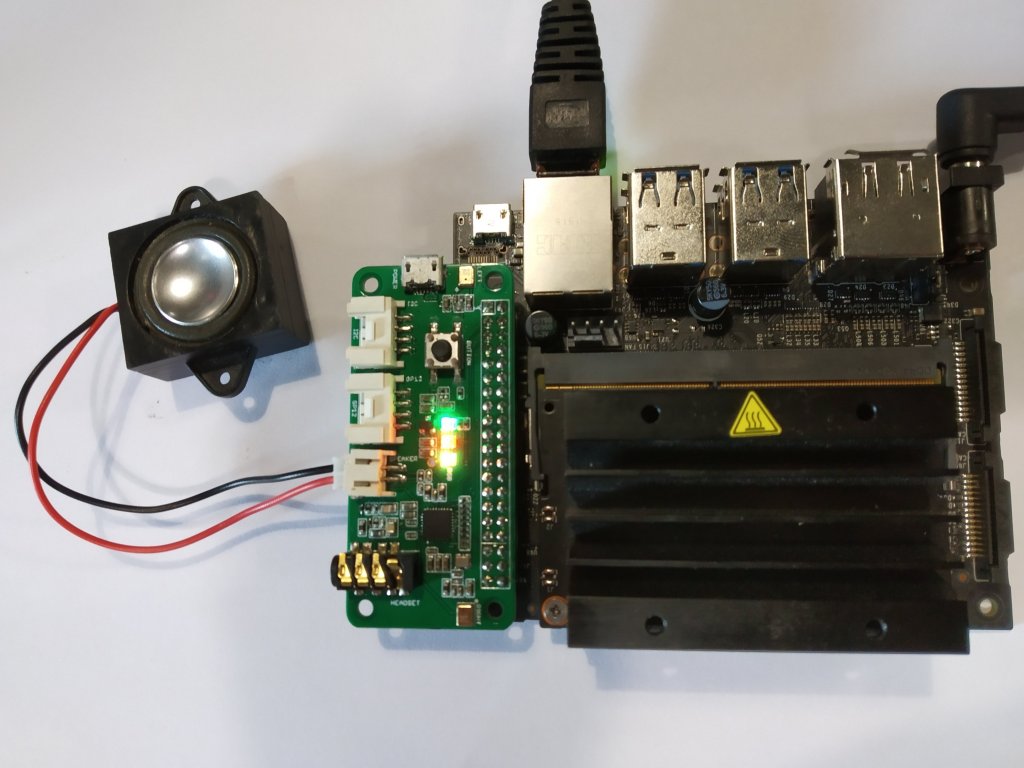
1. 将 ReSpeaker 2-Mics Pi HAT 连接到 Jetson Nano
将 ReSpeaker 2-Mics Pi HAT 安装到您的 Jetson Nano 上,确保在堆叠 ReSpeaker 2-Mics Pi HAT 时引脚正确对齐。
Jetson Nano 连接
2. 在 Jetson Nano 上设置驱动
确保您的设备运行的是最新的 Jetson Nano OS 镜像。(更新于 2021.07.03)
这已在 JetPack 4.5.1 上测试过。对于其他版本,您需要使用 ls /usr/src/linux-headers-* 检查内核头文件版本号
步骤 1. 克隆仓库
cd ~
git clone https://github.com/Seeed-Studio/seeed-linux-dtoverlays
cd ~/seeed-linux-dtoverlays
步骤 2. 构建 dtbo 和驱动
export CUSTOM_MOD_FILTER_OUT="lis3lv02d mcp25xxfd gt9xx seeed-voicecard"
KBUILD=/usr/src/linux-headers-4.9.201-tegra-ubuntu18.04_aarch64/kernel-4.9 make all_jetsonnano
步骤 3. 安装驱动
sudo -E KBUILD=/usr/src/linux-headers-4.9.201-tegra-ubuntu18.04_aarch64/kernel-4.9 make install_jetsonnano
步骤 4. 安装 dtbo
sudo /opt/nvidia/jetson-io/config-by-hardware.py -n "Seeed Voice Card 2MIC"
步骤 5. 重启
sudo reboot
步骤 6. 恢复 Alsa 小部件设置
登录后必须等待一段时间,直到声卡不再忙碌。
cd ~/seeed-linux-dtoverlays
alsactl -f extras/wm8960_asound.state-jetson-nano restore 1
步骤 7. 通过命令 aplay -l 和 arecord -l 检查声卡名称是否与源代码 seeed-voicecard 匹配。
jetson@jetson:~$ aplay -l
**** List of PLAYBACK Hardware Devices ****
card 0: tegrahda [tegra-hda], device 3: HDMI 0 [HDMI 0]
  Subdevices: 1/1
  Subdevice #0: subdevice #0
card 1: tegrasndt210ref [tegra-snd-t210ref-mobile-rt565x], device 0: ADMAIF1 CIF ADMAIF1-0 []
  Subdevices: 0/1
  Subdevice #0: subdevice #0
card 1: tegrasndt210ref [tegra-snd-t210ref-mobile-rt565x], device 1: ADMAIF2 CIF ADMAIF2-1 []
  Subdevices: 1/1
  Subdevice #0: subdevice #0
card 1: tegrasndt210ref [tegra-snd-t210ref-mobile-rt565x], device 2: ADMAIF3 CIF ADMAIF3-2 []
  Subdevices: 1/1
  Subdevice #0: subdevice #0
card 1: tegrasndt210ref [tegra-snd-t210ref-mobile-rt565x], device 3: ADMAIF4 CIF ADMAIF4-3 []
  Subdevices: 1/1
  Subdevice #0: subdevice #0
card 1: tegrasndt210ref [tegra-snd-t210ref-mobile-rt565x], device 4: ADMAIF5 CIF ADMAIF5-4 []
  Subdevices: 1/1
  Subdevice #0: subdevice #0
card 1: tegrasndt210ref [tegra-snd-t210ref-mobile-rt565x], device 5: ADMAIF6 CIF ADMAIF6-5 []
  Subdevices: 1/1
  Subdevice #0: subdevice #0
card 1: tegrasndt210ref [tegra-snd-t210ref-mobile-rt565x], device 6: ADMAIF7 CIF ADMAIF7-6 []
  Subdevices: 1/1
  Subdevice #0: subdevice #0
card 1: tegrasndt210ref [tegra-snd-t210ref-mobile-rt565x], device 7: ADMAIF8 CIF ADMAIF8-7 []
  Subdevices: 1/1
  Subdevice #0: subdevice #0
card 1: tegrasndt210ref [tegra-snd-t210ref-mobile-rt565x], device 8: ADMAIF9 CIF ADMAIF9-8 []
  Subdevices: 1/1
  Subdevice #0: subdevice #0
card 1: tegrasndt210ref [tegra-snd-t210ref-mobile-rt565x], device 9: ADMAIF10 CIF ADMAIF10-9 []
  Subdevices: 1/1
  Subdevice #0: subdevice #0


jetson@jetson:~$ arecord -l
**** List of CAPTURE Hardware Devices ****
card 1: tegrasndt210ref [tegra-snd-t210ref-mobile-rt565x], device 0: ADMAIF1 CIF ADMAIF1-0 []
  Subdevices: 1/1
  Subdevice #0: subdevice #0
card 1: tegrasndt210ref [tegra-snd-t210ref-mobile-rt565x], device 1: ADMAIF2 CIF ADMAIF2-1 []
  Subdevices: 1/1
  Subdevice #0: subdevice #0
card 1: tegrasndt210ref [tegra-snd-t210ref-mobile-rt565x], device 2: ADMAIF3 CIF ADMAIF3-2 []
  Subdevices: 1/1
  Subdevice #0: subdevice #0
card 1: tegrasndt210ref [tegra-snd-t210ref-mobile-rt565x], device 3: ADMAIF4 CIF ADMAIF4-3 []
  Subdevices: 1/1
  Subdevice #0: subdevice #0
card 1: tegrasndt210ref [tegra-snd-t210ref-mobile-rt565x], device 4: ADMAIF5 CIF ADMAIF5-4 []
  Subdevices: 1/1
  Subdevice #0: subdevice #0
card 1: tegrasndt210ref [tegra-snd-t210ref-mobile-rt565x], device 5: ADMAIF6 CIF ADMAIF6-5 []
  Subdevices: 1/1
  Subdevice #0: subdevice #0
card 1: tegrasndt210ref [tegra-snd-t210ref-mobile-rt565x], device 6: ADMAIF7 CIF ADMAIF7-6 []
  Subdevices: 1/1
  Subdevice #0: subdevice #0
card 1: tegrasndt210ref [tegra-snd-t210ref-mobile-rt565x], device 7: ADMAIF8 CIF ADMAIF8-7 []
  Subdevices: 1/1
  Subdevice #0: subdevice #0
card 1: tegrasndt210ref [tegra-snd-t210ref-mobile-rt565x], device 8: ADMAIF9 CIF ADMAIF9-8 []
  Subdevices: 1/1
  Subdevice #0: subdevice #0
card 1: tegrasndt210ref [tegra-snd-t210ref-mobile-rt565x], device 9: ADMAIF10 CIF ADMAIF10-9 []
  Subdevices: 1/1
  Subdevice #0: subdevice #0
- 步骤 3. 测试,您将听到您对麦克风说的话(不要忘记插入耳机或扬声器):
arecord -f cd -Dhw:1 test.wav
aplay -Dhw:1 test.wav
或者(将麦克风的声音立即播放到扬声器/耳机):
arecord -D hw:1,0 -f S32_LE -r 48000 -c 2 | aplay -D hw:1,0 -f S32_LE -r 48000 -c 2
注意: -Dhw:1 是录音(或播放设备编号),根据您的系统,此编号可能不同。
使用概述
要运行以下示例,请将 https://github.com/respeaker/mic_hat.git 仓库克隆到您的 Jetson Nano
git clone https://github.com/respeaker/mic_hat.git
下面示例中提到的所有 Python 脚本都可以在此仓库中找到。要安装必要的依赖项,请从 mic_hat 仓库文件夹运行
sudo apt-get install portaudio19-dev libatlas-base-dev
pip3 install Jetson.GPIO spidev pyaudio
APA102 LED
每个板载 APA102 LED 都有一个额外的驱动芯片。驱动芯片负责通过其输入线接收所需的颜色,然后保持这种颜色直到收到新命令。
python3 interfaces/pixels.py
使用 Python 录制声音
我们使用 PyAudio python 库 来用 Python 录制声音。
首先,运行以下脚本获取 2 Mic pi hat 的设备索引号:
python3 recording_examples/get_device_index.py
您将看到如下所示的设备 ID。
Input Device id 1 - tegra-snd-t210ref-mobile-rt565x: - (hw:1,1)
要录制声音,请使用 nano 或其他文本编辑器打开 recording_examples/record.py 文件,并将 RESPEAKER_INDEX = 1 更改为您系统上 ReSpeaker 的索引号。然后运行 python 脚本 record.py 进行录制:
python3 recording_examples/record.py
如果您想从 2 个通道中提取通道 0 数据,请查看 record_one_channel.py 的内容。对于其他通道 X,请将 [0::2] 更改为 [X::2]。
python3 recording_examples/record_one_channel.py
要播放录制的样本,您可以使用 aplay 系统实用程序,例如
aplay -f cd -Dhw:1 output.wav #用于立体声