Raspberry Pi 入门指南
本 wiki 是为 ReSpeaker 2-Mics Pi HAT v1 编写的,要区分 v1 和 v2 设备,请参考 如何区分 ReSpeaker 2-Mics Pi HAT 硬件版本。
驱动安装和配置
1. 将 ReSpeaker 2-Mics Pi HAT 连接到 Raspberry Pi
将 ReSpeaker 2-Mics Pi HAT 安装到您的 Raspberry Pi 上,确保在堆叠 ReSpeaker 2-Mics Pi HAT 时引脚正确对齐。
Raspberry Pi 连接

Raspberry Pi Zero 连接

2. 在 Raspberry Pi 上设置驱动
确保您的 Pi 运行的是最新的 Raspberry Pi OS。(更新于 2021.05.01)
- 步骤 1:获取 ReSpeaker 2-Mics Pi HAT (V1.0) 的设备树源码 (DTS),编译并安装设备树覆盖。
git clone https://github.com/Seeed-Studio/seeed-linux-dtoverlays.git
cd seeed-linux-dtoverlays/
make overlays/rpi/respeaker-2mic-v1_0-overlay.dtbo
sudo cp overlays/rpi/respeaker-2mic-v1_0-overlay.dtbo /boot/firmware/overlays/respeaker-2mic-v1_0.dtbo
echo "dtoverlay=respeaker-2mic-v1_0" | sudo tee -a /boot/firmware/config.txt
- 步骤 2:重启您的 Pi。
sudo reboot
- 步骤 3. 通过命令
aplay -l和arecord -l检查声卡名称是否与源代码 seeed-voicecard 匹配。
pi@raspberrypi:~/Desktop/mic_hat $ aplay -l
**** List of PLAYBACK Hardware Devices ****
card 0: Headphones [bcm2835 Headphones], device 0: bcm2835 Headphones [bcm2835 Headphones]
  Subdevices: 8/8
  Subdevice #0: subdevice #0
  Subdevice #1: subdevice #1
  Subdevice #2: subdevice #2
  Subdevice #3: subdevice #3
  Subdevice #4: subdevice #4
  Subdevice #5: subdevice #5
  Subdevice #6: subdevice #6
  Subdevice #7: subdevice #7
card 1: vc4hdmi0 [vc4-hdmi-0], device 0: MAI PCM i2s-hifi-0 [MAI PCM i2s-hifi-0]
  Subdevices: 1/1
  Subdevice #0: subdevice #0
card 2: vc4hdmi1 [vc4-hdmi-1], device 0: MAI PCM i2s-hifi-0 [MAI PCM i2s-hifi-0]
  Subdevices: 1/1
  Subdevice #0: subdevice #0
card 3: seeed2micvoicec [seeed-2mic-voicecard], device 0: bcm2835-i2s-wm8960-hifi wm8960-hifi-0 [bcm2835-i2s-wm8960-hifi wm8960-hifi-0]
  Subdevices: 1/1
  Subdevice #0: subdevice #0

pi@raspberrypi:~/Desktop/mic_hat $ arecord -l
**** List of CAPTURE Hardware Devices ****
card 3: seeed2micvoicec [seeed-2mic-voicecard], device 0: bcm2835-i2s-wm8960-hifi wm8960-hifi-0 [bcm2835-i2s-wm8960-hifi wm8960-hifi-0]
  Subdevices: 1/1
  Subdevice #0: subdevice #0
- 步骤 4. 测试,您将听到您对麦克风说的话(别忘了插入耳机或扬声器):
arecord -D "plughw:3,0" -f S16_LE -r 16000 -d 5 -t wav test.wav
aplay -D "plughw:3,0" test.wav
注意: "plughw:3,0" 是录音(或播放设备编号),根据您的系统,此编号可能不同(例如在 Raspberry Pi 0 上它将是 0,因为它没有音频插孔)我们可以通过 "arecord -l" 和 "aplay -l" 找到它。
3. 使用 alsamixer 配置声音设置并调整音量
alsamixer 是高级 Linux 声音架构 (ALSA) 的图形混音器程序,用于配置声音设置和调整音量。
pi@raspberrypi:~ $ alsamixer

左右箭头键用于选择通道或设备,上下箭头控制当前选定设备的音量。使用 ALT+Q 或按 Esc 键退出程序。更多信息
请先使用 F6 选择 seeed-2mic-voicecard 设备。
使用概述
要运行以下示例,请将 https://github.com/respeaker/mic_hat.git 仓库克隆到您的 Raspberry Pi
git clone https://github.com/respeaker/mic_hat.git
cd mic_hat
下面示例中提到的所有 Python 脚本都可以在此仓库中找到。要安装必要的依赖项,从 mic_hat 仓库文件夹运行
sudo apt-get install portaudio19-dev libatlas-base-dev
pip3 install -r requirements.txt
APA102 LED
每个板载 APA102 LED 都有一个额外的驱动芯片。驱动芯片负责通过其输入线接收所需的颜色,然后保持此颜色直到收到新命令。
python3 interfaces/pixels.py
用户按钮
有一个板载用户按钮,连接到 GPIO17。现在我们将尝试使用 python 和 RPi.GPIO 检测它。
从您在步骤 4 克隆的 mic_hat 文件夹仓库执行以下代码。
python3 interfaces/button.py
当您按下按钮时,它应该显示 "on":
python3 button.py
输出如下
pi@raspberrypi:~ $ python3 button.py
off
off
on
on
off
使用 Python 录制声音
我们使用 PyAudio python 库 来使用 Python 录制声音。
首先,运行以下脚本获取 2 Mic pi hat 的设备索引号:
python3 recording_examples/get_device_index.py
您将看到如下设备 ID。
Input Device id 2 - seeed-2mic-voicecard: - (hw:1,0)
要录制声音,使用 nano 或其他文本编辑器打开 recording_examples/record.py 文件,将 RESPEAKER_INDEX = 2 更改为您系统上 ReSpeaker 的索引号。然后运行 python 脚本 record.py 进行录制:
python3 recording_examples/record.py
如果您想从 2 个通道中提取通道 0 数据,请查看 record_one_channel.py 的内容。对于其他通道 X,请将 [0::2] 更改为 [X::2]。
python3 recording_examples/record_one_channel.py
要播放录制的样本,您可以使用 aplay 系统实用程序,例如
aplay -f cd -Dhw:1 output.wav #for Stereo sound
aplay -D plughw:1,0 output_one_channel.wav #for Mono sound from one channel
或者您可以使用 recording_examples/play.py 脚本通过 PyAudio 播放 .wav 文件。
python3 recording_examples/play.py path-to-wav-file
确保在 play.py 中指定正确的输出设备索引 - 否则 PyAudio 会冻结!
使用 ReSpeaker 2-Mic Pi HAT 和 Raspberry Pi 的 Picovoice
步骤 1. 在以下操作之前,请遵循上述 ReSpeaker 2-Mic Pi HAT 与 Raspberry Pi 的分步教程。
注意: 请确保 APA102 LED 在 ReSpeaker 2-Mic Pi HAT 与 Raspberry Pi 上正常工作。
步骤 2. 在终端中输入以下命令来安装 ReSpeaker 2-Mic Pi HAT 的 Picovoice 演示。
pip3 install pvrespeakerdemo
注意: 在全新的 Raspberry Pi OS 安装上,安装此演示时您可能会注意到以下警告: 脚本 picovoice_respeaker_demo 安装在 '/home/pi/.local/bin' 中,该路径不在 PATH 中。
这意味着为了运行演示,您需要将 /home/pi/.local/bin 添加到您的系统 PATH:
echo 'export PATH="$HOME/bin:$HOME/.local/bin:$PATH"' >> ~/.bashrc
演示使用
该演示利用 Raspberry Pi 上的 ReSpeaker 2-Mic Pi HAT 与 Picovoice 技术来控制 LED。此演示由唤醒词 "Picovoice" 触发,并准备执行后续操作,如打开和关闭 LED,以及更改 LED 颜色。
安装完成后,在终端中输入此命令运行演示:
picovoice_respeaker_demo
语音命令
以下是此演示的语音命令:
- Picovoice
演示输出:
wake word
- Turn on the lights
您应该看到灯光打开,终端上显示以下消息:
{
    is_understood : 'true',
    intent : 'turnLights',
    slots : {
        'state' : 'on',
    }
}
命令列表显示在终端上:
context:
expressions:
turnLights:
- "[switch, turn] $state:state (all) (the) [light, lights]"
- "[switch, turn] (all) (the) [light, lights] $state:state"
changeColor:
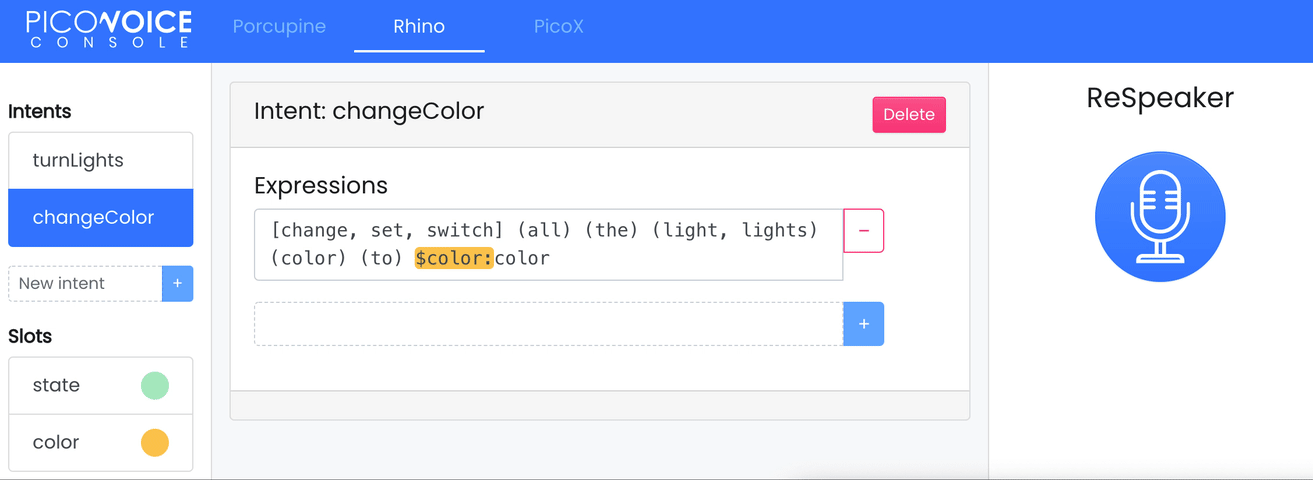
- "[change, set, switch] (all) (the) (light, lights) (color) (to) $color:color"
slots:
state:
- "off"
- "on"
color:
- "blue"
- "green"
- "orange"
- "pink"
- "purple"
- "red"
- "white"
- "yellow"
此外,您可以尝试此命令来更改颜色:
- Picovoice, set the lights to orange
通过以下方式关闭灯光:
- Picovoice, turn off all lights
演示视频展示
演示源代码
该演示使用 Picovoice SDK 构建。演示源代码可在 GitHub 上获取:https://github.com/Picovoice/picovoice/tree/master/demo/respeaker。
不同的唤醒词
Picovoice SDK 包含在 Apache 2.0 许可下的免费示例唤醒词,包括主要语音助手(例如 "Hey Google"、"Alexa")和有趣的词汇如 "Computer" 和 "Jarvis"。
自定义语音命令
照明命令由 Picovoice Speech-to-Intent context 定义。您可以使用 Picovoice Console 通过输入允许的语法来设计和训练上下文。您可以在编辑时使用麦克风按钮在浏览器中测试您的更改。前往 Picovoice Console (https://picovoice.ai/console/) 并注册一个账户。使用 Rhino Speech-to-Intent editor 创建上下文,然后为 Raspberry Pi 训练它们。
多唤醒词示例
Porcupine
Porcupine 是一个高精度且轻量级的唤醒词引擎。它能够构建始终监听的语音启用 应用程序。它具有以下特点:
- 使用在真实世界环境中训练的深度神经网络。
- 紧凑且计算高效。非常适合物联网。
- 跨平台。支持 Raspberry Pi、BeagleBone、Android、iOS、Linux (x86_64)、macOS (x86_64)、Windows (x86_64) 和网页 浏览器。此外,企业客户可以访问 ARM Cortex-M SDK。
- 可扩展。它可以检测多个始终监听的语音命令,而不会增加运行时占用空间。
- 自助服务。开发者可以使用 Picovoice Console 训练自定义唤醒词模型。
为了演示 Picovoice 的能力,我们还准备了使用 ReSpeaker 2-Mic Pi HAT 与 Raspberry Pi 的多唤醒词示例!不同的唤醒词可以设置为执行特定任务。
此包包含一个使用 Porcupine 控制 ReSpeaker 2-Mic Pi HAT LED 的命令行演示。
多唤醒词入门指南
在终端中运行以下命令来安装演示驱动程序:
pip3 install ppnrespeakerdemo
多唤醒词使用方法
驱动程序安装后,在终端中运行以下命令:
porcupine_respeaker_demo
等待演示初始化并在终端中打印 [Listening]。说:
Picovoice
演示输出:
detected 'Picovoice'
灯光现在设置为 green。说:
Alexa
灯光现在设置为 yellow。说:
Terminator
来关闭灯光。
唤醒词对应颜色
以下是此演示中支持的唤醒词对应的颜色:
AlexaBumblebeeComputerHey GoogleHey SiriJarvisPicovoicePorcupineTerminator
多唤醒词示例源代码
请在此处查看此示例的完整源代码:https://github.com/Picovoice/porcupine/tree/master/demo/respeaker。
使用 ReSpeaker 2-Mic Pi HAT 和 Mycroft Precise 进行关键词识别
Mycroft Precise 是一个完全开源的关键词检测引擎。虽然与 Picovoice 相比功能更有限,但它具有更宽松的许可证(Apache 2.0),允许修改和重新分发,包括闭源和商业用途,只要保留许可证。
要开始使用 Mycroft Precise,请安装 Seeed 的 Mycroft Precise 分支的最新稳定版本:
sudo apt-get install libatlas-base-dev
pip3 install git+https://github.com/respeaker/mycroft_runner_simple.git
注意: 在全新的 Raspberry Pi OS 安装中,您可能会在安装此演示时注意到以下警告: The script picovoice_respeaker_demo is installed in '/home/pi/.local/bin' which is not on PATH.
这意味着为了运行演示,您需要将 /home/pi/.local/bin 添加到您的系统 PATH:
echo 'export PATH="$HOME/bin:$HOME/.local/bin:$PATH"' >> ~/.bashrc
然后您可以通过运行以下命令简单地测试 Mycroft Precise 安装
mycroft-precise --model hey-mycroft
如果您想将 Mycroft Precise 集成到您自己的项目中,请查看 Github 仓库 README 文件以获取有关 API 的更多信息。
使用 ReSpeaker 2-Mic Pi HAT 和 Mycroft Core 的智能助手
Mycroft 是一个可破解的开源语音助手。它在功能上类似于 Amazon Alexa 或 Google Assistant,但具有更宽松的许可证(Apache 2.0),允许修改和重新分发,包括闭源和商业用途,只要保留许可证。
此部分目前正在开发中,我们将添加更多关于将 Mycroft Core 与 Respeaker 一起使用的详细信息
使用 ReSpeaker 2-Mic Pi HAT 和 Raspberry Pi Zero 的 Picovoice 入门指南
步骤 1. 按照 驱动程序安装和配置 中的描述安装驱动程序并配置设备。
然后 git clone Picovoice github 仓库:
git clone --recurse-submodules https://github.com/Picovoice/picovoice.git
cd picovoice
注意: 请确保 APA102 LED 在 ReSpeaker 2-Mic Pi HAT 与 Raspberry Pi Zero 上正常工作。
步骤 2. 通过在终端中输入以下命令安装 wiringpi 库。
sudo apt-get install wiringpi
步骤 3. 从仓库根目录,在终端中输入以下命令来 安装 ReSpeaker 2-Mic Pi HAT 的 Picovoice 演示。
gcc -std=c99 -O3 -o demo/respeaker-rpi0/picovoice_demo_mic \
-I sdk/c/include/ demo/respeaker-rpi0/picovoice_demo_mic.c \
-ldl -lasound -lwiringPi
演示使用方法
该演示利用 Raspberry Pi Zero 上的 ReSpeaker 2-Mic Pi HAT 与 Picovoice 技术来控制 LED。此演示由唤醒词 "Picovoice" 触发,并准备好执行后续操作,例如打开和关闭 LED,以及更改 LED 颜色。
安装完成后,从仓库根目录输入此命令,在终端中运行演示:
./demo/respeaker-rpi0/picovoice_demo_mic \
sdk/c/lib/raspberry-pi/arm11/libpicovoice.so \
resources/porcupine/lib/common/porcupine_params.pv \
resources/porcupine/resources/keyword_files/raspberry-pi/picovoice_raspberry-pi.ppn \
0.65 \
resources/rhino/lib/common/rhino_params.pv \
demo/respeaker/pvrespeakerdemo/respeaker_raspberry-pi.rhn \
0.5 \
plughw:CARD=seeed2micvoicec,DEV=0
语音命令
以下是此演示的语音命令:
- Picovoice
演示输出:
wake word
- Turn on the lights
您应该看到灯光打开,并在终端中显示以下消息:
{
    is_understood : 'true',
    intent : 'turnLights',
    slots : {
        'state' : 'on',
    }
}
命令列表显示在终端中:
context:
  expressions:
    turnLights:
      - "[switch, turn] $state:state (all) (the) [light, lights]"
      - "[switch, turn] (all) (the) [light, lights] $state:state"
    changeColor:
      - "[change, set, switch] (all) (the) (light, lights) (color) (to) $color:color"
  slots:
    state:
      - "off"
      - "on"
    color:
      - "blue"
      - "green"
      - "orange"
      - "pink"
      - "purple"
      - "red"
      - "white"
      - "yellow"
此外,您可以尝试此命令来更改颜色:
- Picovoice, set the lights to orange
通过以下命令关闭灯光:
- Picovoice, turn off all lights
演示视频展示
演示源代码
该演示使用 Picovoice SDK 构建。演示源代码可在 GitHub 上获取:https://github.com/Picovoice/picovoice/tree/master/demo/respeaker-rpi0。
不同的唤醒词
Picovoice SDK 包含在 Apache 2.0 许可下的免费示例唤醒词,包括主要语音助手(例如 "Hey Google"、"Alexa")和有趣的词汇如 "Computer" 和 "Jarvis"。
自定义语音命令
照明命令由 Picovoice Speech-to-Intent context 定义。您可以使用 Picovoice Console 通过输入允许的语法来设计和训练上下文。您可以在编辑时使用麦克风按钮在浏览器中测试您的更改。前往 Picovoice Console (https://picovoice.ai/console/) 并注册一个账户。使用 Rhino Speech-to-Intent editor 创建上下文,然后为 Raspberry Pi Zero 训练它们。
多唤醒词示例
为了演示 Picovoice 的能力,我们还准备了使用 ReSpeaker 2-Mic Pi HAT 与 Raspberry Pi Zero 的多唤醒词示例!不同的唤醒词可以设置为执行特定任务。
此包包含一个命令行演示,用于使用 Porcupine 控制 ReSpeaker 2-Mic Pi HAT LED。
Porcupine
Porcupine 是一个高精度且轻量级的唤醒词引擎。它能够构建始终监听的语音启用 应用程序。它具有以下特点:
- 使用在真实世界环境中训练的深度神经网络。
- 紧凑且计算高效。非常适合物联网应用。
- 跨平台。支持 Raspberry Pi、BeagleBone、Android、iOS、Linux (x86_64)、macOS (x86_64)、Windows (x86_64) 和网页 浏览器。此外,企业客户可以访问 ARM Cortex-M SDK。
- 可扩展。它可以检测多个始终监听的语音命令,而不会增加运行时占用空间。
- 自助服务。开发者可以使用 Picovoice Console 训练自定义唤醒词模型。
多唤醒词入门指南
步骤 1 通过在终端中输入以下命令安装 wiringpi 库(如果您尚未安装)。
sudo apt-get install wiringpi
然后克隆 Picovoice github 仓库:
git clone --recurse-submodules https://github.com/Picovoice/porcupine.git
cd picovoice
步骤 2. 从仓库根目录,在终端中输入以下命令来安装 ReSpeaker 2-Mic Pi HAT 的 Porcupine 演示。
gcc -std=c99 -O3 -o demo/respeaker-rpi0/porcupine_demo_mic \
-I include/ demo/respeaker-rpi0/porcupine_demo_mic.c \
-ldl -lasound -lwiringPi
多唤醒词使用方法
从仓库根目录在终端中运行以下命令:
./demo/respeaker-rpi0/porcupine_demo_mic \
lib/raspberry-pi/arm11/libpv_porcupine.so \
lib/common/porcupine_params.pv \
0.65 \
plughw:CARD=seeed2micvoicec,DEV=0 \
resources/keyword_files/raspberry-pi/alexa_raspberry-pi.ppn \
resources/keyword_files/raspberry-pi/computer_raspberry-pi.ppn \
resources/keyword_files/raspberry-pi/hey\ google_raspberry-pi.ppn \
resources/keyword_files/raspberry-pi/hey\ siri_raspberry-pi.ppn \
resources/keyword_files/raspberry-pi/jarvis_raspberry-pi.ppn \
resources/keyword_files/raspberry-pi/picovoice_raspberry-pi.ppn \
resources/keyword_files/raspberry-pi/porcupine_raspberry-pi.ppn \
resources/keyword_files/raspberry-pi/bumblebee_raspberry-pi.ppn \
resources/keyword_files/raspberry-pi/terminator_raspberry-pi.ppn
等待演示初始化并在终端中打印 [Listening]。说:
Picovoice
演示输出:
detected 'Picovoice'
灯光现在设置为 green。说:
Alexa
灯光现在设置为 yellow。说:
Terminator
来关闭灯光。
唤醒词对应颜色
以下是此演示中支持的唤醒词对应的颜色:
AlexaBumblebeeComputerHey GoogleHey SiriJarvisPicovoicePorcupineTerminator
多唤醒词示例源代码
请在此处查看此示例的完整源代码:https://github.com/Picovoice/porcupine/tree/master/demo/respeaker-rpi0。
Picovoice 技术支持
如果您在使用 Picovoice 时遇到技术问题,请访问 Picovoice 进行讨论。
常见问题
Q1:运行 "sudo pip install pyaudio" 时出现 #include "portaudio.h" 错误。
A1:请运行以下命令来解决此问题。
sudo apt-get install portaudio19-dev
Q2:如何更改 Raspbian 镜像源?
A2:请参考 Raspbian Mirrors 并按照以下说明在开始时修改源。
pi@raspberrypi ~ $ sudo nano /etc/apt/sources.list
例如,我们建议中国用户使用清华源。因此请按如下方式修改 sources.list。
deb http://mirrors.tuna.tsinghua.edu.cn/raspbian/raspbian/ stretch main non-free contrib
deb-src http://mirrors.tuna.tsinghua.edu.cn/raspbian/raspbian/ stretch main non-free contrib