reSpeaker 4-Mic 线性阵列套件

Seeed 的 ReSpeaker 4-Mic 线性阵列套件是一块为 Raspberry Pi 设计的扩展板(也称为 HAT)。它是一个线性麦克风阵列套件,带有四个麦克风,专为 AI 和语音应用而设计。这意味着你可以使用 Raspberry Pi 构建更强大、更灵活的语音产品,并集成 Amazon Alexa Voice Service、Google Assistant 等。
ReSpeaker 4-Mic 线性阵列套件 for Raspberry Pi 由两块板组成,一块是语音扩展 HAT,另一块是四麦克风线性阵列。
ReSpeaker 4-Mic 线性阵列套件 for Raspberry Pi 在 Raspberry Pi OS 中支持 8 路输入和 8 路输出通道。前 6 路输入通道用于麦克风录音(只有前 4 路输入通道为有效采集数据),其余 2 路输入通道为回放的回声通道。前 2 路输出通道用于声音输出,其余 6 路输出通道为空通道。

特性
- 2 个 ADC 芯片和 1 个 DAC 芯片
- 8 路输入和 8 路输出通道
- 四麦克风阵列
- Grove 支持
- 兼容 Raspberry Pi(支持 Raspberry Pi Zero 和 Zero W、Raspberry Pi B+、Raspberry Pi 2 B、Raspberry Pi 3 B、Raspberry Pi 3 B+、Raspberry Pi 3 A+ 和 Raspberry Pi 4)
- 耳机和扬声器语音输出
规格
- 2 x X-Power AC108 ADC
- 4 x 高性能模拟麦克风
- 1 x X-Power AC101 DAC
- 语音输出:
- 3.5mm 耳机音频插孔
- 扬声器插孔
- 兼容 Raspberry Pi 40 针排针
- 麦克风:MSM321A3729H9BP
- 灵敏度:-22 dBFS(全向)
- 信噪比:59 dB
- 最大采样率:48Khz
应用构想
- 智能音箱
- 智能语音助手系统
- 录音设备
- 语音会议系统
- 会议通信设备
- 语音交互机器人
- 车载语音助手
- 其他需要语音控制的场景
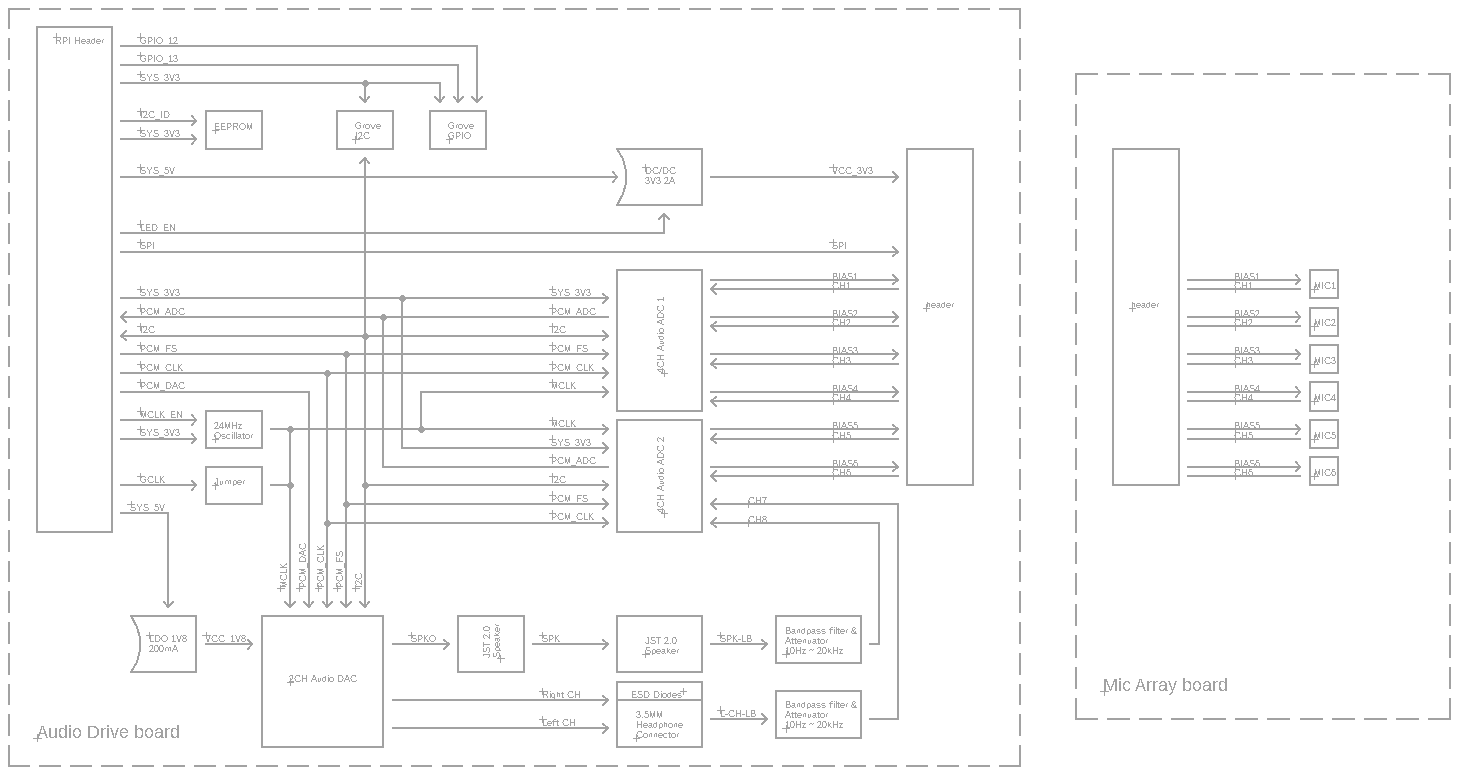
硬件概览
系统框图
接口

连接完成后,请务必使用万用表确认电路的导通情况是否与上图所示一致。
装配图

入门指南
将 ReSpeaker 4-Mic 阵列连接到 Raspberry Pi
步骤 1. 通过排线将 ReSpeaker Voice Accessory HAT 与 ReSpeaker 4-Mic linear Array 连接
步骤 2. 通过 40 针 GPIO 将 ReSpeaker Voice Accessory HAT 插入 Raspberry Pi
步骤 3. 将 耳机 插入 3.5mm 耳机音频插孔 或将 扬声器 插入 JST 2.0 扬声器插孔
步骤 4. 通过 micro-USB 线缆将 Raspberry Pi 与 PC 连接

软件
步骤 1. 安装 seeed-voicecard
获取 seeed voice card 源码,并安装所有 Linux 内核驱动。
sudo apt-get update
git clone https://github.com/HinTak/seeed-voicecard.git
cd seeed-voicecard
sudo ./install.sh
sudo reboot
步骤 2. 检查声卡
输入下面的命令来检查录音设备。
pi@raspberrypi:~ $ arecord -L
输出应类似于:
pi@raspberrypi:~ $ arecord -L
null
    Discard all samples (playback) or generate zero samples (capture)
default
    Playback/recording through the PulseAudio sound server
ac108
dmixer
ac101
sysdefault:CARD=seeed8micvoicec
    seeed-8mic-voicecard,
    Default Audio Device
dmix:CARD=seeed8micvoicec,DEV=0
    seeed-8mic-voicecard,
    Direct sample mixing device
dsnoop:CARD=seeed8micvoicec,DEV=0
    seeed-8mic-voicecard,
    Direct sample snooping device
hw:CARD=seeed8micvoicec,DEV=0
    seeed-8mic-voicecard,
    Direct hardware device without any conversions
plughw:CARD=seeed8micvoicec,DEV=0
    seeed-8mic-voicecard,
    Hardware device with all software conversions
使用以下命令检查播放设备。
pi@raspberrypi:~ $ aplay -L
输出应类似于:
pi@raspberrypi:~ $ aplay -L
null
    Discard all samples (playback) or generate zero samples (capture)
default
    Playback/recording through the PulseAudio sound server
ac108
dmixer
ac101
sysdefault:CARD=ALSA
    bcm2835 ALSA, bcm2835 ALSA
    Default Audio Device
dmix:CARD=ALSA,DEV=0
    bcm2835 ALSA, bcm2835 ALSA
    Direct sample mixing device
dmix:CARD=ALSA,DEV=1
    bcm2835 ALSA, bcm2835 IEC958/HDMI
    Direct sample mixing device
dsnoop:CARD=ALSA,DEV=0
    bcm2835 ALSA, bcm2835 ALSA
    Direct sample snooping device
dsnoop:CARD=ALSA,DEV=1
    bcm2835 ALSA, bcm2835 IEC958/HDMI
    Direct sample snooping device
hw:CARD=ALSA,DEV=0
    bcm2835 ALSA, bcm2835 ALSA
    Direct hardware device without any conversions
hw:CARD=ALSA,DEV=1
    bcm2835 ALSA, bcm2835 IEC958/HDMI
    Direct hardware device without any conversions
plughw:CARD=ALSA,DEV=0
    bcm2835 ALSA, bcm2835 ALSA
    Hardware device with all software conversions
plughw:CARD=ALSA,DEV=1
    bcm2835 ALSA, bcm2835 IEC958/HDMI
    Hardware device with all software conversions
sysdefault:CARD=seeed8micvoicec
    seeed-8mic-voicecard,
    Default Audio Device
dmix:CARD=seeed8micvoicec,DEV=0
    seeed-8mic-voicecard,
    Direct sample mixing device
dsnoop:CARD=seeed8micvoicec,DEV=0
    seeed-8mic-voicecard,
    Direct sample snooping device
hw:CARD=seeed8micvoicec,DEV=0
    seeed-8mic-voicecard,
    Direct hardware device without any conversions
plughw:CARD=seeed8micvoicec,DEV=0
    seeed-8mic-voicecard,
    Hardware device with all software conversions
步骤 3. 录制并播放
你可以先录音再播放,也可以同时进行录音和播放。
#It will capture sound on AC108 and save as a.wav
arecord -Dac108 -f S32_LE -r 16000 -c 8 a.wav
#Take care of that the captured mic audio is on the first 6 channels

#It will play sound file a.wav on AC101
aplay -D ac101 a.wav
#Do not use -D plughw:1,0 directly except your wave file is single channel only.
开发者在使用 4-Mic 线性阵列套件同时进行采集和回放时的限制:
-1. 必须先启动采集,否则采集通道可能会出现错乱。
-2. 回放输出通道必须填充 8 路相同的数据,或者 4 路相同的立体声通道数据,否则扬声器或耳机可能不会有任何输出。
-3. 如果你想同时播放和录音,aplay 的音乐文件必须是单声道,否则无法使用此命令进行播放。
你也可以使用 Audacity 进行播放和录音。
你应该通过 VNC 打开 Audacity,或者直接使用显示器打开它
sudo apt update
sudo apt install audacity
audacity                      // run audacity

使用概览
要运行以下示例,请将 4mics_hat repository 仓库克隆到你的 Raspberry Pi 上
git clone https://github.com/respeaker/4mics_hat.git
下面示例中提到的所有 Python 脚本都可以在此仓库中找到。要安装必要的依赖项,请在 mic_hat 仓库文件夹中运行
sudo apt-get install portaudio19-dev libatlas-base-dev
pip3 install -r requirements.txt
使用 Python 录音
我们使用 PyAudio python library 来通过 Python 录制声音。
首先,运行以下脚本以获取 2 Mic pi hat 的设备索引号:
python3 recording_examples/get_device_index.py
你将会看到类似下面的设备 ID。
Input Device id 2 - seeed-8mic-voicecard: - (hw:1,0)
要录制声音,请使用 nano 或其他文本编辑器打开 recording_examples/record.py 文件,并将 RESPEAKER_INDEX = 2 修改为你系统中 ReSpeaker 的索引号。然后运行 Python 脚本 record.py 进行录音:
python3 recording_examples/record.py
- Step 6. 如果你想从 8 个通道中提取通道 0 的数据,请查看
record_one_channel.py的内容。对于其他通道 X,请将 [0::8] 修改为 [X::8]。
python3 recording_examples/record_one_channel.py
要播放录制的样本,你可以使用 aplay 系统工具,例如
aplay -f cd -Dhw:0 output.wav #for Stereo sound
aplay -D plughw:0,0 output_one_channel.wav #for Mono sound from one channel
常见问题
Q1: Mic 阵列中只有 4 个麦克风,为什么会有 8 个通道?
A1: 该阵列中有 2 颗 AC108,每颗 AC108 芯片有 4 路输出。因此总共有 8 路通道,其中 4 路用于麦克风,2 路用于回放,其余 2 路未使用。
Q2: 如果 Raspberry 可以检测到 ReSpeaker 2-mics hat,但无法检测到 ReSpeaker 4-mics linear array?
A2: 请点击 raspberry -> Preferences -> Raspberry Pi Configuration,然后选择 Interfaces 选项卡,确保 1-Wire 为 Disabled。
资源
- [PDF] AC101 数据手册
- [PDF] AC108 数据手册
- [Driver] Seeed-Voice 驱动
- [Algorithms] 包含 DOA、VAD、NS 的算法
- [Voice Engine] Voice Engine 项目,提供用于创建语音使能设备的构建模块
- [Algorithms] AEC
- [Mechanical Drawing] 2D 图纸
项目
Mojing Mojing - A Smart Mirror with ReSpeaker!:一个通过 ReSpeaker 进行语音界面控制的智能镜子。我们还连接了 Wio Link 来控制其他物体!基于 Raspberry Pi。
技术支持与产品讨论
感谢您选择我们的产品!我们将为您提供多种支持,以确保您在使用我们产品的过程中尽可能顺畅。我们提供多种沟通渠道,以满足不同的偏好和需求。