适用于 Raspberry Pi 的 reSpeaker 4-Mic Array

ReSpeaker 4-Mic Array for Raspberry Pi 是一款为 Raspberry Pi 设计的四麦克风扩展板,适用于 AI 和语音应用。这意味着我们可以构建一个更强大、更灵活的语音产品,集成 Amazon Alexa Voice Service、Google Assistant 等。
与 ReSpeaker 2-Mics Pi HAT 不同,这块板卡基于 AC108 开发,AC108 是一款高度集成的四通道 ADC,带有 I2S/TDM 输出转换,用于高清语音采集,使设备能够在 3 米半径范围内拾取声音。此外,这款 4-Mics 版本配备了一个带有 12 颗 APA102 可编程 LED 的 LED 灯环。借助这 4 个麦克风和 LED 灯环,Raspberry Pi 将具备执行 VAD(语音活动检测)、估计 DOA(声源到达方向)、进行 KWS(关键词搜索)并通过 LED 灯环显示方向的能力,就像 Amazon Echo 或 Google Home 一样。
特性
- 兼容 Raspberry Pi(支持 Raspberry Pi Zero 和 Zero W、Raspberry PiB+、Raspberry Pi 2B、Raspberry Pi 3B、Raspberry Pi 3B+、Raspberry Pi3 A+ 和 Raspberry Pi 4B)
- 4 个麦克风
- 3 米半径语音采集
- 2 个 Grove 接口
- 12 颗 APA102 用户 LED
- 软件算法:VAD(语音活动检测)、DOA(声源到达方向)和 KWS(关键词搜索)
注意:ReSpeaker 4-Mic Array for Raspberry Pi 上没有音频输出接口,它仅用于语音采集。我们可以使用 Raspberry Pi 上的 耳机插孔 进行音频输出。
应用构想
- 语音交互应用
- AI 助手
硬件概览

- MIC:4 个模拟麦克风
- LED:12 颗 APA102 可编程 RGB LED,连接到 SPI 接口
- Raspberry Pi 40 针排针:兼容 Raspberry Pi Zero 和 Zero W、Raspberry PiB+、Raspberry Pi 2B、Raspberry Pi 3B、Raspberry Pi 3B+、Raspberry Pi3 A+ 和 Raspberry Pi 4
- AC108:高度集成的四通道 ADC,带有 I2S/TDM 输出转换
- I2C:Grove I2C 端口,连接到 I2C-1
- GPIO12:Grove 数字端口,连接到 GPIO12 和 GPIO13
注意:如果你使用 APA102 RGB LED,请先确保将 GPIO5 置为 HIGH 以使 LED 供电(VCC)使能。
入门指南
将 ReSpeaker 4-Mic Array 连接到 Raspberry Pi
将 ReSpeaker 4-Mic Array 安装到 Raspberry Pi 上,叠加 ReSpeaker 4-Mic Array for Raspberry Pi 时,请确保引脚正确对齐。
注意:不允许热插拔 ReSpeaker 4-Mic Array,这会损坏 ReSpeaker。


安装驱动
确保你的树莓派上运行的是 最新的 Raspberry Pi OS。(更新于 2021.06.30)
- 步骤 1. 获取 Seeed voice card 源码,安装并重启。
sudo apt-get update
git clone https://github.com/HinTak/seeed-voicecard.git
cd seeed-voicecard
sudo ./install.sh
sudo reboot now
- 步骤 2. 然后在 Raspberry Pi 上选择音频输出:
sudo raspi-config
# Select 1 System options
# Select S2 Audio
# Select your preferred Audio output device
# Select Finish
- 步骤 3. 检查声卡名称是否如下所示:
pi@raspberrypi:~ $ arecord -L
null
    Discard all samples (playback) or generate zero samples (capture)
jack
    JACK Audio Connection Kit
pulse
    PulseAudio Sound Server
default
playback
ac108
sysdefault:CARD=seeed4micvoicec
    seeed-4mic-voicecard,
    Default Audio Device
dmix:CARD=seeed4micvoicec,DEV=0
    seeed-4mic-voicecard,
    Direct sample mixing device
dsnoop:CARD=seeed4micvoicec,DEV=0
    seeed-4mic-voicecard,
    Direct sample snooping device
hw:CARD=seeed4micvoicec,DEV=0
    seeed-4mic-voicecard,
    Direct hardware device without any conversions
plughw:CARD=seeed4micvoicec,DEV=0
    seeed-4mic-voicecard,
    Hardware device with all software conversions
usbstream:CARD=seeed4micvoicec
    seeed-4mic-voicecard
    USB Stream Output
usbstream:CARD=ALSA
    bcm2835 ALSA
    USB Stream Output
如果我们想要更改 alsa 设置,可以使用 sudo alsactl --file=ac108_asound.state store 来保存。当我们需要再次使用这些设置时,将其复制到:sudo cp ~/seeed-voicecard/ac108_asound.state /var/lib/alsa/asound.state
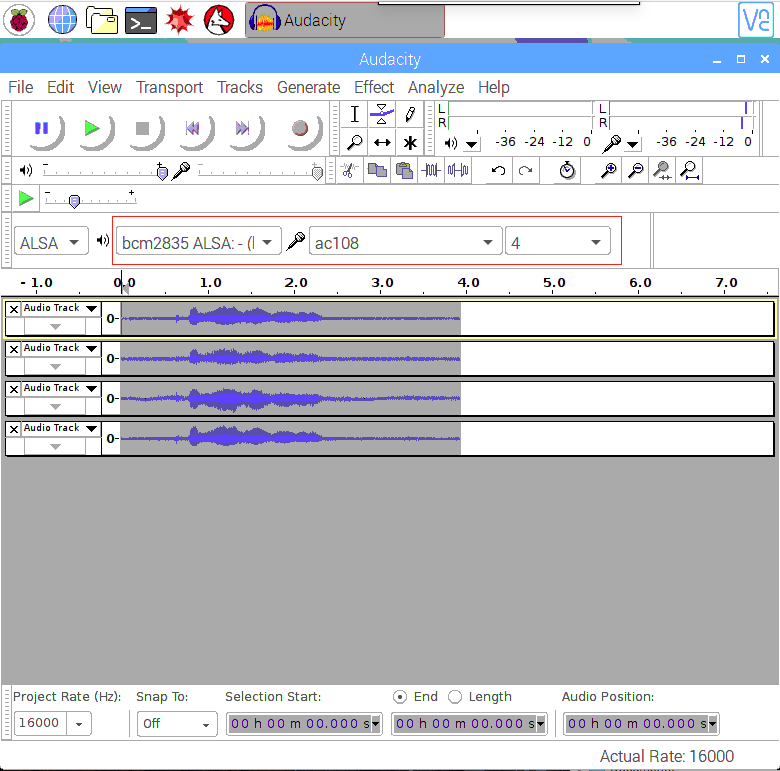
- 步骤 4. 打开 Audacity,将输入选择为 AC108 & 4 channels,输出选择为 bcm2835 alsa: - (hw:0:0) 进行测试:
sudo apt update
sudo apt install audacity
audacity                      // run audacity
- 或者,如果你使用的是 Lite 版 Raspbian Pi OS 镜像且没有 GUI,可以使用
arecord录音并使用aplay播放:
sudo apt-get install sox                             //for audio conversion
arecord -Dac108 -f S32_LE -r 16000 -c 4 hello.wav    // only support 4 channels
sox hello.wav -c 2 stereo.wav                        // convert to stereo
aplay stereo.wav                                      // make sure default device
                                                     // Audio will come out via audio jack of Raspberry Pi
用法概览
要运行以下示例,请将 4mics_hat 仓库 克隆到你的 Raspberry Pi 上
git clone https://github.com/respeaker/4mics_hat.git
下面示例中提到的所有 Python 脚本都可以在此仓库中找到。要安装必要的依赖项,请在 mic_hat 仓库文件夹中运行
sudo apt-get install portaudio19-dev libatlas-base-dev
pip3 install -r requirements.txt
APA102 LED
每个板载 APA102 LED 都有一个额外的驱动芯片。驱动芯片负责通过其输入线接收所需的颜色,然后保持该颜色,直到接收到新的指令。

- 步骤 1. 启用 SPI:
sudo raspi-config
- 选择 "Interfacing Options"
- 选择 "SPI"
- 选择 Enable SPI
- 最后,退出该工具
- 步骤 2. 然后运行示例代码,现在我们可以看到 LED 像 Alexa Assistant 一样闪烁。
python3 interfaces/pixels.py
使用 Python 录音
我们使用 PyAudio python library 来通过 Python 录制声音。
首先,运行以下脚本以获取 2 Mic pi hat 的设备索引号:
python3 recording_examples/get_device_index.py
你将会看到如下所示的设备 ID。
Input Device id 2 - seeed-4mic-voicecard: - (hw:1,0)
要录制声音,用 nano 或其他文本编辑器打开 recording_examples/record.py 文件,并将 RESPEAKER_INDEX = 2 更改为你系统中 ReSpeaker 的索引号。然后运行 Python 脚本 record.py 进行录音:
python3 recording_examples/record.py
- 步骤 6. 如果你想从 4 个通道中提取通道 0 的数据,请查看
record_one_channel.py的内容。对于其他通道 X,请将 [0::4] 更改为 [X::4]。
python3 recording_examples/record_one_channel.py
要播放录制的样本,你可以使用 aplay 系统工具,例如
aplay -f cd -Dhw:0 output.wav #for Stereo sound
aplay -D plughw:0,0 output_one_channel.wav #for Mono sound from one channel
实时声源定位与跟踪
ODAS 代表 Open embeddeD Audition System。这是一个专门用于执行声源定位、跟踪、分离和后滤波的库。
- 步骤 1. 获取 ODAS 并进行构建。
我们将要调用的可执行文件会在 bin 目录中生成
sudo apt-get install libfftw3-dev libconfig-dev libasound2-dev libgconf-2-4
sudo apt-get install cmake
cd ~/Desktop
git clone https://github.com/introlab/odas.git
mkdir odas/build
cd odas/build
cmake ..
make
- 步骤 2. 获取 ODAS Studio 并运行它。
安装 nodejs v12.22 和 npm 6.14。
sudo apt update
sudo apt -y install curl dirmngr apt-transport-https lsb-release ca-certificates
curl -sL https://deb.nodesource.com/setup_12.x | sudo -E bash -
确保已安装相关的编译工具
sudo apt -y install gcc g++ make
sudo apt -y install nodejs
使用 npm 安装 odas_web 依赖
cd ~/Desktop
git clone https://github.com/introlab/odas_web
cd odas_web
npm install
我们的目的是在不必重新构建的情况下安装相关依赖模块,因此在重新构建期间出现的错误可以忽略。然后运行 npm start。
npm start
或者我们可以将 Python 降级到 2.7 来构建旧的 election-rebuild 模块。(我们不一定要执行这一步)
sudo apt remove python3 -y
sudo apt install python2 -y
- 步骤 3. odascore 将位于 ~/Desktop/odas/build/bin/odaslive,配置文件位于 ~/Desktop/odas/config/odaslive/respeaker_4_mic_array.cfg。
我们需要修改配置,将声卡指定为我们的设备
arecord -l #type this commond make sure u have arecord installed
你会看到类似如下的输出
pi@raspberrypi:~/Desktop/odas/config/odaslive $ arecord -l
**** List of CAPTURE Hardware Devices ****
card 3: seeed4micvoicec [seeed-4mic-voicecard], device 0: bcm2835-i2s-ac10x-codec0 ac10x-codec0-0 [bcm2835-i2s-ac10x-codec0 ac10x-codec0-0]
  Subdevices: 1/1
  Subdevice #0: subdevice #0
在 cfg 配置文件的第 18 行更改声卡指定
vim ~/Desktop/odas/config/odaslive/respeaker_4_mic_array.cfg
# Then type :18
# Then press Enter
# Then press i
# Change card = YOUR CARD ;  # We found in "arecord -l"
# For mine is
# card = 3 ;
# Then type  :wq  # To save the configuration file
然后我们打开 odas Web 界面,在 Local System Monitor 界面可以看到系统监控数据,并在 ODAS Control 界面选择控制内核和要读取的配置文件。
启动 odas Web GUI
cd ~/Desktop/odas_web
npm start
点击 ODAS Core 下方的空白区域以调出文件浏览器,并在 "~/Desktop/odas/build/bin/odaslive" 中选择 Core Path
点击 ODAS Config 下方的空白区域以调出文件浏览器,并在 "~/Desktop/odas/config/odaslive/respeaker_4_mic_array.cfg" 中选择 Config Path
当配置正确时,它看起来会像这样

使用 Picovoice 在边缘启用语音识别

Picovoice 使企业能够通过私有语音 AI 快速创新并实现差异化。使用我们的语音识别和 自然语言理解 (NLU) 技术 围绕你的品牌和产品构建统一的 AI 战略。
Seeed 已与 Picovice 合作,为开发者在边缘端基于 ReSpeaker 4 Mic 提供语音识别解决方案。
Picovoice 是一个端到端的平台,可按你的需求构建语音产品。它可以创建类似 Alexa 和 Google 的语音体验。但它完全在本地设备上 100% 运行。Picovoice 的优势包括:
- 隐私:所有内容都在离线处理。本质上符合 HIPAA 和 GDPR。
- 可靠:无需持续联网即可运行。
- 零延迟:以边缘为先的架构消除了不可预测的网络延迟。
- 高精度:对噪声和混响具有鲁棒性。其性能远超基于云的替代方案。
- 跨平台:一次设计,随处部署。使用熟悉的语言和框架进行构建。
Picovocie 与 ReSpeaker 4-Mic Array 入门
步骤 1. 在继续下面内容之前,请先完成上文中 ReSpeaker 4-Mic Array 搭配 Raspberry Pi 的逐步教程。
注意: 请确保 Audacity 和 APA102 LED 在搭配 Raspberry Pi 的 ReSpeaker 4-Mic Array 上工作正常。
步骤 2. 打开 Terminal,输入以下命令安装 pyaudio 驱动。
pip3 install pyaudio
注意:请确保你的 Raspberry Pi 上已安装 pip3
步骤 3. 在终端中输入以下命令以安装适用于 ReSpeaker 4-Mic Array 的 Picovoice 演示程序。
pip3 install pvrespeakerdemo
演示用法
该演示在 Raspberry Pi 上利用 ReSpeaker 4-Mic Array 搭配 Picovoice 技术来控制 LED。此演示由唤醒词 "Picovoice" 触发,随后即可执行后续操作,例如打开和关闭 LED,以及更改 LED 颜色。
安装完成后,在终端中输入此命令来运行演示:
picovoice_respeaker_demo
语音指令
以下是本演示的语音指令:
- Picovoice
演示输出:
wake word
- Turn on the lights
你应该会看到灯被点亮,并在终端中看到以下信息:
{
    is_understood : 'true',
    intent : 'turnLights',
    slots : {
        'state' : 'on',
    }
}
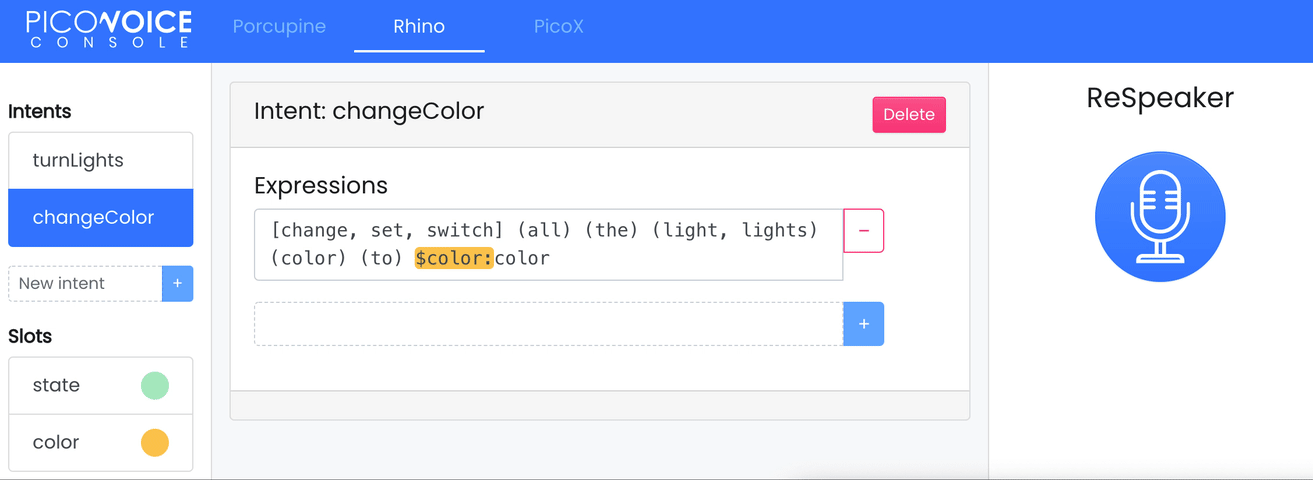
终端中会显示命令列表:
context:
  expressions:
    turnLights:
      - "[switch, turn] $state:state (all) (the) [light, lights]"
      - "[switch, turn] (all) (the) [light, lights] $state:state"
    changeColor:
      - "[change, set, switch] (all) (the) (light, lights) (color) (to) $color:color"
  slots:
    state:
      - "off"
      - "on"
    color:
      - "blue"
      - "green"
      - "orange"
      - "pink"
      - "purple"
      - "red"
      - "white"
      - "yellow"
此外,你还可以尝试以下命令来改变颜色:
- Picovoice, set the lights to orange
通过以下命令关闭灯光:
- Picovoice, turn off all lights
演示视频展示
演示源代码
该演示基于 Picovoice SDK 构建。演示源代码可在 GitHub 上获取:Picovoice Respeaker Demo
不同的唤醒词
Picovoice SDK 包含在 Apache 2.0 许可下的免费示例唤醒词,包括主流语音助手(例如 "Hey Google"、"Alexa")以及 "Computer" 和 "Jarvis" 等有趣的唤醒词。
自定义语音指令
灯光指令由 Picovoice 的 Speech-to-Intent context 定义。你可以使用 Picovoice Console 输入允许的语法来设计和训练上下文。你可以在编辑时通过麦克风按钮在浏览器中测试你的更改。前往 Picovoice Console 并注册一个账号。使用 Rhino Speech-to-Intent editor 创建上下文,然后为 Raspberry Pi 进行训练。
多个唤醒词示例
为了展示 Picovoice 的能力,我们还准备了一个在 Raspberry Pi 上使用 ReSpeaker 4-Mic Array 的多唤醒词示例!不同的唤醒词可以被设置为执行特定任务。
此软件包包含一个使用 Porcupine 控制 ReSpeaker 4-mic 麦克风阵列 LED 的命令行演示。
Porcupine
Porcupine 是一个高精度且轻量级的唤醒词引擎。它可以构建始终监听的语音应用。它
- 使用在真实环境中训练的深度神经网络。
- 体积小且计算效率高,非常适合物联网。
- 跨平台。支持 Raspberry Pi、BeagleBone、Android、iOS、Linux (x86_64)、macOS (x86_64)、Windows (x86_64) 和 Web 浏览器。此外,企业客户还可以使用 ARM Cortex-M SDK。
- 可扩展。可以在不增加运行时开销的情况下检测多个始终监听的语音命令。
- 自助式。开发者可以使用 Picovoice Console 训练自定义唤醒词模型。
多唤醒词入门
在终端中运行以下命令安装演示驱动:
pip3 install ppnrespeakerdemo
多唤醒词用法
驱动安装完成后,在终端中运行以下命令:
porcupine_respeaker_demo
等待演示初始化并在终端中打印 [Listening]。然后说:
Picovoice
演示输出:
detected 'Picovoice'
此时灯光被设置为 green。然后说:
Alexa
此时灯光被设置为 yellow。然后说:
Terminator
即可关闭灯光。
唤醒词与颜色
下面是本演示中支持的唤醒词及其对应的颜色:
AlexaBumblebeeComputerHey GoogleHey SiriJarvisPicovoicePorcupineTerminator
多唤醒词示例源代码
此示例的完整源代码请见:Porcupine Respeaker Demo
Picovoice 技术支持
如果在使用 Picovoice 时遇到技术问题,请访问 Picovoice 参与讨论。
常见问题
Q1: 运行 kws_doa.py 并说 snow boy 时没有任何响应
A2: 请运行 audacity 以确保 4 个通道都正常。如果有一个通道没有数据,当我们说 snow boy 时就不会有响应。
Q2: 运行 "sudo pip install pyaudio" 时出现 #include "portaudio.h" 错误。
A3: 请运行以下命令来解决此问题。
sudo apt-get install portaudio19-dev
Q3: 在 journalctl 中出现 ...WARNING: memory leak will occur if overlay removed... 信息
A4:在驱动程序第一次被加载(启动后)时,确实会有一次性的小内存丢失。然而,由于这是按每次启动或每次加载计算,而典型用户在每次启动时只需要加载一次驱动,因此每次启动丢失几个字节并不重要。所以这只是一个很小的问题,不太可能以实际方式影响任何用户,只是会看到每次启动都有内存丢失的令人担忧的提示信息。
资源
- [PDF] ReSpeaker 4-Mic Array for Raspberry Pi(PDF)
- [DXF] ReSpeaker 4-Mic Array for Raspberry Pi v1.0
- [3D] ReSpeaker 4-Mic Array for Raspberry Pi v1.0 3D Model
- [AC108] AC108 DataSheet
- [Driver] Seeed-Voice Driver
- [Algorithms] Algorithms includes DOA, VAD, NS
- [Voice Engine] Voice Engine project, provides building blocks to create voice enabled objects
- [Algorithms] AEC
技术支持与产品讨论
感谢您选择我们的产品!我们将为您提供多种支持,以确保您在使用我们产品时的体验尽可能顺畅。我们提供多种沟通渠道,以满足不同的偏好和需求。