reSpeaker 6-Mic Circular Array Kit for Raspberry Pi

Seeed 的 ReSpeaker 6-Mic Circular Array Kit 是一块扩展板,也叫 HAT,为 Raspberry Pi 设计。它是一个圆形麦克风阵列套件,带有六个麦克风,专为 AI 和语音应用而设计。这意味着你可以使用 Raspberry Pi 构建一个更强大、更灵活的语音产品,并集成 Amazon Alexa Voice Service、Google Assistant 等。
ReSpeaker 6-Mic Circular Array Kit for Raspberry Pi 由两块板组成,一块是语音扩展 HAT,另一块是六麦克风圆形阵列。
ReSpeaker 6-Mic Circular Array Kit for Raspberry Pi 在 Raspbian 系统中支持 8 路输入和 8 路输出通道。前 6 路输入通道用于麦克风录音,剩余 2 路输入通道为回放的回声通道。前 2 路输出通道用于播放,剩余 6 路输出通道为空通道。

特性
- 2 个 ADC 芯片和 1 个 DAC 芯片
- 8 路输入和 8 路输出通道
- 六麦克风阵列
- Grove 支持
- 兼容 Raspberry Pi(支持 Raspberry Pi Zero 和 Zero W、Raspberry Pi B+、Raspberry Pi 2 B、Raspberry Pi 3 B、Raspberry Pi 3 B+、Raspberry Pi 3 A+ 和 Raspberry Pi 4)
- 耳机和扬声器语音输出
规格
- 2 x X-Power AC108 ADC
- 6 x 高性能麦克风
- 1 x X-Power AC101 DAC
- 语音输出:
- 3.5mm 耳机音频插孔
- 扬声器插孔
- 兼容 Raspberry Pi 40 针排针
- 麦克风:MSM321A3729H9CP
- 灵敏度:-22 dBFS(全向)
- 信噪比:59 dB
- 最大采样率:48Khz
应用
- 智能音箱
- 智能语音助手系统
- 录音设备
- 语音会议系统
- 会议通信设备
- 语音交互机器人
- 车载语音助手
- 其他需要语音控制的场景
硬件概览
系统框图
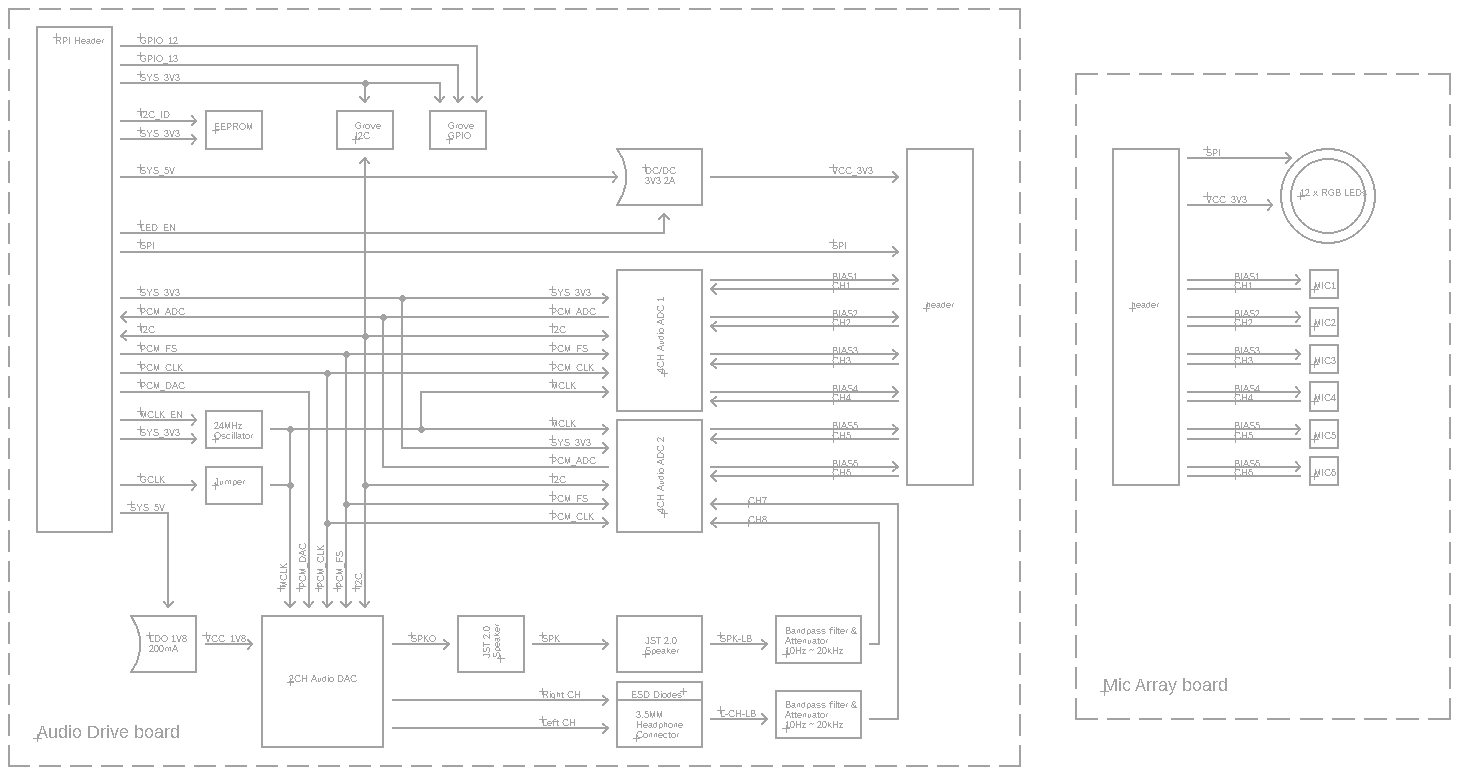
接口

连接完成后,请务必使用万用表确认电路的导通情况是否与上图所示一致。
装配图


入门指南
硬件
准备工作
ReSpeaker 6-Mic Circular Array x1
PC x1
耳机或扬声器 x1
实际上 ReSpeaker 6-Mic Circular Array 支持 Raspberry Pi Zero、Raspberry Pi 1 B+、Raspberry Pi 2 B、Raspberry Pi 3 B、Raspberry Pi 3 model B+、Raspberry Pi 3 A+ 和 Raspberry Pi 4,在本教程中我们使用的是 Raspberry Pi 3。
连接
步骤 1. 通过排线将 ReSpeaker Voice Accessory HAT 与 ReSpeaker 6-Mic circular Array 连接
步骤 2. 通过 40 针 GPIO 将 ReSpeaker Voice Accessory HAT 插到 Raspberry Pi 上
步骤 3. 将 earphone 插入 3.5mm headset audio jack,或者将 speaker 插入 JST 2.0 speaker jack
步骤 4. 通过 micro-USB 线将 Raspberry Pi 与 PC 连接

软件
准备工作
方案 A
你需要使用 Putty 或其他 ssh 工具连接到你的 Raspberry Pi。开始之前,请确保:
1- 打开树莓派的 ssh 功能以允许 putty 连接。如果你不知道如何打开 ssh,请在 Google 搜索 how to setup ssh raspberry pi
2- 你的 Raspberry Pi 和你的 PC 处于同一个 WiFi 网络。如果你不知道如何配置 WiFi,请在 Google 搜索 how to setup wifi raspberry pi
3- 获取你的 Raspberry Pi 的 IP 地址,如果你不知道如何获取 IP 地址,请参考 raspberry offical documentation
4- 使用该 IP 地址,通过 putty ssh 服务将 Raspberry Pi 与 PC 连接。

然后请输入主机名和密码。默认 ID 为 pi,密码为 raspberry。
login as: pi
[email protected]'s password:raspberry
现在你已经登录,可以在 putty 中输入命令,与树莓派进行交互。
要让此套件与 alexa 或 dueros 一起工作,你需要打开一个网站来获取授权。因此你需要使用 VNC Viewer 登录你的 amazon 或 baidu 账号。所以请确保你已经开启树莓派的 VNC 服务。
或者你也可以直接考虑方案 B。
方案 B
如果你厌烦了以上所有步骤,你也可以直接使用一台 HDMI 显示器,并将 USB 键盘和 USB 鼠标插入树莓派,同样可以工作,简单又方便。
步骤 1. 安装 seeed-voicecard
获取 seeed voice card 源码,并安装所有 Linux 内核驱动。
sudo apt-get update
sudo apt-get upgrade
git clone https://github.com/respeaker/seeed-voicecard.git
cd seeed-voicecard
sudo ./install.sh
sudo reboot
步骤 2. 检查声卡
输入下面的命令来检查录音设备。
pi@raspberrypi:~ $ arecord -L
输出应类似于:
pi@raspberrypi:~ $ arecord -L
null
    Discard all samples (playback) or generate zero samples (capture)
default
ac108
dmixer
ac101
sysdefault:CARD=seeed8micvoicec
    seeed-8mic-voicecard,
    Default Audio Device
dmix:CARD=seeed8micvoicec,DEV=0
    seeed-8mic-voicecard,
    Direct sample mixing device
dsnoop:CARD=seeed8micvoicec,DEV=0
    seeed-8mic-voicecard,
    Direct sample snooping device
hw:CARD=seeed8micvoicec,DEV=0
    seeed-8mic-voicecard,
    Direct hardware device without any conversions
plughw:CARD=seeed8micvoicec,DEV=0
    seeed-8mic-voicecard,
    Hardware device with all software conversions
使用以下命令检查播放设备。
pi@raspberrypi:~ $ aplay -L
输出应类似于:
pi@raspberrypi:~ $ aplay -L
null
    Discard all samples (playback) or generate zero samples (capture)
default
ac108
dmixer
ac101
sysdefault:CARD=ALSA
    bcm2835 ALSA, bcm2835 ALSA
    Default Audio Device
dmix:CARD=ALSA,DEV=0
    bcm2835 ALSA, bcm2835 ALSA
    Direct sample mixing device
dmix:CARD=ALSA,DEV=1
    bcm2835 ALSA, bcm2835 IEC958/HDMI
    Direct sample mixing device
dsnoop:CARD=ALSA,DEV=0
    bcm2835 ALSA, bcm2835 ALSA
    Direct sample snooping device
dsnoop:CARD=ALSA,DEV=1
    bcm2835 ALSA, bcm2835 IEC958/HDMI
    Direct sample snooping device
hw:CARD=ALSA,DEV=0
    bcm2835 ALSA, bcm2835 ALSA
    Direct hardware device without any conversions
hw:CARD=ALSA,DEV=1
    bcm2835 ALSA, bcm2835 IEC958/HDMI
    Direct hardware device without any conversions
plughw:CARD=ALSA,DEV=0
    bcm2835 ALSA, bcm2835 ALSA
    Hardware device with all software conversions
plughw:CARD=ALSA,DEV=1
    bcm2835 ALSA, bcm2835 IEC958/HDMI
    Hardware device with all software conversions
sysdefault:CARD=seeed8micvoicec
    seeed-8mic-voicecard,
    Default Audio Device
dmix:CARD=seeed8micvoicec,DEV=0
    seeed-8mic-voicecard,
    Direct sample mixing device
dsnoop:CARD=seeed8micvoicec,DEV=0
    seeed-8mic-voicecard,
    Direct sample snooping device
hw:CARD=seeed8micvoicec,DEV=0
    seeed-8mic-voicecard,
    Direct hardware device without any conversions
plughw:CARD=seeed8micvoicec,DEV=0
    seeed-8mic-voicecard,
    Hardware device with all software conversions
步骤 3. 录音与播放
你可以先录音再播放,也可以同时进行录音和播放。
#It will capture sound on AC108 and save as a.wav
arecord -Dac108 -f S32_LE -r 16000 -c 8 a.wav
#Take care of that the captured mic audio is on the first 6 channels

#It will play sound file a.wav on AC101
aplay -D ac101 a.wav
#Do not use -D plughw:1,0 directly except your wave file is single channel only.

#Doing capture && playback the same time
arecord -D hw:1,0 -f S32_LE -r 16000 -c 8 to_be_record.wav &
#mono_to_play.wav is a mono channel wave file to play
aplay -D plughw:1,0 -r 16000 mono_to_play.wav
开发者在使用 6-Mic Circular Array Kit(或 4-Mics Linear Array Kit)同时进行采集和回放时的限制:
-1. 必须先启动采集,否则采集通道可能会出现错乱。
-2. 回放输出通道必须填充 8 路相同通道数据或 4 路相同立体声通道数据,否则扬声器或耳机可能不会有任何输出。
-3. 如果你想同时播放和录音,aplay 的音乐文件必须是单声道,否则无法使用此命令进行播放。
你也可以使用 Audacity 进行播放和录音。
你应该通过 VNC 打开 Audacity,或者直接使用显示器来打开它
sudo apt update
sudo apt install audacity
audacity                      // run audacity

玩转 LED
在 6 麦克风环形阵列中有 12 个 GRB LED,你可以自行配置这些 LED,现在让我们看看如何点亮它们。
git clone --depth 1 https://github.com/respeaker/pixel_ring.git
cd pixel_ring
pip install -U -e .
python examples/respeaker_4mic_array.py
你会看到 LED 点亮并运行。你可以参考 python examples/respeaker_4mic_array.py 文件来制作你自己的效果。
实时声源定位与跟踪
ODAS 代表 Open embeddeD Audition System。这是一个专门用于执行声源定位、跟踪、分离和后滤波的库。让我们来玩一玩它。
- 步骤 1. 获取 ODAS 并进行构建。
sudo apt-get install libfftw3-dev libconfig-dev libasound2-dev libgconf-2-4
sudo apt-get install cmake
git clone https://github.com/introlab/odas.git
mkdir odas/build
cd odas/build
cmake ..
make
-
步骤 2. 获取 ODAS Studio 并打开它。
-
步骤 3. odascore 位于 odas/bin/odaslive,配置文件在这里。

提取语音
我们使用 PyAudio python library 来提取语音。
- 步骤 1,我们需要运行以下脚本来获取 6 Mic pi hat 的设备索引号:
sudo pip install pyaudio
cd ~
nano get_index.py
- 步骤 2,将下面的代码复制并粘贴到 get_index.py 中。
import pyaudio

p = pyaudio.PyAudio()
info = p.get_host_api_info_by_index(0)
numdevices = info.get('deviceCount')

for i in range(0, numdevices):
        if (p.get_device_info_by_host_api_device_index(0, i).get('maxInputChannels')) > 0:
            print "Input Device id ", i, " - ", p.get_device_info_by_host_api_device_index(0, i).get('name')
-
步骤 3,按 Ctrl + X 退出并按 Y 保存。
-
步骤 4,运行 'sudo python get_index.py',我们将看到如下所示的设备 ID。
Input Device id 2 - seeed-8mic-voicecard: - (hw:1,0)
- 步骤 5,将
RESPEAKER_INDEX = 2修改为索引号。运行 python 脚本 record.py 来录制一段语音。
import pyaudio
import wave

RESPEAKER_RATE = 16000
RESPEAKER_CHANNELS = 8
RESPEAKER_WIDTH = 2
# run getDeviceInfo.py to get index
RESPEAKER_INDEX = 2  # refer to input device id
CHUNK = 1024
RECORD_SECONDS = 5
WAVE_OUTPUT_FILENAME = "output.wav"

p = pyaudio.PyAudio()

stream = p.open(
            rate=RESPEAKER_RATE,
            format=p.get_format_from_width(RESPEAKER_WIDTH),
            channels=RESPEAKER_CHANNELS,
            input=True,
            input_device_index=RESPEAKER_INDEX,)

print("* recording")

frames = []

for i in range(0, int(RESPEAKER_RATE / CHUNK * RECORD_SECONDS)):
    data = stream.read(CHUNK)
    frames.append(data)

print("* done recording")

stream.stop_stream()
stream.close()
p.terminate()

wf = wave.open(WAVE_OUTPUT_FILENAME, 'wb')
wf.setnchannels(RESPEAKER_CHANNELS)
wf.setsampwidth(p.get_sample_size(p.get_format_from_width(RESPEAKER_WIDTH)))
wf.setframerate(RESPEAKER_RATE)
wf.writeframes(b''.join(frames))
wf.close()
- 步骤 6. 如果你想从 8 个通道中提取通道 0 的数据,请参考下面的代码。对于其他通道 X,请将 [0::8] 改为 [X::8]。
import pyaudio
import wave
import numpy as np

RESPEAKER_RATE = 16000
RESPEAKER_CHANNELS = 8
RESPEAKER_WIDTH = 2
# run getDeviceInfo.py to get index
RESPEAKER_INDEX = 2  # refer to input device id
CHUNK = 1024
RECORD_SECONDS = 3
WAVE_OUTPUT_FILENAME = "output.wav"

p = pyaudio.PyAudio()

stream = p.open(
            rate=RESPEAKER_RATE,
            format=p.get_format_from_width(RESPEAKER_WIDTH),
            channels=RESPEAKER_CHANNELS,
            input=True,
            input_device_index=RESPEAKER_INDEX,)

print("* recording")

frames = []

for i in range(0, int(RESPEAKER_RATE / CHUNK * RECORD_SECONDS)):
    data = stream.read(CHUNK)
    # extract channel 0 data from 8 channels, if you want to extract channel 1, please change to [1::8]
    a = np.fromstring(data,dtype=np.int16)[0::8]
    frames.append(a.tostring())

print("* done recording")

stream.stop_stream()
stream.close()
p.terminate()

wf = wave.open(WAVE_OUTPUT_FILENAME, 'wb')
wf.setnchannels(1)
wf.setsampwidth(p.get_sample_size(p.get_format_from_width(RESPEAKER_WIDTH)))
wf.setframerate(RESPEAKER_RATE)
wf.writeframes(b''.join(frames))
wf.close()
DOA
带关键词的 DOA
需求
- pyaudio
- numpy
- snowboy
安装
安装 pyaudio、numpy 和 snowboy,使用 virtualenv 创建一个虚拟的 python 环境。
sudo apt install python-pyaudio python-numpy python-virtualenv
sudo apt-get install swig python-dev libatlas-base-dev build-essential make
git clone --depth 1 https://github.com/Kitt-AI/snowboy.git
cd snowboy
virtualenv --system-site-packages env
source env/bin/activate
python setup.py build
python setup.py bdist_wheel
pip install dist/snowboy*.whl
git clone https://github.com/voice-engine/voice-engine.git
cd voice-engine
python setup.py bdist_wheel
pip install dist/*.whl
让我们说 snowboy
- 步骤 1. 运行 kws_doa.py
cd ~/voice-engine/examples/respeaker_6mic_array_for_pi/
python kws_doa.py
下面是 kws_doa.py 的代码
"""
Search the keyword "snowboy".
After finding the keyword, Direction Of Arrival (DOA) is estimated.

Hardware: ReSpeaker 6 Mic Array for Raspberry Pi
"""

import sys
import time
from voice_engine.source import Source
from voice_engine.channel_picker import ChannelPicker
from voice_engine.kws import KWS
from voice_engine.doa_respeaker_6mic_array import DOA


def main():
    src = Source(rate=16000, channels=8)
    ch0 = ChannelPicker(channels=src.channels, pick=0)
    kws = KWS(model='snowboy', sensitivity=0.6, verbose=True)
    doa = DOA(rate=16000)

    src.link(ch0)
    ch0.link(kws)
    src.link(doa)

    def on_detected(keyword):
        print('detected {} at direction {}'.format(keyword, doa.get_direction()))

    kws.set_callback(on_detected)

    src.recursive_start()
    while True:
        try:
            time.sleep(1)
        except KeyboardInterrupt:
            break

    src.recursive_stop()

    # wait a second to allow other threads to exit
    time.sleep(1)


if __name__ == '__main__':
    main()
- 步骤 2. 说 snowboy,这里是 DOA 的输出。
(env) pi@raspberrypi:~/voice-engine/examples/respeaker_6mic_array_for_pi $ python kws_doa.py
['arecord', '-t', 'raw', '-f', 'S16_LE', '-c', '8', '-r', '16000', '-D', 'default', '-q']
0000000000000000000000000000000000000000000000000000000000000000000000000000000002222222222222222222222222222222222222222222222/usr/local/lib/python2.7/dist-packages/voice_engine-0.1.3-py2.7.egg/voice_engine/gcc_phat.py:22: RuntimeWarning: invalid value encountered in divide
  cc = np.fft.irfft(R / np.abs(R), n=(interp * n))
detected 1 at direction 283.32811392
3000000000000000000000000000000000000000000000000000000000000000000000000000000000000000000000000000000000000000000000000000000000000000000000000000000000000000000000000000000000000000000000000000000000000000002222222222222222222222222222222222222222222222detected 1 at direction 210.0
30000000000000000000000000000000000000000000000000000000000000000000000000000000000000000000000000000000000000000000000000000000000000000000000000000000000000000000000000000000000000000000000000000000000000000000000000000000000000000002222222222222222222222222222222222222222222222detected 1 at direction 62.5448292531
30000000000000000000000000000000000000000000000000000000000000000000000000000000000000000000000000000000000000000000000000000000000000000000000000000000000000000000000000000000000000000000000000000000000000000002222222222222222222222222222222222222222222222222detected 1 at direction 62.5448292531
300000000000000000000000000000000000000000000000000000000000000000000000000000000000000000000000000000000000000000000000000000000000000000000000000000000000000000000000000000000000000000000000000000000000000000000000000000000000000000000000000000000000000002222222222222222222222222222222222222222222detected 1 at direction 223.32811392
300000000000000000000000000000000000000000000000000000000000000000000000000000000000000000000000000000000000000000000000000000000000000000000000000000000000000000000000000000000000000000000022222222222222222222222222222222222222222222222222detected 1 at direction 223.32811392
30000000000000000000000000000000000000000000000000000000000000000000000000000000000000000000000000000000000000000000000000000000000000000000000000000000000000000000000000000000000000000000000000000000000000000000000000000000000000222222222222222222222222222222222222222detected 1 at direction 283.32811392
300000000000000000000000000000000000000000000000000000000000000000000000000000000000000000000000000000000000000000000000000000000000000000000000000000000000000000000000000000000000000000000000000000000000000000000002222222222222222222222222222222222222222222detected 1 at direction 237.455170747
按钮
如果你想检查你的 respeaker_6-Mic 是否在树莓派上正确安装,按钮是一个好主意。我们可以使用下面的代码来检查。
import RPi.GPIO as GPIO
import time

BUTTON = 26

GPIO.setmode(GPIO.BCM)
GPIO.setup(BUTTON, GPIO.IN)

while True:
    state = GPIO.input(BUTTON)
    if state:
        print("off")
    else:
        print("on")
    time.sleep(1)
常见问题
Q1: Mic 阵列中只有 6 个麦克风,怎么会有 8 个通道?
A1: 该阵列中有 2 个 AC108,每个 AC108 芯片有 4 个通道输出。所以总共是 8 个通道,其中 6 个用于麦克风,其余 2 个是回放通道。
Q2: 如果树莓派可以检测到 ReSpeaker 2-mics hat,但无法检测到 ReSpeaker 6-mics 环形阵列怎么办?
A2:请点击 raspberry -> Preferences -> Raspberry Pi Configuration,然后选择 Interfaces 选项卡,确保 1-Wire 为 Disabled。
资源
- [PDF] AC101 数据手册
- [PDF] AC108 数据手册
- [Dxf] ReSpeaker Circular Array for Voice Accessory HAT with 6 Microphones 外壳文件
- [Dxf] ReSpeaker Circular Array for Voice Accessory HAT with 6 Microphone 2D 文件
- [Driver] Seeed-Voice 驱动
- [Algorithms] 包含 DOA、VAD、NS 的算法
- [Voice Engine] Voice Engine 项目,提供用于创建语音功能对象的构建模块
- [Algorithms] AEC
技术支持与产品讨论
感谢您选择我们的产品!我们将为您提供多种支持,以确保您在使用我们产品时的体验尽可能顺畅。我们提供多种沟通渠道,以满足不同的偏好和需求。