在 NVIDIA® Jetson 设备上开始使用 Roboflow 推理
本 wiki 指南介绍了如何使用在 NVIDIA Jetson 设备上运行的 Roboflow 推理服务器轻松部署 AI 模型。在这里,我们将使用 Roboflow Universe 选择一个已经训练好的模型,将模型部署到 Jetson 设备上,并在实时网络摄像头流上执行推理!
Roboflow Inference 是使用和部署计算机视觉模型的最简单方法,提供了用于运行推理的 HTTP Roboflow API。Roboflow 推理支持:
- 目标检测
- 图像分割
- 图像分类
以及像 CLIP 和 SAM 这样的基础模型。
先决条件
- Ubuntu 主机 PC(原生或使用 VMware Workstation Player 的虚拟机)
- reComputer Jetson 或任何其他 NVIDIA Jetson 设备
本 wiki 已在 reComputer J4012 和 reComputer Industrial J4012 上进行了测试和验证,这两款设备均由 NVIDIA Jetson Orin NX 16GB 模块驱动
将 JetPack 刷写到 Jetson
现在您需要确保 Jetson 设备已刷写了 JetPack 系统。您可以使用 NVIDIA SDK Manager 或命令行将 JetPack 刷写到设备上。
对于 Seeed Jetson 驱动设备的刷写指南,请参考以下链接:
- reComputer J2021 | J202
- reComputer J1020 | A206
- reComputer J4012 | J401
- A203 载板
- A205 载板
- A206 载板
- A603 载板
- A607 载板
- Jetson Xavier AGX H01 套件
- Jetson AGX Orin 32GB H01 套件
- reComputer Industrial
- reServer Industrial
请确保刷写 JetPack 版本 5.1.1,因为这是我们为本 wiki 验证过的版本
利用 Roboflow Universe 中的 50,000+ 模型
Roboflow 为每个人提供了 50,000+ 个即用型 AI 模型,让您能够以最快的方式开始计算机视觉部署。您可以在 Roboflow Universe 探索所有这些模型。Roboflow Universe 还提供 200,000+ 个数据集,您可以使用这些数据集在 Roboflow 云服务器上训练模型,或者带上您自己的数据集,使用 Roboflow 在线图像标注工具并开始训练。
-
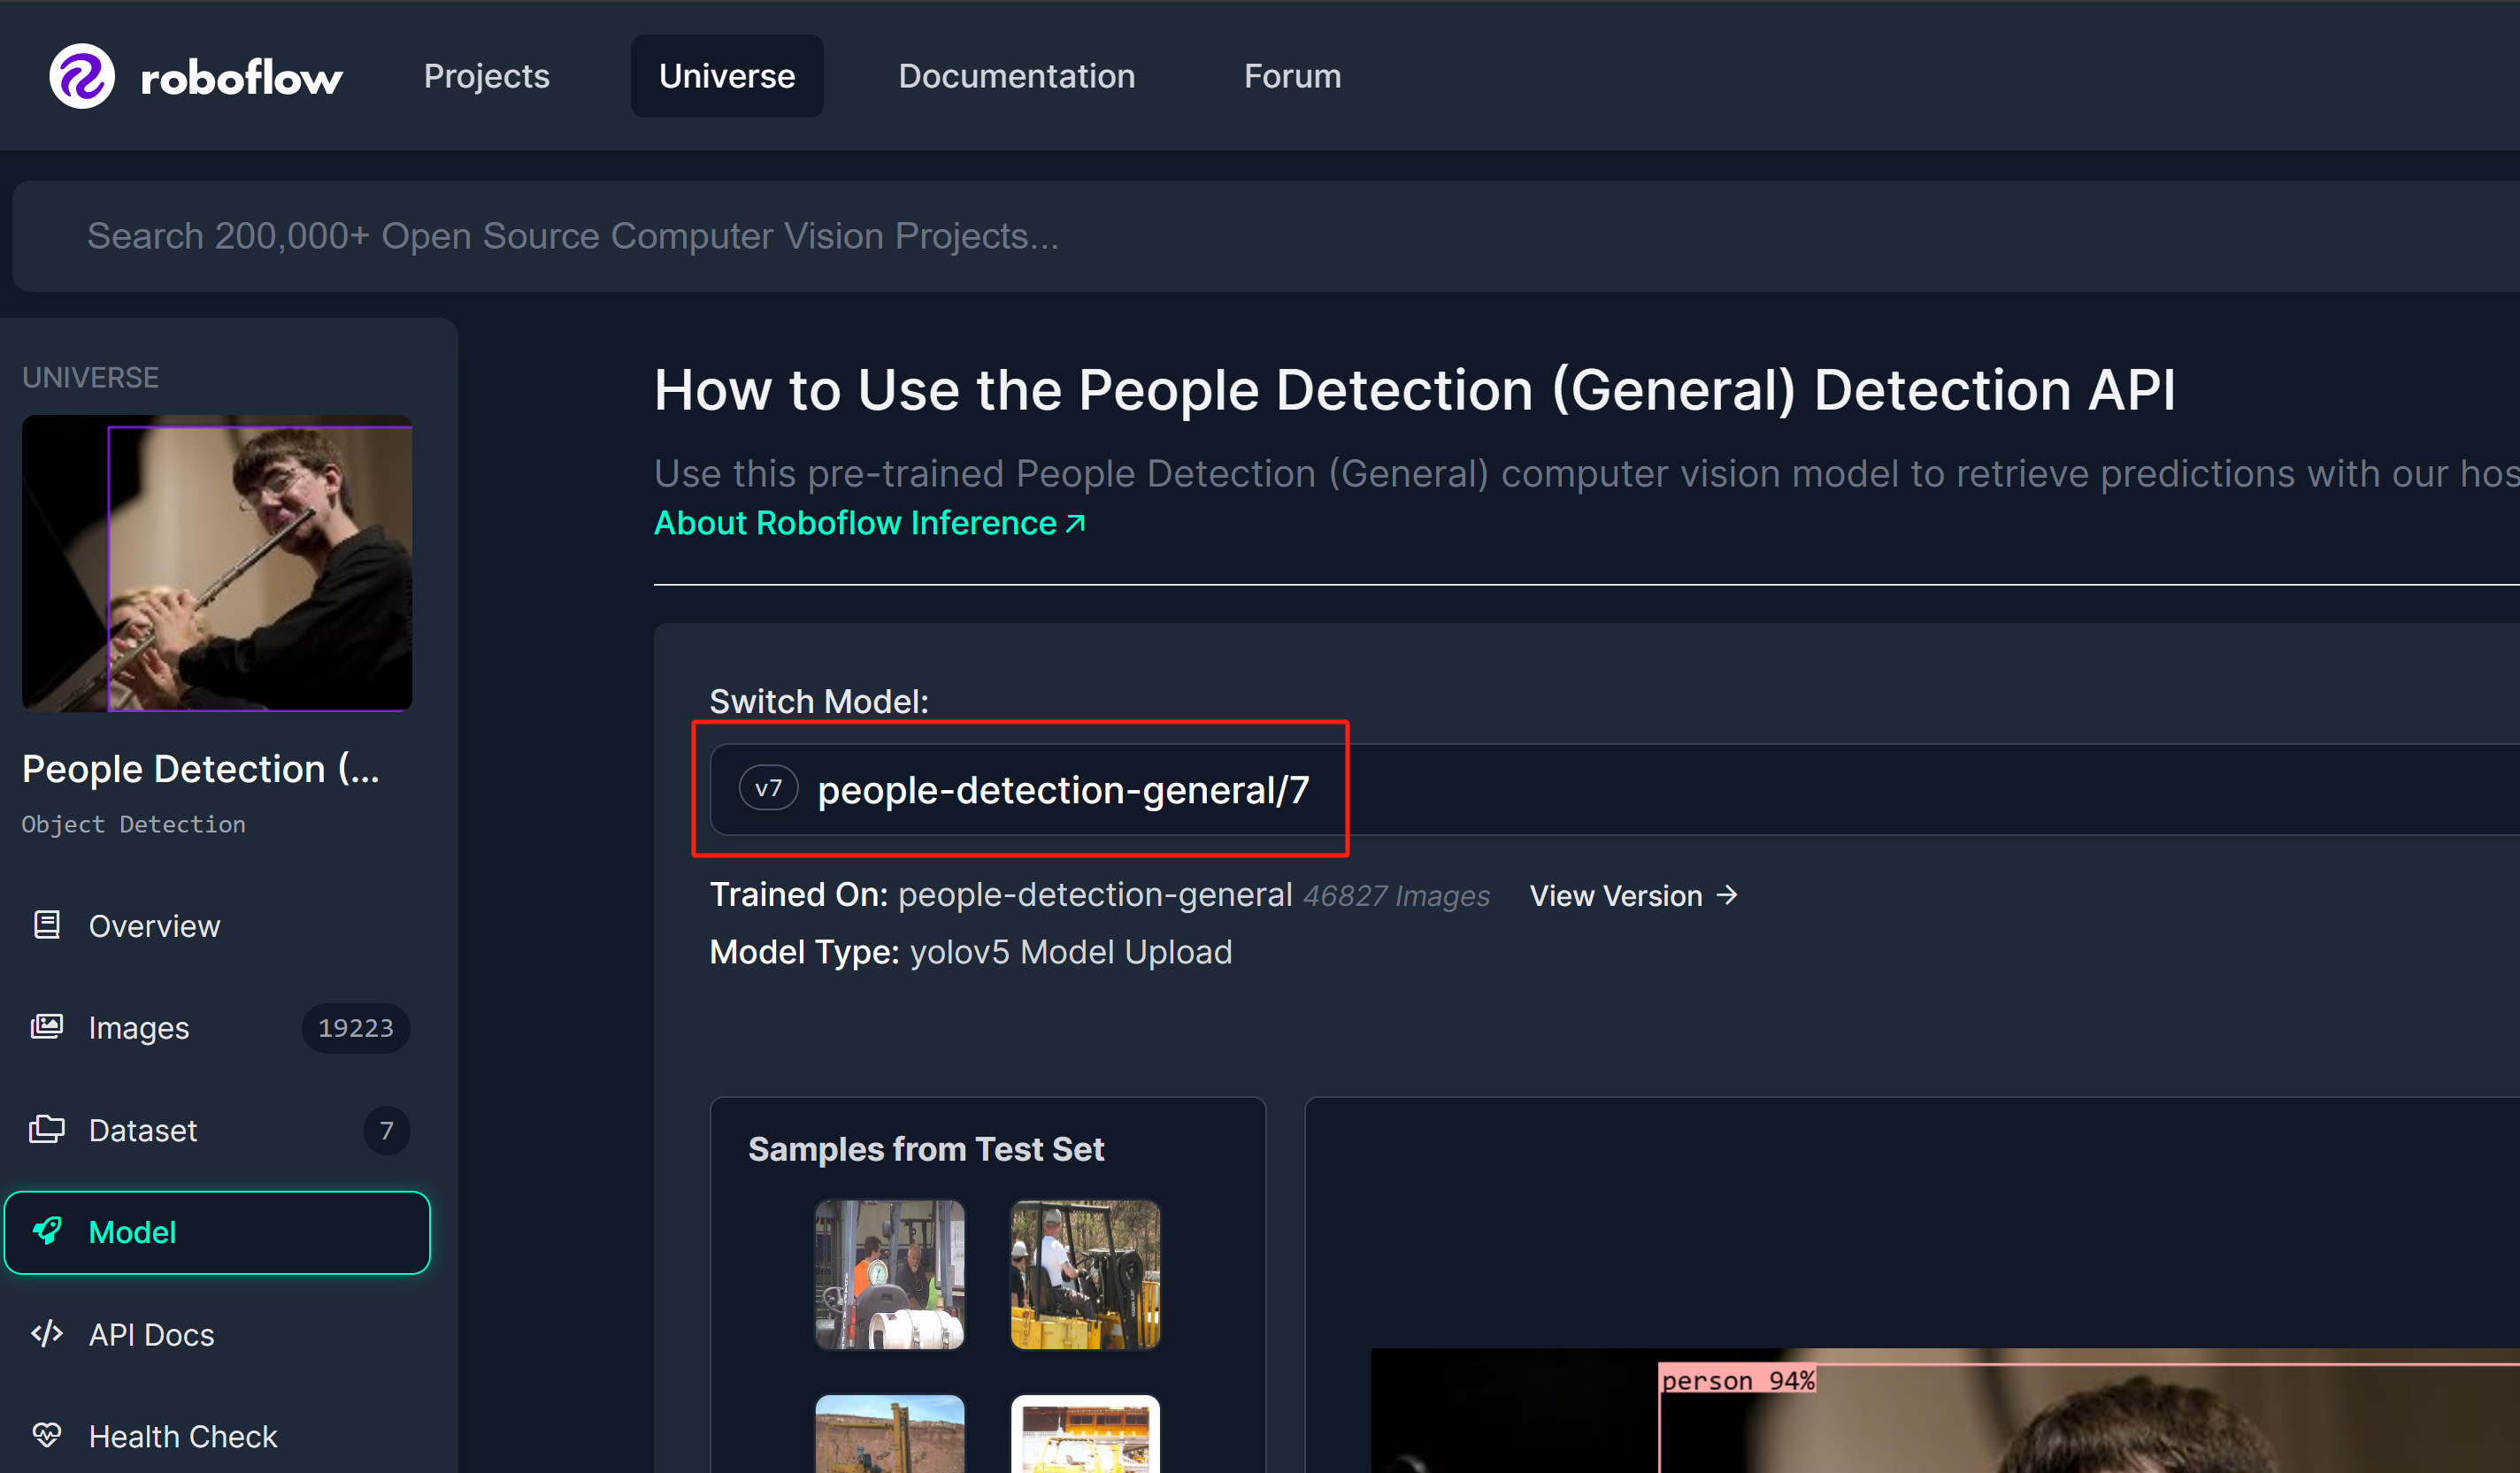
步骤 1: 我们将使用 Roboflow Universe 中的一个人员检测模型作为参考
-
步骤 2: 这里模型名称将遵循"model_name/version"格式。在这种情况下,它是 people-detection-general/7。我们将在本 wiki 后面开始推理时使用这个模型名称。
获取 Roboflow API 密钥
现在我们需要获取一个 Roboflow API 密钥,以便 Roboflow 推理服务器能够工作。
-
步骤 1: 通过输入您的凭据为新的 Roboflow 账户注册
-
步骤 2: 登录账户,导航到
Projects > Workspaces > <your_workspace_name> > Roboflow API,然后点击"Private API Key"部分旁边的复制
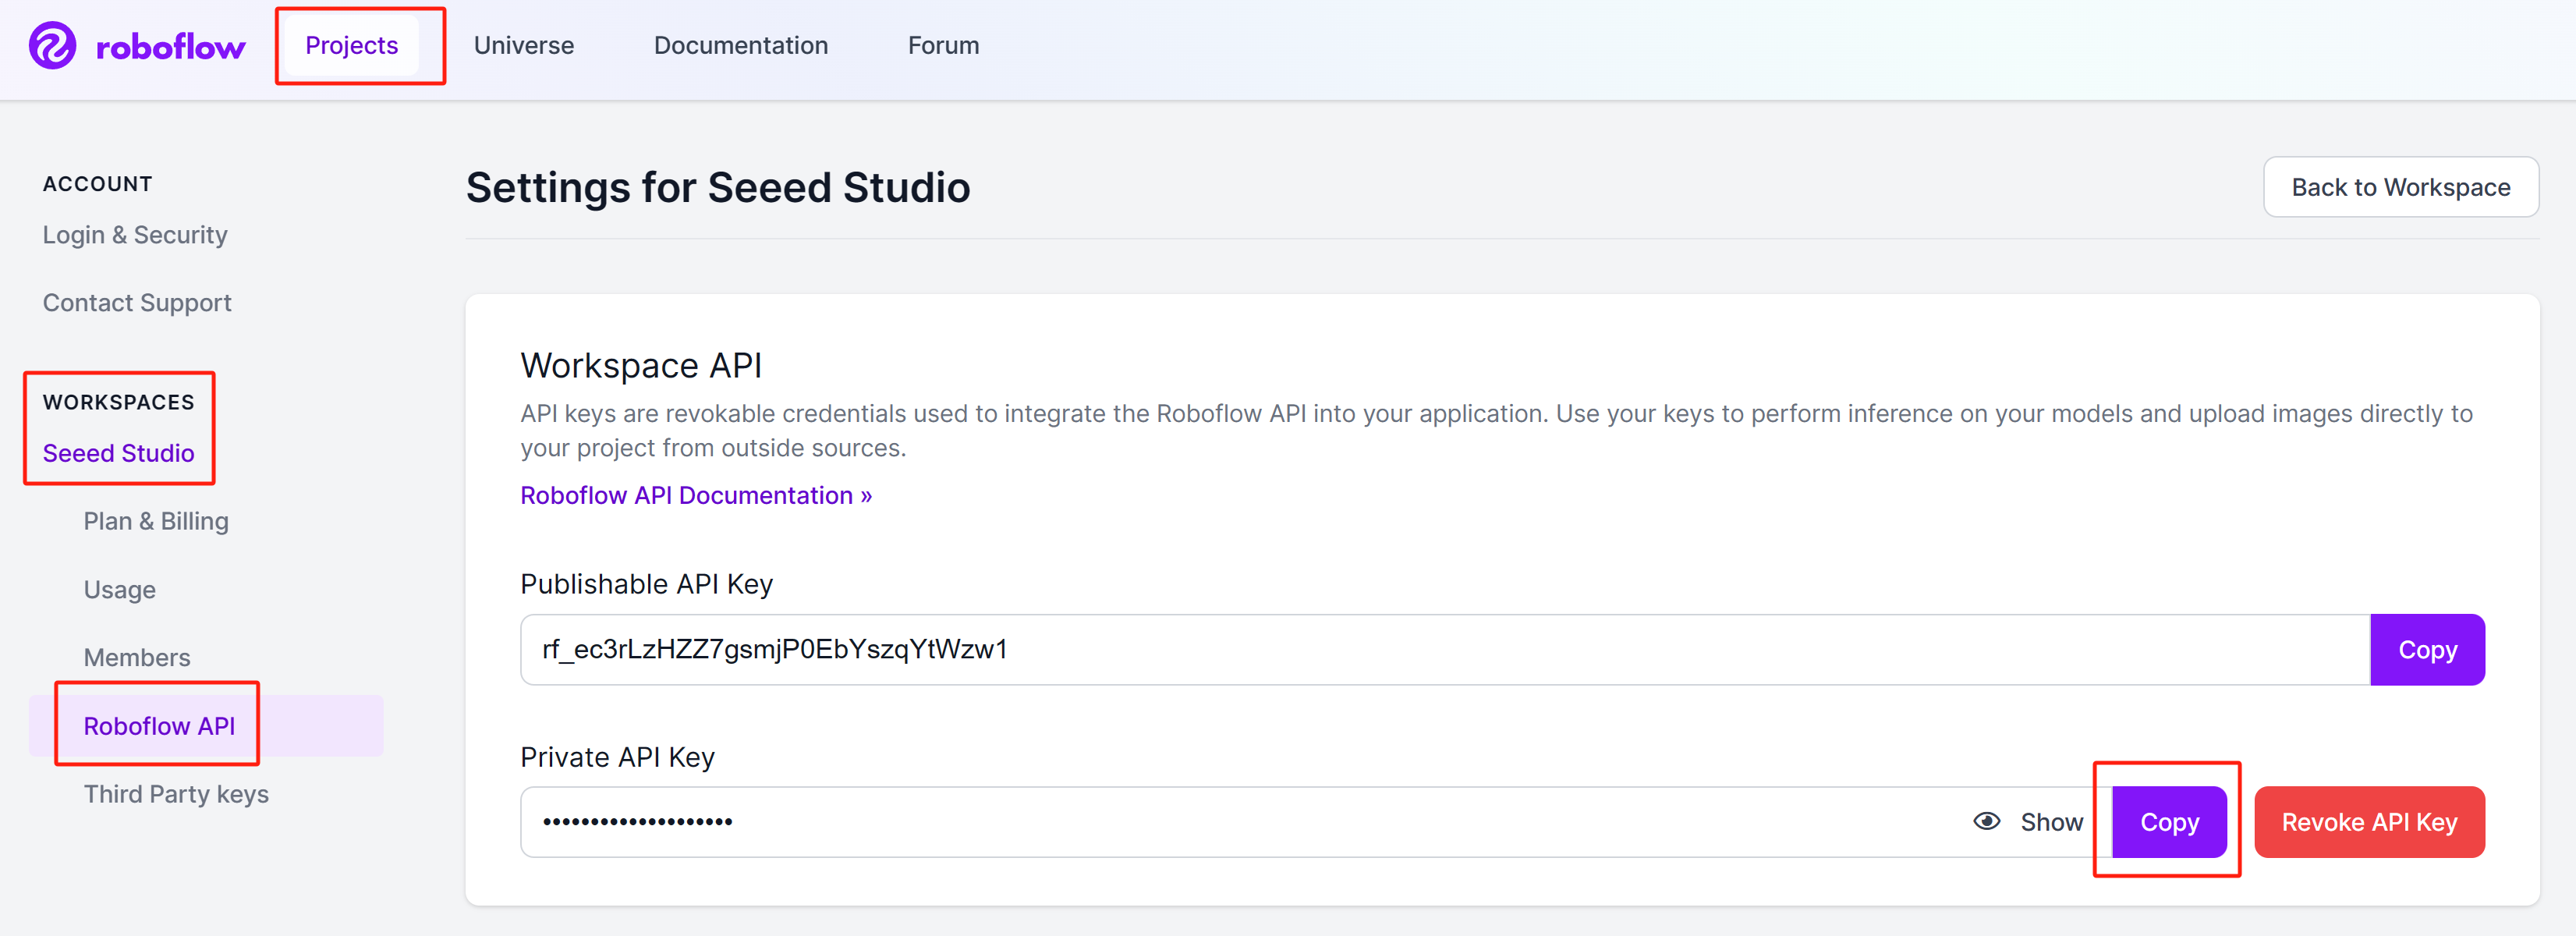
请保存这个私钥,因为我们稍后会需要它。
运行 Roboflow 推理服务器
您可以通过 3 种不同的方式在 NVIDIA Jetson 上开始使用 Roboflow 推理。
- 使用 pip 包 - 使用 pip 包将是最快的入门方式,但是您需要安装 SDK 组件(CUDA、cuDNN、TensorRT)以及 JetPack。
- 使用 Docker hub - 使用 Docker hub 会稍微慢一些,因为它首先会拉取一个大约 19GB 的 Docker 镜像。但是您不需要安装 SDK 组件,因为 Docker 镜像已经包含了这些。
- 使用本地 Docker 构建 - 使用本地 Docker 构建是 Docker hub 方法的扩展,您可以根据所需的应用程序更改 Docker 镜像的源代码(例如启用 INT8 精度的 TensorRT)。
在继续运行 Roboflow 推理服务器之前,您需要获取一个 AI 模型进行推理,以及一个 Roboflow API 密钥。我们将首先介绍这些内容。
- pip Package
- Docker Hub
- Local Docker Build
使用 pip 包
- 步骤 1: 如果您只是用 Jetson L4T 刷写 Jetson 设备,您需要首先安装 SDK 组件
sudo apt update
sudo apt install nvidia-jetpack -y
- 步骤 2: 在终端上执行以下命令来安装 Roboflow 推理服务器 pip 包
sudo apt update
sudo apt install python3-pip -y
pip install inference-gpu
- 步骤 3: 执行以下操作并替换为您之前获得的 Roboflow 私有 API 密钥
export ROBOFLOW_API_KEY=your_key_here
- 步骤 4: 将网络摄像头连接到 Jetson 设备,并执行以下 Python 脚本在您的网络摄像头流上运行开源人员检测模型
webcam.py
import cv2
import inference
import supervision as sv

annotator = sv.BoxAnnotator()

inference.Stream(
    source="webcam",
    model=" people-detection-general/7",

    output_channel_order="BGR",
    use_main_thread=True,

    on_prediction=lambda predictions, image: (
        print(predictions),

        cv2.imshow(
            "Prediction",
            annotator.annotate(
                scene=image,
                detections=sv.Detections.from_roboflow(predictions)
            )
        ),
        cv2.waitKey(1)
    )
)
最后,您将看到如下结果

使用 Docker Hub
要使用此方法,只需将设备刷入 Jetson L4T 即可。这使用客户端-服务器架构,其中 Roboflow 推理服务器将在 Jetson 的特定网络端口上运行,您将能够使用同一网络上的任何 PC 访问此推理服务器,甚至可以将 Jetson 本身同时用作服务器和客户端。
服务器设置 - Jetson
执行以下命令下载并运行 Roboflow 推理服务器 Docker 容器
sudo docker run --network=host --runtime=nvidia roboflow/roboflow-inference-server-jetson-5.1.1
如果您看到以下输出,推理服务器已成功启动

客户端设置 - Jetson/ PC
- 步骤 1: 安装必要的软件包
sudo apt update
sudo apt install python3-pip -y
git clone https://github.com/roboflow/roboflow-api-snippets
cd Python/webcam
pip install -r requirements.txt
-
步骤 2: 在同一目录中创建一个 roboflow_config.json 文件,包含您的 Roboflow API 密钥和模型名称。您可以参考此 GitHub 仓库中包含的示例文件 roboflow_config.sample.json
-
步骤 3: 在同一设备的不同终端窗口中,或在与 Jetson 相同网络的另一台 PC 上,执行以下 Python 脚本,在您的网络摄像头流上运行开源人员检测模型
python infer-simple.py
使用本地 Docker 构建
服务器设置 - Jetson
要使用此方法,只需将设备刷入 Jetson L4T 即可。这使用客户端-服务器架构,其中 Roboflow 推理服务器将在 Jetson 的特定网络端口上运行,您将能够使用同一网络上的任何 PC 访问此推理服务器,甚至可以将 Jetson 本身同时用作服务器和客户端。
- 步骤 1: 克隆 Roboflow 推理服务器存储库
git clone https://github.com/roboflow/inference
- 步骤 2: 进入"inference"目录并开始编译你自己的Docker镜像
cd inference
sudo docker build \
    -f docker/dockerfiles/Dockerfile.onnx.jetson.5.1.1 \
    -t roboflow/roboflow-inference-server-jetson-5.1.1:seeed1 .
这里"-t"后面的文本是我们正在构建的容器的名称。您可以给它任何名称。
- 步骤 3: 执行以下命令来检查我们编译的 Docker 镜像是否已列出
sudo docker ps

- 步骤 4: 基于您刚刚构建的 Docker 镜像启动一个 Docker 容器
docker run --privileged --net=host --runtime=nvidia roboflow/roboflow-inference-server-jetson-5.1.1:seeed1
如果您看到以下输出,推理服务器已成功启动

客户端设置 - Jetson/ PC
执行以下 Python 脚本在您的网络摄像头流上运行开源人员检测模型 webcam.py
import cv2
import base64
import requests
import time


upload_url = ("http://<ip_address_of_jetson>:9001/"
              "people-detection-general/7"
              "?api_key=xxxxxxxx"
              "&stroke=5")
video = cv2.VideoCapture(0)

while True:
    start = time.time()

    ret, img = video.read()
    if ret:
        # Resize (while maintaining the aspect ratio) to improve speed and save bandwidth
        height, width, channels = img.shape
        scale = 416 / max(height, width)
        img = cv2.resize(img, (round(scale * width), round(scale * height)))

        # Encode image to base64 string
        retval, buffer = cv2.imencode('.jpg', img)
        img_str = base64.b64encode(buffer)

        # Get prediction from Roboflow Infer API
        resp = requests.post(upload_url, data=img_str, headers={
            "Content-Type": "application/x-www-form-urlencoded"
        }, stream=True)
        resp = resp.json()

        for bbox in resp["predictions"]:
            img = cv2.rectangle(
                img,
                (int(bbox['x']-(bbox['width']/2)), int(bbox['y']-(bbox['height']/2))),
                (int(bbox['x']+(bbox['width']/2)), int(bbox['y']+(bbox['height']/2))),
                (0, 255, 0),
                2)
            cv2.putText(
                img, f"{bbox['class']}",
                (int(bbox['x']-(bbox['width']/2)), int(bbox['y']-(bbox['height']/2)-5)),
                0, 0.9,
                (0, 255, 0), thickness=2, lineType=cv2.LINE_AA
            )
        cv2.imshow('image', img)
        print((1/(time.time()-start)), " fps")

    if cv2.waitKey(1) == ord('q'):
        break
video.release()
cv2.destroyAllWindows()
注意,脚本中需要包含在 upload_url 中的元素有:
- roboflow 推理服务器的 IP 地址
- 您想要运行的模型
- roboflow api 密钥
模型可以在 roboflow universe 中选择
启用 TensorRT
默认情况下,Roboflow 推理服务器使用 CUDA 运行时。但是,如果您想要更改为 TensorRT 运行时以提高推理速度,您可以在文件 "inference/docker/dockerfiles/Dockerfile.onnx.jetson.5.1.1" 中添加以下内容并构建 Docker 镜像
ENV ONNXRUNTIME_EXECUTION_PROVIDERS=TensorrtExecutionProvider
了解更多
Roboflow 提供非常详细和全面的文档。因此强烈建议在这里查看它们。
技术支持与产品讨论
感谢您选择我们的产品!我们在这里为您提供不同的支持,以确保您使用我们产品的体验尽可能顺畅。我们提供多种沟通渠道,以满足不同的偏好和需求。